


djwarner
Free Member
-
Joined
-
Last visited
Everything posted by djwarner
-
 There was a technical service bulletin covering this issue. TS71-25 dated May 11, 1971. I believe we should have a book of TSB in the documents file on this site. If not, I can donate a copy.
 -
Dave, What is the serial number of your car. Early Series I Z's had smaller ball joints. I believe the change was made in the 1970 production period.
-
That is not a neutral/ backup switch for an automatic transmission. ATs have a switch mounted on the PRNDL input shaft on the transmission body. I am not familiar with the 260Z but many modern cars have a neutral switch in series with the starter circuit to prevent starting while the transmission is in gear.
-
My steering column came with a power cord and FSM documentation. The fuse is inline with the power cord. Documentation specifies a 60 amp fuse. I found an 80 amp fuse installed. Remember the fuse is there to protect the wire, not the device. Select a wire capable of supporting 60 amps.
-
I'm transplanting a 323hp 3.6L Chevy LFX/6L50 into a 2011 Miata hardtop convertible. I originally was going to put it into a 240Z or 260Z, but finding a good rolling chassis in FL proved a bit difficult. The Miata is scheduled to weigh just about 2600lbs. So it should be like a small block chevy/Zcar hybrid when it is done. But with ABS, air bags etc.
-
Pat and Jim, That's what I've been thinking. I have the small overriders and an aftermarket bar overrider. I will probably leave the bumper naked for now.
-
I opened the package and was delighted with the quality. Then I noticed there were no holes for the rubber bumper strips. So what do I do? Drill the missing holes and install the rubber strips - or - since I'm getting ready to sell the Series I - install the bumper and harvest the strips for the new buyer to decide? The strips are about 2 years old and should be recoverable from the old bumper.
-
There's nothing magical or proprietary in his instructions and it would only serve to stimulate sales of his controller, so I guess he would not mind. EPASInstructions_2.pdf
-
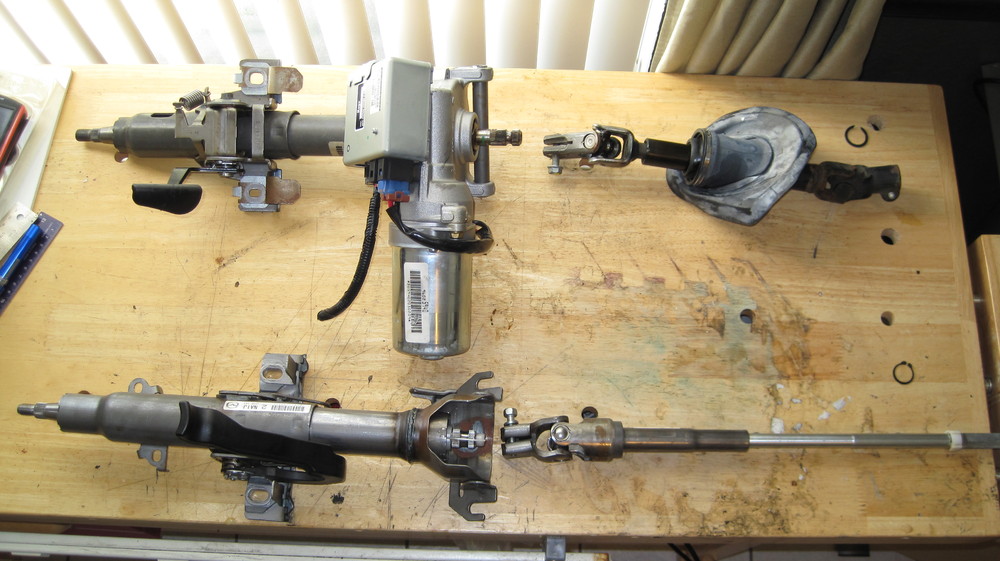
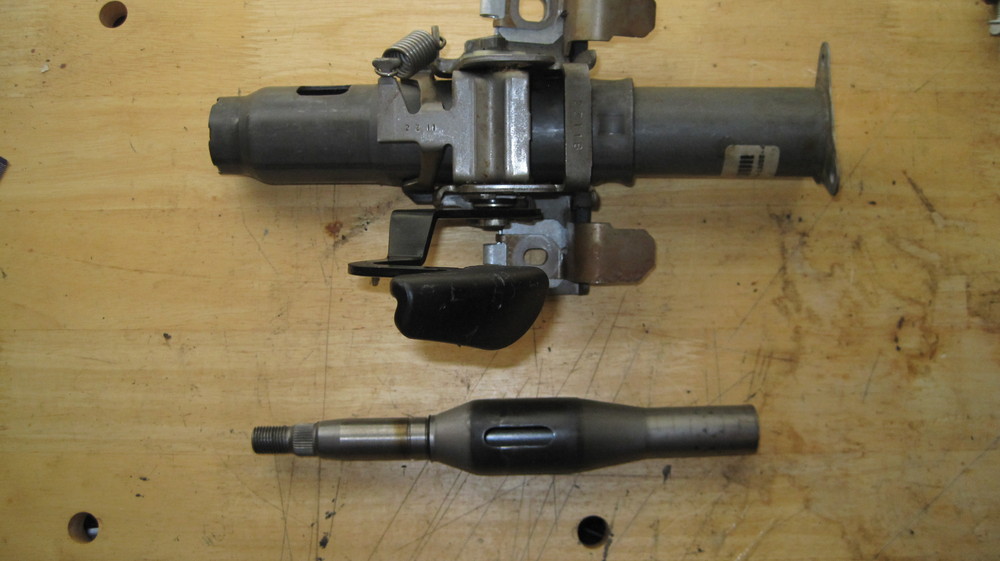
I said I would offer some photos, so here are some. Yes my installation is for a Miata, but it may give ideas. Here are the Vue and Miata steering columns Here is the Vue EPAS nose Here is the Miata's The shafts were easily removed after removing a C-ring.

-
Bruno says he has instructions with photos on how to remotely mount the ECU box and to contact him. Unfortunately, the only way I know to contact him is through his eBay listing.
-
Keep us informed on your progress Chris. BTW the control box on the unit can be easily removed and mounted in any convenient location if you need additional clearance. The unit I bought included the shaft extension to mount the steering wheel and another extension with u-joints and a slip joint to penetrate the firewall. I plan on using the OEM Miata steering column, cutting off the rear end of its tube housing. Then I will use a tail pipe expanding mandrel to match the shoulder in the EPAS housing. Without a mating flange on the tube, I'll drill and tap the shoulder to secure the tubing. Photos to follow.
-
Like several others, I also purchased a rear 240Z bumper from them. Must be a lot of sub optimal bumpers out their. For those who haven't read the fine print, any item listed as backordered in the check out page WILL NOT be filled and should be dropped from your cart.
-
For those interested, pre 2009 vehicles did not have the CAN Bus standards modern cars enjoy. This electric power steering system gets vehicle speed from the "Series 2 Data Link" and listens to the vehicle speed data sent from the Body Control Module to the Instrument Cluster. This is a single wire 10 KHz data link. Interestingly, GM has kept this network calling it the LIN (Local Interconnection Network) and it still feeds speed data to the instrument Cluster. Apparently this data link does not have all the bells and whistles of modern CAN Bus and anybody can listen in. The Controller Box referenced in my last post apparently generates the equivalent of a vehicle speed signal that is adjusted by the potentiometer. The Saturn Vue EPAS that I bought has a steering wheel collapse function like our Z, just a smaller range of collapse (3.5 inches). The u-jointed output shaft has a slip joint to make up for any change in length when tilting the steering wheel. I wouldn't be surprised if the output shaft actually reaches the rubber coupling in our Zs.
-
2002-2007 Saturn Vue or Chevy Equinox. I got a salvaged unit yesterday and the control module is due to arrive this coming Monday. Search Ebay for "Equinox Electric Power Steering Controller Box. http://www.ebay.com/itm/182283275302?_trksid=p2055119.m1438.l2649&ssPageName=STRK%3AMEBIDX%3AIT The listing show exactly which models/years it works with. I will follow up with photos as the I progress. (It will be a couple weeks before the engine mounts are done). When I got the Saturn EPAS unit in, I was surprised to see how closely it dimensionally matched the Mazda steering column. If I luck out, it will be a bolt in replacement. Since I have an OEM hydraulic power steering unit, I will have to disconnect and drain the rack and pinion.
-
Needed to convert the power steering to electric on my Miata engine swap and ran across this option that will work on our Zs. What is neat is that you can dial in the amount of assist needed. And if you are so inclined you can add a tilt mechanism to the steering wheel.
-
Hi Palmetto, Not too much I can add here other than to check the transmission fluid level with the engine idling. Usually low fluid or a clogged filter will cause a shifting problem. Band slippage would cause an increase engine rpm. not a drop. The fact that the front sparkplugs are white indicates a lean mixture. Don't ignore this or think checking the mixture at idle will fix it. The fact that it only happens after a warm up suggests a vacuum leak. Only affecting the front three cylinders suggests the leak is at the balance tube or the heat isolator blocks. Another cause is fuel starvation to the front carb. This can be caused by a sticking float valve or a partially clogged fuel line. Just a few places to check next.
-
If zKars comes a cropper, I have one. PM me if your needs aren't met.
-
Blue, My computer can't open the PDF.
-
Black Dragon has replacement vinyl covers available see pg 43 of their current catalog. I bring this up because in the Series I, this storage area is unused. It makes a great speaker location when packed with fiberglass. The cover over the void is just linoleum and easily cut away. My vinyl covers are plenty big enough for the jack, tool pouch, and a small tool kit with sockets.
-
Please remember the window frame is adjustable as well as the latch. If the frame is tilted inward, it will compress the top portion of the gasket first and binding before the latch completely catches. Lower the window, loosen the frame bolts and close the door. Ignoring the window frame,is the door flush with the aft body? Uniformly flush top and bottom? Is the gap uniform top to bottom? Front gap as well as the aft? If all is to your liking, the hinges and latches are aligned properly. Remember to check the dove tails under the latches. Next, open the door and slowly close it. Stop if you feel it binding against the rubber gasket. If it is binding, rub the gasket with sidewalk art chalk and slowly close the door again, stopping when it binds. Open the door to see where it is rubbing. If by any chance the chalk made things better, you may need some dry lube on the gasket to prevent sticking. Many of the newer after market gaskets are too thick or too hard making the door hard to close. If the door is properly aligned, this may be the case and adjustment may be impossible. The OEM gaskets were quite soft when new. When all else is done, snug the window frame bolts up, close the door and position the frame for the dollar bill test. Open the door and tighten the bolts. Check your work, windows down and then up. If all this fails, others have written about using KIA door seals that are much softer.
-
I'm glad to hear everyone is happy with innovation-interiors. I just ordered a red leather set with gray nueva suede inserts for my 2011 Miata. They didn't have a pattern for the "NC" Miata, so I sent them my OEM covers to use for a pattern.
-
In a recent Wheeler Dealer episode, they upgraded a Volvo's drum brakes with a new lining that had 2-3 times the coefficient of friction of standard shoes. The downside was faster wear. Does anyone know what compound they were referring to?
-
Yes, this is normal for these transmissions. The engine will only start in Park or Neutral, but no lock on the shift lever. The lock in the gear shift box is simply a product of trail lawyers and the nanny state.
-
I have a D6K80-03 from a 1979 280ZX AT in my Series I. I found the following specs for it and used it in setting my timing. Doubt it will be significantly different than yours. Centrifugal advance 0 @ 600 RPM, 8.5 degrees @ 1250 RPM. Vacuum advance 0 @ 5.9 inches of vacuum, 5 degrees at 9.8 inches of vacuum. Please remember that vacuum decreases as you open the throttle, so the only time you would see both high rpm and high vacuum is letting your foot of the throttle at high speed. During this period of engine braking, you are at low pressure during the compression stroke and actually need the additional spark advance and won't see a knock. If you are drawing vacuum from the carb port, check to see what vacuum you are actually drawing at idle. These ports are designed to only port vacuum while decelerating and will read zero at idle. If you are porting vacuum off the manifold, disconnect and plug it when setting the timing. The timing spec given in the factory manual is for engine off with a test light (not a strobe) directly connected to the points. This is known as static timing. When setting timing with a strobe, there will be a component of centrifugal advance as well as this static timing. If you have vacuum connected, the two advances will confound your readings and idle speed as you set the timing. To figure the expected timing at your desired idle speed you have to calculate the amount of centrifugal advance at idle. For mine at 750 rpm, it is 150/650 times 8.5 degrees or about 2 degrees. (650 rpm is the difference between no advance and max advance rpms.) If the static timing was 5 degrees at 0 rpm, you should observe 7 degrees at 750 rpm and no vacuum. If you see significant change in idle speed as you adjust your timing, reset your idle speed and then idle mixture and recheck your timing. repeat until your rpm and timing are on spec and you have adjusted for best idle mixture. All that said, the idle timings specs for our cars has varied over the years. As a rule, they are retarded to control pollution rather than to avoid knock. This gives you some room to err on the advance side without risking harm to the engine. While most manuals typically set timing to 10 degrees BTDC at idle, I routinely set mine to 17. This conforms to the earliest non-pollution controlled models.
-
Pollution control differences. I've always set timing at 17 BTDC with vacuum advance disconnected at idle speed. I arrived at this number by an old timers rubric of adjusting the timing at idle to maximize vacuum. When reconnecting a vacuum line from the manifold timing would advance to over 30 degrees at idle. Then I learned to use the vacuum port on my Weber Carbs and idle timing returns to 17. It turns out the Weber port is only active when decelerating and this is when you need the vacuum advance. Can't say what happens with SU carbs. Never had a knock problem using these settings.


