djwarner
Free Member
-
Joined
-
Last visited
Everything posted by djwarner
-
 From what I can see, it appears to be an early Series II car consistent with a February 71 as placarded. It includes a vertical defroster lines on the hatch glass found on the Series I. Nissan continued to use Series I parts into the Series II cars until inventory was exhausted. The picture of the driver's door jamb shows a hole cover as was used in Zeibart undercoating. Otherwise the underneath photos are so poor as to be worthless. The air pump and removed dealer installed AC would be valuable in a full restore. I would simply ask for better photos of your concerned areas and ask what caused the previous buyers to back out. I have seen other auctions with ghost bidders to jack up the price getting stuck with a winning bid. I don't think I'm qualified to do a rust inspection for you, but better photos would help.
 -
Ouch!
-
I stand corrected good sir.
-
Oh my again! Mecum's just auctioned a 71 frame off restoration that was bid up to $52000 but didn't sell because the owner wanted more than $60k.
-
If I had a $3500 chunk of change at one time, I'd be sorely tempted to buy a G37 totaled in the rear and do a transplant.
-
Looks like this would be as top heavy as my Harbor Freight unit without the lever points to re-erect. During my recent overhaul, after installing the belly pan, I had to buy a 4 foot section of pipe to gain enough leverage to erect the engine.
-
Try MSA for your emblems as well. Quite frankly, I didn't know any Z came with snowflake wheels from the OEM and will bow to our many gurus. If they were aftermarket there would be no right or wrong.
-
Ebay is your friend in this case. Search for snowflake wheels and you will find plenty of options. Though most have firebird center emblems, you can also find "Z" or "Datsun" emblems there as well.
-
It was interesting to see Wheeler Dealers state Nissan viewed the S30 as a "personal GT car". This is the first time I've heard this. Was this Nissan's design goal? Having one of the few remaining Series I automatics, I wonder just how inappropriate is an AT to the GT role? Personally, I enjoy the AT while driving in suburban traffic. Just wondering when it comes time to move her on, if I should be promoting it as a GT, or let the 240 badge represent itself?
-
-
Considering your very special cargo as shown in your photo, why not a 260z 2+2? You are more likely to get more bang for your buck, just as many smiles per mile, and a more opportunity to do the family thing while he is small enough to use the back seat.
-
There is also another issue to consider. Our state motor vehicle departments track mileage at each sale and at other times as well. When I bought my car in Ohio, the previous owner wrote down the mileage as 165??? miles when the actual mileage was 162??? miles. When I went to title the car in Florida, the DMV agent went out to verify the odometer and found the actual mileage lower than what was stated on the Ohio title (63,??? miles). Needless to say, her first impression was fraud, until she realized the odometer was flipped. With the disparity from the previous title, she could not record the current mileage on the Florida title. Since the car was considered a collector car, she ended up using a code indicating the car had unverifiable mileage. As I understand it, the feds have some serious regulations about this now.
-
Thanks for all the help. I saw several YouTube videos on the subject as well. It is easy enough to see light under straight edge. What no one said was how big a gap was tolerable. Even our heads have a feeler gauge tolerance. I quit with no gap as large as 0.005" (how flat is a concrete floor) and used a thin coat of non-hardening Type 2 gasket sealant and a Beck Arnley cork gasket. Set the bolts to 6 ft-lbs with a torque wrench, repeating several times as the gasket took a set. Keeping my fingers crossed.
-
The timing cover is located on the block by two pins. Once you remove the necessary bolts, the cover must move forward about 1/4 " to free it from the pins. BTW I strongly suggest you remove the water pump first. Several bolts on the pump actually go through the timing chain cover and bolt into the block. Looking at the pump from the front, the 6mm bolt at 11 o'clock is actually 75mm long. Being super long, it is subject to corrosion and freezing in position. On my engine, this bolt snapped off. If the belly pan is off, all the better. If not, loosen its bolts enough to separate the pan gasket before removing the timing cover. Most timing cover gasket sets include a replacement section for the belly pan gasket. All this said, the die cast finish is a smooth dull gray and apt to stain. During my overhaul, no amount of degreasing would remove the stains. Polishing would remove the stain but changed the surface finish. In the end I decided to paint it with Duplicolor high temp engine enamel in Cast Coat Aluminum DE1650. It doesn't match the original dull gray, looks more like a modern aluminum casting. My overhaul goal was preservation as opposed to restoration, so your project may demand a different solution.
-
Putting my engine back together after an overhaul and finally turned my attention to the oil pan. I found lots of RTV on the pan and after cleaning it became very clear that someone over torqued the bolts warping the pan. Tom Monroe says to place the pan face down on a flat surface and to use a hammer and a large punch to flatten the re-enforcing beads. This being an early pan, it has no doubler plates, but rather a raised boss about 8mm wide and enlarging to a circle around the bolt holes. Most is not all of the distortion is dimpling around the bolt holes. Does anyone have a better technique for removing the dimples? The only reasonable flat, hard surface I have is the engine block currently inverted on an engine stand.
-
Ok, I suddenly have a dog in this fight. While finishing up my bottom end overhaul, it is time to do a serious inspection of the cylinder head. It had been overhauled around 30,000 miles and 12 years ago and was pulling very good compression and idle vacuum, so I wasn't expecting to find anything serious. I found 3 of 4 cams on cylinders 4 and 5 as bad or slightly worse than Grannyknot's If anything, two of them had a single gall stripe in the center deep enough to penetrate the case hardening. The last time I adjusted the valves, I failed to adequately torque the screws on the spray bar and they loosen after about 500 miles. I heard the shrieking as the cams ran dry, but I was about 15 miles from home when it happened. I limped home but didn't see anything this bad when I inspected it. I've put about 3,000 miles on the engine since then. Anticipating I might run into problems, I purchased a used but very serviceable cam from Madkaw thinking I could slip it in while the engine was torn down. But something I read in Tom Monroe's "How To Rebuild Your Nissan & Datsun OHC Engine" has given me pause. On page 87 Tom writes, "When checking the cam and rockers, check the cam first. If it's bad, you'll have to replace the cam and rockers, regardless of the rocker-arm condition. Remember the second rule: Never install used rockers on a new cam." (Italics are Tom's, Bold emphasis is mine.) Obviously, this contradicts what several posters have said in this thread. Of course I don't have a set of rocker-arms. Nor do I have the expertise to determine what lash pads to use if I did change them. I can tell you that the current cam profile is OEM and not a regrind. Other than this issue, the overhaul has gone smoothly considering the last overhaul I've done was 53 years ago. The crank was surprising clean, smooth, and to size during it first overhaul despite the 186,000 miles on the clock. Cylinder bores had minimal enlargement and no taper to speak of. Bearings were worn in the appropriate places down to the copper. So here I am ready to put the head on and install new timing chain hardware once I sort out the cam issue. What say ye? Also the gasket kits I purchased came with some Orings about 1.25" in diameter and I can't figure out where it is supposed to go. Any clues here as well?
-
The TSB simply notates a production change to increase strength. Back then, words like "safety" were avoided in corporate documents. To do so could be likened to shooting themselves in the foot regarding legal liability. The change was fairly early in the first year of production and most likely a design deficiency corrected after feedback from the field. As for originality, I'd be screaming bloody murder if any judge took points away for a safety issue - especially since the TSB says it could be applied to earlier production. Who is to say that the upgrade occurs during the restore or 40+ years ago. I don't have a copy of the particular TSB, but if you send me your email address in a PM, I'll send you a PDF file with all the TSBs for Datsun from 1/69 thru 12/72. Don't remember exactly where I got it from or I would refer you there.
-
The changeover was documented in TS70-60 dated Dec 16,1970 and applied to VIN HLS30-07985 and later. According to the TSB, converting to the later design is possible but requires changing the knuckle arms as well PNs 40052-A8600 and 40053-A8600. The nut sizes were increased to M14 from M12 as the reason for the change. Torque settings 40-55 FTLB.
-
I think we need a better explanation of what you mean by "back and forth hesitation". Are you talking about the engine rocking with each revolution or are you talking about the rpm surging and retreating under a steady throttle?
-
As John mentioned earlier, you really need a syncmeter to balance the carbs. I relied on my MK III calibrated eyeballs to ensure my Weber idle speeds were set identically. When I finally got a syncmeter, I was surprised to find one carb needed an additional one full turn to balance. We tend to assume zero manufacturing tolerances when we don't have the tools - this almost always ends up biting you in the butt.
-
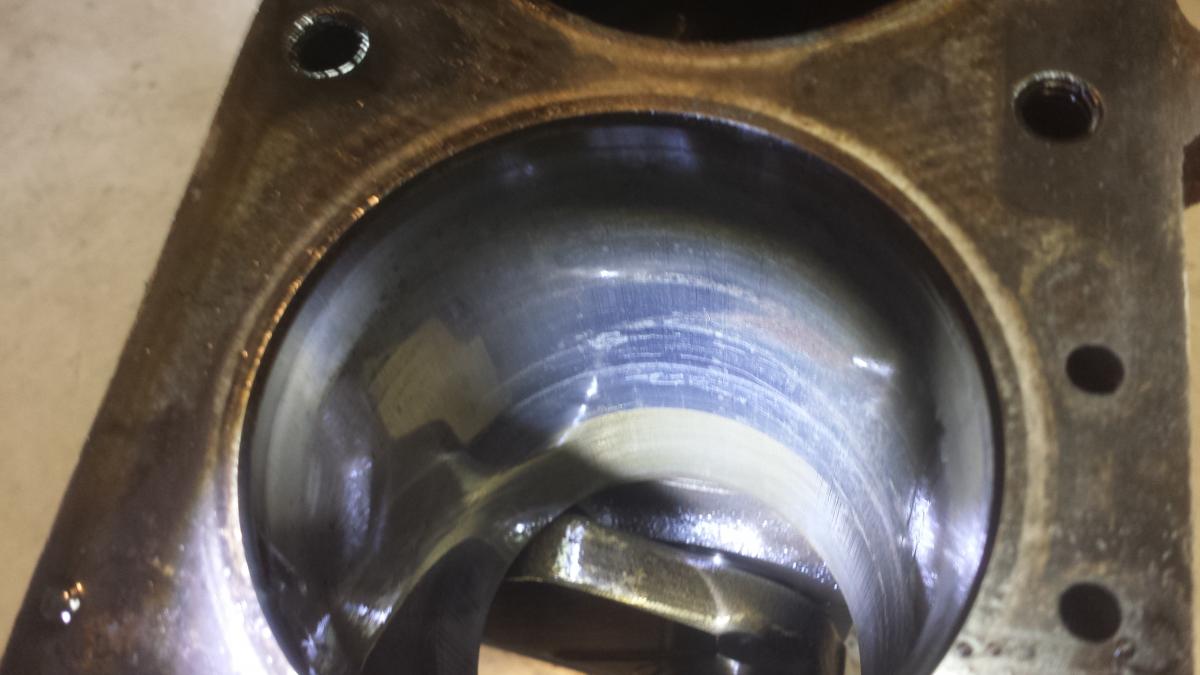
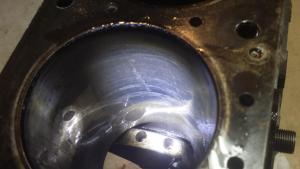
Finally got a chance to tear down my Series I L24 with 186K miles for excessive oil consumption (300-400 miles/quart). All in all things looked remarkably good. Crank and rod bearing show wear in the expected places but the crank surfaces are within a 0.001" with not taper or feel-able grooving. Cylinder walls have little to no taper and are round to size within 0.001". Cylinders 1,2,5, and 6 are clean with some crosshatching visible. Cylinders 3 and 4 are smooth but show the artifacts in the attached photos. Since it is hard to get a finger nail or ball point pen at right angles to the surface, I felt the surface with a clay modeler's tool. Most of the artifacts surface cannot be felt with the probe. In fact the only artifact I can feel is one running parallel to the bore and it is about 0.001" higher or lower than the adjacent smooth surface. (can't tell if it lies on the surface or into the metal. Can anyone identify what these artifacts are? From what I know, the car may have sat in a garage for a year or two. Since cylinders 3 & 4 move up and down together, I suspect they were sitting in the down position during that time.

-
An old machinist's rule is that if you can't detect surface defects with your finger nail, it is less than 0.001" deep. Another method is to use a ball point pen nib across the marks for the same results. Assuming you can't feel anything on the cam or rocker arm, I'd hit the rocker arm surface with a buffing wheel, re-install and monitor. Also verify your spray bar is adequately lubing that area.
-
While I don't have SU carbs on my car, your post suggests several things. First black plugs indicate rich running, so increasing the idle mixture would enrich an over rich mixture even more. You idled the engine with the choke on for 5 minutes. SU carbs actually don't have a choke per se, they have an enrichment function. Again idling with enrichment for an excessive period would tend to lead to carbon fouling. It is not unusual to see some carbon fouling while running rich that burns itself off after a few minutes of normal operating conditions. The fact that you found a difference between the front and back cylinders indicates different operating conditions between the carbs. Either that or you fouled the back plugs so bad that they were miss firing once enrichment was turned off and you were essentially running on three cylinder. Check enrichment functions work identically on both carbs.
-
Unfortunately, due to the automatic exposure function in most cameras, having black turn gray or vice versa is a common exposure error. Also, the texture of the surface tends to make things look grayer as light is refracted over the surface. Even if you get the exposure correct, the displaying/printing software often adjusts exposure as well. From memory, braided hoses look to be about the same color as the tail light finisher panels.
-
If you are concerned about the depth, try Play-Doh to make an impression. It looks like it is below the ring travel and may not affect operation.