djwarner
Free Member
-
Joined
-
Last visited
Everything posted by djwarner
-
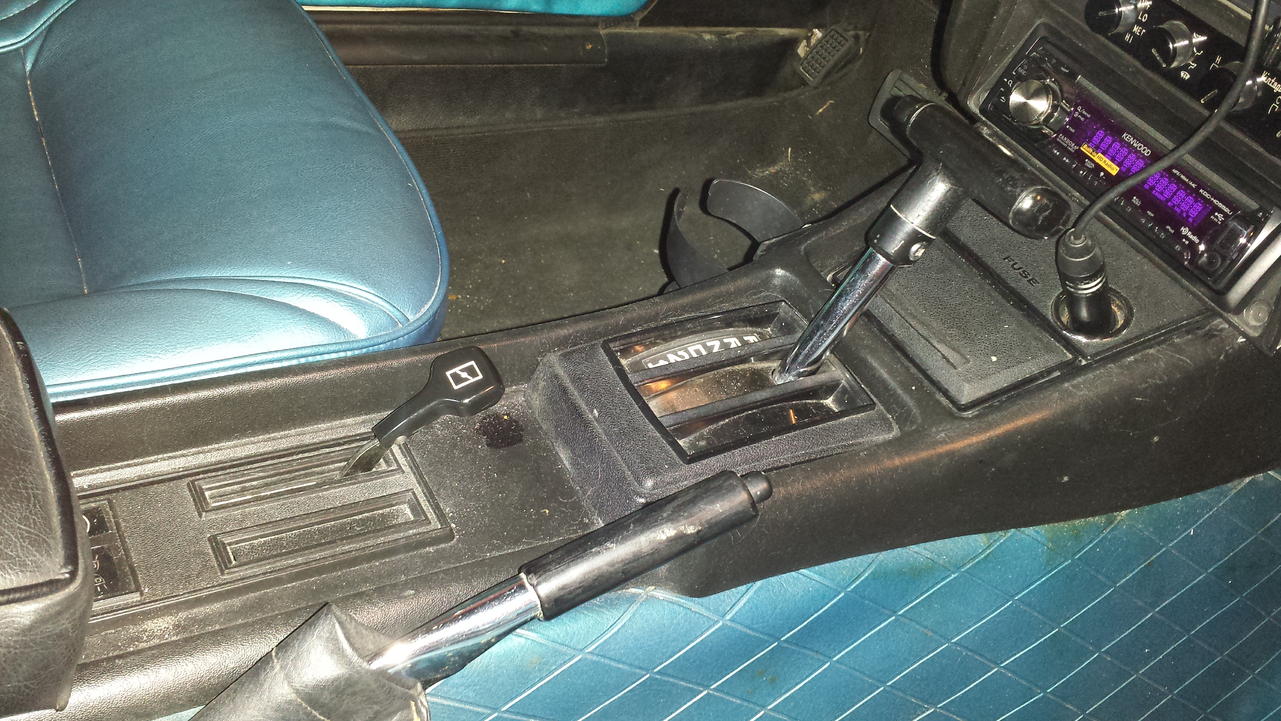
 A quick snap of my console showing the automatic shift lever assembly. To be honest, for your driving intentions, converting back to an automatic would be low on my priority list. Yes, a three speed automatic without a lock-up style torque converter will not be as peppy as a 4 speed. It will kick down from a vacuum switch or from a kick down switch when the throttle is mashed to the floor. Differentials are also different ratio 3.54 for an AT, 3.9 for a MT.
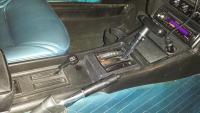
-
According to Carl Beck, the first AT was SN 08942, so it may very well have been in the first batch of AT's produced. Mine has a oil lines running from the AT to the oil cooler built into the radiator. The automatic transmissions were the same for all the S30s as well as several other cars from the era. Finding the AT console and shift lever mechanism may be harder to find than the transmission itself. As for performance, what are you driving intentions? Mine is a daily driver in a suburban environment. 4 speeds can get tiresome in an urban environment.
-
Out of curiosity, is E85 available in the Peoples Republic of California?
-
what % of alcohol? 70% and 90% are available at the drug store, have no idea where to buy 100%.
-
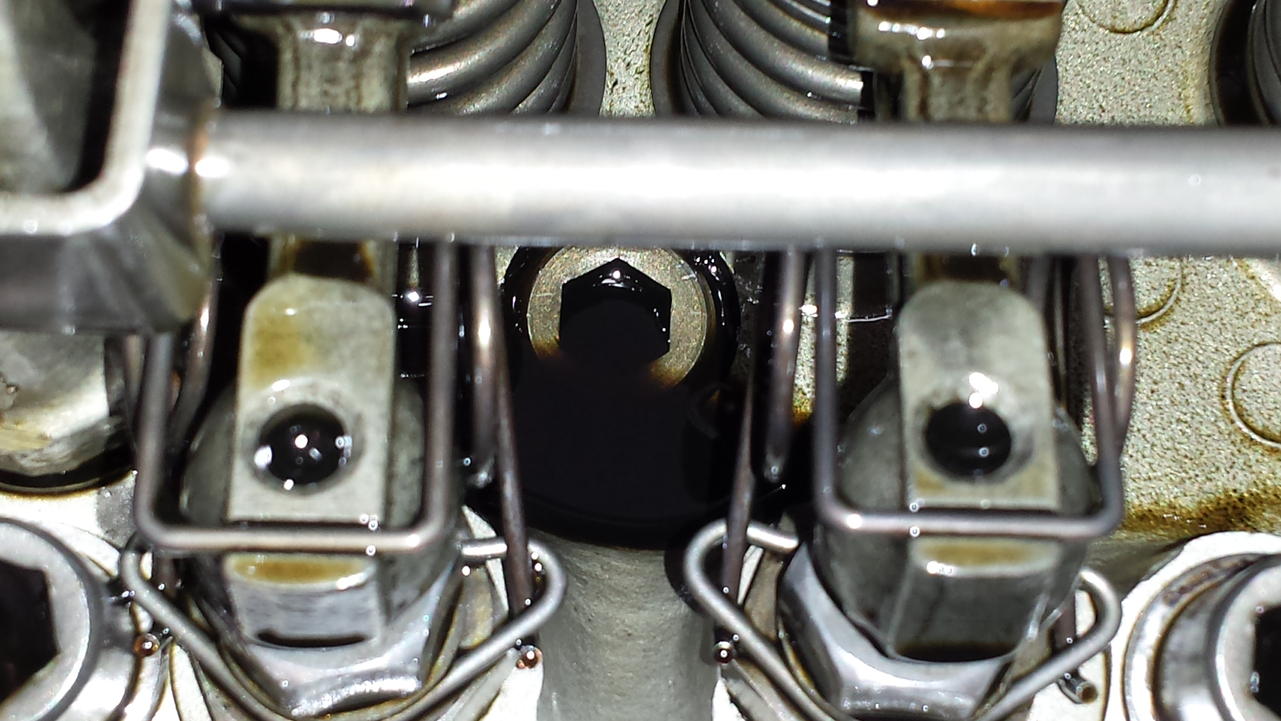
Some additional notes: After a thorough cleaning and inspection with a borescope camera, there is no visual indication of a crack anywhere in the area. However, compared to the other plugs in the head, this plug appears to sit at least one turn deeper than any of the others. A thought: would it be worth trying to seal the thread with an RTV type of sealant to eliminate this as a leak source? If so what sealant should I use? Blue, I understand it is part of the casting process. A sand plug is inserted into the mold to form the coolant channels. Legs attached to the sand plug pass through the opening to hold it in position during the pour. After casting, the plug is broken apart by a vibrator and passes out of the openings.
-
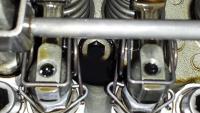
I've been fighting excessive oil consumption since acquiring my car almost 2 years ago. After changing the valve guide seals and replacing the head gasket with a genuine NISMO unit, I have eliminated all external oil leaks and the engine pulls 20" of vacuum and has 190 psi compression. The only hint of oil loss is a wet spark plug on #3 and an occasional puff of blue smoke after idling at a stop light. The #3 exhaust valve is a bear to unload because of its proximity to the cam tower, so I thought I might have bunged something up. I was prepared to replace the valve guide seals again until I did a good visual inspection after pulling the valve cover. The first thing I noticed was it was the exhaust valve next to the tower, not the inlet valve. This makes me shy away from a damaged or improperly installed inlet valve guide. Next I noticed a large puddle of oil partially covering the pipe plug between the valves. I'm now wondering what is on the other side of that plug? If it's connected to a coolant channel, could there be a crack allowing oil seepage into the inlet port. The head was reworked in 2002. From what I can tell, it may have followed an instance of overheating for the original owner. The car is sitting in the garage with the valve cover off, looking for some guidance here before I back it out for an inspection.
-
Courtesy Nissan lists them as available from the warehouse with 2-4 days delivery for just over $300 each. PNs are 63100-N4700 and 63101-N4700.
-
See this site: http://www.chargerr.com/Alternators/ALT.HTM It says to connect the sense wire to the farthest point from the alternator, or rather where the lowest supply voltage will be found. This would be a function of wire size, wire length, and load current.
-
Welcome to the club of Z ownership. Almost all of us have walked down the path you are now taking. Someone in the forum has encountered just about any problem you will encounter. Don't hesitate to ask for help. As with any Z, job one will be a thorough inspection for rust. If you have a Colorado or California car, you will probably fair better than most. But be sure to pull the battery and inspect under the mounting tray. Again Welcome.
-
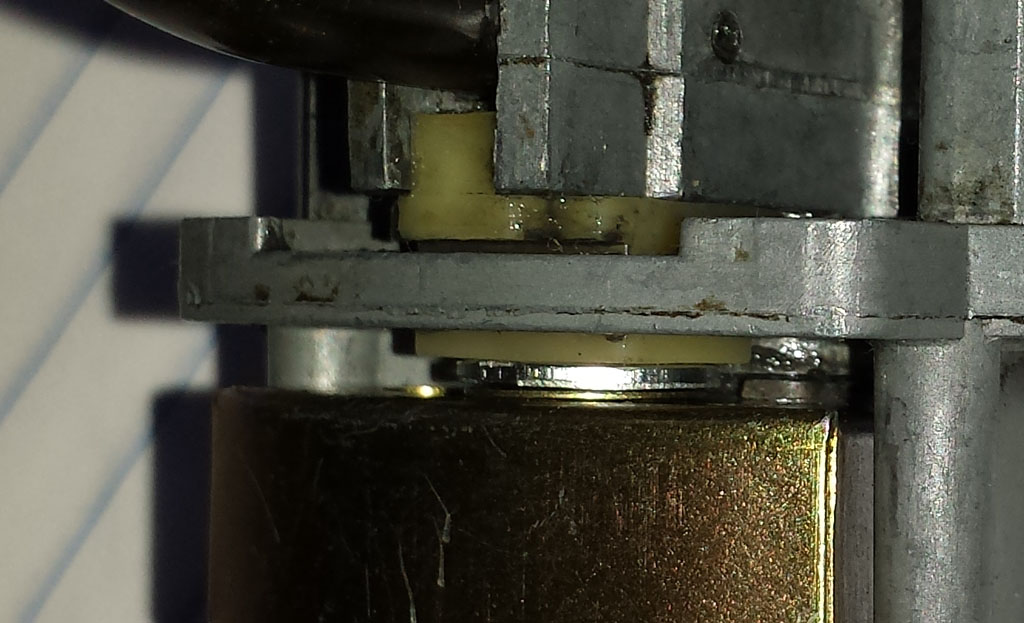
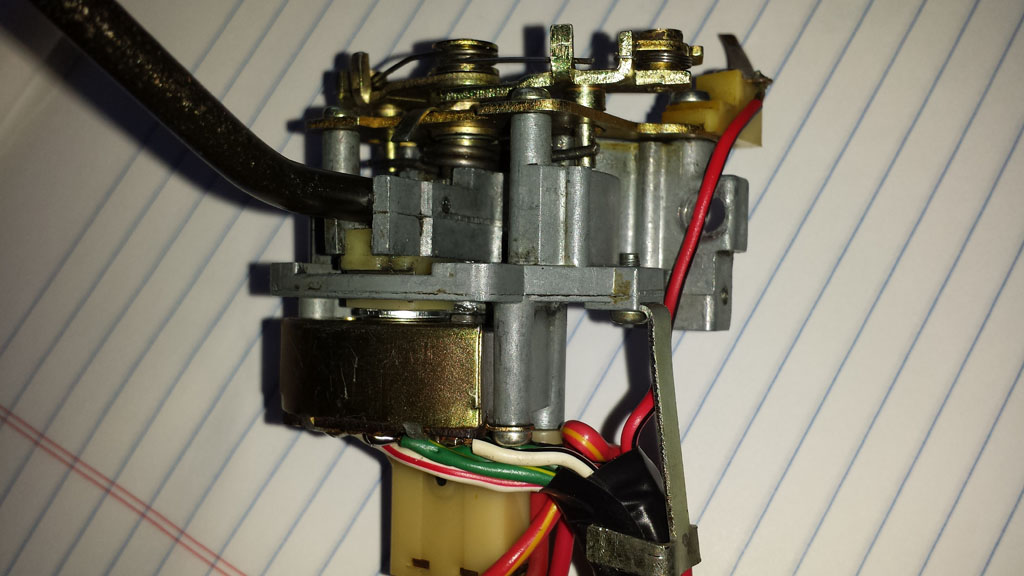
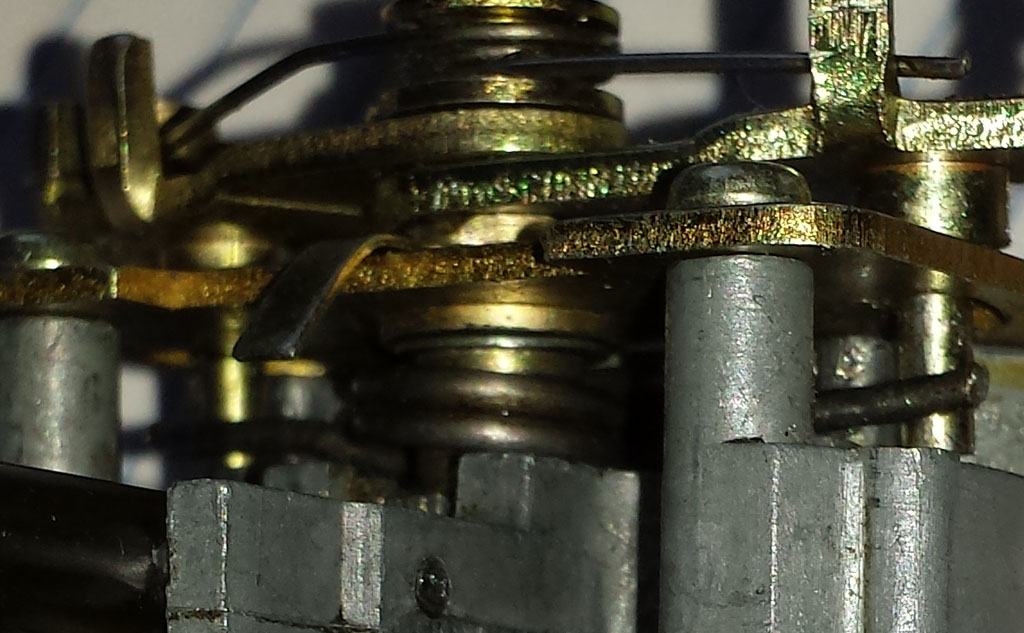
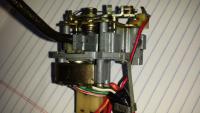
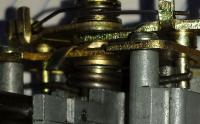
Like many of us with 40+ year old cars, components get old and tired, among them being our Turn Signal Switch Assembly. I had a recurring problem of not flashing the front passenger turn light and the dash indicator light. At first, I disassembled the slide switch and cleaned the contacts. This helped for a while. Then next time I disassembled the unit, the contacts looked clean enough so I did some continuity tests on the switch itself. the lights worked OK with the un-mounted switch but failed again after re-assembly. Jiggling the loosely mounted switch got an intermittent operation. Observing the operation of the switch I noticed there was a lot of free play in the various mechanisms. The switch consists of two main diecast components, the main casting and the pivot casting. The pivot casting mounts the turn signal lever, has detent balls/springs, connects to the slide switch through a nylon coupling. The top of the pivot casting has a press fitted stepped shank. This shank serves a bearing point and inserts into the top return pawl assembly. Between the pawl assembly and pivot casting is a torsion spring that snaps the pivot casting and lever back to the center detent position as the pawl cancels the signal. Upon dis-assembly I noticed two sources of the free play. First the nylon coupling connecting the switch to the pivot casting has shrunk over time. This is not unusual for nylon as it normally retains some water from the manufacturing process. The second issue was more problematic. The stepped shank press fitted into the pivot casting was now only loosely captured. And since the torsion spring continually presses on the shank, it tilted the shank and caused a wobble. This worsened the twisting of the nylon coupling. When the shank was pushed down into its former seat in the pivot casting, it was square and true. But as soon as any side load was applied, it cocked and the wobble began again. My first corrective action was to insert a 0.050"thick #8 washer over the post on the switch between the nylon coupling and the existing brass washer. This did a lot to control the twisting of the nylon coupling but the switch operation was intermittent due to the wobbling of the pivot casting. It was obvious that the severe stress of the torsion spring on the stepped shank and the nature of the zinc diecast material was going to make any re-staking of the shank problematic and short lived. Examining the bottom plate of the pawl assembly revealed a doubling washer to aid in making adequate sides to pivot surface. It occurred to me that if I could insert a shim between the doubling washer and stepped shank, I could hold the shank square. Assembling without the spring and using a feeler gauges, I was able to determine the free space was just about 0.018". I knew brass washers of similar thickness were used in clockworks, so I headed down to the local Ace Hardware. They didn't have any washers that thin, but we found a #8 spring washer exactly the right thickness. Getting the spring back into position with the wobbly shank proved to be a challenge, but when finished the entire switch assembly now works as good as new - or even better. If you attempt this repair, I would suggest NOT removing the torsion spring. When replacing the pawl mount plate, squeeze the pawl assemblies together, engage the stepped shank into the doubler washer, and firmly urge the plate into position to take the retaining screws. If you look carefully at the above photos, you can identify the added washers.

-
I had problems with frozen shocks when I first bought my Z and the tires were hard as rocks. I took careful measurements before and after replacing the shocks. Measuring from the center, bottom, rear edge of the bumpers, after maintenance they were within 3/8" of each other. For mine, they measured 17 7/16" front and 17 1/16" at the rear. This is with a 1/16" of the measurements I took from Carl Beck's white car. And yes the gap between the top of the tire and the lip of the fender well appears higher than todays normal.
-
I would think the marks above the center console are holding a lot of people back.
-
Since I have Weber carbs, this might be a dumb question about SU carbs. Wouldn't a weak float cause the bowl to over fill rather than under fill? Every other float I've seen pushes a needle upwards to seal off the flow of gas.
-
It would help to tell us what car/engine/modifications you have. If you have a carb'd 260Z, there is a dash pot that prevents the throttle linkage from closing too quickly, say when blipping the throttle. If this is hanging up, it could cause your problem.
-
Series I heater cores are rare birds. Worth trying to save it if you can. From what you say, it appears to be clogged.
-
Hi Metal Monkey, The wipers are notoriously slow on a dry windshield and will park high. Probably the least of your worries right now. Many early Z's were hacked into race cars due to their lighter weight. This only increases the rarity of a Series I restoration candidate. Current price premium for a Series I can easily be swamped by condition issues. That said, last year a Classic Motorsports Magazine article listed the Series I car first on their list of affordable classic cars with potential to appreciate. Their recommendation was to preserve them for next owner rather than attempting to restore today. You say you have acquired a hatch. Series I hatches have vents and defroster lines running vertically. Later hatches will work just fine - only brought it up for future potential restoration issues.
-
You may also have a miss firing cylinder that is fouling after a long idle. To verify this, try pulling a spark plug wire when it is idling normally. See if it sound familiar. I had a cylinder with low compression due to my improper valve cleaning last time I changed the head gasket. That gasket turned out to not do the job, so while changing it out for a NISMO head gasket, I took down the valves for the low compression cylinder and thoroughly cleaned the valves and seats. Upon putting things back together, the engine started up immediately and picked up an extra 200 rpms at idle using the previous carb settings. I had no idea how much power was being lost at idle from that one underperforming cylinder.
-
I attempted a repair with SEM bumper repair and was shocked just how fast it set up. I did manage to get a butt joint bond to the vinyl on two of the three cracks. I thought this might be sufficient as I had stop drilled the ends of the cracks. The repairs last a matter of weeks before the butt joints failed and a hairline crack re-appeared. Considering the thinness of the crack, I tried filled with crazy glue filled with micro-balloons used in model aircraft. This also failed. At first I thought it was caused by heat, but over time I've noticed the cracks widen on a cold night and close up in the hot summer sun. I have come to realize that the butt joint will never be strong enough using any kind of adhesive due to the small bonding area. The would indicate a lap joint is needed by inserting a piece of plastic bridging both sides of the crack. Getting good pressure to achieve a good bond would problematic when pressing against the soft, deteriorating foam rubber. I recalled Edd China doing a front plastic bumper cover repair on Wheeler Dealers. He made a point of drilling holes on each side of the crack so that the epoxy not only spanned across the crack, but also through the hole. The Six10 material looks promising. I'm contemplating adding a substrate to for a lap joint, adding through holes, and securing the substrate with sheet metal screws while waiting for the epoxy to set up. After its sets up, I'll remove the screws and fill the holes with more Six10.
-
Low EGTs can come from an over rich condition. The fact that starting without a choke has changed, the plugs indicate rich running and sudden onset, I'd think you have a troubleshooting path to follow. I'd suspect a stuck carb needle. Try inducing a vacuum leak by pulling off a hose or cap to a vacuum port. If RPMs increase, it indicates an over rich condition.
-
Horrible is not a very informative description. You may know what your EGTs normally run buy 300F sounds low. Could be too rich or too lean.
-
Your car is definitely a Series II car with that MFG Date. A Series I has vents on the hatch and "240Z" on the badges on the sail not a simple "Z". After 40+ years of maintenance, it would be a surprise if you didn't have some mixed generation parts installed. Early in the Series II production, some left over Series I parts were used, but I'm sure that they were all used up by June 71.
-
The easiest way to check the probe is to heat a pot of boiling water, ground it to the engine frame and insert the temperature probe. You can use your kitchen thermometer to confirm your reading. The center line of the gauge is meant to be 180 degrees give or take ten degrees. Since I had a 12v power supply, I calibrated my gauge on the range. Found the adjustment tabs frozen with 40+ years of dust, dirt, and corrosion. Wouldn't mess with any error less than ten degrees.
-
The problem with rare cars is that rarity makes pricing is problematic for the seller as well as the buyer. I have a neighbor trying to sell a DD quality '65 Austin Healey Sprite that she has owned for a very long time. She has a sign on it "$19,999 OBO". Unfortunately, it probably worth between $5-6K. Potential buyers shy away from a reasonable offer because the seller indicates she does not have reasonable expectations.
-
It would be nice if you could fine someone to make some OEM headlight covers for a group buy.
-
According to Carl Beck the valve cover change occurred at the same time as the introduction of the automatic transmission at SN 8944.