djwarner
-
Posts
718 -
Joined
-
Last visited
-
Days Won
8
Content Type
Profiles
Knowledge Base
Zcar Wiki
Forums
Gallery
Events
Downloads
Store
Blogs
Collections
Classifieds
Everything posted by djwarner
-
The kit for $6 allows you to retrofit it to your existing cable. Though you might need some heat shrink tubing. Part Number: 07767 Alternate Part Number: LCST8882

-
The turn signal bulbs and sockets are interchangeable. Remove them from the tach and reinstall correctly. Do some searches on this site regarding intermittent tachs. There are several possible causes but none concern the swapped turn signal bulbs.
-
Thanks for the condolence. Car was frame straightened Tuesday. The repair shop manager and the replacement parts supplier got together yesterday to figure out where to cut the belly pan. At least we got to do a thorough rust inspection in places you don't normally see and found surprisingly little. Hopefully they with finish before the end of the month.
-
Pacemkr, Looking again, you are correct. The Cortina does not have a vent window and the tuck under at the bottom of the doors is more severe in the Cortina.
-
Some oil pressure senders are designed to work with idiot lights as well as gauges. Below, say 5 psi, the gauge shorts to ground to light the idiot light. Above 5 psi, it reads a resistance for a gauge. To test this, drop the engine out of gear and rev the engine up to 1500-2000 rpm. If the gauge responds, you have this kind of sender. Now for the next question, what should oil pressure be for a warmed engine at idle. The manuals only give a spec at 2500 rpm. My gauge will do this after coming to a stop from a stretch of highway driving. Lubrication for these engines depends on oil flow rather than pressure. So if it meets the 2500 rpm spec and has proper oil level, the Datsun manual does not define a fault.
-
If you blow up the original photo to 400%, you will find that among other modifications made was a change to rectangular headlamps. Back in '72 I was driving a 510 wagon and did a number of double takes after seeing these on the road.
-
Ford Cortina TC Mark III http://upload.wikimedia.org/wikipedia/commons/a/a9/1972.ford.cortina.mk3.arp.750pix.jpg
-
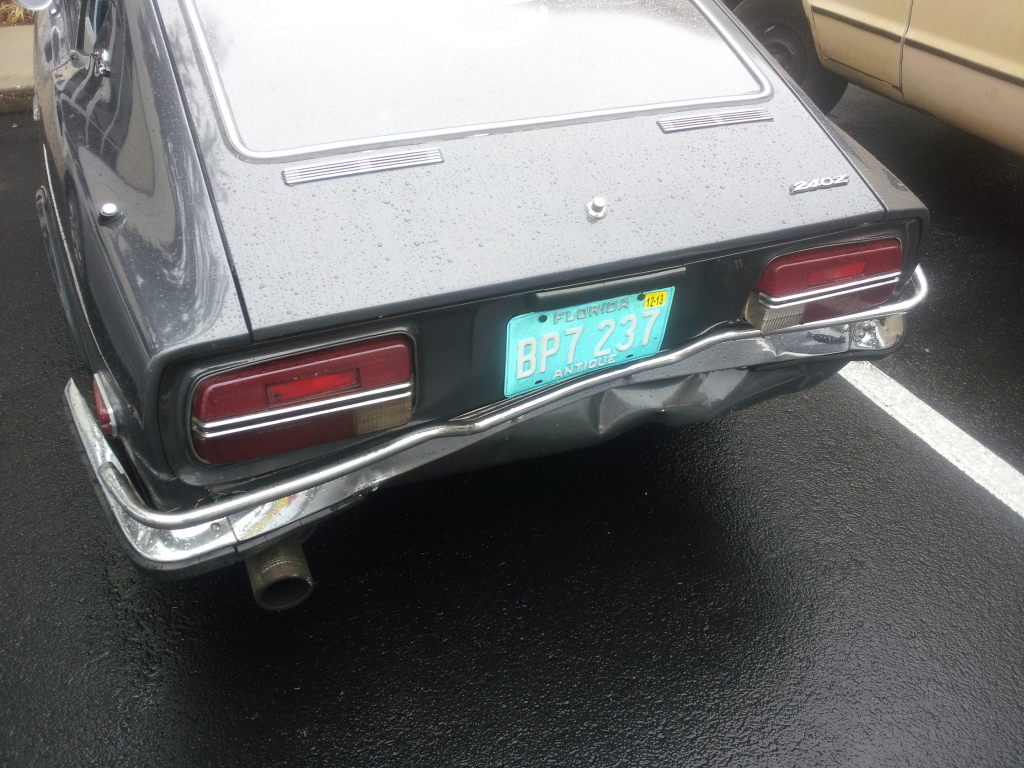
On May 1st I was rear ended. Inspections from below indicated 99% of the damage was behind the rear shock towers. removing the carpet showed that the spare tire pan had been distorted. The rear bumper under the license plate ended up 5 1/2" inches forward of the trailing edge of the hatch (about 8-9 inches of crush). Finally got the car into a body shop yesterday afternoon and popped the hatch. We found the spare tire (properly inflated) jammed in the collapsed pan. Besides increasing the stiffness of the area, the spare had absorbed much of the shock and spread the load out across the forward side of the pan. In doing so, the damage ahead of the pan was greatly reduced. In my case, this has meant a repairable vehicle instead of a total. As far as the human cargo, my wife and I only suffered week long headaches and neck stiffness. Let this be a note of caution for all of us who drive around without a spare - and those of us who haven't topped off the air in the spare for years. For Z's your spare is also part of your safety equipment.

-
When I bought my car the PO had replaced the vacuum source line to the power boost and had omitted the servo check valve resulting in no boost. Six months later the boost unit failed when its diaphragm ruptured. In both cases braking action was weak to nil but the pedal was stiffer than when the boost was working properly. The fact that your pedal goes to the floor board indicates an inability to build a back pressure. This is only caused by a leak, air in the system, or a defective master cylinder. Thinking as I write this, I had a problem with a 64 Renault Dauphine. First pressing the pedal, it would go to the floor. Repeated pumping would eventually build pressure. Releasing the brake for a few moments, and the next pedal press would go down to the floor again. That problem turned out to be a defective seal in the reservoir cap. I have no idea why, but replacing the seal fixed the problem. When the pedal was pumped, you could see the fluid draw down. The seal was designed to allow air to enter as the fluid was used, and to seal that air in. With a defective seal, fluid would return to the reservoir once the brakes were released.
-
My series I car has its original mirrors. The forward mounting screw is 110 mm behind the leading edge of the bottom window chrome trim strip. The spacing of the two screws are 108 mm and the mirror surface is 95 mm behind the leading screw measured from the pivot point. The mirror surface distance is somewhat difficult to measure because it mounts at an angle to the axis of the pivot.
-
If your strut tubes are perished, Look here: 240z front strut housings - Parts for Sale - HybridZ
-

Estimated labor cost to repalce struts on 240z
djwarner replied to dltalfa's topic in Suspension & Steering
I had all four done last year and I was billed for 4 hours. In all honesty, I think that was standard rate and the actual time for a 42 year old car was longer. -
Looking for post about wood engine cradle
djwarner replied to Jeff G 78's topic in Engine & Drivetrain
Thanks siteunseen, that's the thread I was thinking of. -
Looking for post about wood engine cradle
djwarner replied to Jeff G 78's topic in Engine & Drivetrain
Ok Now I can't get the given link to work. Anyone know the correct link? http://www.classiczcars.com/forums/thread46362-3.html -
A good way to keep the ball in place while re-assembling is to put a very small dab of Vaseline on the ball. Last time I didn't have a jar at hand so I used some triple antibiotic.
-
Glad to see all the help articles for our newbies. SteveJ, my main concern with the turn signal switch is breaking off the tabs shown in your picture #24. They are soft metal and can only be flexed a small number of times before they break off. Proper re-assembly of the switch can also be problematic - your photos can help there. I was trained as an airborne electronics technician back in the days when these were state of the art, so it didn't bother me. I just caution others who may not have been so afflicted.
-
Before touching the valves, measure them. Even clattering valve will not greatly affect performance as you describe. I would verify you don't have any vacuum leaks first. Our cars with their 40 year old rubber is great for hiding cracks in the small vacuum hoses. Another problem can be frozen distributor centrifugal advance weights.
-
I had almost the same problem with my 1970 z when I first acquired it. There are two problem areas. The turn signal switch and the 4 way hazard switch. Mine turned out to be the turn signal switch. Zed Head has a good first step. The turn signal switch is not sealed and subject to dirt and oxidation. You don't even have to remove the switch from the stalk. Simply remove the upper and lower covers and have at it. I have used contact cleaner from Radio Shack with good success. The little red tubes come in handy. If the cleaners don't get it. Dis-assembling the switch and burnishing the contacts may be required. However these parts are delicate and this is not a job for a beginner.
-
Help needed: Alternator not charging and Turn signals not working.
djwarner replied to MKI4EVA's topic in Electrical
It appears your z was out of commission for a while with the headgasket change. I would take the old and new alternators and regulator down to your local parts store and have them tested. If they say you have a good working set, check the large white and white/red wires at the connectors in the wire bundle on the passenger side of the of the foot well. After 43 years, I found mine to be quite corroded. Tracing these wires in the wiring diagrams show they are connected to everything! -
Get your Z ready and join the Suncoast Z Car Club and the Central Florida Z Club for a BBQ picnic April 13, 12PM to 5PM, at Fort DeSoto Park, Shelter #3. The park is located at 3500 Pinellas Bayway S., Tierra Verde, FL 33715. Once you get into the park, take a right and shelter #3 will be on the right, near the end. The clubs will provide the hot dogs and hamburgers, and members are asked to bring a dish. This is a family event, so bring out the spouse, significant other, and kids! So we can plan accordingly, please RSVP with the number attending to jay@quigley.net by Friday, April 12th. Non-members are invited to join us as well! Just pass this email along and have them RSVP. We ask they bring either a side dish or a $5 donation. Note, there is a $5 per car admission fee to enter Fort DeSoto park, so be sure to have some $$$ with you. Like us on: Jay Quigley Phone: (813) 846-5672
-
I've been watching your thread with interest. I tried the flat surfaced BA9 bulbs that replace the original 2 watt bulbs only to find them no brighter than the originals. I was hoping to see your results before I did anything, but the side pointing white LEDs just seemed too good to pass up.
-
Just finished a similar project to light my gauges with white LEDs. I found a unit at Wally World with two 14" strips for $19. These strips of LEDs aim parallel to the adhesive backing. By sticking them to the inner surface of the instrument case, they point towards the opening reflecting light on the meter face. A 14" strip will nicely circle the tach and speedometer. Likewise the clock can be fitted with one loop and cut to length. The flexible strips can be cut to lengths in multiples of 3 LEDs. (Each set of 3 LEDs has it own dropping resister) The temp/oil pressure gauge and ammeter/fuel gauge are a little trickier. The meters fit close to the case and will not allow a single strip to circle the case. I cut strips of 6 LEDs, one for the left side and one for the right side of the case. At the cut points they have to copper pads to solder leads, just be careful to observe the + and - polarities some units are marked others are not. I didn't want to alter the existing instrument lighting, so I drilled a small hole in the back of the cases and inserted rubber grommets. Wired them into the instrument panel lighting circuit I had previously patched in for my Vintage Air AC panel. I had considered taking the base of #57 bulb and plugging into the existing socket, but this would require removing the blue-green bulb filter. The new lighting setup works through the rheostat with the LED brightness matching the bulbs reasonably well. As a project, I would give it a difficulty rating of 5 on a scale of 10. Definitely not a job for beginners. However the results fully met my expectations.
-
I replaced my passenger door seal with an MSA seal last fall. I've gone through all of the above corrective actions except shimming. To date the required door closing effort has not yet eased to my satisfaction, though it has gotten better with age. Compared to the driver's door seal, the new seal is significantly harder. It appears to be binding at the hinge side of the door due to it resisting compression there. I can' really fault MSA as they are simply offering replacement parts from a third party manufacturer. It appears the replacement parts manufacturer is simply taking a standard rubber extrusion and making a 90 degree joint for the upper rear corner. I don't know whether a similar extrusion is available in a softer durometer, but it would certainly improve the product. Are you listening MSA?
-
Most people do not realize that heat is transferred three different ways, conduction, convection and radiation. When the evening air cools, it normally stops when it reaches the dew point meaning the humidity reaches 100%. However the engine also radiates heat away causing it to drop below the dew point. As a result dew collects on the surfaces both inside and outside, much like a cold drink glass will sweat. This sweat eventually runs down to the oil pan. Contrary to the old saw about oil and water not mixing, motor oil can absorb water up to about 1% by volume. Dissolved water will play havoc with proper lubrication. Oil has to be heated to about 180-185 degrees to drive off this dissolved water. This is why short trips cause maintenance woes. It's also why car thermostats are rarely set below 180 degrees. Sounds like your car has cold soaked repeatedly until the 1% limit has been reached. Excess water and the detergents in the oil have accumulated in the bottom of the pan.
-
Page 21 of the owner's manual states, "For best results reset the clock on a daily basis." Back in the day, as old man Harrison says on Pawn Stars, a quality wrist watch was only good for 1-2 minutes per day. I do have a clock display on my radio, so resetting is no big deal.