djwarner
Free Member
-
Joined
-
Last visited
Everything posted by djwarner
-
 I bought a leather dash cover from them earlier this year. Quality of materials and workmanship was good but design wasn't up to par. This of course may not apply to door skins. The technical skills for door skins are not anything like those for wrapping the curves of a dash. Their English language skills are somewhat lacking and may not be up to answering anything but basic questions. Also, they have no color standards to match our Z's and I would stick with basic black. (bad luck for my blue interior).
 -
Since no one else has mentioned it..... Martha bought an orange Series I 240Z non-running for $4K. Sail badges were missing and filled in, hatch chrome was missing, and interior was pretty mush trashed. She got the motor running, added seat covers and exterior jewelry. Added $1700 and sold it for $11.5K
-
When you are that close to perfection, there is much more to say. While in the Military Airlift Command, they started a cargo airdrop competition. The first year we got dinged for surface rust on the exterior rivets on our C-141A. The second year we got dinged for having paint on the rivets because the judges couldn't determine if there was surface rust underneath.
-
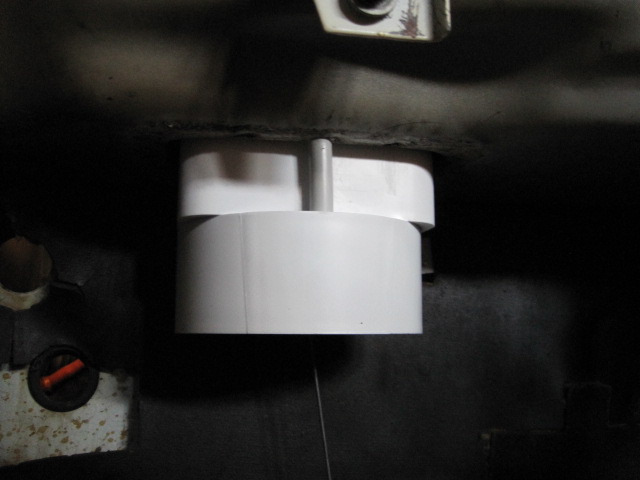
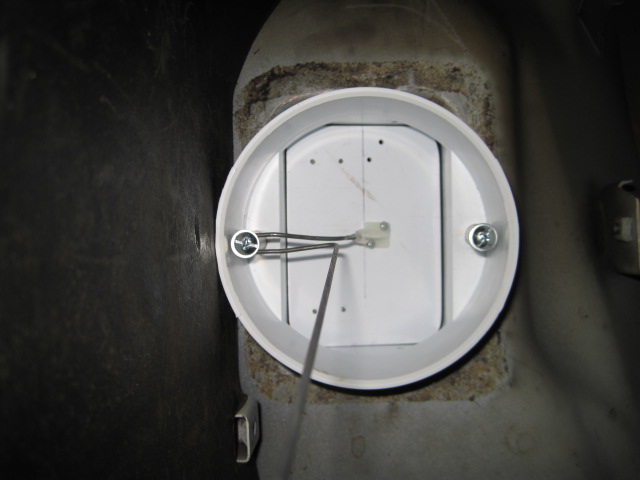
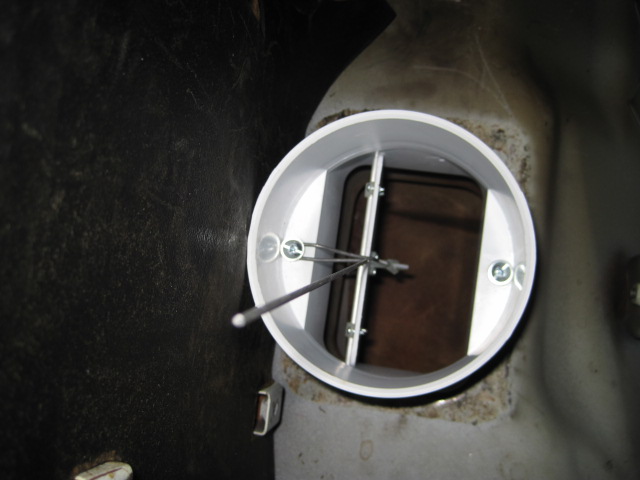
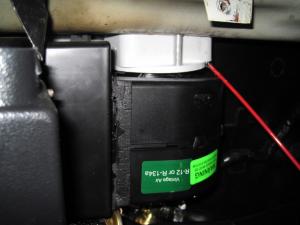
The white plastic part is a PVC drain adapter for gutters I bought at Home Depot. I fabricated a flapper. The entire assembly moves up and down, riding on the two posts. When lowered over the fan, the flapper opens. When raised, the flapper closes.
-
May I suggest that you un-mount the wiper mechanism and then connect the wiring. Operate the wiper motor and verify that it wipes on both speeds and parks when you turn them off. With them in the parked position, re-install. Verify they continue to operate without wiper blades and again park. Install the wiper blades in the parked position. My guess is worn motor brushes.
-
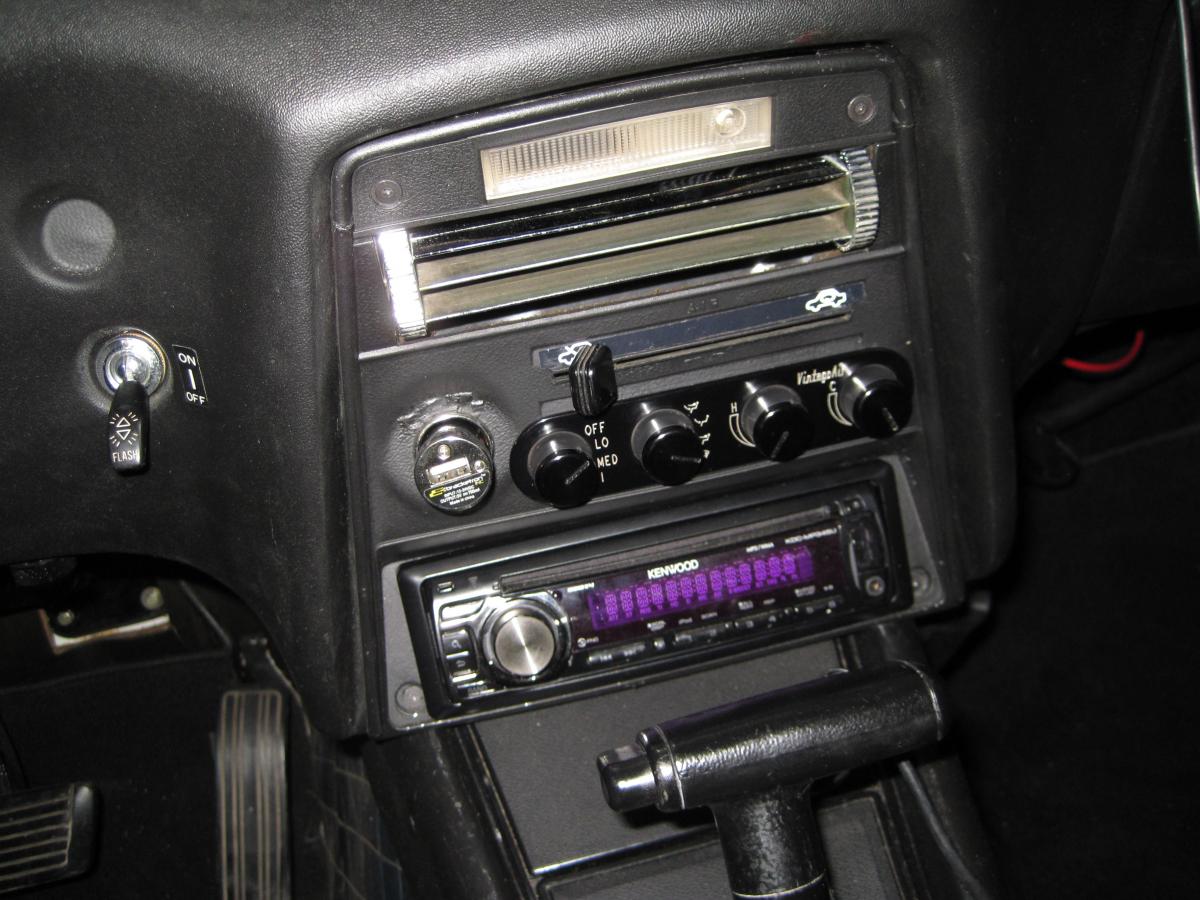
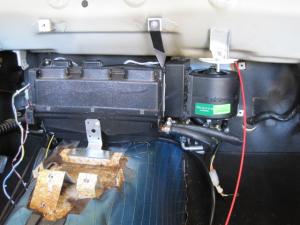
As you can see from the photos, I retained the fresh air vent control. If you chose to eliminate yours, you can simply block off the opening. If you do, I would get a sheet of black plastic from a hobby store to cover and clean up the center section of the heater control panel. If I were to do this again, I would use this for a fresh air control: http://www.woodcraft.com/product/149578/dust-collection-fitting-blast-gate-abs-4-od.aspx I inverted the fan and used a spacer to locate the fan under the fresh air vent. Note, this probably voided the Vintage Air warranty.


-
Aha! A victory of form over function. Your panel will look OEM but be utterly useless. That is your choice, so mount the control under the dash. Just check to make sure you have enough knee room. I chose to enjoy my AC instead of wasting my time worrying about design purity. My design gives a neat installation while keeping the ability for a new owner to return to stock with minimum difficulty. The choice is yours, enjoy.
-
The hoses will have to do a sharp u-turn from behind the fan up to the connectors on the air box. I used bulkhead fitting for the heater hoses so it can be done. VintageAir may have preformed u fittings that would make things easier.
-
I finally got around to doing some 0-60 runs after re-jetting the mains and converting the carbs to dual barrel synchronous operation. As I mentioned above, I didn't expect the conversion to synchronous operation to improve 0-60 times since this is done at full throttle. Where it does make a very significant difference is in the 40-70 mph driving range. At 50 mph the Z is loafing along with the throttle slightly opened. In this state, the car accelerates to 60 surprisingly quick without a hint of strain. I suspect that the light throttle position at 50 leaves lots of accelerator pump action in reserve. Now for the best part, after re-jetting I dropped a full second off the 0-60 time, 9.9 seconds versus the 10.9 secs previously. This is actually a half second faster than the writers for Road and Track were able to do back in 1971.@ 10.4 seconds(Remember this is for a car with an AT.) Other than the DGVs my engine is completely stock. I did a bottom end overhaul this year. The head was rebuilt about 40k miles ago and tested good so I left it alone save replacing the cam with another stock cam.
-
Y'all come. http://suncentralzclub.com/all-about-zfest/
-
Let us see.... No holes and preserve the original heater control panel. You do not specify that the heater control panel must remain in the vehicle, just that it remain intact. When you remove the OEM heater box, replacing it with the Vintage Air Gen II Mini, the controls will not be connected to anything. You have been given two potential solutions. Both involve pulling the OEM heater control panel and preserving it with the OEM heater box. Buy a second control panel and cut it up.... Or fabricate a new panel from sheet aluminum and paint it flat black. Quite frankly, I don't know what additional requirements you are demanding. Are you saying you want to preserve the original OEM appearance even though the levers and fan switch will be useless place holders? What we have suggested allows you or any future owner to revert back to 100% OEM without adding any holes. Please be more specific.
-
As an alternative, you might preserve the OEM panel and replace it with a flat piece of aluminum.
-
If I were you, I would mount it on the side of the center console like the ARA control. Just make it within easy reach from your driver's position.
-
Electrically, it is isentical to the unit I used and is a viable alternative if you do not want to cut the OEM panel.
-
You don't say which year you have, but the early year s30s had a problem with the control cable on the drivers side bending over. A service bulletin was issued that modified the configuration so that the cable pulled rather than pushed.
-
Unlike the halogen bulbs, the LED replacements come in a variety of powers. High power LEDs almost always come with a fan cooled heat sink. Since the subject units had some unusual heat radiators, I would question just how much power they had. Getting a high power LED lamp, heat sink with fan, and ballast to fit into a 7 inch reflector and inside our headlight bucket is problematic. There are 7" LED reflector units that are street legal with a $400+ price tag.
-
The ARA controller is NOT plug-in compatible. It will do some functions but not all required. It could be used to provide a panel space for additional controls, but additional engineering would be required.
-
http://www.6speedonline.com/articles/actor-sung-kang-to-unveil-nissan-240z-race-car-at-sema/
-
The ARA unit has a Thermostat control knob and a power switch. The OEM Fan Control switch has a blue wire that ports 12 volts to the ARA switch when the Fan switch is turned to any position but OFF. The Vintage Air unit has separate controls for heat and AC operation. It relies on the AC thermostat to control power to the compressor. The Vintage Air Gen II Mini unit has four control inputs: 1. Power/fan switch which can be mounted in place of the OEM switch. 2. An AC thermostat that could be mounted in place of the ARA thermostat. 3. A heater control potentiometer. A standard rotary potentiometer could be mounted in the switch position on the ARA panel or a linear resistor mounted to work with the middle control lever. 4. Finally, the problem of the lot, the mode switch. The mode switch performs the functions of the control levers but with some differences: The lowest lever diverts output from the room to the defrost vents. In the Vintage Air unit, a 12 volt signal is sent from the mode switch to the control module in the air handler. The middle lever can be connected to a linear potentiometer to operate the heater. A signal from the potentiometer is sent to the control module. The control module operates the heater control servo to proportionally open the control valve. The OEM top lever has two control wires. One operates a door on the fan housing to source air to the fan from the fresh air vent or from the room. The other lever allows a mix of output air to the dash vents or floor vents. The Vintage Air unit is designed to only source air from the room. The Vintage Air mode switch has positions tells the control module to direct air to the floor vent, dash vent or both. I don't know how you would convert the Vintage Air Lever Control module as I have no experience with it.
-
They never did say, but I think it had to do with the cam regrind. They went for a mild regrind because they wanted something street-able. At that point they may have figured that the car would have limited additional oomph from the triples. There is another thread on this episode on this forum.
-
Blue interiors only came in the '70 and '71 model years and only with white or blue exteriors. Mine was originally white with blue interior and was repainted by the previous owner. As for how many? I've never found production quantities for any color, interior, or transmission.
-
I installed mine in the original heater box location. Being in Florida, I wanted to keep the fresh air vent and came up with this. I added a box to act as a spacer to align the fan under the air vent and took lever parts from the old cable assembly.


-
Check out his history on Hybrid Z http://forums.hybridz.org/topic/120203-anyone-have-experience-with-datsunzfiberglasscom/?hl=datsunzfiberglass
-
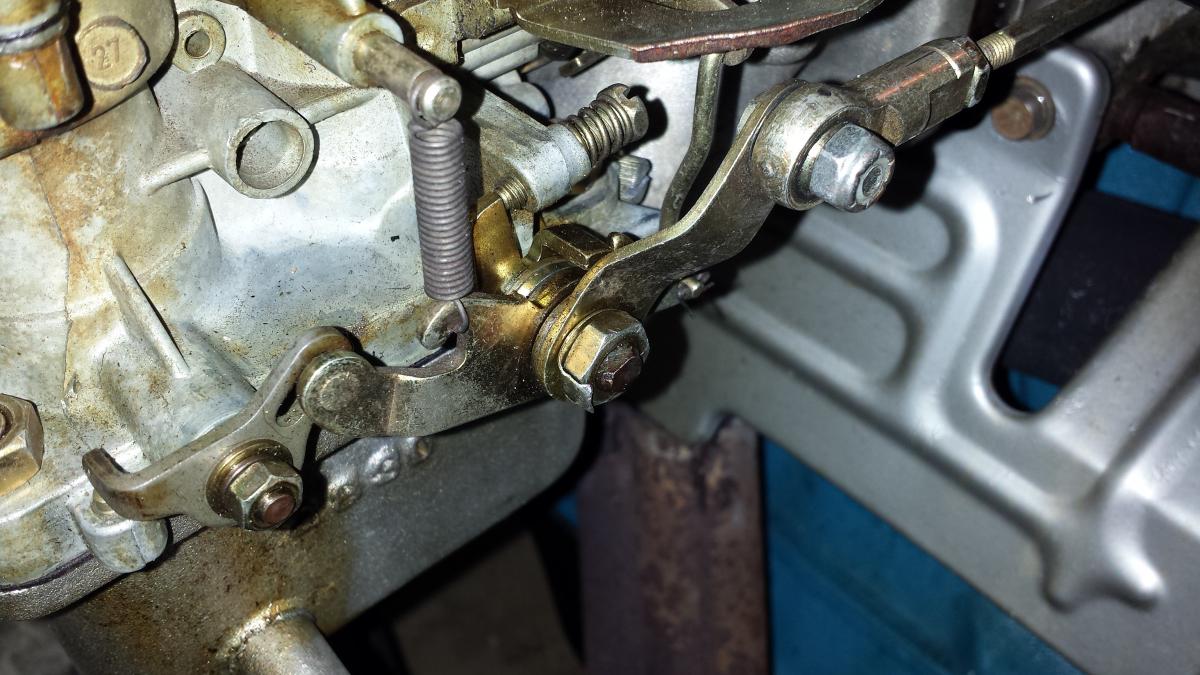
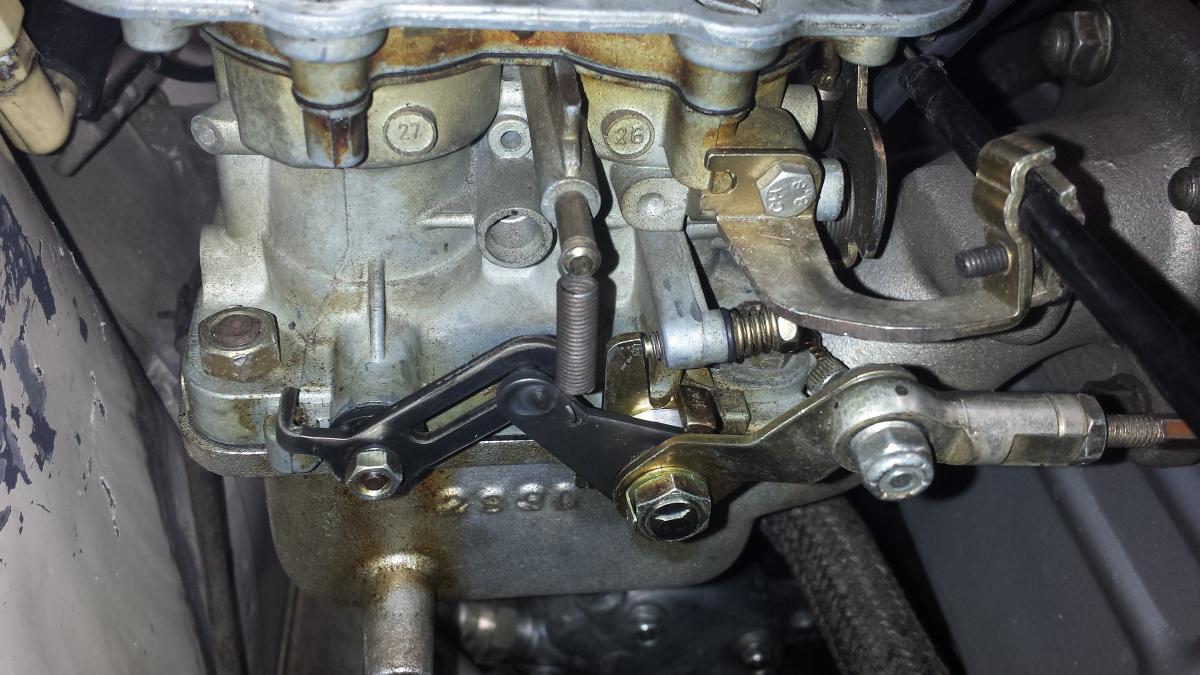
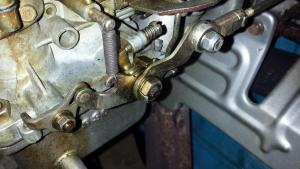
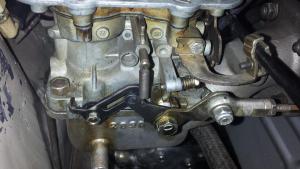
I was stimulated to investigate my Carbs when I continued to accumulate soot around the exhaust after my engine overhaul while the plugs showed the classic tan. I was also not particularly happy with 0-60 times of my 186K mile AT car. Even after a fresh overhaul, I was able to post a 10.9 second 0-60 without over-revving the engine prior to launch. An August 1971 Road & Track review of an AT 240Z said the best 0-60 time they could achieve was 10.4 seconds. This serves as my benchmark. My engine is otherwise completely stock and wouldn't benefit from going to triple DCOEs. Researching Webers, in Pat Braden's HP Book on WEBER CARBURETORS, the author states the magic of Webers is that the can be tuned to fit your needs whether it economy driving or for the race track. It turns out DGVs have seen track service on Escorts and other smaller cars. In addition, Theory of operation for the DGV is almost identical to a 40 DCOE. So I began to wonder just how many people install DGVs accepting the jetting that came with their kits. And just how much more performance could be attained by proper tuning. For those unfamiliar with DGVs, they are two barrel progressive carbs with 32mm and 36mm barrels. Common opinion is that they are sedan carbs with decent fuel economy but definitely non-sporting performance. So I contacted Redline, the US distributor for Genuine Weber (as opposed to Asian knock-offs) for any additional information they might have about proper tuning on out 240Z's. I received fantastic support from them and was able to make substantial improvements. One of their first comments is that modern gasoline formulations burn much leaner than even 5 years ago and that any carb that was tuned more than five years ago is likely to under perform. Second, they stated that they have changed the specs for the plastic floats, lowering the closed level and reducing the range of travel. They now measure plastic floats from the top of the float as opposed from the previously specified bottom. 17mm closed and 21-22mm fully open. Redline also suggested a 10-15% performance improvement could be made by converting the linkage from progressive to synchronous operation. With a progressive linkage, the throttle travel operates only the first barrel for the first half of travel and starts opening the second barrel after that. With synchronous operation, both barrel open together. While this doesn't affect wide open throttle performance, it provides the equivalent of a 49mm single barrel carb compared to the 48mm of our SUs. The standard 32/36 DGV operates solely on the primary about 90% of the time. First, I documented the jetting that came with the car, these turned out to be standard jets for a generic 32/36 DGV 5A carb and were not at all tuned for a 240Z. The standard idle speed/mixture setting procedure indicated that the primary idle jet was in fact too rich. There is a half size jet difference between the primary and secondary idle jets. swapping the jets so the primary had the leaner jet made an improvement, but it now indicated the main jets were too lean. This was enough to confirm my need for a pair of jetting kits. I order a set of synchronous linkages at the same time. I have installed the linkages and richened the main mixtures by three steps as well as leaning the idle mixtures to the proper sizes. Mid throttle response, where we live 90% of the time, has dramatically improved since I'm using the full 49mm equivalent rather than the 36mm of the original setup. It makes driving the car a much more enjoyable experience. I haven't had time to do a 0-60 run, but if there is any wide open throttle performance improvement, it will be from the richer jetting and not the synchronous operation. The original progressive linkage The new synchronous linkage All in all, for less than the cost of one new carb, I've gotten a significant boost in performance. ​
-
I know, I know - Weber DGVs are neither fish nor fowl, but the came with the car when I bought it. I've been reading in this forum how these carbs are for family sedans and taxicabs ever since. But to date no one has offered a free set of SU's and associated linkages, air cleaner, etc. I will have an interesting post about recent modifications in another posting.