mr_han_solo
Free Member
-
Joined
-
Last visited
Everything posted by mr_han_solo
-
Well I considered it that, but for the metallic silver color drove the price of powder coating up so much that it would be more cost effective to paint. The original paint up fine for 40 something years anyways. Looked into the video, pretty nifty DIY project and something I am going to have to do. Wow, I knew it was running rich, but not that bad.
-
Hello, I am planning to refinish my iron cross wheels as one of my winter projects. I originally talked to two different powder coating companies and they were leery/doubtful about replicating the current two tone paintjob. In turn, I have decided to just paint and refinish them. Before I do, I have several questions: 1. Is it going to hurt the rims for me to sandblast them? If it will damage them, what is the best way for me to remove the current clear and paint? 2. Can anyone point me to the color names or color codes on the rims themselves? I'm hoping this will help with being able to actually find/match the correct colors without having the wheel with me. 3. In my area I have both a PPG and a DuPont paint supplier. Which one makes a better paint for wheel, (assuming that it's going to have to be a specialty paint)? Thanks, Han
-
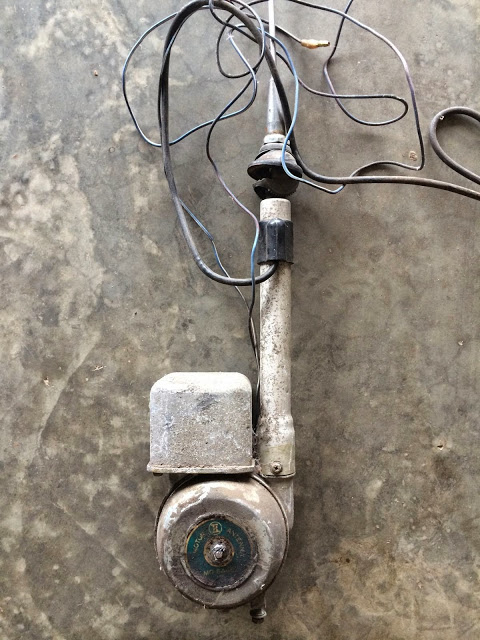
Hello, I am doing a clean-out and trying to sell some of my excess or extra 240-280 parts. I know this is a ebay/craigslist board and I do have these posted on ebay. Just thought I would list them here as well, If needed I can add the ebay links to conform with the rules. Datsun 240z, 260z, 280z Water Temp/Oil Pressure, And Clock Gauges: Pulled these from my 240z when I upgraded to a SBC. I changed to autometer gauges. When pulled the water/oil gauge worked. I bench tested the clock and it runs, but it doesn't have enough power/gearing to move the hands. I have put some sewing machine oil on it to see if that would free the gears up enough but it didn't. You can see the gears turn but they don't have enough power to turn the minute hand. They also come with the glass/black vanity shields. I had to use the black cases for my autometer gauges. I put white faces in my gauges and these will come with the white face, but they can easily be peeled off if you want to return to the stock look. 240z, 260z, 280z Clutch Master Cylinder: This is the Clutch master cylinder off of my 240z. I did a SBC swap and had to upgrade to a tilton master cylinder. This comes with the stock Datsun cylinder, and all of the tilton reservoirs and accessories that I didn't use. One thing to note is that the pushrod in the picture is the tilton pushrod. The master will come with the stock datsun push-rod though. I took the picture when I was wanting so see the how they would interchange. 240z, 260z, 280z Power Antenna: Pulled this off my 240z, not sure if it's a power antenna of not. It does have an accessory power wire going to it. 280z Center Console Panel: Pulled from a 280z parts car. Rear light connector is mangled. Other than that the entire panel looks good. 280z HVAC Switch: This was pulled from a 280z parts car. All sliders move and seem to function correctly. 70-74 Datsun 240z Console/HVAC Panel/Switch: Pulled these from my 240z when I got it. Everything looks good and levers move and function correctly. Paint is chipping on the main panel, but a repaint on if should be fairly easy. Small hairline crack on smaller panel that goes over fuses. Fan switch also included. Extra Prothane (Red) Urethane Bushings: Bushings I had left over. Bump Stops, Transmission X-Member, 16 and 20mm Sway Bars. Stealth Conversions Aluminum Spacers. Dat-105: I really have no price to put on these. Just make me an offer. Feel free to ask plenty of questions or request more pictures, I took several of each item.

-
DirectTV channel 281
-
Just noticed that the Velocity channel show "Garage Squad" will be airing a Datsun episode tomorrow (Friday 8/15) night at 9 P.M. Eastern. Here is the synopsis: "Jason is a motorcycle mechanic with a big car problem. He owns a rare Datsun 240z, number 89 off the line with serious problems under the hood and in the interior. Can the Garage Squad team help this owner get his beloved Datsun back on the road?" Just thought I would post this to let everyone know so they can watch/DVR it. Edit: Just noticed that the title shows 9/14, this should be 8/15. Hopefully a mod can fix this.
-
I don't have a part #, but it was listed as "Urethane Airdam with brake cooling ducts". Hope this helps.
-
Hello, I recently purchased a urethane bumper. The inlet part is very wavy, I was wondering if anyone knew any way to straighten it out. Thanks, Han
-
Used some left over primer I had from my Camaro. Evercoat durabuild. Not more than two years old. The color coat is an enamel. New paint. I sanded the original paint, then primed it. I wet sanded the primer with 400grit then applied the basecoat. Wet sanded the basecoat with 400 and then put on the second (current) coat. What I mean by uneven is that if you look in the picture you can see where it looks thicker in some areas than others. However, when i run my fingers over it it's all the same.
-
Hello, Just finished shooting my car with some satin green paint. However, the paint looks really uneven. It's all good to the touch but you can clearly see where I started and stopped. My question is, how do I even all of this out? After my first coat I tried sanding with 600grit, but It ended up making the paint look bad. I was thinking of trying 1000 or 1500 grit, but I wanted to check in before I did that. I will be shooting the car with a flat clearcoat, so it that takes care of these problems I'll just do that instead of sanding. Hoping someone can give me some tips.
-
Well I took the gauge out and wired it to the battery. Messed with the adjustment crew a little bit and it didn't change a thing. Looks like the Voltmeter is bad. Guess i'll have to buy another one. Thanks for the response! Hopefully this thread will end up helping someone in a situation similar situation to mine.
-
I put the gauge faces on myself, but I did not touch the adjuster screw. However, I do not know what may have happened to the gauge in the past so I will check the screw tomorrow. Is it okay to adjust that gauge with it still connected to the battery? The fuel tank is empty so that may be why the fuel gauge looks like it's not working. Unless it's suppressed to wiggle like the voltmeter does.
-
Hello, I am re-installing my dash and I have run into one small problem. I got everything hooked up, but I am having a problem with the ammeter conversion. The AMP/Fuel gauge is from a 1976 280z. I used he following instructions in my swap: "Basically you just disconnect the two fat White/Red wires (maybe just white?) from the back of the ammeter and re-connect them. Insulate the living daylights out of this connection, and not with just electrical tape. Use heat shrink, preferably the stuff with the glue on the inside. Clean the contacts first. Bolt them together VERY tight. Oh, and take a new 18 gauge wire from this same spliced connection and connect it to the + terminal of the voltmeter, and connect the negative terminal to ground. That's it." Unfortunately the AMP gauge is only reading 4 volts. Here is a youtube video of the gauges operation. I'm hoping someone can tell me what I did wrong or if my gauge is bad. Thanks, Han
-
I went ahead and pulled the trigger on the Master Cylinder. I also went ahead and bought new wheel cylinders, shoes and stainless steel lines. All of this was the day before Christmas... Unfortunately, I also bought the Toyota 4x4 (non vented) calipers and pads. Now I suppose that I could return them, but I was wondering if there was any more input. pbarcher, thank you for your previous input. I am going to do some more researching on the Toyota front and drum rears. As I said before I can still return them, but I just want to make sure that there isn't any way around the brake balance problem.
-
Hello, I am in the process of removing my Evap tank and reconfiguring the evap lines into the European style that doesn't have the expansion tank. My question is that I have a vacuum line coming from my manifold and carb advance into a metal distribution block and from there the line runs all the way into the back to the evap tank. What can I do with this line? Is it safe to disregard the metal distribution block and just run the line straight from the distributor to the manifold? Hopefully this picture gives an idea of what I'm talking about: Thanks, Han
-
Hello, I some different questions regarding the brakes. On a lot of threads I have heard people say that the 240z stock rear drums are on par with any disc upgrade. They also mention some drum upgrades, but never specify what the exact upgrades are. I am looking into stainless steel lines and rear performance brake shoes. Is there anything else I need as far as a rear drum upgrade? On my front brakes I am upgrading to the Toyota 4X4 breaks. I was actually looking at getting the vented ones. However, I read that I will need a machined spacer to correctly move the hub from the rotor for wheel clearance and matching bolts. The source of these were Modern Motorsports. However, I see that they no longer sell these. I was wondering if there was any other source for these spacers? If not how much of a performance hit will I be taking if I back down to the standard Toyota 4x4 brakes? I do plan on doing some auto crossing in this car. The other brake upgrades I will be doing is the 15/16 master cylinder from a '79 280zx. Hope someone can chime in so I can load up on some parts to get me started. Thanks, Han
-
That's the diagram I am using. However, it doesn't show the black wire going to the defroster. I have another colored diagram as well.
-
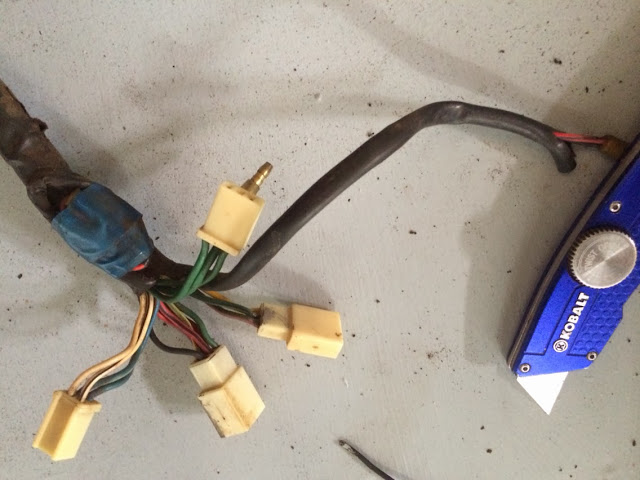
Hello, I recently converted my '73 240z taillights and light harness to a 280z taillight. Today I wanted to check the wires with an ohmmeter to make sure I soldered everything correctly. So I disconnected the body harness from the passenger compartment and pulled out the old voltmeter/ohmmeter. Everything worked fine except for the black wire. (ground?) After looking at the wiring diagram it seems that the black wire goes to my rear defroster. Sure enough I traced the black wire from my taillights to this black wire: I can see where the female end plugs in my rear defroster, however, where does the male end go? Also, I dont have another female connector/wire to go onto the other tab on my defroster. let's say I wan to take the defroster out and not use it. Could I just ground this black wire to the body and be okay? Now for the second question. On my body harness connectors (the part that plugs in the passenger area of the dash I have two black wires that I cant trace. As I said before I have the black wires coming from my taillights and they go the the black wire that connects to the defroster. I'm wondering where these two black wires come from. The first black wire is in the middle connector along with the red/black, green, white/green, and red/blue. The second black wire goes combines with a red/black wire into a single connector. This can be seen as the top wire (the kobalt utility knife is on it). Just hoping someone can help me answer these questions so I can move onto checking the wire from the turn signal/headlight switch/and fuse box to the connectors in the passenger compartment. Thanks, Han

-
My #1 carb is getting wayyy too much gas. I have posted the following video to demonstrate what it is doing: SU Carb - YouTube The #2 carb seems to be getting the right amount of fuel. I mean I don't see it flowing out like a geyser like the #1 carb is. I initially thought that the regulator was bad (i have an aftermarket electric pump), however since the #2 seems to be working right, I'm thinking something may be wrong with the #1 carb. Hope someone has some answers. Thanks.
-
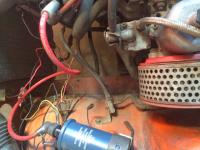
Hello, I purchased my first Z car yesterday and while it may be kind of rough, the guy told me that it was running when he parked it. Unfortunately that was two years ago and it looks like he cut the cables when he took the battery out, or the battery was stolen and all of the cables were cut. I installed new terminals today and I am just trying to see if I can get the car to start. Unfortunately, it looks like the car was replaced with an after market electric fuel pump and I have no idea how it’s supposed to work. I have some questions and my hypothesis, and I have presented it with pictures and a diagram. I am just wanting some conformation that what I am presenting is correct or some suggestions if I am wrong. First under the dash: As you can see there is a switch to turn the electric pump on and off. The red wire going outside the car is A, whole the other switch wire goes into the console. Now onto the engine bay: Here you can see where A comes up and has been cut off. My hypothesis is that it needs to be wired onto A? which goes into the fuel pump. B? Is the black wire from the fuel pump and I'm guessing it gets screwed onto the body as a ground. Now I will ask about the fuel lines. 1 comes from a steel line on the frame rail and my guess is that it goes into the fuel pump. Line 2 out of the fuel pump should go to line 3 which goes to the regulator. From the regulator line 3 goes into another steel line which goes to the carbs. Line 4 is the return line from the carbs and goes back into another steel line on the frame rail. Just wanting to make sure all of this is correct. Here you can see the + and - Battery cables I'm guessing that ?2 is the red line from the switch that went into the console and dash. I suppose it should be wired directly to the battery. I have no idea what the connector ?1 is. I was hoping someone here could fill me in on it and tell me if there is anything else I need to hook up to get the car going. Thanks, Han