Carl Beck
Free Member
-
Joined
-
Last visited
Everything posted by Carl Beck
-
If the timing is set correctly, the vacuum advance is working - and the points are set correctly - - - then perhaps your hesitation/misfire is caused by something else. Carb's not adjusted correctly, sticky vacuum slides, wrong weight damper oil, float levels not correct etc etc. or Perhaps your plug wires are breaking down, loose wiring connections at the plugs or in the distributor . or Perhaps your fuel supply isn't consistent at a constant pressure.. Lots of stuff can cause the symptoms your talking about.... FWIW, Carl B.
-
Hi Guys: Seems nothing turns out completely "as planned". I failed to get the BRE BAJA Z completed in time to meet the transport deadline, for the 40th Anniversary Celebration of the SCORE/BAJA 1000 in California this coming week. As a result, the BRE BAJA Z will be here in Florida and we'll be taking it to the ZCCA's Annual Convention in Daytona - at least for Monday and Tuesday. (Wife has to be back for work Wednesday). Hope to see as many of you there as possible for the two days available... FWIW, Carl B.
-
The E88 as used on the 73 240-z's had 47.8cc combustion chambers. The N47 has 44.6cc combustion chambers. So there would be no loss of compression ratio. The E88 on the from 73 has very poor combustion chamber design as far a "performance" goes, although it's a good emissions head. As mentioned the N47 has larger intake and exhaust valves as well as hardened valve seats, but it too suffers from poor combustion chamber design. The N47 will need to have its exhaust liners left out - and the exhaust ports need some porting work to open them up a bit. If you go with the N47 - might as well add the crank from the 260/280... and pick up the extra stroke and added cc's. FWIW, Carl B.
-
Can you Post some pictures of them please. I'd like to see what the "Point Polisher" looks like. thanks, Carl B.
-
For some reason, this did not seem to work completely on my 73. If I turn the key "off" the engine stops, but if when turning the key I pass "off" and continue to "acc" or "lock" the engine keeps running... So I just turn the key "off" - wait there a second, then continue to rotate the key to the "lock" position. The car is not pure stock.... but pretty close as far as the car's wiring harness goes... FWIW, Carl B.
-
Hi Kenneth: "10 degrees on the plate"...... If you mean the plate on the distributor itself - NO. When you hold a timing light on the crankshaft pulley - with the engine at idle... you see the timing marks on the crankshaft pulley - and a "Pointer" that is bolted to the engine. The "0" timing mark is always the largest/deepest notch in the crankshaft pulley. You'll be standing on the passenger side of the car with the Timing Light in hand at that point. If you turn the distributor clockwise / counter clockwise very little and very slowly - while carefully observing the timing marks on the crankshaft pulley - you will see the the marks advance or retard (move ahead or behind the "0" mark). You want to set the initial spark timing on the 10 degree mark. Your Public Profile gives me no indication of what year Z you own - so I can't tell you exactly what the marks/notches on the crankshaft pulley should look like - but in general they are marked in 5 degree increments. So the Pointer bolted to the block - should line up with the second mark past the larger "0" mark. If you can't see the timing marks/notches clearly on the crankshaft pulley - you have to clean the pulley and put some white paint in the marks/notches... Install the rebuilt distributor - and start over. FWIW, Carl
-
Hi Kenneth: "Initial" engine timing is marked or set when the engine is being put together. That is the Top Dead Center of the Number 1 cylinder, on the compression stroke. The initial MARK on the crankshaft is "0". The 10 degrees BTDC is the initial "spark" timing. Meaning you want the spark plug to fire 10 degrees before the piston reaches Top Dead Center - at the RPM the engine is set to idle at. So you dial that in by turning the distributor while using a timing light to watch the marks on the crankshaft pulley. It's important to have the vacuum advance disabled, by removing the vacuum line from the distributor and the line plugged off, when you do this. Generally speaking - when people talk about "initial timing" - they really mean the initial timing of the spark at engine idle speed. After that - you reconnect the Vacuum Advance. As engine RPM increases the timing curves built into the distributor by both centrifugal weights spinning outward, and vacuum advancing the points come into play. If you are running a stock distributor - you don't have to mess with this aspect - except to quickly open (blip) the throttle - and see if the timing at the crankshaft advances quickly - then falls back to 10 degrees BTDC. If your car backfired at 2000 RPM - it is possible that you sat the initial spark timing with the vacuum advance connected, or it is possible that you forgot to reconnect it. If it isn't one of the two -then it is possible that your vacuum advance isn't working properly. FWIW, Carl B.
-
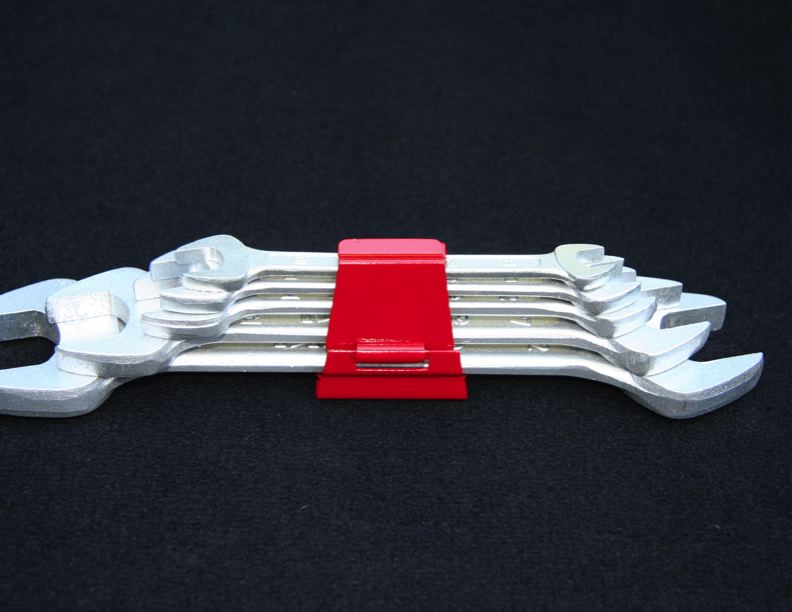
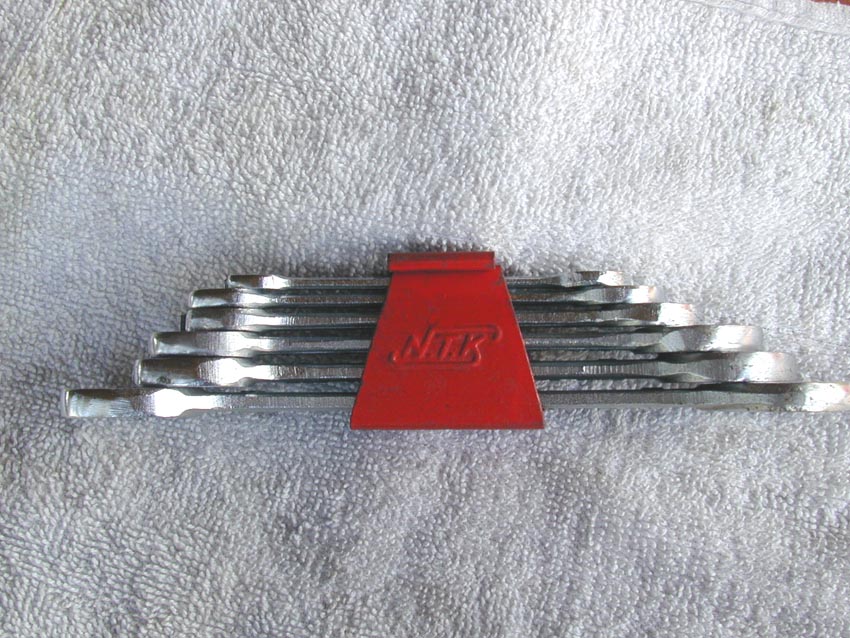
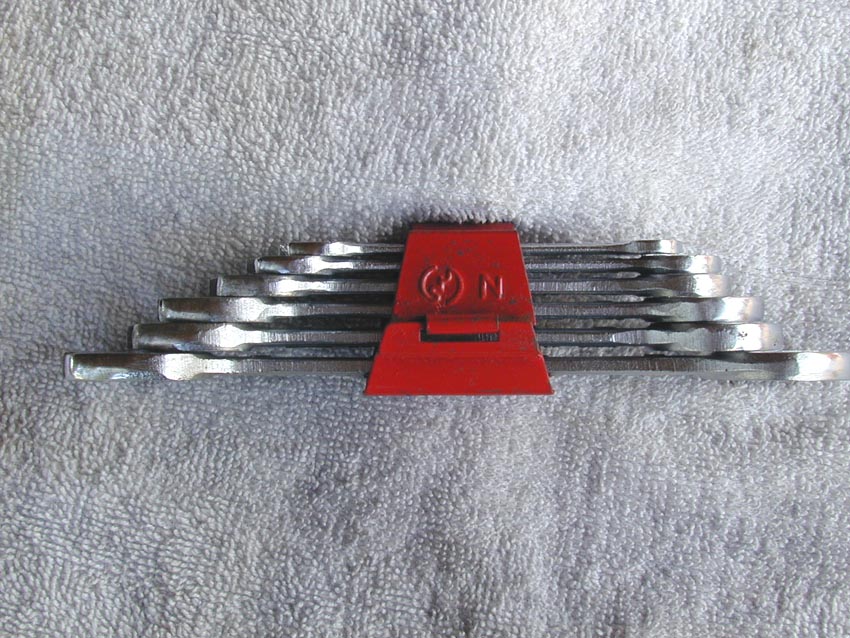
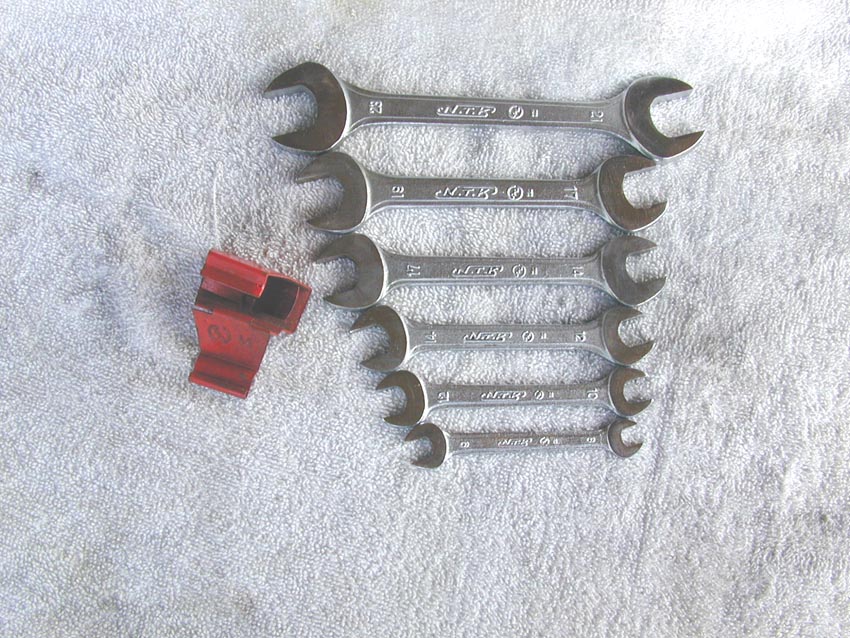
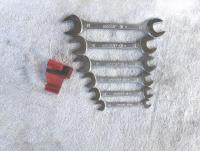
Hi Bob: I put your image first below - followed by mine. I knew I kept mine - but it took some time to find them!! Mine are somewhat different than the picture you show. They are marked NTK on one side and Dropped Forged on the other. This is the set that I got through the Datsun Parts Dept. - when I ordered them for my 1970 240-Z. FWIW, Carl B.
-
Hi Kenneth: Most dwell meters have settings for 4, 6 and 8 cylinders - make sure yours is set to 6 cylinders. You set the point gap (0.0177 to 0.0217 inch or 0.45 to 0.55 mm) and measure the dwell angle at 700-800 RPM (35 to 41 degrees). Then rev the engine slightly and check to see that it stays the same. If you see your dwell angle changing, it means you didn't tighten down the point base..and your points are bouncing. You use the larger nut/ phillips screw head to make final adjustments in the timing - yes "A" is for advance and "R" is for retard. You use the smaller nut at the base to get the initial timing within the adjustment range on the top. The vacuum advance hose should be disconnected from the distributor and plugged - because you adjust the carb's and set the idle speed with it hooked up to the carb. When you disconnect the vacuum hose, to disable the vacuum advance at the distributor - you throw off the tune on the carb's if the hose isn't plugged... as the #1 SU now has a leak at the intake port - so to speak. FWIW, Carl B.
-
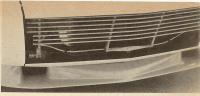
Hi Randy: When BRE first started shipping the Spooks for the Z's (their Mk II design for the Z).. the lower half of the ducts were molded into the Spook, the upper half of the ducts were molded separately and then bonded to the lower half by BRE. So when the Spook arrived the rear of the ducts were fully enclosed and round. Sometime later, they simply included the upper half of the ducts, and it was up to the installer to decide if they wanted or needed to use them, later still BRE simply quite suppling the upper halfs all together. The first Spook I received for my 70 Z was of the first type. After I smashed that one, the second Spook I received was of the second type and I did not install the upper half of the ducts on that one. When I purchased a new Spook for my 72 Z - it came without the upper half of the ducts. The Spook that BRE ran on their #46 car was quite different than the "redesigned" Mk II that they sold to the public. See picture below... The early Mk II's also had a wider reinforcing lip around the outside, than the later one's.
-
Hi Randy: What or which "that" has you confused? regards, Carl
-
Hi Wayne: Your description was fine - my memory was not. The Mk I Spooks were for the roadsters... and the Mk II's were the first for the Z's. Yes, originally the Z Spooks had the tops of the ducts in place when shipped, then they left them off, but still included the upper half of the duct with the Spook, then finally they eliminated them altogether. sorry for the confusion... Carl B.
-
Because the brake isn't "really" off. a) if you pull your e-brake when you park the car - it's possible that the rear brake shoes are hanging up - ie. sticking in the full open position. quite common for the front brake calipers to stick as well Normally if it's the rear brakes that are sticking - when you force the car to move forward - they release. If the front brake calipers are sticking - you usually need to remove them and clean out the piston cylinder walls. (ie rebuild the front calipers). a) faulty master or slave clutch disk rusted/stuck to the flywheel They are each independent variables, related to the time the car sits not being used. They are not dependent variables. The cause - time, corrosion - related to the front calipers and clutch disk. The "self-adjusting" feature of the rear brakes - adjusts the brake shoes too tight if the e-brake is pulled too often and the car hasn't been driven enough to wear the rear shoes down. Corrosion in the rear brake cylinders is another cause - as they stick or hang up and won't allow the rear brake shoes to retract. To break the clutch disk loose: Hold the clutch pedal to the floor Put the car in 3rd gear Pull the e-brake and step on the brake pedal firmly Bump the starter several times Normally the above procedure will break the clutch disk loose. If the above procedure doesn't break the clutch disk loose; Start the car - out of gear - and let it warm up to full operating temps. - then shut it down. Re-Start the car in 1st gear and get it rolling about 20mph. Make sure you have clear roadway ahead when you start the car in gear - so you can get it moving. Hold the clutch pedal to the floor Yank up hard on the e-brake to stop the rear wheels from turning, and at the very same time give the engine some gas to rev it up. You may have to repeat the process several times... but the clutch disk will break loose..... FWIW, Carl B.
-
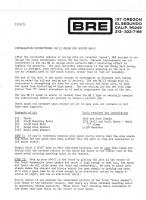
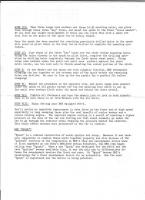
Hi Goose52: Sounds like you got one of the last Mk 1 Spooks. They did come with the "tops" of the brake ducts and the leading edges were wider. BRE started shipping the Mk II's about mid year 1971 as I recall. Anyway - here is a copy of the installation instructions for the BRE Mk II Spook... The three bolts at the back edge used existing captive nuts in the bottom of the radiator core support. All others had to be drilled through the Spook and into the lower finisher panels on the car. FWIW, Carl B. Carl Beck Clearwater, FL USA http://ZHome.com
-
I love my 72 510 Wagon... almost as much fun to drive as the Z and gets every bit as much attention and comments from people. I'm sure you'll love the sedan... FWIW, Carl B.
-
Hi Guys: Given its location and current condition - I'd say it should bring between $4,500.00 and $5,500. All stock, original paint and un-molested by unknown previous morons - - makes the ideal basis for a really fun "Refresh" or full up Restoration. Cost to Refresh in a first class manor - $12K to $15K Cost to Restore properly $20K to $25K All of the above is based on the next owner having a pretty good idea of what he's doing and that he is doing all the "grunt" work himself. If it was carefully restored, with full documentation of the restoration process kept along the way - it would take two to three years for the average guy to complete. Two to three years from now properly restored Datsun 240-Z's will be easily selling for between $25K and $35K... Hold on to it for another 10 years and you'd see #1 and #2 240-Z's in the $65K price range.. Let's hope they don't try to start the car - let the next owner get it ready to restart... Just my opinion... Carl B.
-
Hi Bo: That wouldn't surprise me - my 11/71 build 72 Model Year has one too. I put it there when I switched to an electric pump - VBG - Are you still running the mechanical pump on the engine as well? Carl B.
-
Hi E. / everyone: That first picture looks like the installer was an Authorized Dealer using the Factory supplied parts. The little clips on the side of the fuse block were also included in the Factory 73 Modifications Plus Program package here in the US. I don't know if the Factory Actually installed the same parts later in the production year ot not - they easily could have.. It is nice that one is clipped to the side of the fuse block - but I haven't seen too many of them done that way (even by the dealers mechanics taking short cuts and leaving the fuse holder next to the other two in the wiring harness behind the dash. Usually- if you find an in-line fuse holder - that wasn't installed by the Dealer - the installers didn't have the same color coded wires to use.. or the aftermarket fuse holder simply had black wires on it.. FWIW, Carl B.
-
The 73 240-Z's did NOT come from the factory with an electric fuel pump, until the last part of the production year. At first Nissan had great problems with the 73's and their Emissions Carb.'s. This in turn lead to a series of "fixes" that were developed over time and implemented in Stages. If one has an early build date car - and that car wasn't taken into an Authorized Dealer for the Modifications Programs - it is quite possible to have a 73 with no electric pump, no in-line fuse and no relay etc. - - or some odd combinations of all or some of the items. On many of the early cars - the mechanics just activated the existing pre-wiring for the electric pumps by putting a jumper wire in place... if the mechanic was at all smart he put an in-line 20amp fuse in the jumper. There is a green wire and a I think a red/blue wire in a female connector that has three wires in it, - - it was taped up to the outside of the harness with blue tape - that has to have two male ends from the jumper wire - it's in the harness behind and to the right side of the fuse block.. Anyway - the point is you never know what your going to find on a "73 240-Z" in regard to the fuel pumps... So it should not be a surprise if Weasel73240Z doesn't have a relay, nor if he's having a hard time finding the in-line fuse that "should" be there. FWIW, Carl
-
Hi Guys: Terms, terms, terms.... they have to be made more specific if we are ever to really understand one another. 71 Calender Year - same as "Production Year".... 1 Jan. though the end of 31 Dec. 71 Model Year - varies by Manufacturer and Country. ie... the first regular production 1970 Model Year Datsun 240-Z's were built in Oct. of 1969. The first Series of Datsun 240-Z's were produced from Oct. 1969 into Jan. of 1971. They were sold and titled as 1969 Model Year 240-Z's, 1970 Model Year 240-Z's and 1971 Model Year 240-Z's. These are the cars with the fresh air exhaust vents on the rear hatch lid and the 240-Z Script Emblems on the rear quarter panels. The Second Series of Datsun 240-Z's began production in Jan. of 1971 and Nissan restarted the Chassis Serial Numbers for the HLS30's at HLS30 21000 and the HS30's at HS30 00501. Nissan called these the "Late Model 1971 Datsun 240-Z Sports". These are the cars with the fresh air vents moved to the rear quarter panel and the Circle Z emblem. (among other changes). Yes - there is a large overlap in the VIN's and Build Dates of the Series I 240-Z's that were titled as 1970 Model Year Datsun 240-Z's, and those Titled as 1971 Model Year Datsun 240-Z's. That is to say; that it is easy to find cars with lower VIN's that were titled as 1971 Datsun 240-Z's, than many that were still sold and titled as 1970 Model Year Datsun 240-Z's, here in the States. How the car was sold and then titled, depended upon what month it finally reached the selling dealers, and how the laws of the State within which it was sold were structured. The Series I Datsun 240-Z's meet all the Federal Safety and Emissions standards in place for 1969, 1970 and into March of 1971. So they could legally be sold as any of the three Model Year vehicles. All that changed when the Federal Government's Federal Motor Vehicle Safety Standards and the Federal Emissions Standards set production dates that implemented the specific changes in the laws. So from about April of 1971 forward - only cars meeting the 1971 FMVSS and Emissions Standards could be sold as "1971 Model Year" vehicles, likewise only cars meeting the 72 Standards could be sold and titled as 1972 Model Years, 73 etc etc. FWIW, Carl B.
-
Hi mally002: Using a general term like "71 model" - the answer to your question as ask - would be: One or the other of the two emblems you ask about, might be correct on any specific car. In order to get a more useful answer to your question - we'd have to know more detailed information about the specific Z, or group of Z's, you are asking about. 1. What is the VIN. 2. What is the Date Of Manufacture displayed on the Data Tag on the Drivers Door Jam. Rear hatch lids can be changed, holes in the rear quarter panels can be either filled in and/or covered up with the 240-Z Script Emblems. Who knows what some previous owners have done to any particular example over the past 37 years. FWIW, Carl B.
-
Hi E: Pinch welt molding on the hatch seal???? Not on any 240Z I've seen. They are glued in place with weather strip adhesive.. You must have been thinking about the door seals??? FWIW, Carl B.
-
What are the serial numbers on the engines you have? Nissan begain using the 9mm rod bolts at L24-096181 and the engines would be found in cars built starting in 04 or 05 of 1972. Most likely both the engines you have would have had the 9mm rod bolts - but check the serial numbers anyway. Carl B.
-
Nate, the Integra seats do not touch the center console, nor the doors. Mount in the stock seat holes in the body. If you measure the distance from the seat cushion to the roof both the stock seats and the Integra seats are the same. "HOWEVER" when you set in the Integra seats, they do not compress as much as the stock seats, because the Integra seats are more firm to begin with. So it feels like you are sitting about 1/2" higher.. FWIW, Carl B.
-
Scroll down below the "box" where you type in your Post or Reply. Below the "Submit Reply" and "Preview Reply".... To the section titled "Additional Options" You will see a box titled "Attach Files"... hit the "Manage Attachments" hyper-link. Then simply select the pictures from your computer files. They should be .jpg format, and they have to be within the specified sizes..... that you will see listed in the Manage Attachment Box after you hit that hyper-link. Max Width 1281 and Max Height 1025.