Carl Beck
Free Member
-
Joined
-
Last visited
Everything posted by Carl Beck
-
Yes, but you do work such wonders with it.;-) Merry Christmas Alan Carl B.
-
Actually, while it is true that the vast majority of all first generation Z's are from Japan, a few stayed there and are thus in Japan. On the other hand, if by "all" the reference was to a GS30, now found outside Japan, then at least it is from Japan;-) Merry Christmas Everyone.... Carl B.
-
Yes - the N3700 is the new number... Just went and looked at the parts they sent (I always order a spare;-)
-
Hi Randy: The last time I purchased the parts from Courtesy - I don't recall them being very expensive. You can certainly use aftermarket parts.. I simply like the way the OEM parts are pre-cut and fit. The first sets lasted about 35 years - so I thought I'd stick with them. Felt-Glass Run Door 80335-E4102 Rubber-Glass Run Door 80336-E8700 (not to be confused with the Fuzzy Felt attached to the door panel, nor the rubber wiper attached to the chrome strip on the top of the door outside the glass window.) Just why Nissan used two different materials... I'm not sure. But perhaps it's because when the window is down, it's held in place at the rear of the window frame - and using rubber there provided a firmer hold - or perhaps the "felt" used wouldn't get as good a chance to dry out inside the door with the glass held against it. I do know that when that lower section of rubber starts to fall apart.. it can become very difficult to roll the window down. FWIW, Carl B.
-
Hi Randy There are two parts that go inside the window frame. The "rubber" goes inside the frame that is inside the door at the rear - the "felt" runs from the rear of the window frame above the door, up around the top and then down the front of the frame. Take the frame out - clean out the old "rubber and felt".. then replace both. If you don't you'll have to do it a short bit later anyway. FWIW, Carl B.
-
Hi Mike: Sorry you are having this problem... but it's just another learning opportunity now - how lucky can a guy be?.. .... and so we learn that we should always remove the Fill Plug FIRST.... only after that, should we ever remove the Drain Plug..... rear end or transmission... Absolute worst case (and I've been there a couple of times) - you have to remove the mustache bar and then remove the rear cover... So you'll need a new cover gasket most likely... Once you have the rear cover off - you can clamp it in a vise, then you can heat the area around the Fill Plug with Propane Torch (both inside and outside surfaces) ... and break the Fill Plug loose. Make sure you put a little anti-seize on both steel plugs before you reinstall them in the aluminum cover... good luck Carl B.
-
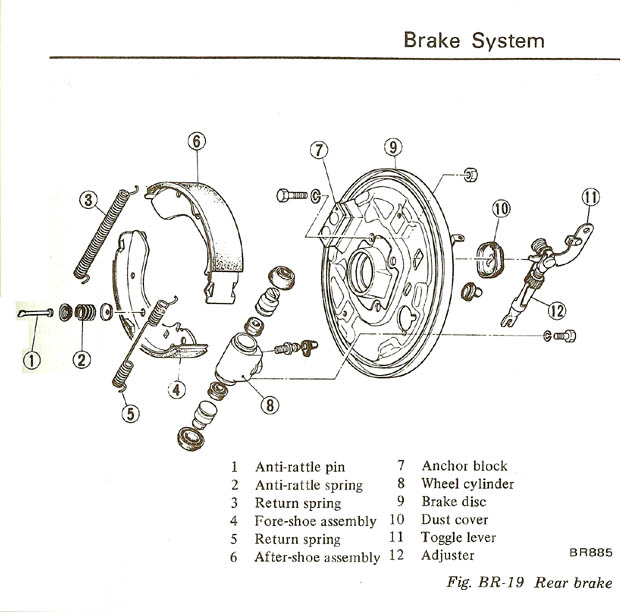
From the 77 Factory Service Manual FWIW, Carl B.
-
Ahmen Sad - but true. ... Just too funny... Carl B.
-
Camping Out In America: In 1971 I was stationed at Fairchild AFB outside Spokane, Washington. Originally, I had lived in Columbus, Ohio. So when it was time to take Leave... it was time to jump in the Z and head East to Ohio! Driving pretty much straight through - it was a 36 to 42 hour drive, depending on how much time was spent stopping to eat, get gas or to take a catnap. About 20 or 25 hours out - I found myself becoming overwhelmed by the need to sleep. I was at that point out in the middle of no-where and it was around 3:00 AM. The night was clear and sky filled with brilliant stars - and a moon that light the highway ahead. You could turn off your headlights and see for miles and miles down the freeway. I was either well into North Dakota, or just into Minnesota at the time, I'm not sure which..... So I started looking for the next freeway exit... and in that part of the Country freeway exits could be a hundred or more miles apart!! As I looked off to my Left I could see gently rolling farmland, most with bails of hay laying in the freshly cut fields. As I approached the next Exit.. I could see a road running off the highway crossing the freeway.. and back along the fields. So I thought this would be a good place to stop and take a short nap. I exited the freeway, and then turned back down that little county road.. a 1/2 mile or so later, I pulled the Z off on the road... Took the sleeping bag out of the car, jumped the wire fence and walked out into the field. There were about 10 bails of hay grouped together, waiting for later pick-up (you farm boys will know what I mean)... It was a warm late Summer night, so I just spread the sleeping bag out on top of a couple of bails... and laid down on top. Last thing I remember was how impressed I was with the night sky... I guess it took me about three seconds to fall asleep. As I awoke, noticing that the sun was in my face, I could hear a tractor running in the distance, and guys yelling at one another over the noise of the tractor... At that point I sat up, looked at my watch and it was about 10:00 AM !! I then realized that the ten or so bails of hay that had been there when I laid down - were now gone! Only the two bails I was laying on were left. Looking around, I realized that the all but the entire field was now cleared of hay bails!!!!!... The tractor and people that I had heard, were way down by the freeway exit now... Once I was fully awake.. I rolled up the sleeping bag and headed for the car. Jumped the fence, loaded up... broke out the thermos for some hot coffee... and headed back up the county road toward the freeway.. As I passed my "Hosts" - I blew the horn and waved - they looked up from the tractor and the now all but full hay trailer - and all waved back... It may have been in another time - and most certainly in a very special place in America... but the culture or values of the people in Montana, North Dakota, Minnesota, Wisconsin... is the bedrock upon which America was built. Courtesy and freely extended kindness to a complete stranger... all without a word exchanged... nor any expectation of recognition or reward... Good people just being Good People. FWIW, Carl B.
-
Hello TomoHawk (everyone): I realize that your original question had primarily to do with finding a way of sleeping in your Z. As someone else mentioned... to make that work, you would need to find a passenger seat that would not only fit in the first place, but fold forward at something close to the level of the rear deck area. Then you would have to craft a couple "hole fillers" perhaps from Styrofoam and then unroll perhaps a 1" thick foam pad over the top of all that. It could be done... Some of the mini-van passenger seats that fold forward might work.. As to the subject of Camping-Out while taking your Z on long road trips... In 1975 I was working at the local Datsun/BMW Dealer here in Clearwater. As a sales incentive the Dealership offered a Car-Top-Camper to whoever sold the most cars during the Summer. Our Parts Department sold them at the time. I won it. It fit on top of a Z.. and was actually pretty trick - although it was a bit thick and presented a pretty good additional drag on the car at speed. Today that could be solved with the addition of some "aero" device... It looked and worked pretty much like this one: <a href=http://www.autohomeus.com/products/overland.php TARGET=NEW> CarTop Camper</A> This at least gives you a place to sleep, off the ground, with a tent over your head - and it only took a minute to set up. It mounts on the Z's drip rails, and they are plenty strong to support the tent and two people. The older style had a canvas cover over the unit when it was folded down, I see they are using a PVC cover.. The only problem is - this one isn't too cheap... FWIW, Carl B.
-
Hi duffman: I have a 72 240Z with L28, Triple Webers, 78 5spd. and 4.11 Posi rear end. I put the 5spd. with the 4.11 in when running an L24.... and at the time I was mostly driving it around town, auto crossing on the weekends every once-in-awhile. When I added the L28, it had so much more torque, that the 4.11 was actually too low a gear - IMHO a good L28 could easily pull the 3.9 or even the 3.7 in the light weight 240-Z for performance purposes. I have another 72, that I've kept basically stock - I'm running an 83 5spd. with the stock 3.3 rear gear. I use it mostly for longer road trips to Z Car events and or other Car related events. For a road going Z, I don't think you can do much better. It gives you 70mph cruse with the lowest engine RPM and that relates to the best fuel economy, as well as the lowest noise cruise. I'm long past jackrabbit starts in town, so even though that tranny / rear-end combo relates to a fairly tall 1st gear - I find it easy to live with. I think you'd like the 81-83 non turbo 5spd with the 3.54..... for the use you ask about. FWIW, Carl B.
-
Hummm..... the Emergency Brake Cable..... changing it out... or replacing it after it's lost... Lost?.... wonder why the previous owner didn't replace it? It's simple as pie....once you figure out how to break the rusted, corroded, or gummed up with undercoating - length adjustment nut/stud loose. It's simple as pie... once you figure out how the clips and mounts work. Once you figure out that you have to strip the cable itself, back from the cable shield - to get the cable and shield in/out of the body mounts. Figuring it out is one thing - getting your hands up in the right position to do it is another. (note: nothing to that as long as you have the driveshaft and rear-end out of the car) It's simple as pie... to get the clips out of the mounts above the differential.... getting them back in, well that ain't fun... It's simple as pie .... if you have the car up on a lift. Getting it up on jack-stands, at the right height that you can lay on your back, and have room to get your arm and hands up around the differential, yet not to much room that you can't reach the cable in the mounts........ Well, I'll just say that I'll finish mine up the next time I have the car on a lift somewhere... It's simple as pie... If you remember, for the fourth or fifth time.... to put the e-brake cable back in place BEFORE you put the rear suspension and differential back in the car......da.... I hate to be cynical... but this is just one of my pet-peeves.... has more to do with me and my experiences than the actual design of the system... when it was put together with everything new... It's really simple... really it is.... no kidding... honestly... I agree with Will - get a copy of the Factory Service Manual... FWIW, Carl B.
-
Hi Al: Thanks for the feedback. I'm glad it worked out for you. It's always good when some of the men working at the Part Counter also happen to own or have owned 240-Z's.... Carl B.
-
Hi Mike: The problem with "blending" paint on the hood or fenders is - after several years, the new paint will no longer look like the old paint, because they have now both aged over different time frames. In which case, you will see the blend lines themselves start to show up.. - and when they are on the hood or front fenders, they always look nasty... I'd shoot for color matching.. and If I had too, I'd let the color be a tad off.. at least that way you'll have some body lines to hid any differences. If the color is way off - they need to try again simply to have an acceptable job by todays standards.. FWIW, Carl B.
-
Hi Terence: Why don't you tell us a little more about your Z ie Mileage, condition, Price... Also what "value" do you expect to insure it for? Past that - I don't know who you checked with at Hagety - but as far as I know, they don't have any set mileage limits. The agents will usually tell you that Classic, Collectible of Special Interest Automobiles are not usually driven over 3000 miles per year. The truth is most of them aren't drive an average of 1000 miles per year. If you want to take your Classic Z to work, to show your co-workers once in a while, or to take a cute secretary out to lunch - there is no hard and fast rule that says you can't. The hard and fast rule is that you can not use the car "as daily transportation" such as driving it back and forth to work every day or every other day. Nor can you use it to replace your daily transportation, when your driver is tied up in the shop etc. The intended use - is the issue. If you intend to drive the car to your place of employment to show it off - that's fine. If you intend to use the car a couple days per week to keep the mileage on you leased BMW... then that's not fine. You see - Special Line Automotive Insurance Carriers are limited by most State Laws... to selling coverage NOT already offered by Full Line Carriers... hence the ban on using the car for daily transportation needs.. Also don't confuse "Agreed Value" with "Stated Value" or "Actual Cash Value".... Don't just believe the guy selling you insurance either - READ your policy and if it doesn't clearly say "AGREED VALUE" as in "in case of a total loss the company will pay the Agreed Value".... and/or something like .. "the company will pay up to the Agreed Value to repair or replace your vehicle"... If the words Agreed Value are not in your Policy, or written on the declarations page.... you don't have an Agreed Value at all... If you are planning on driving the car to work a couple of times per week - stick with the regular insurance carriers.. and accept the fact that if your in an accident, the Claims Adjustor will want to total you Z for something around $1,500.00 to $2,500.00... The real benefit of Classic Car Insurance - is having an Agreed Value #1 - so no hassles if something happens to your baby... but also saving a thousand or so dollars per year on premium costs, while getting far better coverage. Personally, I've been with Hagerty for years and years - you couldn't get to change.. FWIW, Carl B.
-
HI Zack: Thanks for the update - do you know where the car was originally sold/titled? regards, Carl B.
-
Even when the tensioner hasn't popped out - it is not easy to get the chain back over the cam gear. Take a lot of force to stretch all the slack of of the metal links... Most mechanics wind up using a screwdriver to get a little extra leverage. Additionally, driving the wedge in to hold the tensioner in place, you wind up shortening up the available slack in the chain. Sometimes, backing off ever so slightly on the wedge - will give you that extra fraction of a mm.. to finally get the chain back in place. I wouldn't give up too soon... you may just need to use a little more force and take a little more time. good luck, Carl B.
-
Hi Dave: Looking back at everything I have - it would appear that 1. The Parts Catalogs show 08/73 as the "From" date for the rear anti-sway bar, and "Up-To" of 07/73 as the rear bar being "optional". 2. It looks like the Nissan rear anti-sway bar always ran around the front of the diff. You had to drill your own holes in the floor to install the mounts. 3. The rear anti-sway bar that runs around the rear of the diff. along with it's mounting brackets was offered by BRE in 1970. I couldn't find any pictures of the BSR bar... so far I don't know what Bob Sharp sold... So at this point it looks like the mounting hardware you have was a BRE product.. FWIW, Carl B.
-
Hardly a "JDM 240z"... It's a Datsun 240-Z with lots of mod.'s. Can't remember how much the last one brought... but looking at the paint on this one, it will most likely bring less than the Orange one did. FWIW Carl
-
Good point. Sometimes we forget just how rare the "HS" Z Cars are. Of the 240-Z's produced less than 6% were Right Hand Drive Models. With about 3% sold in Japan and some 2.8% exported. Of the something less than 10,000 HS30's produced in total - I wonder how many of them are still in existence? FWIW, Carl B.
-
Hi Zup (everyone) : I believe that the small body change was preformed by some previous owner. I note the two holes drilled in the panel on the orange car - most likely they were there to mount a front spoiler, and the lip of that panel was bent out, to clear wider wheels, wheels with the wrong off-set and/or tires. FWIW, Carl B.
-
Hi Will: That sounds like a third question, in a way. At least it's a subset of a detailed list of changes and when they were made (yes/no?). The Series I and Series II cars shared may individual parts, components and sub-systems. So the list your talking about would have to be only the parts that were unique to the Series I cars, which could also not be moved easily. As you point out, that would most likely be components of the uni-body itself. I think I remember the car you are talking about - and the same was true when we looked at S30-0002 wasn't it? The VIN stamp seemed to be the only part of the body that matched the early cars... We'd have to give that some serious investigation... because several things even on the Series I body changed during the calender year and then carried over to the Series II cars. There are several things on the first 1000 or so cars, that are unique to them... Nonetheless a list of "Verification Items" would be very useful. The first thing on that list would be to have all the original data plates, firewall stamping and original engine present and correctly matching. Tough question... if the "move" was from a Series I body to a Series II body. A little easier to answer if the "move" was from a Series I to a Series III or IV. FWIW, Carl
-
Hi deadflo (eveyone) According to Nissan's TSB TS70-42: The begining serial numbers for cars that got the improved rear finisher with the Access Holes are: Cars with Black Interiors HLS30 02830 HLS30 03327 (California models) Cars with Brown or Blue Interiors HLS30 03881 HLS30 04364 (California models) NISSAN USA, Sales and Marketing constantly sought feedback from their Authorized Dealers as to what the end Customers were happy with or not happy with. Thoes reports then went directly back to the Factory. In turn, many items were changed or improved during the calender year. The rear tail light finisher is one example.. Hub caps that flew off - were another Shocks that leaked before their expected life were another Front End wonder at high speed was another Front End Shakes were another Doors that wouldn't stay firmly in the open position Weak batteries for both cold and hot climates Where ever possible all these area's of dissatisfaction were addressed as soon as possible. Some, like the one above were addressed with Technical Service Bulletins - others were simply running production changes, that did not seem to require a TSB... and we may still be missing some of the TSB's.. This process continued though 70 and 71 in earnest, and by 72 most all areas mentioned by the existing customers were taken care of. That is one reason many people, myself included consider the 1972 DATSUN 240-Z's to be the best of breed. 73 would have been even better, had it not been for the Federal Requirements for Saftey and Emissions. FWIW, Carl
-
Hi Dave (everyone): I don't think you missed anything, but I'd say that what started out as one question - morphed into a different one. When I originally wrote the article about the Series I cars being sold and titled as 1969, 1970 and 1971 Model Year Cars.... thus leaving all of us wondering just which car someone had when they said they had a "71"... The attempt was to define the Series, with the fewest visual clues that could be used to make a "distinction" between them. It was NOT to document all details changes of all parts or components. Dave originally ask, "what is the TRUE definition of "Series I"" I believe that it is a completely different question to ask, "what are all the fine details that are found on the Series I cars and at what point in time do they appear?" Looking at the exchange between 240znz and I - it seems possible that the two questions and their associated answers are at least part of the reason we don't understand each others statements or questions, to one another. Confusing isn't it? So I would respectfully suggest that we treat the two questions as just that - two questions. Answer to Question #1 - ie. What Is The Definition of "Series I"? The definition of a Series I car would be: *Fresh Air vents in the rear hatch *240-Z Script on the rear quarter panels *Knob used to adjust seat back *140 psi Oil Pressure gauge & Speedo that starts at 20mph * Plastic Tool Covers behind seats * Lever release type seat belts * Steering wheel with pressed indents Then the definition a Series II car would be: *Fresh Air vents moved to the Quarter Panel *Circle Z replaces the 240-Z Script on Quarter Panel *Lever Controlled flip forward seats *Push button release on seat belts *Steering wheel with stamped out holes Then the definition of a Series III (1972 Model Year) car would be: *Dash with Cig. Lighter by hazard warning switch *Redesigned Center Console - with ashtray behind shift lever * Type B transmission - rear end moved rearward - and rear lower transverse link with "bowed out" area * 5" steel wheels standard Then the definition of the Series IV (1973 Model Year) car would be * 2.5 mph bumpers * Emissions control Flat Top Carb.'s * Lighted Center Dash Finisher * Windshield Wipers with "intermittent" position added In the above - I'd tried to leave out any items that were common to more than one Series. Also many items that would be hard to see, without getting in the car or under the hood. Remember the goal is to be able to "distinguish" between the Series by looking at them .. not to document every detail. While the use of Series identifications is needed here in North America to clear up any confusion caused by Nissan and their Authorized Dealers sales and titling procedures - it may not be needed outside the US. Nonetheless, while it may not be necessary to use Series designations outside the US, it does not mean that they can not be applied to 240-Z's out side of North America. (if the definitions above are correct). So the question to our guests from outside the US is - looking at the definitions above - do your 240-Z's for 1970, 1971, 1972 and 1973 agree with all the basic elements of each Series? - - - - -- - - - - - Detail Changes - -- a long time goal- -- To Pin Down 100's of detailed changes, that took place over the calender years - we would need confirmation of parts on pure stock, pure original cars and/or technical documentation from Nissan. I'd venture to say that something close to 99.5% of our now 33+ year old cars - have had more than one previous owner, and almost none that haven't had parts changed or replaced. (I say almost none because I do know of a couple cars that are almost - as they left the show-room floor - and only one 78 that is exactly as it left the showroom floor). Past the above type cars, we'd have to have at least five or ten cars, with the same build dates, that had the same identical original part... This would be a very major undertaking, not to mention the verification effort needed. The Concours Z effort is an attempt to document the fine details of only the Series I cars, and that effort is still a major task with a very long way to go... At any rate, as everyone said - it's been interesting FWIW, Carl B.
-
Hi datsun40146 (everyone): First let me say that I applaud your efforts. I like the idea of having the results of a day's work in a wind tunnel. My problem is I don't know "why" I like that idea! I have read the thread on HybridZ... and Personally, I have no idea what specific tests can be conducted in a wind tunnel, nor how the effects of air flow over, under, around the car are actually measured. (what instruments?, how is the car connected to them?). Because of that lack of knowledge, I have no real idea of exactly what data or information will be reported. For example - aside from viewing the air flow over , around or under the body, and then guessing at their effect - what test instruments are attached to the car in the wind tunnel, that actually measure down force, lift, or drag? What instruments are in the wind tunnel that actually measure air speed at various points along the car - or are there any? In the Car & Driver road test done years ago - they hooked up test equipment that measured changes in the ride height of the car as it was running on the road, and thus computed pounds of lift or down force at the wheels. Is that type of equipment used in the wind tunnel? Isn't the coefficient of drag simply calculated based on the profile of the frontal area of a car? It's not actually derived from measurements taken in a wind tunnel is it? Are Down Force and Lift actually measured? Aside from viewing laminar flow and turbulence, then identifying areas of high or low pressure based on observation - maybe a little more detail about exactly what information or data would result from a wind tunnel set up would be helpful. That is to say, what is actually measured there and how is it measured - as opposed to being calculated. Maybe some real details would help raise the contribution levels.. It is not so much a matter of what works and what doesn't - as it is a matter of knowing that something works well enough for either your intended purpose, or well enough to justify the expense of adding it. I thing VaGus510 ask a good question related to the cost benefit of a wind tunnel vs. a CFD model as well. FWIW, Carl B.