Carl Beck
Free Member
-
Joined
-
Last visited
Everything posted by Carl Beck
-
Jeff - add about 1 inch to your measurements - to get to the bottom of the rocker panel - as I recall the pinch weld is about 1 inch lower than the bottom of the rocker panel.. TomoHawk is measuring to the bottom of the rocker panel.... FWIW, Carl B.
-
Hi Ed (everyone): We had this discussion some time ago, in another thread. I recorded the information everyone reported then, and I'm trying to add any additional data I can from this thread. "Ride Height" as reported by Nissan for our US Spec. 240-Z's was measured from the front part of the frame rails, just behind the point at which they meet the floorboards. In stock form that is the lowest point to the ground and that is supposed to be 6.34 inches (161mm). However - given that point can be and in all to many cases is - damaged or bent up... we were using the more consistent measurement points from the bottom of the rocker panel to the ground at the front and rear jacking points. (bottom of the ROCKER - NOT the bottom of the pinch weld under it. The pinch weld sticks down about an inch farther). STOCK at those points on the bottom of the rocker panel - is 8 1/2" front and rear for the 240-Z. I believe that the 73 and forward to 78 Z's sat about 1/4 inch higher to meet the 73-78 bumper height standards for the US. (still trying to verify that....) Where it was reported, I also noted everyone's wheel/tire combinations... From the reported data - it would seem that the newer High Pressure Gas Shocks rise the ride height between 1/2 and 1 inch. A 1 1/2 inch lift has been reported.... So... back to Ed's original question.... Ed.. if you actually measured the distance from the frame rails, just behind the point at which they meed the floorboards to the ground - and that is 5 1/4 inch, it would seem that your car is sitting about 1 inch lower than stock. (if your running close to stock tire/wheel sizes). Most of the earlier "performance springs" for the 240-Z claimed that they lowered the car between 3/4 and 1 inch.... so that sounds normal. HOWEVER - you said "jack points on the framerails"...... There are no jack points on the frame rails, but there are places where jack stands can be safely placed. On the front frame rail that would be just under the point at which the compression rod meets the frame rail... and that point would be a couple inches higher.... so I hope you didn't mean that... There is no way I know of - to determine who make/sold your springs. At best some people might guess based on their "blue" coatings.... On top of that, even if you knew who made them, it is unlikely that you would be able to find out what the original spring rate was.... as many re-sellers didn't provide that specific data about the springs to begin with. FWIW, Carl
-
Hi Guys: It's truly a sad day for the world. I'm sure that I was just 1 of his 400,000,000 fan's here in the US. As one of the "men on the street" said in a news interview from Australia "he died doing what he loved"... but that we could all be so lucky... I feel like I lost a personal friend.... Crikey.... Heart felt sympathy to his wife and children... Carl B.
-
Hi Jay (everyone): GT SEATING vs. RACE/Competition CAR SEATING: Important to consider what your primary use or intention is for your seats. As Jay, the duffman and I found - with aging bodies ourselves... we wanted a Grand Touring style seat, that provided more leg, hip and back support on longer trips - without being as restrictive as Racing/Competition Seats are intended to be. For competition you may need a Racing Seat for a 4 or 5 point harness. For a GT seat, you may prefer an adjustable/removable head restraint... easier to gain access to items in the rear deck, better sound from rear mounted speakers etc. etc. For a competition seat you will find that the high back, built in head restraints are more common and stronger... Most speciality seat manufacturers (Recaro etc) make several different seats.. narrow to extra wide, Touring to Competition designs... Best if you can actually set in the seat before you buy. FWIW, Carl
-
The last thing you should see in the article is - "That's About It For Now"... So - when you have the metal braces in place on the seats, and the original seat tracks bolted to the braces (as in the last picture) - you're done. Except for bolting them back in the car of course... they are the stock seat brackets and bolt back to the stock position... I have not yet recovered them, nor added the memory foam... as they have been fine just the way they are... and just too many other projects got in the way. regards, Carl
-
Hi Jay: So far here's the best I've found. <a href=http://zhome.com/ZCMnL/AcuraSeats/AcuraBeck.htm TARGET=NEW> 96-98 Accura Seats </a> I've now put thousands of miles on the car with these and I've been very happy with them. FWIW, Carl B. Carl Beck Clearwater, FL USA http://ZHome.com
-
See: <a href=http://zhome.com/ZCMnL/tech/GearRatios.html TARGET=NEW>the Z Car Home Page</a> If you can't find a rear end locally call Idaho Z, they are not too far away, in Napa,Idaho..(208) 466-0004. Tell em Carl Beck said to say hello... FWIW, Carl B. Carl Beck Clearwater, FL USA http://ZHome.com
-
Odd.. usually if it's only one side - its the Left Side of the hatch area that is damaged first. Look at this: <a href=http://zhome.com/Classic/CommonZRust/RustPrevention240Z.htm TARGET=NEW> Common Rust Area's Of The 240-Z <a> Pin holes on the outside mean big rust on the inside of the dog legs. You may want to order the Patch Panels for the Dog Legs and replace them while you are at it. FWIW, Carl B.
-
Hi Adam: Given that you said you are using it against a painted surface, using a flange bolt with a lock washer should be no problem. It might be a problem if establishing a specific and/or critical torque on the bolt is necessary for it to do its job. If it's a body bolt or one with a relatively low torque spec. (say something below 25 lb/ft) I don't see any problem. FWIW, Carl B.
-
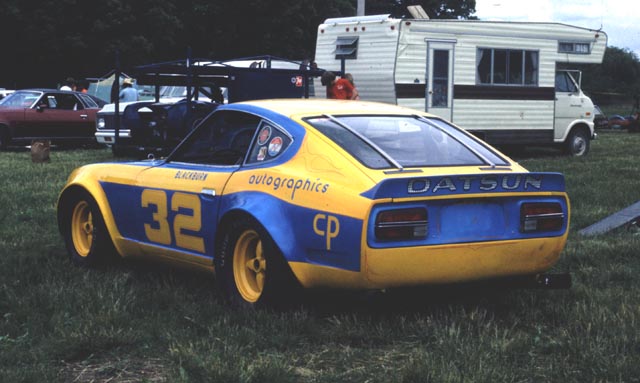
Hi Geoff: It is believed that Logan's yellow Z racer, which was Red, White and Blue in prior years.. and before that it was the BRE #3 Z. It is still being raced in Vintage events, having been restored to it's original BRE #3 colors etc. I say "it is believed" because many people believe it. Dan Parkinson doesn't however, as he is convinced that he wrecked the #3 BRE Z years after he bought it from BRE in 73. Others believe that Dan actually bought the #46 car and wrecked that one.... At any rate here's a picture of Logan's car in the late 70's... (thanks to Clark Lance of New Jersey for sending them to me). FWIW, Carl B. Carl Beck Clearwater, FL USA http://ZHome.com

-
Hi Tom: If the engine was left in the car and car stored inside - I wouldn't give up on it too soon. Especially if it ran well and didn't burn any oil before it was parked. I'd sure try to save it if possible, it's hard to get a better engine than the one the factory put together in the first place. You might want to read/follow this thread.. See Post #8 and forward.. at: <a href=http://www.classiczcars.com/forums/showthread.php?t=22619 TARGET=NEW> "Waking the sleeping beast"</a> good luck, Carl B. Carl Beck Clearwater, FL USA http://ZHome.com
-
Hi Marty: I've used SEM products for years. If you wipe the vinyl down with lacquer thinner - then apply a VERY LIGHT COAT of SEM Vinyl Dye, allow it to dry for 24 Hours, then buff with a soft cloth... it will wear will and well and not come off on your cloths. The lacquer thinner will soften the vinyl so the dye will soak in/or adhere. That said - I would not want to use it on the new seat covers unless the stained area is significant and there is no other way to clean it up...35 year old vinyl is not the best thing to attempt dying and the SEM might be a shade off the original.... in which case you'd wind up dying the entire surface of both seats... I'd try using a clean terry cloth rag, with some lacquer thinner to see if you can get the stain to lift off the vinyl. Make the terry cloth fairly wet with lacquer thinner ... hold it still on the stain for about 20 seconds.. then wipe gently, turning the rag to keep a clean surface in contact with the seat vinyl - and see if you can work the stain out.. (then wipe it dry). FWIW, Carl B. Carl Beck Clearwater, FL USA http://ZHome.com
-
In your frame of reference - what would be an "affordable" price range for a daily driver that you could depend upon? FWIW. Carl B.
-
Hi Guys: I may have introduced some confusion when I said "right to left"... I really should have said A, B, of C Left To Right.... da.... Anyway Bill - I'll note your vote for the one on the Left.. Z-137... when you said "A" did you mean the one on the far left as well? - or did you really follow my original Post and label the one on the far right as "A"?. Ah the 70's.... ashtrays and lighters in all cars..."your free to smoke'em of you got em"... later, Carl B.
-
Hi Steve: At 70 mph+ the Z builds quite a low pressure area over the hood, and at the same time it builds quite a high pressure area under the hood.. the result is that the hood emblem is literally sucked up off the hood surface, then the wind gets under it and lifts it higher still until it flies off.....the good news is that as it flies off the car, the high speed air flow picks it up quickly - so it never hits the windshield nor roof. Metal or plastic - their minor difference in weight doesn't really seem to be a factor. Although I do believe that the clips (no matter which you use) do seem to hold better to the metal studs.. You can use either 3M Emblem Adhesive, or any good Silicone Adhesive... just make sure it's not a silicone calk, sealant/adhesive. (some silicone products are marketed as multiple use..but their adhesive strength is far less than the single purpose silicone adhesives. The 3M Emblem Adhesive is what GM and Ford usually use... it's somewhat like their weatherstrip adhesive, in that it stays somewhat pliable (a type of RTV perhaps?) .. and you can pull the emblems off if necessary - then remove the adhesive with a little dab of lacquer thinner. I apply it to both posts, then run a very thin bead around the inside of the groove around the outer edge (see arrow in the picture below). That way it seals the outer edges of the emblem to the surface of the hood and prevents the airflow from getting under the emblem. Once you push the emblem in place, if a little adhesive oozes out - you can clean it up with a Q-tip and some lacquer thinner. In the picture below - the emblem on the Left is metal, the one on the Right is plastic and Nissan fasteners are below. While the Parts Catalogs show "Clip-Tublar".... the bag of them that I have on hand show "CLIP-PUSHING".... same part number nonetheless. These clips don't seem to be a problem when used on the emblems on the rear quarters.. I don't use them on the rear deck lid either.. mostly because they rust there as well as on the hood. FWIW, Carl B.
-
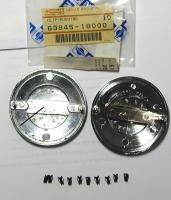
Hi Steve: Part Number 63845-18000 Clip-Tublar up to 07/73 All the hood emblems I've seen have been held on with small tubular clips - I haven't ran across the factory use of speed nuts on the hood emblems. Although I wouldn't think it would be a bad idea as long as you can get to them in order to get them off again if necessary. That said - I wouldn't recommend the use of the original tubular clips, which push into the holes from the outside of the body, and which are steel.. because the holes wear larger than original, the clips rust and the hood emblem can blow off at higher speeds. (lost two before I figured out what was happening). I now mount my hood emblems with 3M Emblem Adhesive on the mounting studs and on the back of the emblem itself. Haven't lost a hood emblem, nor had a rust problem since. FWIW Carl B. Carl Beck Clearwater, FL USA http://ZHome.com
-
Hi Mark: Good to see you here, and I'm sure you will have a lot to contribute. Aren't you glad you didn't sell that car in 2000? kind regards, Carl Carl Beck Clearwater, FL USA http://ZHome.com
-
And is there any rust on this 73? thanks, Carl B.
-
Hi Chris: Well that's encouraging news... If the car is solid - it's well worth the $8K number today. I'm amazed that cardogman1 didn't tell him it was worth $15K... I honestly expected a bottom price something closer to $10K.. $8K might be a little higher than one would want to go - for the basis of a complete and correct restoration - but personally I'd spend the extra few thousand to have a nice car to start with... it sure makes the process of restoration a lot more pleasant over the following couple of years.. thanks for the feedback... regards, Carl B.
-
If you let us know what budget you have in mind - it could greatly alter our advice. Are you thinking $5K or $25K? A 240-Z that is actually in beautiful conditoin and really road ready.. will run in the $9,500.00 to $14,500 range... Buy selectively and carefully in the $6K to $9K range today and you can realistically expect to have to put another $3K to $5K into the car... The bottom line is the more you can fund up front the less expensive in total cost the 240-Z will be. FWIW, Carl B. Clearwater, FL USA http://ZHome.com
-
This is one of those 240-Z's that is really a "between" car. It isn't really low enough mileage to be close to the "Collector" market and it's overall condition shows that. On the other hand it really isn't the ideal car to start a full restoration on because it's actually too nice and therefore the selling price (if it sells) will be placed too high by the seller. So what or who will actually buy this car? Well if it checks out to be truly rust free as far as the floorboards and frame rails go... it "might sell" to someone looking for a car they can drive now, and fix up as they go along.... The problem there is that buyers with that approach in mind... really don't expect to pay $10K+ for a nice driver... The error in thinking (if you can call it that)... that this seller and most likely prospective buyers will make - is to place too much importance on the stated mileage. It very well may be 32K actual miles.. but in this case it is only One thing to consider... and really not the most important thing. While 32K miles is certainly "low mileage" - the car is still 36 years old.. and not having been driven daily/weekly/monthly by the owner - it has most likely been badly neglected as far as keeping it fully "road ready"... 32K mile or 132K miles... the new owner will still need shocks, brake lines, fuel lines and vapor lines, coolant lines/hoses, new weather stripping on the rear deck, new battery, etc. etc etc. The seats will still need to be rebuilt to proved any amount of support. The engine compartment will still need a lot of elbow grease and detailing... The car will need a new hood as that one on it now is bent on the nose.. the new paint on the new hood will never match the rest of the car... The front bumper is dented as well. To buy this car and end up with a 240-Z that is really road ready and very presentable... the future buyer will wind up putting another $5K to $7K into it.... The bottom line is - 32K original miles in this case doesn't relate to added value... it actually detracts from the value of the car. A couple of friends have 71 Z's with right at 100K original miles - and both cars are in far better condition than the one on e-bay. Both cars were driven by their previous owner quite often, and both were maintained in proper "road ready" condition... For $10K I'd take either of their cars with 100K miles over this one with 32K miles.. Just my thoughts... FWIW, Carl B.
-
Hi Guys: Wait a minute... what is that behind the seat in the photo of the drivers seat... looks like a tool storage cover to me - yet the data plate shows 2/71 and VIN of 23175? It seems to have the right Series II rear quarters.. with the vents... Would be interesting to see what type of seat belts it has in it.. I can't see - but are those the "flip forward" seats? Got to be worth $1700.00 shipped to your house at any rate.. FWIW, Carl B.
-
Hi Arne: Thank you so much.... that is very good feedback. I'll forward your results to all the members in the original group purchase, as well as to the guys at Courtesy. Your observations related to the front strut's installed height is most interesting - and it rings a far away and somewhat faint bell.... Somewhere, at some time, I believe I read that the Euro Spec. 240-Z's had front struts with their bottom spring perch set at a different height than the US Spec. cars... The bottom line then is - your car is sitting about 1/4 inch higher than the US Spec.'s show... and it's actually about 1/2 to 3/4 inch higher in front than expected.... Sounds like you could take about 2 coils off the top in front.. and maybe 1 to 1 1/2 coils in the rear????? regards. Carl B.
-
It was actually pretty easy for the previous owner. He had HLS30 00157 in May of 1970. Drove that about 32K miles before he took it completely apart to "put a decent pain job on it"... After #157 was properly restored, he bought a Wine colored 78 280Z to drive (because it had A/C )... then saw the first Black Pearl.. Bought it just to have another "new" Z when he wanted one... as he had heard the body style was going to change in 79... So he just added the Black Pearl to his Collection (a rather extensive collection of many many thing)... He never did wear out that Wine colored 280Z... today it has about 80K miles on it (and still looks new).. His 48 Chevy has almost 28K miles on it, and his 65 Mustang is approaching 10K miles.. When you have 20+ cars and 45+ Harley's... it really is hard to drive them all more than a few miles per year! He still has his fathers 32 Ford Pick-up.. that thing is really getting up there now.. it has almost 40K miles on it.. Now approaching 80 years of age.. he's starting to place a few of the cars and other objects he's loved so much for so many years - in the hands of people he believes have both the resources, and the will, to preserve them for yet the next generation of fanatic Collectors. In general that is exactly how cars like that survive the decades... to delight us at shows and museums around the country. FWIW, Carl B.
-
Sorry - I guess I didn't refresh my screen... took me a few minutes to find the engine photo, resize it and up load it ... and I didn't see your last Post.. Nonetheless.. it's a great picture of Pure Stock and 100% Original... regards, Carl B.