Carl Beck
Free Member
-
Joined
-
Last visited
Everything posted by Carl Beck
-
As I recall the OEM Brake M/C was TOKICO on the 240-Z's and NABCO was OEM on the 280ZX's. Checking the Parts Catalogs that seems to be the case as well. FWIW, Carl B.
-
Yes - 70/71 (Series I and II up to Aug. 71 Tokico) had the larger reservoir for the front brakes in front, while the 72/73's (Tokico - from Sept. 71 forward) have the larger reservoir in the rear. The 70/71's had the bleeder valves on the inside toward the engine, while the 72/73's had them on the outside under the fender. Huge difference in price between the two also (at least the last time I bought them). Hummmm.... the distance between the brake line fittings is closer on the 70/71... and they are wider apart on the 72/73.... If you tried to interchange them, I don't believe that the brake tubing would line up properly... so you'd know something was wrong.... as you tried to force them into a new location... ( as I recall, I made that mistake once...).... FWIW, Carl B.
-
Ok - sometimes, it's a matter of getting the brake line (the tubing) headed perfectly straight and even into the fitting.. so that the flair nut will also allow itself to be screwed in perfectly straight. A very slight misalignment of the tubing into the fitting... and the flair nut will seem to start - then when the bottom of the nut hits the tubing in the fitting - it stops... nothing will go in - nor come out right... at that point. Sometimes you just have to get the tubing oriented correctly and seated in the fitting .. and sometimes that takes several tries. The trick is to not get frustrated and not to force anything... If you have one fitting that screws in correctly and feels good while your doing it.... you have at least one example of how it should work.. Try working the tubing a little - as you screw in the flair nut.. it it doesn't go.. back out and try working the tubing a little more to improve it's alignment with the hole... etc etc. Sorry I can't think of a better way to describe the process.. nor the problems you run into.. Sometimes it's better to just stop - take a break... and come back fresh later.. FWIW, Carl B.
-
Yes - that is why I ask if it was an OEM Nissan Replacement Part Agreed - that is why I said "tapered fittings",... it was the only way to describe how the flair nut would feel as it was initially screwed into place. FWIW, Carl B.
-
Ok - so once you bled the MC.... did you then proceed to bleed the brakes again? To assure that you have now cleared any air from the lines... Carl B.
-
Hi Steve: The were originally smaller versions of the plastic rivets as used in the interior panels. I believe you can still order them from your Nissan Dealer's Parts Dept. FWIW, Carl B.
-
Hummm.... that's one of those questions that without being there to personally put your hands on it - and feel it.... it's really hard to say. The brake line fittings are tapered fittings - so they are going to screw in only a short distance easily by hand... but you should feel that they are screwing in straight and when you put a line wrench on the flair nuts, they should be very easy to turn with the wrench until the begin to tighten down... Is this a Nissan OEM Part?... and are you sure it's the right one? FWIW, Carl B.
-
Hi Arnie: Every original spare wheel I've seen in a 240-Z has been painted black on the outside face. FWIW Carl B.
-
They look very much like the original Racing Mirror Sets sold via the Datsun Dealers Parts Dept.... They came as either a set of Mirrors - or they were included in the Datsun Rear Window Shade Kits. They were metal, but they were actually pretty cheap as well. While they do look good on the first generation Z's... they really don't have enough angle adjustment to make them really useful, while at the same time being positioned for looks. See: <a href=http://zhome.com/History/240ZRacingMirrors.htm TARGET=NEW> Datsun Racing Mirror Set</a> You can find them on E-Bay every once in a while... FWIW Carl B.
-
Hi Datfreak: I like to think of the vacuum advance as a "load compensation advance" (as in the How To Modify book) - - that is employed at lower RPM's to advance the timing as more fuel is feed to the engine. when a demand or load is placed on it (you start to press on the gas pedal)... As the engine comes up to speed, the mechanical advance takes over to advance the timing as the vacuum advance backs off (it backs off because you aren't holding the throttle wide open once the desired speed is reached.) What you really have to be concerned with is not only "Advance" that can be dialed in by the distributor and Total Advance numbers (distributor plus initial advance at crank) but the "Timing Curve" - that determines at what RPM the advance is brought in. Swapping distributors from one model car to another, can result in a real performance loss - if the timing curve isn't the one needed by the car/engine receiving the distributor. (and in most cases the timing curves from the factory are intended to meet emissions standards, not to provide the best performance). So you need to put the replacement distributor in the hands of a capable automotive ignition shop - who will put it on a Distributor Machine - to measure/record the entire timing curve in the distributor... ie how much advance takes place at each incremental increase in engine RPM. Then make adjustments to it - to dial in the timing curve you need for your engine. While 36 to 38 degrees of total advance have been mentioned and the L series engines can stand them - every dyno tuned result I've seen so far would suggest that anything over 34/35 degrees of total advance results in a loss of power in the upper RPM range. Initial timing is set at the crank, by twisting the distributor. Most street L series engines do well at about 12 to 14 degrees initial or static advance (BTDC) at 650/750 RPM (no vacuum advance hooked up). In terms of total advance (initial plus mechanical advance in the distributor) then - you want to have the distributor mechanical advance start to come in around 1000/1200 RPM and advance 10 to 11 distributor degrees total by 2500/3000 RPM. (10 to 11 degrees in the distributor is equal to 20 to 22 degrees at the engine) So 14 degrees initial + 20 degrees from the distributor mechanical advance = 34 degrees of total advance. A good automotive ignition shop will have various spring strengths and weights to use to dial in the timing curve on your distributor. They will also have the equipment necessary to measure the changes they are making...until they find the right combination of springs and weights. Don't take any of the numbers used for discussion here - to be in any way absolute... just a starting point. You'll have to try them - and depending on the throttle response and ping/knock etc - you may have to adjust the timing curves for your engine accordingly. On top of all that - we get back to the vacuum advance. Because it too works against a spring tension - it is possible to adjust the amount of advance it adds at different vacuum levels - by adjusting the strength of the spring. But here again, work with a good automotive ignition shop... FWIW, Carl B.
-
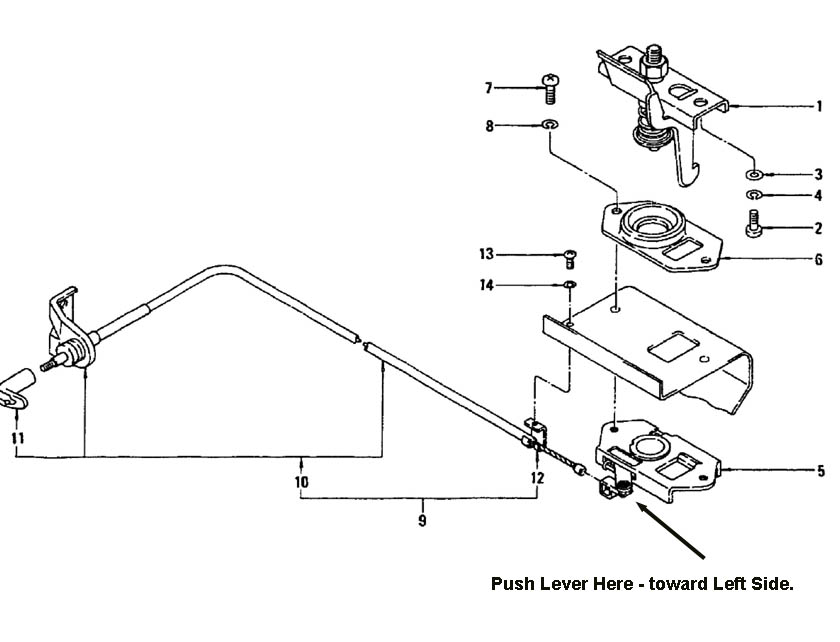
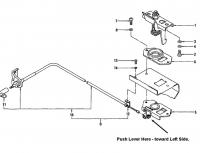
It is also very helpful - if someone can stand up above and alternatively press down on the hood - and release - as you push the lever with the screwdriver blade - then they can grab the hood and pull up as it releases... Sometimes if you are by yourself - the hood still won't pop open like it should - even if you have moved the release lever far enough... glad the diagram was helpful... Carl B.
-
None that I have ever found - but I have thought several times about producing them... FWIW, Carl B.
-
Mr. K personally signed all 2300 prints... There was a lot of joking about him being held captive at Mad Mikes house, until he had signed all of them before coming to Denver for the Convention that year... Mad Mike worked for the Printing Company that printed them, as well as printing the "Mr. K" book that was translated into English, and had many additions added by Mike - from it's original Japanese printing. FWIW, Carl B.
-
Hi Mike: If you can get to the bolts - why not just put a screwdriver into the bottom of the latch - and push the lever to open/release? I've never had to remove bolts - to open a hood with a broken hood release cable. Is something else jammed? FWIW, Carl B.
-
Hi Will / everyone: I have A/P #3 of 300 - These are the "Artists Proof's" I have #2 of 2000 - as well as several others...(#260 my IZCC Membership Number, #42 for HLS30 00042,.. etc). While these were made via an Offset Printing Process... they were cleverly marketed like they were lithographs (or serigraphs). When a lithograph is made from an original piece of Art... the Artists actually redraws the artwork by hand on one or more silk screens.... this may involve three or more silk screens before all the colors are put down. Because the silk screens do wear out - the first prints made are always the best quality... Artists Proof's are usually limited to 10 or 15 at most... With high quality offset printing - they could have ran 10,000 of them and the actual quality would have been the same for all of them.. The images are simply pictures of the original artwork. Yea Gad... I'd love to see these selling at $400.00 - I've given a few away to friends over the years. As I recall - they sold them at the 1996 Convention for around $50.00 for the Prints and $75.00 for the more limited A/P's. It was a way of raising money for the Convention expenses. Might be worth $150.00 by now... FWIW, Carl B. Carl Beck Clearwater, FL USA http://ZHome.com
-
Hi Enrique: Yes, the Series I, Series II and very early Series III cars had the rubberized fabric bands for support of the thick foam rubber seat cushion...Sometime in Jan. of 72 the cars started coming with the spring supports in the seat bottoms. That was necessary, so that the deflection of the seat bottom could be sensed - for the Seat Belt warning system to work. You can tell the early Series III cars from the later one's simply by looking at the center console (if it's original)... the early cars didn't have Red Seat Belt Warning Lights on the cover over the fuse box. "71" - - "72"? I thought we were talking about Series I and II differences... Series I 10/69 into 01/71 Series II 01/71 into 09/71 Series III 09/71 into 08/72 Series IV 08/72 into 08/73 Other than the seats... if you really did mean Series I - with the round seat angle adjusting knob..It sounds like #43274 had the items that a Series II car should have. The Series I and II dash and center console were the same. The indent for the hazard switch label started with the Series III cars..and the center console was redesigned at that point partly because of the new Type "B" transmission. Carl B.
-
Little question that during the few weeks that Series were changing, there are some overlap of parts or body configurations. But that is about the only time we see that happening. 01/71 and 09/71 Could that be because they are both Series I examples? The Series I 240-Z's were sold and titled as both "70" and "71" Model Years here in the States. Quite possible if it was built in 01/71...Several 01/71 Series II cars did show up with the Series I steering wheels. The headlight bucket - NO - they didn't start production until the Series IV 1973 Model Year... when they had to meet the 2.5mph bumper impact standards. FWIW, Carl B.
-
So someone swaped the seats out..? What differences do you see in the Series I and Series II dash and center console? Carl B.
-
Hi Nate: According to Nissan - the Series III, 1972 Model Year Datsun 240-Z's in Left Hand Drive started at HLS30-46000, with build dates of 09/71. However HLS30-43496 is the lowest VIN we have found that has most of the changes for 72, and which was sold as a 72 Model. We have no cars with VIN's in the 44000 nor 45000 ranges recorded at present... and lowest VIN after 46000 we have found is 46354. FWIW, Carl B. Carl Beck Clearwater, FL USA http://ZHome.com
-
Hi Nigel: Try Courtesy Nissan. They are in Richardson, Texas and have supported the Z Car Community on the Internet here in the US for many years. Some of the guys in their Parts Department actually own 240-Zs. I believe that they will ship to known buyers in the UK. You can check their Web Site at: <a href=http://www.courtesyparts.com TARGET=NEW> Courtesy Nissan Parts</a> And/Or e-mail David House - david AT courtesyparts dot com David is a 240-Z guy and handles most of my orders... good luck, Carl B Carl Beck Clearwater, FL USA http://ZHome.com
-
Hi Nathan: Your "Front End Loader"...comment made me laugh out loud. Max, my dog goes everywhere with me in the truck... So when it's time to go to the Cypress Saw Mill for mulch... Max goes with me. As this huge Front End Loader scoops up 3 cubic yards of mulch, and starts to approach the truck - Max is transfixed, I can see him thinking "what the hell is THAT".... I thought he was going to jump out of the truck when the Front End Loader dumped that mulch in the bed!! I was laughing out loud, as he looked at me with one of those "did you see that?".. looks that only dogs can get... Took three trips to fill the area around the back of the garage initially, then about one trip per year to refresh it. Good thing it's only about three miles from the house.. as three yards fills that 8' bed to above the cab roof. 5 gallon buckets... just put 5 of them filled with paint, 5 filled with primer, 5 filled with roof paint and 1 filled with trim paint in the truck for my latest project - repainting the house. Then picked up a high pressure washer and airless paint system.... Can't fit that in the Yukon XL either. Just too funny... regards, Carl B.

-
Sure - you can count a good neighbor that will loan you his truck as well. (my truck is a family truck when my son needs it .. and a neighborhood truck every once-in-awhile).. Carl B.
-
Depending on the actual, very specific, Judged by a Qualified Judge... condition of the car today... In the Classic, Collectible and Special Interest Car Market - there are a couple of demarcation lines that are important to keep in mind, as we consider the relative market values... now and in the future. If we use the usual Condition #1, #2, #3, #4 and #5 categories for example... you will find that the values of these cars First - and IN GENERAL... Condition #1 and #2 Cars are very very close in over-all condition. They would both win National Level Car Show Competitions in their Stock Class. A #2 car will win, so long as a #1 Car didn't show up and so long as the Judges really know how to judge the specific models. In the Collector Market - the #1 and #2 Condition cars demand/hold values 50% to 80% more than a #3 Condition Car. So if a #1 or #2 Datsun 240-Z is selling for between $25K and $30K today... a #3 Car will sell for between $16.5K and $20K. Over time from this point forward ... as the #1 and #2 condition cars grow steadily in value at between 10% and 15% per year.. the #3 cars will simply hold their value if they are maintained in #3 Condition. So several years from now a #1 or #2 240-Z might very well be in the $35K to $40K range... that #3 car will still be $16K... and maybe by then it will become a #4 Condition car... So we have at this point in time - a demarcation point .... between the #1, #2 Cars and the #3 or lower cars. The reason is that #3 Cars are driven.. everything on them gets older and more worn. They are kept in the garage (non A/C and non Humitity Controlled space). Restoring them in the future will cost far more than it does today - as all parts and services go up in price. Over the next five to ten years you will most likely see the difference between the #1, #2 cars and the #3 cars grow ever wider. Past the ten year mark, as true #3 cars become ever more rare... "IF" the Concours Examples are fetching $50K +... then you'll see the values of the #3 cars start to close the gap again.... The bottom line is - if you have a real #3 Condition 240-Z today - it would win most local or even perhaps a few State Level Z Car Shows... and may take 1st in the "Import" category at many open car shows... If you drive it and enjoy showing it every once in a while... Keep it and Enjoy it... but know that it will cost you something to own.... if you maintain it in great shape it should hold it's value... but it won't keep up with the real Collector Quality examples. #4, #5 quality cars will stay about the same in value for many, many years... "IF" they stay in the same condition they are in today - but that usually is not the case... usually they wear with more age and it shows... FWIW, Carl B
-
Hi Mike: First - Don't get near the car with a starting battery.... until you have everything ready to actually start the car. Can't tell you how many people damage a perfectly good engine, simply because they get in a hurry - and want to see if it will crank over, let alone start. You don't want to wipe out a good cam, or scuff the rings/cylinders by forcing crud, that's built up from sitting for prolonged periods past the rings or running dry cam lobes over their rockers... So lets hope no one had dinked with the car... before you got it... Did you get the hood open yet?... Prior To Start-up: 1. As mentioned, I'd drain the gas tank and see what comes out. If it's full of rusty partials - drop the tank and have it boiled out (some radiator repair shops off that service). Plan on replacing the old rubber fuel lines as well as the vapor recovery lines that run into the passenger compartment. You will more than likely have to do this anyway - as the vapor recovery lines leak gasoline vapor into the passenger compartment - and it will give you headaches and drive you out of the car. Do it now and be done with it. It's not fun, takes some time - but you'll be glad you did it all at once.... 2. As mentioned, replace all the fuel lines in the engine compartment. 3. No doubt you need to check the carb's for operation - the vacuum slides get stuck... pull them apart and clean them... The flat tops look odd - but they are pretty much the same as the earlier SU's.. as far a basic operation goes.. 4. Might as well replace the upper and lower radiator hoses - you'll have to do that anyway - do it now before you loose the fresh coolant you put in later. 5. Pull the spark plugs and poor a couple ounces of ATF in the cylinders... let it sit over night.. poor a little more in the next day... then - see if you can rotate the crank pulley by hand... if you have a large Strap Wrench it helps... of course you'll remove the old fan belt first - as you have already bought a new one... (when you bought the new hoses, oil, filter, coolant)... If you can't rock the crank back and forth by hand - put the car in low gear and push the car forward/backward (air the tires up and it's easier to hand push!). The idea here is to break the cylinder rings loose, and get some oil between them and cylinder walls. The ATF is very high detergent and very thin... Once you break the cylinders loose by rocking the car - poor a bit more ATF in the cylinders and see if you can now rock the engine back and forth by hand... 6 - Now drain the old oil - replace with fresh oil and new filter... 8. Install new NGK BP6ES spark plugs 9. Install new starting battery... and make sure that the oil battery cables are in good shape and very clean at the terminals.. 10. Remove the valve cover - and poor some clean oil over the cam lobes and rocker arm pads..replace the valve cover - (just check to be sure all the rockers are on/in-place..) 11. pull the wire from the coil - and crank the engine over rapidly - you should at least see the oil pressure gauge move... at least a little to indicate your getting oil pressure... replace the coil wire and crank it over - it will take a few seconds to get fuel though the new lines and into the carb.'s... USE THE CHOKE! (you almost always have to choke the old Z's to get them started when the engine is cold). If it doesn't start - then you can start checking for Fuel at the Carb.'s - and Spark at the plugs etc... From the picture - it looks like a car worth saving... good luck, Carl B. Carl Beck Clearwater, FL USA http://ZHome.com
-
Hi Guys: My daily driver is an 88 Chevy 1500 Long Bed (8') Pickup. Basic truck with wind up windows, rubber mats (no carpet) and 257,000 miles. I'll most likely keep it and drive it until one of us passes away. Whoever remarked that you can't have a house without a Pick-up is certainly right as far as I'm concerned. To tell you the truth, I've become quite attached to the poor old thing. It has always done anything I ask of it, I can leave the keys in it and no one will steal it. I can park it in any parking lot and no one ever opens a door against it. The paint is pealing off like sunburned skin.. but the A/C still works even if the A/T is getting weak. I can throw anything in the bed, without the first worry about denting it or scratching the paint. It's always outside and always the first thing I jump in to drive. I've gone out several times with the full intention of buying a new PU... but came home without one every time. I just can't see putting $30K into something that is depreciating rather than appreciating. I have to admit to suffering from Sticker Shock each time as well. The Nissan Titian Crew Cab... at around $21K on sale... is looking better and better.... but so far I just can't make myself do it... My wife has a 2000 GMC Yukon XL... we love it. She also has a 91 Thunderbird Super Coupe as her "collectible". She's the original owner and has about 9K miles on it. I put a 100,000 miles on my 89 SC and sold it a couple years ago..(should have just stuck that one away too)... FWIW, Carl B. Clearwater, FL http://ZHome.com