Carl Beck
Free Member
-
Joined
-
Last visited
Everything posted by Carl Beck
-
Thanks wannaz: Whoever bought that car for $16.5K got a super deal... but it shows us how much these cars are bringing when they get wide enough exposure. A 240-Z in like condition with like mileage would most likely bring $18K to $21K just as fast... (and I've seen a couple sell for $25K).. Cars like these Yellow and Black 280Z's - are where the smart money is going right now. Super clean, super original, exceptionally low mileage, documented cars selling for less than half what the cost to restore one would be. FWIW, Carl B.
-
No... I don't find it... but if it's the car I'm thinking of - that was a real bargain. Carl B.
-
The focus right now at BJ is still on the half million dollar Muscle Cars... but that too will pass... That Black Pearl would most likely do better at the auctions held with the Monterey Historic ... When you draw buyers willing to spend $225K + for cars.. usually that's the type of cars that will bring ever higher and higher bids... anything below that is too far below the buyer group to be of interest. For a car in the $35K range, it needs to be a Classic Car Auctions where the average cars are between $25K and $125K... Serious Car Collectors, not prestige buyers... Just how I see it... Carl B.
-
Hi Guys: I know the car - and the description is conservative. 28K miles, and all but brand new.. You could easily part that car out on e-bay and get twice the price. Or you could buy a very nice Black Pearl with 60K to 90K miles for $10K - then spend two years and $30K on it ... and it still wouldn't be as nice as this original car. At this point in time, $25K is still a bargain. For that matter, for cars like this anything under $35K is a good buy, because you can still find them. Five years from now you won't seen any for sale.. FWIW, Carl B.
-
No Problem - you have plenty of time to move the Wediding. Or worse case - you fly direct from Orlando the day of the Wedding, then return the same day. That would assure that you would be out of the way.. We all know that Fathers of the Bride are always in the way...:-) FWIW, Carl
-
Hi Montezuma Humm..... the last 240-Z on the Classic Z Car Register, on the Z Car Home Page is HLS30 168500 with a build date of 07/73. What URL are you looking at? The highest VIN reported so far in North America is HLS30 172715 with an 08/73 build date. (not on the Classic Z Car Register - but listed on the "Production Changes" page... What we have found vs whatever the Factory Documents state. Series I ended production sometime in 01 of 71 (70 and 71 Model Year) Series II ended production sometime in 10 of 71 (Late Model Year 71) Series III ended production sometime in 08 of 72 (72 Model Year) Series IV ended production sometime in 08 of 73 (73 Model Year) FWIW, Carl B.
-
But don't confuse a Red Line established 35+ years ago, for a new engine... for a safe Rev Limit for that engine with 35 plus years and 100K plus miles.... Unless you have owned and cared for the engine since it was new - pushing it to very high Rev's could easily kill it today... Carl B.
-
Given the price of the OEM Fuse Block - I'd buy the Motorsports replacement.. But that's only fixing a problem caused by something else - and that cause is still there. You need to relay the headlights, so that only low voltage is going though the fuse box and your headlight switch. You may save your headlight switch in the process as well. See: <a href=http://www.jaderunner.com/Auto/240Z/Docs/daves_harness.doc TARGET=NEW>Dave's Relay System</a> FWIW, Carl B.
-
Hi Randy: OK - given the goal and prescribed process - I agree with moompup. For a $4100.00 dollar paint job on a fairly clean 240-Z - I'd expect the body shop to remove all bolt on panels - and panel paint the car. Get a clear understanding with the body shop before you take the car too them - and always get a detailed list of the specific tasks to be performed. When I'm dealing with a new body shop (new to me) I always make a list myself - then sit down with the shop manager and go over it... When you reach agreement as to what's in and what not - have him sign it. If he won't - go somewhere else... I put all the issues on "me wanting to clearly understand and write down so I don't forget"... not on the body shop for not writing a proper and complete estimate to begin with - they are always very vague... and always lump many individual tasks into a single statement "Paint the Car"... If your working with a good shop - they won't mind your "newbie" questions at all. I make a list something like this: Provide a copy to the shop manager, take notes on your copy as you discuss the items with him... when your done, sign his copy and ask him review your notes and to sign your copy. I Will: A) deliver the car to the shop with all chrome, lights, trim, removed. I will strip the interior plastic panels, door panels and door hardware (windows, regulators, handles etc). I will strip the door thresholds, carpet and padding. C) I will expect a very professional job of body work and paint , to at least the standards of the original factory finish - however I fully realize that I am not building a Show Car, nor do I expect an $8000.00 job for half price. D) I will be stopping by the shop at least weekly - to see the progress, take pictures of the work in progress for my records. This is also important to have should I ever be forced to resell the car.. I have to be able to assure any future owner that the paint and body work were done to professional standards. The Body Shop Will: 1. remove all bolt on panels, and assure all fasteners are properly removed and replace.(no rusted nor busted bolts/nuts/washers left in hidden places, none left off the car) 2. all rust damage will be cut out and properly metal patched. No body filler, filling holes. 3. no body filler of any kind is to be applied to bare metal - all metal will be first repaired, then sealed with an epoxy primer - and any body fillers will be applied on top of the sealing primer. 4. the engine compartment will be completely sealed off - before any work is started. Above and below. Any wiring harnesses exposed in the front of the car will be mask off/sealed and NOT painted. (note - matter of fact, since your removing all the lights - remove the horns, and have them pull the wiring harness in front - back behind the radiator core support before they paint). 5. the car body, all body panels, door jams, rear deck threshold and jams, the front inner-fenders at the headlights will be properly prep'd and painted. (you need to look at this area, and show him where to break off the new paint - you may not want to paint the radiator core support , for example. 6. complete my car within 120 days. ( professional work at a professional schedule - anything less should cost less). I do not expect my car to become a "hanger queen", or a side job pushed aside month after month. If this is not acceptable - and agreed to - say so before we start. I usually offer a 10% premium for work completed on schedule - and expect a significant discount for work that runs more than one month over schedule. Most shops appreciate this - I give them the "premium" as cash on the side if necessary. Believe me - an extra $400.00 to get your car done on time and back in your hands is worth every penny!! - - - - - I'm sure there are other thing I'm forgetting... walk around the car with the shop manager when you drop it off - and answer any questions he has about what you want... Good luck... always remember that it's your money your spending and if you don't tell them what you want - no telling what you'll get. Carl B.
-
I quite bidding on E-Bay, when the started hiding the bidder ID's. Just too much opportunity for Shills getting into the bidding, and raising the stakes on their buddies cars, parts etc. I do believe that this latest move by E-Bay is an open invitation to extensive fraud.. which was bad enough to begin with. They are only trying to prevent any off-line sales or contact between/among the people that use E-Bay - to protect their profits. Screw the users.... f funny - this car was put up at no reserve this time.... hummm.... do you suppose he has a friend bidding? If you watch closely I believe you'll see this happen more and more FWIW, Carl B.
-
Hi Will: Sorry to join the thread so late... holidays and all ... and thanks for the help. Actually we have a group of peope working on the Judging Manual. Needless to say this is a multi-year project. Related to Part Numbers At Your Post #1 & #22 Map lamp assembly 26430-E4100 (Series I cars) 26430-E8200 (Series II cars) Your Post #23 Center air outlet grille 68834-E8200 (Series I cars) 68834-E4100 (Series II cars) Your Post #28 Comp-switch Hazard Warning 25910- E4600 (Series I - no words on knob) Comp-switch Hazard Warning 25910- E8300 (Series II - flash on knob) -- this is when they added the additional tail lights to the circuit and made wiring changes to the Light Switch and fuse box Comp-switch Hazard Warning 25910- E8800 up to 06/72 Comp-switch Hazard Warning 25910- N3300 07/72 up to 07/73 (green pull knob?) Knob -Switch Hazard Warning 29215-N3300 7/72 - 7/73 (I think this is the Green pull knob of the 73 Model year???) Earlier knob/levers... came only on the complete switch assembly. The tail lights themselves were also changed with the Series II cars. Rear turn signal unit - this was said to increase the life of the hazard switch. 26550-E4600 (3 light Series I) 1 Tail light and 1 Brake Light + reverse light 26555-E4600 26550-E4601 (4 light Series II) 2 Tail lights and 1 Brake Light + reverse light 26555-E4601 25410-E4600 Fuse Block (Series I) up to 12/70 25410-E8300 Fuse Block (Series II) from 01/71 25410-E8800 Fuse Block (72 &73 up to 07/73) FWIW, Carl B.
-
Hi Randy: Headlights Parking Lights Side marker lights Tail lights (and finisher if it's not already off) Take the rear latch/lock out of the tail gate Take the door handles and locks out of the doors Remove the radio antenna Drip Rail Trim Door panels and exterior stainless door trim (rubber wiper on the outside of the glass) Pull the interior plastic panels, and remove the rear quarter windows. Take the hubcaps off.... Take the headlight buckets off - and take them with the car to the body shop. If you plan or if the bid - repainting the door jam's and rear deck threshold area - YES you have to remove the weather stripping. Have the Body Shop - call a professional if necessary - and pull the windshield and rear deck glass - or have a professional glass man come to your house and remove it - You'll need to get new front and rear glass seals for the reinstall later. This is the only way to avoid having a "repaint line" around the seals. What you failed to tell us - is "what are you having painted to begin with" - a) just the top coat of the exterior of the car door jambs, rear deck threshold, and jam's c) are you retaining the original color? Point out to them - any area's you expect to be mask-off or covered.. like the bumper mounts, or the area under the lip on the rocker panels - you don't want over-spray all over places it shouldn't be. good luck, Carl
-
Hi Mike: Sounds like you found the best case - that being that the fill plug is still square enough to get a tight fitting wrench on, and then break loose with the application of sufficient dynamic torque. (I'm a big proponent of using a large brass hammer when necessary;-). Actually, I can't remember the last time I found a fill plug that wasn't all but completely rounded off. I now keep a few new ones on hand. As many here will attest - the use of Kroil Oil and Time - will also work wonders on any threaded or slip fittings that have frozen themselves in place. Kroil Pentrating Oil isn't real easy to get - as you have to order it on-line and wait for it to arrive at your door. It isn't cheap either, but it's worth it's weight in gold when you need it. Look for Kano Labs on line... Given the shipping costs I now order at least three aero-cans at a time. This year I ordered a case and give some as Christmas Presents to a few guys. I know they won't really appreciate it, until they put it on that first rusty bolt or screw they are trying to remove... I will mention also that these plugs when new, with the square external heads are in effect Pipe Plugs. As such, when they get too rounded off to hold a standard size wrench, your next best tool is a thin Pipe Wrench, aka a Monkey Wrench (thin is a relative term here)..It will tighten down on the plug as forced is applied (if you put it on the plug in the right direction:-) . Enjoy that 240-Z ..... there are really very few things on that car that the average guy/gal can't fix themselves. FWIW, Carl B.
-
Hi Brendan: Since the Triple Webers do not provide for the use of the Vacuum Advance, you have to dial in a lot of initial advance at the crank. Because of that you also have to have a timing curve in your distributor that limits total advance to something around 34/35 degrees. Replacing the points with an electronic trigger will not address the above issues. Nor will adding a CD system. You could - take your distributor to a good Automotive Ignition Shop - and have them set it up such that at 1500 PRM you have 0 mechanical advance and by 3500PRM you have an additional 14-15 degrees (crankshaft degrees). With the vacuum advance mechism removed. Once that is done, you set your initial advance at the crank to 18-20 degrees. The question then becomes - do you rework your stock distributor, by adding the XR700 or Pertronix to replace the points, and having your distributor timing curve adjusted - or do you switch to an HEI ignition etc. One option is to switch to the later 280ZX electronic distributors/coils, or spend the big money on something like a Mallory UniLite distributor and their HyFire VI CD... I've been running the Mallory UniLite with a Pro-Master Coil for about 15 years now - with the triple webers.. and ignition has not been a problem. Your biggest problem with the triple Webers is - like someone else said - finding a truly competent tuner - that really knows not only the Webers, but how they have to be set up to run on the L6. Most of the time the 40DCOE's are delivered with primary chokes too large for the L6 on the street, and to make things worse they usually have the wrong combination of primary jets, emulsion tubes and accel. pumps. By the time you buy new primary chokes (28mm to 30mm at most), and all new jets etc for 6 individual set-up's... you'll have several hundred dollars in parts and postage. Plus the time the mechanic will need to work everything out... So you can set $600.00 to $800.00 aside to get the Webers set up to run right... Short of that you can dink around with them for years yourself and spend twice that amount. If you want a good running Z at a reasonable price, with very little hassle - get a set of rebuilt S.U.'s and sell the Webers...... If you have plenty of time and lots of money to throw at it - you can get the triple Webers to run just fine (but you won't have any better performance because of them, unless you do a lot more to the engine in total). Just my opinion... FWIW, Carl B.
-
Yes, but you do work such wonders with it.;-) Merry Christmas Alan Carl B.
-
Actually, while it is true that the vast majority of all first generation Z's are from Japan, a few stayed there and are thus in Japan. On the other hand, if by "all" the reference was to a GS30, now found outside Japan, then at least it is from Japan;-) Merry Christmas Everyone.... Carl B.
-
Yes - the N3700 is the new number... Just went and looked at the parts they sent (I always order a spare;-)
-
Hi Randy: The last time I purchased the parts from Courtesy - I don't recall them being very expensive. You can certainly use aftermarket parts.. I simply like the way the OEM parts are pre-cut and fit. The first sets lasted about 35 years - so I thought I'd stick with them. Felt-Glass Run Door 80335-E4102 Rubber-Glass Run Door 80336-E8700 (not to be confused with the Fuzzy Felt attached to the door panel, nor the rubber wiper attached to the chrome strip on the top of the door outside the glass window.) Just why Nissan used two different materials... I'm not sure. But perhaps it's because when the window is down, it's held in place at the rear of the window frame - and using rubber there provided a firmer hold - or perhaps the "felt" used wouldn't get as good a chance to dry out inside the door with the glass held against it. I do know that when that lower section of rubber starts to fall apart.. it can become very difficult to roll the window down. FWIW, Carl B.
-
Hi Randy There are two parts that go inside the window frame. The "rubber" goes inside the frame that is inside the door at the rear - the "felt" runs from the rear of the window frame above the door, up around the top and then down the front of the frame. Take the frame out - clean out the old "rubber and felt".. then replace both. If you don't you'll have to do it a short bit later anyway. FWIW, Carl B.
-
Hi Mike: Sorry you are having this problem... but it's just another learning opportunity now - how lucky can a guy be?.. .... and so we learn that we should always remove the Fill Plug FIRST.... only after that, should we ever remove the Drain Plug..... rear end or transmission... Absolute worst case (and I've been there a couple of times) - you have to remove the mustache bar and then remove the rear cover... So you'll need a new cover gasket most likely... Once you have the rear cover off - you can clamp it in a vise, then you can heat the area around the Fill Plug with Propane Torch (both inside and outside surfaces) ... and break the Fill Plug loose. Make sure you put a little anti-seize on both steel plugs before you reinstall them in the aluminum cover... good luck Carl B.
-
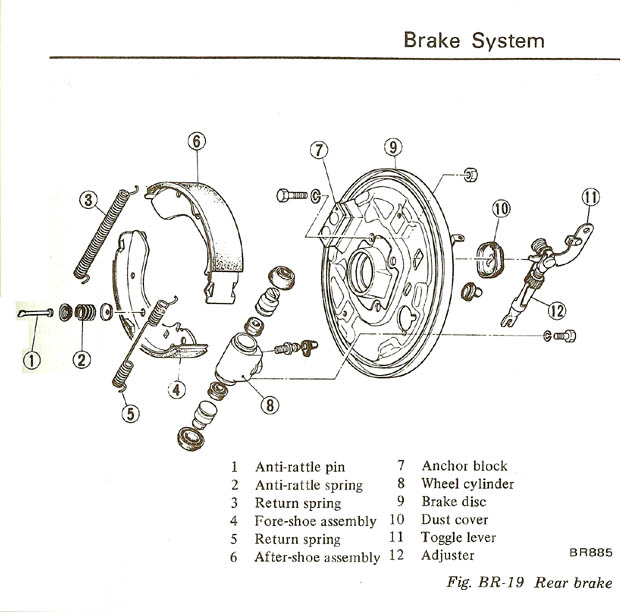
From the 77 Factory Service Manual FWIW, Carl B.
-
Ahmen Sad - but true. ... Just too funny... Carl B.
-
Camping Out In America: In 1971 I was stationed at Fairchild AFB outside Spokane, Washington. Originally, I had lived in Columbus, Ohio. So when it was time to take Leave... it was time to jump in the Z and head East to Ohio! Driving pretty much straight through - it was a 36 to 42 hour drive, depending on how much time was spent stopping to eat, get gas or to take a catnap. About 20 or 25 hours out - I found myself becoming overwhelmed by the need to sleep. I was at that point out in the middle of no-where and it was around 3:00 AM. The night was clear and sky filled with brilliant stars - and a moon that light the highway ahead. You could turn off your headlights and see for miles and miles down the freeway. I was either well into North Dakota, or just into Minnesota at the time, I'm not sure which..... So I started looking for the next freeway exit... and in that part of the Country freeway exits could be a hundred or more miles apart!! As I looked off to my Left I could see gently rolling farmland, most with bails of hay laying in the freshly cut fields. As I approached the next Exit.. I could see a road running off the highway crossing the freeway.. and back along the fields. So I thought this would be a good place to stop and take a short nap. I exited the freeway, and then turned back down that little county road.. a 1/2 mile or so later, I pulled the Z off on the road... Took the sleeping bag out of the car, jumped the wire fence and walked out into the field. There were about 10 bails of hay grouped together, waiting for later pick-up (you farm boys will know what I mean)... It was a warm late Summer night, so I just spread the sleeping bag out on top of a couple of bails... and laid down on top. Last thing I remember was how impressed I was with the night sky... I guess it took me about three seconds to fall asleep. As I awoke, noticing that the sun was in my face, I could hear a tractor running in the distance, and guys yelling at one another over the noise of the tractor... At that point I sat up, looked at my watch and it was about 10:00 AM !! I then realized that the ten or so bails of hay that had been there when I laid down - were now gone! Only the two bails I was laying on were left. Looking around, I realized that the all but the entire field was now cleared of hay bails!!!!!... The tractor and people that I had heard, were way down by the freeway exit now... Once I was fully awake.. I rolled up the sleeping bag and headed for the car. Jumped the fence, loaded up... broke out the thermos for some hot coffee... and headed back up the county road toward the freeway.. As I passed my "Hosts" - I blew the horn and waved - they looked up from the tractor and the now all but full hay trailer - and all waved back... It may have been in another time - and most certainly in a very special place in America... but the culture or values of the people in Montana, North Dakota, Minnesota, Wisconsin... is the bedrock upon which America was built. Courtesy and freely extended kindness to a complete stranger... all without a word exchanged... nor any expectation of recognition or reward... Good people just being Good People. FWIW, Carl B.
-
Hello TomoHawk (everyone): I realize that your original question had primarily to do with finding a way of sleeping in your Z. As someone else mentioned... to make that work, you would need to find a passenger seat that would not only fit in the first place, but fold forward at something close to the level of the rear deck area. Then you would have to craft a couple "hole fillers" perhaps from Styrofoam and then unroll perhaps a 1" thick foam pad over the top of all that. It could be done... Some of the mini-van passenger seats that fold forward might work.. As to the subject of Camping-Out while taking your Z on long road trips... In 1975 I was working at the local Datsun/BMW Dealer here in Clearwater. As a sales incentive the Dealership offered a Car-Top-Camper to whoever sold the most cars during the Summer. Our Parts Department sold them at the time. I won it. It fit on top of a Z.. and was actually pretty trick - although it was a bit thick and presented a pretty good additional drag on the car at speed. Today that could be solved with the addition of some "aero" device... It looked and worked pretty much like this one: <a href=http://www.autohomeus.com/products/overland.php TARGET=NEW> CarTop Camper</A> This at least gives you a place to sleep, off the ground, with a tent over your head - and it only took a minute to set up. It mounts on the Z's drip rails, and they are plenty strong to support the tent and two people. The older style had a canvas cover over the unit when it was folded down, I see they are using a PVC cover.. The only problem is - this one isn't too cheap... FWIW, Carl B.
-
Hi duffman: I have a 72 240Z with L28, Triple Webers, 78 5spd. and 4.11 Posi rear end. I put the 5spd. with the 4.11 in when running an L24.... and at the time I was mostly driving it around town, auto crossing on the weekends every once-in-awhile. When I added the L28, it had so much more torque, that the 4.11 was actually too low a gear - IMHO a good L28 could easily pull the 3.9 or even the 3.7 in the light weight 240-Z for performance purposes. I have another 72, that I've kept basically stock - I'm running an 83 5spd. with the stock 3.3 rear gear. I use it mostly for longer road trips to Z Car events and or other Car related events. For a road going Z, I don't think you can do much better. It gives you 70mph cruse with the lowest engine RPM and that relates to the best fuel economy, as well as the lowest noise cruise. I'm long past jackrabbit starts in town, so even though that tranny / rear-end combo relates to a fairly tall 1st gear - I find it easy to live with. I think you'd like the 81-83 non turbo 5spd with the 3.54..... for the use you ask about. FWIW, Carl B.