inline6
 Subscriber
-
Joined
-
Last visited
Everything posted by inline6
-
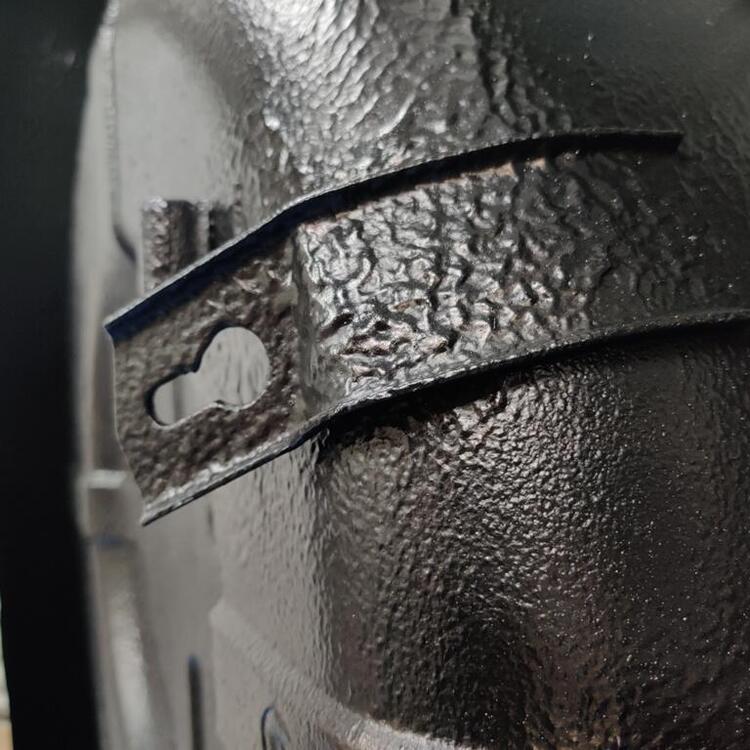
 As removed from my 6/71 car that lived in AZ for an unknown amount of time, and was subsequently stored (non-operational) in a garage near Denver CO for over 25 years. So, painted black from the factory.

-
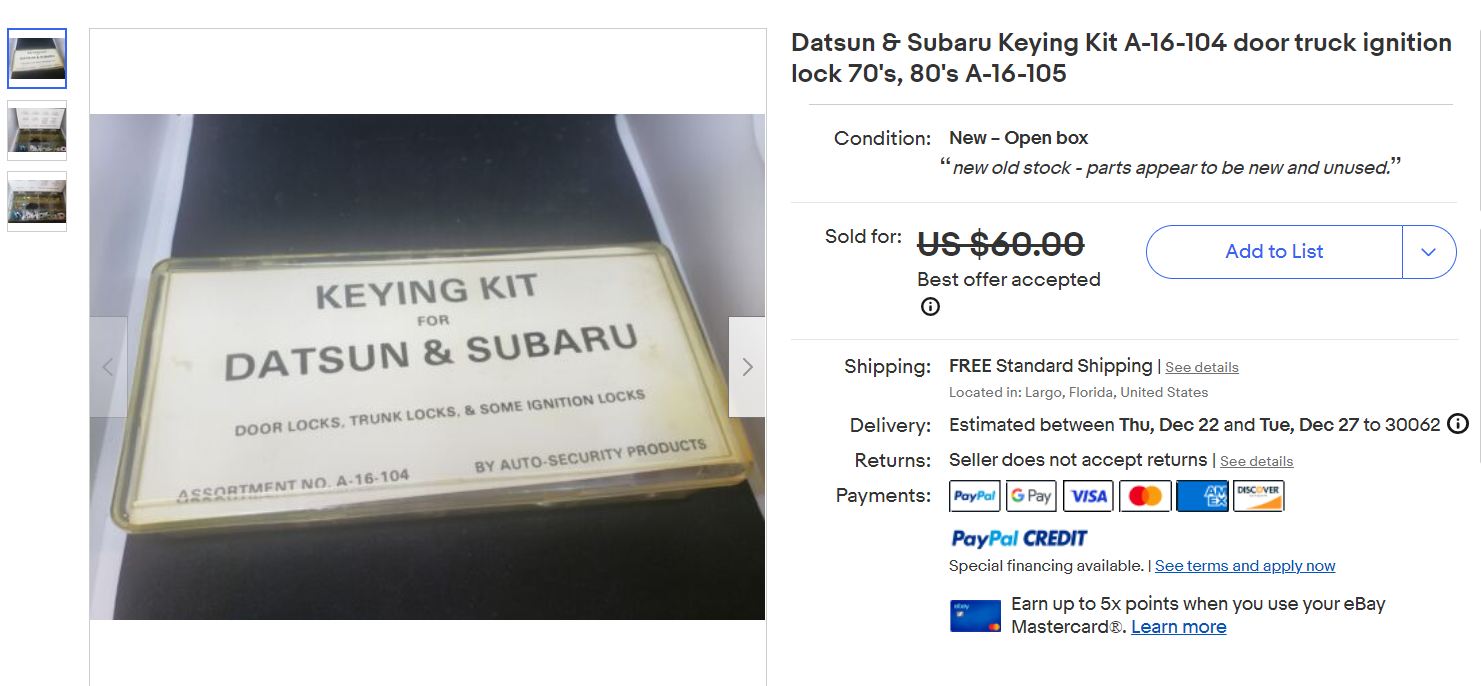
I know what you mean about the soft metal. The "sleeve" that the hatch lock cylinder works with has partial grooves in it made by the tumblers interfering with it. A bit of 3 in 1 Marvel Mystery oil and I had the wrong key working that hatch lock about as good as the correct key would have! I plan on using some parts from the spare hatch lock I have that currently uses the L type key. The exterior wear is noticeably less, so I am hoping the internal wear is less also. I'd like to get the sleeve re-chromed though. I dislike the discoloration from wear of pushing the hatch lock cylinder in to operate the latch. Question for you, did you rekey the glove box lock to match as well? I haven't taken a close look at that one. Also, I have researched enough online to see that the ignition switch uses different tumblers than the door or hatch locks. Do you have A-16-100 keying kit? At present, I'm thinking it would be nice indeed to get just a few little parts to rekey the ignition. If you can help, let me know.
-
I was going to share that here last night, but then I realized that sharing the codes might not be wise. I decided to sleep on it. But I did buy one of those. I will just have to rekey my locks in a "smart way" if you know what I mean.
-
So, this? https://kfvintagejdm.com/shop/datsun/forward-rocker-reinforcement-left-side-datsun-240z/ A large amount of replacement panels available from them now for the Z's.
-
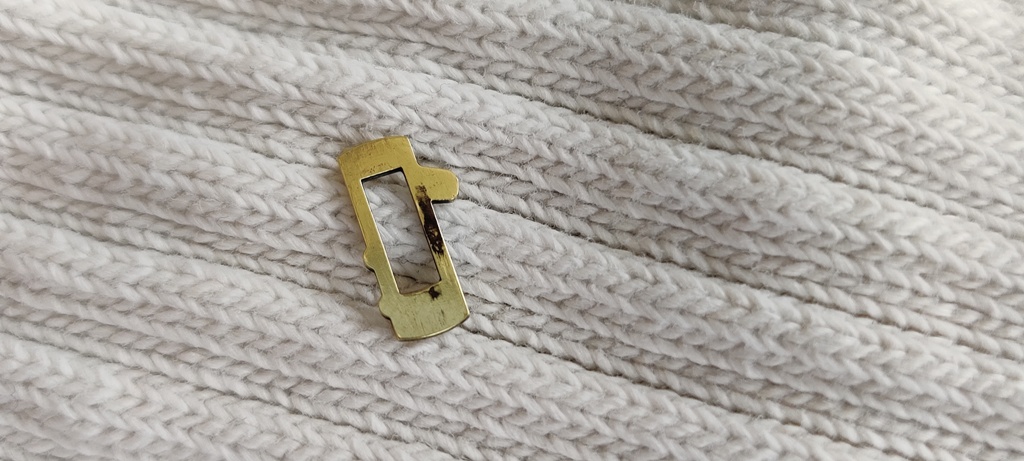
Whoops - I just realized that my hatch lock has 5 wafers. Just wasn't paying enough attention there. Can see that in my pic. So four to the 5th power - 1024 combinations.
-
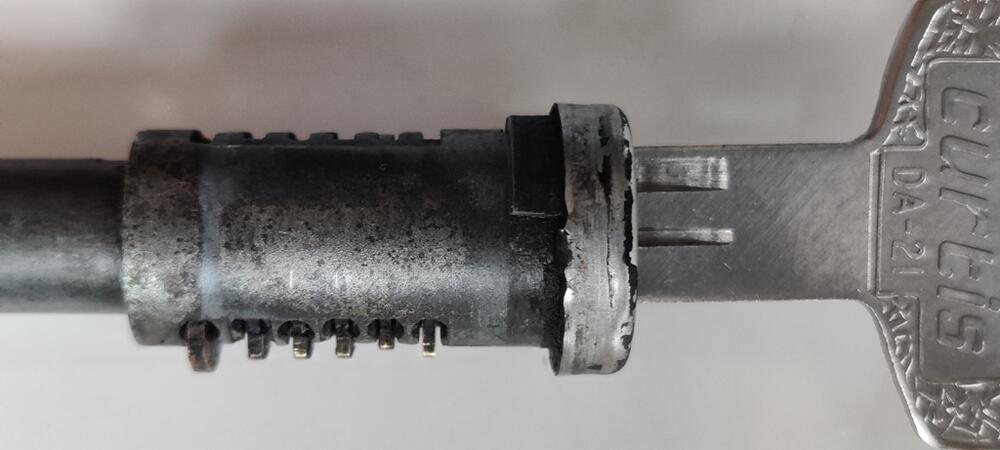
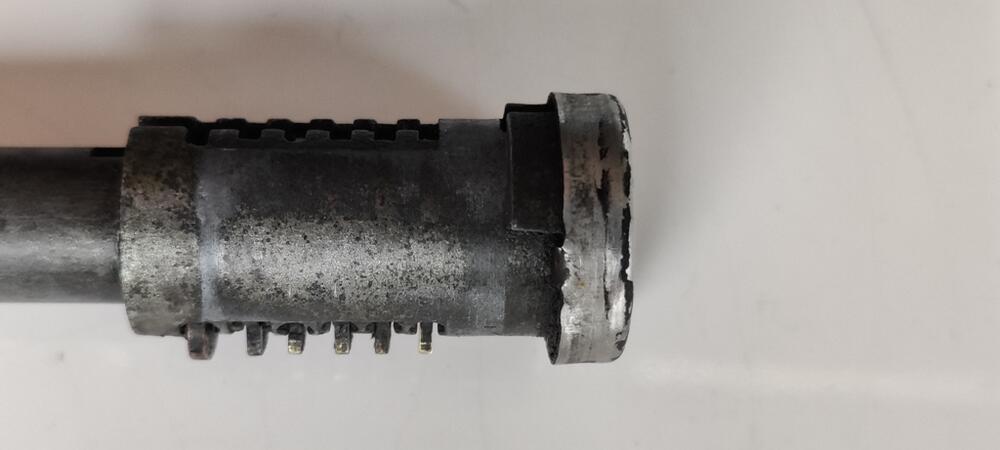
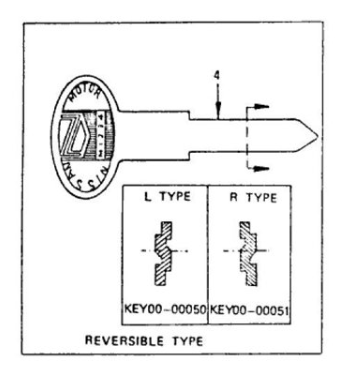
Hmmm. Yes, I quickly determined that one wafer per position didn't make any sense. 4 distinct wafers, each of which can be in any of the 4 positions, 4 to the fourth, could be accurate, but 256 unique combinations still doesn't make sense to me. My latest theory is that the lock cylinder, or more precisely, the non-moving parts might play a roll. Looking at a cut key makes me think this. The number of "cuts" appear to be more than the number of wafers. I also don't know what is different within the lock for the L type vs. R type keys. Still more to investigate.
-
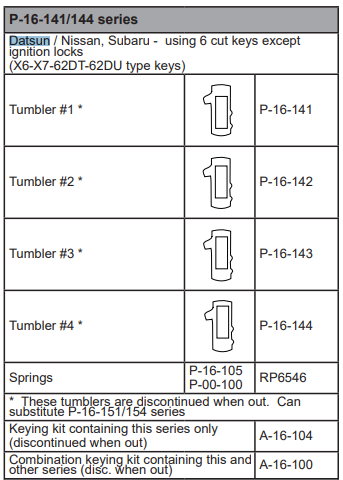
Oh, yep, I see. Regarding the numbers 0-9, if you look on eBay for NOS Datsun locks, there are enough right now to see lock code combinations including 1, 2, 3, 4, 5, 7, 8, 9, and 0. I'm guessing 6 is valid as well. So, I don't know how 4 wafers identified as #1, #2, #3, and #4 in the kit turn into codes like M7048, N1709, N1534, (all ebay auctions for NOS Nissan locks) etc. My hatch lock only has 4 tumblers. This kit has four distinct wafers I can't see any evidence looking online of the existence of another necessary kit for the 240z. So, I am wondering if locksmiths have to use special files in order to modify the rectangular cutouts depending on the code number. Maybe the wafers in the kit are starting points, and for certain code numbers, you have to file the slot. Doesn't make any sense to me, actually. There must be something I am missing.
-
So, the rectangular slot cut in the wafer varies in height. And thanks for confirming the correct position of the wafers when the key is inserted. From looking at key codes on various locks I have, it seems likely that the numeric digits vary for Datsun locks from 0-9. While investigating the rekeying kits, the one I bought seems to be comprehensive for door locks. The kit, however, has only 4 wafer part numbers. How does one use 4 tumbler wafers and achieve all the combinations to correspond to the lock codes (0-9)? Do locksmiths have to modify to slots in the wafers?
-
Just bought this and will play around with it some, see what I can accomplish. Maybe, the right parts are here to rekey the hatch and door and glove box to match my ignition key. Or, maybe some other option is possible.

-
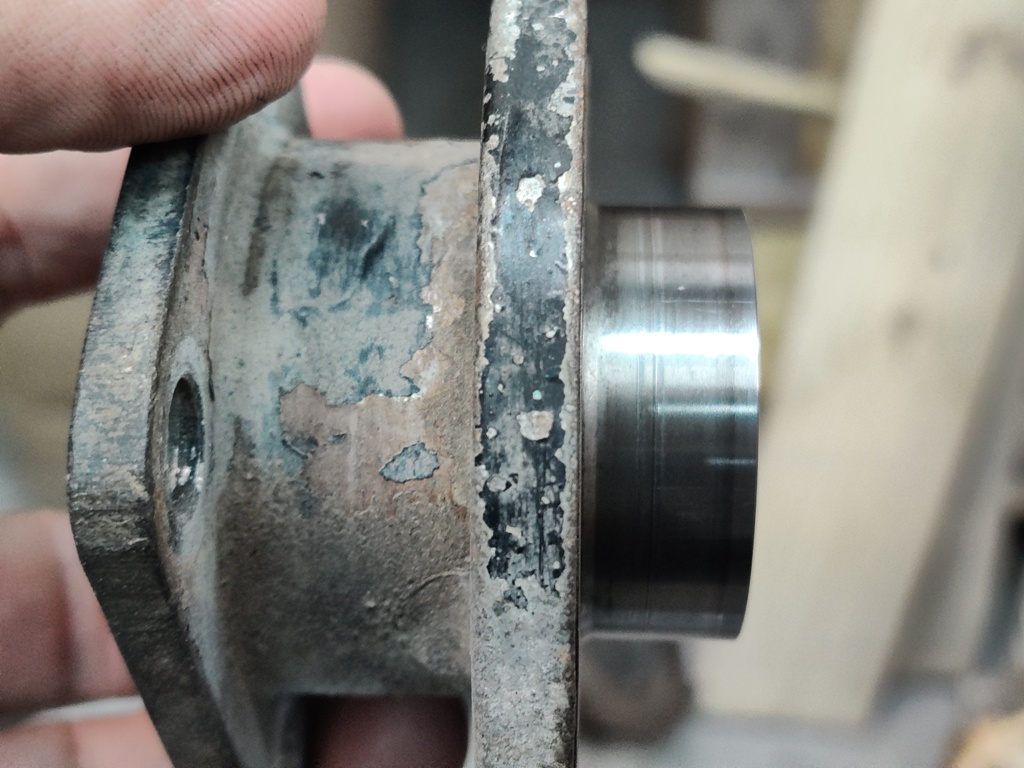
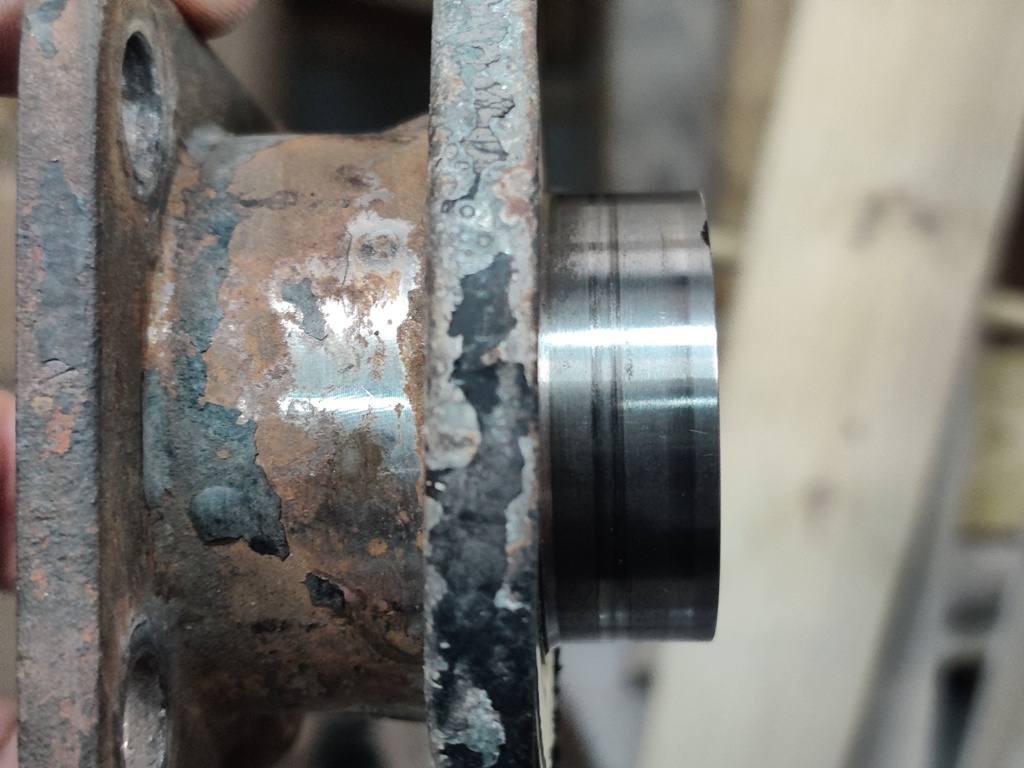
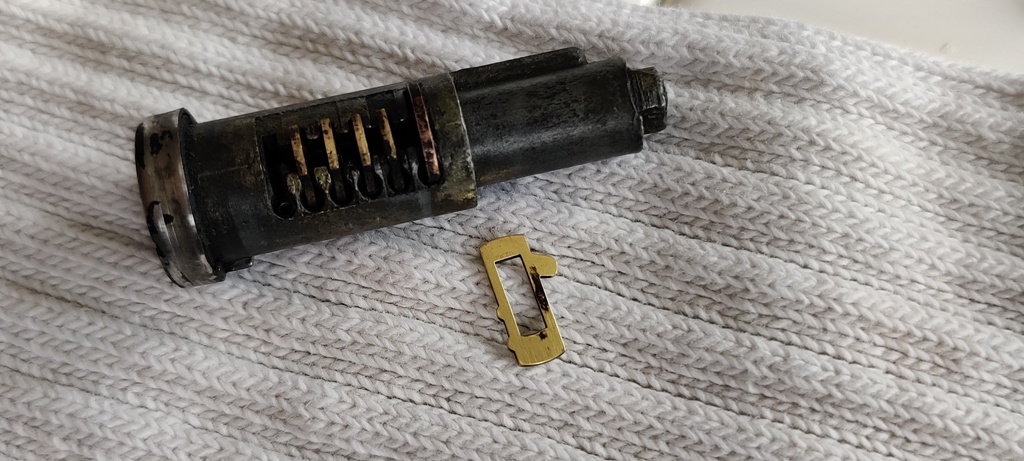
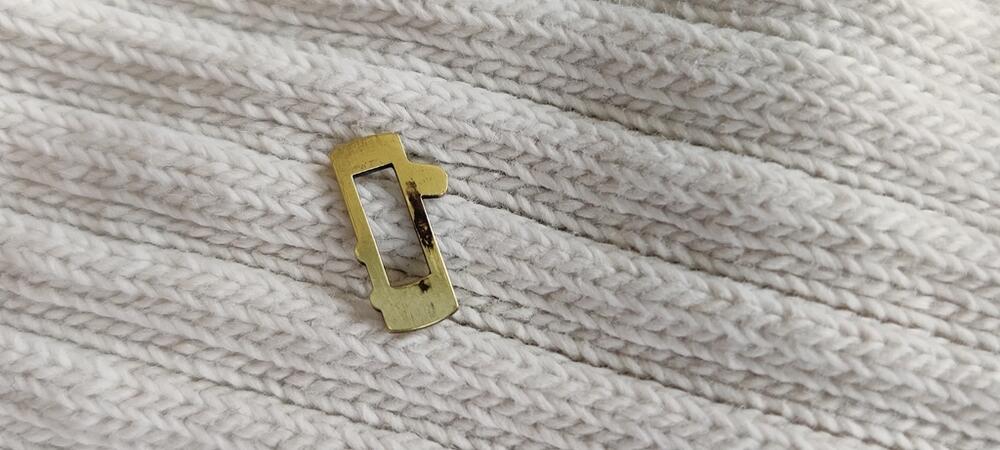
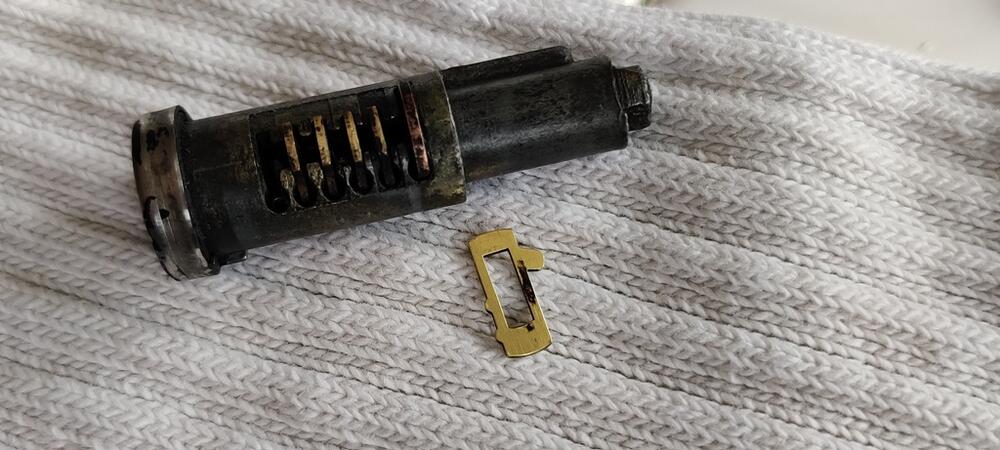
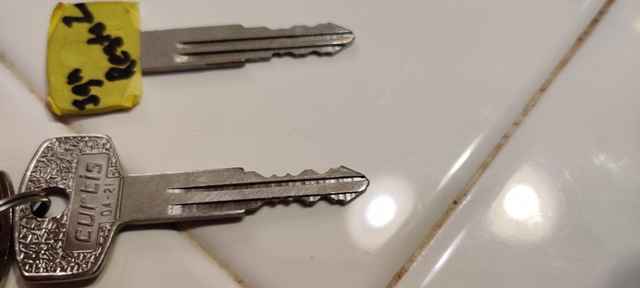
Still figuring out my key and lock situation. I found some locksmiths online who have been in business a very long time and sent them inquiries. One was a little more than an hour away, but they said they only do "mobile" and wouldn't drive that far. Yeah. Whatever. The other hasn't responded. So, in the meantime, I have been messing around with some of the locks I have on hand. After lubricating two door locks (with the same code) and a hatch lock, I was able to operate all three with a key I have (cut into a Curtis blank). The stainless covers and key "doors" on all of these locks are in rough shape. Curiosity got the best of me and I took the hatch lock apart and took some pictures. What you are looking at here is the hatch lock cylinder in side profile view. The key is not inserted presently. Note the little bumps along the bottom of the cylinder - bottom in the picture those are "wafers", which we will see more closely in a min: In this next picture, the key has been inserted. Note that the bumps (wafers) have moved a bit. The second one from the right is sticking out from the cylinder noticeably less: Here, I have removed one wafer. It pushes out (snaps out) with only a little, initial resistance. A closer look at the wafer: I'm not sure how they differ, but one thing I suspect after looking at things closely: The key I have, which works the lock... I don't think it is actually the correct key. When I insert the key, the wafers are supposed to retract into the body of the cylinder fully, or at least such that, all of them extend out of the cylinder only a small and equal amount. With all retracted, the cylinder will turn inside the sleeve (not pictured), and thus the lock operates. With any of the wafers sticking out of the cylinder, the lock is not supposed to turn/operate. Found this helpful info. Maybe I will be rekeying the locks myself. https://objects.eanixter.com/PD508330.PDF
-
Thanks for the information Kats. I am looking further into what my situation is with locks and keys. When I acquired the car, it came with one key for the ignition (R type). The original hatch lock was missing. And there was no key for the left and right door locks and glove box lock (but I can tell they are R type as well). With no key, I cannot confirm so far that the glove box lock matches the left and right door locks. However, I can confirm that the 1 letter 4 number combination on the left and right door locks match. I see a 4 digit number on the glove box lock that does not match. Does the glove box lock have key code information on it? A spare hatch lock with a key came with the car, but it is the L type. So, I won't be able to use it if I want to only have one key to work all locks, which is what I desire. @DutchZCarGuy sent me information about how to modify the wafers in the key lock to match an existing key, but I'd like to attempt to get a working lock set without modifying them first, if I can. I am thinking of finding a locksmith who can make a key blank to match the code on my door locks. I hope that will work the glove box lock also. Then, I would need to have a locksmith modify the ignition lock and a hatch lock that uses an R type key. I have a spare hatch lock from a previous car which uses the R type key. The only downside is that the stainless parts of it are in poor condition. So, I am having to mix and modify to get a matching lock set that can use one key. And I want two original keys to go with it.
-
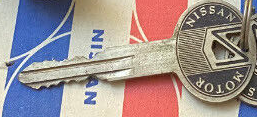
So, I have a 6/71 Z and have determined that it should have the cool keys... You know, the ones with round heads and painted black. Any of you hoarders (meant in a nice way 😀) willing to part with your original key blanks? Come on... You know you will never, ever actually need them. It will go to a very good new home 🙏 ... at Christmas 🎄 too. This key blank: Fat groove on bottom when key is pointing to the right. Thanks for looking.
-
View Advert Looking for a complete lock set for my 6/71 Datsun - matching... and with key would be nice I'd like to have all the locks on the car I am restoring work with one key. I am exploring options with a locksmith, however, it may be easier if I can source a complete set. Let me know what you have please? Garrett Advertiser inline6 Date 12/11/2022 Price Category Parts Wanted Year 1971 Model 240z
-
From reviewing the brief video, that car looks to be one of the nicest restored 240s I've seen. $41k is a killer deal.
-
Someone bring it (110 red 240 z) back across the pond: https://silverstoneauctions.auctioneersvault.com/catalogues/the-nec-classic-motor-show-sale-2022/56/index.html
-
Interesting. Green and white cars have their write-ups switched. VIN on green car is in the range of cars that had 240z quarter emblems. Each car has oddities. But, it looks to me like the owner was knowledgeable.
-
I came across this on Youtube today. Very nice looking paint. I assume it is a respray. Of interest to me at this moment, as I am nearing completion of the body work on my car and will be handing it over to be painted, is the ability to sight down the side of this car as it rotates in front of the camera. In the reflections, I can see low areas on the fenders and on the doors in particular. I have worked very hard to eliminate similar looking low areas on my car's panels. This weekend, I'll be sanding again... sanding down the primer I sprayed on the car two weekends ago. I am hoping that my low areas are finally gone.
-
Made a video which is a few minutes long showing the undercoating. Sorry for the odd movement and shaky filming briefly - the cord of the light I am holding got tangled up on a container on the floor. If I could shoot the undercoating again knowing what I know now, it would be much better, but I am pleased with the results.
-
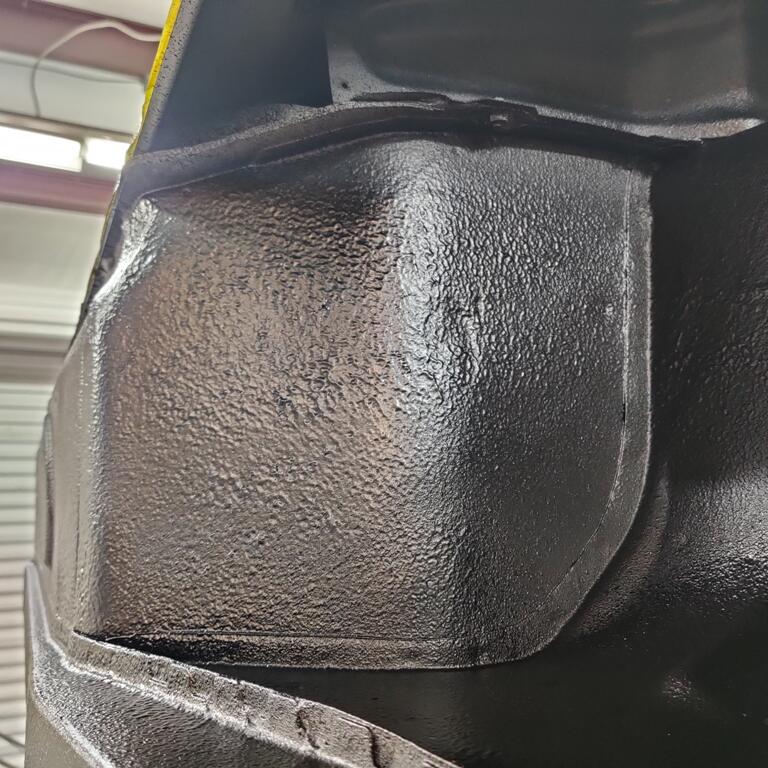
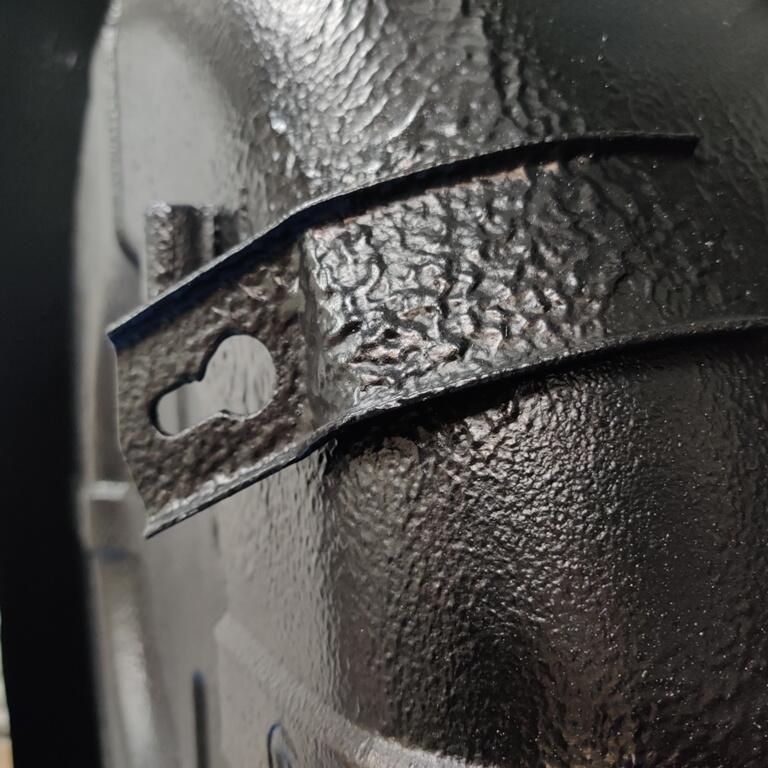
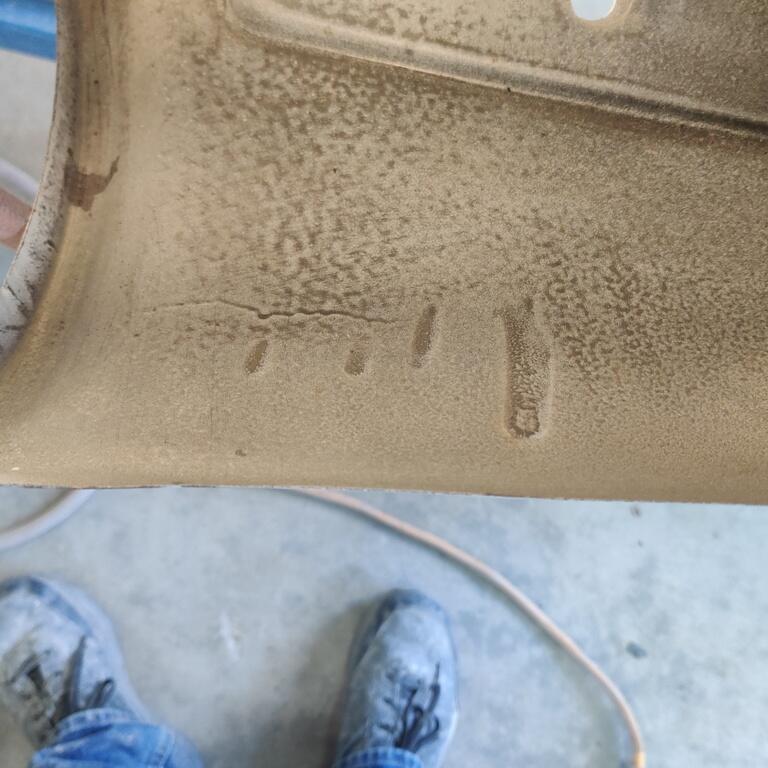
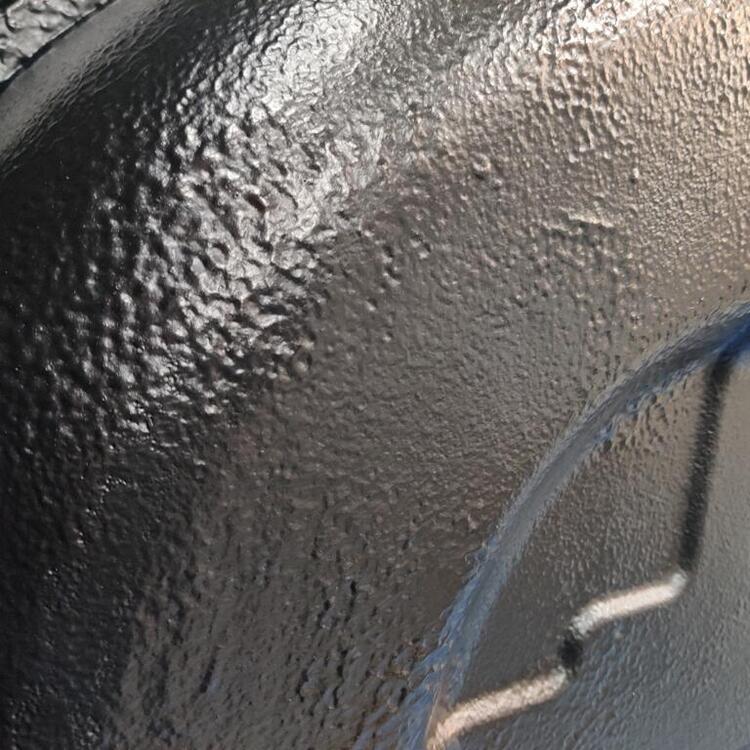
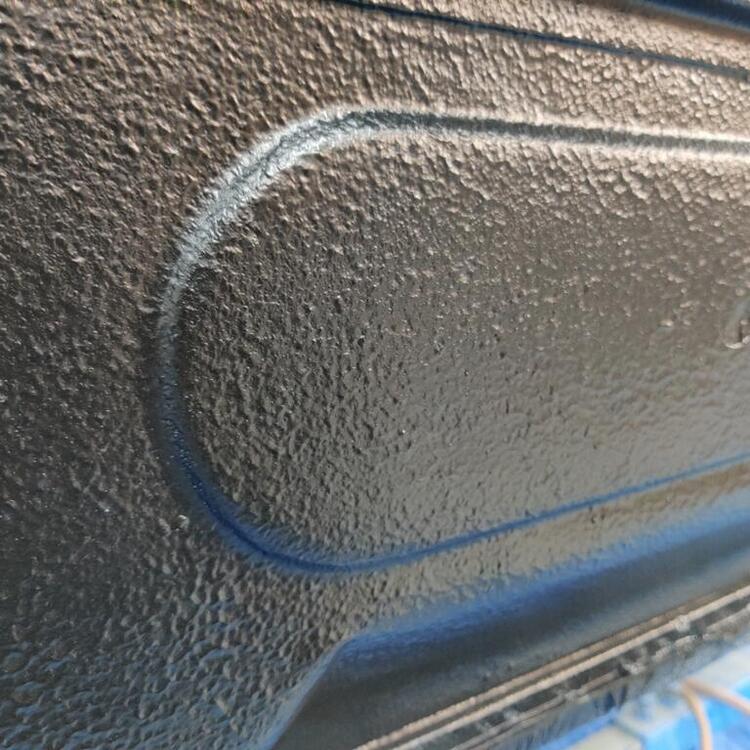
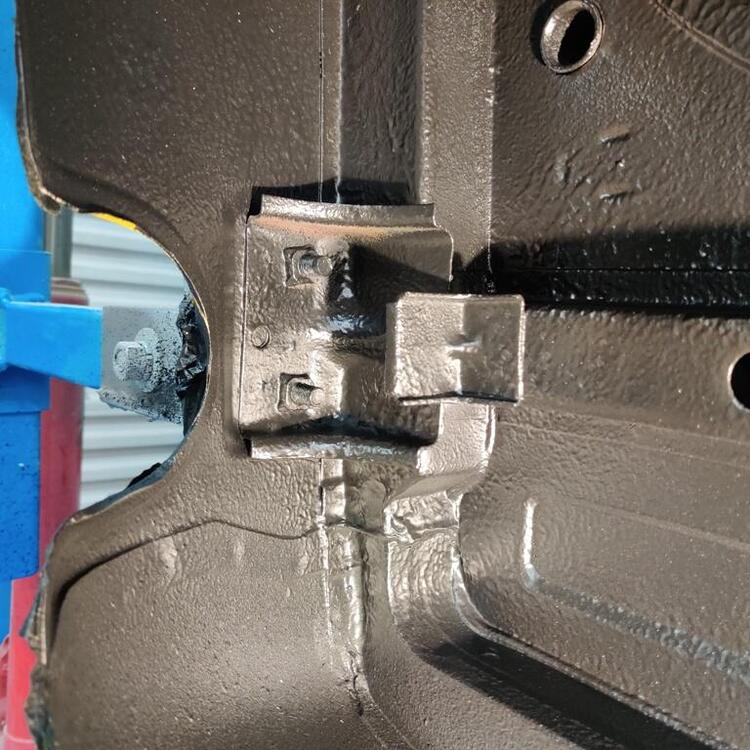
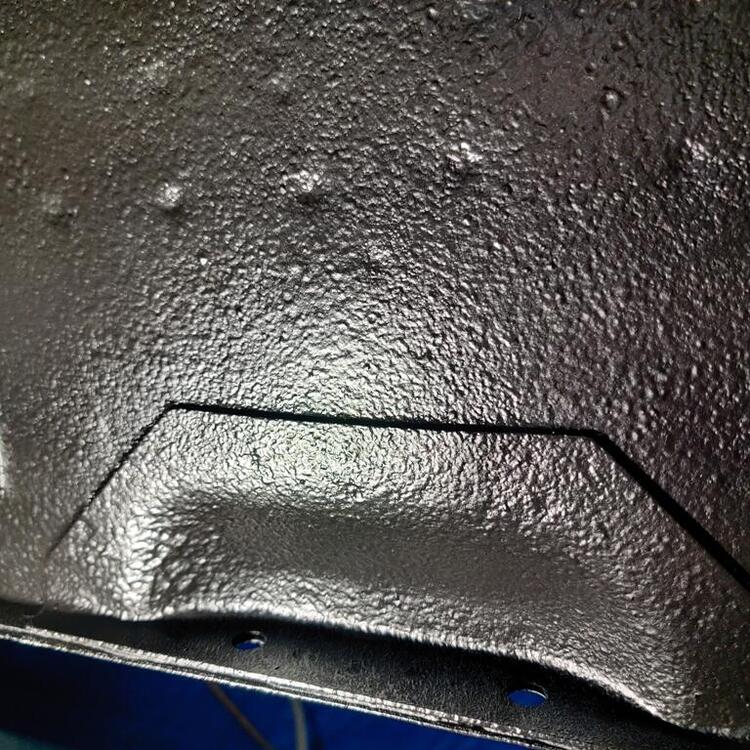
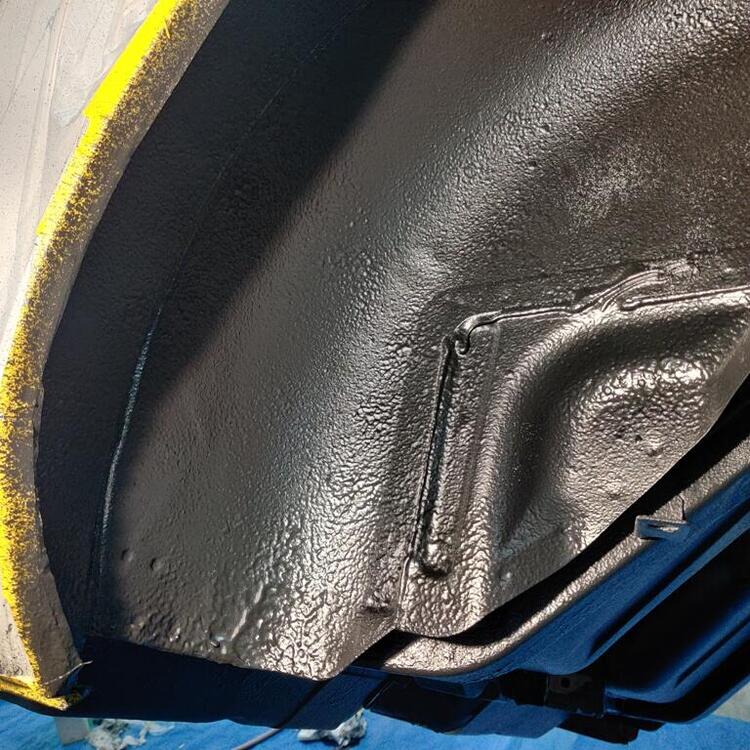
I was able to get the Raptor Liner applied today. With all my planning, I had hoped for a better outcome, however, it is hard to achieve what I planned without having some experience with this stuff. The standard mixing calls for 3:1 of Raptor Liner with the hardener, and up to 20% urethane reducer. I mixed 4:1 with hardener and would have gone 4:1:1 with thinner, but that mix wouldn't all fit in the Raptor container. As part of my planning, I watched videos that said it was a bad idea to mix more than one container at a time. If you are doing a truck bed liner, that is probably wise advice. However, for my custom mix, and at the gun, I was using 60 psi, I was able to get through a full can in like 2-3 minutes. Then I would have to stop, and go mix again. And that would take 5-8 minutes, so the stuff already sprayed on the car would dry for that amount of time, and when I came back and started spraying, you could see the transition. That is not ideal. Had I to do it over again, I would have mixed all four bottles with hardener and thinner at once in a large bucket. And then fill the bottle and spray. Refills of the bottle/container would take less than a minute, and stops and starts in the material on the car would be indiscernible. My plan also included spraying undisturbed factory coating with the HVLP gun to refresh the appearance. It became quickly apparent that wherever the new coating wasn't, it was going to be very noticeable because the texture is a bit rougher than the factory. In addition, my first full can only covered the wheel well area and rear lower apron. So, it became clear to me that I may not have enough material completely spray the whole car, and I quickly ditched the idea of using the HVLP gun. So, I applied a little less thick on the remainder of the car to attempt to get full coverage on everything that remained to be sprayed. My test samples ended up consuming enough material to cause me an issue of running out prematurely. 4 cans is just enough for the mix and psi, etc., I used. Keep that in mind if you attempt to follow any of my experience here. With all of that said, it could have been much worse. So, here are some pics to share the outcome: Again, for the wheel well and rear lower apron, I went a little thicker because I was unaware that that point that I didn't have material to spare. I like the look of that first can of material - still not quite as smooth as the factory coating, but I prefer it. Once I realized how much area I had to cover with the remaining cans, I had no alternatives.


-
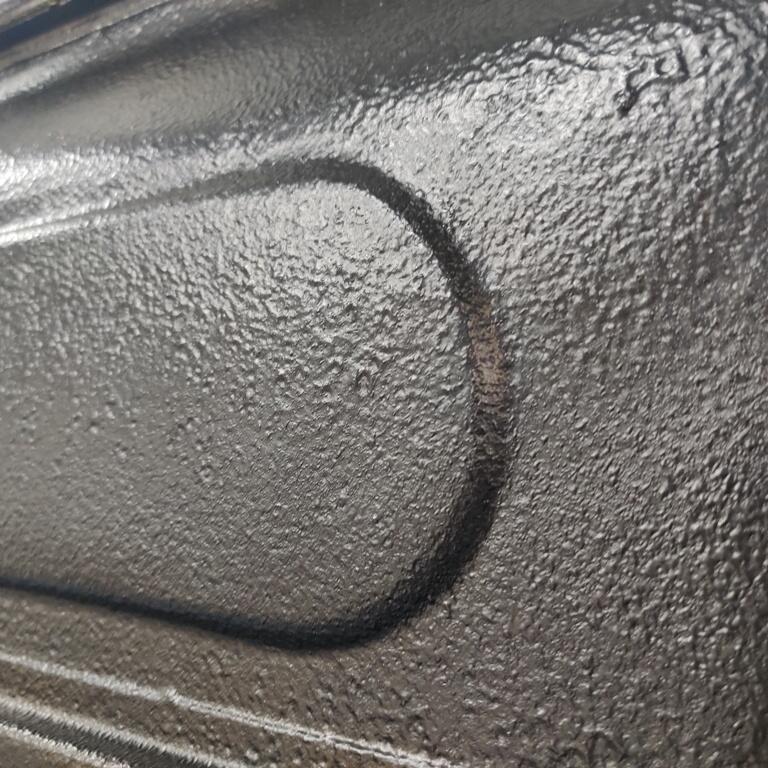
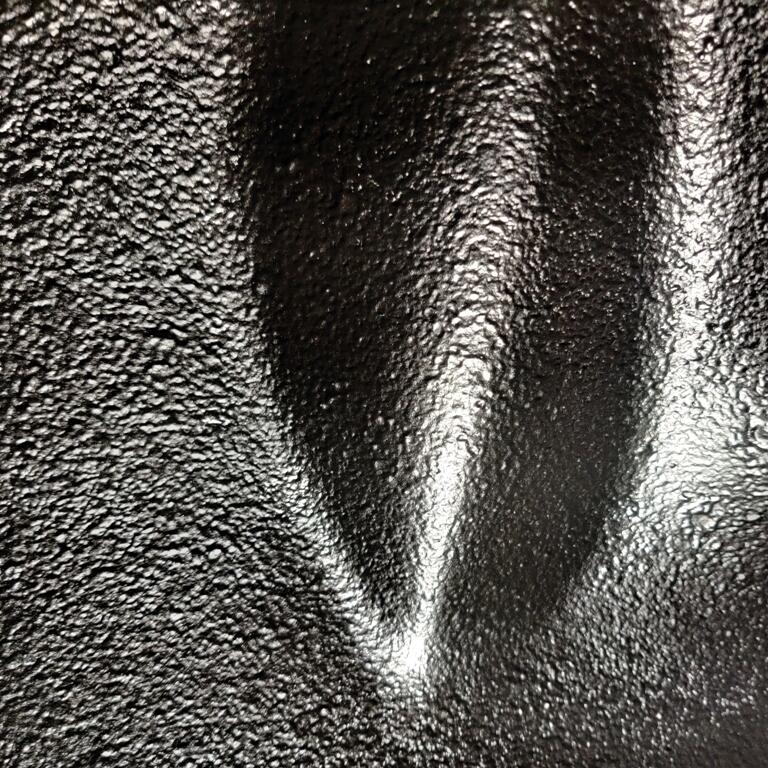
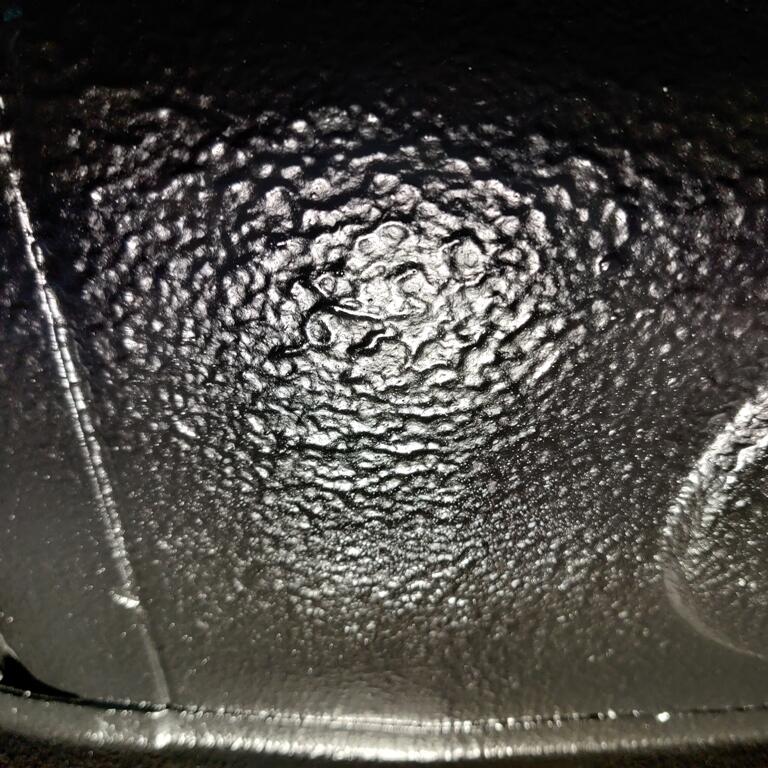
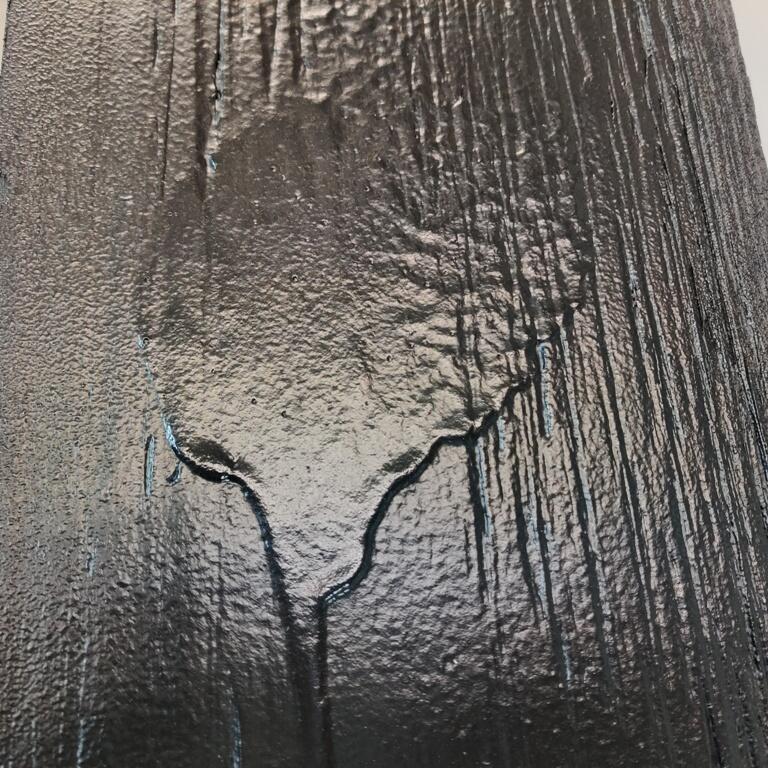
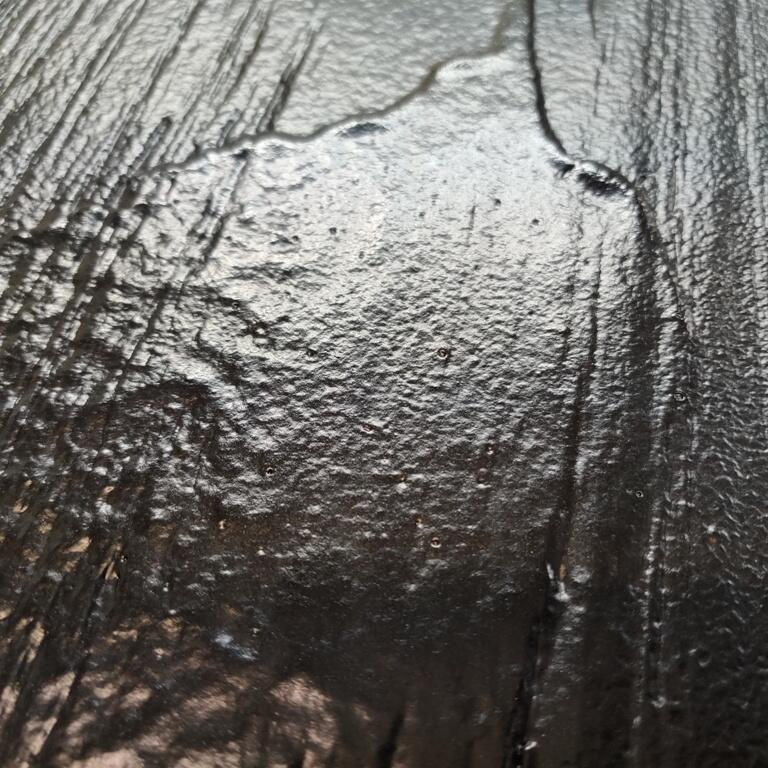
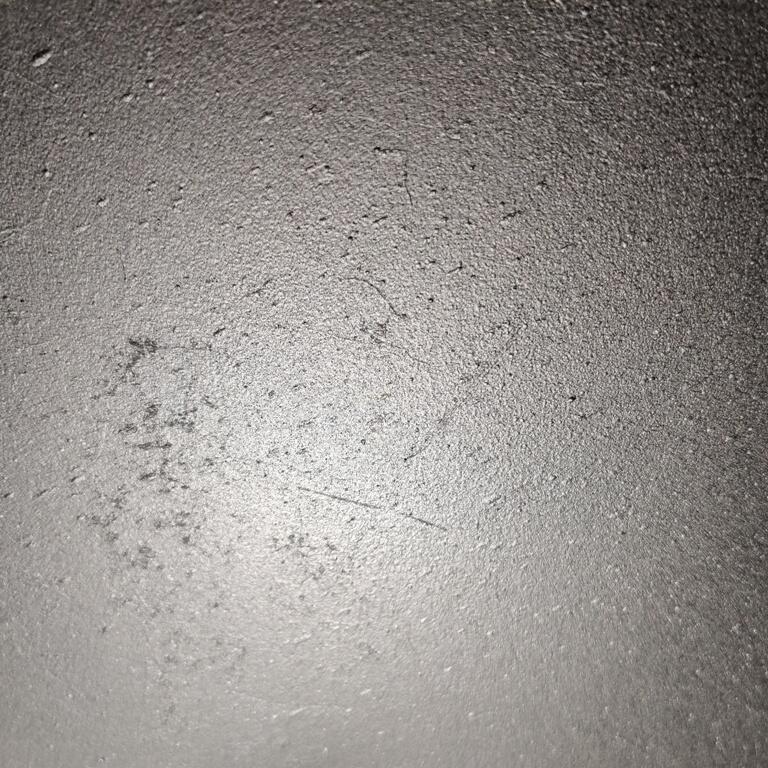
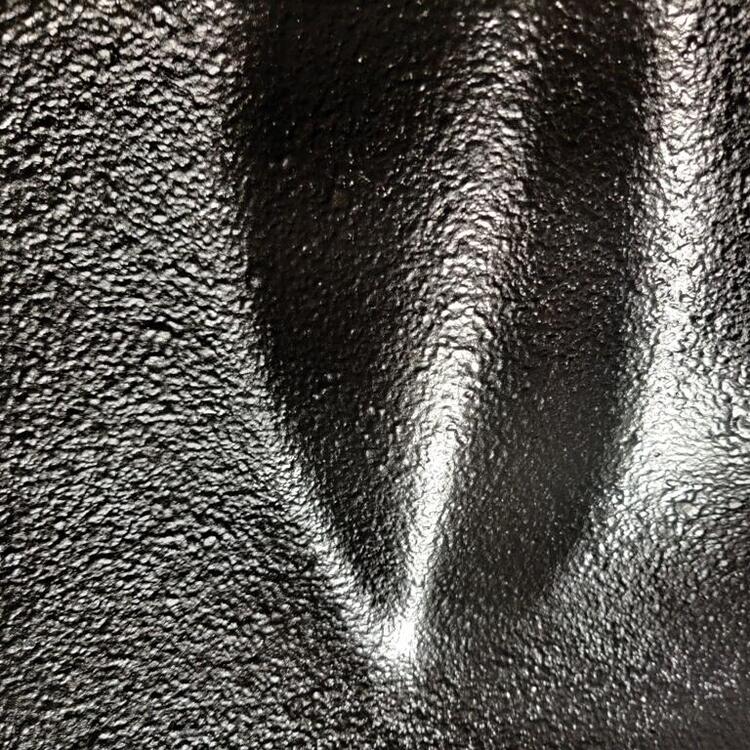
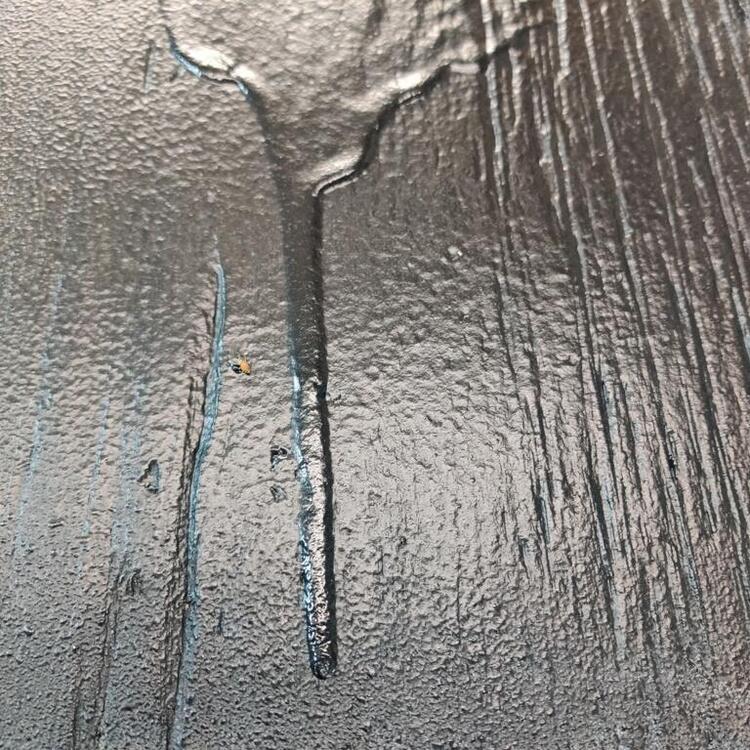
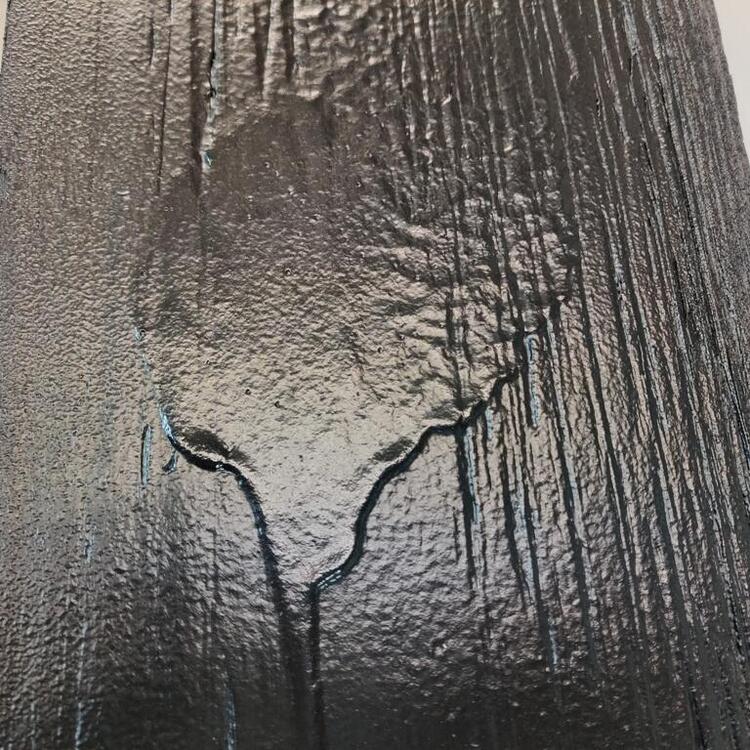
I was able to do some experimentation yesterday with the Raptor Liner and I am pretty darn excited to share - this was sprayed on a piece of plywood: Pretty - darn - cool, eh? I know, right! In case you think I am joking, have a look at a couple of pics of my car's original coating: Now, I don't intend on making runs, however, I am excited to see that the original texture can be replicated, though it will not be easy. Here is another pic - focus on the middle of the blob: Creating that texture on the areas of my floor that no longer have the original coating is my goal. If I stick with what the instructions say for mixing ratio and thinner and spray pressure and gun distance, I will get something more like this: That is not bad - I kind of like it. But, it doesn't look have the same texture as the original coating. The samples above were shot with a Schutz gun. This last one was done with an HVLP gun: This was shot on the inside of my well used and not prepared at all wheelbarrow. I am actually quite zoomed in here, but a couple of observations are: There is very little texture at all The coating is a bit less glossy Scratches in the original paint and rust (both underneath) show through the new coating. So, the plan is to used the Schutz gun to add a coating back where there is none and to a few areas where it was not applied from the factory. And then, I will follow with a coat from the HVLP gun on the entire bottom of the car. I think the texture of the original coating will show through the HVLP coating. If I don't achieve the desired texture with the Schutz gun applications, I will wipe it off and try again, or I will wait for the Schutz gun applied coating to dry, and will "fix" areas as needed with some sanding. We'll see how it goes.


-
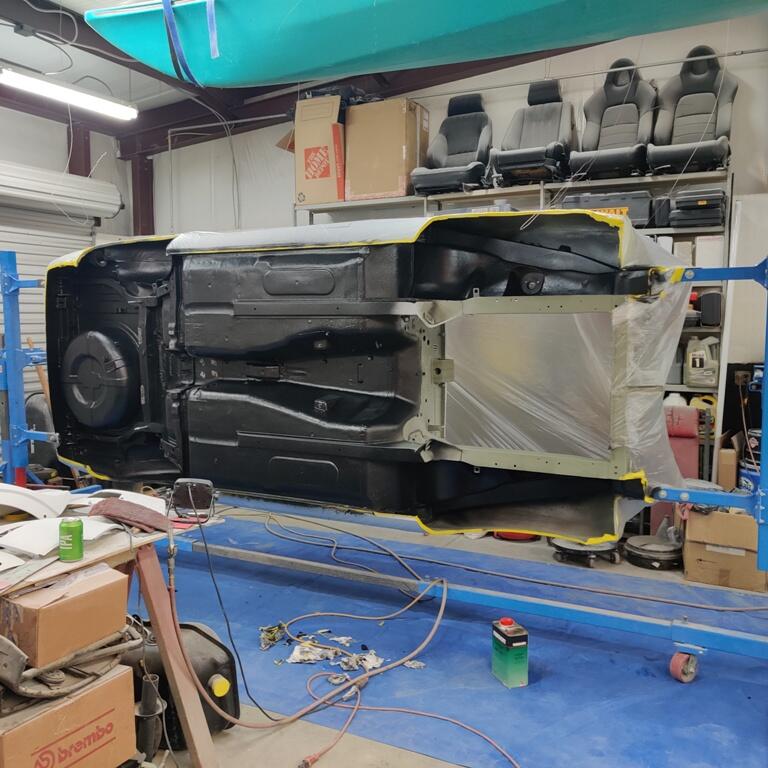
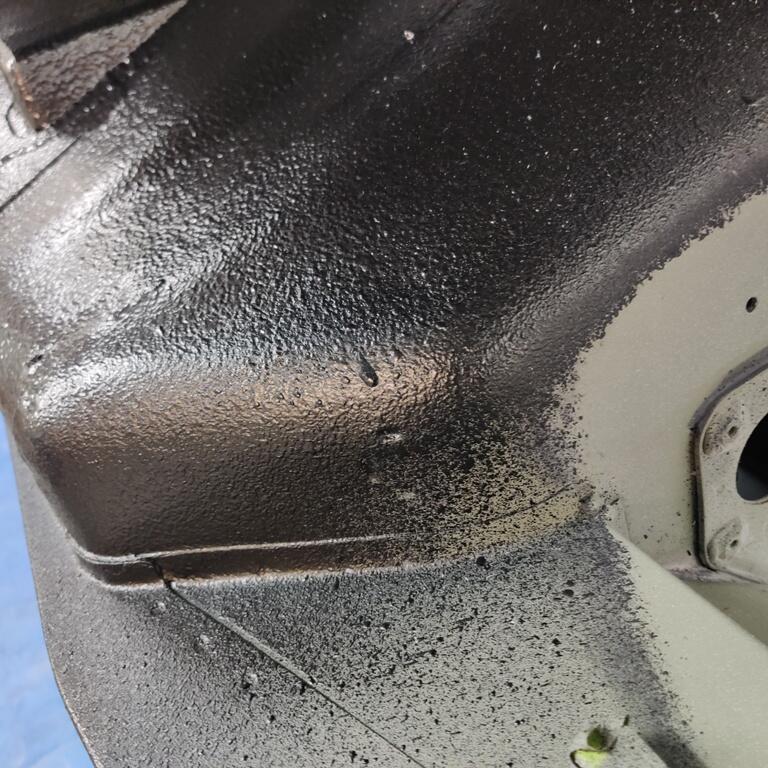
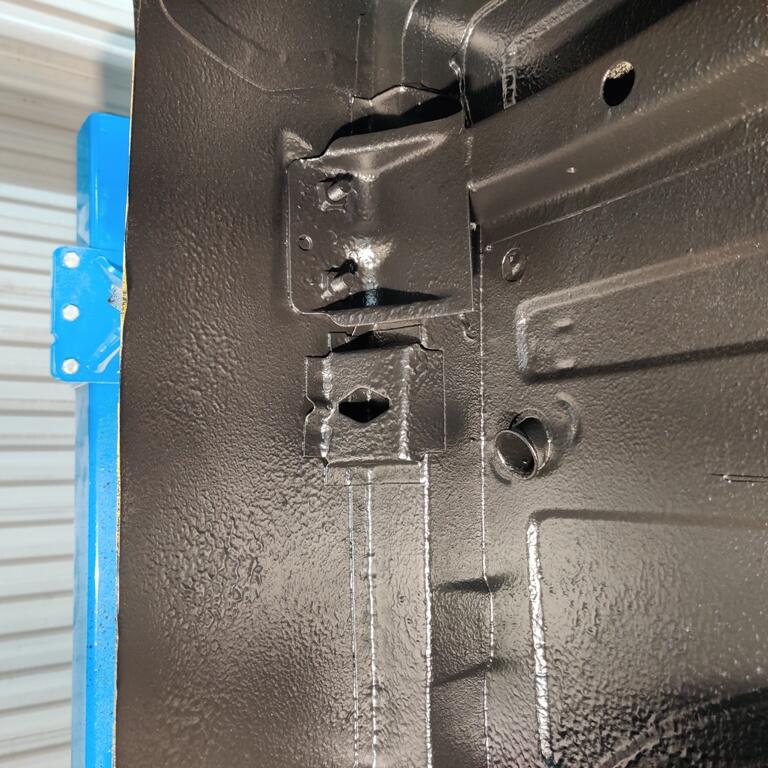
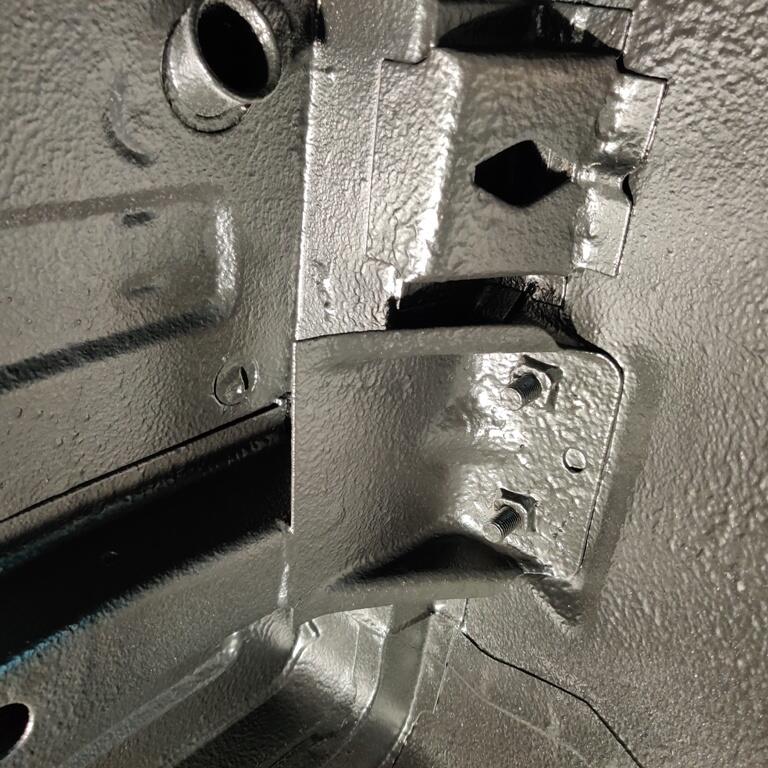
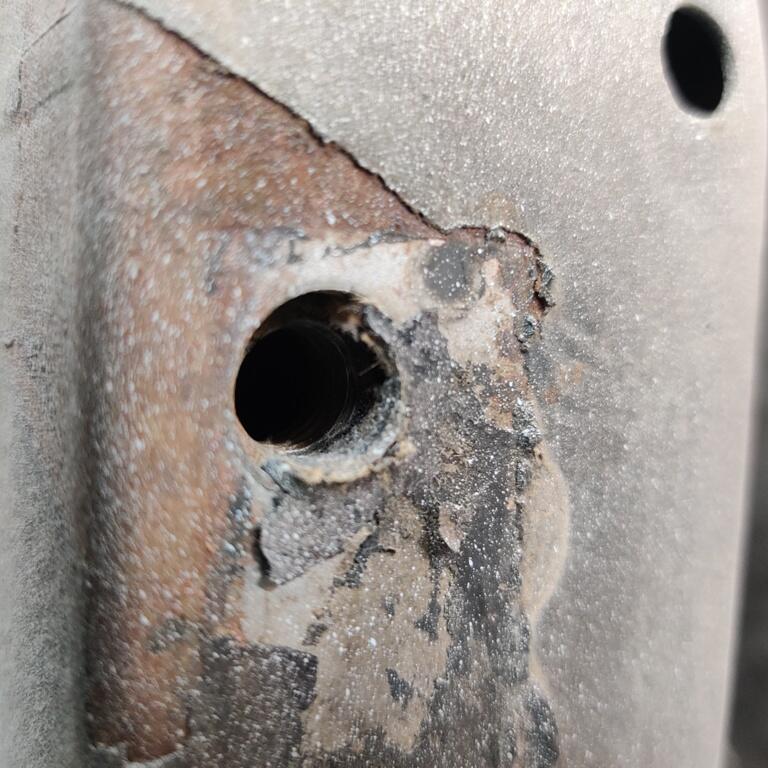
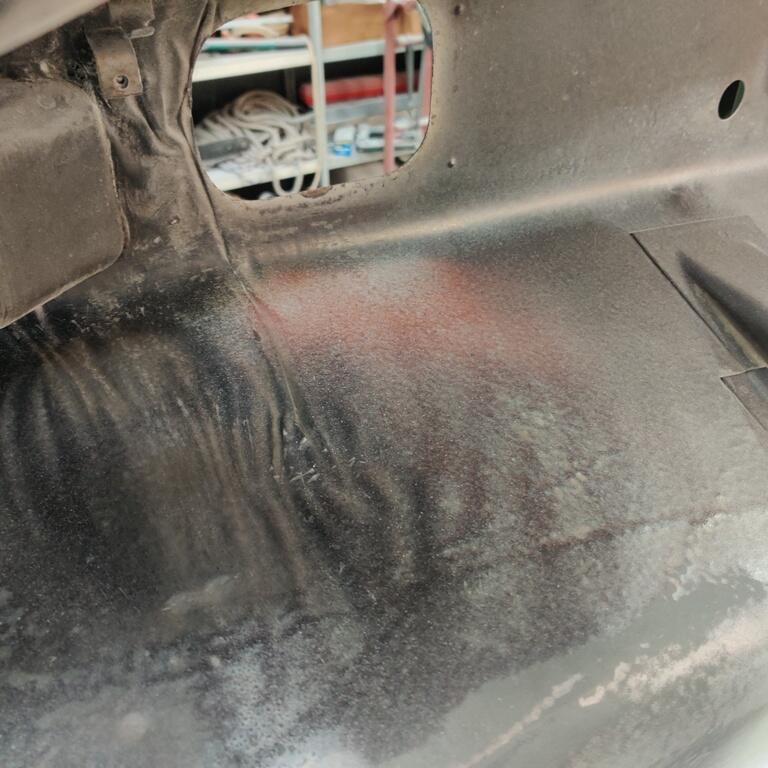
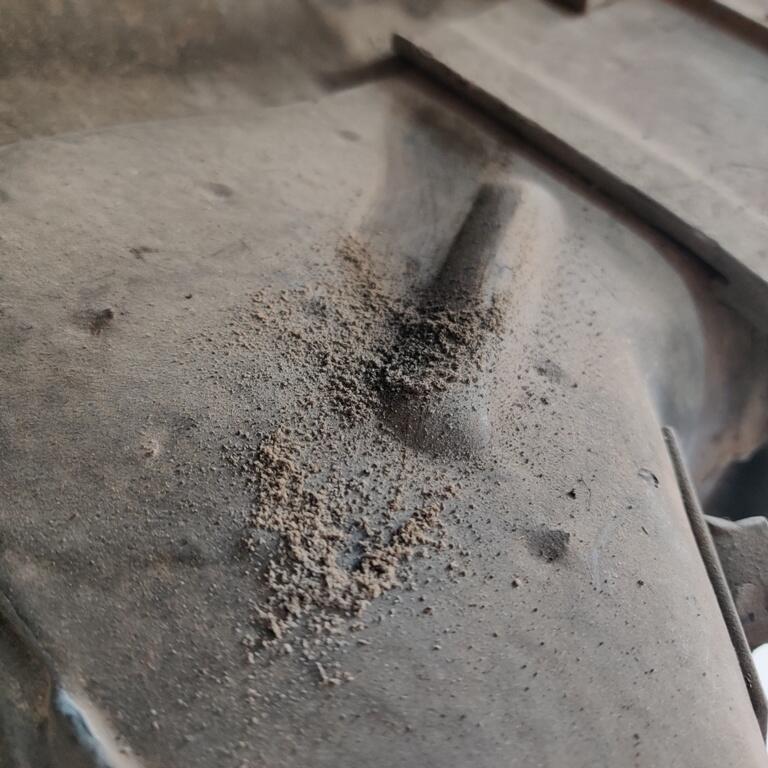
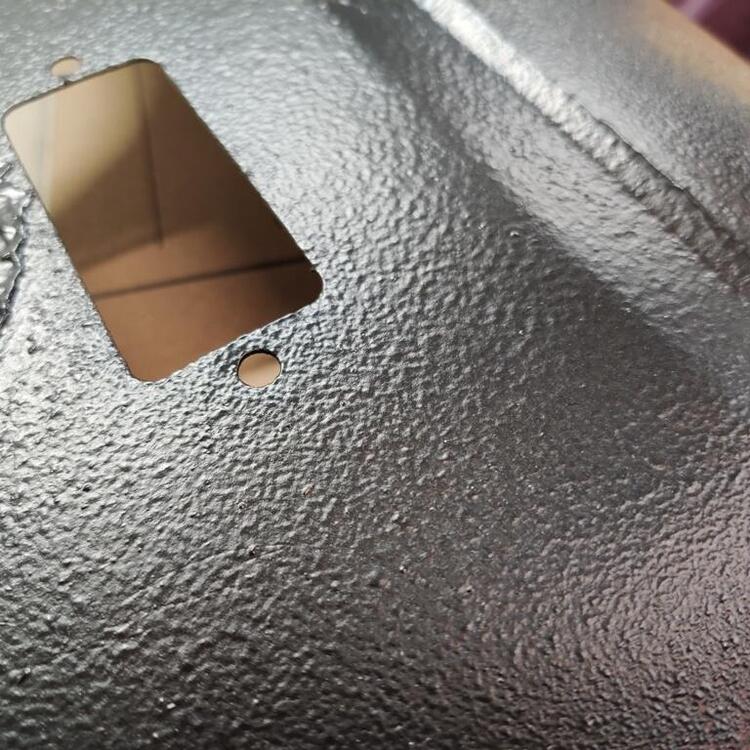
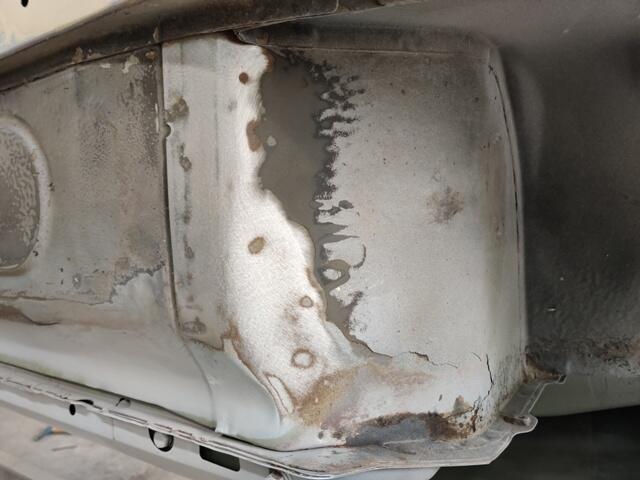
With what I believe (hopefully) is the last of the primer coats on the exterior of the car, I have switched to the bottom surface. There are areas of the floor which had impacts. These were straightened and the existing undercoat has been sanded down and feather edged. These photos show basic progress in that regard: My plan is to keep most of the original undercoating on the car. It is in great condition in most places. Where it is not, I will be attempting to spray Raptor Liner (primer on bare metal areas first). I've watched a lot of videos on Youtube of people who have experimented with different ratios of hardener, thinner, spray pressure, and spray technique. In almost of all them, the texture is not like what you see here on the car. But, I have ideas of how I may be able to get something close. In addition to continuing to prep the underside today, I hope to have time to experiment a bit. I am intrigued by one technique I saw where the person used less hardener than is called for and a Harbor freight HVLP gun with the tip drilled out to 2 mm. He claimed that less hardener allowed the coating to flow out more before drying, and the video seemed to confirm that. The Z is small, so the Raptor kit I bought should be much more than I need, allowing for plenty of material for experimentation. At the factory, they used a kind of tape to cover bolt holes to keep the coating from getting to threads. I took some existing tape off where he handbrake part bolts to teh underside of the tunnel (third pic): Preparing the underside for a coating of Raptor Liner to repair areas where the factory coating is gone) and give the entire floor a somewhat consistent finish is a lot of work. I am using small wire brushes to remove the accumulation of dirt cemented in place with oil. Then I follow with a degreaser/thinner. Then I follow with more wire brushing and a red Scotch Brite pad. It is tough to get into all the corners, but I will get them eventually. Seam sealer will be used on some seams like the overlap of the lower, rear panel to the quarter panel (third pic).


-
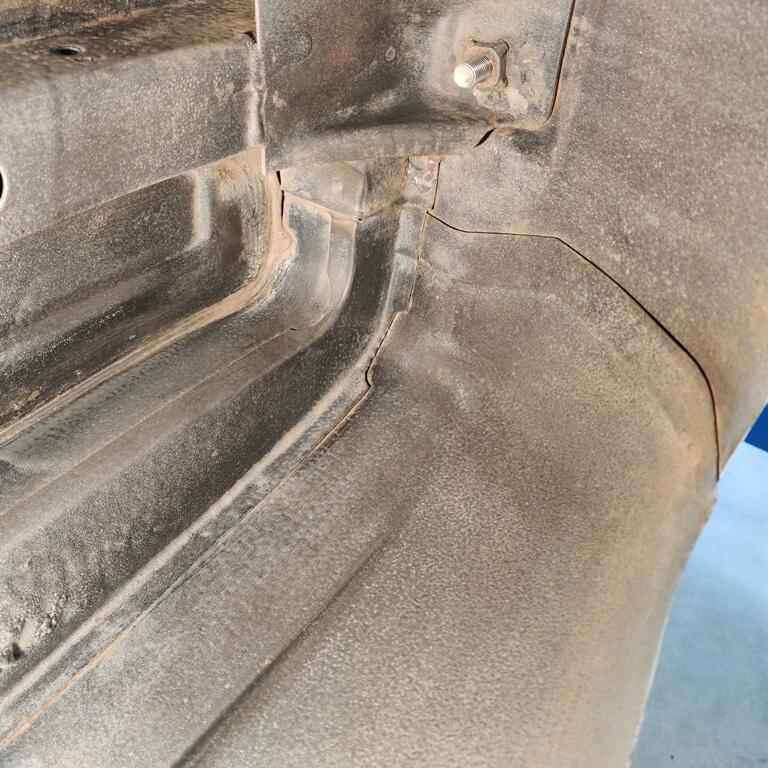
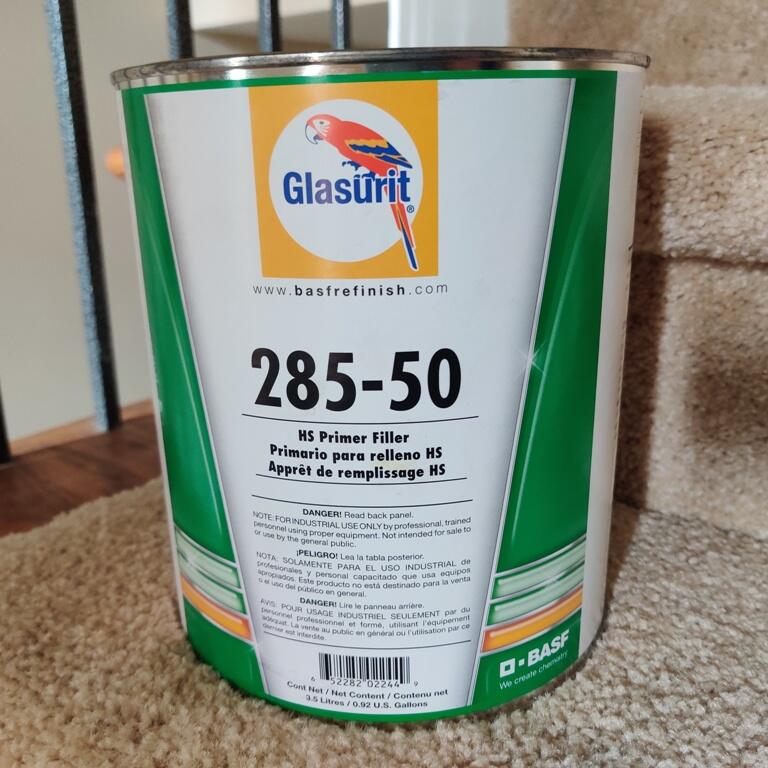
I was hoping the time between weekends for primer to dry was sufficient, but I can't explain the reappearance of very slight low areas on the right door and flat vertical area of the right fender unless the previous layers shrank. Most of the bodywork is a year plus old, but unfortunately, I am in a situation where many primer coats are being used in a few areas to build up low areas. I used very fine body filler in those areas to attempt to raise them up, and that helped. But, inevitably, when sanding the body filler, where the filler edge meets the primer, there is a slight transition which I find easiest to address with coats of primer. For my 510 that I will do as my next restoration project, I will be doing things very differently, so that not so much primer is needed. Speaking of which, I bought another gallon Friday. It went from low $400 last time to $516 this time, with tax.

-
I sanded most of the car with 600 grit today. I have been working most weekends on the body since my last post. A few areas look to have "moved" to me. Not the areas shot in this video, but a few other spots. Perhaps some shrinkage has occurred over the last couple of months. Body work is difficult and time consuming.
-
Zspert, you have my respect - I don't mean any disrespect, however, that is very, very, very... silver. As in, doesn't look original to me. Don't get me wrong... I love that silver. But, is it the original silver for 70/71? I am close to having the car I am restoring painted and am planning to go with silver, which is the color it was originally painted. However, I am concerned that I won't like the factory silver which often looks grey in pics. What paint line was used for that car? Anyway, from the one pic, that car looks very, very, very nice. Would love to see more pics. I also have an order typed up for several items from you - some of the last items that I will need to procure for my restoration.
-
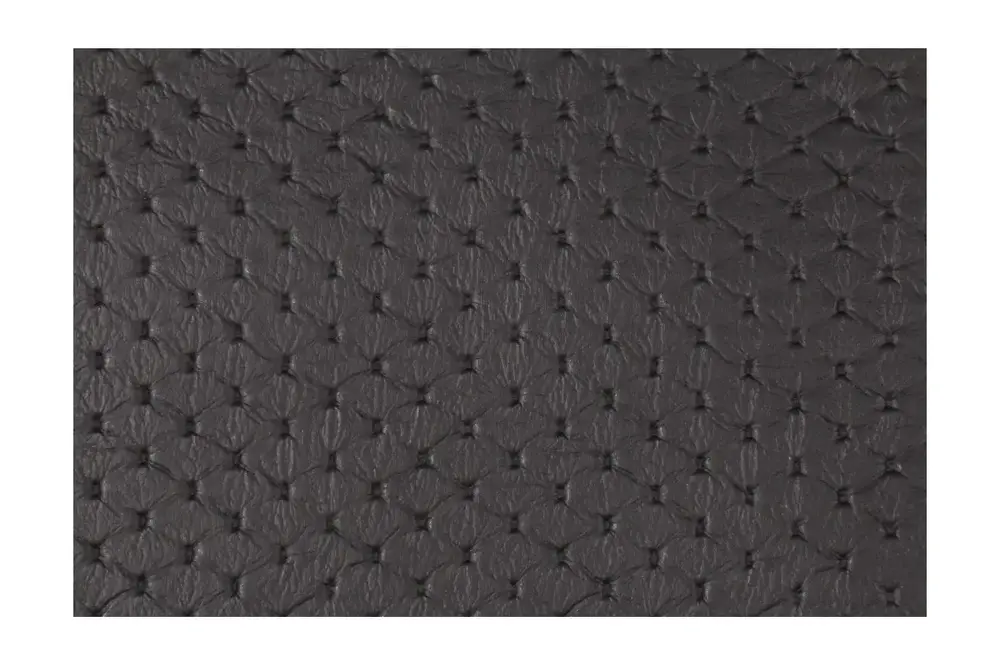
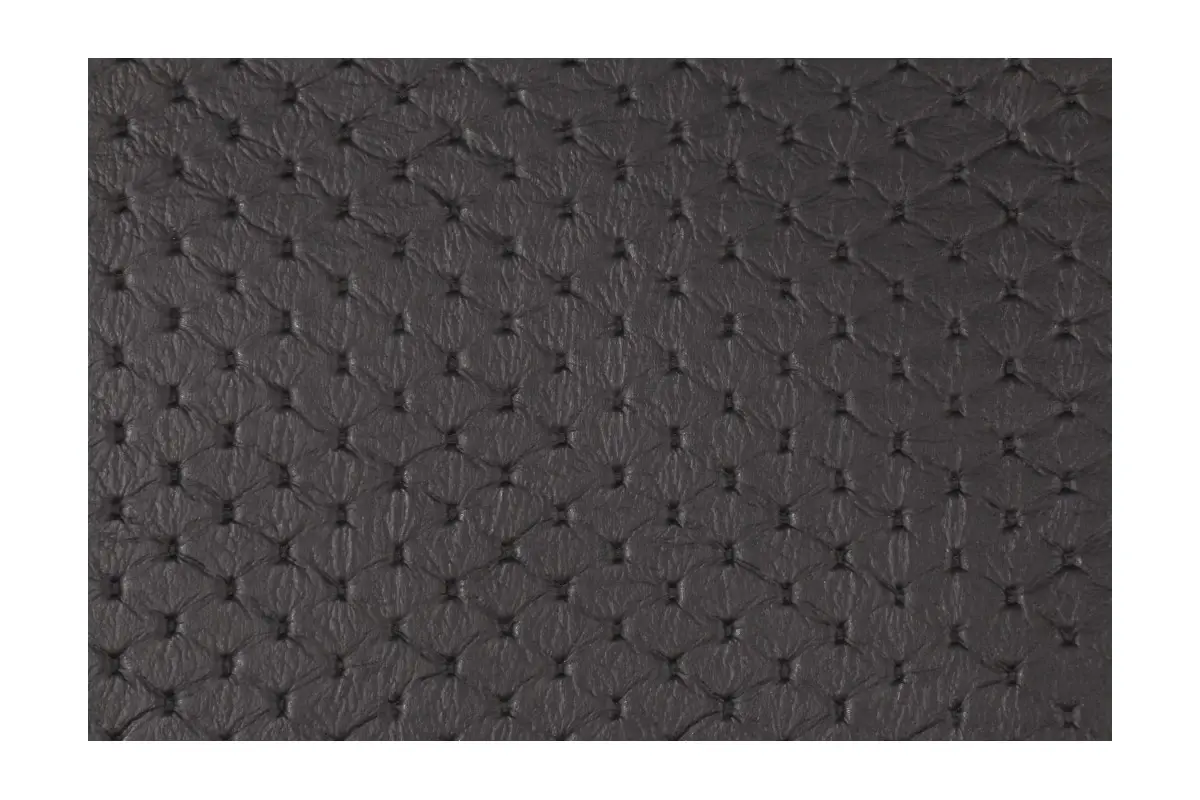
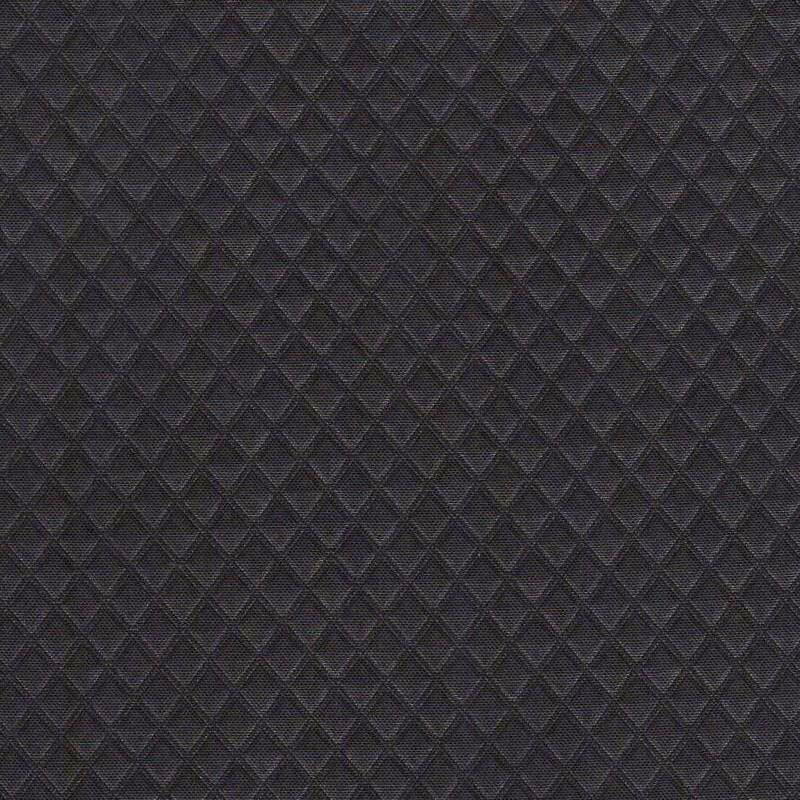
This is great! Thanks for posting these pics. Another material I have been looking for is a vinyl for the tool storage compartments. I have had sourcing some used ones on my list for a very long time, but haven't been able to find anything. I am contemplating using a cloth material - gluing it to a 1/8" foam backing to "semi" replicate the original look. Here is a cloth I found: https://www.decorativefabricsdirect.com/MORSE-BLACK-Diamond-Fabric-p/7036211.htm This vinyl would probably be more durable, but looks considerably different: https://www.fabricguru.com/marine-vinyl/marine-vinyl-diamond-outdoor-fabric-black.html?gclid=CjwKCAjw6raYBhB7EiwABge5Kl3cwLQmn_bZARZ-xjpzzLBqujGFLs8qjcoWdEbapQ8zzvbzNIH3HBoCCCwQAvD_BwE