inline6
 Subscriber
-
Joined
-
Last visited
Everything posted by inline6
-
 Thanks for the info. I spray with a 3M mask with charcoal filters. I am guessing is reasonably ok. I have absolutely sanded by hand, and wear nothing more than a N95 particle mask. I will be more careful in the future.
 -
That is amazingly clean. Love to see some others post up pics of this area of their cars "as found". I may get some of my passenger fender on my first (now track) car, which unfortunately has been off the road for 7 years now. I doubt I cleaned it out right when I put it in storage.
-
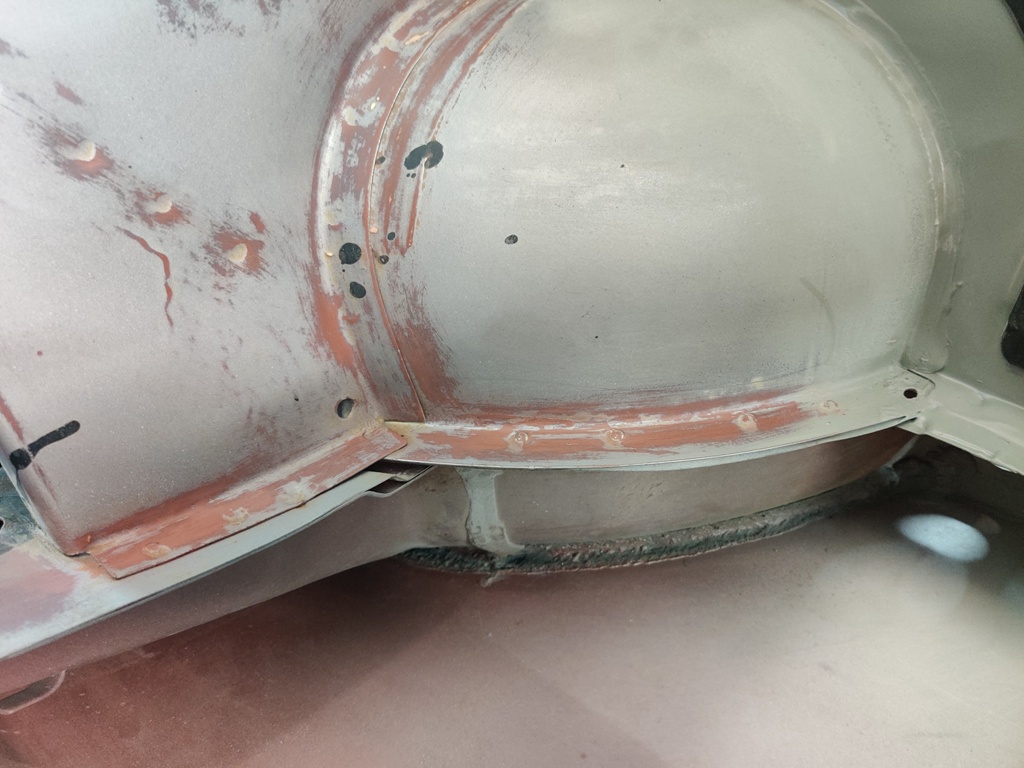
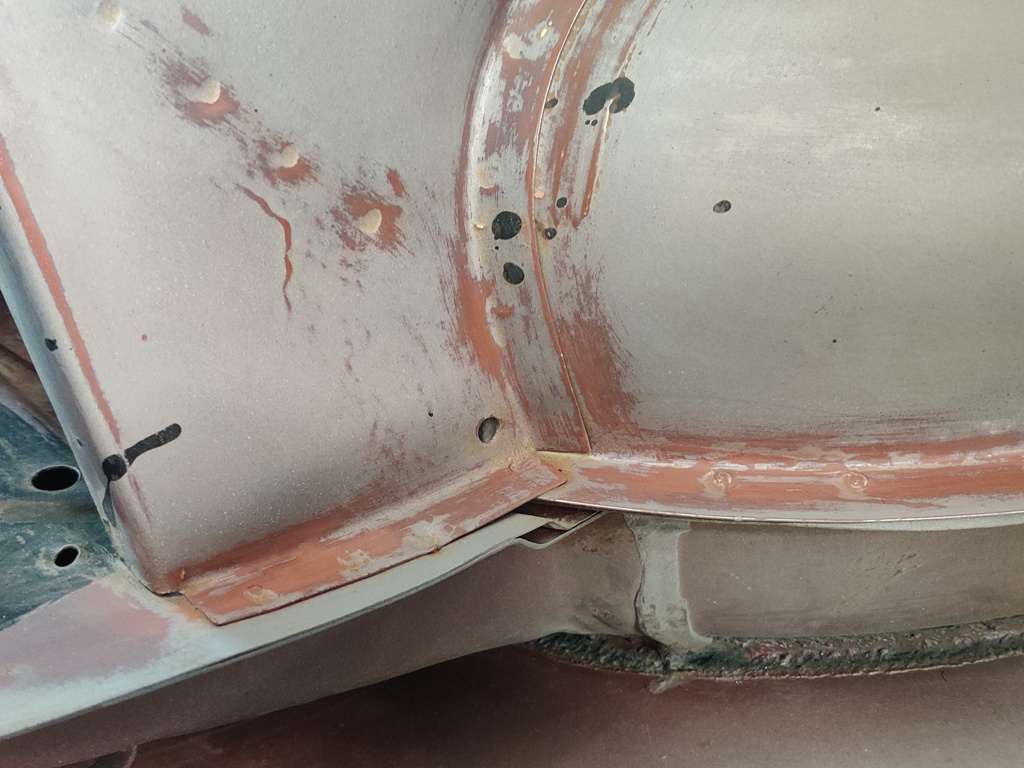
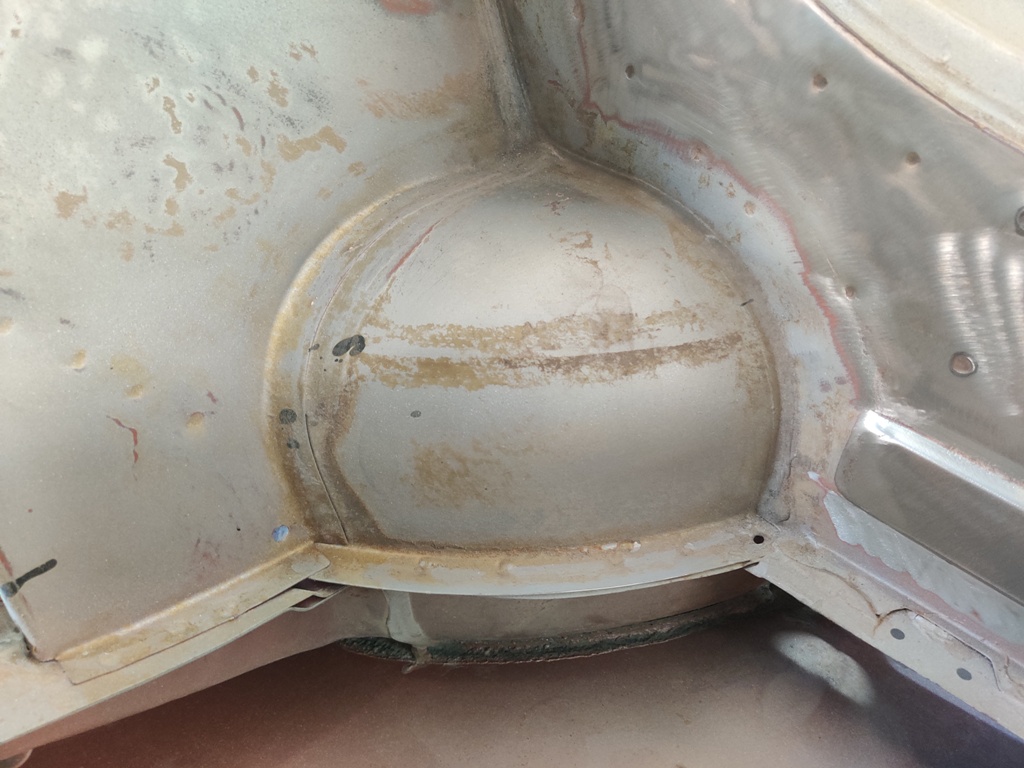
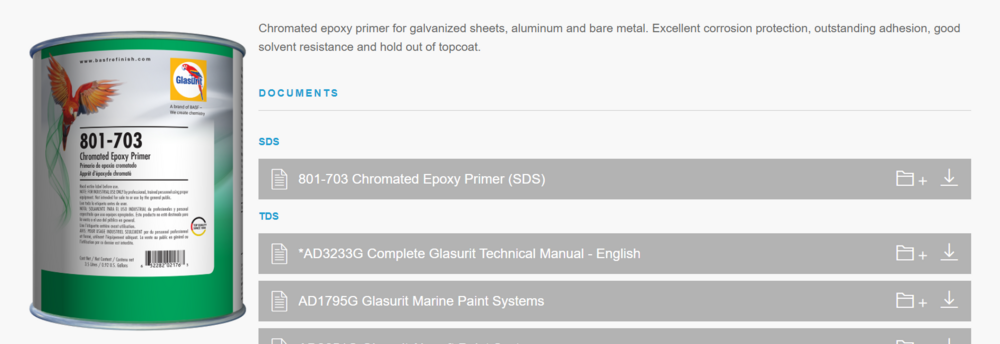
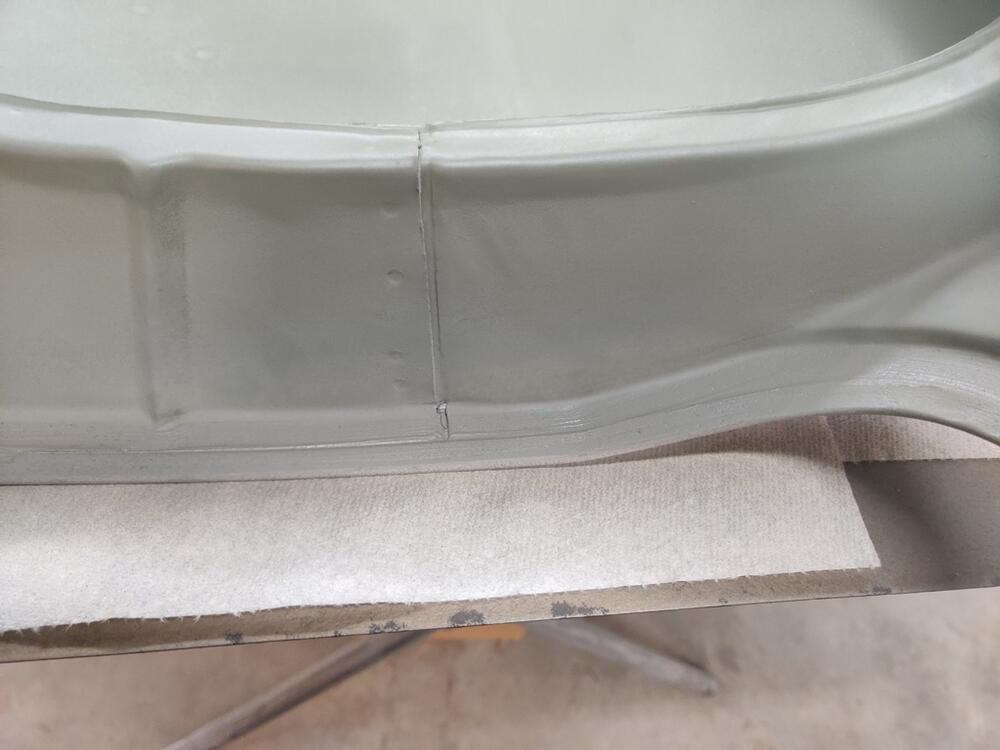
On my first 240z, with new fenders back in 1993, I sprayed chromated primer into the area we've been talking about. I did not immerse the corner of the fender in the primer. For my 240z undergoing restoration currently, I used the existing fenders. They had some rust in this area. I cut out the rust and welded in replacement metal. I also unfolded the metal that wraps around the reinforcement panel because some rust had occurred within. As a result, the area captured by the folded rear edge of the fender had "expanded". This happens when metal rusts. It expands at the same time. So, I unfolded the bottom two or three inches where the outer panel wraps around the reinforcement panel. I manually removed the rusted metal that was loose from within the pinch, and then re-pinched the reinforcement panel. This time, I poured the epoxy primer into the inside of the reinforcement panel. And separately, I applied seam sealer to the outside of the pinch to seal the other side of it. So, that corner of the fender has been "soaked" in chromated epoxy primer on the inside, and seam sealed on the other side. And of course, now it has a fabricated panel that hopefully will keep debris from settling into this trouble spot. The chromated epoxy primer I have been using is pretty bad-arse. That said, again, I do not recommend relying on it (plus top coat) alone to save this area of our cars from rusting.
-
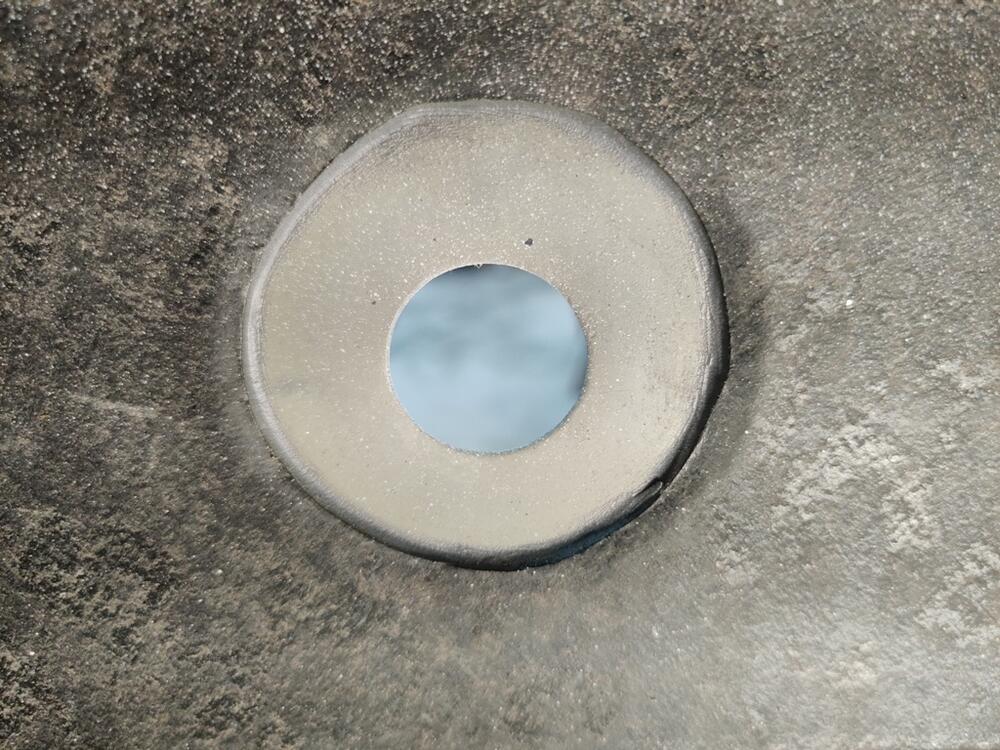
That is helpful information. Cleaning that area out I think should be recommended regular maintenance as it is a real problem area on these cars. I cleaned that are out on my first 240z (now a mostly track car) a few times over the years it was on the road after I restored it. Even with new fenders, and the extra prep of using Glasurit zinc chromate epoxy primer and paint in that area (on the inside of the fender), 90% garaged time, driving only infrequently in rain, and the before mentioned clearing of debris a few times, the outside, bottom corner of the right fender has some tiny bubbles in the paint, indicating some pin holes are now present in the panel. I hope my modification on this car will eliminate this problem completely. For what it is worth, regarding the comments about not recommending sealing that area 100% by some here, I note that there is about an 1/8" air gap between the inner reinforcement and the outer panel at the very bottom where the bolt hole is. The question for me now is, do I leave the 3 slotted vent holes I added? Those are now entry points for water coming down the inside surface of the reinforcement panel. I could close those up, and the air gap at the very bottom where the bolt is would still allow drainage.
-
I don't recall ever talking about those or seeing them with either David, or Tom Howen, his friend and driver. Tom was the car builder, engine builder, etc. Dave sold Datsun Competition Parts and Cosworth pistons and other brands of racing parts. He possessed all of the knowledge from their efforts, and he provided the financial backing for their direct racing efforts. I believe there were some reliability issues with the roller rockers, and I also remember hearing that weight was a problem, but I don't recall if I got that info from either Dave or Tom directly. I worked in Tom's Shop for the summer of 89. It was neat to see a lot of the work being done and learn some from the depths of knowledge they had acquired.
-
To the original poster (OP), I offer my opinion. I only have experience with Mikuni 44's... so stating that up front. David Weber of Malvern Racing (long dead, but was a friend of mine when I was a young kid) told me that Mikuni 44's are the best carb for Datsuns. He didn't care for any Webber variant and the 40's were no good either in his opinion. I was 18, and running a 2.3L stroker motor in my 510. Know that there are many variables in engine building and you can get lost in them. That said, don't. Rebuild the 44's you have. Match the intake side ports of the manifold to the carbs outlet if you wish, or don't. Not an issue for a street car. Taper from intake inlet to head side should be gradual, but for a street car, again, it doesn't really matter. Do source RUBBER carb isolators. Dave said the others are trash, and Mikuni's won't operate properly if the fuel is bouncing around inside the carbs. Mikuni's can be tuned for street without issue. I was running 40mm chokes on the 510, and it was totally streetable with a 490/290 cam. It was my car in college. Lotsa fun. Separately, I have run 44's on my 240z as well. 2.933L technically because sonic bore testing wouldn't allow me to go past 88.5 on the bore. Narly cam, still totally streetable. Lots of fun. The crazy loud wine is a Kameari chain tensioner which I may have had a bit tight.
-
I know! And, all the time and money that has gone into repairing and then painting 💰💰💰💰💰 on everyone's Z before us... and possibly will go into every one after us! I mean, I REALLY don't want to have this area rust out again on my restored Z after I spend 2000-3000 hours and tens of thousands of dollars on it. Just not an option. For what it is worth, I considered removing the lowest 4-6 inches of the reinforcement panel, in order to remove this "trap", but there is one of two bolts which secures the lower fender here, and without it, the shape of the outer panel will be altered, and unsupported.
-
Ah. Yes, a modification of some sort to keep debris of a certain size from ever entering the cowl would be very helpful to the overall situation.
-
Not a bad idea in concept, but the I think the problem is that the rear fender reinforcement panel, specifically because of how the shape of it twists at the bottom where it is then spot welded to the outer fender panel - it makes a "wedge" area which literally traps debris. Sure, the water (gravity fed) will flush the area if you route the drain to this location, but I don't think it is accurate that it will flush out all of the debris. Depending on the shape of the debris, it can get stuck in a way such that it will not get flushed out. Also, focusing the drain from the cowl area, in addition to flushing with water, will add a new source of debris. Anything that finds its way past the cowl panel vents in the top of the car will work its way to the cowl drain holes. Think propeller seeds... or pine straw, for example. Debris that doesn't flush out holds onto water every time it rains... thunderstorms... or possibly even sprinkles... or the car is washed, etc. Thinking about it, I am now of the opinion that the main contributor of that debris in the first place is the cowl drain.
-
Not a thing I care about - just decided to point out that it was me. 🙂
-
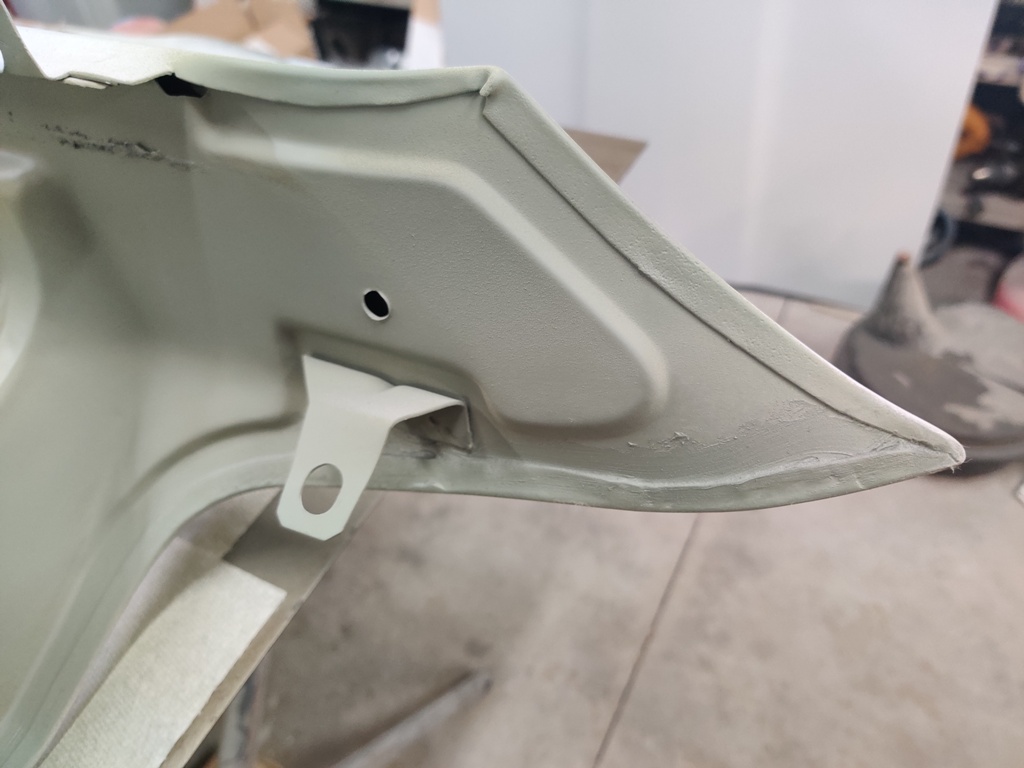
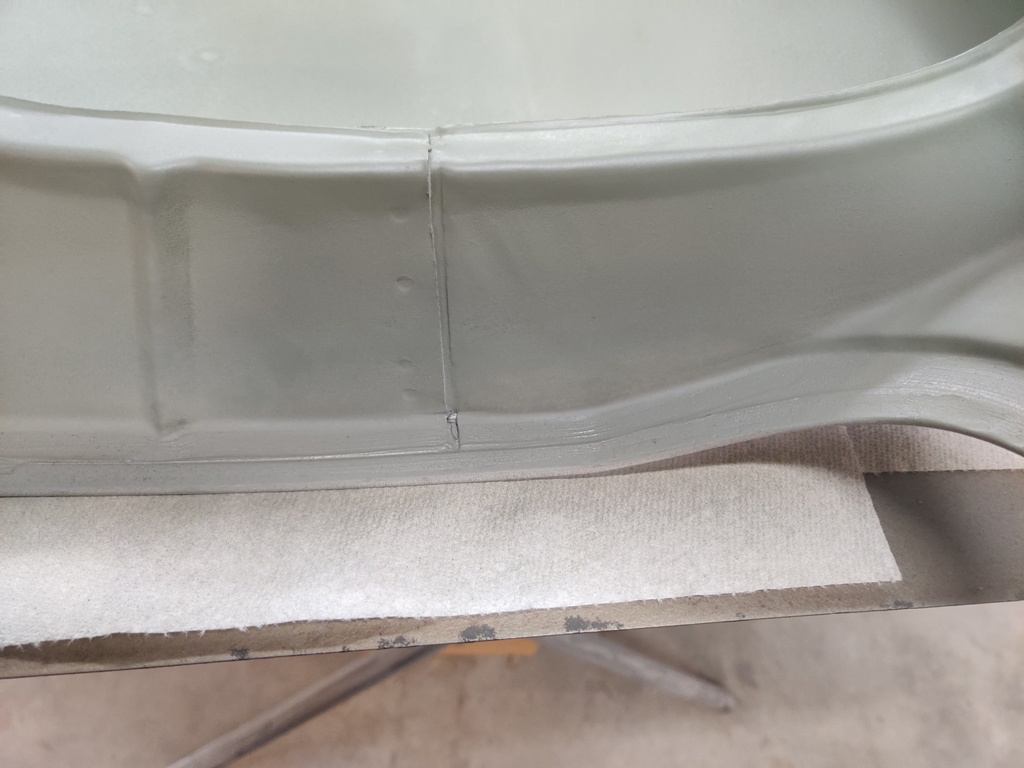
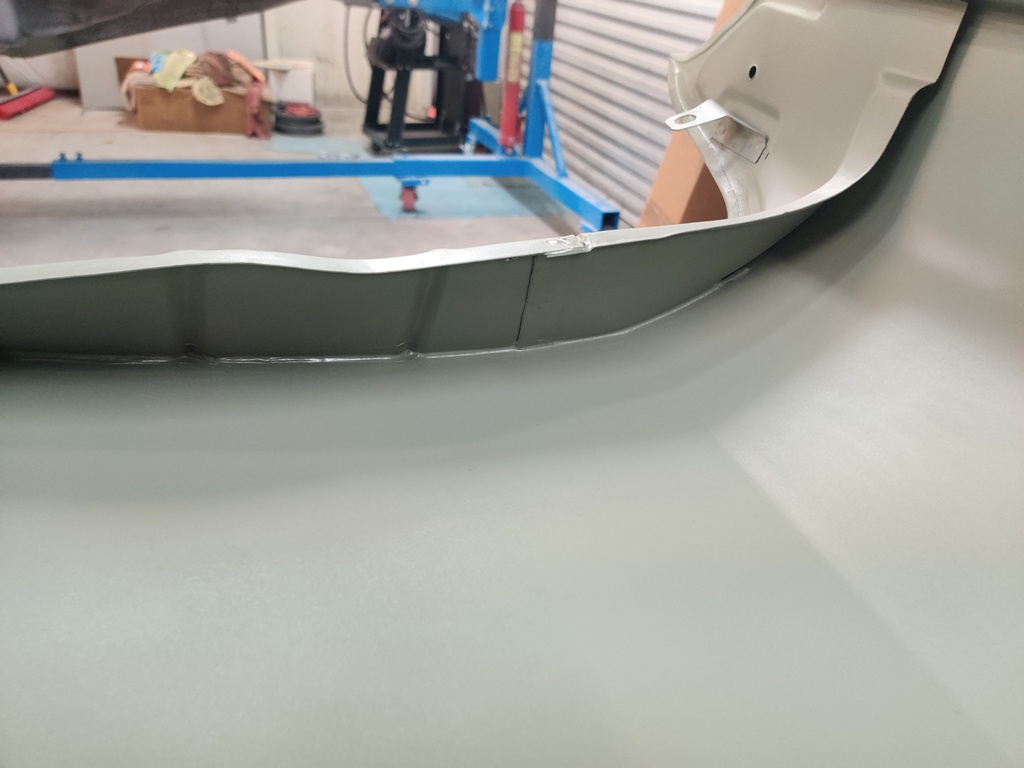
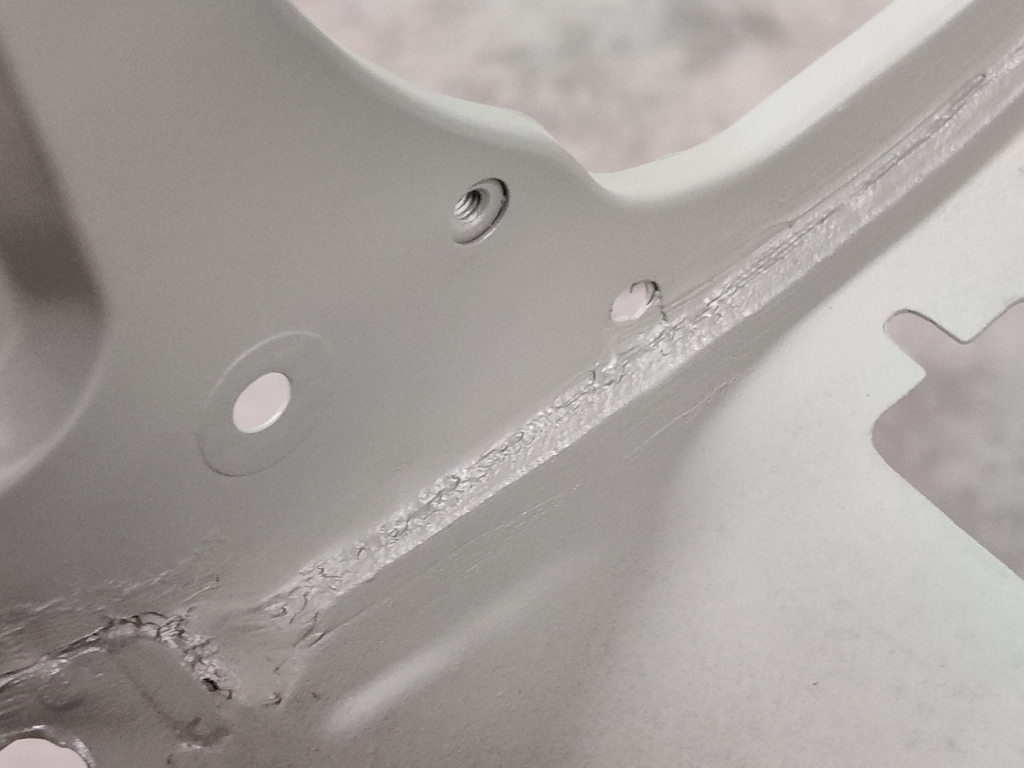
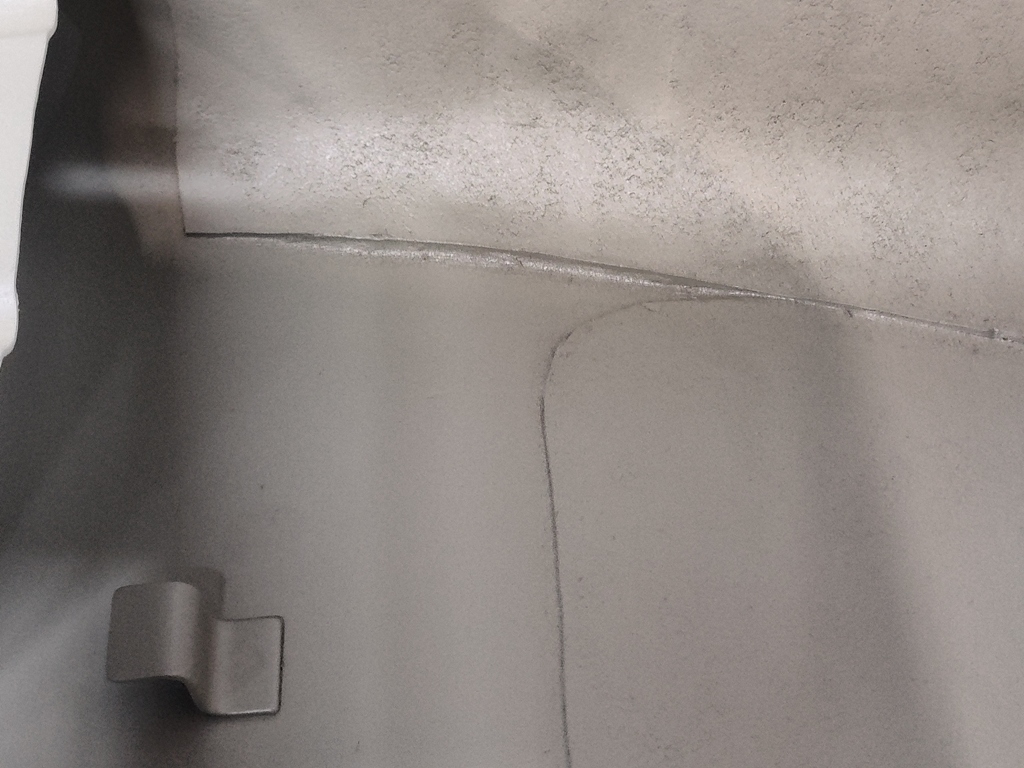
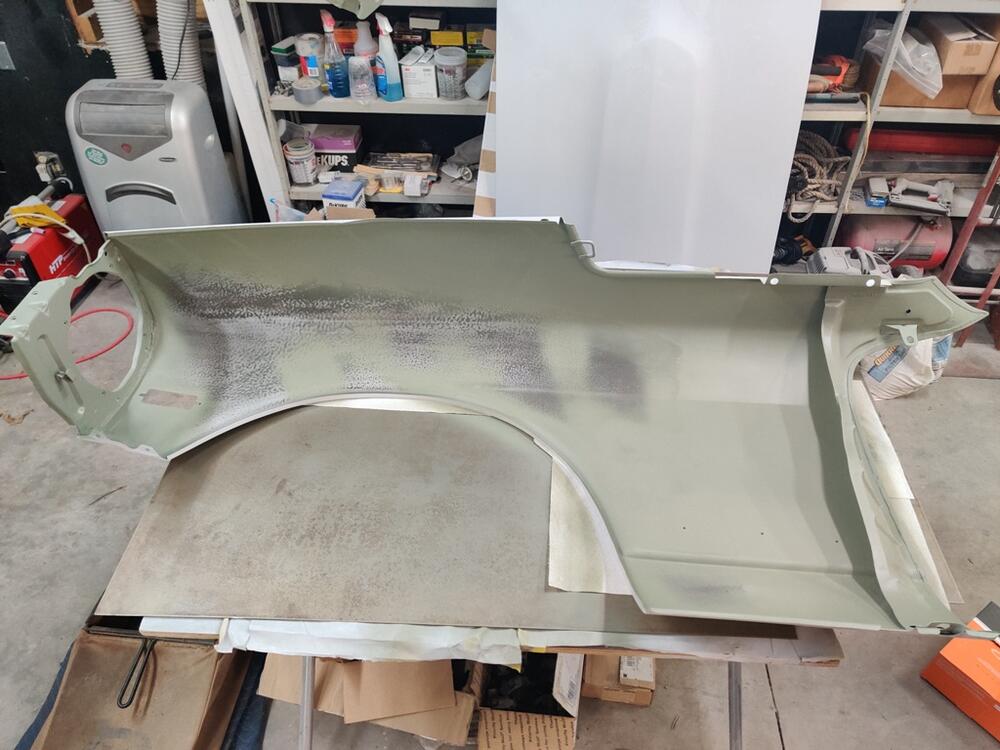
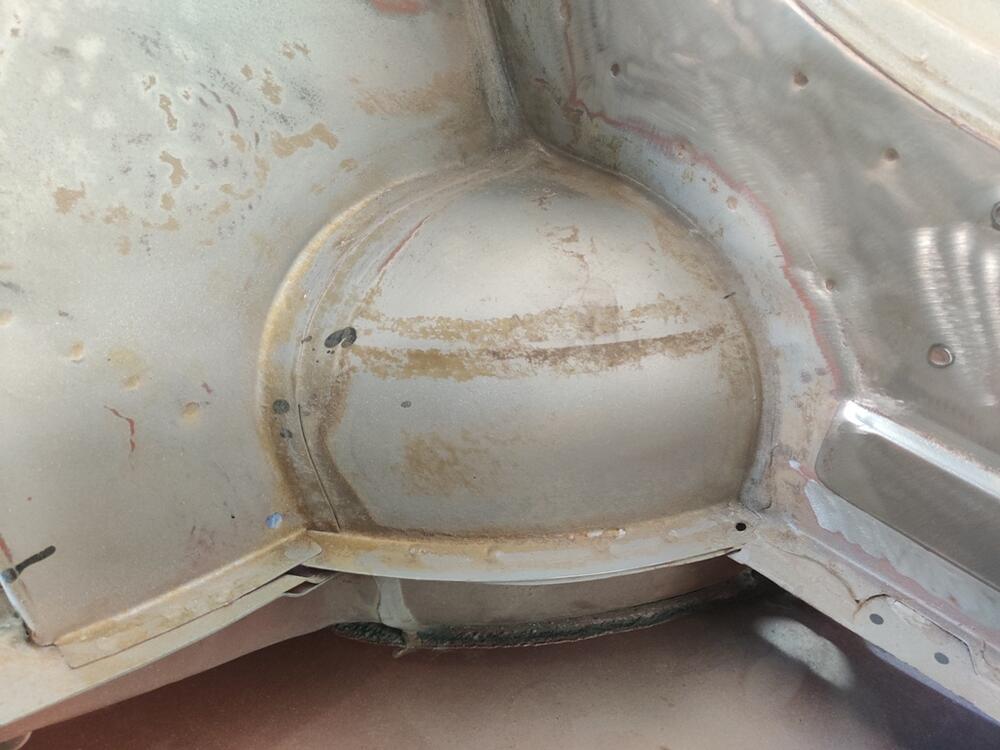
Actually, when looking at this picture, you see the black line going vertically just in front of the hinges? The area that will be kept dry is to the left of that line, but entirely on the fender itself, not the car body. When the fenders are re-attached to the car, I will use a new, closed cell foam weatherstrip in the location of that black line. This will keep much of the water coming from the cowl drain from entering the bottom of the fender where the rear reinforcement panel is spot welded to the outer fender panel, but with that said, my modification will keep the lower backmost corner of the fender (area between the outer panel and the inside of the reinforcement panel) dry. Cowl drain functionality will not be hampered. You can follow the rest of the progression of this work done to the fenders in my restoration thread if you are interested. The link is in my signature.
-
Yep, that was me also. 🙂
-
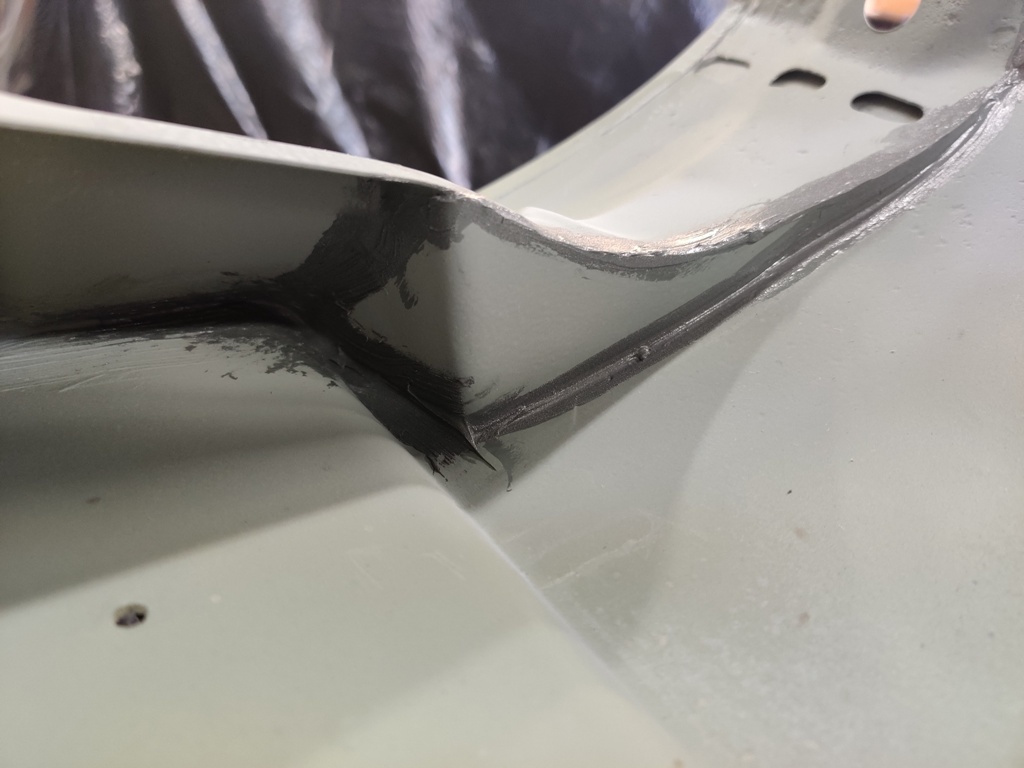
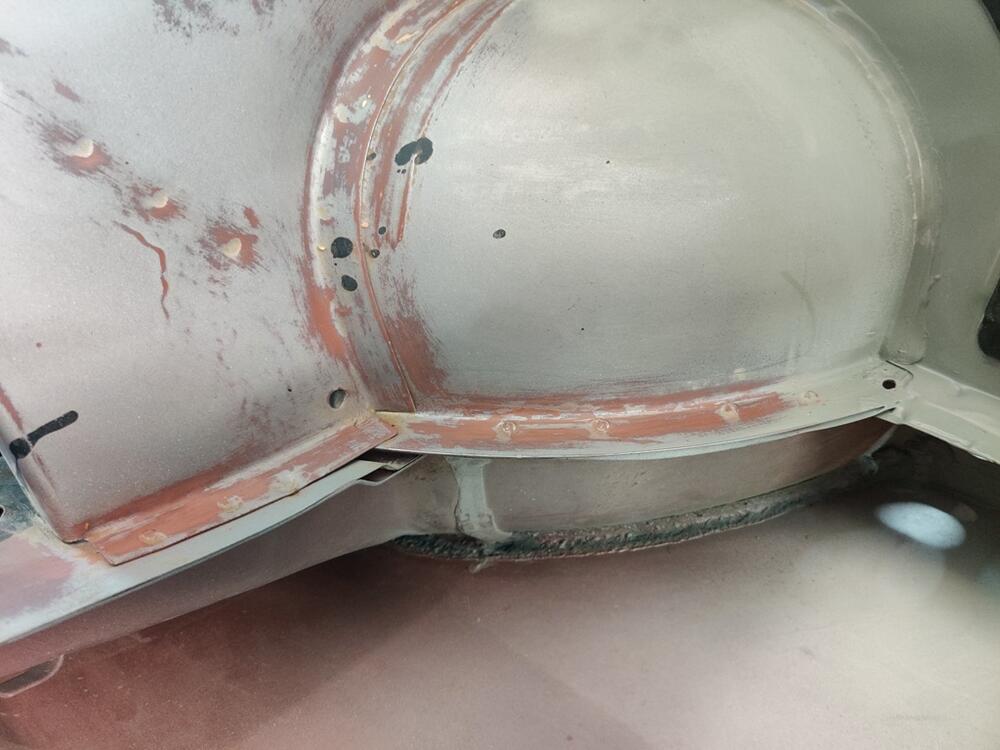
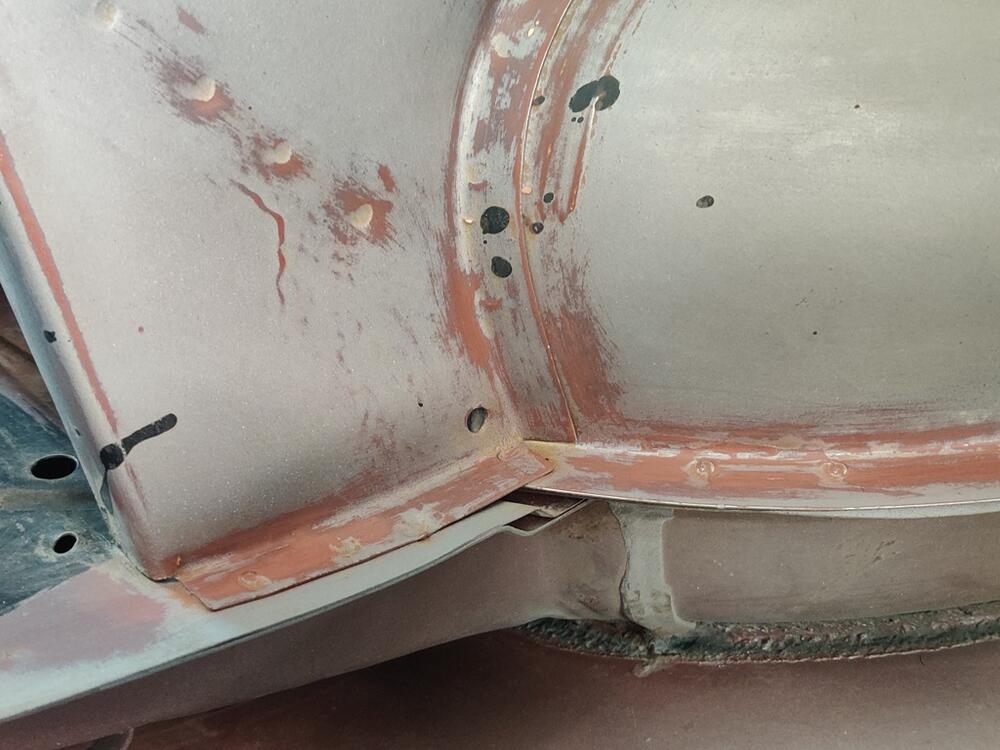
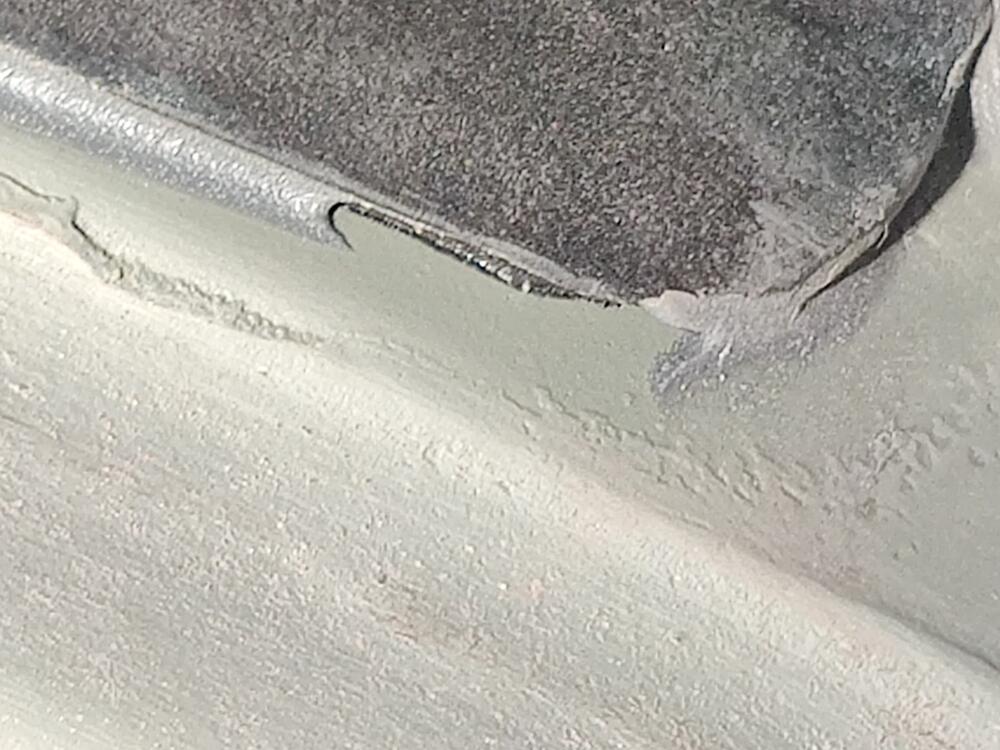
Deep! That said, I think the worst option is spray coatings into this deep crevasse and hope for the best. My fabricated parts will direct water away from this area and therefore, keep them dryer than they would be otherwise. Additionally, I have coated these areas on more than one occasion with epoxy primer. Feeling good about it. 😎
-
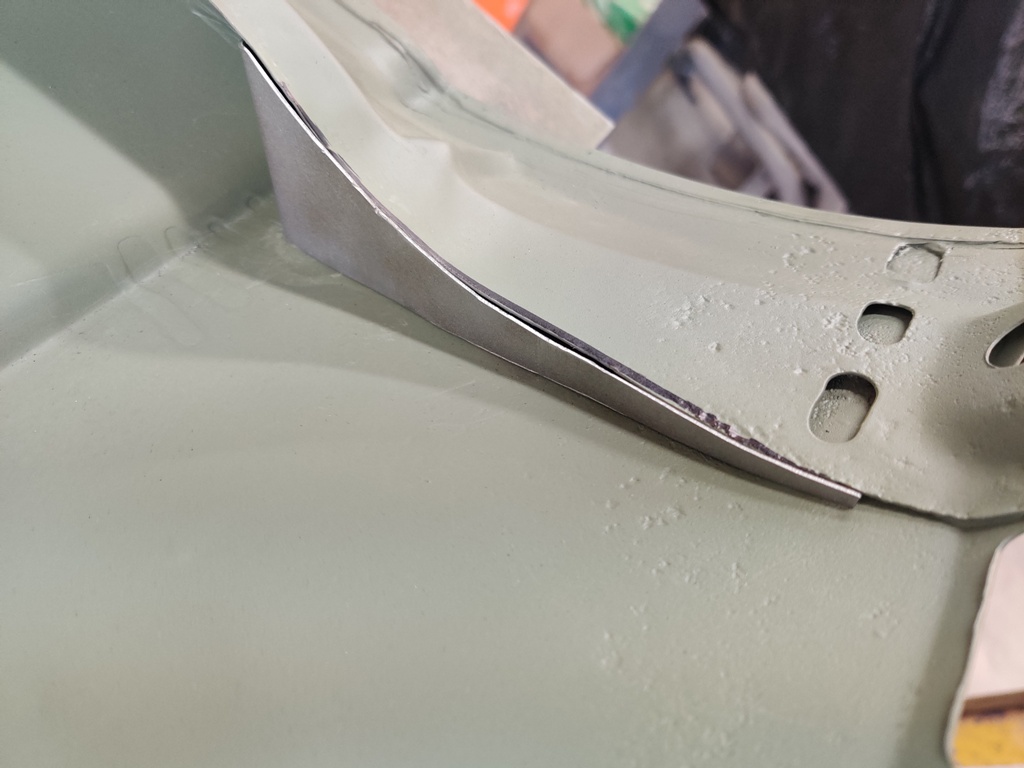
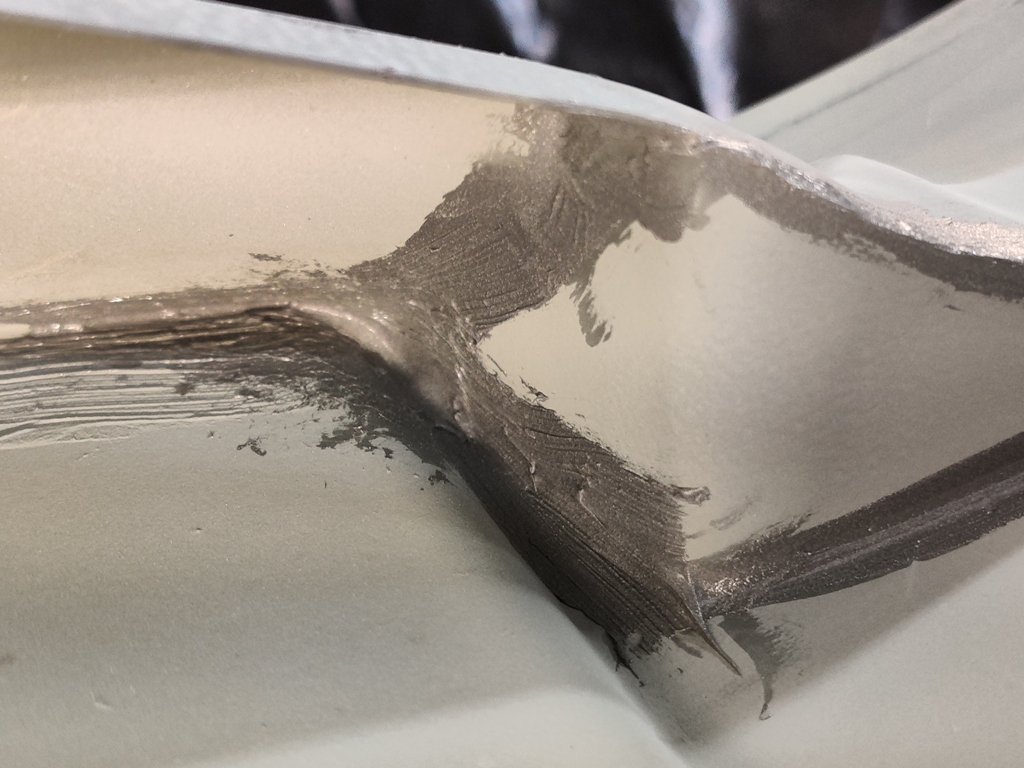
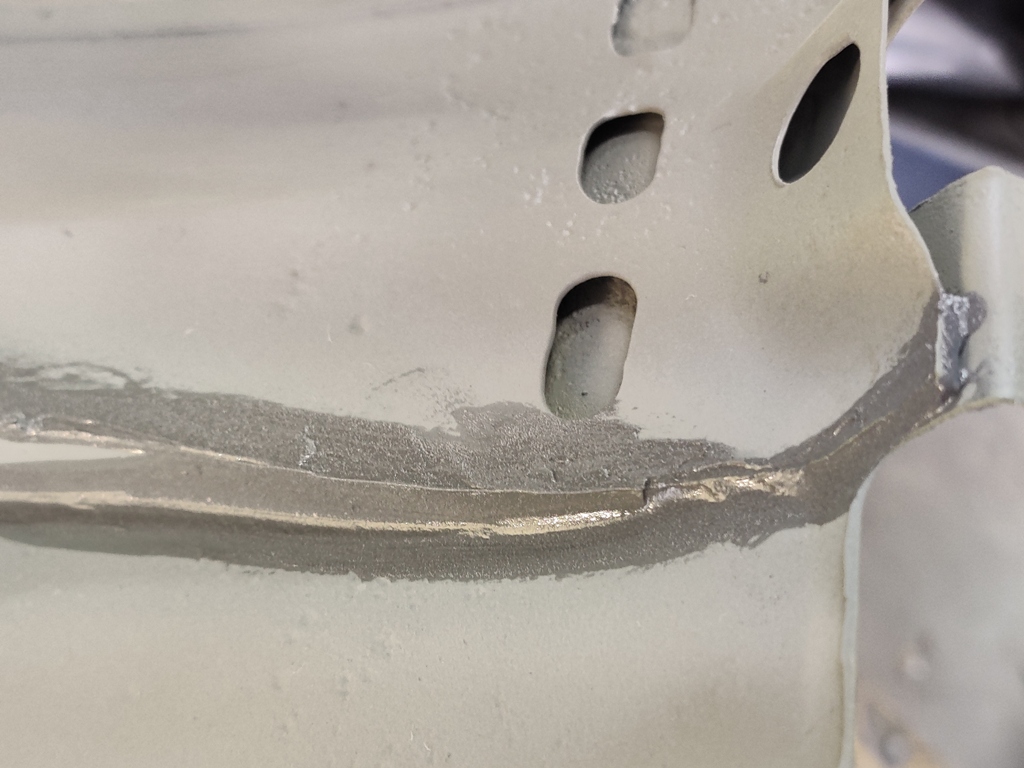
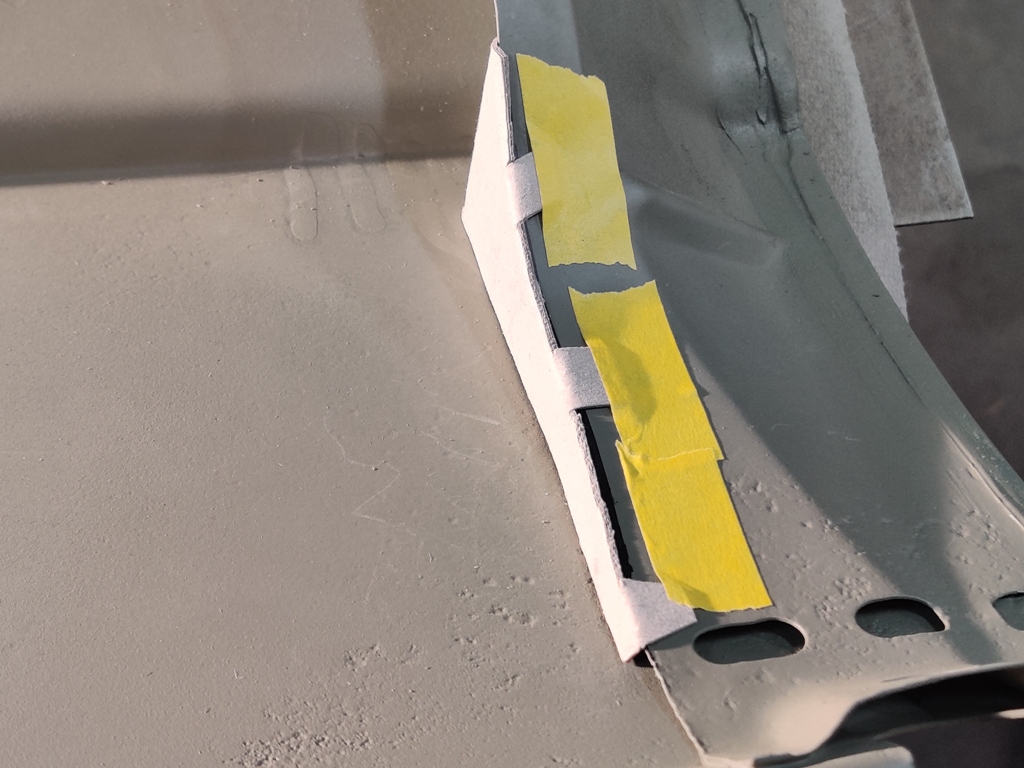
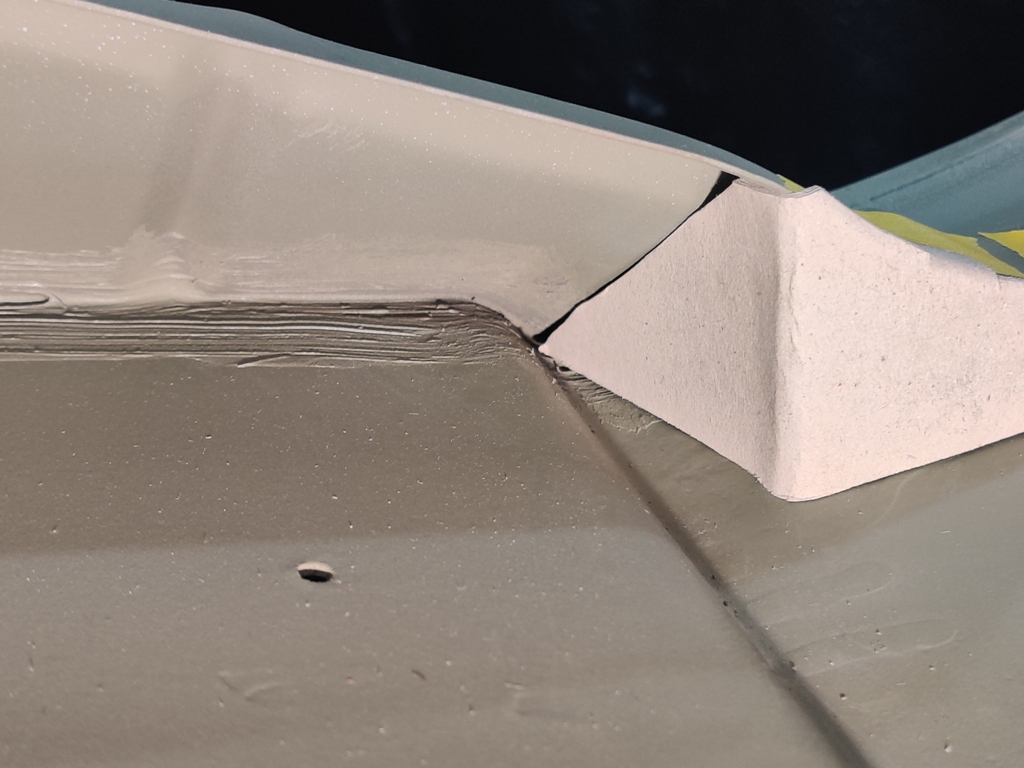
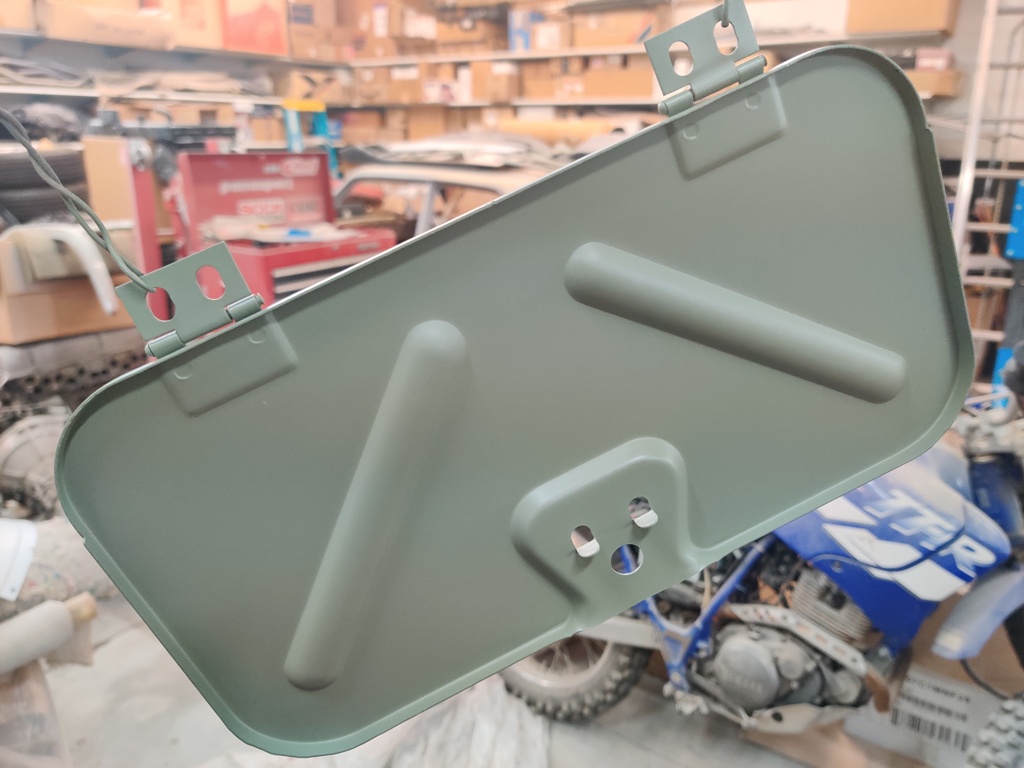
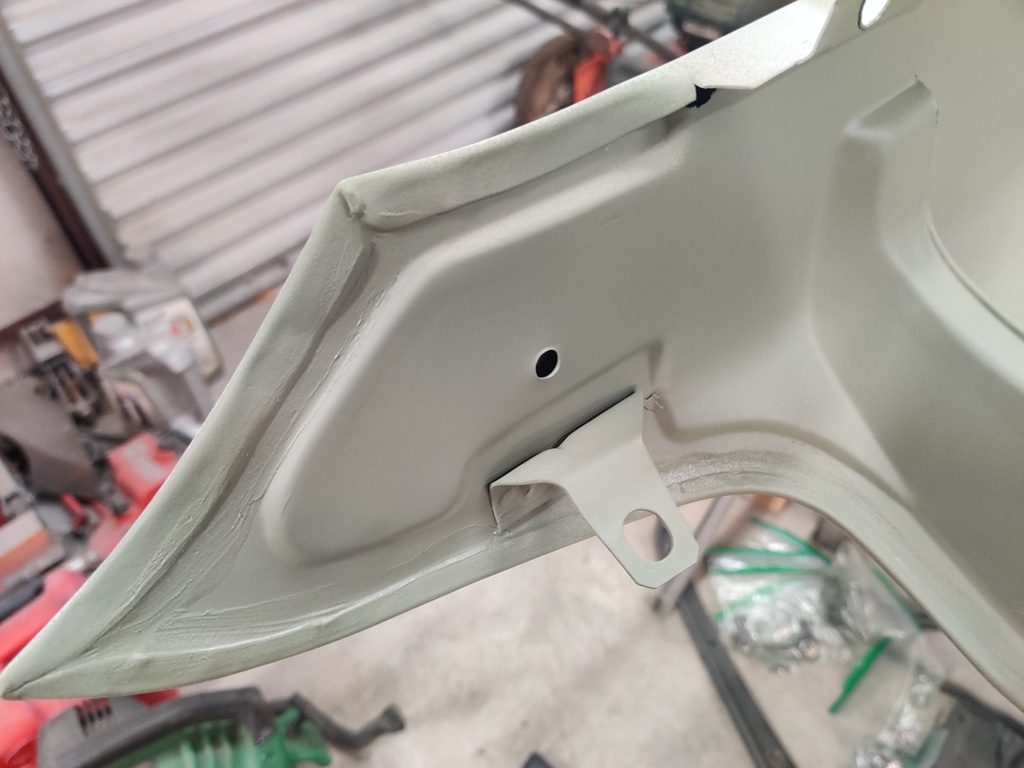
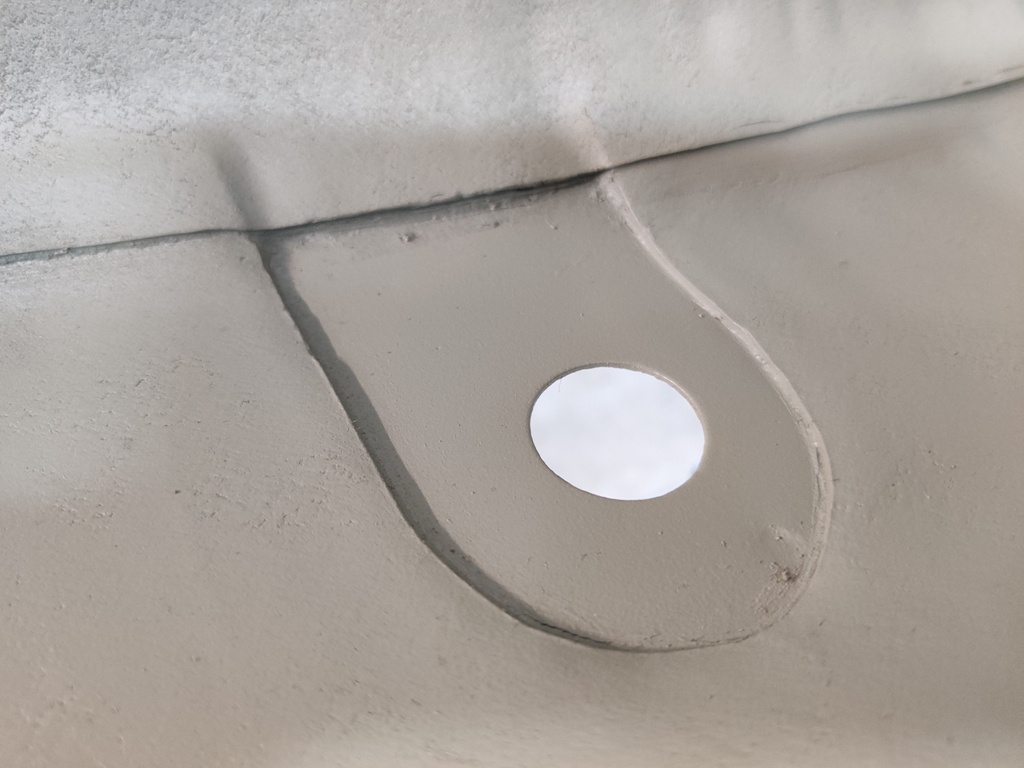
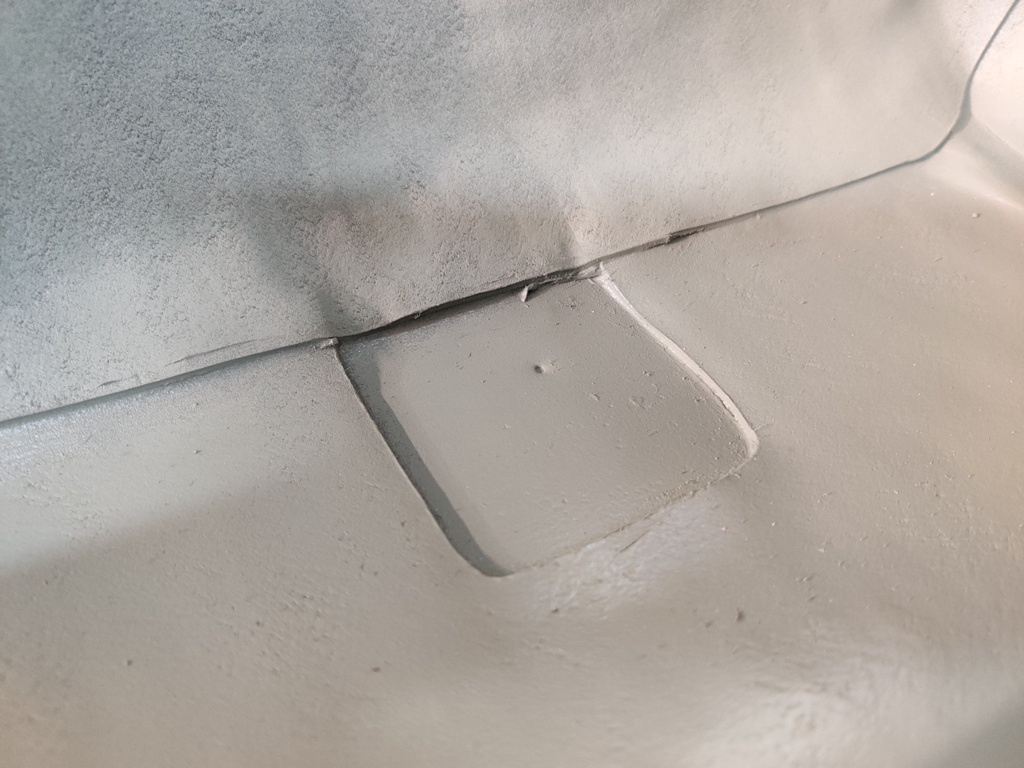
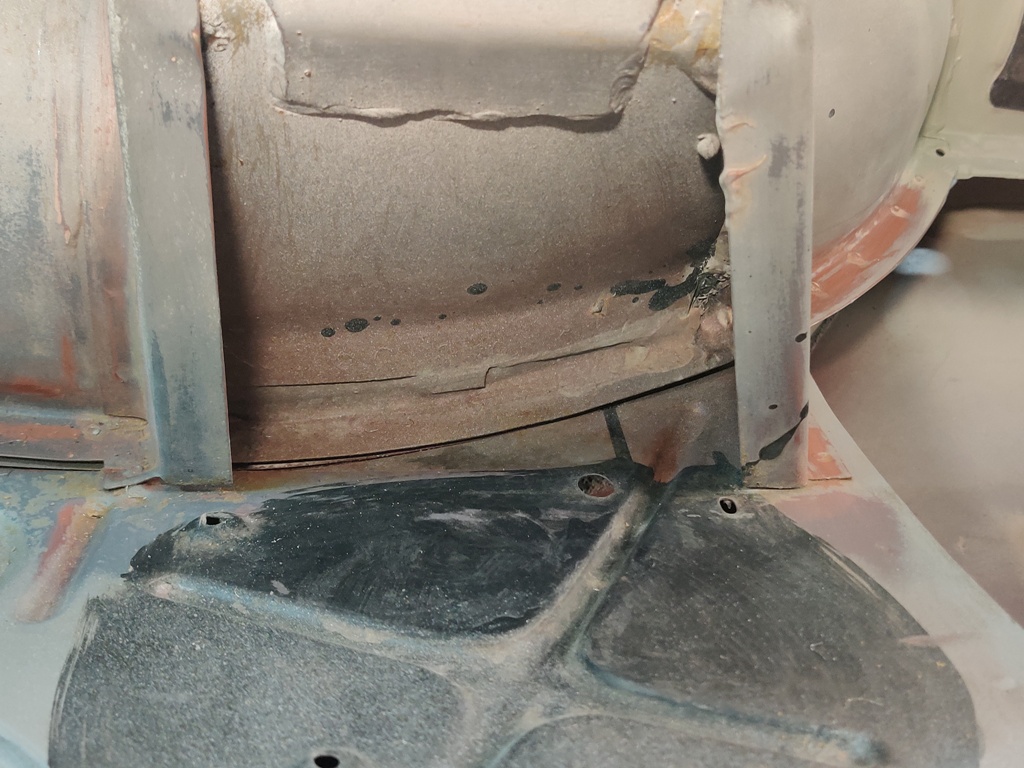
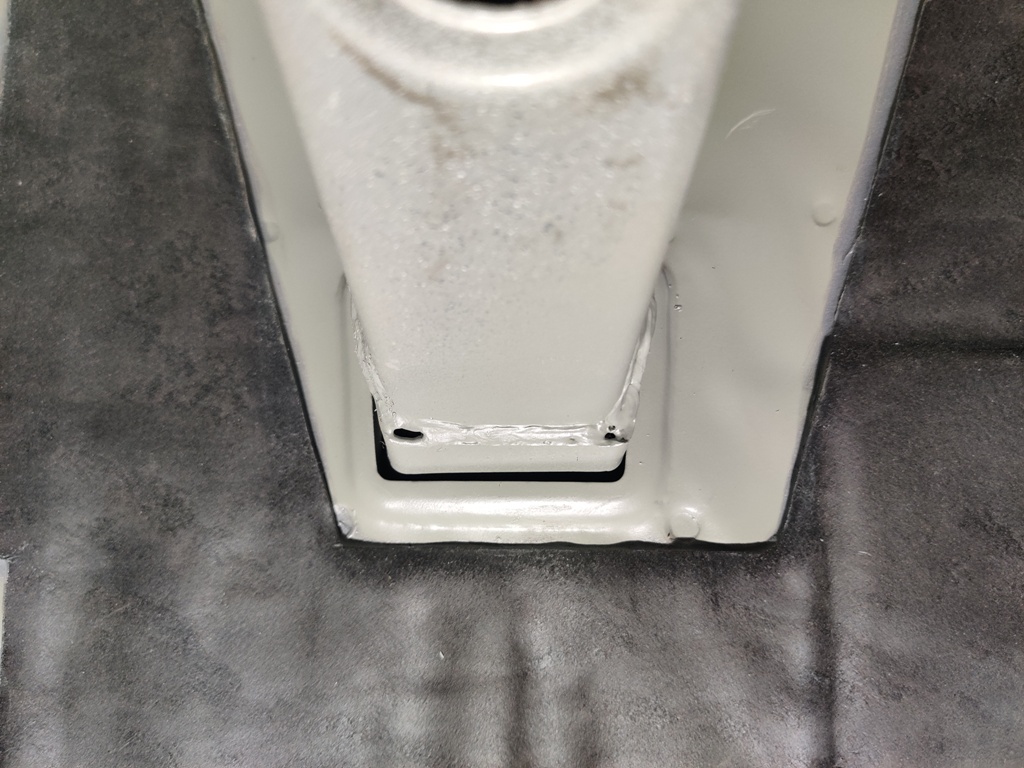
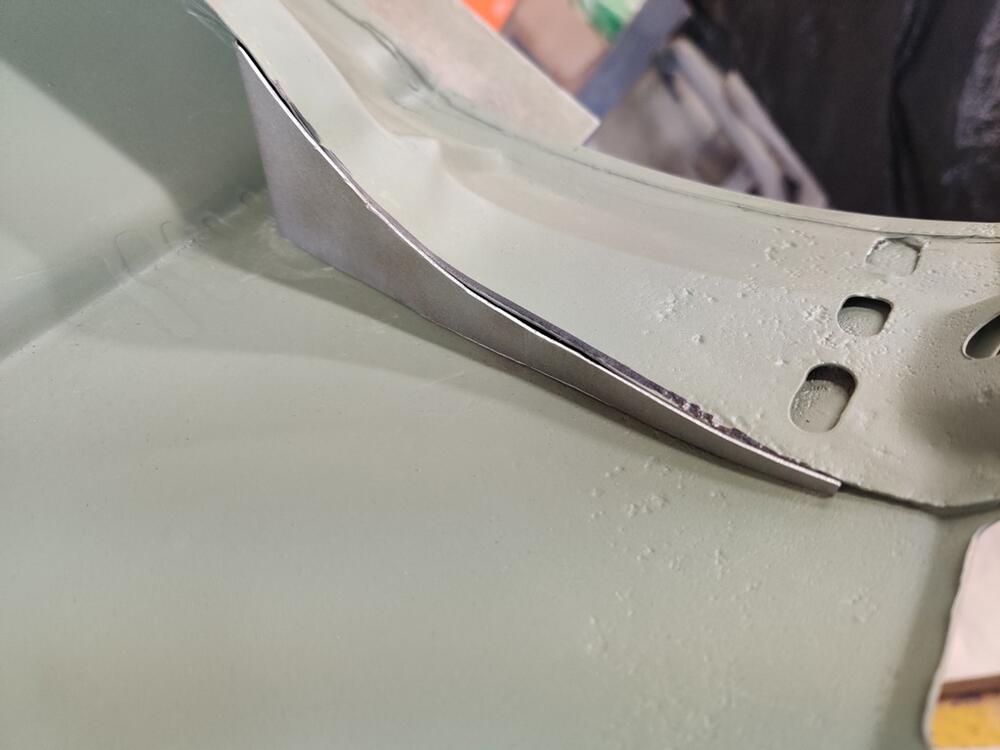
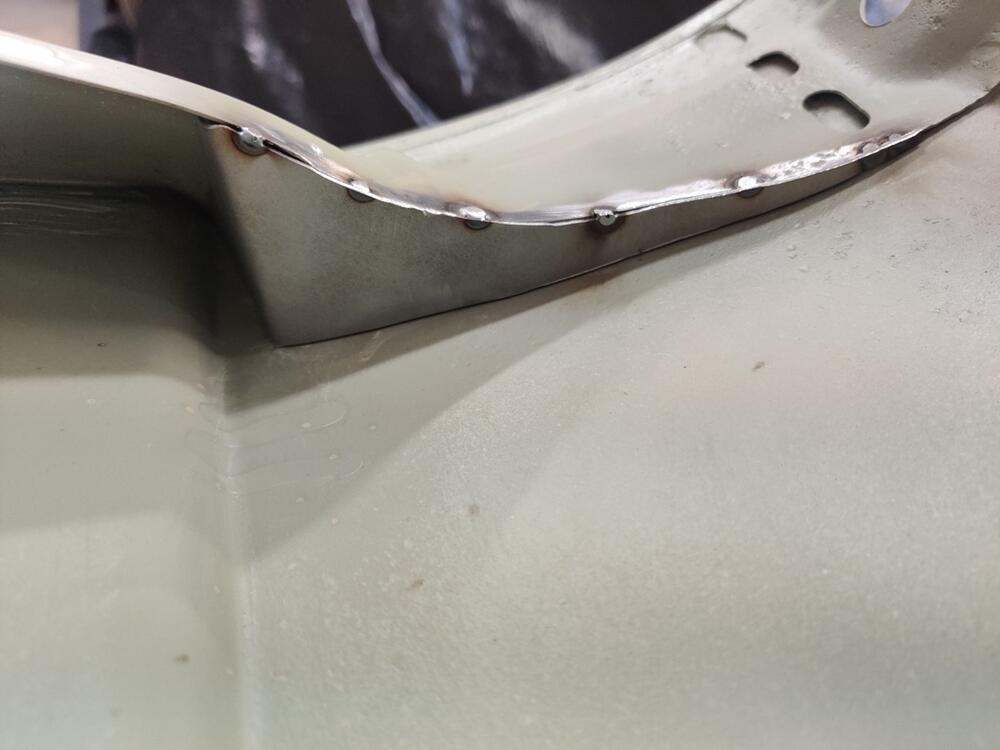
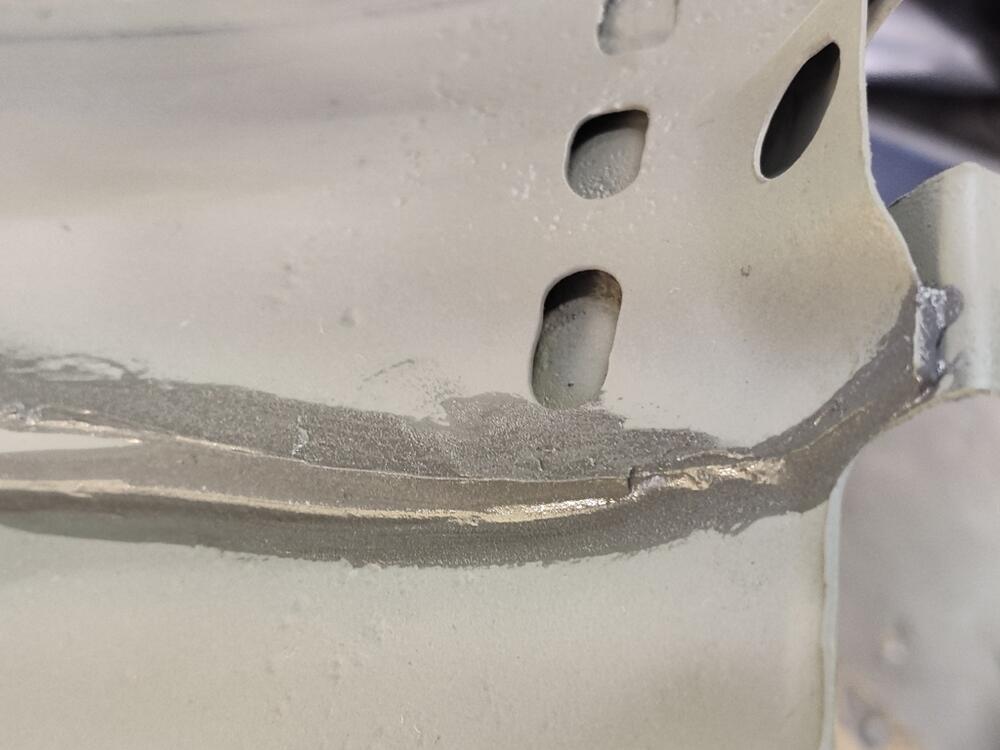
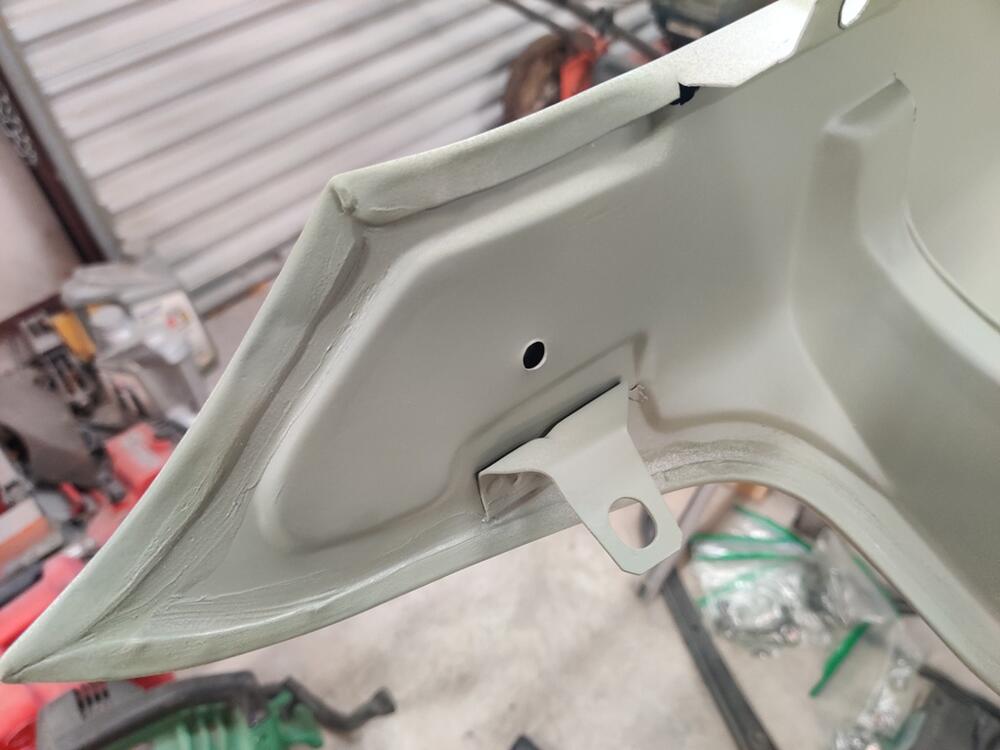
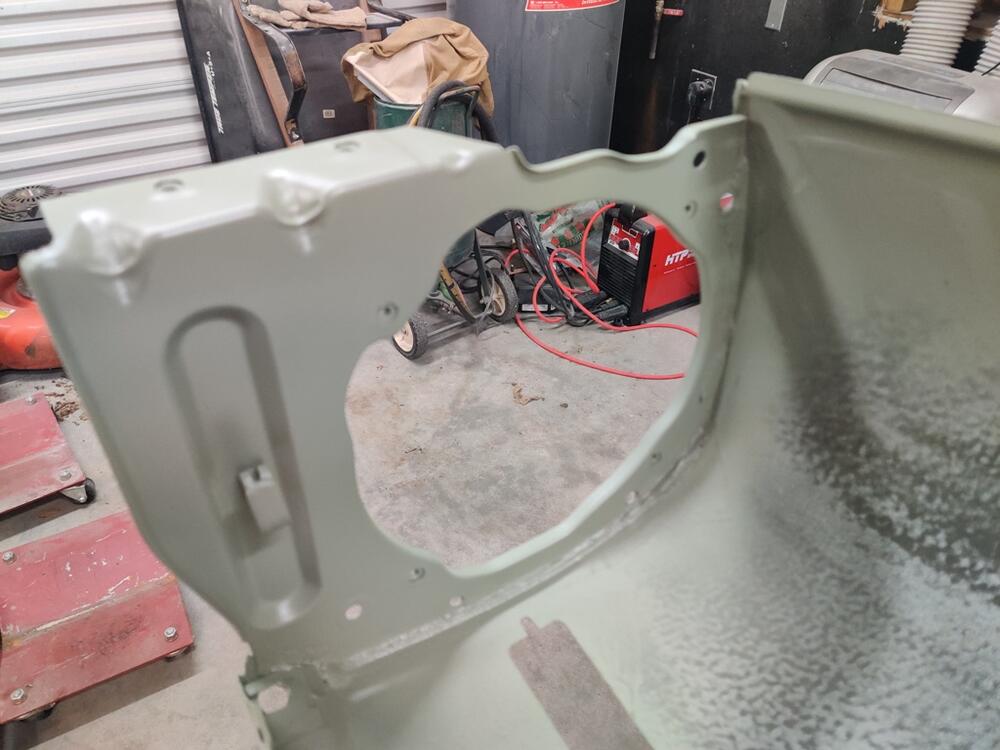
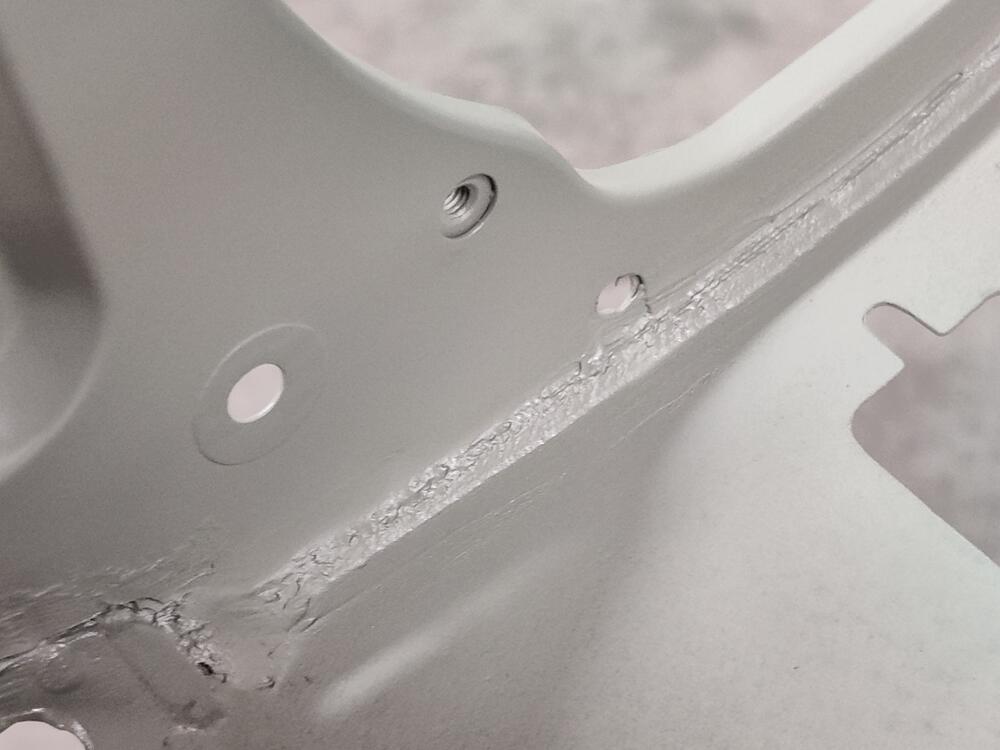
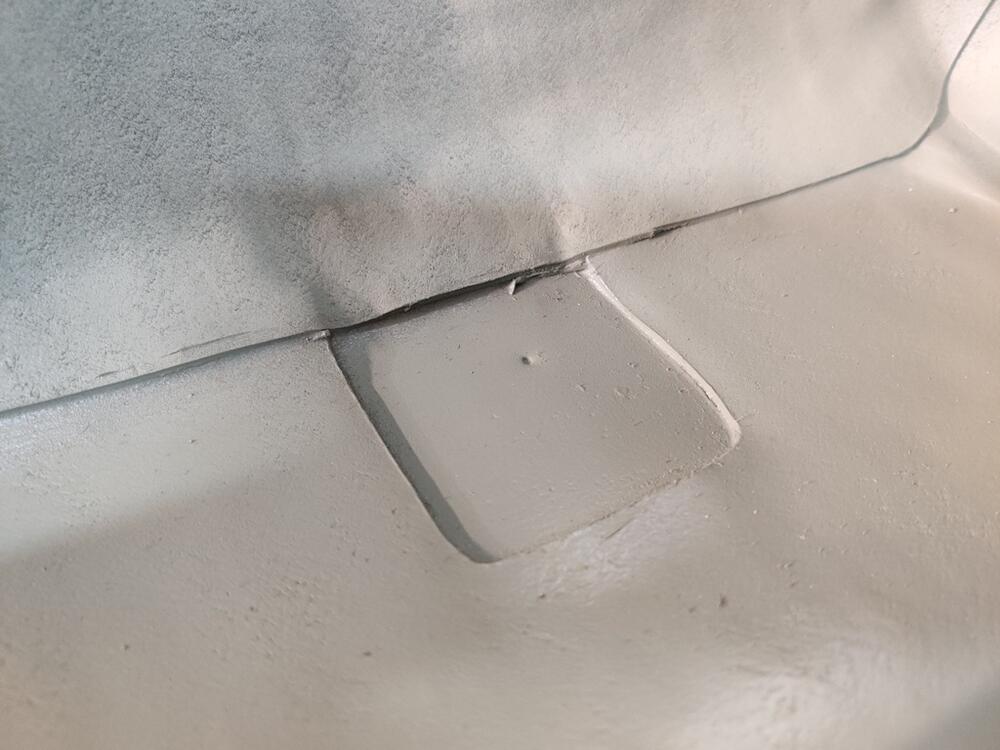
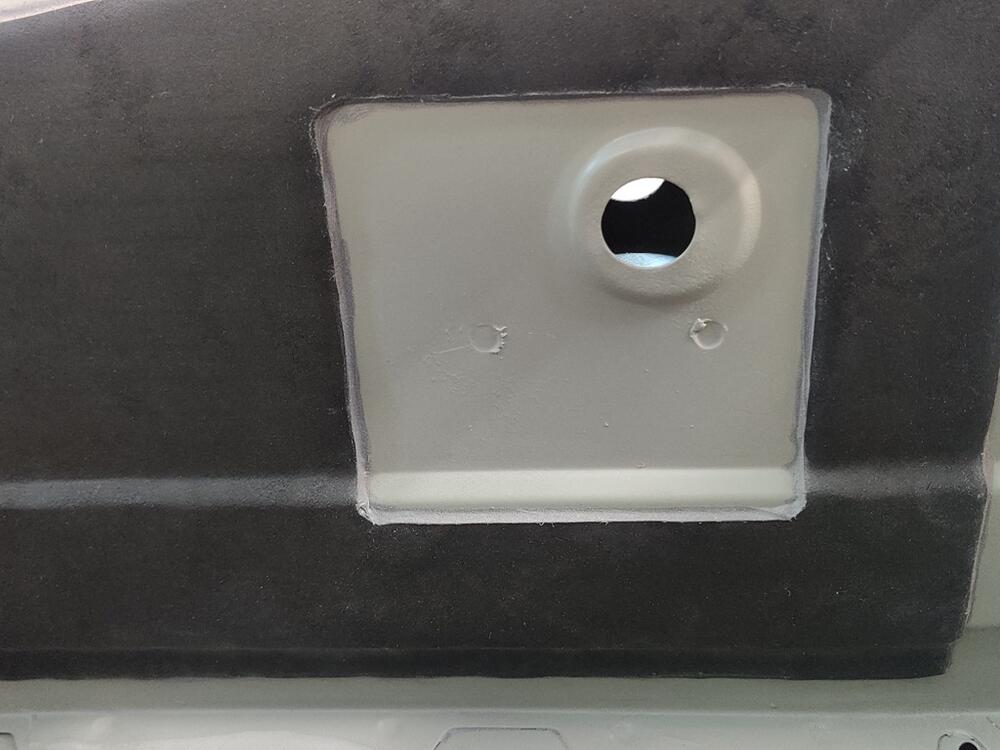
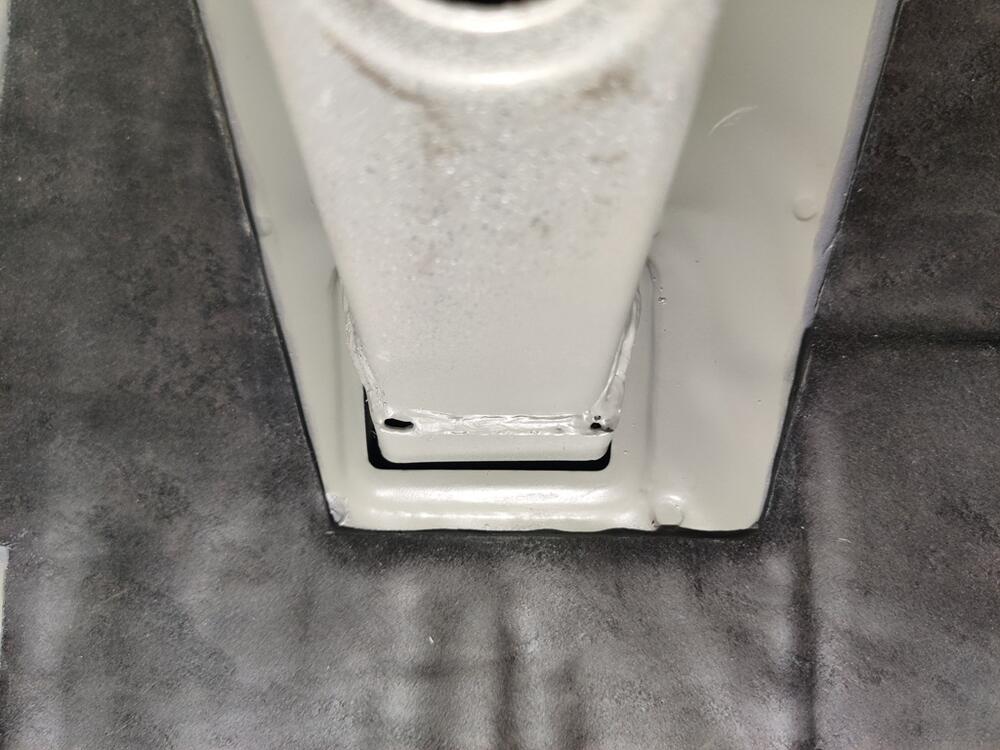
I was able to fabricate these for both fenders today. This metal piece is easy to fabricate as it only has one bend. I decided to tack weld it to the support instead of using pop rivets - thanks grannyknot for the suggestion. I did not tack it anywhere else though, as the body work is nearly finalized and I am not interested in deforming the outside surface of the fender. Hopefully, the addition of this piece does not cause a change in the shape of the panel when it is bolted in place. It might. And more time on bodywork will be the result if it did. After tacking, I used a hand-held belt sander to clean up the edge and then applied seam sealer. Now, any water coming inside the fender will run down the inside and be directed away from this corner by the shelf of this panel.


-
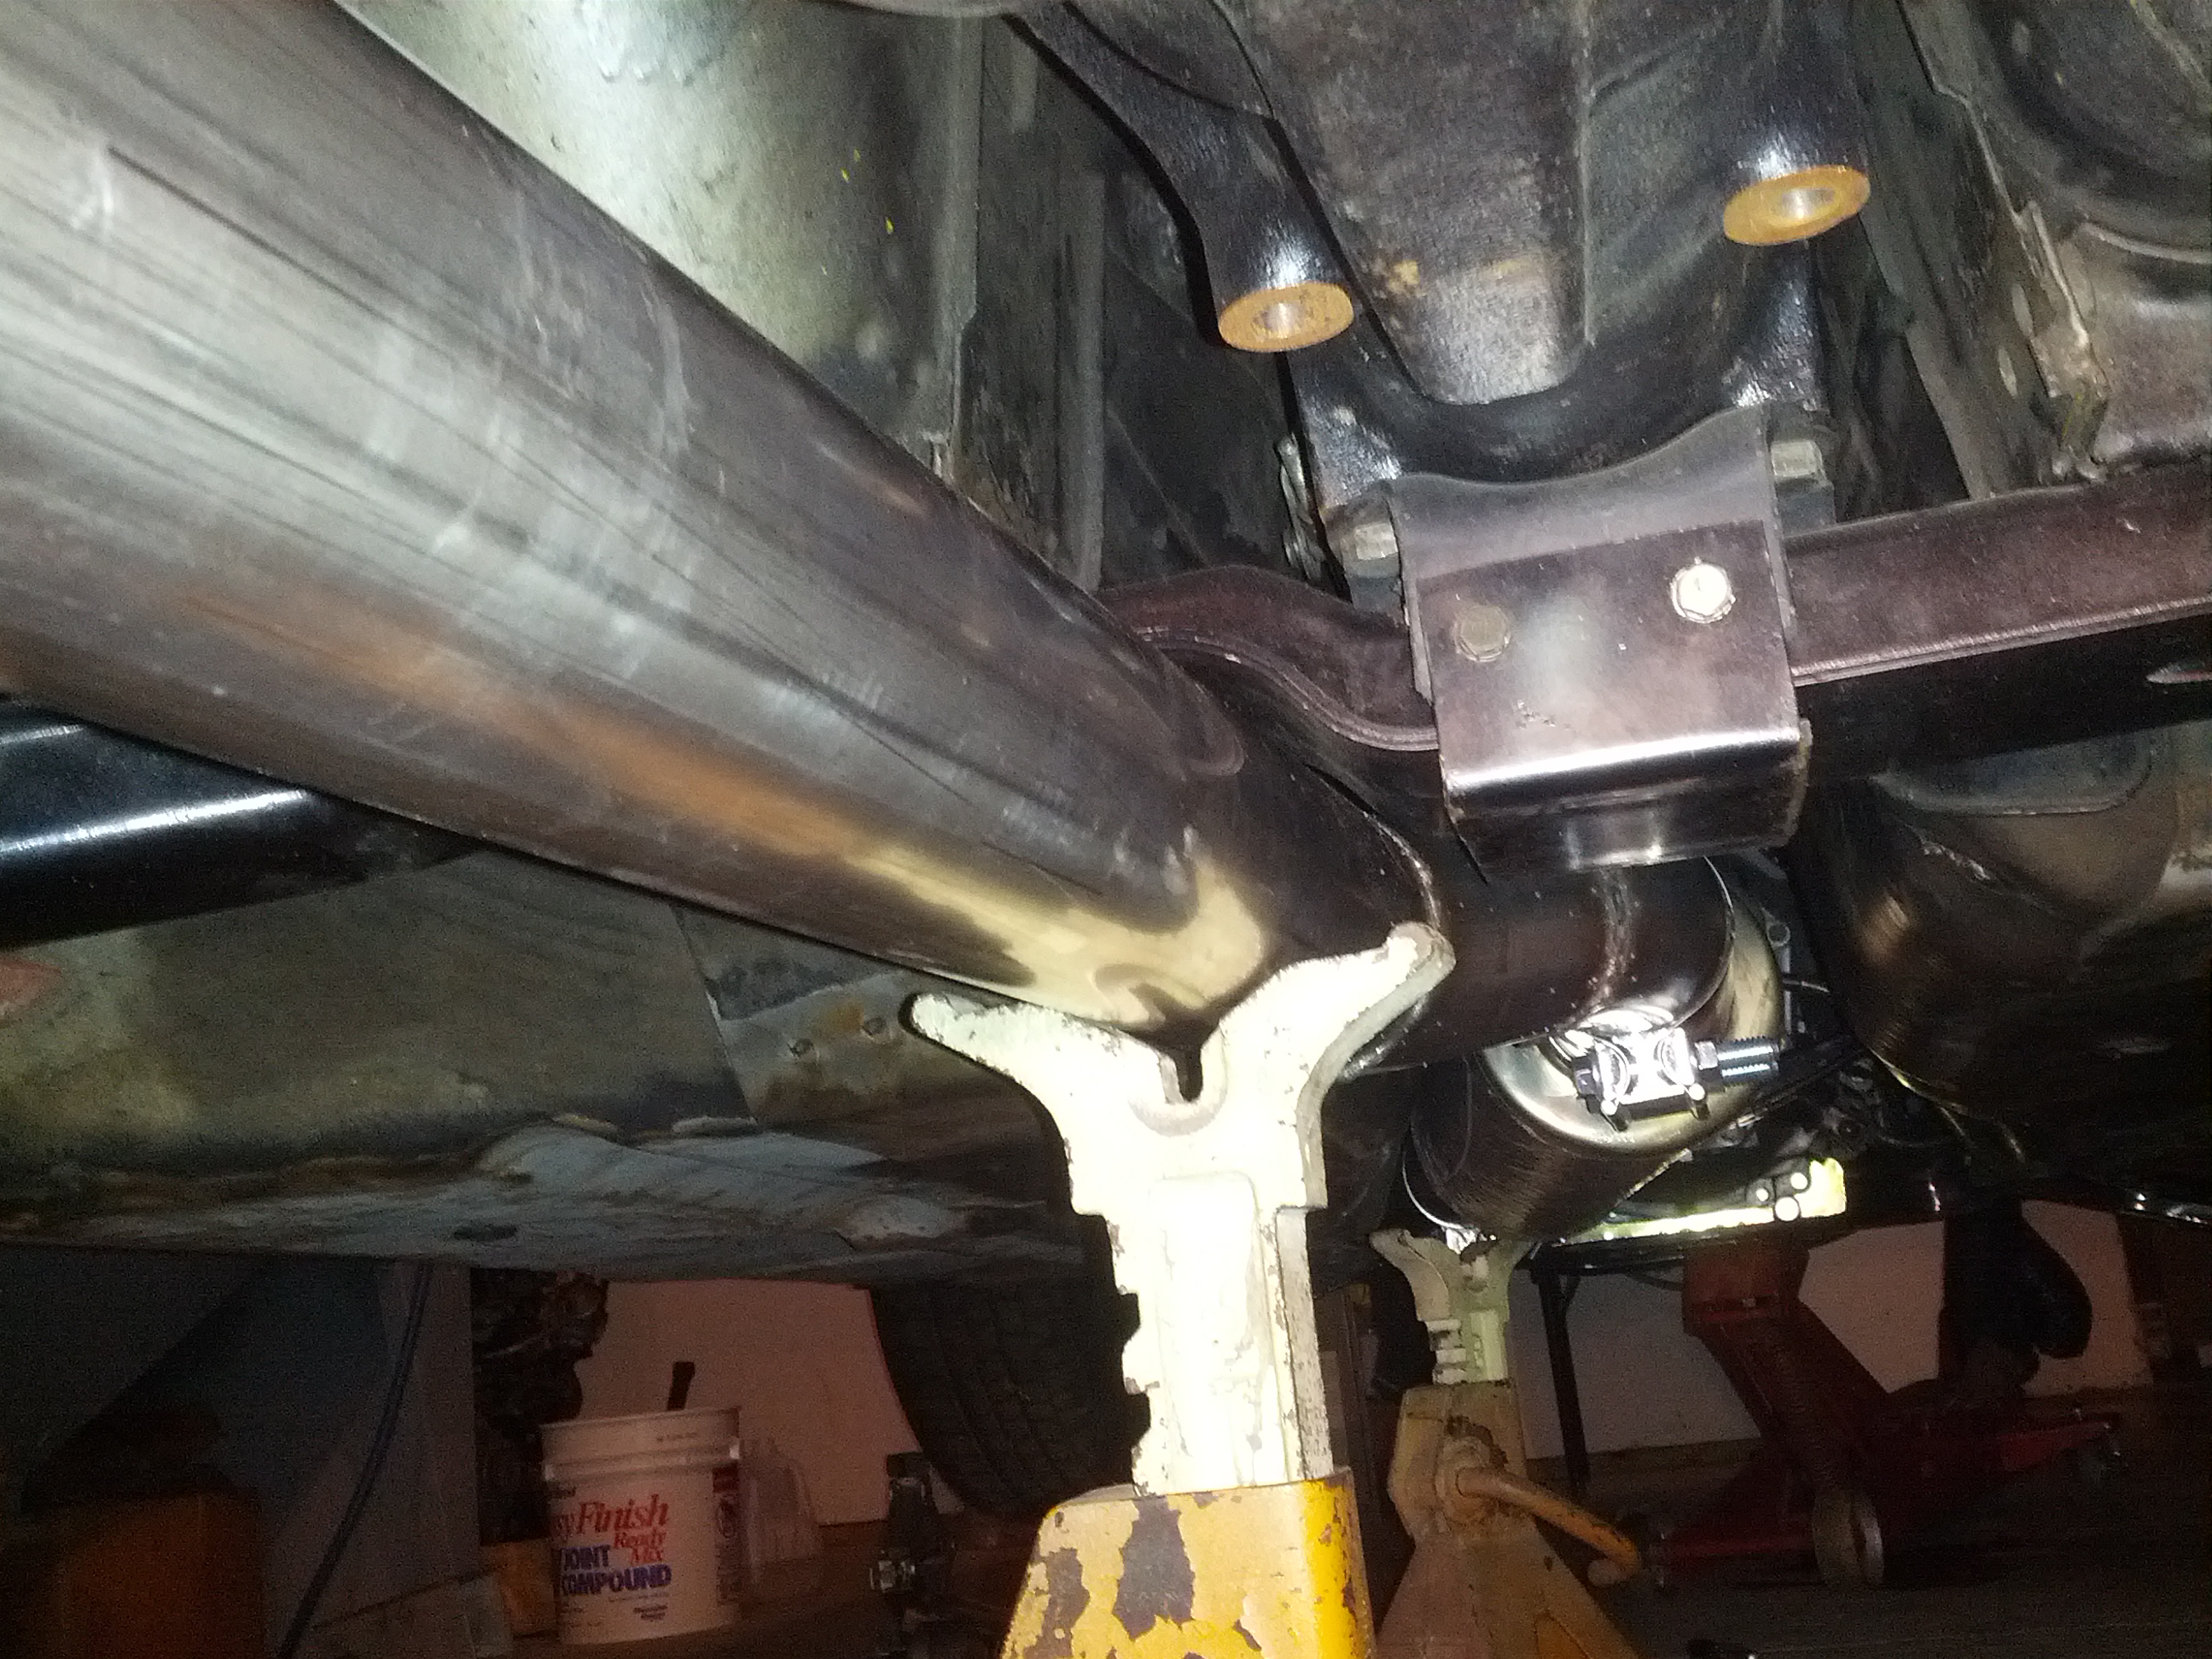
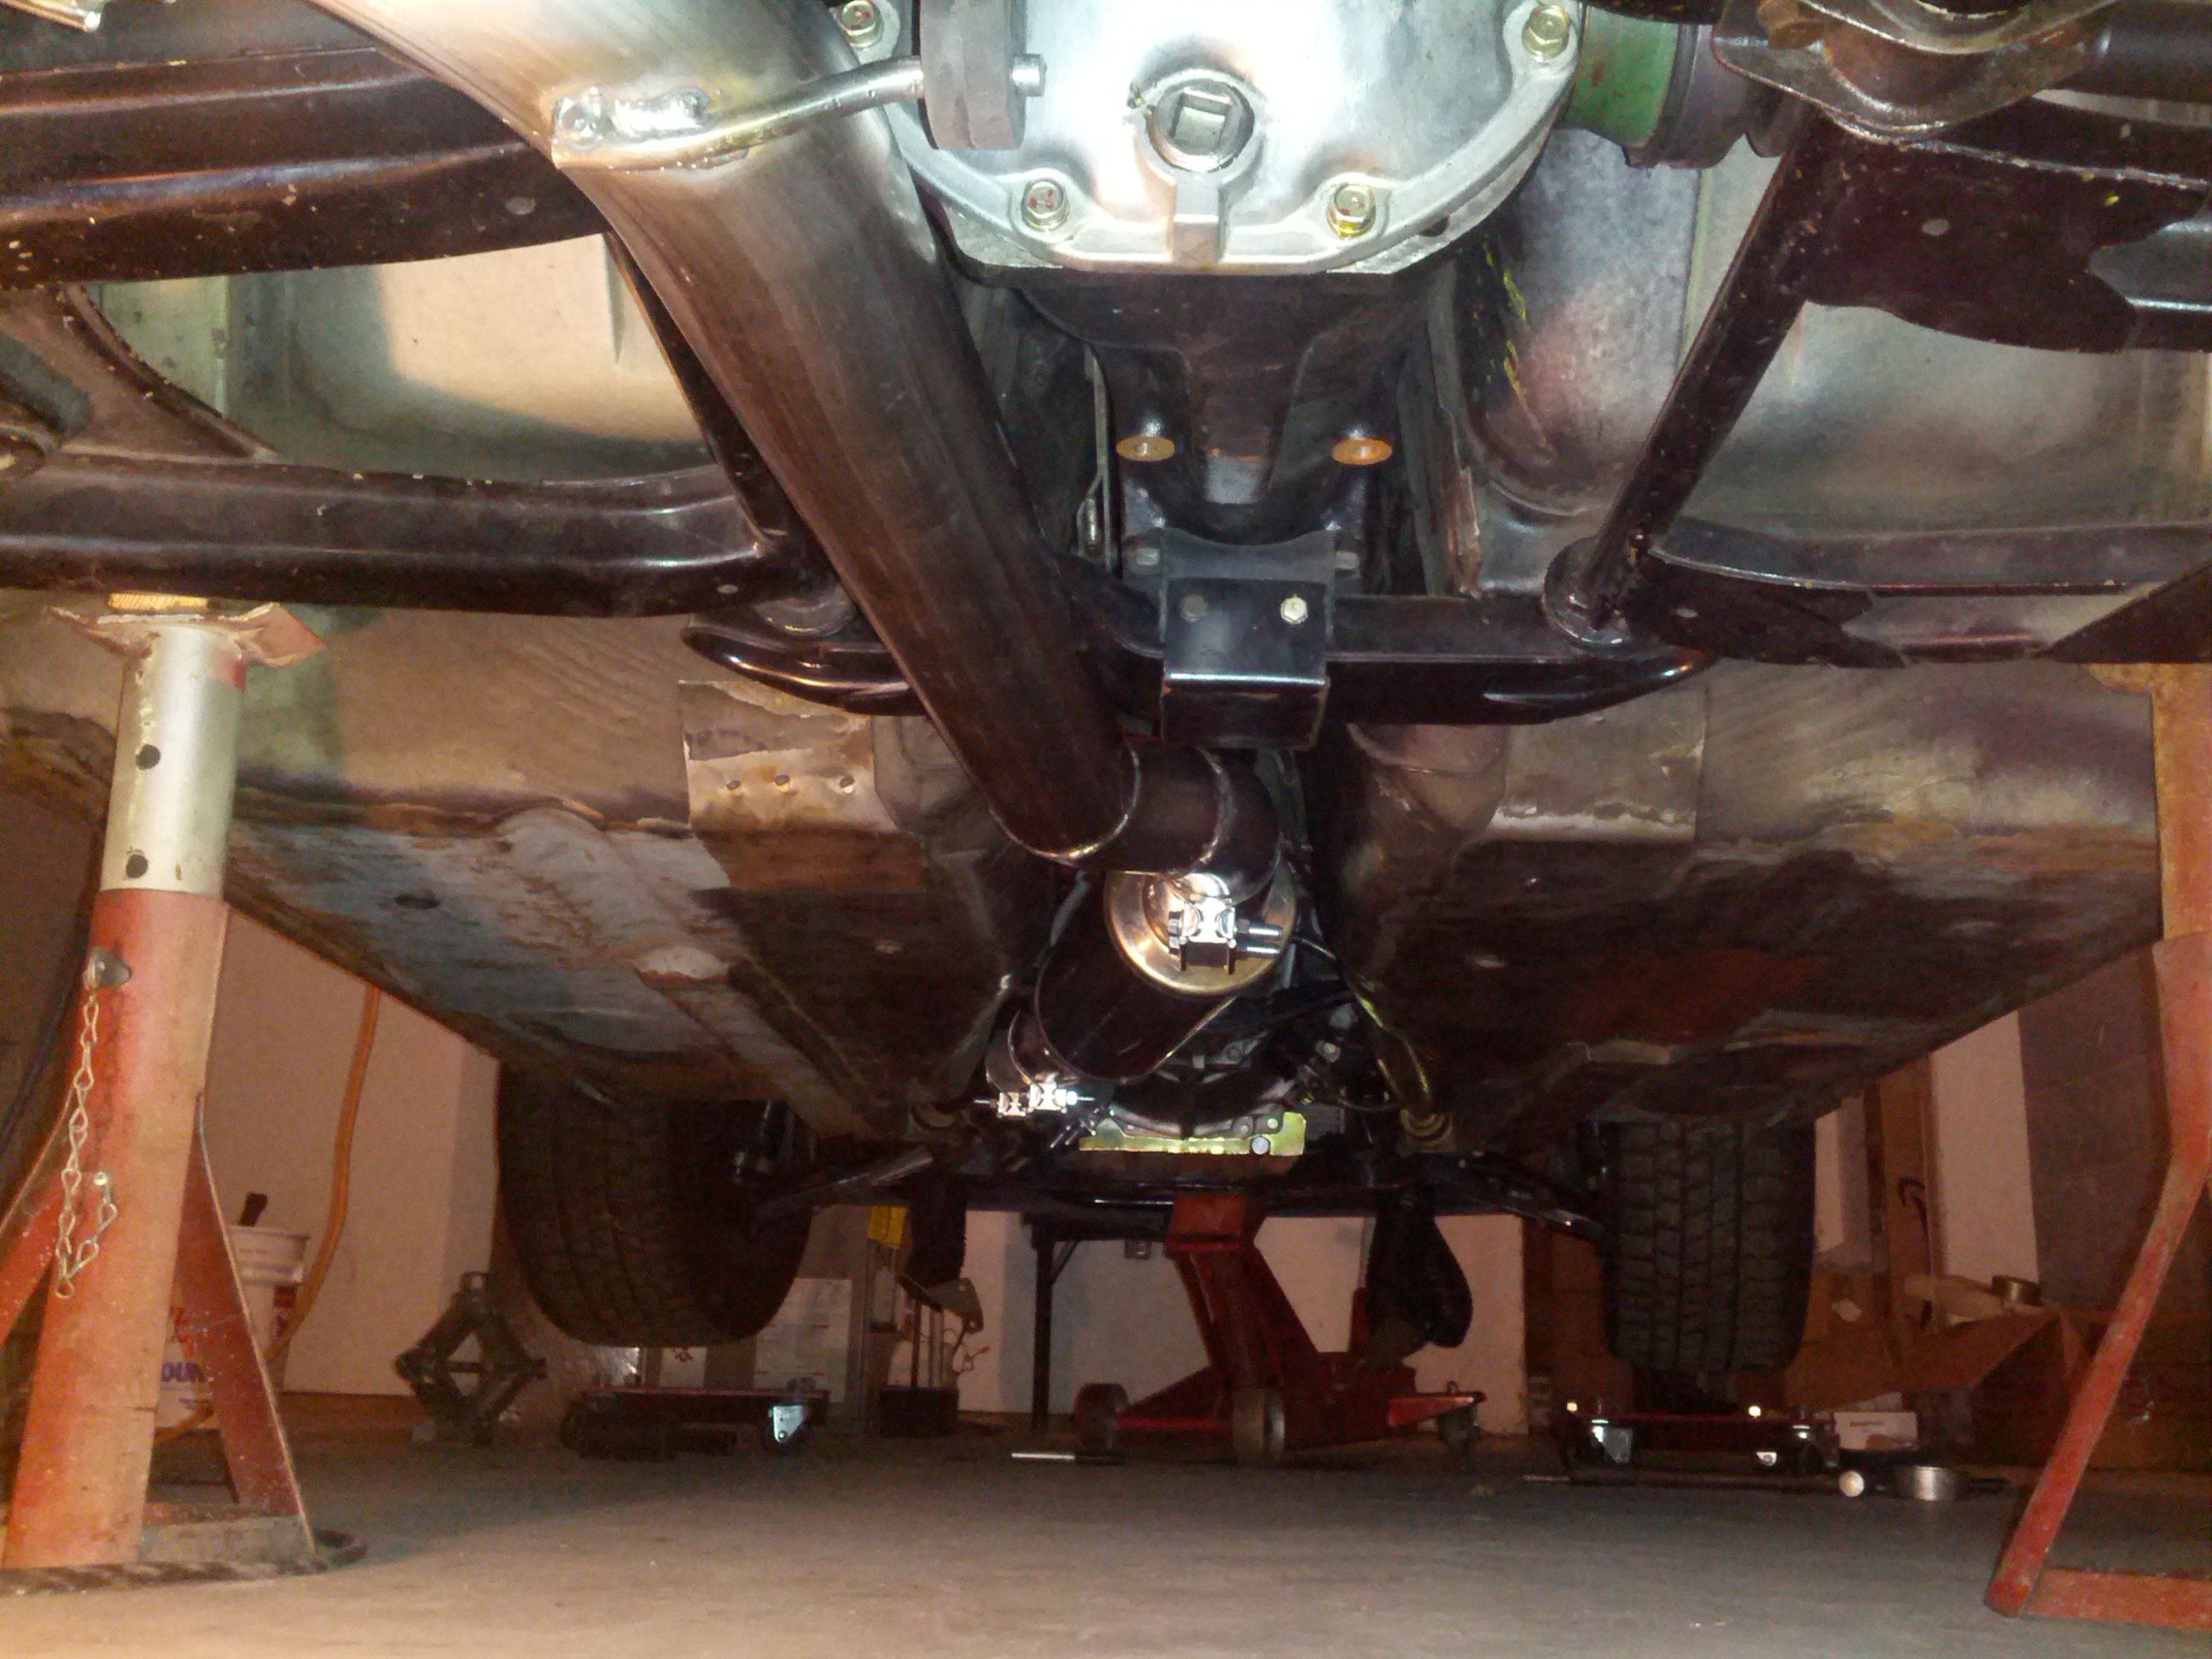
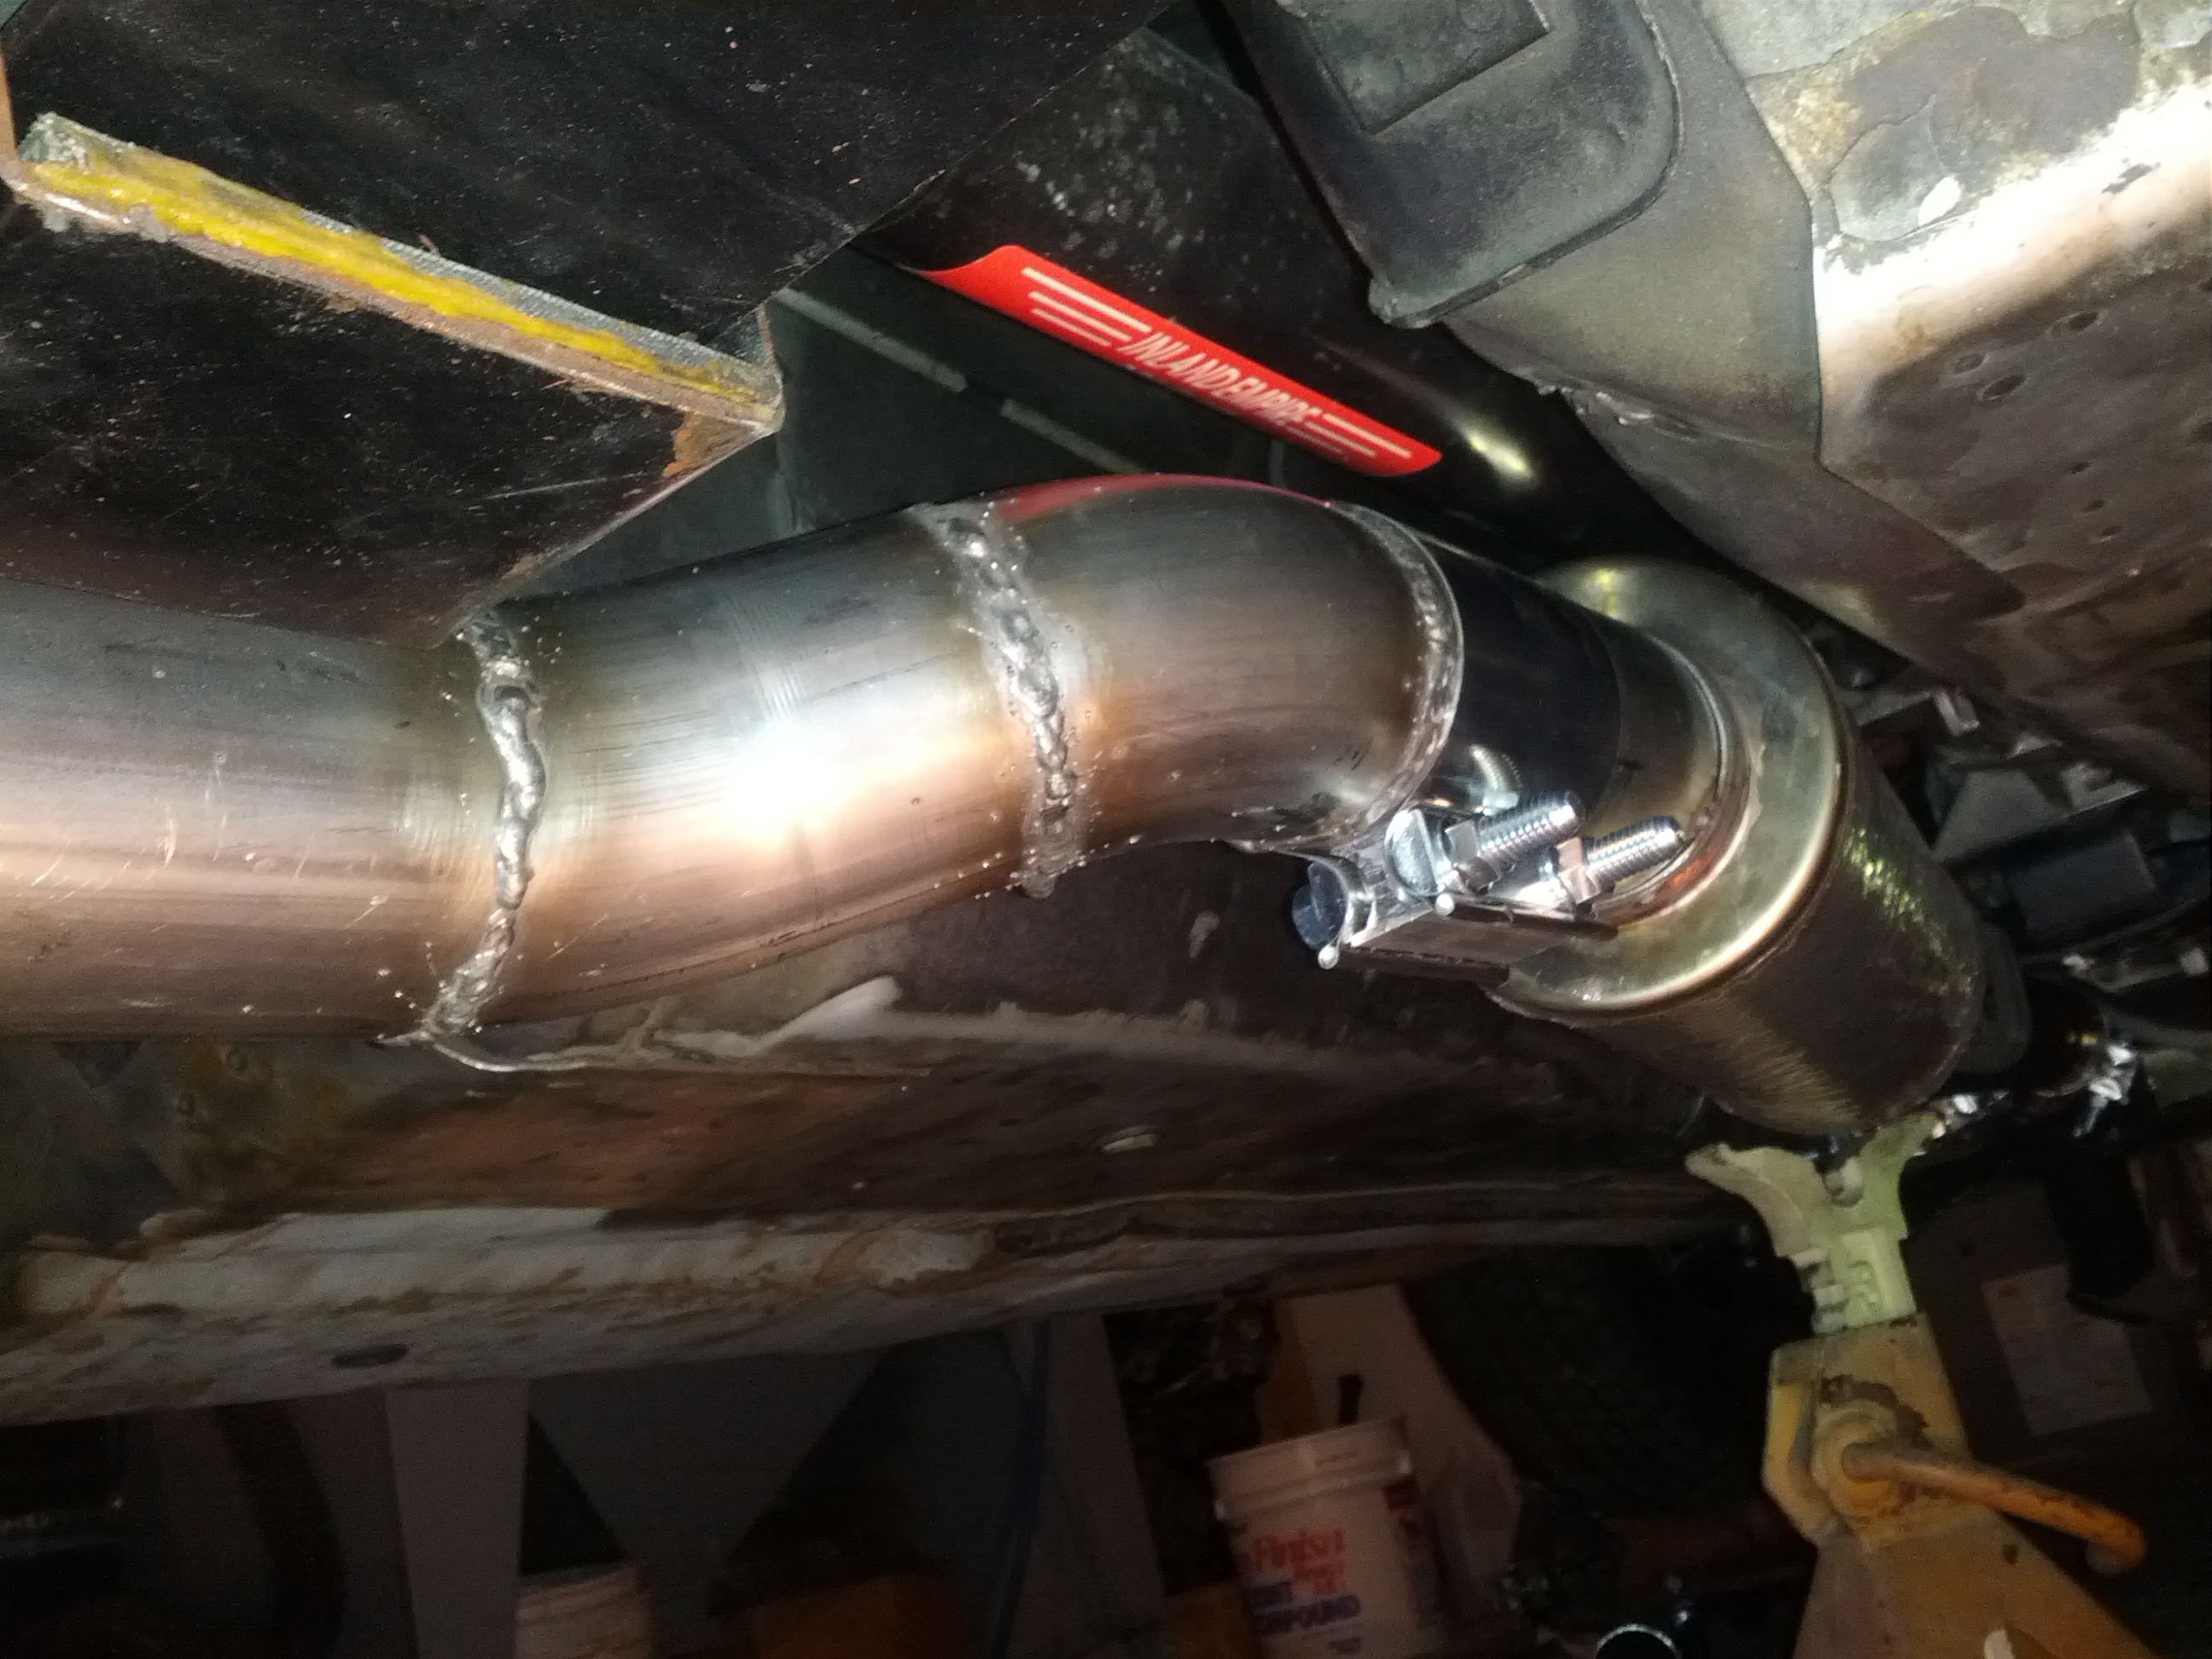
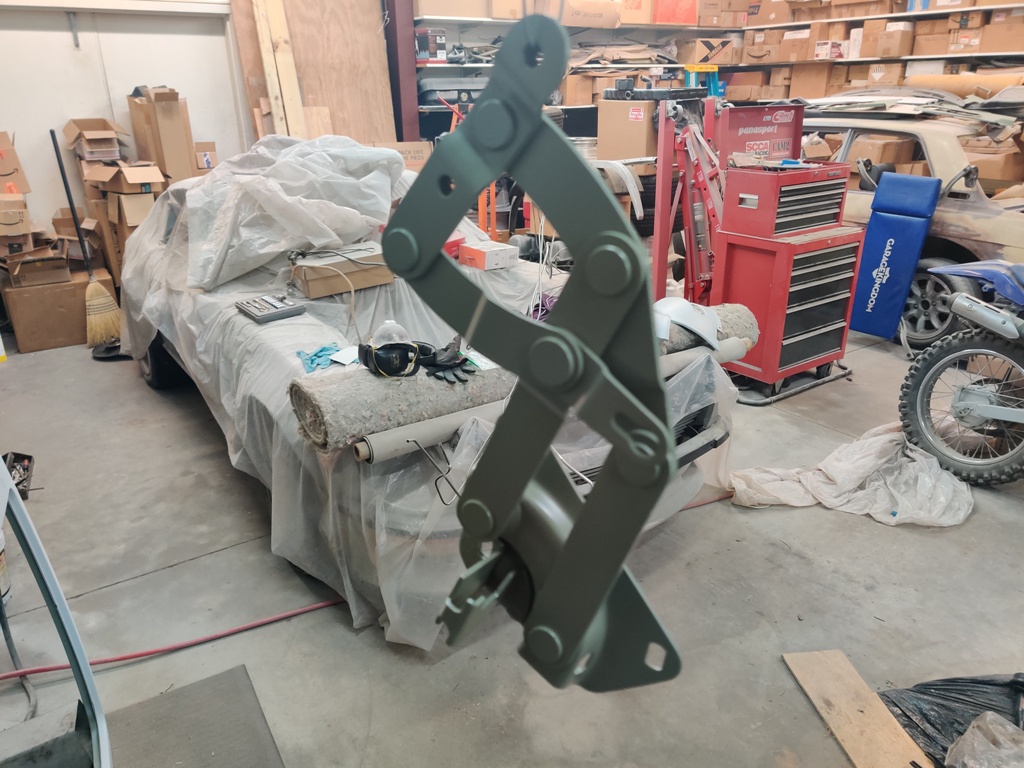
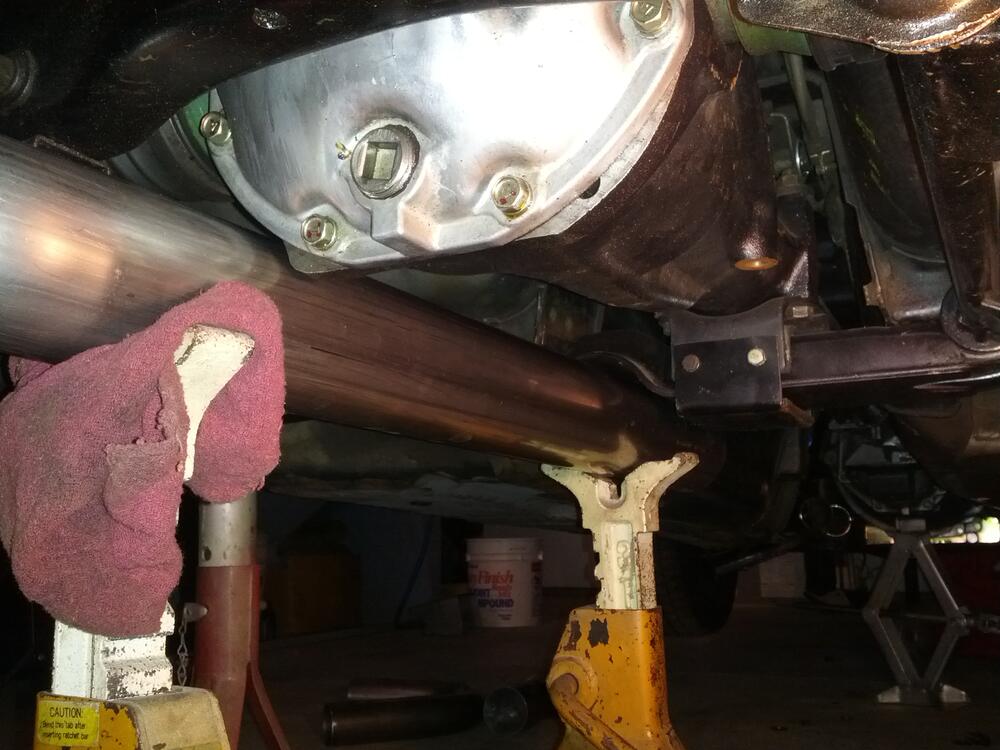
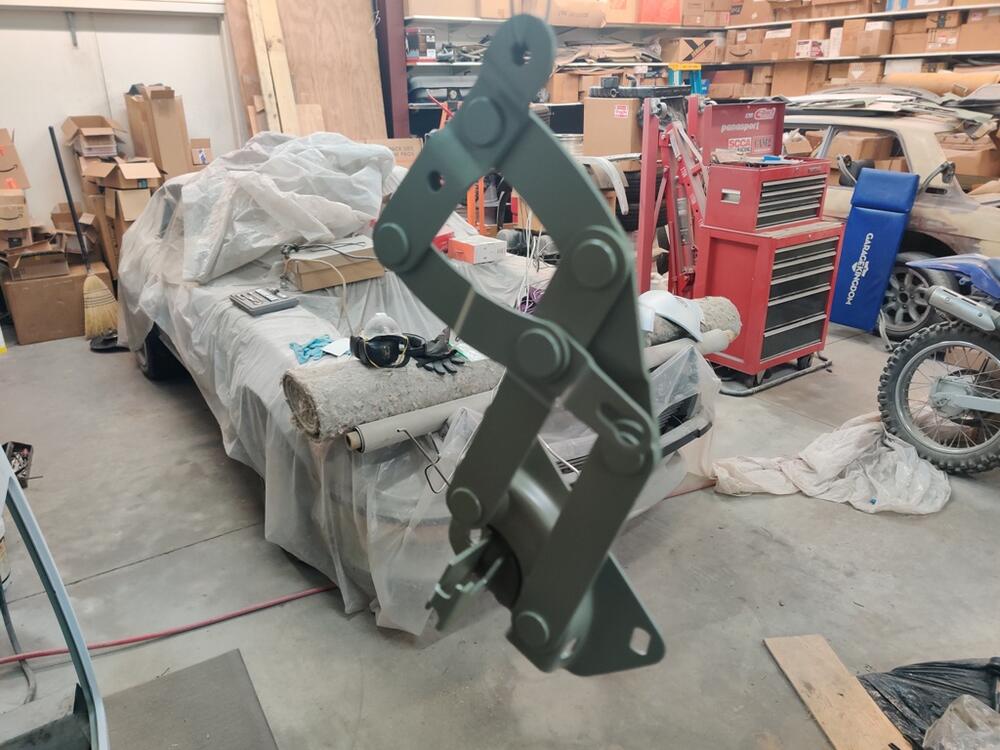
I found a few relevant pics of the bracket from when I was fabricating a 3" exhaust. Here they are: Looks like my air gap is more like 1/4". In the first pic, you can see the rubber padding glued to the floor of the U bracket: Here is a close up of the bracket going under the crossmember. I used yellow contact cement to glue the reinforced rubber belt material to the floor of the "U". You can see the air gap nicely here (top left of the photo):


-
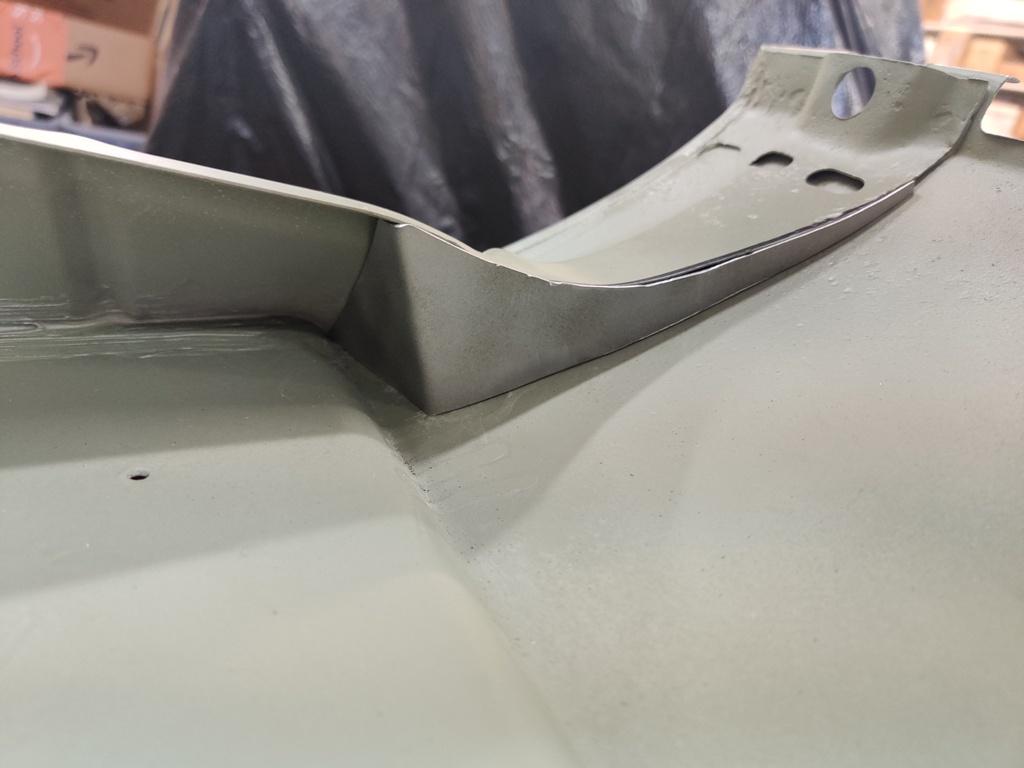
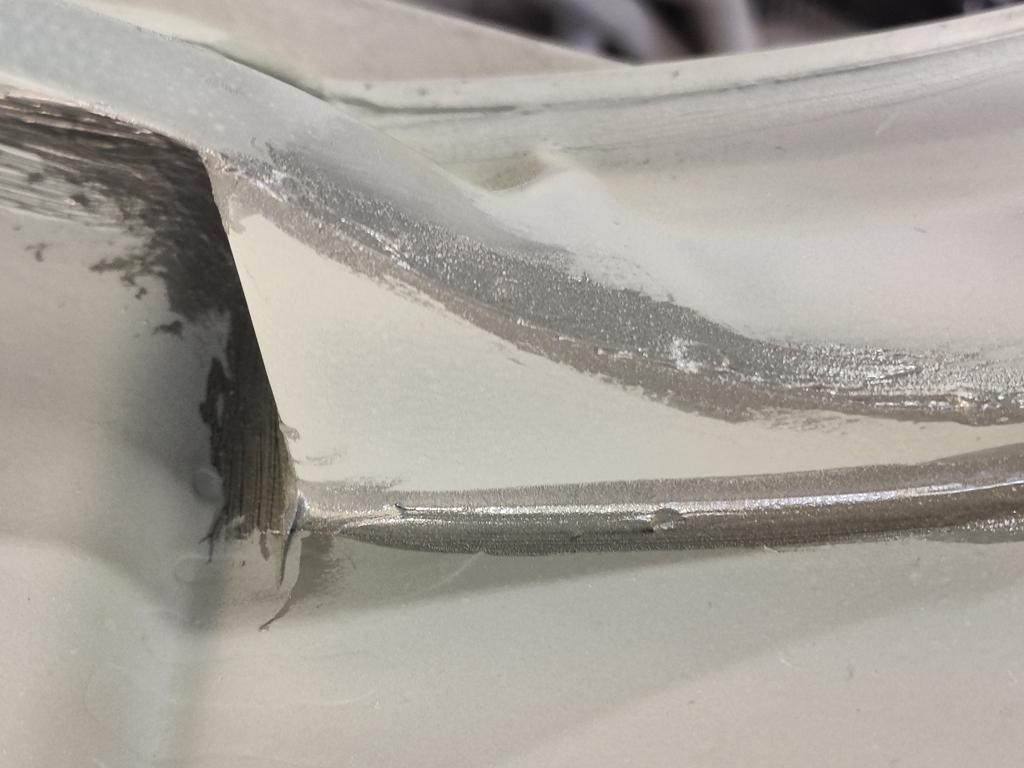
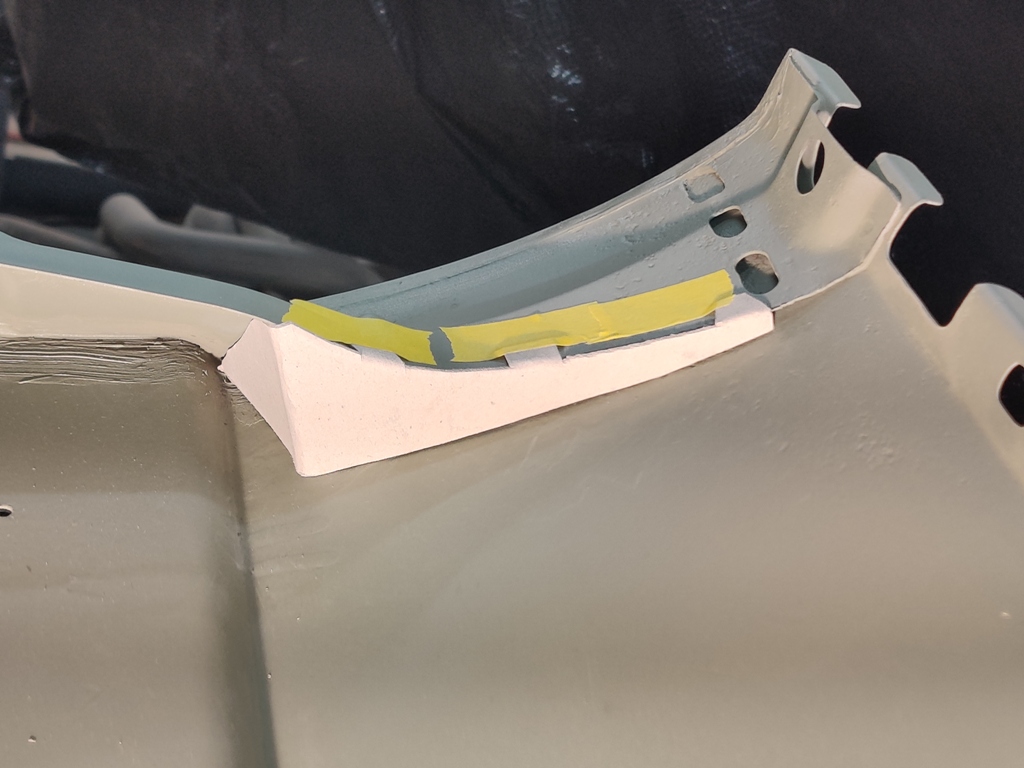
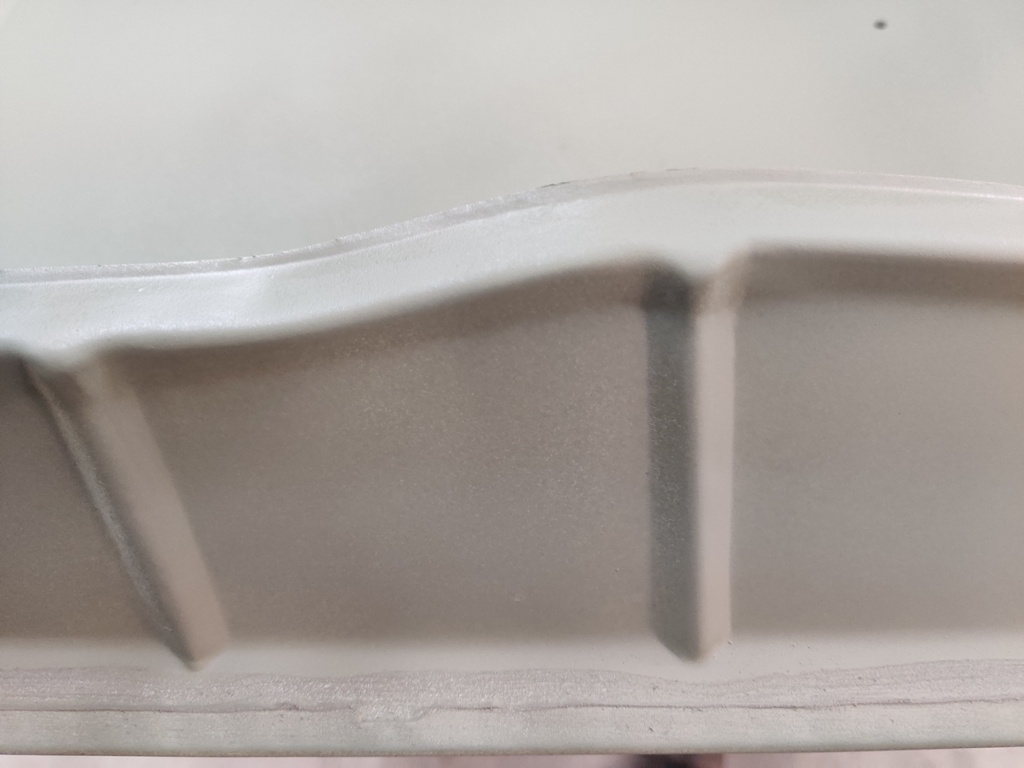
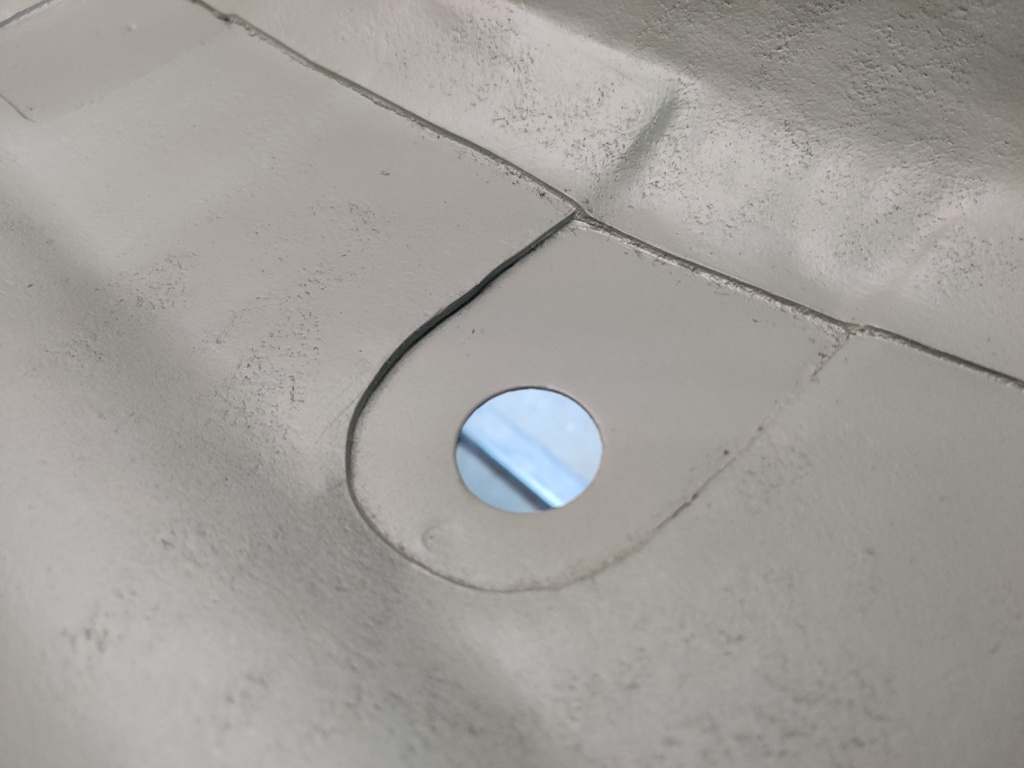
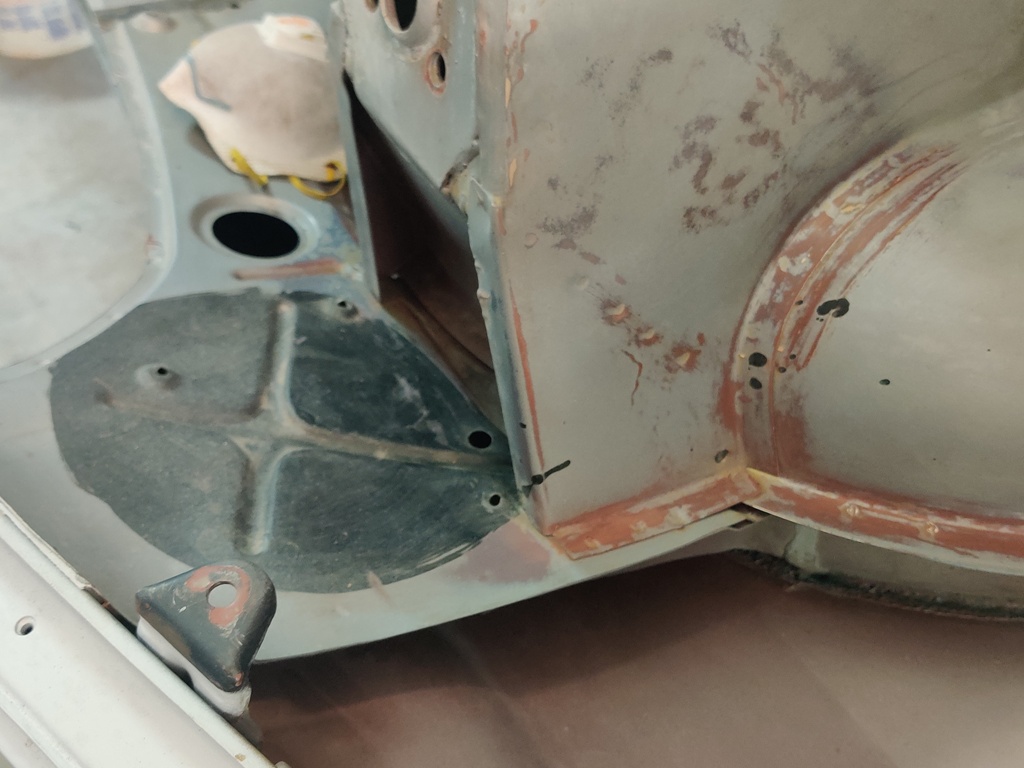
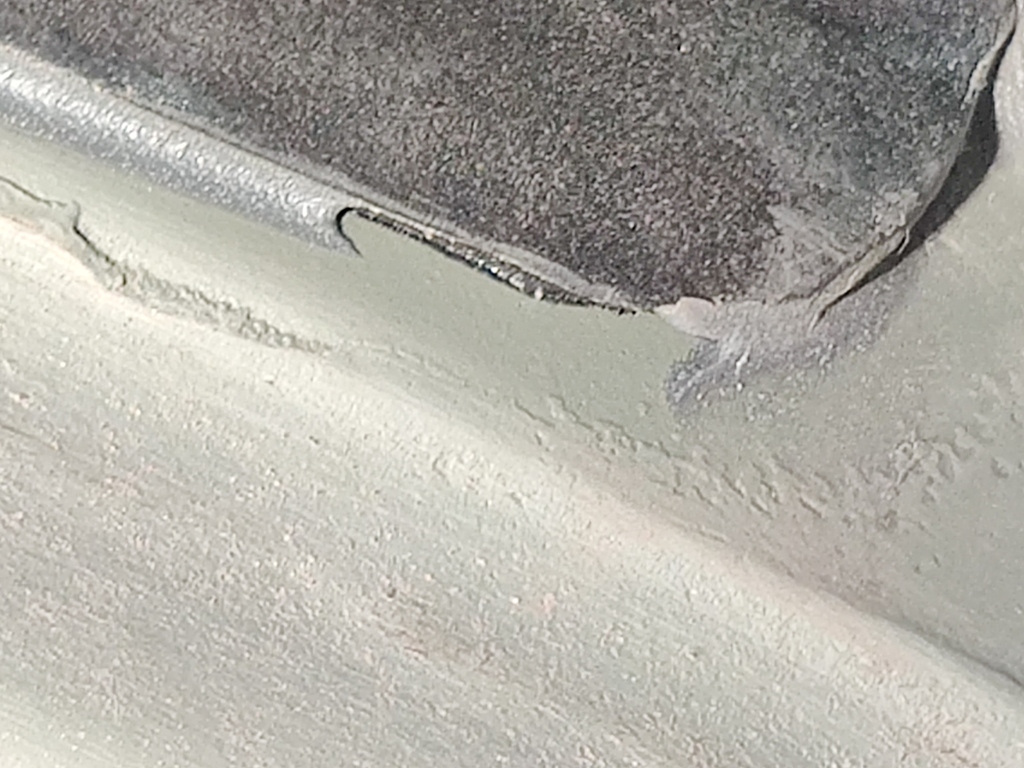
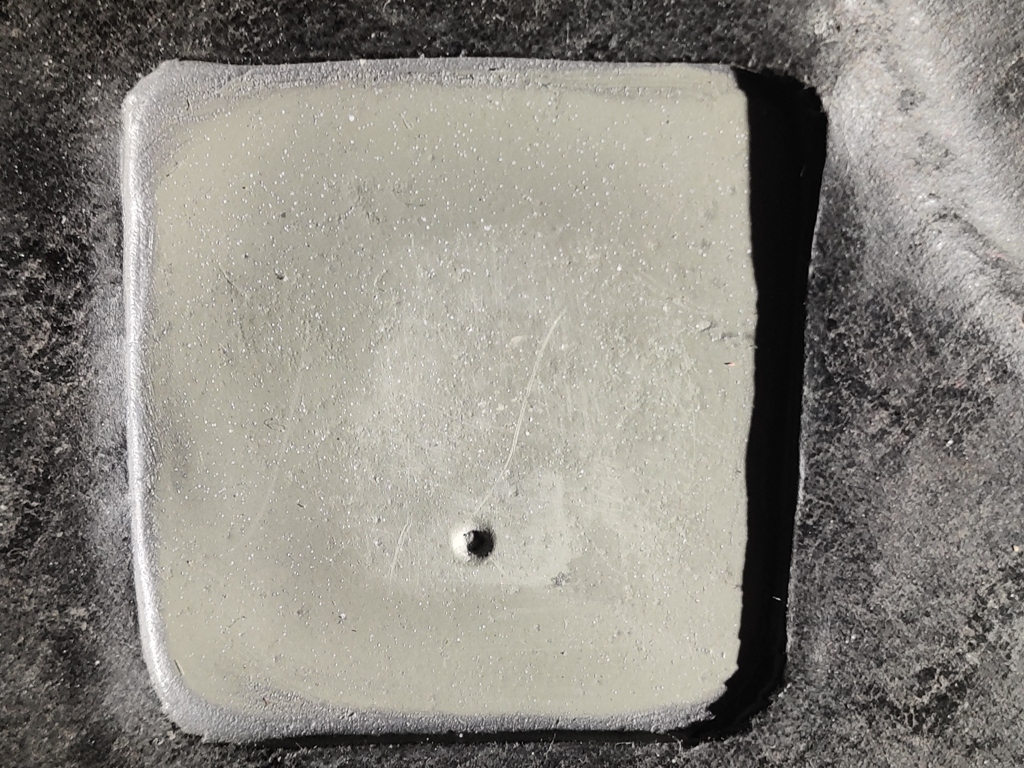
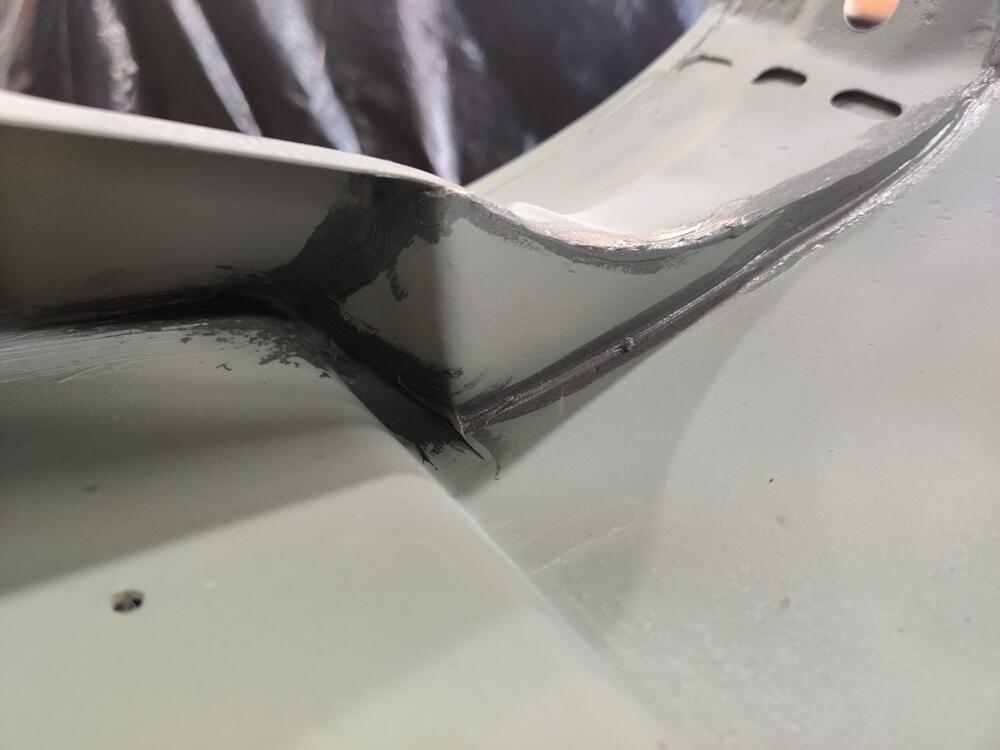
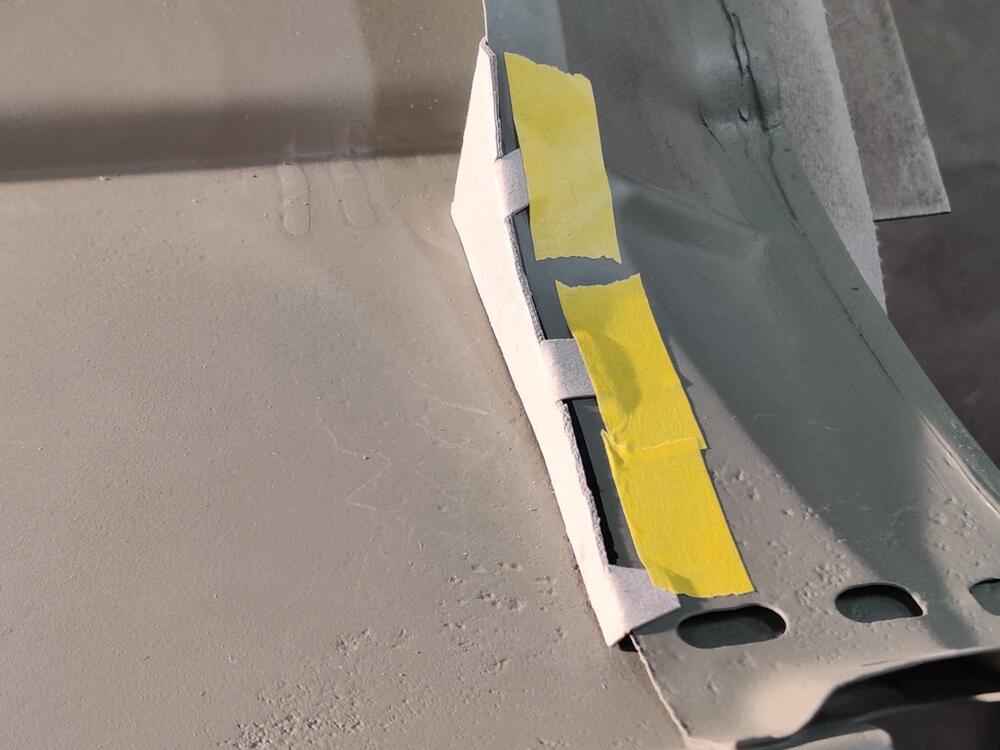
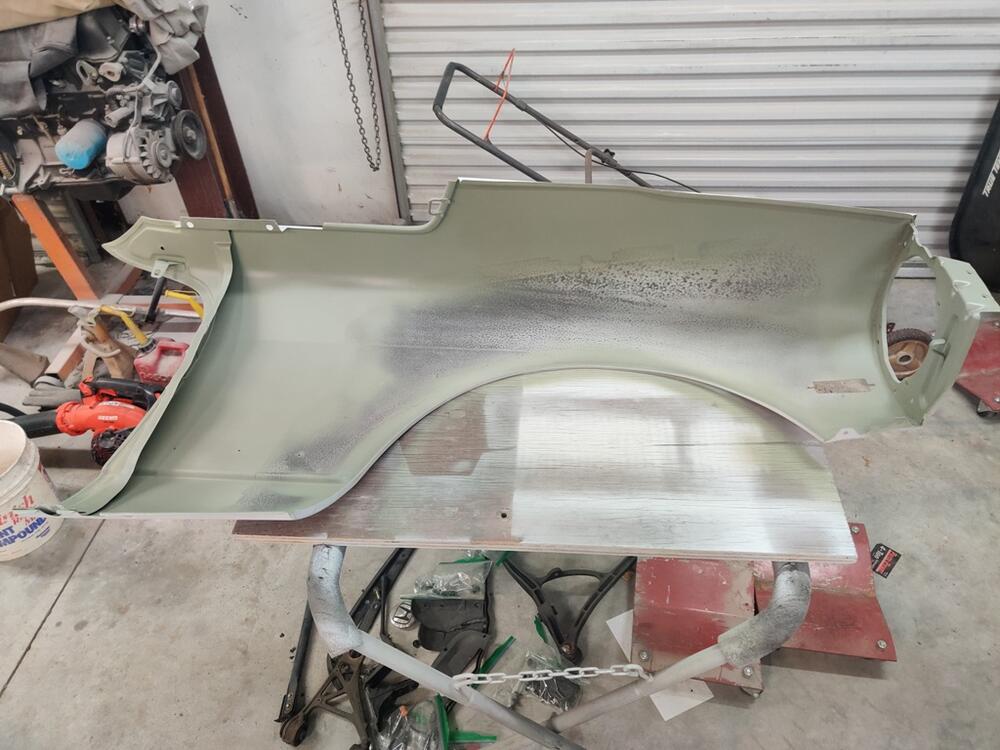
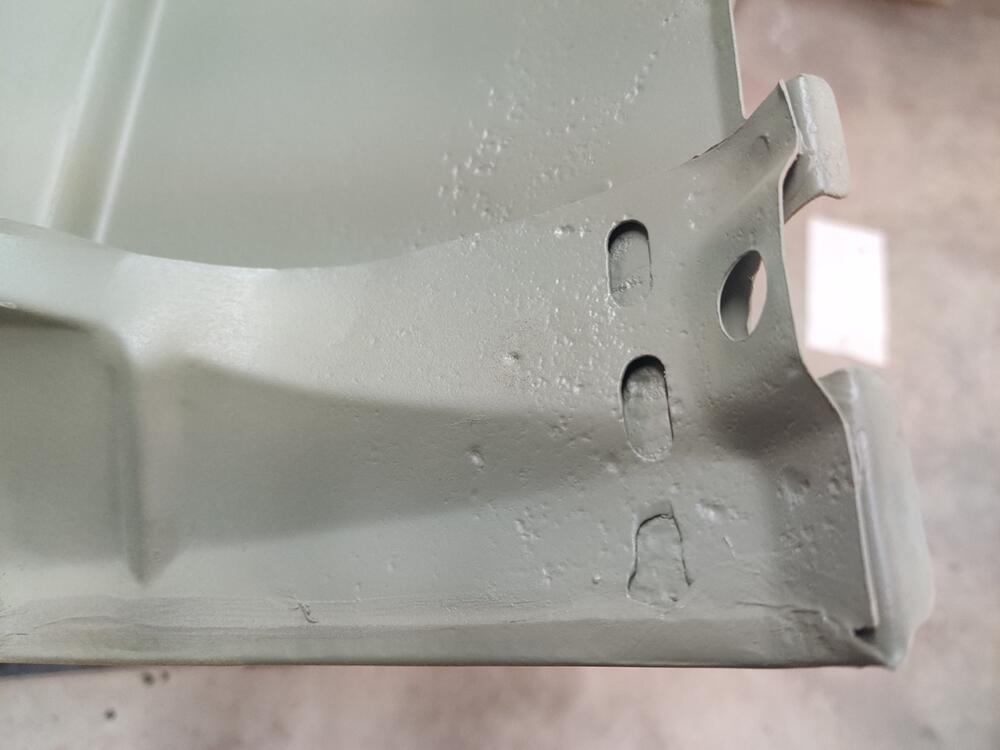
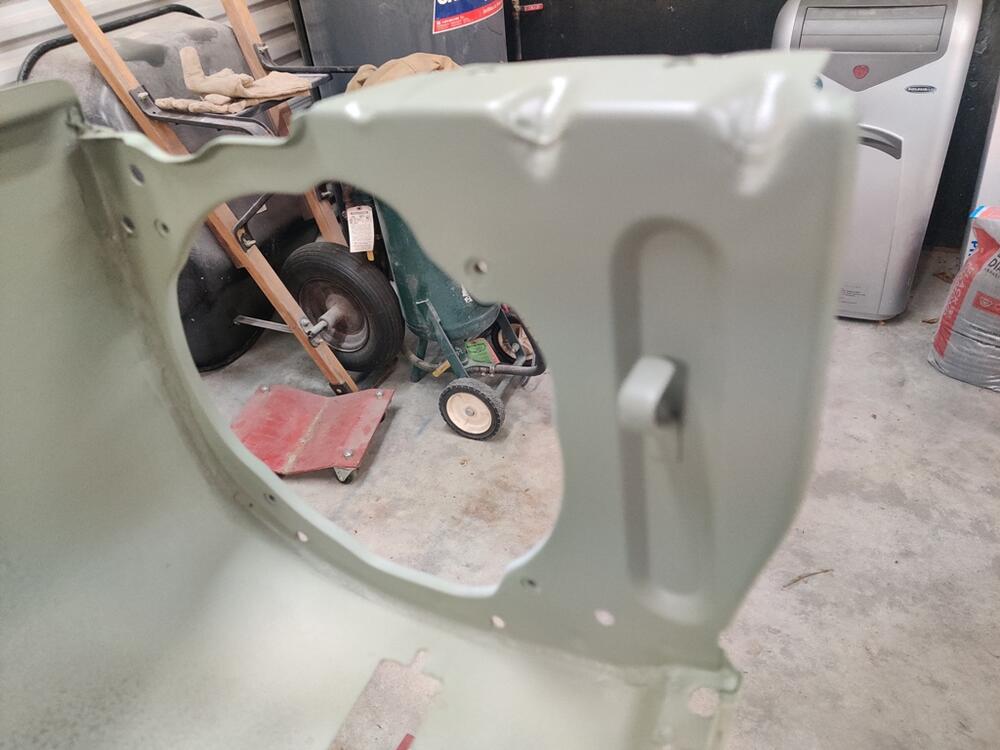
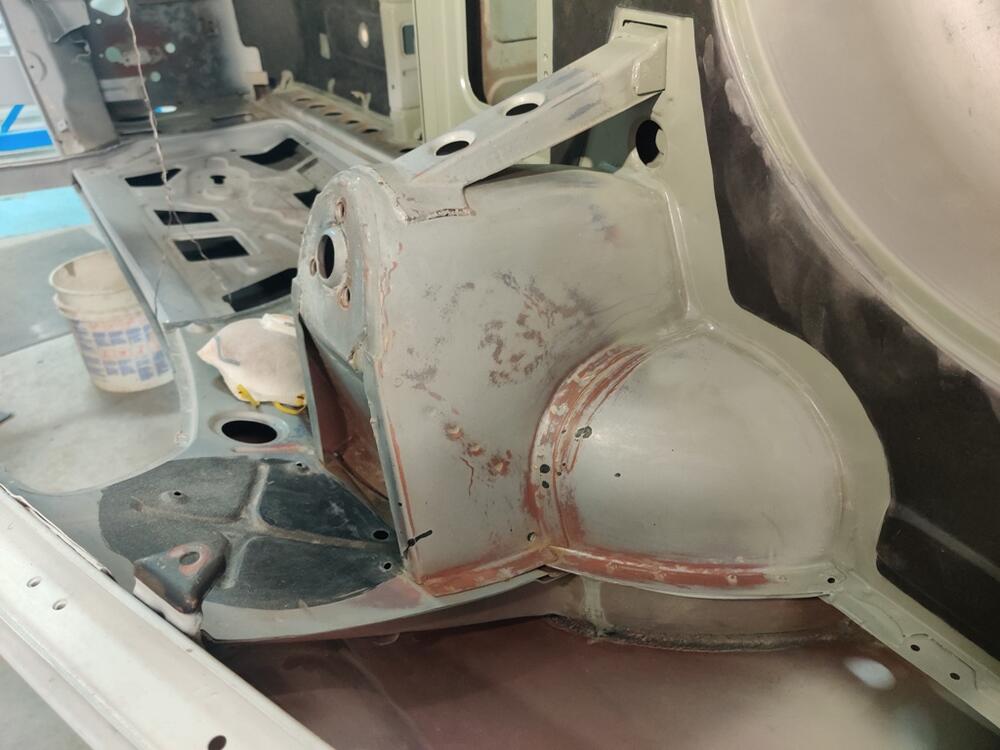
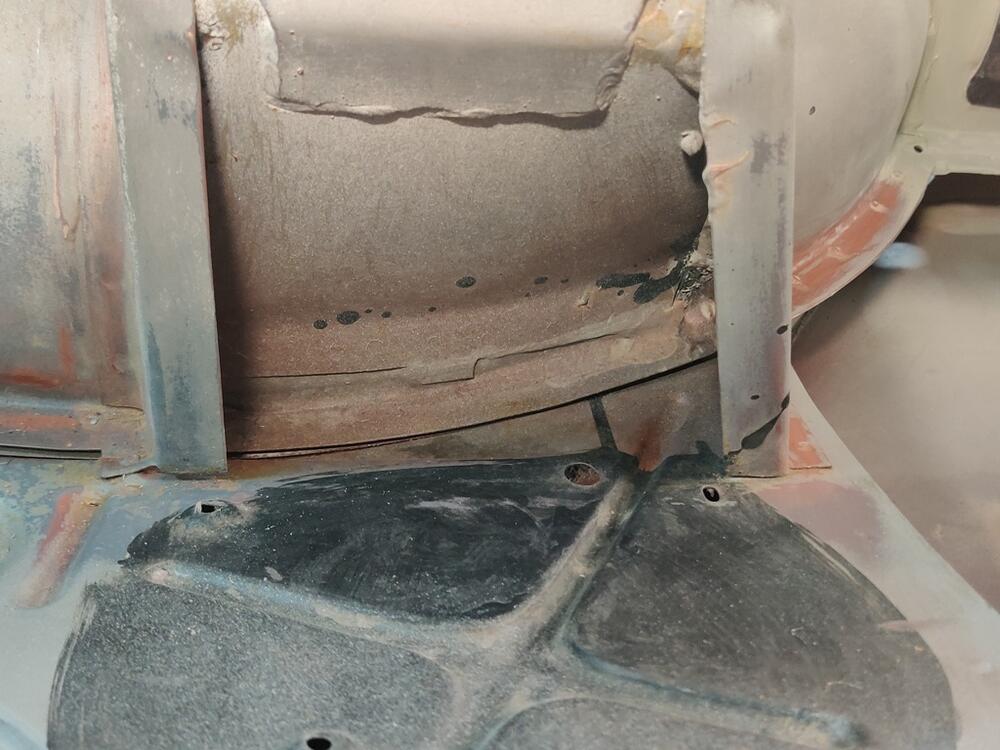
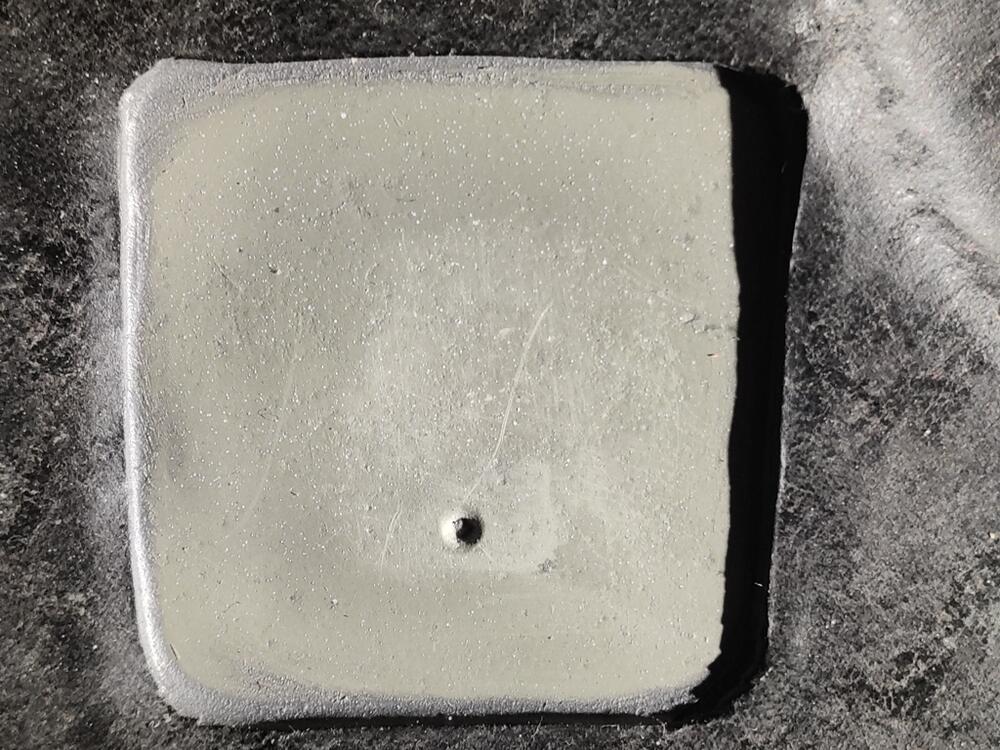
I've been thinking about how best to address one of the most common rust out areas on our cars, the bottom corner of the front fender. There is a reinforcement panel which is crimped into the back edge of the fender, and where it twists at the bottom of the fender, it creates a trap for dirt and debris, which over time, collects in the bottom rear corner. The debris which gets trapped here allows no air circulation so it holds moisture for extended periods of time, over and over again. Eventually, bare metal gets exposed and rust starts. On my first 240Z, I bought brand new OEM fenders, and I sprayed epoxy primer inside this area along with paint. That was in 1993. Even though that car has seen relatively little weather (it has been stored in a garage for most of the years since), the lower corner of the passenger side fender started showing some raised bumps (indicating rust through from behind around 2011. I also, unbolted the bottom of that cars fenders and blew out the debris and dirt a few times over the years with compressed air. Still, these preventative efforts did not work. With the 240Z I am restoring now, I want a better solution. Initially, I thought I would address this problem area by cutting some oval vents to allow additional drainage from this corner, and additional air circulation for drying. However, I think that would only be a slight improvement. Instead, I now have in mind fabricating a small metal panel which will seal off this area completely, and therefore, not allowing any dirt or debris or moisture to collect in the corner at all. Here is a cardboard mock up: I will extend the actual metal piece I fabricate a little further down than this cardboard template, so that the gap is closed. I may pop rivet this piece on using the little tabs. Once secured, I will use seam sealer to seal all the gaps. Of course, I now need to do something to seal up the oval holes that I cut into the reinforcement panel, or water and debris will enter there and I will still have the same problem for the bottom inch or so of the fender corner.


-
I've been thinking about how best to address one of the most common rust out areas on our cars, the bottom corner of the front fender. There is a reinforcement panel which is crimped into the back edge of the fender, and where it twists at the bottom of the fender, it creates a trap for dirt and debris which over time, collects in the bottom rear corner. The debris which gets trapped here allows no air circulation so it holds moisture for extended periods of time, over and over again. Eventually, bare metal gets exposed and rust starts. Initially, I thought I would address this problem area by cutting some oval vents to allow additional drainage from this corner, and additional air circulation for drying. However, I think that would only be a slight improvement. Instead, I now have in mind fabricating a small metal panel which will seal off this area completely, and therefore, not allowing any dirt or debris or moisture to collect in the corner at all. Here is a cardboard mock up: I will extend the actual metal piece I fabricate a little further down than this cardboard template, so that the gap is closed. I may pop rivet this piece on using the little tabs. Once secured, I will use seam sealer to seal all the gaps. Of course, I now need to do something to seal up the oval holes that I cut into the reinforcement panel, or water and debris will enter there and I will still have the same problem for the bottom inch or so of the fender corner.
-
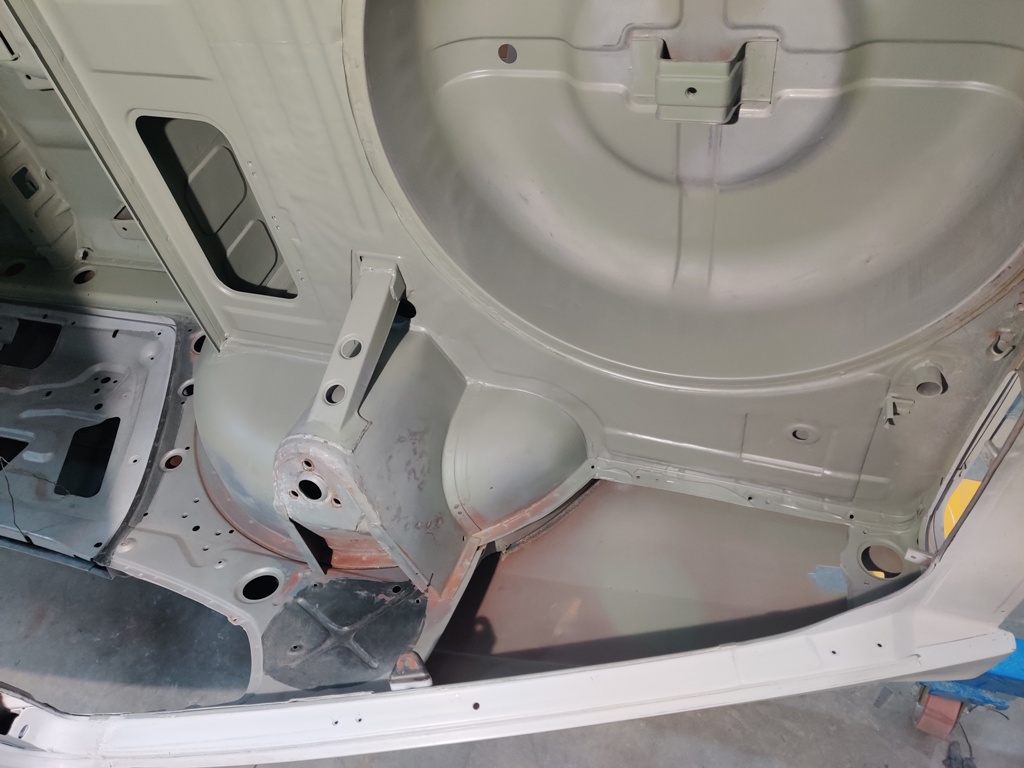
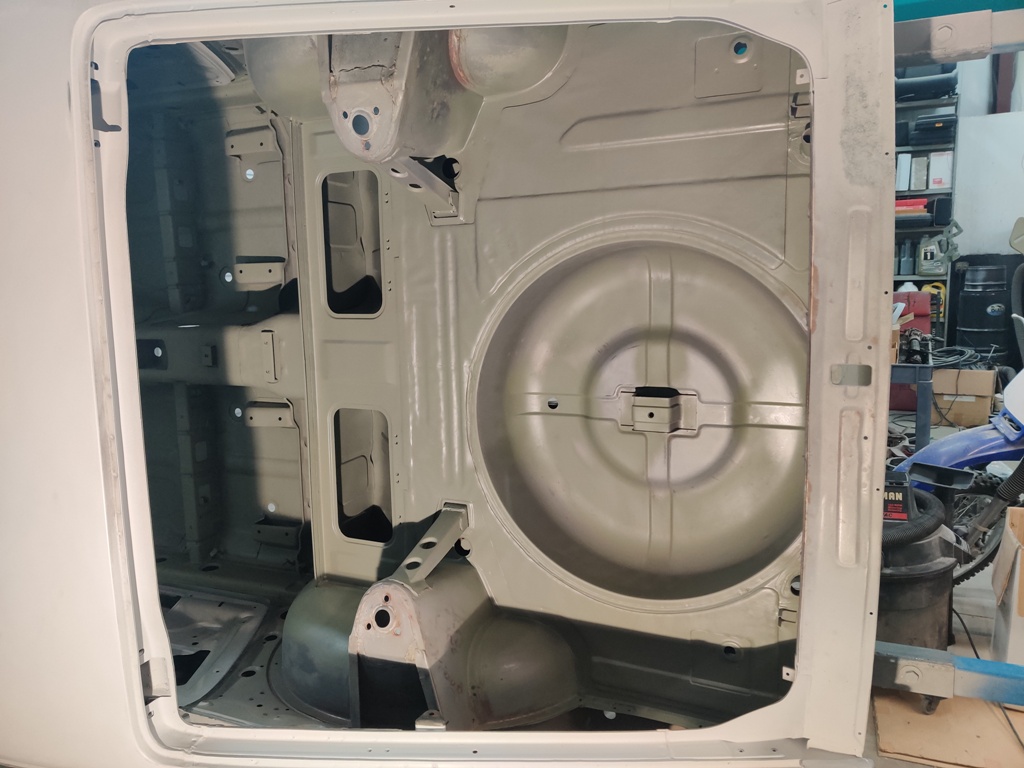
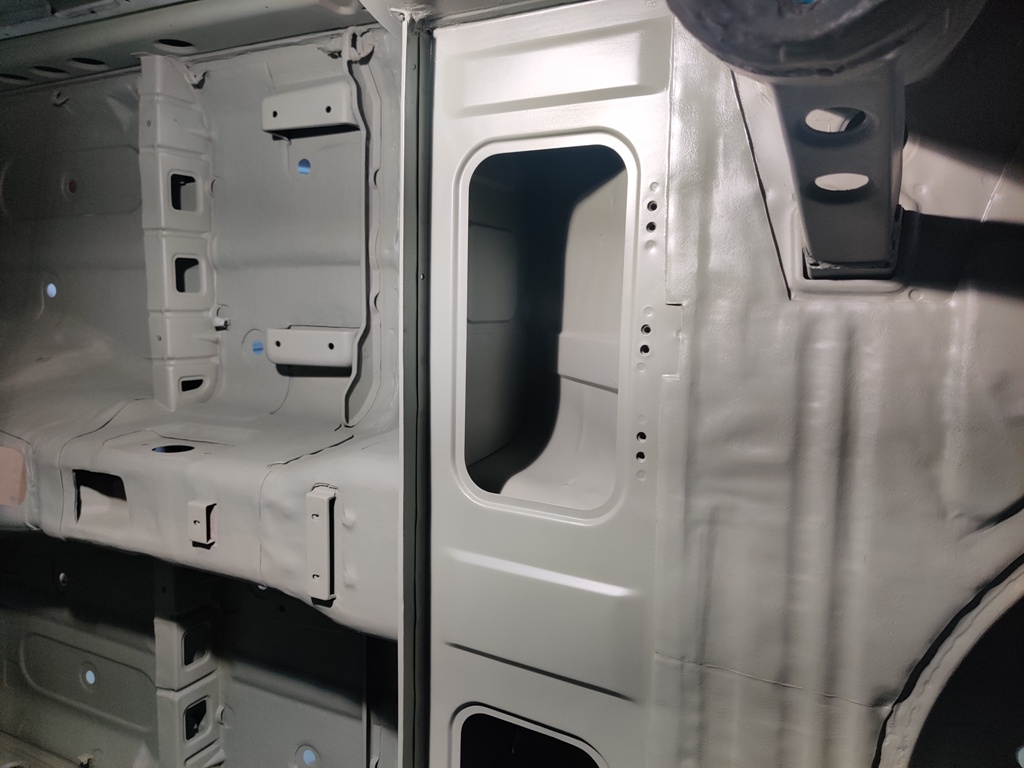
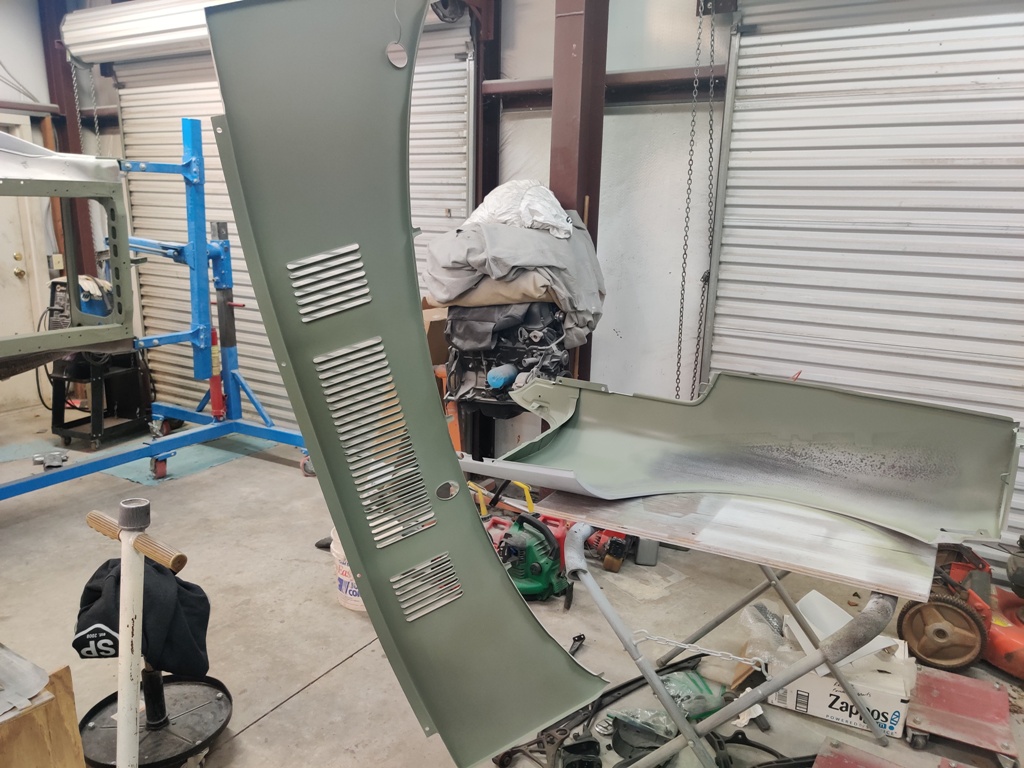
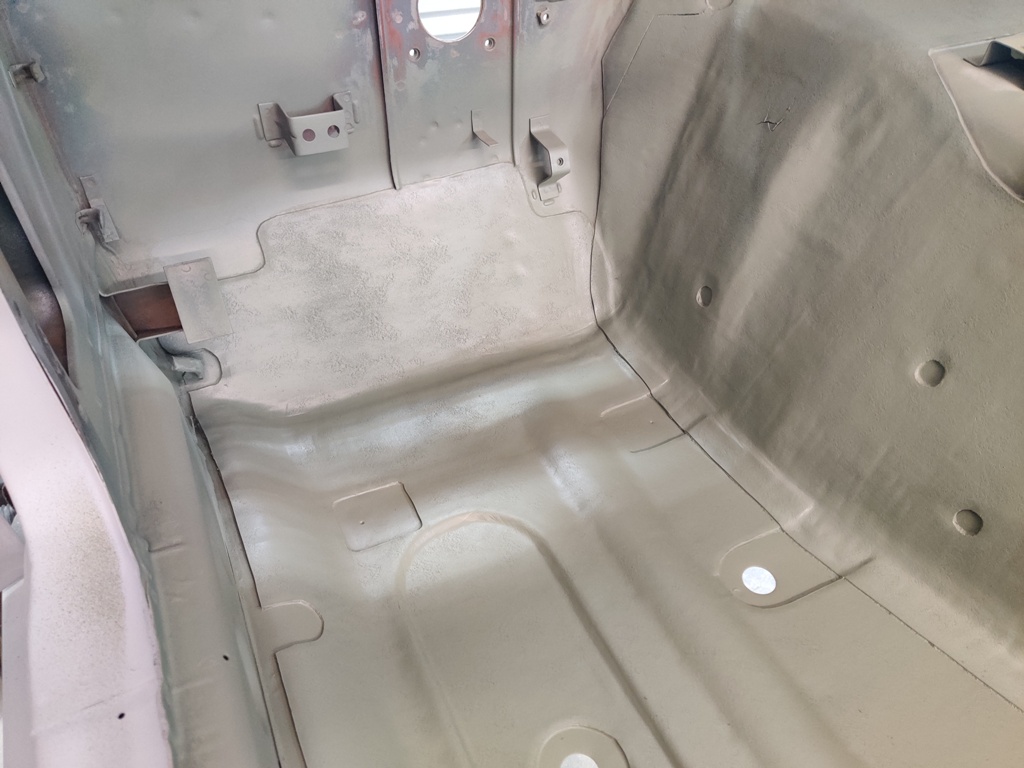
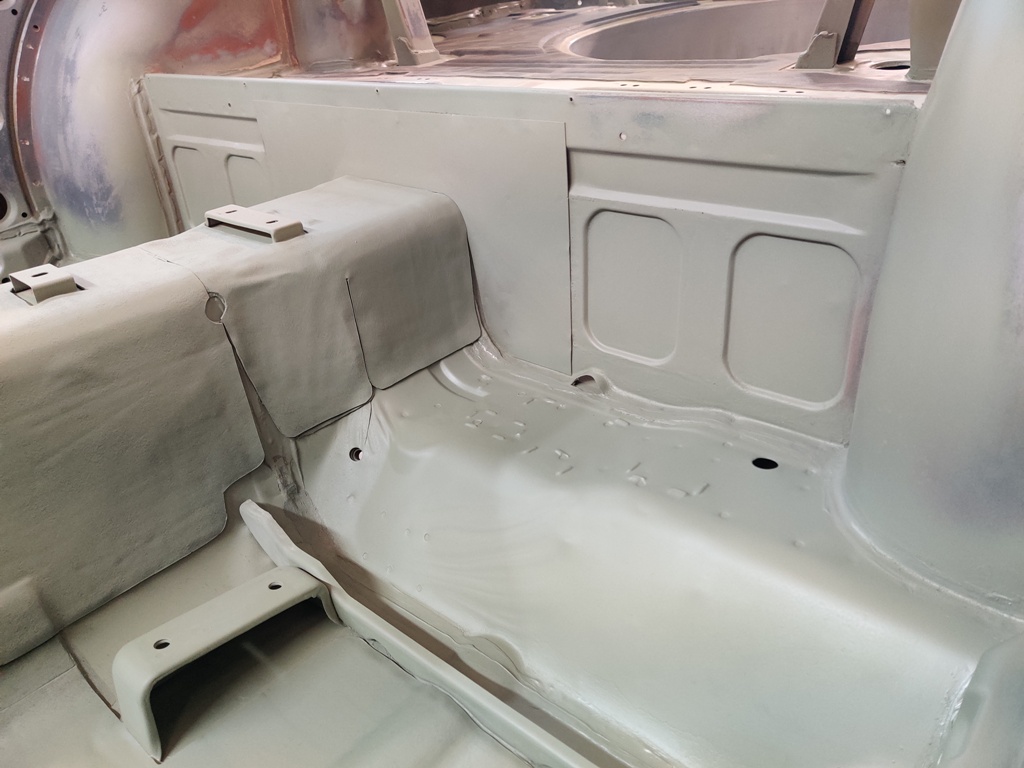
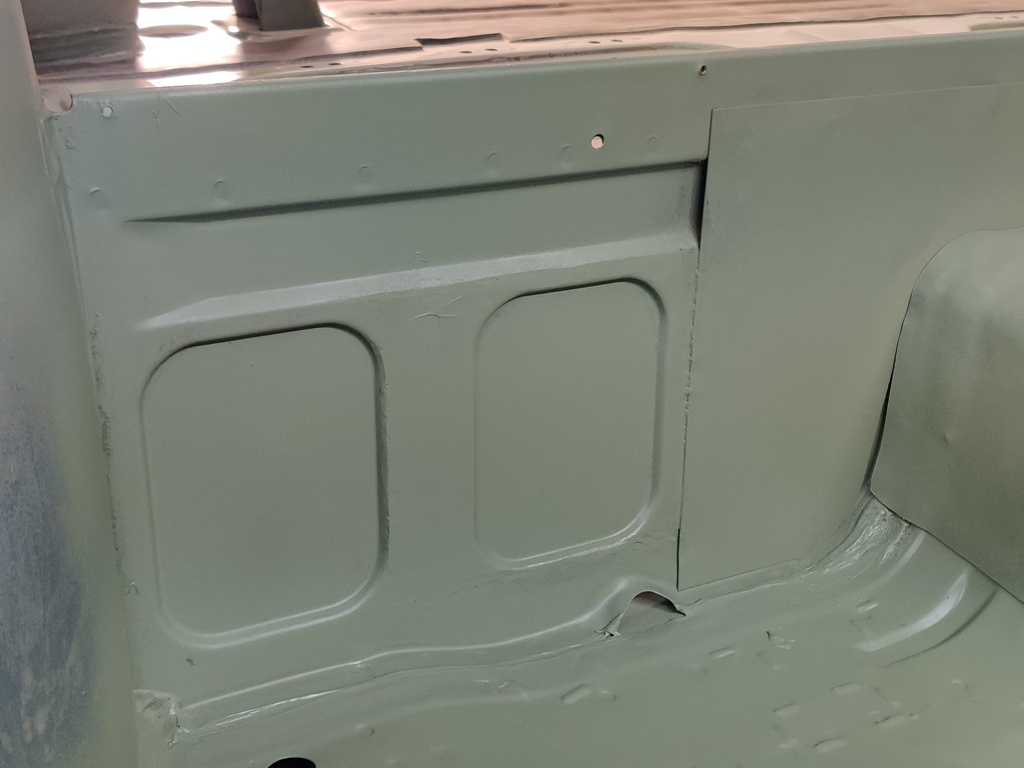
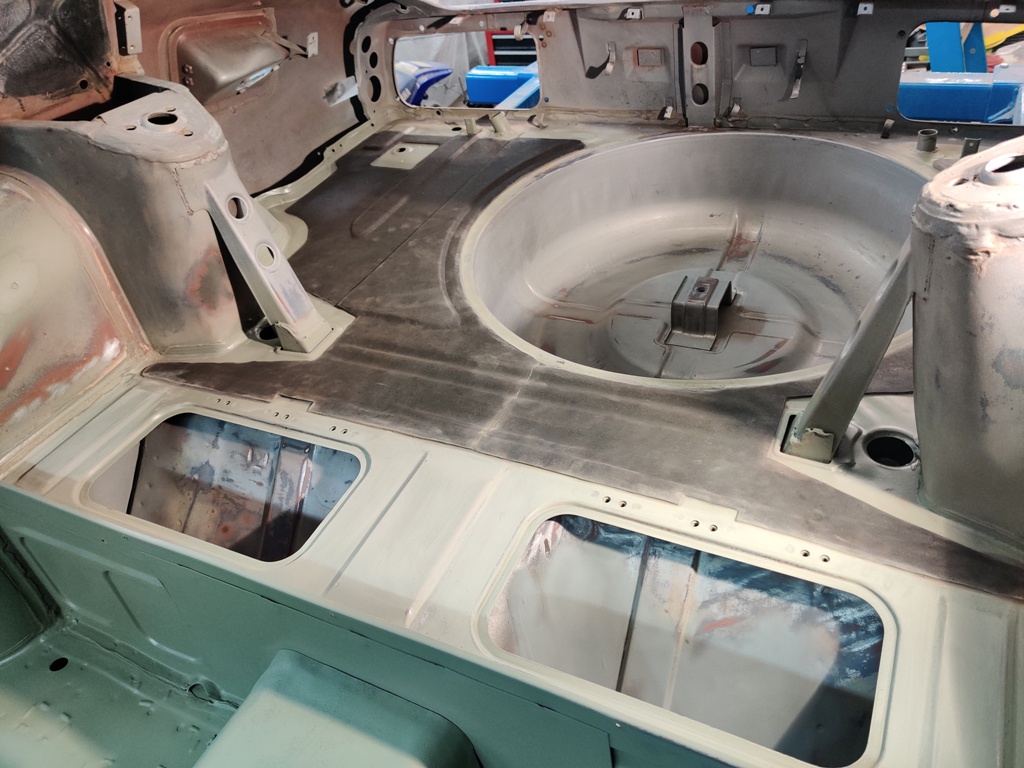
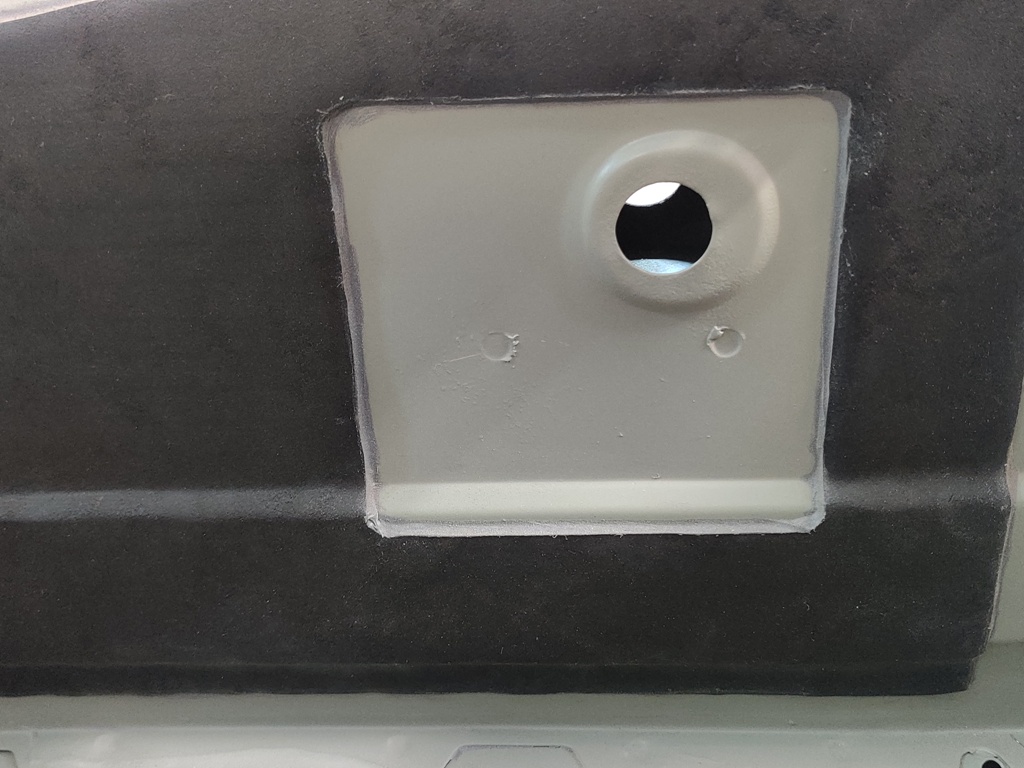
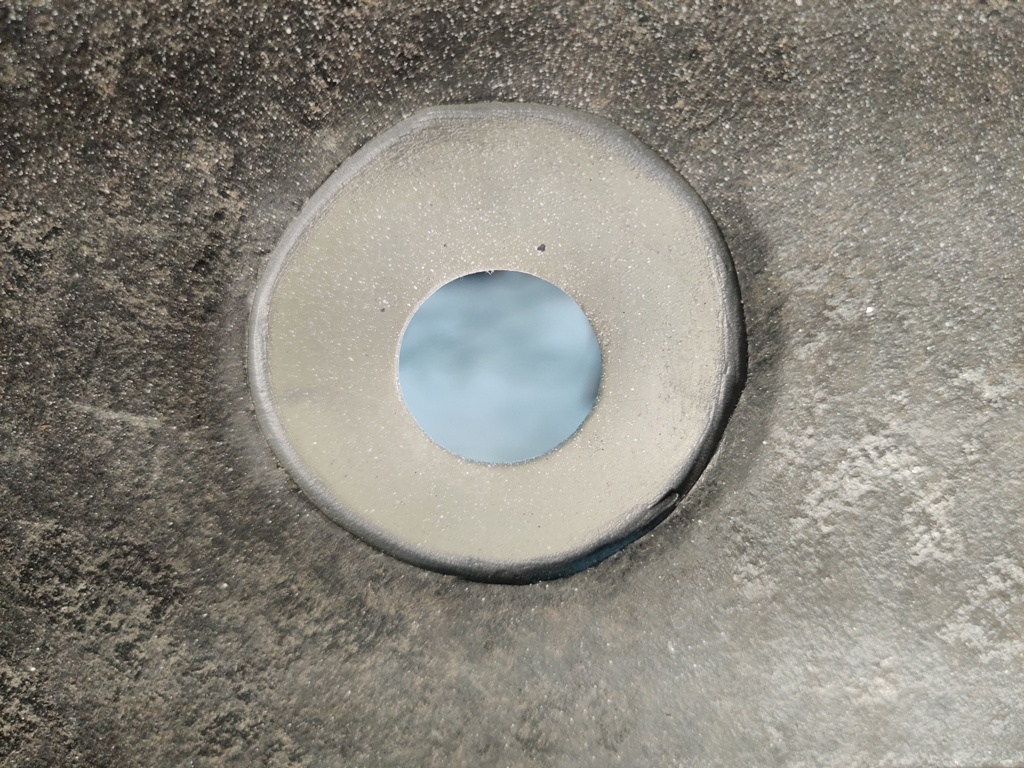
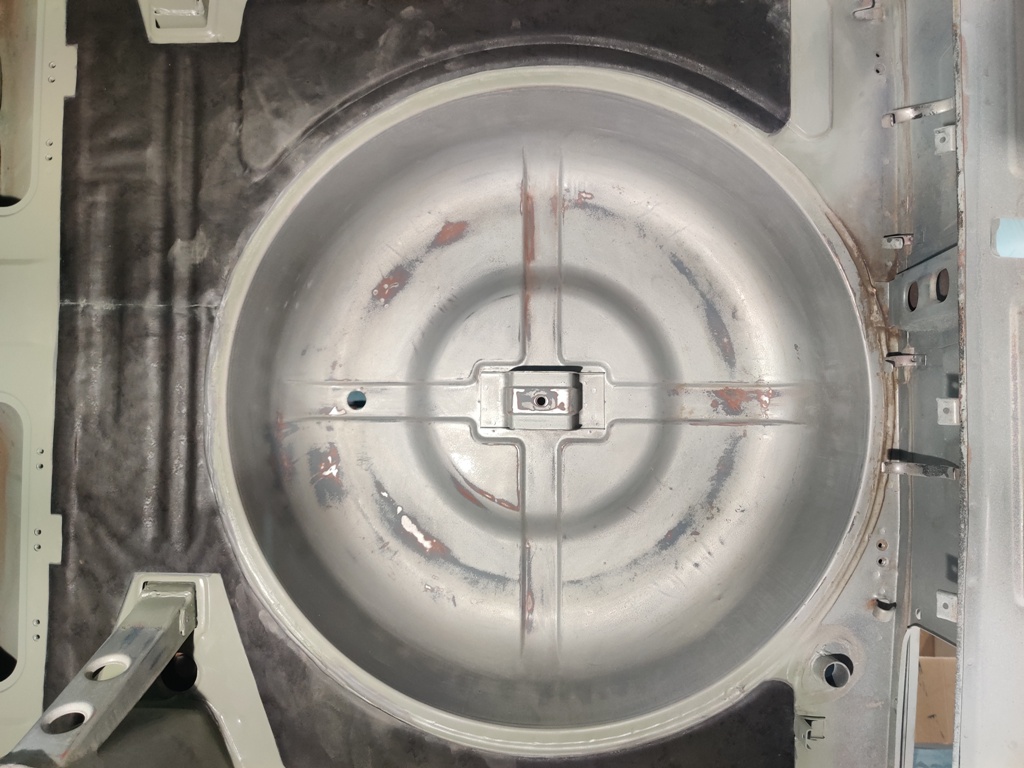
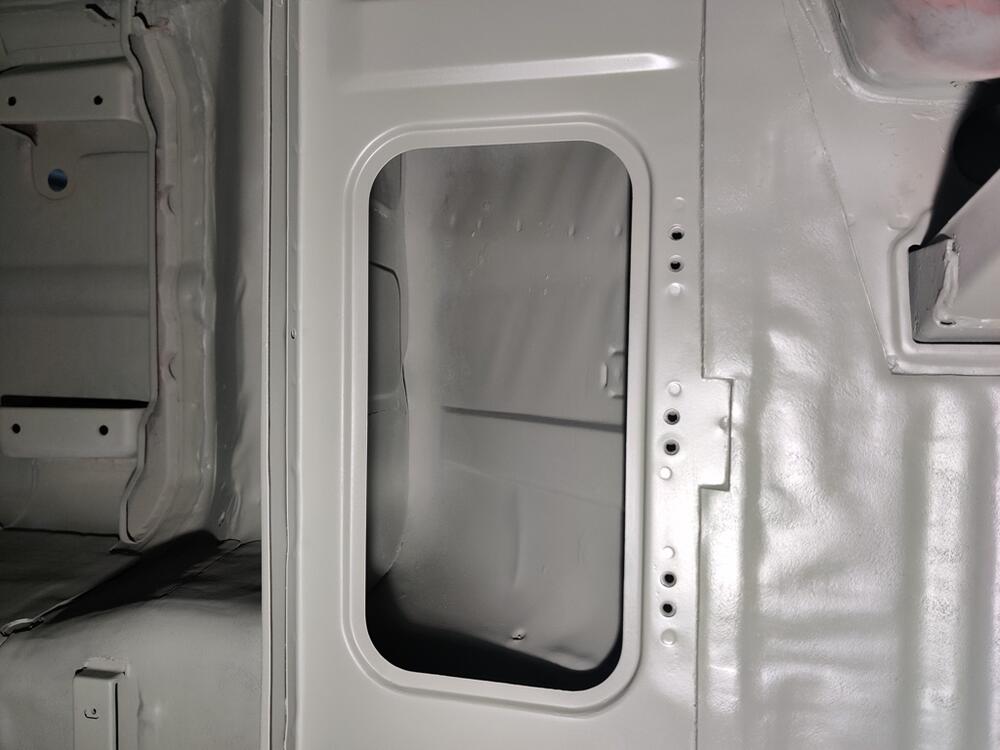
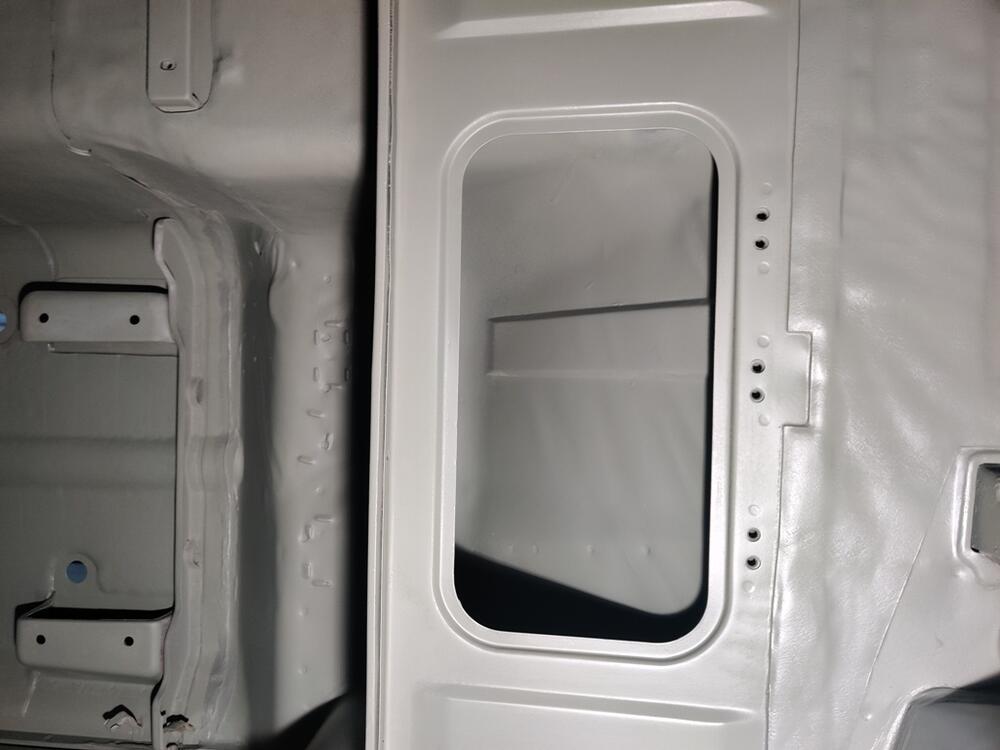
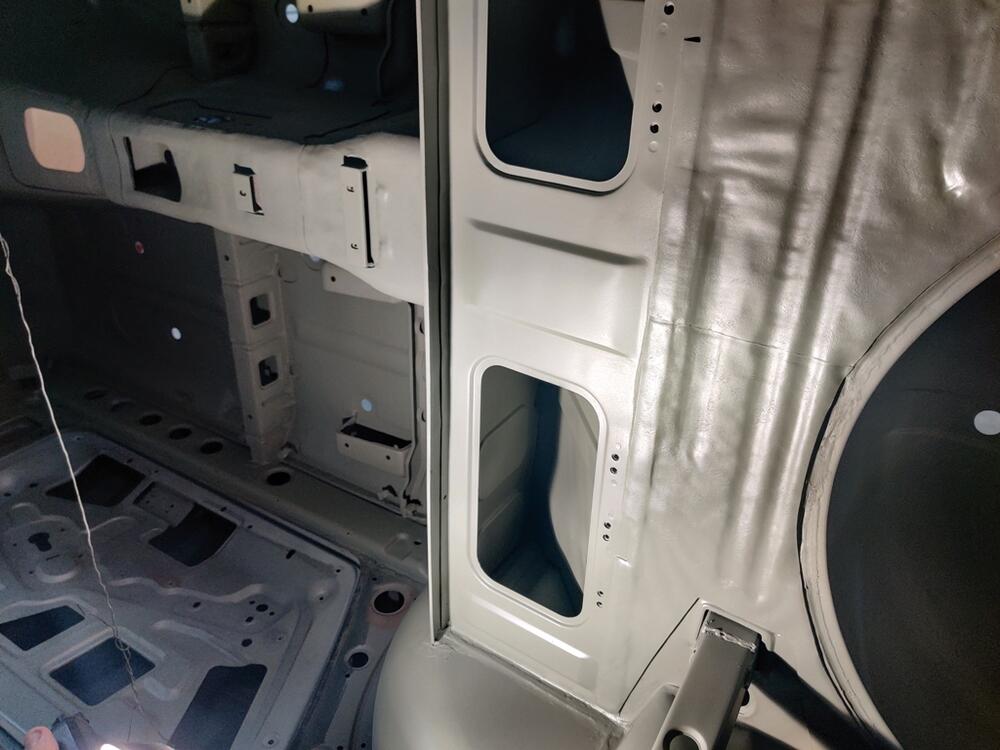
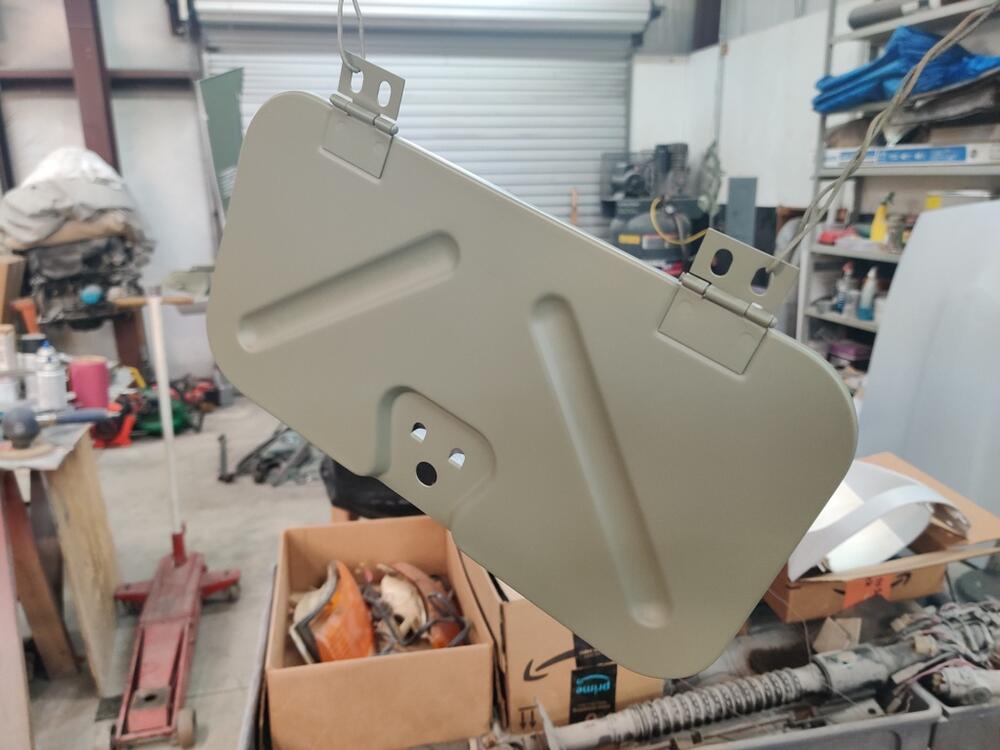
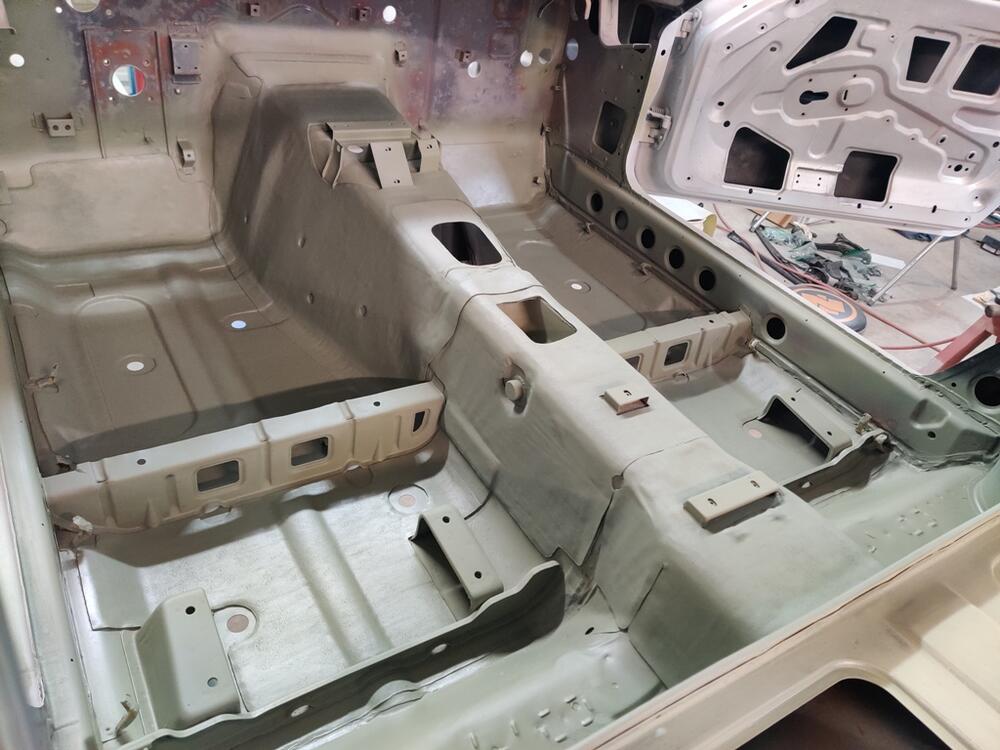
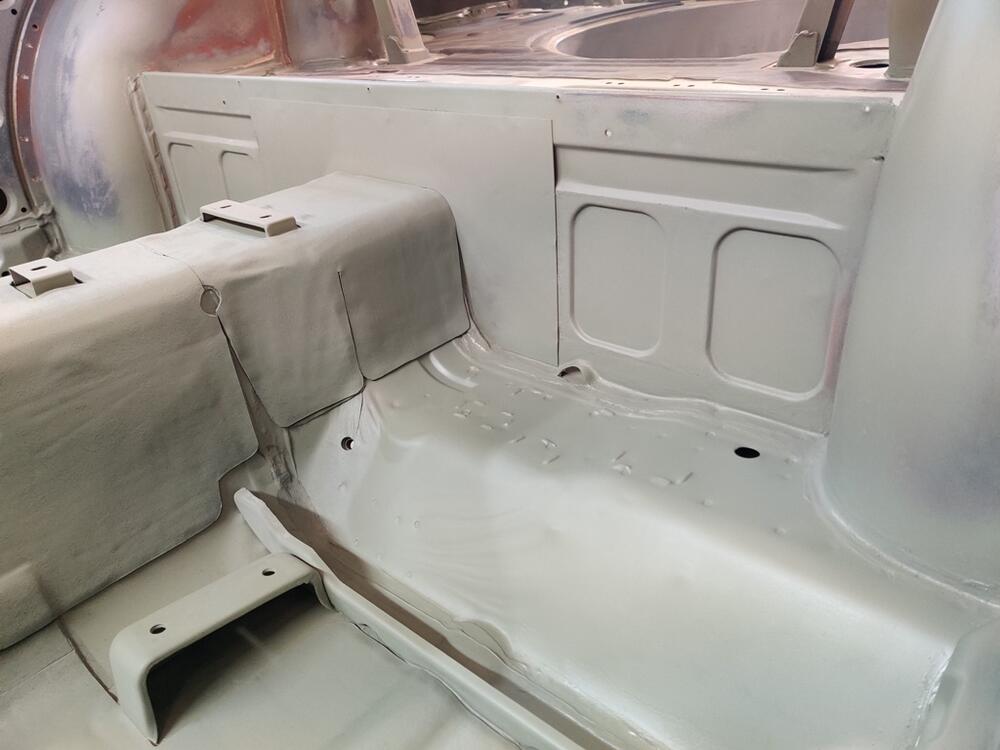
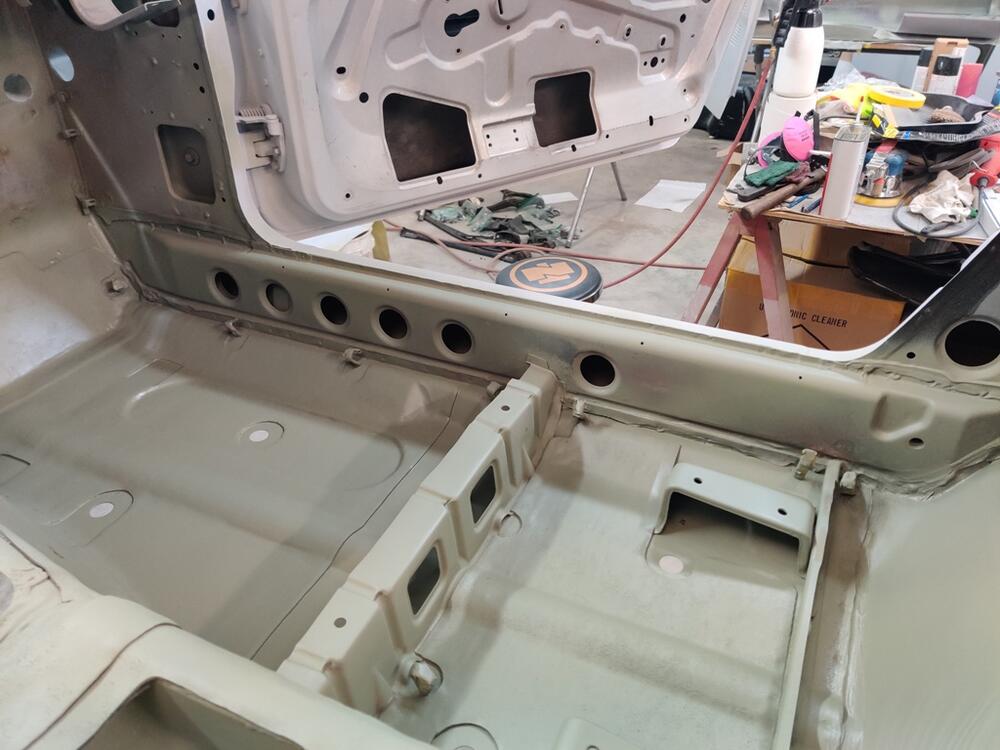
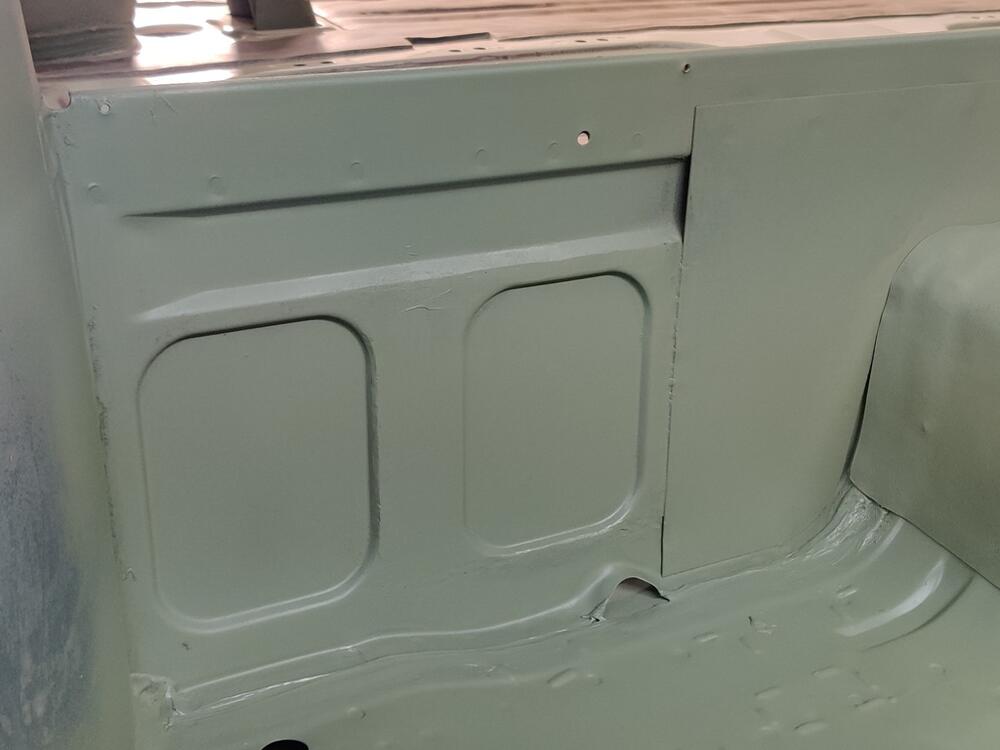
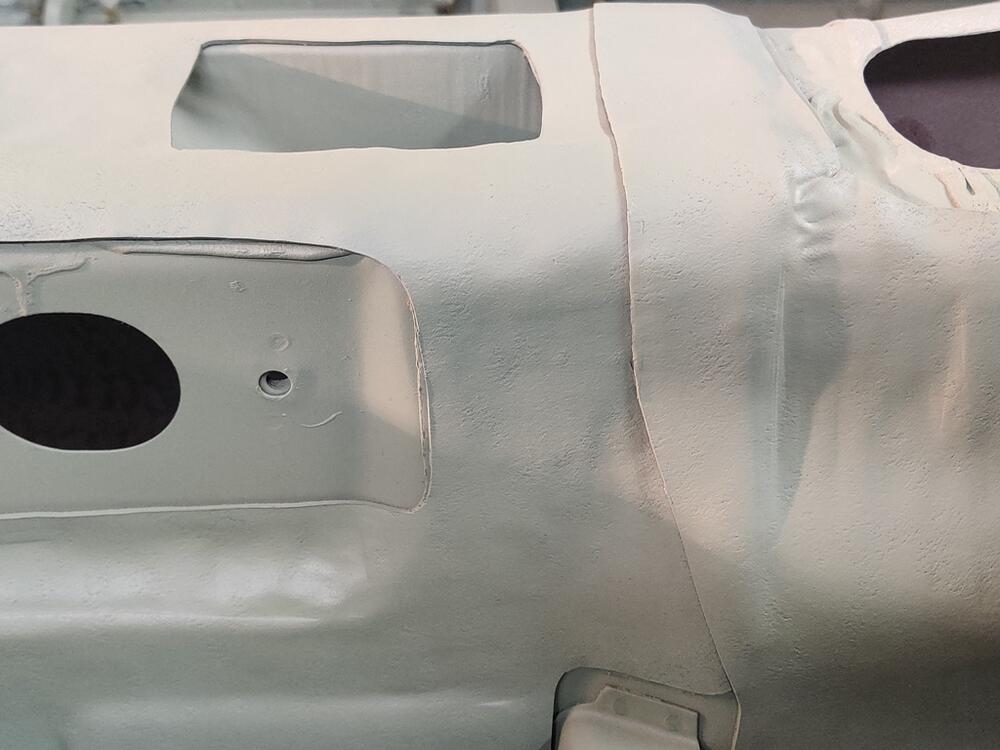
Picking up where I left off, I primed inside the rear hatch area. In the spare tire well, I only sprayed to cover spots where bare metal was exposed during sanding. Since the spare tire well and tool door areas will be more visible when all is said and done, I have spent and will spend more time in these areas to make them look factory fresh looking when the car emerges from the paint booth. While spraying epoxy primer, I sprayed a few other items including a glass bead blasted tool compartment door (I got the car with one blue and one silver one), the two sand blasted hood hinges, and the insides of the front fenders. For the fenders, I put seam sealer in some important areas before priming.


-
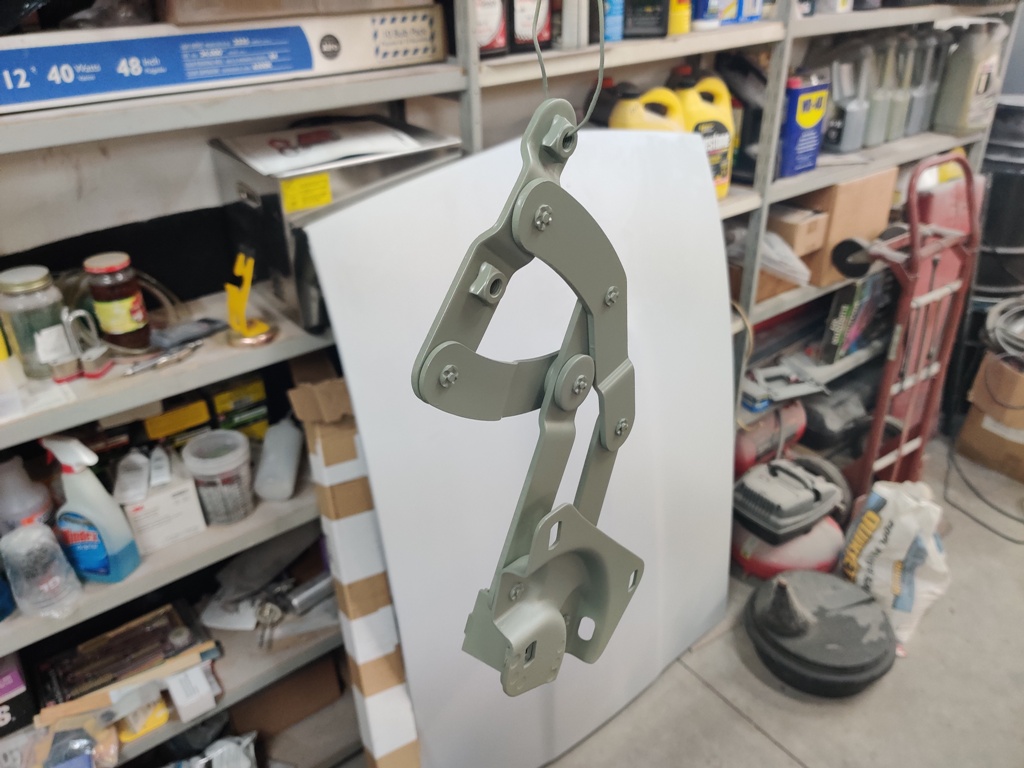
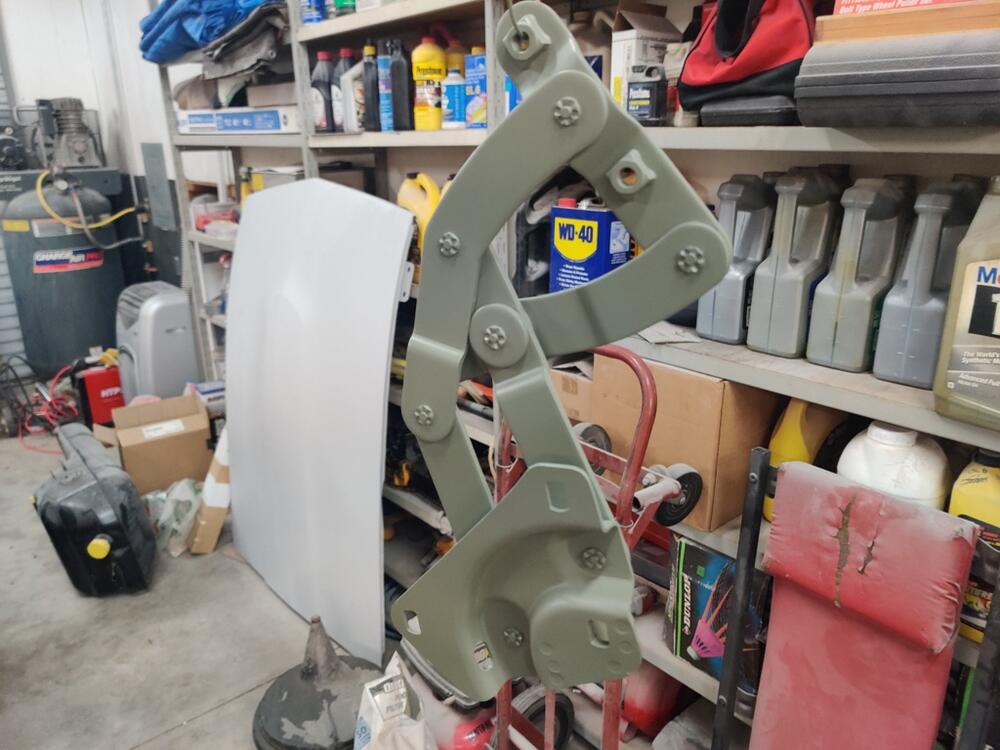
I happened to see this thread and thought I would mention an alternative solution I used. I don't recall if I saw someone else do this, or I came up with the idea, but it consists of using a simple bracket in the shape of a U like this: |______| I bent a piece of 1/8" (.125) or similar thickness plate which I installed underneath the front diff mount/crossmember, so that the motion is stopped by the bracket coming in contact with the bottom of the front diff mount/crossmember instead of the stock design or the RT design that stops movement up above the diff. With this solution, the front diff insulator fits in between the walls of the U and the floor of the U passes under the front diff mount/crossmember. A tight fit to the stock insulator is not needed, but just close fitment. I removed the front diff mount/crossmember and front diff insulator from the car. I bolted the insulator to the crossmember. Then I placed spacers between the floor of the bracket and the bottom of the crossmember so there was a 1/4" between the two parts. I clamped it into place, so that I could drill two holes through the front and rear walls of the plate and into the metal of the front and rear of the diff mount. I then removed the clamps, set the U bracket aside, and tapped the newly made holes in the front and back of the diff mount for metric bolts (6M X 1.0 pitch). Final touches were to glue 1/8" thick rubber mat material (I used a reinforced rubber from Tractor Supply) to the inside floor of the U bracket, and paint it black. At that point, simply re-install the diff mount and insulator as stock, and slide the U bracket in place from the bottom of the car. Two bolts with lock washers on the front, and two on the back, and the bracket is installed. There should be a 1/8" air gap between the rubber glued to the floor of the U of the bracket and the bottom of the front diff mount/crossmember after installation. Cheap - light - easy to remove and install. I don't happen to have pictures because I did this a long time ago, but can add some if needed by anyone who is intrigued by this solution and wants more info.
-
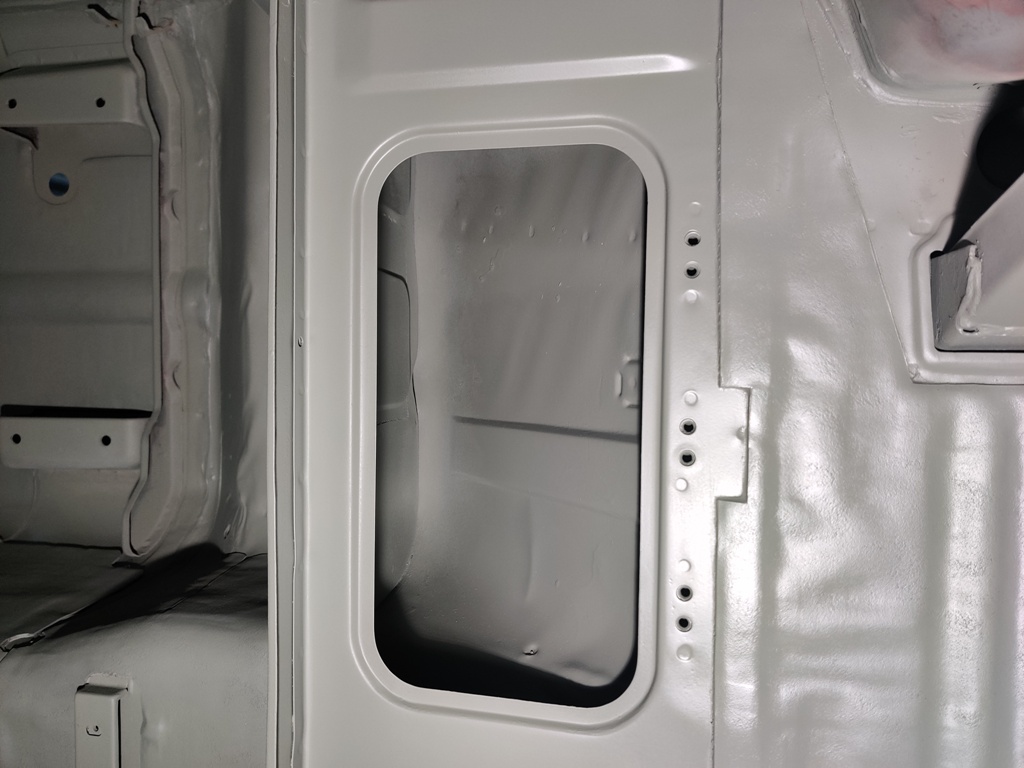
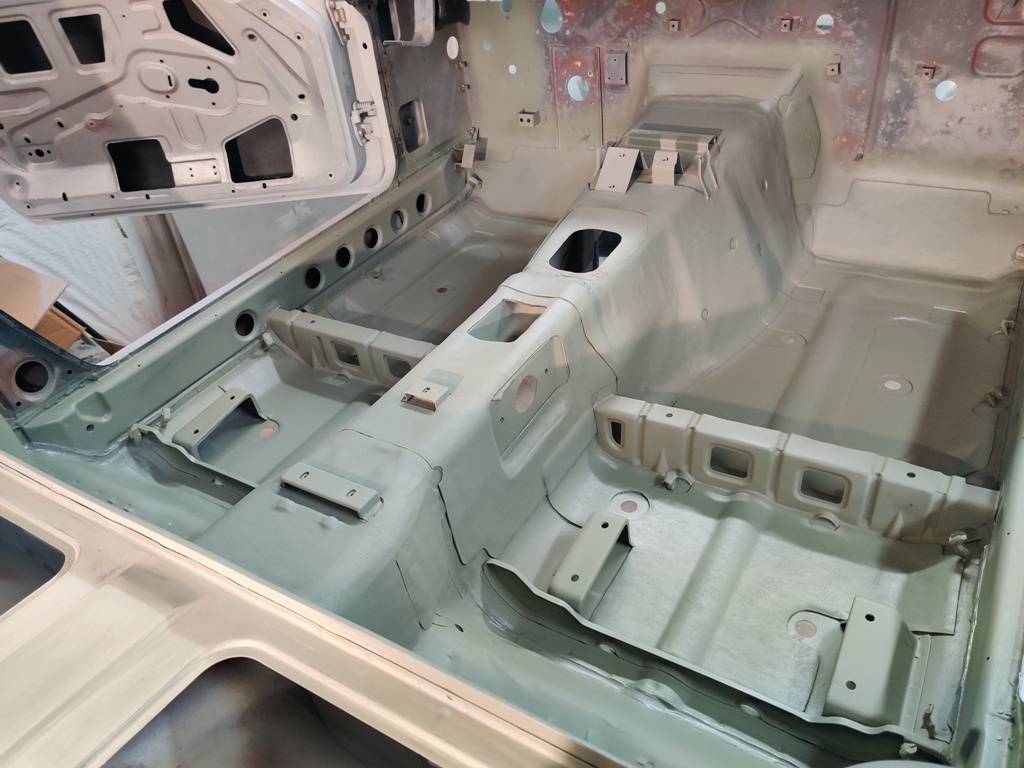
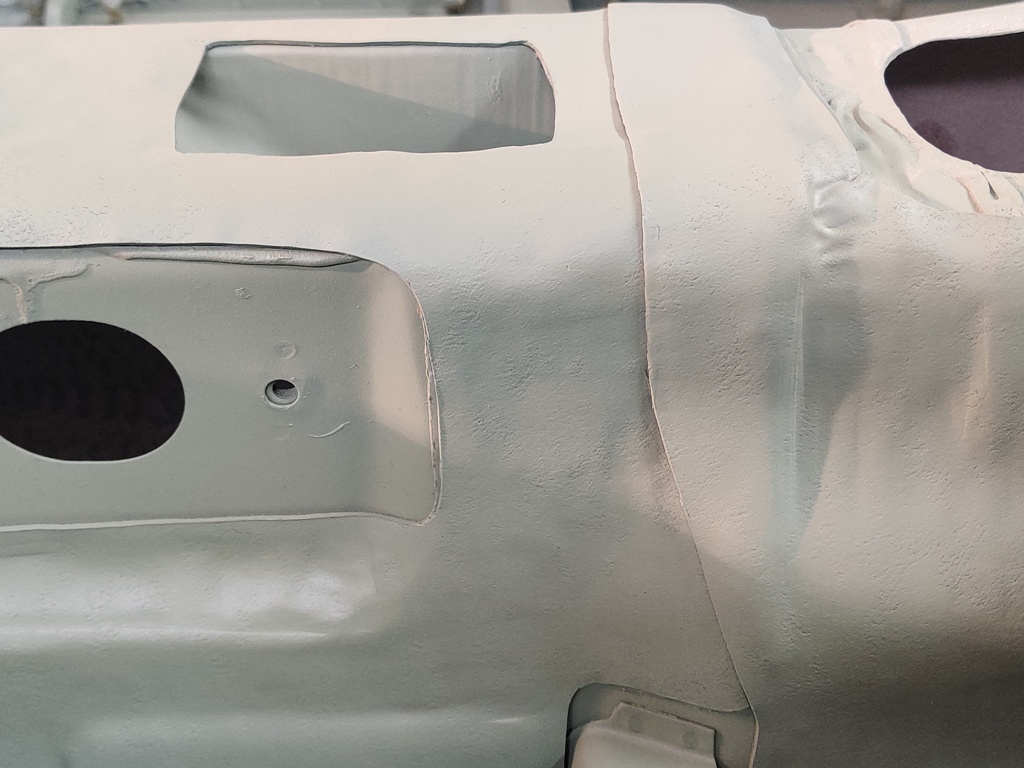
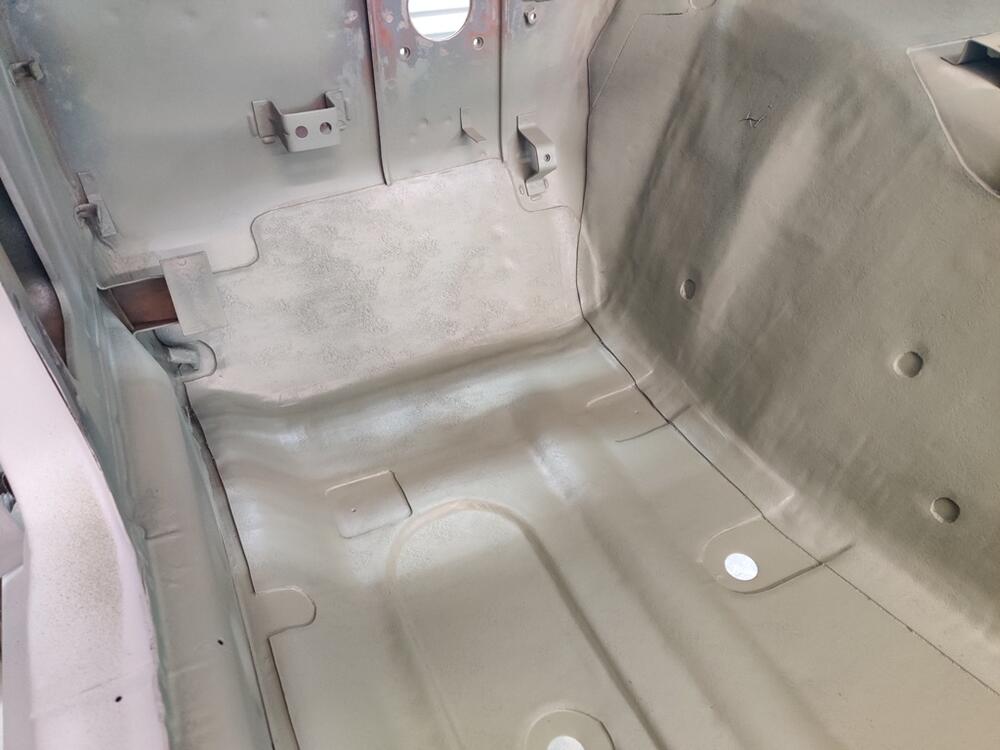
I've spent a lot of hours scrubbing, scraping, sanding, etc. to remove all of the glue from the inside panels of the car. Getting it off shock towers, inner rocker panels, roof, hatch openings, luggage riser, firewall, and inside the tool compartments was a job. I've still got more prep to do before the inside of the car will be ready for paint, but after about 4 Saturdays, I called it 'good enough' to get a layer of epoxy on top of the newly installed sound deadening mats in the passenger compartment. The hatch area will get the same treatment with epoxy soon. A video follows, but here are some still shots as well:


-
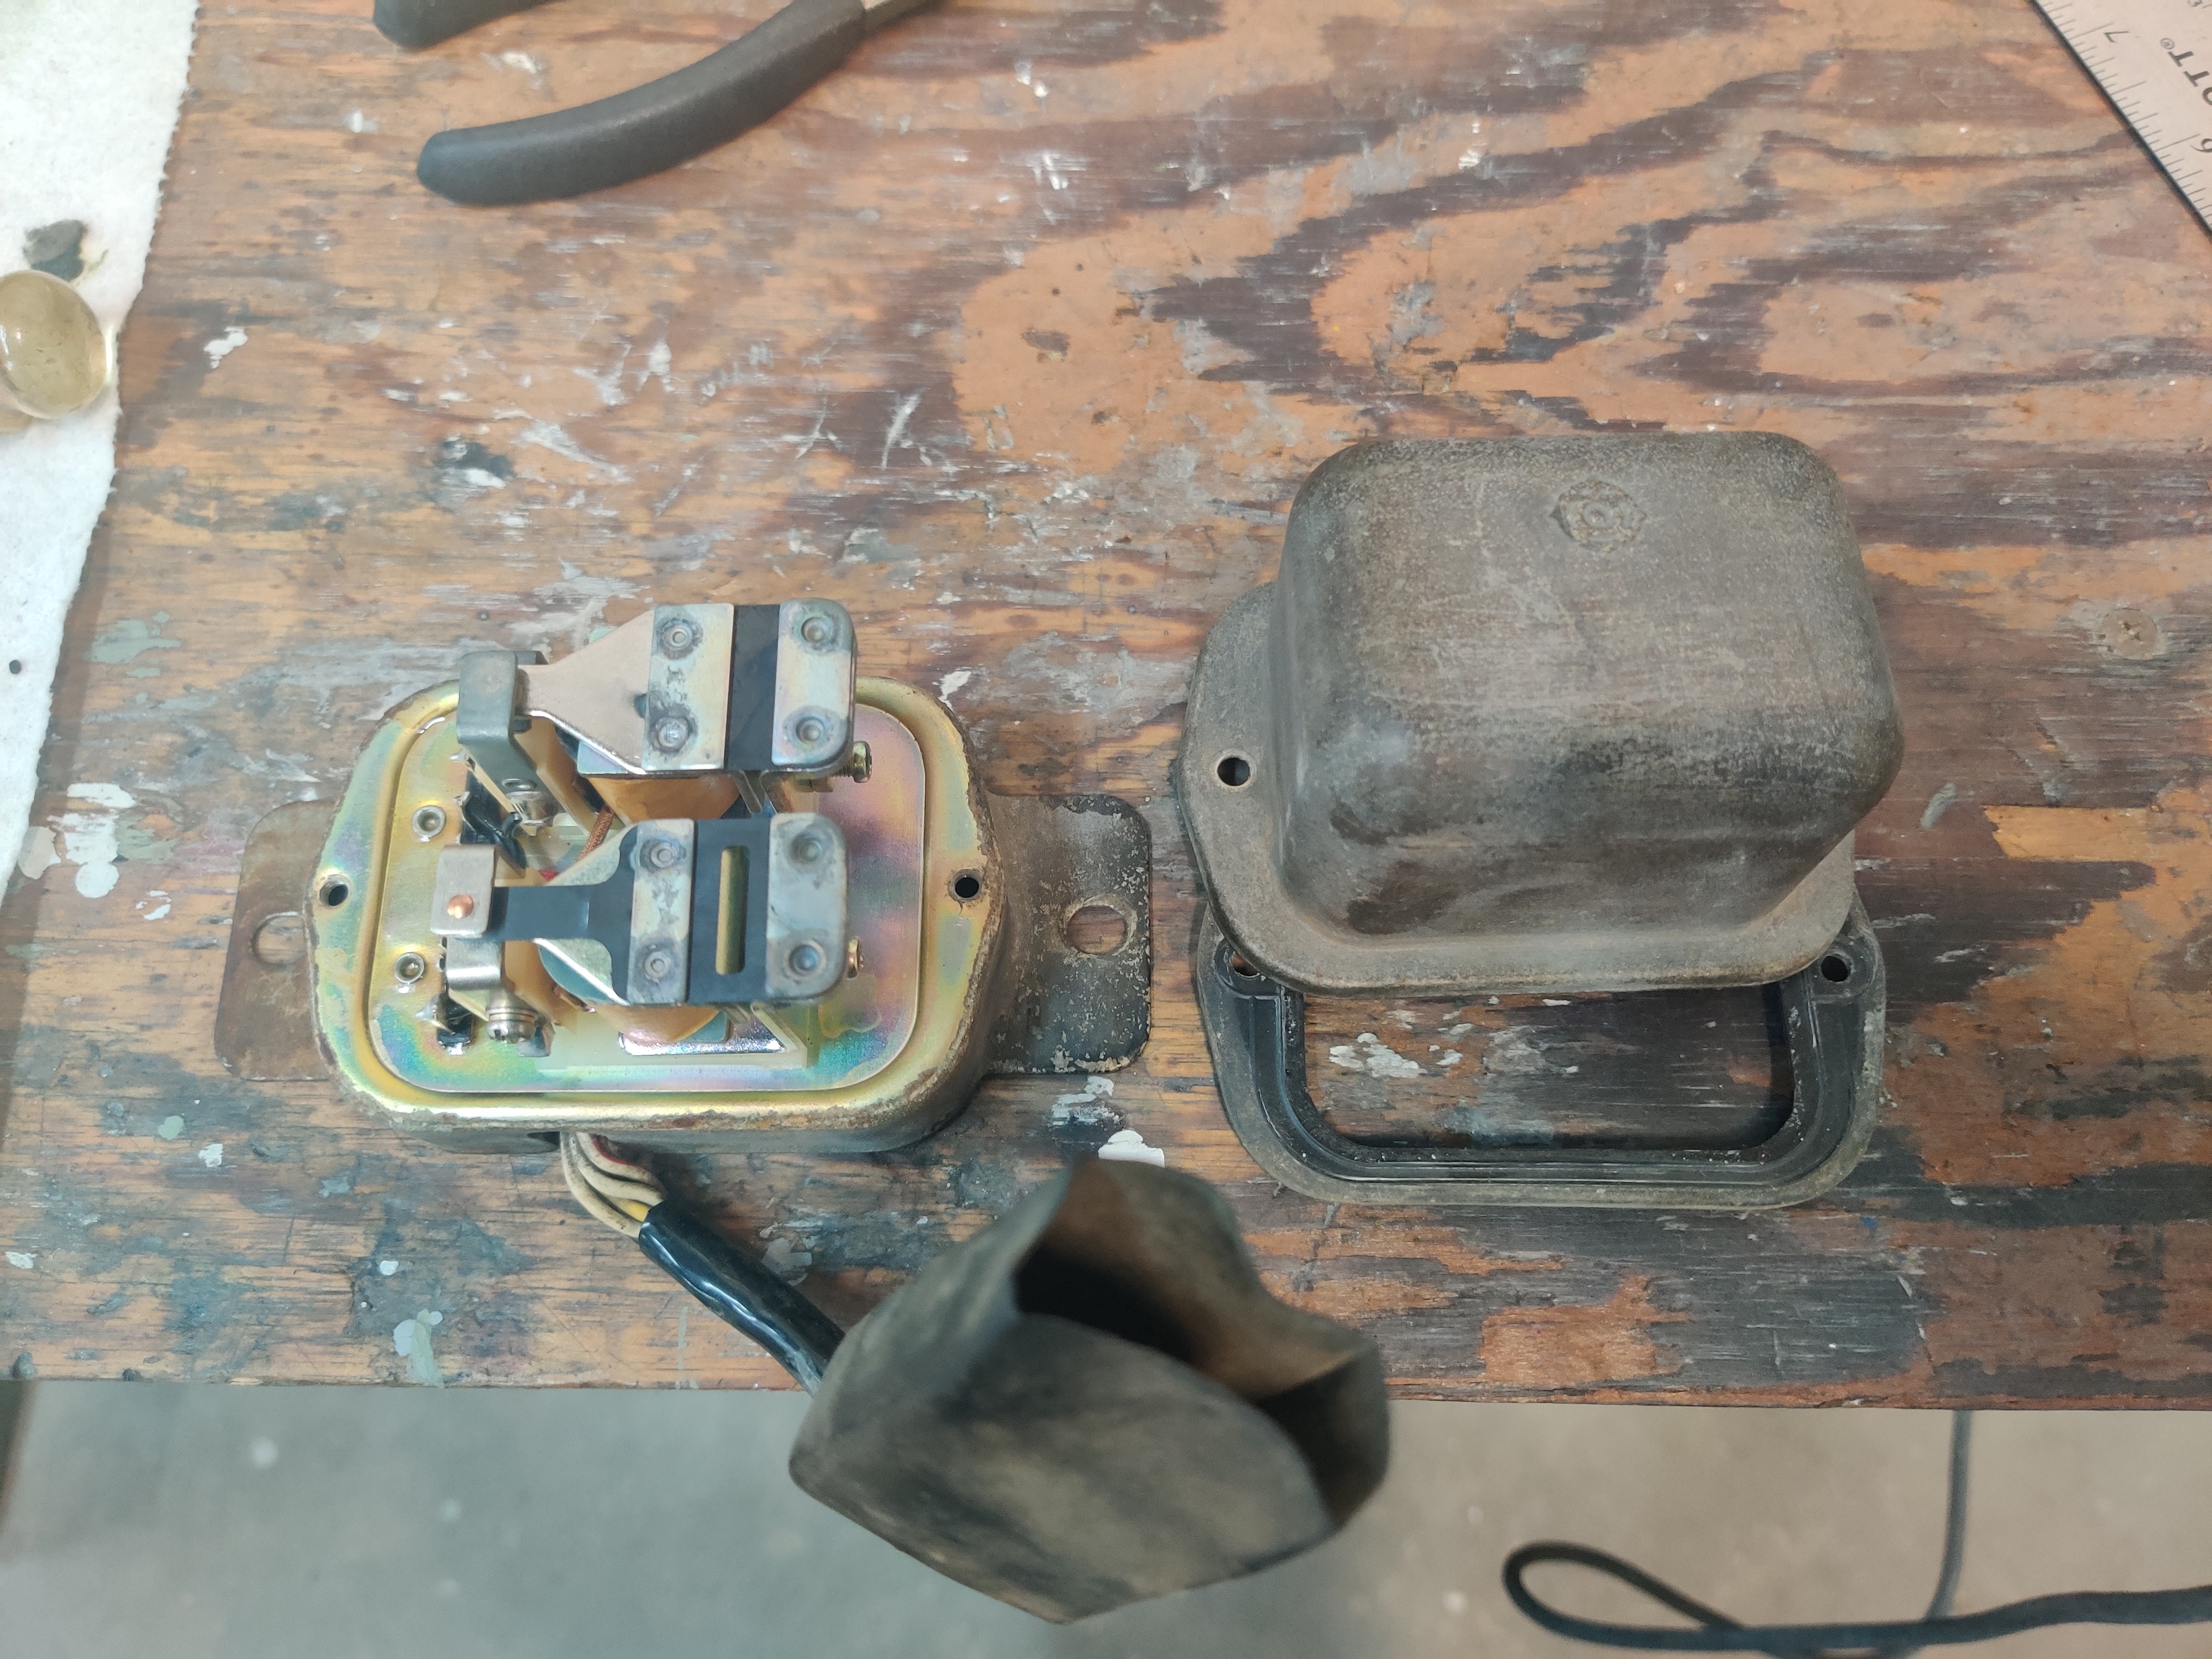
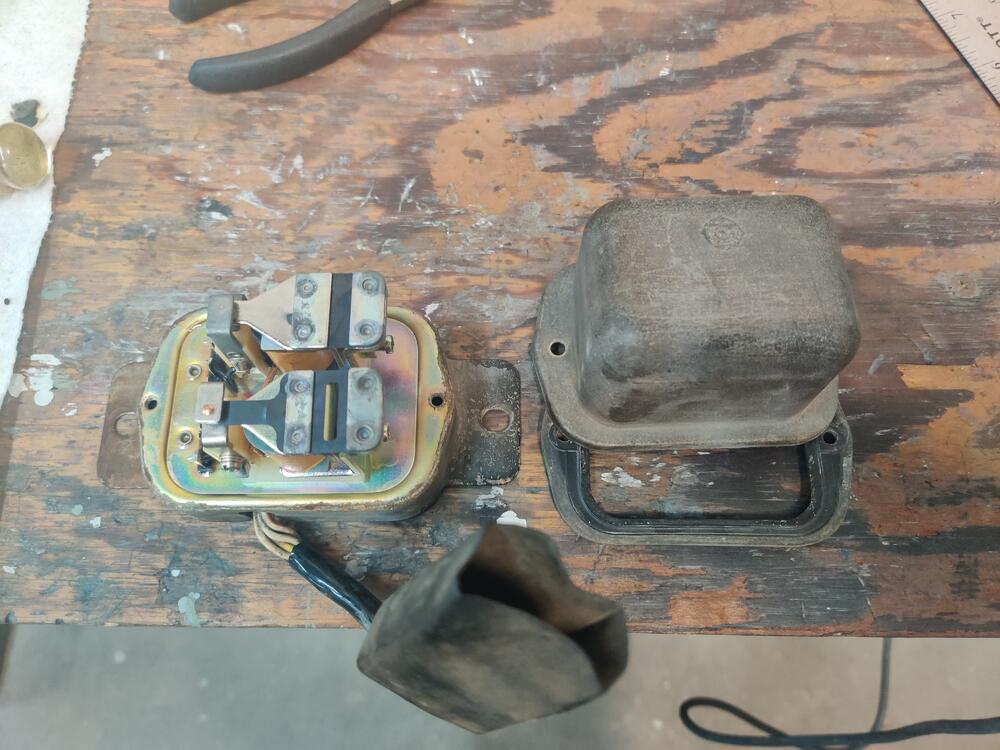
I thought about drilling out the rivets, but they are directly in center line with the two cylinders (in the guts) of the mechanism. I think there are posts running though the center of those and through the mounting plate and the shaft ends are folded down - as the "rivets". So, if I drill them out, I won't be able to just replace them with rivets because the cylinders will not be re-attached to the mounting plate. Replacing the guts seems like a better option, but I will say I am not knowledgeable about automotive wiring/circuits. 6 wires on the original and 3 on the Ford... now what?
-
I'm doing a rotisserie restoration and would prefer to get this regulator restored. I can get the cover and screws re-plated, but does anyone know a place that can restore the rest (re-plate the base while not hurting the electrical parts)?

-
Can I buy your old jute? 🙂
-
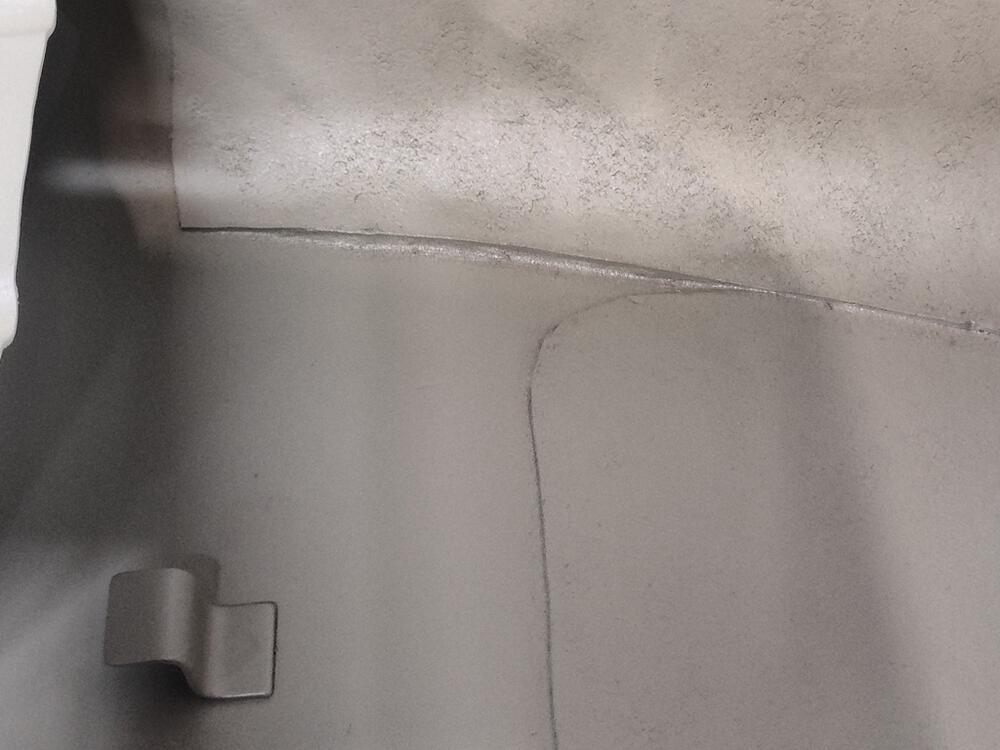
Last weekend, I directed my efforts finishing up the sound deadening mats and at the car interior surfaces. The glue sprayed onto various areas to secure the vinyl trim is quite difficult to remove. After trial and error of various methods, I settled in mostly on using a very stiff metal brush. It seamed to pull the adhesive off the best while least effecting the existing painted finish. Adhesive remover is ok, but more messy and it can prolong the process because the adhesive gets sticky again and smears to a degree. Wiping a cloth with adhesive remover just back and forth briefly on the adhesive and then letting it evaporate for a bit seamed to soften up the adhesive a proper amount to aid with quicker removal with the stiff wire brush. Soaking the adhesive doesn't help as it turns gooey and wants to keep sticking as you are brushing it. And it can get clogged in the brush and smear to other locations. Examples of old adhesive: My goal for the interior prior to getting the car painted is to prep the surfaces by removing all of the adhesive and putting some tooth on the old paint so primer and paint can be applied achieving a clean, "factory applied" paint finish. The original paint is thin inside the passenger compartment and it is easily broken through to the oxide type primer which was applied at the factory. I find the black paint applied by hand with a brush in this circle interesting. The purpose on my car is so the silver does not show through the pattern of vent holes in the trim finisher that goes inside along the rear quarter panel. The presence of runs and drips is interesting to me. I also applied seam sealer to all the edges of the sound dampening mats. This way, water will not be able to get under them in the future. One thing to note is that impacts to the floor can cause the original material to pull loose from the floor as well was crack. This creates an opening for water. If your floors and sound deadening are still not rusted out, you should have a look and address issues via sealant to attempt to keep them that way. I see have some spots where I missed application of the sealer, so I will need to touch those up: Hand sanding the tire well is a time consuming exercise. Power tools don't fit in here well and I didn't sandblast it. So, hand prep it is.


-
I didn't have any issues when I replaced mine on my track Z several years ago.