


Mark Maras
Community Member
-
Joined
-
Last visited
Everything posted by Mark Maras
-
 I'd guess a late 71. Good mix of 70-72 parts. Too bad about the tattered cover. I'll bet most the contents are still good.
 -
So is the kid on the front porch with the banjo. It's the others you have to worry about.
-
I remember somewhere in the orig. info using hydrogen peroxide (h2-o2) vs h2o and alum. Anyone know how or if an extra oxygen molecule could affect this process?
-
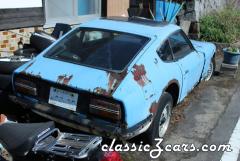
That's a nice collection. I wouldn't hesitate talking to him. I've found collectors love to show their "projects" to fellow collectors (I think some of us qualify) and talk about all the cars and their plans to finish them.(Most of us can relate). Personally, I've found the more intimidating the the property looks, the better the chance of discovering a keeper. This guy's collection is a great example. And the Spokane area is a lot drier than the West side of the Cascades. Wish I was closer. The VIN number would determine if this is worth pursuing. Who knows. It might be a very early RUNNING Z with repairable rust AND he says he has everything to repair it. (panels?). IF, it's complete and original with a very low VIN, $2500.00 may be a good price to the right person. Top of the pic. Is that a 1st. Gen. RX7?
-
I ran many brands of pads over the years. Most were cheap, some were better quality. Little to no difference in wet braking. IMO The problem of wet brakes isn't caused by pads. It is caused by old piston "o-rings" and or stuck pistons. The o-ring seals are actually a squarish configuration with the outer edge angled. This angle allows the pads to retract just a bit when the brakes are released but still contact the rotor to wipe away water. Time for a caliper rebuild. Not a difficult process with one exception. I was able to blow my pistons out with air. Take care. The pistons will come out like they are shot out of a cannon. I was careless the first time and my Z sat for a few days while my hand healed. If they won't come out with air, a pneumatic grease gun is the answer. I used brake fluid and a Scotch Brite pad to clean things up.The o-ring seals are directional. Be sure the new ones are oriented correctly.
-
A VIN would be more convincing than 54th Z. Seems like he is more focused on selling the car based on the ID he has bestowed upon it rather than the actual car.
-
Everything wrong with this car is typical of all unrestored Zs. The one thing that affects the value the most isn't mentioned in the list. What condition is the body in? Rust is the enemy. Any rust you can easily see is just the tip of the iceberg. Mechanical work on a Z is a walk in the park compared to "rustoration". If the body is sound, it would certainly be worth $2000.00. It could also be worth as little as $500.00 if it needs a lot of rust repair. Choose wisely. Many people have become overwhelmed when they opened up their Z and realized the amount of rust in a it. It's hard to stay motivated when you keep finding more and more rust.
-
You might want to recheck the oil pump-distributor shaft for proper orientation w- the No. 1 cyl. on TDC compression stroke. If you can't advance the dist. enough, the shaft may be off one tooth.
-
Before you give up on any (frozen, rusty, crusty) fuel sender, soak it in 100% CLR for 24-36 hours. I've done two. One frozen, one just plain ugly. Both look good and are usable now.
-
I agree with Zed Head. Engine was ran long after problems began and probably ran until it finally died. I don't know what good used engines cost in Texas but here in the NW they are a dime a dozen. Well maybe not that cheap but they are plentiful and can be purchased for $200.00- $500.00. If you start with a good used engine, you'll be able to refresh it for a lot less money (reusing pistons, rods, crank. cam. etc. and probably get a good balancer with it.) than using an engine that every part is in question including the block. IMHO, Peace of mind is a big factor in this decision. You could throw a lot of money into this engine and still have those nagging doubts about its' longevity.
-
Welding itself is not difficult if the conditions are good. What makes it difficult, even for a pro, is contamination and crappy fitting parts. Much like painting, most of the work is done in the prep stages. Clean steel and minimal gaps (1/16" is too wide, 1/32" is good) make welding a lot easier when butt welding thin sheet metal. Care in fitting the new steel to the old will be rewarded. The finished work will look much more professional.
-
Old school method to find water in the oil was to put a drop onto a hot exhaust manifold. Pure oil will just smoke, no noise. Any water in it will sizzle and steam.
-
Update Finally home and doing great. I'm going to briefly share what was going on. Kind of thought provoking unless you're satisfied with luck or coincidences. In layman's terms, she had an artery in her stomach that blew out. Took 3 units of whole blood and countless units of other fluids to get her b.p. up. By the time they took a pic. of it, many hours later, it had sealed up "on its' own". Multiple Drs. just shook their heads in disbelief. One smiled and said, "You must know someone". I think that "you" was meant for all of you. Thank you all.
-
Update- Thank you all for your kind thoughts and prayers for Kathy. While I always had positive thoughts, frankly, I'm blown away. She is coming home today! Saturday - Tuesday in ICU. Wednesday, into a regular room and now being released today. I've never seen such a speedy recovery nor a hospital releasing someone so soon. Her Drs. are amazed at the speed of her recovery and can't find a reason to keep her in spite of their best efforts. Now we need to concentrate our prayers on Mrs. Warner. Don't know what went wrong. Doesn't matter. We all know what to do. You can't argue with success.
-
The rusty seams and welds would seem to confirm the aluminized coating. Interesting difference between galv. and aluminized steel we found in the wire business. The cut end of a galvanized steel wire won't rust. A cut end on aluminized wire will not only rust but bleed rust color onto the surrounding coating. However, the aluminized coating is superior to galvanizing in most applications.
-
So much for memory. Next time I'll check first. The finish, however, is much like an aluminum color spray paint. Bright but not reflective at all. There are some cold galv. sprays that look similar but most are a darkish flat grey. Just had another thought about the original coating on the shields, It's quite possible the shields were aluminized sheet metal. More durable than galv. and might explain the color. I've worked with aluminized wire, vs. galv., on spec jobs. The finish looks and feels like freshly blasted alum. using very fine media.
-
-
Any of the orig. early heat shields I've seen were bare aluminum. No finish on them. The finish was similar to the aluminum door sill plates all of which slowly oxidize over time to a dull finish.
-
Circletrack.com has a good how to about four wheel alignment titled "stringing your car". Although I have not tried it yet it is an interesting read and makes a lot of sense.
-
Hi everyone I want to apologize and explain to the members that have been patiently waiting for their parts. My wife Kathy has been very ill and has been in ICU. We thought everything was improving until a test came back that put everything into doubt. Now she is being moved to the main hospital to undergo more testing. As soon as life starts to return to normal I'll get back on the parts. Thank you everyone for your patience and please remember Kathy in your prayers. Mark
-
Good Grief! Red Green would have, at the very least, wrapped it in duck tape to prevent splitting.
-
Believe me, If I had the space and dollars I'd have more than the three I have now. Late 71 (Parti Girl) that is being parted out (gas tank is good btw), My 260 project that was going to be on the road a year and a half ago and my original early 71 that I'm going to part out this summer. I haven't given up the thought of getting a few more bargain Zs to part out. The key word being bargain. I'm still looking for that elusive "rust free" Z that needs to go to a good home (mine) at a reasonable price The Pac. Northwest is full of rusty Zs. Unfortunately they weren't stored in barns. I keep coming across Zs that are said to have "little rust" thinking that at last I've found "the one". When I step back and look at the reality of that happening I feel a bit like the Lagina bros. searching for the Oak Island treasure BUT there are treasures (Zs) still out there and I'm having fun searching. We'll see what the future holds.
-
Oh how I love simplicity. You stripped it of ALL the extraneous B.S.
-
Both S30s. At the time, I thought the owner was unsure about the years, but I was so bummed about the rust I let the subject of the Zs drop in favor of an MGB that got my attention. The earlier Z has the older style rad. support. The later Z with the Datsun logo sill plates has the newer style rad. support. What year did the rad. supports change? I think the sill plates must have come from an earlier Z at some time. Sure hope he wants to sell some parts.
-
Geoff, Do you have return lines on your set-up? I've always wondered if they were really necessary.
