


gramercyjam
Free Member
-
Joined
-
Last visited
Everything posted by gramercyjam
-
 Big pond in straightaway dammit!
 -
 Big pond in straightaway dammit!
 -
Thats me. I finished this project up a week ago, basically the day before I took it to an DE/TT event. The car performed wonderfully. Chassis was rock solid and cornered like - well, like nothing I've ever driven before. Anyway, I crashed it but good that day. The chassis refurb held up well as did the fuel cell/battery tray structure. Passenger side sheet metal is torn up, bent the wheels, slight tweak to the front frame rails now. But it should be good as new in a few days. P.S. I wouldn't even think of starting that job for $1K-$2K. It took me roughly 11 weeks, or about 500 hours to refurb the chassis (cockpit, floors, tranny tunnel, firewall, inner fender wells, radiator support, frame rails. Nothing behind the cockpit. Not including the exterior skins). Don't forget to count the expense of things like all newly fabricated brake lines, various other new parts that went in, fasteners, 3 quarts of two part epoxy primer (and thats just two coats), 30 4.5 inch cutting disks, 3 grinding disks, 244 cu. ft of argon, 20 lbs of welding wire, 750 lbs of blasting media, an even dozen blasting hood windows, 5 face shields, an unknown volume of compressed air, broken drill bits, 3 alternators, 4 voltage regulators, a voltage gauge, and lots of other incidentals. Stuff happens - I never thought it would go this far, but as long as your in up to your neck, a little bit more couldn't hurt. Oh, and my problem wasn't even close to his .... My car was more like the rust free kind. I prefered not to know for years and called it "surface rust" like so many of us do. But I hunted it down, discovered the truth and took care of it.
-
I hadn't thought of putting the bar through the rod end.
-
Well if I were to cut the bar, and do something there like weld on a vertical plate on the top of the bar, with adjustment holes in the plate then a rod-end solution could fit. But to make a clevis that bolts up through the vertical hole in the bar, then a rod-end, there isn't enough room in my setup. Were talking maybe an inch and a half between the lower control arm and the bar. Maybe my car is a lot lower than most? I'm also hesitant about cutting and welding the very thick forged bars I have. That's a pretty highly stressed part and cracks could develop pretty easily. EDIT: I like the way my car is handling with the current bars and don't want to change something that would upset the current balance.
-
What is everybody using? I'd like some adjustables using rod ends but there just doesn't seem to be enough room on my car so I'm still using stock type with urethane bushings. It would be nice if there were some spherical bearings that could fit on/in the forged eyes on the sway bars.
-
Two weeks ago I overhauled my whole braking system (including new adjustable prop. valve and new fabricated steel brake lines, and new rebuilt MC). I had problems getting the air out too. I bled the MC without success until I wasted about a quart. Then I started looking for something seriously wrong. It turned out one of the bleeders on my brand new rebuilt MC was leaking air no matter how much it was tightened and it ended up stripping. As I didn't have time to wait for another MC to be ordered, I took the new rubber guts out of the rebuild and put them in my old MC. After that, it only took about 1/2 a pint to completely bleed the whole system. Works good, looks good too. P.S. I removed the brake booster from the car too. Just my driving preference.
-
I agree with the no fluid - I will not pull or install a tranny with fluid. It is just to nasty. I also am a stickler for clean work area, clean floor, clean tranny case. It makes a difference.
-
I just swapped in a 5 speed for a 4 speed last night. Piece of Cake. I use a 1/2 drive extension with masking tape wrapped around it for an alignment too. I drag the tranny under the car. I put a floor jack under the car and wrestle the tranny on the jack pad. Position the tranny on the jack in such a way as it doesn't try to fall off immediately when you let go of it. I jack up the tranny and get the input shaft in the pressure plate. At this point it is sometimes necessary to put a jack stand under the tranny if you run out of height in the jack. Add a short length(s) of 2X4(s) between the tranny and jack to get enough lift height out of the floor jack. After getting the tranny input shaft into the clutch, proceed to line up the tranny and motor by raising/lowering the tail so the input shaft of the tranny is basically lined up and parallel with the crankshaft. and push it onto the motor until there is about 1/2" to go. You have it thru the clutch disk at that point and if you have a tight pilot bearing, tighten each of the tranny 4 bolts a little at a time until the tranny is snug to the block. Put the rear tranny support on at that point. I have been doing it this way for about 35 years. I also have the fancy tranny jack adapter and have found it to be more trouble than it is worth.
-
PVC tubing is the best material to use for homemade cold air induction. Lighter, cheaper, whiter!
-
Thanks guys. Jackstands. Tall ones. Actually worked out pretty well. I did half the work lying down and that beats standing up. Rotisserie's are great, but this projecs schedule didn't allow me to take the time to deal with one. But what I would have really liked to do was turn the car upside down to dump all the blasting sand out. It is really hard to get it all that blasting grit out. I two-part epoxy primed it last night, some of that expensive Dupont stuff. I never used it before. It goes on NICE. I just discovered painting is the most enjoyable part of the project for me. I can't wait to start another car project. Nothing special. The radiator support and the box section that runs along the top of the wheel well held it all together just fine when you cut out one side. You may not realize tha the chassis is incredibly light so there really isn't a great need for extra support. You can pick the front half of the bare chassis with 1 finger. It is that light. The biggest problem is you need to be careful not to knock it off the jack stands if you lean on it or bump it.
-
 I had a little help from my little Lincoln SP135 Pro MIG welder.
 -
That should be very helpful. I found some color chips here too.
-
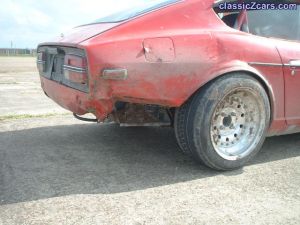
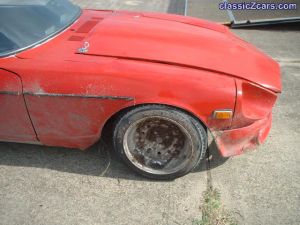
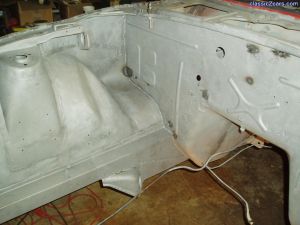
A month or two ago I posted some pics of rust I had uncovered after removing some undercoat on what many would consider to be a rust free south Texas car. Of course the more I looked, the worse it got. I won't even mention that the front of this car was cut off sometime in the past and another one was welded on, kind of sort of. Maybe I will mention it! I finally cut out the firewall, battery tray area/inner fender wheel well, and frame rail and pounded out some replacement parts. I also fixed that old front clip cut. Here are a cople of pics, all fixed up, in bare metal and ready to paint. Materials and tools required, a few square feet of 22 Gauge and 18 gauge steel to fab the panels out of, tin snips, hammer, MIG welder, 4 1/2" abrasive cut off wheel and a grinding/sanding wheel and a few welders clamps. A decent air compressor and a $50 Harbor Freight sand blaster helps too. This is a car used in competitive driving and not a future beauty contest winner so the repairs haven't been made invisible, but they are good and strong and shouldn't ever need to be done again. If you are into undercoat and bondo, the repairs can be hidden quite nicely that way. <rant> Yes, you can do this too! I don't ever want to see post about how you can fix your car by pop-riviting a patch over the rust and fiberglassed/bondoed over! </rant>
-
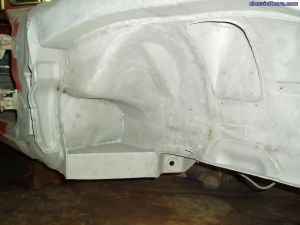 Fabricated battery tray area, firewall, frame rail and something extra.
 -
Fabricated battery tray area, firewall, and frame rail ....
-
IMO, Not a keeper unless you want to strip that thing down to the bare steel shell and become an expert tin man. Consider the purchase price of the car as petty cash if your going to go that way.
-
My seat mounts looked fine after some thorough sand blasting. I left them in. I drilled out the spot welds to the floor from under the car with a spot weld bit (looks like a little hole saw). I fabricated my floor pan (before ever cutting any of the old floor pan out - you can use the existing floor as a buck to shape the new pan if you don't cut it out before making a new pan) and installed it from underneath as well. I was able to sneak the flange of the new floor pan between the seat mount and the tranny tunnel and then weld the seam on both the inside and outside. If your seat mounts can't be saved, find a donor car or fabricate them.
-
Keep looking. You haven't found it all yet.
-
-
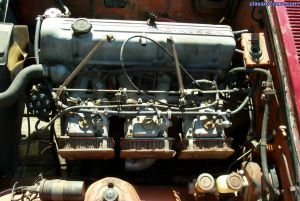 oops! looks like you blew the plug wires right off!
 -
Ohio - lots of used commercial quality machinery like milling machines and lathes and TIG welders for sale. Stuff that is hard to find around here.
-
Texans think they are in the SW. Definitely not midwest.
-
Ha, Ha! Don't they have alligator crossing signs in FL? (I shouldn't laugh, my company wants me to move there) Sounds like you had a very narrow escape.
-
I made my own. The original floor pans in my 240 are about .034" in the thickest parts. The 22 ga steel I bought to fab the floor pans was miked and measured the same. A 4X8 sheet costs around $40 here I think. I do have a few years of sheet metal experience, in both modern production facilities and 17th century tin/black smith shops and I love working metal. I actually used very little of the sheet, a lot less than I had originally thought. But I fabbed floors and frame rails that are quite a bit different than the stock ones. My frame rails are more like subframe connectors that are now inside the car and the floor now fills the spaces between them, and the tranny tunnel or the rockers. It didn't make sense for me to buy the replacement pans because I would have just cut them up anyway. If I wanted a stock looking replacement, I would definitely buy the pans from ZF and save myself a lot of time and aggravation. You really can't fab a floor pan as good as ZF's without a lot of time and special tools.