rossiz
Free Member
-
Joined
-
Last visited
Everything posted by rossiz
-

-
-
-
Funny - my buddy has a twinmax that I borrow for the annual tuning on my carbed Duc. Never thought to use it on the SU’s though. Would certainly be an improvement over the unisyn in accuracy (super sensitive) but I have had a unisyn in my toolbox for almost 30 years (bought it for my 64 Corvair convertible RIP) and always associated the unisyn with cars and the Twinmax with bikes...
-
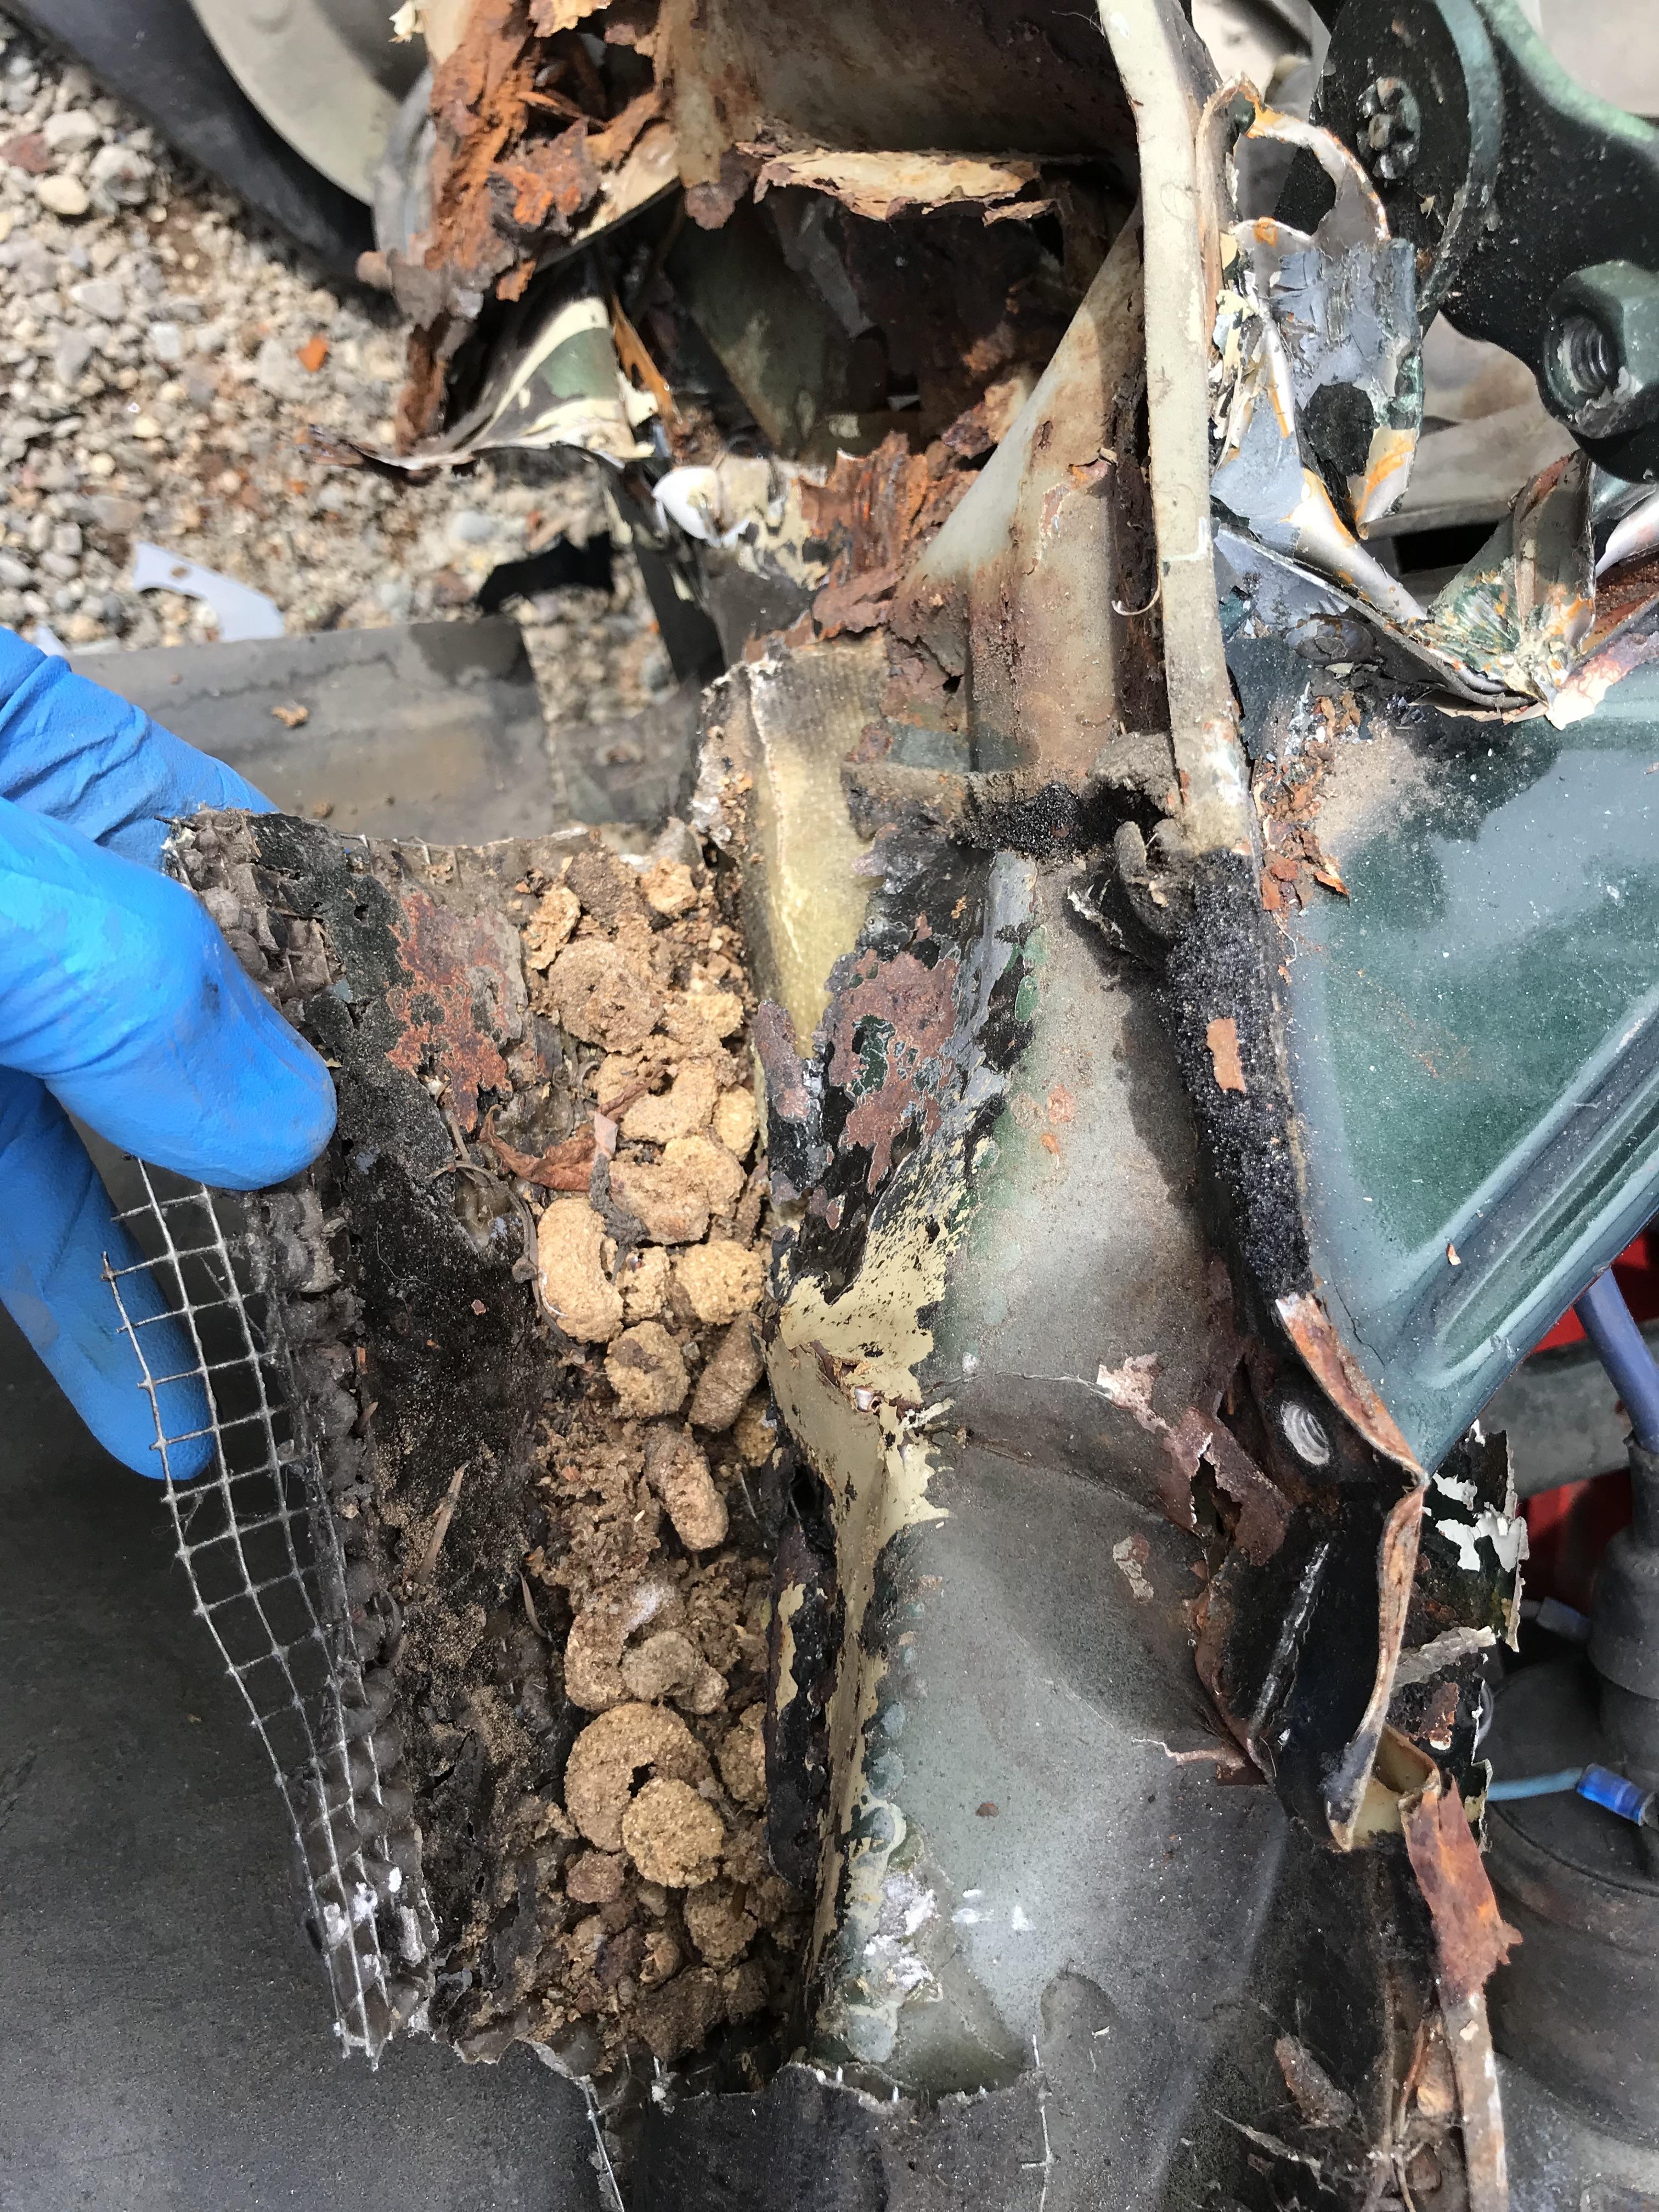
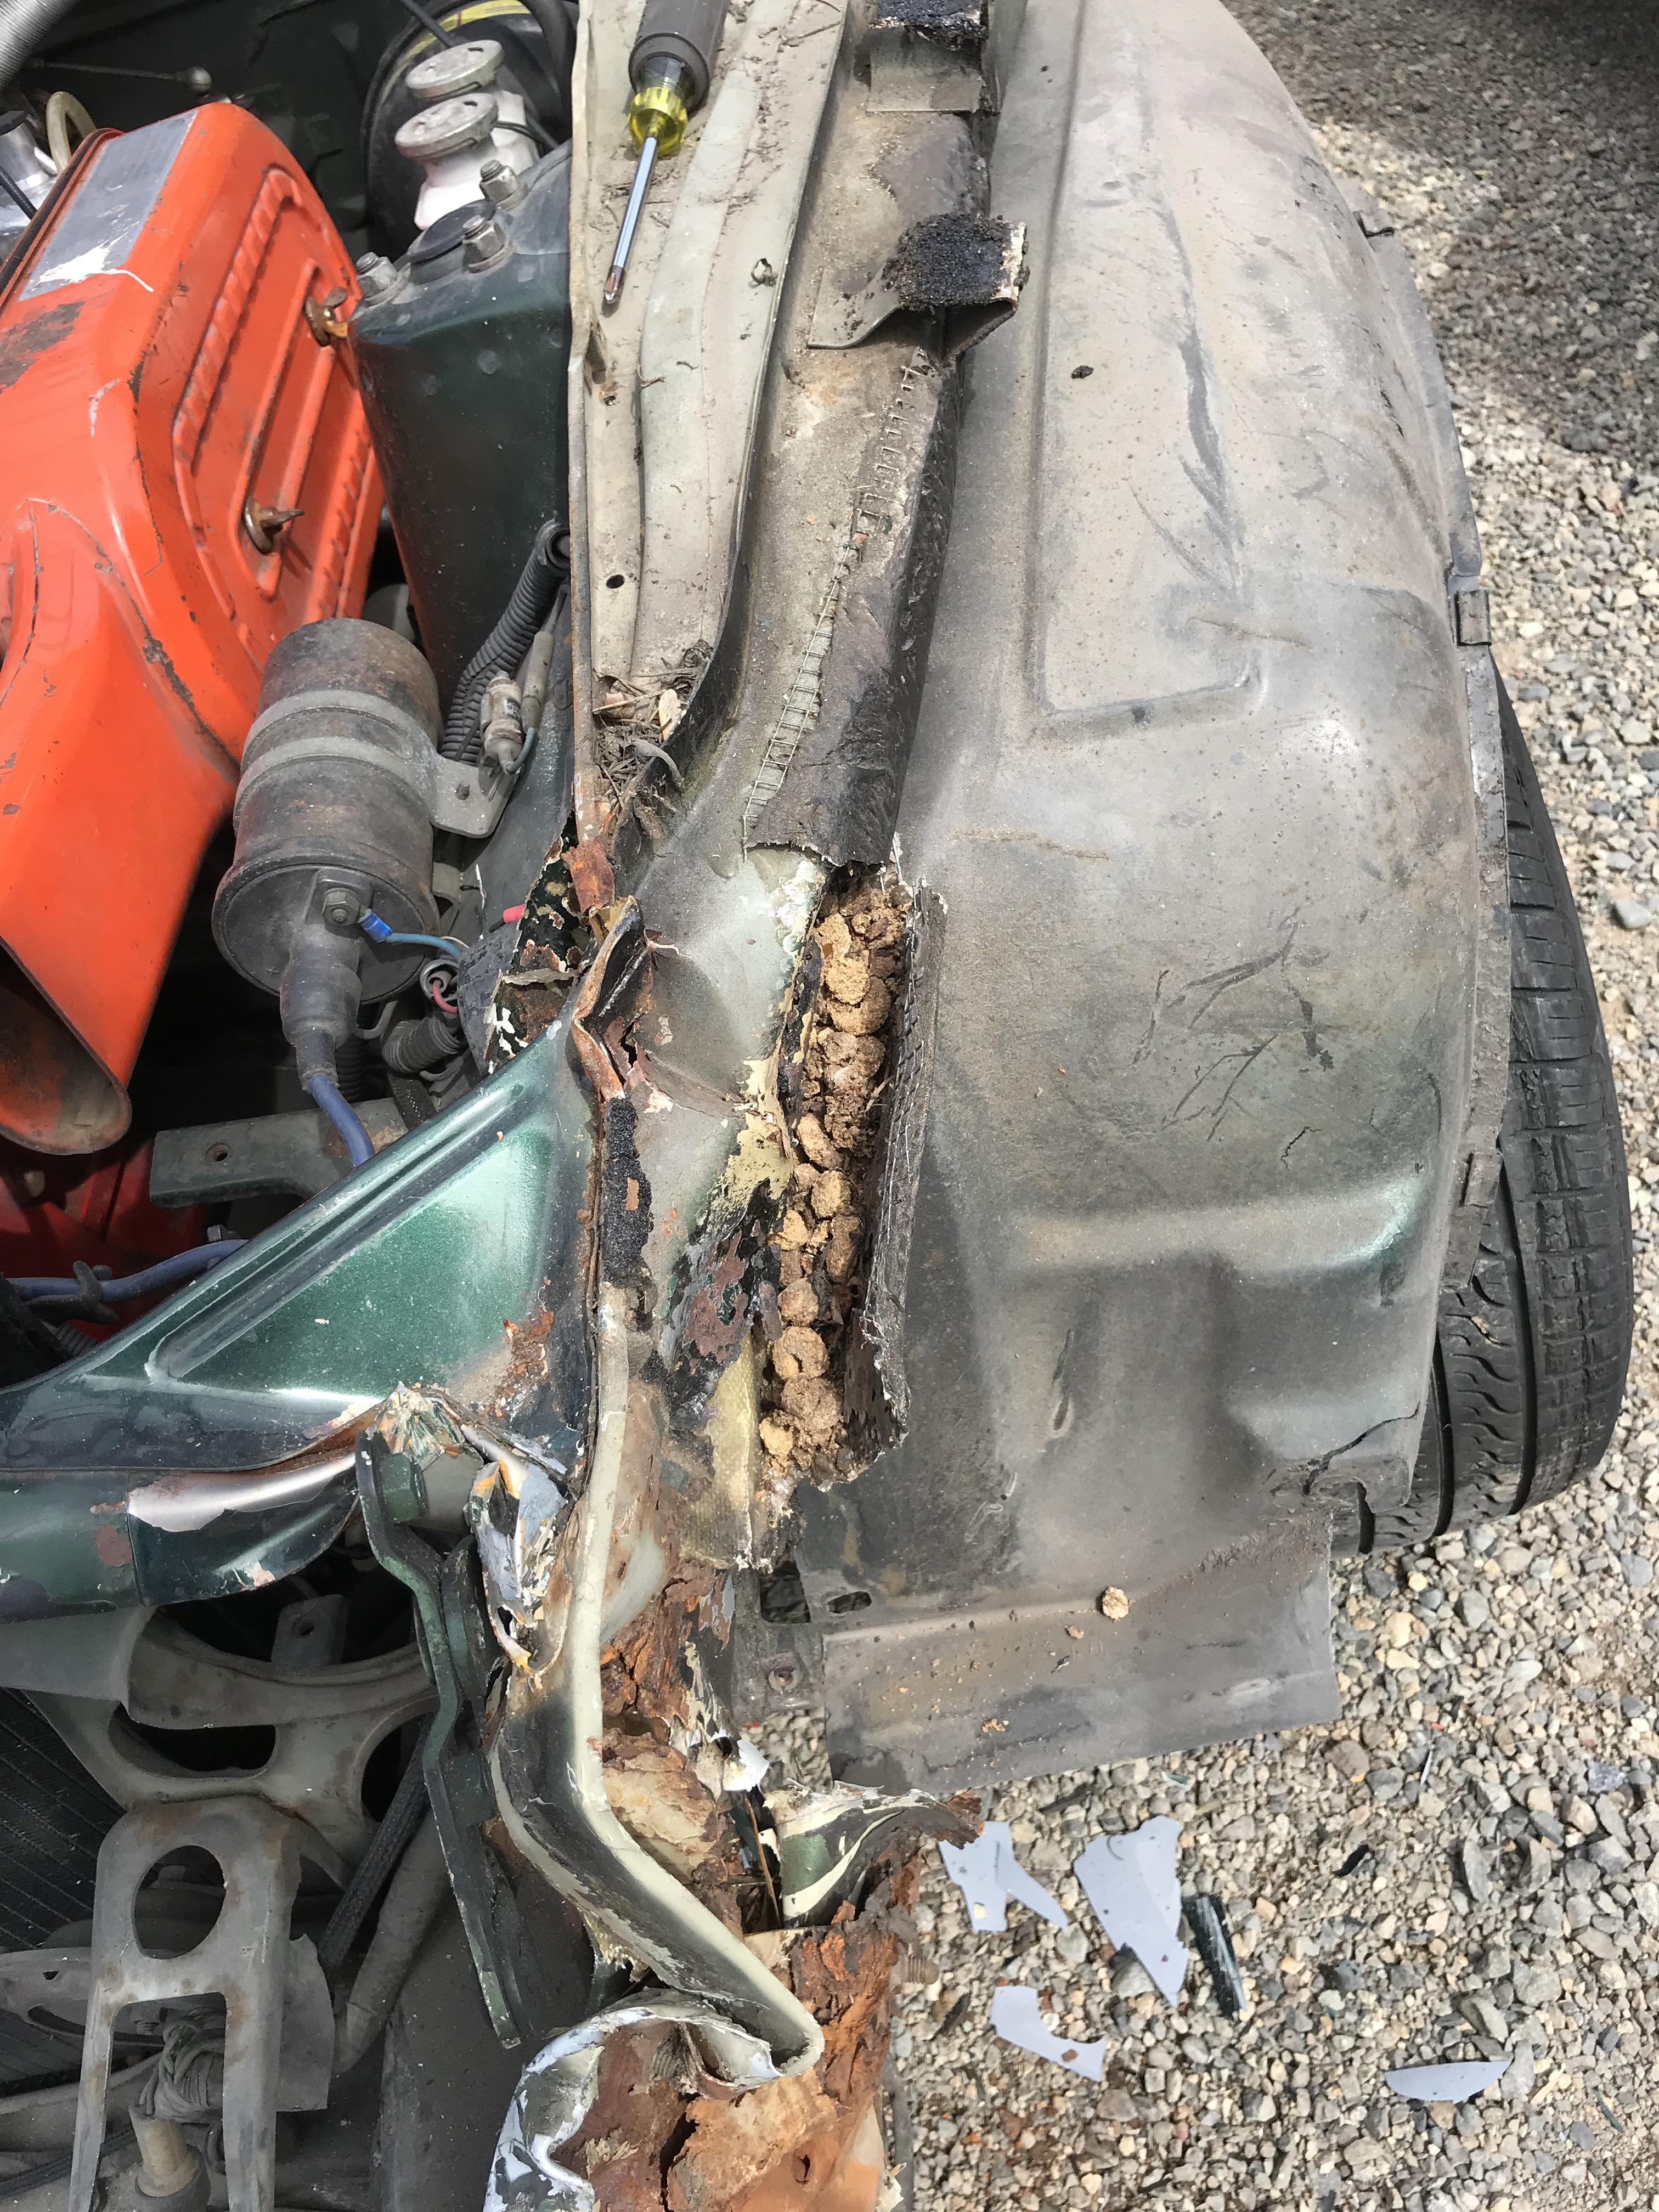
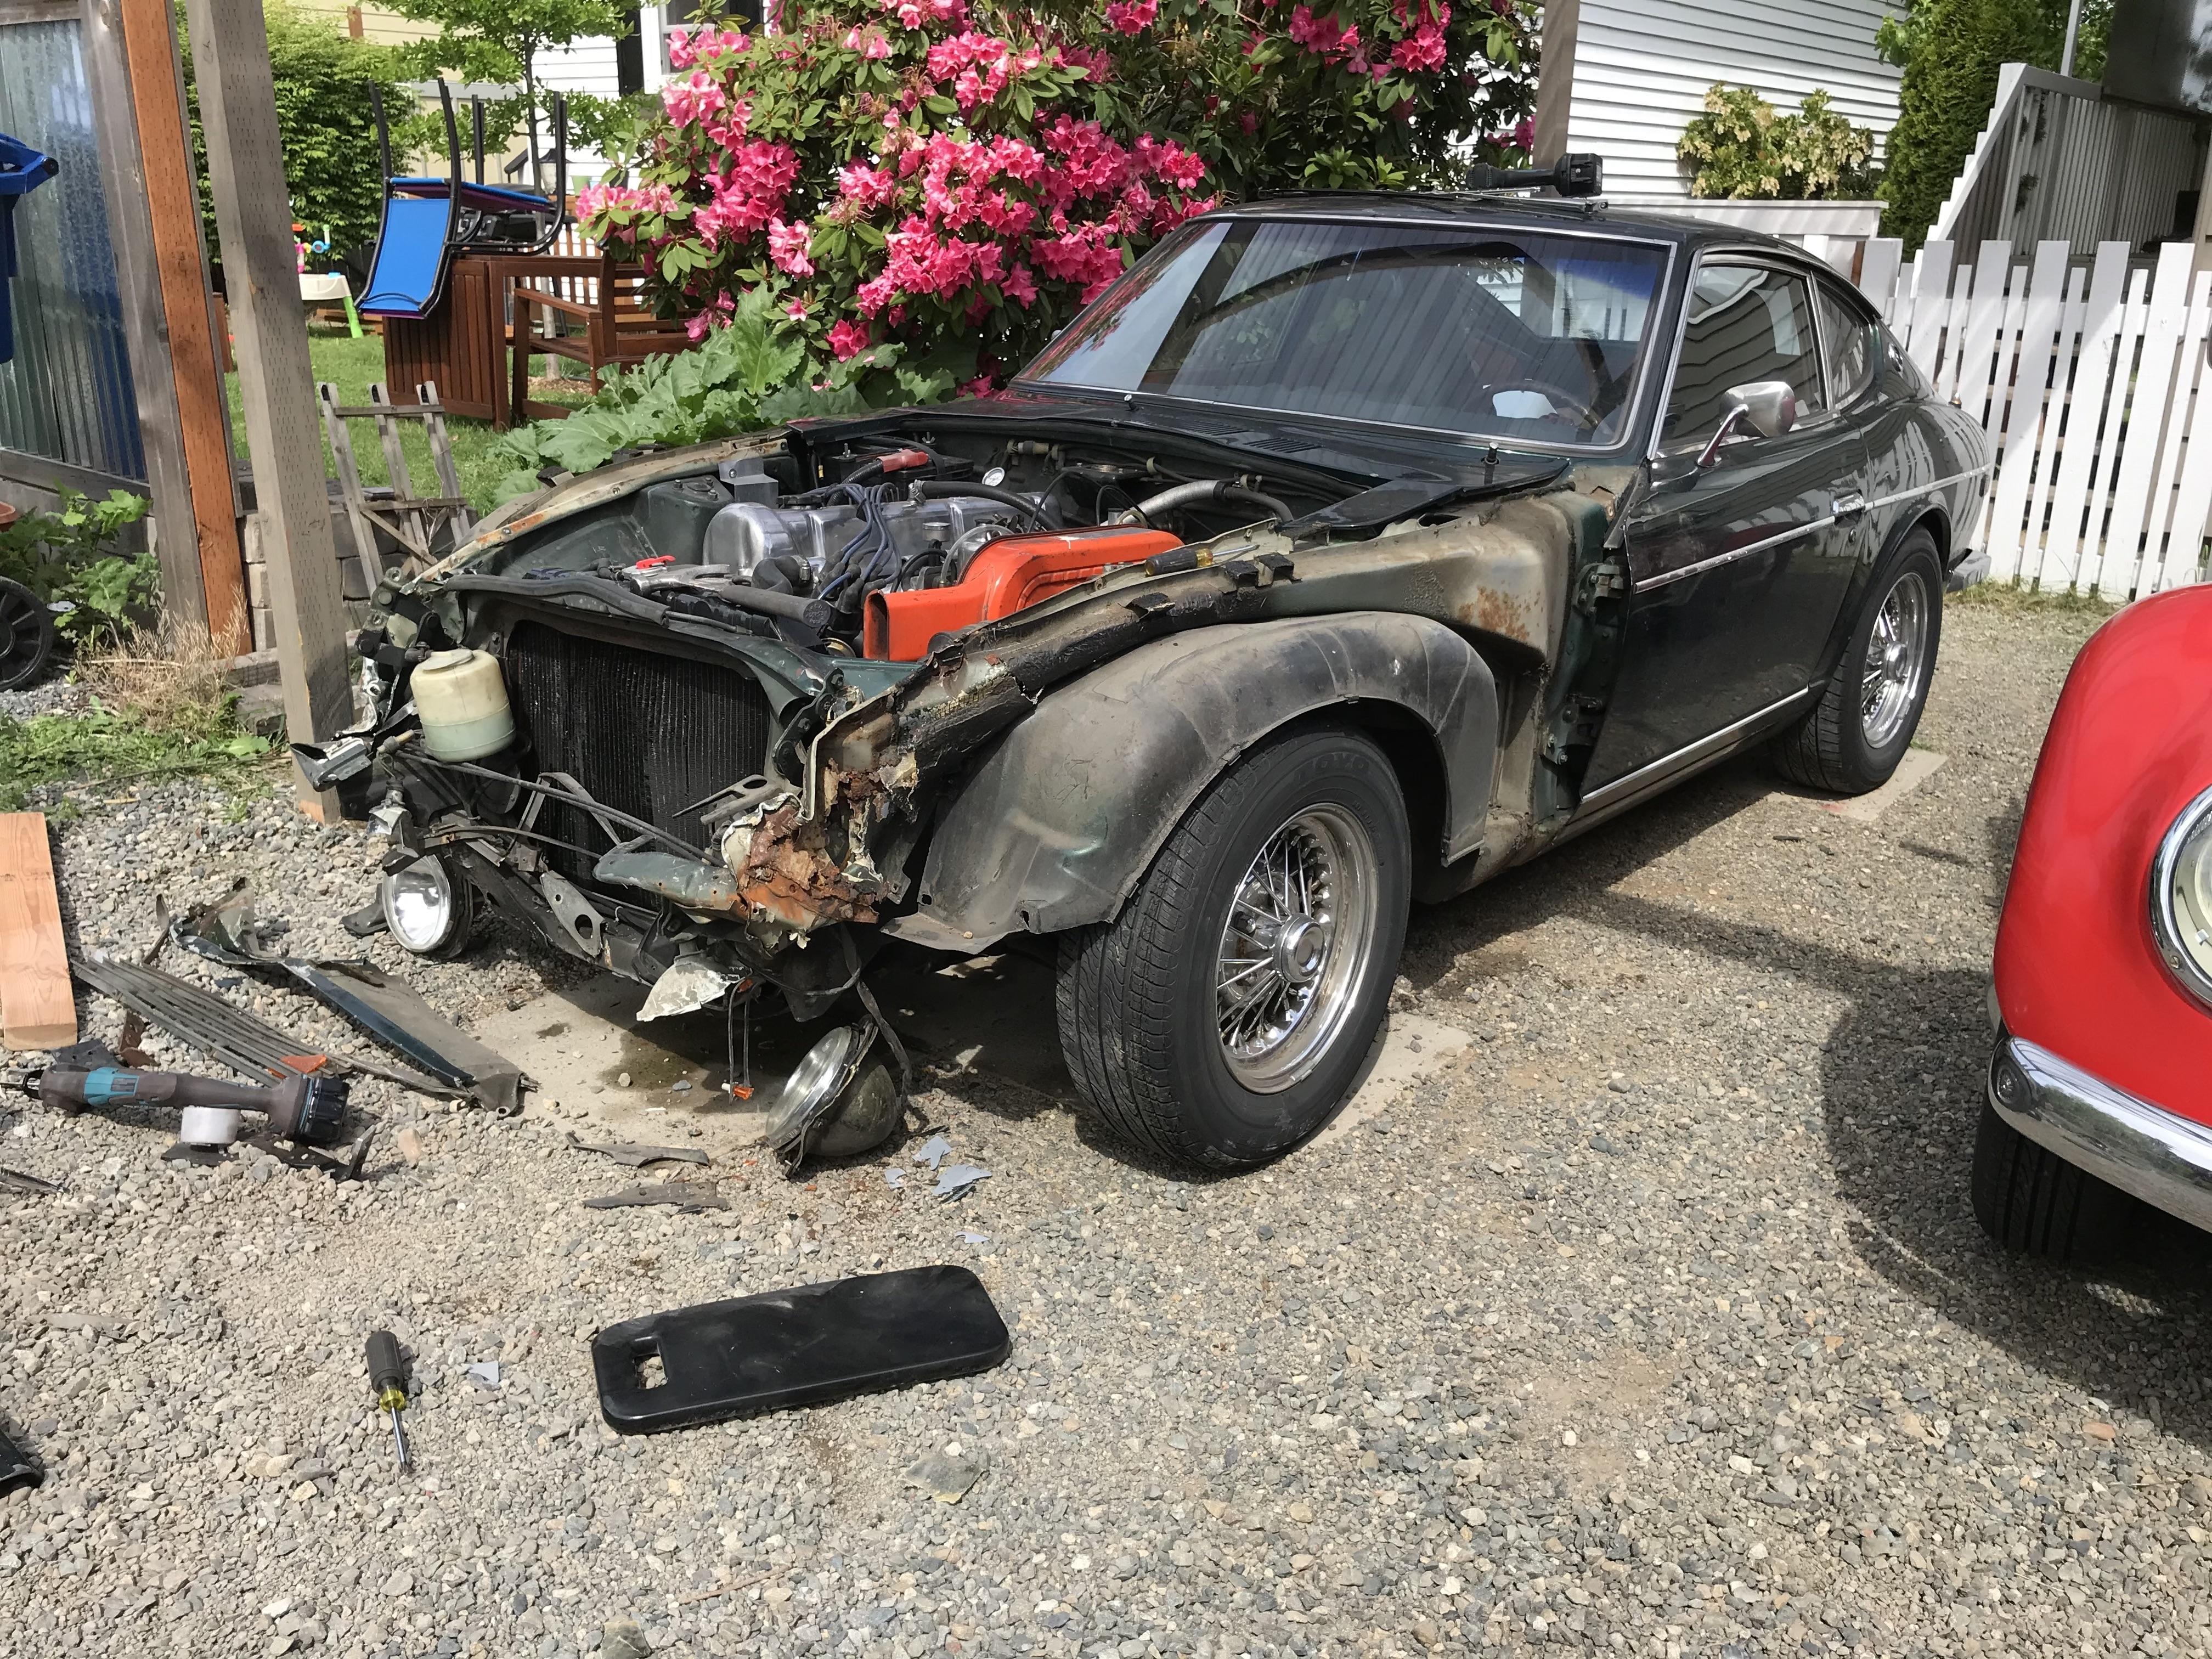
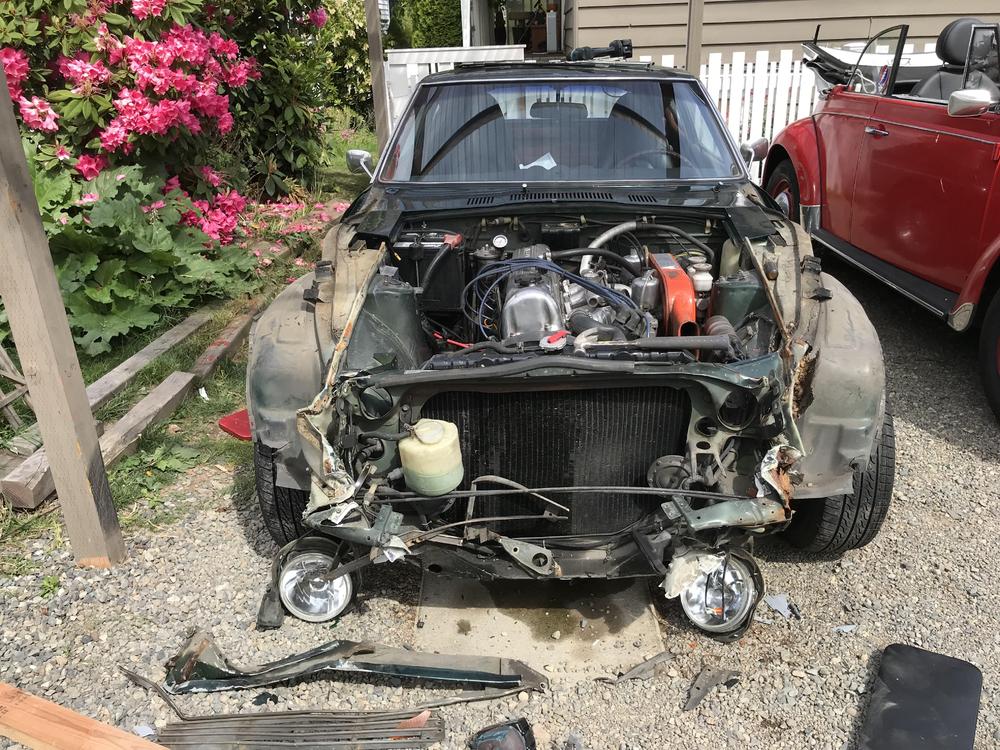
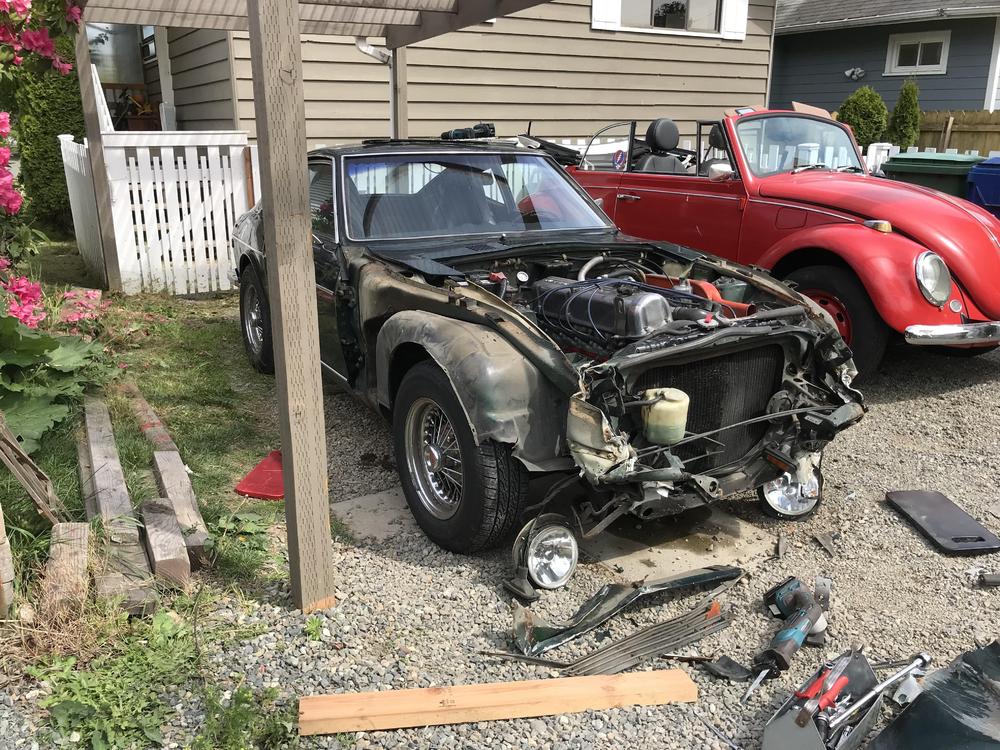
Decided to get motivated while the sun was shining - pulled off the fenders, hood, grille, sugar scoops, bumper to see what i'm dealing with. Looks like the sheet metal work forward of the wheel wells is not worth saving, combination of some hidden rot and it being really mashed up. Might try and find a frame-cut from just in front of the shock towers and just weld it on. One thing that was rather exciting: I finally solved the mystery of the "Z Mana". Some of you might remember previous posts under this title, about how every time I got going really fast or encountered some bumpy roads I'd have a piece of what looked like (very old) toasted oats cereal fall on my left foot. I figured either the previous owner's little kid had been depositing them through the defroster slots, or some critters had been stashing a winter food supply. Well - it looks like it was the critters! I found a stash under the drivers side fender supports - and not surprisingly this is where the rot had started. So I guess I would've had to deal with that at some point anyway...


-
Thanks again to all for weighing in, it's great to have some like-minded folks to help get perspective on the situation. Had a great chat w/Patcon and am feeling a little more optimistic. At this point I'll probably pull off and discard all the parts that are beyond repair and then see what it'll take in time/$$ to get her driveable again. Once I get a required parts list I'll post up and see what's available to purchase from the CZC community. Stay tuned...
-
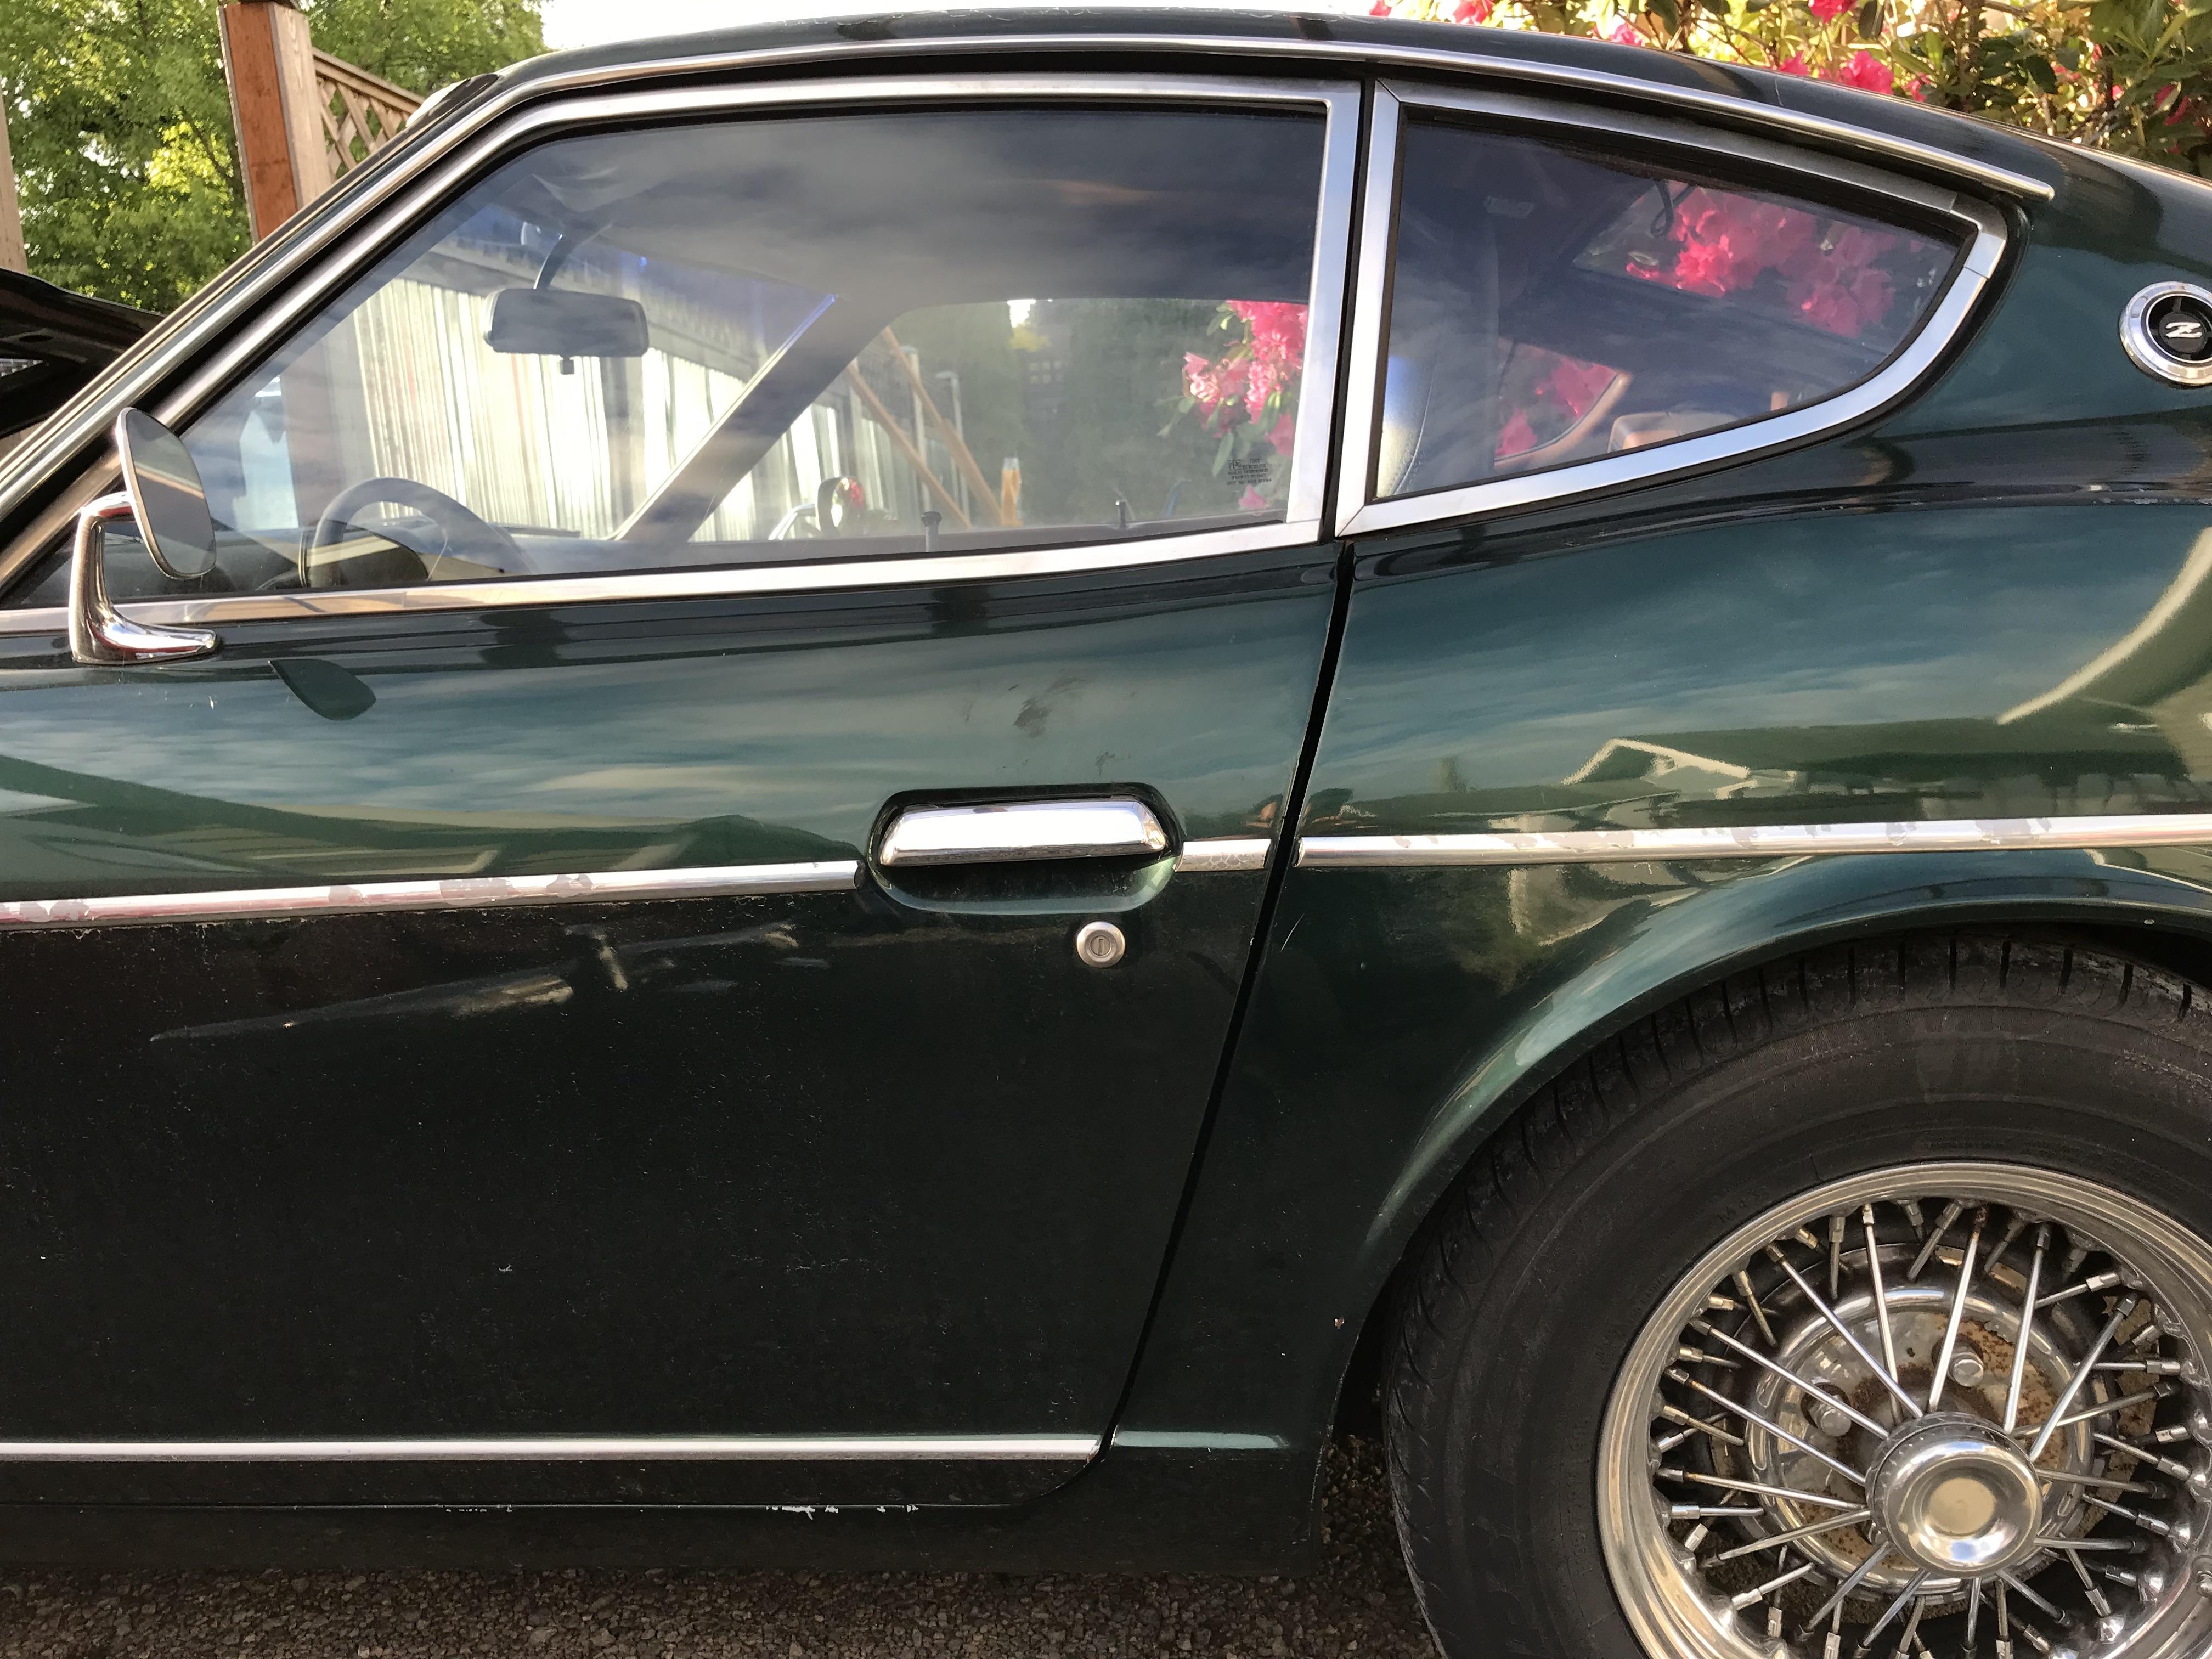
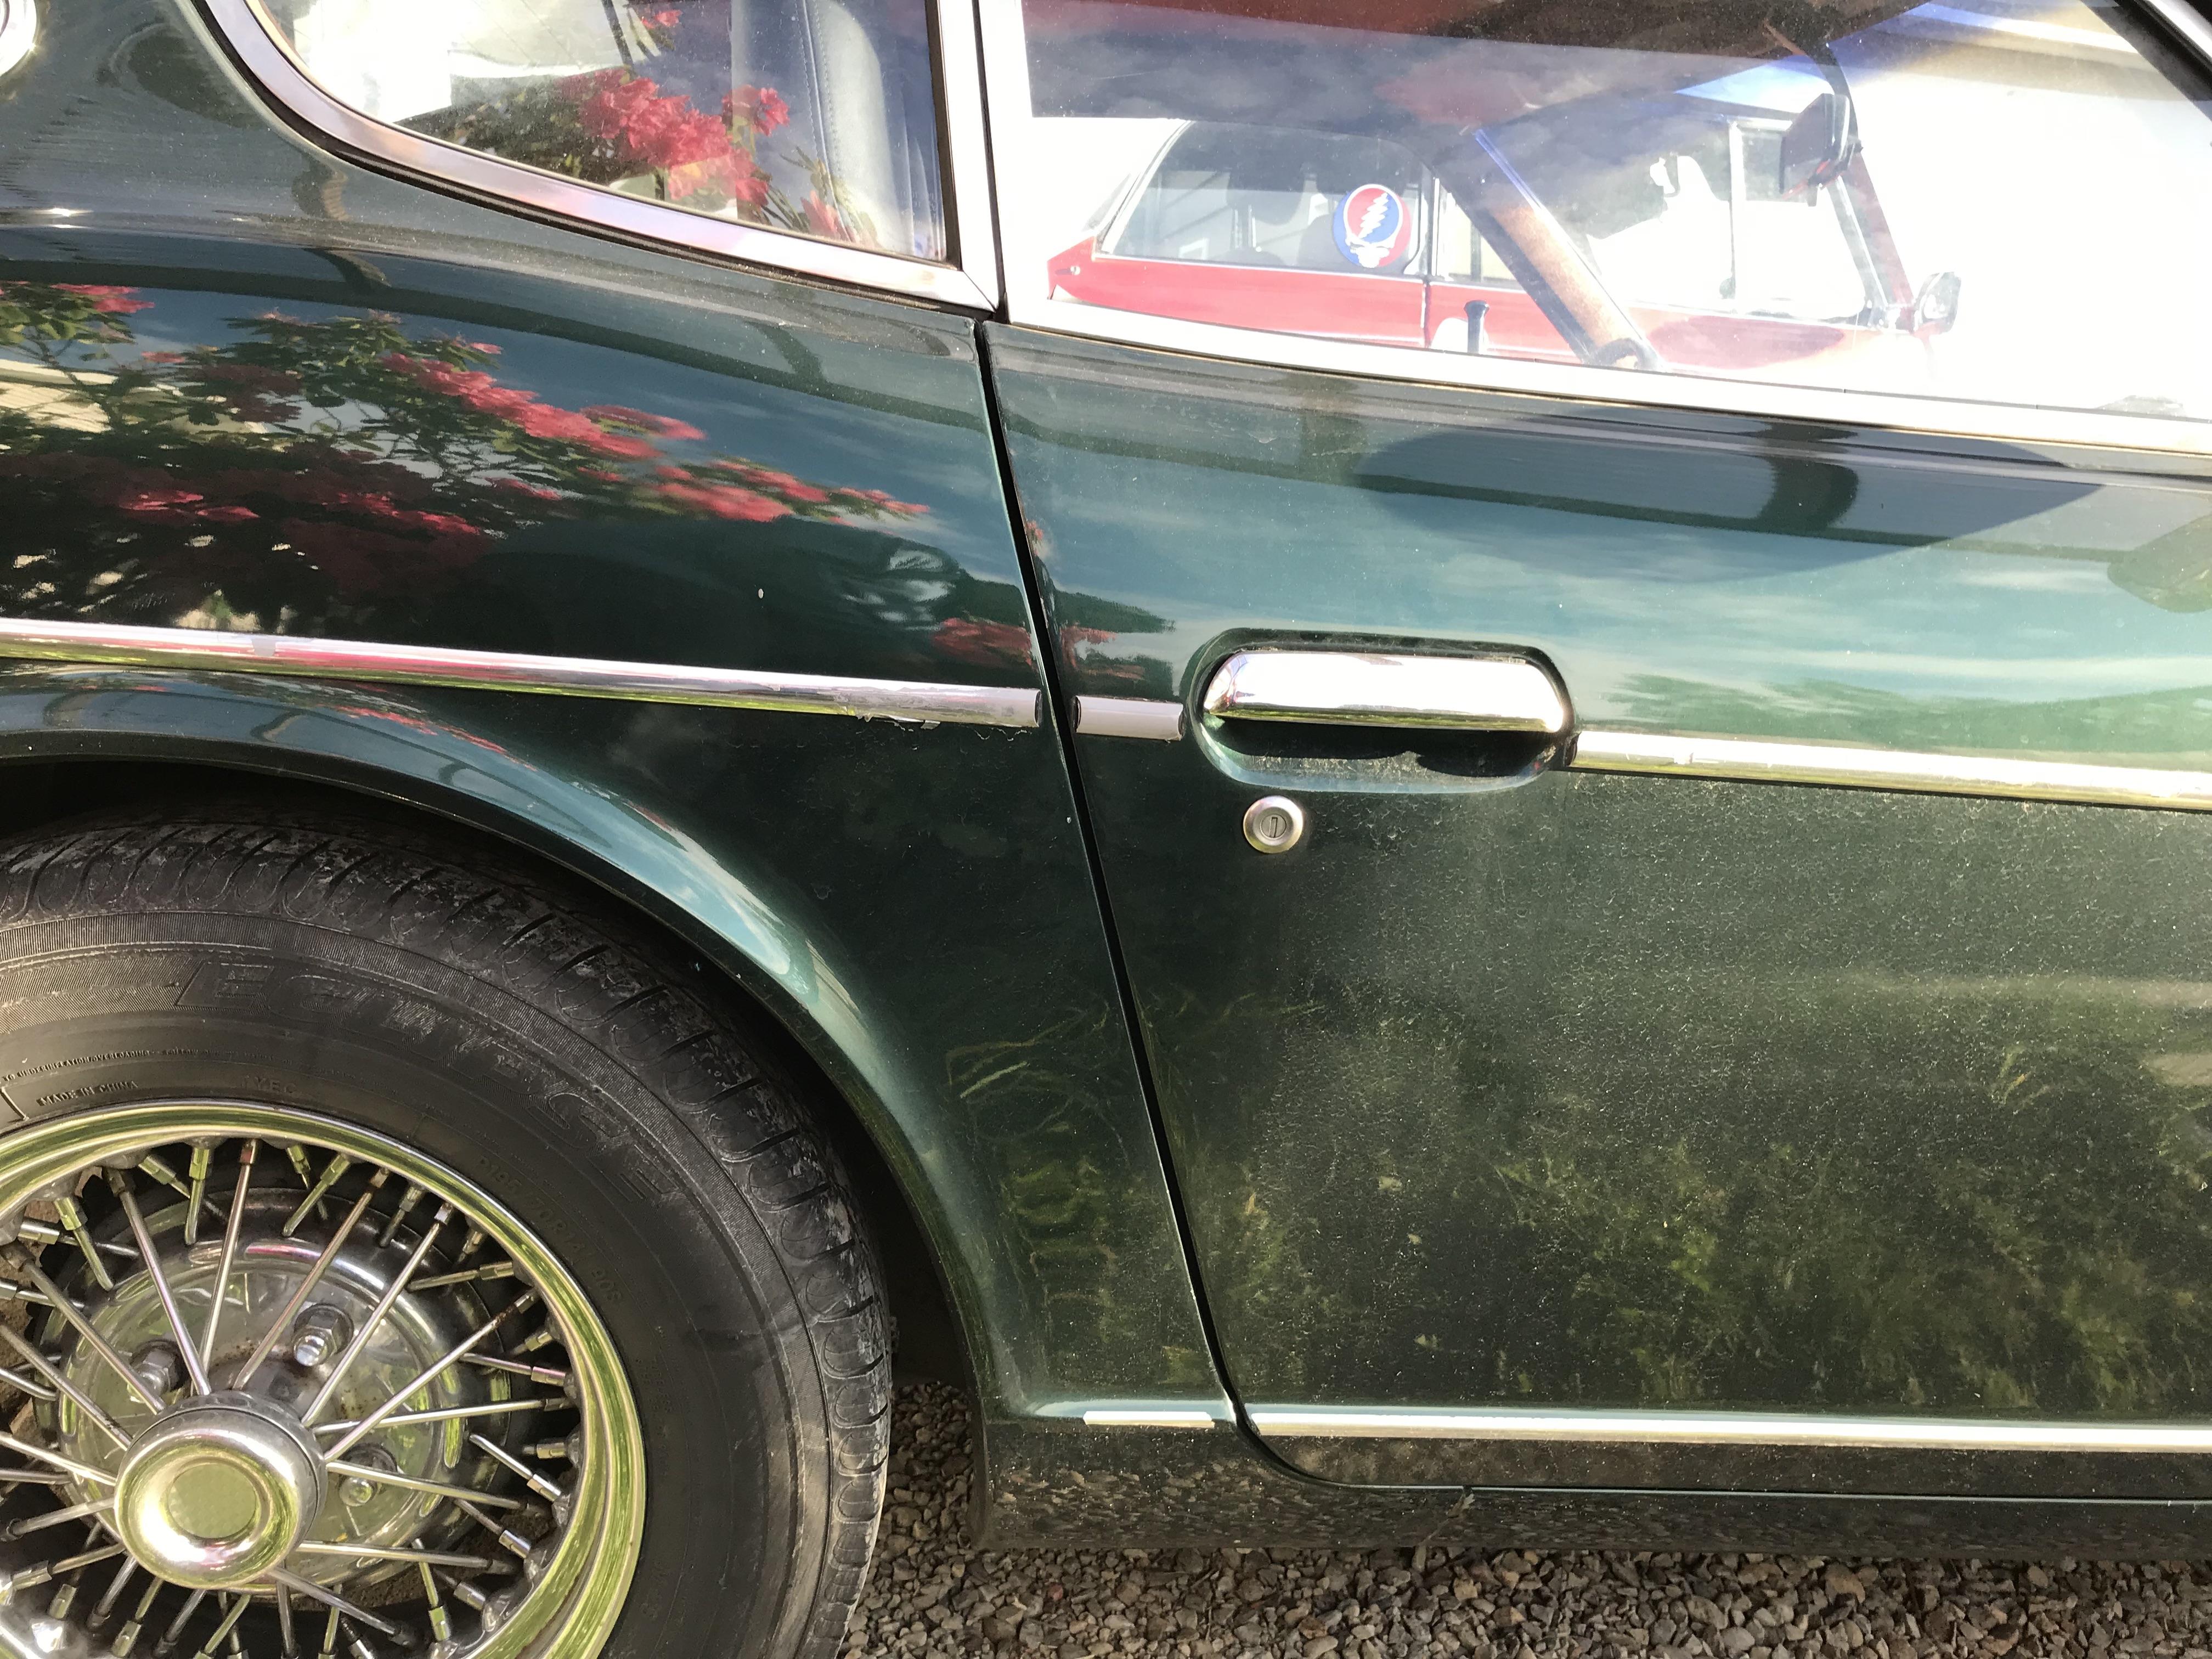
I checked w/SDOT this morning: all our traffic cameras are live-stream only, no recordings are made due to the strict surveillance laws in Seattle. The pics below show the door gaps: passenger looks exactly as before, but drivers side is opened up at the top - makes me think the rocker is "frowning" a little, which would mean the drivers side front shock tower moved, right?

-
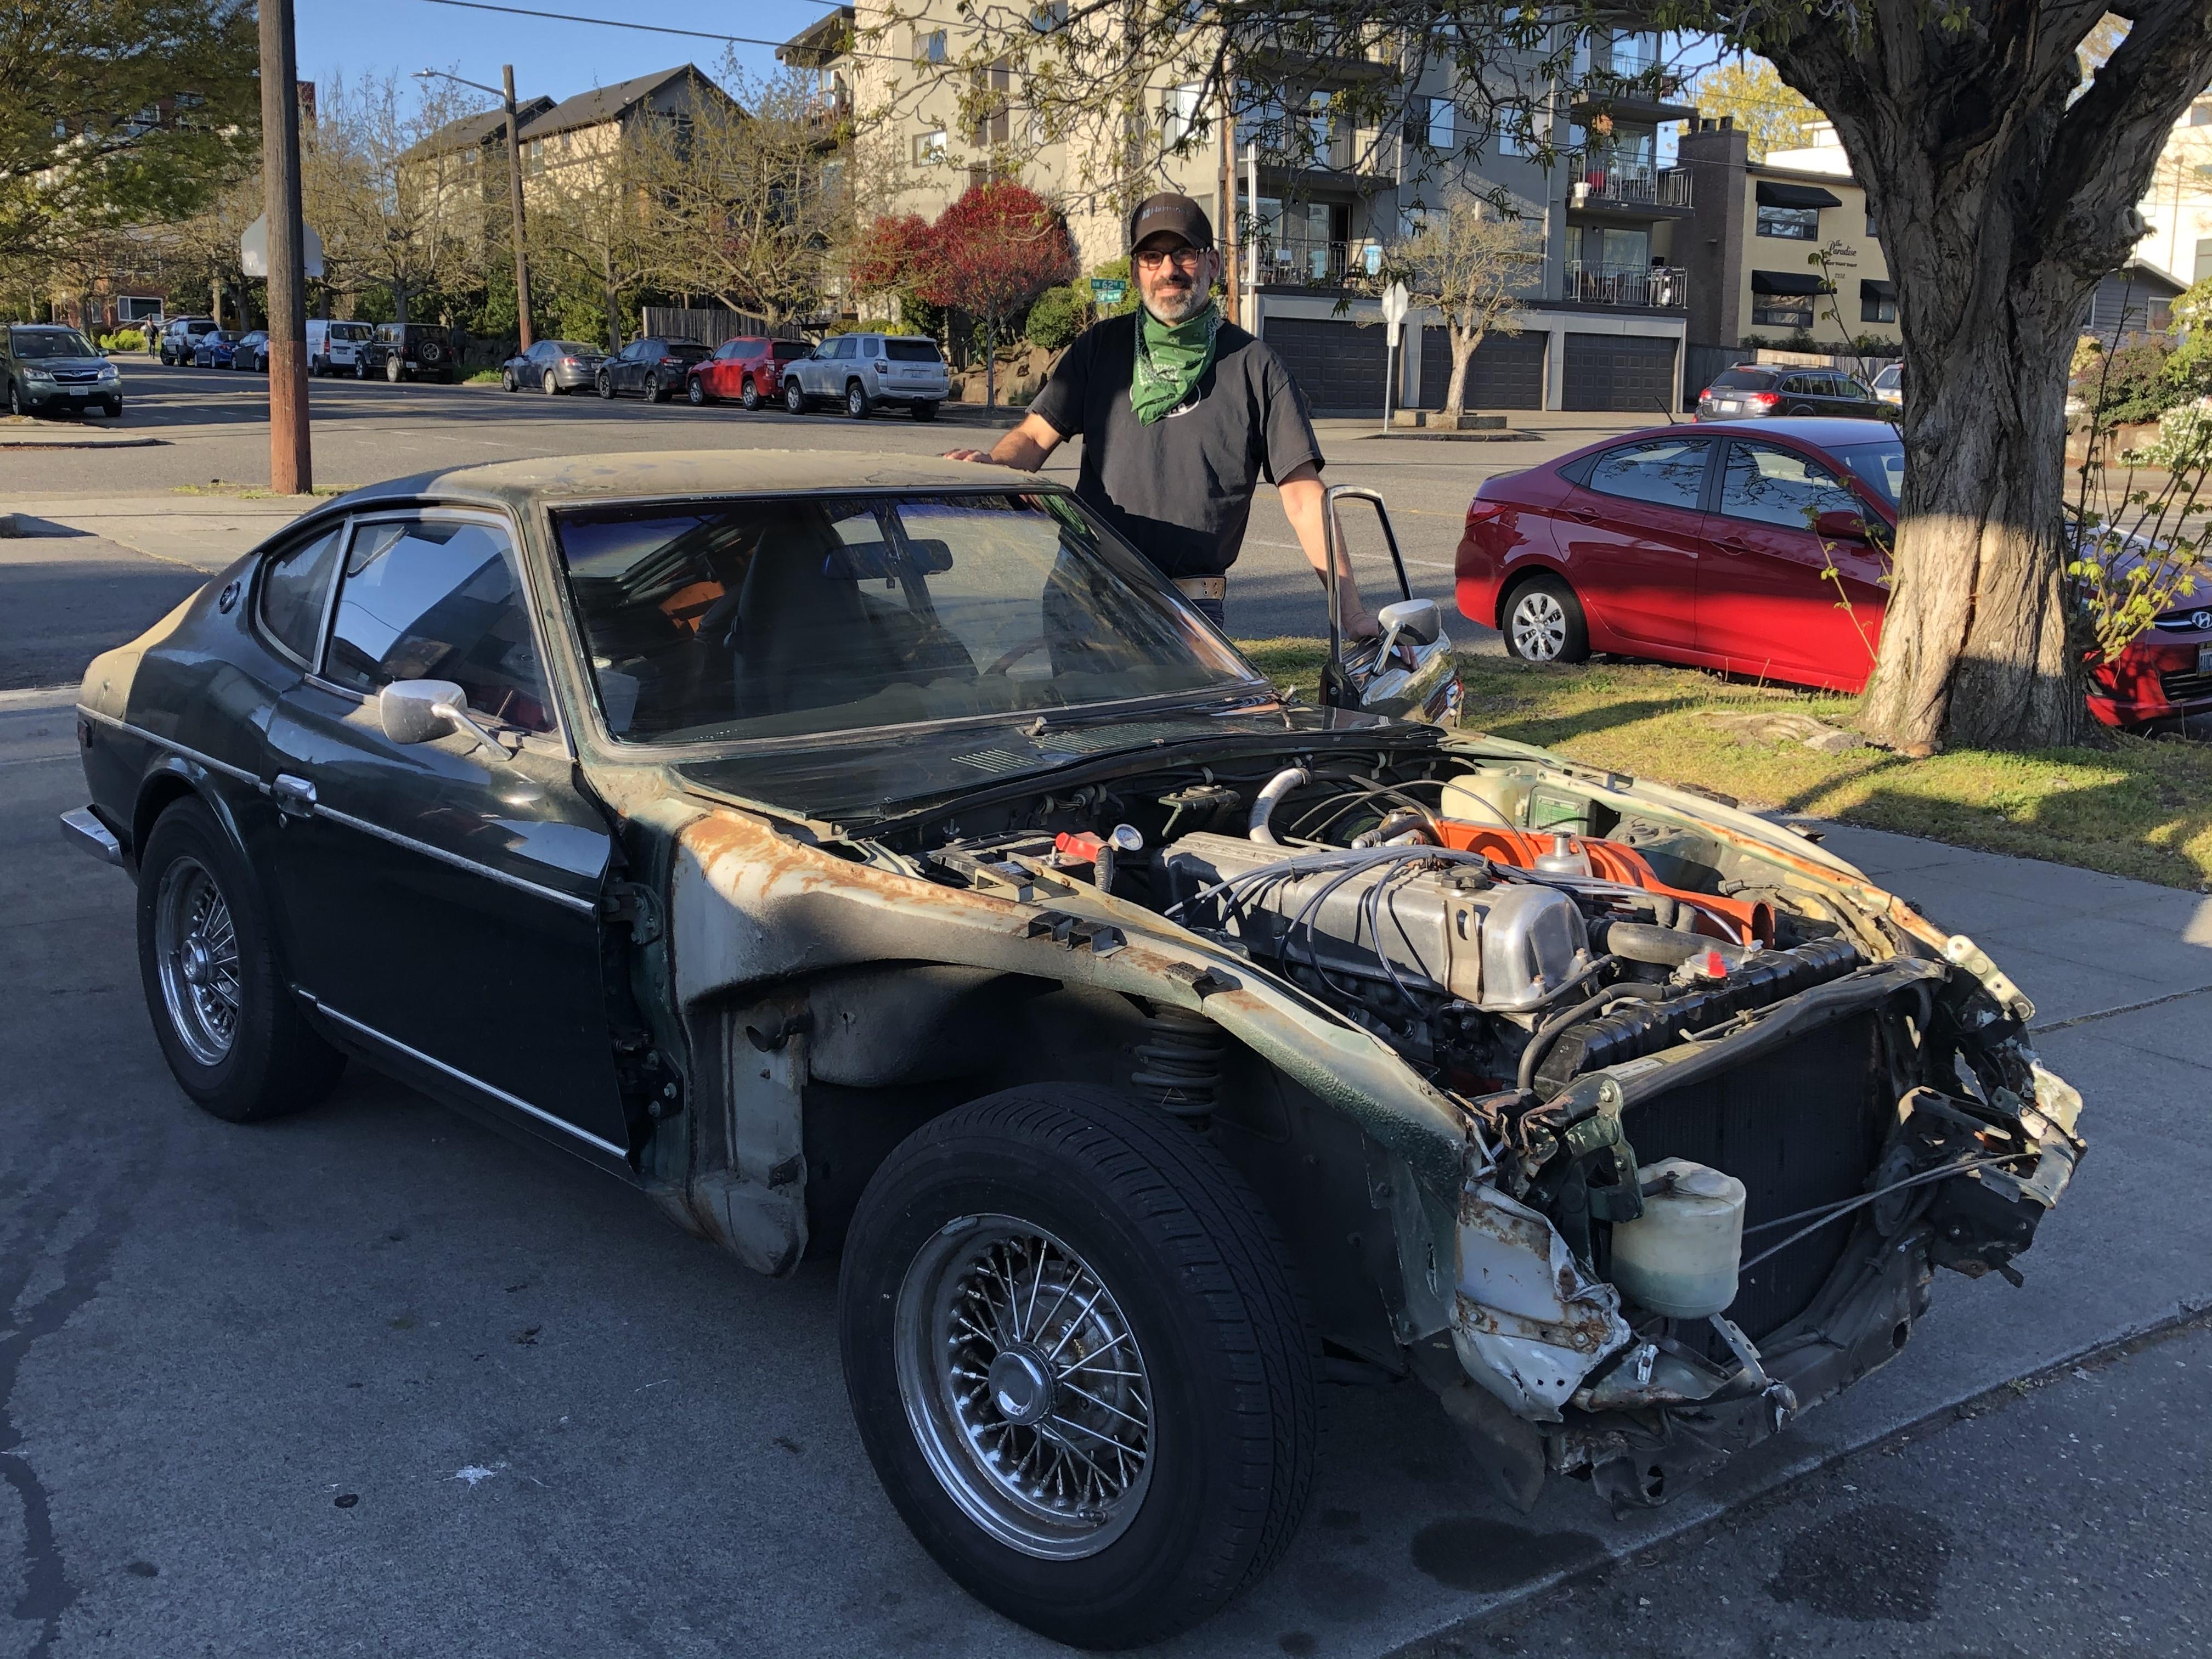
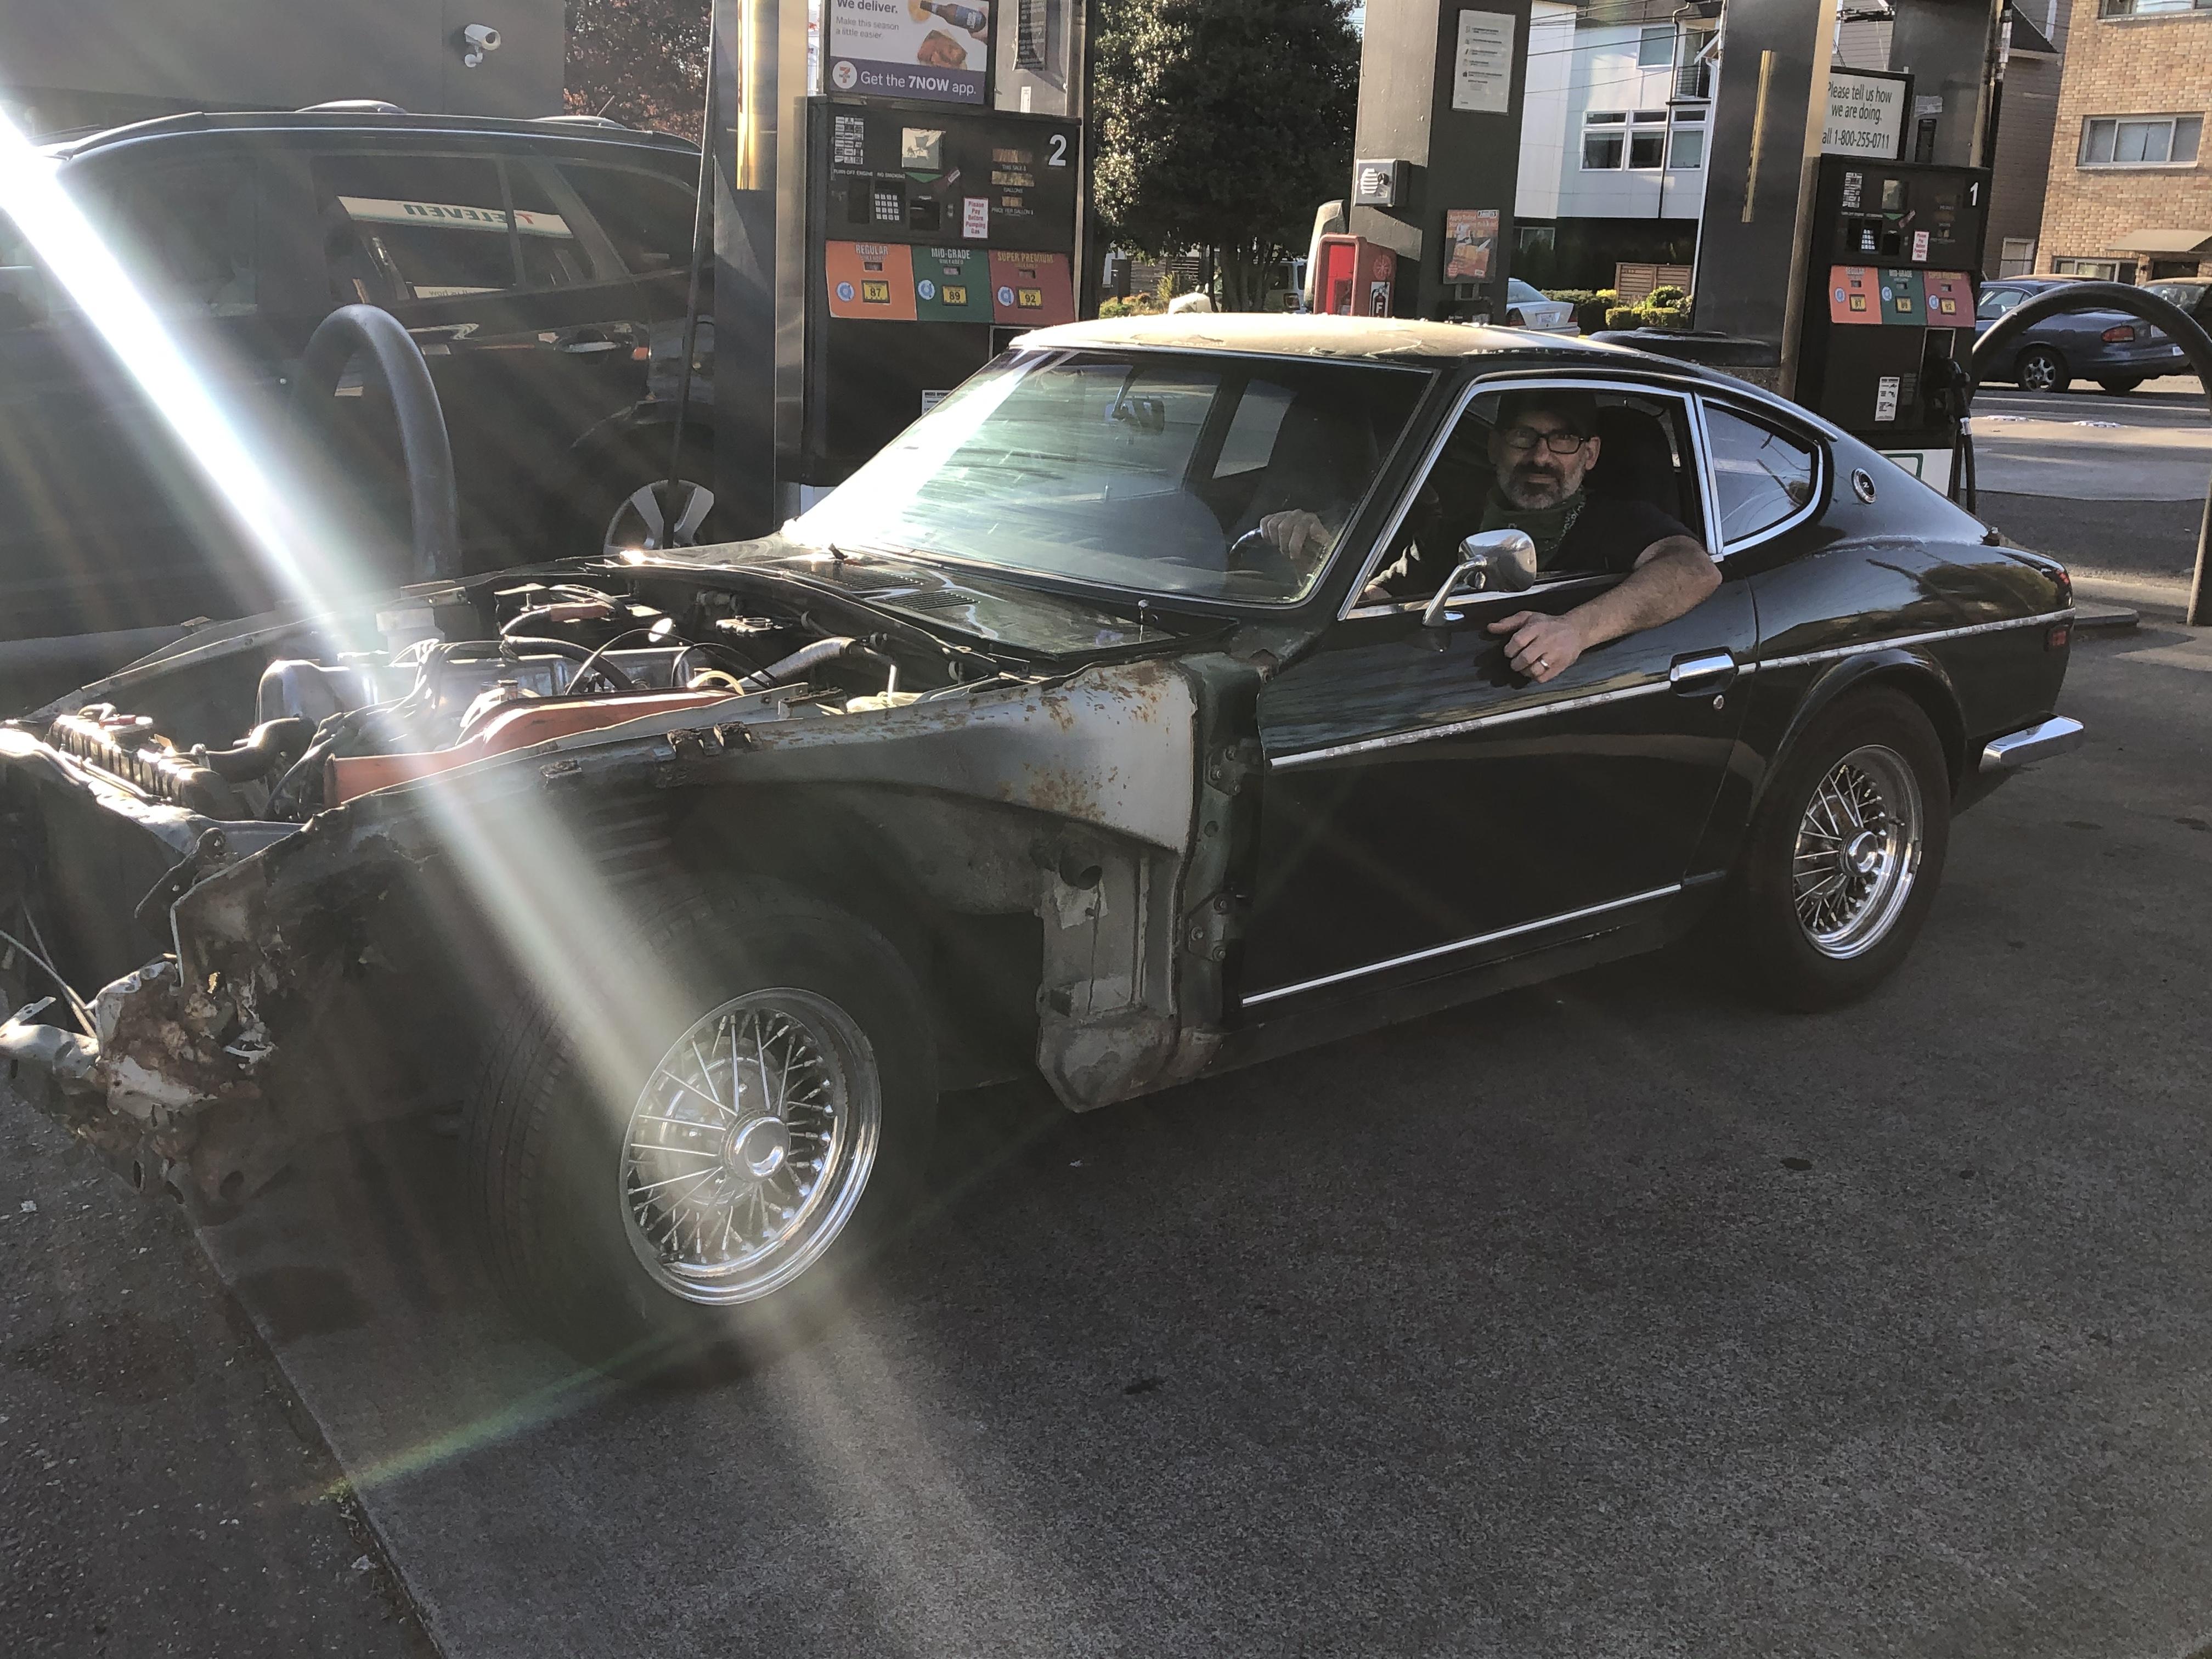
Thanks for all the kind words - and yes, the kids being safe makes it a very lucky event. I don't think the truck even saw them, as the roof of the Z is below the window sill of most large vehicles and it was dark & rainy. At any rate, they never even stopped. The bummer is that since their was no contact with another vehicle and they have no witnesses to ID the other driver, it's considered an "at fault loss of control" and I receive $0. Then, to top it off, the tow truck driver (contacted by the police before I got there) convinced me that I should let him tow it to their yard instead of my house "...because the insurance will pay at our yard, not at your house" and that was total BS. Insurance is paying $0 and AAA is just now bringing it back, after $400 in towing and storage fees at the yard (for 1 night). I really don't know if It's worth rebuilding b/c I'm concerned that the frame is all bent and the thought of having a car that shimmies and wanders all over the road is not exciting to me... I can certainly shape/fab/weld sheet metal, but I worry about not being able to get her straight. Also, w/no insurance payout I can't afford the project. For now it'll have to sit in the driveway until I find the heart/energy to start taking her apart and assessing the damage.
-
Last night was not good. My son was driving my daughter home from the movies in my Z, going across the Ballard bridge (drawbridge w/metal grating in the rain) when a pickup pulled into his lane. He swerved into oncoming traffic to avoid the truck, then cut back into his lane and the car went into a spin, crashing into the guardrail. Thankfully both kids walked away unscathed but I'm afraid it might be the end of the road for the Z... IMG_0013.HEIC IMG_0017.HEIC
-
-
it's actually a pretty straightforward job, costs less than dinner at a nice restaurant, no huge skills needed and rather satisfying when done. the bonus is it forces you to adjust your valves - always a good thing to do on an older motor... i think it's around an hour or so to do the whole thing and the valve guide seals are cheap. the only things that could cause you drama are: dropping something into the hole of doom (cam chain area) so be sure to stuff it w/rags as soon as you take off the valve cover and you'll be fine. loosing a valve keeper - they can fly when they break loose, so do it in your shop vs. out in the gravel driveway (don't ask me how i know this) also see bullet #1 for flying valve keepers damaging the valve cover gasket - should be able to re-use, but if the cover's not been pulled in a long time they can stick and tear, but they're pretty cheap anyway. that's really all there is to it for "danger/warnings" otherwise i wouldn't shy away from it at all if you want a fun little saturday afternoon project.
-
sorry about my delayed response to this, been a little remiss on checking posts... i re-built a set of SU's for my conversion from EFI-carbs, and in the process i got rid of just about everything non-essential in the engine bay. no carbon canister, re-routed fuel lines and a host of other mods to reduce the spaghetti factor in there. you could probably find the old post (4-5 years ago, i think) i believe it was titled "out with the new, in with the old" or something to that effect. bunch of pics and pretty good amount of info. i never did put in the AC - thought about it, picked up some of the parts, but lost momentum on the project and couldn't bring myself to put more stuff in the engine bay... funny thing is, i have always had the exact same idle waver: about a 200-300 rpm up and down fluctuation and i've never been able to figure it out. the car runs great, the carbs have been rock-solid for many years now and it starts quicker on the choke than the EFI ever did. i've just learned to live w/the idle hunting, but would love to hear thoughts from others on what could be causing it.
-
that's the tool i have - pretty cheap for the amount of use i got out of it (did several heads, including replacing valve stem seals for other folks). it works well enough, a little tricky on the ends where there is tight clearance at the cam towers. +1 on the vinyl tubing - i think it was 1/4" or so, you just need to push up the valve so it doesn't fall down when keepers are removed.
-
My condolences re: your EFI woes, especially being forced to deal with it by the municipality. Seems a Kafkaesque nightmare. I did sell my 78 EFI setup, but I have a complete one from a 79 ZX (entire manifold, ECU, TB, etc) that’s been gathering dust under my work bench for several years. Let me know if any bits would be helpful. PS: The SU’s are still performing beautifully...
-
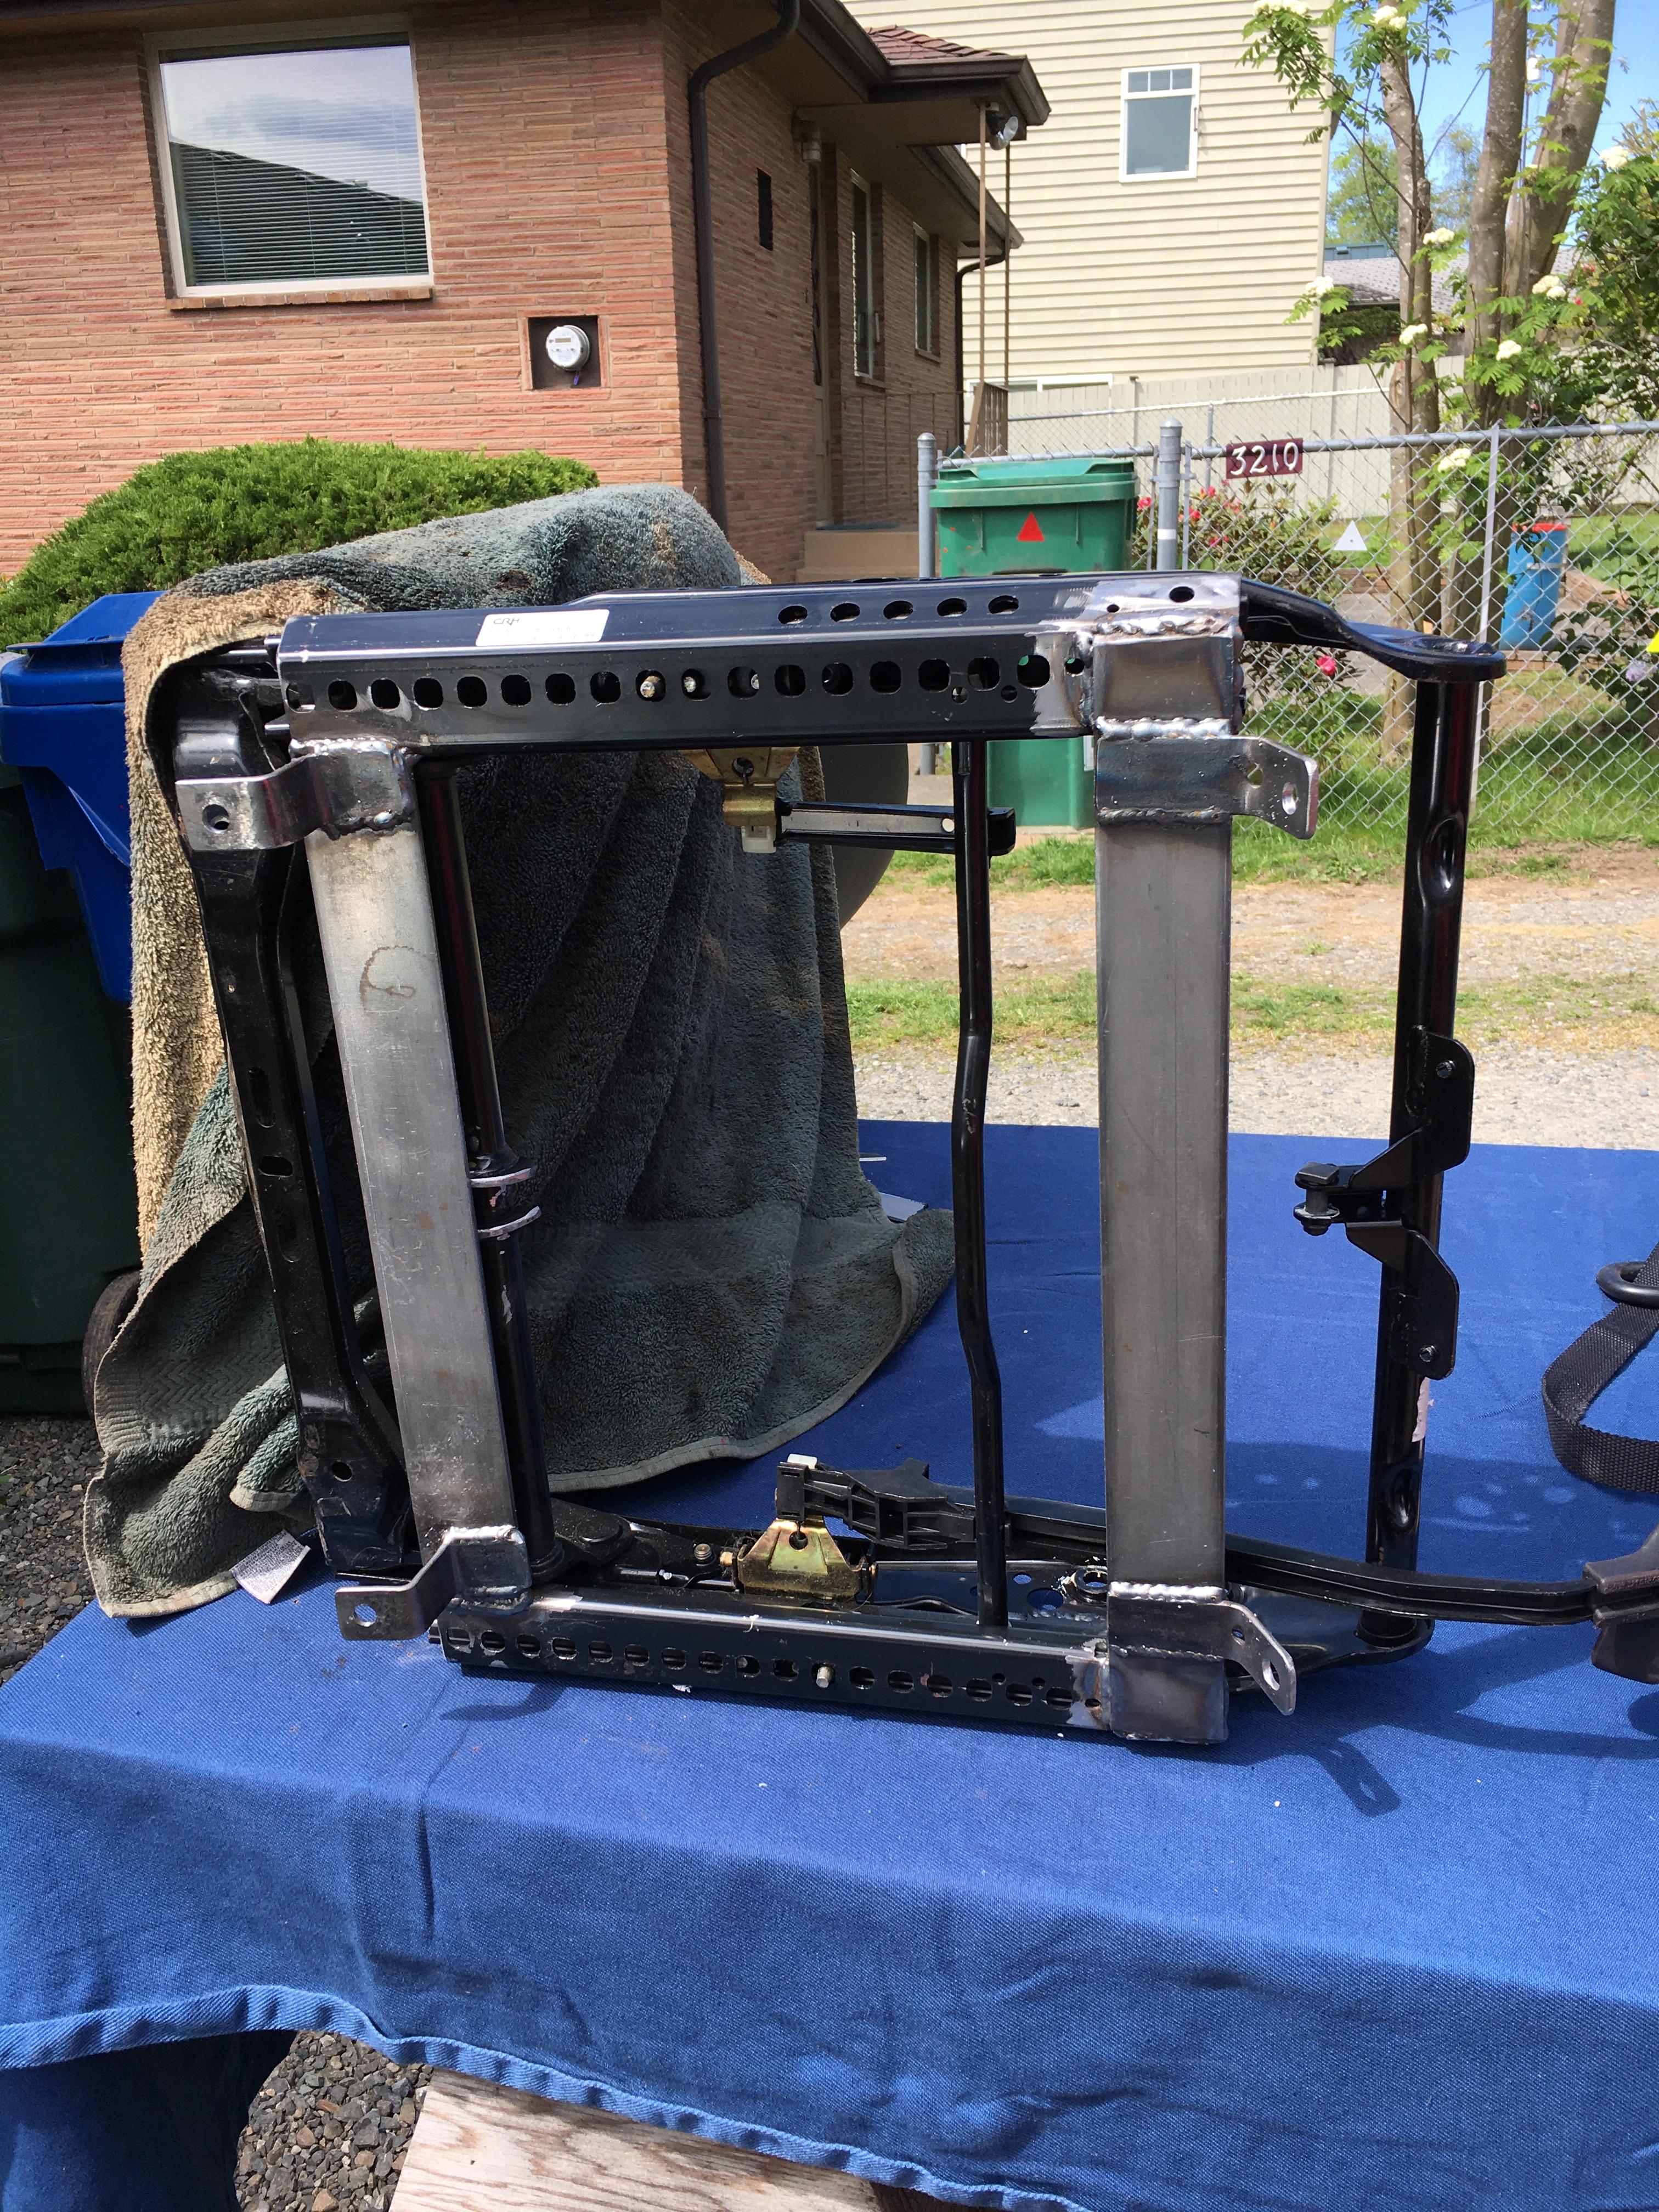
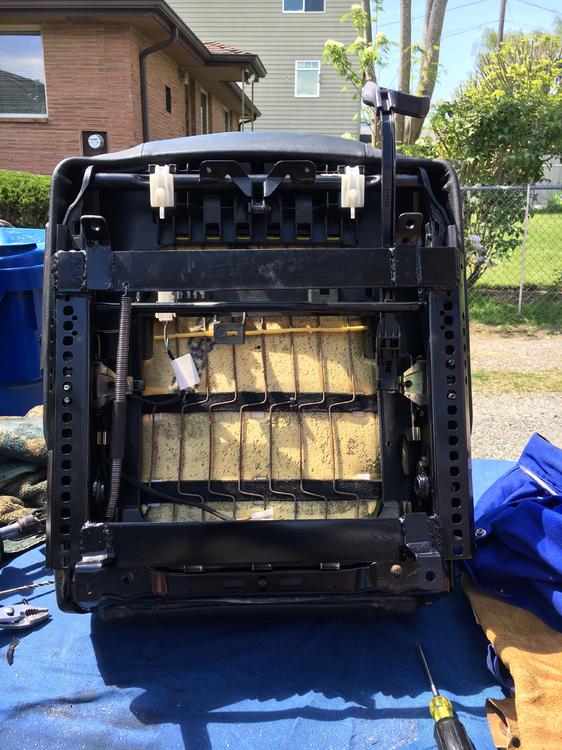
It’s been a bit - can’t remember the model. Was late 90’s I believe. Please note this was a huge PITA project. Definitely not a “bolt-in”. The seats had a manual piston-assisted height adjustment, which I had to remove/collapse and weld closed to get them low enough to clear the headliner, the mounting point width was too wide so I had to fab new mounts, the tracks were too long so I had to cut/weld them and reconfigure the slide adjustment lever, and the floor pan on the drivers side (propeller shaft hump) required some “adjustment” with a 4 lb hammer to make room. I don’t recommend this unless you are hell-bent on making it happen and willing to modify your z a bit.
-
-
Electric recliner (you can see the control on the side of the seat pan). power was the easy part. Major drama rebuilding the mounting system. Not for the faint of heart.
-
True, I guess I’ve been away so long I forgot one of the cardinal rules of posting...

-
Thanks for the offer - really appreciate it. At this point I’m gonna hold off accumulating any more z parts. The project is pretty far down the road and I’m up to my ears in stuff w/no place to store anything. When the time comes, and I’m actually in fabrication mode, I’ll evaluate if that’s the right solution or perhaps a motor from something more recent.
-
hey guys - thanks for thinking of me, sorry i've been so far out of the loop. for the past couple years the z has been running well and i've been pretty consumed with other projects. built a 69 vw bug convertible from a rusty, rotten piece of junk to a decent daily driver, learning how to weld in the process so now i'm pretty dangerous. mark is right: the su's have been soooo wonderful - not a single hiccup and i drive her just about every day, rain or shine, commute is 50 miles round trip. just topped off the oil yesterday, and while i was at it checked/cleaned the plugs and they were all a nice consistent tan. tickle the choke lever in the morning and she starts instantly. best thing i did to that car and i can't see ever going back to all those fussy electronic bits. i did one pretty big z project a few months ago: swapped out the squishy z seats. was going to go the miata route, and found a set of porsche seats that looked like they'd drop right in. turned out to be a major pita - 3 weekends of cutting, welding, re-building. the z seat wells are a goofy tapered shape, partly due to the big tunnel hump with its exhaust pipe lump on the drivers side, and partly due to the horizontal beam at the front. makes for two different height mounting points front vs. rear. at some point i will cut out and re-build the entire floor pan area to make it flat and wide enough to put in normal flat-mount seats. at some point i'm gonna strip the z down to bare chassis, do some body mods (tail lights, valence, grille, shave markers, eliminate panel joint at sugar scoops) and re-paint. that's when i'll probably do the rear wiper. probably a year or two from now, based on the current list of projects in the queue... i do pop in from time to time and read some of the threads - good to see you all are still at it!
-
I’m afraid I don’t have much to offer here, as I’m nowhere near the level of dialed-in performance that you’re trying to hit. My 280 is a DD that I have a great deal of fun with, but it’s not a track day weapon. I have a set of round tops that I rebuilt with a ZTherapy kit and it runs great for what I need. It was a couple years ago, so I don’t recall specifics on the needles - I believe they are a bit richer than stock. At some point, my plan is to swap out my 6-1 header for a 6-2-1 so I can install dual O2 sensors to measure & map (probably when I do the cam) but I’ve been largely distracted by other projects since the Z is running well enough as is.
-
i was suffering from the typical corroded electrical system, so i started from scratch. took power directly from the battery via a marine grade 4GA wire with a ring lug at the + connection on the starter, ran it back through the firewall using the big grommet. once i yarded out all the old wiring, there was plenty of room. mounted a maxi-fuse block up on the right side under the dash - screwed it to the big plastic block that holds the multi-connector plugs. then i mounted all my relays on a piece of 1" aluminum flat bar and mounted it to the firewall in the passenger footwell using the two bottom fasteners that hold the blower fan, so no new holes drilled into the body. works great, but if i were to do it again i'd use a standard fuse block as i'm not really sure what the advantage is with the maxi - just takes up more space. and i'd probably mount the relays further up under the dash as mine are vulnerable to the feet of a long-legged passenger.
-
what % is patch panel vs. original at this point? you're a monster of productivity!
-
yes, i capped off the old vent line w/a bolt in a piece of fuel line. i've never had any gas smell - neither inside the cabin nor in the engine bay.
-
the little airtex just purrs away with no problem - between the light output of that pump and the diaphragm pressure regulator on the filter it's all good. i've been doin' nothing but putting in gas and driving day after day and it runs great. middle of the winter, 30 degrees (cold for us in seattle) and just pull the choke, she starts right up and off you go. middle of the summer, 90 degrees (hot for us in seattle) and never a hint of vapor lock or hot-start issues. this is of course with a header (runs cooler than the cast iron stock manifold) and the stock round-top heat shields in place.