rossiz
Free Member
-
Joined
-
Last visited
Everything posted by rossiz
-
 love the color - looks great!
 -
time is irrelevant - progress is all that matters. but you knew that already... love watching this project come together and looking forward to the next set of design/fabrication exercises - nice work!
-
-
so true - damn near every day i get someone who walks up with a smile and starts off with one of the following: "I dated a guy back in high school who had one of those..." "I dated a girl back in high school who had one of those..." "I had a friend back in high school who had one of those..." "I always wanted one of those back in high school..." i met more folks in my neighborhood when i started working on my z in the front of the house than i had in the 10 years i've lived here. people walking by would just stop and chat, comment on the progress and wish me well on the car.
-
no numbered position is "preferable" - it's really about setting the timing marks correctly. if the v groove is to the left of the mark, the cam is retarded, if it's to the right of the mark, the cam is advanced. your cam chain shouldn't be loose - there's very little play in it and the tensioner keeps it pretty tight. if it is loose, it could be stretched or the tensioner may not be set correctly.
-
it does sound like a timing issues. the cam gear should have one of the numbered marks lining up with the bright link on the timing chain. there are 3 numbered marks on the cam gear which you can line up with the bright link to advance the cam and compensate for chain stretch/wear. there are 2 bright links on the chain, one is set to a mark on the crank gear - of course this assumes that the second bright link was correctly set on the crank gear (which you can't see unless you take off the timing cover)... if the chain has been installed wrong (bright link not lined up w/crank gear mark) you can still set the cam gear correctly, it just takes a little more work. with #1 at TDC (be sure) you can set the cam gear so that the timing mark (v groove in base of cam gear) lines up with the stamped mark in the thrust washer on the first cam tower. before you take off the cam gear though, be sure to wedge the cam chain to avoid losing your cam chain tensioner (which turns your 1 hr. job into a 6 hr. job).
-
funny you should start this thread - i've found that commuting in my z is a blast. it's so much fun to drive that even something as banal as a work commute makes me smile. i'm usually on the road by around 5:30am and there's something awesome about ripping through the gears as the sun is coming up, and i love looking back at her in the parking lot as i open up the office.
-
love the sound!
-
horrible story, so sorry to hear it. take care of yourself first - you will likely be sore from the impact even though no outward injuries are apparent. then take stock of what's left and get yourself another z. all the work you did on this one can be transferred to another one - knowledge, parts or both - and you will be ahead with a parts car to work with. it's not "just" a car if you put your heart into it, but it is replaceable and the next one can be even better.
-
perhaps i'm missing something, but i was under the impression that the flattops provide the higher cr for na application and the turbos used the dished pistons to lower the cr and avoid detonation. i don't claim to know the intricacies of a turbo setup, so take this w/a large grain of salt - just what i've read. for comparison, i had the following work done at a local seattle shop: block tanked, surfaced, decked, honed crank balanced rod/piston assys tanked, balanaced flywheel lightened & balanced clutch pressure plate balanced head tanked, shaved, surfaced i believe this was around $750 the balancing is really nice - makes for a very smooth motor at high revs. they did it in stages: rod/piston assys individually, then crank, then flywheel, then crank + flywheel, then crank + flywheel + clutch pp. the clutch pp has a "V" mark stamped into it which indexes to a similar mark on the flywheel for proper assembly.
-
hest is the best, lest you freeze like the rest - mornings are cool this time of year...
-
perhaps i didn't read the op carefully enough - i thought he was talking about difficulty with a grind, which is exactly what mine did.
-
carbs. an unmentionable word in this area of the forum...
-
sorry in advance to the kind folks who helped me troubleshoot my 78 through many a dark time, but i gotta chime in here... i know others may have different experience, but i never could get the efi on my 78 to do better than 16 mpg on freeway driving. the car ran well (not great) and i replaced every single component, hose, fitting, connector and wire in the system - sensors, injectors, csv, fpr, filters, aar, everything (the ecu was less than a year old, as was the afm) as well as new pcv, plugs, wires, cap, rotor, etc. i'm not saying it's impossible to get good mileage out of it (others have) i just know i couldn't, so i finally bailed on it. yanked the whole thing, harness and all and swapped in a set of su's with sm needles and i'm consistently hitting 22-25 mpg and i'm driving it like a lunatic most of the time. old school just plain works.
-
-
not sure why, but it seems that getting into reverse is affected most by clutch drag - happened to me after a rebuild and new clutch. just a few turns of the adjuster nut at the pedal and problem solved. as others stated, however, if the problem has appeared over time you may have issues elsewhere in the hydraulics (master, slave or air in the lines) which aren't giving you full range of motion at the fork. a good flush/bleed and rod adjustment first (low $$) then if it persists, master and slave (also pretty cheap) and check the lines - especially the rubber one from the frame to the slave down at the bottom of the tranny - they get old and cracked.
-
while the triples are cool and many enjoy a little bit of added top-end performance, i can attest to the simplicity and ease of use that a nice set of su's provides. i rebuilt a set myself, but mostly because i wanted to get to know the carbs - there's not a whole lot to be saved vs. getting a set from zspecialties if you count your time at all. if your triple setup is in decent shape, you should be able to sell them for enough to offset the cost of the su's considerably. and fear not, your son will have plenty of fun w/the su's - they are not a big downgrade. lots of folks race these carbs happily. once they're bolted on and the float levels set (the hardest part) you'll be surprised how simple and effective they are.
-
to everything - turn, turn, turn, there is a season - turn, turn, turn.... sorry, couldn't help myself
-
ugh.... sorry to hear that. at least if you pull the engine you'll have a chance to go through the whole thing and do it right. my experience with Al is that he seems to be a nice enough guy, but may have more than one shop (or more than one technician) doing his machine and build work with questionable QC. while you have the block out, a fresh set of bearings, seals and gaskets + the rings will give you peace of mind going forward. re-building the head yourself (assuming it isn't damaged) is not difficult, just takes a clean bench, a book and some patience.
-
i don't believe the unit is designed to be completely air-tight when closed - it's just a sliding plate with no rubber seals. but if it's closing all the way you should be fine. i don't believe hthe aar creates a vacuum leak, it just allows extra throttle air past, kind of like having your foot on the gas pedal a little bit for starting.
-
hey jim, i used new foam from msa when i restored my seats and the base foam is definitely a little taller than what was in previously. not sure if the new foam is the oem height and my original was just way worn down or what, but it's a little too tall for my tastes and i'm betting you'd be unhappy as it comes. simple solution is to just shave some off prior to installing. i would shave it off the bottom to ensure you keep the seat profile and the new leather fits correctly. when you install the seat covers, the edges are long and you pull them around the frames until tight and fasten with hog rings - easy, and it will compensate for any changes in the foam's overall height. just shave off 1/2" at a time and do a quick test fit until you hit the right dimension. i would definitely go this route vs. re-using old foam under new leather - the old foam in mine was really falling apart and was clearly done for. another thing i can't recommend enough is to install a seat heater kit while you're at it. i picked up a set off ebay for $50 new - includes the 2-level switches (low and high heat), relays and 2 seats (base and back) and it is a total joy on cold mornings!! i've got a thread on here somewhere showing the install - i mounted the two rocker switches in the console just ahead of the ashtray and they look very subtle completely oem.
-
nice! where did you wind up w/timing? any obstruction to intake will affect flow - you can tune for some of it w/afr but it will always be there. i've spent quite a bit of time w/motorcycles on the dyno and every little bit counts. unless you're on the track you feel a few hp a lot less in a car than on a bike though. i was shocked at how much difference a set of screens made on the intake bellmouth, but if you think about it all screens have a % open area spec and even a fine wire mesh with large openings (filters out bugs/rocks but does nothing for dust & grit) will choke out 5-10% and that's a direct reduction to intake. end of the day, for street driving the filter effect will be essentially negligible and your bores will thank you...
-
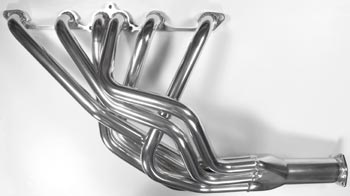
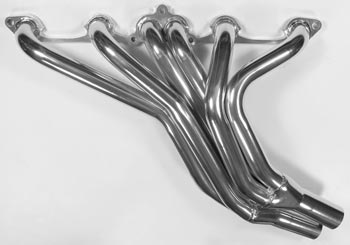
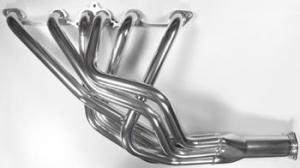
hey site, good info - thanks for the post. and thanks jeff G for passing on the experience. i have a dual-sensor unit and my plan is to swap out my current 6-1 for a 6-2-1 and put the sensors in the Y collector which will give me separate readings for the front and rear carbs. this will put them a bit higher into the engine bay and while it should eliminate tranny interference, i'm gonna have to watch out for the fender well - i'm hoping the angle of the Y will wind up putting them below/in front of the break booster. i'll be sure to post up when the time comes these are the pics i'm using for reference: MSA 6-1 (current) MSA 6-2-1 & Y adaptor


-
i agree w/getting them punched in - should be cheap and it will look nicer with so much less work. check around the custom body shops, i'd talk to the local rice-racer kids who have their cars lowered to near dragging and tailpipes big enough to fit their heads in, they'll know where to go. it's a pretty common piece of tooling.
-
just a quick follow-up on this thread: i completed my F54/P79 rebuild and swapped it in, transferring the carbs exactly as set up for the old motor and i've been delighted with how well it runs. the the new motor is broken in with about 700 miles on it and the carbs are performing flawlessly - beautiful, steady idle at 600rpm and silky smooth right up to 7K (haven't revved any further than that yet). i'm pretty sure there's more to get from them with some fine tuning, but that will wait until i install a 6-2-1 header and the dual O2 sensors to really understand where it's at. i'll report back when i dig into that in a few months.