rossiz
Free Member
-
Joined
-
Last visited
Everything posted by rossiz
-
 looks like i've got a long day (or two) ahead of me... the biggest thing i've been dreading is getting the balancer off the shaft (i haven't done this yet) and i'm gonna have to read up on timing the distributor after removal. next weekend is a long one... maybe i can clear the decks of obligations and git-r-done. of course i won't know if the tensioner is salvageable till i find it, so may have to order parts and have the car out of commission for a while. booooo.
 -
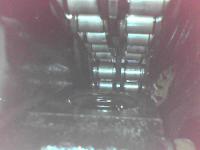
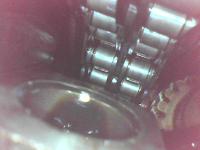
so i've looked at the pictures of other chain tensioners popped out and squished up between the chain guide and the chain, and it baffles me how mine could have vanished - doesn't look like there's enough space for it to drop between it's housing and the crank gear, and the chain is going "upwards" (traveling clockwise) so it doesn't seem it would drag the tensioner down... can i pull the oil pan without pulling the engine? looks like the front pan bolts are obscured by the front crossmember. i already have a new pan gasket (bought to do it "someday" to fix that nagging slow leak). i was hoping maybe with the oil pan off and the valve cover off i'll have access to the tensioner from both top & bottom and maybe i can put humpty together again???
-
ok, i get it that the camera is cool and the pics are neat... but what about my L28???
-
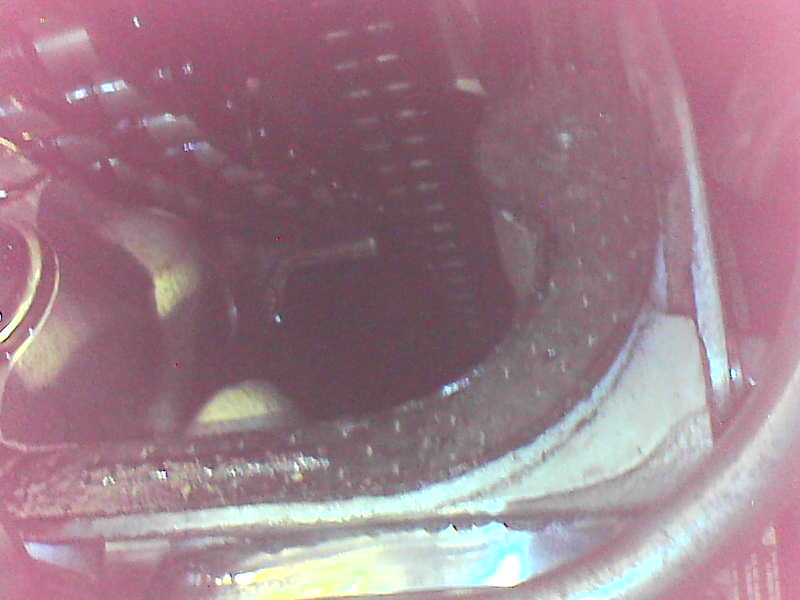
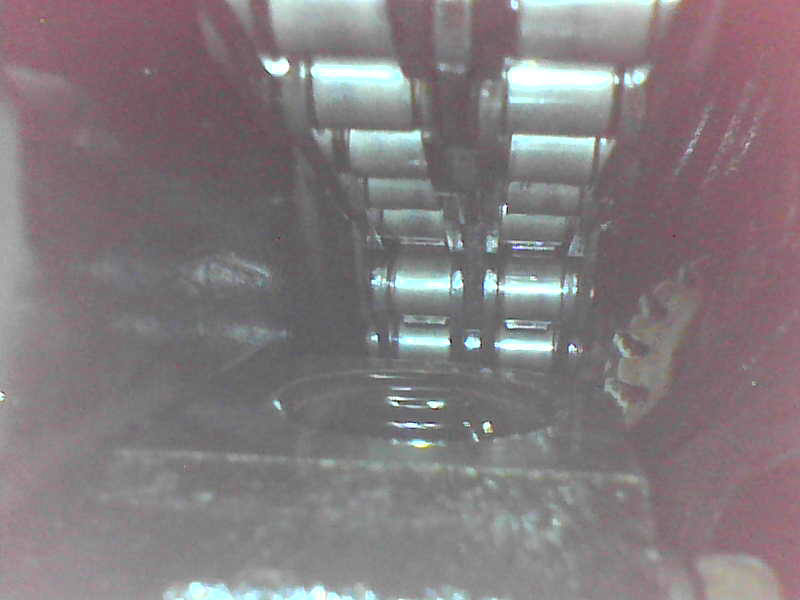
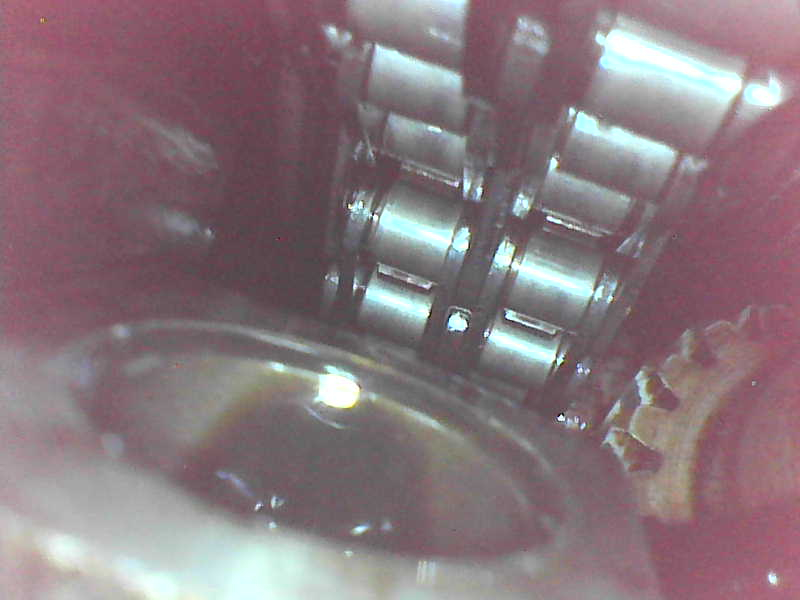
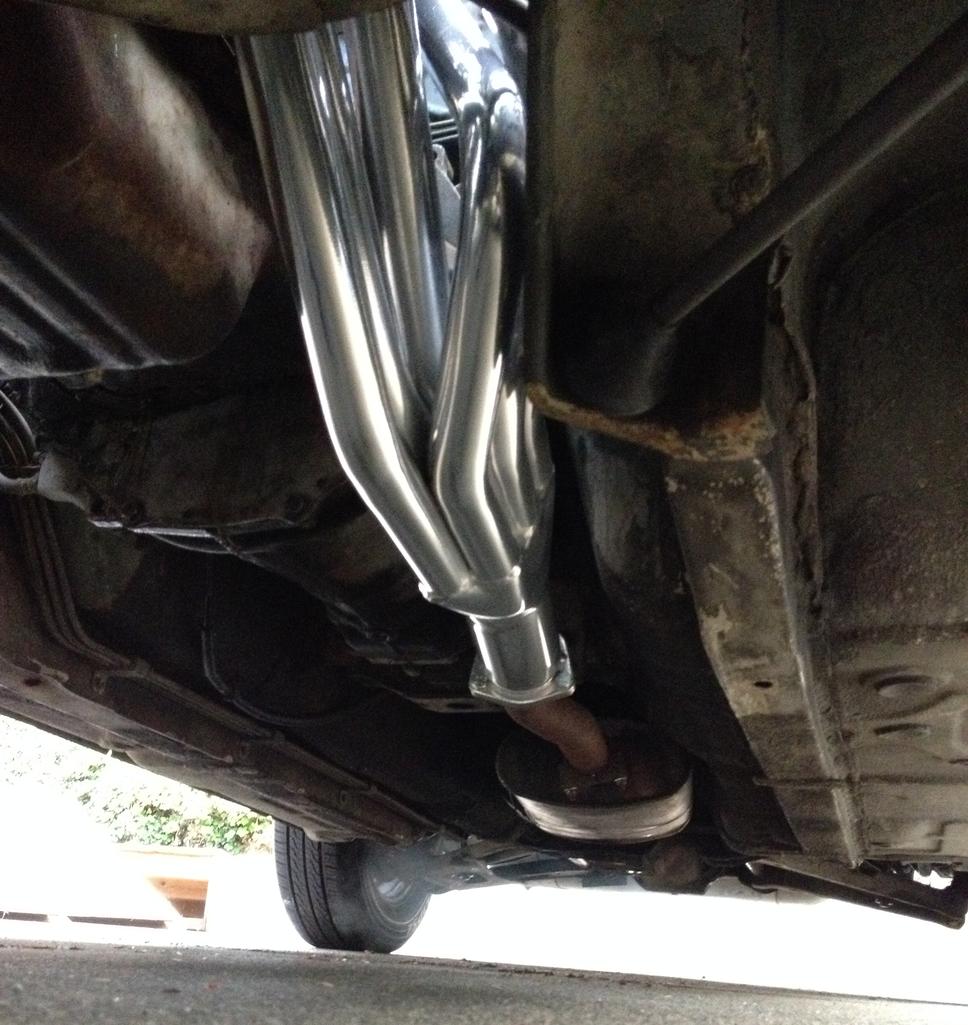
so after replacing the head and futzing endlessly with the timing chain, i finally got her running. went in to do a valve lash adjust after ~600 miles on the new cam and discovered my cam chain was quite slack. while rotating the cam by the bosses i felt it turn a few degrees as the slack picked up in each direction. when i replaced the head, the chain was super tight - so much so that i had to lever the cam sprocket on with a big wrench. it seemed too tight to me, but everything i read stated "zero slack" and that's what it was. the first startup turned over verrrry slowly for a few revolutions, then something clicked and the engine spun free and started. i figured the tensioner was clicking into position or seating itself after being displaced. alarmed by the amount of slack i was now seeing, i got my little endoscope cam out and went into the abyss to see what the chain tensioner was doing, and i found it was.... completely missing!!! looks like it got sucked into the hole and i have no idea what to do now. oddly, i couldn't see any parts lying around down there, but they could be hidden in a cavity that i can't see. the engine runs pretty well (not perfect, hence my valve check) and doesn't make any crazy noise like i would expect from a loose chain, but i am concerned to say the least. anyone experience this chain tensioner vanishing act?? a couple videos of the slack chain: going in to look for the tensioner: nothing there: just a whole where the oil comes out: am i reading these pics correctly? is the tensioner really rattling around in the bottom end? perhaps this might explain slightly lower oil pressure?

-
Madkaw disease!
-
motorsportauto (MSA) Welcome To Motorsport & The Z Store! Nissan-Datsun 240Z-260Z-280Z-280ZX-300ZX(Z31/Z32)-350Z-370Z Parts! is a good resource - i replaced all my heater hoses, inside the cabin and outside. the ones on the inside were hard as rock and a small crack would have meant sudden and catastrophic failure for sure. there's a fitting that's attached to the firewall with screws and a rubber grommet - the hoses clamp to it on either side. easy to remove and clean up. on the inside it's a bit of a pain to get up there - blower fan comes out, heater core is behind the console. get used to being upside down w/your head under the glove box... easier if your seat is out, gives you a bit more room to work. in general, it might be a good idea to attack each system, one at a time, replacing rubber hoses that are even vaguely questionable. cheap to do when ya got it all apart and saves a whole lot of pain vs. waiting for things to fail (which they will, eventually) have fun - looks like a really cool car!
-
thanks all for the great posts - some really good things for me to chase down. i will approach in a methodical, systematic way to cross items off the list one at a time. i will re-do the yogurt-cup and beer-can tests and spin the engine to get a closed-intake condition the PO replaced the ecu a few years back so i'm doubting it has drifted. he also replaced the afm, but i haven't done the calibration thing yet - looks fun as far as the injectors go, i didn't realize they were in separate groups - i just thought they all went back to one set of leads since they all fire at once?? so i might not have them on the right injectors because the PO replaced all the plugs with loooooong leads and ace hardware crimp connectors - i re-did them as they were all over the place but may have switched some around... is this an issue? is there a way to figure out which one is supposed to go where? to be honest, i've been so upset by the dent i put in the hood that i haven't had the heart to open it back up. just been driving it and and quietly cussing. fortunately the curve of the hood is such that i can't see it from the driver's seat - otherwise i'm not sure i could handle it. to think this hood lasted 36 years without so much as a scratch and i managed to do that to it through sheer carelessness... ANYWAY, i've got a weekend planned with my son and so i'll probably jump back on it next week. stay tuned...
-
a couple of tips: to make a paper fan, you have to do many folds watch where you're going, or you might trip and take a header. it's 6-1 or half-dozen of the other. baffling, eh?
-
don't get gassy on us. nuthin' but a lot of hot air. sorry, had to pipe in at the tail end of this one. it's a hot topic and puns could backfire...
-
been driving for about 300 miles on the new head/cam and have been trying to hold my judgment until things wear in, but she's just not at 100%. what's been done: re-built head set valve lash at install, then hot adjust after an hour or so of run time set timing to 35 degrees max with no vacuum advance (seems to get best result so far) all new injectors - nos oem new CSV all new sensors at the thermostat housing checked/cleaned all bullet connectors from sensors checked/cleaned ground connections all new connectors at all injectors + cold start manifold cleaned out, new gaskets egr system removed, manifold sealed off 6-1 header k&n cold air intake i've adjusted afm by moving the white gear to where it hits the best idle and best vacuum symptoms: smells like it's running very rich stumbles at wot up around 3500 plugs read rich/sooty on 3, 4, 5, 6, but 1&2 seem fine if not almost lean vacuum is down around 14 in hg at idle when the small vacuum plug is pulled to put the gauge on (letting air into manifold) the idle goes up (indicates rich?) tried to do the yogurt test yesterday but couldn't seem to get any useable info - here's what i did: pulled afm and plugged afm-to-tb hose w/plastic cup pulled breather hose to top of valve cover off and blew into it with thumb over valve cover hose inlet kept my pressure gauge on the small vacuum nipple at end of manifold and watched leakdown pulled vacuum lines from everywhere i could, one at a time while watching the leakdown for differences, couldn't find any the break booster is rock solid. the leakdown happens really fast - couple of seconds. couldn't hear any hissing or air escaping, wouldn't it just be going around whichever intake valve was open and into the cylinders? am i doing this wrong? seems the only thing i was able to accomplish was putting a horrible dent in my hood when i closed it on a tool i had left on the radiator crossmember :stupid: i am not happy...
-
quick edit: the new head is an n42...
-
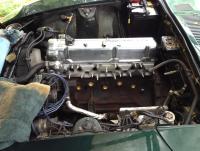
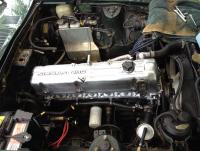
so i'm not sure i can offer anything conclusive here, as i've done quite a few things at once and can't tell for sure which one did the trick, but it's been hot as all get out here in seattle the past few weeks (hot for us at least, upper 80's) and the car has been starting just fine. when it's really hot it runs a little grumpy for a few seconds, but cleans right up with a rev or two on the pedal. i'm using the cheapest gas i find (as always) which typically has ethanol in it. mods: new n42 head shaved/cleaned manifold new ceramic coated 6-1 header home made "ghetto-style" single run fuel rail (cut from oem) all new injectors (nos oem)
-
on my '78 i was able to simply pull one the wire connector off the buzzer. got on my back upside down, head under the dash and turned the key several times to listen to the buzzer and feel around with my hand to locate it (and hearing it all those times in a row fully cemented my decision and resolve) and then just pulled off the plug. best free mod - i don't miss it at all. the "fasten seat belts" warning light still lights up in the console, giving that old-school look/feel as well as to remind me of this important safety feature
-
quick question to the electrical gurus out there (i am not adequately talented in this dark art). yesterday on the way to work the interior fan wasn't working - and it was hot out... when i got to my parking garage i turned on the headlights and the fan turned on with them (the fan switch was left on high) and now it all seems to work, with or without the lights. does this make any sense or was it a very, very strange coincidence?
-
nice work - i'm getting inspired...
-
glad to hear things went well - i've gotta freshen up my brakes too... so far i haven't finished off my tail, it's still a mess from the removal of the bumper spacer (spot welds, shadow from previous paint job) and the old shock holes. been on the fence whether to put on a 240 rear bumper or just do the body work and keep it bumper-less. the decision also ties into my nagging desire to do a dual exhaust, which involves moving the tank over and cutting a second exhaust tip recess in the valence panel. so many decisions... for now i'm just gonna drive it. looking forward to seeing your progress.
-
funny, i was visiting relatives in MA this summer and we went to see the go-gos at hampton beach casino - didn't drive the z from seattle, though it would have been a helluva reliability report to post! i agree w/zed re: the hatch leak - check the rubber seal. i had the same thing. the PO installed louvers attached via thin strips of aluminum which slipped under the seal - when i removed it, the seal was deformed. my quick/cheap fix was to buy a tube of silicone and used a small screwdriver to pry back the seal around the glass and squeezed a bead in between the glass and rubber, working my way from the drivers side about 4" above the bottom, then down, across the hatch and up 4"on the passengers side. tedious job, but after i wiped off the excess it's invisible and completely stopped the leak - and we get rain over here...
-
glad to hear you got that anchor off the back - it's a pain and a bit fiddly, but nice to have it gone. i used wide sst fender washers and matching rubber washers to block off the empty holes. how are you planning on filling up the old holes in the bodywork? will your new bumper cover them?
-
another way to get the fuel pump to run with the engine off: turn the key to on and disconnect the oil pressure sender (located on passenger side of the block, down low, below #2 cyl, should have a rubber boot on it, just pull the plug off) and the pump should start right up and run till you plug the sensor back in. i've used this method a lot to try and prime my fuel rail during hot conditions - simple, no tools required.
-
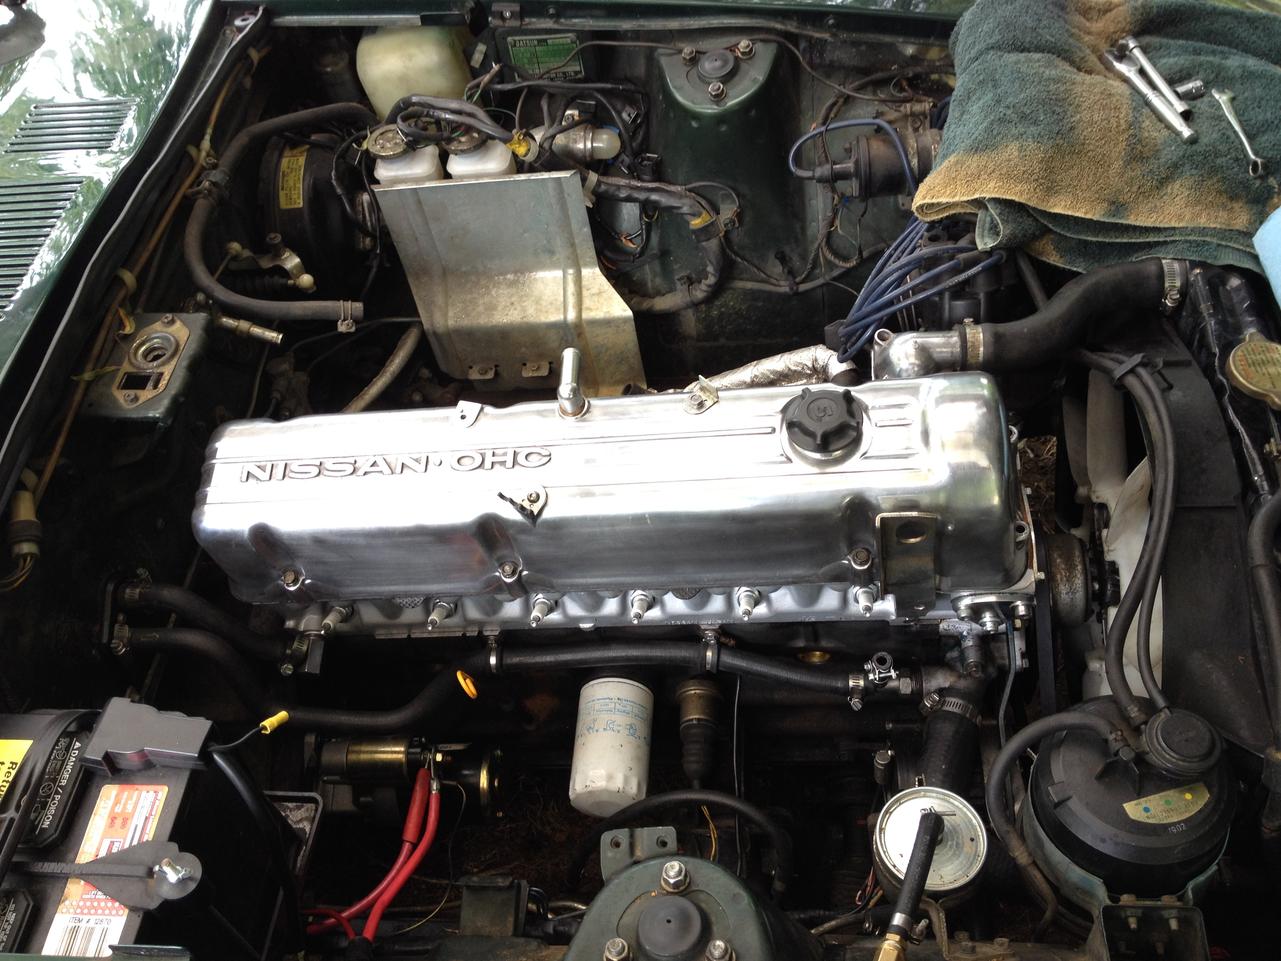
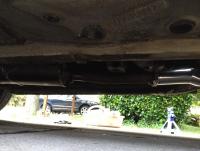
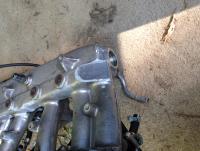
thanks for all the kind words - you folks kept me going during the dark days on this one. all in all, it was pretty straightforward. in hindsight, with all the parts on hand and having done it once, the whole thing could've been a big single weekend project (minus all the re-conditioning of the intake manifold) and i'm pleased with the results. yes, the n42 head from datsunparts llc appears to be well done as far as cleaning, machining, assembly, valve job, cam condition, packing, shipping and price. the valve lash was also spot on (for cold adjustment) right out of the box. the only thing that was a pain was all the stripped/knackered threads - most of them on the valve cover bolts, one exhaust manifold stud and one of the intake bolt threads. while these only presented a mild inconvenience to me, i can see how this could be a major issue for someone who was looking for a truly "bolt-up" part. i didn't mind, because the price was great and i got it in a week, shipped to my door, all clean vs. having to deal with a used swap or expensive re-build. fortunately the spark plug threads are all perfect - a much more important bit for me. i've been doing little around-town drives, got almost 20 miles on it, keeping it under 4K rpm for the first 100 miles or so just to baby the cam a little. hope to get the final exhaust made/installed in the next couple of weeks and looking forward to seeing how it runs/sounds when done. the hillbilly setup is innocuous, with a twinge of "junkyard" burble, but it'll keep me going for now...
-
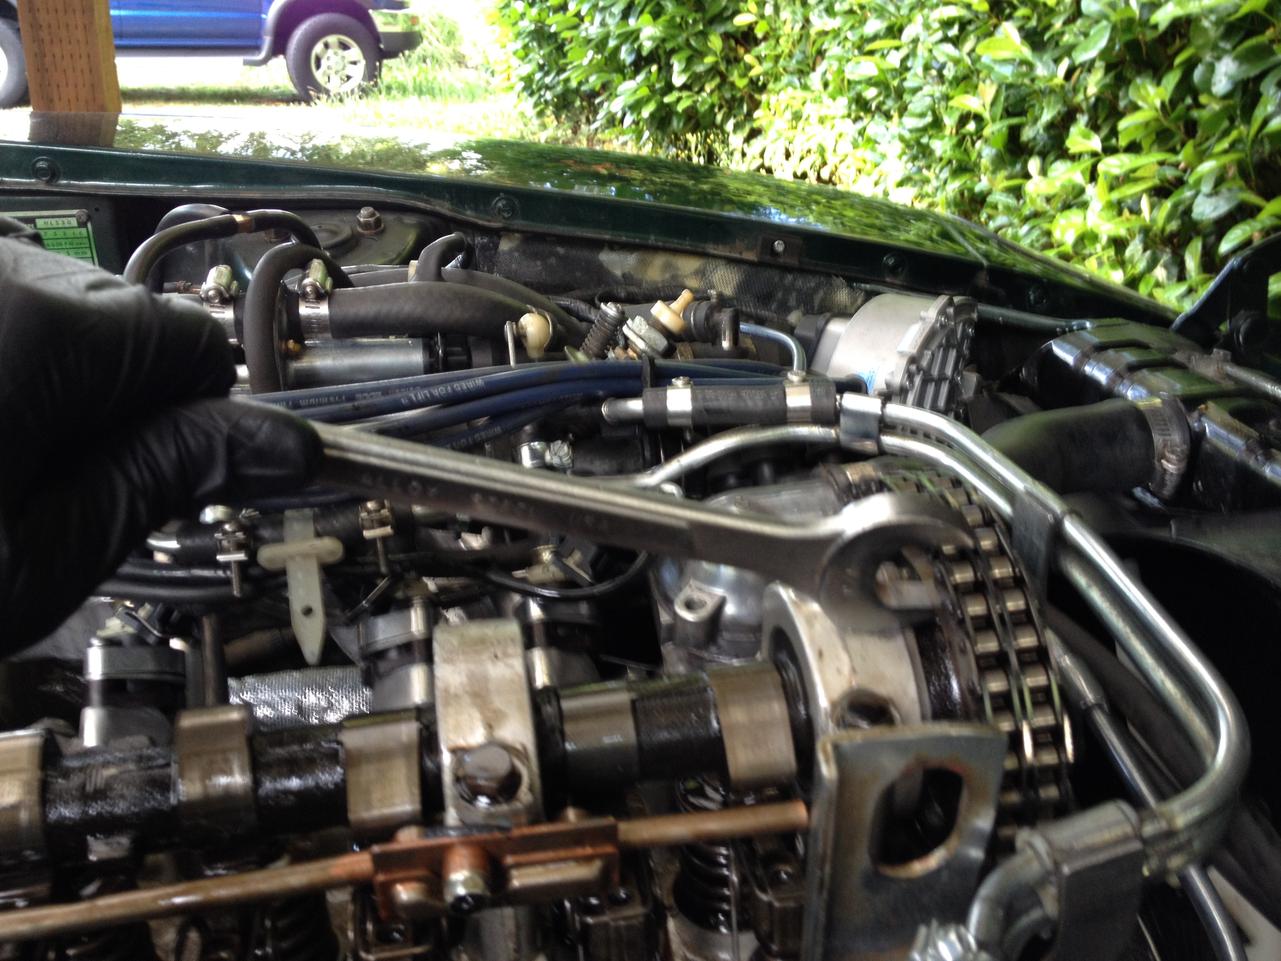
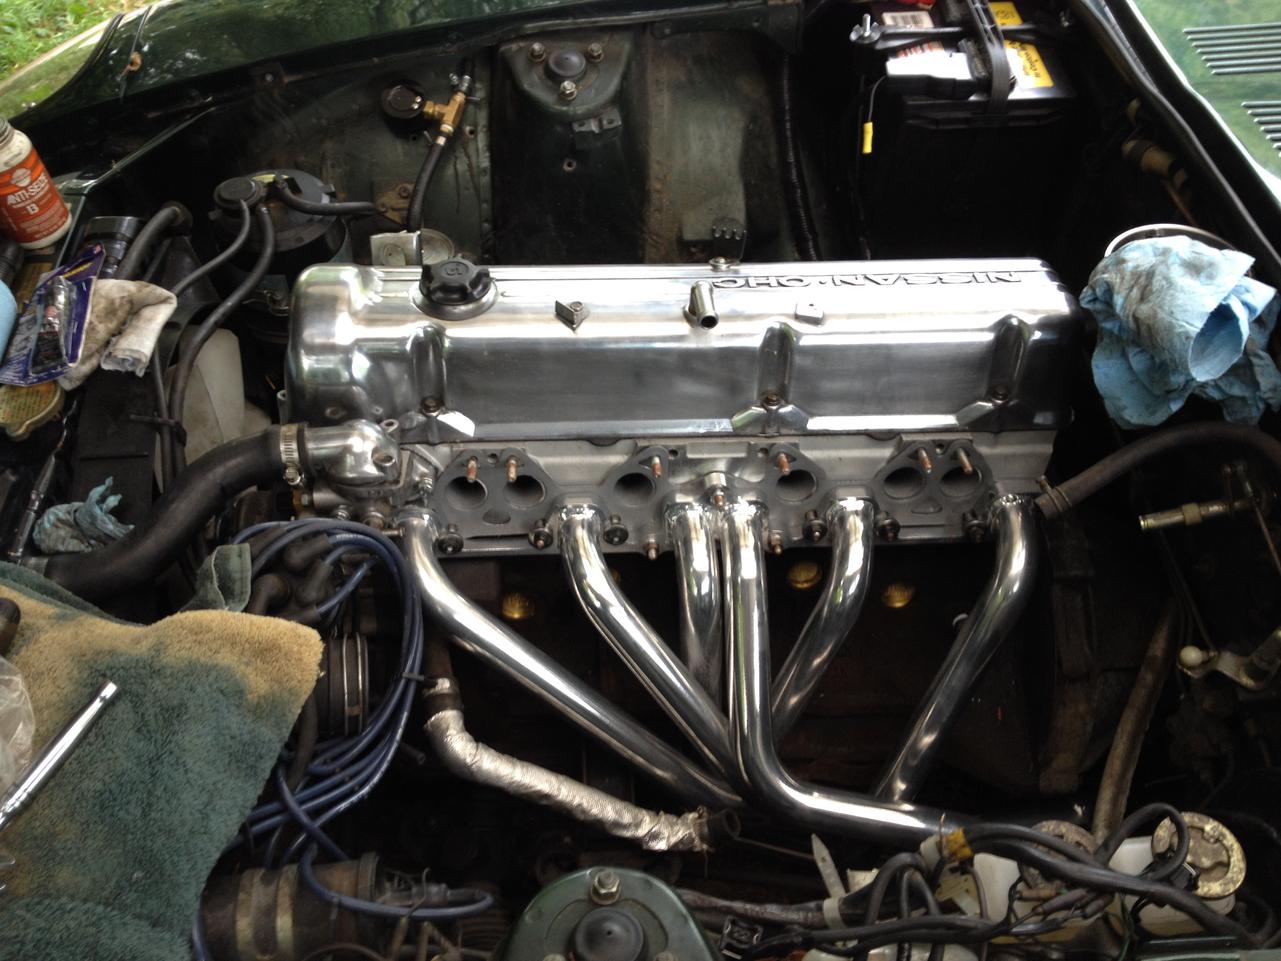
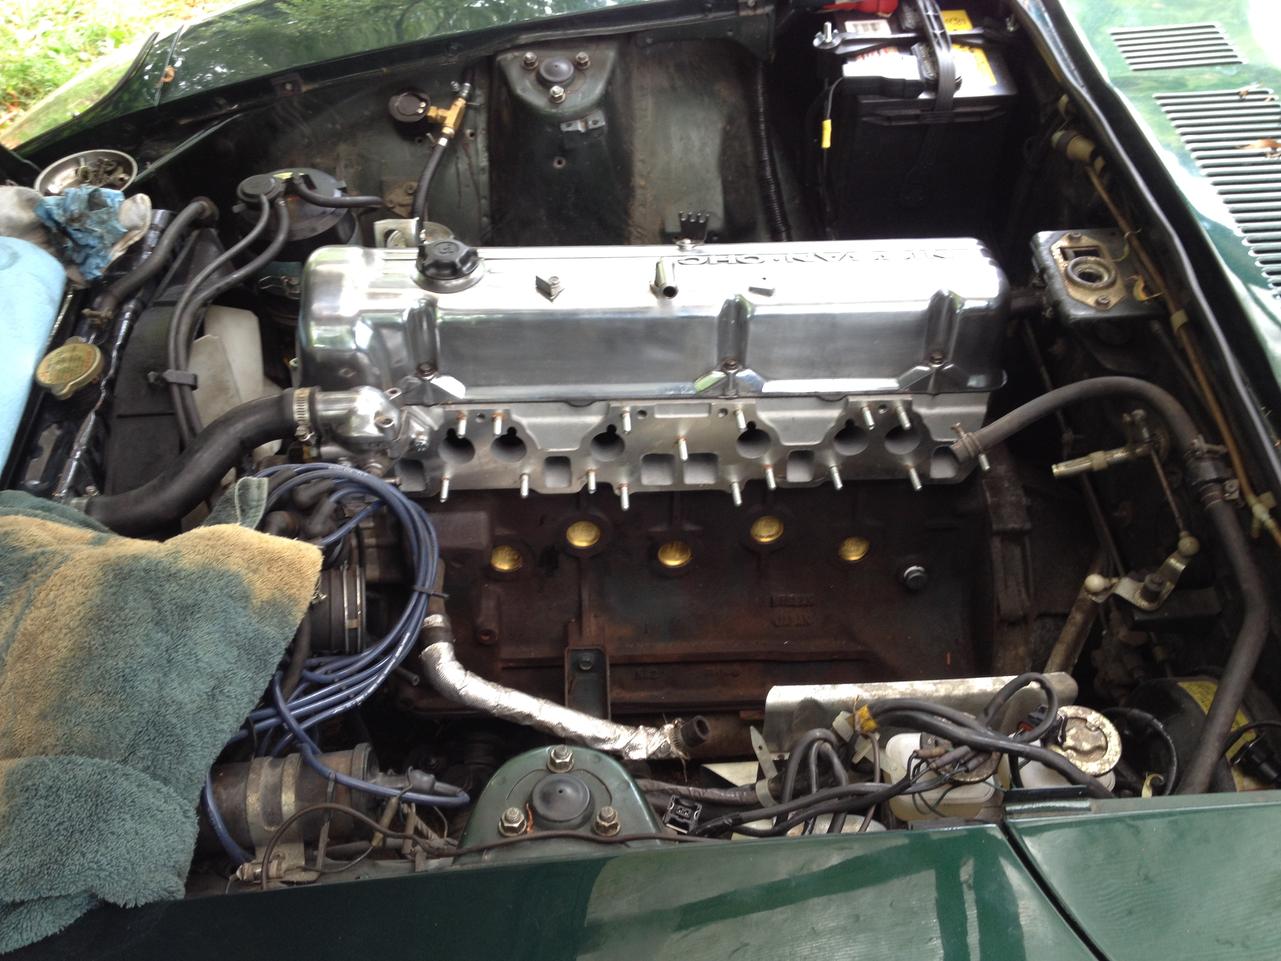
well gang, once again the savvy members of this forum are correct. first thing i did today was pull the plugs, clean them (they were still wet) and pull the valve cover - i had a nagging doubt that i had somehow screwed something up with the timing chain tensioner and was worried that the chain had jumped a tooth. to my delight, the cam was still perfectly timed and the chain was nice and snug. there was also a plenty of oil up there, so i believe the system was doing its job. jumped the starter and spun it over to see if the spray bars were working and was appalled at how weak the flow was - it really just burbled out onto the rocker pivots. took the spray bar off and discovered that the center cam tower oil journal wasn't blocked with a gasket, so it was leaking pressure (the spray bar is in two halves, with the two end cam towers providing all the oil and a blank mounting plate in the center). made a gasket for that and it seemed to help, but i believe the force needed to actually spray the cam lobes only comes when the motor is spinning faster. glad i sprung for a quart of zinc additive, hope it performs as advertised. scary how dry things must be after a motor has sat for a few months and then gets started up... put her back together, pulled the plugs from the thermotime and coolant temp sensor and switched them (thanks s30driver!). gave the key a poke and after a few grumpy blubbers she fired up and as the plugs burned off she ran better and better. loud as all hell with the straight header, but music to my ears :classic: followed blue's advice and ran her for 20 min. w/the throttle linkage pinned to 2K rpms to break in the cam. then shut her off, pulled the valve cover and did a hot lash adjustment - 5 out of 12 needed some attention. will do another check after a few hundred miles when i change the oil out. couldn't resist taking her up the street to see if i might set off a few alarms or shatter someones windows with the ruckus - too much fun. yeah, i'm THAT guy on the block. grabbed the bits of oem exhaust i had laying around and hacked off a piece that had a flange on it (from the mid-muffler back), and stuffed it into the old fart-can that used to hang off the back, bolted it up to the header and hung it from the e-brake pivot with a piece of bailing wire to create a surprisingly functional hillbilly exhaust. shocking how quiet it got with less than 6' of junk hung on the header... took her for a longer drive around the neighborhood (raised no eyebrows on this run) and she runs really smoothly. nice idle, smooth revs. i think i need to fiddle with ignition timing and afr a little as it seems a bit rich, but i didn't want to push it for a bit just to let the top end settle in. btw - getting the cam gear on took some leverage, wound up using a large open end wrench to pry it up against the cam tower till it was lined up w/the cam nose: smooth running after valve adjust and sensor re-wire: the rossiz hillbilly exhaust: running smooth AND quiet:

-
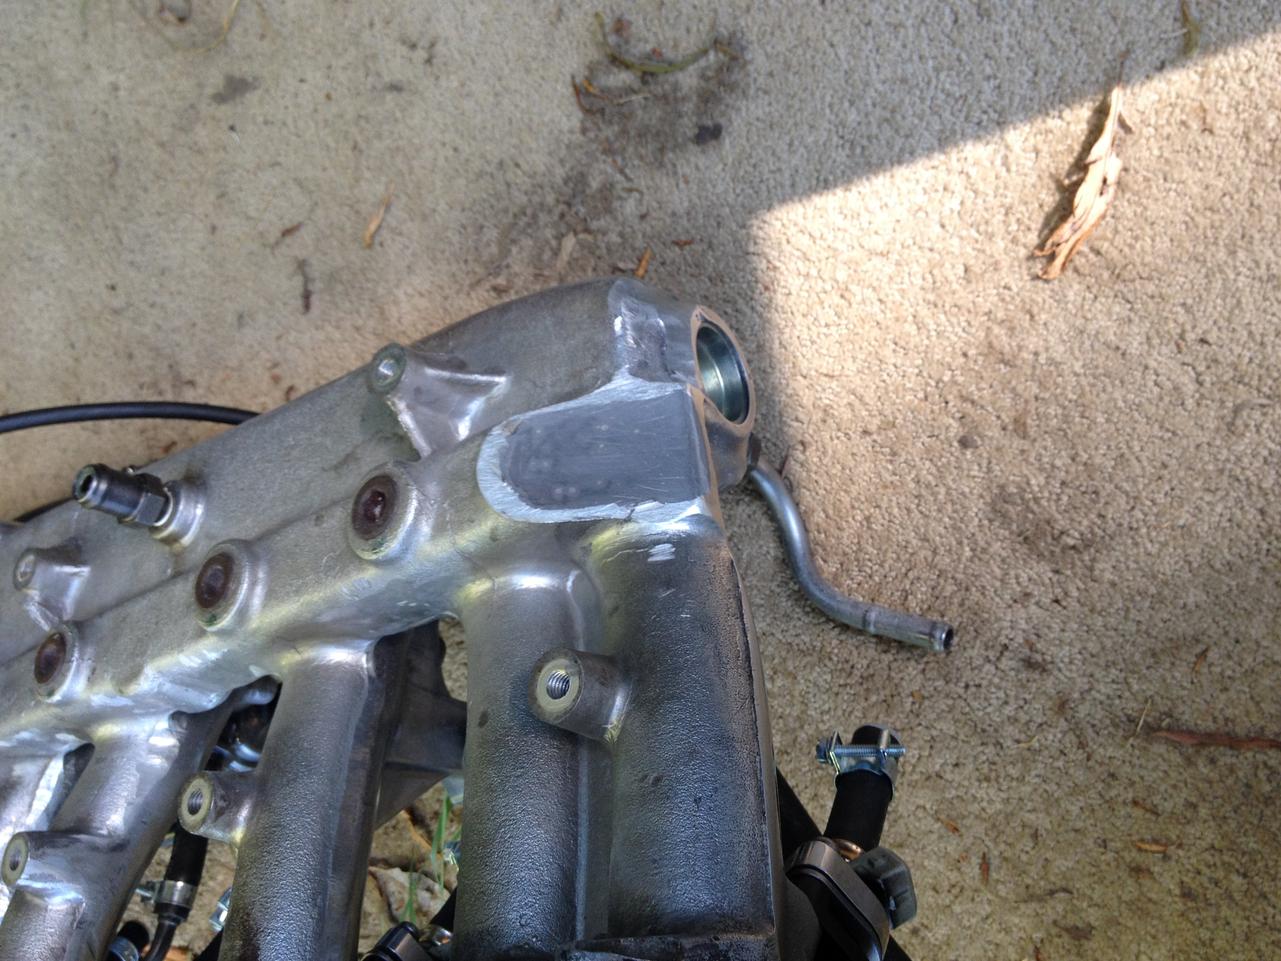
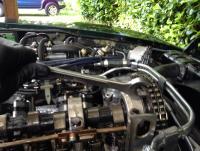
been busy the past couple of days getting things buttoned up. head on: header going on: intake manifold egr plenum filled: the msa header fit perfectly - had to remove the heat shields in front of the break masters to get it in place, think i'll leave them off because i like the cleaner engine bay and i'm hoping the headers will run cooler than the manifold. put on the intake manifold and discovered one of the two center large bolt holes in the head was stripped out - i spent a bunch of time repairing the stud holes and missed that one... fortunately i was able to run a tap in and use a longer bolt which grabbed a bunch of new threads in deeper - got it torqued up fine and she's good to go. hooked up all the linkage, hoses, wires, etc., then filled up the radiator w/coolant and gave the starter a spin... it sounds a little like an old pickup truck because the exhaust consists of a 6-1 header connected to... nuthin i've got an idea to just scab on the muffler right to the header to get me to the exhaust shop without shooting flames through the streets of seattle. funny thing is, it started right up, ran for about a minute, then died on me and wouldn't fire up again. i checked the plugs and they were perfectly clean and dry, got big fat sparks from all of them, put xmas lights on all the injectors and they are definitely firing, but now i can't get it to start for anything. it spins and spins, sort of "trying" to start, but only lights up for a few fires at a time. i pulled all the plugs after trying to start it for quite some time and they were black, sooty, a couple of them wet. spun it over w/out plugs to blow out the cylinders, wiped off the plugs and put 'em back in and got a promising "mini-start" then back to the same thing. i've checked and re-checked the connections going to the sensors at the thermostat housing and tried pulling the connections off the cold-start and aux air valve but no love. any ideas??

-
sorry, forgot to mention the notch/groove - used the dowel to get it in the neighborhood, the notch groove were exactly lined up on the #1 cam hole setup. will check again after initial break-in when i re-set the lash hot.
-
@ S30 - thanks for the pm, i just responded making progress, in between traveling and entertaining house guests... finally got the head installed - chased my tail for a day dealing with timing, but got it sorted eventually. i had wedged the timing chain with a piece of wood, but didn't realize that the chain tensioner was so far down past the inward curve of the chain, so my piece of wood wasn't actually pushing on it and the chain dropped down a little and the bright links lost their orientation with the timing marks. i spent the better part of an afternoon trying to fiddle the chain around because i was stuck on re-orienting the bright links. a few frustrating hours later i took a break, had a bite to eat and a glass of water, put band-aids on my now scuffed up knuckles, and realized that the bright links weren't really necessary anyway... i had read the chapters re: engine assembly/valve timing so many times that i had fixated on those links and finally figured i'd just time the thing like any other engine: set #1 to tdc (head off, piston at top, timing mark on pulley at 0 with pointer) and set camshaft with lobes out, dowel at the mark in the thrust washer at the side of cam tower #1. simple. done. slathered the cam in oil/zinc additive, oiled chain, torqued up the head, valve cover on, back to work on the manifold side. got the header on, intake manifold installed, buttoned up hoses/wires, getting close now. need to hook up fuel on the drivers side of the engine and then focus on the exhaust. going to make up a new 2 1/2" system from the header back, with a resonator in the tunnel and a round muffler at the end. saved my old muffler and grafted on the msa adaptor and will try to jimmy it onto the end of the header just so i can drive to the muffler shop without shooting flames down the street... will post up a couple of pics later.
-
Lots of threads about this to search and learn from, and I'm neither sage nor racer, but here's my .02 from having done similar to my 78 280: For looks/stance - Eibach progressive kit will drop you down enough to get a better look w/out rubbing or a harsh ride - nice street compromise in my opinion. Best bang for buck in performance will be a thicker set of sway bars - do both front &rear together. I did the MSA ones and boy, what a difference. Removed body roll and made the car track so much better. Both the above mods are pretty affordable and other than typical tools, you only need spring compressors and a pickle fork to split the front tie rods. You can do the whole thing on a Saturday in your driveway.