rossiz
-
Posts
1,109 -
Joined
-
Last visited
-
Days Won
30
Content Type
Profiles
Knowledge Base
Zcar Wiki
Forums
Gallery
Events
Downloads
Store
Blogs
Collections
Classifieds
Everything posted by rossiz
-
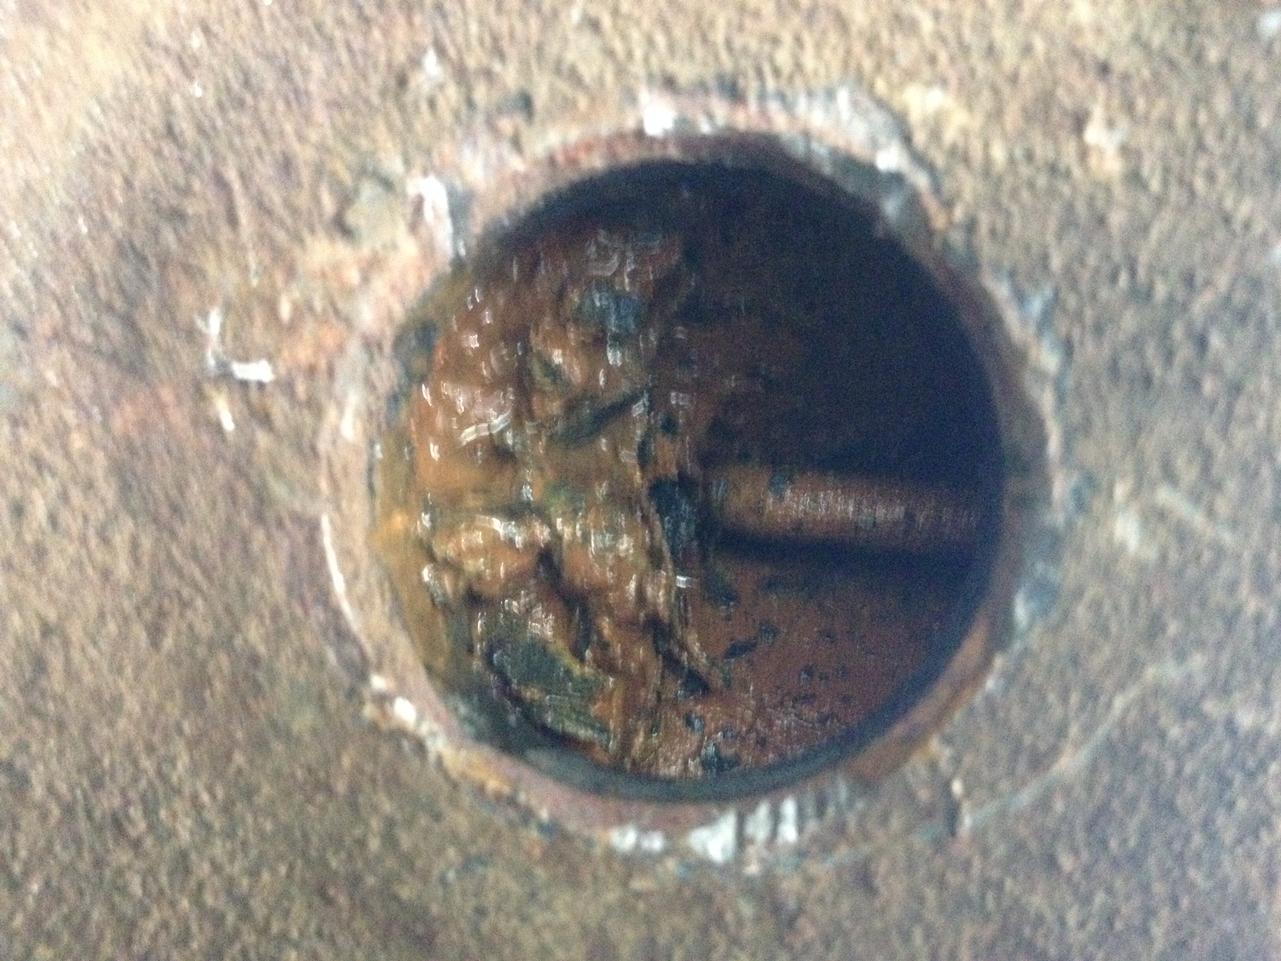
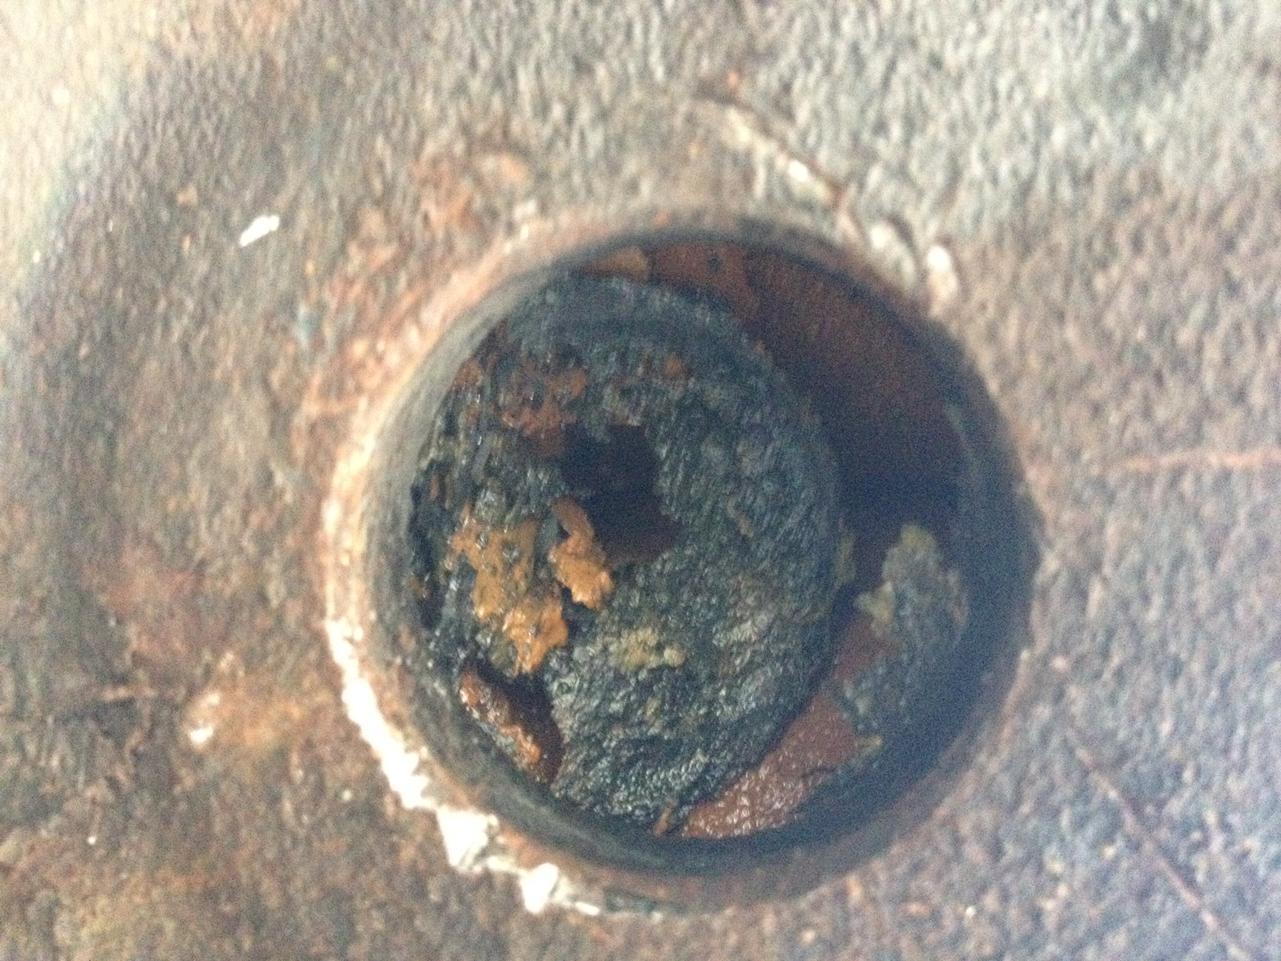
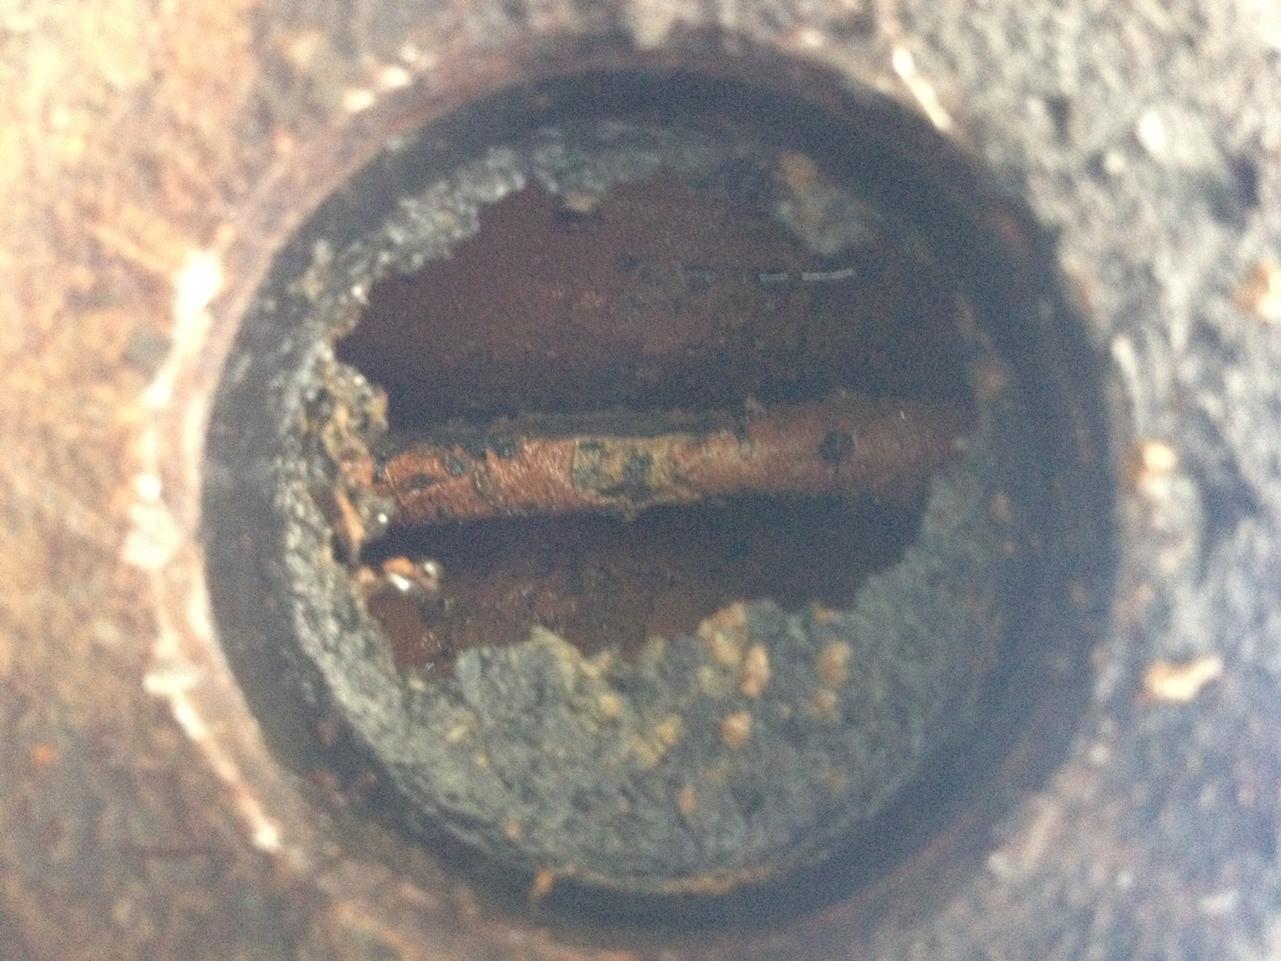
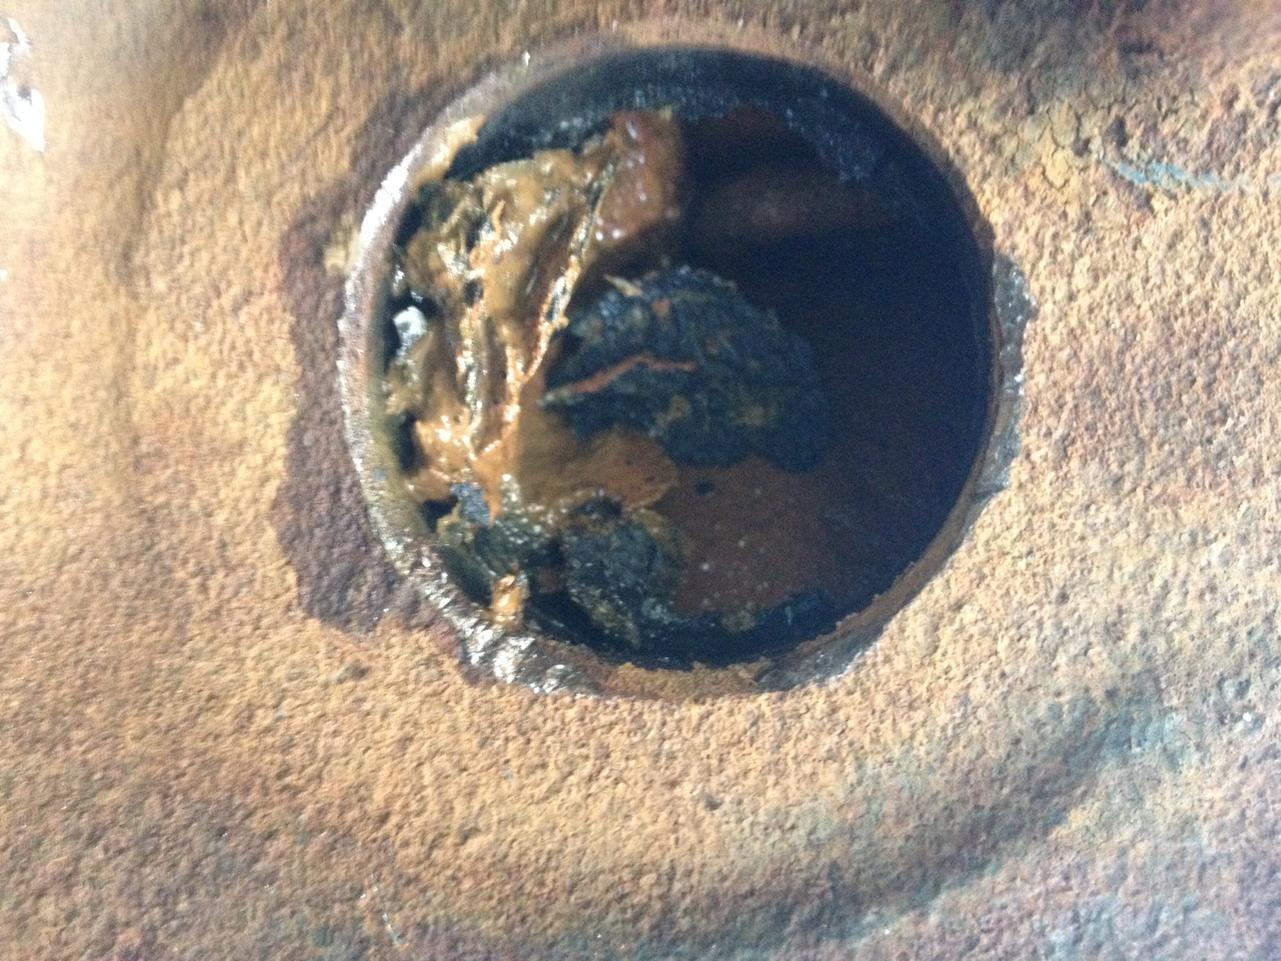
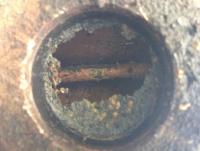
pulled the drain plug in the block and the water just started dribbling out, then it puked out a clump of crap and brown sludge oozed out of the block. yanked the frost plugs and was absolutely stunned at the crud in there. spent a good hour flushing it out, rodding the passages out w/a wire then using the hose, a pressure washer, etc. to blow out heaps and heaps of nastiness until the water finally ran clean. i really don't know how the poor thing didn't melt itself ages ago. some of the stuff that came out looked like mud, then there were big, nickel-sized sheets of rust scale - some bigger that i had to break up before they would come out of the freeze plug holes. i can easily imagine a water jacket getting plugged and having a localized hot spot to warp the head. the pics below are looking into the frost plug holes on the drivers side of the block - they're actually sideways... this one is looking down through the top of the block behind #6 the crap that oozed out when i pulled #6 frost plug


-
ditto on the price - not premium at all in my book. the $$ and time to get a $7K example up to where yours is far exceeds any "premium"... great looking car, awesome deal - love it!!
-
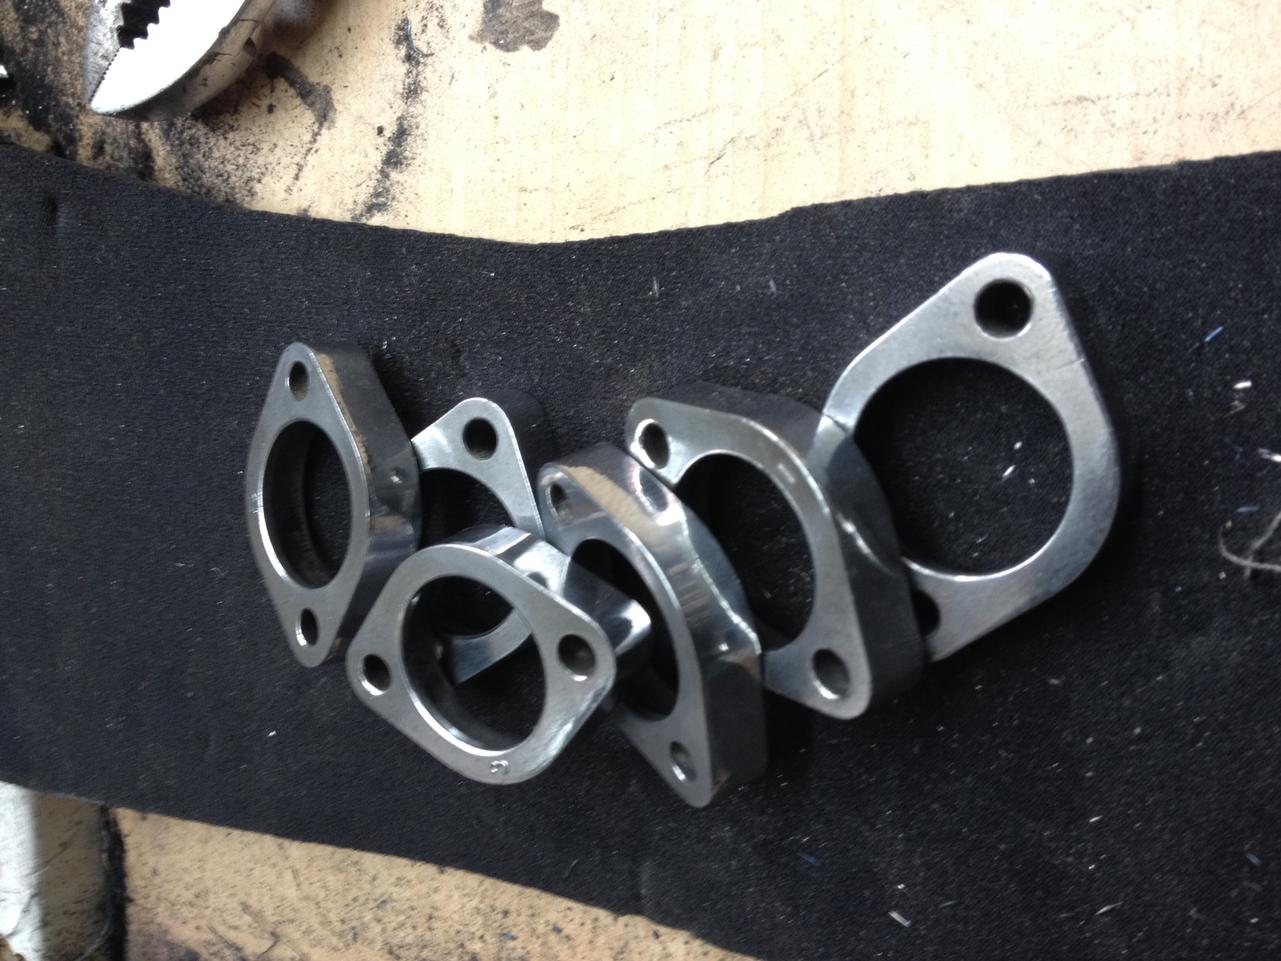
right - head... duh. good idea, i already ordered the stud kit, but i suppose i could just get some SST studs. will i need to drill out the header and intake manifold for clearance? and what about the big washers that share the load between the two - just get some bigass SST washers to fit the new studs?
-
when you say "bigger" do you mean drilling out the block and tapping for a larger bolt and/or stud? i've already replaced all the connectors & clips, will probably do a little clean-up of the harness on the install though.
-
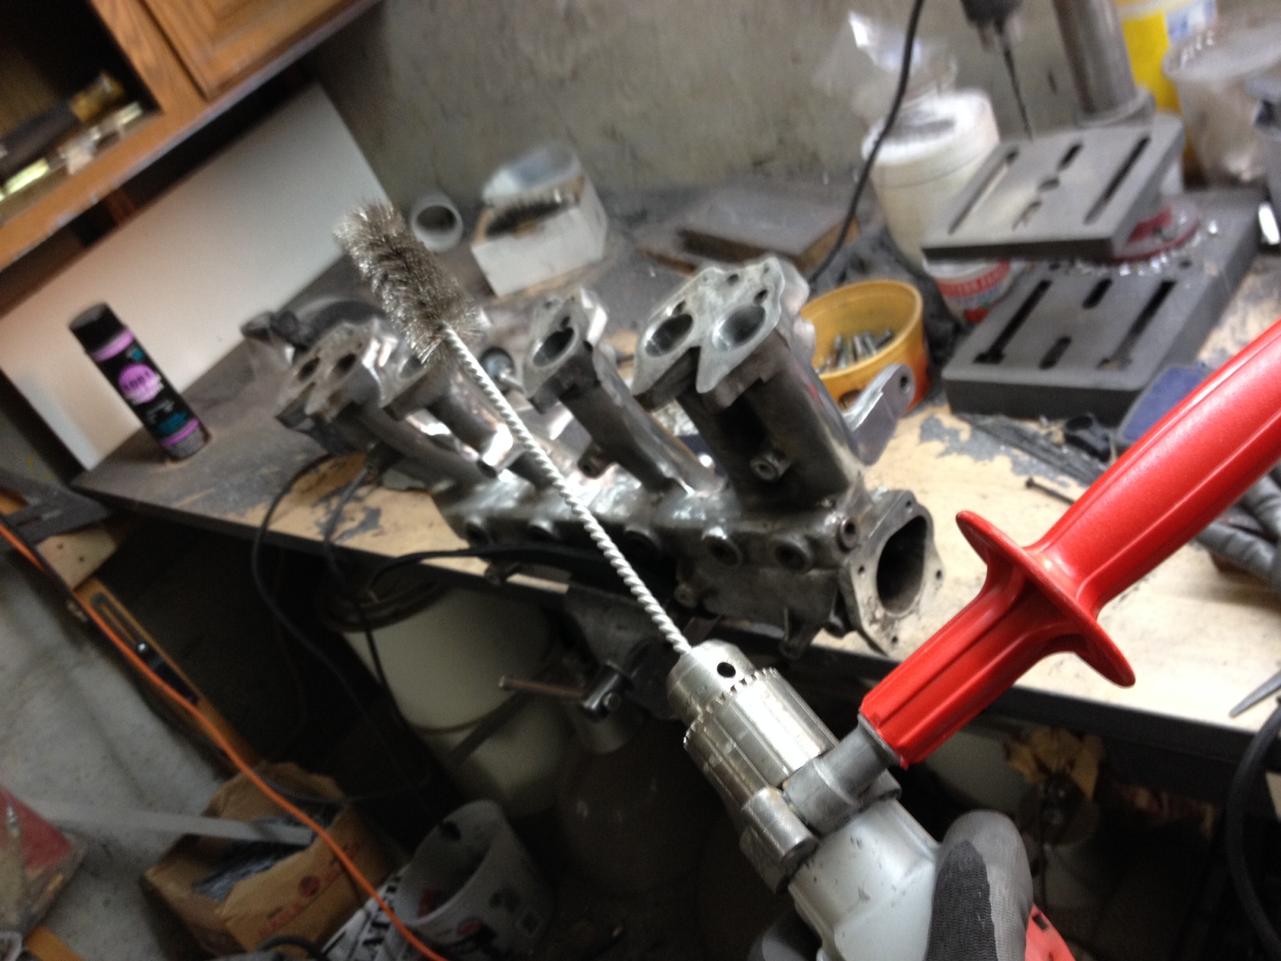
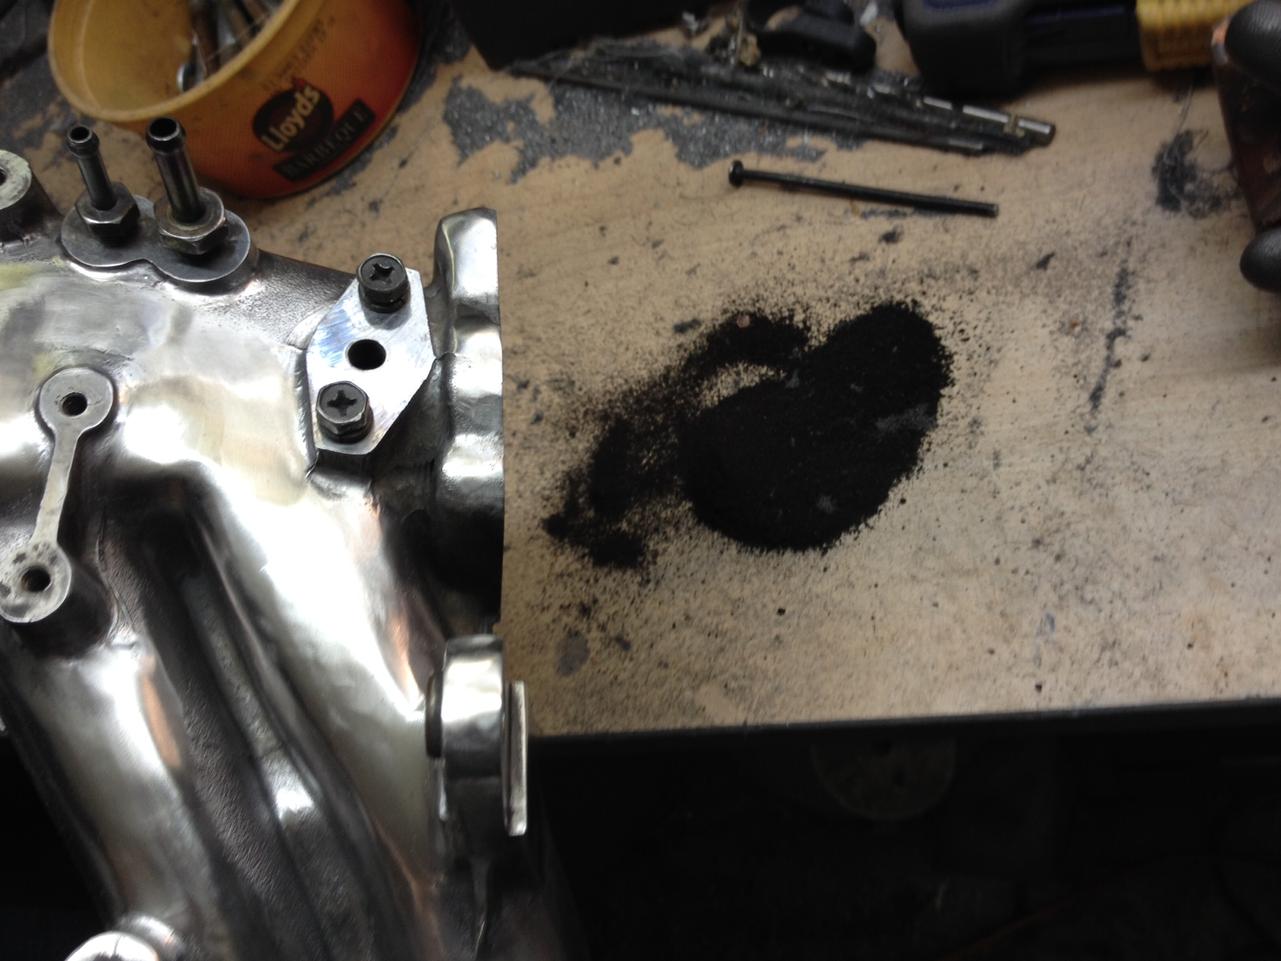
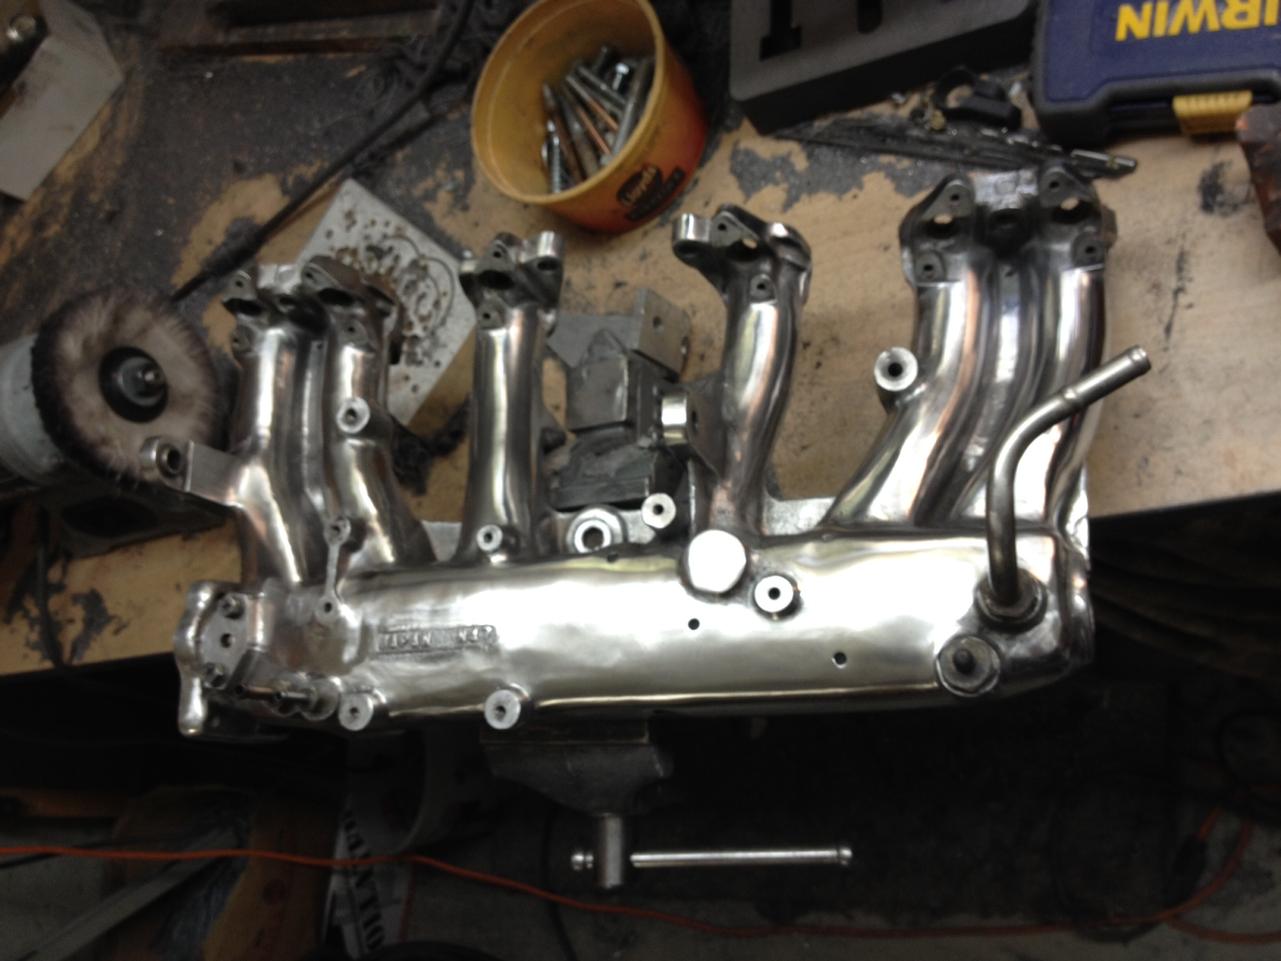
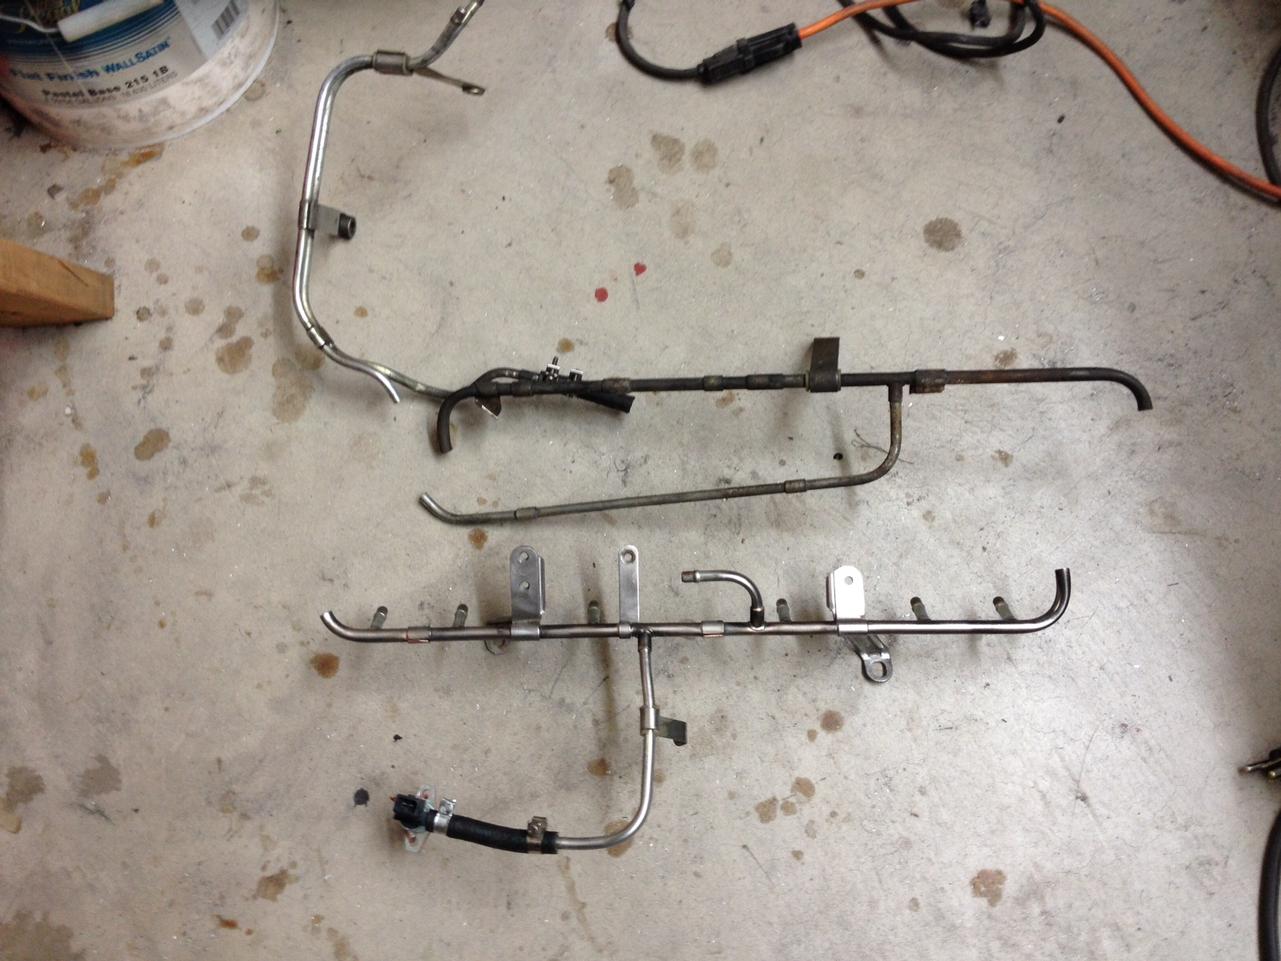
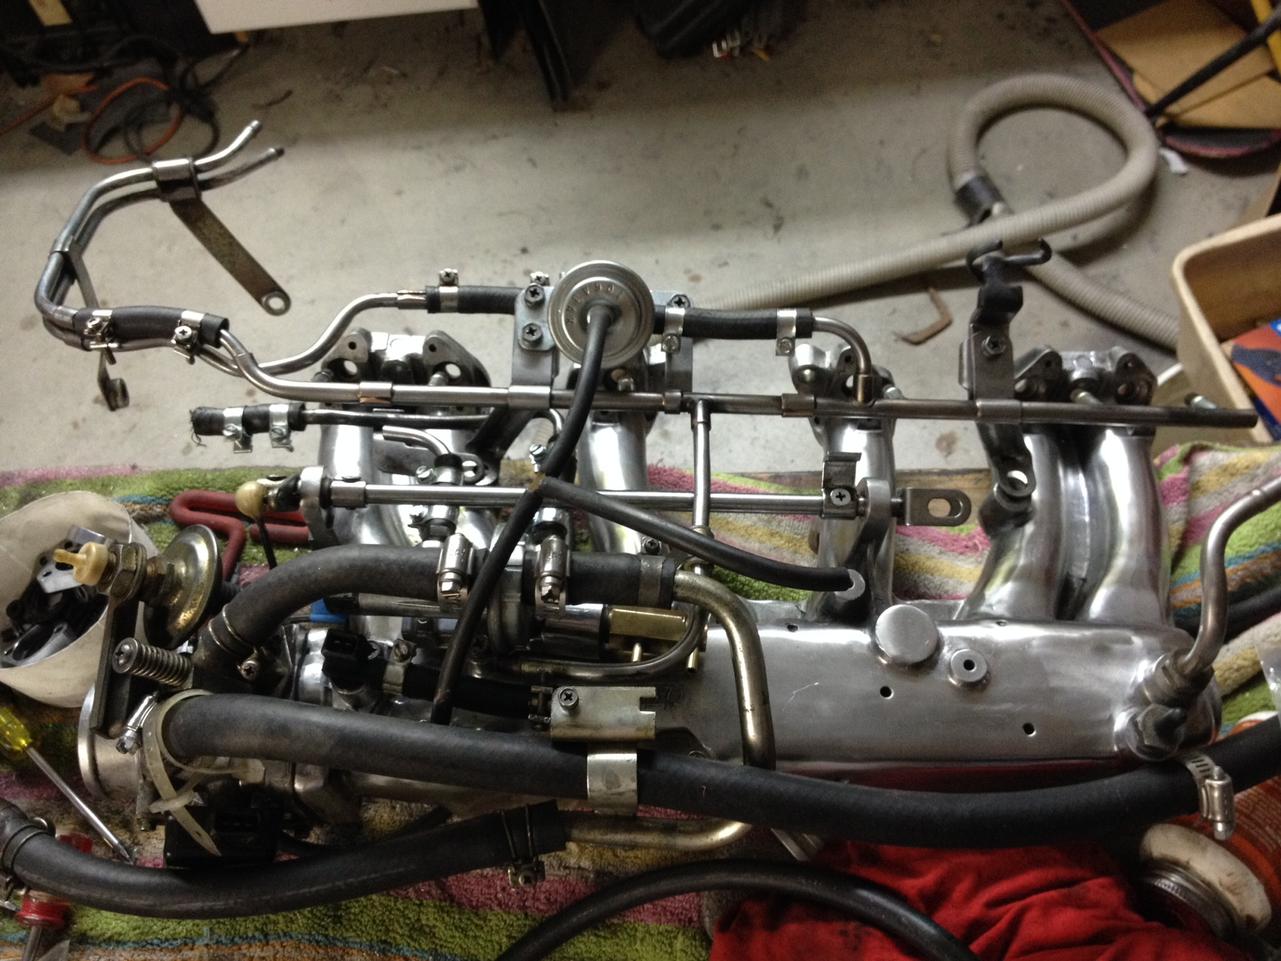
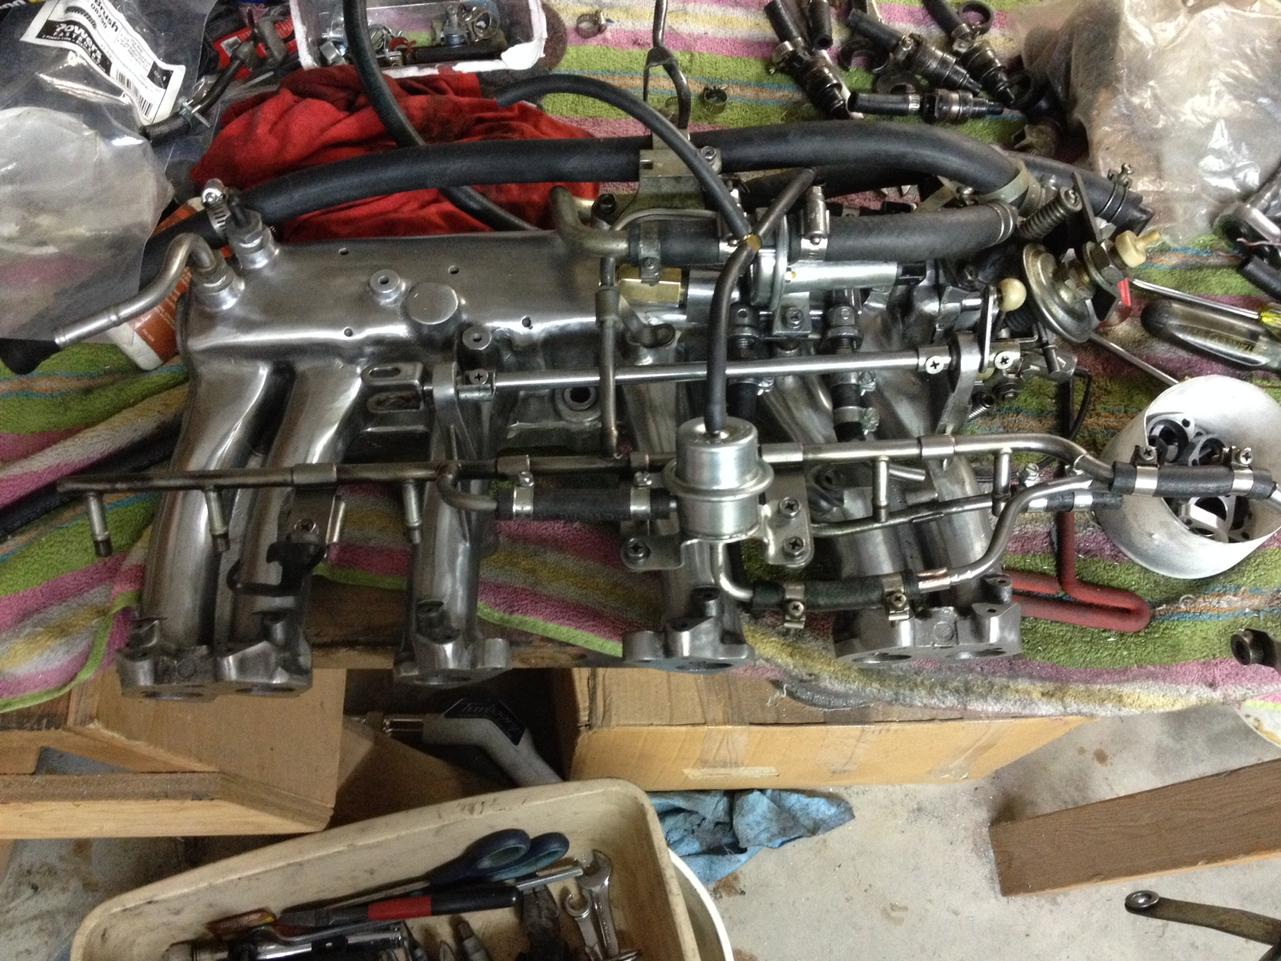
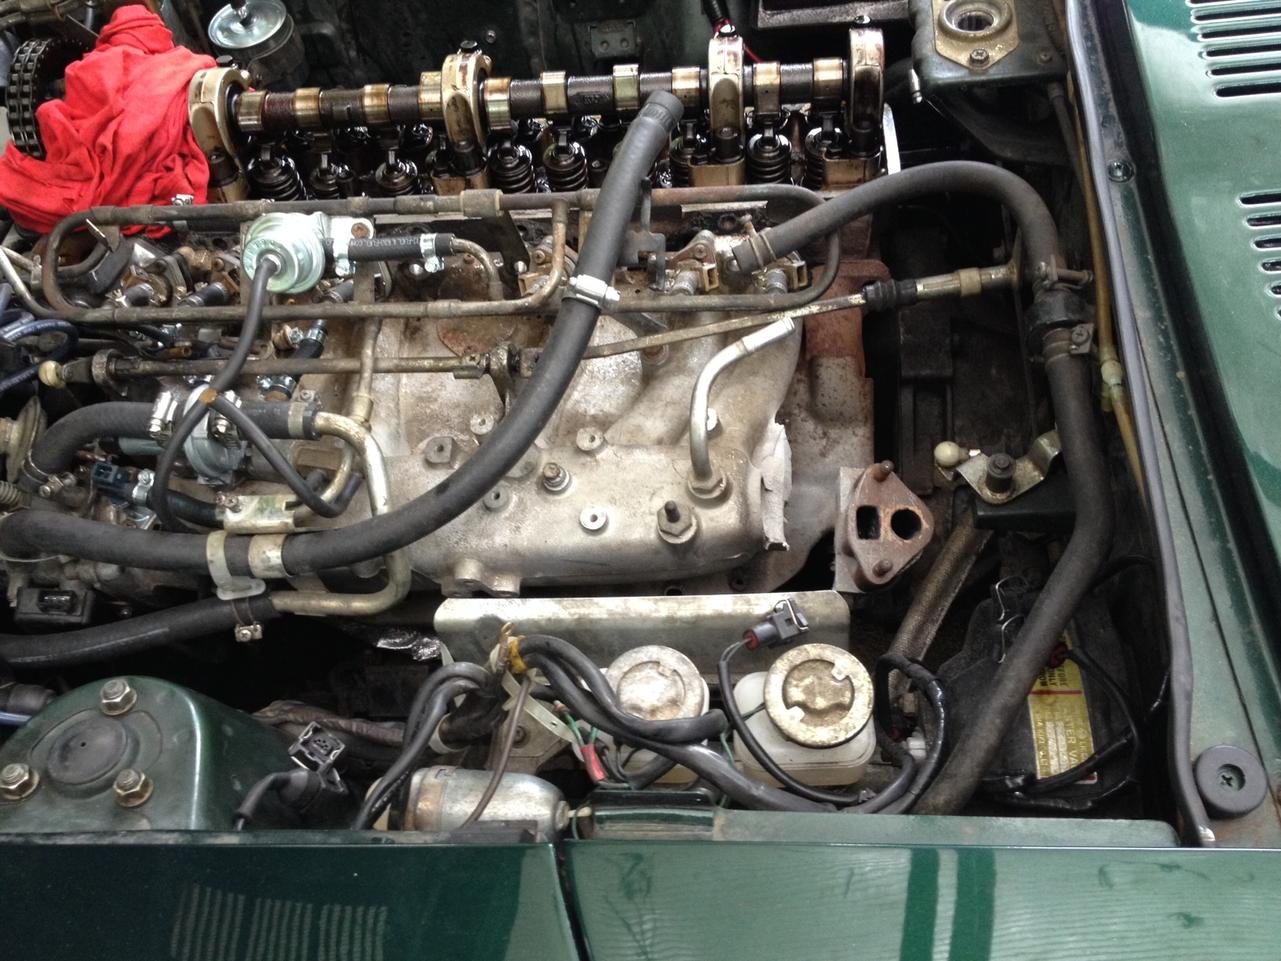
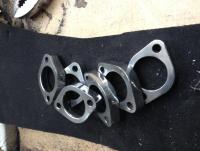
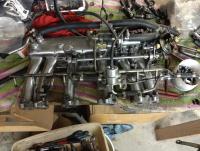
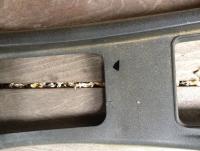
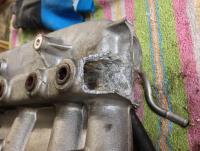
the z is parked while i wait for a replacement head, so i figured it's a good time to tackle the intake. the egr had rotted out, so i hacked off the bad parts and ground it flat to take a blank off plate underneath. then the whole thing went into the vice and i went beast on it with the sawzall, hacksaw, die grinder, scotchbrite, steel wool and buffing wheel. webs gone, vestigial bosses ground off, lookin' good. i've been thinking about a pallnet fuel rail for a while, but i decided to take a page from blue's book and modify the oem. hacked it apart, re-routed the flow and plugged the end - really cleaned it up. it's not super fancy, but i like it better than the trumpet... ordered a new set of injectors and seals, which should come in next week. cleaned up the injector clamps and spent some time making things look a little nicer. nasty, rotted egr before blank-off sst wire brush on the drill to clean the runners out this is the crap that poured out after the brushing gettin' a shine on! injector clamps before cleaning fresh! fuel rail cut up re-configured as a straight rail


-
dan - as with any old car (or bike) you just need to keep replacing parts until it is new! all kidding aside, as you drive the car more and more you will flush out issues and fix/replace parts and at some point it will be dead reliable (until the new parts become old). as for what to bring with you, my personal experience has me set up a few separate pouches with parts/materials and tools to address potential issues by system. so i have a pouch of goodies for electrical (wire, stripper/crimper, connectors, tape, test light, etc), one for fuel (fuel hose, clamps, vacuum hose & plug nipples, silicone tape, etc), one for mechanical (tire plugger, jb weld, gorilla tape, zip ties, etc.), some bits for exhaust (safety wire, jb weld), and a tool selection to cover the above. sounds like a lot, but it all fits easily in the two storage compartments behind the seats, including a spare quart of oil and a foam garden kneeler pad (really nice when on the side of the road in dress slacks). i have had to use these on several occasions and it is quite comforting to know they are there. there's a thread about custom embroidered tool rolls that i posted on, with pics of my emergency kits - might be a good starting point for you. re: the steering play, check the rotating connector bushing (i don't know what it's called) that acts as a little universal joint between the steering column output just outside the firewall and the steering rack shaft for play, also check the rack bushings - rubber insulators in the clamps that hold your rack to the cross member. you can look into the engine bay and watch the rack tie rods move back and forth as you wiggle the steering wheel through the open window - if your rack moves around (mine did) replace the bushings (cheap) and it will make a big difference. if not these easy rubber pieces, it could be any of the connections in your steering (ball joints, tie rod ends, steering rack, or a combination of all the above) but the rubber bits are the first place to look. oh, and isn't it great to drive such a conversation piece? i can't recall how many people have stopped to chat in parking lots, at stop lights, etc. and they almost always start with "...i dated a guy/girl who had one..." or "...i had one..." or "...i always wanted one..." and almost always end with "...i loved that car!!"
-
you're a very, very bad man...
-
oops! but i do have to say it's nice being able to fit more than a pocket pack of kleenex or a cd (laying flat) in the back area of my hatch... i actually use my z for getting groceries (when it runs) and the increase in cargo space w/the lower floor, while only a couple of inches, makes a big difference. i guess i'm a "real" forum member now, as it seems i've officially influenced another member w/some wildass idea! up until now, it's been all you characters feeding me money-sucking temptations
-
another option - get a tire plugger kit and a spark plug air pump, both of which are small and inexpensive. fix-a-flat can make a real mess of your tire & rim, and isn't permanent. i am of the old-school camp that doesn't mind having a tire plugged (yes, it does have a balance offset effect, but it stays put so you can re-balance if needed). tires are expensive, punctures are (in my experience) mostly nails/screws and easily plugged. the spark plug pump is quicker than the cigarette lighter variety, smaller/lighter, and has and doesn't run out like compressed air cartridges. i can usually plug a tire, re-inflate and get back on the road as quicker than jacking up the car (dangerous on the side of the road) and yanking lugs and swapping tires, and once fixed, you're done - no need to do it again to replace the spare w/a new tire. just my .02 (and i also carry a AAA card, just in case)
-
hey folks, sorry for the delay in getting shipping costs sorted out - i've been swamped with kids graduating and family in town (not to mention replacing the head, intake and exhaust on my z...) i will get on it so these parts can start finding new homes.
-
beautiful car - sure to be lots of fun! as i'm sure you're well aware, some of the key things with a car that has been sitting are: - rubber parts dry out (radiator/heater hoses, belts, tires, fuel lines, vacuum hoses, diaphrams in vacuum advance) and should be replaced, doing these all at once makes sense before you get leaks - gas, sitting, turns to varnish and gums up the entire fuel system - a good cleanup and some seafoam are in order - gas tank may have rust/sludge - drain from the bottom plug, then install a cheap fram clear plastic filter right after the tank and keep an eye on it, changing when it fills w/mud - electrical connections (especially plugs & grounds) corrode - pull 'em all apart, clean w/deoxit and 400 paper, re-connect and cover w/dielectric grease - cooling system, if not filled w/antifreeze (which is a rust inhibitor) can rust - a good flushing and new coolant is in order a side benefit to doing these whole-car/whole system clean & refresh exercises is that you will really get to know your car well, learn the various systems and how they interact, and possibly find a few issues before they present themselves on the road oh, and pb blaster is your friend!
-

Rear shock tower bolts/nuts have a dabb of white paint
rossiz replied to Healeyalt's topic in Suspension & Steering
i went w/the staag struts - much less $$ and seem to be fine for my dd my previous struts were toast so i don't have a baseline to compare to the kyb, but i'm happy with them. Stagg 4 Shocks Nissan Datsun 260z 280z 1975 1978 | eBay there is a thread on the forum with some discussion of these and you can see my thread about suspension upgrade - some drama over the springs (my foolishness) but the struts were easy-peasy. -
Rear shock tower bolts/nuts have a dabb of white paint
rossiz replied to Healeyalt's topic in Suspension & Steering
i had a clunkety-rumble coming from somewhere in the rear suspension prior to swapping out my struts/springs/swaybars. it was most noticeable in the parking garage (quiet, lots of concrete walls to reflect sound, suspension moving around a lost) and now it's gone. my struts were completely toast - you could push them down by hand and they wouldn't even come back... -
i ordered a remanufactured n42 from datsun parts llc (Category 1, Category 2 items in Datsun Parts LLC store on eBay!) which comes with the following: - Complete disassemble, Inspection and Pressure test - Re-Surface all 3 sides, Intake Gasket Side, Head Gasket Side and Valve Cover Gasket Side - 3 Angle Valve Job - Reconditioned Rocker Arms - Cleaned, and Installed OEM stock Springs, Retainers and Lash Pads - Full Set of new Valve Seals - Stock Polished Camshaft. - All threads cleaned and repaired as needed - Full Reassembly and Valve adjustment - 30 day warranty that plus the new head gasket and a new set of head bolts (one of mine snapped during removal - not reusing any of 'em) has me back enough that i'm gonna have to wait on the cam for now... should arrive next week along with my new header (exchanged for the n42) and i'm looking forward to a project next weekend putting humpty back together again...
-
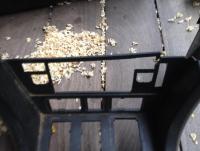
ah yes, sawdust... can't seem to keep the shop clean - funny thing is whenever i'm in it, i seem to have a project to do that takes precedent. happy to give this stuff away to the folks on this forum who have been so helpful and patient with all my questions and emergencies.
-
i'm guessing it's your efi relay or a bad ground or corroded connection
-
-
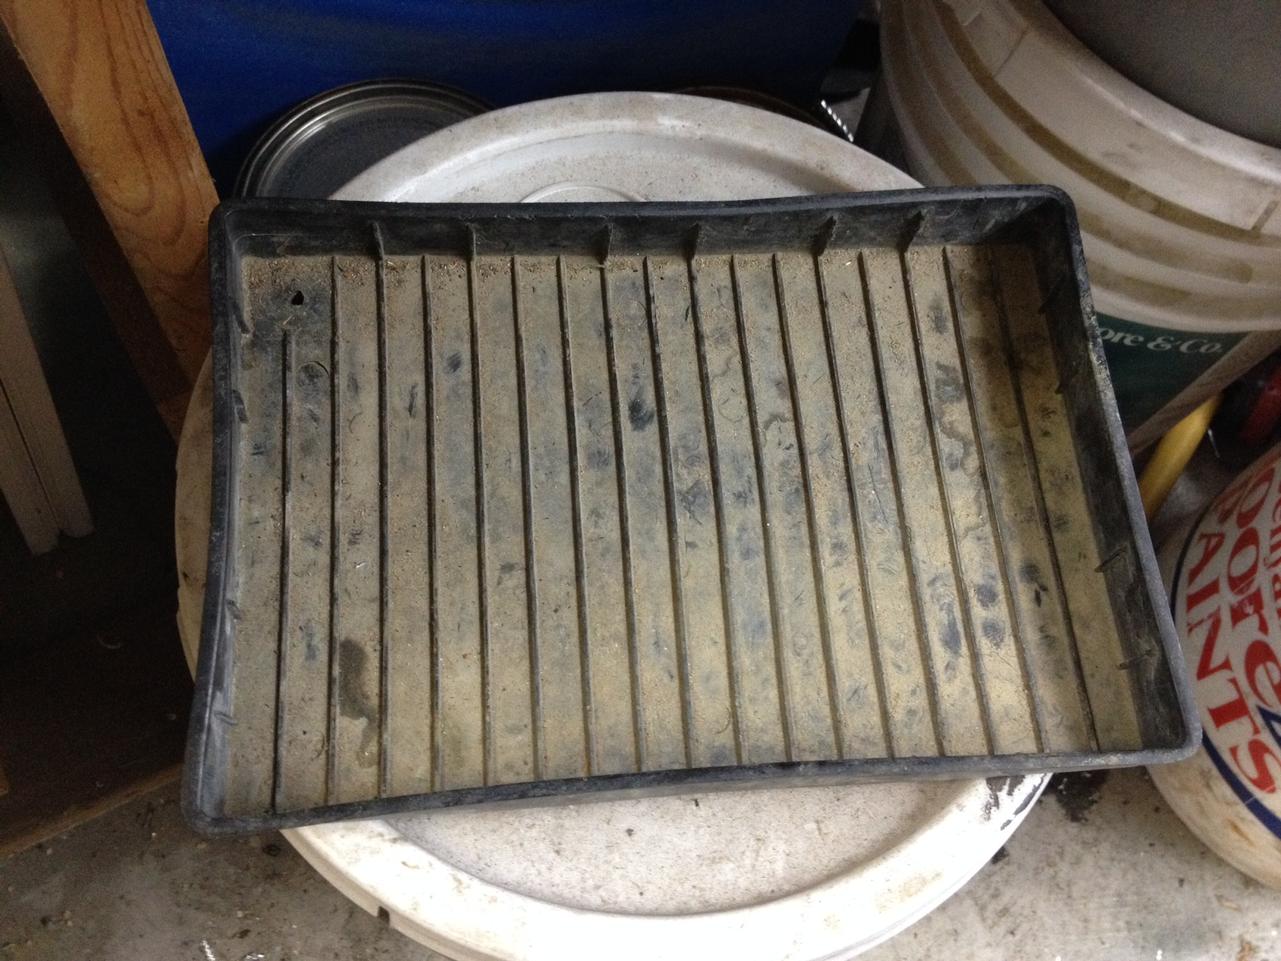
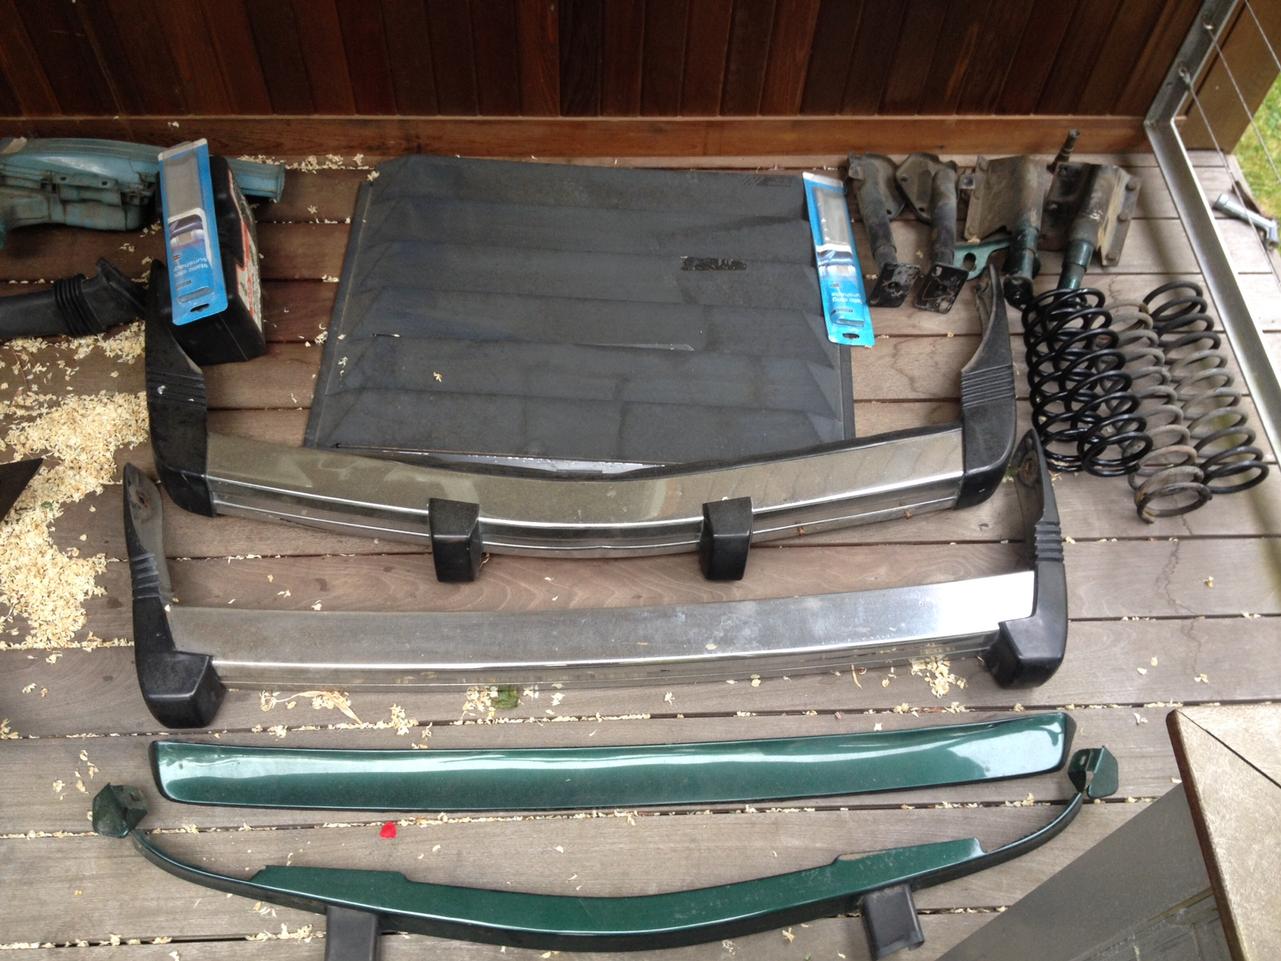
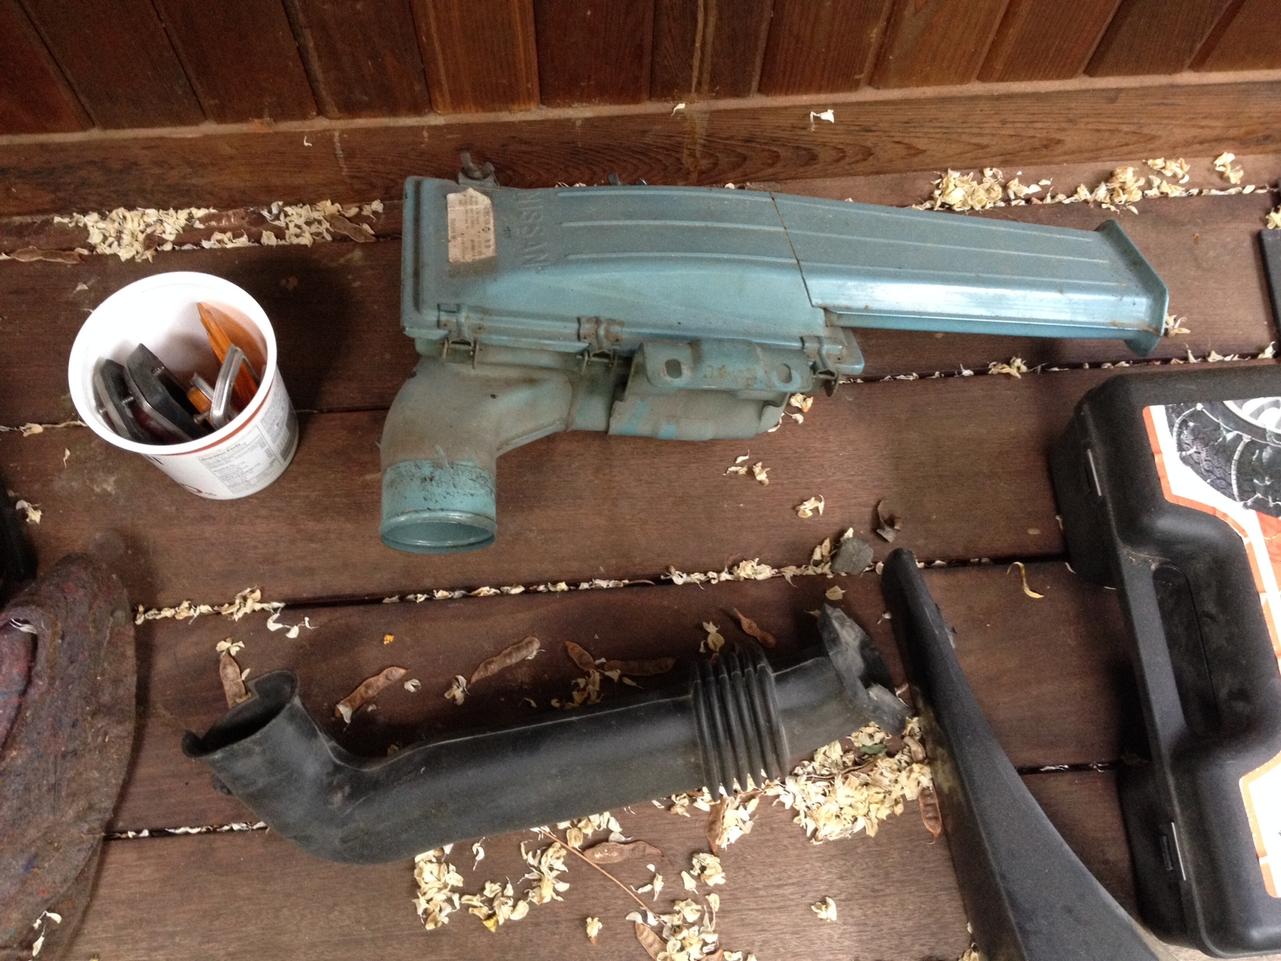
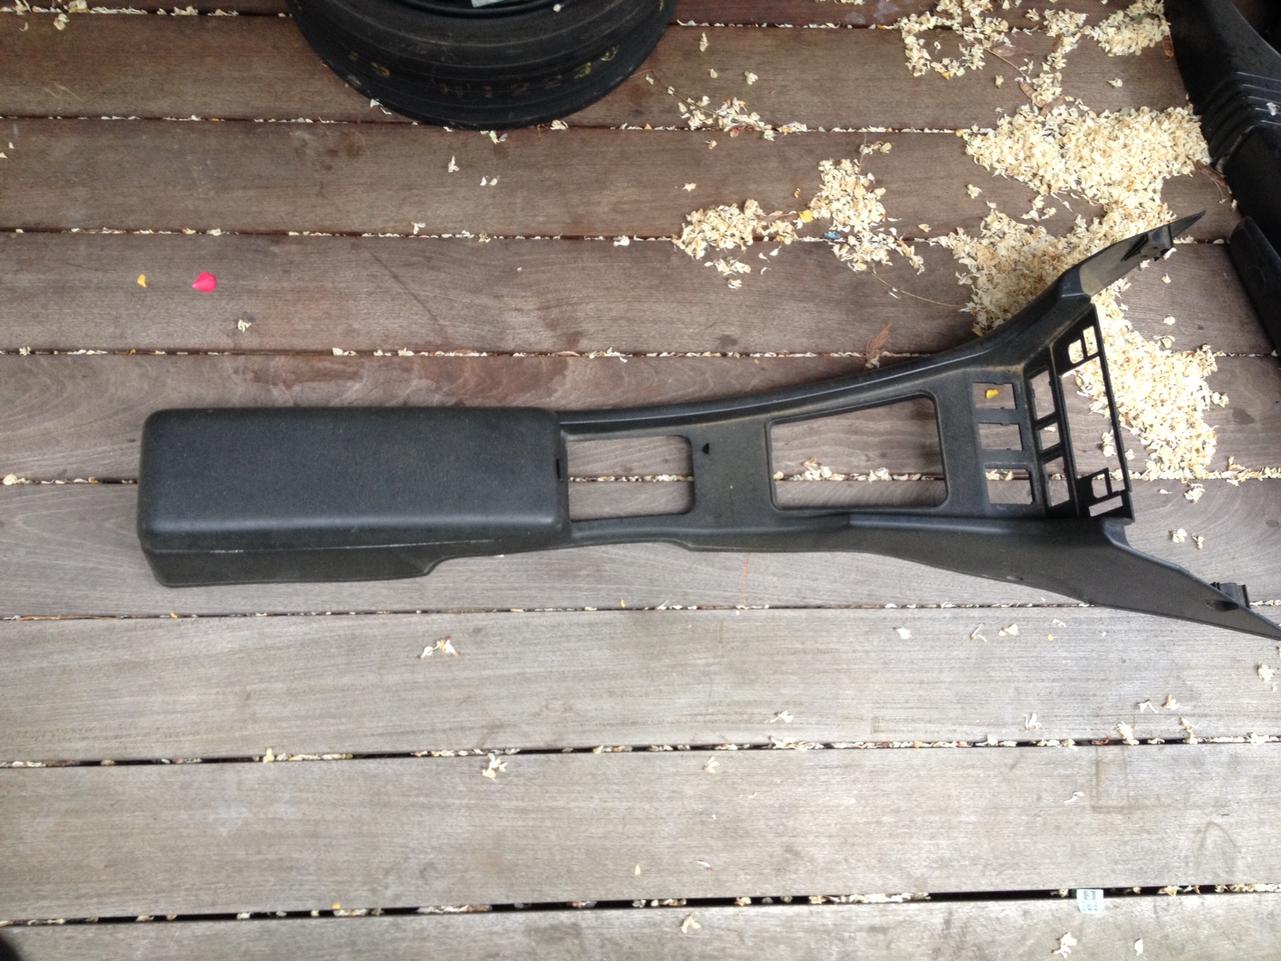
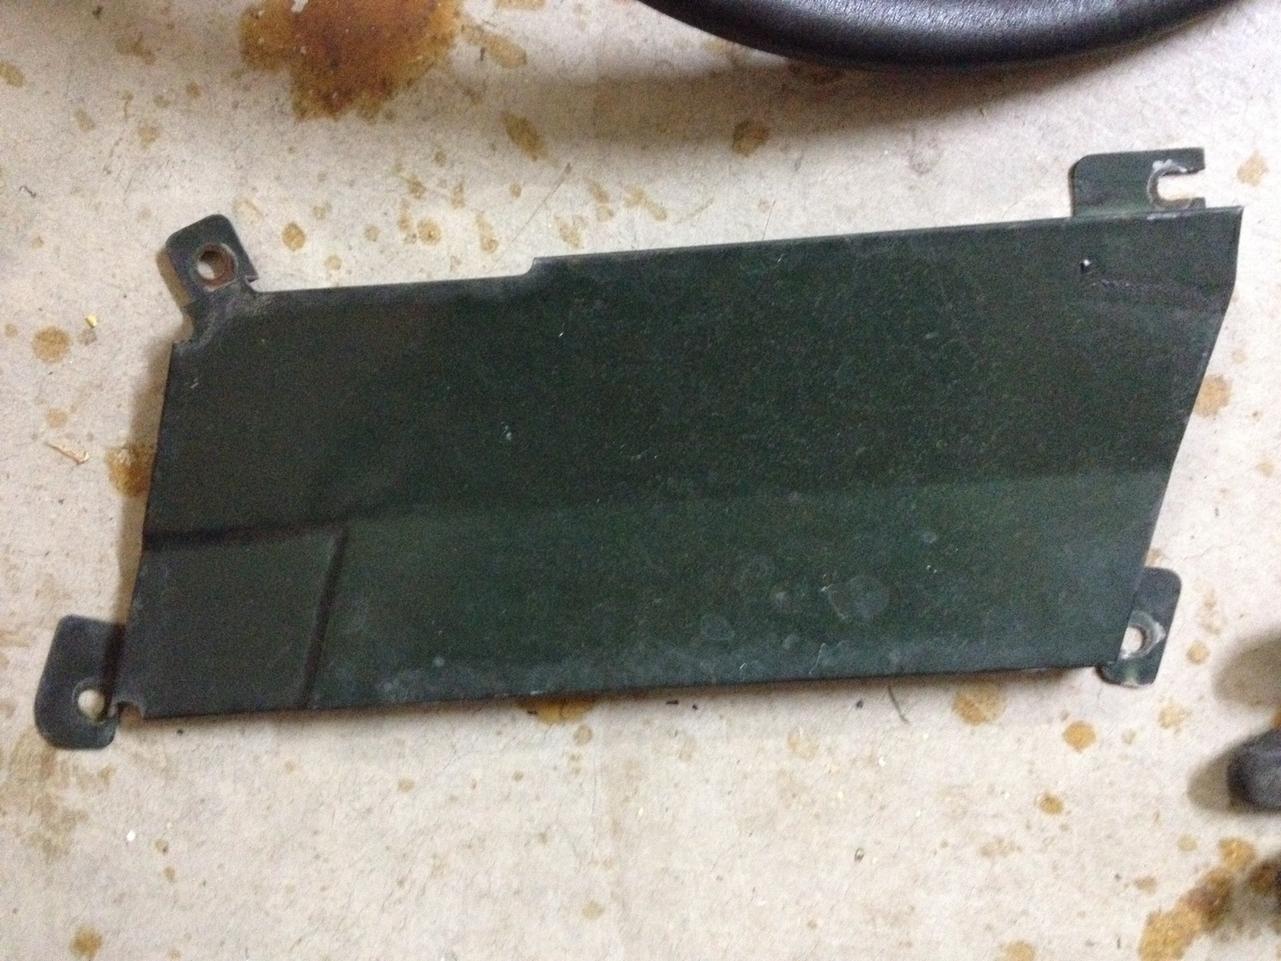
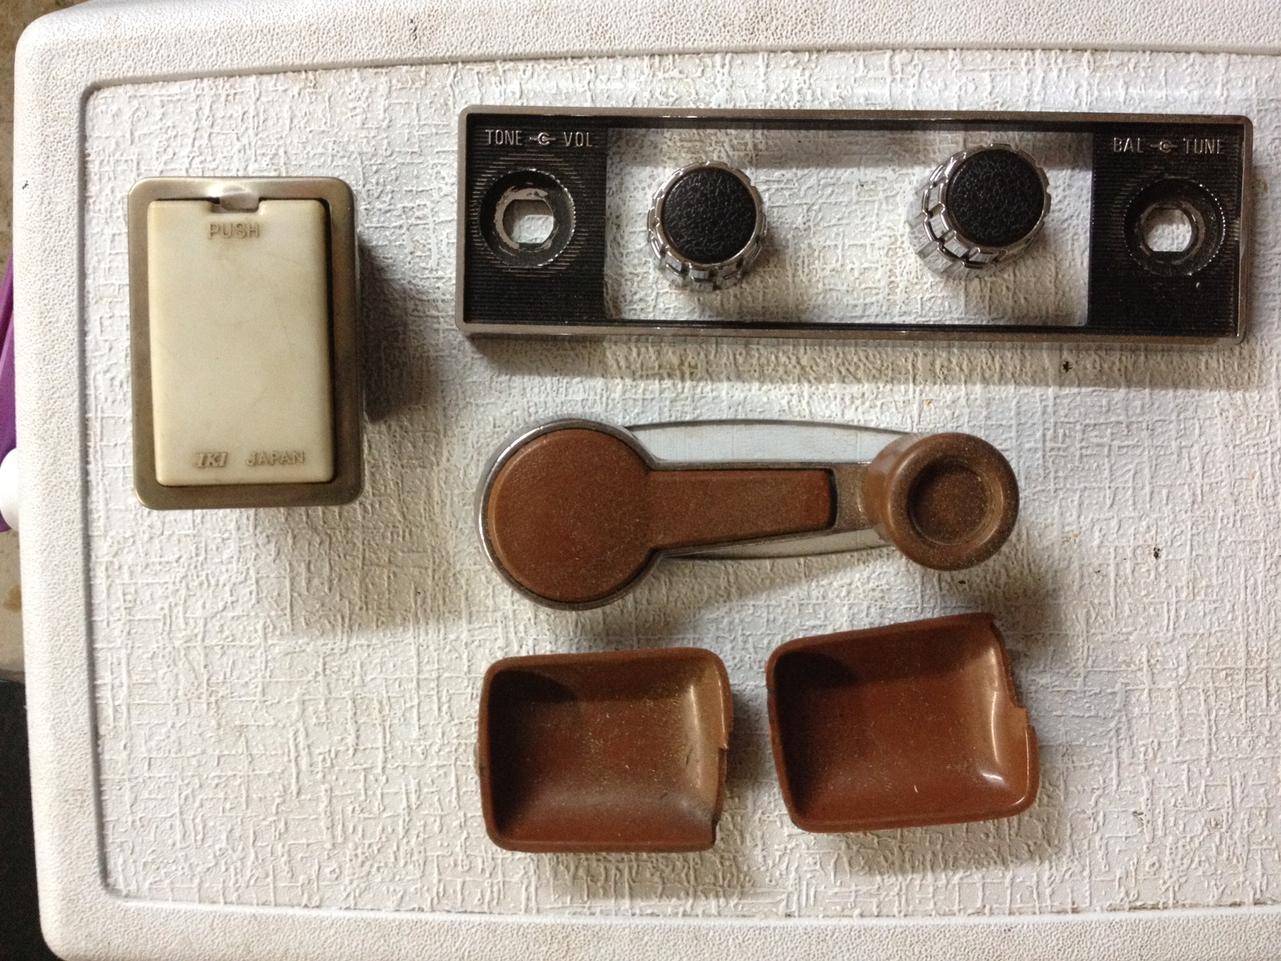
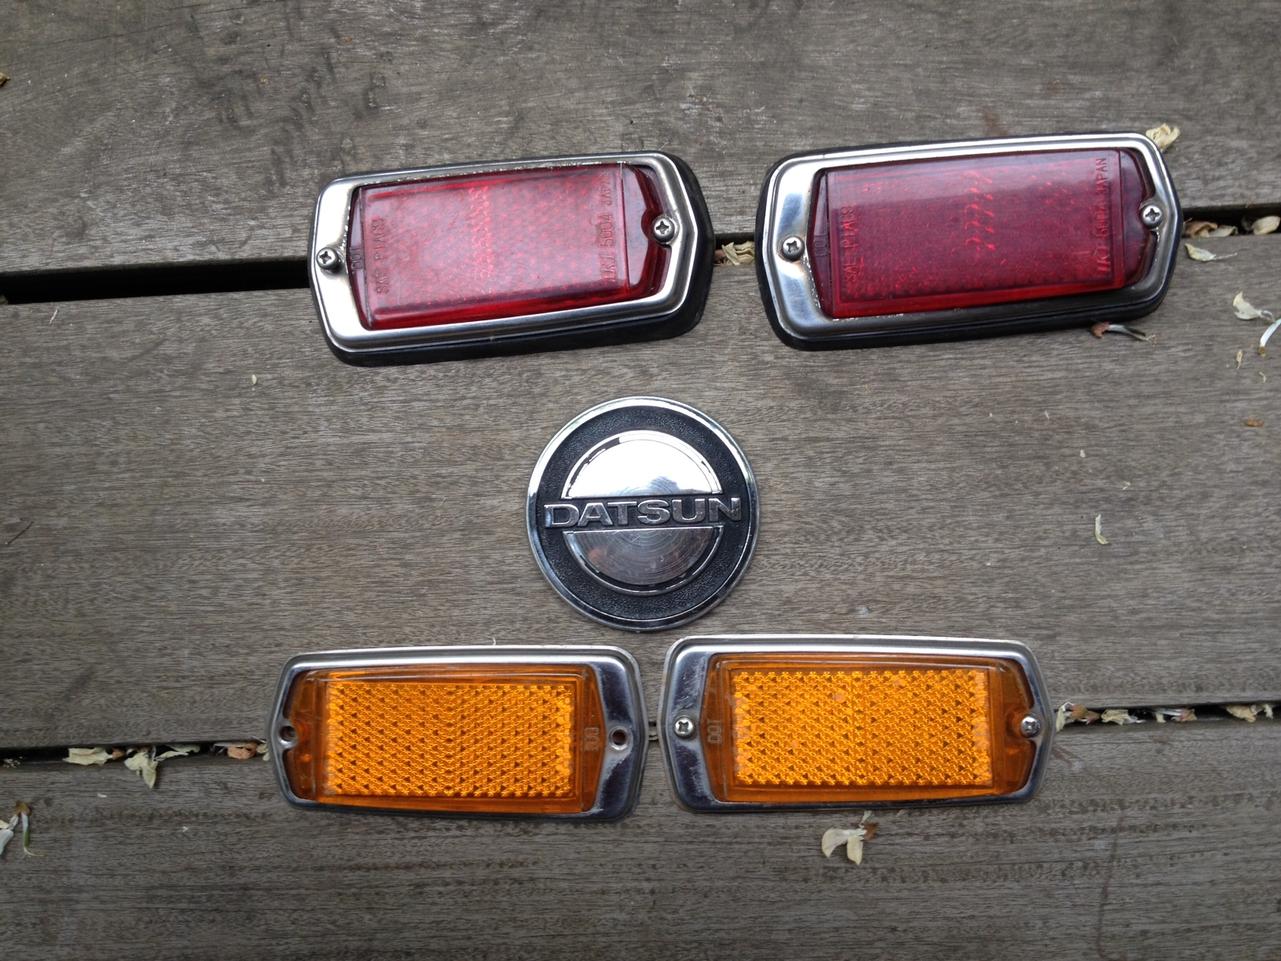
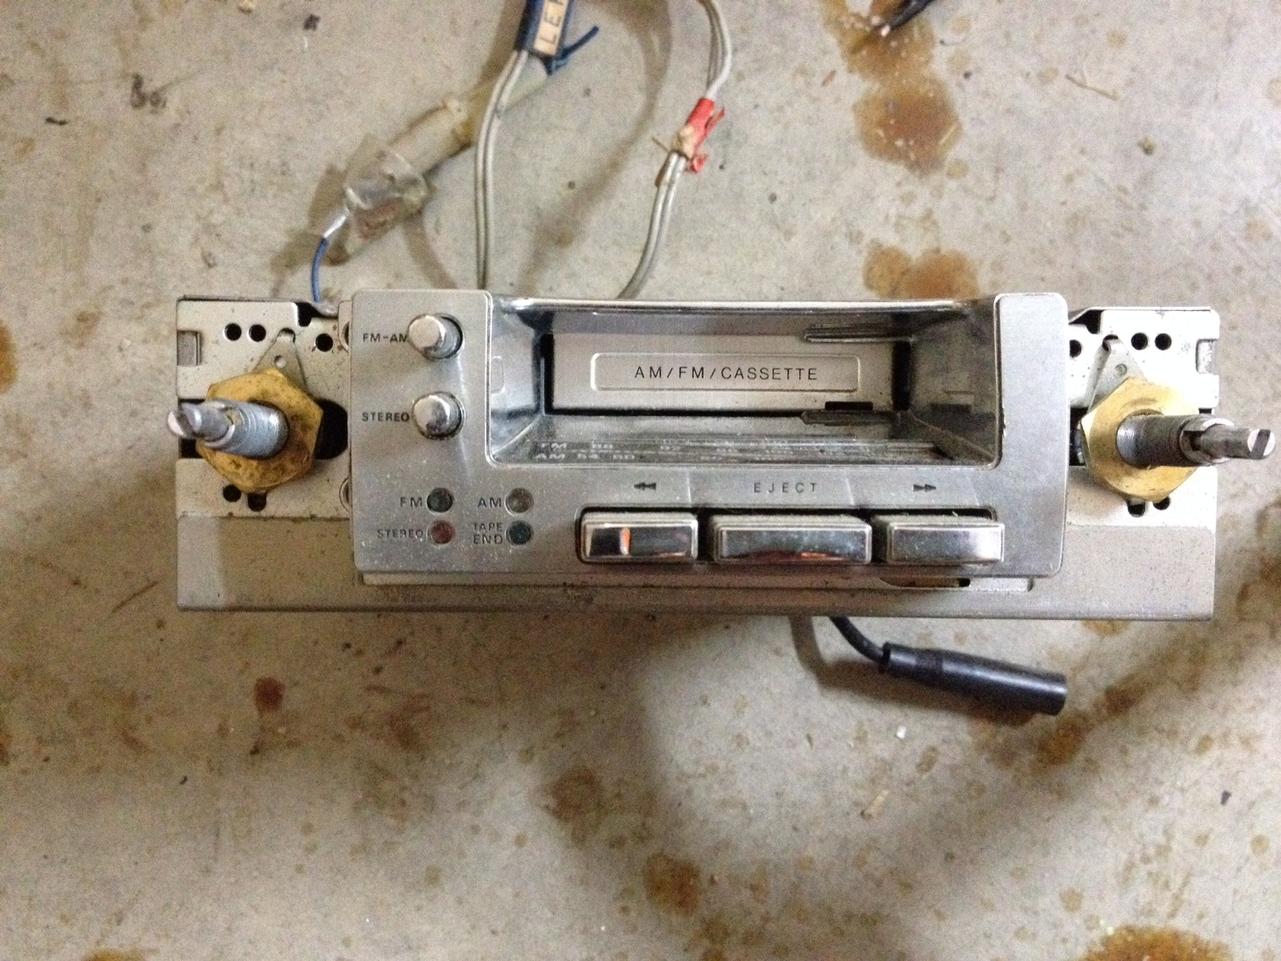
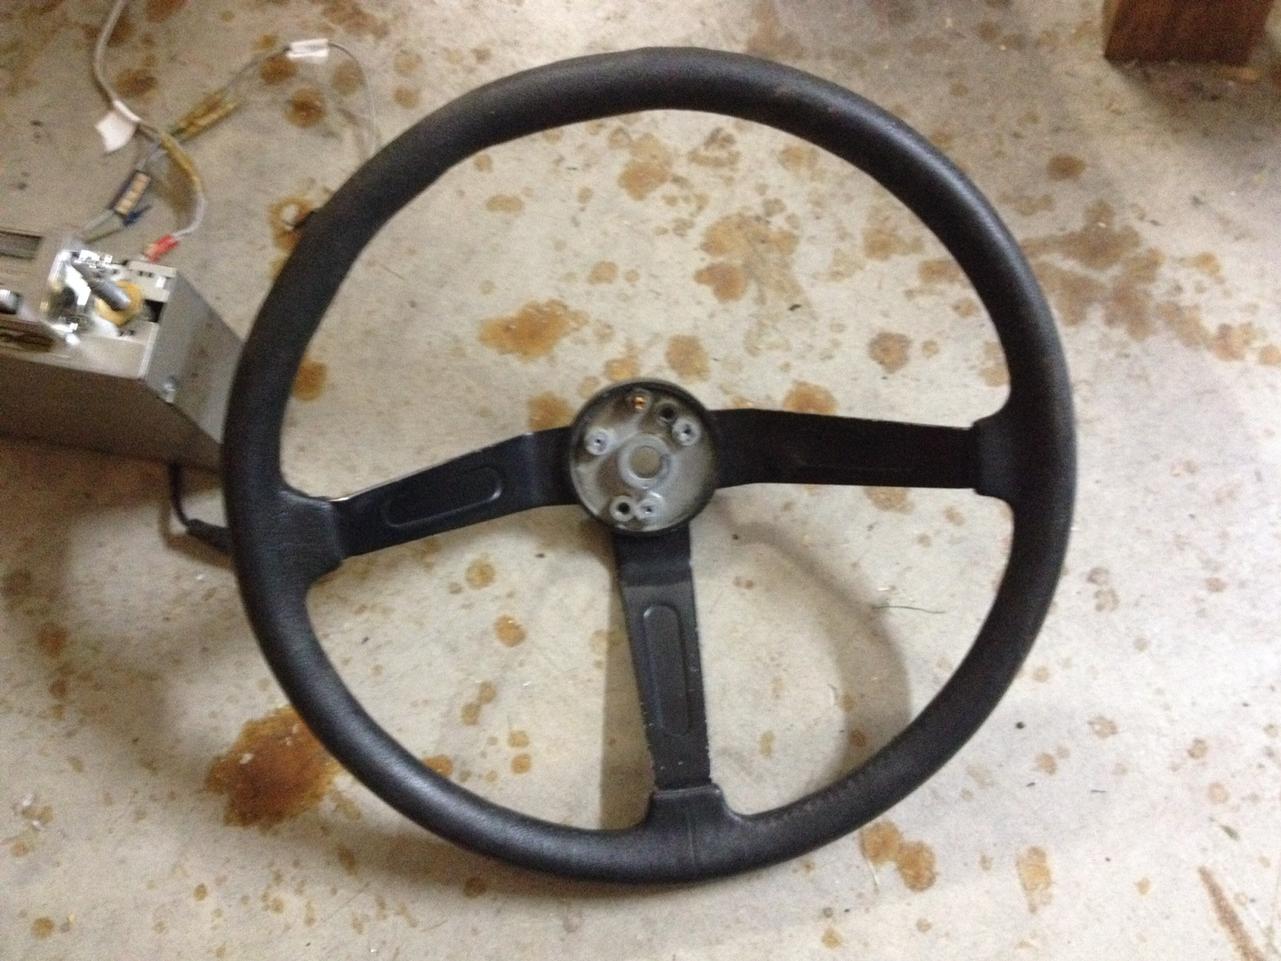
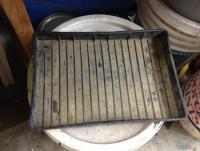
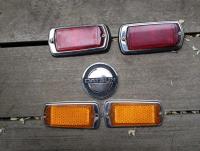
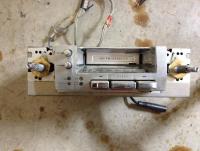
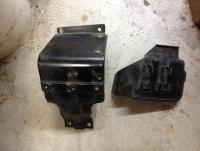
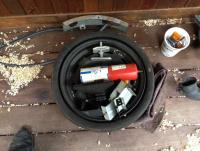
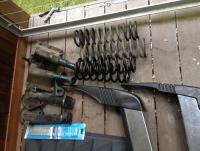
bunch of random stuff from my 78 280 - all are being offered for the whopping price of $0.00 to my forum buddies who have been so helpful in my (many) times of need... Battery Tray Bumpers & Body Panels, Bumper Shocks, OEM springs (the painted ones are shortened by 2 coils) aluminum hatch louvers, and the discerning eye will see a set of tire chains to fit the z - Never Used!! don't ask... it's beyond me, but they were in the back when i brought the car home... also some "cling-on" window shades cold air intake & snorkel center console - some damage, see below hood louver rain pan radio face plate + beautiful knobs (really, they are nice), a window crank, 2 door latch inserts, a courtesy dome light side markers with trim and hood emblem (missing the posts, was stuck on w/double-sided tape) radio/tape deck engine bay relay covers spare tire & pressure canister - neither have been used, on top of it are all the back deck spacers steering wheel with squishy, squirmy perimeter


-
i bet i know what it is - my car was doing the same thing after i updated the suspension... the top of the spring perch has a big rubber isolator that has a sealing lip against the perch which keeps the thrust bearing protected from dust & debris - i cleaned that off really well and wire-wheeled and painted the spring perch, and the isolator sealing lip was squeaking as the perch twisted with the steering. had to pull it all apart and apply a liberal smear of lithium grease to the top of the perch and the rubber isolator sealing lip and presto! no more squeaky toy ;}
-
i kinda did it the other way around - set the wheels parallel and when they were aligned i simply moved both left and right adjuster nuts equal turns to move the steering wheel. just a note: it may look dead on, but i needed to do several test drives and re-tweaks to get the steering wheel dead on center. there's friction between the tires and the ground and some play in the steering system, so it sits a little different when rolling than when stationary. very satisfying to get that wheel straight and have the car track straight with no hands on the wheel :}
-
love the shark gills - are they functional engine bay vents?
-
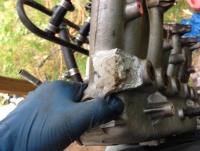
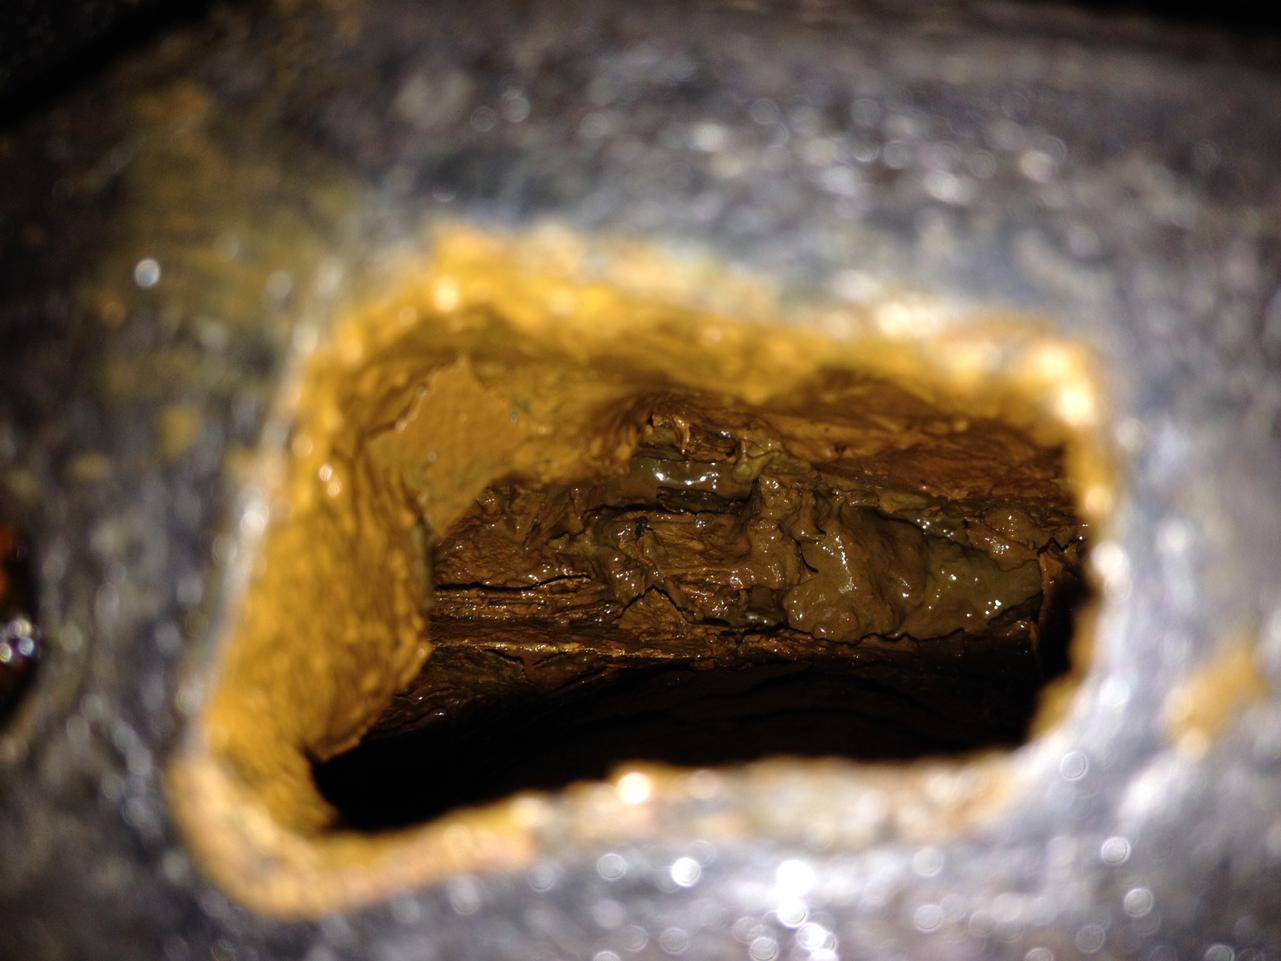
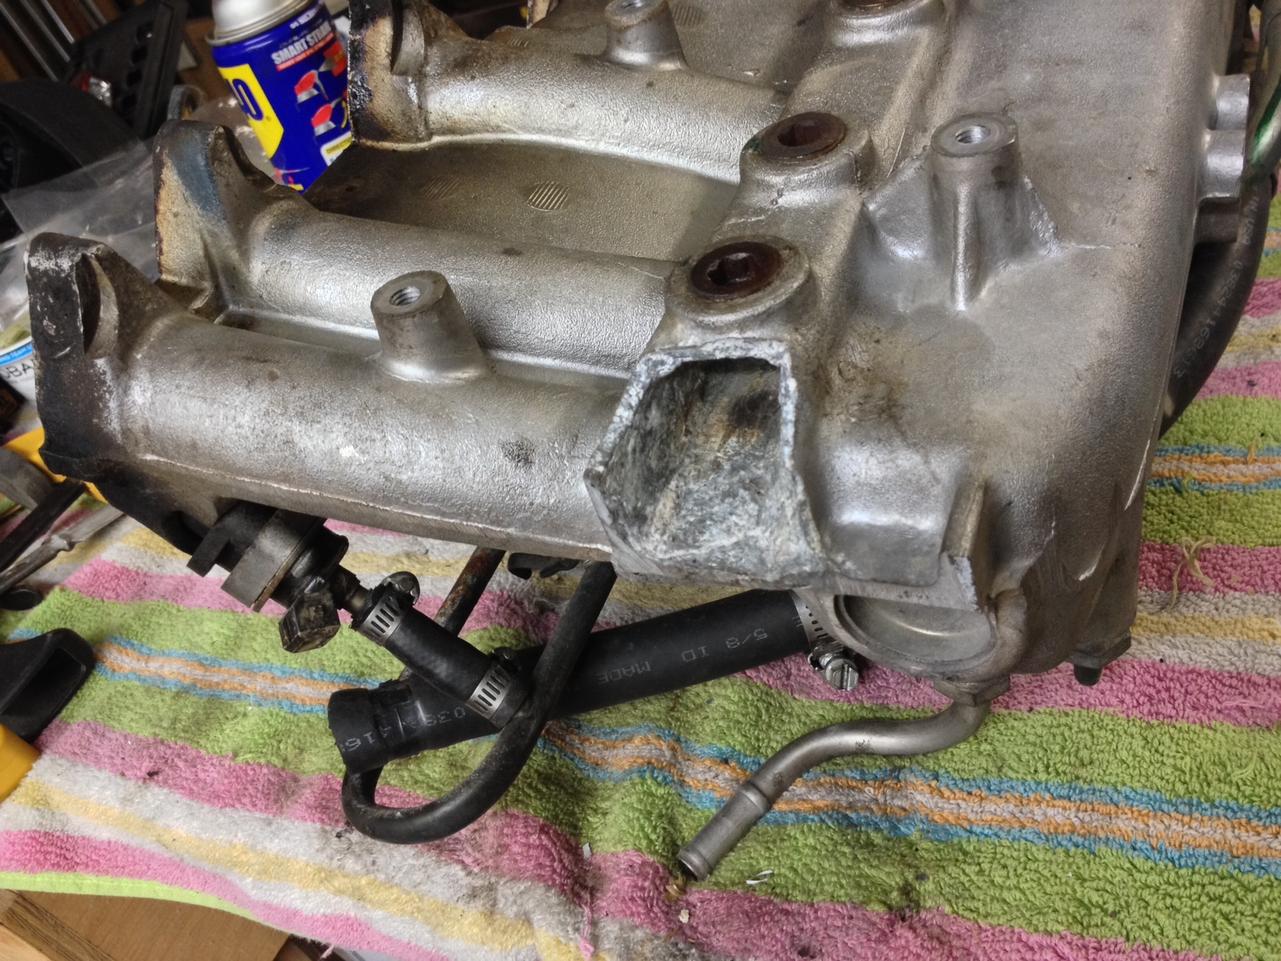
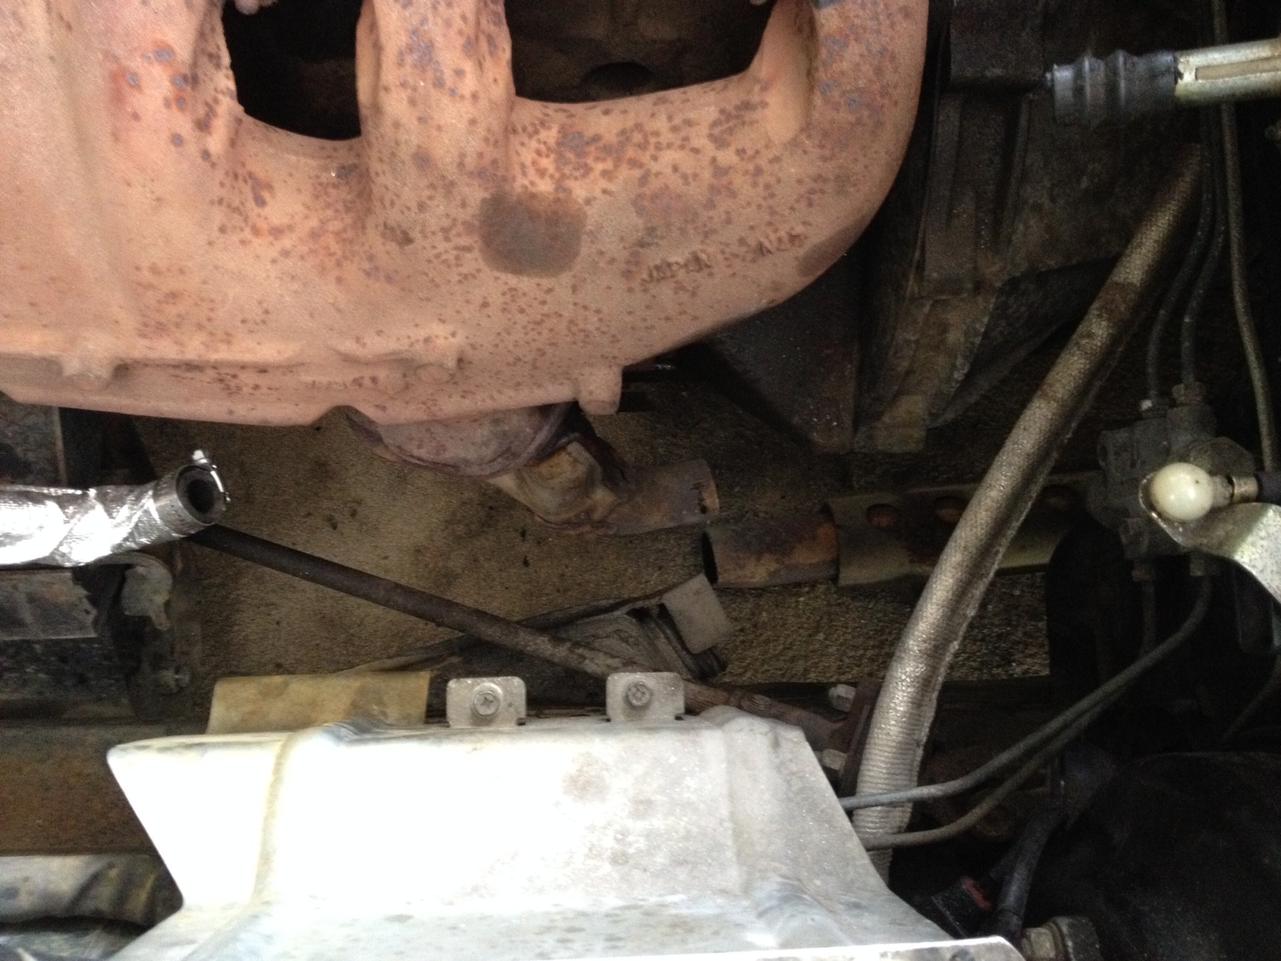
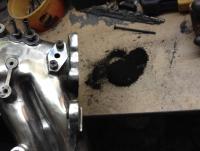
fastwoman - yes, it's been a journey... but i have to say i'm glad it's happened a little at a time, i was totally confident ripping it apart for the head, as all the systems are much more familiar/de-mystified after diving into them over the past few months. i chipped out the plaster-like filler that was in the manifold where it was broken under the egr - there was an enormous amount of the crap in there. the stuff towards the exhaust manifold was gray and crumbling from the heat, the stuff inside was brown and crumbling from fuel vapor - what a mess. i'm going to grind down the jagged edges and have it welded shut.

-
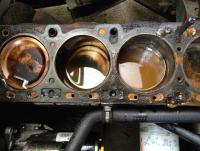
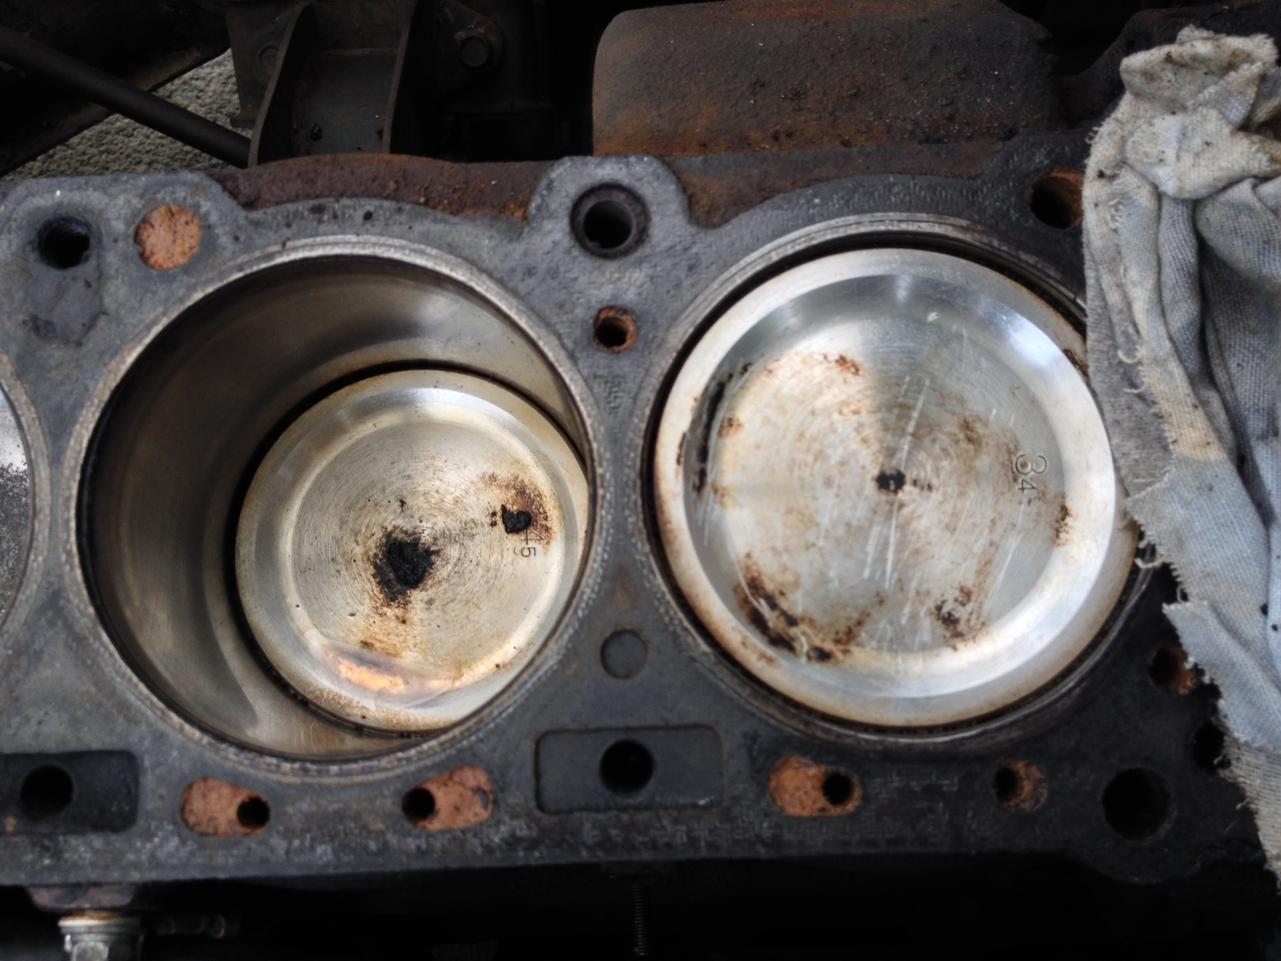
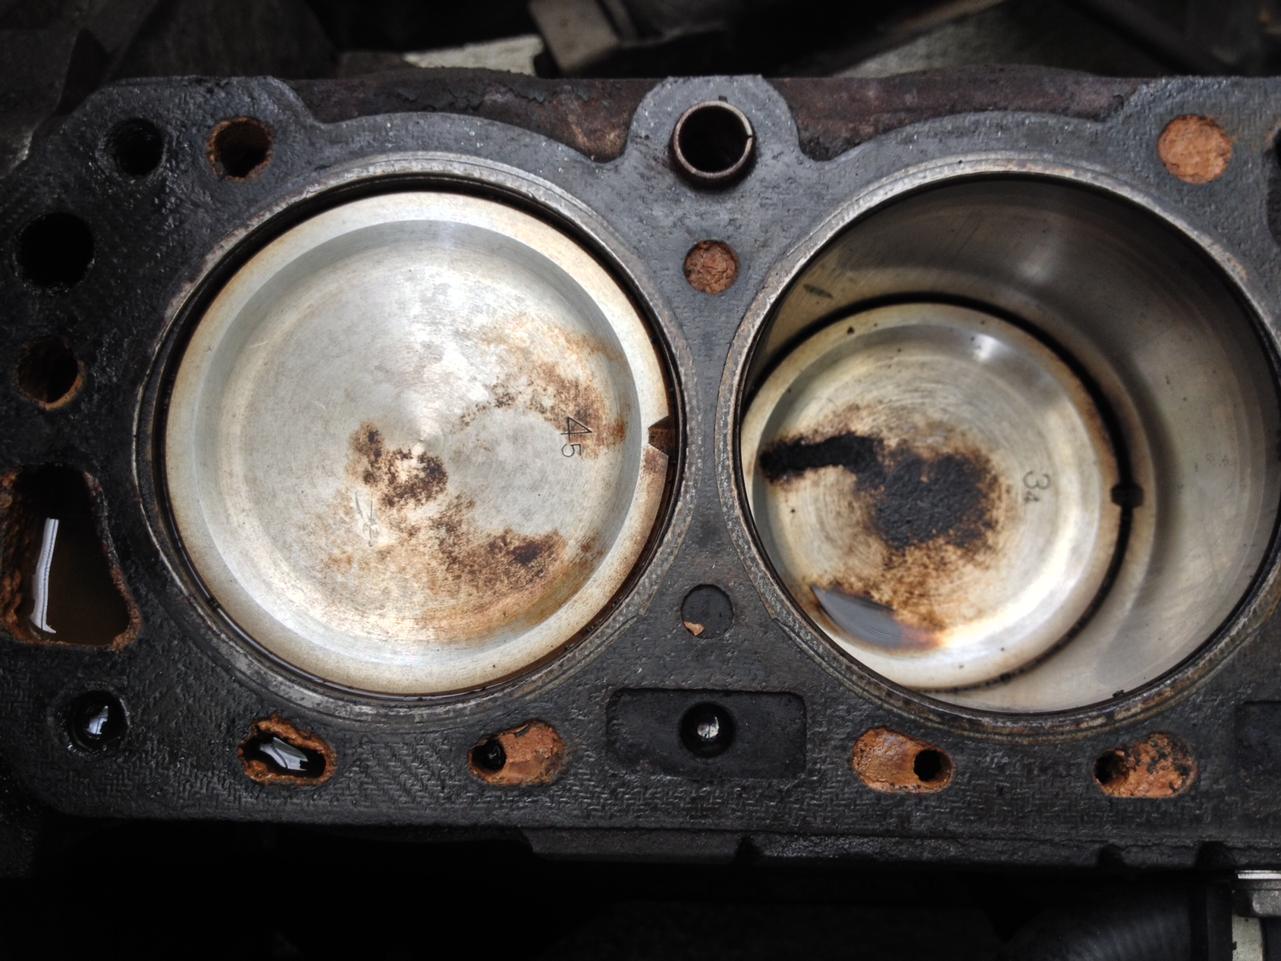
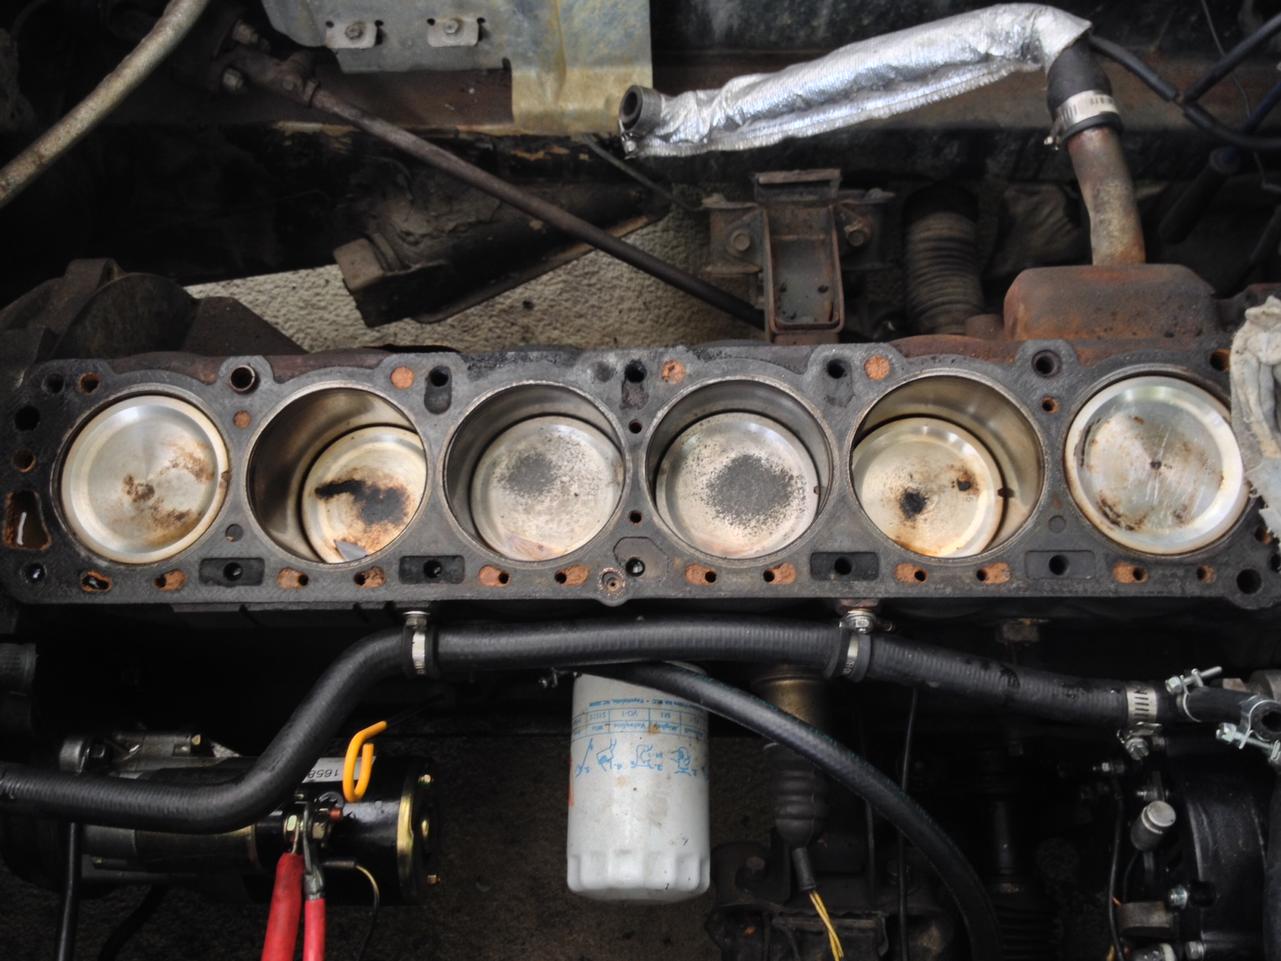
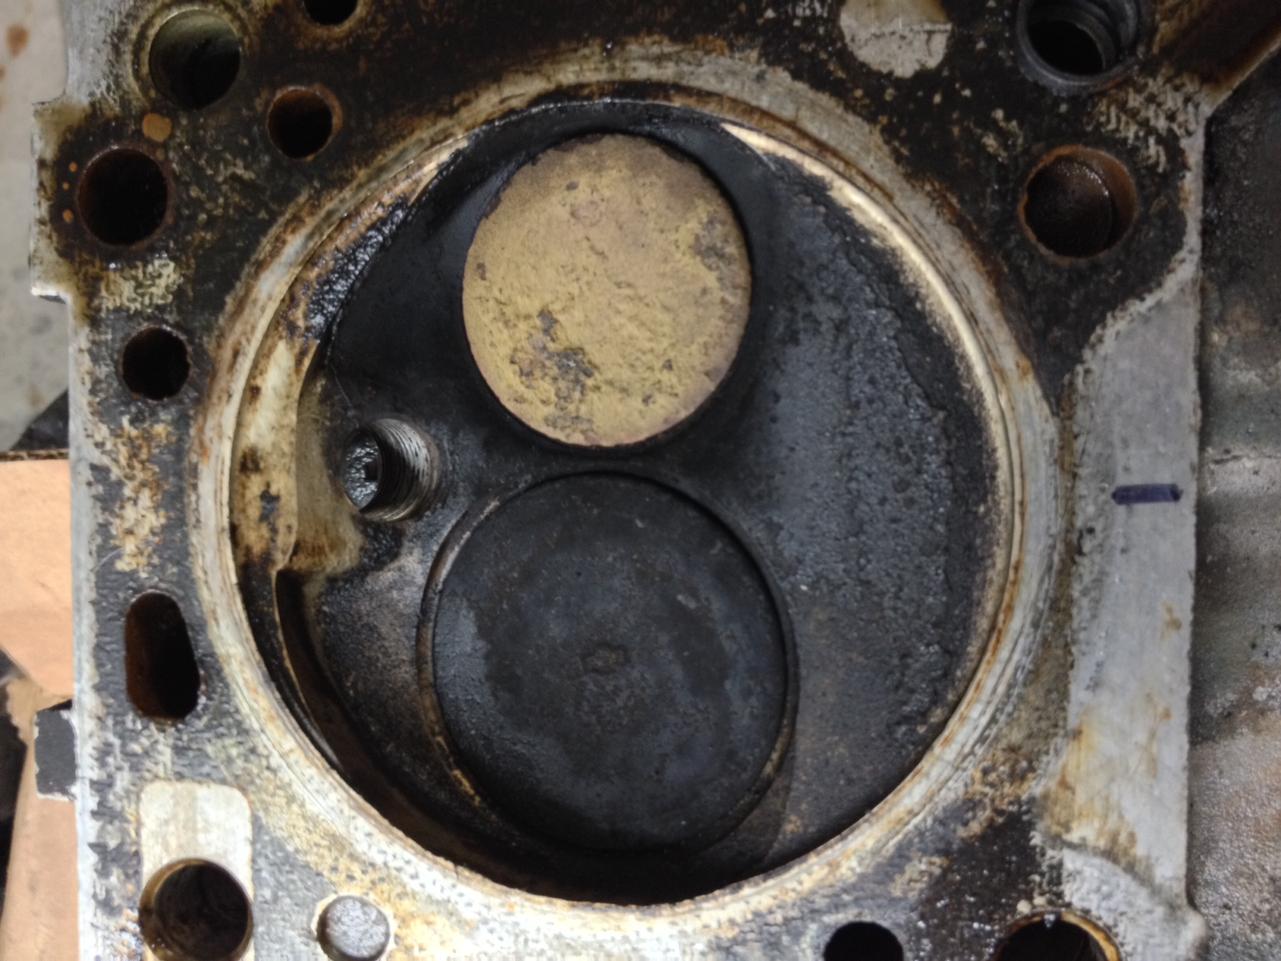
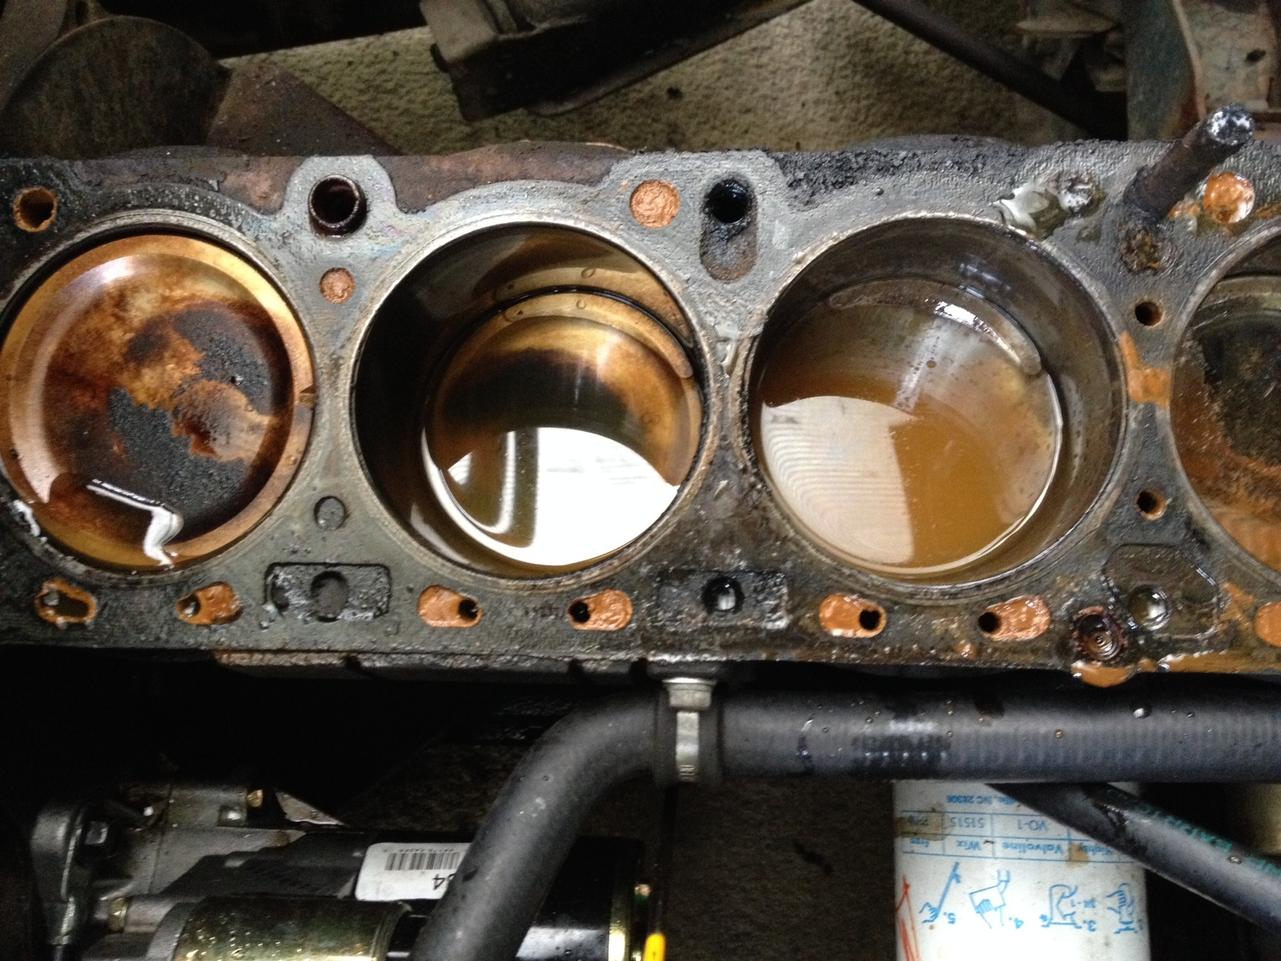
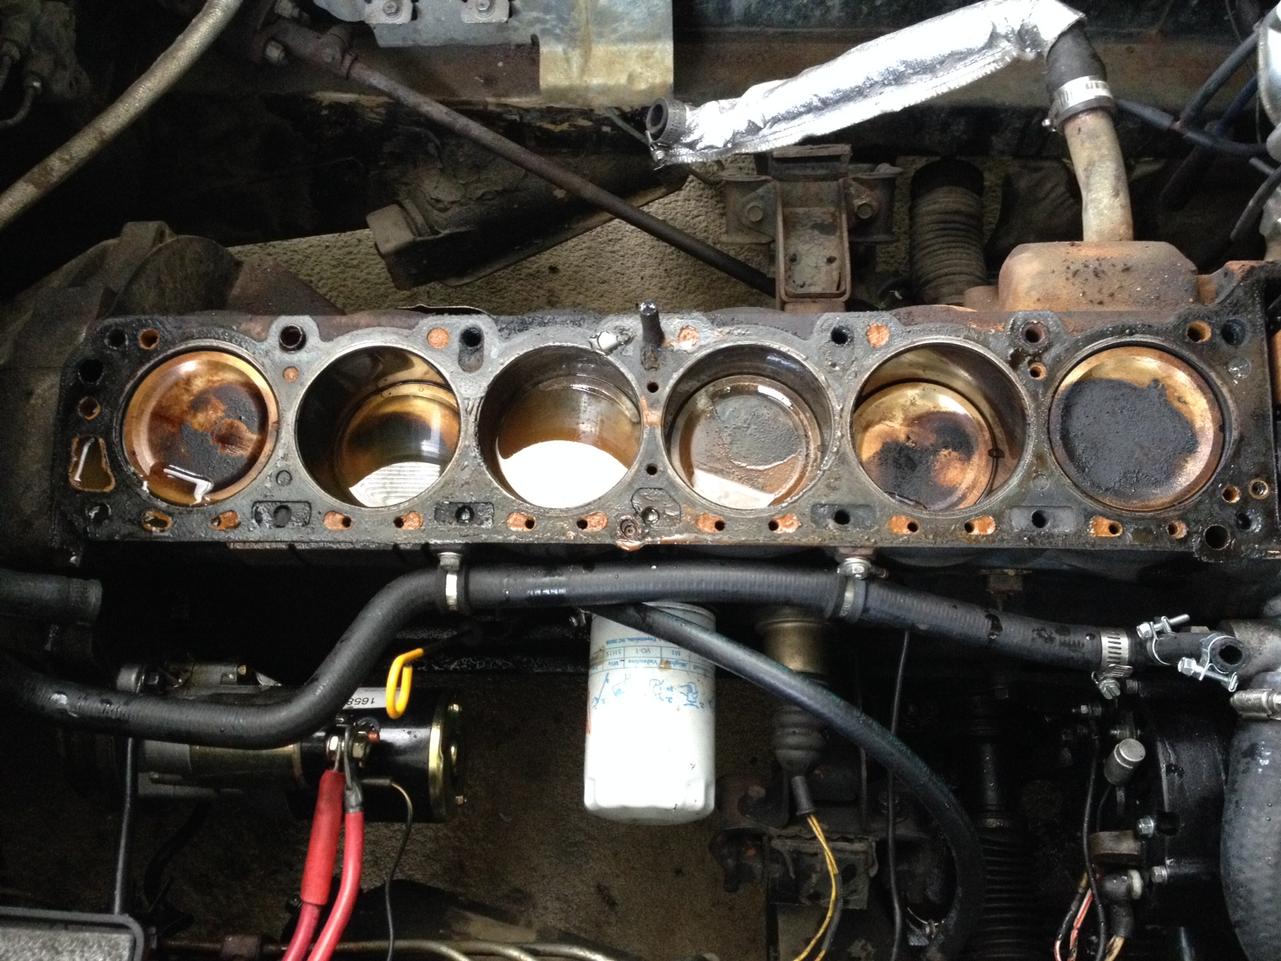
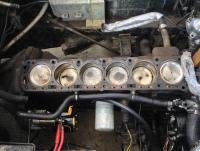
pics of the block/cylinders: overall view - surfaces wiped down, any liquid is excess wd40 sprayed in to keep rust at bay 1&2 - normal carbon, scratches from me scraping off some large patches 3&4 - gray cloud is pitting, i think from lean or water burn?? 5&6 - normal carbon

-
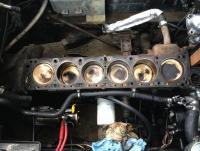
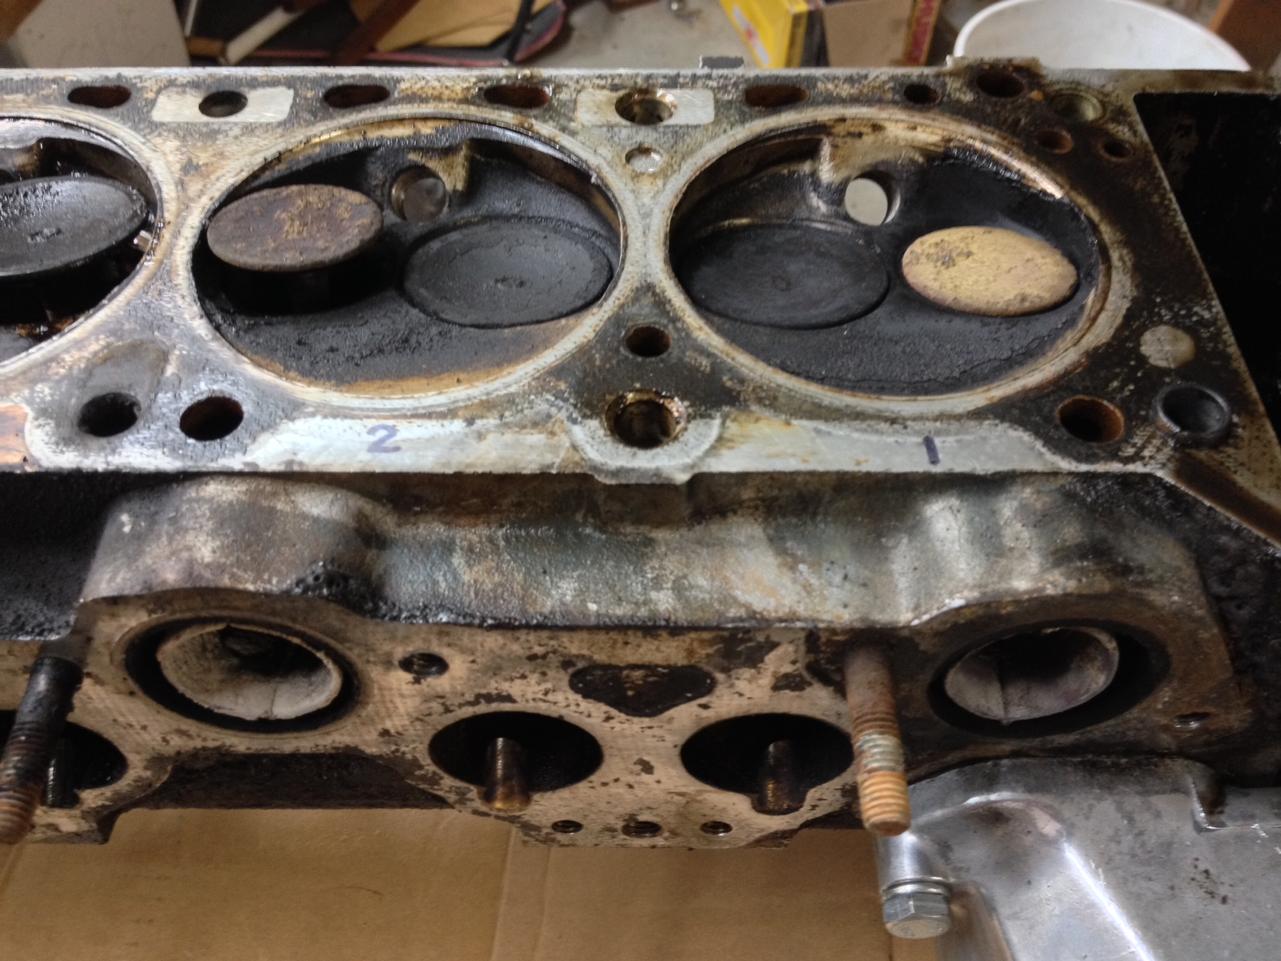
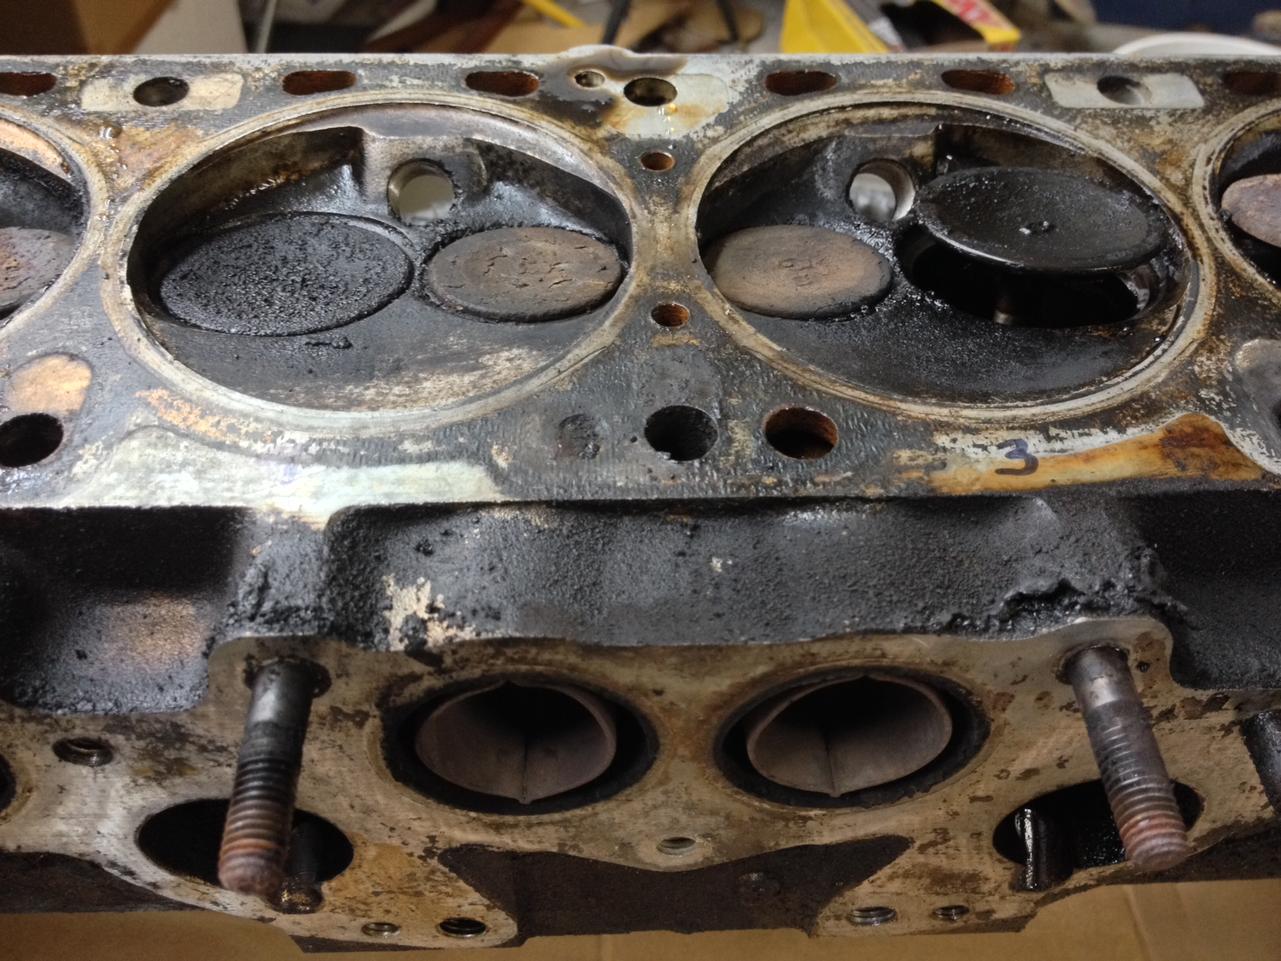
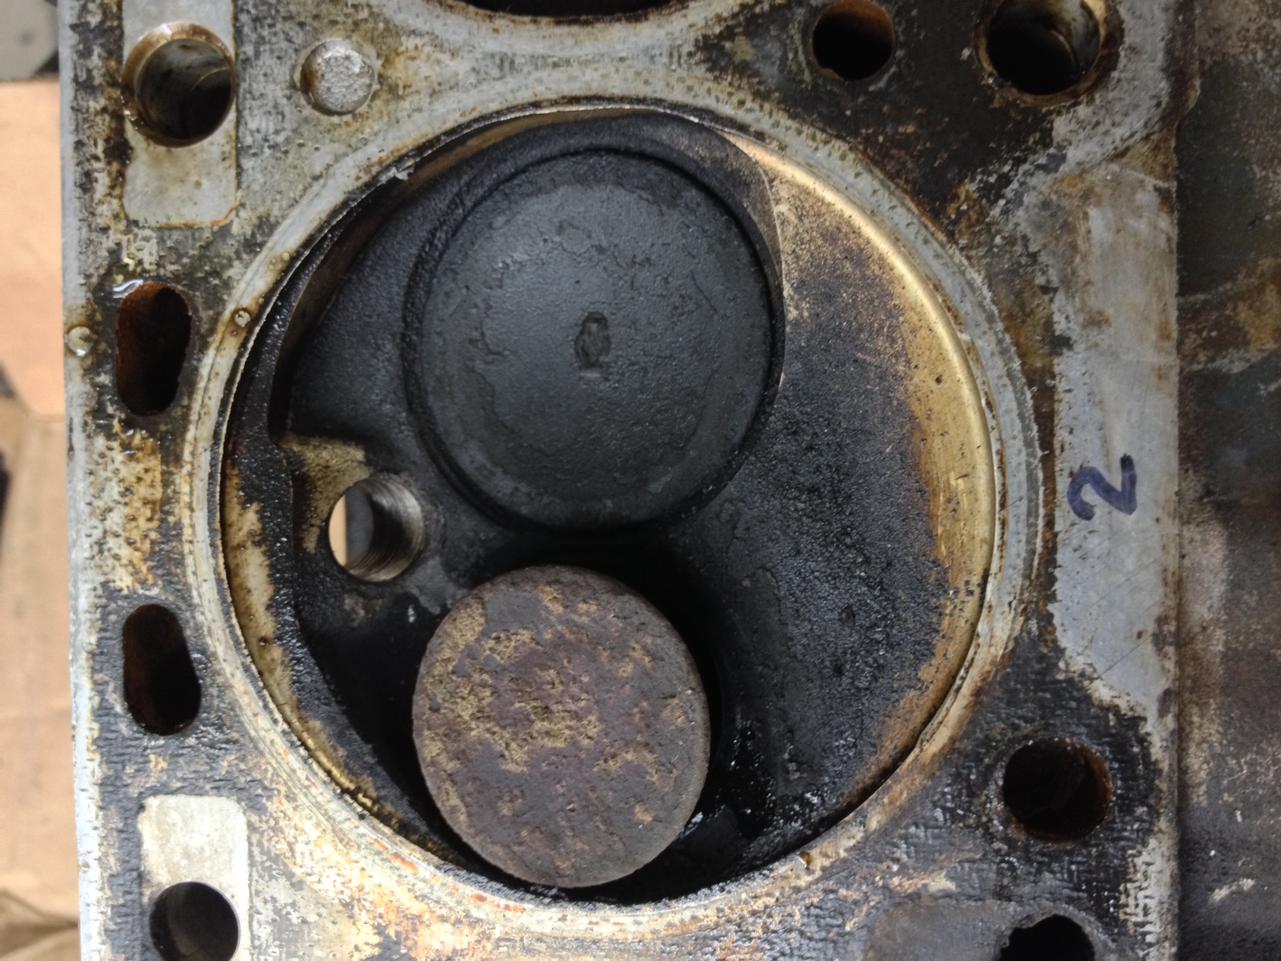
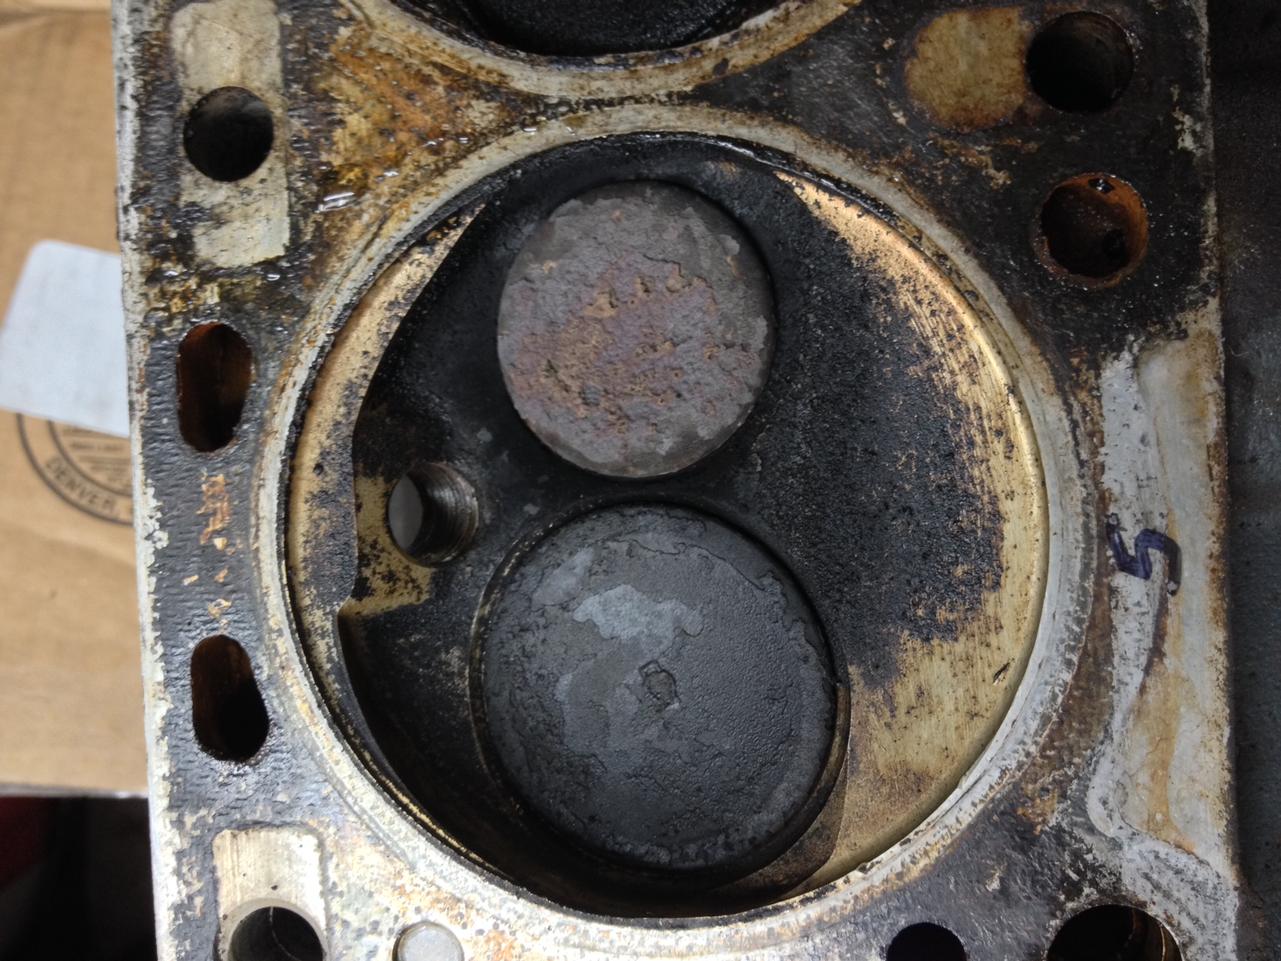
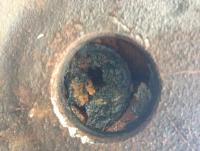
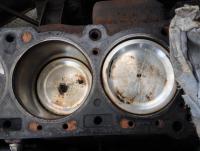
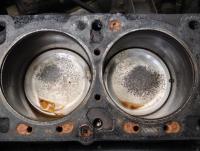
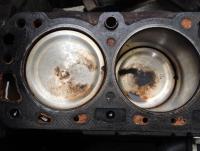
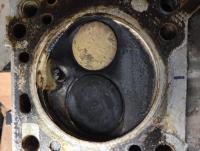
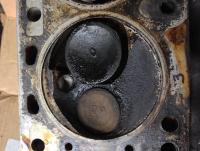
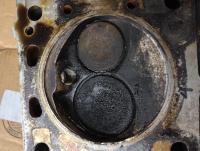
blue - the pictures above of the block are deceiving: the water all over the place was left over in the head and spilled on the block. the rust spot you circled was just a small puddle of rusty water. i've posted a few pics of the block and head below for analysis. my theory is that when i replaced the radiator i had some large air pockets in the system and possibly the pump lost its prime, causing localized overheating/uneven heating and the head warped. i can't find any evidence of head gasket failure and i would think that a crack would have to be pretty big (or multiple cracks) to let that much coolant in that quickly. here are some pics of the head - i numbered the cylinders w/sharpie: valves + exhaust 1&2 - crusty white liners valves + exhaust 3&4 - note different color port liners valves + exhaust 5&6 - crusty white liners combustion chamber 1 - note color of valve (this was my best cylinder for compression and plug color) combustion chamber 2 combustion chamber 3 combustion chamber 4 combustion chamber 5 combustion chamber 6


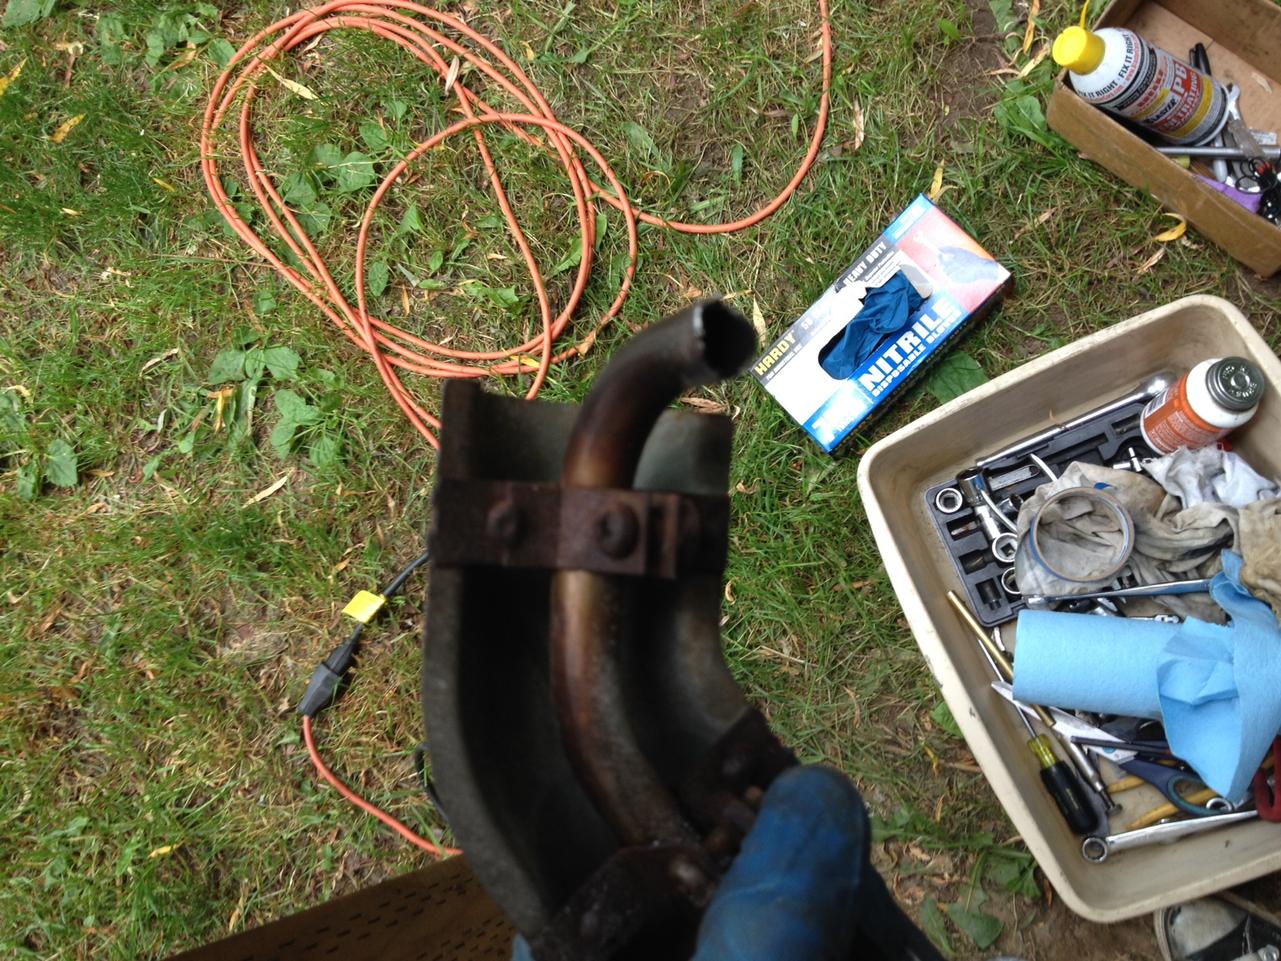
-
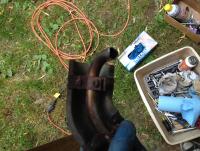
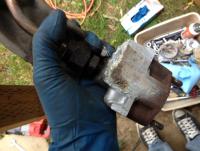
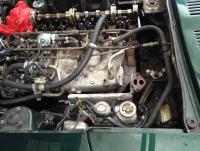
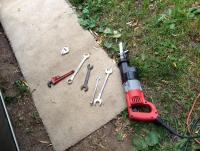
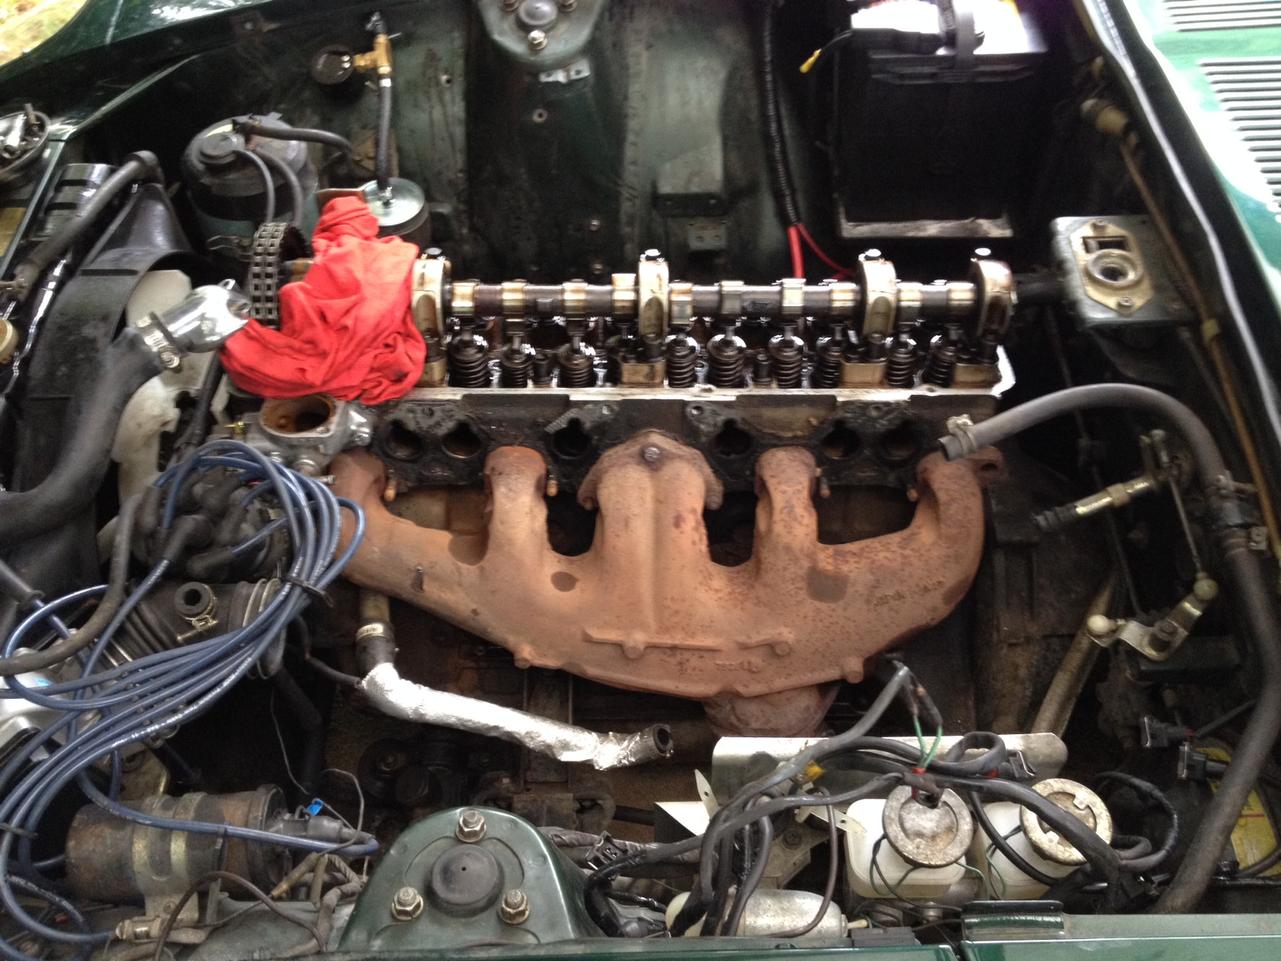
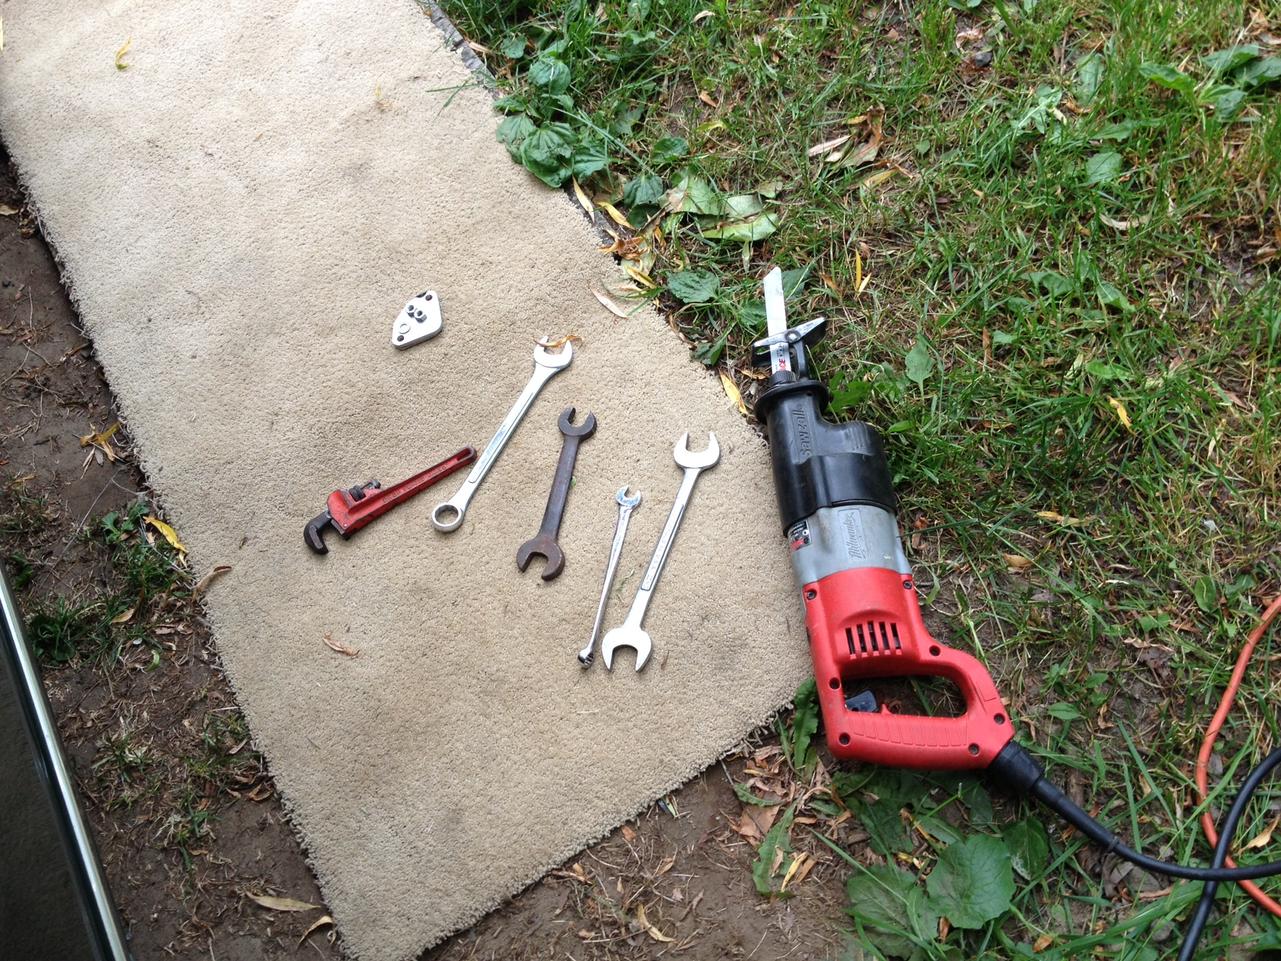
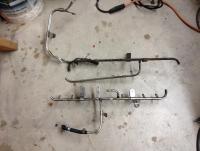
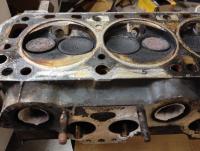
decided to get right into it - thanks to blue for the great tech article, i got the head ripped off in 2 1/2 hrs. also the entire exhaust system and a few other bits. i had ordered an msa 6-1 header (supposed to arrive later this week) and a stud kit, but this was before the latest disaster - i was planning on taking my time, picking up parts and doing the work a bit later, but heck, no time like now, eh? i was really lucky in that there were no frozen bolts, except for a couple on the exhaust flanges but that's all scrap anyway. one head bolt snapped, but it broke in the middle and i was able to twist it out w/vice grips - lucky. the head looks horrible - crusty, full of carbon, exhaust liners look like a crazy science experiment, with all different color crud caked to them. the pistons look in surprisingly good shape, but 3 & 4 have some light pitting on them in a similar pattern, in the center that looks like it might be from some funky burn issues. the head gasket doesn't show any clear signs of being blown, but i haven't scraped it off the block yet. faced with the time, effort and uncertainty with fixing up the head, i think i'm just going to spring for a re-built replacement. i've seen a couple for ~$500 complete w/cam, valves, everything all set up and fresh. i'm guessing by the time i replace the valves, re-do the guides, skim the surfaces, magnaflux, repair cracks, grind the seats, replace springs, i won't be far off from that cost anyway. thinking of going for a cam while i'm at it - any recommendations for the grind? couple of pictures of the process and some of the "interesting" discoveries - i'm actually glad to be doing this, as i found some things that were really sketchy and never would have known about them otherwise... sawzall does the job egr tube was broken at exhaust manifold - fell off in my hand end of manifold had cracked off and PO had filled it w/some kind of epoxy/putty/filler crap PO packed the filler all the way into the egr cavity - i chipped out LOADS of the crumbling, chalky stuff - gonna weld it shut intake off, ready to attack exhaust (w/the sawzall) easier to cut the downpipe than mess w/the frozen studs tools of torture head off - cylinders were full of water that drained from the head sopped up the water with paper towels and sprayed some wd40 in to stave off rust i'll post some pics of the head tomorrow - it looks pretty hopeless...