rossiz
-
Posts
1,109 -
Joined
-
Last visited
-
Days Won
30
Content Type
Profiles
Knowledge Base
Zcar Wiki
Forums
Gallery
Events
Downloads
Store
Blogs
Collections
Classifieds
Everything posted by rossiz
-
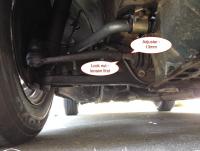
Mike: you can check the rack bushings for play by opening the hood, rolling down the drivers window, then lean in w/your right hand and move the steering wheel back and forth while watching the rack (just follow the steering column down, you'll see it under the engine between the wheels). my rack bushings had given up and i could see the rack moving side-to-side as well as vertically when the wheel was moved. the new bushings keep the rack dead still. you can also check for play at the wheels by jacking up the front of the car until the wheels are off the ground, then grab the tire and try to wiggle it side-to-side, as if steering the car. you will be able to easily move the steering wheel with your hand on the tire, but you shouldn't feel loose play in the system.
-
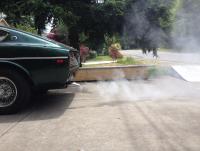
tried to drive to work - no go. 3 miles down the road coolant came spraying up through the hood vents and onto the left & right corners of the windshield. pull over, dump out half of the maxxed out coolant reservoir, pour half gallon of water into the radiator, limp home. i will be using my son's 4runner and/or my bike to get to work until this is sorted. will pull the head and see if it's a gasket (hope springs eternal...) or if i need a new head. funny thing is i was getting pretty excited about how great it was starting and how the hot-start issue had vanished after i solved my low fuel pressure problem - was actually gloating every time i'd get in the car and fire it up - especially running errands on a hot day. pride cometh before a fall.
-
blue - just checked your cracked head tech post, and now i don't feel so good... now is so most definitely not the time for a major deal/engine swap - kids graduating, college payments starting, i just need the car to run so i can go to work each morning. so can i drive it as is and carry a gallon jug of water with me, or will this ruin things below? there was no "event" to speak of prior to this happening, other than me replacing the radiator. i'm wondering if there was localized overheating due to air in the system? the temp gauge never went past the center though...
-
control arm bushings - front ones didn't do much at all when i loosened the bolts, they weren't stuck at all. rear ones are still as is, i need to get a big enough six point socket...
-
actually i think i may have a blown head gasket. nice replaced a leaky radiator (it was toast) and when i got her all filled up i noticed billowing white plumes from the tail pipe. also got a geyser shooting out of the little vent hole in my coolant reservoir tank. smells like burning propylene glycol... i think mr. murphy caught up w/me very quickly. so it looks like maybe the head's gotta come off sooner than i had hoped. anyone done this recently? any tips?
-
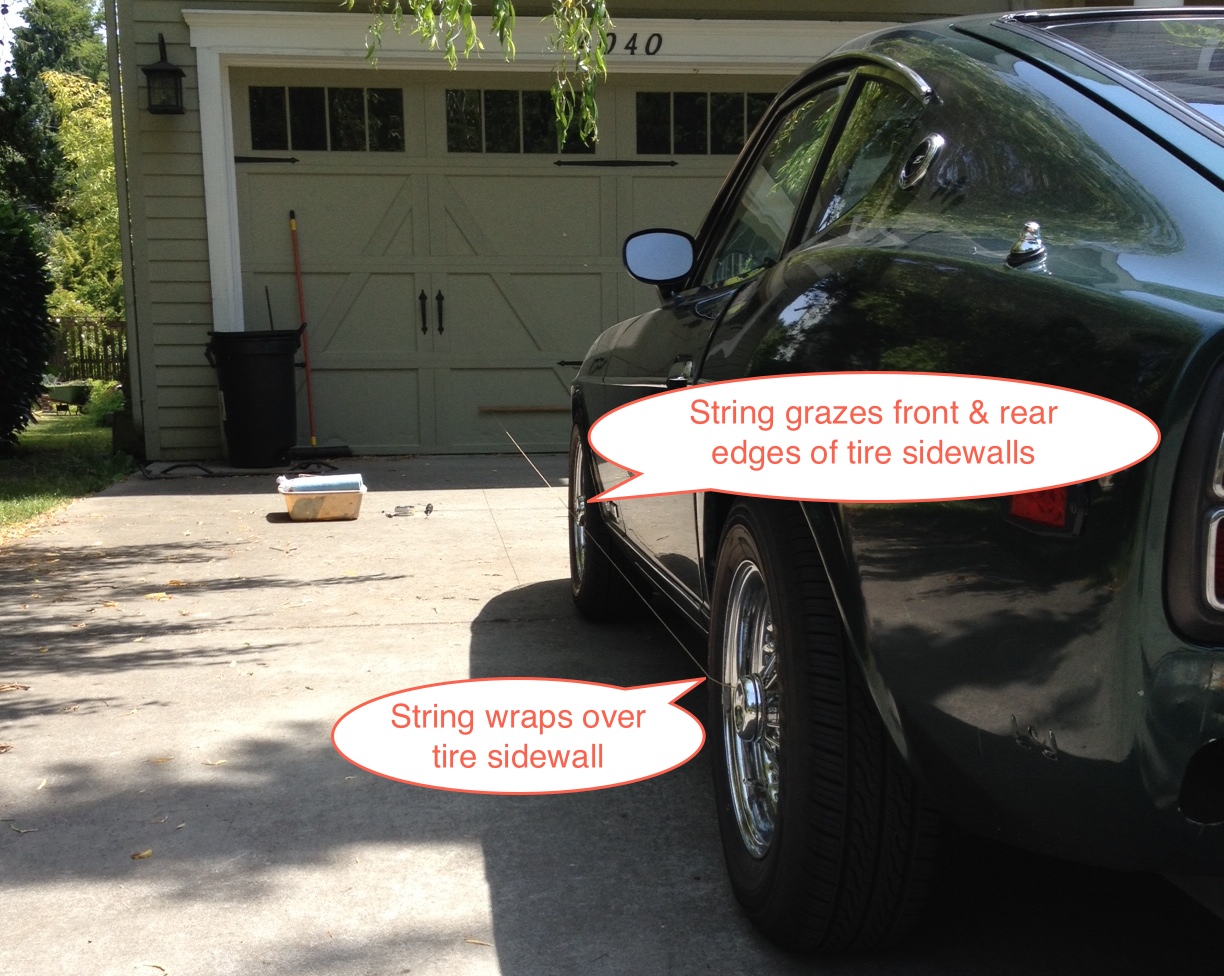
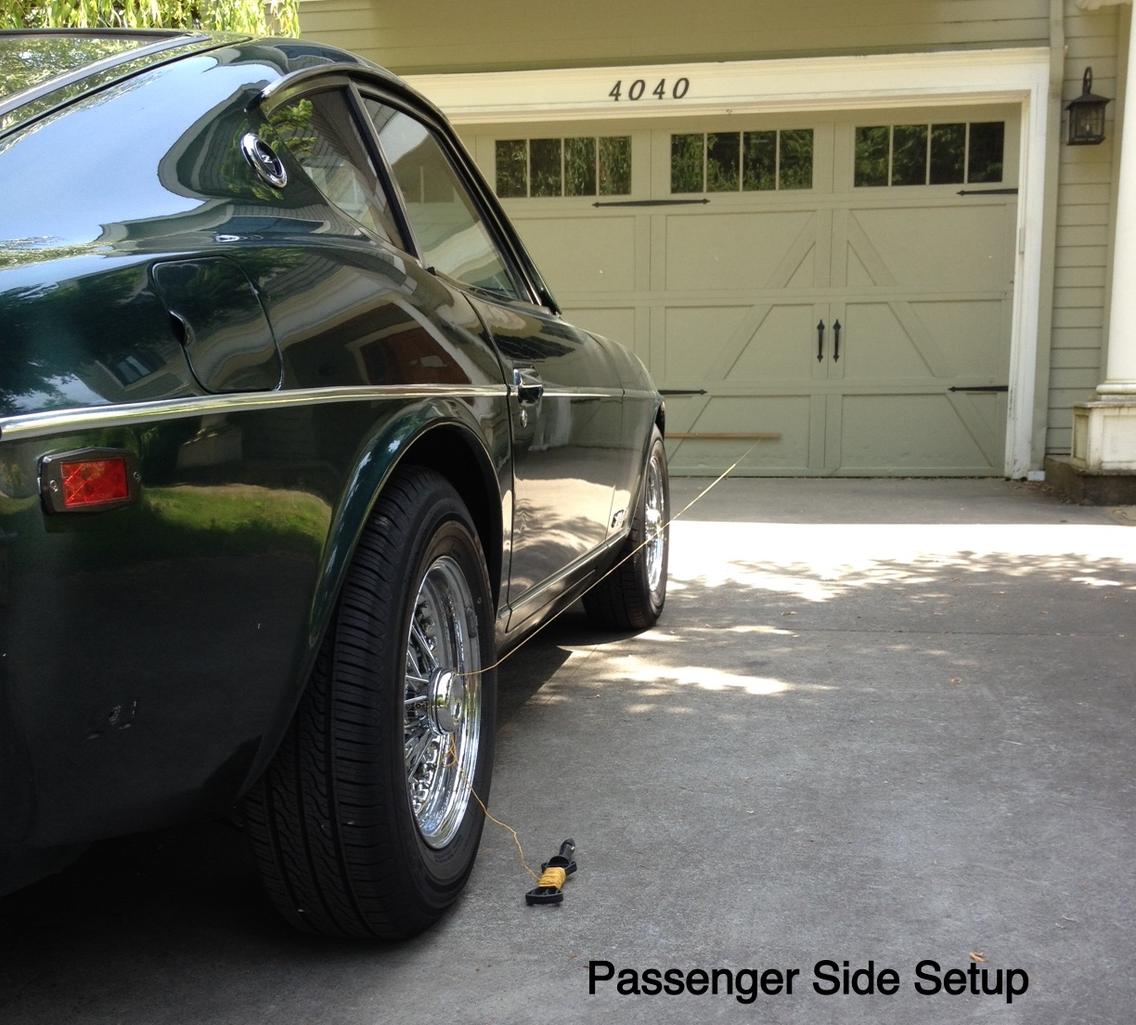
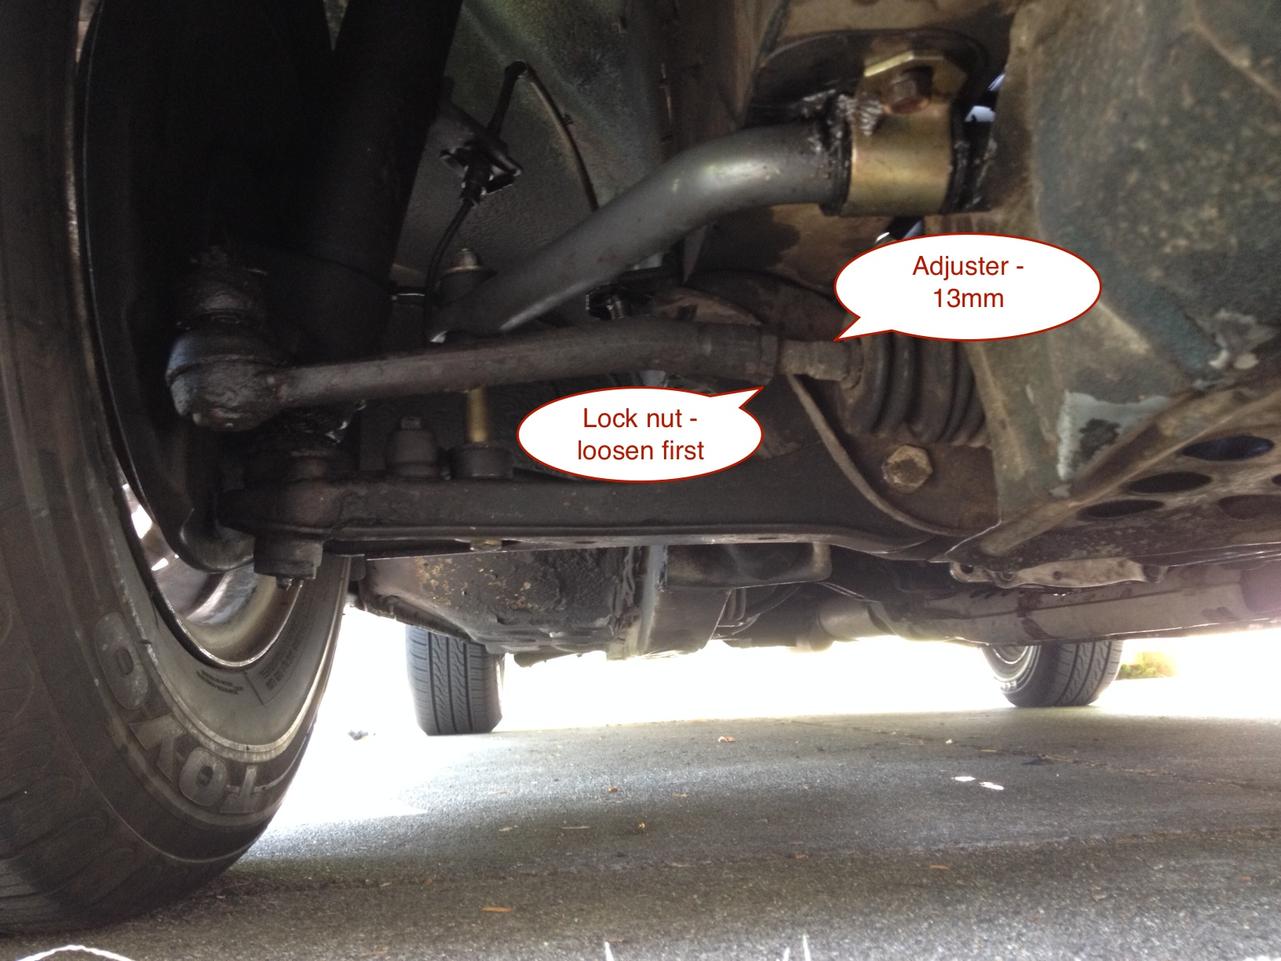
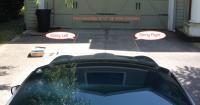
after replacing the front steering rack bushings and upgrading the suspension i noticed the steering wheel was a few degrees off and figured it was time to check alignment. the z is amazingly simple to align, with the only adjustment necessary on the end of the tie rods. there may be other ways to get the toe angle correct (some folks use a rod or wire to measure the tires inside-inside at different locations) but i've always used a simple old-school setup that just requires some string and a rod. in case anyone is looking to do this, here's the process i used: get a rod or piece of wood that is a bit longer than the width of your tire spacing (outside to outside) attach it to a wall or some heavy object - concrete blocks will work (you need to get some tension on the strings) mount it at the wheel centerline height, or a little lower if required to clear hub caps or center caps stick out park the car square to and centered on your rod/wood bar, about 15' or so away (i was lucky to have a centerline in the concrete pattern) tie the string to the back wheel at a lug nut or the wheel itself, inboard of the plane of the tire, such that the string runs over/touches the tire sidewall when pulled forward pull the string forward, loop it around the rod/bar and pull it taught, adjusting it in small increments to get it to just graze the sides of the front tire do the same on both sides of the car measure width of string at tires, then match dimension at the rod/bar set the steering wheel to the center position, check to see if one or both wheels are out of alignment undo the lock-nuts on the tie rod adjuster rods, turn the adjusters in or out as required to line up the wheel w/the string lock it all back up and take a test drive - it may take a few shots to get it just right, depending on how much slop there is in your system set up rod, line up the car, pull the strings: get strings lined up with the tire sidewalls one side at a time, checking dimensions at the wheels and at the rod do ensure strings are parallel measure how far out you are and in which direction as you crank the adjuster keep an eye on the tire - you can watch it move as you turn the wrench and dial it in all done in about an hour (i was lucky - no frozen threads!) and now she tracks nice and straight :classic:


-
i figure i must have been due for a break w/this car! hilarious toy, blue - and clear evidence that the 70's were fueled by drugs...
-
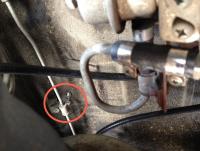
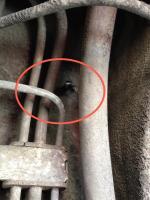
a few months ago i did an interior project - pulled out the back deck spacers and lowered the deck to get more storage room in back. also made a hinged flap to access the tool compartment wells behind the seats. i needed to make some new, lower spacers to get the deck level above all the various lumps/bumps in the sheet metal, so i used short pieces of pvc pipe and self-drilling, self-tapping screws to go right down through the sheet metal and hold everything in place. it worked out just fine and i've been happy with the added space (i actually do grocery runs in my car!). today i had the car up on ramps and was messing around the rear suspension when i saw a shiny screw tip poking down through the sheet metal, and realized it was one of my deck spacer screws. then i saw 2 more of them and just about fainted when i realized just how close i had come to piercing my fuel lines with one of those screws, and my brake lines with another!! i was completely clueless when i was drilling and screwing down from above - incredibly lucky that i didn't wind up with a very different kind of post!! Brake line near miss: Fuel line near miss:
-
thanks for all the kind responses - and i completely spaced on the fact that there's actually a drain plug on the gas tank! duh... much easier than filtering the poop out one fram G3 at a time. will definitely do a drain/clean when the tank gets low. no worries on the radiator - i have no problem dealing with issues i can see/understand/resolve with a simple repair/replace, all part of the fun. btw: i had to replace the 6-gang plug & spade terminals for the efi relay and picked up the parts here: OEM-Type Bullet & Spade Electrical Connectors for 1960's through 1970's Japanese Vehicles... Bridgestone, Datsun, Hodaka, Honda, Kawasaki, Landcruiser, Suzuki, Tohatsu, VW, & Yamaha great site with all the plugs/connectors for our cars (and old bikes!) and very nice quality. i got a kit which comes with tons of terminals and various paired plug shells, plus a very nice crimping tool - leagues ahead of the hardware store variety. it gives proper, factory crimps including the extra "wings" that grab the insulation for a solid connection. i'm going to replace a few of the sketchy connections on the passenger side firewall that were pretty green from a (formerly) leaky set of heater hose connections.
-
i've been trying sooo hard to NOT keep track of what i'm spending on my resto - otherwise i would have stopped long ago! seriously though, good info and pretty dead-on. a key component to note is that you started with a nice example. it's so easy to fall for the lure of a cheap "project car" and halfway into it realize that it would have made so much more sense to start out paying a few thousand more for a solid, rust-free car...
-
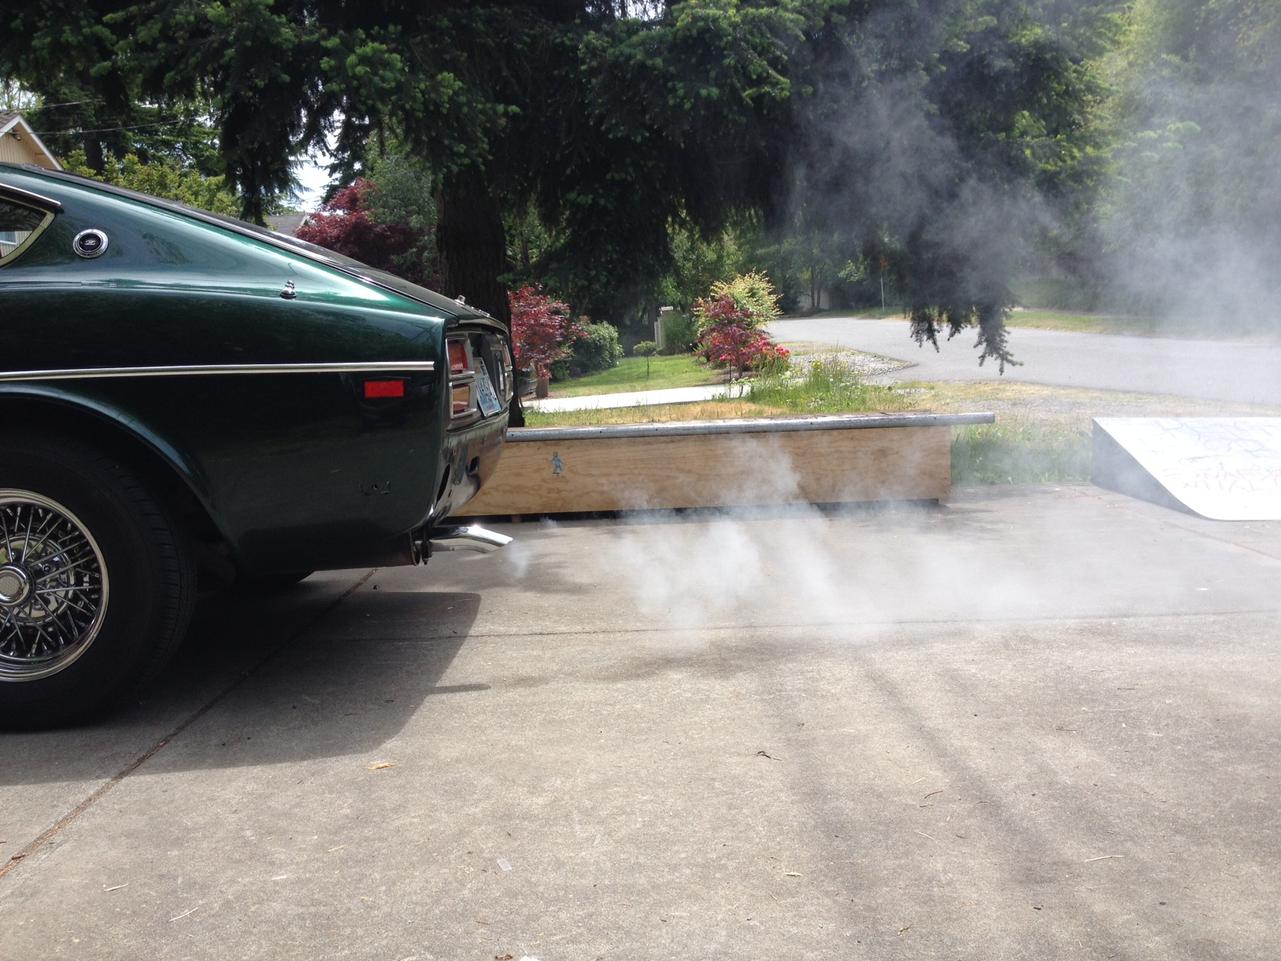
so i believe the fuel filters were the issue - the car started flawlessly in both cold (first thing this morning) and hot (several times throughout a hot day). you guys were right that it was a lean condition. i checked the plugs and they were reading quite a bit richer just from today's driving, so i cranked back the afm a few teeth and the exhaust smelled a bit better as well (i've been known to sniff a tailpipe or two in my day). the new fuel pressure gauge is much better. i opted for a whopping $15 gauge vs. the $4.95 special previously used, but price aside i think a real difference is the psi range. the old one went up much higher, i think 120psi or so, and the new one only goes to 60psi. this makes the scale much wider and easier to read, plus the needle sweeps a lot more distance, smoothing out the reading considerably. i like it. the system holds pressure for a while after shutdown, but an hour or so later and it's bled off - didn't seem to make much of a difference though. of course now my radiator is pissing all over the pavement, but that's a tale for another thread...
-
i just had fuel pressure issues due to clogged fuel filters. i had a clear fram G3 between the tank and pump, which was filled w/brown crud in ~2 months of use, and the main filter (which was installed by the PO prior to the fram G3) was filled w/junk too. your pump may be able to supply the pressure, but if the flow is restricted you'll have problems. the filters are cheap and easy to replace.
-
sure sounds like timing...
-
ok, so i found and fixed quite a few things: replaced fuel filter between tank & pump - it looked like an old coffee filter... replaced the main fuel filter in the engine bay - brown filth drained out of it replaced the fuel pressure gauge - it had been lying to me, stuck at ~30 psi reading even disconnected :disappoin replaced the efi relay with a spare i had - it was being flakey so far it's started several times in a row w/out the priming routine - i'm thinking the filters were restricting flow, and priming was eventually building enough pressure to start. the new pressure gauge only goes up to 60 psi, so the scale is much wider and easier to read. it also moves much more smoothly. the system holds pressure for as long as i stand there and watch it, but it had bled out during the 2 hours when i went in for dinner... tomorrow will be a big test.
-
i'm going to replace the fuel pressure gauge - it's a fairly cheap hardware store pressure gauge and i'm not sure it's entirely accurate. but it's not reading any differently to before when there was no starting issue whatsoever. when the car starts correctly (which it did all winter, with the exception of some solenoid issues that were fixed) it literally fires up instantly - quicker than my newer/modern vehicles. blocked egr and afm adjustments were done back before starting problem occurred and it started/ran fine. no potentiometer in coolant sensor circuit, plugs look fine color-wise. i will report back on the pressure readings from the new gauge and pull some vacuum measurements from the manifold, as well as do some starting fluid spray testing around the engine to maybe sniff out a leak...
-
i was pretty sue i was dealing w/a hot-start issue, as my current problem only commenced with hot days, hot running and the car would start beautifully when cold. i even waited for several weeks to log many starts prior to posting in the "hot-start" thread, but it seems this car is making me look a fool yet again (no difficult task, i must admit)... the past 2 days my presumed hot-starting issue has become an every-start problem, even stone cold, first thing in the morning. it goes like this: turn the key, it fires up for a millisecond, dies immediately and will not start no matter how long i crank unless i prime the fuel lines. i do this by pulling the solenoid wire from the starter, turning the key to start and letting the fuel pump run for 10 sec or so. i've watched/listened/sniffed for leaks during the priming and starting drill, but i find no trace of fuel escaping. when i run the pump, i hear what sounds like air being purged through the system for about 5 sec. then it quiets down to just the sound of the pump and fuel rushing through the lines and the car will fire right up. once started, the car runs fantastic - no hesitation, great power, dead smooth idle, perfect. new/replaced parts: fpr aar csv all vacuum hoses all sensors at the thermostat housing all injector plugs all rubber fuel lines in engine bay except the short ones between injectors and rail afm k&n cold air intake wires, cap, rotor, plugs egr is removed, manifold plated off i ran 2/3 can of seafoam through it a couple weeks ago to try and clean the injectors and de-carbon - sucked it in slowly through a vacuum port with idle set up high, let it sit 10 min. then fired it up and burned it off. this seemed to smooth out my idle - it's dead solid now, was hunting a little prior. i have a fuel pressure gauge between filter and rail, it shows i'm holding 30+ psi, and when i prime (turn the key to run the pump) i can see it blip up a couple psi as the pump runs and drop right back down to 30-ish psi. picked up a new fuel filter, plus a replacement for my clear inline filter between tank & pump (looks pretty nasty already after a couple months) but i don't think these are related, as i figure if it was starving for fuel it wouldn't run so well. seems like i'm getting air in my lines, or at least that's what it sounds like i'm purging when i run the pump. at first i thought it was vapor from the hot-start issue, but i would think this vapor wouldn't stay in the lines after the engine had completely cooled. i have to do this drill just about every single time i start the car and it's getting old... any thoughts?
-
looks like Chip 'n Dale have been enjoying themselves in your intake - or maybe mickey & minnie... check for the stash of food and bedding that may be further up in there! instead of replacing the hoses that leak, i'd literally replace every piece of rubber in the engine bay - just go through methodically and do one system at a time: cooling, fuel, vacuum. over the course of a month i wound up doing this on my car (which had been driven vs. sitting) and it would have been much more efficient to just do it all at once. i think there's a fairly recent post about replacement hoses... also might be a good idea to get a full set of replacement injector plugs (plus the one for the csv and sensor @ the front of the thermostat housing) - they are pretty cheap and better off to put in new ones than try and fiddle with corroded old ones. as others have said, take the time to remove/disconnect every single electrical connection - including all the grounds to the engine, manifold, firewall, etc. and sand them shiny, (including the fasteners) clean w/deoxit, reconnect and protect w/a little dielectric grease. this will save you many headaches down the road w/the efi system. nice car - will be a very fun resto project!
-
the panel gap at the rf fender/passenger door looks pretty wonky... if they took fenders off, were they doing structural repairs and/or body work? biggest worries are hidden structural rust. just about anything can be fixed/restored (there are some really great threads that have come up recently with incredible restorations and a lot of d.i.y. work) but it does come down to how much time you want to spend, and the old "pay me now or later" adage. if you want it to be a project where the process is the important part and the end product isn't tied to a timeline, then no worries. my past experience has steered me to always spend a little more up front to get a better starting point - but that's because i have neither the skills nor budget to do a lot of body work...
-
the rack bushings keep the rack from moving laterally and vertically when steering - while the poly does transmit road feel, the rack isn't a sprung component so it won't make the ride harsher. i just replaced my old, worn rubber rack bushings and am extremely pleased with the improvement to the steering.
-
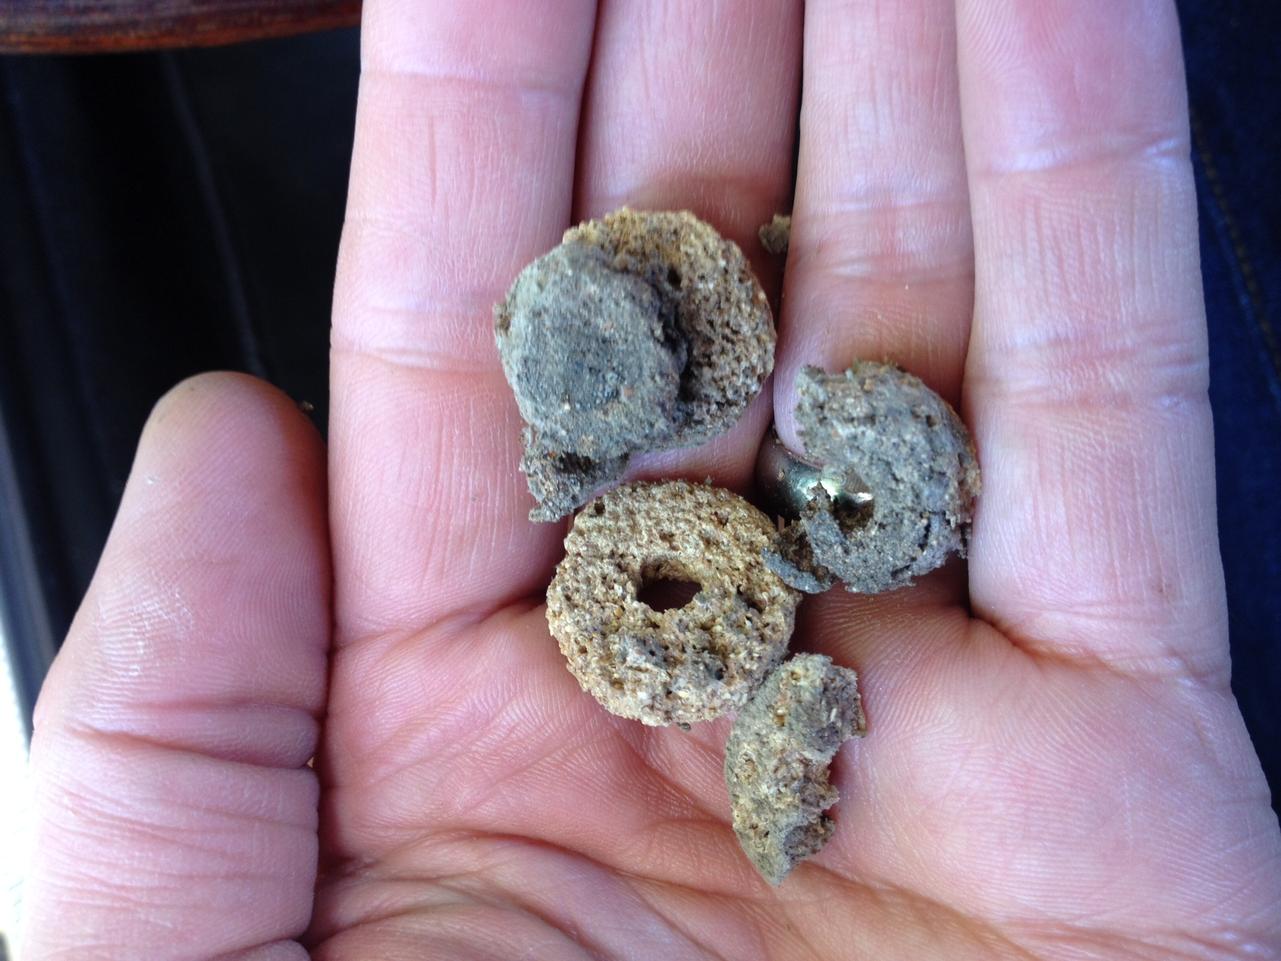
i'm pretty sure it is the fresh air vent, i'll try the shop vac. i would not be surprised if they were deposited into the defroster vents, would've been like a coin in a slot - fun for little fingers!
-
another one popped out going through the car wash - at the end there's a strong fan and it blows hard through the vent. no need for a pic, you know what they look like. there's a collection of them on the porch railing and so far the squirrels, raccoons and birds have all taken a pass. the mold does point towards food - but i'm not nibbling. is it easy to take out the vent system? where is the intake anyway?
-
when you replace the t/c bushings, you can do a simple, inexpensive upgrade to a ball & socket type bushing joint - black dragon sells the kit for ~$30 and it's a simple plug-n-play option. reduces the vertical drag on your suspension.
-
Maha Prasad today - a bulk offering! at least it doesn't happen on the passenger's side (yet) - just a quiet little dump on my left ankle from time to time and nobody else in the car has to know...
-

Hot-start issue with EFI - who has it, who doesn't
rossiz replied to Zed Head's topic in Fuel Injection
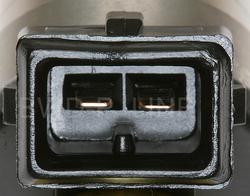
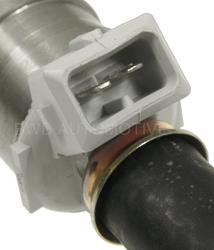
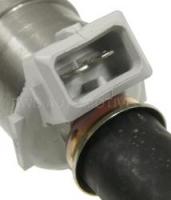
it looks like the 57519P has a different plug/connection - is there a removable insert in there so the oem style plugs will work? i just bought and wired in a complete set of new plugs to fit the oem injectors (and csv) 57519P: 27519: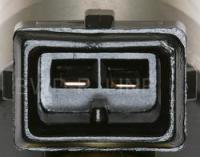
-
beautiful car! is the side stripe a two-tone paint or a decal?