


rossiz
Free Member
-
Joined
-
Last visited
Everything posted by rossiz
-

-
leaving seattle?
-
my dad taught me some of the most important things about wrenching when i was a kid. i remember watching him work on an old automatic toaster to fix the little spring mechanism that makes the bread pop up when its done. he took it apart on the kitchen table, on the previous days newspaper and taught me that if you learn how to take something apart really carefully you can always put it back together correctly. go slowly, take your time, think as you go. it's easy to get excited and rip things apart and wind up with a dizzying pile of parts. never trust your memory - take notes, take pictures, label things, keep them in piles of associated components.keep like fasteners together - in most cases they will serve the same purpose, and use an organizing system to keep track of where they came from (ziploc bags and a sharpie are perfect).look carefully at wear marks where one part meets another - this will give you clues as to how the parts go back together.think about what parts do - if you understand what a lock washer, compression washer, spacer, etc. does it makes it easier to know the order that these things go back on.a motor seems complicated as a whole, but when you break it down into systems it gets very logical. think of charging system, electrical accessories, ignition system, fuel system, lubrication, valve train, timing, etc. and it will make sense.ask questions, read up, get help when you feel that nagging doubt in your gut. when something doesn't seem right, it probably isn't. don't force parts together unless they're supposed to be, as in a press-fit component.when you're done and you have an "extra" part or two, never, ever throw it away and assume it's not needed. don't ask how i know this...the advantage you have with a spare engine is that you have no urgency since your car is currently running. if you don't rush you'll be fine. looking forward to the build thread!
-
-
my pcv hose was cooked when i got the car in stock trim - with the heat shields in place. i bought a new one and wrapped it in foil faced hose insulation and it seems to be doing fine. i'll have to keep an eye on it though, as the cooking may be an issue over time. in general, the engine bay seems a bit cooler with the ceramic coated header vs. the stock manifold - this is just anecdotal from my working on it, no measurements taken...
-
heck, if your front seal is leaking, pull the timing cover and replace that seal - easy seal to replace, just a bit of a project getting the front cover on & off. radiator/fan come out first. since you're going to flush the system, pulling the radiator is less a deal because you will drain it anyways. timing chain kit is affordable and includes the seal, both sprockets, both guides and chain tensioner.
-
interesting... i pulled all my heat shields when i put on the header thinking that it would run a lot cooler in that area w/out the big cast iron lump. i'm pretty sure i kept stuff from sitting over the headers, but i'll have to check my hose routing again though...
-
yup - simple way to get 'em nice and clean quickly. just to be safe, wrap some tape around the stem to protect the stem from the drill chuck.
-
yes, i had lots of carbon. best way to clean valves is to take 'em out. you'll need a spring compressor and an egg carton to keep your parts matched up. it's a very satisfying job - not particularly hard, just one that takes patience and a methodical approach. careful of the little retainer collets - if they've been on there for a while they can get stuck and fly off when you compress the springs. i believe the build up on the back & stem of the valve are what will restrict flow, and the build up on the front face can increase compression and cause pinging. you will be happy when your head is all cleaned up, new valve guide seals, heck - while you're at it you can polish up the cover too. oh, and for the love of god - be sure to wedge your cam chain tensioner before you pull the cam sprocket! and stuff the chain opening with rags or risk losing something down the hole of doom...
-
i did what mark suggested but in the opposite direction - put the head upside down on some pieces of 2x4 and filled the chambers up with some rubbing alcohol, then looked into the ports with a flashlight. this lets you do both valves at once, but mark's method is probably easier to spot the leak as it's right out in the open. cleaning & checking the valves, replacing the seals, head gasket and bolts and flushing out the block are all great things to get done without having to pull the engine. if you discover that the bores are worn, you're already most of the way to pulling the engine anyways...
-
pulling the head and replacing the head gasket can be done in an afternoon - depending on how much resistance the manifolds give you. that's the big unknown as far as my experience goes. that and if head bolts snap. putting it back together goes much quicker - provided you take care with your cam chain tensioner. losing that little bugger turns a sandwich into a banquet, if ya know what i mean... as for flushing the block, you can do some with it all together, but i found a ton of sludge in the two blocks i've taken apart so far. the one in my car i pulled the frost plugs and used a pressure washer to blow down into all the passageways in the block and mounds of crud came out of the frost plug holes. i even used a coat hanger to reach in through the frost plug openings and scrape out clumps of goo. your's may not be as bad, but i doubt i would have been able to clean the block out like that with the head on it.
-
careful re-torquing head bolts if they haven't been touched in a couple of decades... first time i took my head off on of them snapped and 2 others almost did. they get frozen from corrosion and having gone through a whole lot of heat cycles get brittle. if you pull the head, get a new set (courtesy nissan has the turbo ones for ~$60 a set) and be worry-free.
-
i vote to do the head gasket and while you're at it pull the freeze plugs and flush out the block to get rid of all the crud in there - you will feel so much better knowing it's cleaned out. and while the head is off you can clean out the chambers, which is also a very nice feeling! it's not that hard and when it's done there will be no more leaks, no more crud.
-
looks cool - let us know how the geometry works out w/those lash pads and the rockers you're using. based on my recent experience, i'll be interested to see how a "one size fits all" set works out.
-
i'm learning that i can only fully trust (and fully blame) myself for what i do. that really increases the satisfaction of doing it right and makes it much easier to deal with when it's done wrong, as i'm never the victim - just the iidiot
-
i posted a thread about my intake shave & polish - its a LOT of work, i used a die grinder with different abrasive wheels and it took me many hours to smooth down the sand-cast finish and get it looking decent. if you just want to clean it up and have a burnished look, a small wire wheel will do the trick - the kind where the bristles are pointing forward, vs. the radial style. i don't know that i'd try to do it on the car though, too many things to bump into and work around.
-
are you sure it's not a fuel issue? could be crud in the filter or in the little screen at the fuel pump, or even an intermittent fuel pump. there are a few posts/threads on here about fuel pumps that pump fine at first, but then taper off as they warm up. a quick test to see if you're fuel system is at least flowing: engine off, pull the connector off the oil pressure sending unit (passenger side, mid-block) and then turn the key to "on" position and the pump should run, circulating through the rail and back to the return line into the tank. without the engine running you should hear it swooshing through the lines at the engine bay and hear the pump going at the rear (up behind passenger side rear wheel). this won't tell you if you have enough pressure - you'll need a gauge for that - but at least it will test for flow... if you don't yet have one, it may be a good idea to put a clear filter between the tank pickup and the fuel pump - cheap insurance and an easy visual on the condition of the tank.
-
here are a couple links: http://www.classiczcars.com/topic/50416-75-280z-headlight-relay-upgrade/?hl=%2Bheadlight+%2Brelay http://www.zhome.com/DaveRelay/DaveBuild/DaveInstruction.htm i'd search under "headlight relay" for more - lots of info here...
-
sweet - i think you and i are on the same page...
-
in case the photos aren't clear enough, the issue is the tab on the top end of the rod that spins your dizzy isn't in the center of the shaft - it's offset slightly to one side, so the dizzy can only go on one way. easy to get it mixed up (i've done this) and easy to fix - pull the oil pump and you'll see a notch in one side of the part tube-shaped nose of the pump, and there's a small dot machined into one side of the dizzy timing gear shaft that has to be lined up with the notch in the pump. then you slide it up and in and the spiral gears will mesh and the shaft will twist into place (if you're lucky) or be a tooth off and you'll have to go back a tooth and try again. can be done solo, but much easier w/two people - one up top with a pair of needle nose pliers and one below holding the pump. install it w/the dots lined up and the person up top can grab the tab w/the pliers and push the rod down slowly, feeling for the point where the gears disengage and then jump it a tooth and pull it back up while the person below pushes the pump up to keep things in place. this may sound complicated, but once you're doing it things will make perfect sense. i did this myself a couple of times by stuffing a wad of paper towels up under the shaft at the oil pump hole, threaded in a pair of oil pump bolts and stretched a rubber band across them, which gave me the ability to push down from the top, twist and let the rubber band push the shaft back up until i got the dizzy tab lined up. then i used a pair of needle nose pliers with a rubber band wrapped around them (a pair of needle-nose vice grips would be better if you have 'em) to hold the tab from falling down when i went back underneath to put the pump in. you may have to unbolt the sway bar from the frame rail mounts to get the oil pump to drop - no need to take the sway bar all the way off, just the two surface mount u-shaped brackets that hold it on w/the bushings. if the car is up on jack stands, the wheels will drop and the sway bar brackets will not line up for re-install, but just put a jack under one front tire at a time and lift it up a little and the sway bar will move right into place. hope this helps!
-
time spent now getting the electrical system cleaned up will surely pay dividends later... lots of good threads on upgrades to the primary wiring, charging system and swapping fusible links for maxi-fuses as the stock setup is a bit dicey. also a good time to look at adding relays to take load off the steering column combi-switch - a common source of problems as well.
-
how can you get rid of the return line with a mechanical pump? it would seem that there would be significantly different fuel demands a 4K freeway cruising vs. stomping on it at 4K and since the mech pump would see the same rpms the flow would be the same, so wouldn't that over-pressurize the bowls? or is there a mechanical pressure release inside the pump? same question for the electric pump - without a return line, does the pump shut off when it reaches a max pressure? sorry for the slightly off-topic questions, but this thread group seems to know a bit about fuel pumps - if it's an annoyance i can start a new thread...
-
interesting - anything else other than the heat issue?
-
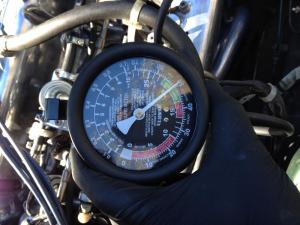
got rained out a few days in a row, sun came out today and got 'er done. she fired right up and ran smooth as can be. once she was all warmed up i did a hot valve lash adjust, topped off coolant, set the dizzy timing, and just for kicks threw on the vacuum gauge and was amazed to finally see fantastic manifold vacuum! on another thread i posted how i've done everything under the sun trying to solve my low vacuum readings - replaced every hose, connection & associated mechanism, checked compression, played w/dizzy timing, but always had horrible readings. the car ran well enough, but i just bugged me that the vacuum was reading so low. now i believe that the rocker geometry affected my valve timing. i took her for a spin and was quite pleased with how she ran. super smooth and the sound is fantastic - couldn't resist ripping it up to 6K with every shift. surprising how much timing & cam affect exhaust note. the stock cam doesn't have the big hit at 5K that the other one had, but it pulls nicely in a very linear fashion right up to 6K. the plan is to just drive it as is while i build the F54/P79 and spend some time calibrating the butt-dyno for baseline comparison thanks to all who have provided encouragement and assistance on this latest blow-up! finally - a happy motor!
-
not to hijack, but what is the advantage of an electric fuel pump vs. the mechanical one? i've read that the stock mech. pump will happily feed a carbed L28, it makes no noise in the cabin and i like the simplicity of less wiring, fuses, relays, etc. reason i ask is i was planning on going this route on the F54/P79 that i'm building - any input would be greatly appreciated...

