


rossiz
Free Member
-
Joined
-
Last visited
Everything posted by rossiz
-
 mine were rusted and worn, didn't seem worth fiddling with 'em so i just bought a new pair online - i believe they were pretty inexpensive.
 -
clever use of mechanical advantage!
-
-
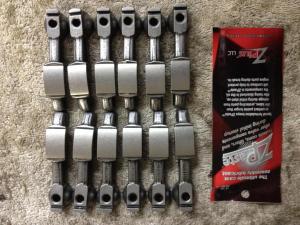
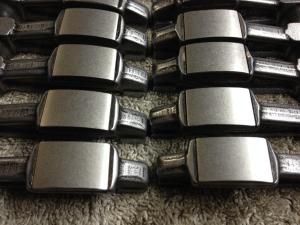
just got my rockers back from delta cams - they look beautiful, like new surfaces on the pad and toe. perhaps tonight after dinner i can sneak down to the basement and check wipe patterns with my shims to get final lash pad size required...
-
nice - huge improvement! btw: the trick to cutting the seal is to use a utility knife and get between the metal ribs. the clip-on portion of the seal is made of many small metal ribs with a gap in between them where you can slip the knife blade. like cutting a rack of ribs between the bones...
-
no worries - it's not a hard part to find, and the price difference between vendors is only a few dollars. when it's all done you'll quickly forget whether you paid $39 or $47 or whatever for it.
-
oh god, you're killing me! that looks sooooo nice... i'm in a bit of a holding pattern because my re-build project is being "trickle-funded" and other expenses have reduced that trickle to a slow, sporadic drip... i've been looking around for machine shops here in seattle that are L6 savvy, i'm open to any recommendations. back to siteunseen's thread though...
-
i understand about "cheating" the geometry to the back of the wipe pad (towards the pivot end) but these heads were both set up with the cam lobes running right off the back of the wipe pad and hitting the rocker arm itself. what you're seeing that appears to be a thin strip of un-wiped pad area is actually a small bevel at the end of the wipe pad where that sharp corner was worn off by the cam lobe going over it. this fooled me at first until i looked really closely under good light - hard to photograph it. i'm expecting my re-surfaced rockers to come back from delta cams any day now, then i'll re-measure required lash pad thickness, order a new set of lash pads and hopefully be back on the road soon. the z has been sitting headless for way too long...
-
oooohh.... sorry to hear about the back! i've been through that twice, no fun - and always seems to happen at the absolute worst time. i had been building a bike for 6 months and finally got the bodywork back from the paint shop, stayed up till 2:00 am in the garage putting her together, all ready to ride. next morning i bent down to pull on a sock and my back froze up. couldn't barely walk for 2 weeks, over a month before i could even think about throwing a leg over a bike - and in the middle of summer with that thing just begging to be taken out on the twisties! take care of yourself, stretch every night - we want to see you finish this project!
-
love the progress!
-
sorry you had to go through that, but glad you got it done. and if its any comfort, thanks to your post, others will avoid the same drama...
-
the stock manifolds breath well - lots of folks race with them. save the $$ and do our exhaust from the collectors back. my system was about $400, i've read of others who spent much less. depends on where you are and what kind of shops are available. the good news is our cars have a really simple system - just a couple of bends and hangers and you're done. a better breathing exhaust can definitely be felt with the "butt dyno" but the sound is really the kicker for me!
-
beautiful!
-
+1 on the header-back 2.5" system. i did this and am very, very pleased. sound is amazing and will make you feel like speed racer every time you pull past 4K rpm here's my thread on this - there are many others as well: http://www.classiczcars.com/topic/49967-2-12-shop-built-exhaust-sounds-great/?hl=2.5 bolt-up systems are available, but for the price you can get a custom setup fabbed and have it exactly like you want. find a good mom-&-pop muffler shop and you can do the whole thing for $200-$400 including the resonator in the tunnel, muffler and tip. alumanized steel is fine for the pipes, as they don't hold water much and will last plenty long - mandrel bent is best for free-flow, go with stainless resonator and muffler, as they are the first to rot out, then get a polished stainless tip which will look beautiful forever. much has been written about using a tip that turns down and sticks out a bit farther than the rear bumper to help get exhaust out of the airstream so it doesn't pull back into the cabin. lots of threads on this - of course a simple muffler swap will change the sound, but it's a pretty small step up to do the whole thing and be very, very happy.
-
looks beautiful - thanks for taking the time to post your progress. i'm reading these build threads like a sponge in prep for mine...
-
great to hear your progress - and excitement! i'll be borrowing your enthusiasm when i start re-building my f54/p79.
-
its a tough debate on this topic - it's nice to think about our cars appreciating in value to help offset the money poured into restoring them, but it cuts both ways when they become too expensive to buy in the first place. one of the things i love about my z is how affordable it is to work on, which makes it much more enjoyable to drive every day. as exciting as it would be to have a piece of euro exotica in the stable, i don't think i'd be able to drive it to work, park it at the grocery store or (gasp) put the dog in it... sorta leaves the realm of sports car and becomes high-end investment art. not that i'm seeing that any time in the near future for my z, but its the trend in general i'm commenting on. i've enjoyed building a couple of ducatis and after getting used to the ridiculous prices they charge for tiny bits of sculpted billet its quite refreshing to see how affordable a z and its parts are. i also thoroughly enjoy the unpretentious, down-to-earth crowd around the z. i've met a lot of great folks - tinkerers and clever minds that don't cringe at the thought of modifying, swapping parts around or fabricating your own pieces out of scrap. i believe this is directly related to the fact that owning a z hasn't become a big statement of net worth. the part i like least about ducatis is the "lifestyle" crowd - clad in thousands of dollars worth of branded gear with thousands of dollars worth of shiny bolt-on bits on the latest model, with 500 miles on it after 2 years and 3" chicken strips on the tires. and of course they're the ones who will shake their heads when i pull up with a fairing plastered with bugs (because i ride it) and gape at the fact that i put a suzuki front end on my ducati (1/3 the price and works way better). ok, rant over...
-
beautiful car - love the color. glad it's running again - but like zed said, details are helpful, as they will allow this thread to be useful to someone else. this forum is great for it's wealth of knowledge and helpful culture. now that you found some hack wiring, it's a good idea to spend a few hours going through the entire system one harness at a time and clean/check/fix for long term reliability. do one wire path at a time, start/run/test, then move on - this way if you make a mistake or there is a problem you will know it's the last thing you touched. i'm not an electrical guy, so i've learned to use this "feel in the dark" method of isolating systems. others are good with testing equipment and meters - i can't seem to make heads or tails of 'em...
-
i agree that the intermittency and the fact that it runs well when it does run point to electrical. your efi and fuel pump relays are under the fusible links (engine bay, on the passenger side inside a plastic housing) check the wiring/connections to these as well as their condition - along with the fusible links. on your '78 these parts can get a bit of weather due to the fact that they are under the passenger side hood vent. in general, i'd go over the entire electrical system, one harness at a time - you will undoubtedly find some nasty connections and it's a good way to preemptively fix anything that isn't currently failing. this is not hard to do, and it will really help you get to know your car. just start with the efi system and unplug every connector one at a time, clean with deoxit and a little 400 sand paper and re-connect. hit every ground connection and apply a little dielectric grease after they're re-connected to keep things from corroding afterwards. there are a set of connector plugs in the passenger side footwell that bring power from the engine bay into the cabin and over to the ignition switch - pull 'em apart, clean 'em. you can find a link on this site to the factory service manuals online - fantastic resource. they show the harnesses and their locations and have some decent diagrams calling out wire colors, plug colors etc. which helps to de-mystify the various systems. spending a few hours doing this will pay big dividends and get you a much more reliable ride.
-
go with your gut - if something feels off, it probably is. i've burned myself more than a few times letting my brain tell me to go down a certain path when i had vague misgivings... now that i'm working on my third head, i'm learning that setting the valve geometry is not that complicated - but it's really important.
-
progress seems to come with an aching back. it's the one downside to these low-slung sports coupes - serious 'bend-over factor' when working under the hood. i find myself taking a 'wide stance' to get lower and keeping one palm on the hood latch bracket otherwise just changing the plugs is enough to get me feeling much older than i am... the exhaust manifold is a pita, but once it's off you're just about done. i wrapped my u-joint socket adaptor w/some electrical tape to keep it from flopping around when trying to reach some of those hidden stud nuts, this was a great help.
-
my "old" phone (ancient iphone 4c) won't even open the czcc website anymore - it just sits on a blank page. maybe i'm just not doing it right, but tapatalk seems pretty clunky to me - i can't browse around like on the site, i'm just forced to read what it tells me is the most current post. i just don't bother on my phone anymore...
-
my eyes will also be on this thread... my f54/p79 build will progress sloooooowly, as it is being "trickle-funded" so i will have plenty of time to watch and learn. thanks for posting up for the benefit of us all.
-
i'd say nope - walk away. the bodywork will kill you, what you can see through the paint is only the beginning, and at $2k you're starting out way behind. a parts car, sure - but for a few hundred vs. a few thousand...
-
i did a complete re-design of the primary wiring on my '78 - i wasn't happy with the fusible links and all the relays out in the weather. i used marine grade 4 gauge wire and sent it into the cabin, then re-located the relays and a new maxifuse block on the fire wall passenger side. used a length of 1 1/2" x 1/8" aluminum bar mounted horizontally sharing the two bottom blower fan bolts as a mounting bar for the relays, mounted the maxifuse block to a plate made of ABS which i attached to the big white plastic connector block that's up under the dash on the far passenger side. cleaned up the engine bay considerably and got all those vulnerable parts and connections inside out of the weather. it's been working well and i no longer worry about things failing when i drive in the rain


