


gwri8
Free Member
-
Joined
-
Last visited
Everything posted by gwri8
-
 Coming along nicely! That is a much more acceptable look than the park bench effect IMO.
 -
Your interior panels should be held with round plastic rivets with a center post ( a dot in the middle). To remove those, push the center post through the rivet with something like a small nail or punch of some sort. Then try to retrieve it. Don't worry too much about that as new rivets are plenty available. Do not try to pry out the rivet out before you do that. Could scratch your panels.
-
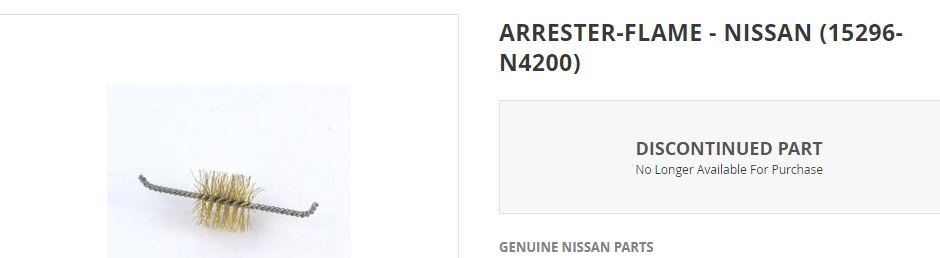
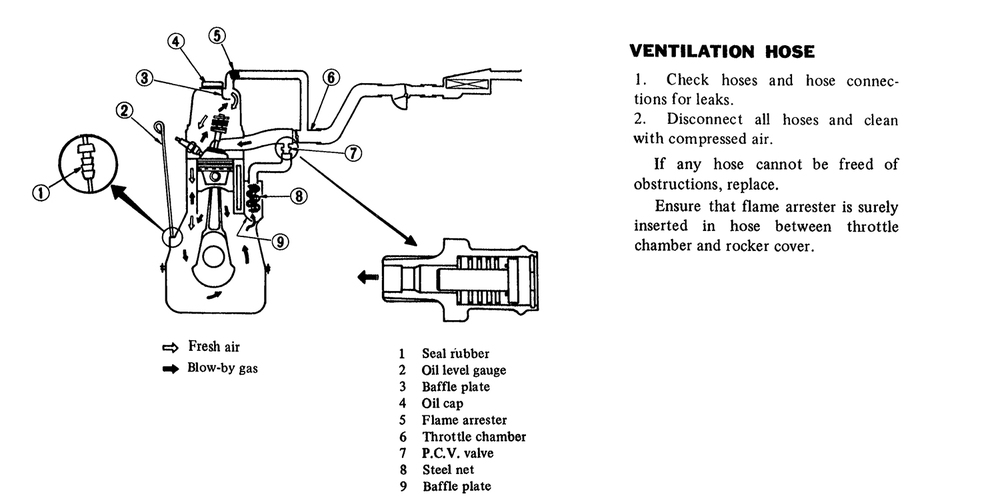
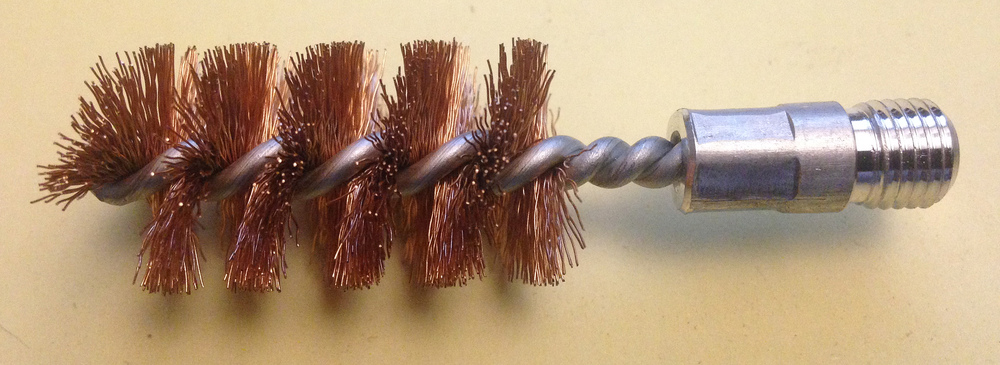
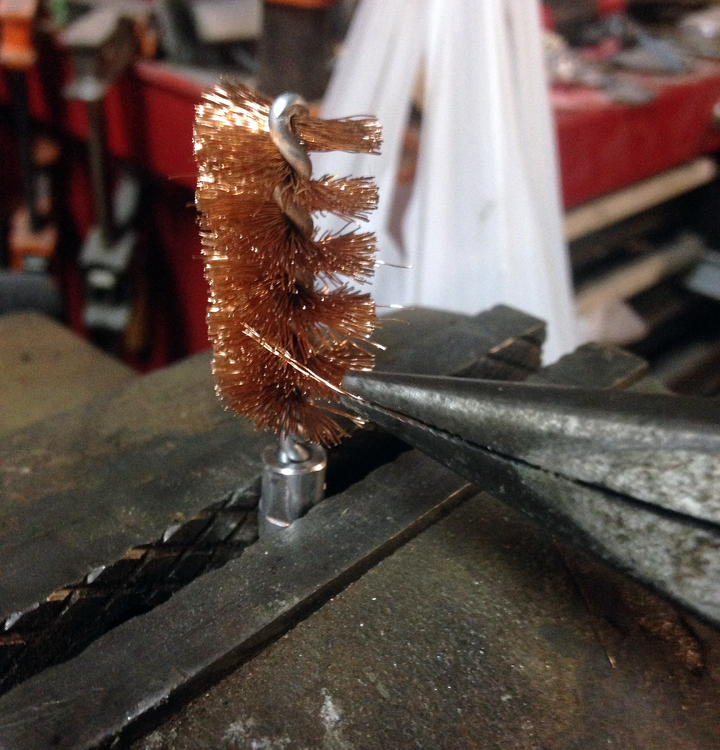
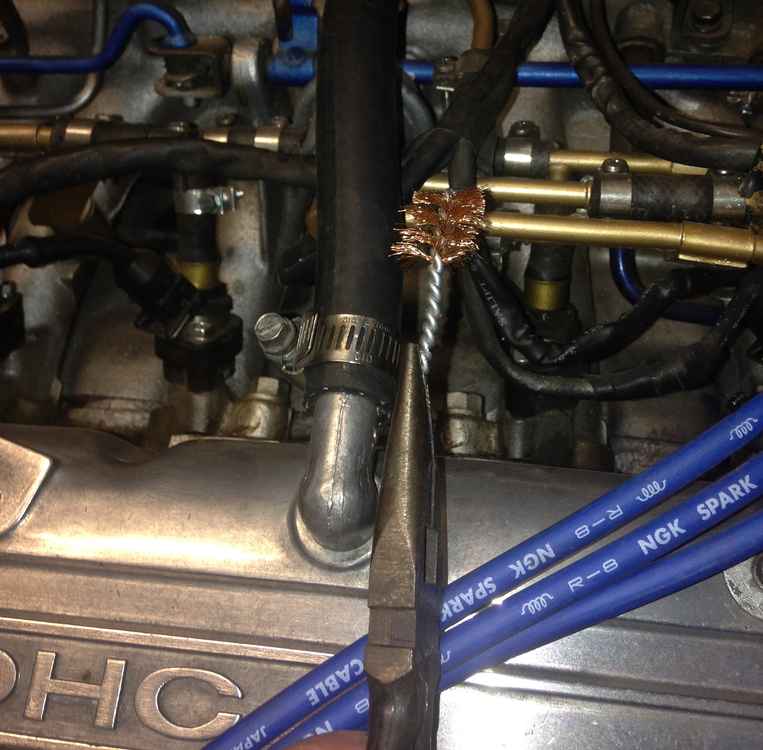
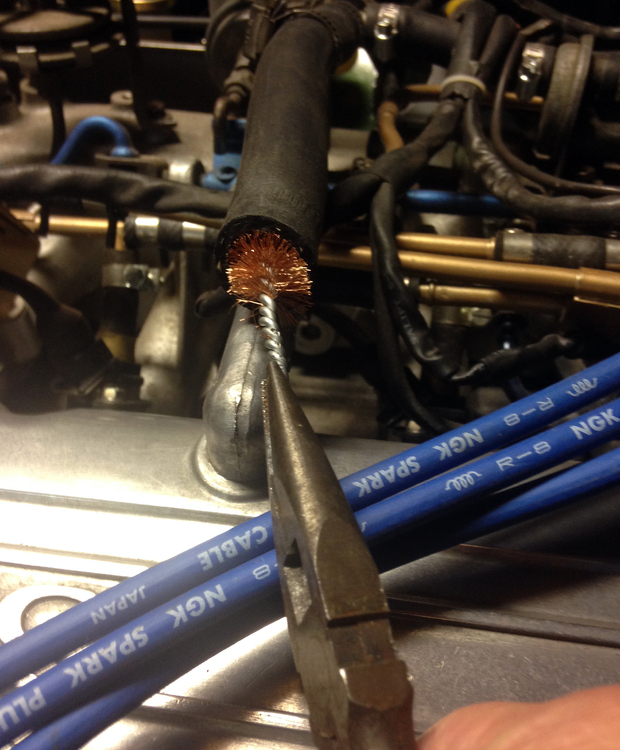
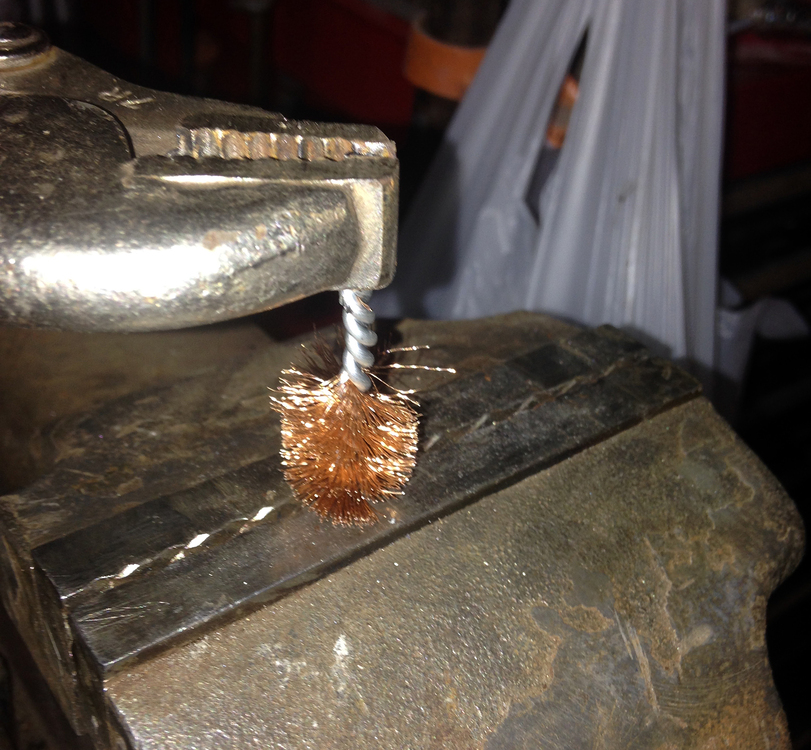
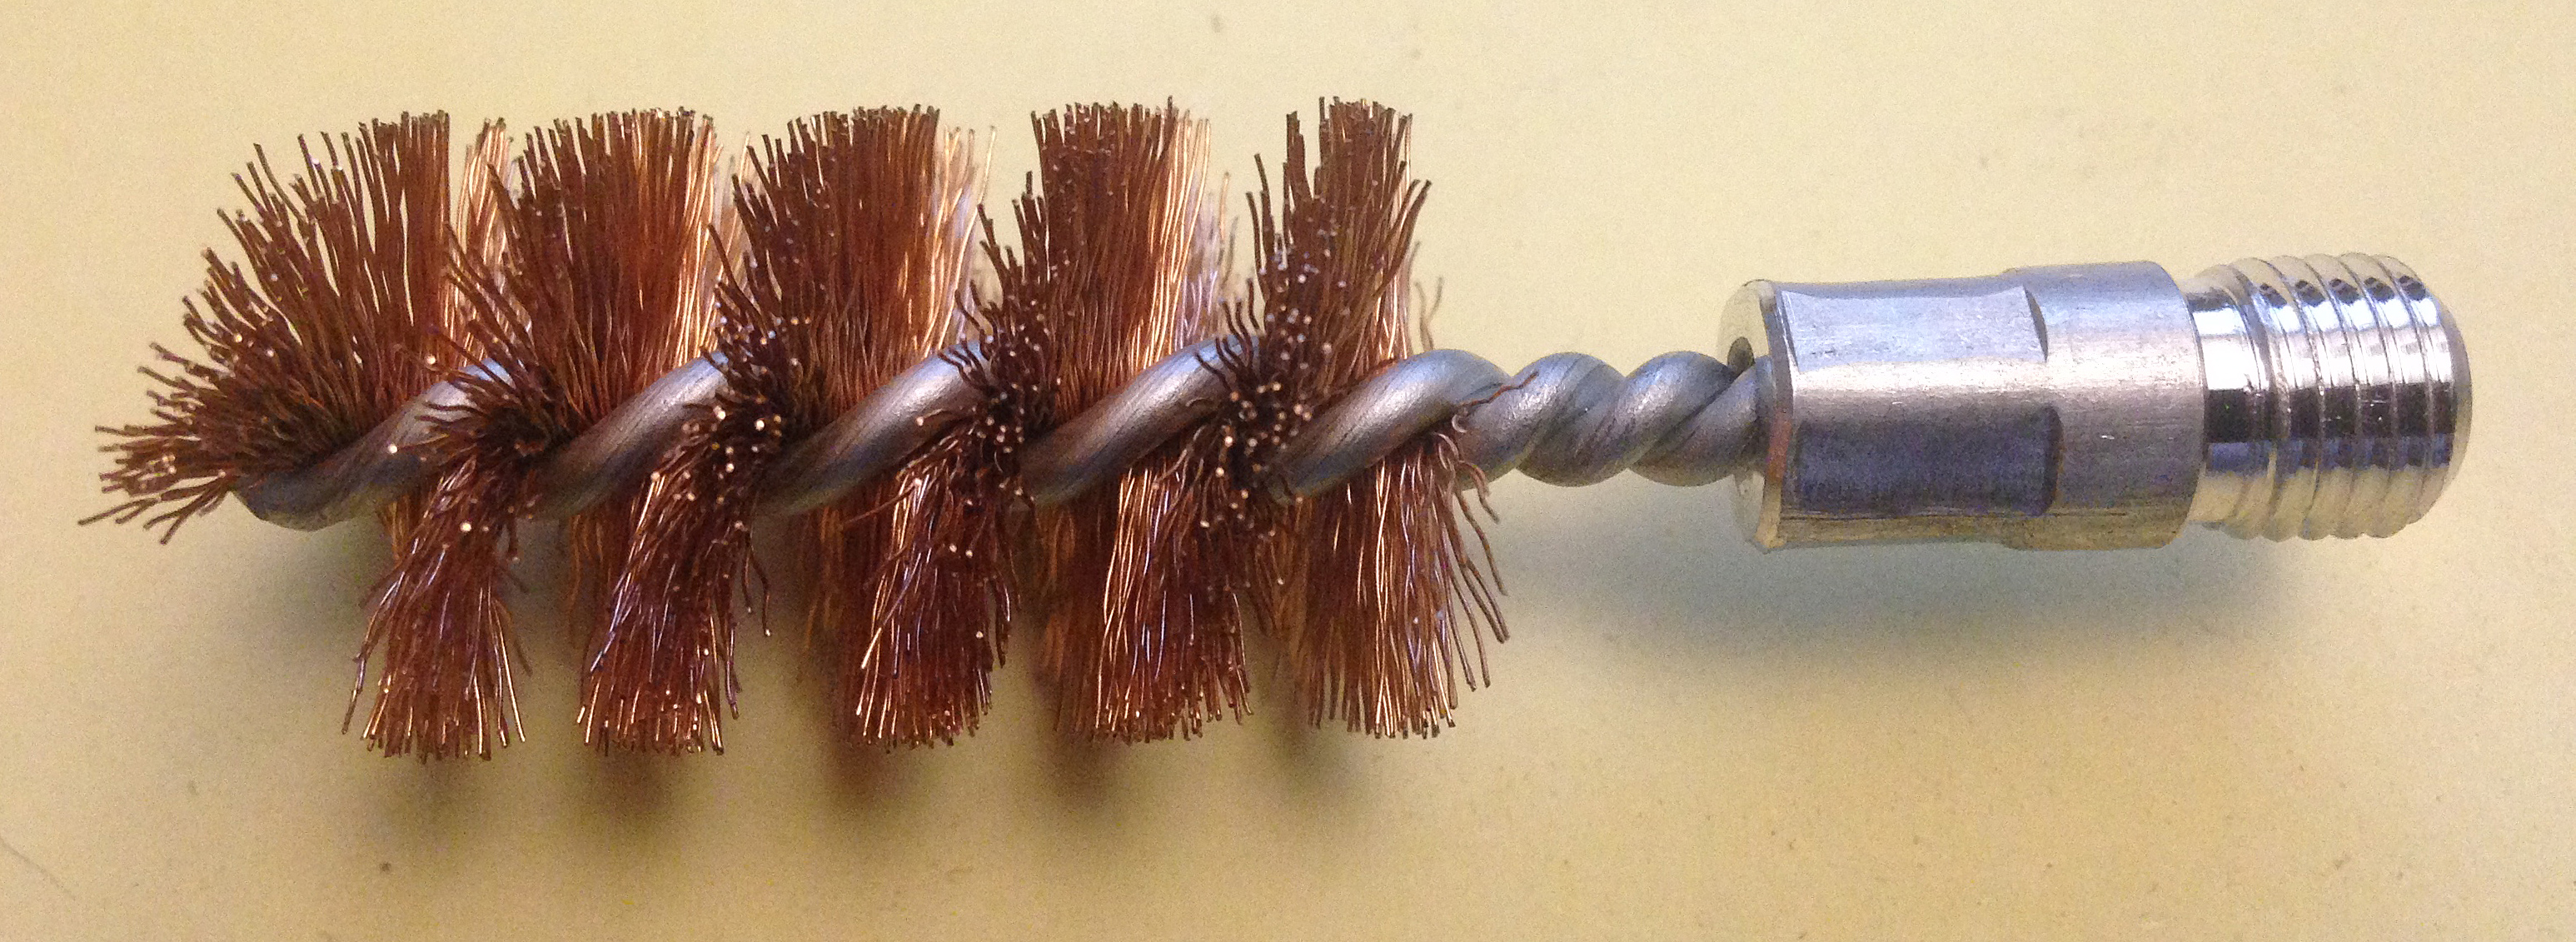
For those of us with a late 70's 280z folks with Fuel Injection there is a hidden part called the flame arrester. My 77’ came from previous owners with various failed attempts at maintaining said Z. Like mine, there is probably a chance that the Valve Cover Ventilation Hose has been replaced. If so, check to make sure this part is in there and if you replace the hose be sure to remove and insert it into the new hose. It is part #5 from this page of the FSM. Mine did not have this and since it is NLA I came up with this really inexpensive replacement. It is a quick and easy part to substitute with very little effort behind it. You will need : (1) 20 gage bore brush (for cleaning shotgun barrels) (2) Needle nose pliers (3) and a bench vise or something to hold the bore brush firmly. 20 gauge bore brush available from any retailer with a sporting good section. I paid less that $2 for this one. It fits snugly into a 5/8” valve cover hose. Next, place it in a vise and Pluck out the bottom section of bristle. The reason to remove some of the bristle is to allow air flow. The original part was less densely packed than this brush. I have no calculations to go by other that the picture of the original part. It’s only function is to stop any flame going through the tube, not to impede air flow. I think the finished bore cleaner resembles the original pretty well. The bristle is held in place by the tension of the twisted wire. After the first few pulls the rest will come out very easily. It will leave a bunch of little wires Once you pull off about half of the bristles place the top of the bore brush in the vise. These will be loose so be careful. They want to make a mess. The aluminum base will come off easily with a twist leaving just the wire. Now, just twist/retighten the wire with the remaining bristle. Make sure there are no loose wires. You don’t want those to get into the head! Now trim it if you want with some wire cutters. It’s ready to go! Finished flame arrester. Here is where it will fit. Place it in with some needle nose pliers. It just has to go in far enough to clear the nipple on the valve cover.

 Glad to have you here Mike! Tons of info and help here for anything you want to do Z wise.
I think the Glam Rock era from the 70's and the Hair bands from the 90's might have had a little too much influence on you.
, we're gonna be famous!
Glad to have you here Mike! Tons of info and help here for anything you want to do Z wise.
I think the Glam Rock era from the 70's and the Hair bands from the 90's might have had a little too much influence on you.
, we're gonna be famous!
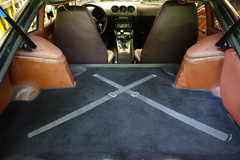
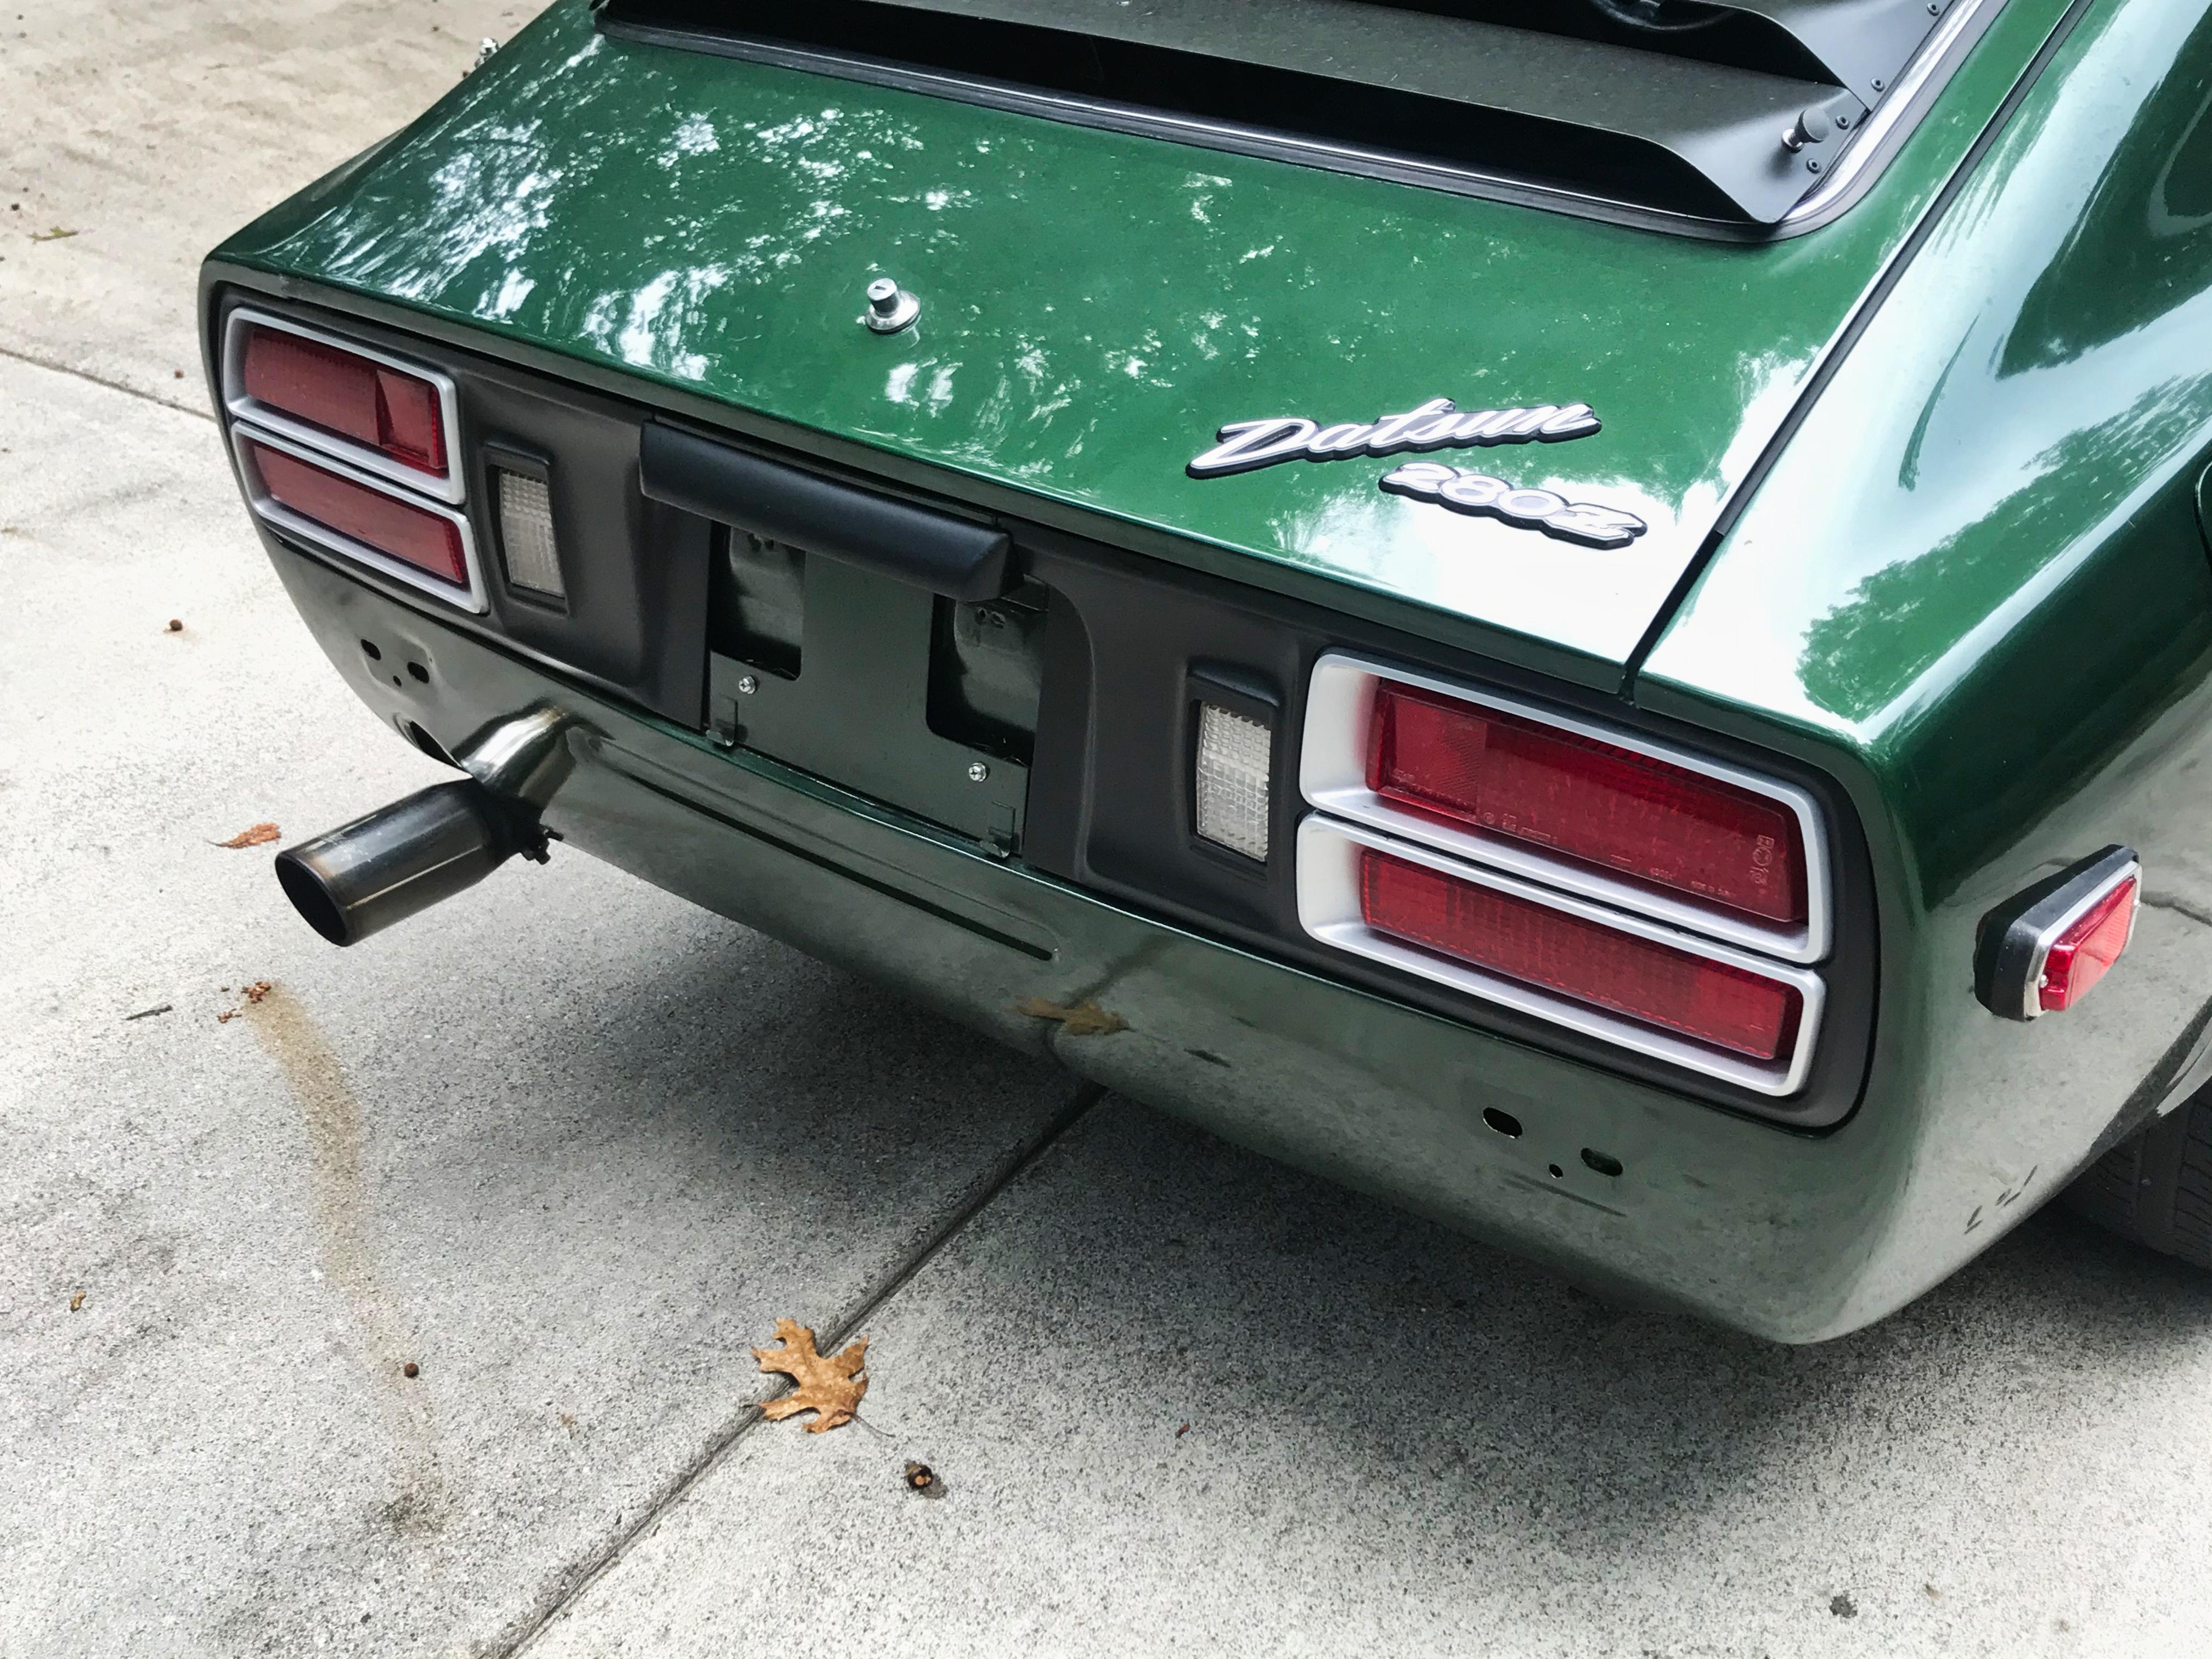
From the album: 77 280
1977 280 rear hatch with luggage straps
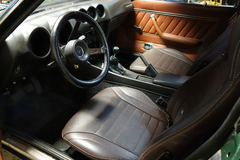
From the album: 77 280
1977 280 driver side interior
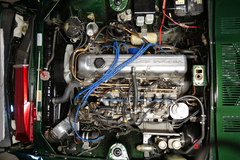
From the album: 77 280
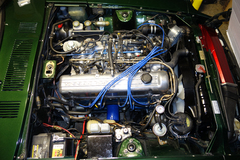
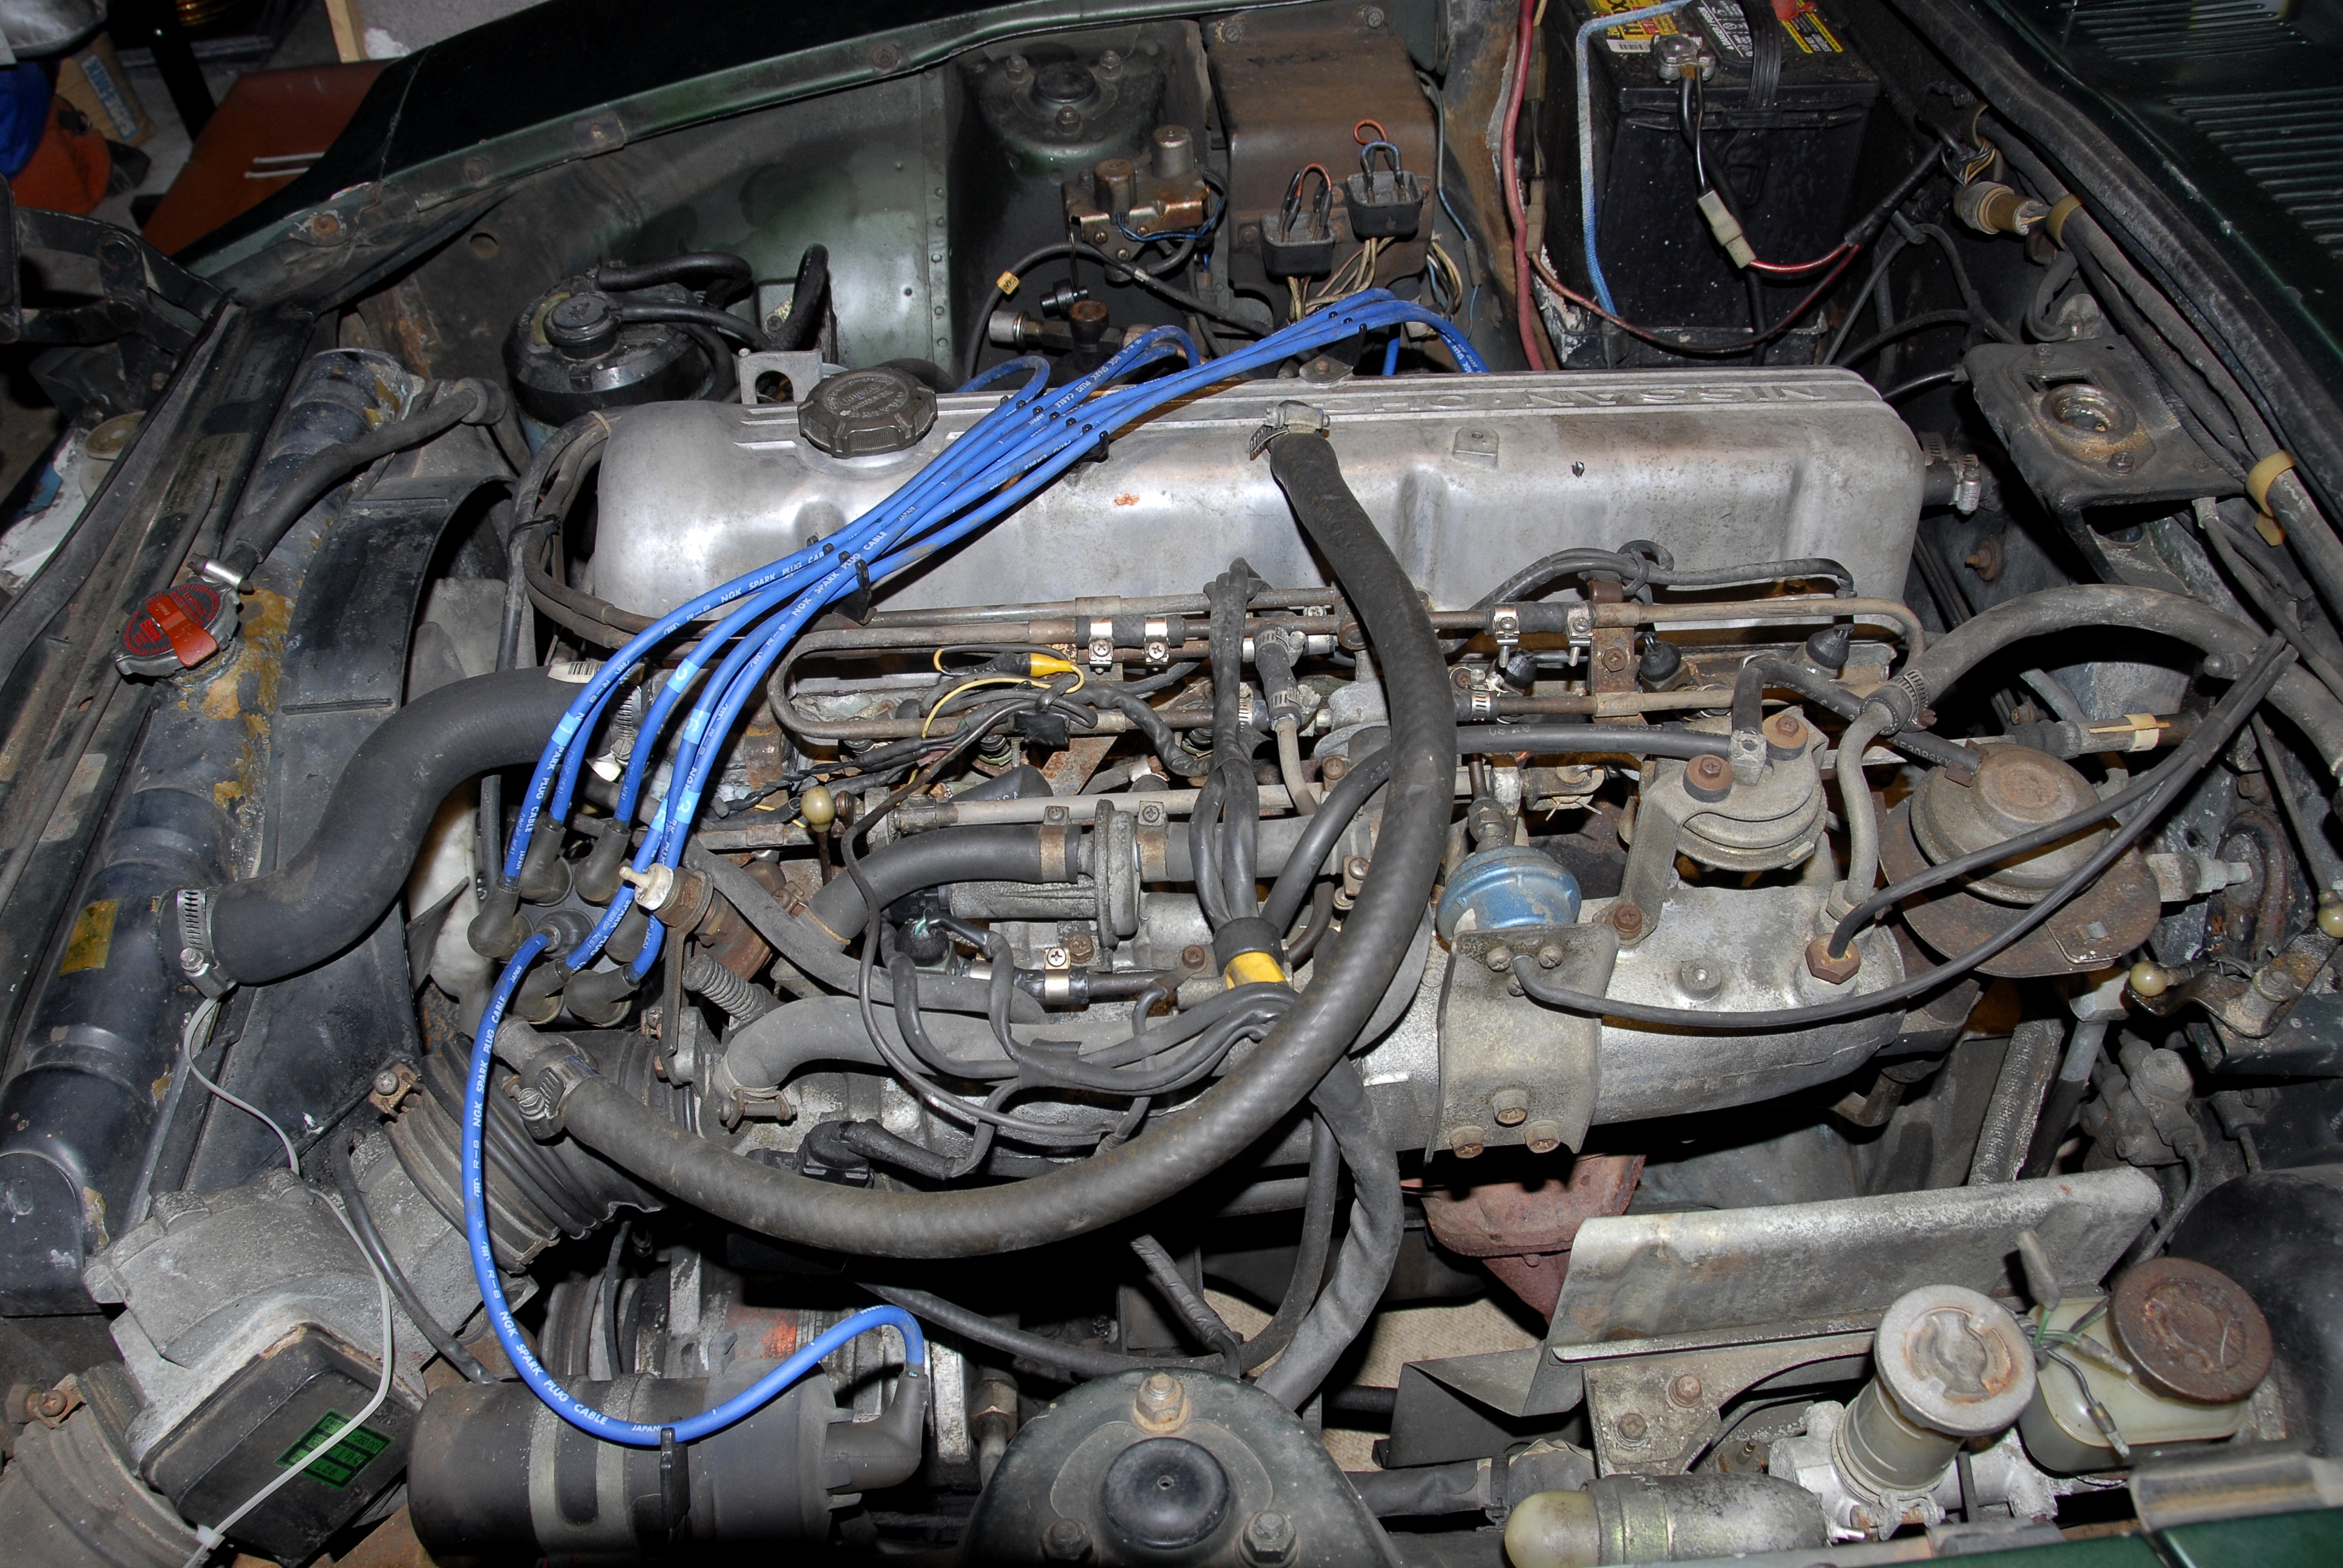
1977 Bone Stock L28E, Bosch EFI
I painted mine with the engine in. I did't want to remove a perfectly running engine just to clean it up. Mine is more of a driver than a show car and since it is the engine bay and prone to future grease, oil and scratches, I felt like it did not have to be perfect but be better than the original factory finish. Yours sounds like it is already at a good starting point. Instead of a spray gun, I went to a automotive paint store and and had them mix my paint code (#240) in Acrylic and put it in a couple of Aerosol Spray cans. Much easier than getting a spray gun in there IMO. I could do the hard to reach spots like the battery tray area. You just have to be careful where the nozzle is aiming. Then I worked on one side at a time, cleaning, removing parts, and masking anything left Like AC hoses, wiring harness, etc. with masking tape and Paper shop towels. The trick with keeping it cleanable and shiny is to clear coat. It had to be compatible with the enamel. Got that at an Automotive store. The firewall was the hardest with the brake lines still attached. That is why I did one side at a time. Overall, I'm happy with the results considering nothing major had to pulled. As a bonus, I even painted the visible parts of the engine block with ford blue using the same method, I keep an extra can of paint since there is always something to do under the hood and I can retouch or re-do something if needed. I have posted before and after pictures on the AFM boot thread if you haven't seen them yet.
deleted
The ported boots are still available new from various places. If you are looking for a used ported one, I have a couple. PM me if you are interested.
Thanks for the explanation Blue. Summation: Fire = bad. Mine is not original so there is currently no flame arrestor. Now I have to go back to the un-asthetic garden hose look and try to make it presentable. Maybe I can put a bow on it………...
I've wondered about this also. I believe it was changed it in mid 77' and I think you are right about the AAR. Maybe they had some complaints or took note of dealer repair frequency for the FI? My 01/77 had been reconfigured to the new boot when I found it. But it just didn't look right to me, kinda like a wang laying across the manifold, so I routed to back to the old way and capped the boot. I don't know if I'll run into any problems later or not. fingers crossed . Before and After
 I think Z car Source of Arizona may have a used one. Worth a try. http://www.zcarsource.com/air-flow-meter-boot-to-throttle-body-280z-75-4-77-used_8_55228_52816.html
The diameter of the throttle neck is about 2 1/4" and the diameter of the AFM is about 2 5/8". The stock connecter is a pretty snug fit. The hose you found go's from 2" to 3" so there would need to be a little stretching on the 2" side and some compressing on the 3" side. I suppose it would do if you had nothing else available as you would have to make it fit properly. But it is not enough of a savings cost wise (about $40?) overall to justify the struggle IMO.
For the 280, it is recommended to remove the front fender to access the six bolts attaching the hinges to the body. It's a Less chance to scratch all that pretty new paint. But, you can just loosen the fender by removing the bolt nearest the door towards to top (you can see it when the door is opened) and the bottom bolt(s) under the fender behind the wheel. Also remove all of the bolts along the top inside the hood up to the headlight. Then take a medium size screwdriver or whatever and prop the fender away from the body. That should allow enough access to loosen/remove the six 12mm bolts holding the hinges. If you need to access the inner bolts holding the hinges to the door, I found that a 12mm ratchet wrench works best. You might be able to use a socket on one or two of those.
1974 and $35 an oz? Ya'll must have got the good stuff! I vaguely remember (and I do mean very vaguely) $15 maybe $20. But then again I've always been cheap and I still have all my digits.
…….and wash your butt. Your dog will appreciate it.
I think Z car Source of Arizona may have a used one. Worth a try. http://www.zcarsource.com/air-flow-meter-boot-to-throttle-body-280z-75-4-77-used_8_55228_52816.html
The diameter of the throttle neck is about 2 1/4" and the diameter of the AFM is about 2 5/8". The stock connecter is a pretty snug fit. The hose you found go's from 2" to 3" so there would need to be a little stretching on the 2" side and some compressing on the 3" side. I suppose it would do if you had nothing else available as you would have to make it fit properly. But it is not enough of a savings cost wise (about $40?) overall to justify the struggle IMO.
For the 280, it is recommended to remove the front fender to access the six bolts attaching the hinges to the body. It's a Less chance to scratch all that pretty new paint. But, you can just loosen the fender by removing the bolt nearest the door towards to top (you can see it when the door is opened) and the bottom bolt(s) under the fender behind the wheel. Also remove all of the bolts along the top inside the hood up to the headlight. Then take a medium size screwdriver or whatever and prop the fender away from the body. That should allow enough access to loosen/remove the six 12mm bolts holding the hinges. If you need to access the inner bolts holding the hinges to the door, I found that a 12mm ratchet wrench works best. You might be able to use a socket on one or two of those.
1974 and $35 an oz? Ya'll must have got the good stuff! I vaguely remember (and I do mean very vaguely) $15 maybe $20. But then again I've always been cheap and I still have all my digits.
…….and wash your butt. Your dog will appreciate it.


Important Information
By using this site, you agree to our Privacy Policy and Guidelines. We have placed cookies on your device to help make this website better. You can adjust your cookie settings, otherwise we'll assume you're okay to continue.