ensys
Free Member
-
Joined
-
Last visited
Everything posted by ensys
-
RE: '77 280Z Gentle Readers: I need to understand the procedure for gently removing the door's upper chrome moulding (w/squeegee), to be accomplished without (with the emphasis on "without") any damage to the existing (in this case, original) paint on the door or surrounding elements. As I understand it, there are no actual fasteners involved, and that the moulding mounts with clips. Can it be done with the lowered window in place, or must it be removed from the door? Would it help to cut off the original (and now ossified) rubber squeegee? What about the inner fuzzy strip? Must the window or door card be removed? A couple of the few "first-time" efforts still left to me on the Old Z Drvr, and I am loathe to cause any damage while I replace some perished soft parts on the doors. Your suggestions are greatly appreciated.
-
RE: Happy Ending As I stood on the threshold of seizing recent opportunities, I stubbornly said to mySelf; "Self, one more time". So I donned my HAZMAT gear to troll the turgid nooks and crannies of my overstuffed garage... And lo and behold, there they were, in plainer sight than I care to admit, wrapped in an unexpected guise still fresh in their last coat of paint, and chuckling to themselves over their cruel joke. Thus, my search is absolved by the return of the prodigal wipers To those who troubled to offer suggestions/opportunities, my thanks. Stout Lads. Semi-interesting footnote: My Original wiper arms are of the configuration (side-post pivot) shown in the FSM, but which is rarely seen in the wild, aparently. Even the web Parts Manual shows a blade-to-receiver joint to the head. Who is crazy, or is it just another reality shift.
-
RE: '77 280Z Hello All: All that stands between my recently refreshed '77 280Z and the open road, is a missing pair of windshield wiper arms (R & L) and heads (blade carriers). As these items will be used frequently, the OEM pieces will have to be not damaged and completely serviceable. No junk, please. Please reply to <ensys@michiana.org>
-
Then there is this: I have found no reference to the piece of wiring harness that would connect to the main (by the glove box), and extend thru the engine room to the fan (which is shown mounted to the fan sheetmetal bulkhead in front of the radiator). In addition, as so ably noted by Mr.O, one wire is hot, and the other is switched, implying that there is a relay (and its harness) involved in the fan installation. Of course, the likely scenario would have the in (water) line switch (shown in the diagram) connected to this relay for automatic temp-sensitive operation; that would require yet another piece of harness... Interesting mystery, eh?
-
All: This has been very informative, indeed. I too, am surprised by the location of the stub outs; I also was looking in the engine room for them, since the parts manual image of the fan didn't show a very long harness. Very curious. On the plus side, it promises to simplify my re-tasking wiring quite a bit. Tho my Calif. car w/A.C. had no such fan, I still think it was intended to address heat issues, particularly in urban situations (tho admittedly, it would be useless to combat heat soak). Still, it was offered; perhaps the key is "optional", and was born as a potential remedy for disgruntled customers in particularly hot climes. So, would it be correct to assume that no one has ever seen one installed?
-
So I am wondering about the aux. electric cooling fan for the ('77) 280Z. - Most references call the fan "optional"; any opinions about how frequently 280s went out the Factory door with this fan mounted on the radiator? - Or was the fan more often an after-purchase, dealer installed kind of thing. - And now, the $64 question: exactly where are the two connectors for the fan to be found on the stock harness? Thanks for looking.
-
Well folks, I am still looking for blanking plates, both for the console's vertical upper group: - for the 45mm x 29mm "Seat Belts" hole (same as hole on the other end). - for the 23mm x 29mm center hole. Thanks
-
-
Well, if one is picky, the issues of texture, edge finish, and attachment make a respectable fabrication unlikely. The blanking plate offers the best opportunity for modification that looks like it belongs without making an irreversible change to originality. Speaking of blanking plates, I find I also need the square one in the middle of the same grouping. Thanks.
-
All Today's adventure in Parts Hunting starts at the center console of a '77 280Z. Attached thereto is a "Fasten Seat Belt" light fixture, located on the upper vertical panel, just below the radio. It is this fixture that is the subject of the following questions: Hope no.1: Was there, in any model, an instance of a blanking plate for that hole size? If so, does anyone have one they would part with? Hope no.2: Does anyone have a "Seat Belt" fixture housing (bulb holder not required) they would part with? Hopefully,
-
Mr.Patcon: Thanks for the attempt to translate, but in fact (and as illustrated in my story), "looks" are not the primary criteria at all, tho they do have a place in the equation. It is the experience of many people that with old cars, a long and often uncertain past should be enough to make one think twice all by itself, but add the element of a disreputable appearance, and refurbishment becomes a no-brainer. Especially if other tasks provide the easy opportunity to do the job, as in the case of Mr.Gothem22's in-hand injectors. This paradigm is especially true with cheap old cars, which only remain feasible when personal labor can stand in for money. See "taking the time to do it right the first time is always cheaper than making the time to do it over", above. Of course, I will concede that if one's past operations make doing more damage than good the likely outcome, I can understand their trepidation at doing what should be done. My personal issue with the caveat of "a man should know his limitations", is its application to one's level of skill implies "I can't learn more", which leads to "I give up", a form of defeatism that is too easily communicable. This is what leads to infectious despair and the sale of "projects" half done. I happen to believe that the point of this kind of forum is to provide a learning experience thru shared knowledge and enthusiasm. Maybe I'm wrong, but I don't think so.
-
Mr.Head: Sorry you find the point obscure. I'll try one more time to be more clear; don't complain if you find it blunt. Only a fool trusts luck.
-
(accidental duplication)
-
Mr.Head: Word-wise, what I intended was: "responsible", as in "to one's self" "prudence", as in "taking the time to do it right the first time is always cheaper than making the time to do it over" And you're right: "could" is the guts of that matter. To each his own of course, but I tend to believe that gambling with the results of one's work, is generally a lazy sucker's bet.
-
All: Well, if anecdotal evidence is going to supersede responsible prudence, I will tell my story. My Z's mechanicals were in very good condition, outside and in. But the soft parts were old after 200K. mi., and refreshing the engine included full hose changes. Since they were on the bench, I naturally checked them and found that their volumes and patterns varied some, making a simple cleaning a no brainer. The operation was brief (in relative terms) and successful. Sidebar Note: Yes, I should have mentioned the need to "backflush" the internal wire screen (which, at the time and in retrospect, seemed a better idea than trying to remove/replace same). It was the last step of the clean cycle (which pointedly excluded H2O, of course), which had removed nearly all the trapped matter. This final step was accomplished by powering the valve open and applying low power compressed air back up the orifice. This was followed with a final "frontflush" with cleaner. I believe you stated that you wanted this to be the last time you wanted to do a major service on your engine, which has had a full life already... in someone else's hands... with who knows what kind of maintenance (including filters, condition of the tank, etc.). In short, its a crapshoot situation. I believe you owe it to yourself to be as thorough as you can within the given parameters. Or not. Your dice.
-
Mr.gotham22: I admire your youthful enthusiasm and gritty determination. I hope it is enough. Given the shots of the car at the curb, I can understand your hopefulness. Regardless of how it looks under the new paint, it looks like any shiney side issues will wait well enough. Just be careful of your working heats. While it is not my intention to deal in discouraging words, I will, in the name of reality checks, note that your biggest handicap is not the rust, but the lack of a secure enclosed work space. If there is a garage on the premises, commandeer it; the wife will probably understand. If not, try to make some arrangement with a neighbor. At the very least, build an 8'x10' shed to hold your tools (a few small things like a bench grinder and a place to paint will make a difference) and keep vital parts from "disappearing". Plus, winter is coming and enough said about that. Another suggestion: buy a large blue tarp to go over the cushion of the car cover. The tarp will give better weather protection (winter, remember) and make the cover last longer. Plus, you can get a better "wrap" from prying eyes. One more: You might think about some concrete pavers as a make-shift "floor" for the body that would be above the ground water and snow. Practical ideas: I would suggest that the engine should be stripped down to the long block to allow the extensive re-conditioning obviously required for all the vital systems/plumbing on the engine (opening the distributor should be interesting). Plus, you'll need to replace the manifold gaskets anyway. The fix for the broken exh. manifold studs (at each/either end) will probably require removing the head to do it right. Note: the best repair for broken studs (head, manifold-tailpipe joint, etc.) is a careful drill-out, in steps of larger bits, to the point just shy of the threads. Done carefully, one can then just peel the stud threads out, leaving the body threads intact. Be wary of easy-outs; when they break, they are worse to drill out than the original bolt/stud. Have you got a Factory Shop Manual yet? Seriously; Good Luck. The rest is up to you and the good folks on this site.
-
If I may be so bold, I would note Mr....88 that your body did not figure in Toyota's demographic calculations for what was intended as a Japanese market only image car. The bodywork reflected the best of contemporary styling but with a distinctive interpretation that did not betray a derivative approach. The lines are simple and effective without a trace of cliche. But like people, one has to look below the skin to understand what makes it tick so well. DOHC in-line six with triple carbs and cross-flow heads, 5-speed gearbox, wishbones at all four corners, LSD, and largely hand-built. At the time it was released, it was well known that the GT was sold at a "subsidized" price as a halo vehicle. This was a whole different league than the Z, which is reflected in the current values of each. The GT's rarity is just the icing on the cake of investment collecting
-
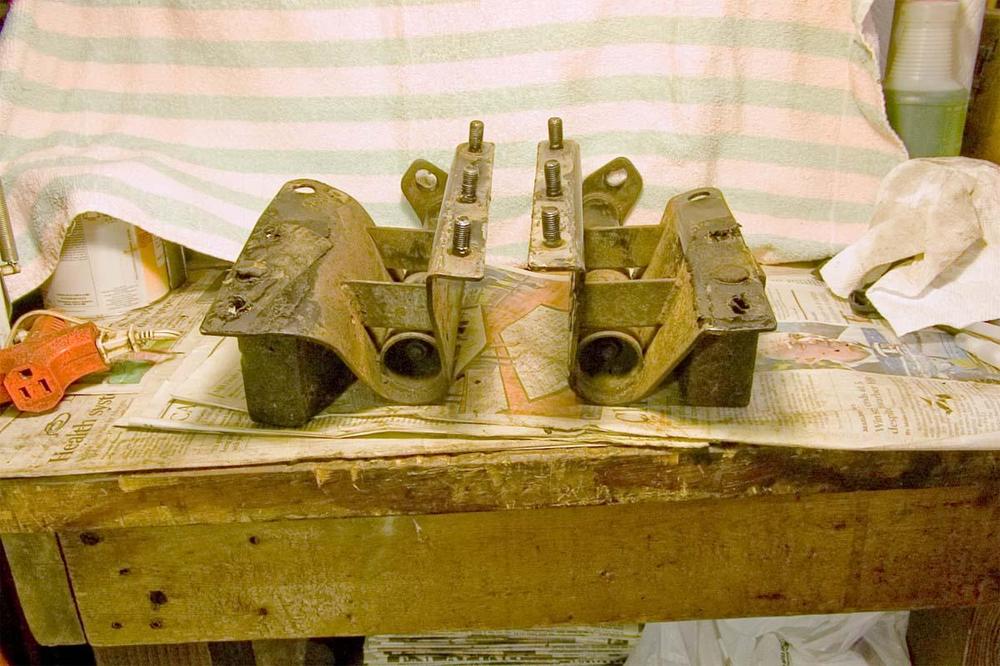
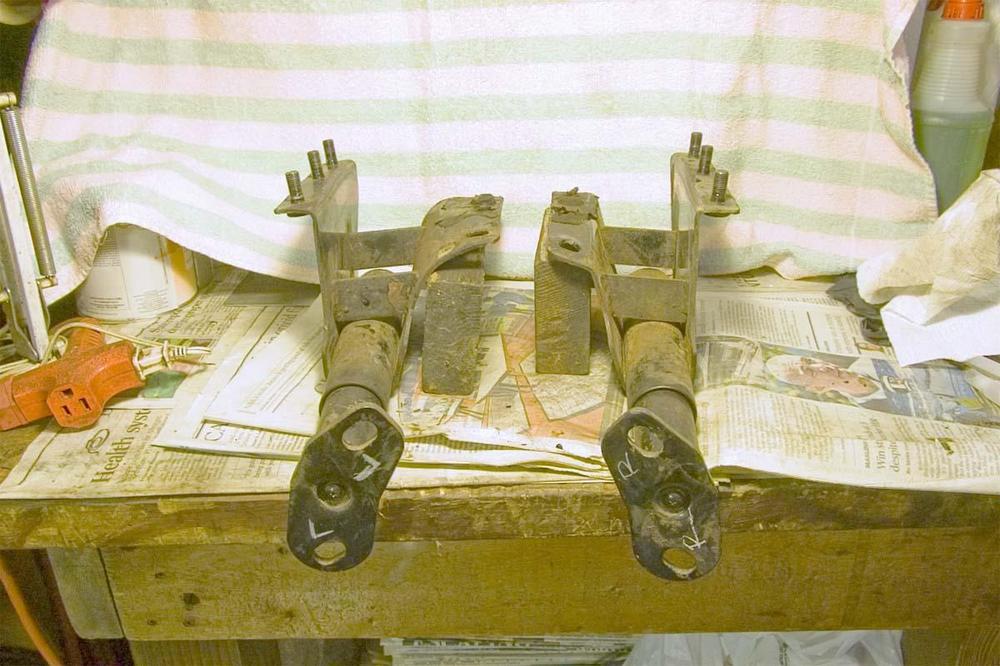
Mr.EuroDat: My good Sir; your thoughtful shots are exactly what I need to effect repairs. I can't thank you enough for taking the trouble. The left one (which has a different bolt-row spread, and thus, different wall config as your fotos clearly show) was the particular issue of concern to me. And the flange edge shots are particularly helpful. Again, my thanks.
-
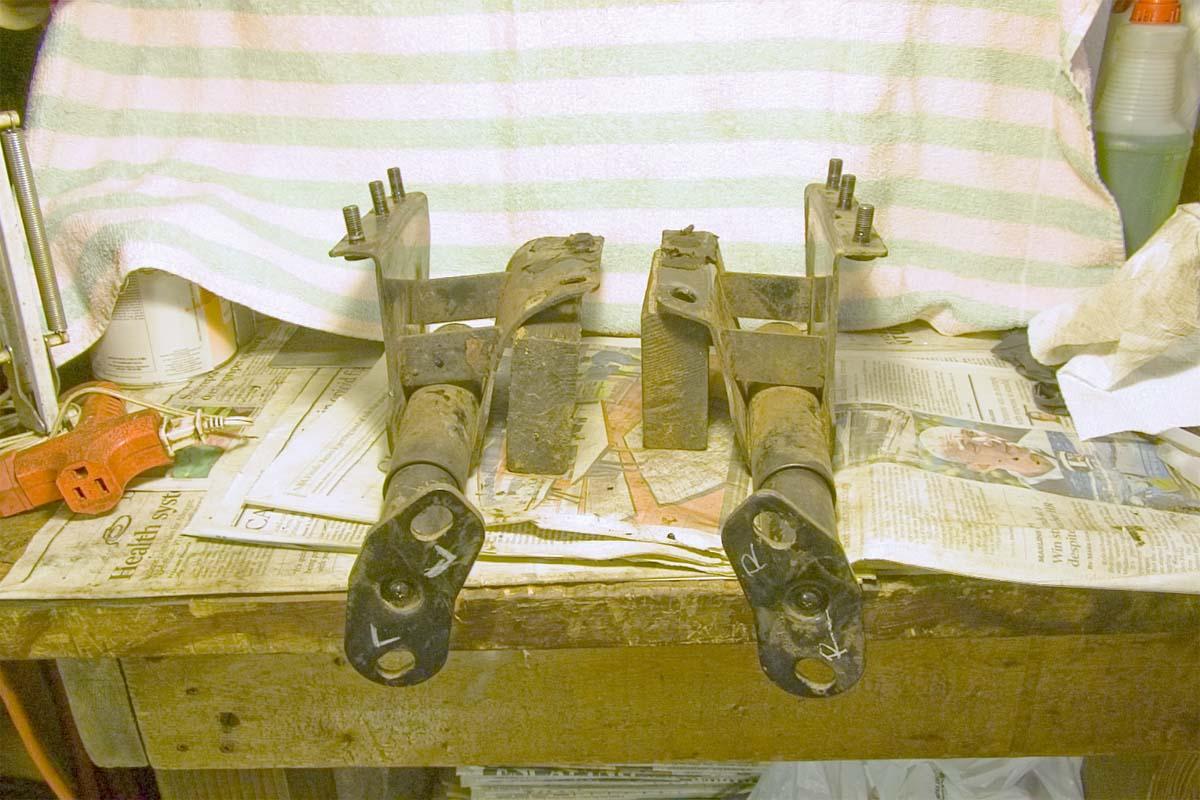
All: I am working to straighten out the effects of a long-ago rear-ender, and the issue comes down to the "before" configuration of the rear bumper rams on a '77 280Z (see fotos) . I think that the right (passenger) side ram bracket is the least deformed, and therefore is the closest model of original configuration, but it would help a great deal to have an unmolested unit on which to base remedial actions. So, can anyone out there offer a comparable shot of a pristine rear bumper ram to provide a model for restorative action? This would be greatly appreciated. Thanks.
-
Are the louvers plastic or aluminum? How do they attach?
-
Mr.Cpt.Obvious: I would note that you can't have it both ways; its either round bottom or round ends (now wouldn't that be an interesting "key" to machine with precision... imagine trying to extract that puppy at Factory fit specs). Mr.ZedHead: And when that end bolt either loses its clamp or the pulley develops sufficient eccentricity in rotation so as to develop tangenal rotational stresses... Well, I believe Mr.rcb280z has graphic evidence of the peril. There is a reason, beyond a passion for precision, that mfgrs. provide such close tolerances in any keyed assembly. It is the last line of defense for rotational continuity. Of course, splines (longitudinal or radial) would do the best job of rotational lock, but they are soo expensive to cut en masse, as opposed to a simple keyway cut. If it was just a matter of locaton, dimples/scribe marks in the parts, or perhaps a shallow longitudinal kerf and inside spur, would do the trick.
-
Mr.rcb280z: First, the Woodruff key has a round bottom to fit into the only slot (round bottom) that can be machined into a crank (ever see a rotary tool that cuts a square-bottomed slot?). When assembled at the Factory, a key that was carefully machined to be tight, was snugly fitted into the slot. This is why every description of its removal demonstrates the need for force and finesse. If you're lucky, you'll find that the new key cannot be fitted properly without removing the front cover. If not, even the correct key will drop in easily. If it does, it means that the once parallel sides of the slot are now not, as one or both have become sloped, assuring further problems in the future. Theoretically, the key should never have come out easily in the last two operations in the first place. Perhaps the failed balancer pulley induced unusual stress on the key, causing enough wear on the pulley slot to hammer the key regularly. Again theoretically, the key should absorb the wear, as they are typically a touch softer than the crank they are fitted to. So, harsh as it sounds, I hope you will be cursing the need to pull that cover; the alternatives to anything more than a kiss-and-a-promise repair get ugly fast. Good luck.
-
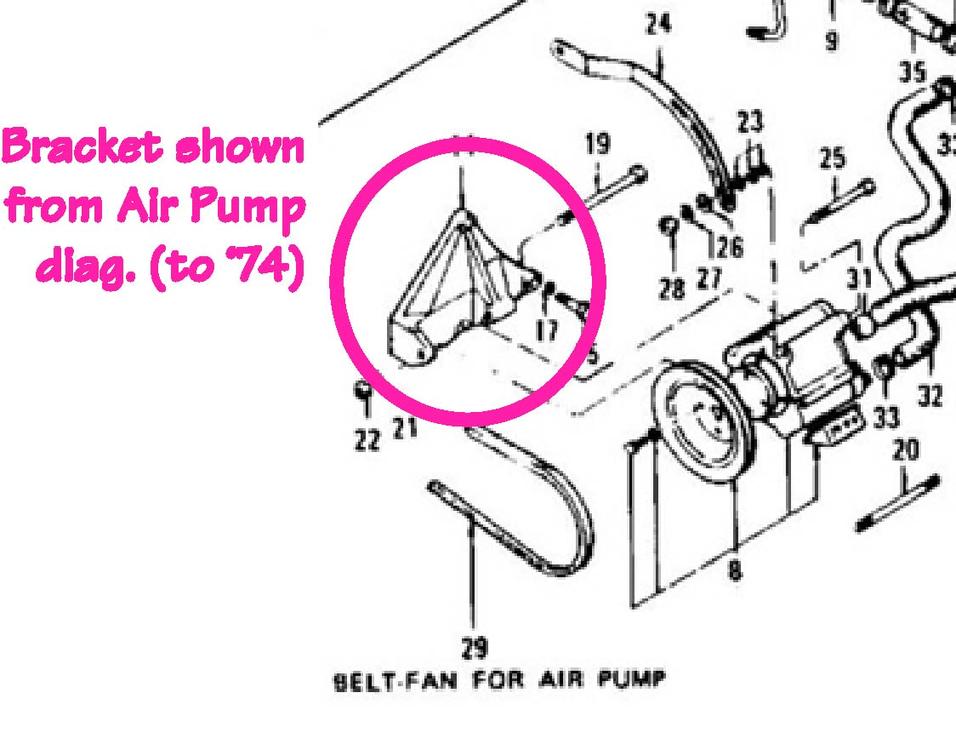
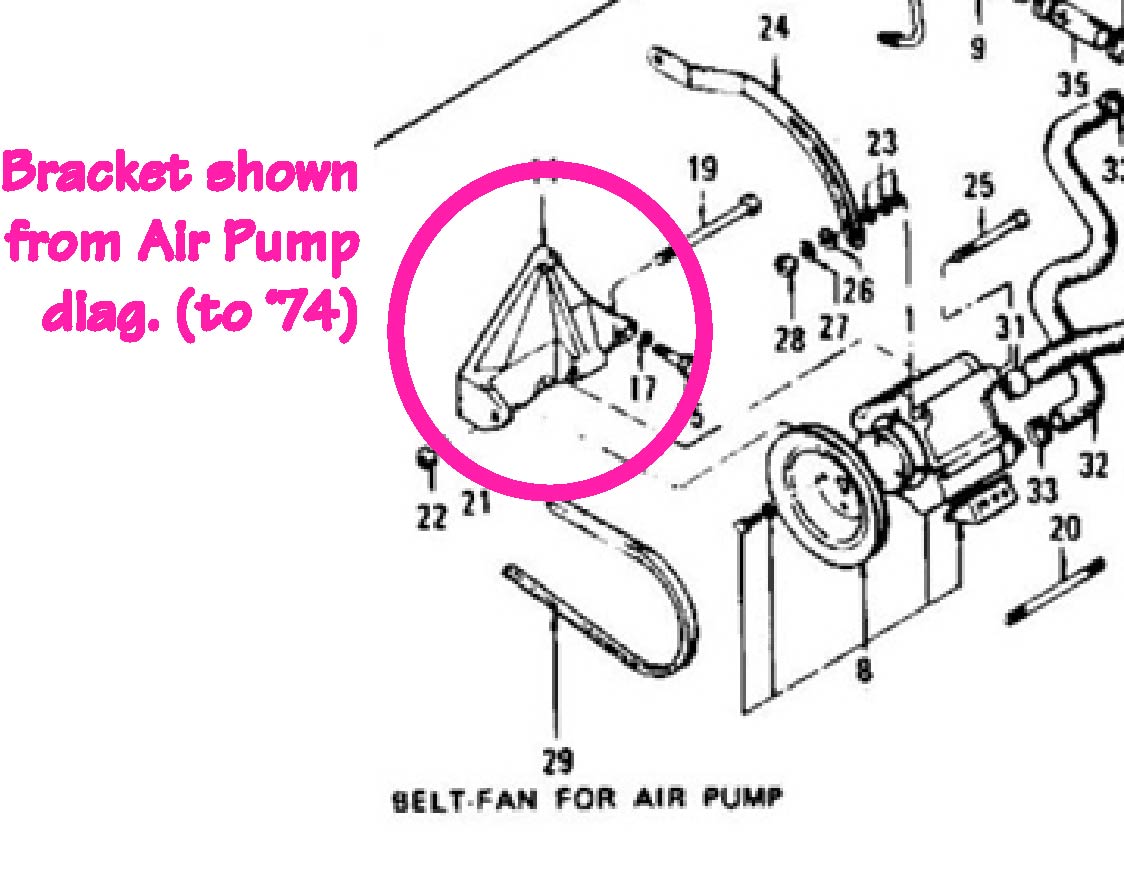
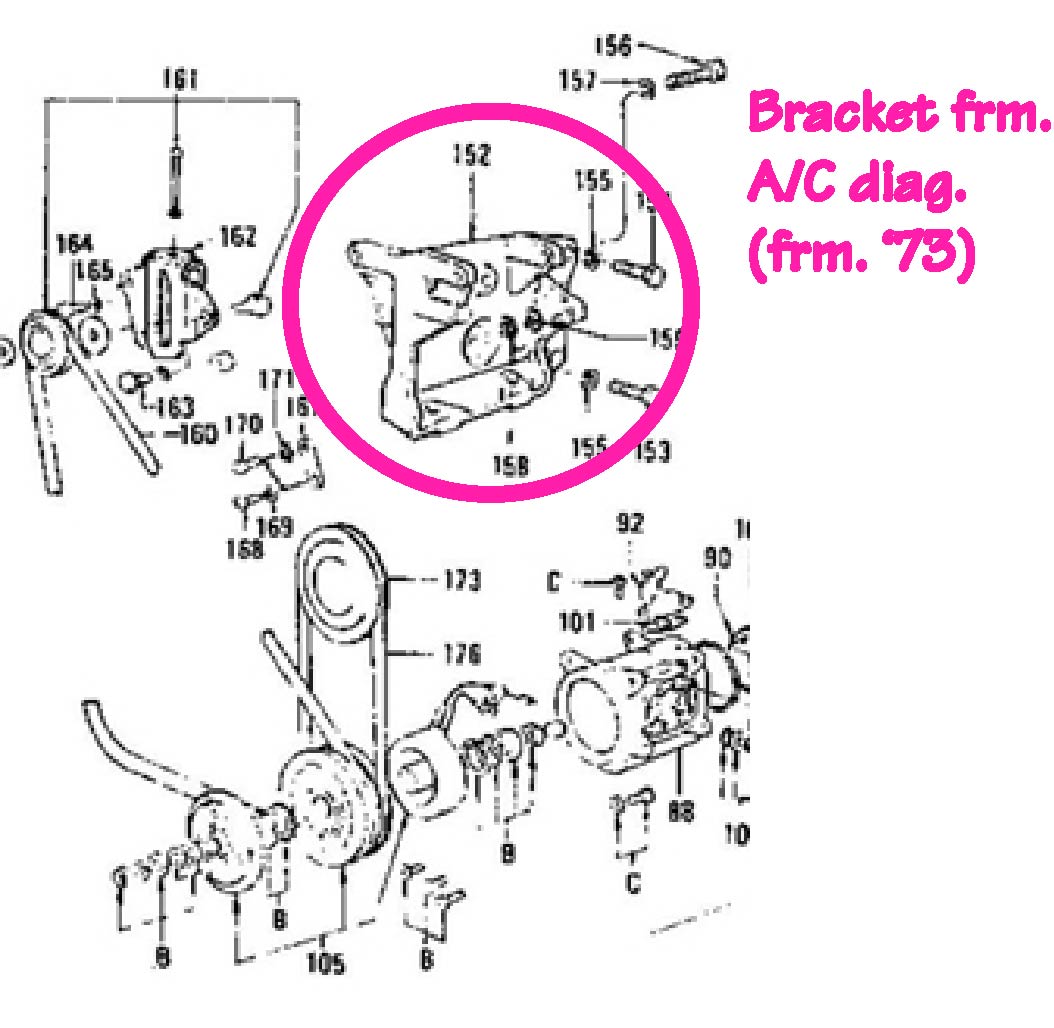
Mr.HS30-H: Aren't those fine illustrations; makes one wonder what Futu-whoever used to make the copies found on their website.... carved wood blocks perhaps. As a bonus, your first fig. also introduces a third config of the lower-left block A/C bracket that while different from that in my fig.3, both diag. share the same tensioner pulley location (but not pulley brackets(!)) high on the right side, just above the water pump. Curiously, the bracket in my fig. looks the most (tho not identical) like the one in my 280, which mounts, as near as I can tell, the very same tension pulley bracket (as in my fig.3) below the distributor on the left side. The curious thing is that the block bracket in my fig.3 looks to be the only one that might mount the A/P bracket by its two lower lugs (tho I haven't a clue where its top third lug attaches... besides the lack of a threaded boss, seems like the breather pipe is in the way), tho its anbody's guess if it (the A/P bracket) would fit between the A/C compressor's top two mounting lugs. Mean while, I have no idea how the very early block bracket (shown in my fig.1 and your fig.2) "figures" into this at all. It seems to be getting murkier instead of clearer. Theories, anyone? PS: Does anyone out there have a foto of the A/P mounted to the block?
-
Mr.HS30-H: Probably a glitch in my less-than-cutting-edge browser, but as your references are neither illustrated nor active, I can only regret missing the potential enlightenment. So, it would seem that between '73 and '74 one could have both an Air Pump (per regs) and A/C. Of course, this still begs the question about where/how the A/P bracket attached to the block, with or without A/C. Does anyone have something to offer about the square bracket in my fig.1? This doesn't look like it could mount any kind of compressor that I've seen, and it doesn't look as if it could accommodate the A/P's triangular bracket either.
-
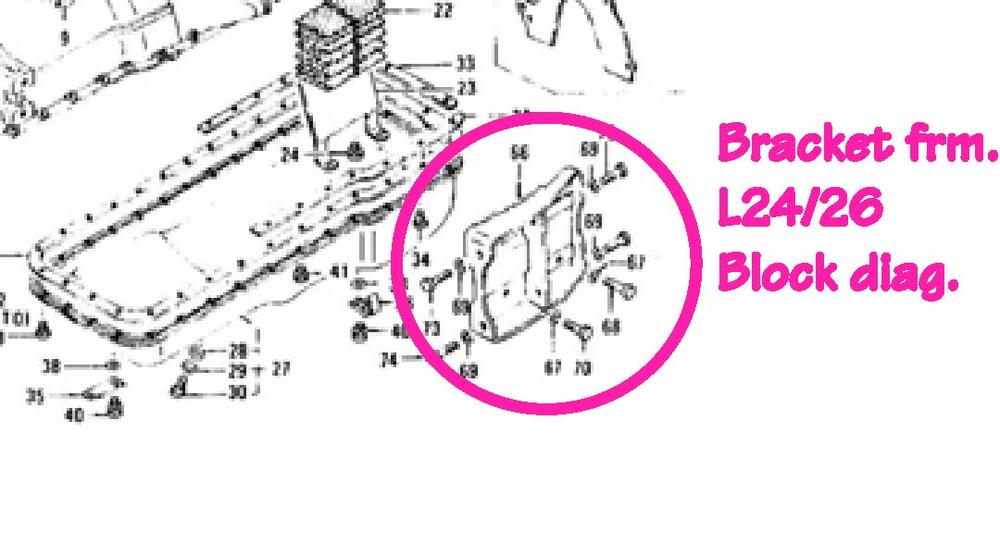
Well, Gentlemen, it's my pesky curiosity that keeps buggin' me about that transition period between the (presumable) intro of A/C in '73 and the end of the Air Pump in '74, not to mention the curious assortment of brackets thru this period. First, there is the bracket shown on the L24-26 block diag. (fig.1, hopefully... first time trying to integrate images... fingers crossed) Then there is the bracket shown in the diag. with the Air Pump to '74 (fig. 2)... And then there is the bracket shown in the diag. with the A/C from '73 (fig. 3), which would seem to indicate a pulley for the Air Pump shown above the compressor (part no. 173)... Now, if Mr.esmit208 is correct, it would mean that for a year, A/C equipped cars would not pass Fed and Calif. smog tests, a condition I can't help finding untenable. As noted above, fig.3 seems to indicate that A/P and A/C co-existed, tho I haven't the foggiest where the A/P bracket was spudded onto the block. And I still don't get what/how the odd "orig." bracket in fig. 1 was used. Perhaps my confusion is the price of geezerhood....