
heyitsrama
Free Member
-
Joined
-
Last visited
Everything posted by heyitsrama
-
 i reapplied some seam sealer on the slam panel area in the boot yesterday, and then got down to some primer earlier this morning. While i was waiting for it to dry i got this Honda CB 500 finally started after i lost a bit of interest when i got into the Zs. I had the coils wired backwards ?. Cant wait to move it out of the garage and get working on the other Z.
 -
ill strip it down and give it another go @Patcon I was looking at some images of your work, I dont see the edge of where the top panel meets the sheet that makes the hatch support, did you fill that area in?
-
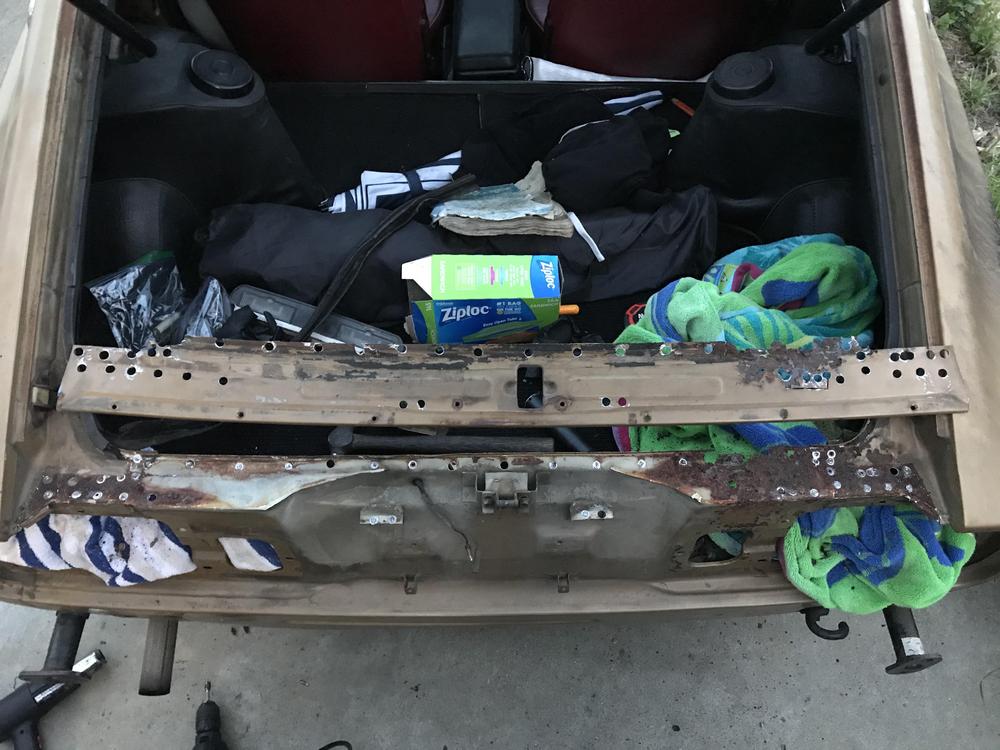
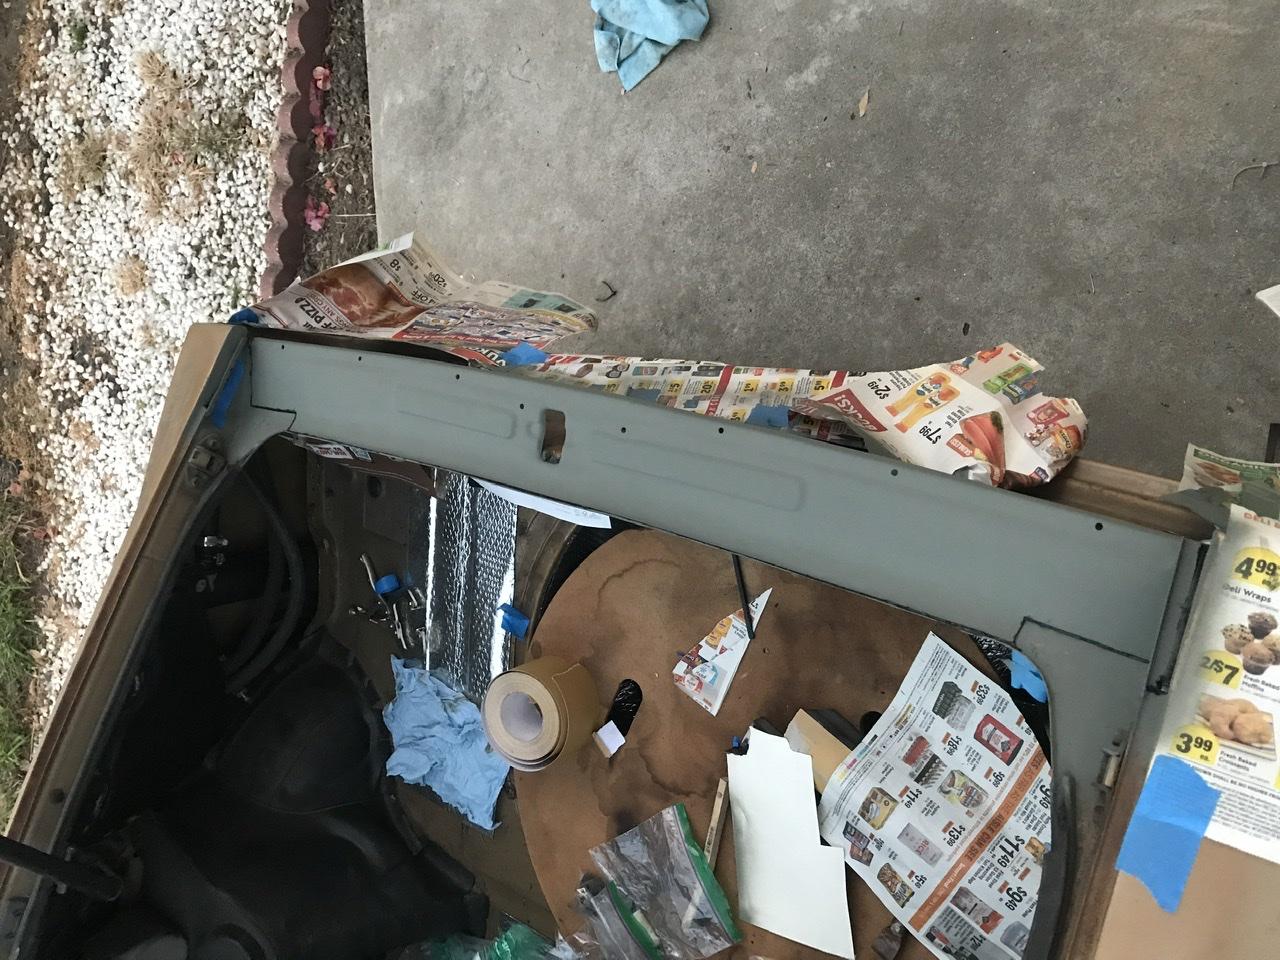
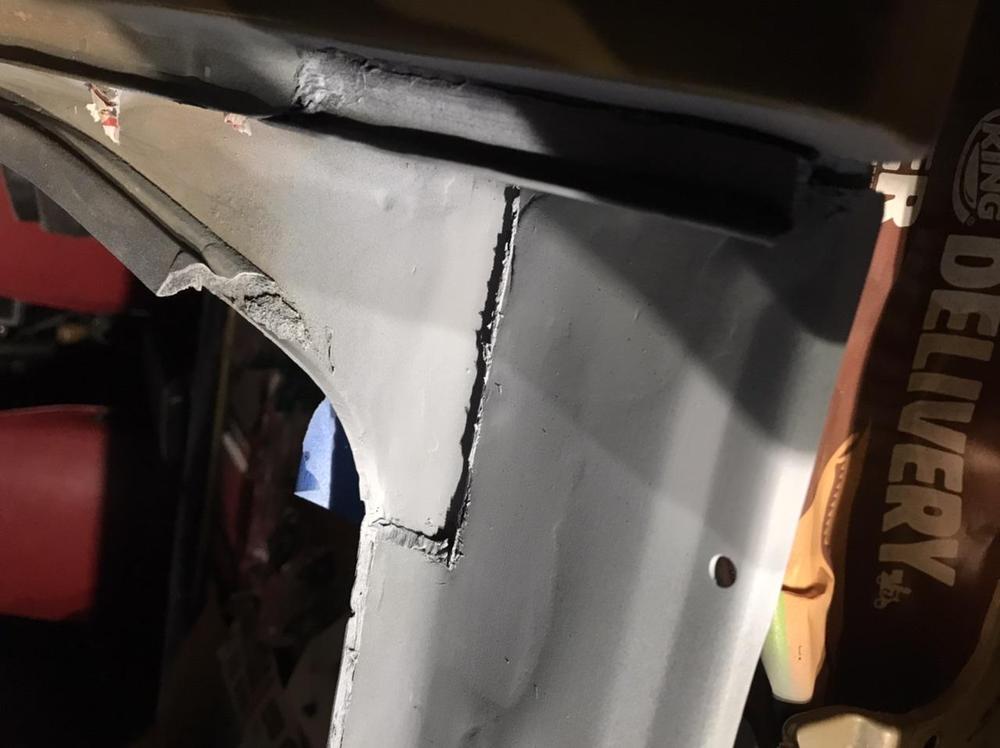
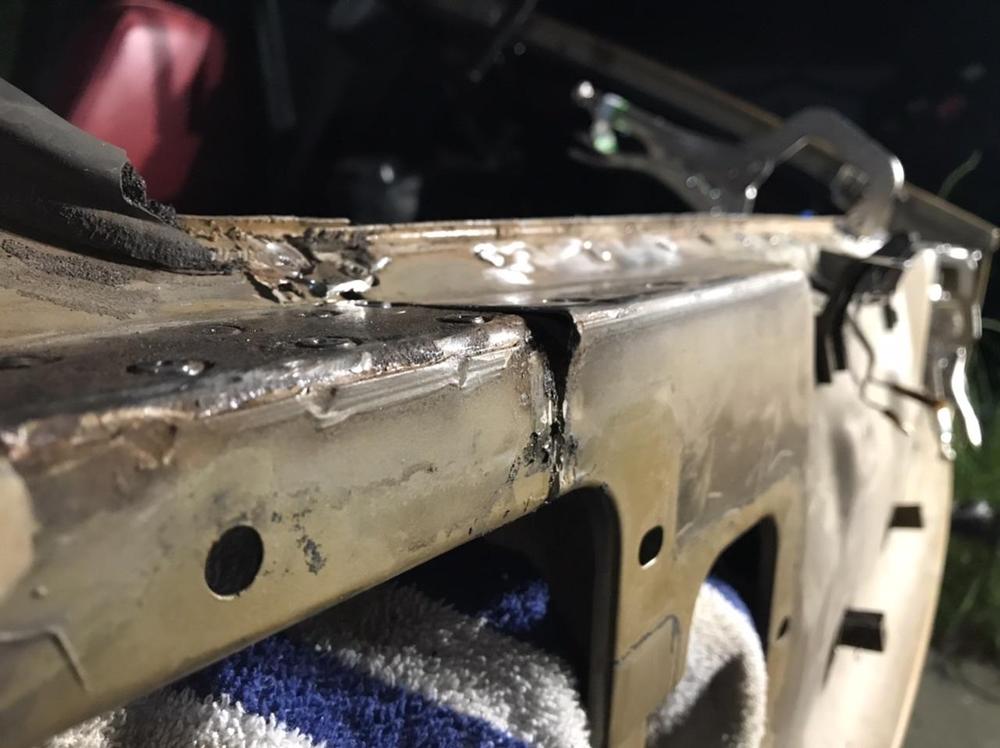
I got the top panel welded in, I applied some etch primer to the bare metal, and now am looking at redoing the seam sealer layer that I added. I’m not happy with how rough the seam sealer looks on the top panel. Does anyone have advise on how to get it more “hidden”? I’m thinking it should cut and remove it all, and reapply it.
-
I got the top panel welded in, I applied some etch primer to the bare metal, and now am looking at redoing the seam sealer layer that I added. I’m not happy with how rough the seam sealer looks on the top panel. Does anyone have advise on how to get it more “hidden”? I’m thinking it should cut and remove it all, and reapply it.


-
from what i can see with the installed windshield there is a slight visual size difference between both gaskets, i notice it the precision gasket when i installed it, there are sections where the oxidized paint shows through. With that being said my whole car needs a respray. ? The white one is OEM, the brown one is a precision gasket. In the end i could not justify the price for OEM, for me the old gasket was leaking water into the cabin and ruining metal work I did. At the time I was a broke college student, now Im a broke public employee ? I'd be curious to see what vintage-rubber offers.


-
I’ve installed a windshield seal from precision (bought from MSA) on my 260z, I had to use some silicon fill seal on the bottom edge to stop a leak. ive used the felt liners inside the doors which work very well, along with quarter window seals, so far they have held up. ive yet to install the hatch seals, it’s next on my list to do, just have to throw down some paint on the tail lights. for the doors I used some McMaster-Kar seals, they worked pretty well.
-
Seems shorter than what i was expecting; i was thinking 20-25 hours to get out there. So @SoCalJim we stopping over at the in-n-out in Reno or what? @Montana Z How did your Z run with the elevation changes? I'm running su-carbs at the moment.
-
drive up to nor-cal and we can caravan out ?
-
from the image that you posted in the other forum it looks like your dizzy/dizzy pedestal is not installed correctly. The thread hole should be on the header side of the motor, currently its on the radiator side (front). Further it looks like your setting the dizzy far too advance, this can cause the backfiring issue you are experiencing. Review the images here in this thread ive linked Read the directions below, then read them again. 1. Remove the Dizzy and set your pedestal correctly (if its wrong, looks that way).. 2. Set the motor to TDC on cylinder 1 on the compression stroke. 2.a You can verify the compression stroke by using your thumb on/in the spark plug hole for cylinder 1 feeling for the air pushing out while the piston moves to the top. 2.b You can use a long metal screw driver to feel the piston at the top ( dont let it hit the piston walls ). 2.cIf you dont feel comfortable with that, take off the valve cover and get to TDC with the cam lobs on cylinder 1 facing out. 3. After you do that you need to verify that the asymmetrical cam gear is pointing in the 11oclock position. 4. reinstall the dizzy that you removed. 4.a When you reinstall the dizzy the cap should be right about to hit Cylinder 1. Start messing with the carbs after you ensure that the timing mechanical AND electrical / valve clearance work correctly. EDIT: Something seems strange about the pedelstal, might just be me at 1am. There should be a screw that fit into the bottom of the dizzy on this side. https://photos.google.com/share/AF1QipMy0E9uWSgHsEd5n8MsPKqvDId_wP16YCQTysMwYCnvx1W_3OKiBFFkNoi5kllmiw?key=X0MzRExUTWlMeHFPMF9GYVlFR1AycUNaMjJ2X093 That allows you to limit the advance that you place on the engine on this side. https://photos.google.com/share/AF1QipOKErtk-ULO01S-PEtXmxC2Y66aMcr2FzODqfCL6ZaUoGLmERZhXyEchPsBuQUbKw?key=VzVMQjR6V1A3bm1rLUtoN1VvQzgtUGgtWTEzWmpR Try reducing the timing a bit. I want to verify the distributor settings, but i cant look at my car, i got it all tucked up for the bit of rain we are to get in the morning. Ill see if i can get pics tomorrow for ya.
-
It’s starting to get hot out! ? dors anyone have recommendations on a high quality sun shield? I say high quality because they tend to fit better than the cheapo eBay one that I have in the car that’s starting to deteriorate. I saw that MSA has one https://www.thezstore.com/page/TZS/CTGY/classic08d09 a little on the pricy side, the rigidity of the panels seems nice. Pictures and Recommendations are welcome! ?
-
With that being said I just realized that my 260z also operates about the same way, is ~6-7 gal to get it from empty to a little past the midway point. Now it’s gonna bother me.
-
I never tried to take my car all the way to empty. I recall the friend time I drove my friend around in my “new car” I ran outta gas, we had to walk back to her place to get a jerry can. see this thread on hybridz https://forums.hybridz.org/topic/64752-240z-gas-tank-capacity/
-
They should make a 400eZ option.... you know with those electrical motors that people are using now days. ?
-
Chad nice to see that you made if off reddit and onto here, I think you can start off with an angle grinder and some stripping bits. Something like this might help remove the paint, not sure how effective it is on the bondo. https://www.amazon.com/Abrasive-Grinders-Flaking-Materials-Removal/dp/B07K19L38B/ref=psdc_552584_t2_B000VRS8YM Note that the diameter of the disk i linked is 100mm ~= 4" If you dont have a angle grinder, harbor freight makes a cheap one (i bought 2 so i dont have to change disks in the middle of working) I was reading on another forum that you can use a propane torch and a scrapper to remove bondo sections off quickly. Maybe try that in a small section. Did you plan on retaining the sunroof?
-
Looks clean TopaZ, that thing needs body work? Maybe a wash and some elbow grease with a clay bar, looks better than my car ha.
-
Happened to me when I was driving in the rain at night to Thunderhill Raceway, glad my headlights were working, turned out to be the fuse that was causing an issue. Did you inspect the fuses? I feel like on the old glass fuses, they can look “ok” but sometimes there is intermittent to no continuity between the sides....
-
that sounds like a pretty good idea, i don't think the smoke machine can cause damage to the muffler... (but im not a mechanic :p).... be careful with the exhaust studs, some of them can be snap happy (especially that bastard cylinder 1 that snapped on me and i never fixed)
-
It should slip right over the top..... IIRC.
-
I just have 1 note about that spring/shock combo and that is the rear does not seem stiff enough, I think it’s a trait from the progressive spring, but if the wallet lets you get Koni Yellows, might be worth it. ?
-
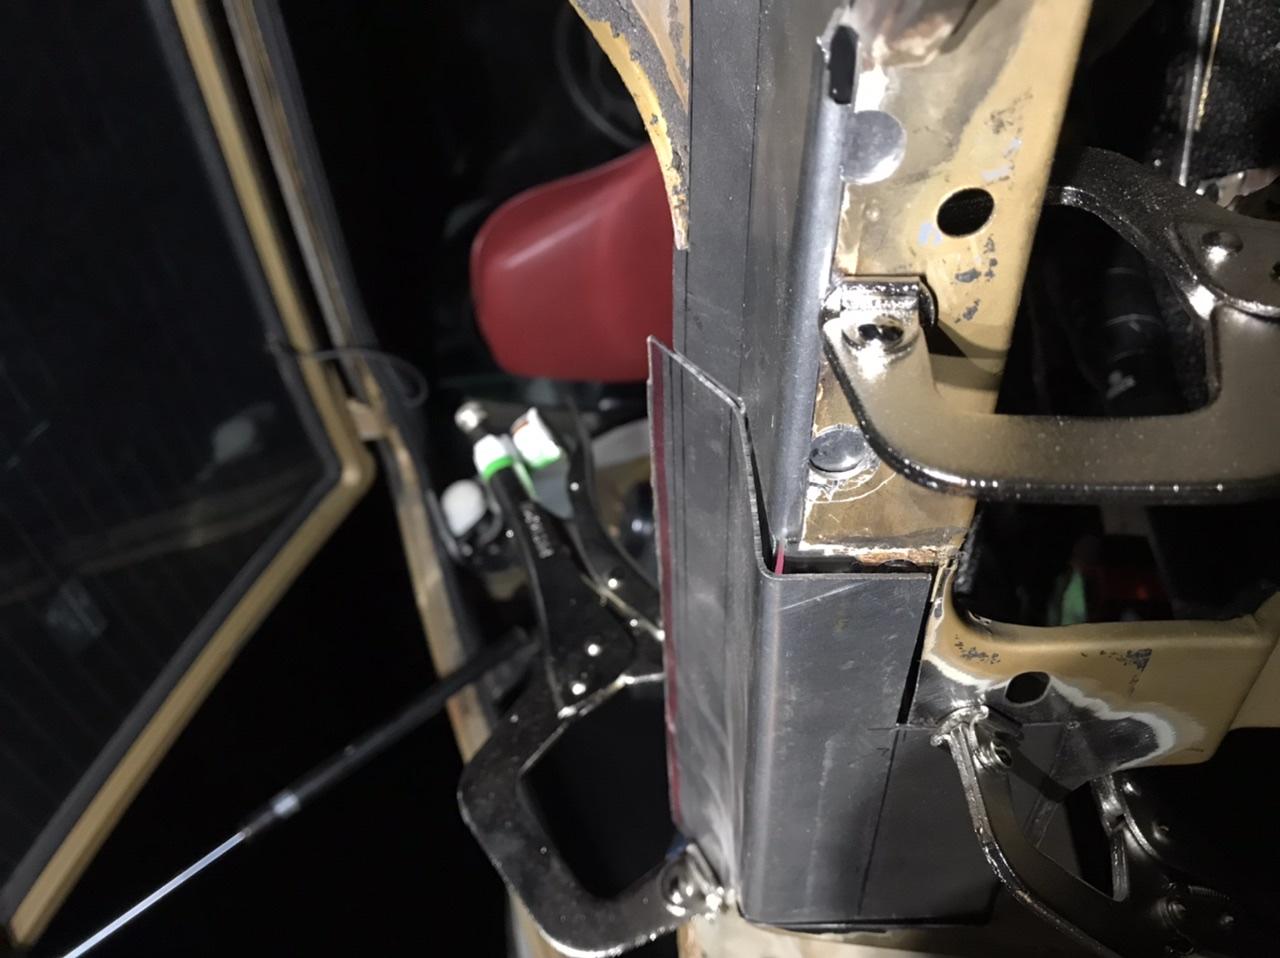
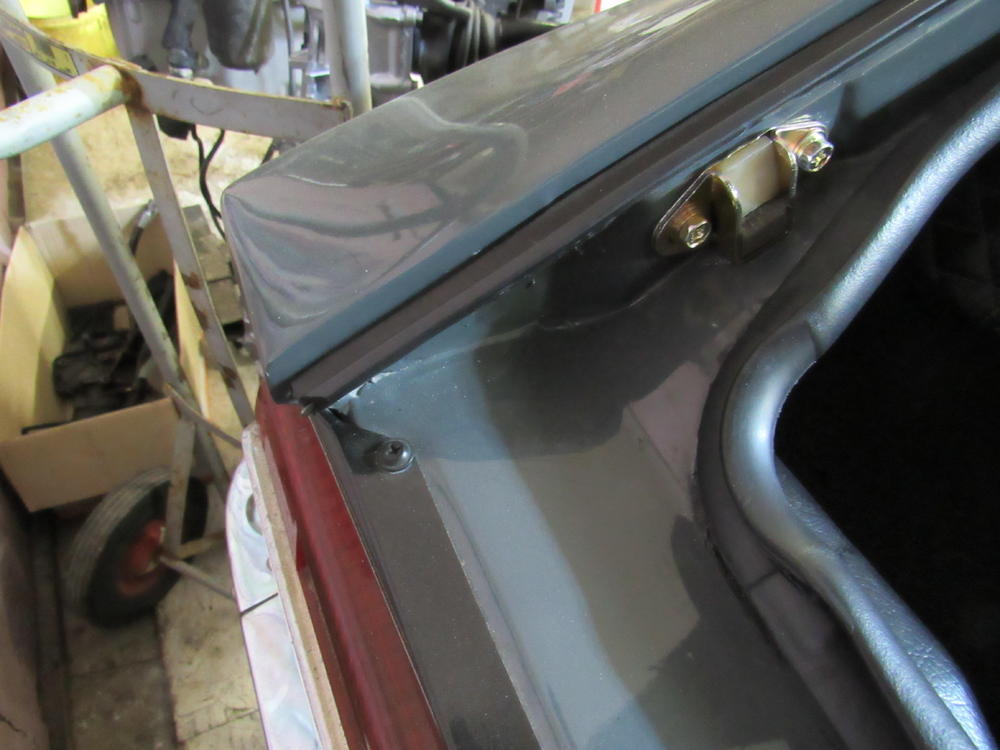
I’ve been slowly chipping away at this. I think I got the panels close, although the gap between the panels is a little high. I’d like to make it closer. does anyone know if there are supposed to be a gap between the corners where the tail light meets the top panel? In the second photo granny posted you can see a pen sized hole right where the outer seal ends. this area on my car has welds, on both sides, the 73 I have does not have the welds.


-
@siteunseen i have to 99% agree with you on that one, except I've been moving away from Google and have been using duckduckgo, I find that i can get better results and less advertising than Google, i also notice that the search results tend to be more relevant on duckduckgo. A lot of sites go under "search engine optimization" which in a way rigs content to the top of Googles Search, even if the content is not what you're looking for. What I like about DDG is that ability to get clear search results, and not have a shadow advertising profile built up about me. Sometime i have to use google to get to what i need, in that case i use DDG and add a `!google` to the end of the search, https://duckduckgo.com/bang I attempted to submit a new `bang` called `!czcc` which links to classizcars search index, if it gets approved then we can all use it on duck.com ? I tried to find this thread on duck and google, and was not able to find it.... Hilariously it popped up on the 1st search result on the internal czcc search.
-
There’s some reproduction ones from Asia that a lot of forum members have had a good experience with. The search function is your friend here ?
-
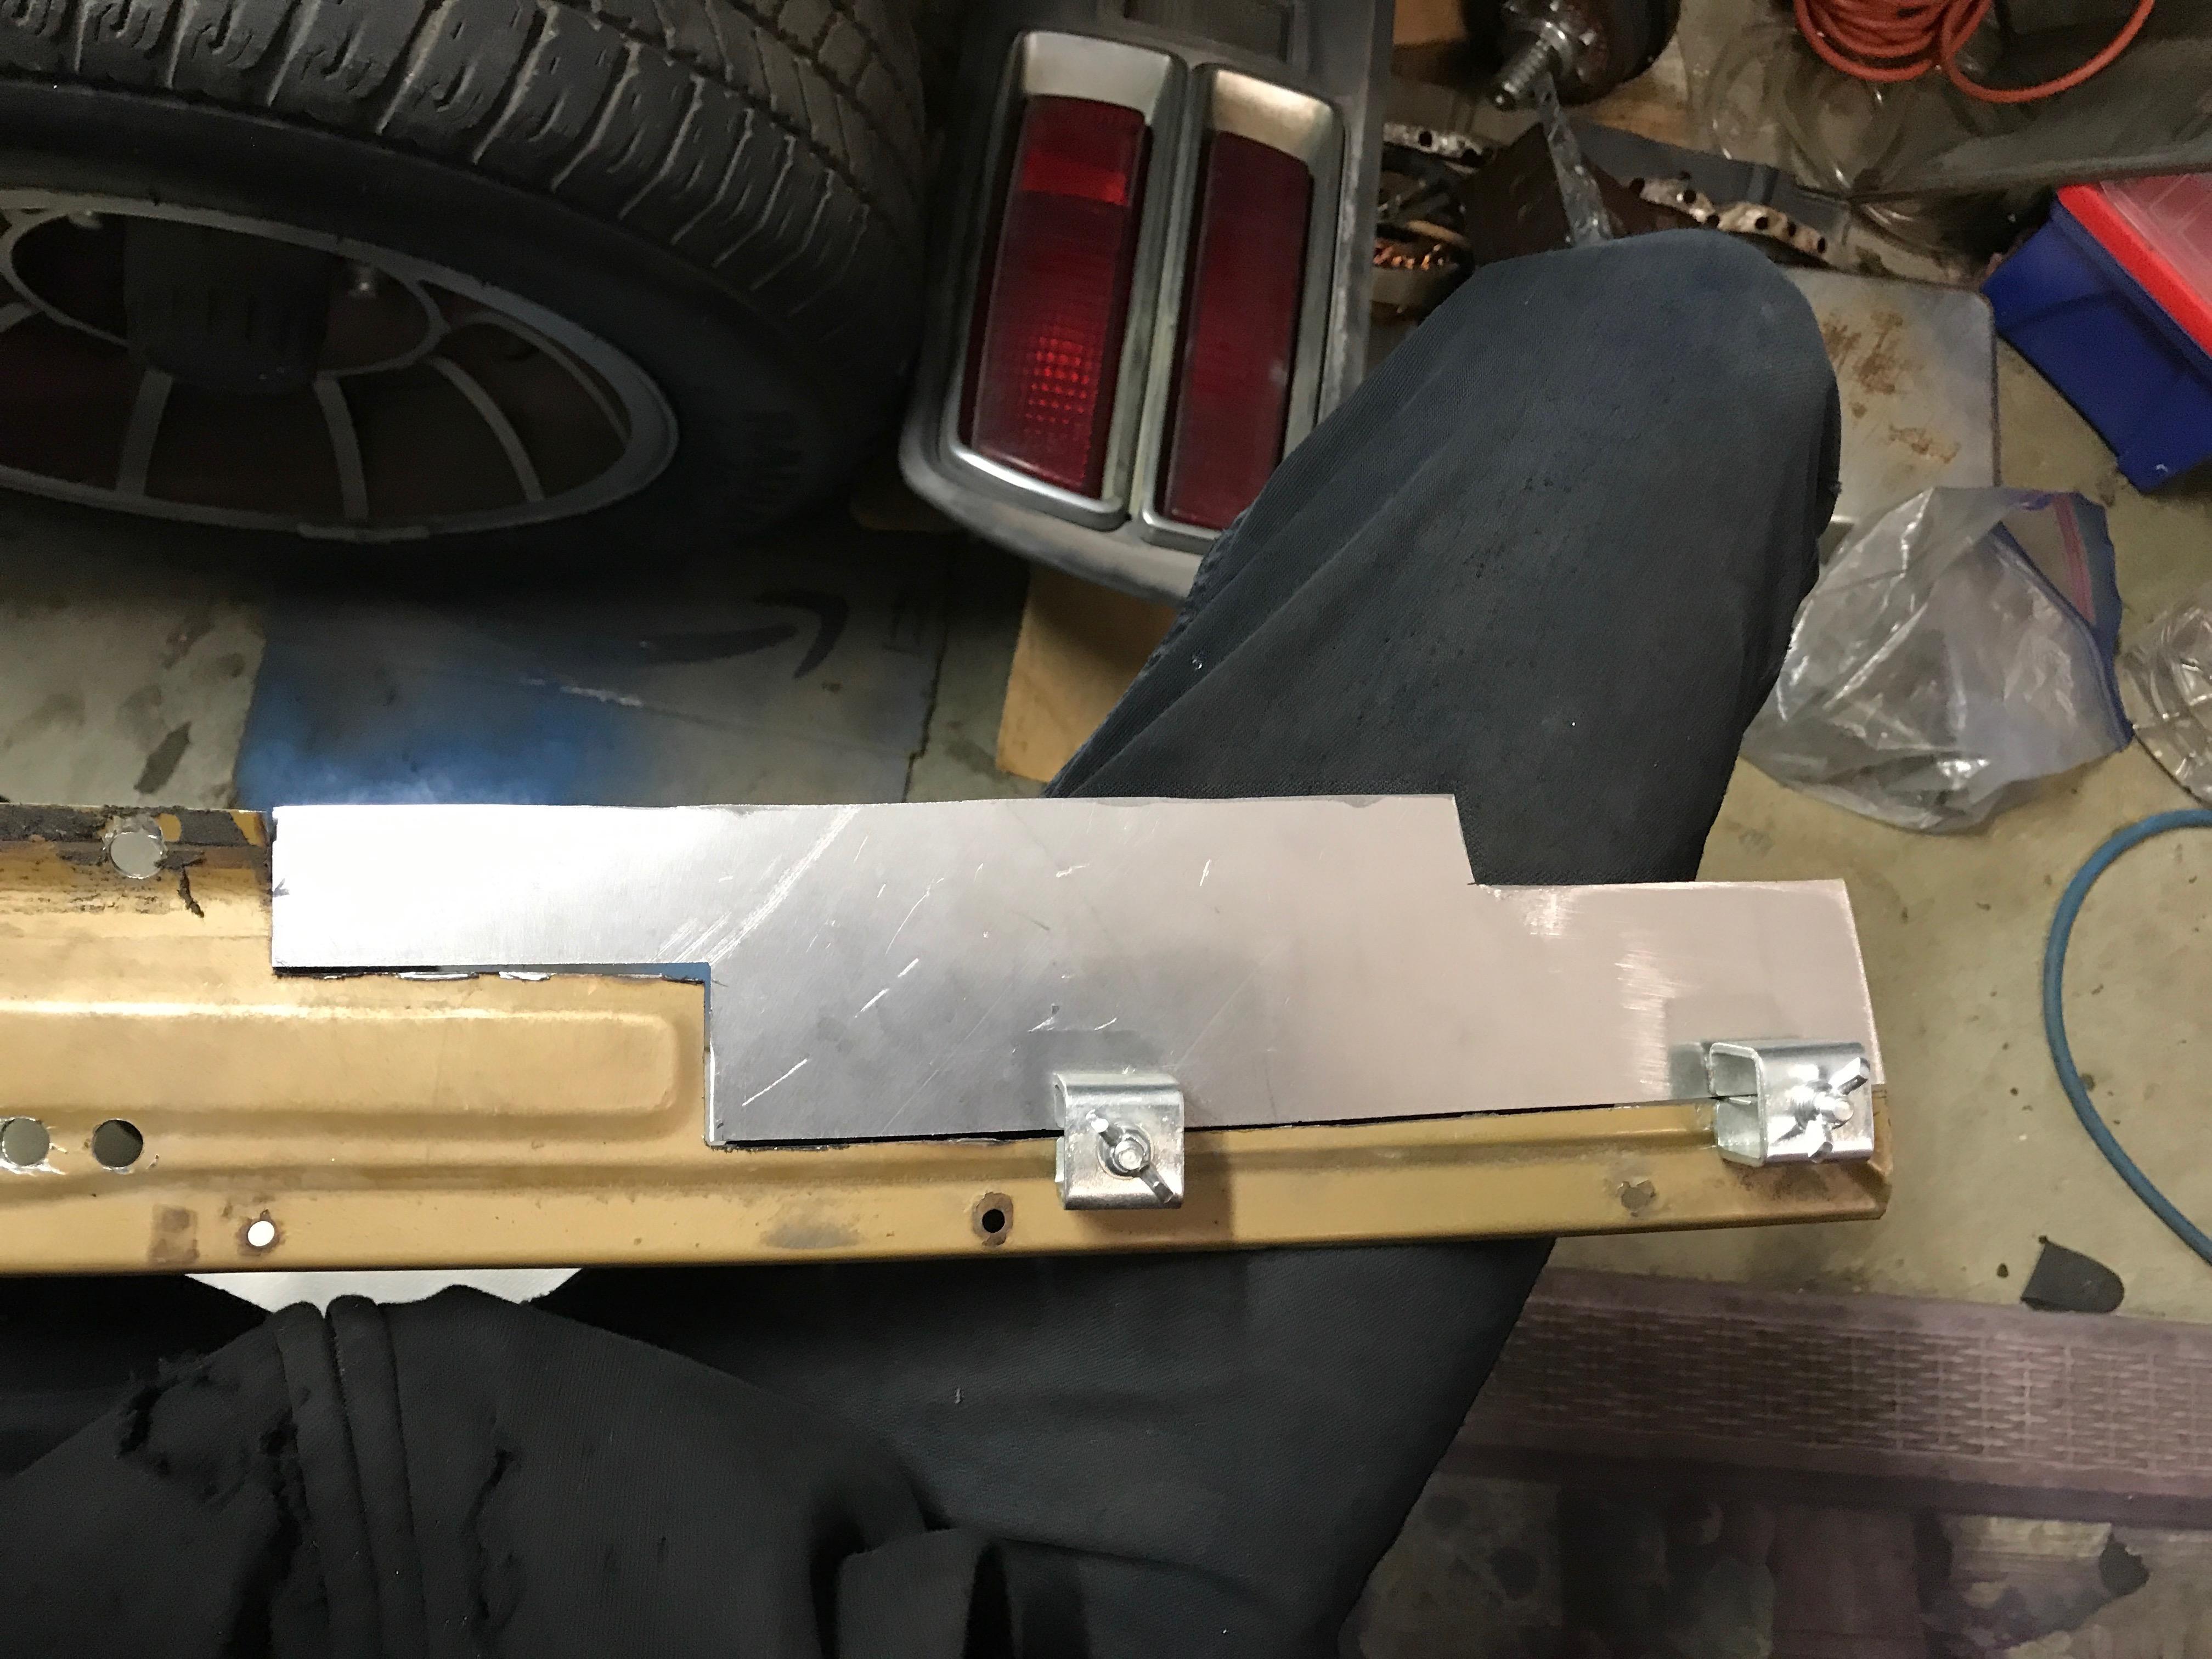
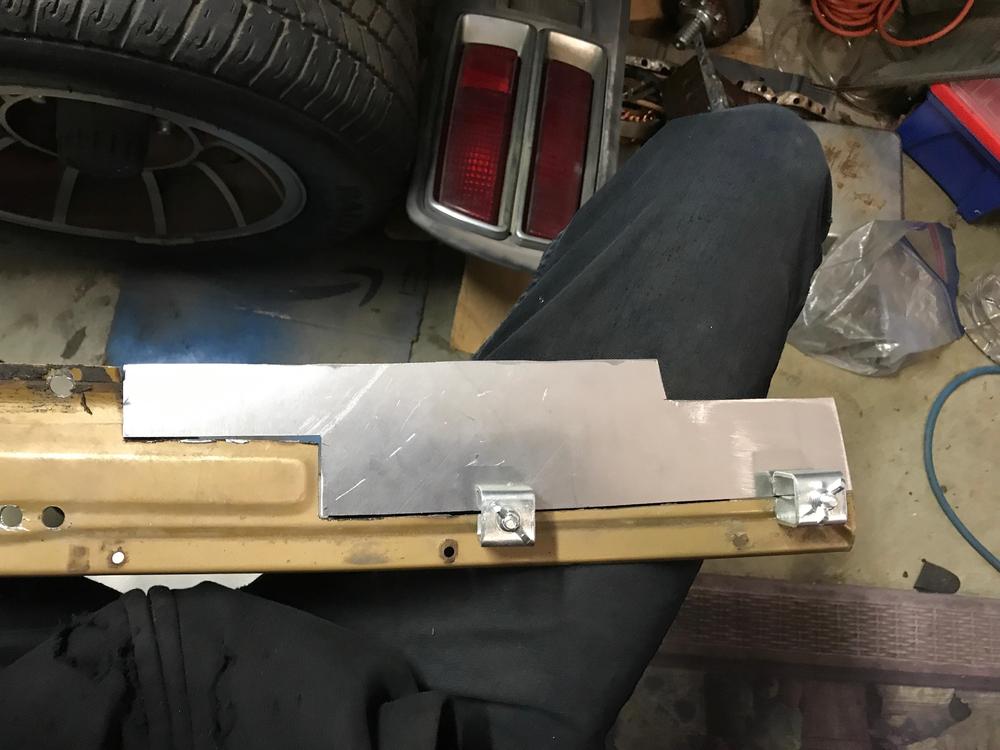
I attempted to create a patch on the top panel, and i was not entirely happy with the way the panel formed. To save time (and my eyes every time i look at it) I think ill order a replacement panel. @grannyknot do you have any more pictures of that repair? I cant see the top edge of where the surfaces mate. Jumped down the rabbit hole that is painting the rear taillight panels. a lot of options.
-
Oh I’ll definitely add those to the car. Was there any use of glue on the underside of the panel by Nissan? I can see why someone would want to use body glue here, it would prohibit water from entering between the top cover and the body underneath. did you use any kind of paint between the 2 layers to prevent this?
-
@grannyknot yeah it gets a little difficult to control the depth of the drilling, i dont think it will be a problem to fill in the holes that i ended up with. the mid section is not too bad... I've been debating to order the top section. If i can save the money then why not? But then again fab time adds up. top section is removed, going to head over to the shed and try to make a section that i can replace, worst case tomorrow ill order all the stuff. the right side is going to be a bit annoying to get through. I think someone has been here before on the car, i saw some questionable welds on the car. I dont have a spot welder, would drilling out a hole on a new panel, then welding them to the bottom section be appropriate? i see the 3m body glue that some people use, i think i have some left over form the floor pan i did, i think that could also be used.....