JTO
Community Member
-
Joined
-
Last visited
-
Thanks to all of you for responding. Zed Head - I have the Diagram BE-37 in the FSM. I also have some removal instructions (with photos and diagrams) in the "SERVICE MANUAL - S30 Supplement Chassis Manual- Datsun 240-Z Sports". These instructions on Page 21 seem to infer that once you remove the "radio tuner escutcheon", the radio unit should come out through the opening. IT DOES NOT. Perhaps this doesn't apply to my particular vehicle. I am now trying to release the larger finisher face plate (with the heater controls) enough to remove the radio, without disconnecting the heater vent cables as you suggested...we'll see. Patcon - I have the metal plate/spacer around the front of the radio that you referred to. If the plate wasn't there, or could be removed, the radio probably would come out through the opening. Thanks again...Tim
-
My radio works but no volume. I am assuming the speaker is okay as I can hear the radio. I am in the process of trying to remove the radio to take to a repair shop. I have a Supplemental Service Manual that advises that once the radio front trim piece is removed, the radio/tuner unit should come out through the opening. Is this the case or is it necessary to remove the larger "front" of the dash that holds the Fan Switch and Vent Levers. I am trying to remove the radio out through the opening but it's a very tight fit. Forcing it risks breaking the 50 year old plastic dash piece. The radio is the original Hatachi Radio and has never been removed ( I am the original owner). Can anyone direct me to any previous threads about this, or can anyone offer any advise on how to remove this radio. Thanks...Tim
-
I think Zed Head's thinking is correct (as it usually is). With the rubber bushings installed, I have tightened the control arm inner bushing bolts with the rear suspension hanging, then, after lowering the car and driving down the driveway, there was still considerable camber (vertical misalignment) in the rear wheels. You could try this process with the (lubricated) PU bushings and see if the rear wheels are vertical after lowering and driving the vehicle down the block. If the rear wheels straighten up, then the PU bushings are turning in the bushing brackets with the up and down movement of the control arm (assuming everything else is in order). In my experience, when using the rubber OEM bushings, you definitely have to lower the vehicle and put the load on the control arms before torqueing the bushing bolts.
-
Jonathan...Thanks for your comments. I ended up doing exactly as you described - sanding down the PU bushings (slowly) with a belt sander and bench grinder/sander. The sleeves provided with the PU bushings were the same diameter but longer so I ground those down to the required length as well. The existing sleeves seemed in good condition so I ended up using a new ground down sleeve on one side and a cleaned up existing sleeve on the other side. Apparently, this type of transmission mount cross member was installed on 240Z's manufactured up until July of 1972, then the newer type cross member was used (my 1972 240Z was manufactured in November of 1971). Energy Suspension (and others) only provide a PU bushing kit for the newer type cross member. I also procured a new transmission mount but it was for the newer type cross member as well. I could not find a new transmission mount that fits the older style cross member so I Installed the new mount on my cross member and it seems to work fine.
-
Ernesto...Good work. Did you road test it yet. I installed the RT Mount with zero clearance between the snubber and the top of the diff nose and found that everything feels very solid, but noisier. It may be less noisy if I had left some clearance between the diff and the snubber. This noise may also be due to the new urethane bushings (as opposed to rubber) I installed for the mustache bar and rear engine mount. In any event, I accept the additional noise for the significant improvements to the drive and rear suspension. I would be interested to hear what you find once you road test it. Tim
-
Measuring the distance between the bottom of the RT Mount and the top of the diff is the hard part. Your method sounds like it would work. I would be interested to hear how it turns out.
-
Ernesto...I recently installed an RT Mount but the local guy I bought if from had installed a few of them and knew where to cut the snubber so I didn't have to go through the process of cutting the snubber to fit. If I did, I think I would try the following: With the diff removed, install the RT Mount with snubber. Use something to plumb (like a plumb bob if you have one) to plumb from the middle of the snubber to a spot on the garage floor and mark the spot. Measure and record the height from the bottom of the snubber to the mark on the floor. Remove the RT Mount. Raise the diff on your floor jack, with mustache bar attached, so that mustache bar is in place on its mounts and the diff front cross member and insulator are in position. Install and tighten mustache bar bolts and a couple of the front cross member bolts. Measure the distance between the top of the diff (at the location on the diff that is directly under where the snubber will be...you may be able to identify this location by where there is wear from the old arrestor strap) and the mark on the floor. Using these two measurements, you can then cut the snubber to the required length (either with some clearance between the snubber and the top of the diff, or no clearance). Then lower the diff, install the RT Mount with snubber bolted to it, then reinstall the diff. Measuring from the top of the diff to the floor with the diff in place can be tricky. Before mounting the diff to take the measurement, you can try installing a clamp around the diff in such a manner that you can measure the distance between the top of the diff and "something" on the clamp that will be easier to measure to when the diff is in place, then install the diff with the clamp still clamped and measure from the "something" on the clamp to the mark on the floor. I haven't done this procedure but I think it would be the way I would first try.
-
Just an update on this. I installed the RT Mount. I now have the diff back in. Everything seems very solid. I am very impressed with this RT Mount. Thanks to all you guys for recommending it. I acquired the RT Mount locally in Calgary so if anyone in the western Canada region is looking for one, let me know and I'll connect you to this guy.
-
siteunseen...Thanks for your response. I will go back to my Nissan dealership with the old part No. you provided and see what comes up. Can you tell me if your Transmission Mount Cross Member is the same as mine, as shown in the photo, or do you have the newer version, which doesn't have the bar.
-
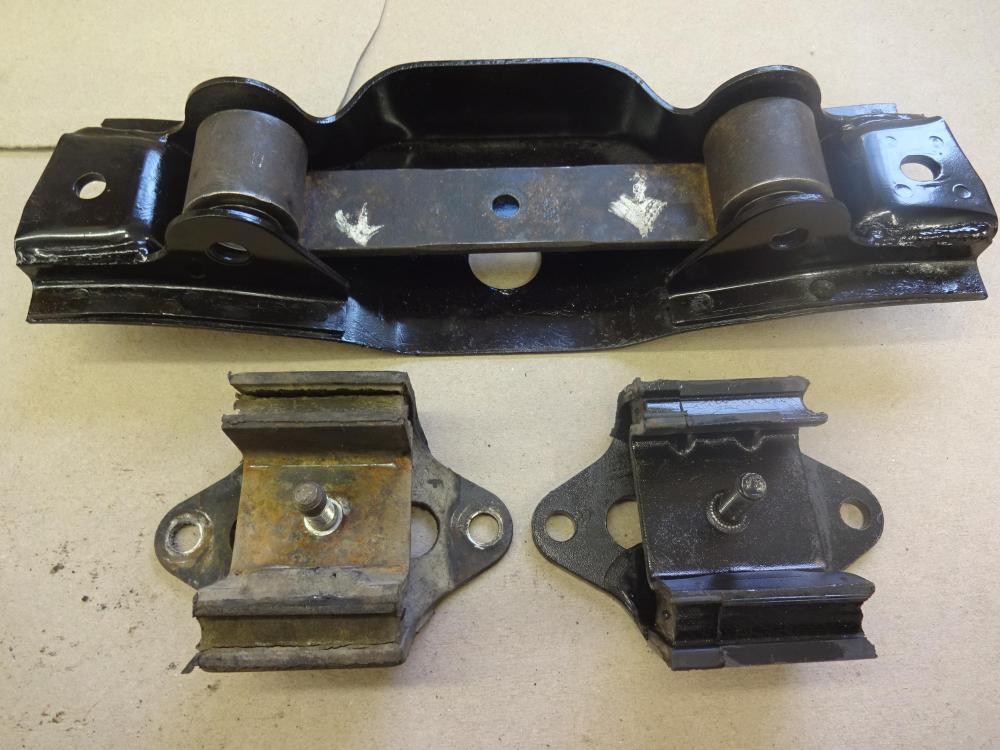
I am replacing the Transmission Mount on a 1972 240Z. The attached photo shows the Transmission Mount Cross Member (bushings for each end of the bar have been removed) and two types of insulators. The insulator on the left is the original insulator and the one right is a new after market insulator. The bearing surface of the new insulator (the surface that rests on the bar) is wider than the bearing surface on the original insulator. The new insulator also has a couple of "tack welds" along one edge of the bearing surface. These are visible in the photo. It is my understanding the cross member I have (the one shown in the photo) was used until June of 1972. Beginning in July of 1972, a different cross member was used and that is what the insulator on the right will fit. When referring to "Engine Mounting" in www.carpartsmanual.com the part # for both insulators is 11320-N3000. I am trying to locate a new insulator that will fit my cross member. That's the insulator on the left. My local Nissan dealership advise this older type insulator is NLA. I have searched online but no luck so far. If anyone can help me with any sources, I would appreciate it. If I cannot locate a new "older style" insulator, I may try using the newer type with my cross member and see what happens. If anyone has done this, please let me know how you made out. Sorry for starting "yet another thread" on this topic but I cold not locate a thread where this has been discussed. Datsun Z Engine Mounting (Manual From C-# HLS30-46001, RLS30, GRLS30) L24, L26 (To Nov.-'74).url
-
Zaspen...Thanks for your response. There are two different sizes of the rubber insulator mount. I will take some pictures and start a new thread on the mount issue .
-
Zaspen...I am replacing bushings and mounts in a 1972 240Z. I have the same transmission cross member mount as you have in the above thread and the same problem with finding replacement bushings. I ordered bushings and a new insulator mount online but the bushings and insulator are for the larger type cross member and do not fit. Did you use the outer control arm bushings as you described, and did they work. Also, did you change the rubber insulator mount and if so, do you remember where you bought it. When viewing the www.carpartsmanual.com site that Zed Head sent you back in February of 2020, it would seem that the transmission cross member mount (Engine Mounting) configuration changed in July of 72 (which may have been with the beginning of the 73 production).
-
Zed Head...Thanks for digging up this thread. I will post on that thread as to issues with the Trans mount cross member.
-
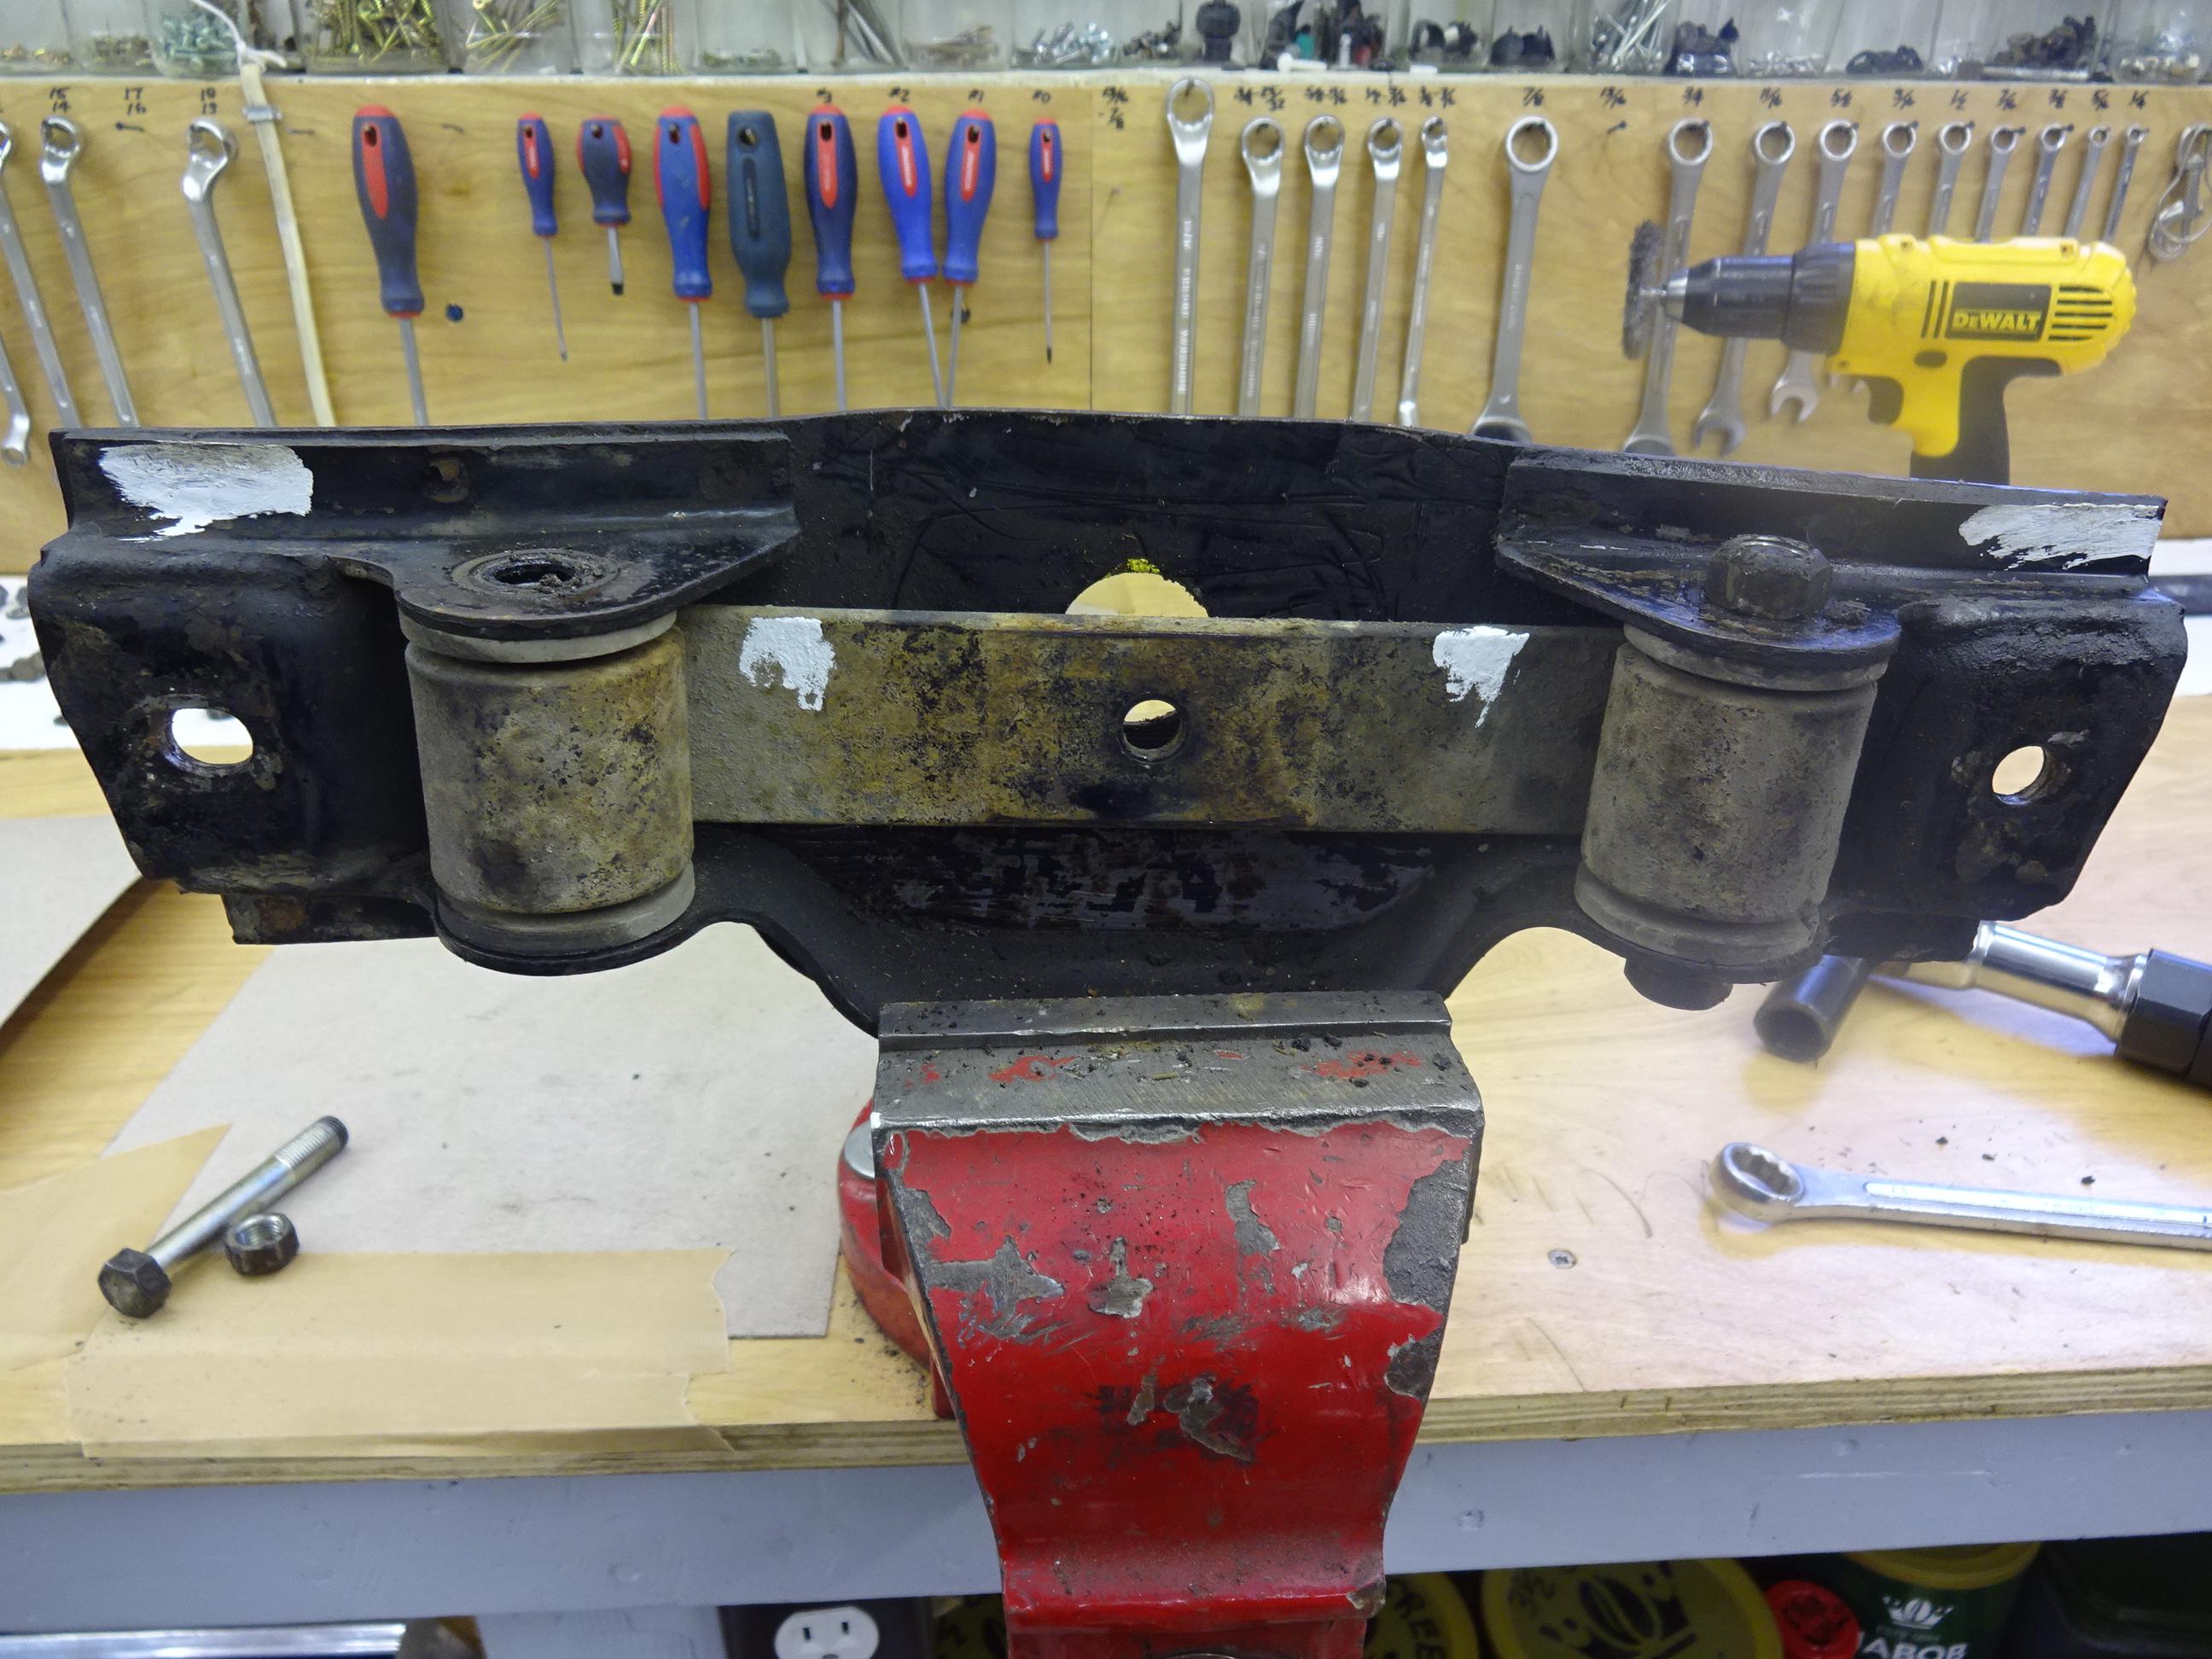
To all that responded, thanks for the info. Much appreciated. On another matter, I had noted in a previous post above that I had purchased the PU bushing kit for the transmission cross member mount from Performance Suspension but the bushing kit they sent doesn't fit. The bushings and sleeves are too long and the bushing diameter is too big. I have attached a photo of my cross member. The distance between the brackets that carry the bar is 2.135". If anyone happens to have a spare cross member sitting around or a cross member out of their car, could you take a measurement between the two brackets and let me know if you get the same or different measurement. I know my cross member is OE but for some reason may be different than most. Thanks...Tim

-
zKars...Maybe you could send me an email at tim.ogle@shaw.ca. I would be interested in hearing about what 72 240Z parts you have. Jeff G....Thanks for the RT Mount info. I took prints of the photos from the link you sent so now I will get back under the car so I can visualize how it would go in. Ernesto....I agree the torque shouldn't be much different. I will go with the 54 - 69 lbs. Seems like a pretty large range of torque but we will see, Thanks.