
KenFirch
 Subscriber
-
Joined
-
Last visited
Everything posted by KenFirch
-

-
-
-
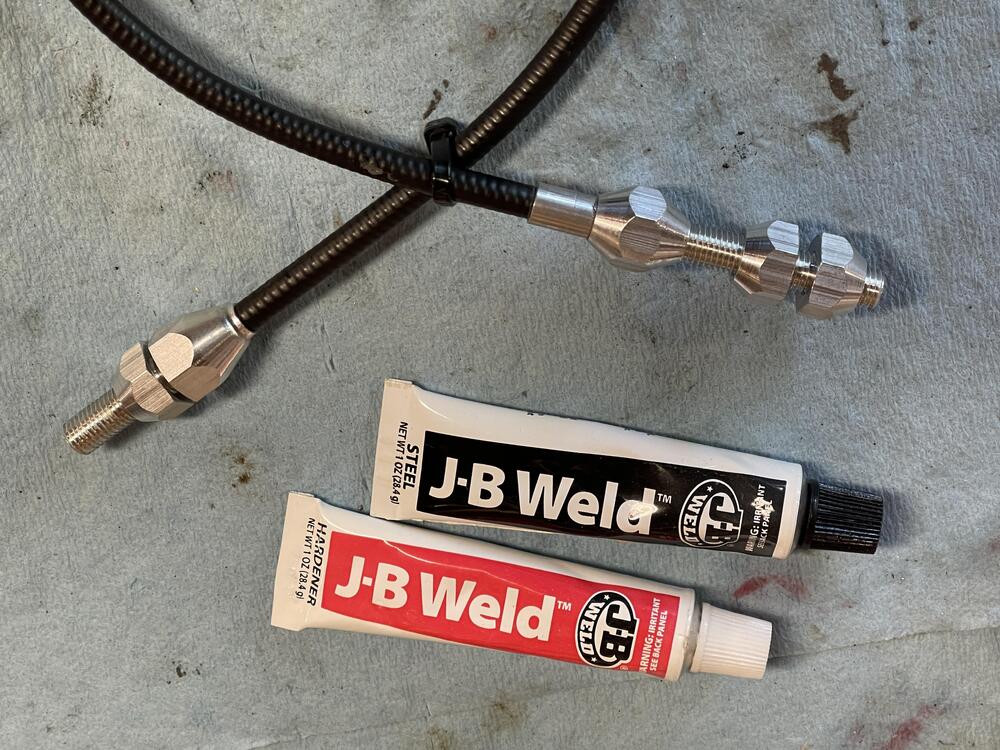
I replaced my stainless Lokar cable with the black Lokar TC-1000U, I now think it's the best choice. Someone mentioned that when he manually blipped the throttle from the engine side, the cable ferrule dropped out of place at the bracket. I honestly never tried this on mine while working on this kit, but obviously would be necessary while balancing the carbs, or just playing around. The problem is when you push the cable (instead of pulling with gas pedal) back down the sheathing, the gas pedal spring is resisting and ferrule moves out of place. Worse, the engine can't return to idle. Not good. And if you're using the stainless one, it's a pain to get those little frayed strands back inside the ferrule. The black version is much easier to get back together. But, it shouldn't happen in the first place. The firewall side is crimped around the sheathing and isn't a problem there. I called Lokar Tech, but they couldn't offer a solution since they only make a kit for the 4 bbl carb on the 240Z, and just said it wasn't installed correctly. Whatever. So, the fix is to glue the sheathing to the ferrule with some sort of epoxy glue. I used J-B Weld. Two areas, the sheathing to the ferrule, and the ferrule to the aluminum adjuster. Apply to outside surfaces so no adhesive gets inside center hole when assembled. Wipe off excess and let dry throughly. Problem solved, blip away.

-
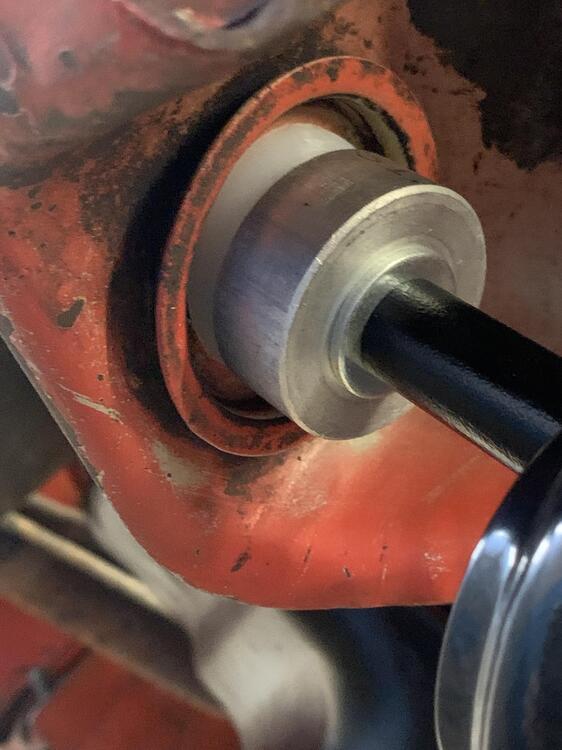
Here's a pic and instructions. You'll still need a rubber bushing on the rearward side. TensionRodKit.pdf
-
I had the same problem with the tension rod bushings splitting. This MSA kit works much better: https://www.thezstore.com/datsun-240z-1973/product/6551/tension-rod-t-c-kit-70-8-87-240z-260z-280z-280zx-300zx
-
-
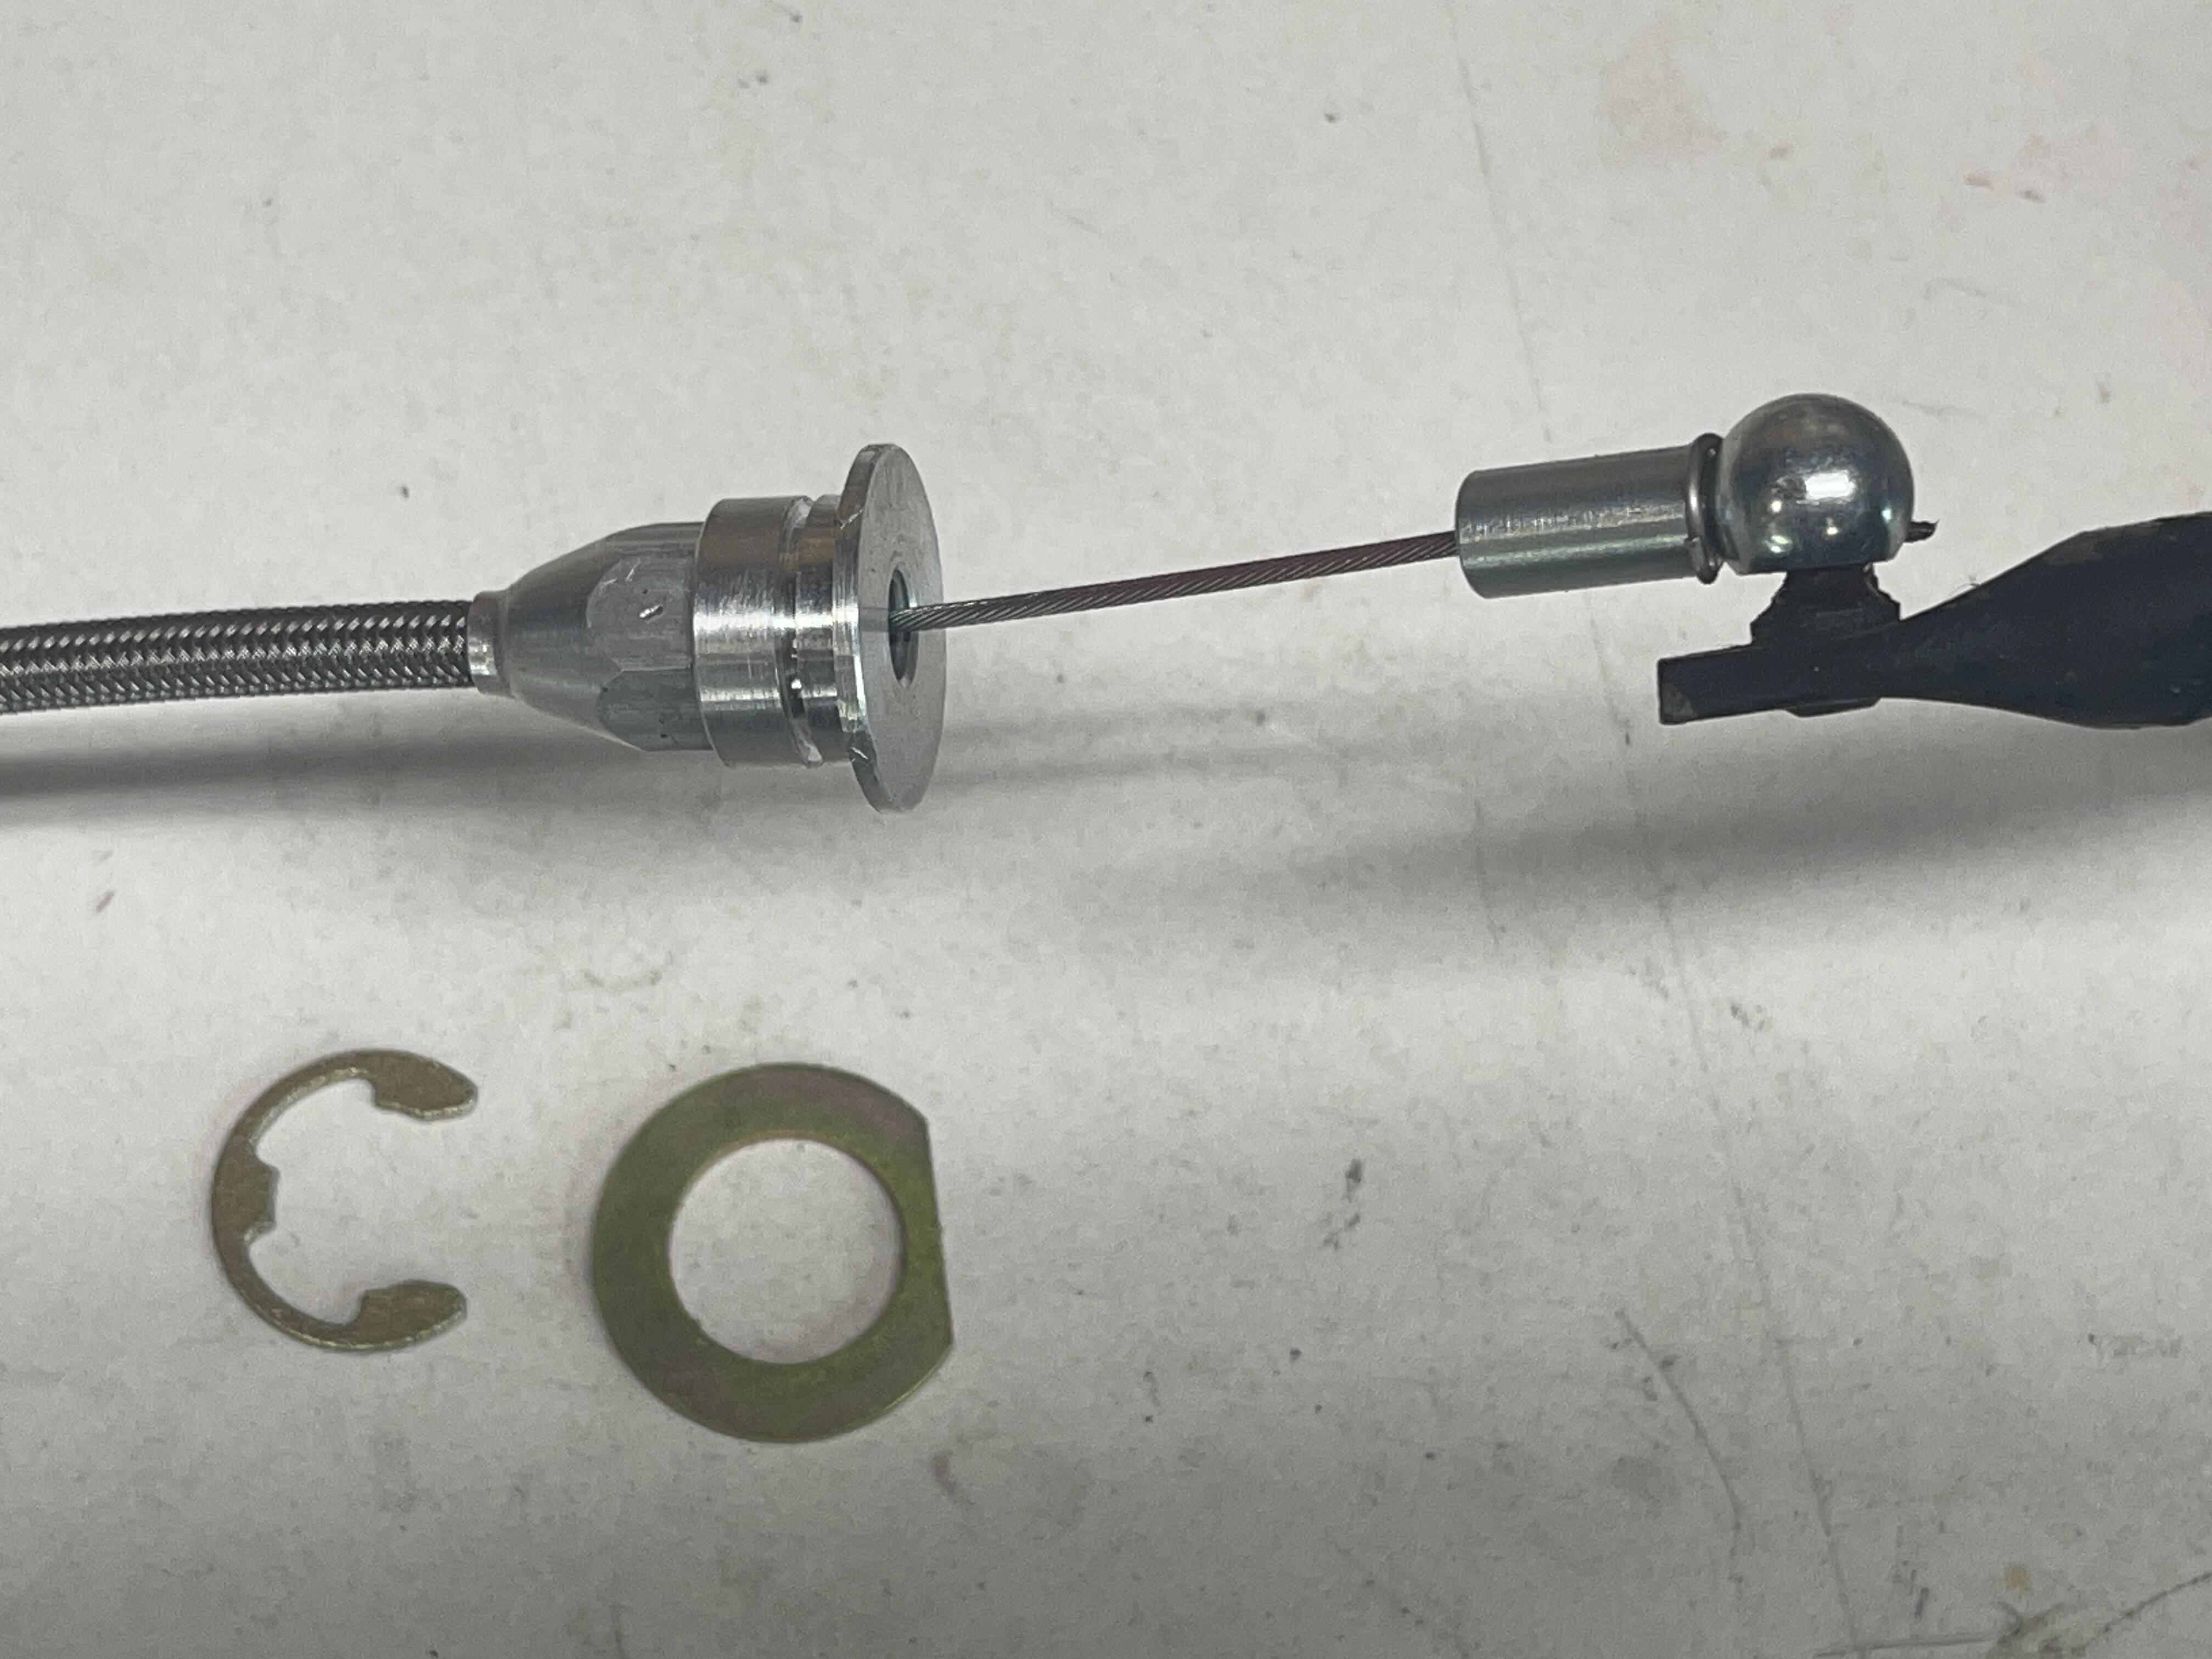
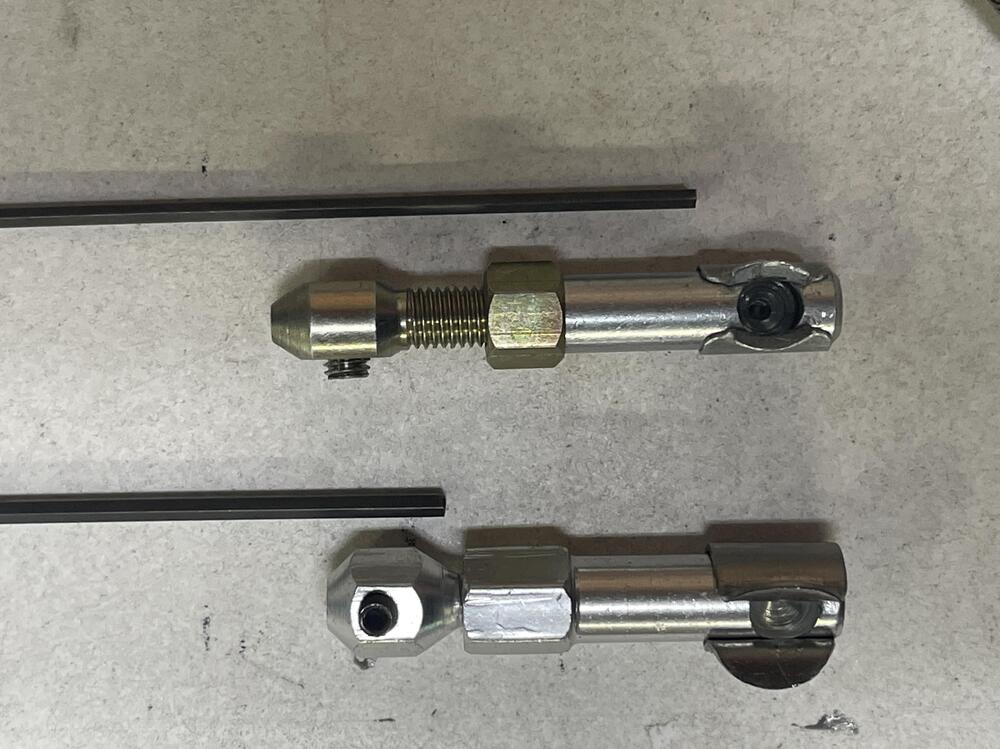
I've only looked at this one from Amazon: www.amazon.com/gp/product/B0B6BLY7PH . Yes, comes with gloves! I can't tell much difference between the two as far as the braided sheath or the actual cable. Not sure about the lining differences between them, they both feel smooth in action. One big difference is the quality of the hardware, like the included ball & socket fitting. The Lokar looks of better quality, and has a real adjusting lock nut. The other doesn't, the hex is for looks, although the cable set screw part is threaded. The Lokar cable set screw part is metal, the other is aluminum, which I think is a bad idea. And lastly the Lokar has more room for the loose end of the cable to fit instead the socket fitting, the other only has about 3/8". Picture shows distance of both. But the other has crimping around the braided sheath to prevent it from coming apart. The braided sheath of the Lokar comes apart too easily and is a PITA to get back together. Mine came apart when I took it out of the box, so be careful. But it is a cut to length universal kit, and the Lokar instructions warn you, you know, after it happens. Maybe wrap a piece of tape around sheath and ferrule until you're done. I don't think the other's outside sheathing can be shortened. But 24" is perfect for this kit. Also, I try to support our local and US businesses, even if I have to pay a bit more. But that's just me. Anyway, those are my ramblings.
-
Yeah, the Lokar and others, typically come with a 1/4" ball and socket fitting. Plus had to do a little pivot point geometry change. The cable on the pedal makes 1 7/16" of cable pull, and the stock linkage ball only moves 1 3/16" downward. So new ball pivot point corrects that so valves don't try going past full open, and pivot is farther away from linkage centerline to give a little bit better modulation from idle. The new lever fits/forks over the linkage shaft, and a hole that fits around the old socket boss on the old lever, to locate into position. Yeah, I remember reading that soldering socket thread!
-
For this first batch of the kits, payment can be sent via PayPal (Friends & Family), ApplePay, or Venmo. I'll refund if kit doesn't work for you, if you send it back. PM me for 'send to' info since I'm not sure if it's proper to post that in this thread. I can also send you my phone number if want to talk it over first. Also, the cable hole on the bracket is 3 3/8" from the center of the SU stud. Make sure that works for your setup. The bracket is made of 14 GA (.074") steel, and the lever is 11 GA (.120"). Thanks, Ken

-
Pricing....$125 for full kit, plus $15 shipping (US only). I've got 9 of these. For our Weber/Mikuni carb friends, you can get just the firewall/gas pedal end of the kit for $65, plus $10 shipping (US only). I've got 10 of these. Hopefully this sounds reasonable for what you are getting. I'm not making much, just trying to recoup for now. I've got 3 full kits reserved for Patcon, SteveE, and DaveWormald if you still want it. I still need to order a few small parts before I can ship, and drill some set screws. Thanks, Ken
-
Thanks all for the positive comments, especially since you guys know these cars inside out. I've run this setup for the last few months for testing, and can honestly say I haven't had to touch it since installed. zKars, good advice and info. Early on I put a long M5 bolt or threaded rod in the gas pedal socket and watched how centered it was through the range of motion. It did appear to keep pretty horizontal in the center of the hole. That's one reason why I really wanted to keep the factory ball since they surely went through that same design exercise. As good as the factory linkage worked, I still don't understand why they didn't use a cable. It's not like it was uncommon in that era. I didn't grease my cable, I should pull it out and rub some grease over it. Not sure what type grease, don't want it to eventually gum up. The Lokar instructions don't mention it, maybe it's the liner they use. Yes, I need to take a good look at a 280 and get some measurements. If demand is there, I may put out a 280 version. The thing about machining small parts is the first one will cost you $150+, but the next 10 could be $30 each. And I wanted to avoid having some guy on his garage lathe cranking these out manually. Best to automate. I gave a real short 2 sentence version of adjusting the cable. LOL. Yeah, you definitely don't want to stress the butterfly valves, or risk pulling the cable out from the set screw. What I did was put the gas pedal against the floor stop, set the adjusters midway on the bracket, measured where to cut cable end while carbs are full open, then tighten set screw while in that position. Used adjusters to fine tune. Still working on detailed installation instructions, they need to be concise. Ken
-
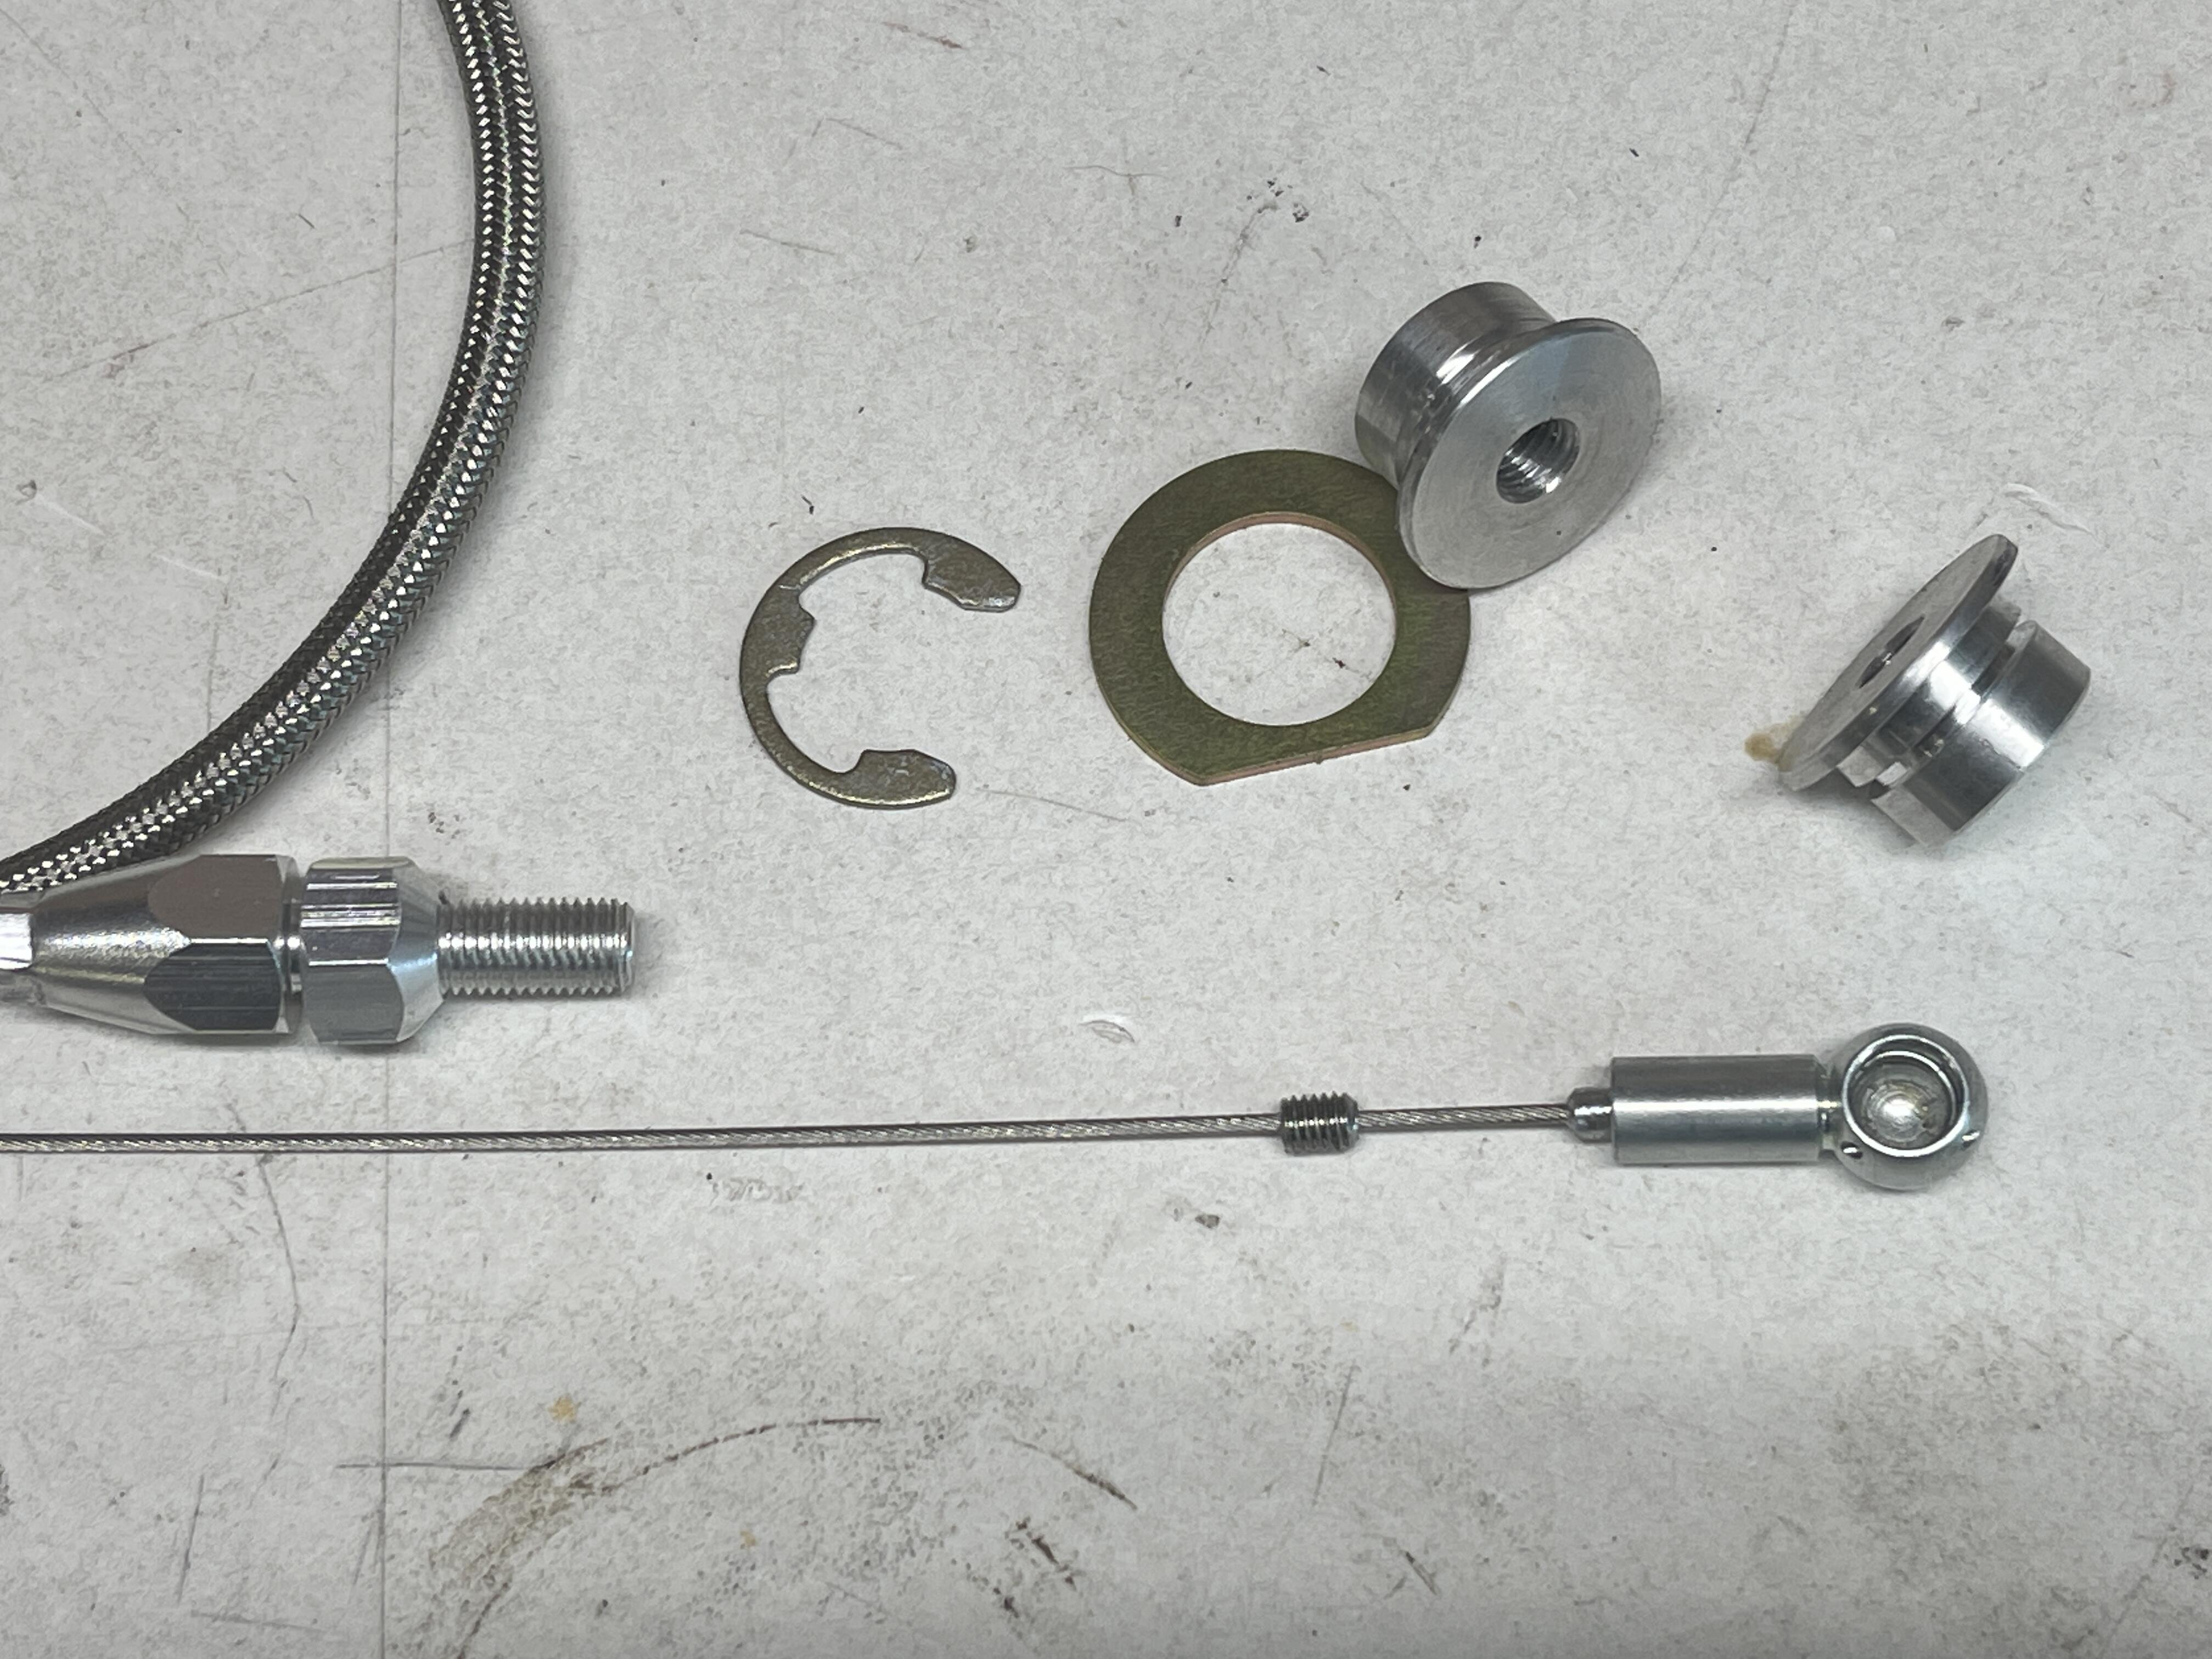
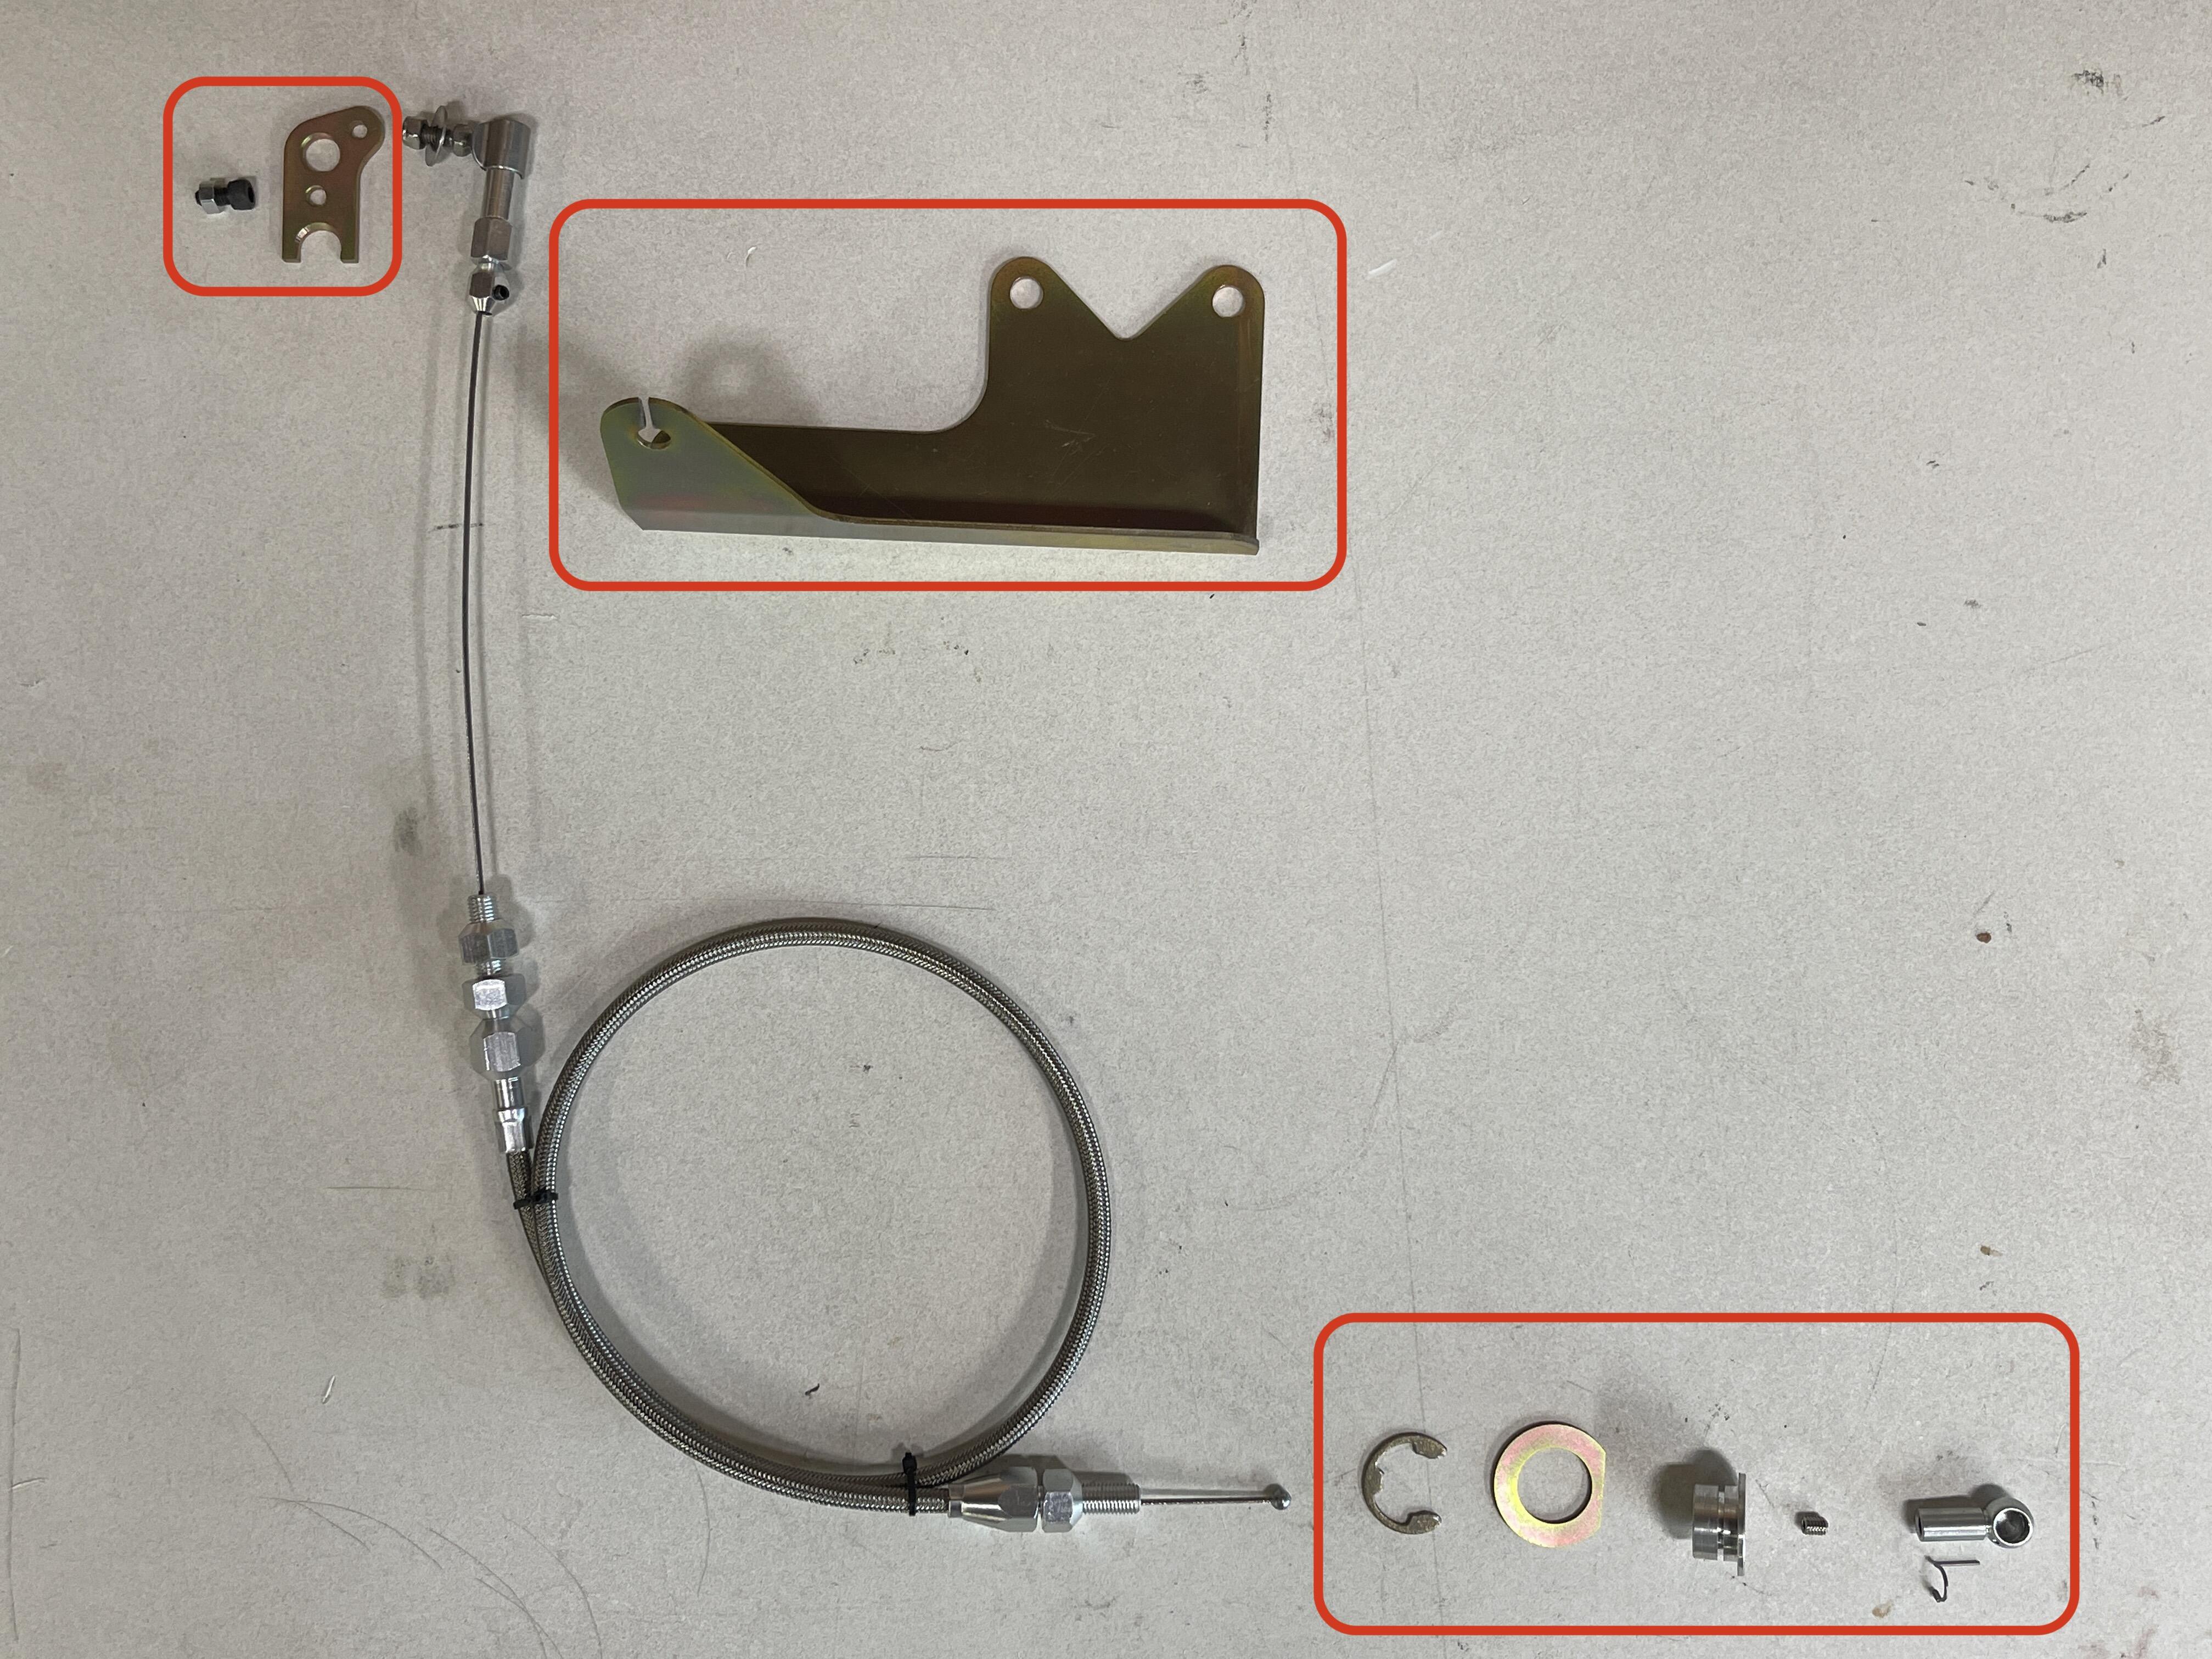
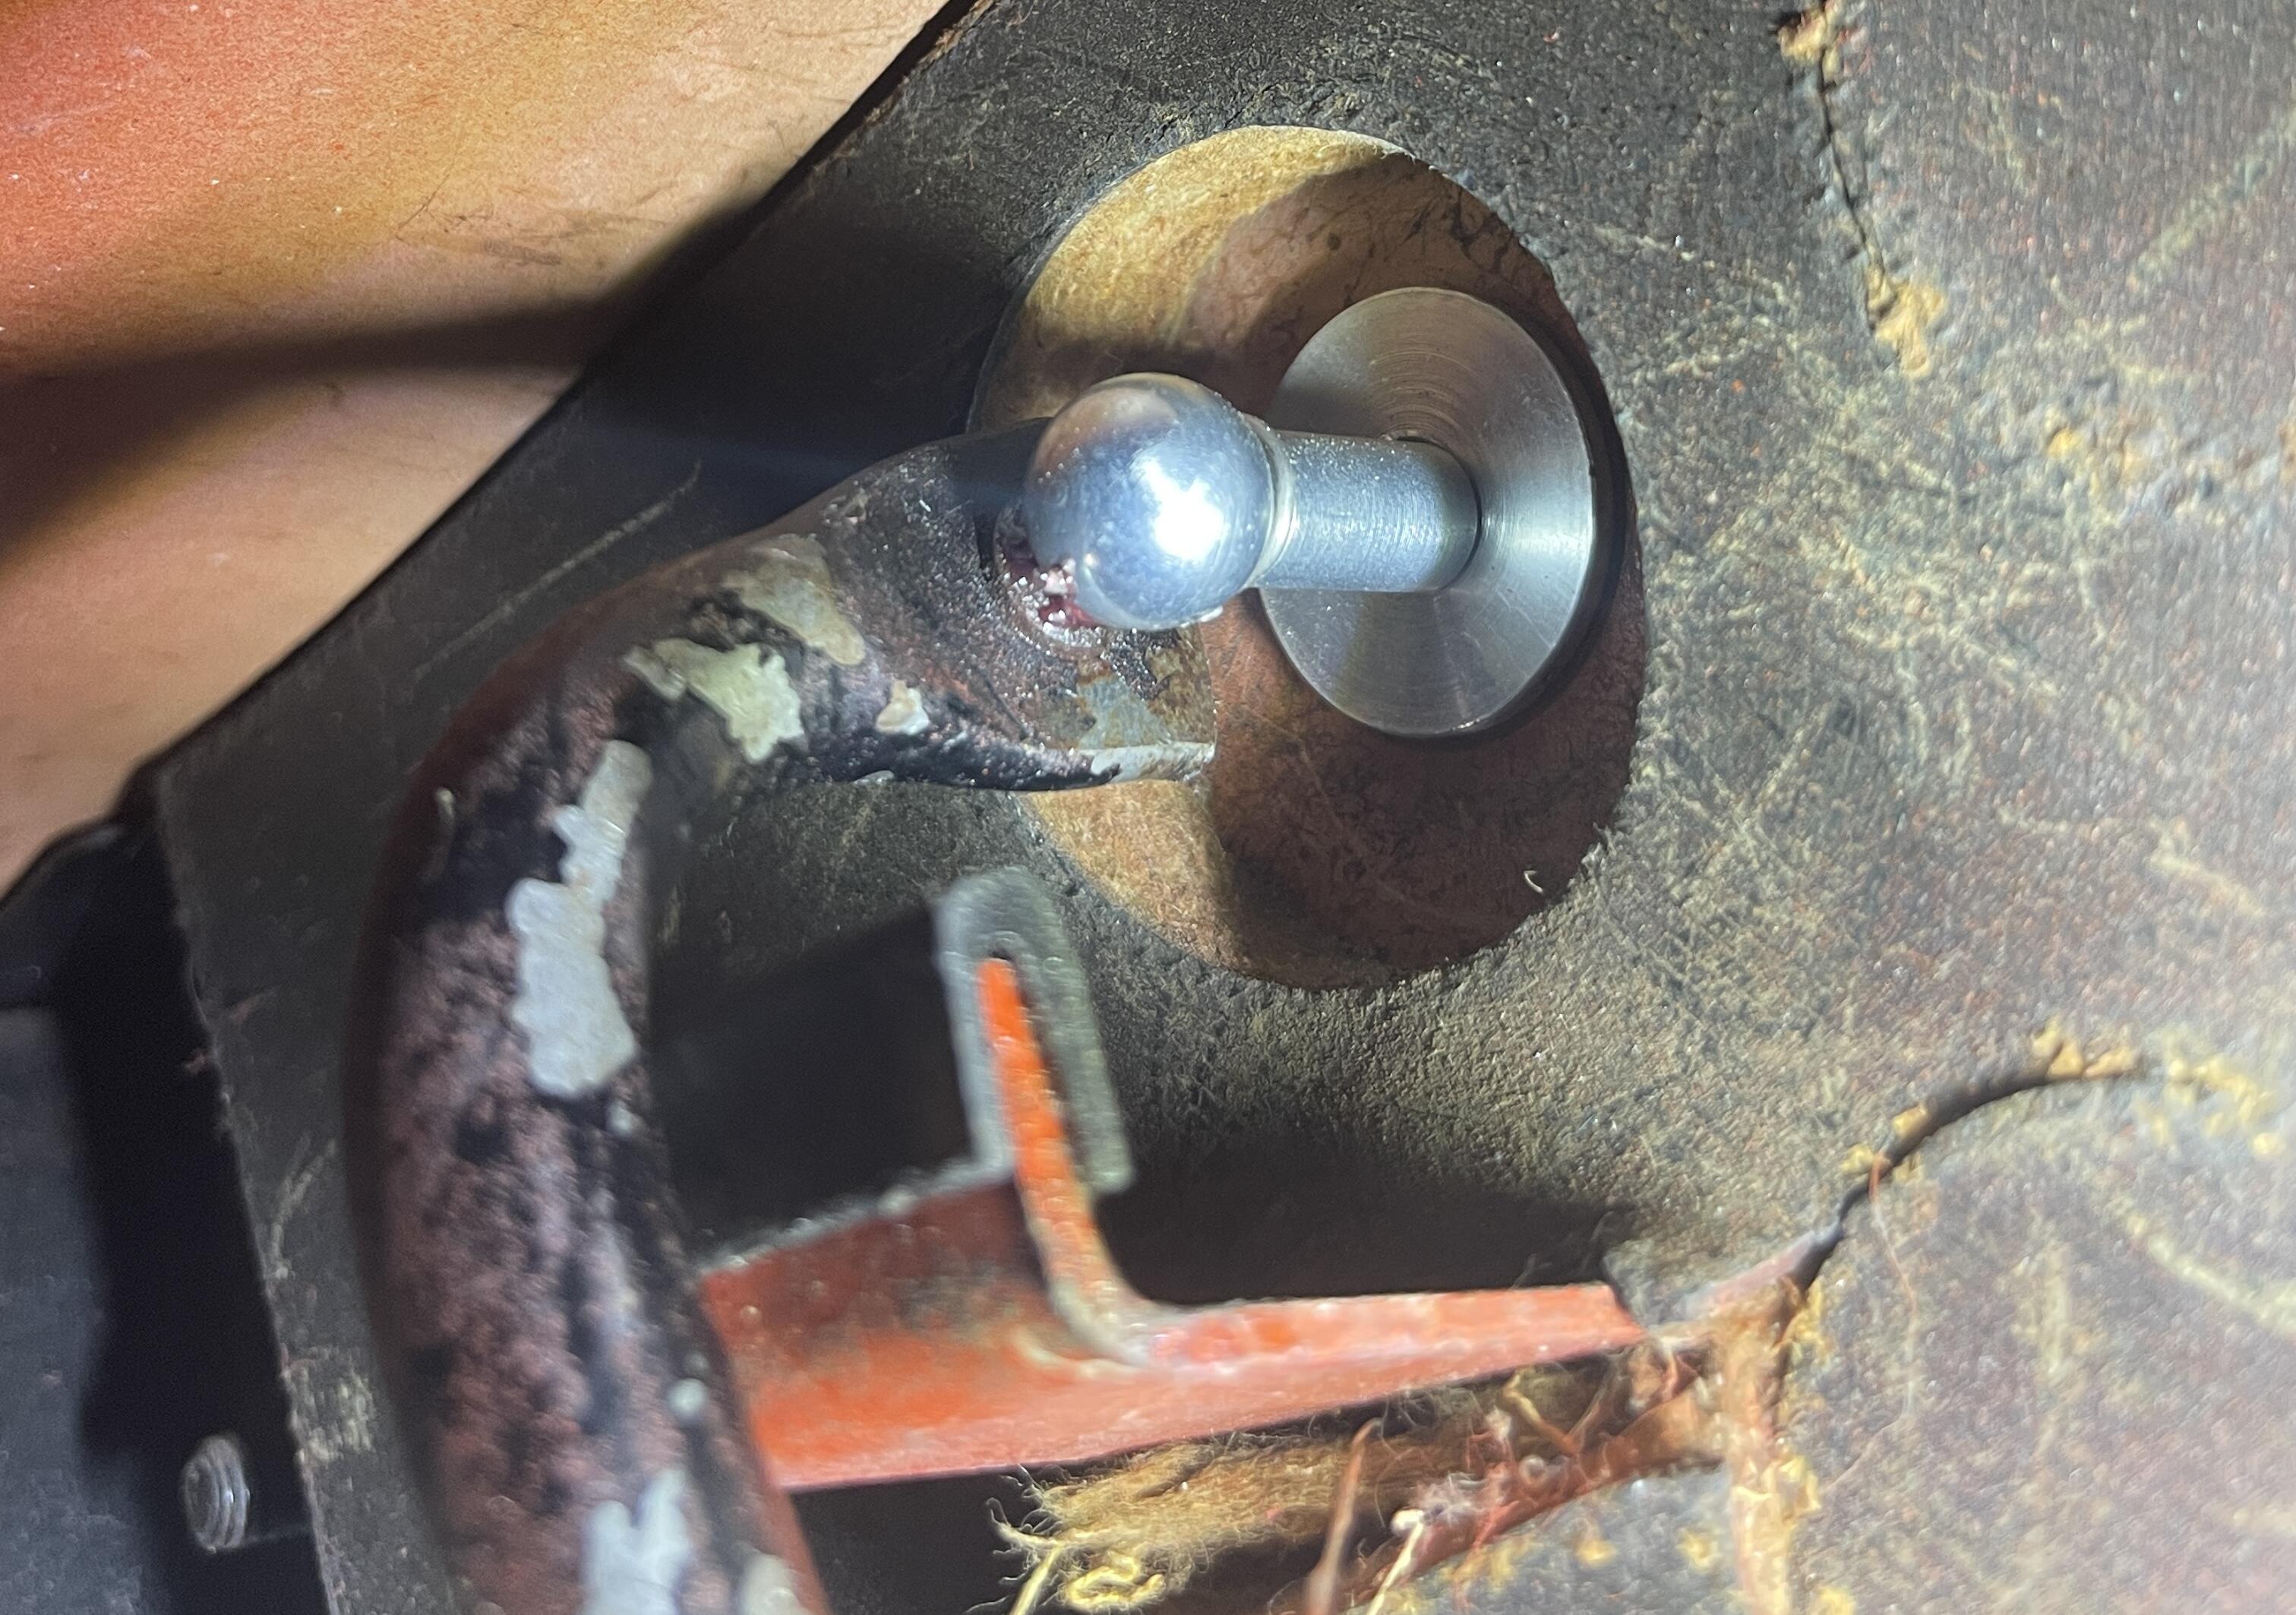
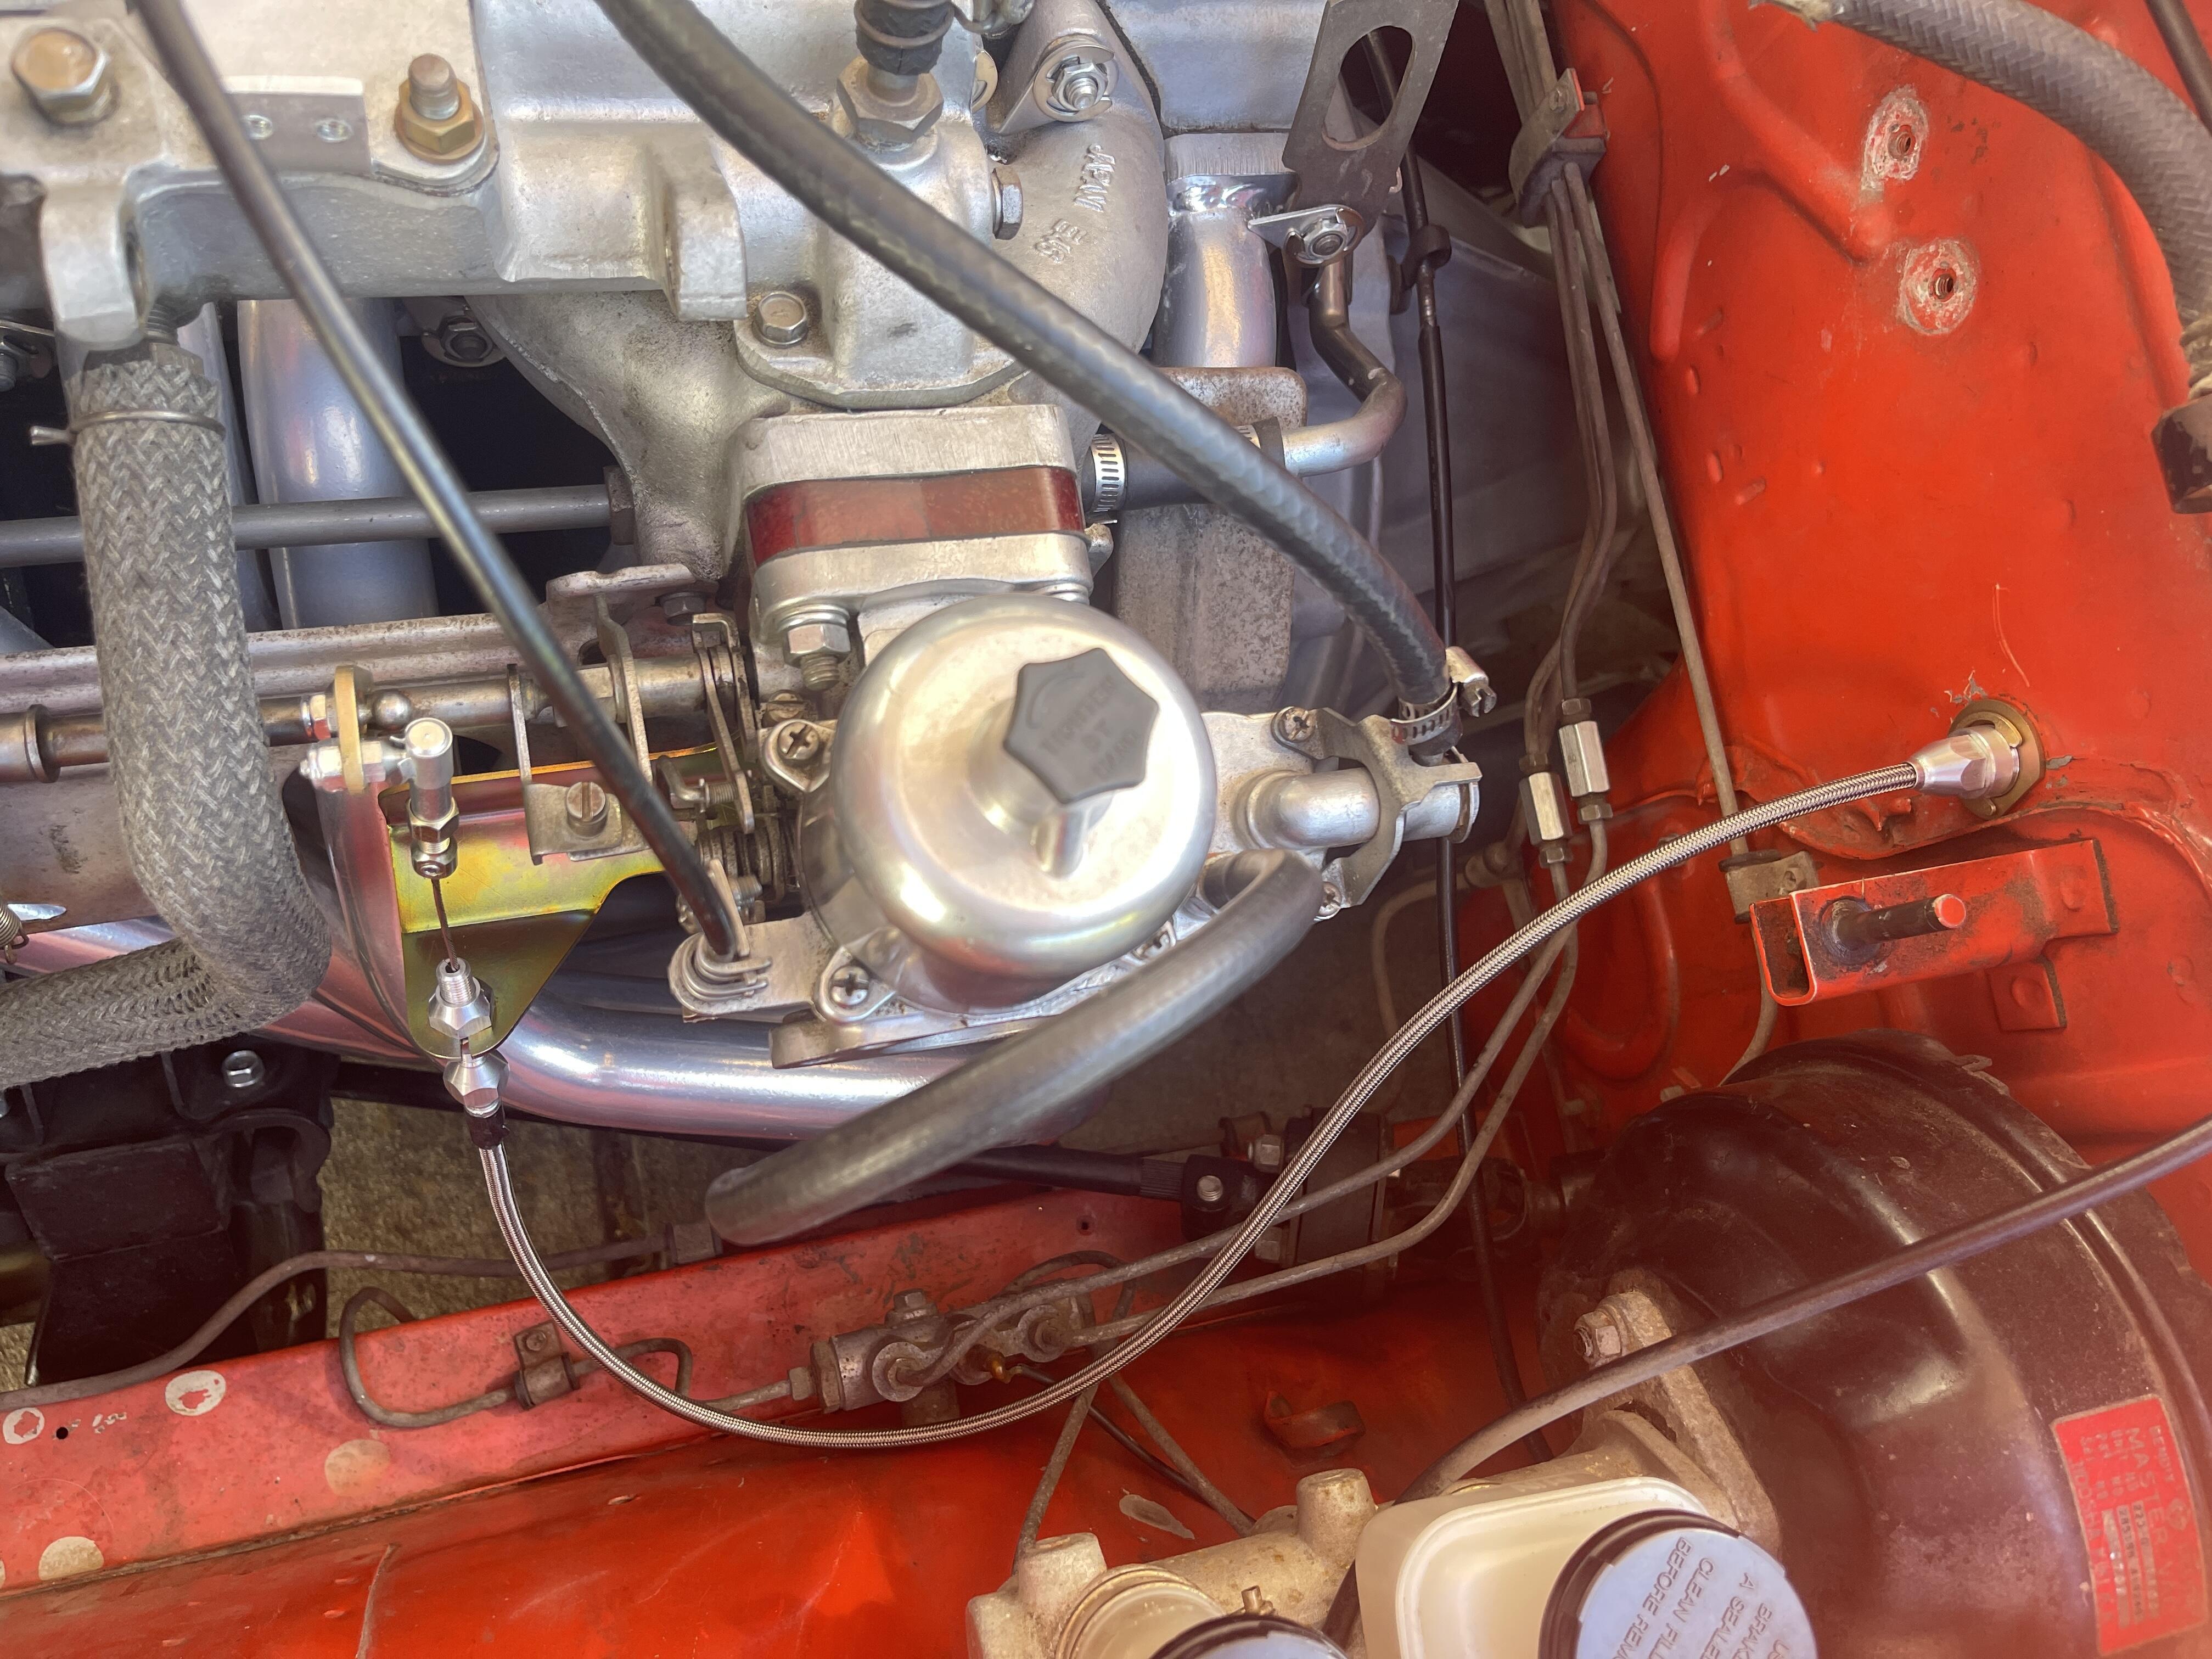
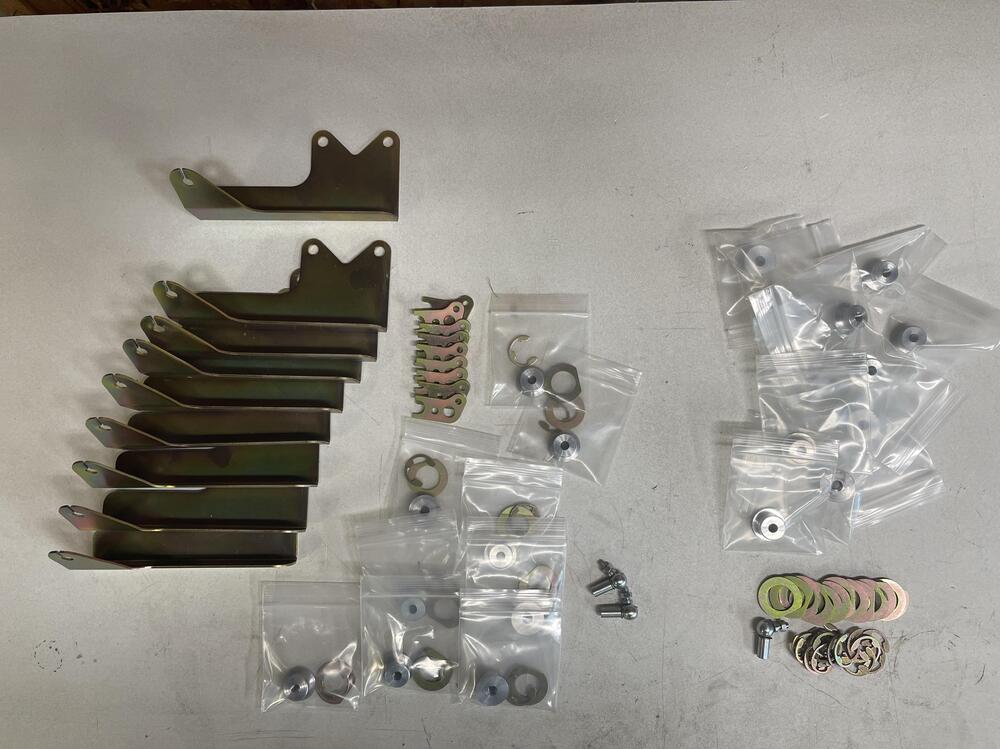
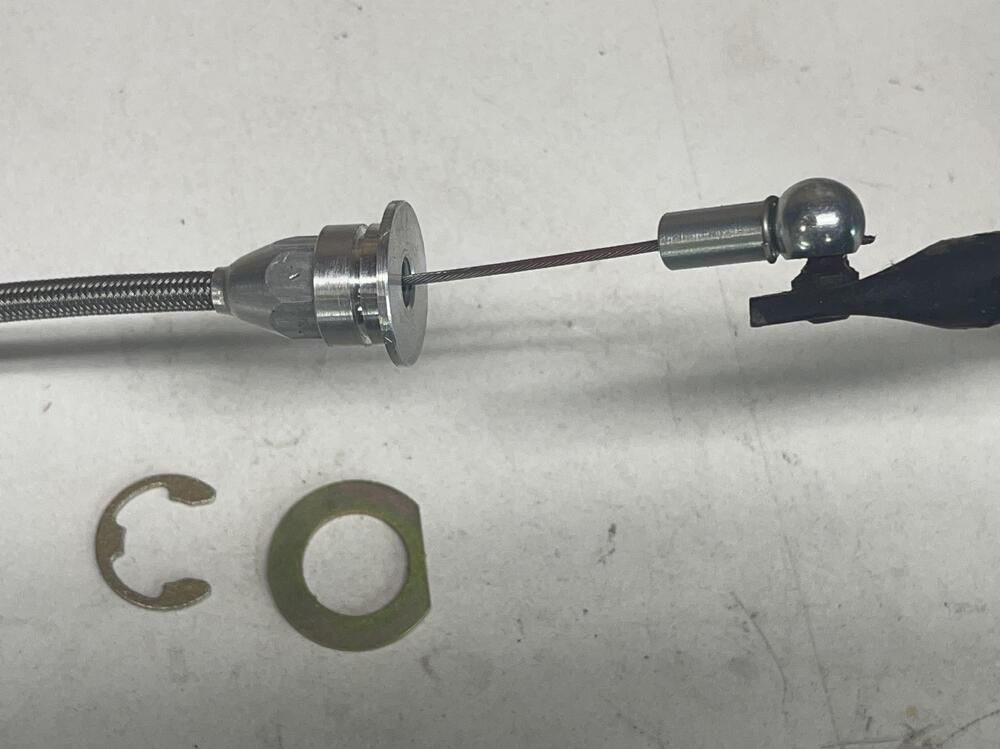
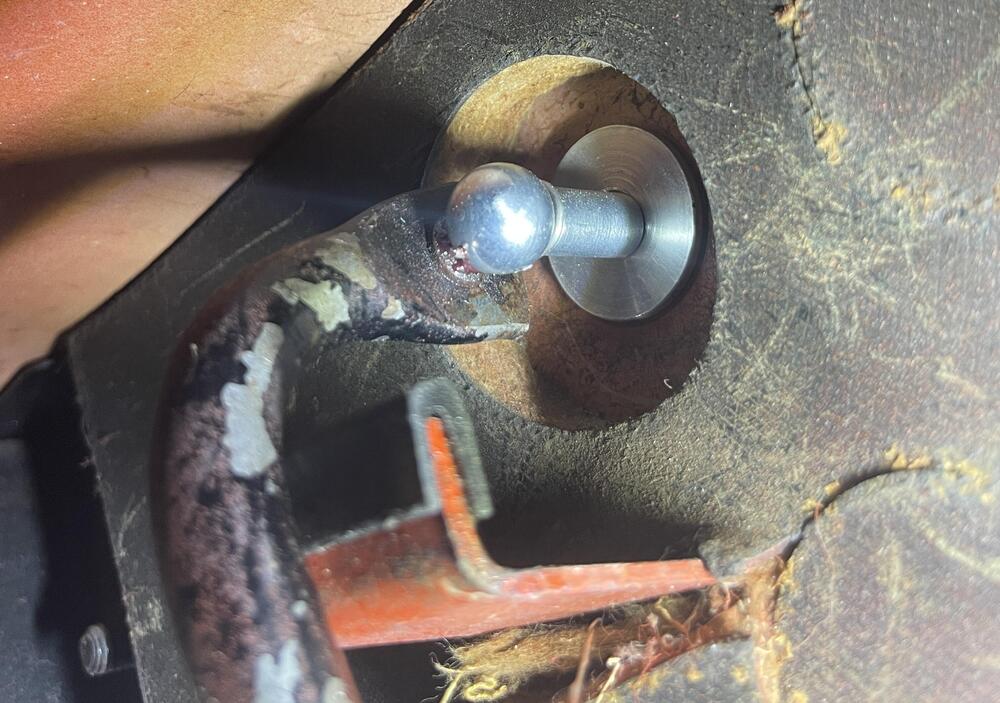
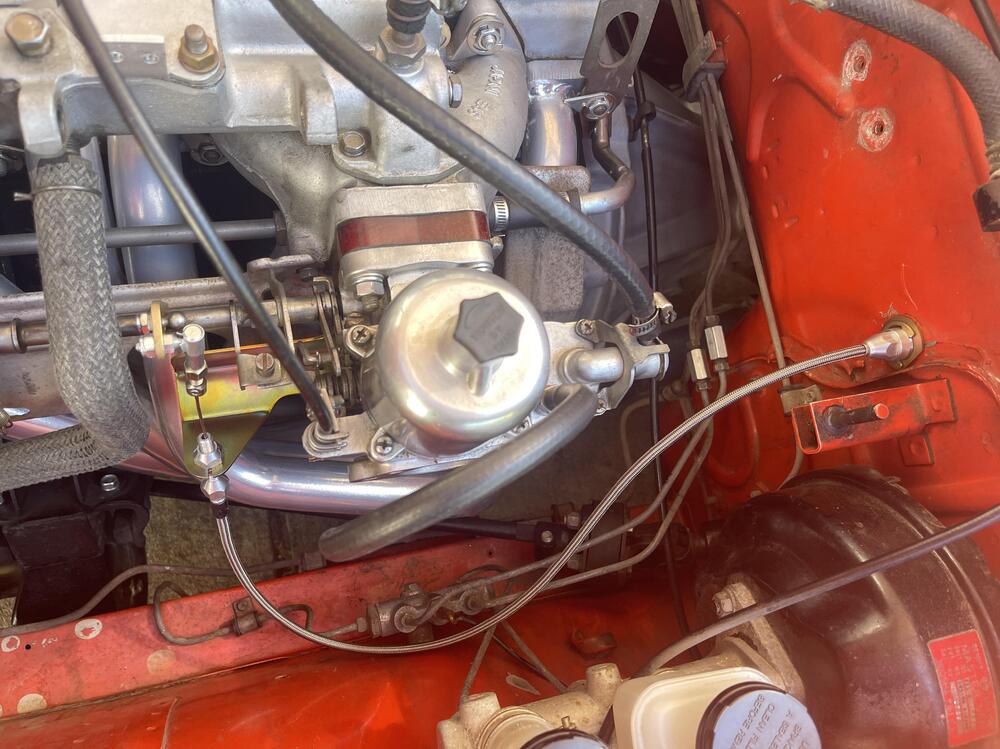
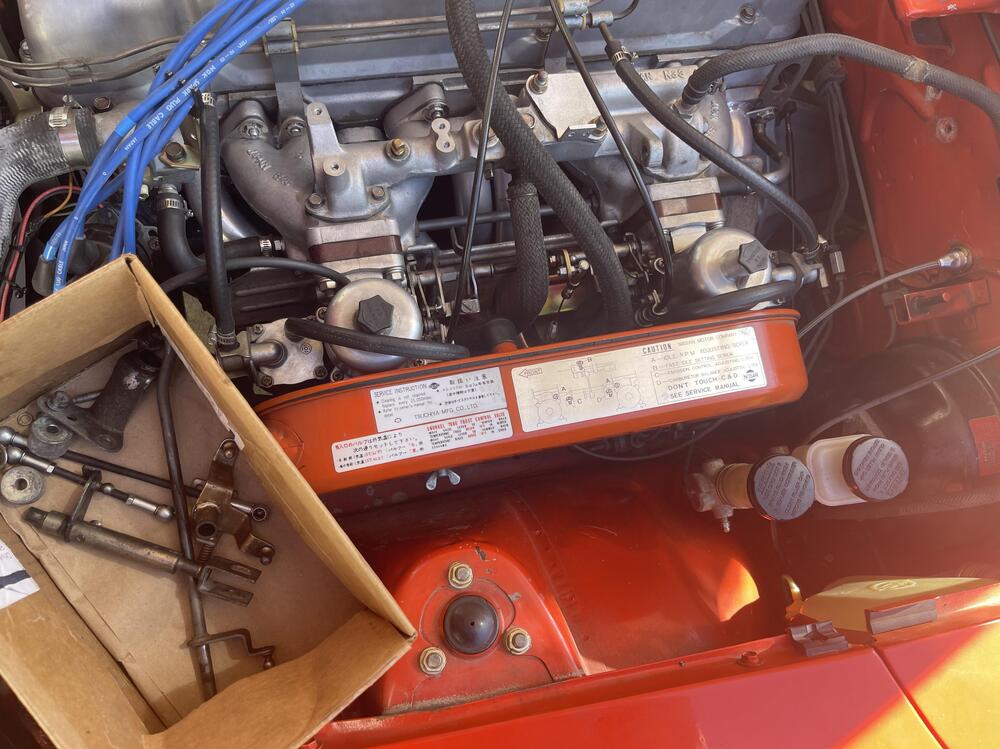
I've been looking for a good throttle cable kit for my 73 240Z with SU's, but couldn't find any. I heard MSA had one, but no luck finding any links or info. There's an ArizonaZCar instructions link I kept seeing, but link is broken. So, seeing nothing available, I decided to build my own. Actually, I put together a few kits (9 more left) thinking maybe others might also be interested. You provide the cable kit, but you decide if you want to spend more for a Lokar cable, or a cheaper $20 Amazon knockoff. The design objectives were: Use of readily available 24" universal throttle cable kit (you provide). No junkyard rummaging needed. No welding or modification to gas pedal. Stock ball is used. No drilling of firewall. Completely reversible if you want to return to stock setup. Only 1 hole needs to be drilled in the carb linkage. Cable runs from carb linkage all the way to gas pedal so you can completely remove old linkage. High quality parts. Plasma cut, yellow zinc plating, and CNC machined bushing. Circled parts are included. You provide the 24" Lokar TC-1000HT (braided), Lokar TC-1000U (black), or a cheaper knockoff. The Lokar is better, but any will work, as long as the adjuster threads are 5/16-24. Just so you get a taste of the install process, here are abbreviated instructions. I'm working on a more detailed set for purchasers. Remove the 4 nuts from the rear SU carb, slide away from engine and remove center linkage. Slide carb back on studs to hold, you don't need to remove any cables or hoses from the SU. The only modification needed is drilling a 3/16" hole in the stock lever so a new lever can be bolted in place. New ball is placed further away from linkage centerline to help give better off idle control of rpm's. Reinstall center linkage and place bracket onto the 2 lower studs of the SU and tighten carb back into place. At this point you could reinstall your old linkage if want to finish project later, or test to make sure your SU's are still happy. Slot provided so you can pull cable away from engine without loosening the cable set screw. On the firewall/gas pedal side, remove gas pedal by removing the 3 screws. You'll need to make the ball end of the cable smaller in diameter so it will fit inside the socket's M5 thread. I twirled mine on the side of a grinding wheel, but a file could work. Then run the Allen head set screw (it has a hole drilled through it) onto cable and into socket to lock cable in place. Red thread locker or small center punch on threads to lock set screw in place if needed (after checking fit at gas pedal). Discard the adjusting nut and replace with firewall bushing after cutting the threads to about 3/8" in length so they don't stick out of the firewall bushing. Tighten cable sheath to firewall bushing, large diameter side facing to rear. Slide cable back into sheath and attach socket to your gas pedal linkage ball. Feed cable through firewall throttle hole until bushing is against inside of hole. I found it easier to feed cable through sheath now, leaning gas pedal against trans tunnel, instead of trying to feed that small wire through that tiny hole afterwards. I hate working under dashes and definitely didn't want to have a nut to tighten above the gas pedal. From engine bay side of cable, slide washer down over cable and gently pull on bushing until you can get the E-clip in groove. Be careful with these braided sheaths that you don't pull the braiding out of the ferrules, it's a pain to put back together. I put duct tape on mine to help prevent unintentionally pulling apart. Screw gas pedal back in place. The rod should stop against the rubber stop with a nice thud without the socket hitting the aluminum bushing. I glued the rubber stop on, it kept falling off. You can cut the socket down in length if it hits bushing. The hard part is done, now you just need to mount cable adjusters onto new bracket, and mount new socket from your cable kit onto 1/4" ball. Cut cable to length and set Allen screw. Adjust as needed. Remove old linkage parts and store away. One nice thing is the cable is hardly noticeable coming up to the carbs instead of over the top. Still working out the price. I've only worked on a 73, but I think the spacing of the center linkage lever is pretty much the same for earlier Z's. I need some feedback on that. Anyway, let me know what you think, if you're interested, or if you have any questions. Thanks, Ken


-
It looks right at home in the engine bay. Sounds lovely. Well, we can dream.
-
This would be cool !! Likely too expensive for me. If it's ever available. https://www.hagerty.com/media/news/nissan-forgets-rb-engine-exists-develops-dohc-head-for-s30-z/
-
Sorry I started a Series I sh*tstorm. LOL. It's been erased from my vocabulary and won't happen again! I think for me, I'll just go with "early" 240Z and 240Z.
-
Went to above link and there's a 71 Series 1 advertised as a "1971 Nissan 240 SX" for $16,900. Be a good project for someone. Surprised it's still available. And yeah, Facebook does suck! Deleted my FB account years ago. https://www.facebook.com/marketplace/item/1568263933939885/
-
I returned tranny for a full refund. You guys should never listen to me for any 240Z advice! [emoji23]
-
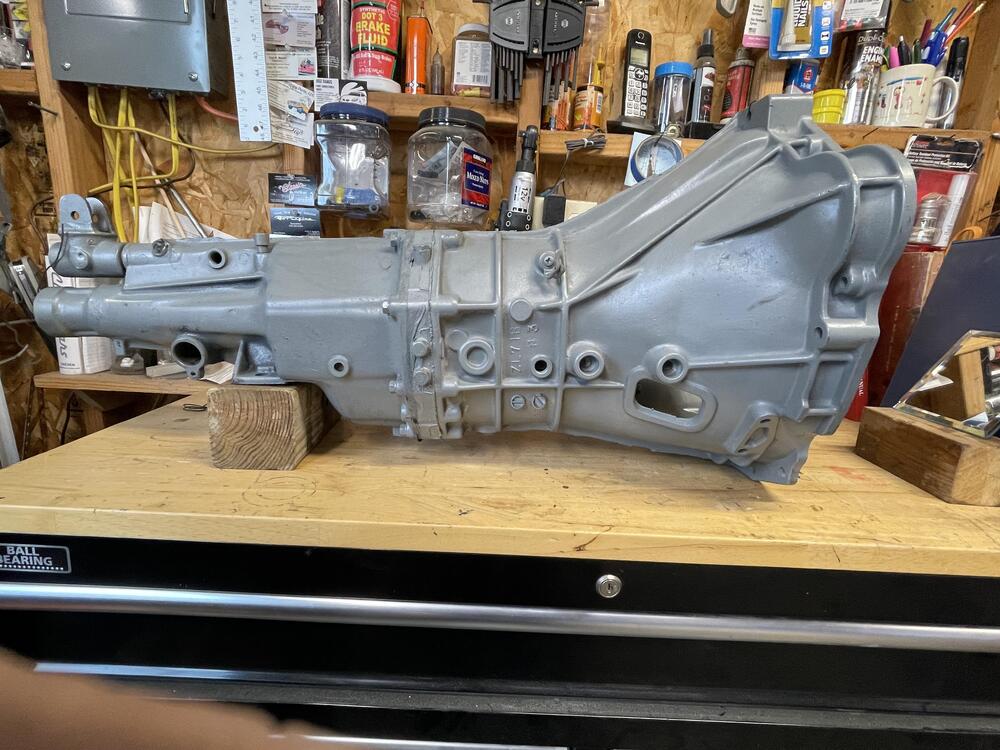
I think I'll be returning this. I think it's a 200SX trans, somehow with a 280ZX tail shaft housing.
-
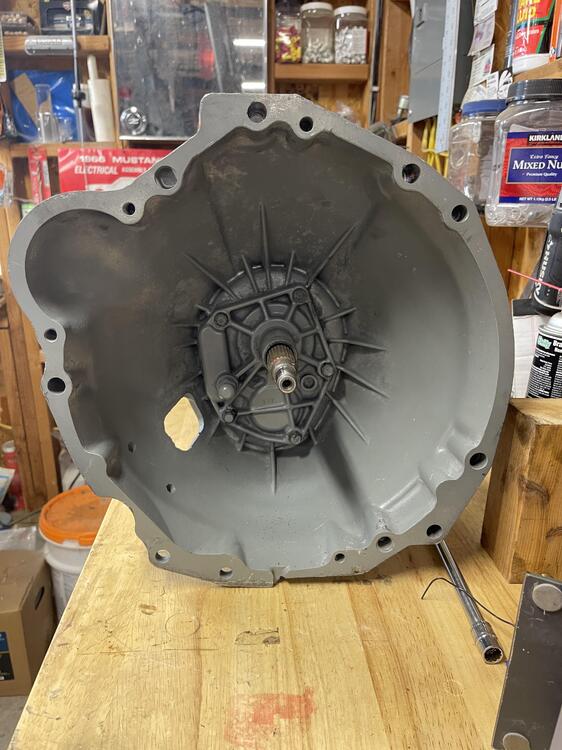
Yeah, front view does look different. Measures 30.5" overall, 29" to shifter centerline. ZL71B is cast into side of main case.
-
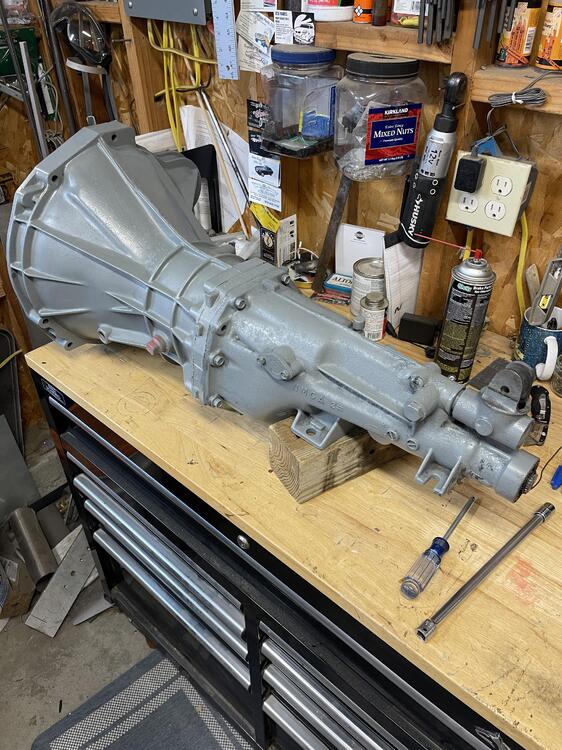
I finally got a lead on a 5 speed, which has been sitting on the shelf since the mid 90's at a Sacramento manual trans business . Went to look at it, appeared to have a close ratio tail housing. Did a quick check of the 1st and 5th gear ratios by marking shafts and turning, not too accurate. Estimated 5th was .773, and first was 3.6, which I thought odd. They recently replaced the seals since it was sitting for so long, and came with 1 year warranty. They unfortunately painted it gray, ugggh. Anyway, decided to buy it. It looks like like a typical close ratio tail shaft housing, no dust shield, bottom speedo bolt, one rear tab, reverse lockout plate. Its does have the oil filler plug on the left side of the case instead of the normal right side. I put a degree wheel on the input shaft to try to get more accurate ratio calcs, with 2 output shaft turns: 1st - 3.6 (2590º / 720º) probably 3.59) 2nd - 2.25 (1620º / 720º) 3rd - 1.42 (1022º / 720º) 5th - .81 (585º / 720º) So, it looks like it has the 72-74 4 speed ratios, which is fine with me since I still have the 3.364 diff. Can the 4 speed gear set be used in a 5 speed case? And a .81 5th, I didn't know that was even possible. That's right in the middle of what I was expecting, .773 or .864. Actually .81 my be perfect. Anyway, anybody have any thoughts on how this tranny came together? Thanks, Ken
-
Yes, I'm very impressed with the kit, the quality of parts, the little effort needed to install, etc. Really well balanced out of the box, the fronts locked up before the rears, as I quickly found out during break in. Although, if on a track car, I think a proportioning valve would be nice to really dial in the bias as wanted. For the street, awesome setup!
-
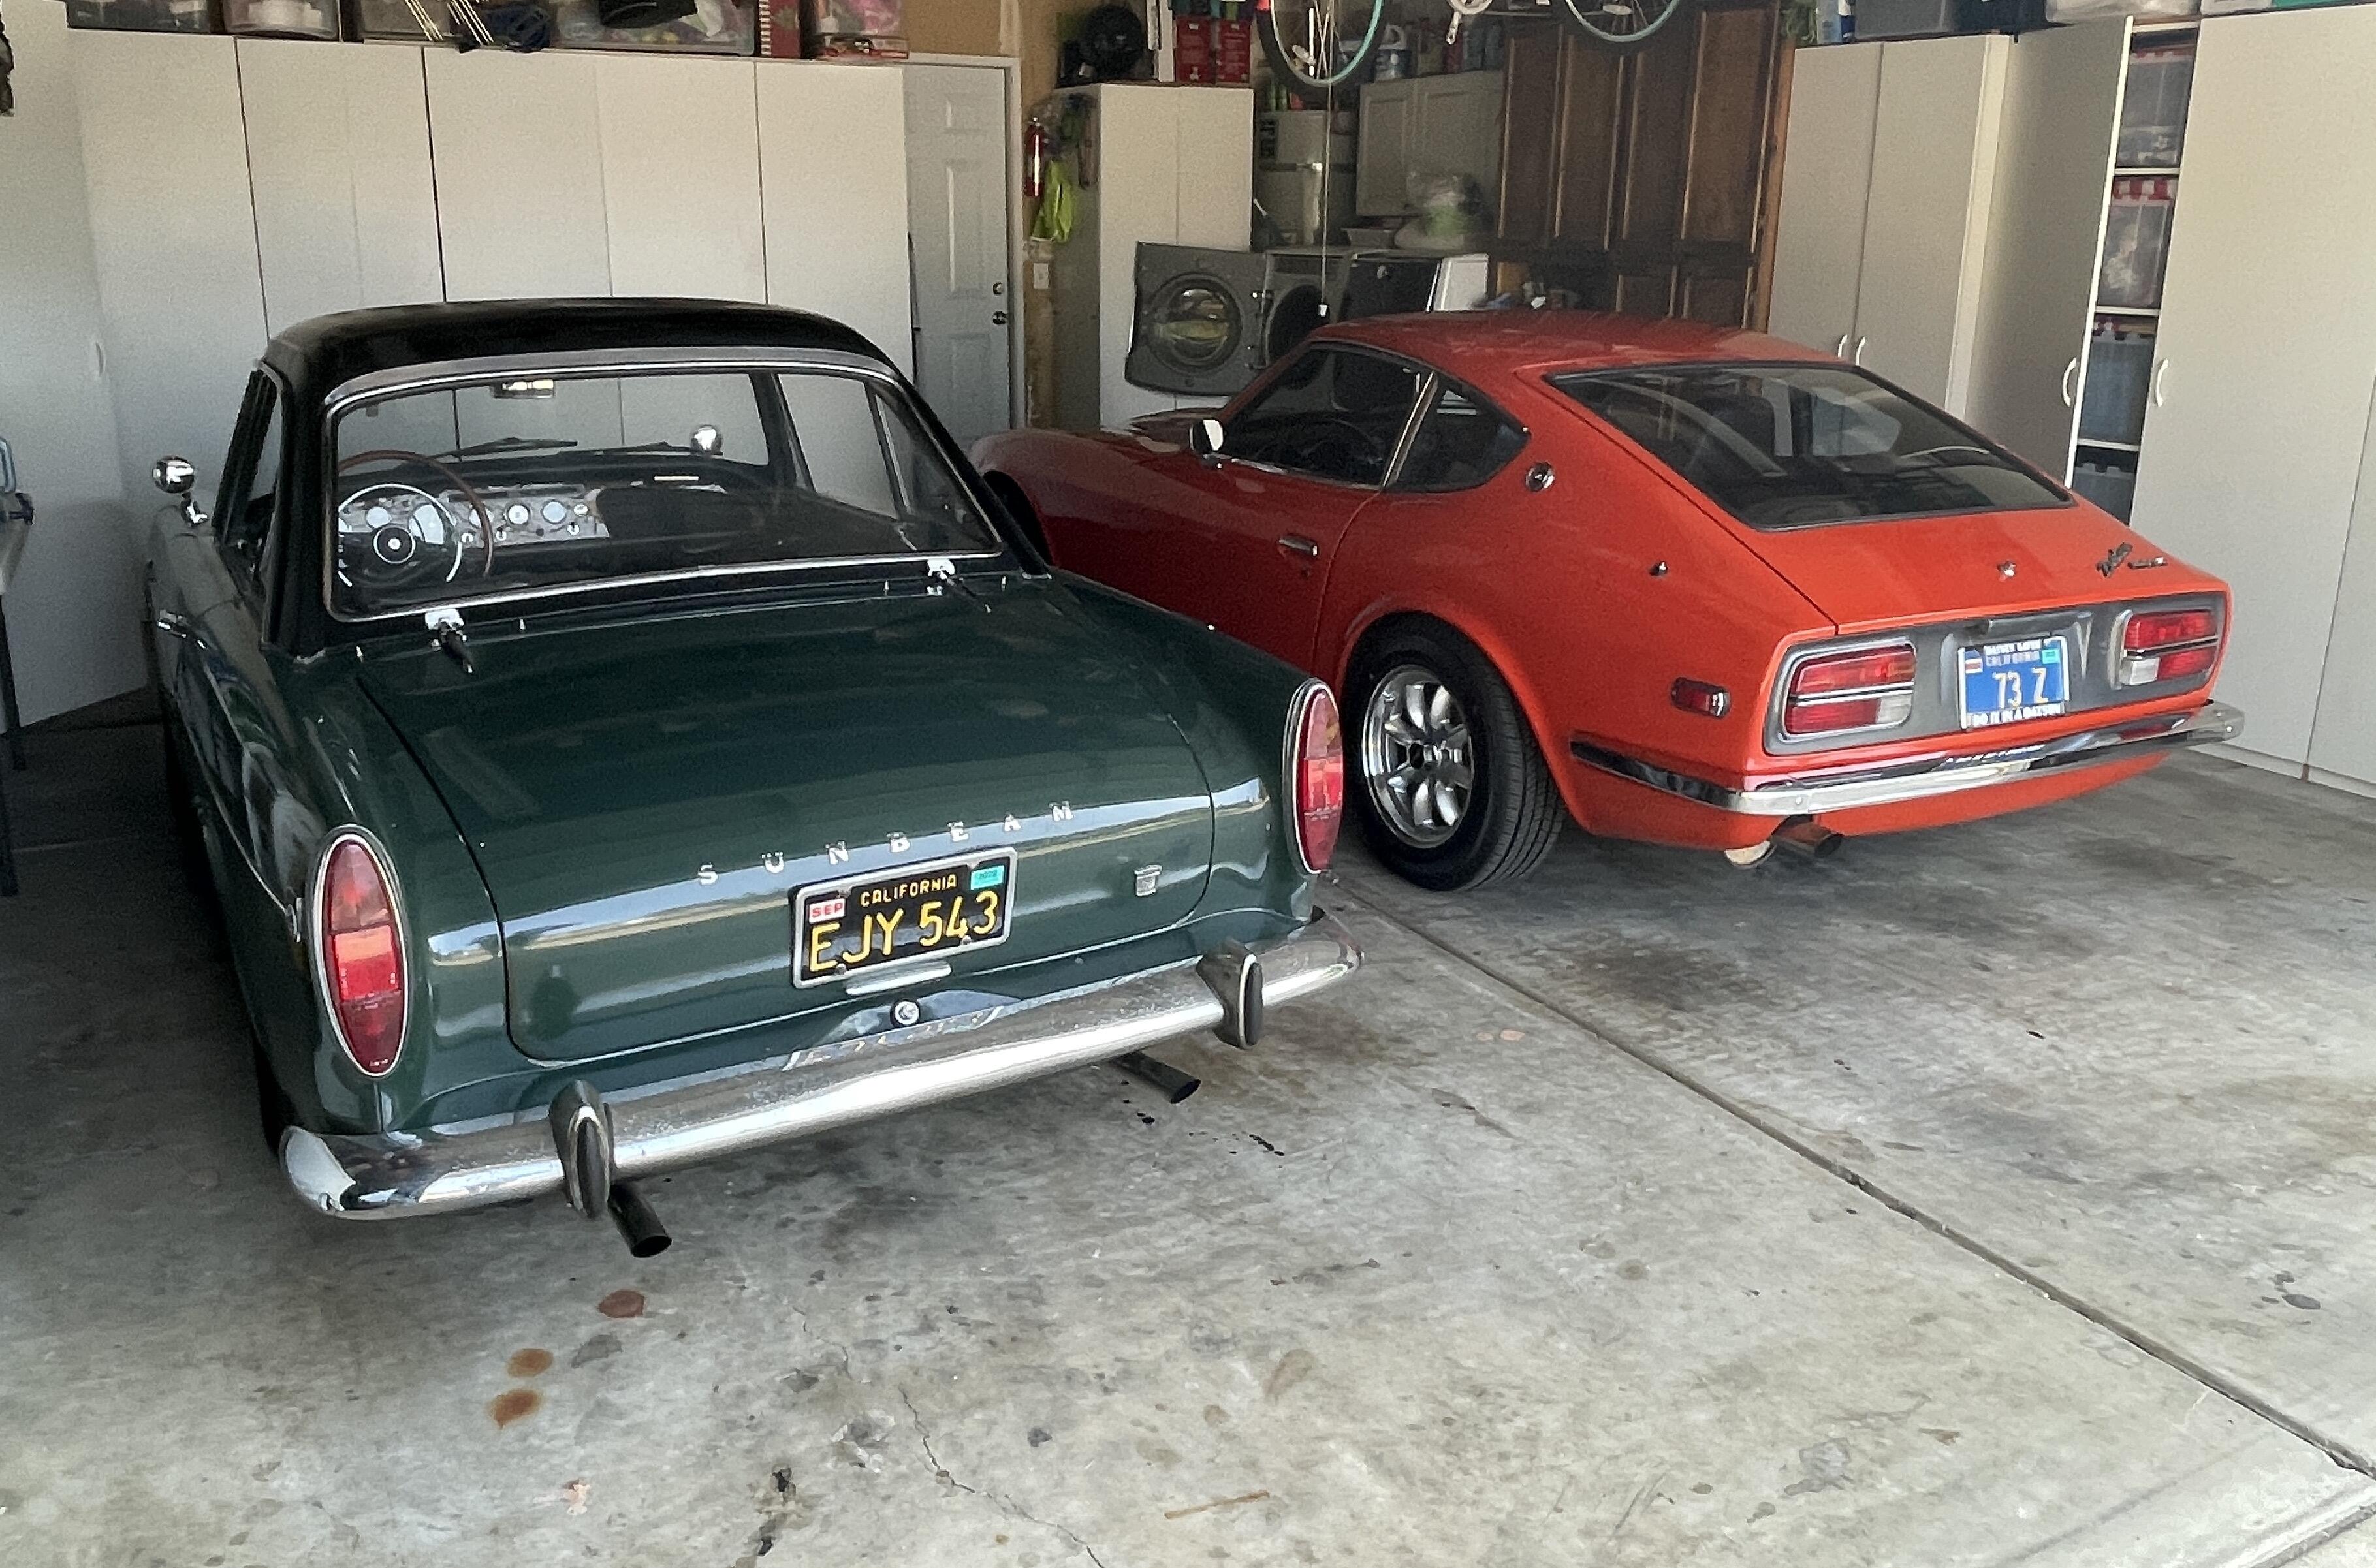
It's got more bark growl than bite. It sat from 1985 to 2020, so I've tried to keep it in original/survivor mode. Still has the 260, warmed over, with the original Autolite 2 barrel carb. Fun car to drive.
-
Nope, gently drove it there and started the camera.
-
I finally got the YouTube video uploaded. It's kind of long, wanted to show everything, and I'm a lazy editor.