
KenFirch
 Subscriber
-
Joined
-
Last visited
Everything posted by KenFirch
-
 No one has an old one laying around they'd be willing to sell? Thanks!
 -
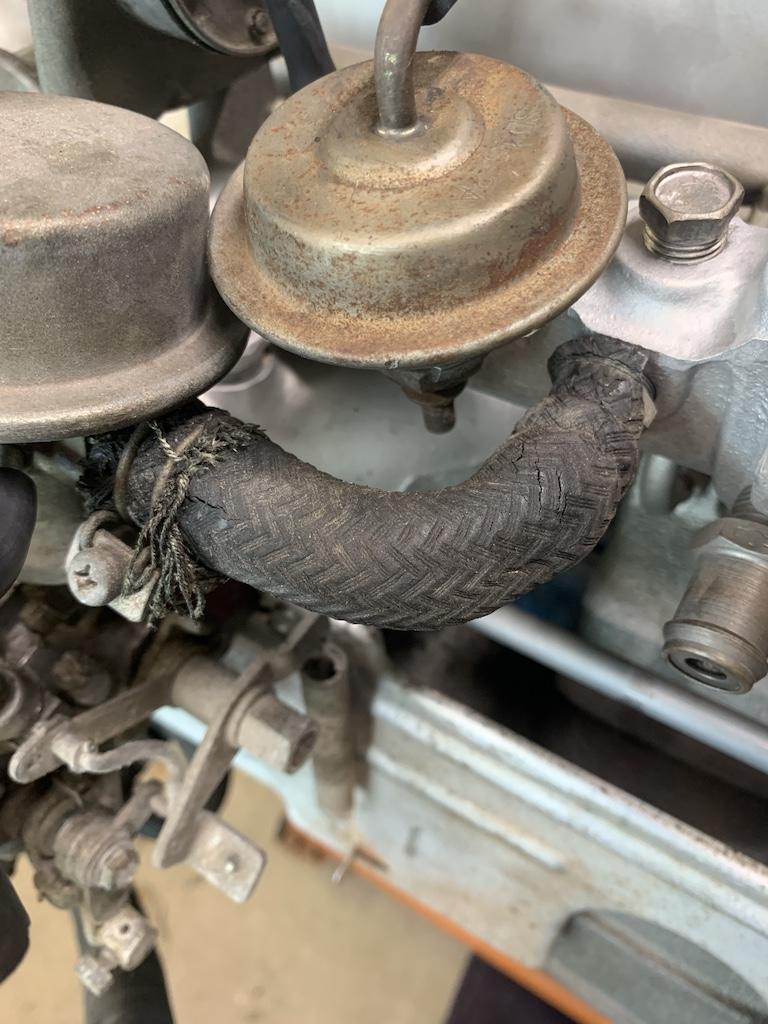
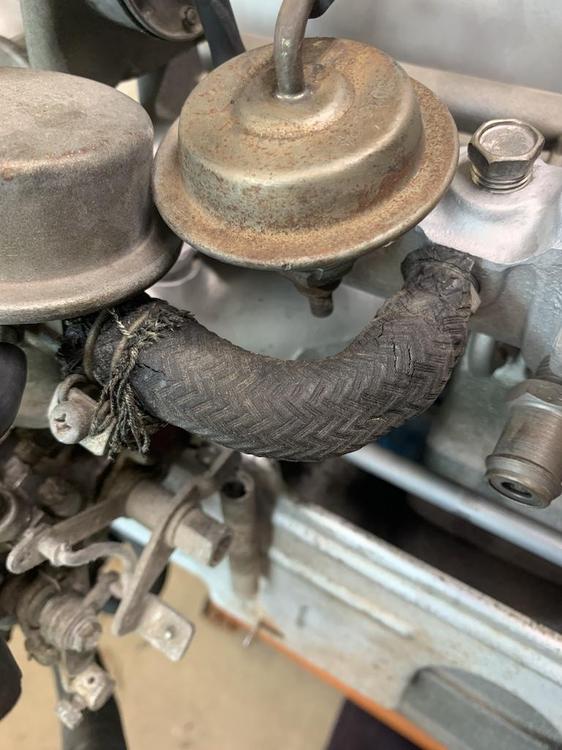
I've been gone for awhile, been working on a Sunbeam Tiger I found in my neighborhood. Done with that, now back to working on my 73 240Z. Is there a source for the hose from the AB valve to the manifold? I've seen the $300 set for 70-72, not sure if the other hoses would work, and kinda pricey. Yeah, I know, what the heck am I bothering with that smog crap for anyway! ? Thanks, Ken
-
The bottom one, attached to the arm. Sent from my iPhone using Tapatalk
-
In Sacramento you can contact Gary Cook at Vintage Performance, 916-481-1763, 4631 Auburn Blvd. He vintage races his 240Z, and mainly works on Z's and Mustangs. He can point you in the right direction for a machine shop.. Z8987, notice you're in Elk Grove, CA. So am I. ?.
-
I bought one. Guy was on Etsy. Not sure if this link will work: Sun Visor Clip - Rear View Mirror Base https://r.tapatalk.com/shareLink?share_fid=83168&share_tid=61356&url=https%3A%2F%2Fwww%2Eclassiczcars%2Ecom%2Findex%2Ephp%3F%2Ftopic%2F61356-Sun-Visor-Clip---Rear-View-Mirror-Base&share_type=t Ken Sent from my iPhone using Tapatalk
-
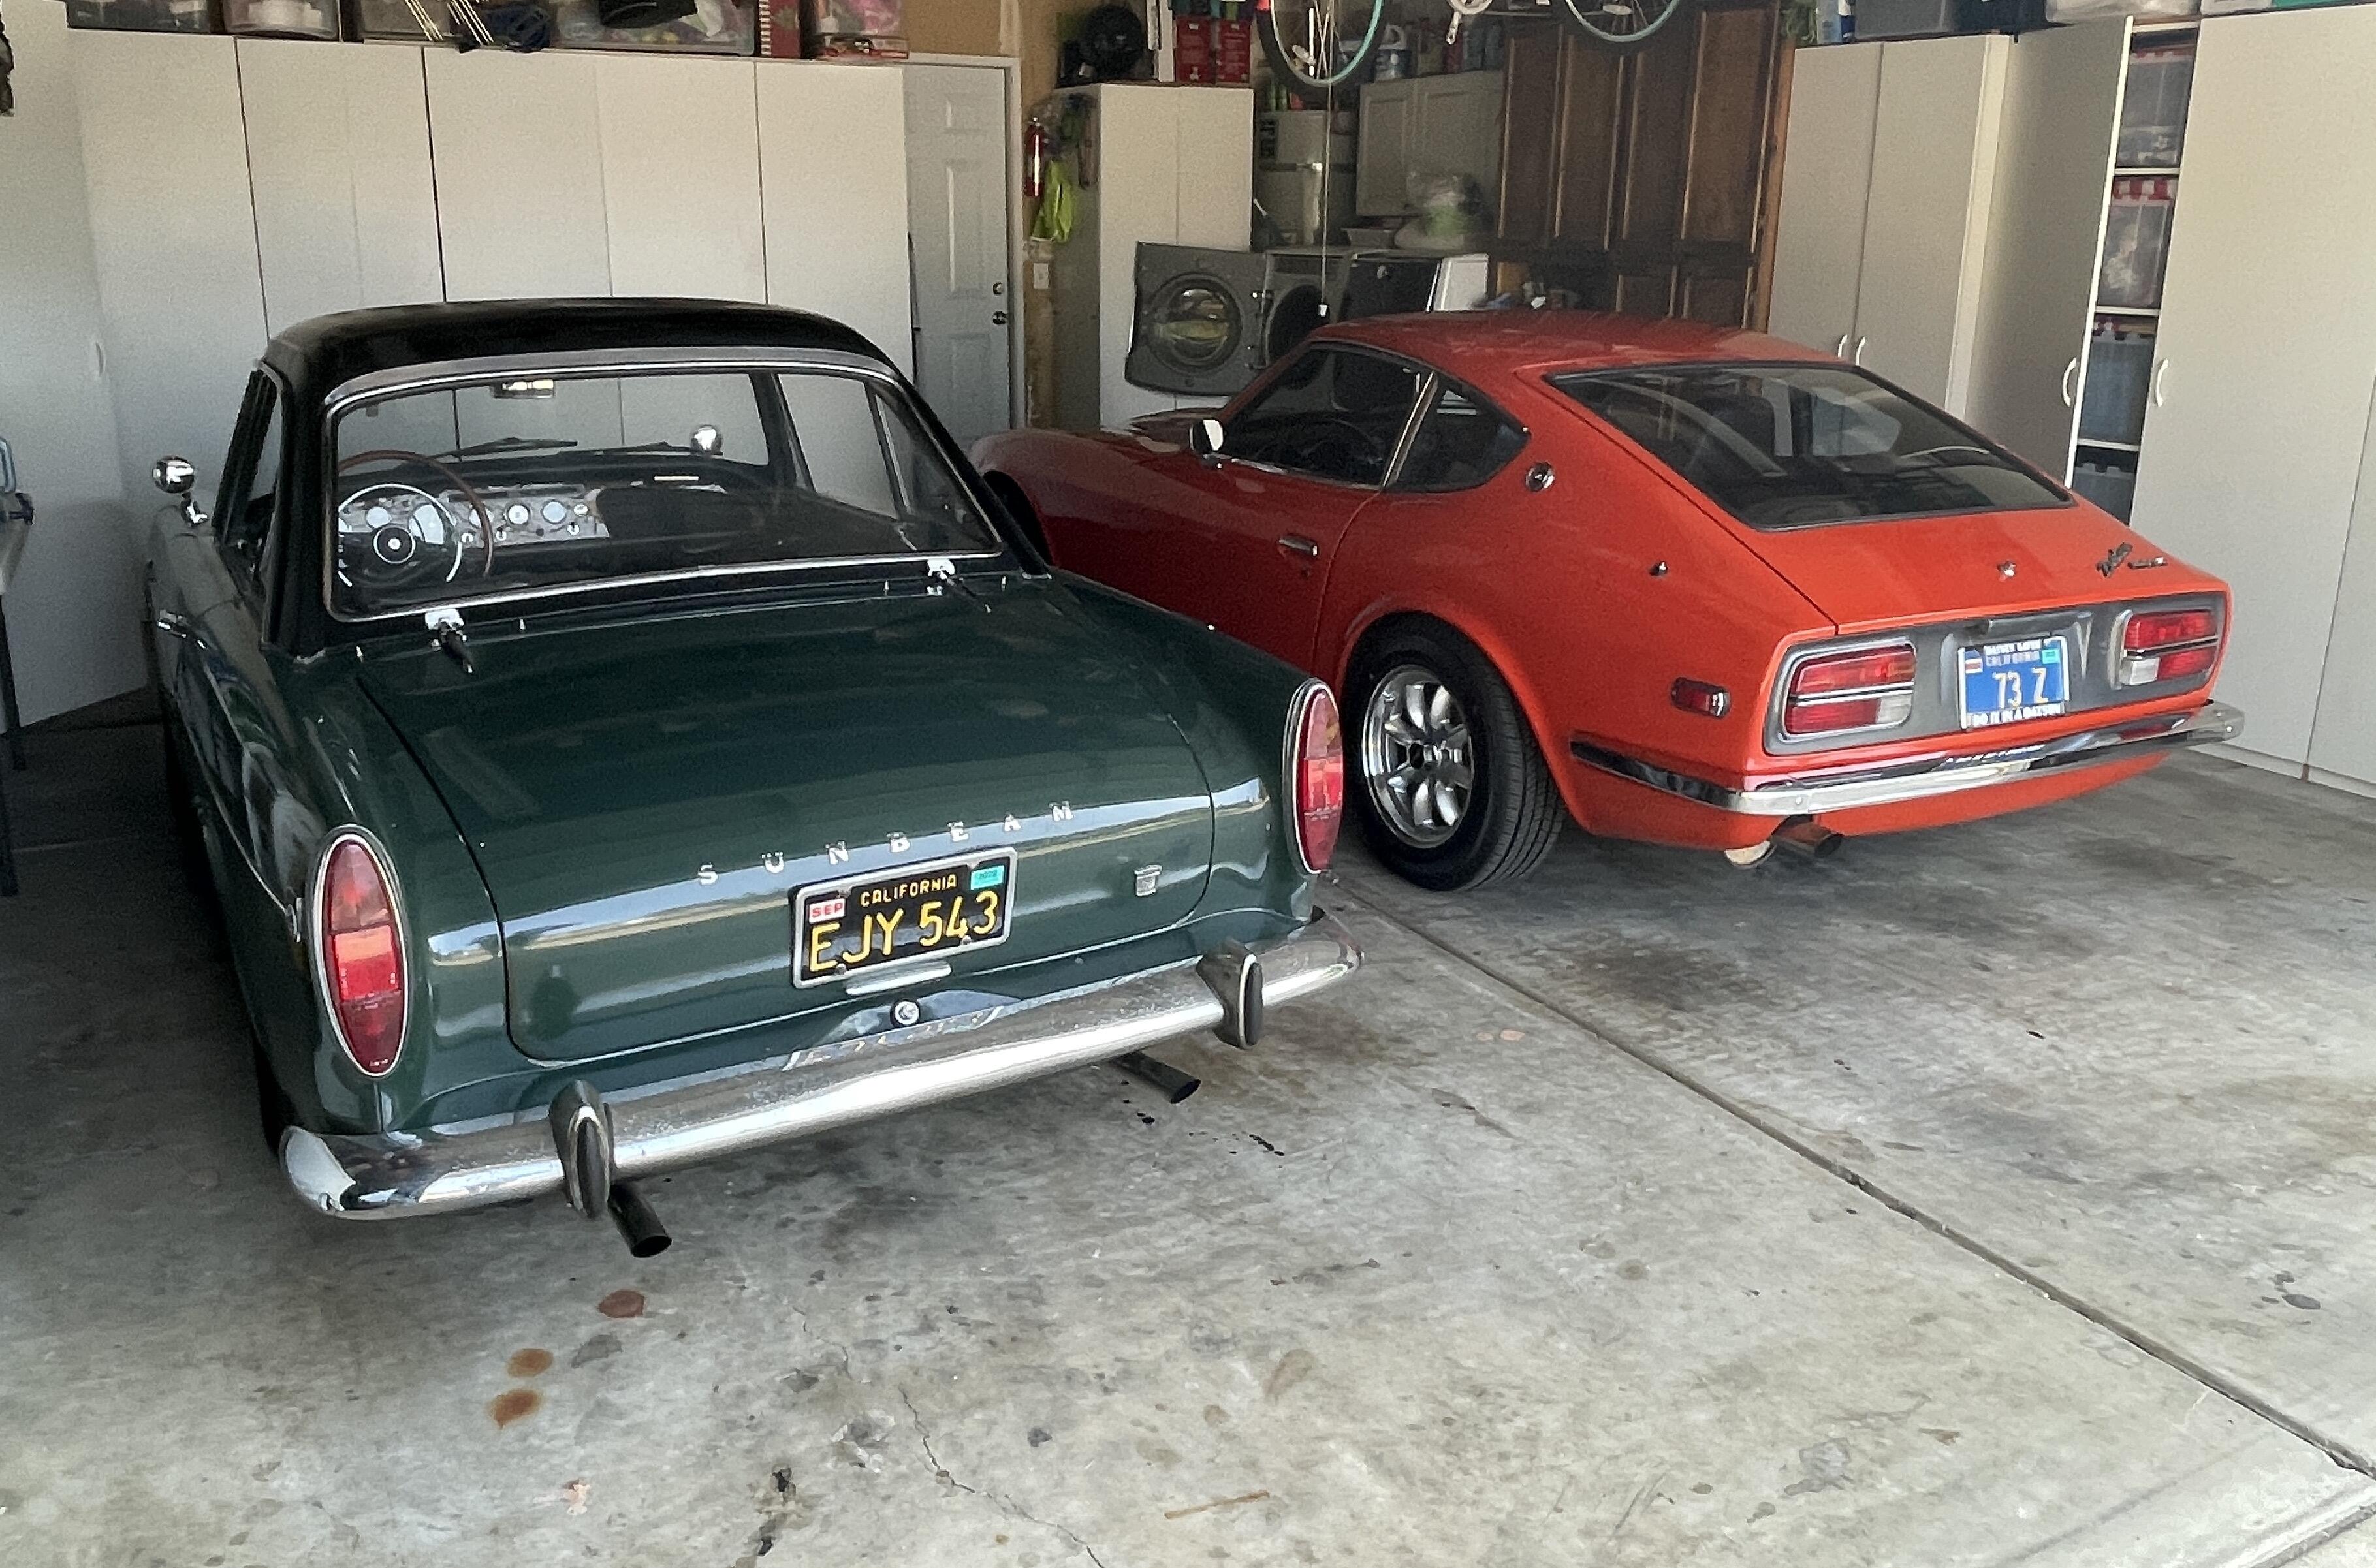
View Advert 1971 240Z - $13,000 - Sold!!! Year: 1971 Model: 240Z VIN: HLS30-32103 Engine: L24 Trans: 5 Speed Manual Color: Green/Black Mileage: 152,900 Description: Up for sale is this nice looking 1971 240Z Series II I bought about a year ago to fix up as a project, but have decided to focus on fixing my other 73 240Z and 66 Mustang instead. This car is in good overall condition, but still needs some attention. But you can drive and enjoy it as you fix it up. Rust-wise it is very good, which is one of the reasons I latched onto it in the first place. It has a 5-71 build date. The non-original L24 engine runs great, and by looking at the engine number is probably from a 72. It has a E88 head, header exhaust, SU carbs, and backed by a 5 speed transmission making it nice on the freeways. Aluminum dish wheels with new tires, and new brake pads, rotors, and calipers. This car was originally silver but was a painted green about 2 years ago. The underside and frame rails are in great shape, dog legs fine, as well as all the other typical 240Z rust areas. No signs of previous accidents. There are 3 areas of rust that need attention. There’s a dime sized hole near the battery, but the rest of the battery area is fine. The drivers side floor pans do have some surface rust, and 2 areas of pinholes, but are structurally sound and not bad enough to replace. The rubber sound deadening material on the rear drivers side pan was loose, indicating surface rust underneath. I removed to rubber material, the surface rust, and properly prepped and applied POR-15. The drivers front pan has a similar sized area the should be treated as well. The rubber sound deadening on passenger side pans is tight, which typically means there’s good paint underneath instead of rust, and nothing shows from the underside. It had an incorrect 72-73 console installed when I got it, so I replaced with a fiberglass reproduction piece from the Z Store. More photos here. Other pictures available by request. Pros: Great looking 240Z. Very little rust. Runs and drives good. New weather stripping. New carpets. New tires and brakes. 5 speed makes it nice to drive. Clean California title in my name. Cons: Non original engine. Non original paint color. A few missing parts: radio, fuse cover, horns, door light switches. Amp gauge and clock don’t work. Asking price: $13,000 Sold!!! Name: Ken Phone: 916-997-1170 Email: kenfirch@yahoo.com City/State/Country: Sacramento, CA - USA Advertiser sfm6s524 Date 04/27/2019 Price $13,000.00 Category Cars for Sale Year 1971 Model 240Z Vehicle Identification Number (VIN) HLS30-32103
-
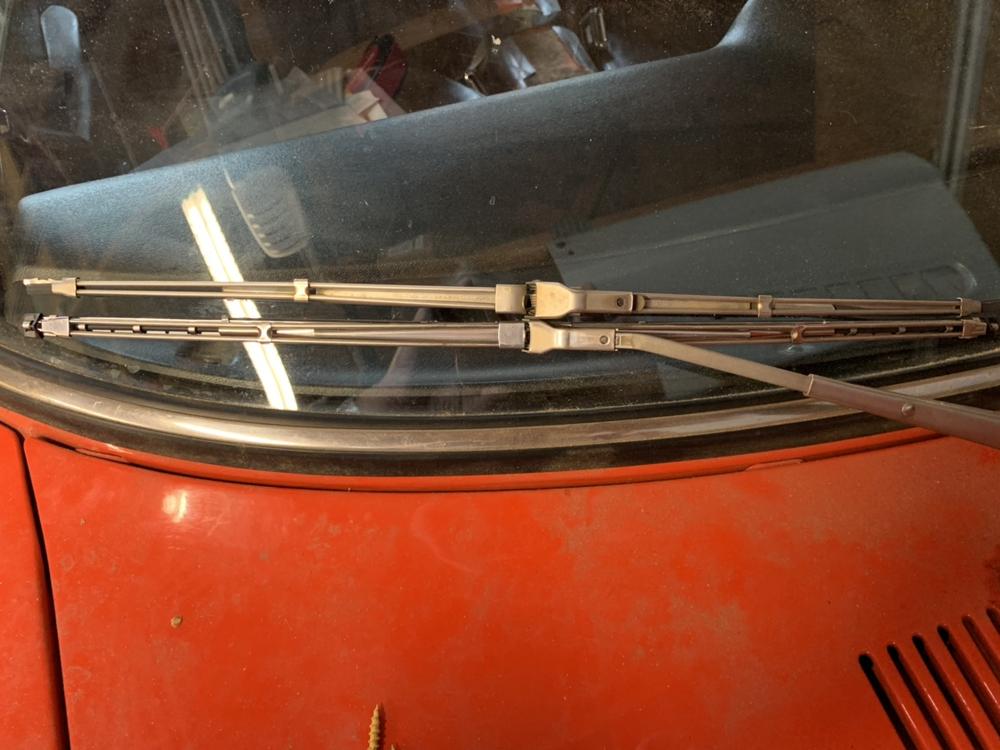
Here’s a pic of one of the wiper blades I just got from ZCarDepot a few weeks ago. Not sure if the one laying above it is an original or not. Sent from my iPhone using Tapatalk
-
Ok, April Fools isn’t for a couple months! Kidding, nice catch. Sent from my iPhone using Tapatalk
-
Not $2000, but might be worth paying a bit more for less rust. https://inlandempire.craigslist.org/cto/d/la-crescenta-1971-datsun-240z-classic/6801109962.html Sent from my iPhone using Tapatalk
-
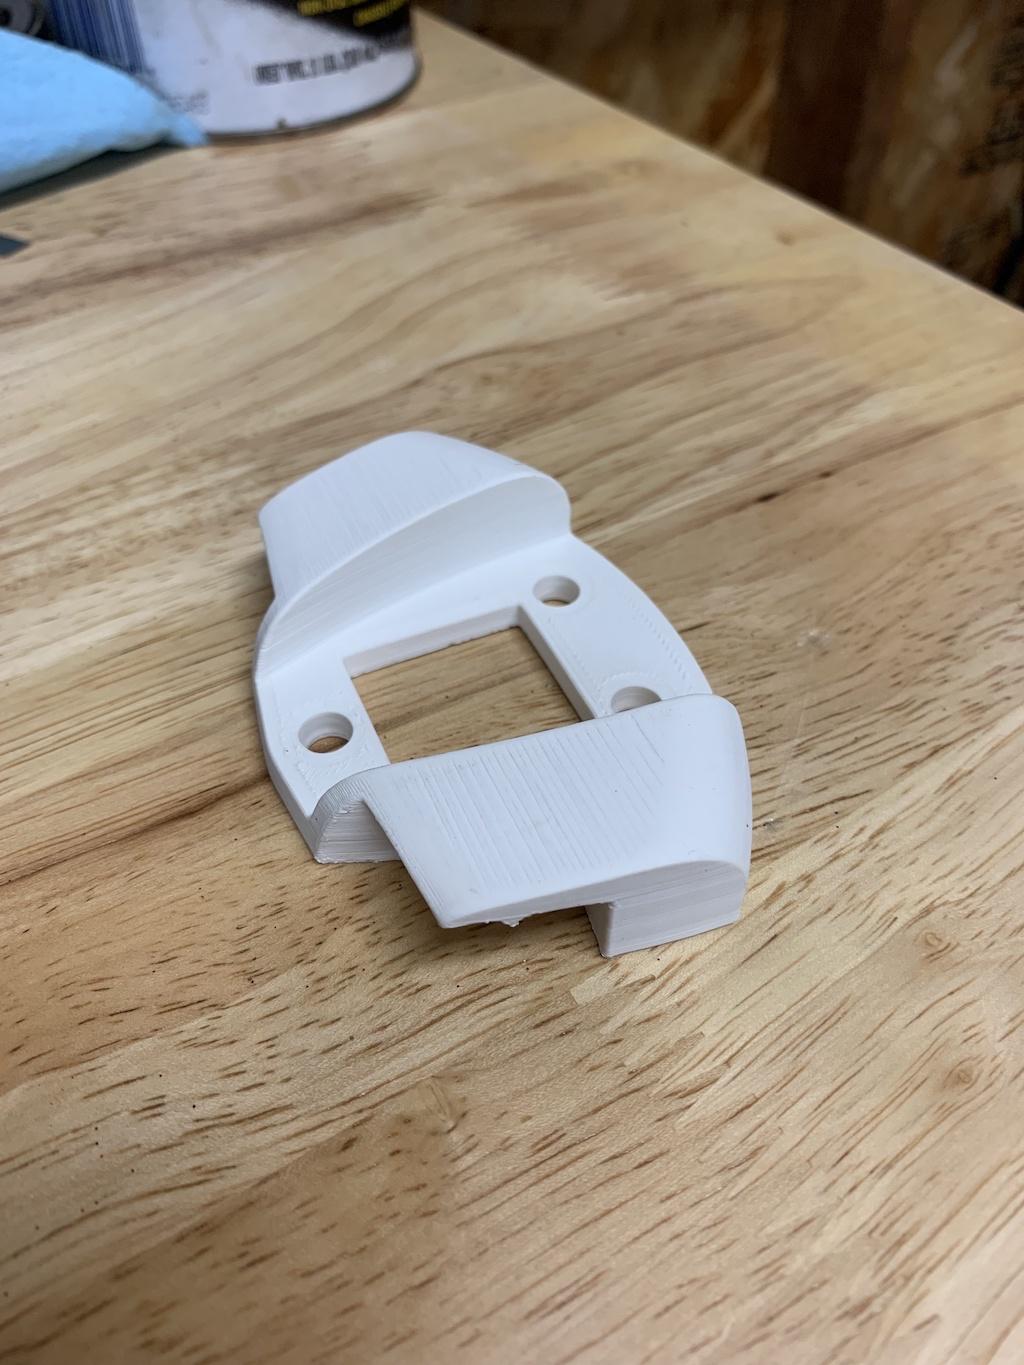
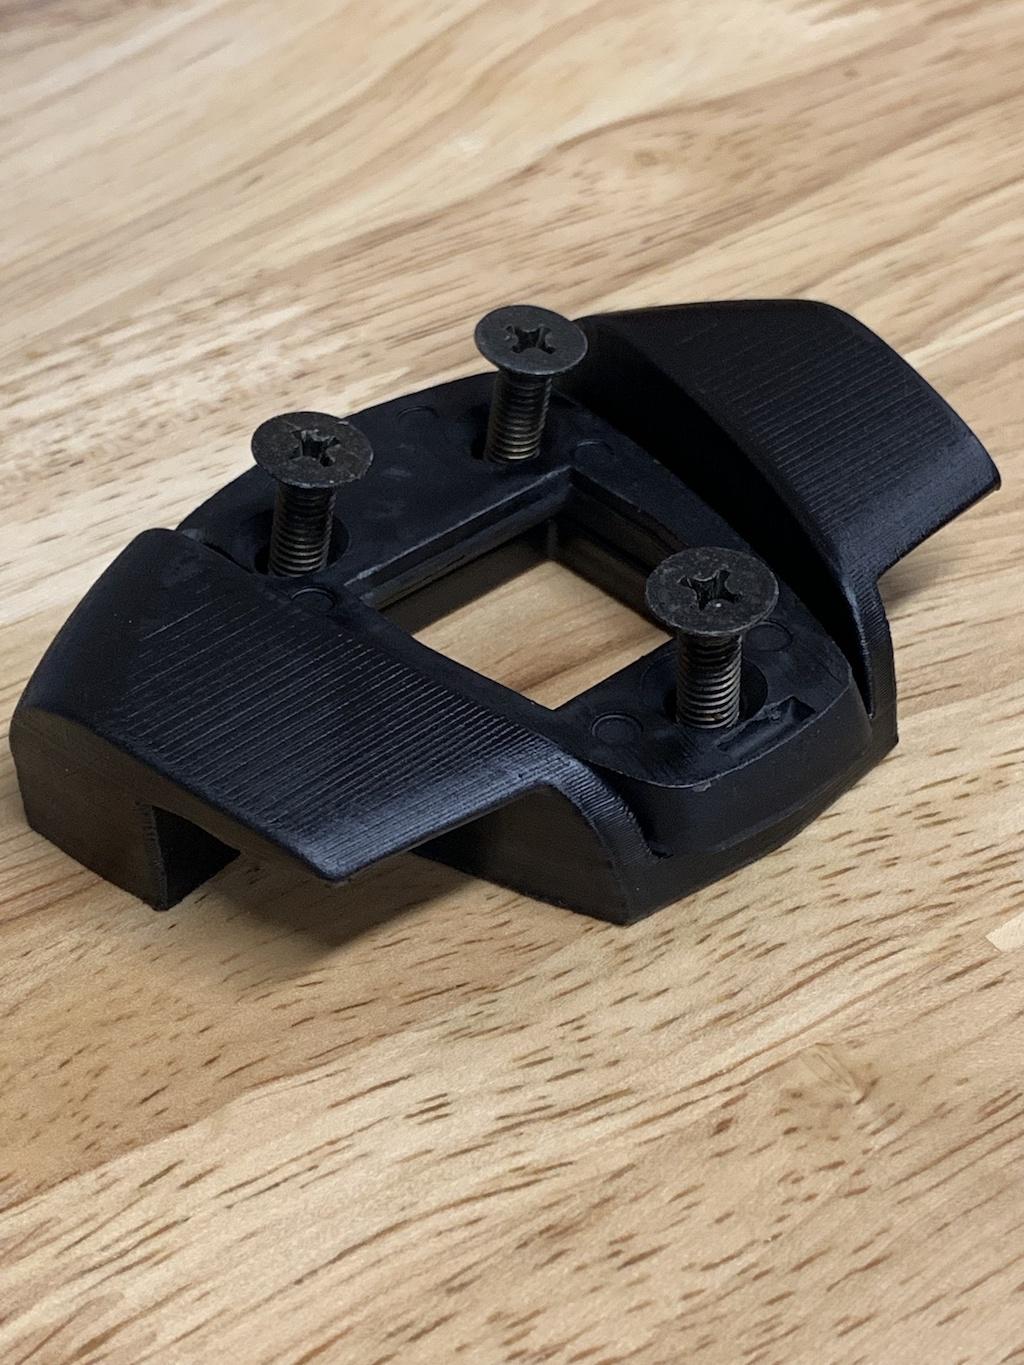
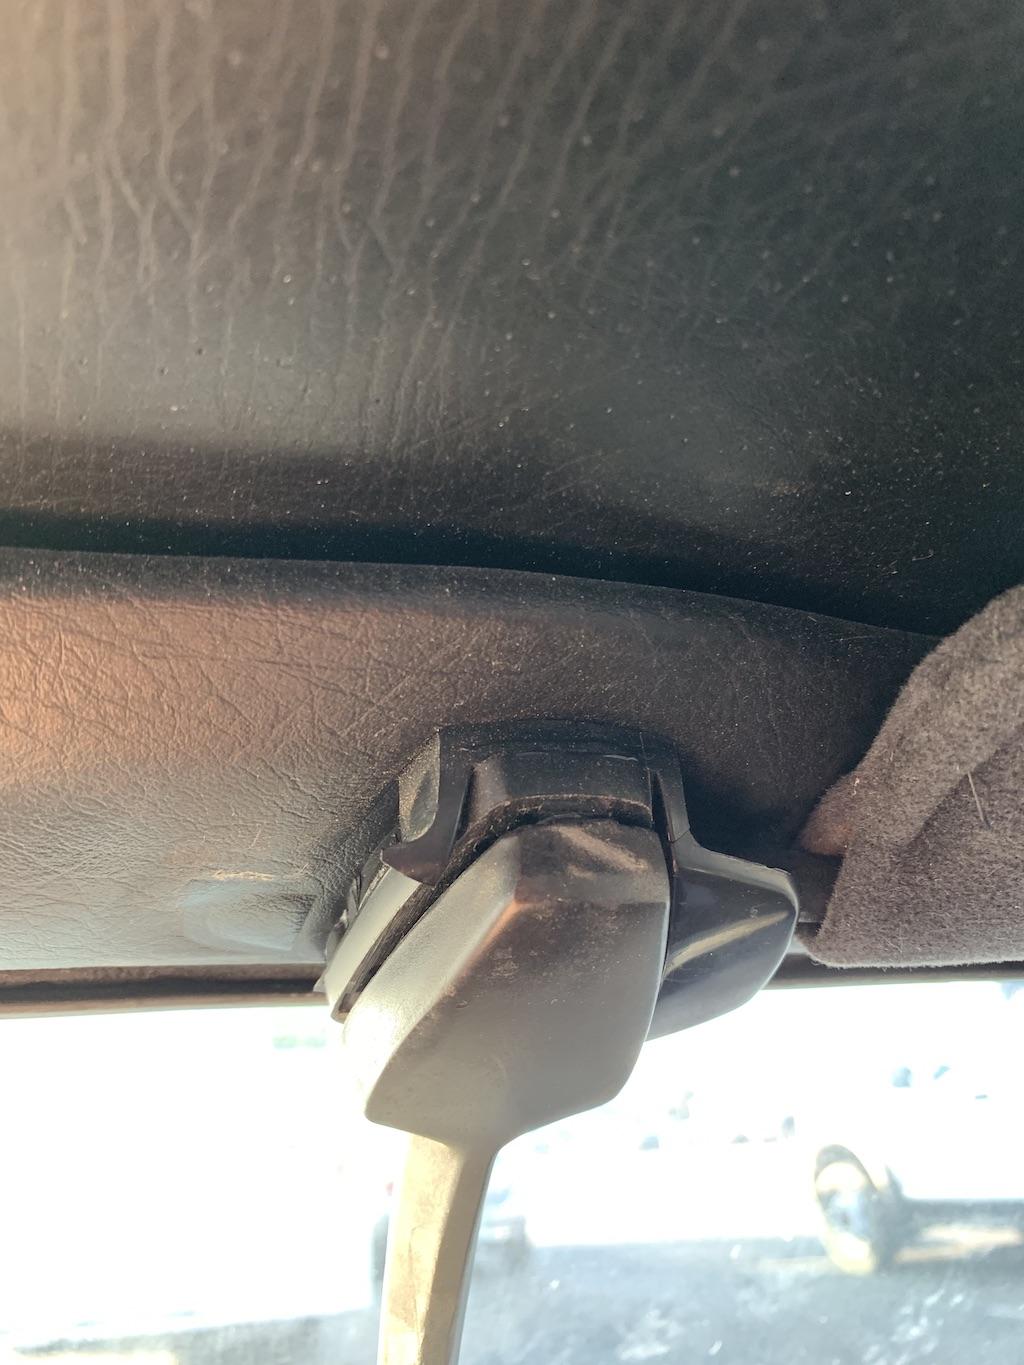
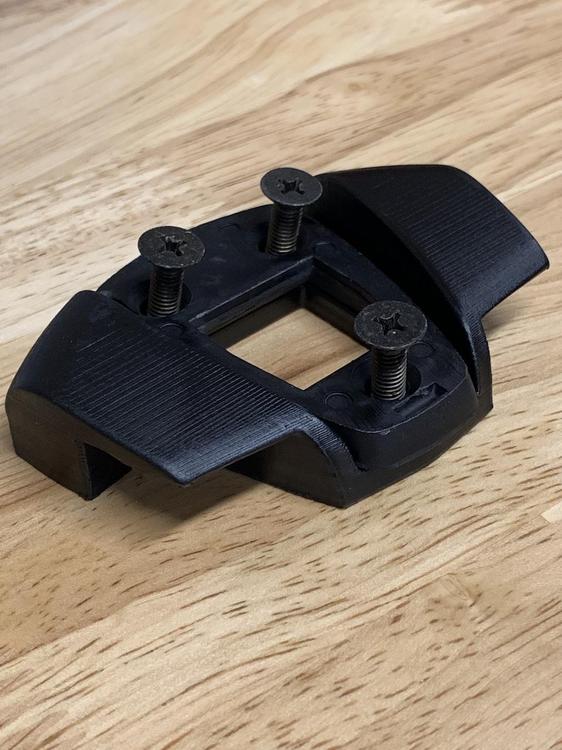
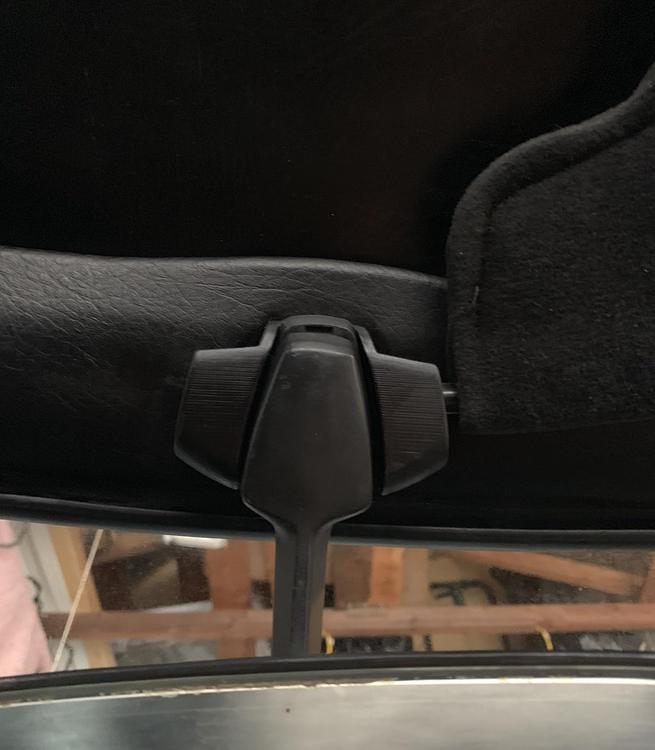
On a 71 240 Z I have, the piece that holds the sun visors in place that mounts beneath the rear view mirror, broke on the drivers side. It was pretty annoying having the visor flop around, and I finally took the visor off until I could locate a replacement part. Searched all over the place for another, no luck. Finally saw one on Etsy from a person who has a 3D printer named PlasticWiz, figured I'd give it a try. Removed my old one, which basically disintegrated while trying to pop it loose from the vinyl covered roof frame. Sanded the new ABS piece a bit and painted black. I suppose the "print lines" could be removed completely with a lot of work, but for this car I just wanted a functional piece. Here it is mounted ready to pop in the rear view mirror. I've never used a 3D printed part on any of my cars, but I must say this really did the trick for a difficult part to find. Anyway, just thought I'd post this since I couldn't find any recent help on this part. I may order another for my other Z just in case...


-
No mention of it. I saw mixed info online using LocTite with Helicoils. Maybe for a frequently used bolt, but once the stud is there, it ain't moving. No benefit if you can save your threads the way you suggest. I didn't try running a M8 1.25 tap down it, I guess I should've tried first. If I were to do it again I'd probably use a Time-Sert instead. Looks like a better solution, but pricier.
-
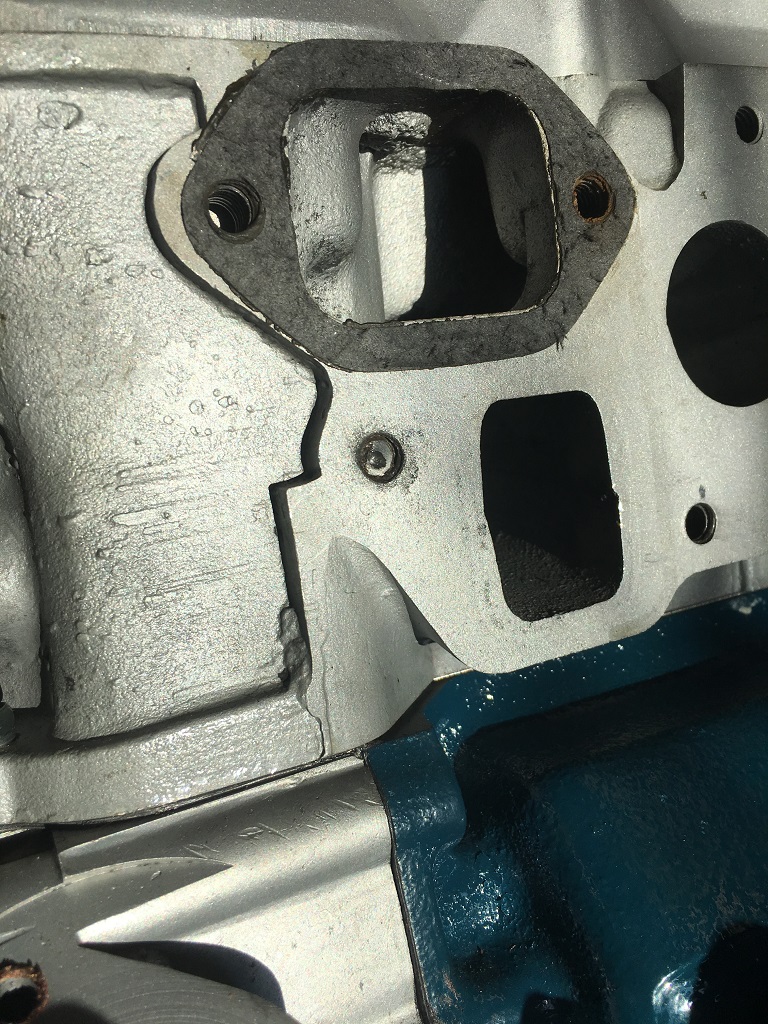
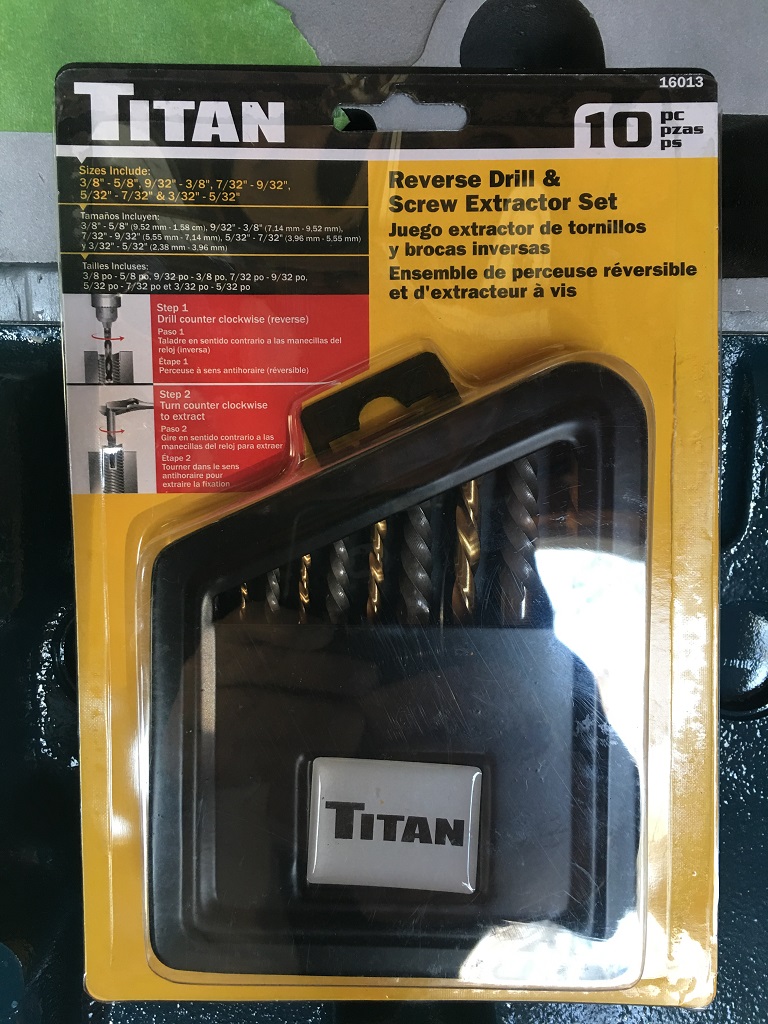
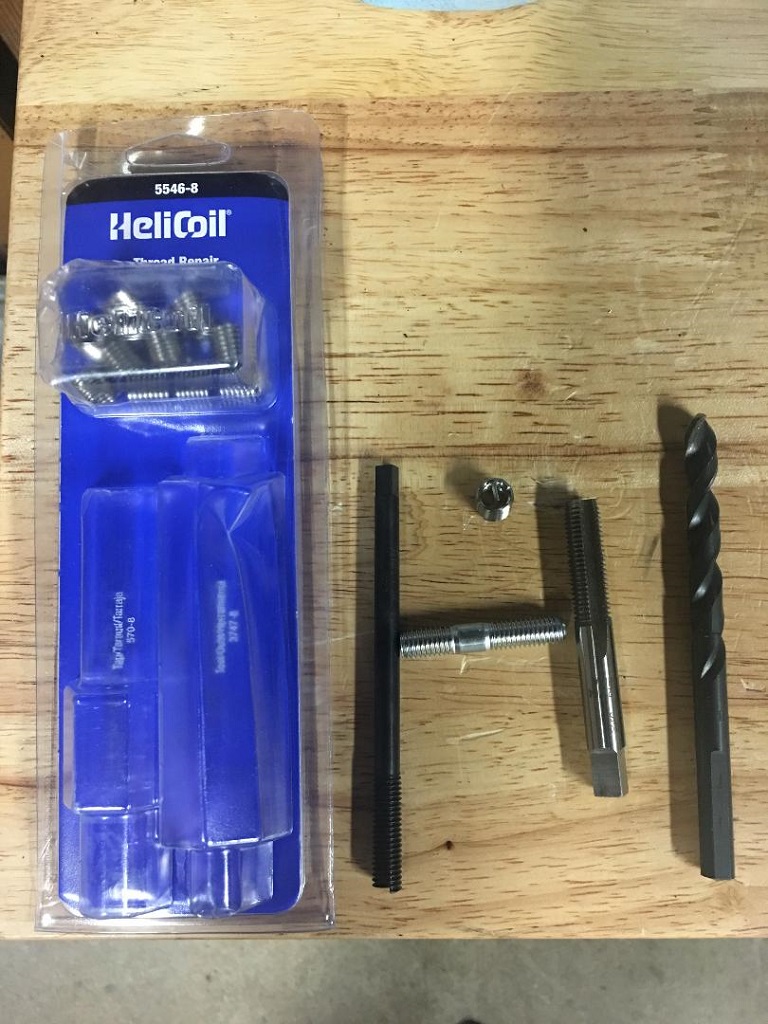
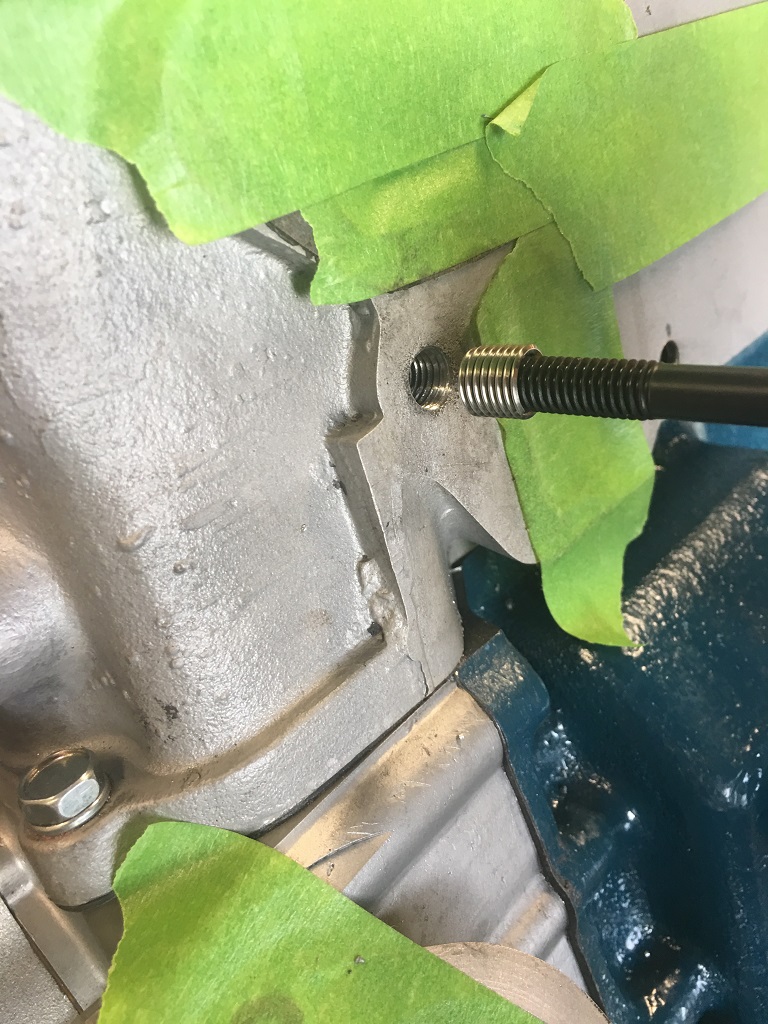
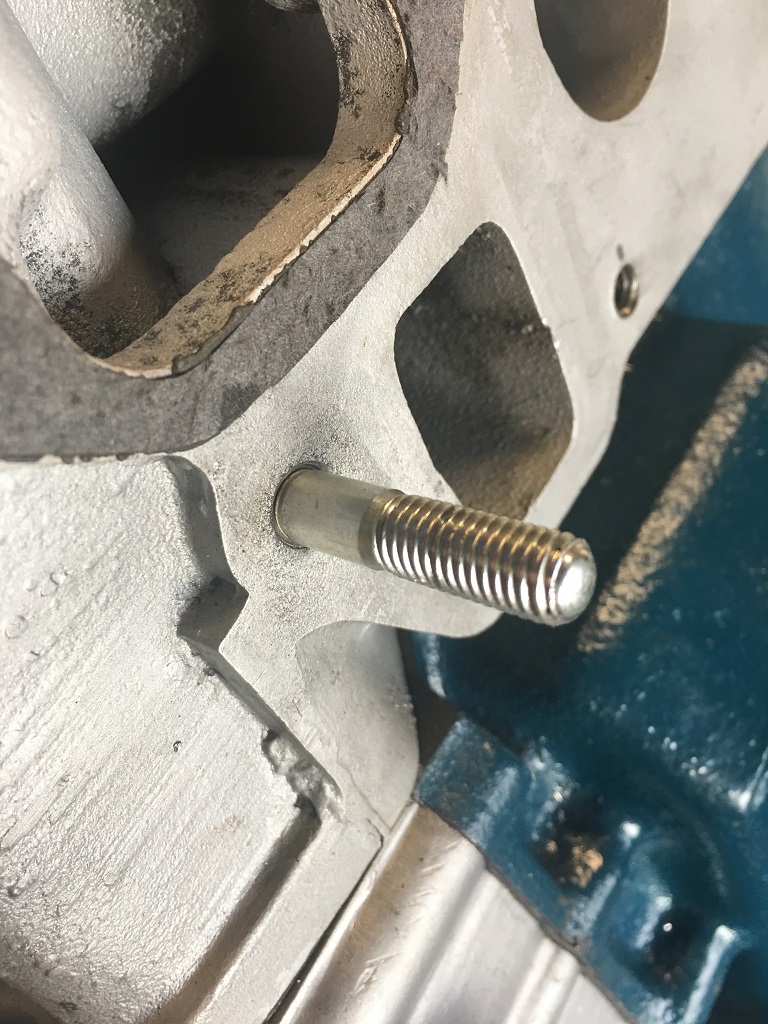
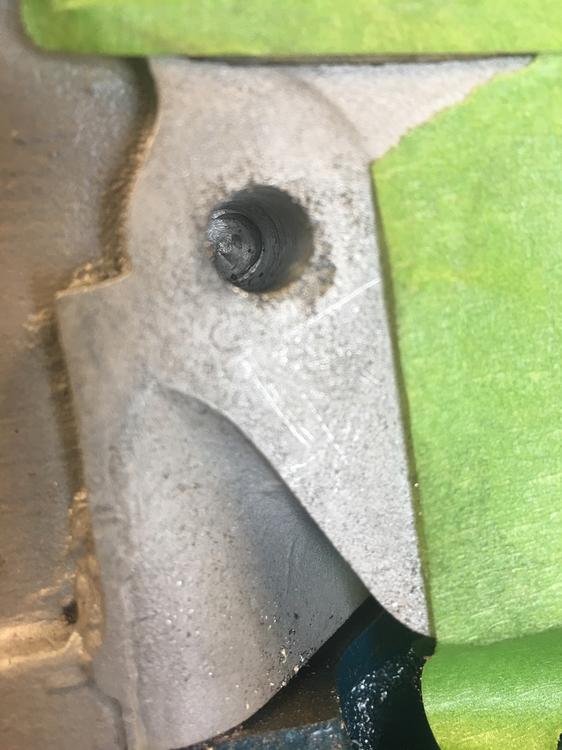
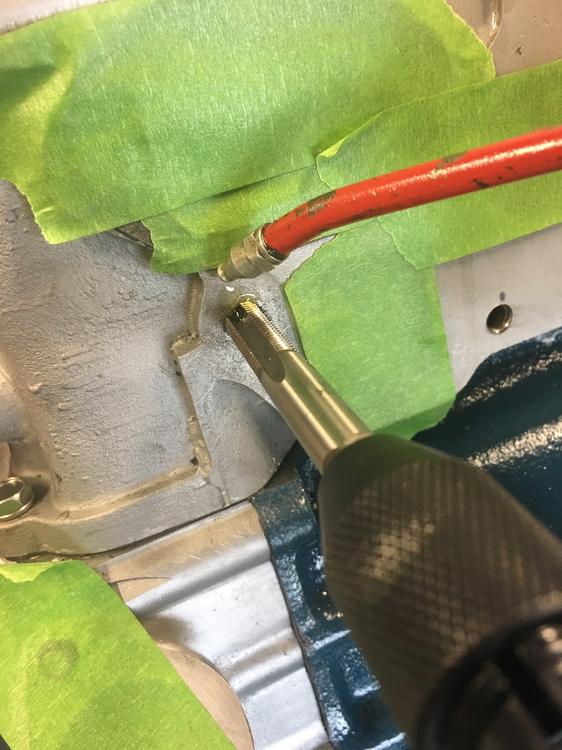
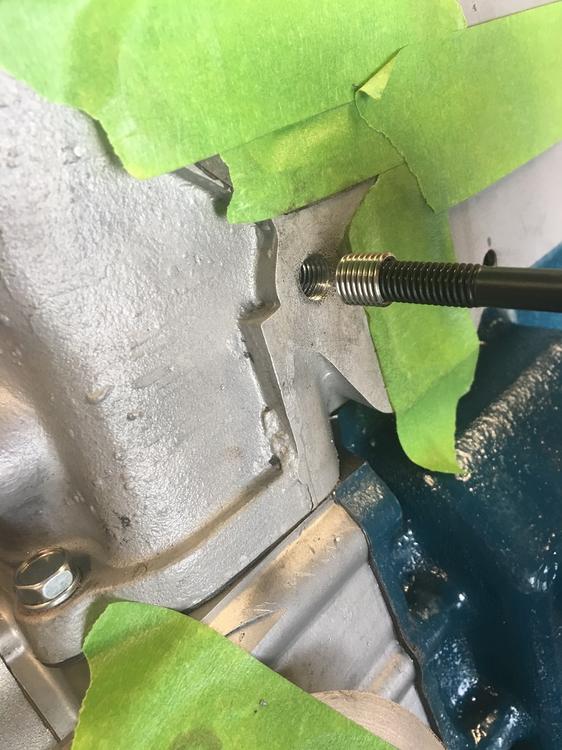
While removing the manifold studs on my rebuilt head to replace with new studs from MotorSports, the front one broke off below the head surface! The one that broke was already broken to where only a 1/4" worth of thread was usable, and I couldn't double-nut it, so it had to be replaced. The others came out okay after a good soaking with Kroil, a bit of heat, and double-nutting to loosen. But the front #1 exhaust wouldn't budge and broke while trying to remove with vice grips. Lucky for me the engine is on a stand, easier to work on. I figure I'd post some pics of the Helicoil job since I didn't see one around here, in case someone else has the "joy" of doing this in the future. I've done a few, but definitely not an expert. Feel free to add your thoughts or tips to the thread. Above shows broken stud. I've already center punched it to help get the drill bit centered. Here was my first choice, screw extractor and left handed drill bits. Tried 2 different sizes, no luck. Plus I'm always afraid the extractor will break off and make further drilling a real pain, so I didn't crank on them too hard. Since I already had the stock M8 1.25 stud kit, I opted for that size instead of going to a stouter 10M stud. Ordered a real Helicoil kit instead of cheaper knockoff. Kit includes some threaded inserts, a tap, and tool to install inserts into newly tapped hole. Didn't include the 21/64" drill bit, which I had. Carefully drill, keeping hole perpendicular to surface, and no deeper then existing hole, and centered. I started with 1/8" hole, 1/4", 5/16" then the final 21/64". Tap the hole, using oil to help get a clean cut. Work tap back and forth and remove a few times to clean out debris. Insert is threaded in using the tool. There's a little tang at the bottom of the insert that you break off after you get it in place. Done. Be sure to use anti sieze on the threads when installing new studs. I'm not sure how well this will hold up in the long run, and the repeated hot/cold cycles. I guess I'll find out.


-
No issue, good title, but owner chose to pay minimal fees while not driven. Sent from my iPhone using Tapatalk
-
Sent from my iPhone using Tapatalk
-
Saw this ad, which is within 20 minutes of me. Seller says it’s #399. Tempting... https://sacramento.craigslist.org/cto/6376731957.html Sent from my iPhone using Tapatalk
-
Looks to be a generic no-name brand provided by the machine shop. Have only used the rear main seal so far from kit. Don't have a warm and fuzzy feeling about using this head gasket, should probably just pick up a Fel-Pro head gasket. Sent from my iPhone using Tapatalk
-
A question on the head gasket. There are 2 oil passage locations through the head, one up front, one in the middle. Shouldn't both locations on the head gasket have the copper sealing ring? Mine only has one on the front. Any head gasket preferences out there? Thanks Sent from my iPhone using Tapatalk
-
While putting together my motor I'm trying to use the original factory finish for engine parts and fasteners. The following thread is great and covers most everything, but doesn't include all the bolts and plating types. For instance, what color is the timing marker? Has this info been consolidated somewhere? Pictures help, but nothing beats a list. Also, for the natural aluminum finish, what are folks using to preserve it? Or maybe nothing? Thanks, Ken

-
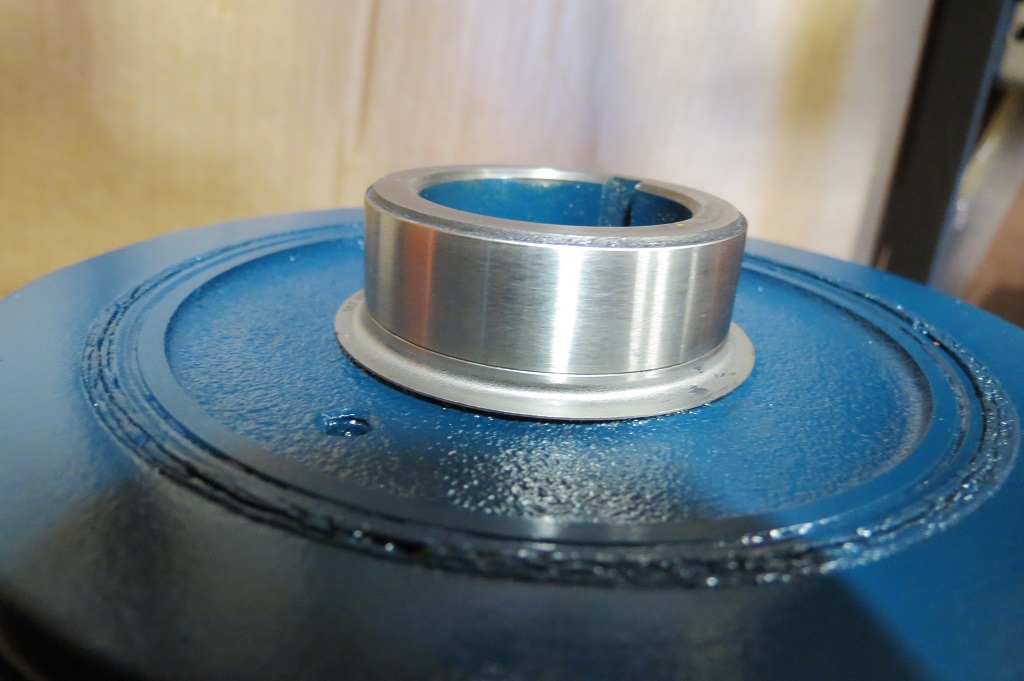
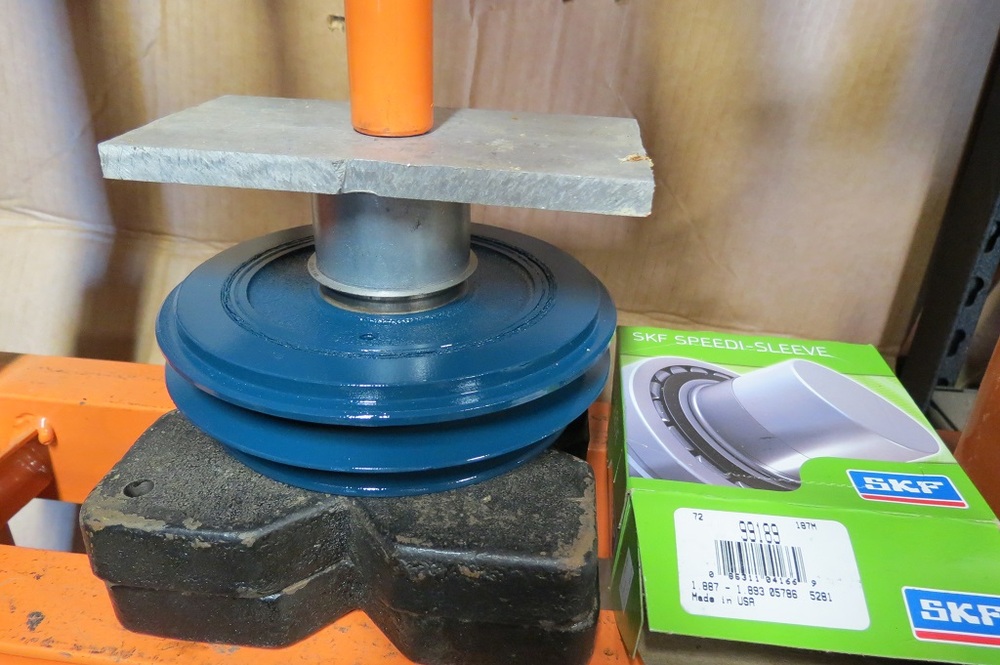
Okay, got the sleeve on, thought I'd post a few pics. Put thin coat of silicone on inside of sleeve, and pressed it on. I suppose a mallet would have worked too if careful. Ready to go.


-
Oh man!!! Looks like I got censored!
-
I installed a rear seal on mine last week. Since the motor is on a stand being assembled, I put it on the crank before dropping it in. After installing the rear cap I noticed it was a bit ****-eyed in the seal bore. Looking at the distance from the block/cap chamfer edge to the seal was a little bit different from one side to the other. Less the a sixteenth of and an inch, but still visibly crooked. As said above, make sure it's square. Sent from my iPhone using Tapatalk
-
Jerry Prentice did all the machine work on mine. He's one of the few machine shops in the Sacramento area that knows Z motors. He's at Prentice Enterprises, 3663 Olmec Circle #8, Rancho Cordova, CA, 916-852-1957. Gary Cook, who vintage races a BRE 240Z, recommended Jerry. Gary also works on Z's at his Vintage Performance business (4631 Auburn Blvd, Sacramento). Non-related but just for kicks, here's Gary at the Laguna Seca Historics:
-
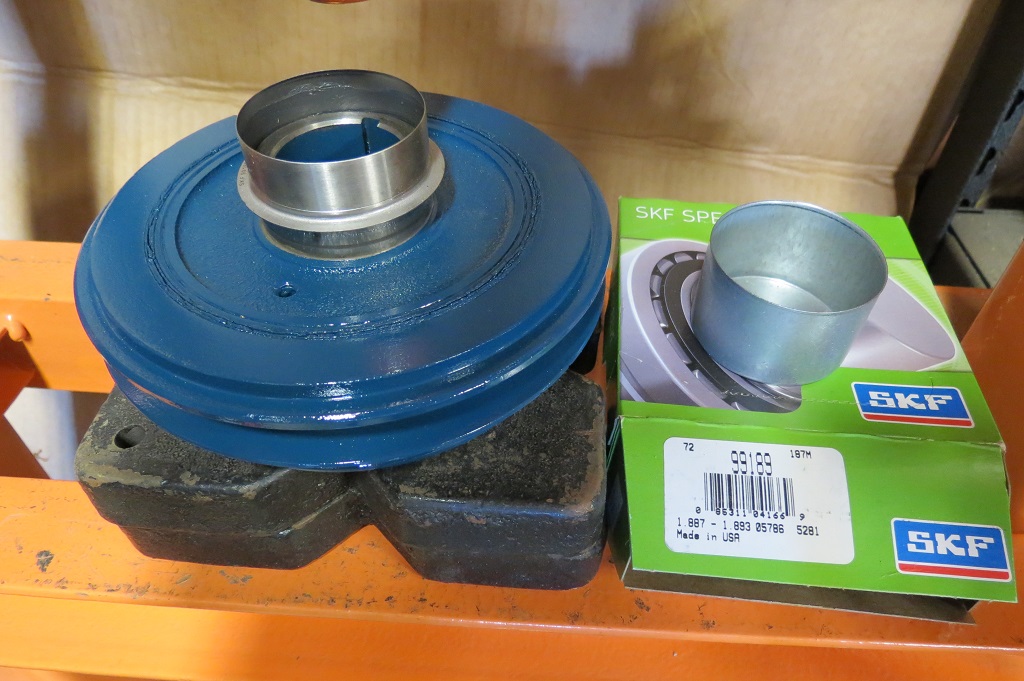
I got it, SKF 99189.
-
I don't remember it leaking before, just trying to avoid future problems. I guess I'll go the sleeve route. Anyone have a part number for what works? Damper shaft is 1.889" x .60" long (260z block). Or a Z vendor that sells them? Thanks. Sent from my iPhone using Tapatalk
-
Finally getting back to getting my engine back together. I noticed some decent groves on the damper/pulley, and wondering if I should use a Speedi-Sleeve. My trusty Tom Monroe engine book doesn't mention anything about them. And if they are used, the seal is riding on a bigger OD which may fail the seal sooner. Or should I try to place it in the cover at a depth where it avoids the grooves, like I did with the rear seal. Attached is a pic, what do you think? Also, the factory color for the water pump pulley is black, right? Thanks, Ken Sent from my iPhone using Tapatalk