pogden
Free Member
-
Joined
-
Last visited
Everything posted by pogden
-
-
Ferg, I refurbed a 240Z steering wheel because I liked the way it looks. But like you, I don’t care much for how thin it is. I bought a “Compe” wheel from a guy in Japan (I’m guessing it’s the same as what ZCarDepot sells) and like it way more. It looks good, the horn works, and I have not found it necessary to bend the turn signal lever to keep from accidentally hitting it while driving. Sent from my iPad using Tapatalk Pro
-
That’s awesome. I really hope that with the marriage to Renault going asunder and some excitement building around the new Z, Nissan can claw its way back to relevance. Showing appreciation to loyal customers is another step in the right direction.
-
I agree with Yarb, the shredded straps are hangers for the e-brake cable. Mine look just like yours. Haven’t found a suitable replacement, but it seems to be the same stuff the muffler hangers are made of.
-
When I did this I removed only the smallest two rings of the snubber cone. Mine does fit tight against the differential which is what I wanted for the time being (trying to remove all play from the driveline). There is some noise/vibration but t it's not terrible, and I honestly can't say for sure that it's due to the RT snubber. If you don't want any normal contact with the differential then you should probably shave off the next half a ring. Just a data point - the previous suggestion of trying various sizes of socket seems like a great idea. Sent from my KB2005 using Tapatalk
-
This past weekend I installed an RT mount (without the optional top mount) and a new OEM differential isolator in my 76 280Z. It is doable without completely removing the diff and rear suspension, but it's kind of fiddly. I'll try to do a full write up this evening, while it's all still fresh in my head, so I can make it easier for you. On my car, which has an R200, I removed 4 sections of the cone-shaped RT mount bumper to achieve a tight fit - essentially sandwiching the nose of the diff firmly between the isolator and the cone. When I was done, I took it for a short spin and did not notice any vibration/harmonics/noises that weren't there before, but I should probably drive it a bit more before saying that for sure. @Av8ferg, if you decide you do need to replace your isolator, I have an extra brand new OEM one I'll sell you way below the retail price. Because I'm an idiot. I ordered one years ago in anticipation of the day I would install the RT top mount, and then a couple of weeks ago when I finally decided to do the job I thought "might as well replace the isolator at the same time" and so I ordered (another) one.
-
I thought about using the cloth tape, but was not planning on rewrapping my entire harness and thought it would look better if everything was wrapped in vinyl. I ended up rewrapping almost everything anyway, so I guess it wouldn't have mattered. As Chuck says, you can finish end with a wrap of adhesive electrical tape to keep the non-adhesive tape from unraveling. There's also a way to tie it off by splitting and knotting the last few inches, but I never got that to work in a way that looked good. BTW, it seemed to me that the way the factory harness was wrapped was pretty clever. If you imagine one of the harness sections being a "tree" where the trunk is at the big end and branches are where the individual smaller connectors are - you start at the farthest branch, wrap a little ways past the first "Y" and then cut. Then you wrap the next farthest branch past where the first wrap stopped and keep going till you pass the next branch, and cut. The you wrap that next branch from its tip back to the bigger branch and carry on to the next branch, and so on. In most cases, you can do the whole harness section like this and only have to secure the final cut, at the "trunk", with tape.
-
When rewrapping parts of my 76 280Z engine and dash harnesses I used non-adhesive vinyl harness tape. It’s what the factory used, it’s easy to work with and won’t turn into a sticky mess like regular electrical tape will over time. Sent from my iPad using Tapatalk Pro
-
Seems like your carbs need adjusting. It looks like the "fast idle screw" has some play (meaning, it's not the forcing the throttle mechanism open), which is good. Maybe just back the throttle adjustment screws on each carb off 1/4 turn at a time until the idle sounds right. I'm not sure how the ballast resistor could cause a high idle - I think it functioned to allow a hotter spark during start, followed by a somewhat tamer spark for normal running.
-
View Advert FS5W71B M27x1.0 main shaft nut - right hand thread I had several of these made by a local machinist friend and am offering them for sale at my cost. They are for the early (1977-1980) "wide-ratio" FS5W71B 5-speed transmission. This nut is a replacement for the NLA Nissan parts (32354-E9804, 32354-E9802, 32354-E9800 and 32354-A7400); I was unsuccessful at finding a source for them anywhere in the world. Price *includes* USPS Priority Mail domestic shipping (currently costs $8.70), international will cost more. Advertiser pogden Date 01/12/2022 Price $45 Category Parts for Sale
-
This weekend I started refurbishing the driver's seat of my 280Z. Did the passenger seat last week (leather covers and new foam from Interior Innovations). Aside from a small crack in the seat back sheet metal (which I tried to reinforce with fiberglass), the passenger seat was fairly straightforward - cleaning everything up from previous owner's work took more time than actually fitting the foam and covers. The driver's seat is a bit more challenging because one of the metal rods on seat bottom that the hog rings attach to was cut off. I've made a new one and a friend of a friend will weld it on this coming weekend.

-
@Dolfinz, I have a boroscope, some extra unused valve stem seals that I'm hopefully never going to use, and the right size rope for filling the cylinder (if it comes to that). I'm in North Phoenix (~Tatum and Deer Valley), will PM you my phone number and we can talk. I'm about 10% as knowledgeable as the other guys who have been helping out, but I'm local and happy to help if I can. Word of warning: I'm not a Z whisperer, though maybe someday ... Today, I did my first oil change on my own rebuilt L28, re-torqued the head bolts, and adjusted the valve lash. And now it idles and runs like crap. I'm hoping that I just don't yet have the "feel" for my feeler gauge and that I just got a couple of intake valves a little tight. The ups and downs of Z-itis.
-
Really sorry to hear about your engine, but there are a bunch of Z guys here in Phoenix and maybe we can help. [mention]Randalla [/mention] [mention]cgsheen [/mention] [mention]duffman [/mention] Sent from my iPad using Tapatalk Pro
-
This was actually yesterday, but [mention=17919]randalla[/mention] and I went to a local Cars and Coffee in Scottsdale. We're definitely at the low end of the cars that show up, but get more than our share of attention. The Delorean next to me looked brand new, the Jensen Healey next to Randy was sweet as well. Sent from my KB2005 using Tapatalk
-
@SteveJ, @Captain Obvious - thanks for adding color to the charge lamp story. When I learned that the lamp was part of the alternator control circuit, I figured an LED might not be an appropriate replacement. Now if I can just figure out what causes my car to occasionally hesitate or jerk violently when pulling away from a stop or shifting into 2nd ...
-
I chased a couple of electrical issues. My parking lights, tail lights, and instrument lights stopped working shortly after I took my dash partly apart for another problem. I discovered that the 15A fuse in my Dave Irwin (@Zs-ondabrain) parking light relay mod was blown. After a bit of further troubleshooting (and unnecessarily re-dismantling of my dashboard), I found the problem. While tidying up after my previous issue, I was re-tucking the wires behind the console and noticed a male and female bullet connector had fallen apart, which I just reconnected. Turns out, those connectors were power and ground for the (unused) automatic transmission selector lamp, snapping them together made a pretty nice short circuit! They have now been taped up to prevent such foolishness in the future. I also fixed my turn signals, which had stopped working about the same time. Basic troubleshooting was getting me nowhere, but a quick search here led me to a similar problem in which @Captain Obvious recommended the obvious: bypassing the hazard switch. As soon as I did that, the blinkers started working again. Removed the hazard switch, took it apart and cleaned the contacts with DeOxIt and my wife's emery board, tested it, replaced it and now everything is working again. My initial problem (the one that caused me to get into the dash in the first place) was kind of strange. A couple of weeks after getting the car running I went to start it and the battery was completely dead. It didn't take long to figure out that the alternator wasn't working. I never noticed because I just took short joy rides around the neighborhood, and apparently hooked my battery tender up often enough that the battery "seemed" to be fine. Once again, an old post on this site led me to wonder why my charge light wasn't working. I bypassed the charge lamp and the alternator starting charging! I remembered testing all of the gauge lights when I replaced them with LEDs and was sure the charge light worked then. But I vaguely remembered that LEDs are polarity sensitive and wondered if that had something to do with it, or maybe it was just the fact that the charging circuit depended on seeing the load of the charge light to work properly. I replaced the LED charge lamp with an incandescent one, and the charge lamp (and my alternator) started to work just fine.
-
I replaced the insert springs with new ones, but the inserts are NLA. I looked carefully at the springs and inserts from both the 1-2 and the 3-4 synchro hubs and they seemed fine. But I replaced the springs anyway. Sent from my KB2005 using Tapatalk
-
+1 on the 38mm / 1.5in crowfoot cocked 90deg to the side. It's not exact, but if you shoot for the middle of the torque range you will be fine. My gears were lined up just like yours are. In one of the how-to videos I watched it was said that they lined up perfectly, which mine obviously didn't. When I looked at them closely, it seemed that flipping the countershaft gear might make things better, so I did that. It was a pain - the woodruff keys kept wanting to fall out - but I did it. Mine was definitely NOT flipped to begin with, but my transmission had definitely been half-assed rebuilt at one point so I wasn't really confident that it was assembled right. After looking at lots of pictures and diagrams, I decided that the the countershaft gear was originally was indeed right, so I put it back. As @EuroDat said, once you secure the mainshaft bearing to the front housing with the big circlip and make sure you have the right countershaft bearing shims in place, everything lines up pretty well. It's still not perfect, but it's good. As an aside, the reason I rebuild my WR 5-speed was that it sometimes slipped out of 2nd gear. I actually never drove it much (maybe 20 miles) before the engine and transmission came out for other reasons, but it slipped out of 2nd a few times so I decided to learn about transmissions while the engine was being worked on. Sadly ... it still slips out of 2nd (rarely) and 4th (occasionally, when I rap it out in 3rd then drop it into 4th and coast). I had thought the problem was probably due to worn detent balls/springs (which I replaced) or worn baulk rings (which I also replaced), but apparently there's something else that causes the problem. I did look carefully at the 1-2 and 3-4 selector rods and forks and they looked fine (to my untrained eye). Otherwise, the transmission shifts great and it "feels" really good.
-
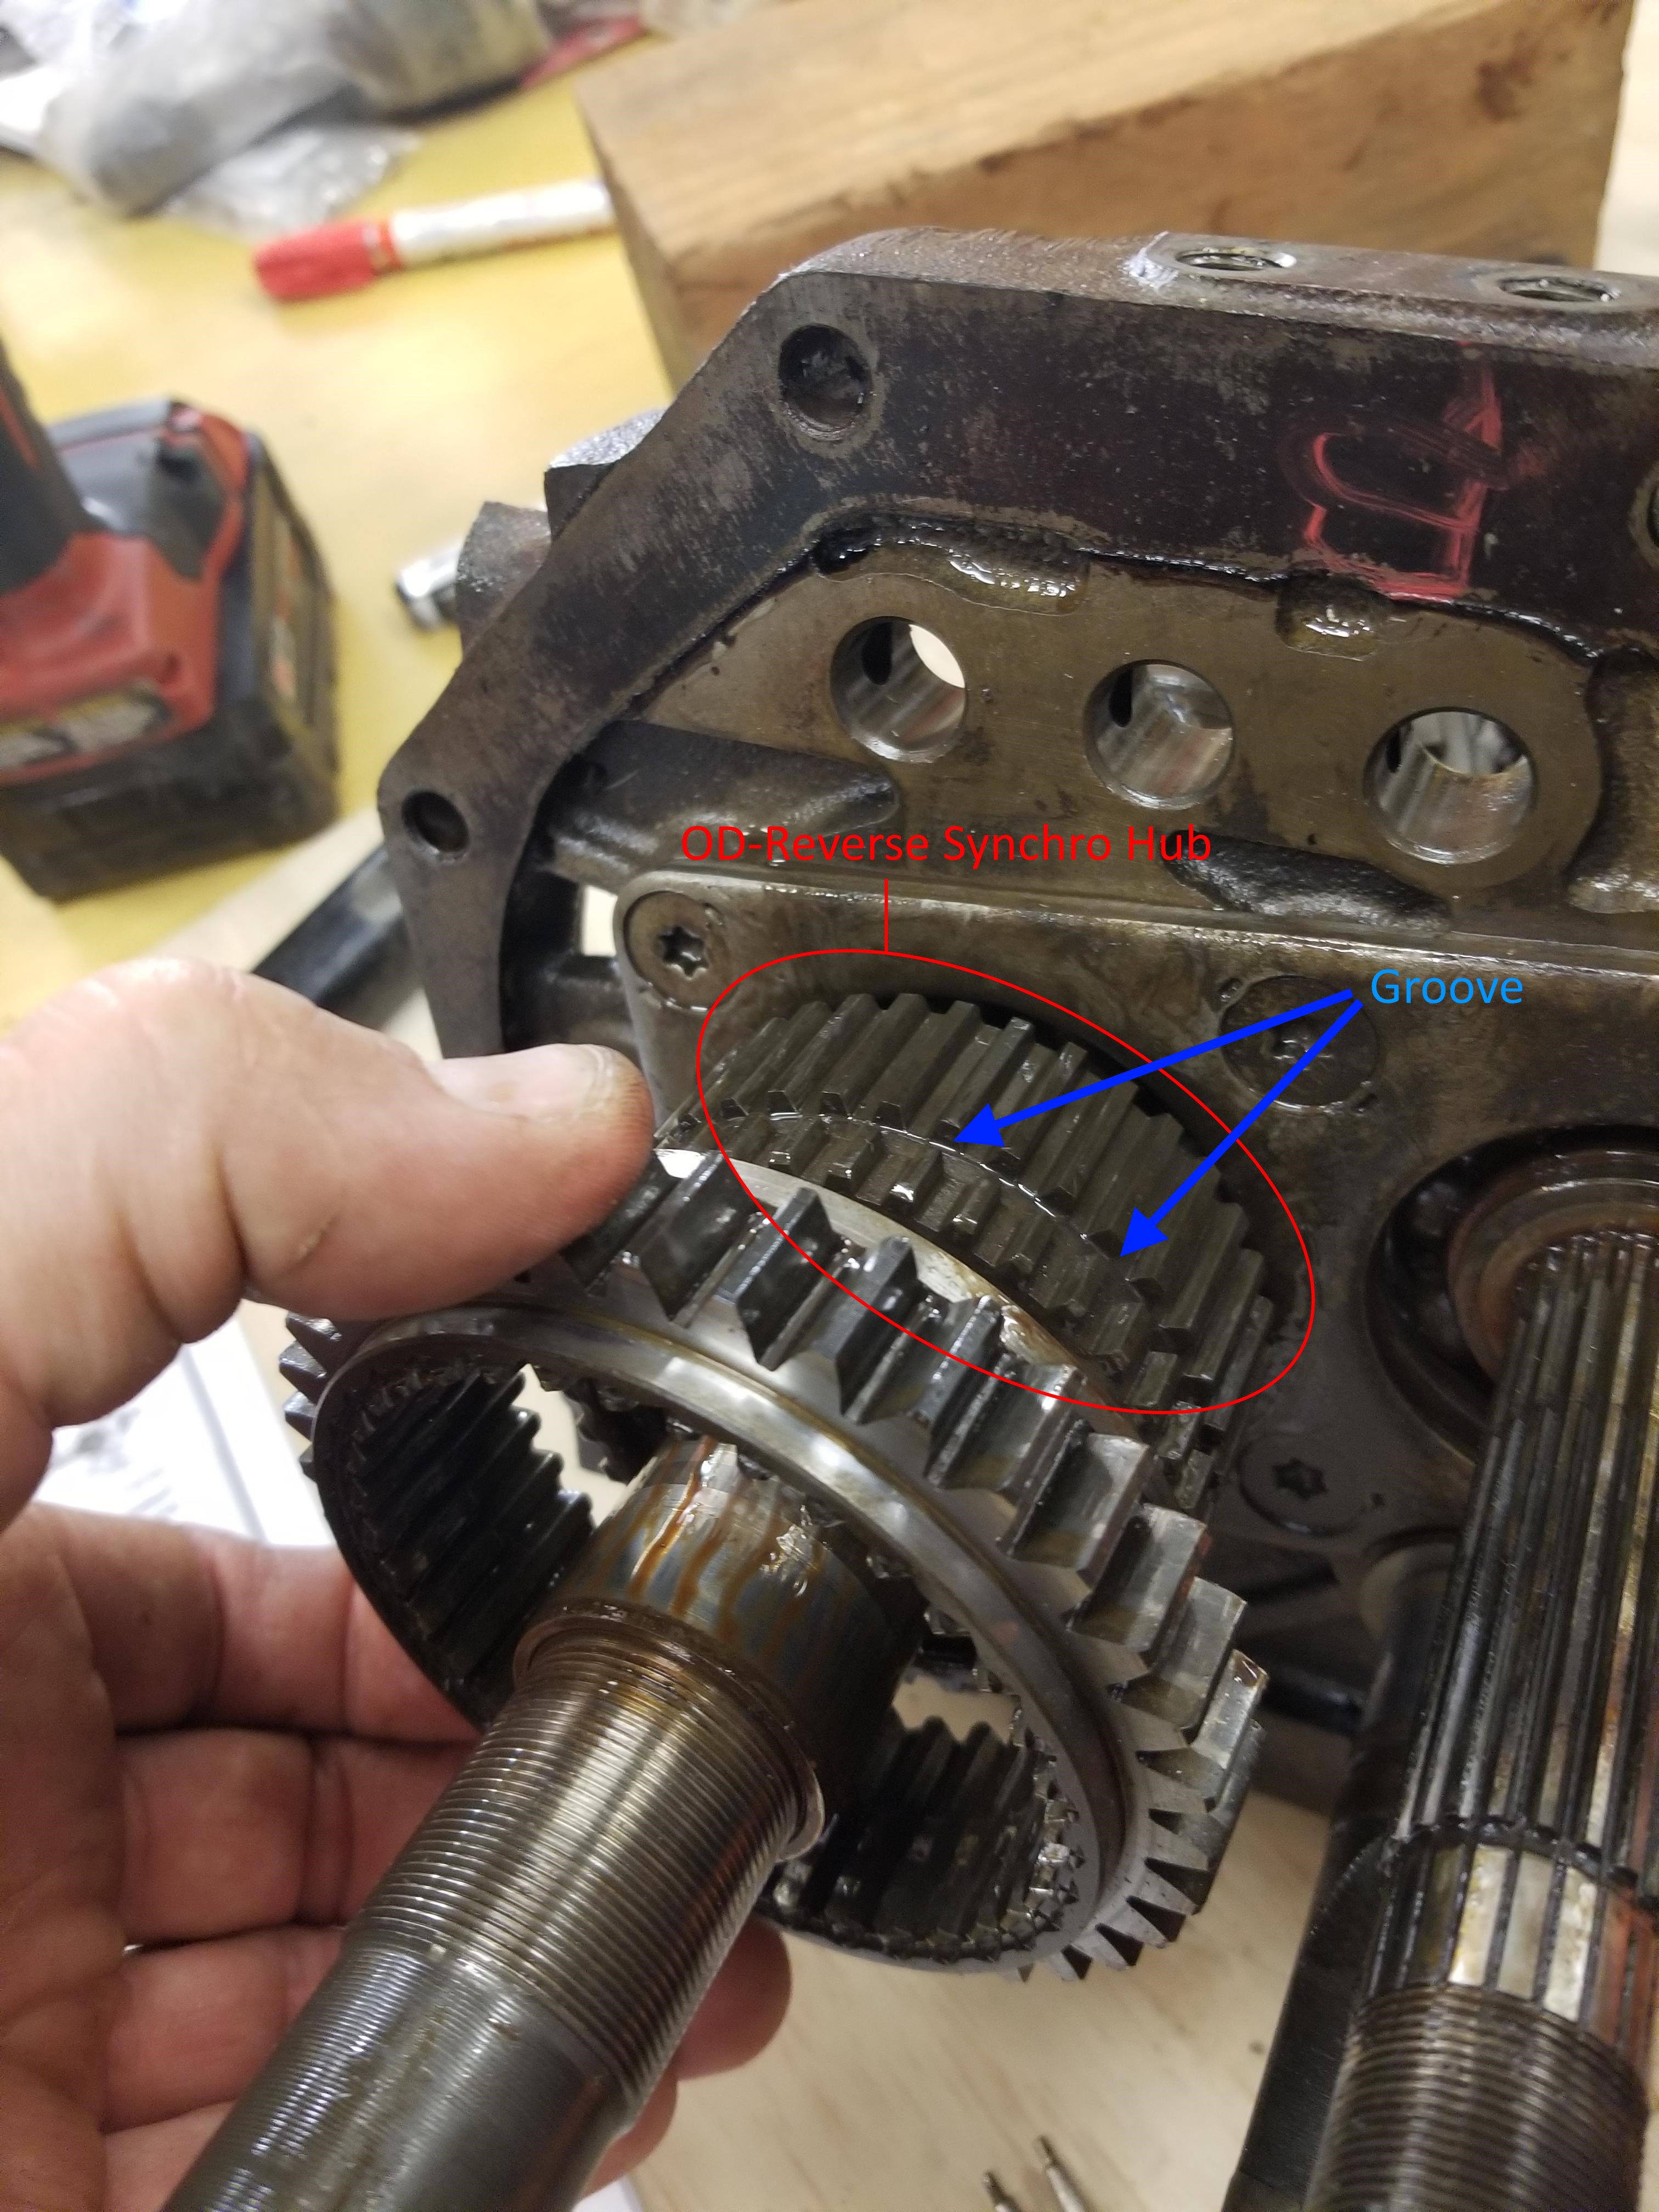
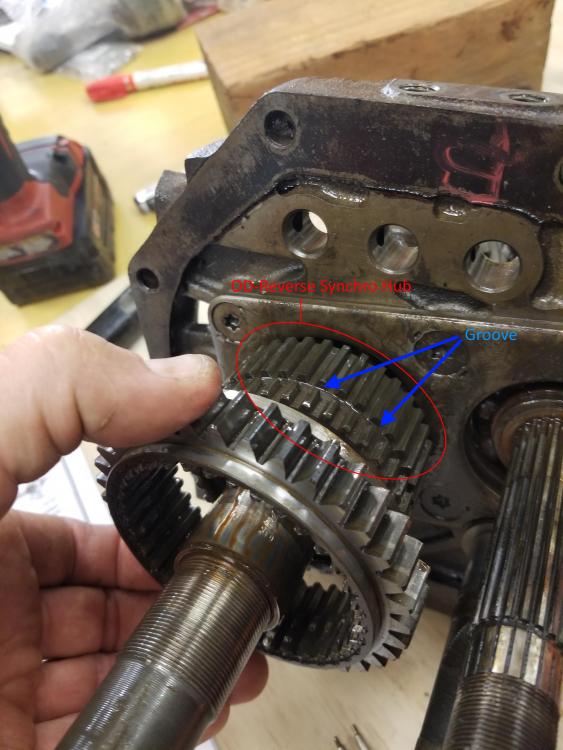
Yes, the one below. This is the OD-Reverse Synchronizer Slider (in hand) and Hub (circled). The photo was taken from the rear of the transmission facing forward, and the the synchronizer hub is clearly oriented with the concentric groove aft, which is opposite of the diagram in the FSM.
-
Jeff, I believe the spacer you are referring to exists in the later (close ratio) FS5W71B that was available in ~1981. The synchro design was changed, and the three-pronged spacer (32624 - I think it’s actually called an insert retainer) was part of that and it is indeed the first thing on the mainshaft behind the mainshaft bearing - on the later model transmission. Regarding the RockAuto kit, it does not contain any retaining rings. I assume you are referring to the "main drive bearing snap ring"? I just reused mine. I hope you can find one - it seems critical to the proper axial positioning of the input shaft relative to the mainshaft. When the mainshaft, input shaft, and counter gear assemblies are all fit together and pressed into the bearings in the adapter plate, there is some fore/aft movement possible between the mainshaft and the input shaft. When I was testing the rotation/movement of the various parts, I noticed that if I pushed the input shaft firmly back against the mainshaft, the whole thing sort of "froze", but if I allowed the input shaft assembly to float forward, everything moved freely. Once everything is reinstalled in the case and the front cover is attached, I think the big snap ring keeps the right fit between the input shaft assembly and the mainshaft assembly (which is locked into place in the adapter plate by the mainshaft nut). Sent from my iPad using Tapatalk Pro
-
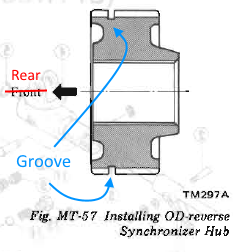
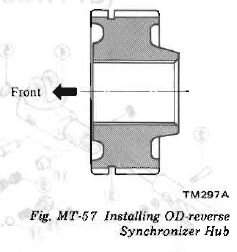
@Patcon, I just finished rebuilding my early FS5W71B. I encountered what I think is a discrepancy in the 79/80 FSMs, in the Manual Transmission Section. I meant to take a couple of pictures before putting the case back together so that I could post here to document the issue, but forgot. I'm hoping your transmission is in a state where you might be able to take the pictures I didn't. So, here's the thing: When installing the OD-Reverse Synchro Hub, the 1979 FSM says the following on page MT-16: Note: Assemble OD-reverse synchronizer hub, paying attention to its direction. It refers to the following diagram, which I believe is WRONG. The arrow should point to the right (towards the front) - the protrusion on the synchro hub butts up against the mainshaft bearing and allows the splined part of the hub to clear the bearing retainer (both of which are forward of the synchro hub). If the flat (non-protruding) part of the hub is oriented forward, the whole thing just butts against the retainer plate. If you could take a photo or two of the hub showing the actual orientation - maybe one showing the protrusion butting against the bearing, and another with the slider all the way forward, showing the groove in the splines facing rearward, it would be helpful for other rebuilding an early FS5W71B.
-
View Advert FS5W71B M27x1.0 main shaft nut - right hand thead I had several of these made by a local machinist friend and am offering them for sale at my cost. They are for the early (1977-1980) "wide-ratio" FS5W71B 5-speed transmission. This nut is a replacement for the NLA Nissan parts (32354-E9804, 32354-E9802, 32354-E9800 and 32354-A7400); I was unsuccessful at finding a source for them anywhere in the world. Price *includes* USPS Priority Mail domestic shipping (currently costs $8.45), international will cost more. Advertiser pogden Date 02/27/2021 Price $45.00 Category Parts for Sale
-
Sorry - late nite post on my iPad, must've somehow fat-fingered in an extra comma at the end of the URL. I fixed it in my post above, and here it is again: http://mmerlinn.com/catalog/dox_angel/dt_w7b/dtw7b010.htm
-
@patcon, I saw your post earlier today and was wondering the same thing. I have a 4-speed in the shed, will try to find time to have a look. I haven’t started on my wide ratio yet, and I know mine came from a 79 ZX. It will be interesting to see whether mine has a RH or LH nut. This page has some interesting data, http://mmerlinn.com/catalog/dox_angel/dt_w7b/dtw7b010.htm and the company itself sells recycled parts. For what it’s worth, my transmission guy said they were very helpful in finding a “good” input shaft for my close ratio. Sent from my iPad using Tapatalk Pro
-
I am going to rebuild my wide ratio FS5W71B, hopefully over the holidays. I bought the rebuild kit from RockAuto (and I confirm what zkars states in his thread: that the kit seems to be the same one sold in other places, and contains Japanese bearings). I bought all the other stuff on EuroDat’s list (seals, main shaft and countershaft nuts, oil gutter, detent balls and springs, ...) from Nissan (Courtesy, I think, but I will check tomorrow if you want). Sent from my iPad using Tapatalk Pro