dmorales-bello
Community Member
-
Joined
-
Last visited
Everything posted by dmorales-bello
-
I didn't check that because I didn't perform any readings with a voltmeter. I simply checked if the "warm" thermistor triggered the light and that once the thermistor was dunked in fuel the light turned off. Sent from my SM-N950U using Tapatalk
-
Did you try plugging in the unit before putting it in the tank with your key to the "ON" position? That should trigger the light in about 10 seconds or so. BTW, what alternator are you running?
-
Thanks for the help. Just placed the order and should have six different bulbs to experiment with by middle of next week. For each bulb I will first check to see if it illuminates with the connected sender OUT of the gas tank and the car key in the "ON" position. If any of the bulbs fail to illuminate, that one will be eliminated from further trial. Next, with the sender installed in the tank with fuel, I will run the engine for 15, 20, and 30 minutes and see which bulb (if any) light up. Hopefully at least one of them will not and the problem should be solved. If not then it's pot time. (By that I mean "potentiometer", not weed. LOL)
-
In looking at the available bulbs in your link I'm a bit lost because they all have different voltage ratings and none are 12 volt (like the one I'm replacing). I understand that I need to go below 3.4 watts but how about the voltage rating? Which bulbs would you suggest for the test?
-
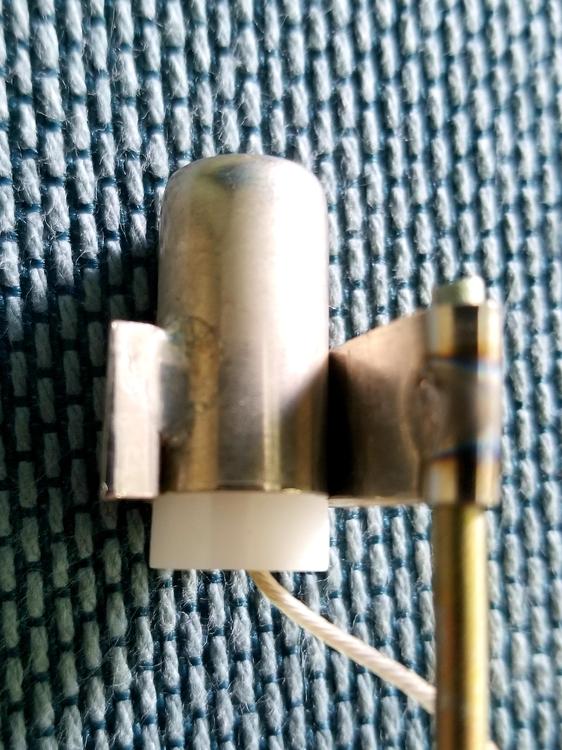
Here are are couple of pics of the Z Car Depot thermistor. It has no markings on it whatsoever. I must say that the whole sender unit seems to be a high quality reproduction. This thermistor issue is unfortunate. BTW, the pics are from the first sender I received from them which is out of the car. When I notified them of the malfunction they immediately sent out another one which is currently installed in the tank. They are both identical.
-
That's a great offer, Dave. I will try to find as low a wattage bulb as possible and order it to finish off experimenting with the bulbs. If that fails I will gladly take your offer and purchase one of your potentiometers (whichever you think best suits the application) and attempt that remedy.
-
I just completed the experiment with the 4.3 watt and the 6 watt bulbs and the malfunction was triggered after 25 minutes or so in both cases. The gas tank is still over half full. So (as the Capn' pointed out) it looks like we're back to the thermistor.? Just thinking "out loud" here: would some kind of resistance placed inline just prior to the lead reaching the bulb be a possible fix? Granted, it would have to be calibrated precisely to allow enough current to reach the bulb once the fuel level dropped and the thermistor was above it.
-
I'm sorry Steve, I've never been able to really understand this. So, keeping all other variables the same, would the thermistor illuminate a lower watt bulb sooner than a higher watt bulb?
-
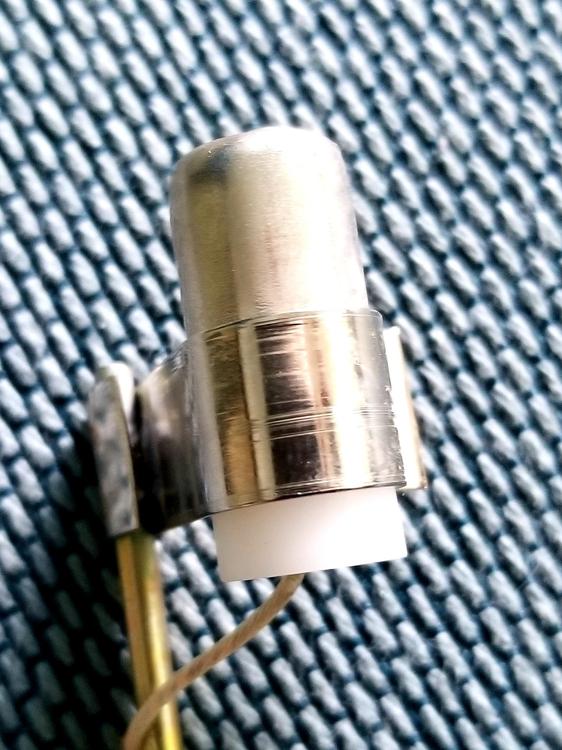
@Captain Obvious, @SteveJ , I'm definitely open to try any experiment that might clear this up. I must first admit I made a mistake with the bulb identification. I assumed the other bulb I had in my "bulb drawer" was the same as what was in the "FUEL" light housing because they looked the same. In fact, when I pulled the actual bulb form the housing it was a Toshiba branded 12V 3.4 amp bulb. In the "bulb drawer" I not only have the 4.3 watt bulb I photographed, I also have a 6 watt bulb of the same size. So I will now experiment with all 3 bulbs and report. Question: In theory, is the wattage of the bulb reversely related to the amount of current needed to illuminate it?
-
Thanks for your input,@captain obvious. It's good to see we're all going in the same direction. It's also clear that if we're correct, there seems to be no easy fix unless a properly calibrated thermistor replacement can be sourced. Sent from my SM-N950U using Tapatalk
-
I'm not sure what you mean by having "the mount wire correct". The factory connector only fits one way. The whole unit fits only one way and straight into the tank which was full of fuel so yes, the thermistor must be in the fuel. As a matter of fact, with the unit plugged into the harness but not installed in the tank, the thermistor triggered the "FUEL" light on. It went out as soon as I introduced the sender into the tank as the thermistor hit the fuel. I will run your suggested check by plugging in the connector with the sending unit out of the tank and putting the thermistor in water (alcohol might be better perhaps) and also shorting the leads to the common negative wire to check function. Is there a chance that perhaps the rating on the thermistor is wrong and therefore triggers the light while fuel warms up a bit from the heat outside plus whatever other heat sources could be involved (engine?, exhaust? etc...)??
-
I thought about that as well but it's been 94 degrees at most. The same thing has happened during a morning drive when the temperature was 84 degrees. Not what I would think of as extreme temps.
-
Here's a pic of the bulb. It reads 12V 4W 3E. Does that seem right? Sent from my SM-N950U using Tapatalk
-
Dave WM, the bulb that's in the "fuel" light housing is the stock incandescent bulb. It's round in shape. At least that was the bulb in that housing when I purchased the car and one of the very few incandescent bulbs I didn't change to LEDs. Sent from my SM-N950U using Tapatalk
-
Considering the current demographics you might do better if you get Stewie Griffin to do the voice
-
Hi Zed Head, you are correct in the basic function of the sensor. From research on this site I've learned it is a "thermistor" which will close a circuit when it stops being cooled, in this case, by the "cold" fuel in the tank. The previous owner of the car changed the factory alternator to a 105 amp unit form Z Car Specialties in 2014 which (as per the voltmeter in the dash cluster) is charging a tad over 14 volts at idle. Isn't that within normal range? I have no other electric snafus at this time.
-
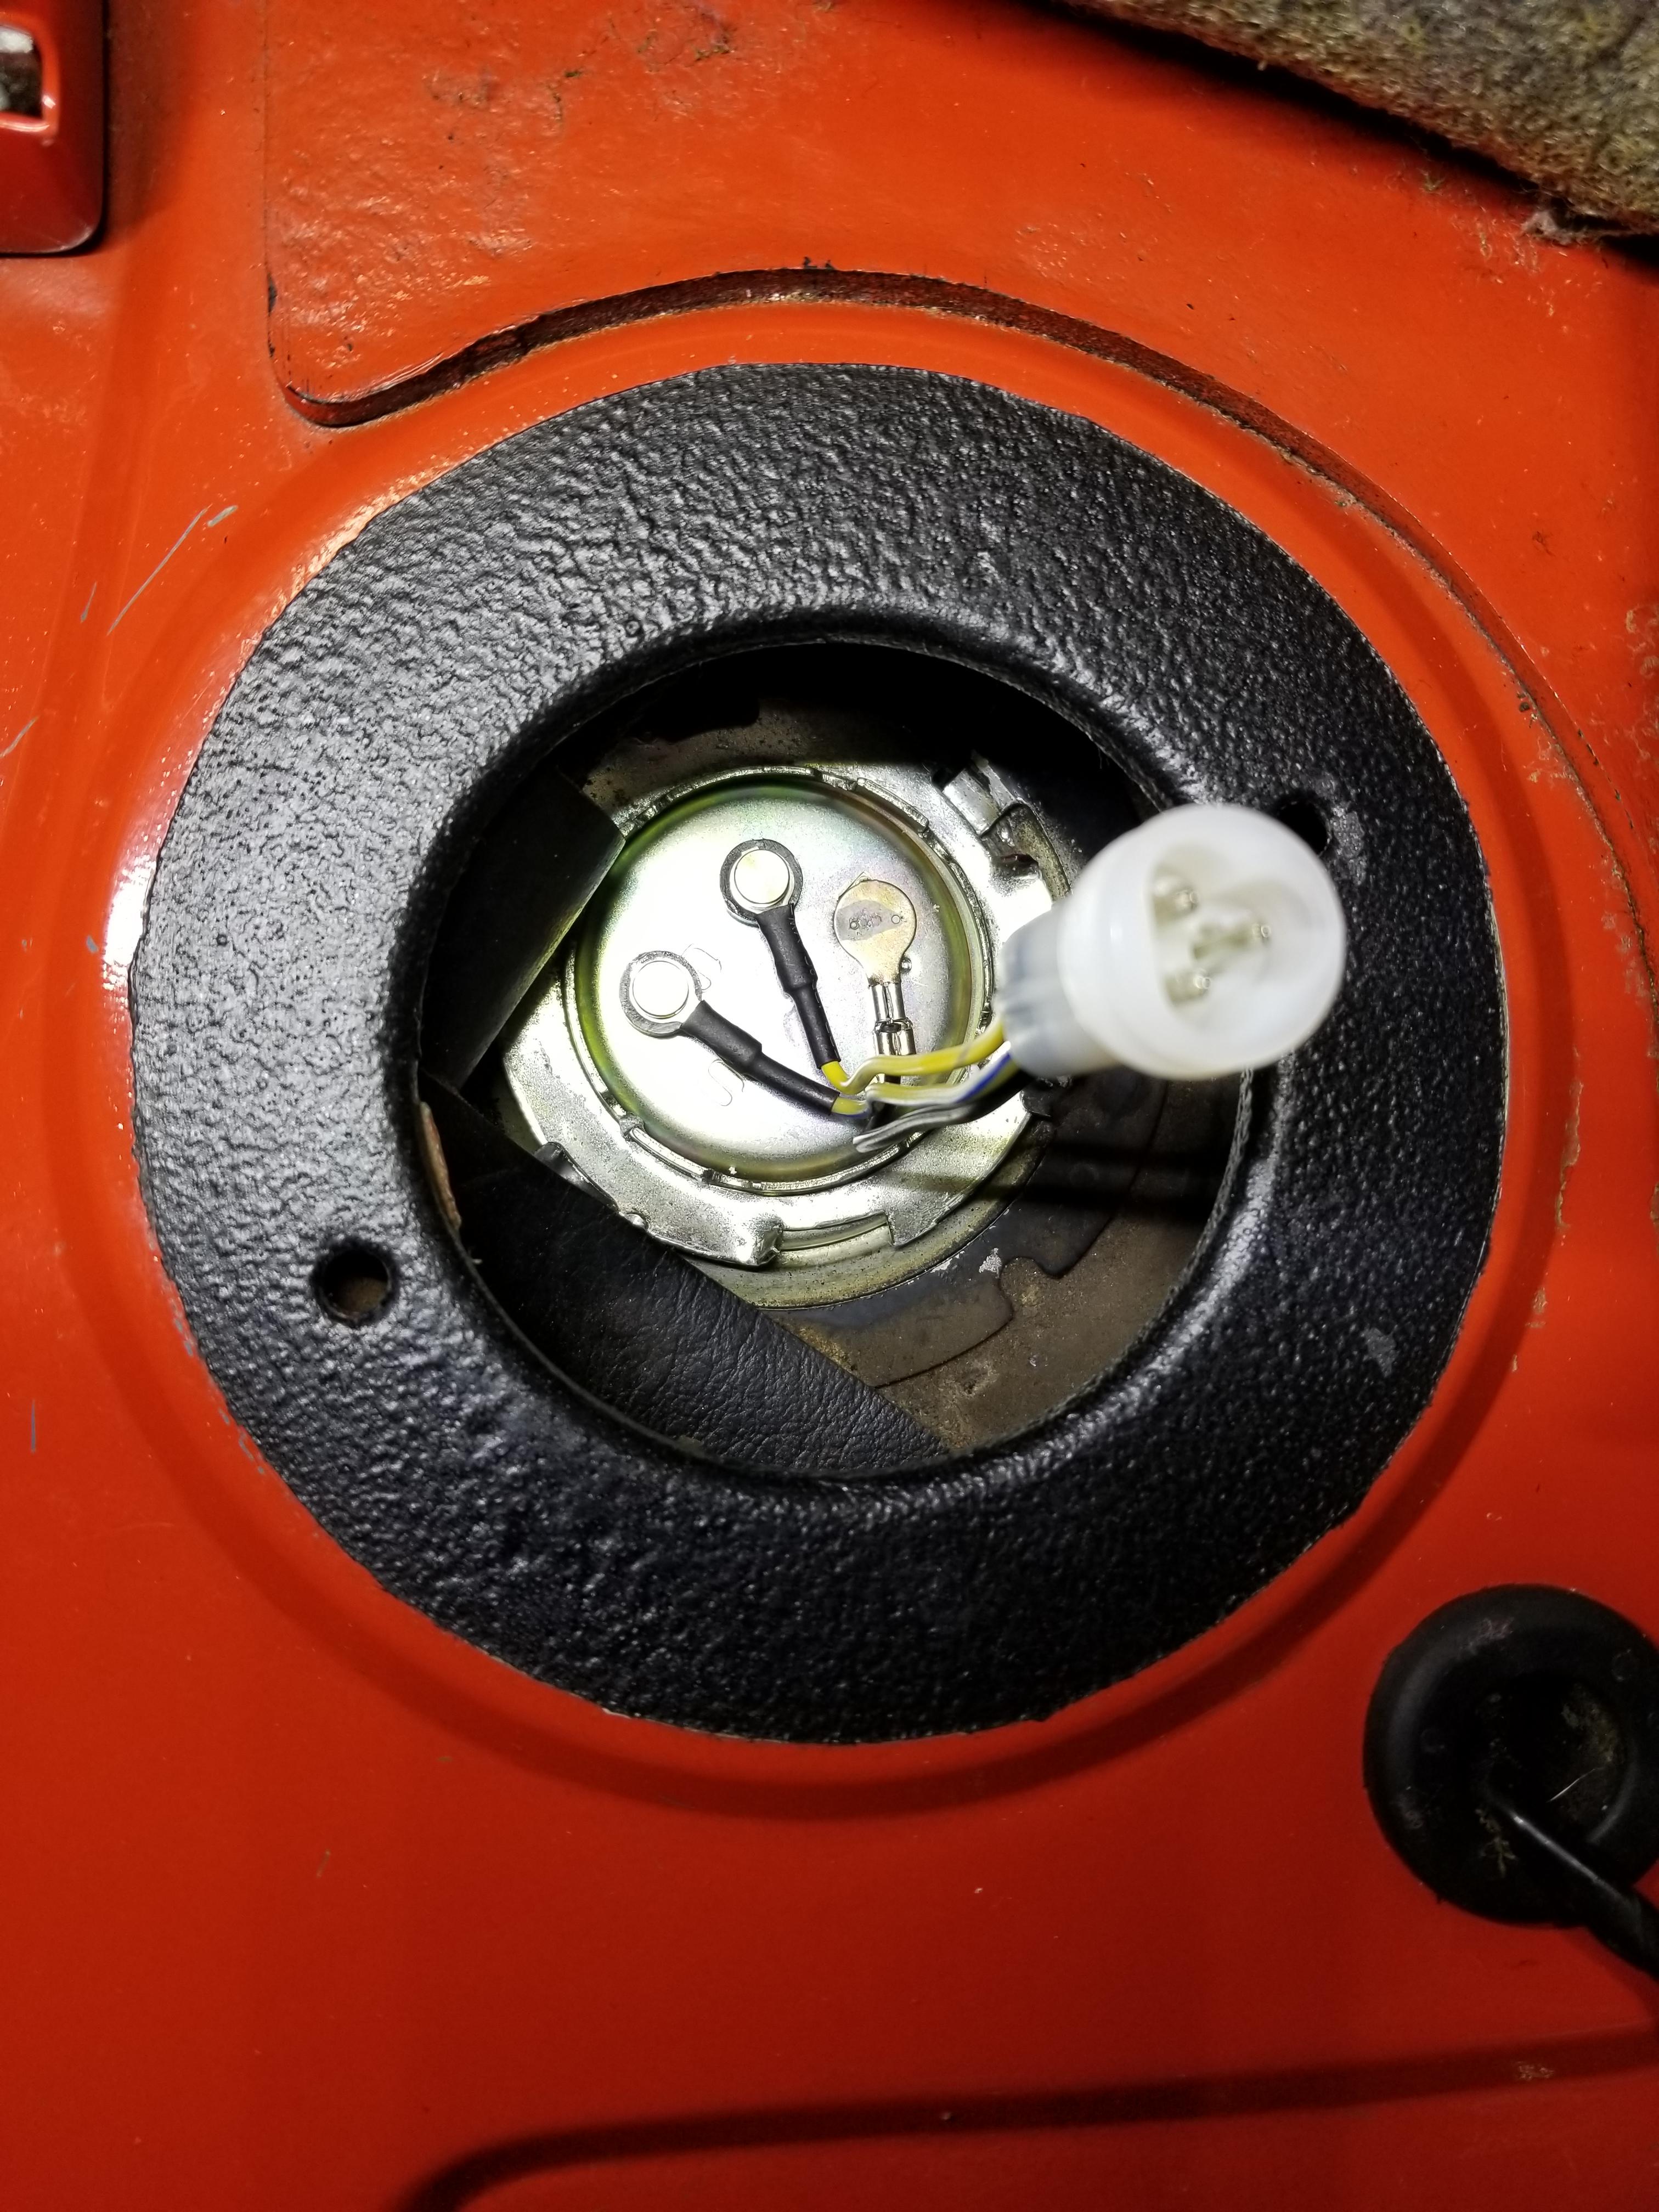
As some of you might remember, I swapped my original fuel sending unit on my "78 280Z a few weeks ago. Although the original sender measured fuel level adequately, the "FUEL" warning light had stopped working a couple of years ago so I decided to spend some quality quarantine time swapping it for a new reproduction unit from Z Car Depot. I had already tested the yellow/blue lead and assured I had continuity from the "FUEL" light in the dash all the way back to the sender plug. I plugged in the Z Car Depot sender to the harness before inserting it into the tank and upon turning the car key to the "ON" position the "FUEL" illuminated and I could change the position of the needle on the fuel gauge by moving the floater arm on the sender. Everything seemed to work as it should. Once I put the sender into the tank and locked it, the needle in the dash positioned itself to the right (I had an almost full tank of gas) and the "FUEL" warning light turned off (as it should). Needless to say I was very happy with the way everything went. I drove the car for the first time since the sender swap about a week later and went on a nice 25 mile run. After driving for about 15 minutes the "FUEL" warning light came on! The tank was still pretty much full and the needle on the gauge was close to the extreme right. I drove another 15 minutes to get home and the "FUEL" light did not go off until I turned off the ignition. I turned the key back to the ON position to power the fuel gauge and the "FUEL" light did not illuminate BUT upon turning the key to START and running the engine the darn light came back on. I performed the same routine a few days later and the malfunction remained exactly the same. "FUEL" light comes on after the car has been running for about 15 or 20 minutes. The tank being over half full. The "FUEL" light will turn off when I shut the engine it and will remain off even with the car key turned to "ON" with the fuel gauge working but will illuminate as soon as I start the car again. After the car sits overnight the light will be off until the engine runs for about 15 minutes and the whole "Groundhog Day" scenario repeats itself. In other words, the engine needs to be running for the malfunction to occur. Leaving the key in the "ON" position (which powers the fuel gauge) will not trigger the "FUEL" light. I'm totally stumped!! I contacted Scott at Z Car Depot and he said he hadn't had that malfunction reported before and he immediately sent out another sender. Amazing customer service!! I installed the "new" sender the day it arrived and the malfunction remained exactly the same. I made sure all the contacts on the plug were clean, applied dielectric grease, looked for anything that might look strange, successfully tested the sender by plugging it into the harness before putting it in the tank and nothing changed. I'm even more perplexed by the malfunction. As always, any help from the vast knowledge base will be greatly appreciated. Keep safe everyone.
-
Beautiful work! It's going to be a gem.
-
As a pleasant footnote: James @MSA offered a store credit for the full amount of the sender I bought from them that broke during installation($200) if I returned it! So it's on its way to them now. I'm happy about that and MSA will continue to be one of my the suppliers for my Z parts. Sent from my SM-N950U using Tapatalk
-
BTW, you can get some very nice reproductions from Z Car Depot for about $135 for a set. Just saying... Sent from my SM-N950U using Tapatalk
-
Yes, a buffing wheel and aluminum polish paste. It was a pretty dirty job with paste flying everywhere. Definitely wear eye protection and a mask because you'll be covered in that stuff. The final finish is satin, not chrome. I'm considering laying a couple of coats of gloss clear over them for a nicer shine and protection. Sent from my SM-N950U using Tapatalk
-
I buffed mine a couple of years ago and that took out all minor surface oxidation and stains. Some small dents can be hammered out but take into account that the material is pretty thin.
-
Not being satisfied with the "plump" look that resulted from my first attempt, I decided to be more radical and opened the visors again, took out all the foam I had added and all the factory green foam pads as well. I started with the now totally empty visor skins and prepared a "sandwich" consisting of a single piece of black 10mm thick high density foam precisely cut to shape, covered with a single layer of 2mm sheet of the same foam on each side. I beveled the edges a bit before reinserting into the visor skins. Closed up the same way as before. I'm super satisfied with the much improved flatness and stock appearance. Sent from my SM-N950U using Tapatalk
-
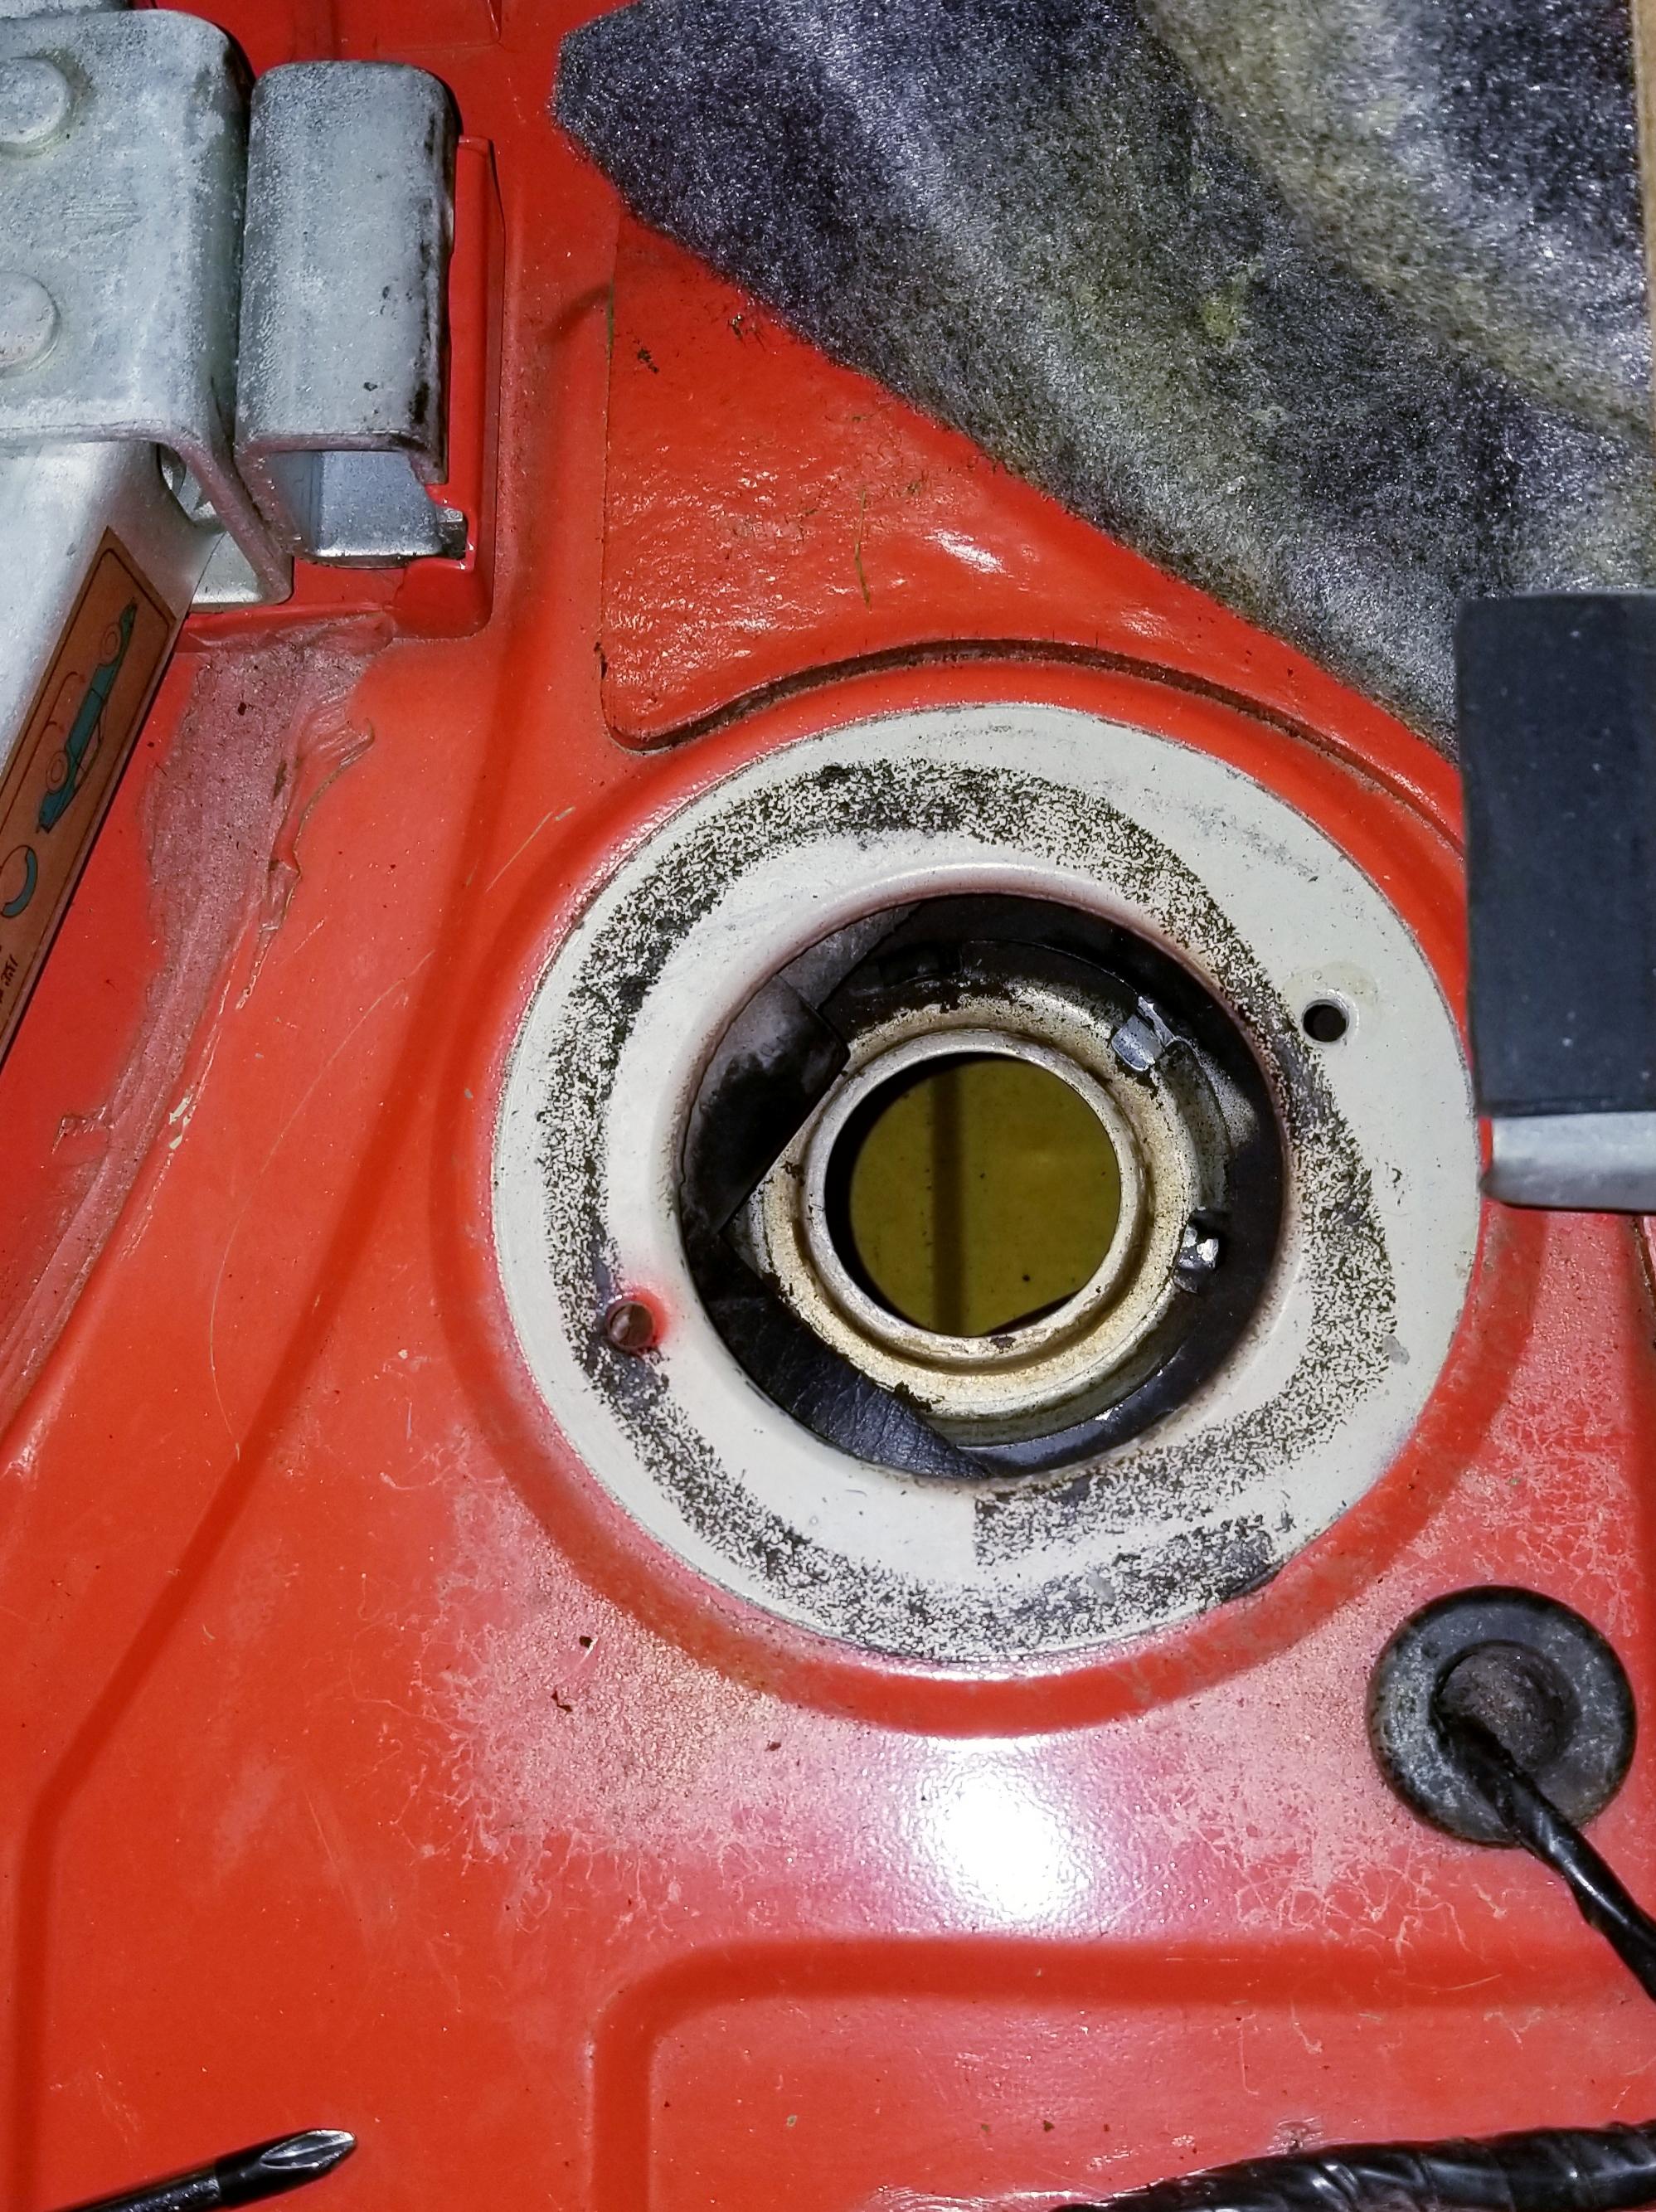
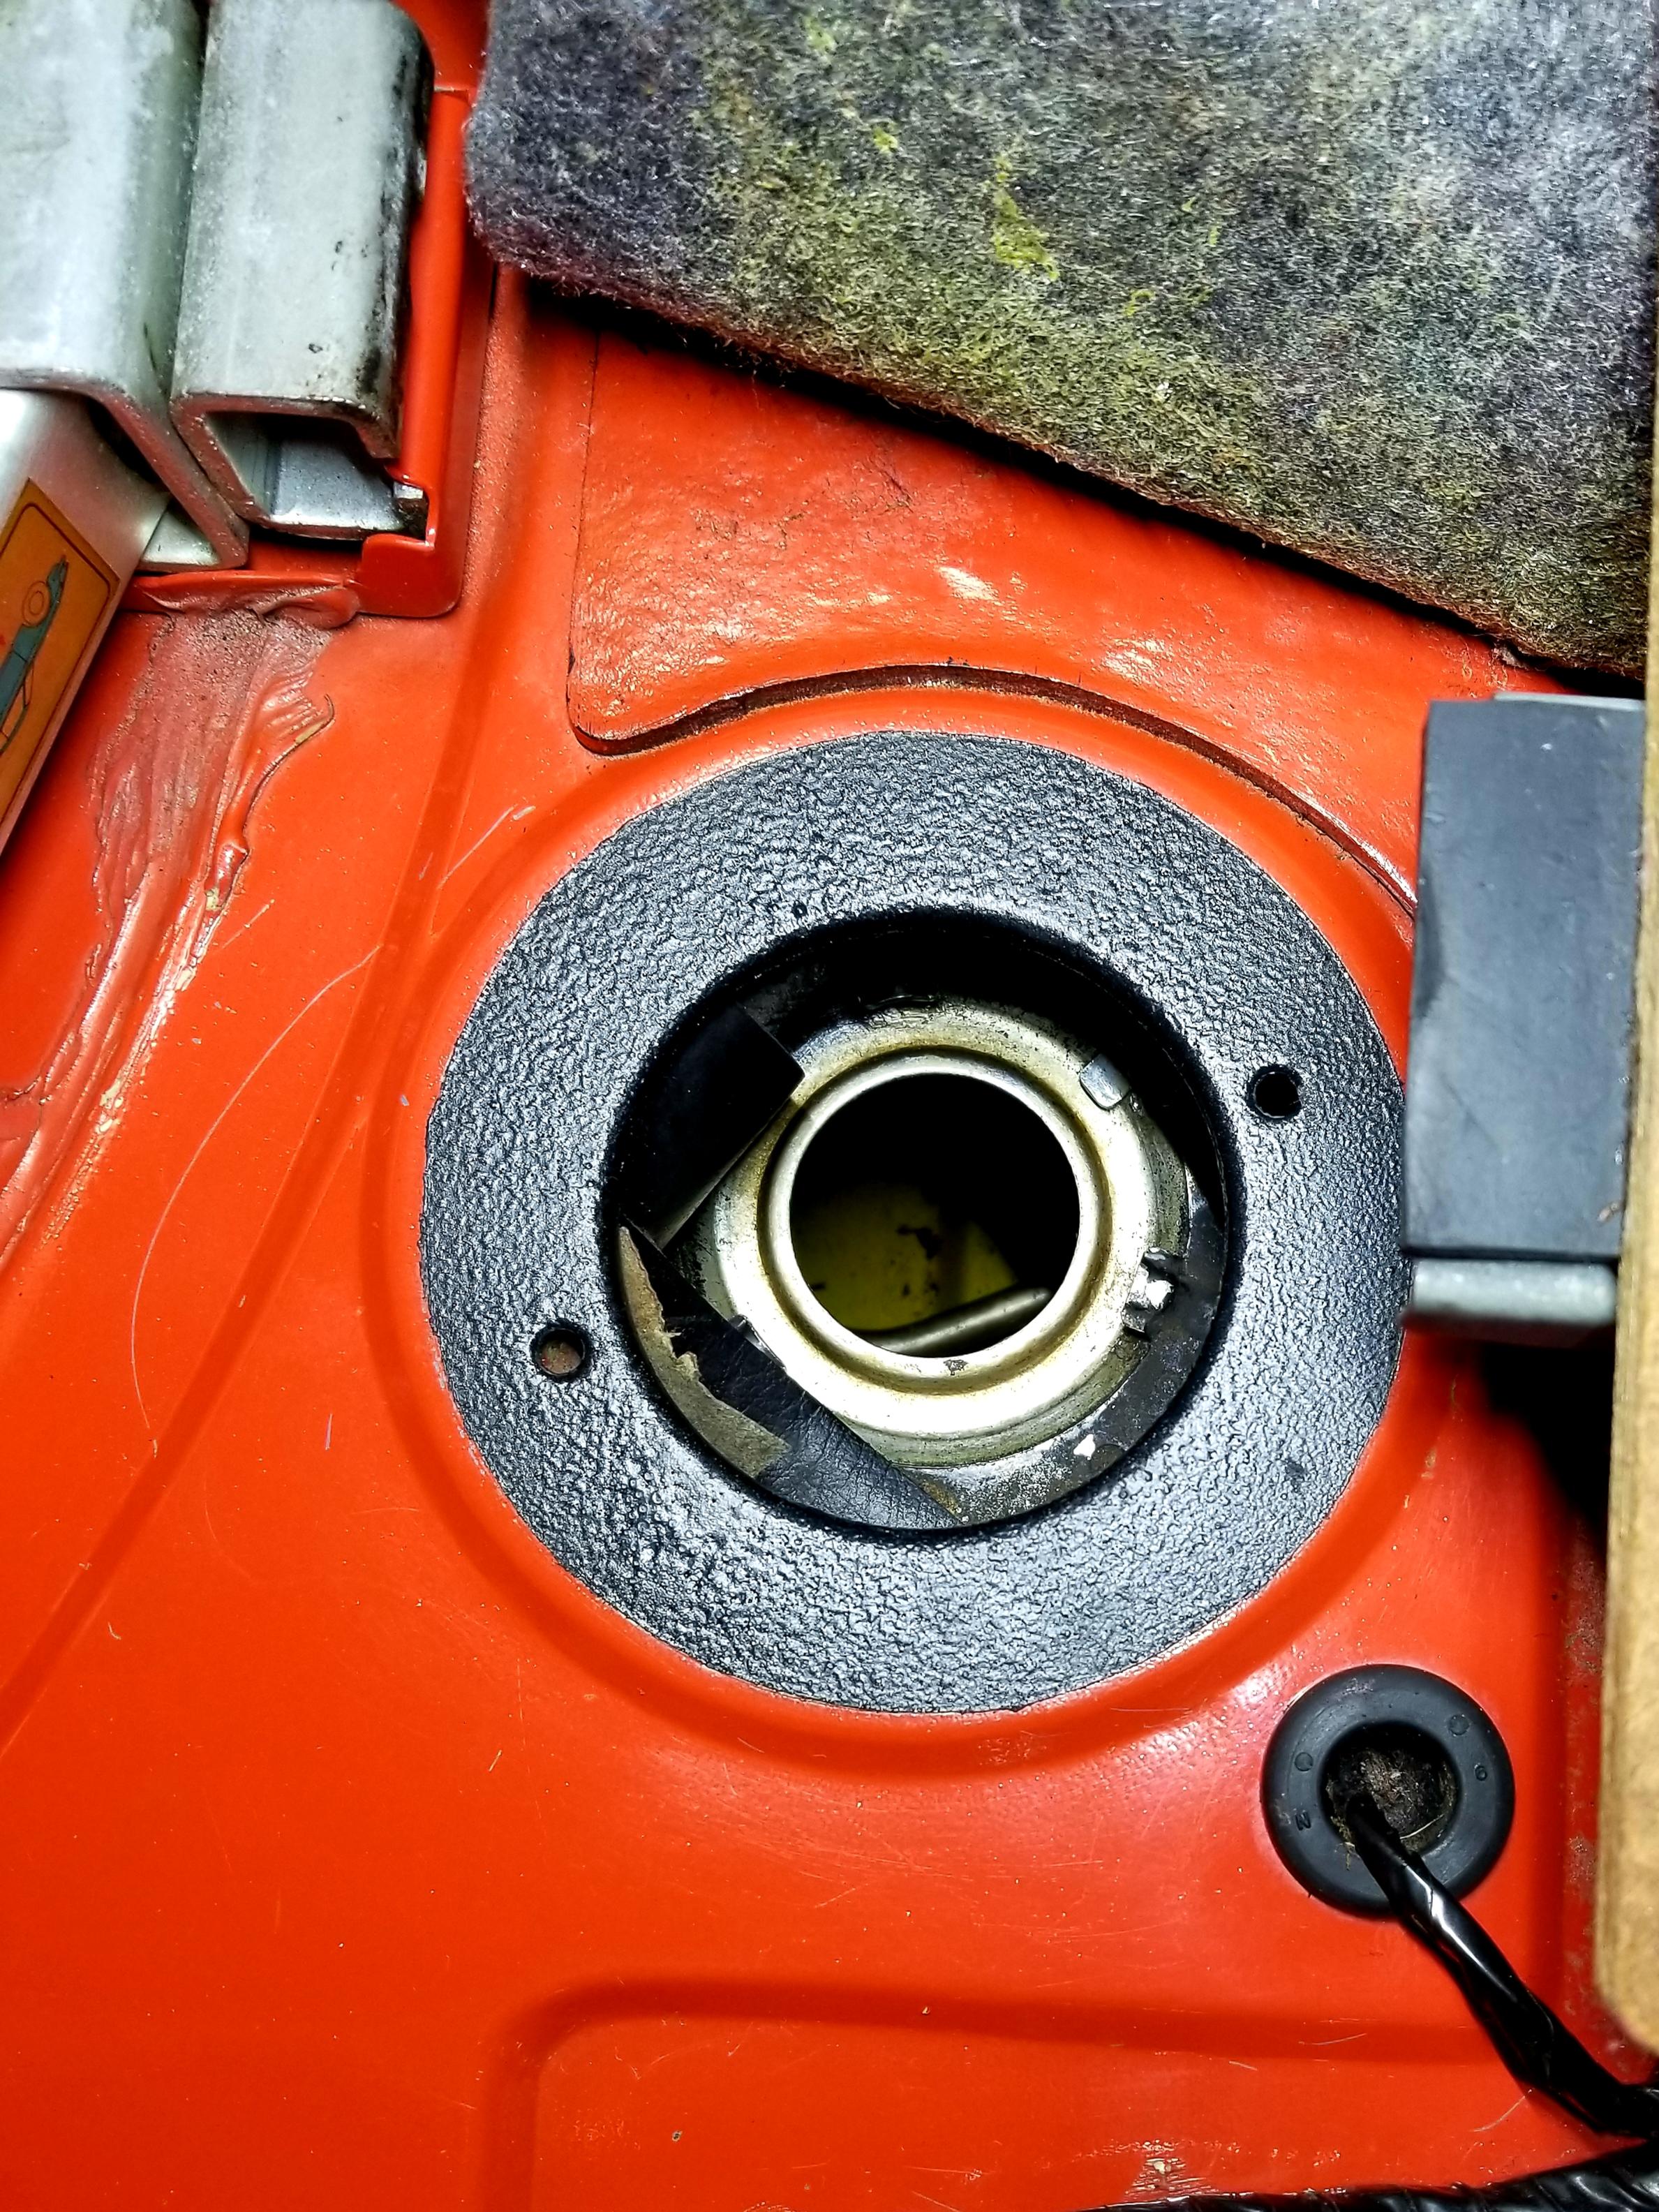
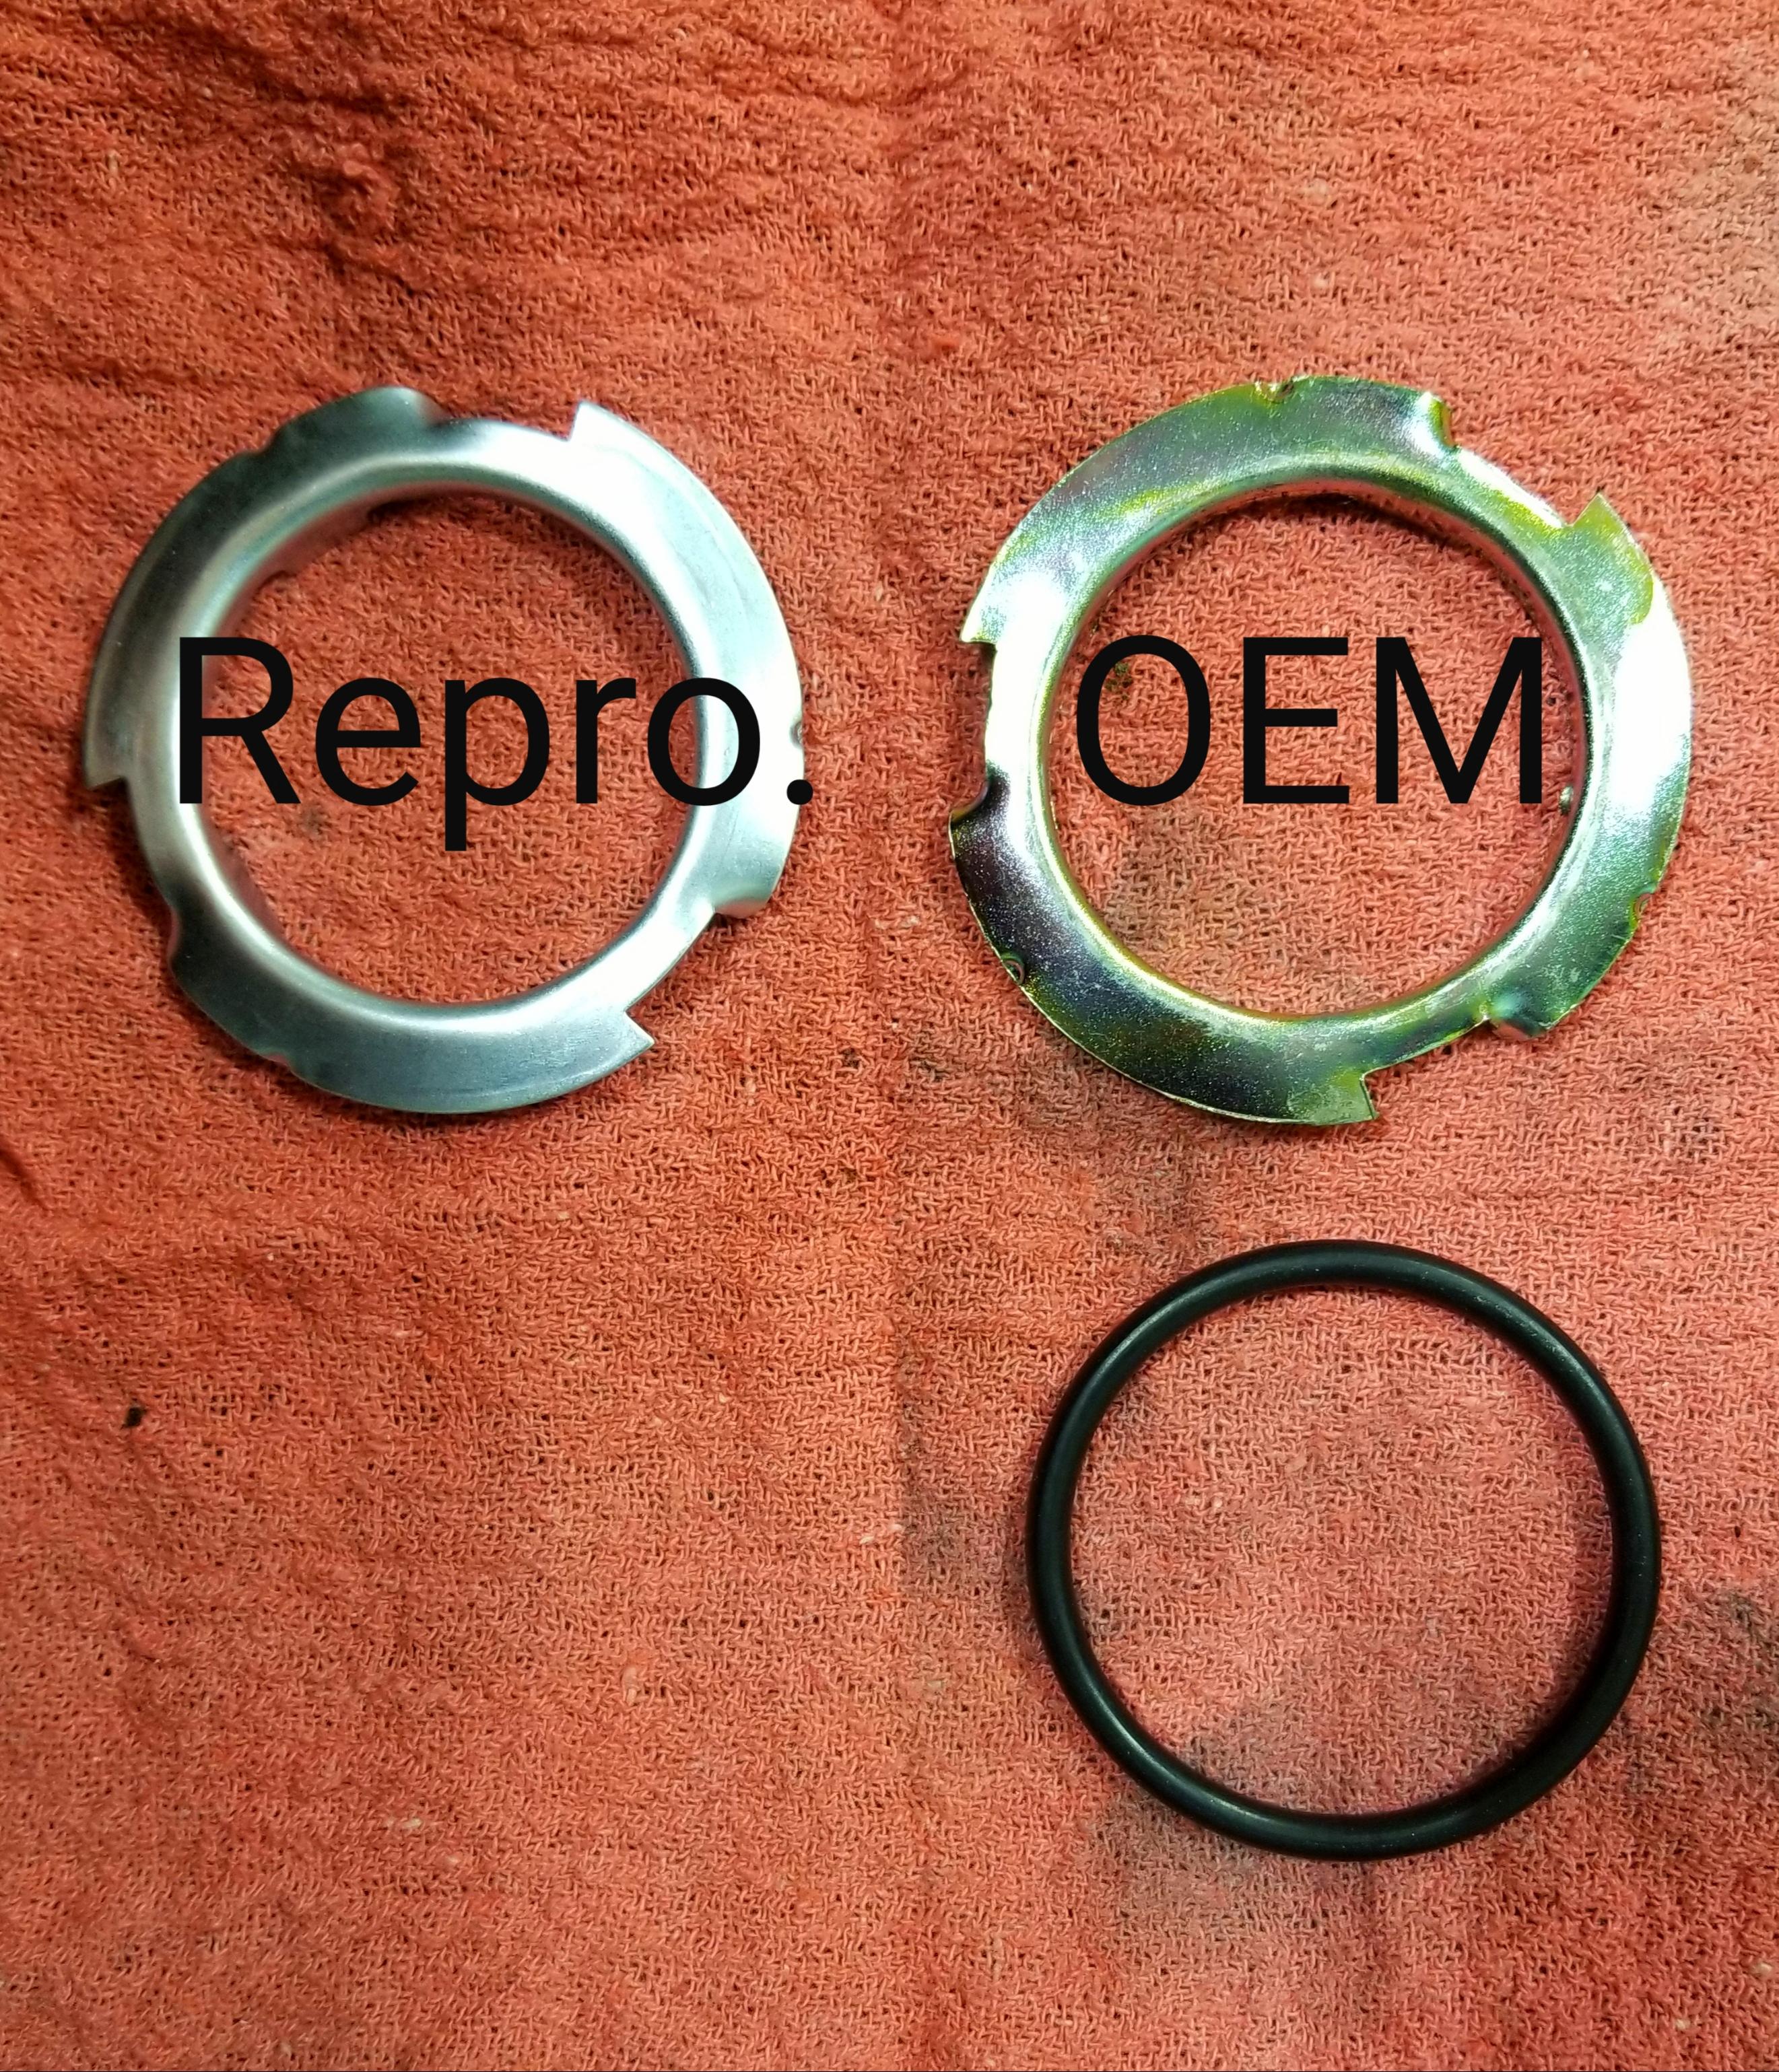
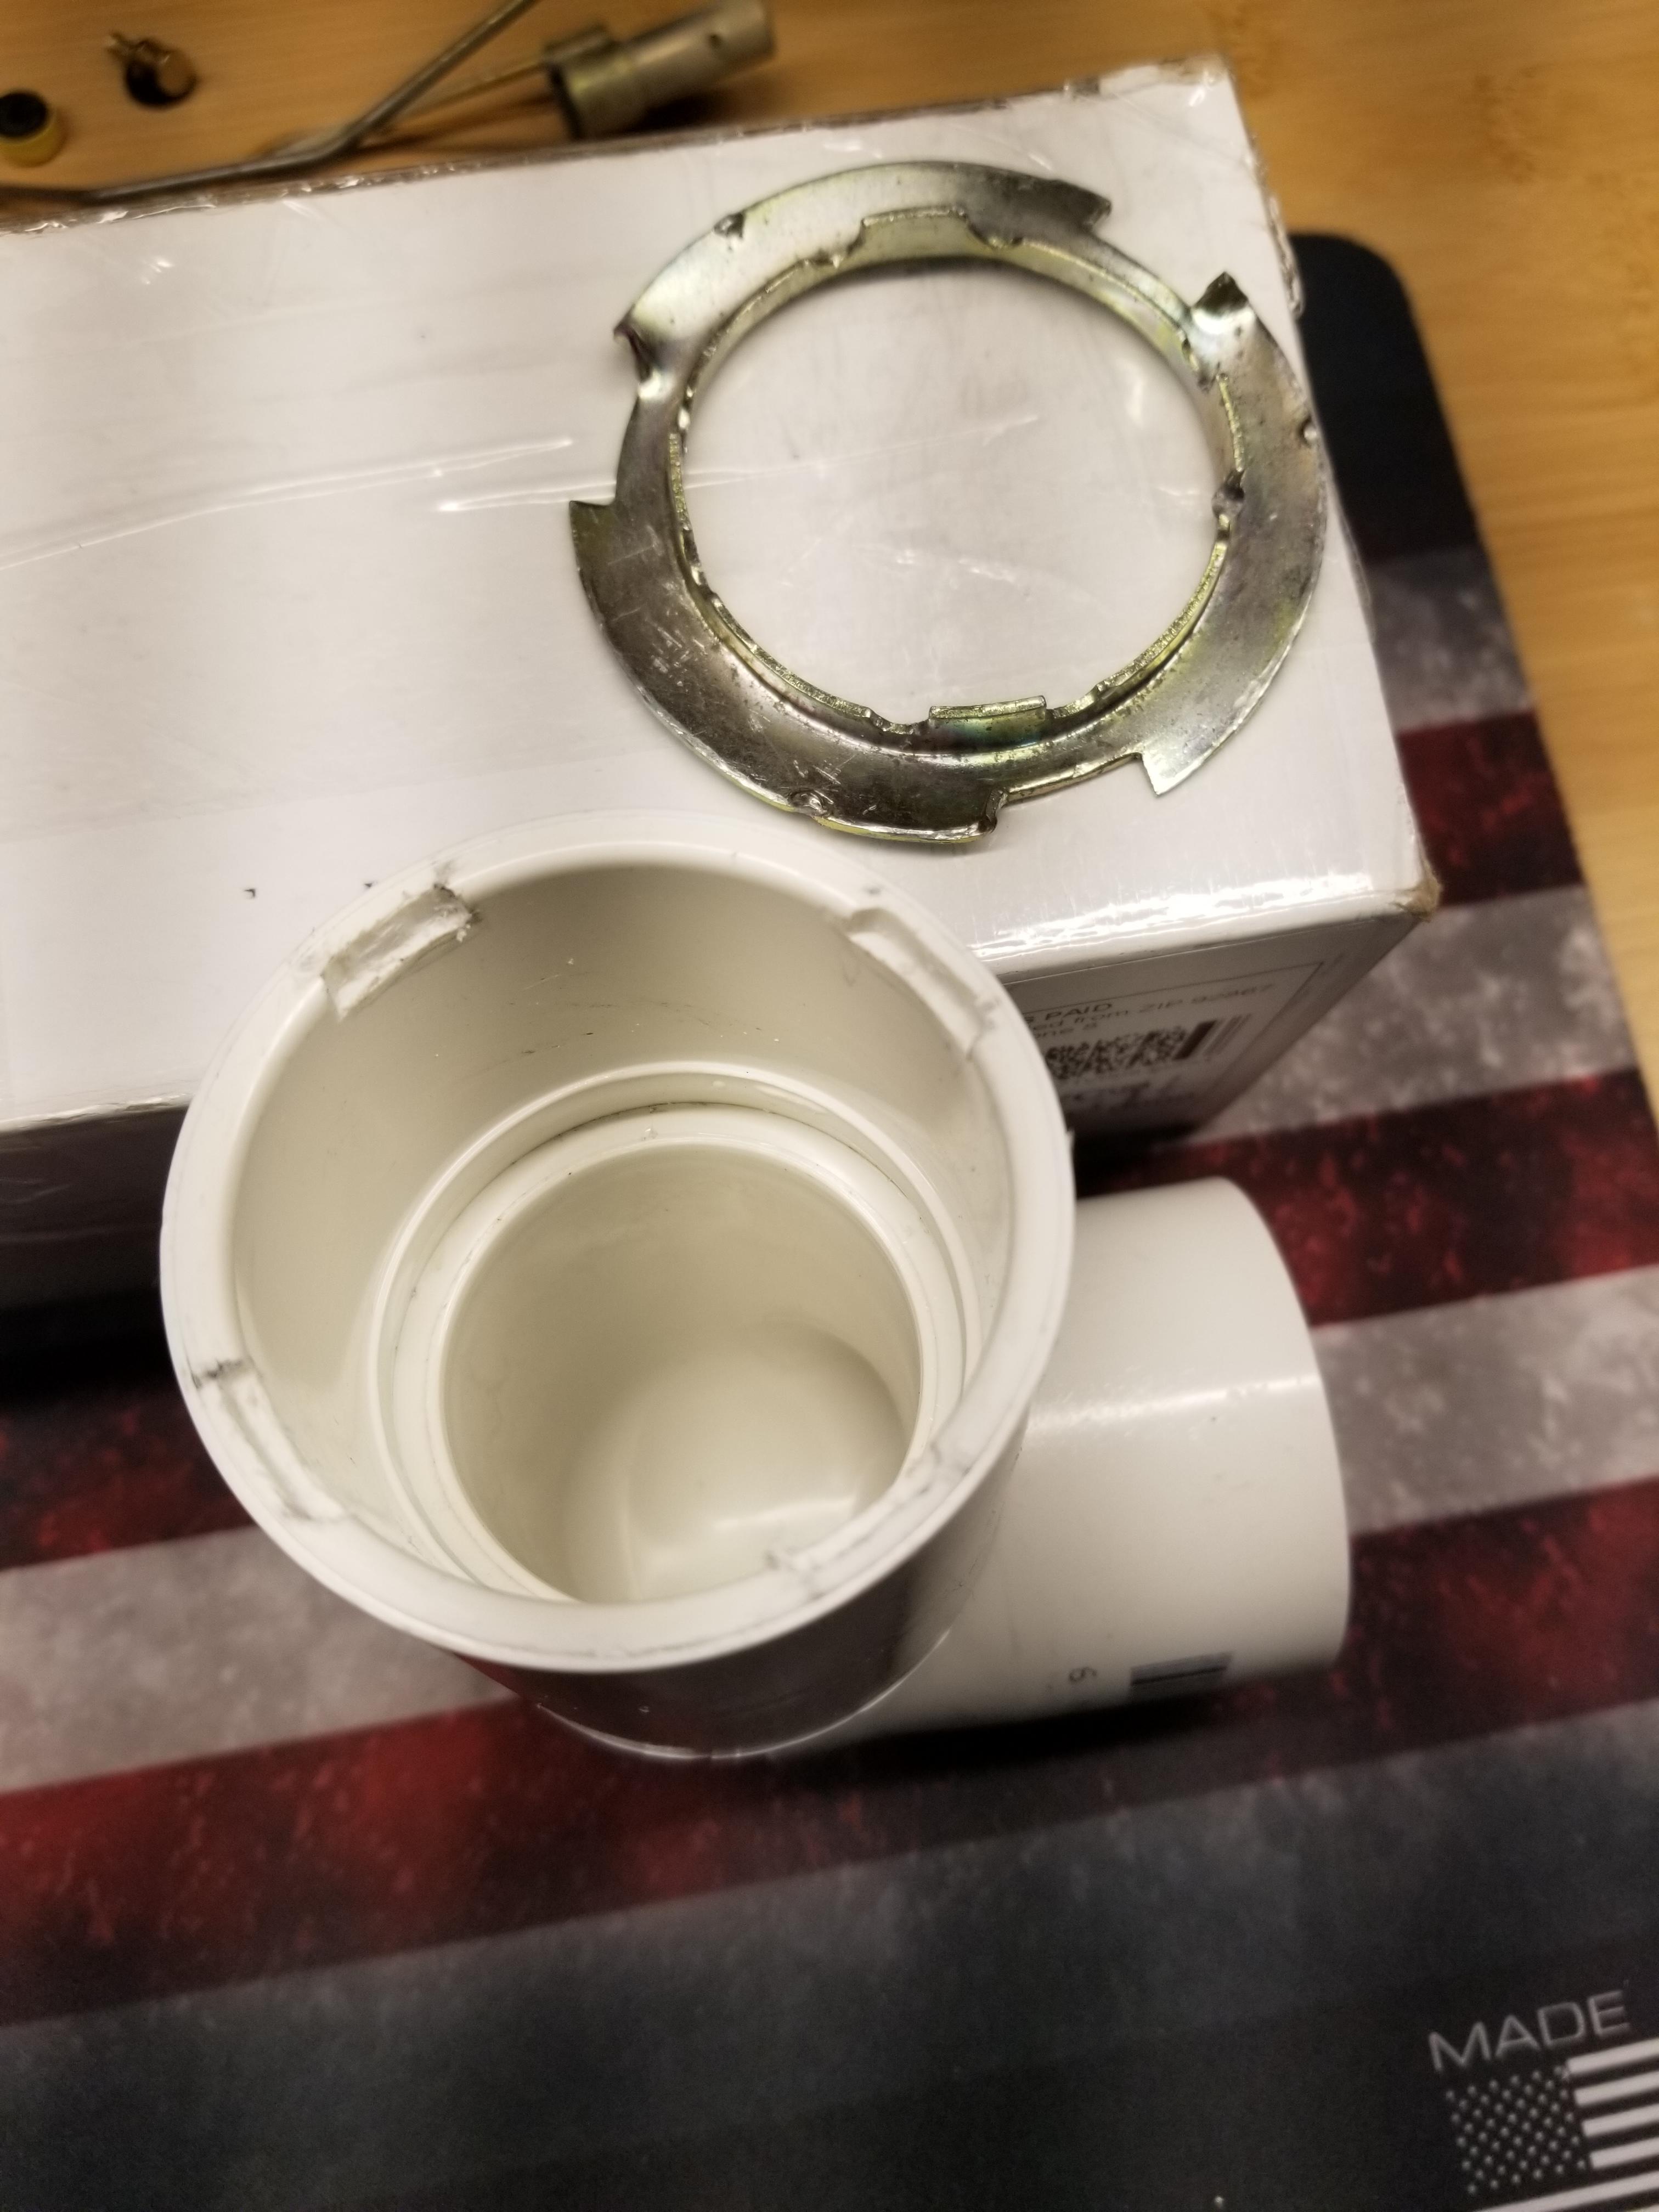
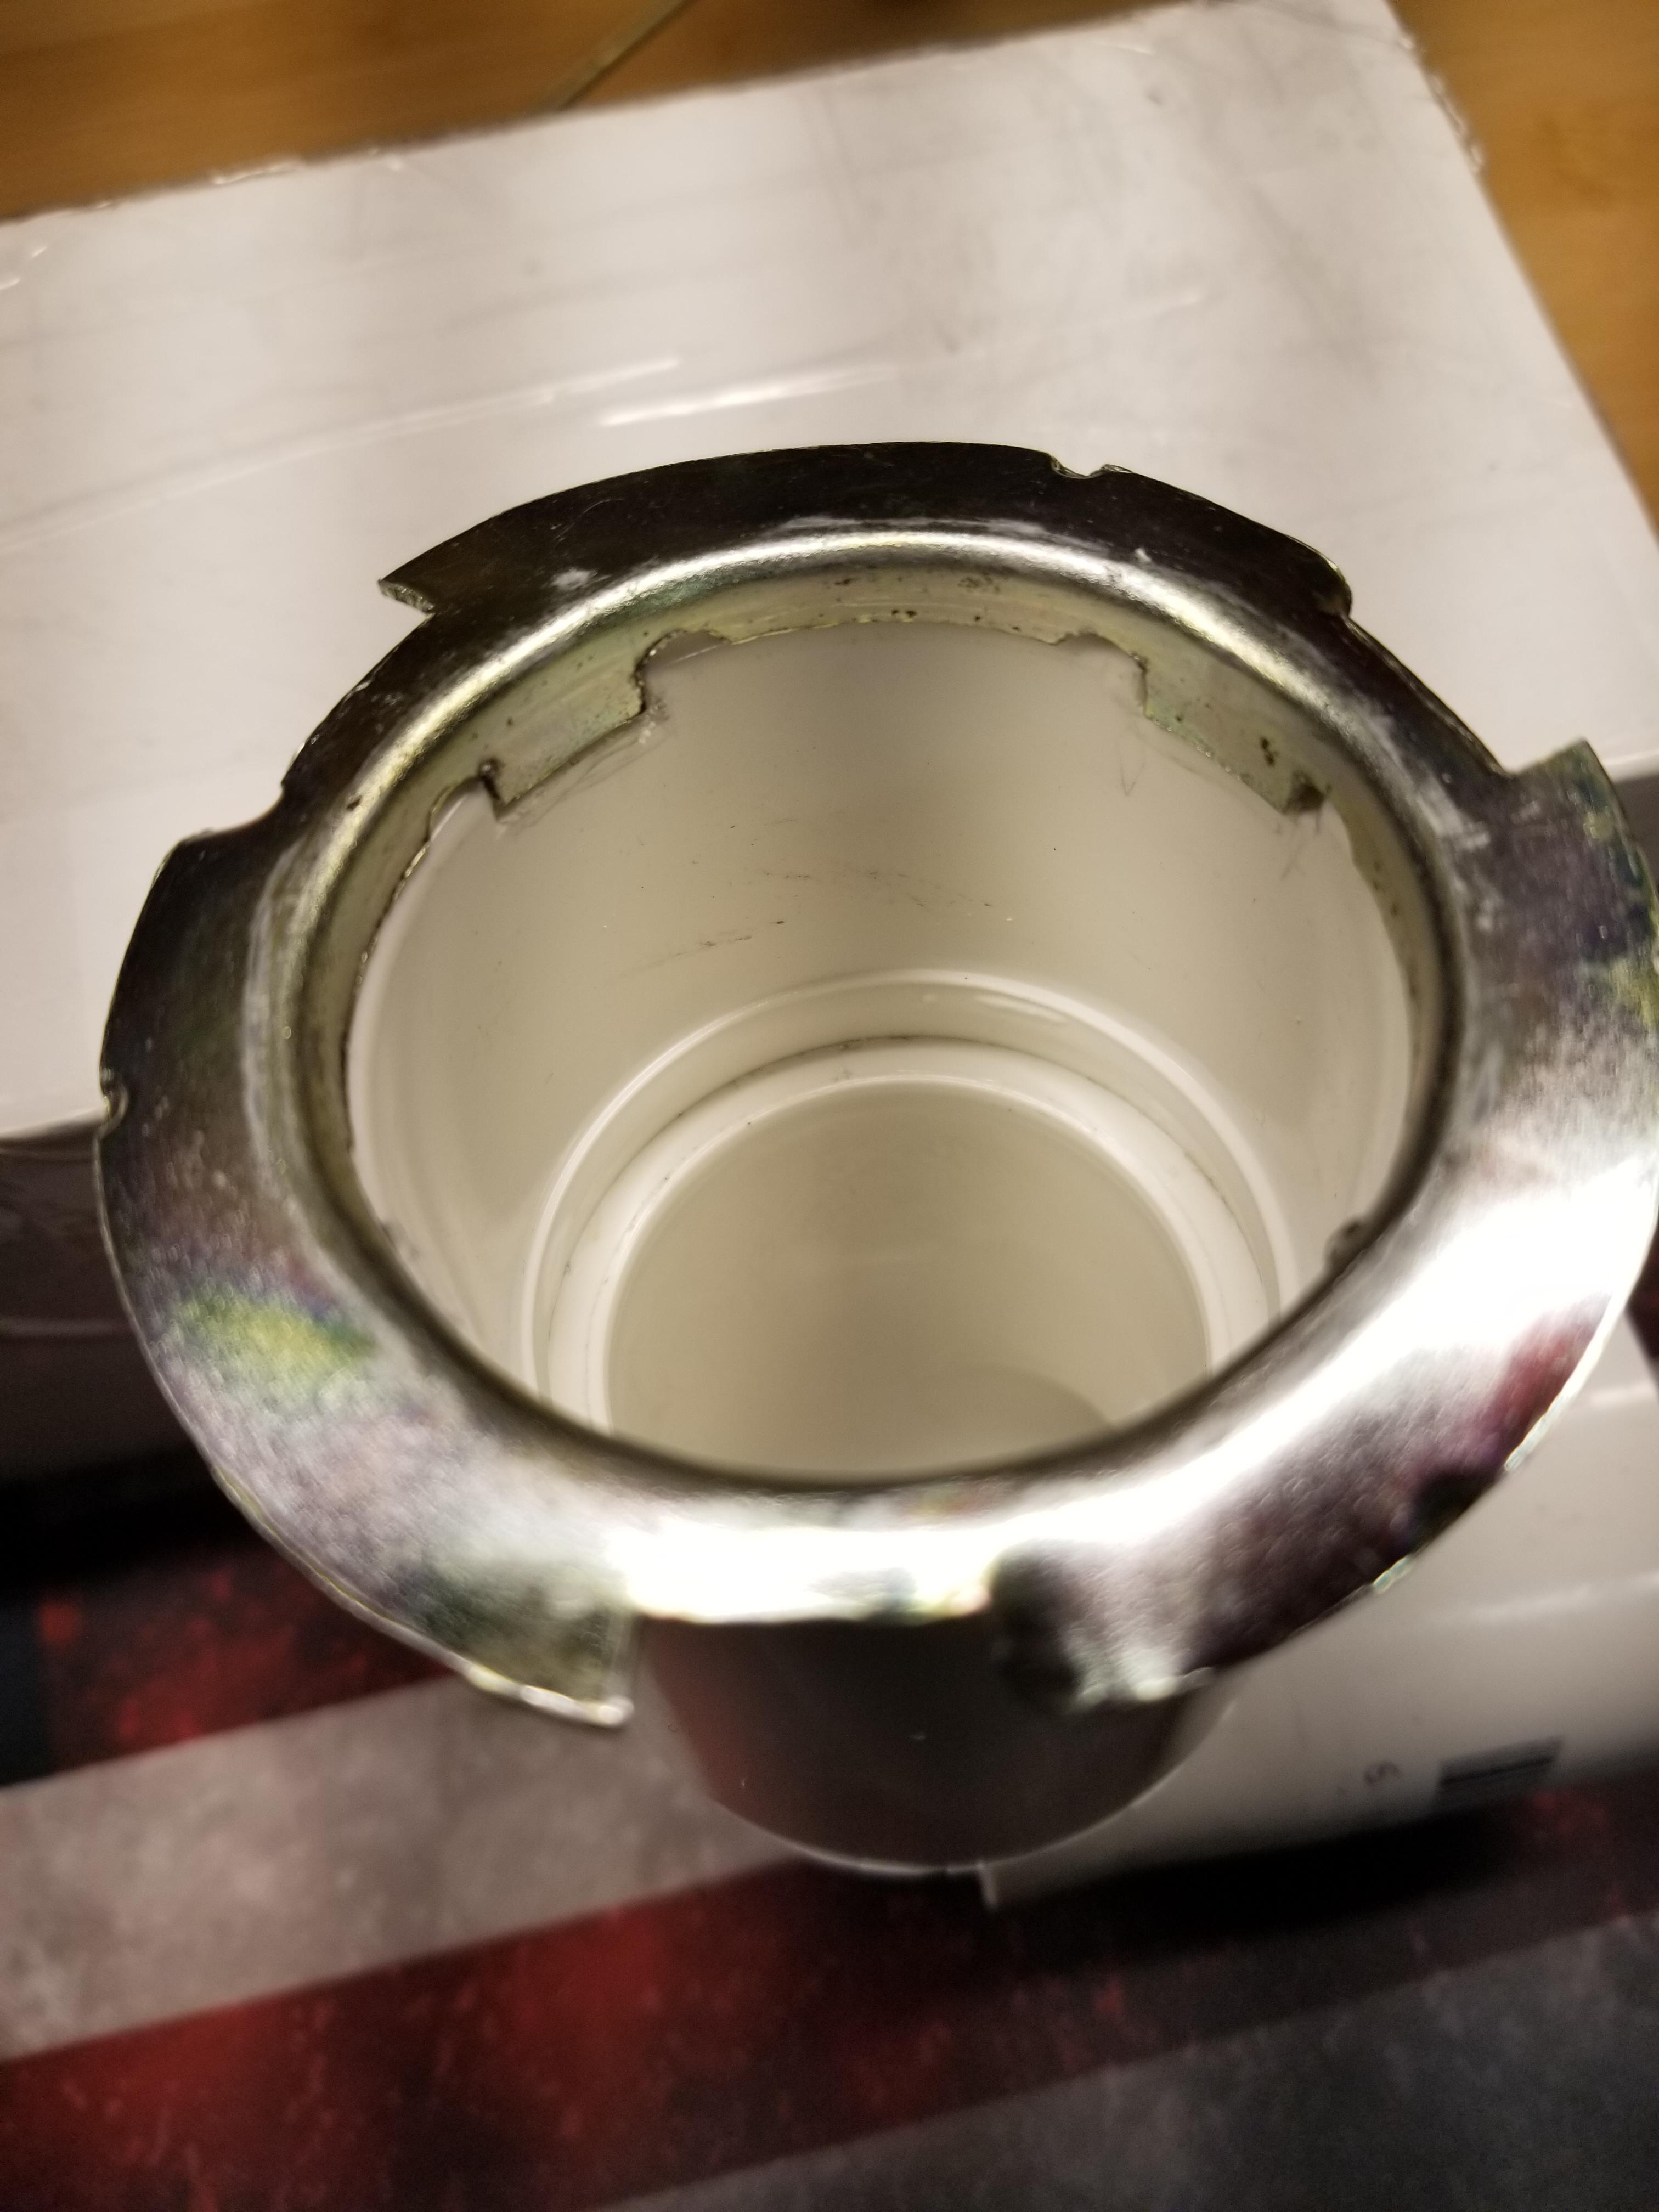
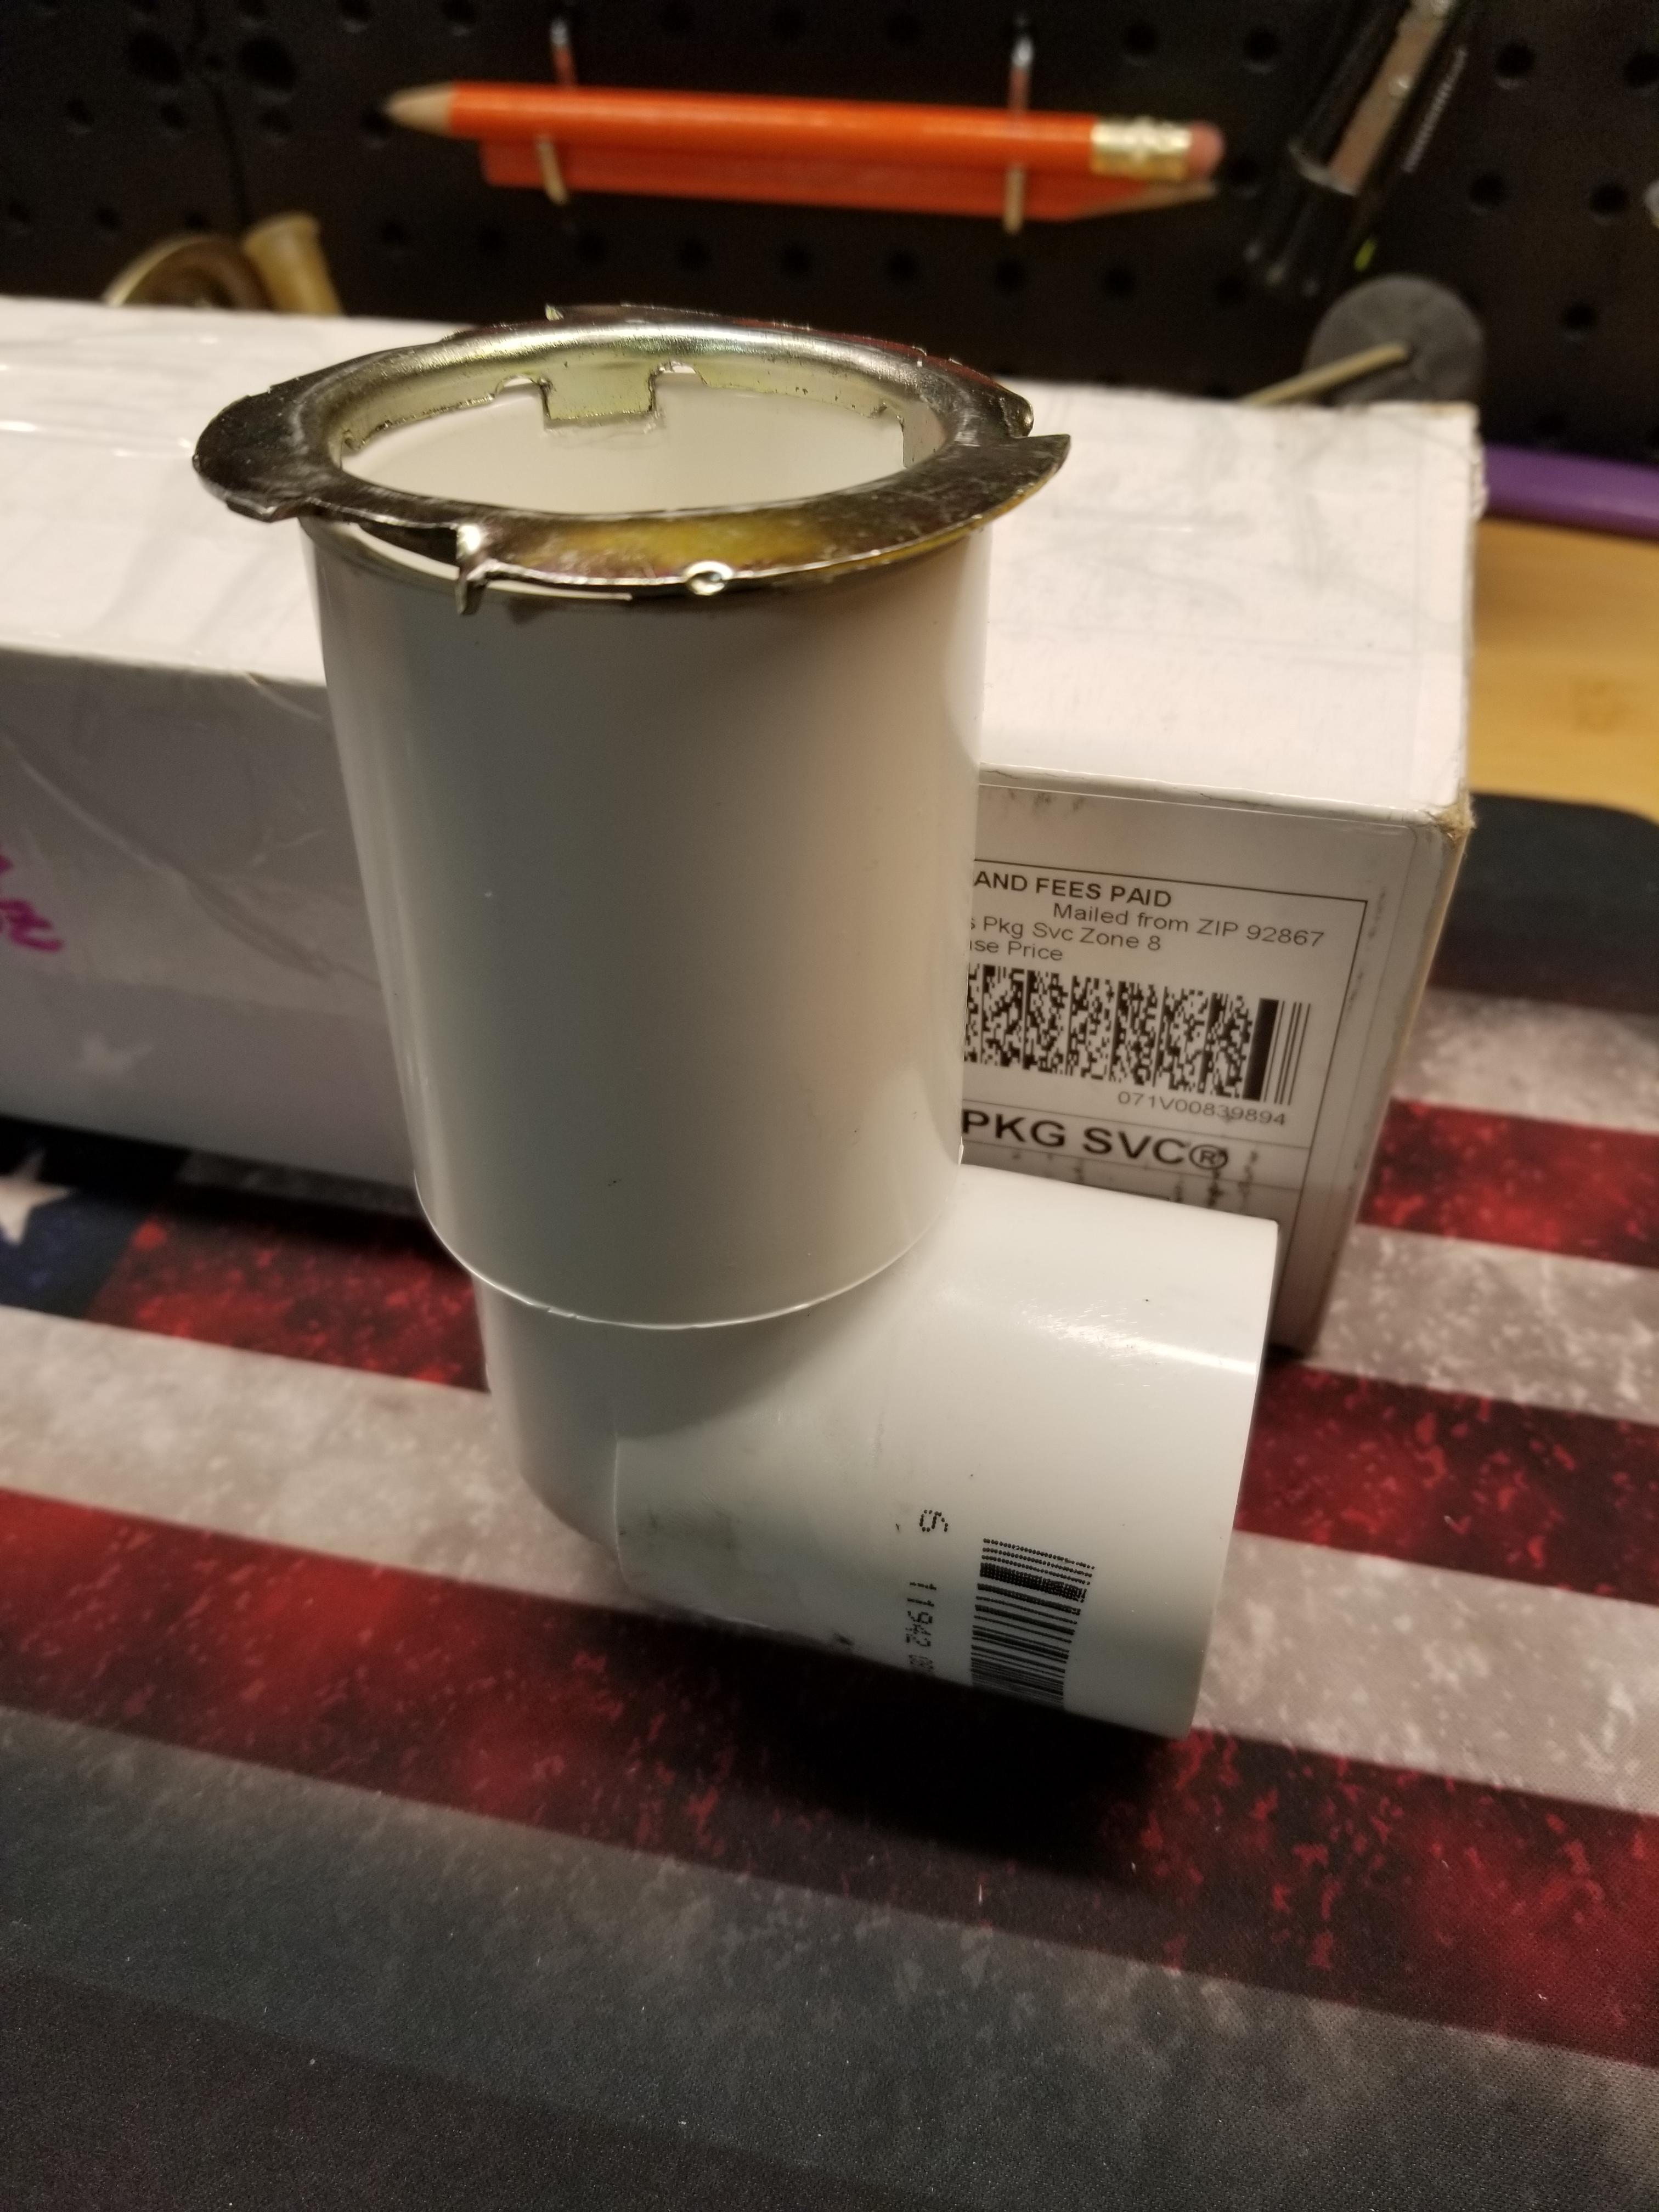
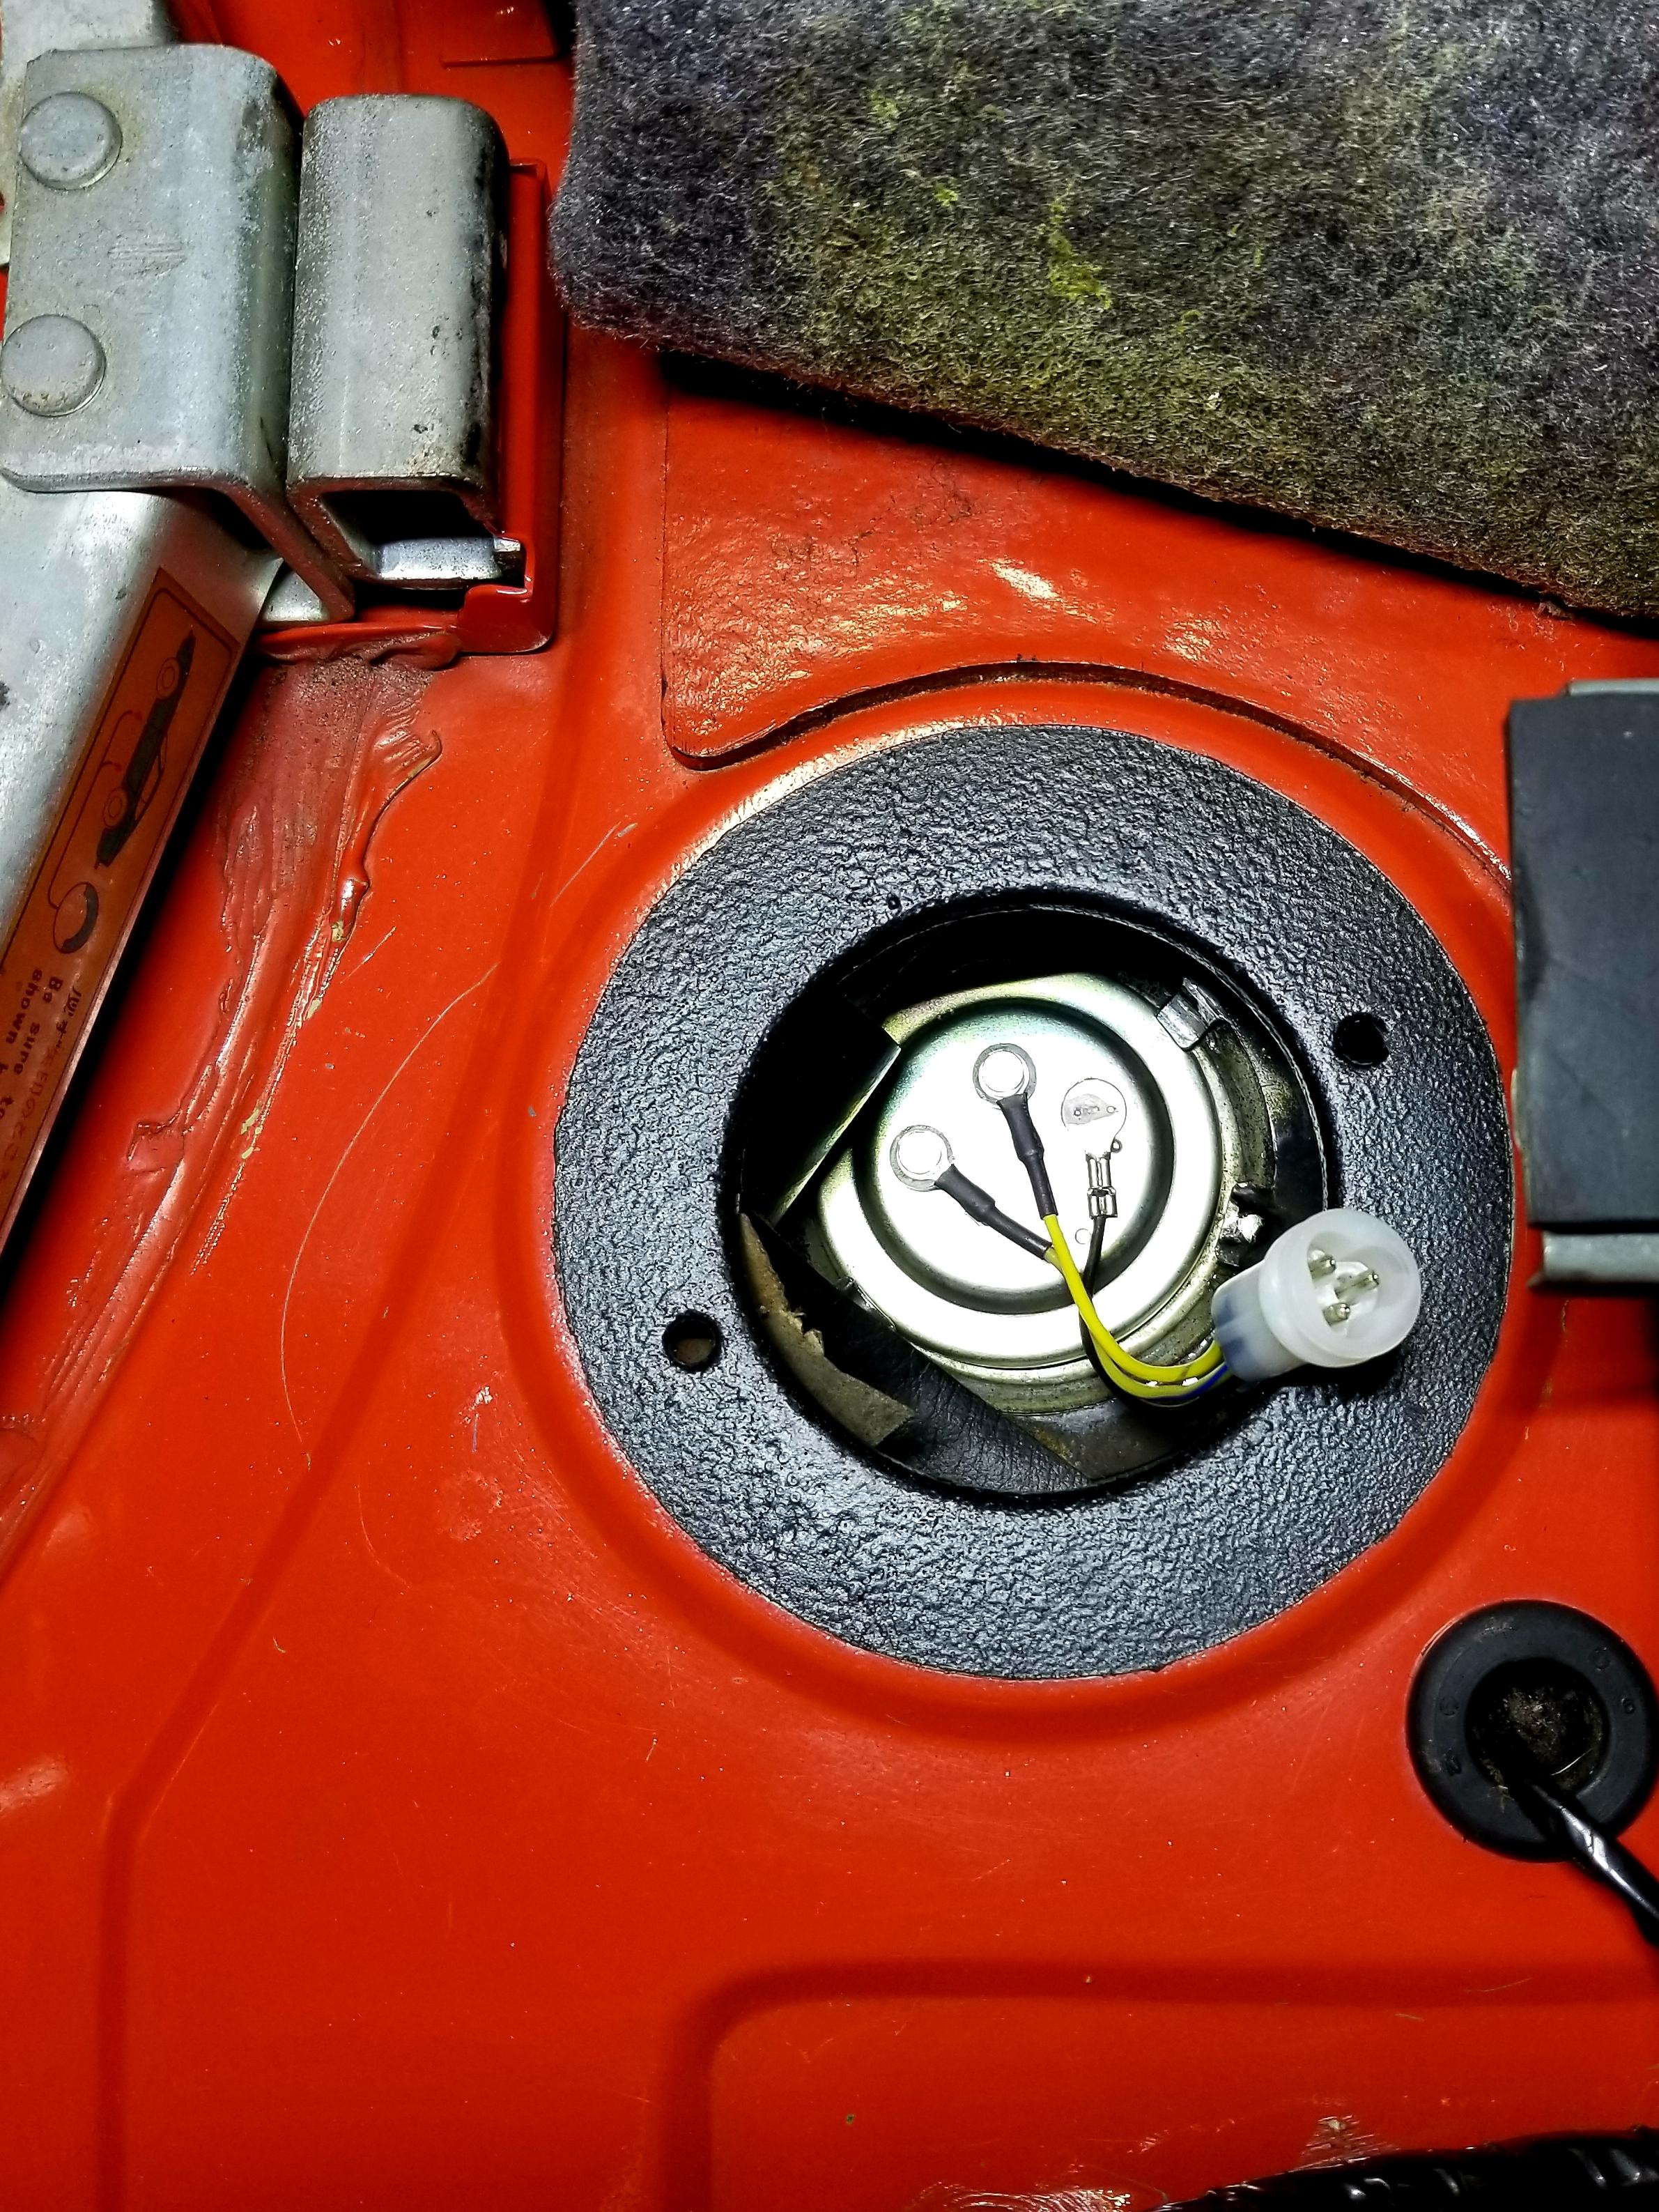
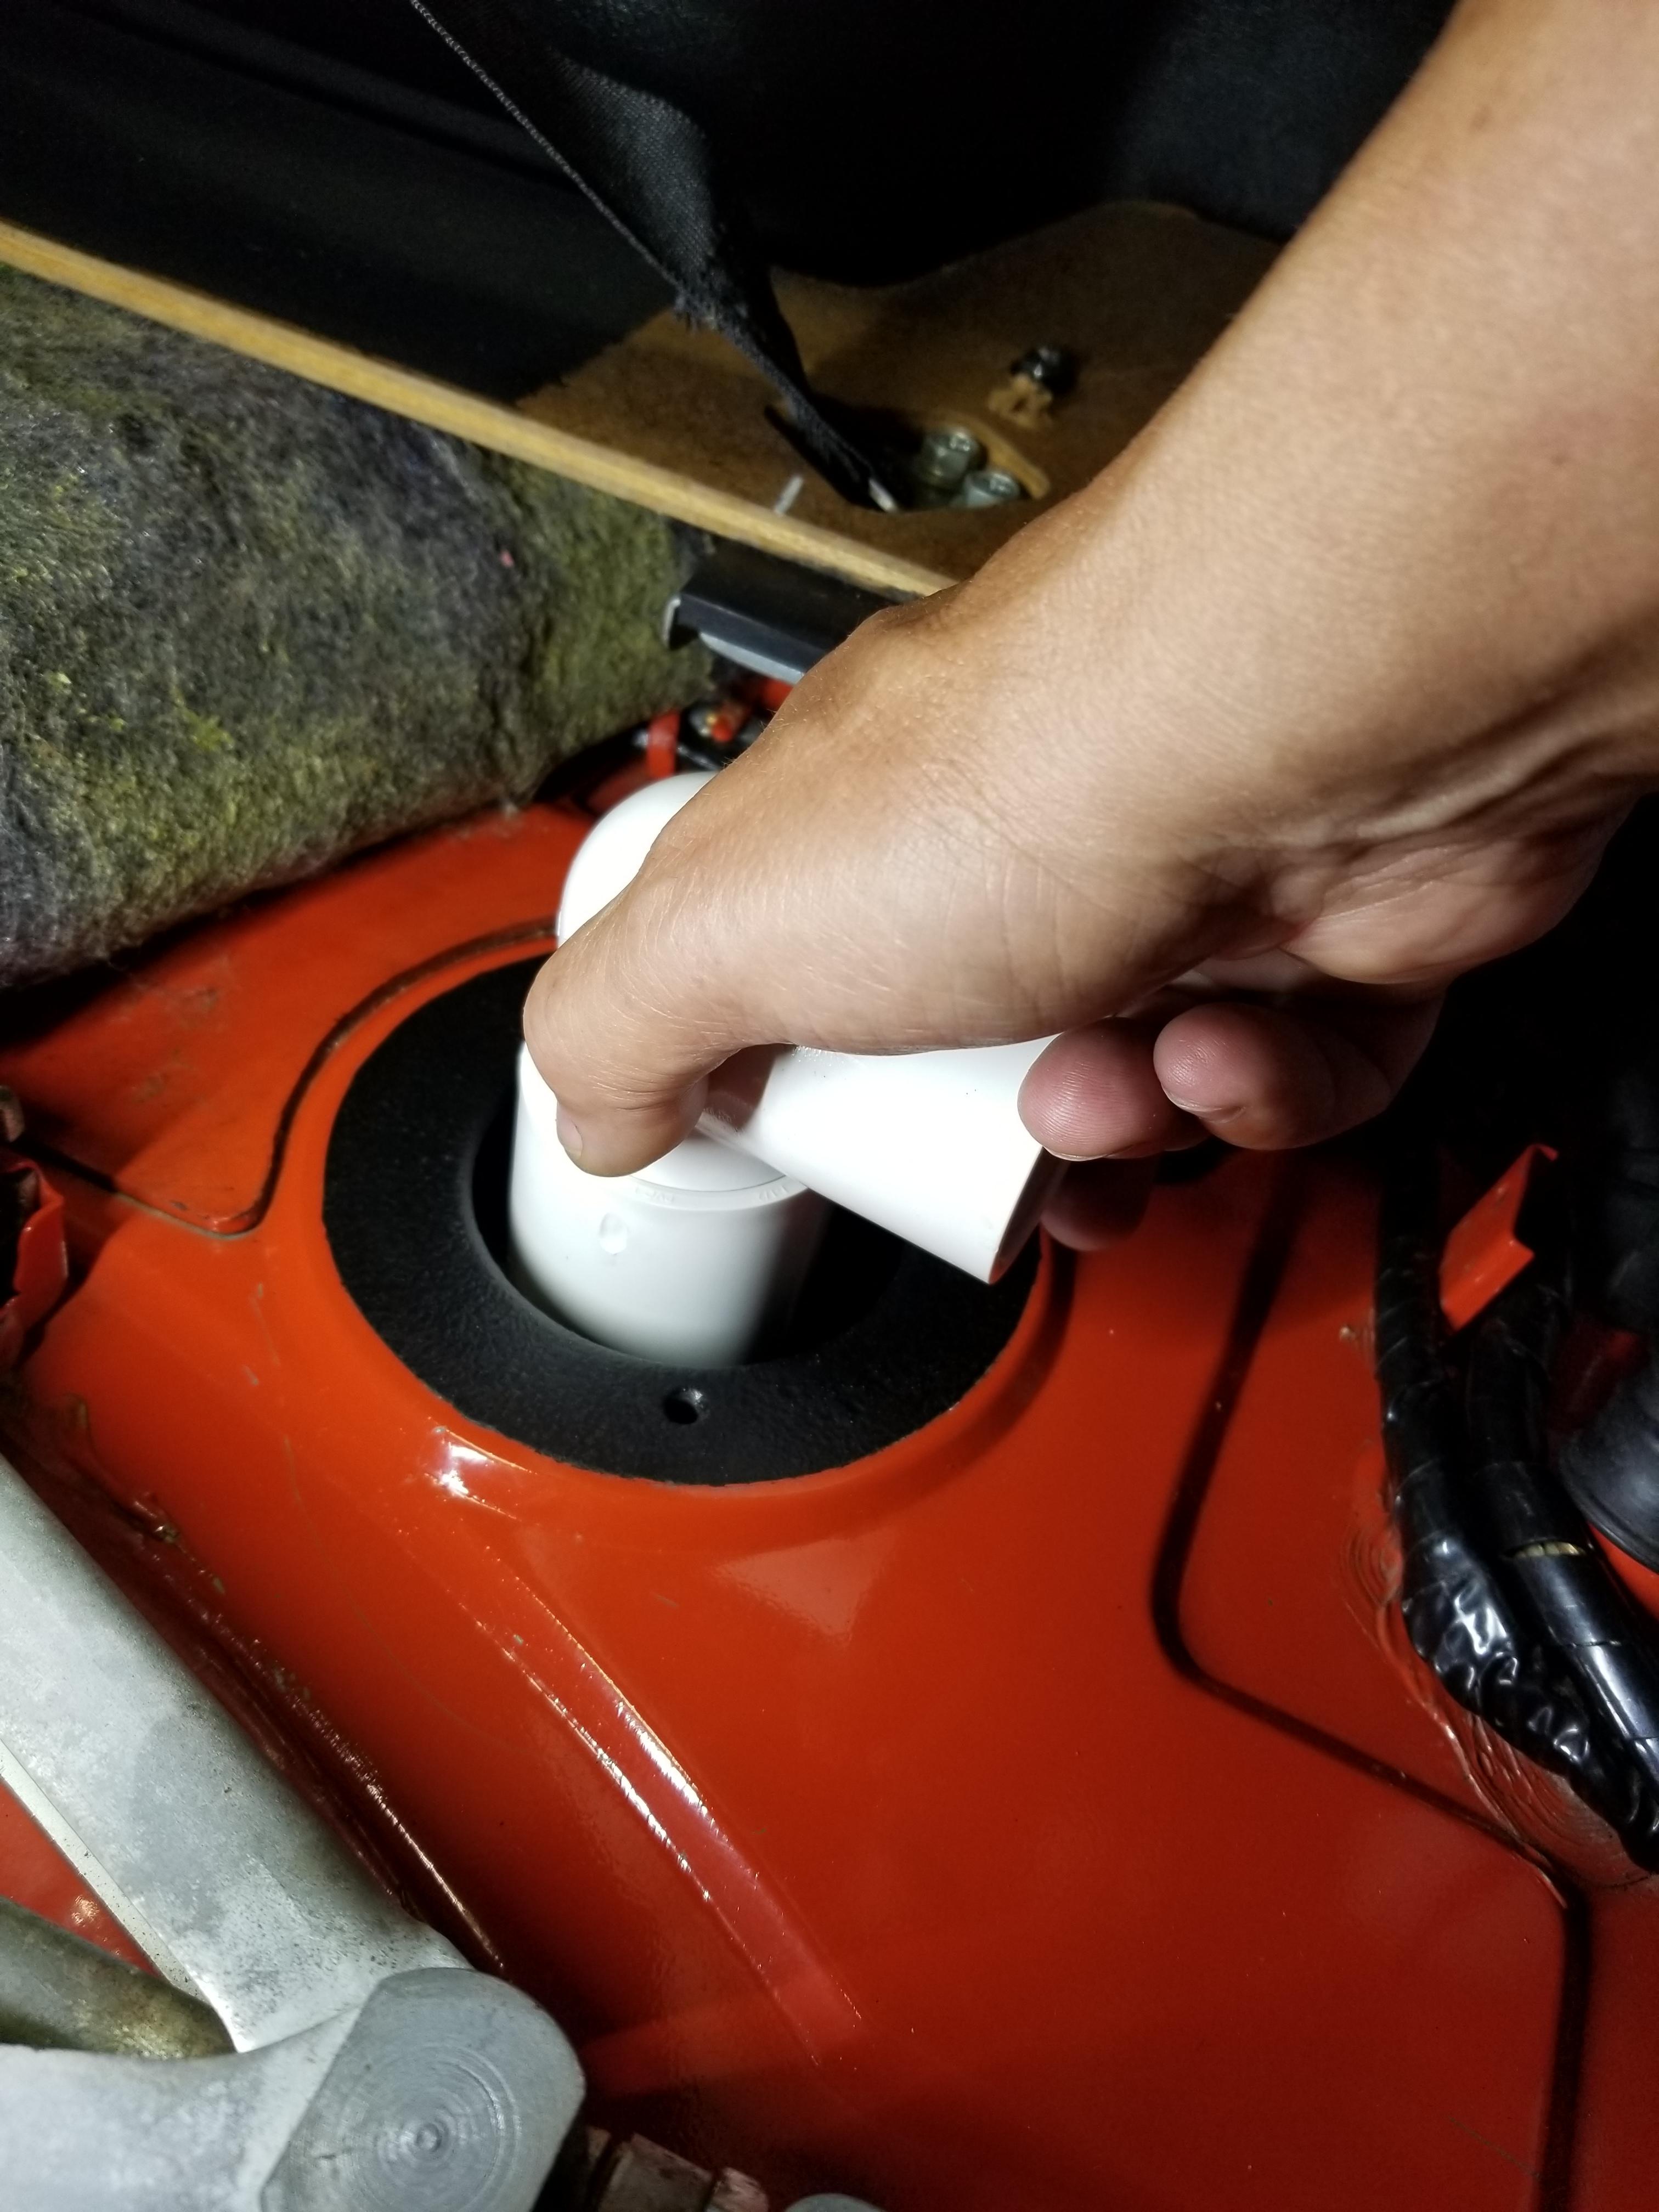
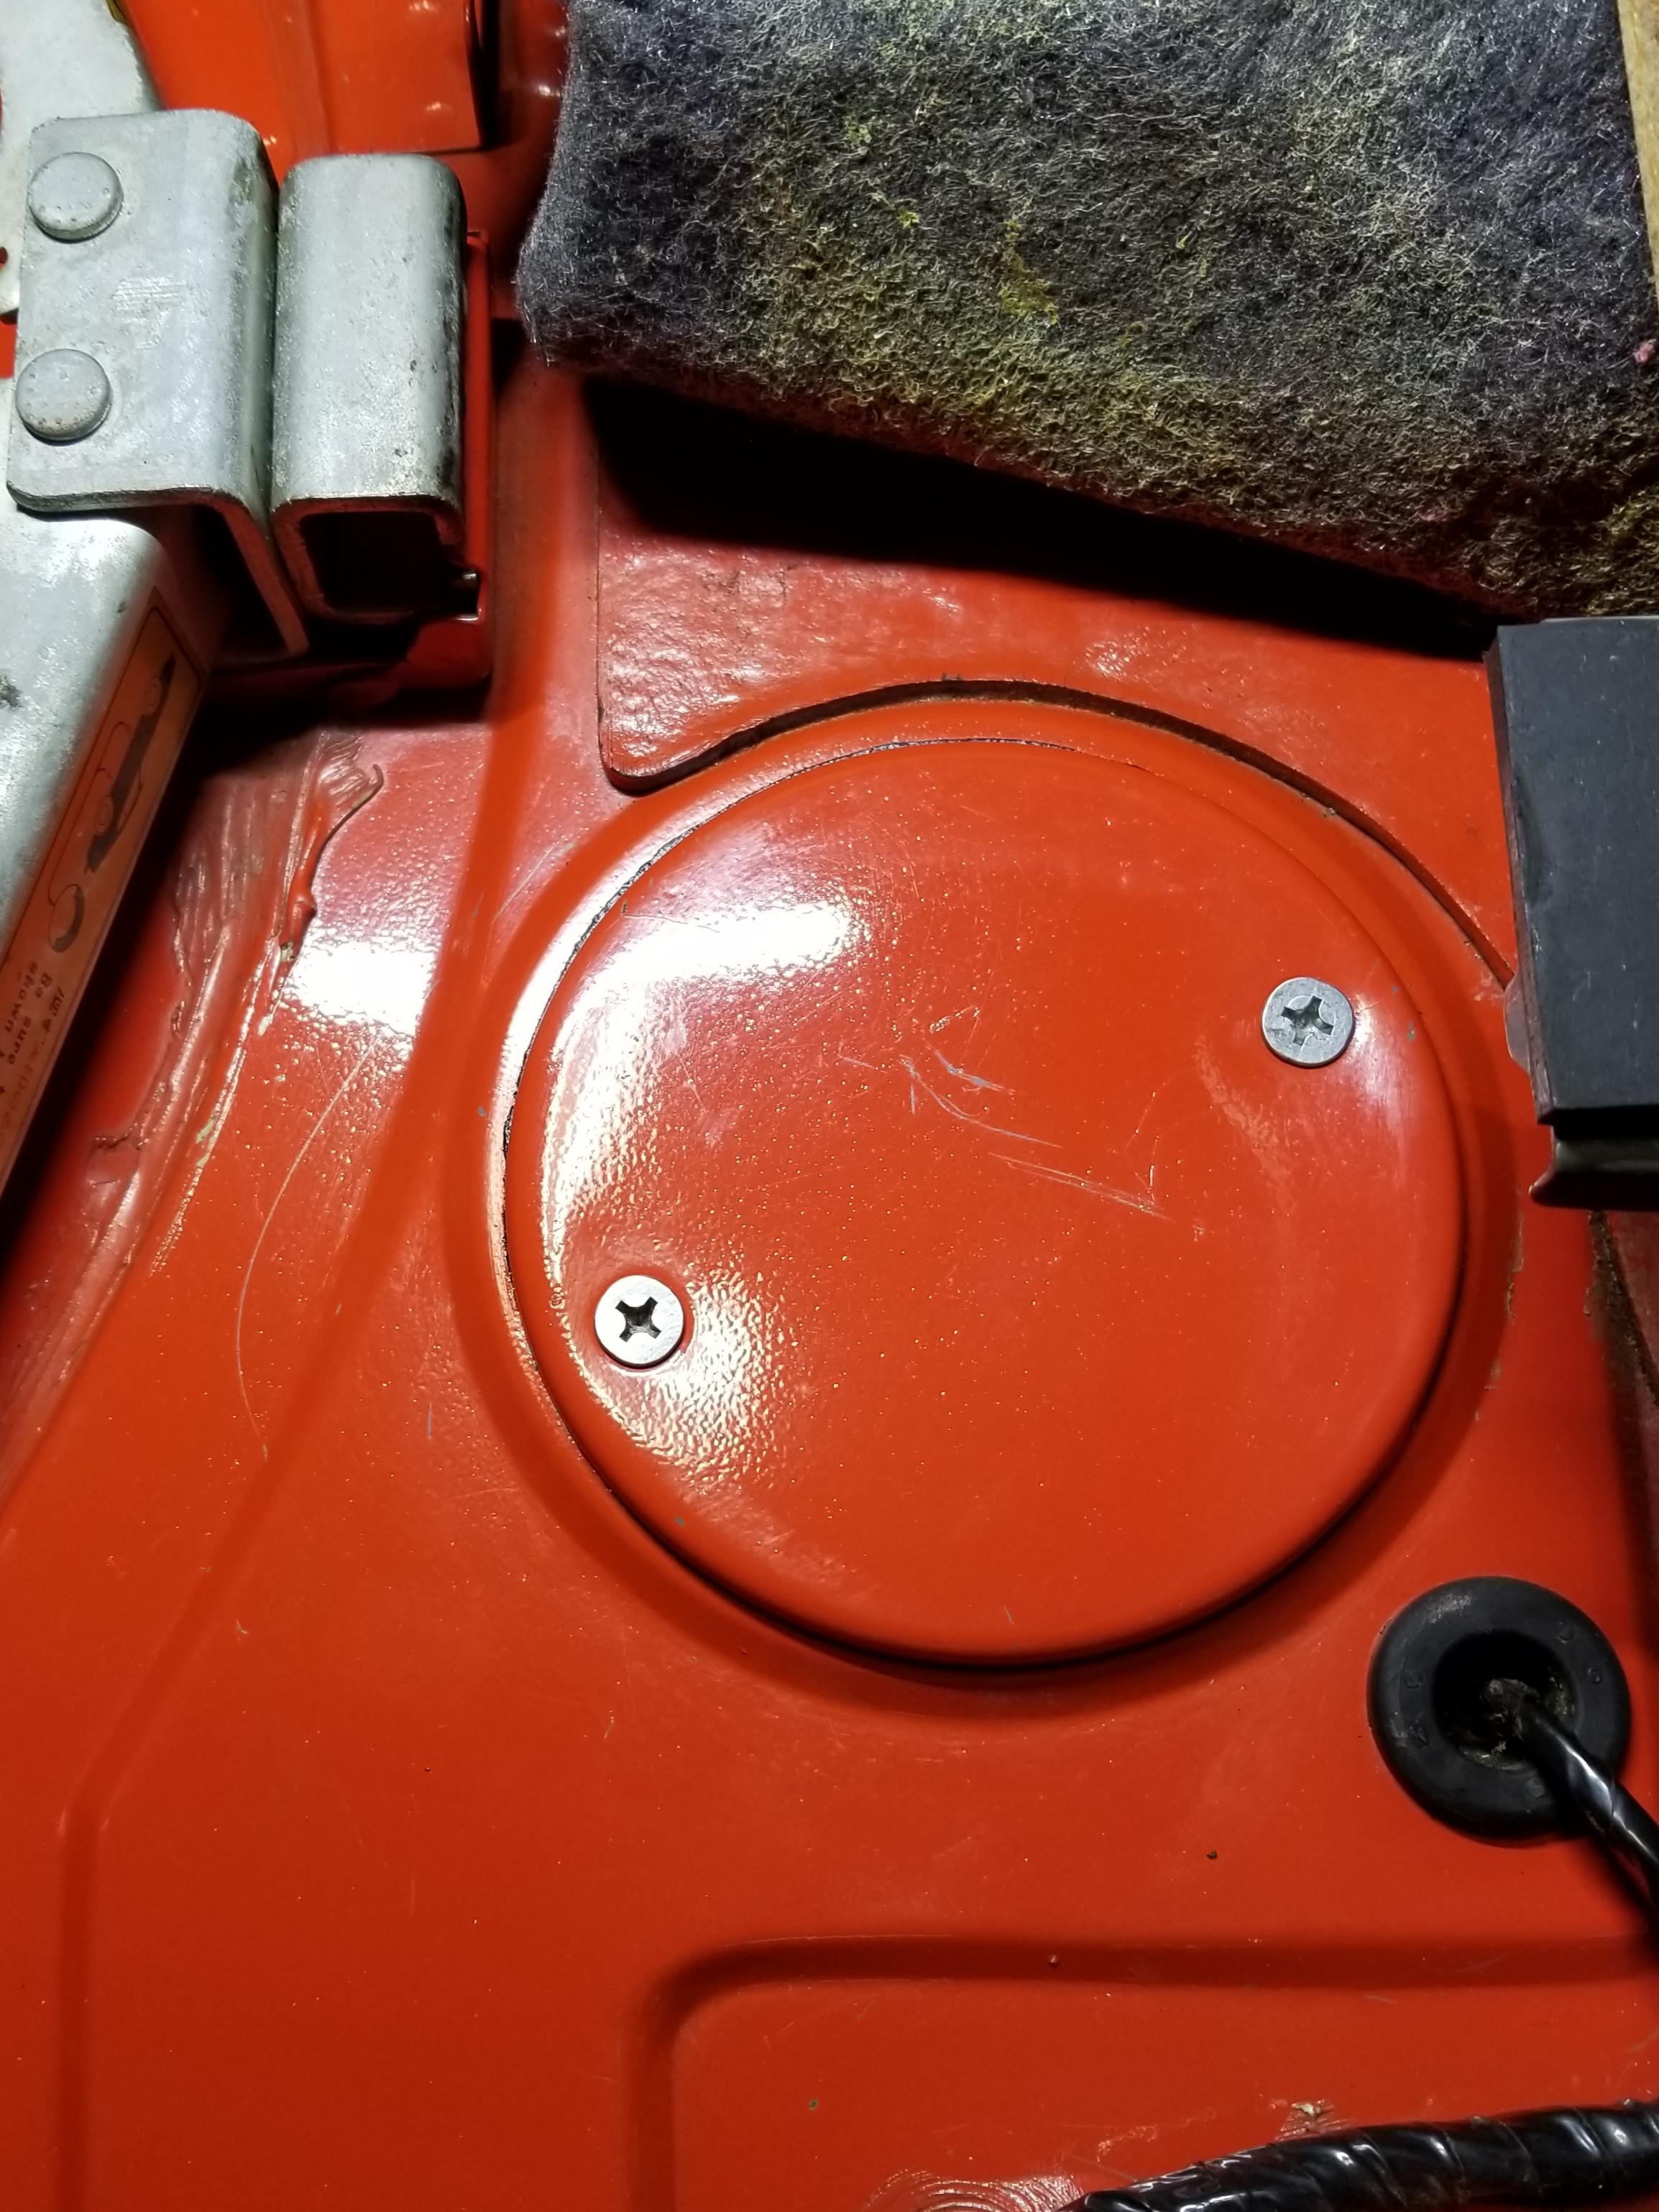
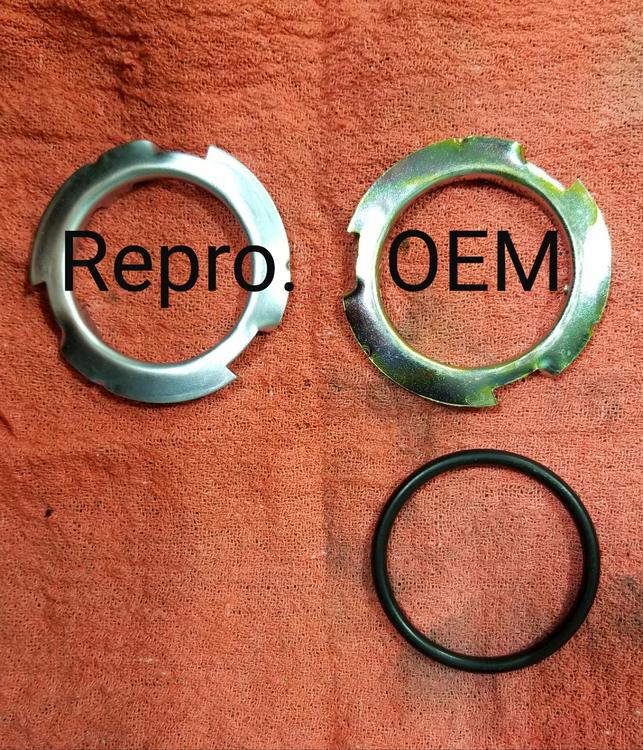
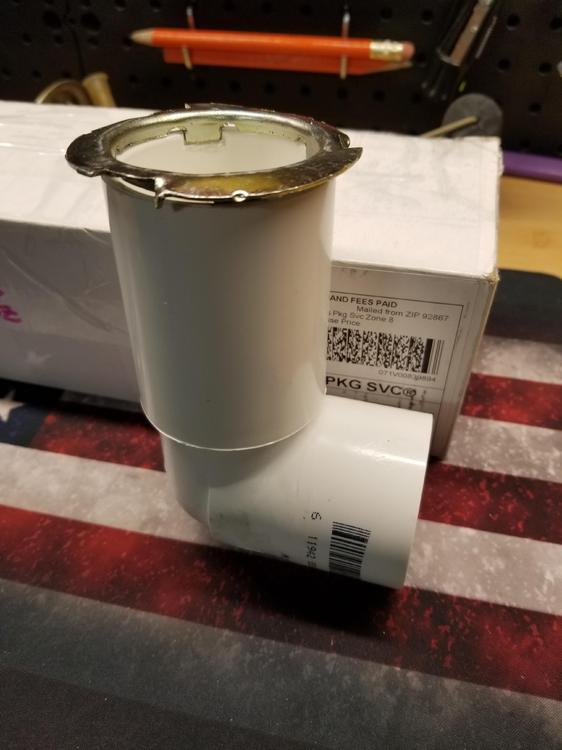
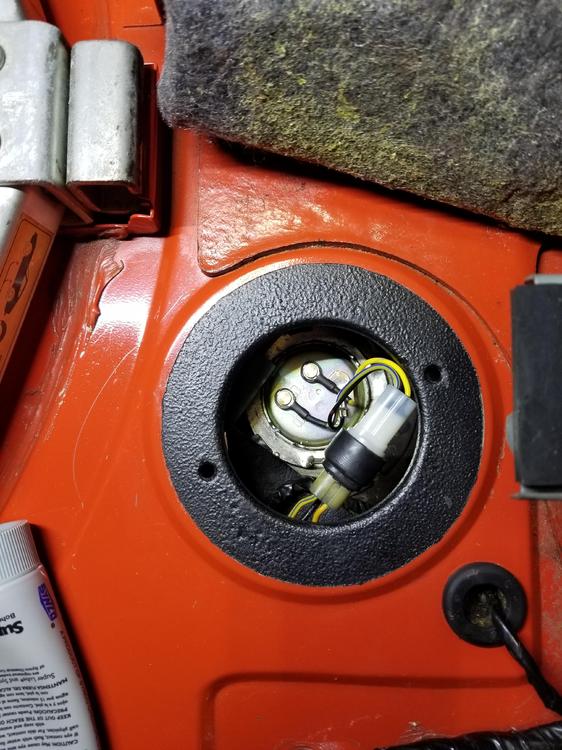
... and the new fuel sending unit from Zcar Depot arrived this afternoon and it's installed and working!! Because the reserve fuel light had stopped working on my original unit I will confess that last week I had tried installing a fuel sender I purchased from MSA last September when they just got them for the '77-'78 280Zs but one of the contact rivets snapped off when I slid the connector onto it. Very bad quality! Not only do the MSA units come with different type connectors that you have to splice in after cutting the stock connector from the sender, the quality of the riveted contacts on my unit was much less than adequate and failed miserably. Fortunately it happened before the final stage of installation and not after everything was closed up again. Additionally the unit is more than twice the cost of the @zcardepot.com unit I just received which plugged right in and is working flawlessly. I spoke to James at MSA who's always very helpful and he said he would talk to their manufacturer about the problem but electrical parts cannot be returned, much less after 30 days. He will get back to me on it but I might be looking at a total waste of $200! If they at least repair it I will keep it as a spare or pass it on to a fellow forum member in need. Anyways...I designed a "wrench" out of 2" PVC pipe that enabled me to very easily re-install the lock ring over the sender and that makes the job a piece of cake. By using my Dremel, I made 4 slots on the inside edge of a 6" straight piece of PVC so that the 4 crests that jut out of the lock ring would fit into those slots. A 90 degree elbow at the other end of the straight piece of pipe provides easy rotation of the lock ring in either direction. I used my original lock ring since it was in great shape and lightly sanded and coated with anticorrosive bed liner paint the area around the access port. Pics attached. Thanks again everyone for all the good references regarding the @zcardepot.com sender.


-
Thanks for the opinions, guys. It's much appreciated. I just put my order in with Zcardepot. [emoji106] Sent from my SM-N950U using Tapatalk