Matthew Abate
Free Member
-
Joined
-
Last visited
Everything posted by Matthew Abate
-
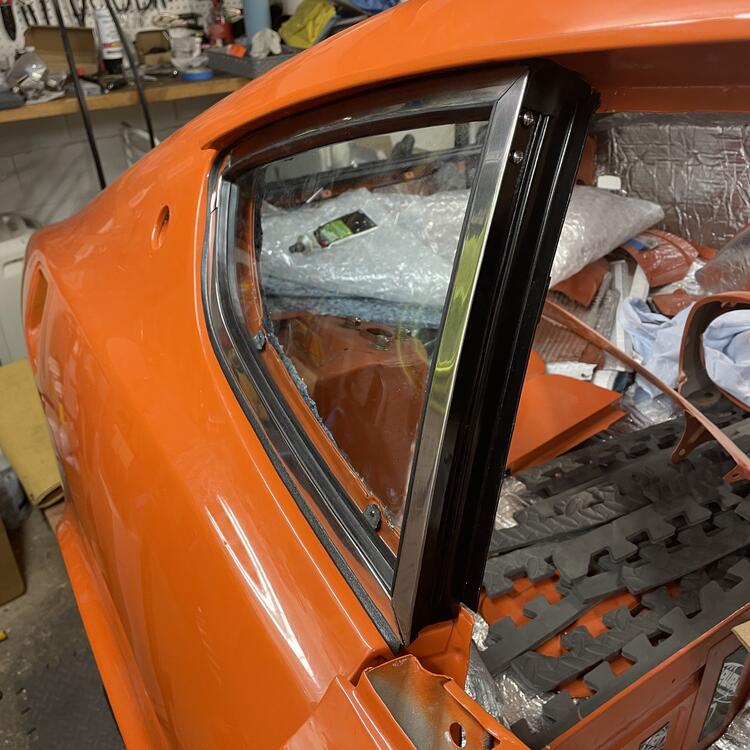
 I’ve been trying to figure out an elegant solution to connecting the coolant bypass tube to the thermostat water connector, and while I have some ideas, I thought I would ask to see how other people have done this. Right now I’m thinking I might be able to find a molded coolant line that has the right question mark shape for the front to connect to the thermostat, but then has a long straight segment that can go straight into the bypass tube in the back. Ideally it would be some Nissan OEM thing so it has the braided look that the other hoses on my engine have. I’ve also considered using fittings and braided tubing, but I’m not super into that idea. Another option is to run a long piece of stainless tubing between the factory hoses that are already there. That would function similarly to the tube that connects the two haves of the OEM manifold for the SUs, but I’m concerned about the heat from the headers boiling the coolant if I did that. Other considerations on my mind are… …hanging it from the carb heat shield to keep the hose from sagging and touching the headers …the material of the hose being melted by the headers, even if it stays up flush to the carbs …reducing the number of connections to the fewest possible (two) to prevent leaks or ruptures …OEM style looks Anyway, I would love to see how others have closed the look on the coolant system when they removed the SU manifold.
 -
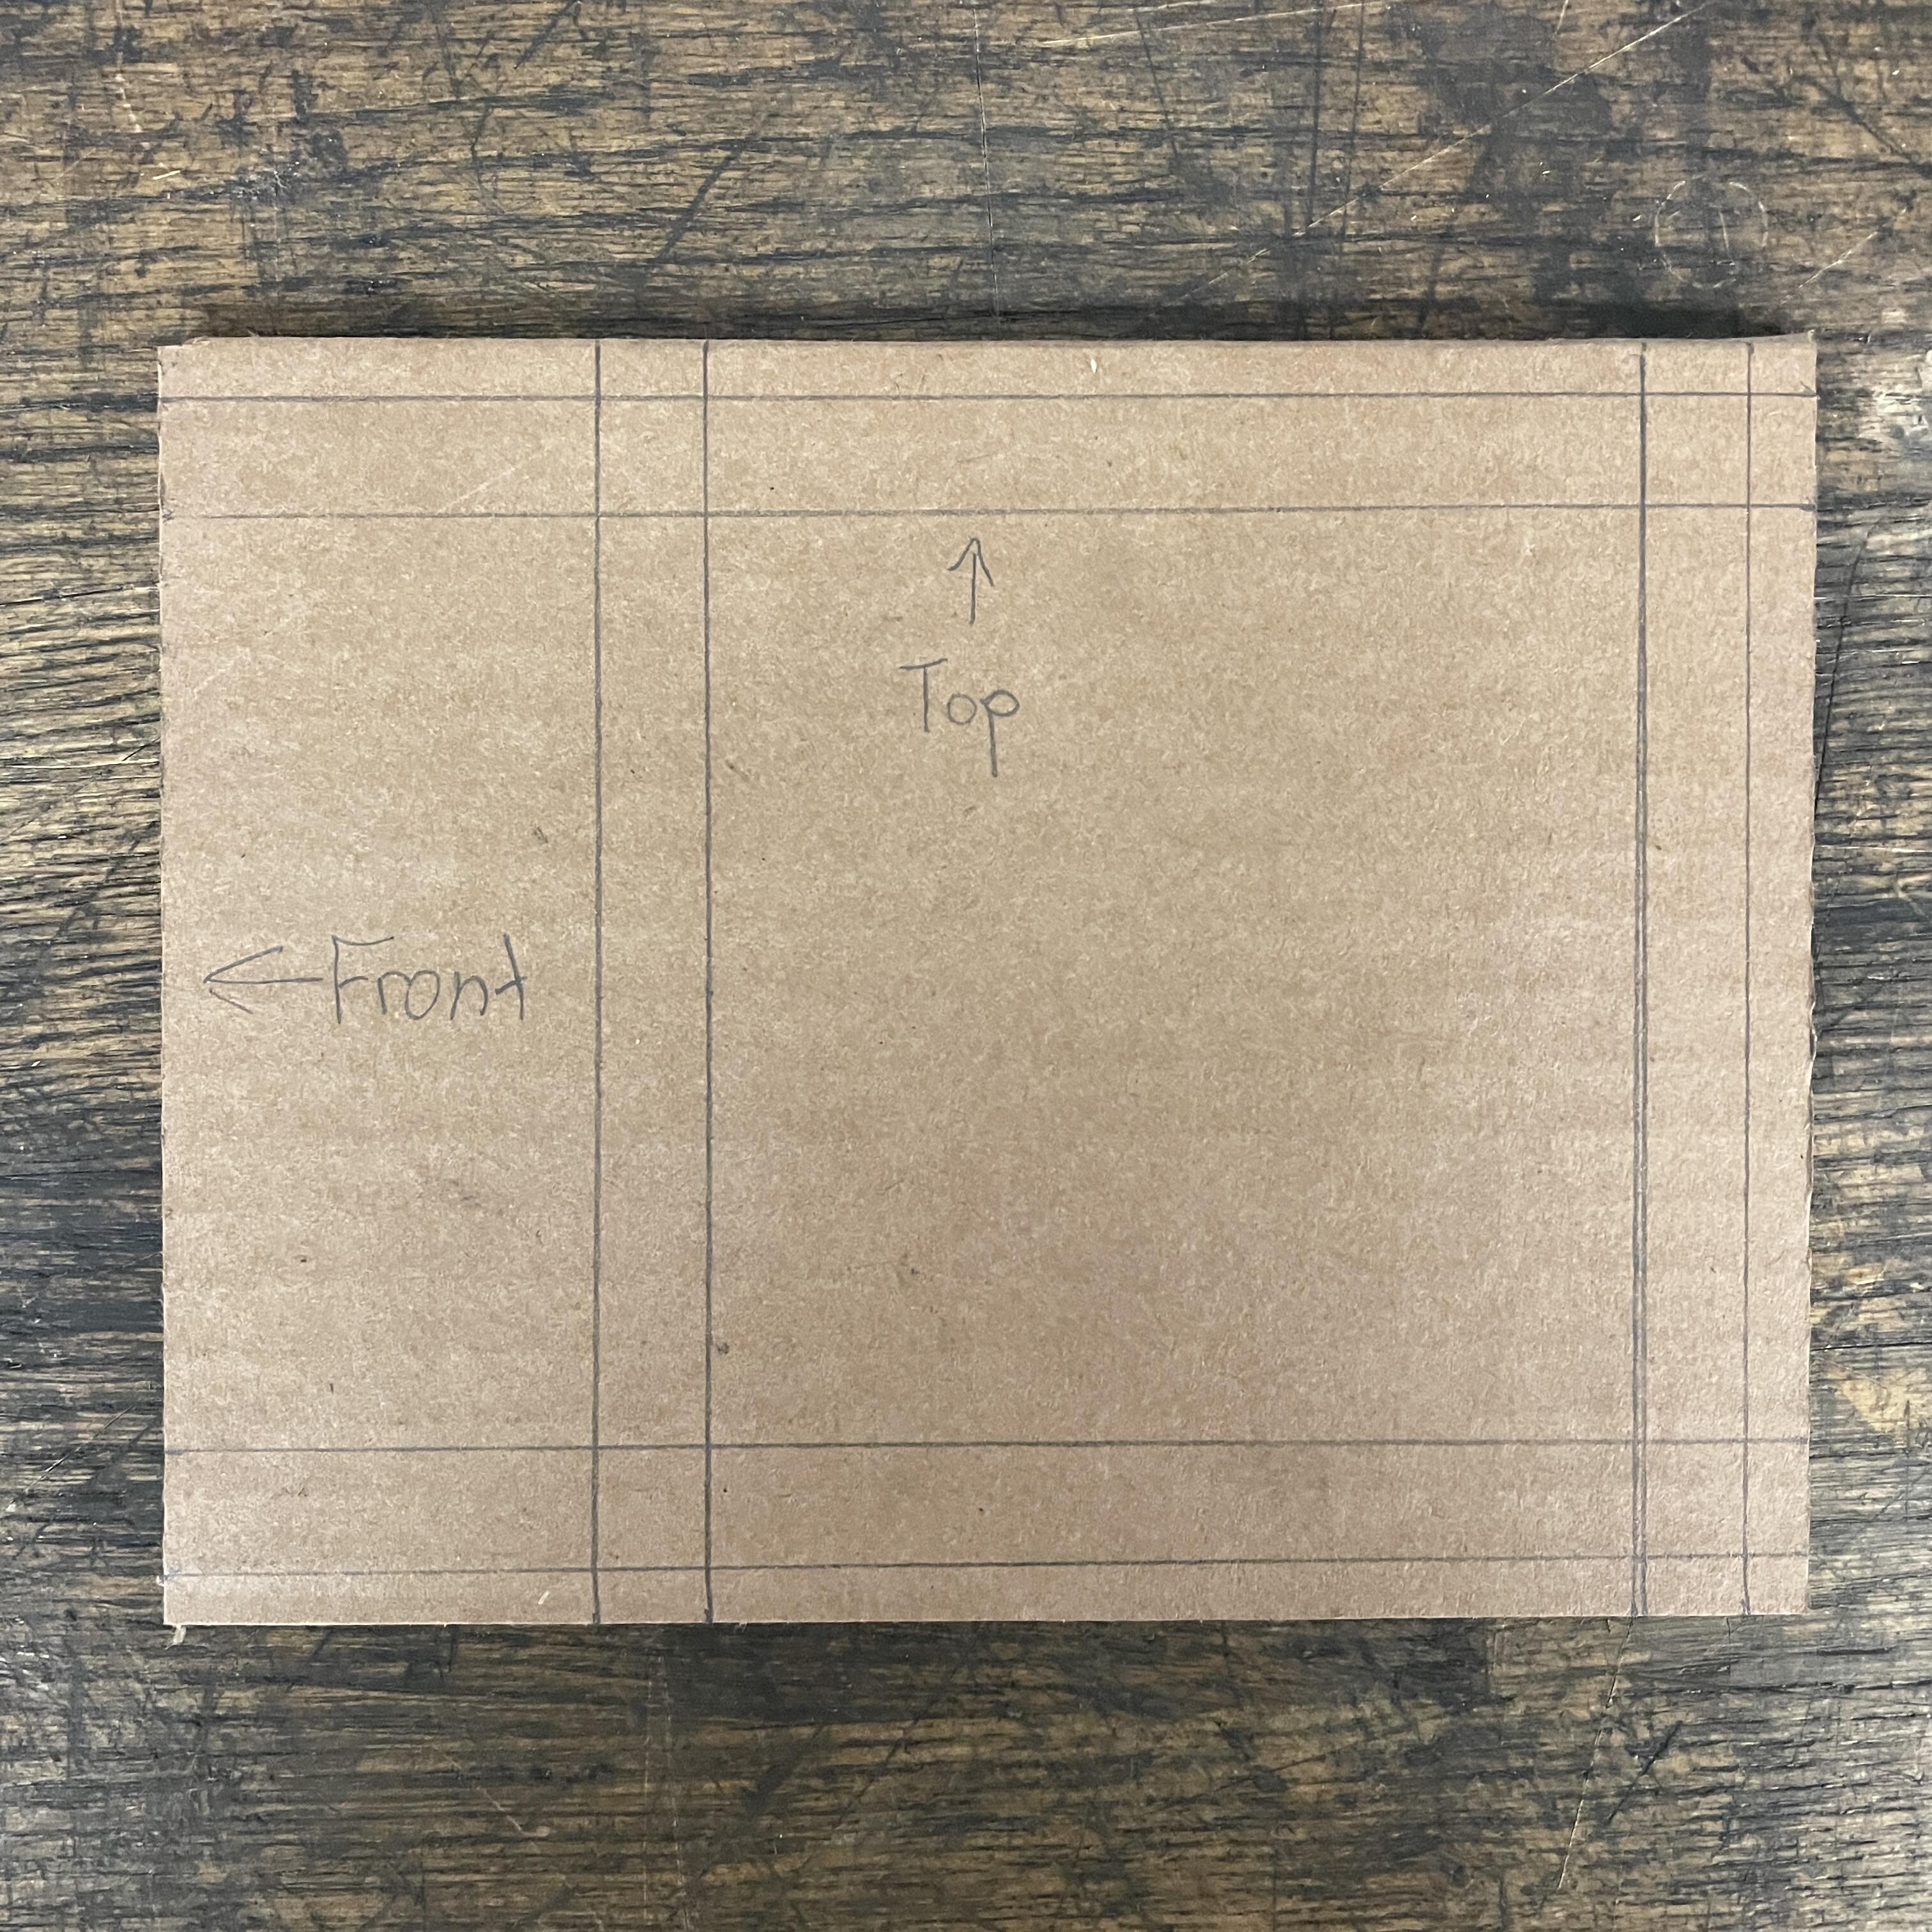
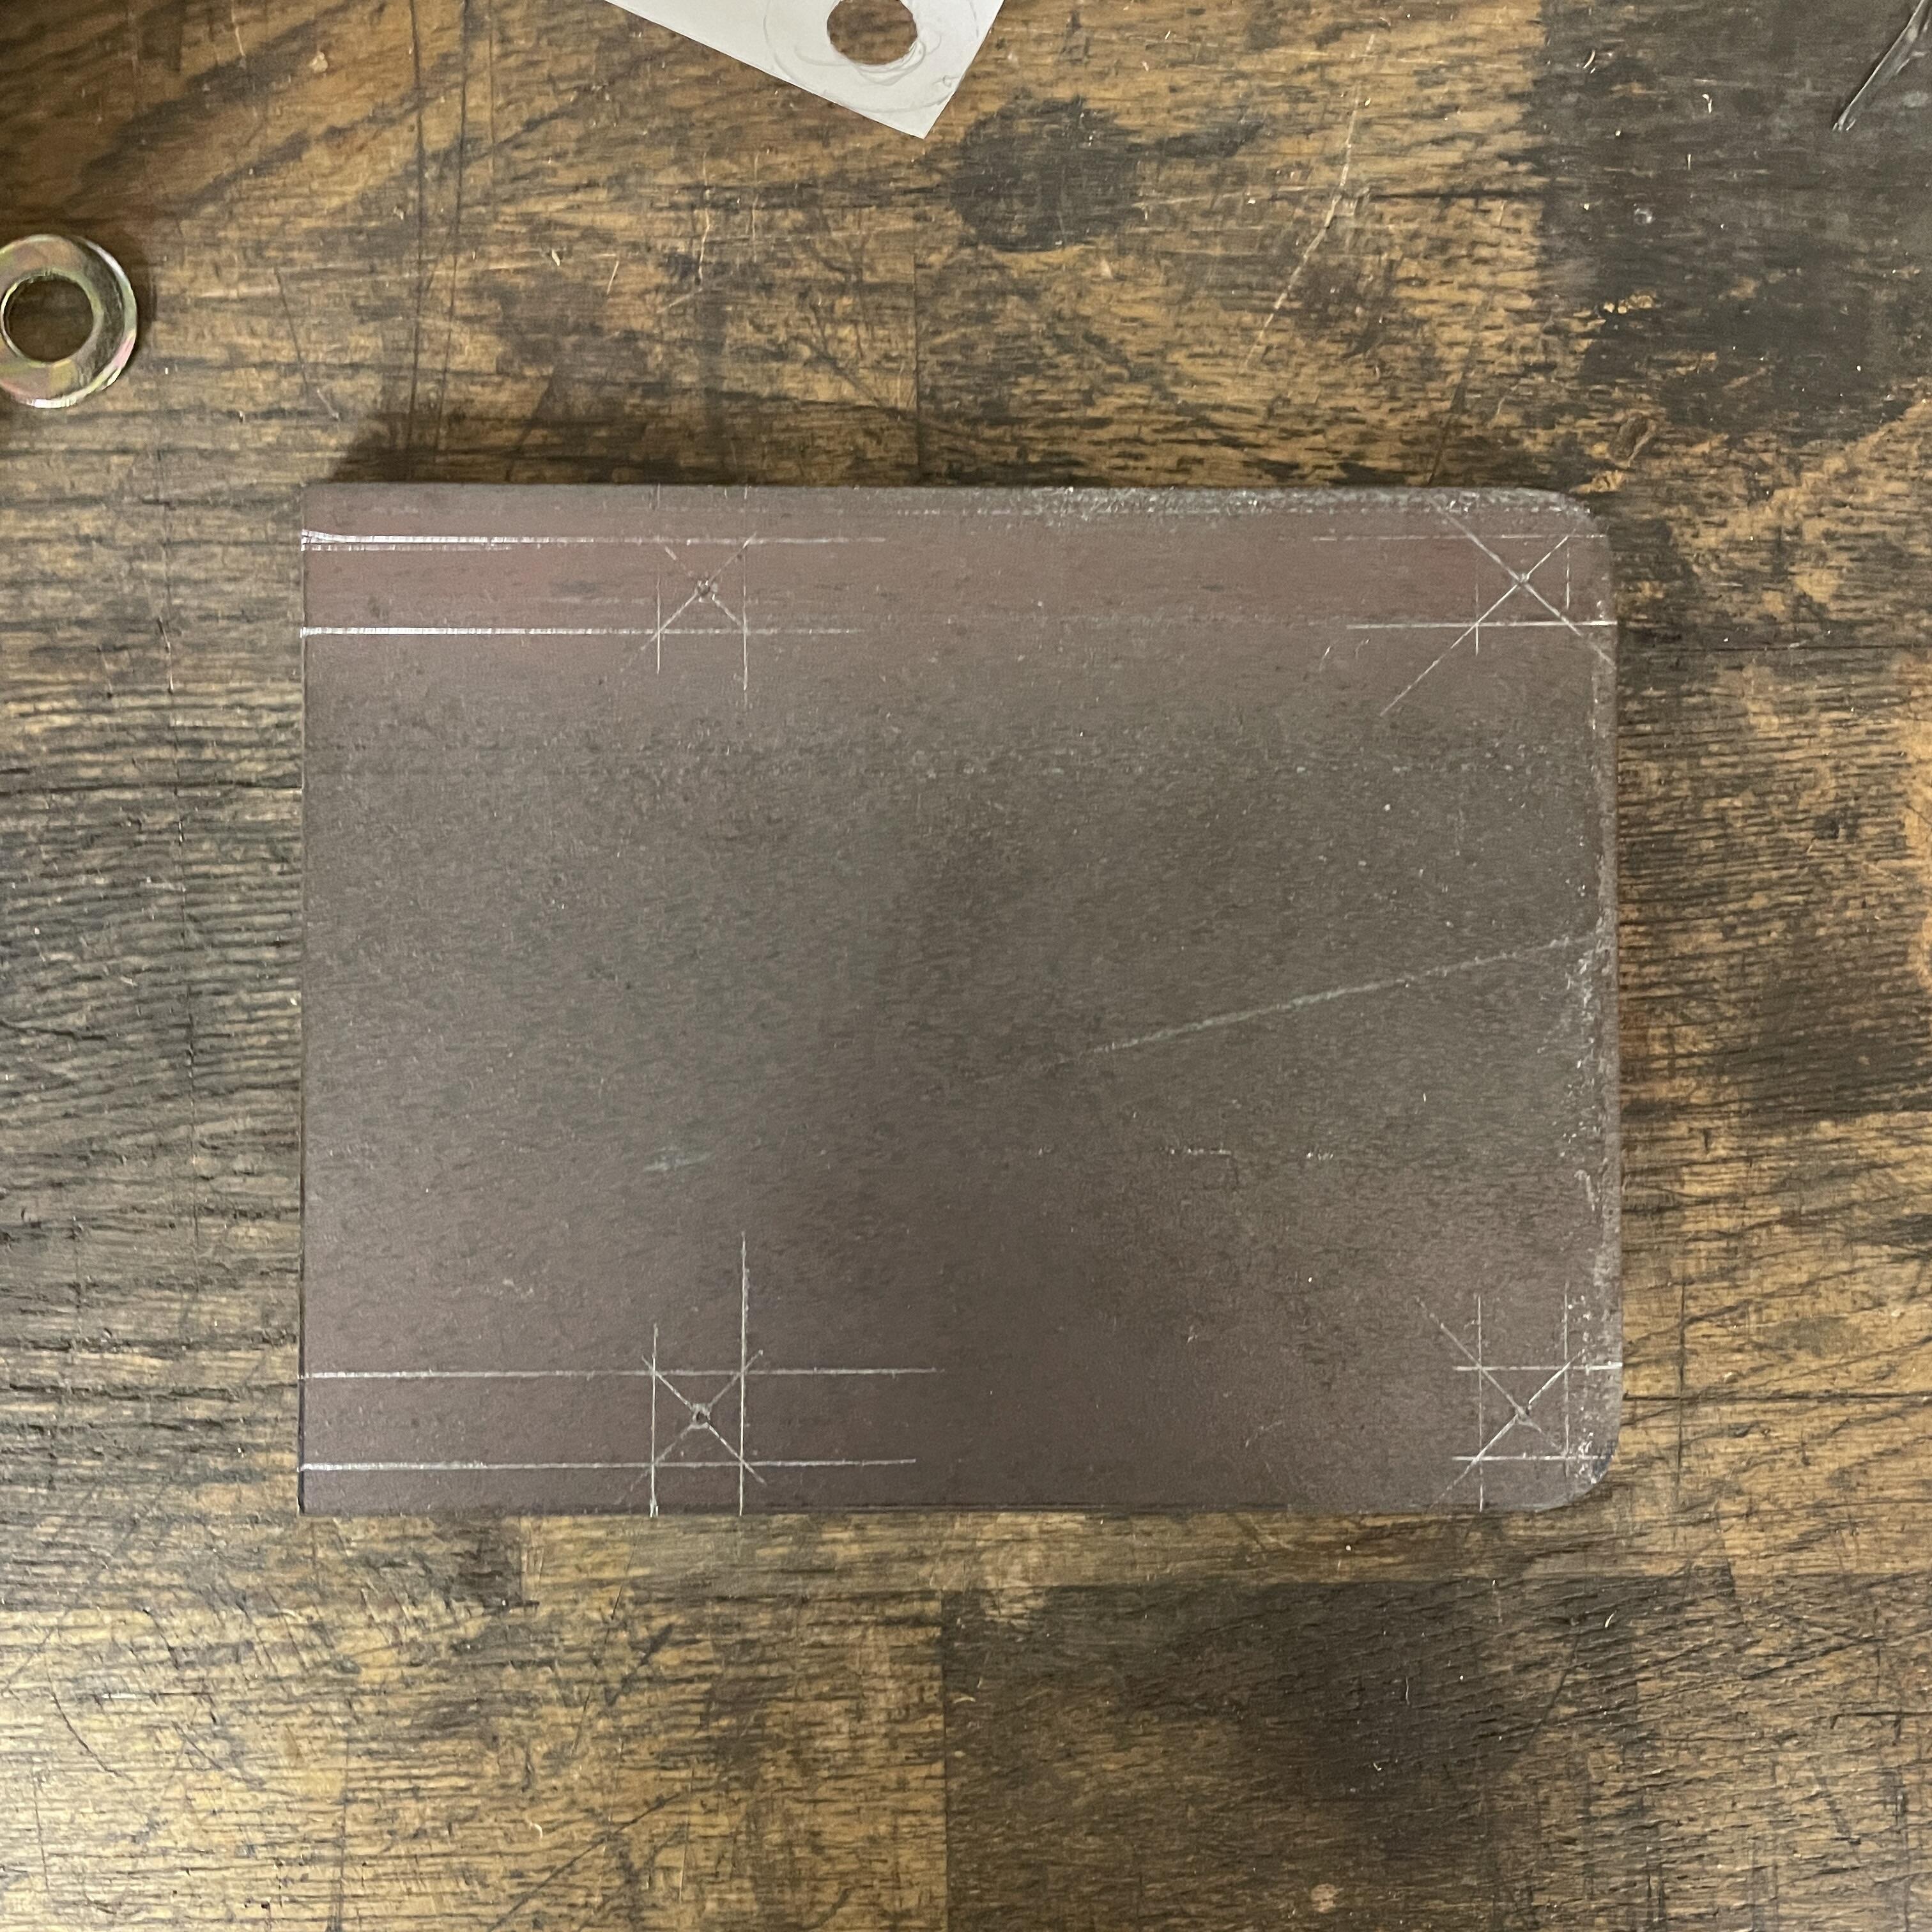
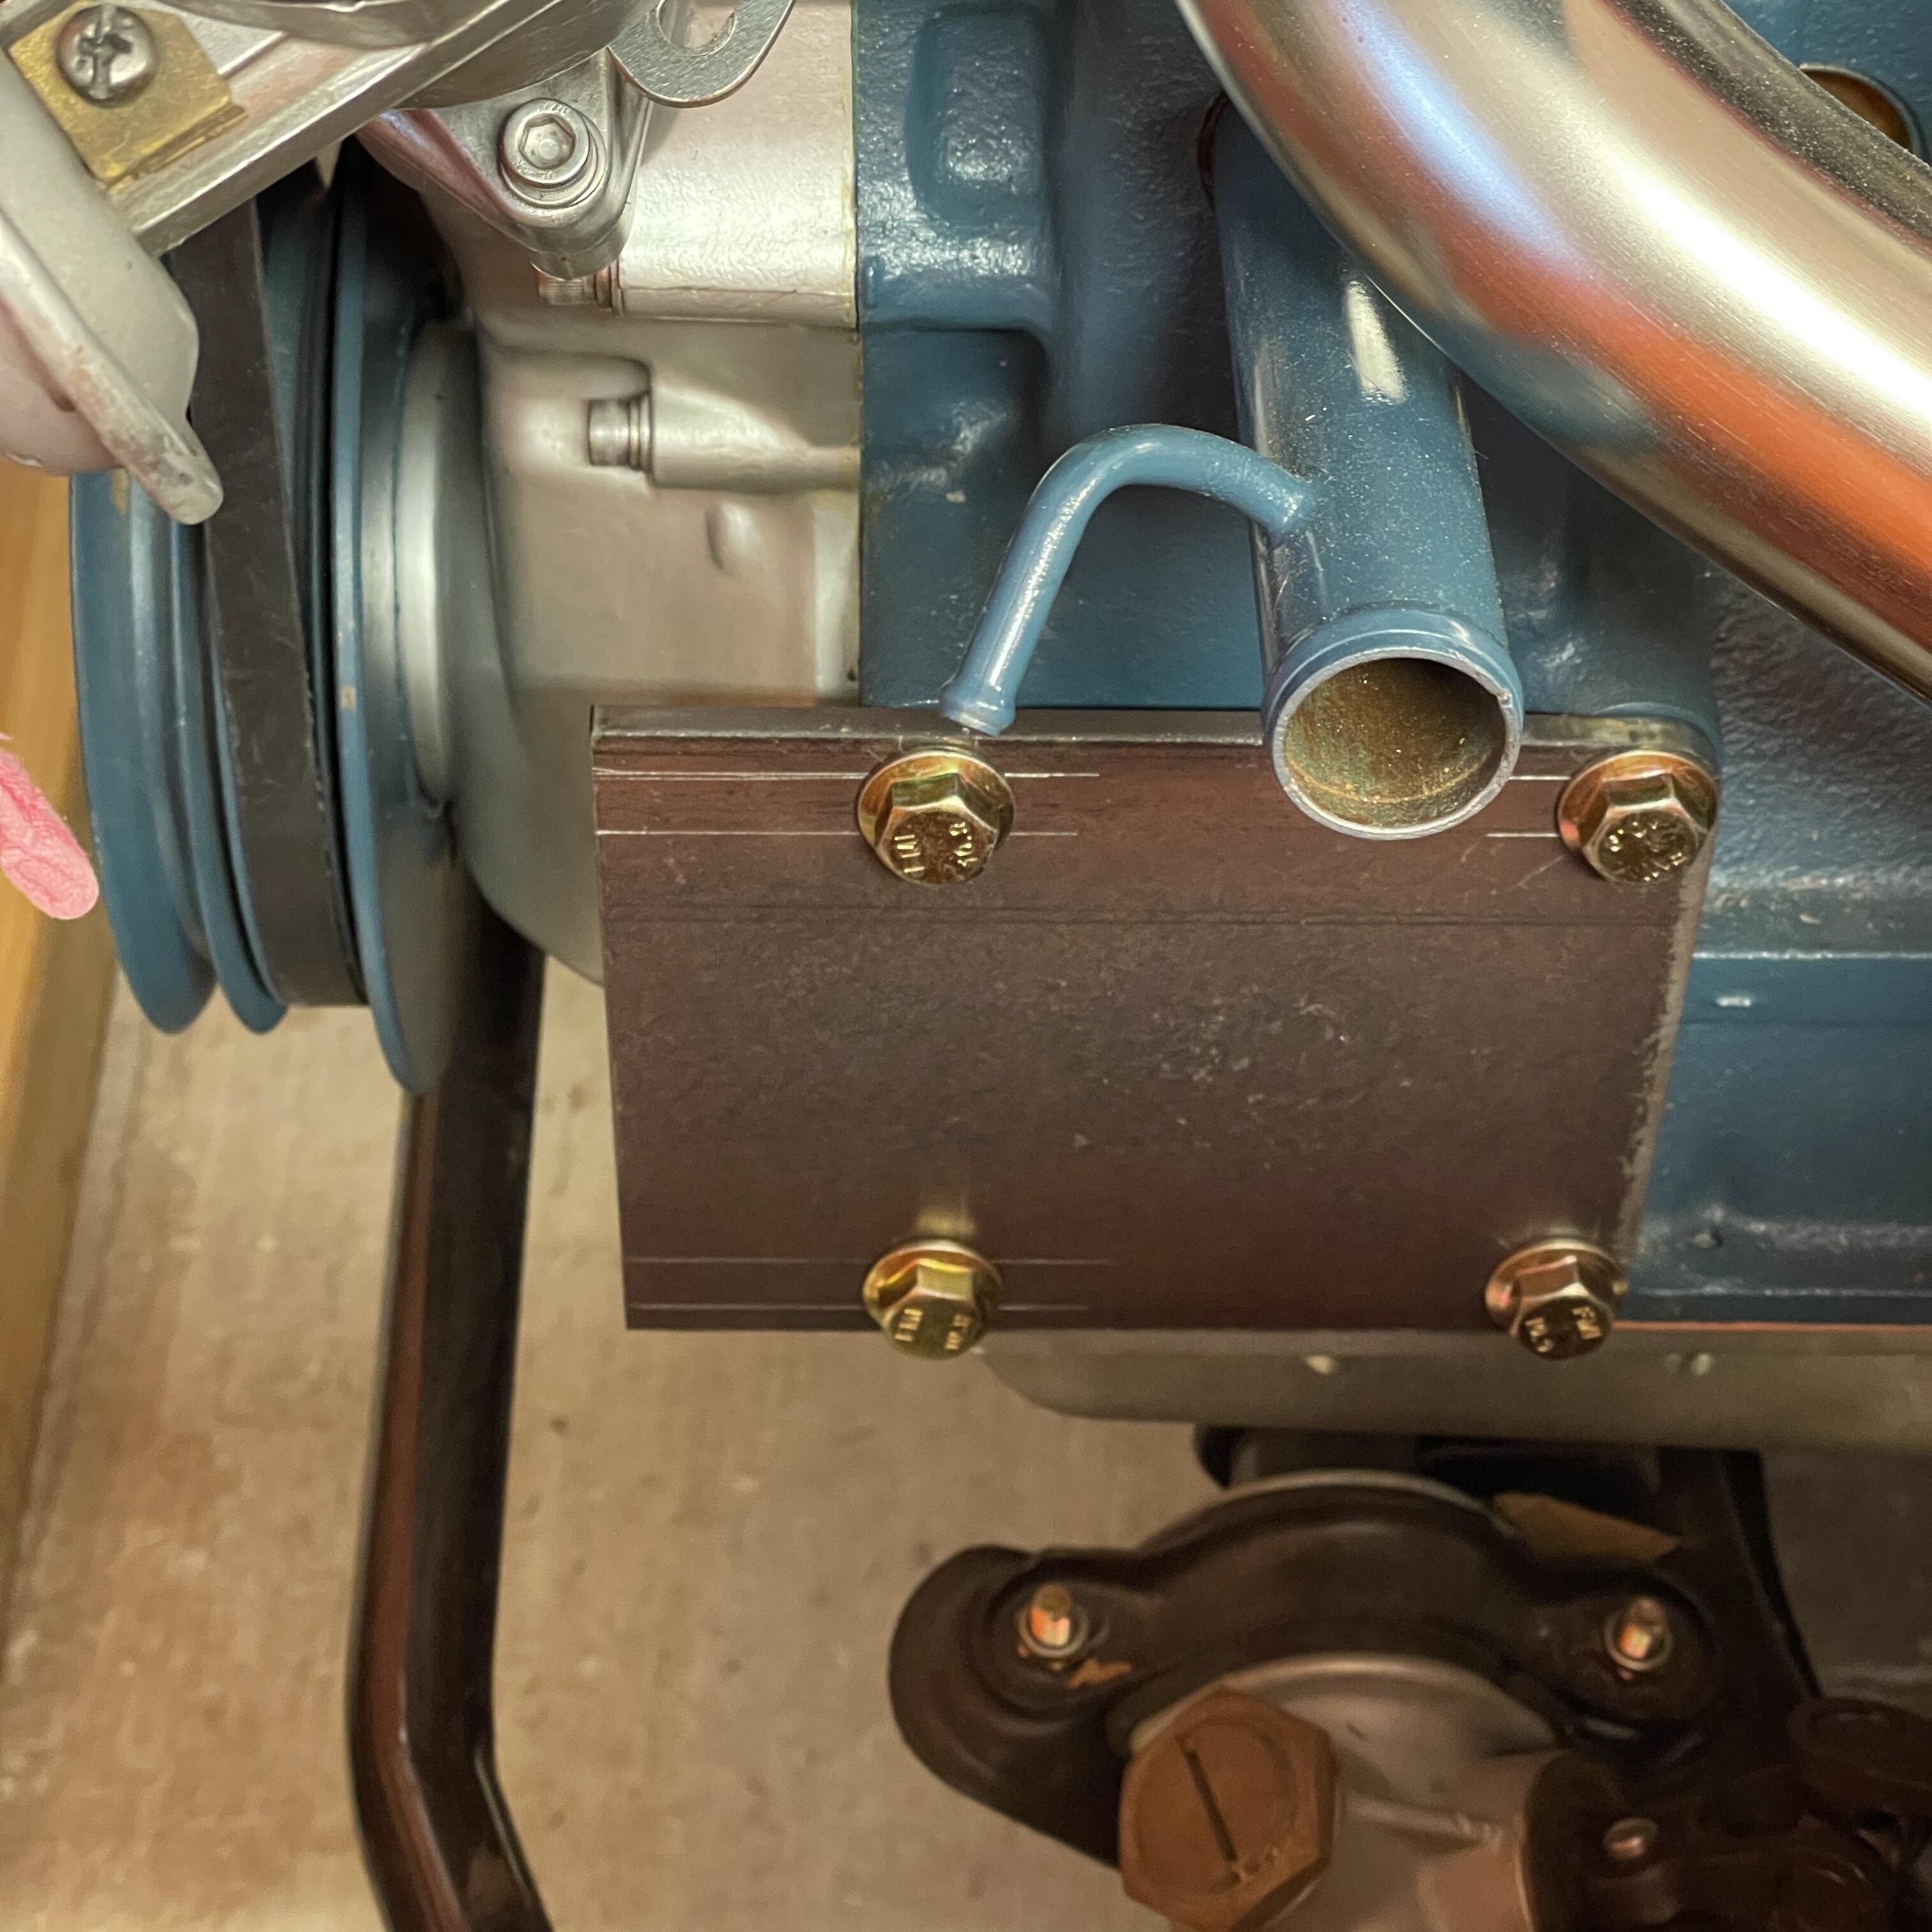
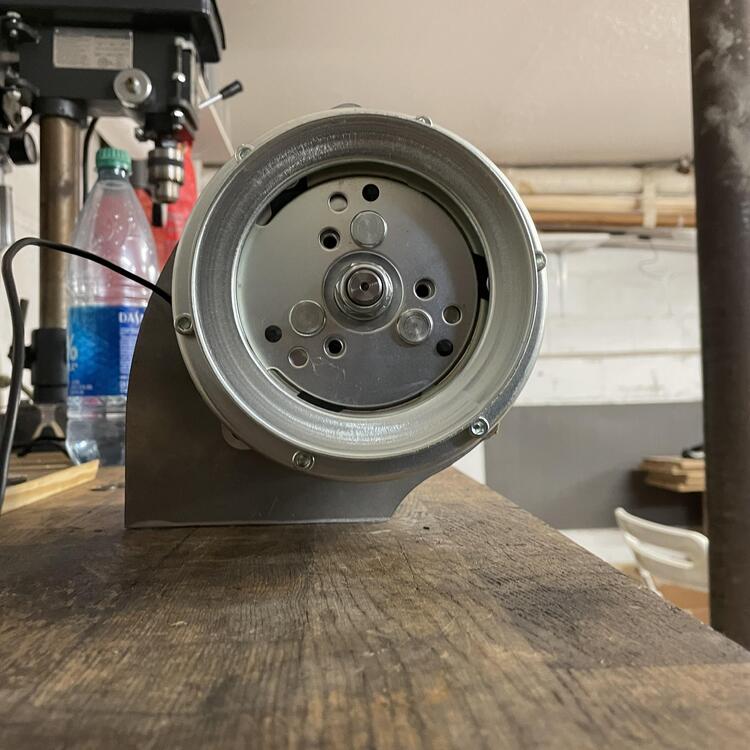
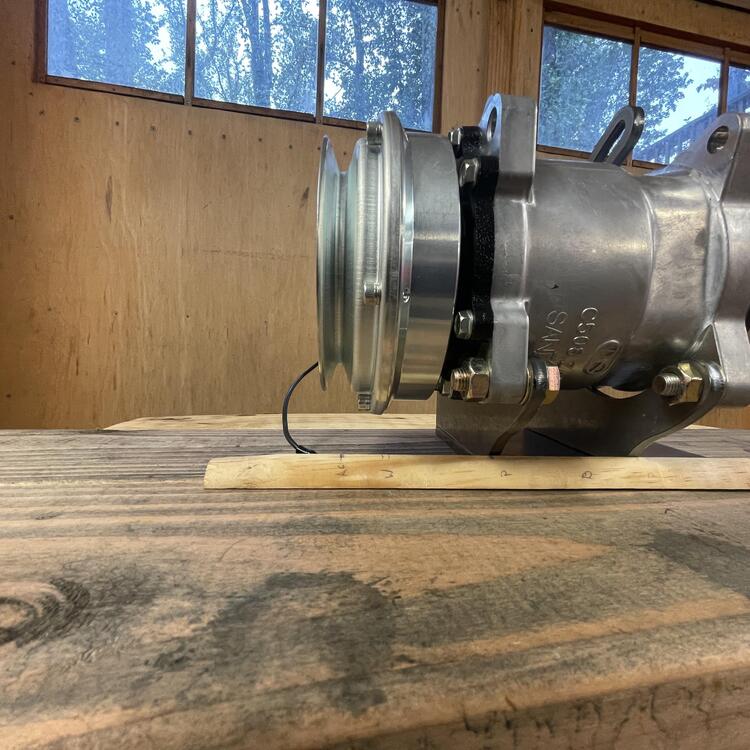
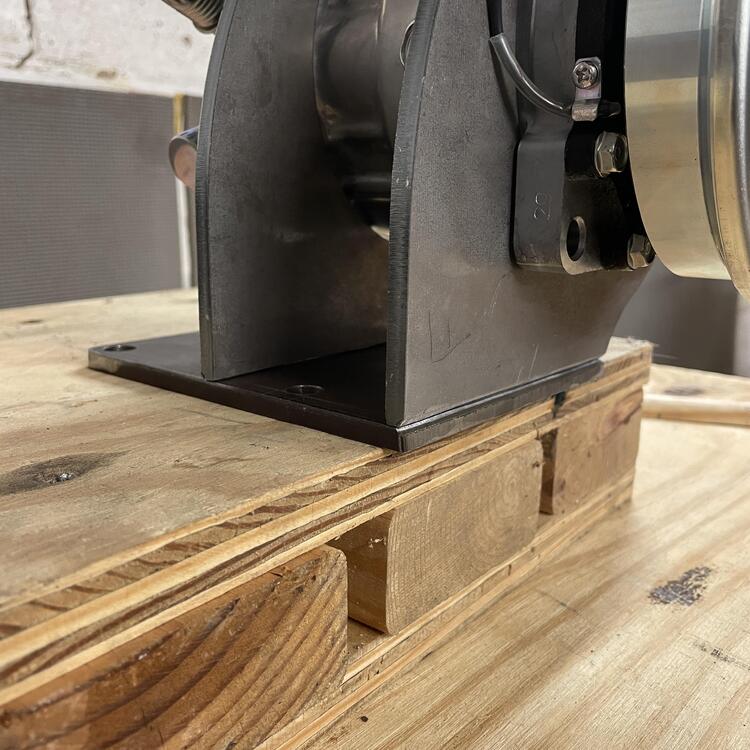
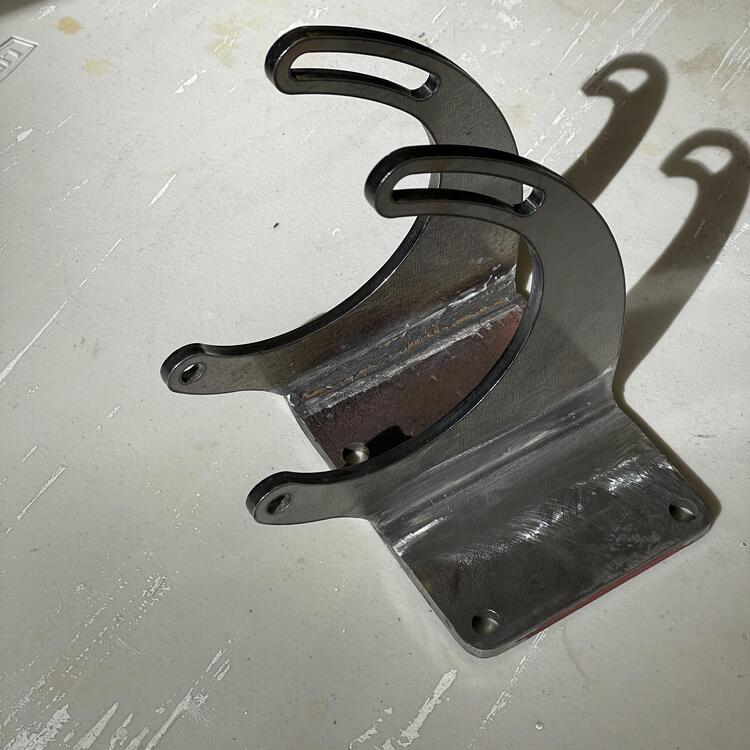
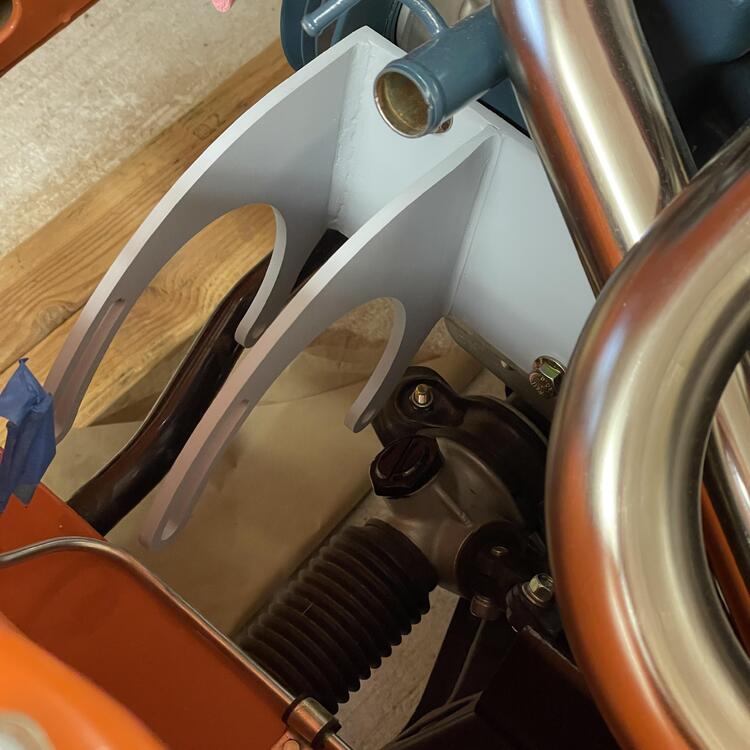
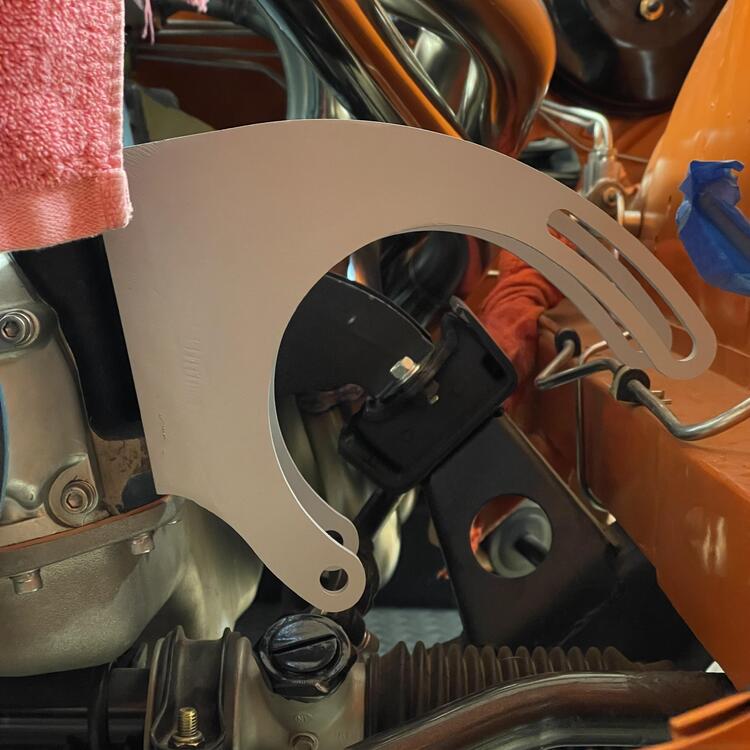
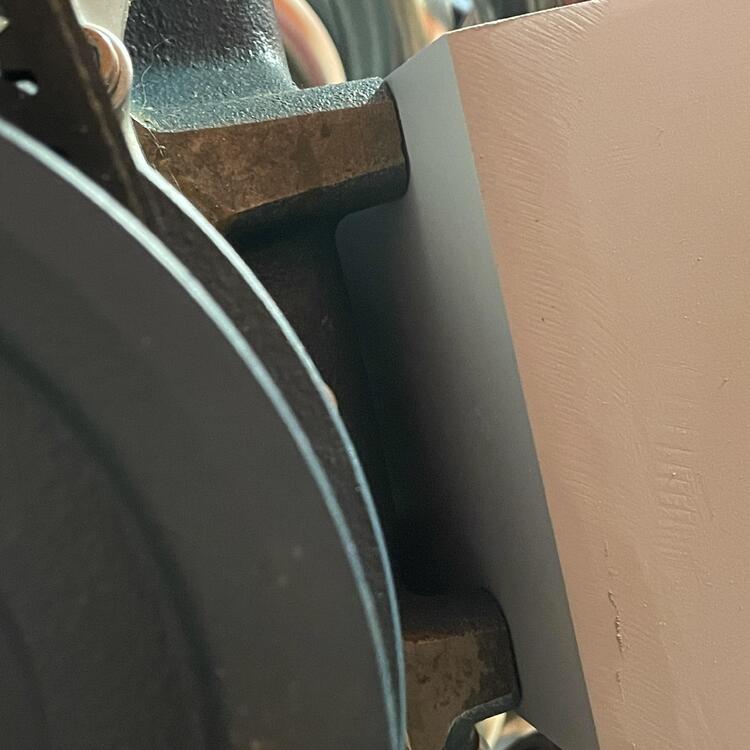
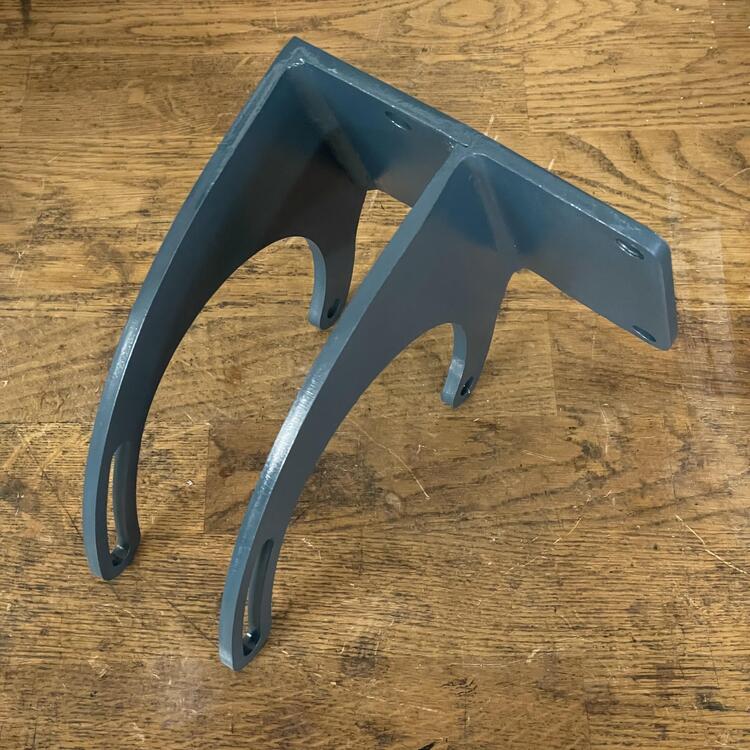
More progress… I fabbed up a bracket for my Sanden compressor because modifying the ZX bracket was turning out to be just too much. I used the Vintage Air universal bracket parts ($50 @ Summit) and a sheet of 1/4” steel from the hardware store, which I cut, drilled, and welded to the brackets. It came out okay. If I were going to do it over again (which I’m not) I would angle the bracket up more to 1. make more clearance for the compressor to slide in under the bracket, 2. move the compressor away from the frame when at the furthest point of adjustment, and 3. change the adjustment angle to be more perpendicular to the block, making the adjustment span more pronounce/longer. Otherwise I’m happy with it.


-
I’m good. I had ordered a harness boot from zcardepot that was labeled 1970-73, but I should have meassured the hole first. JDM Car Parts and MSA have the 280 boot, so I have one in the mail. Once I get that I can put this thing in, then on to fitting the body harness.
-
Yes. Good if you have parts to sell, bad if you want them. I slightly blame MZR and other customizers. There are only so many of the NLA parts that aren’t being reproduced, and I will bet they hoarded stocked up on them.
-
I blacked out the radiator bulkhead and grill tabs (thanks @Patcon for the thread showing how that’s done). Now I just need a 280z harness boot and I can put the engine harness in.


-
I’ll probably get the MSA one. This one is way too much. It’s also pretty different from the factory one. Other than being 3 pieces instead on one, it’s flat on the engine side. I was just curious if anyone had seen this before.
-
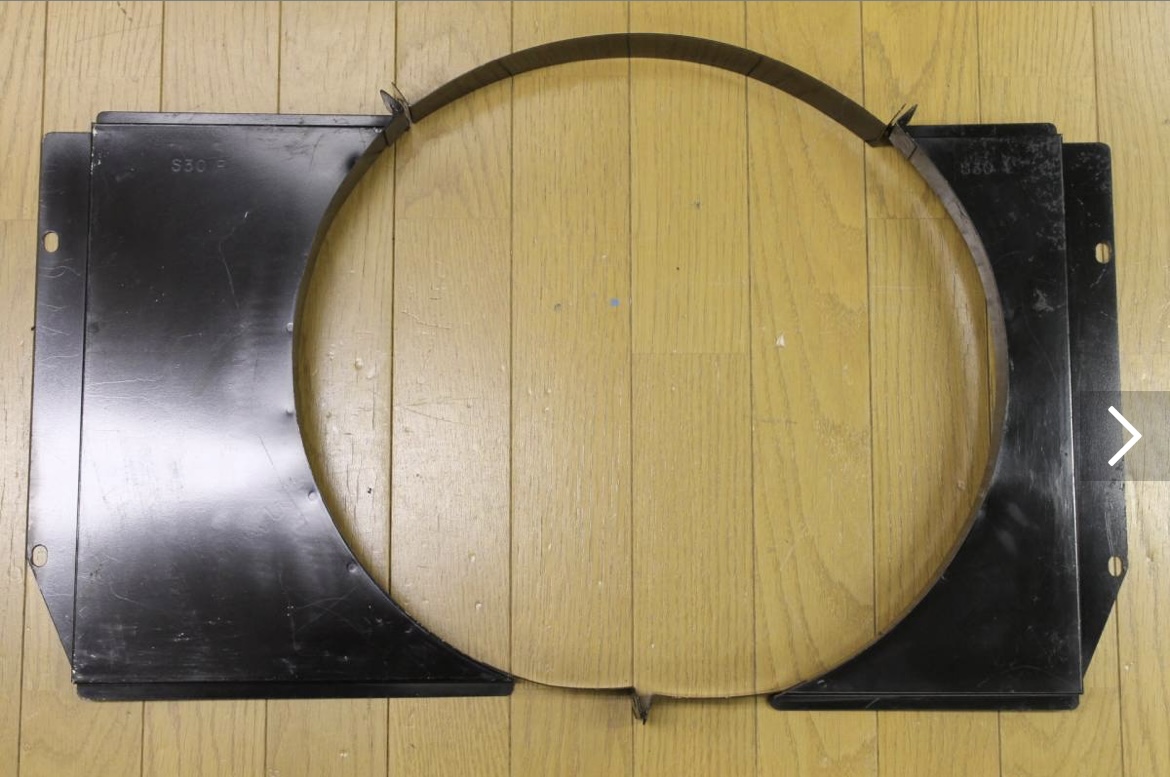
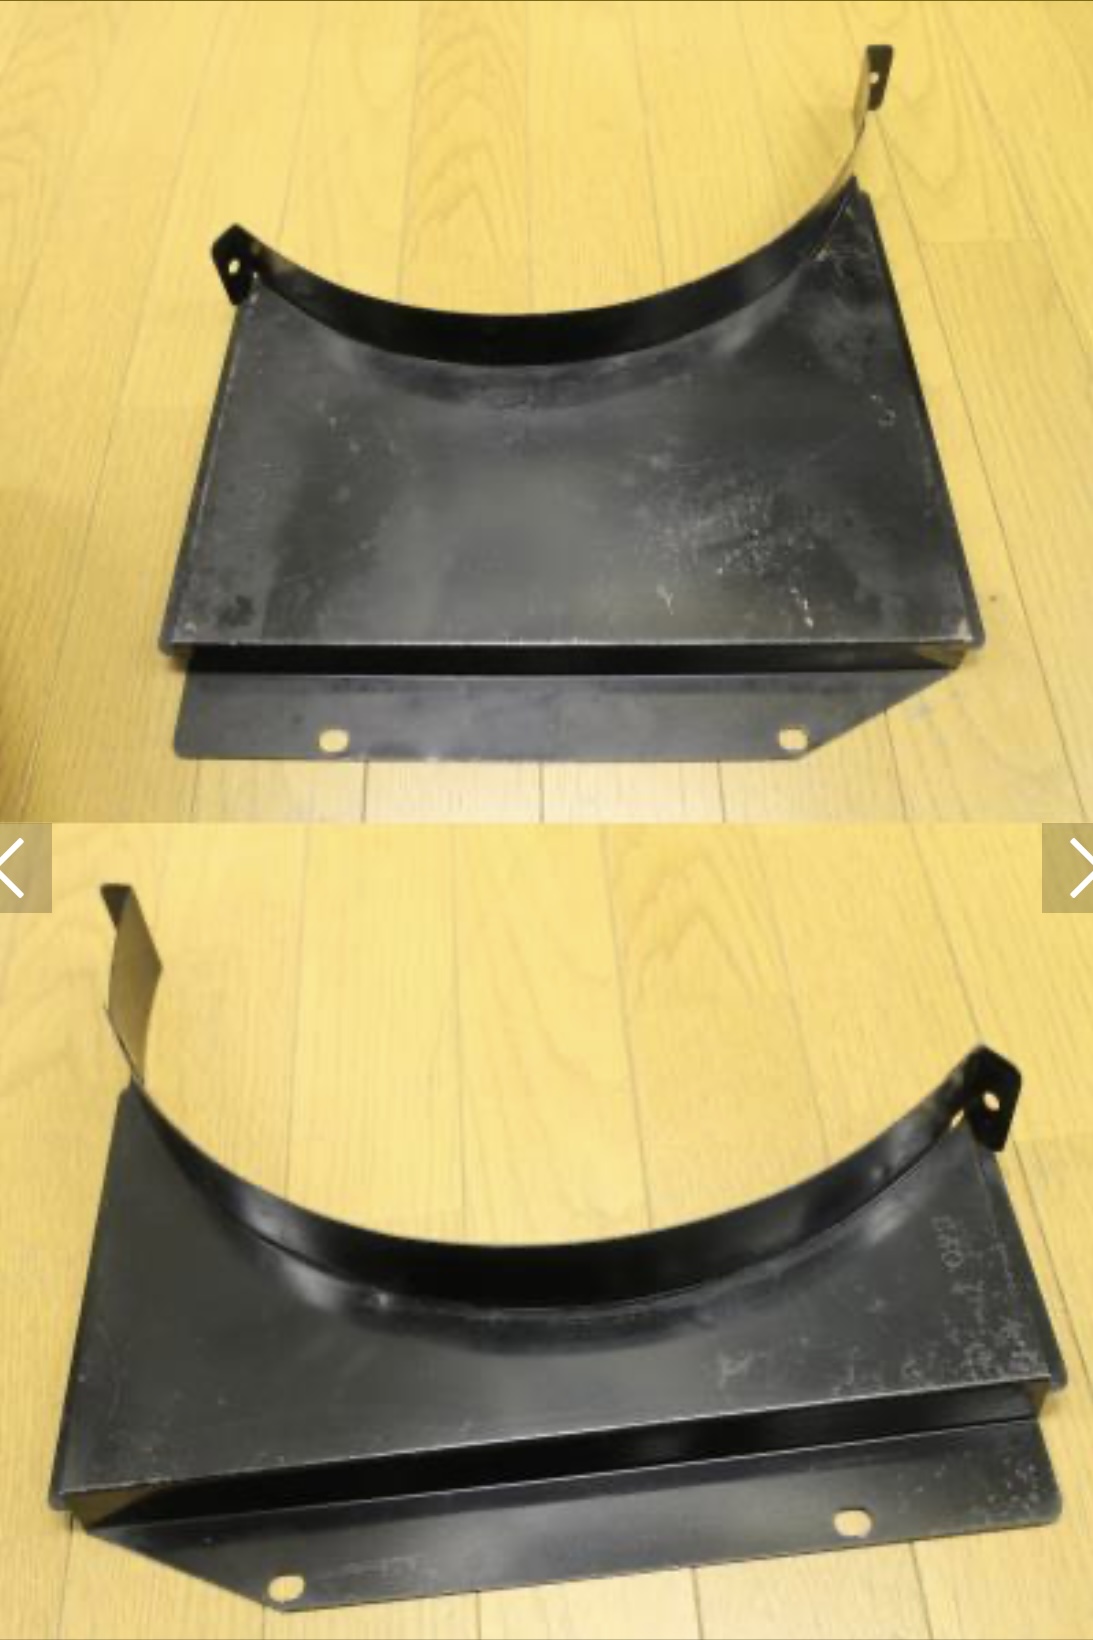
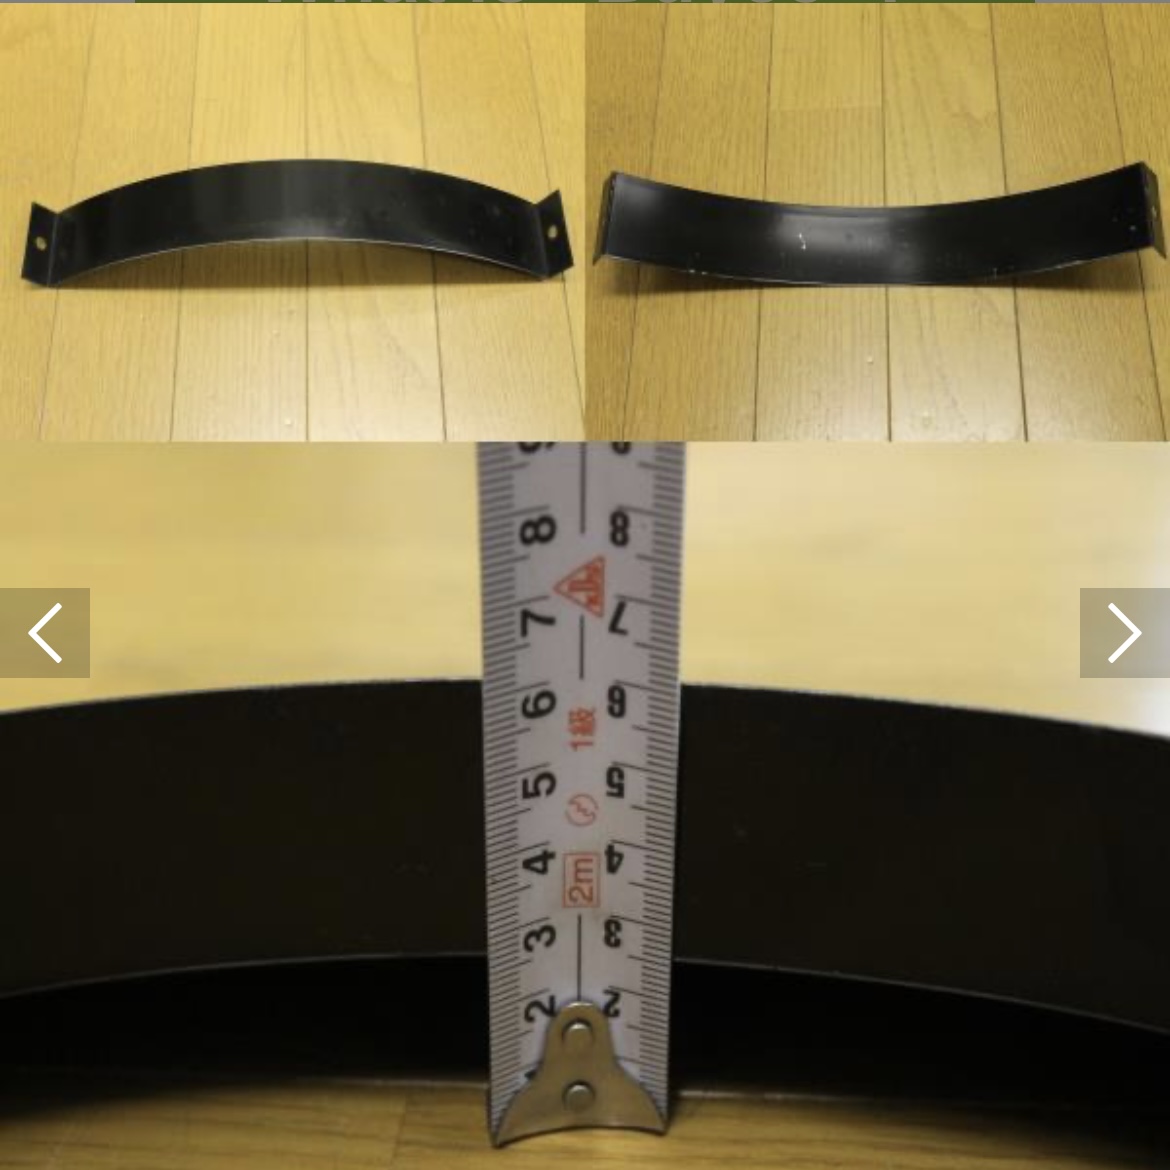
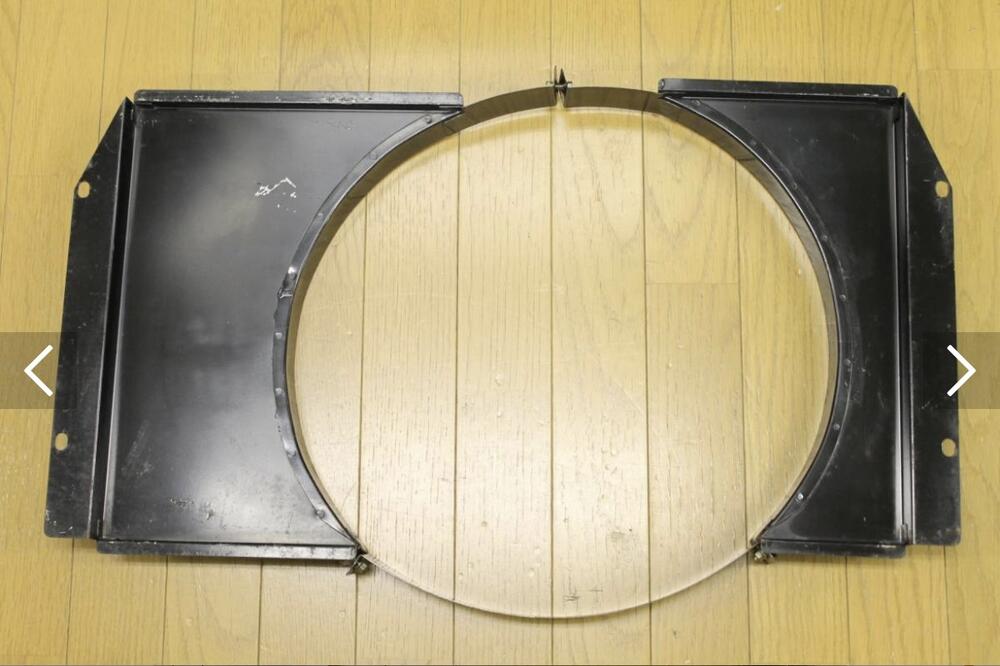
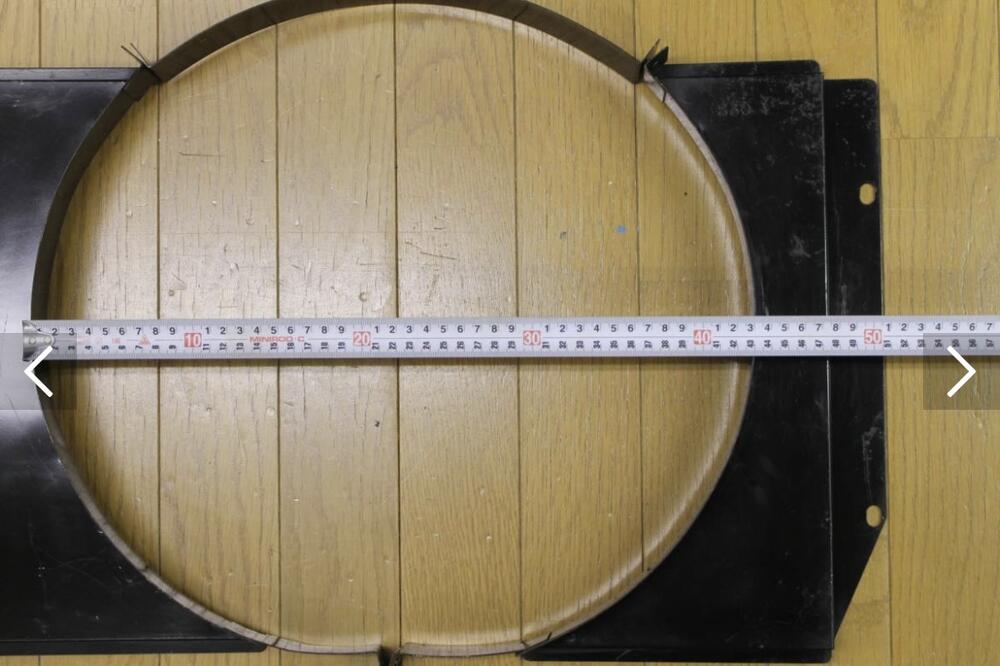
I stumbled upon what is said to be a fan shroud for a 240z (well, S30) made by Sanden. Has anyone ever seen one of these? Any thoughts on whether it is meant for the shorter 240 radiator or the taller 280 radiator?


-
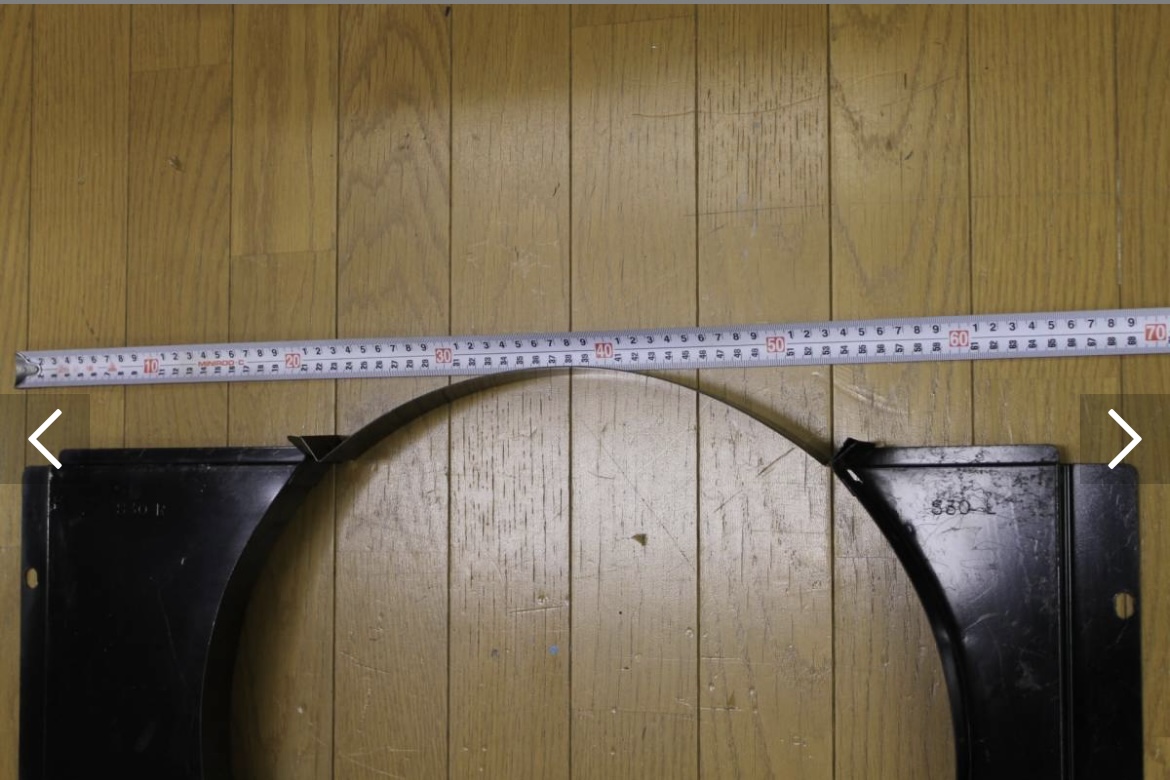
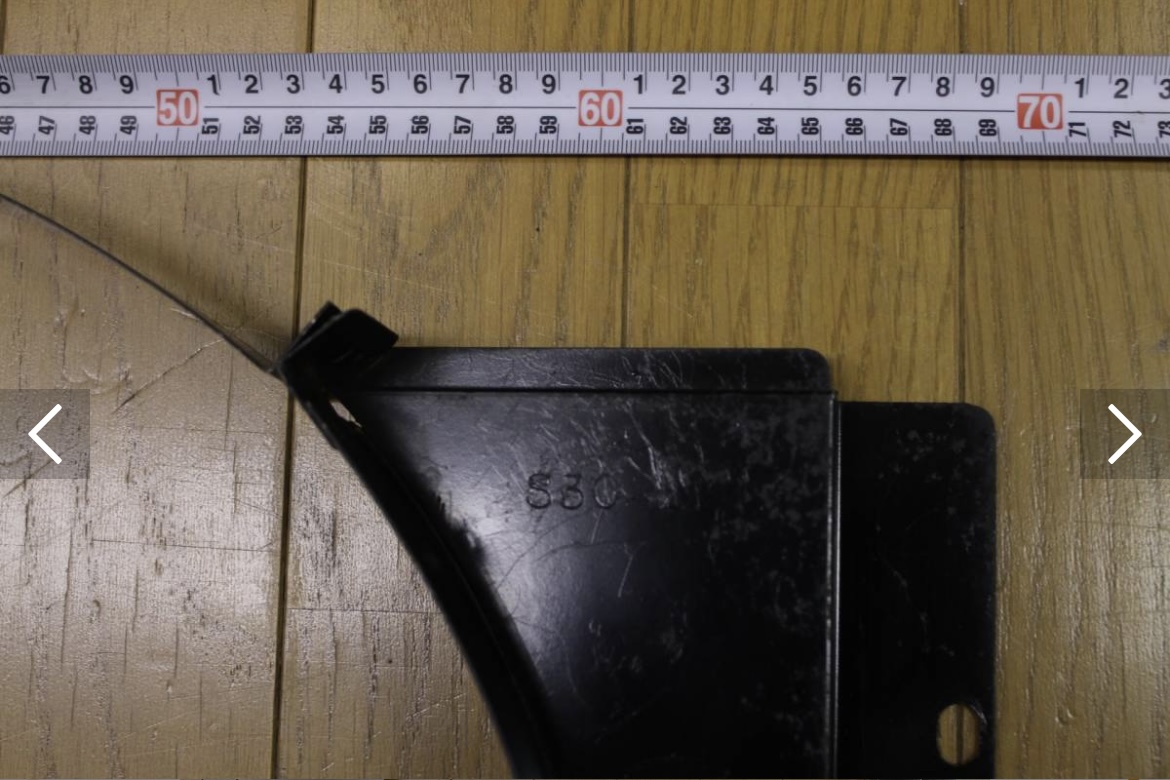
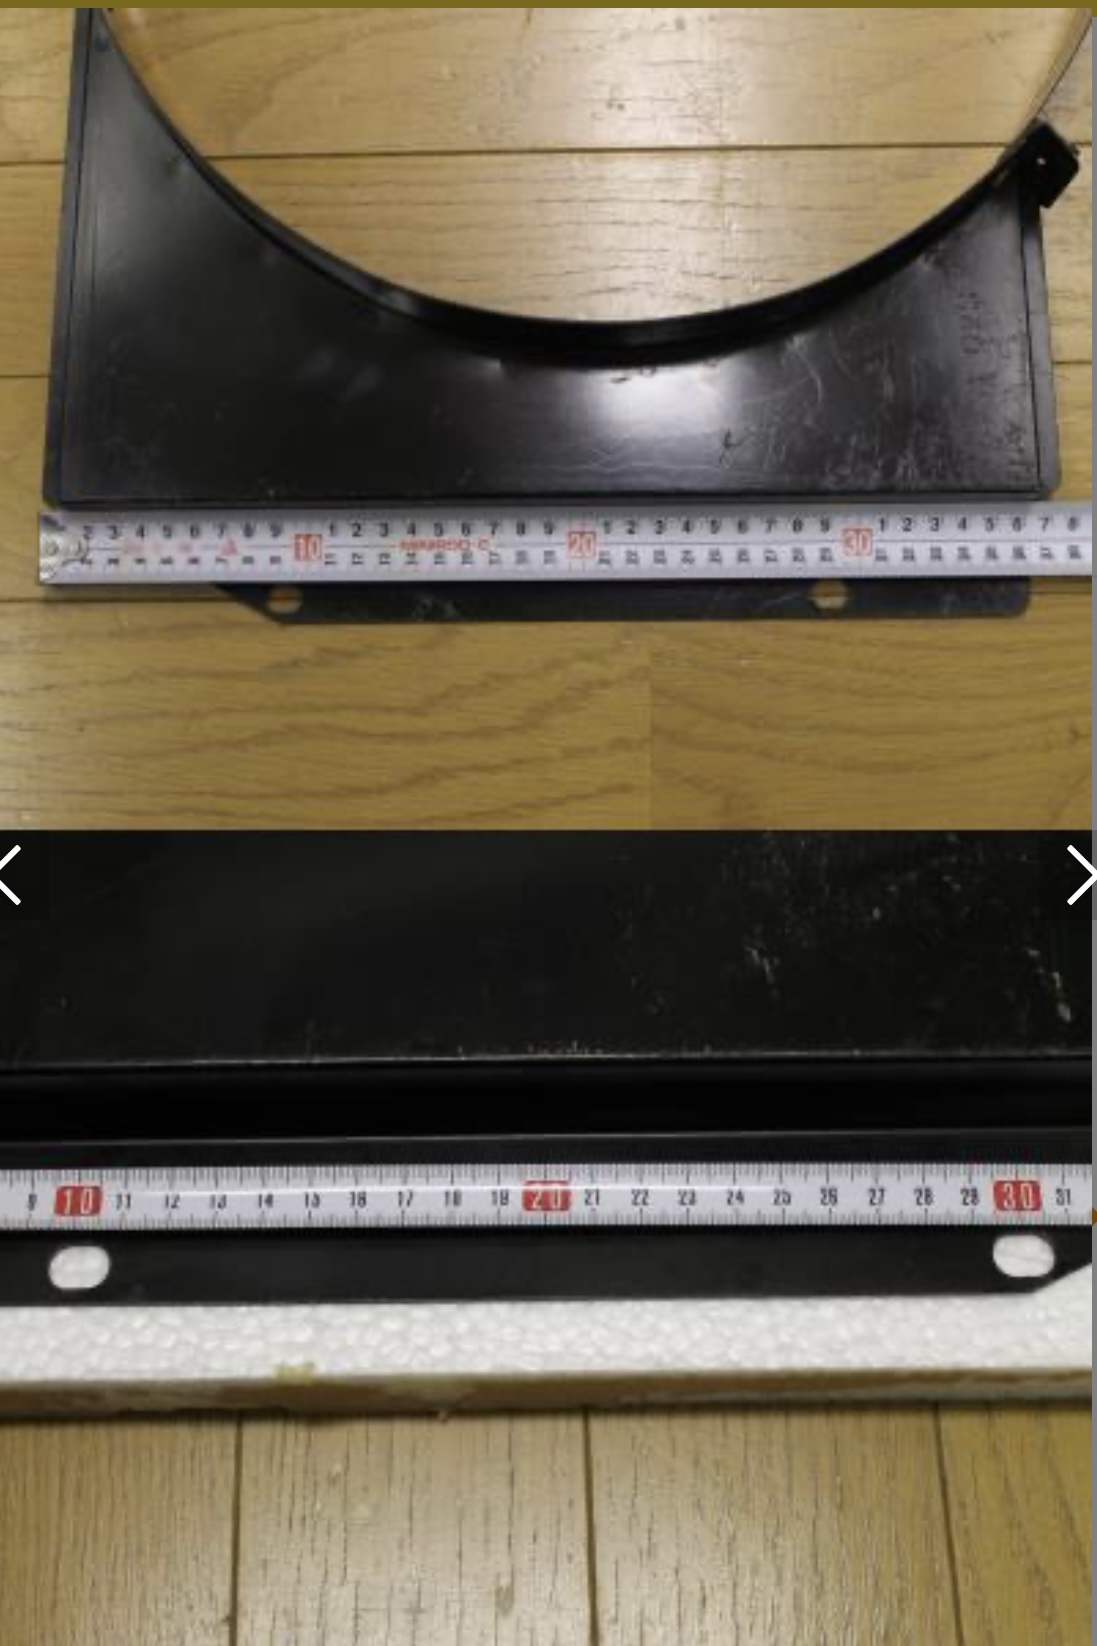
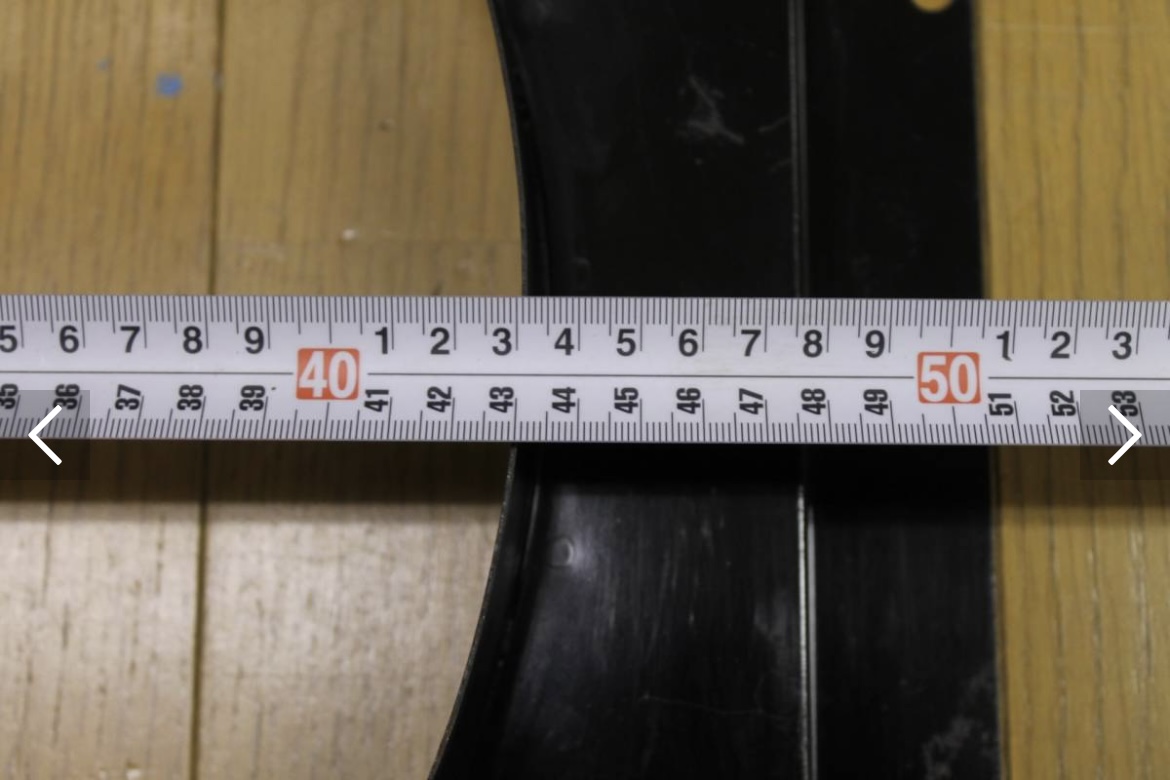
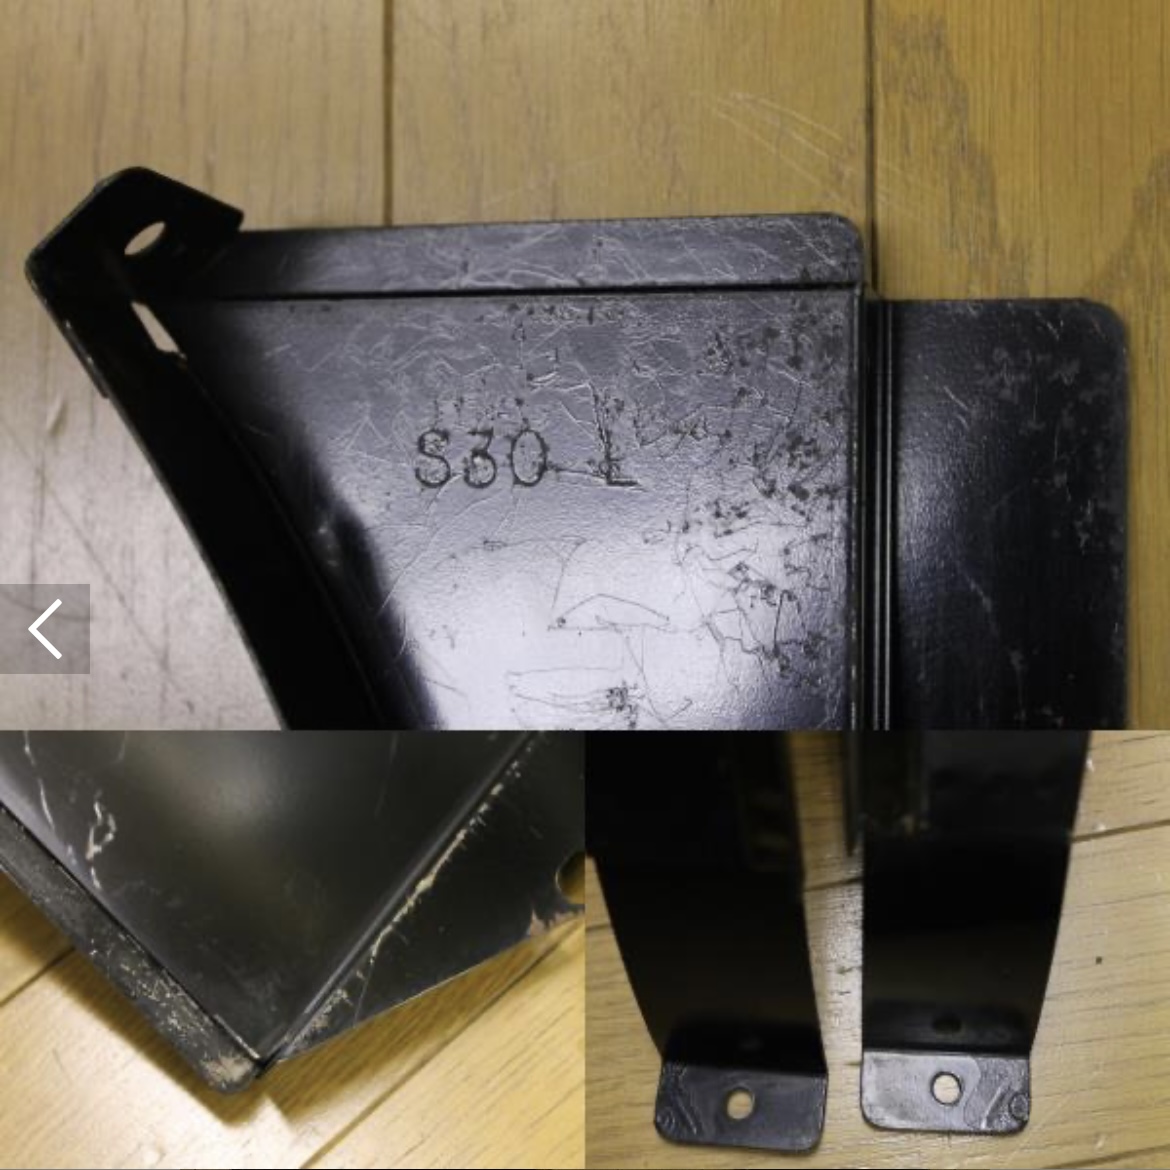
View Advert Steel L6 to FS5W71B Gussets I am in search of the steel gussets that connect the F54 280ZX block to the bell housing on the FS5W71B five-speed transmission. Nissan part numbers are 30429-K1200 and 30430-K1200. The correct gussets will have four holes on the right side piece (see photos). They were also used in some limited L20 applications (i.e. 1980 720s; see illustration). Note that these are NOT the aluminum ones that are used on Z20/22/24 blocks (see photos). I have a source for NOS ones in Japan, so please keep your prices reasonable. Advertiser Matthew Abate Date 09/13/2023 Price Category Parts Wanted Year 1980 Model 280ZX, 720
-
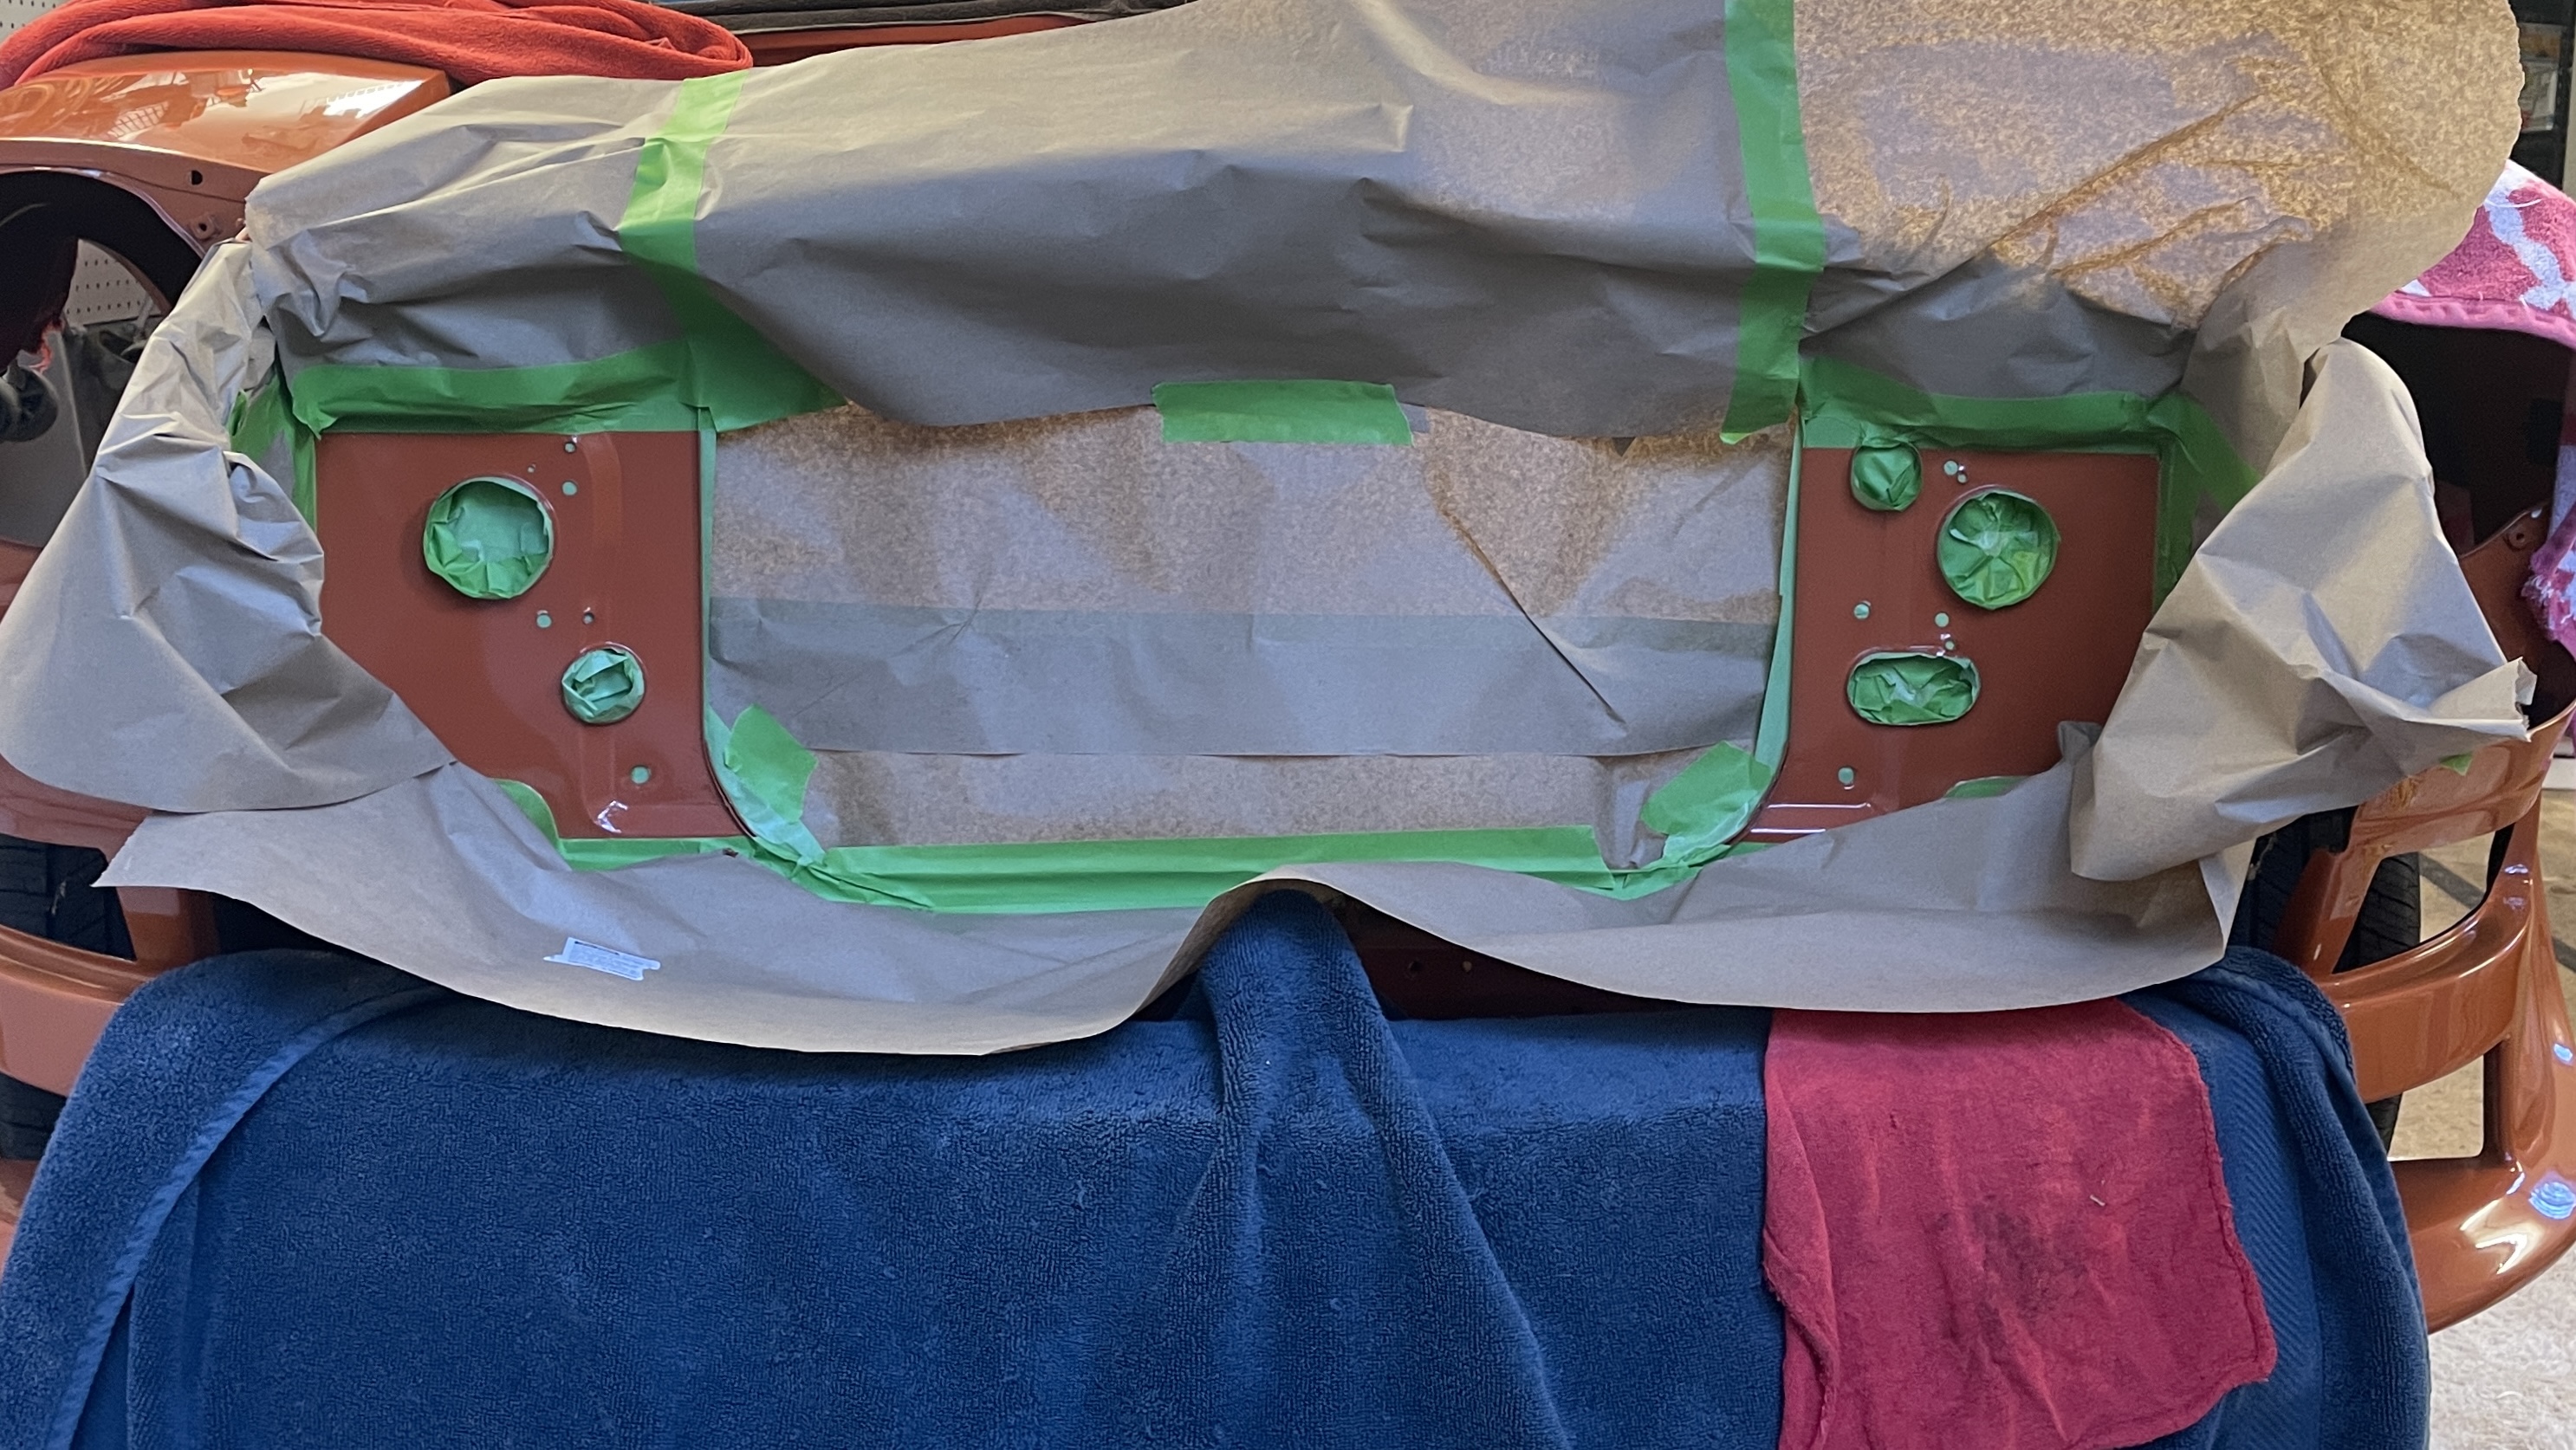
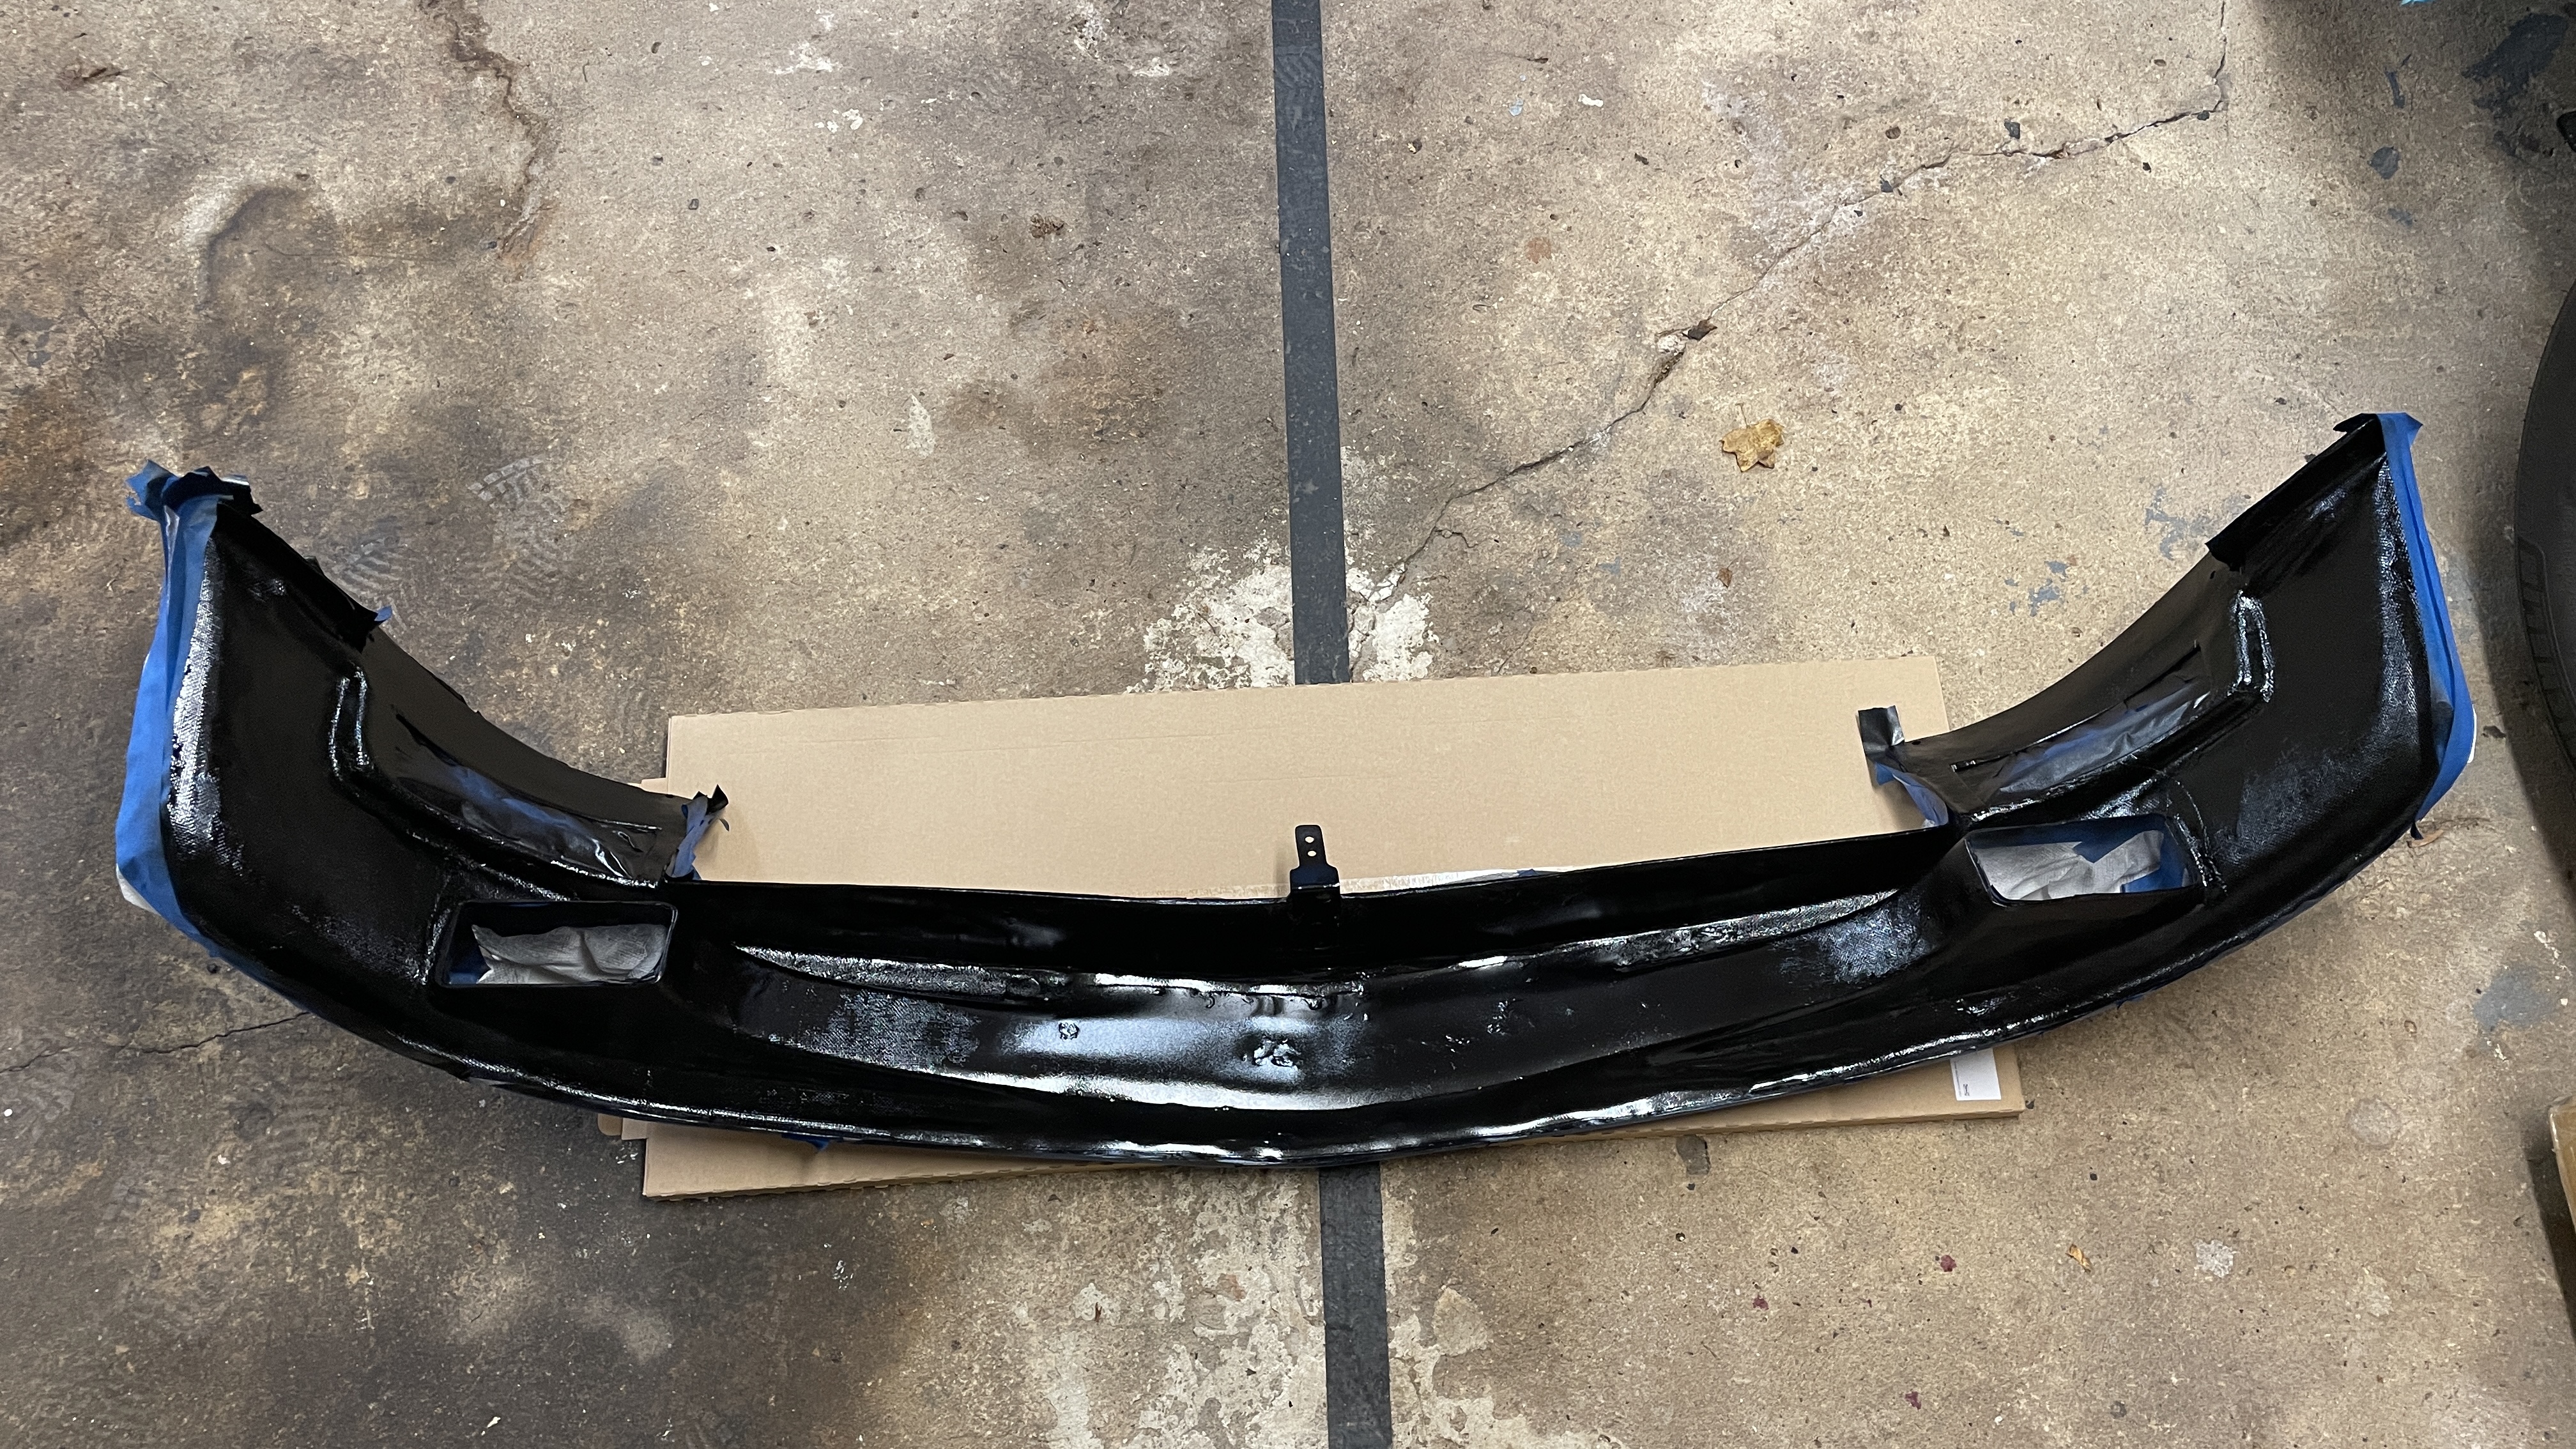
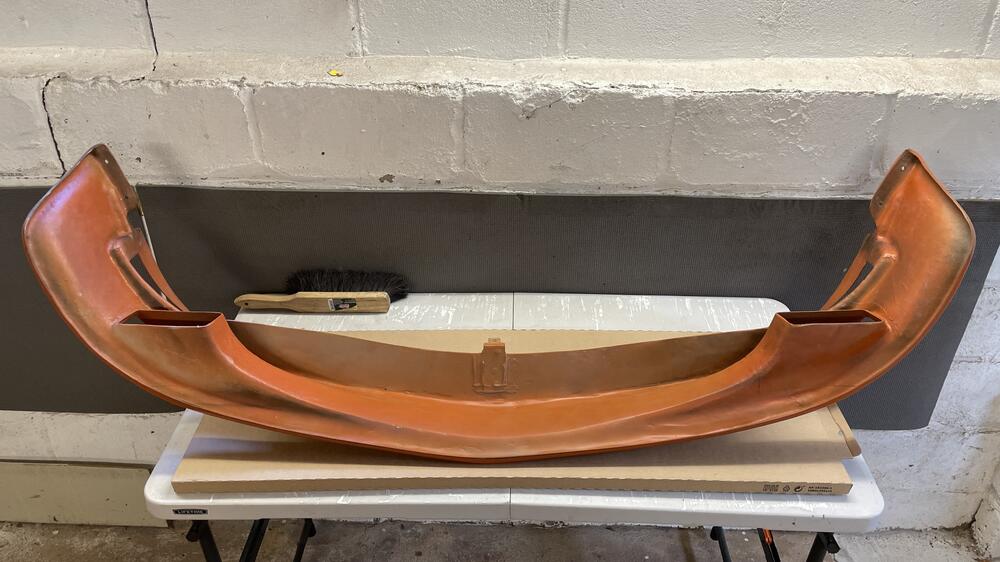
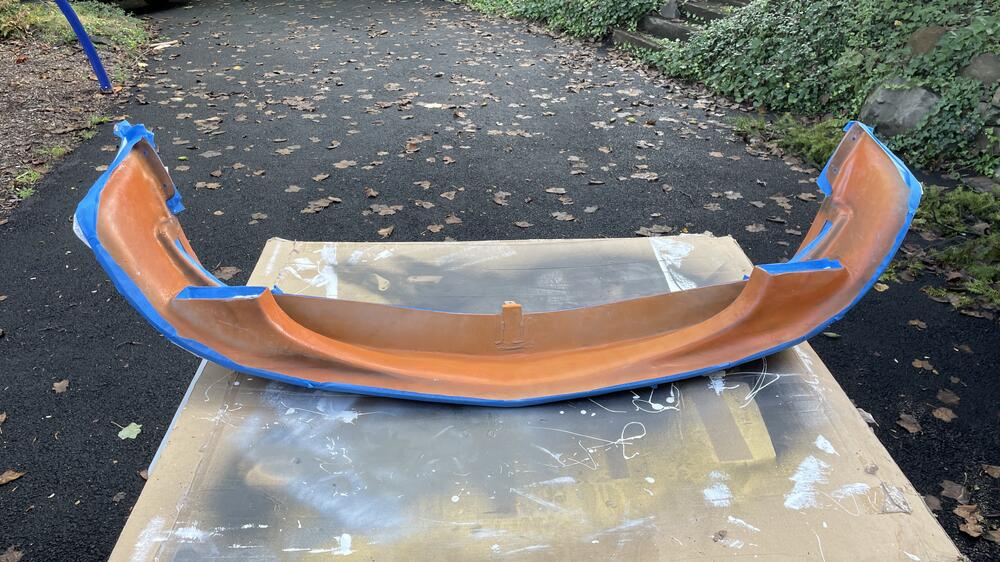
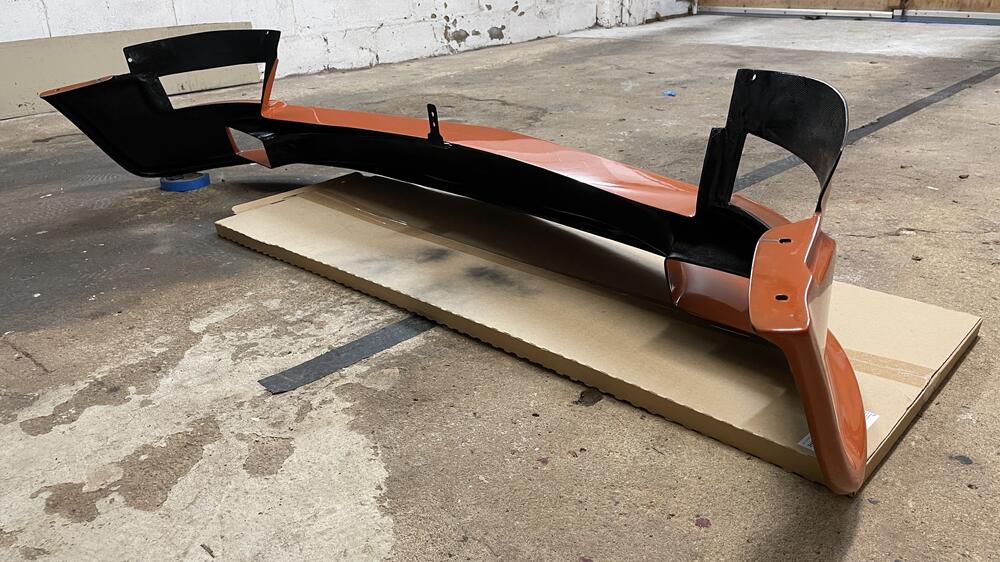
One of the many, many things the painter screwed up on my car was not painting the back of the air dam black like I asked him to. Not the most egregious screwup by far, but still annoying when compounded with everything else. I hit this with gloss black and it helps. Doesn’t fix the spots where the primer is showing through the orange but it’s better.

-
Let’s hope it works! 🤪 Thanks! Yeah, I discovered that a couple of times. It also can’t be restuck. Once you pull it off it’s shot. By the way, @SteveJ, I found that it’s possible to lessen the effectiveness of the plastic that catches the tab on the 1/4” connectors, so be careful when you pull off those colored connectors. I had to fix a few spots, particularly where a 12 or 10 gauge wire had been removed.
-
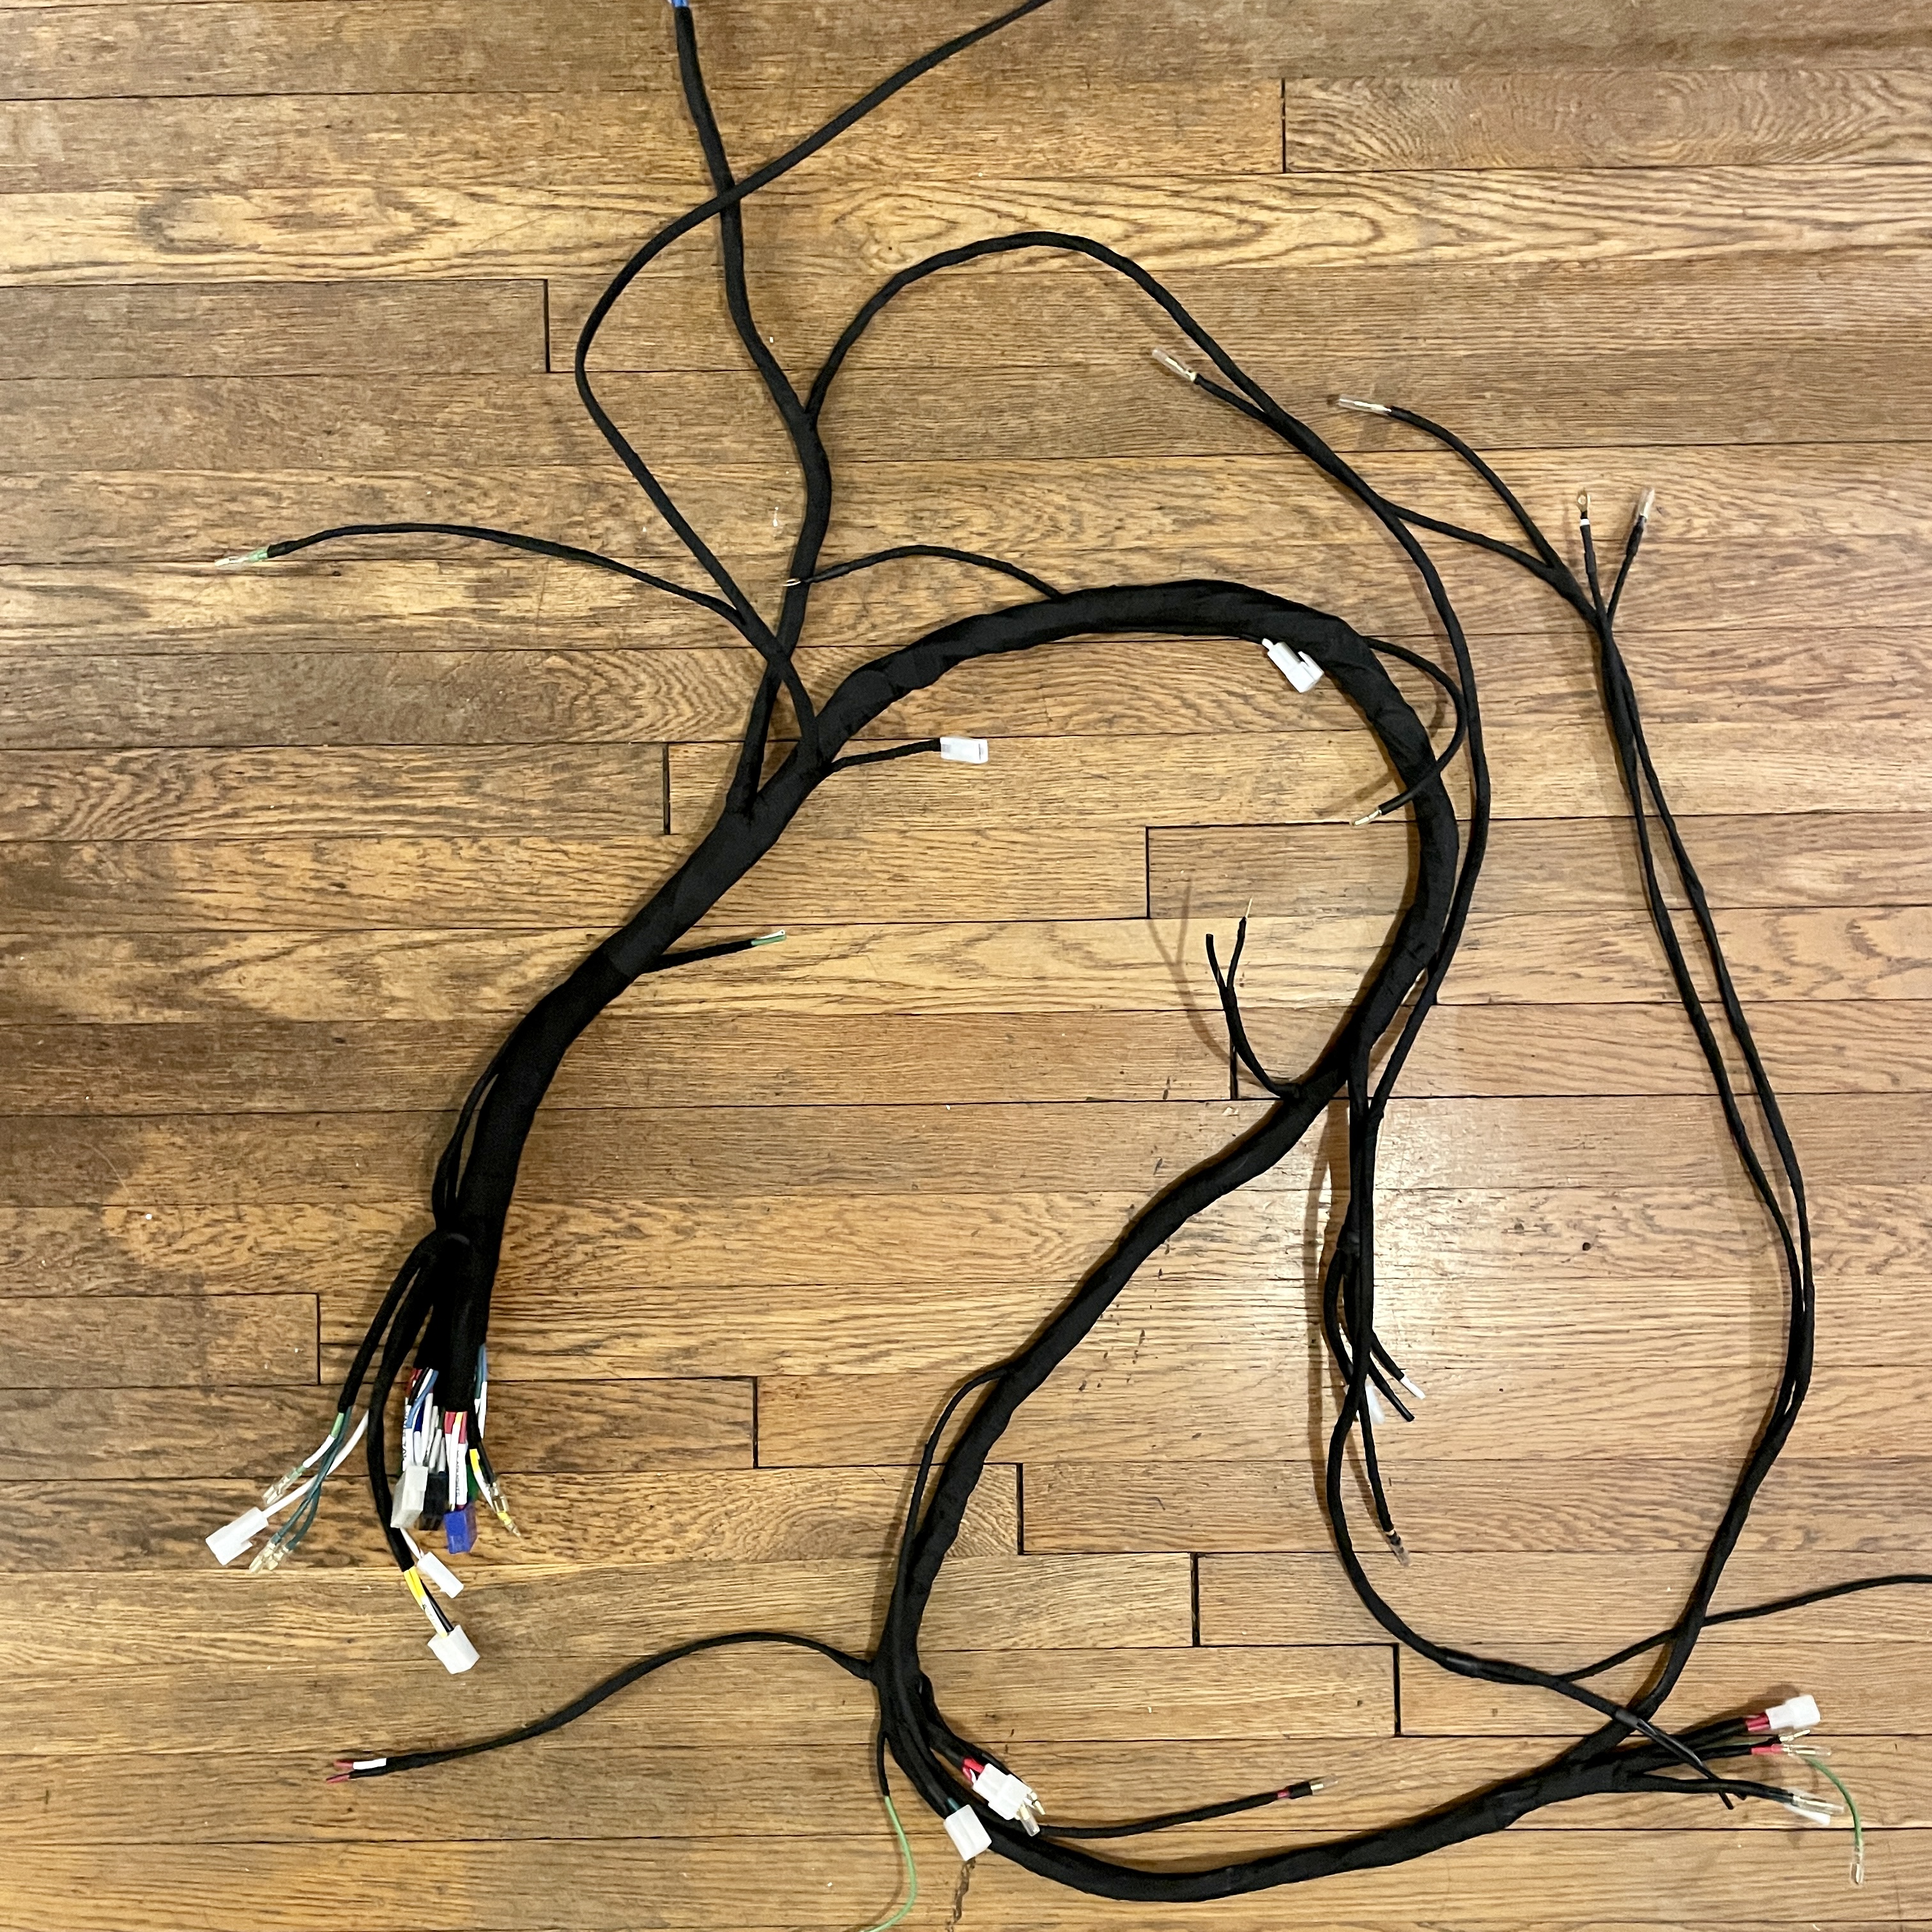
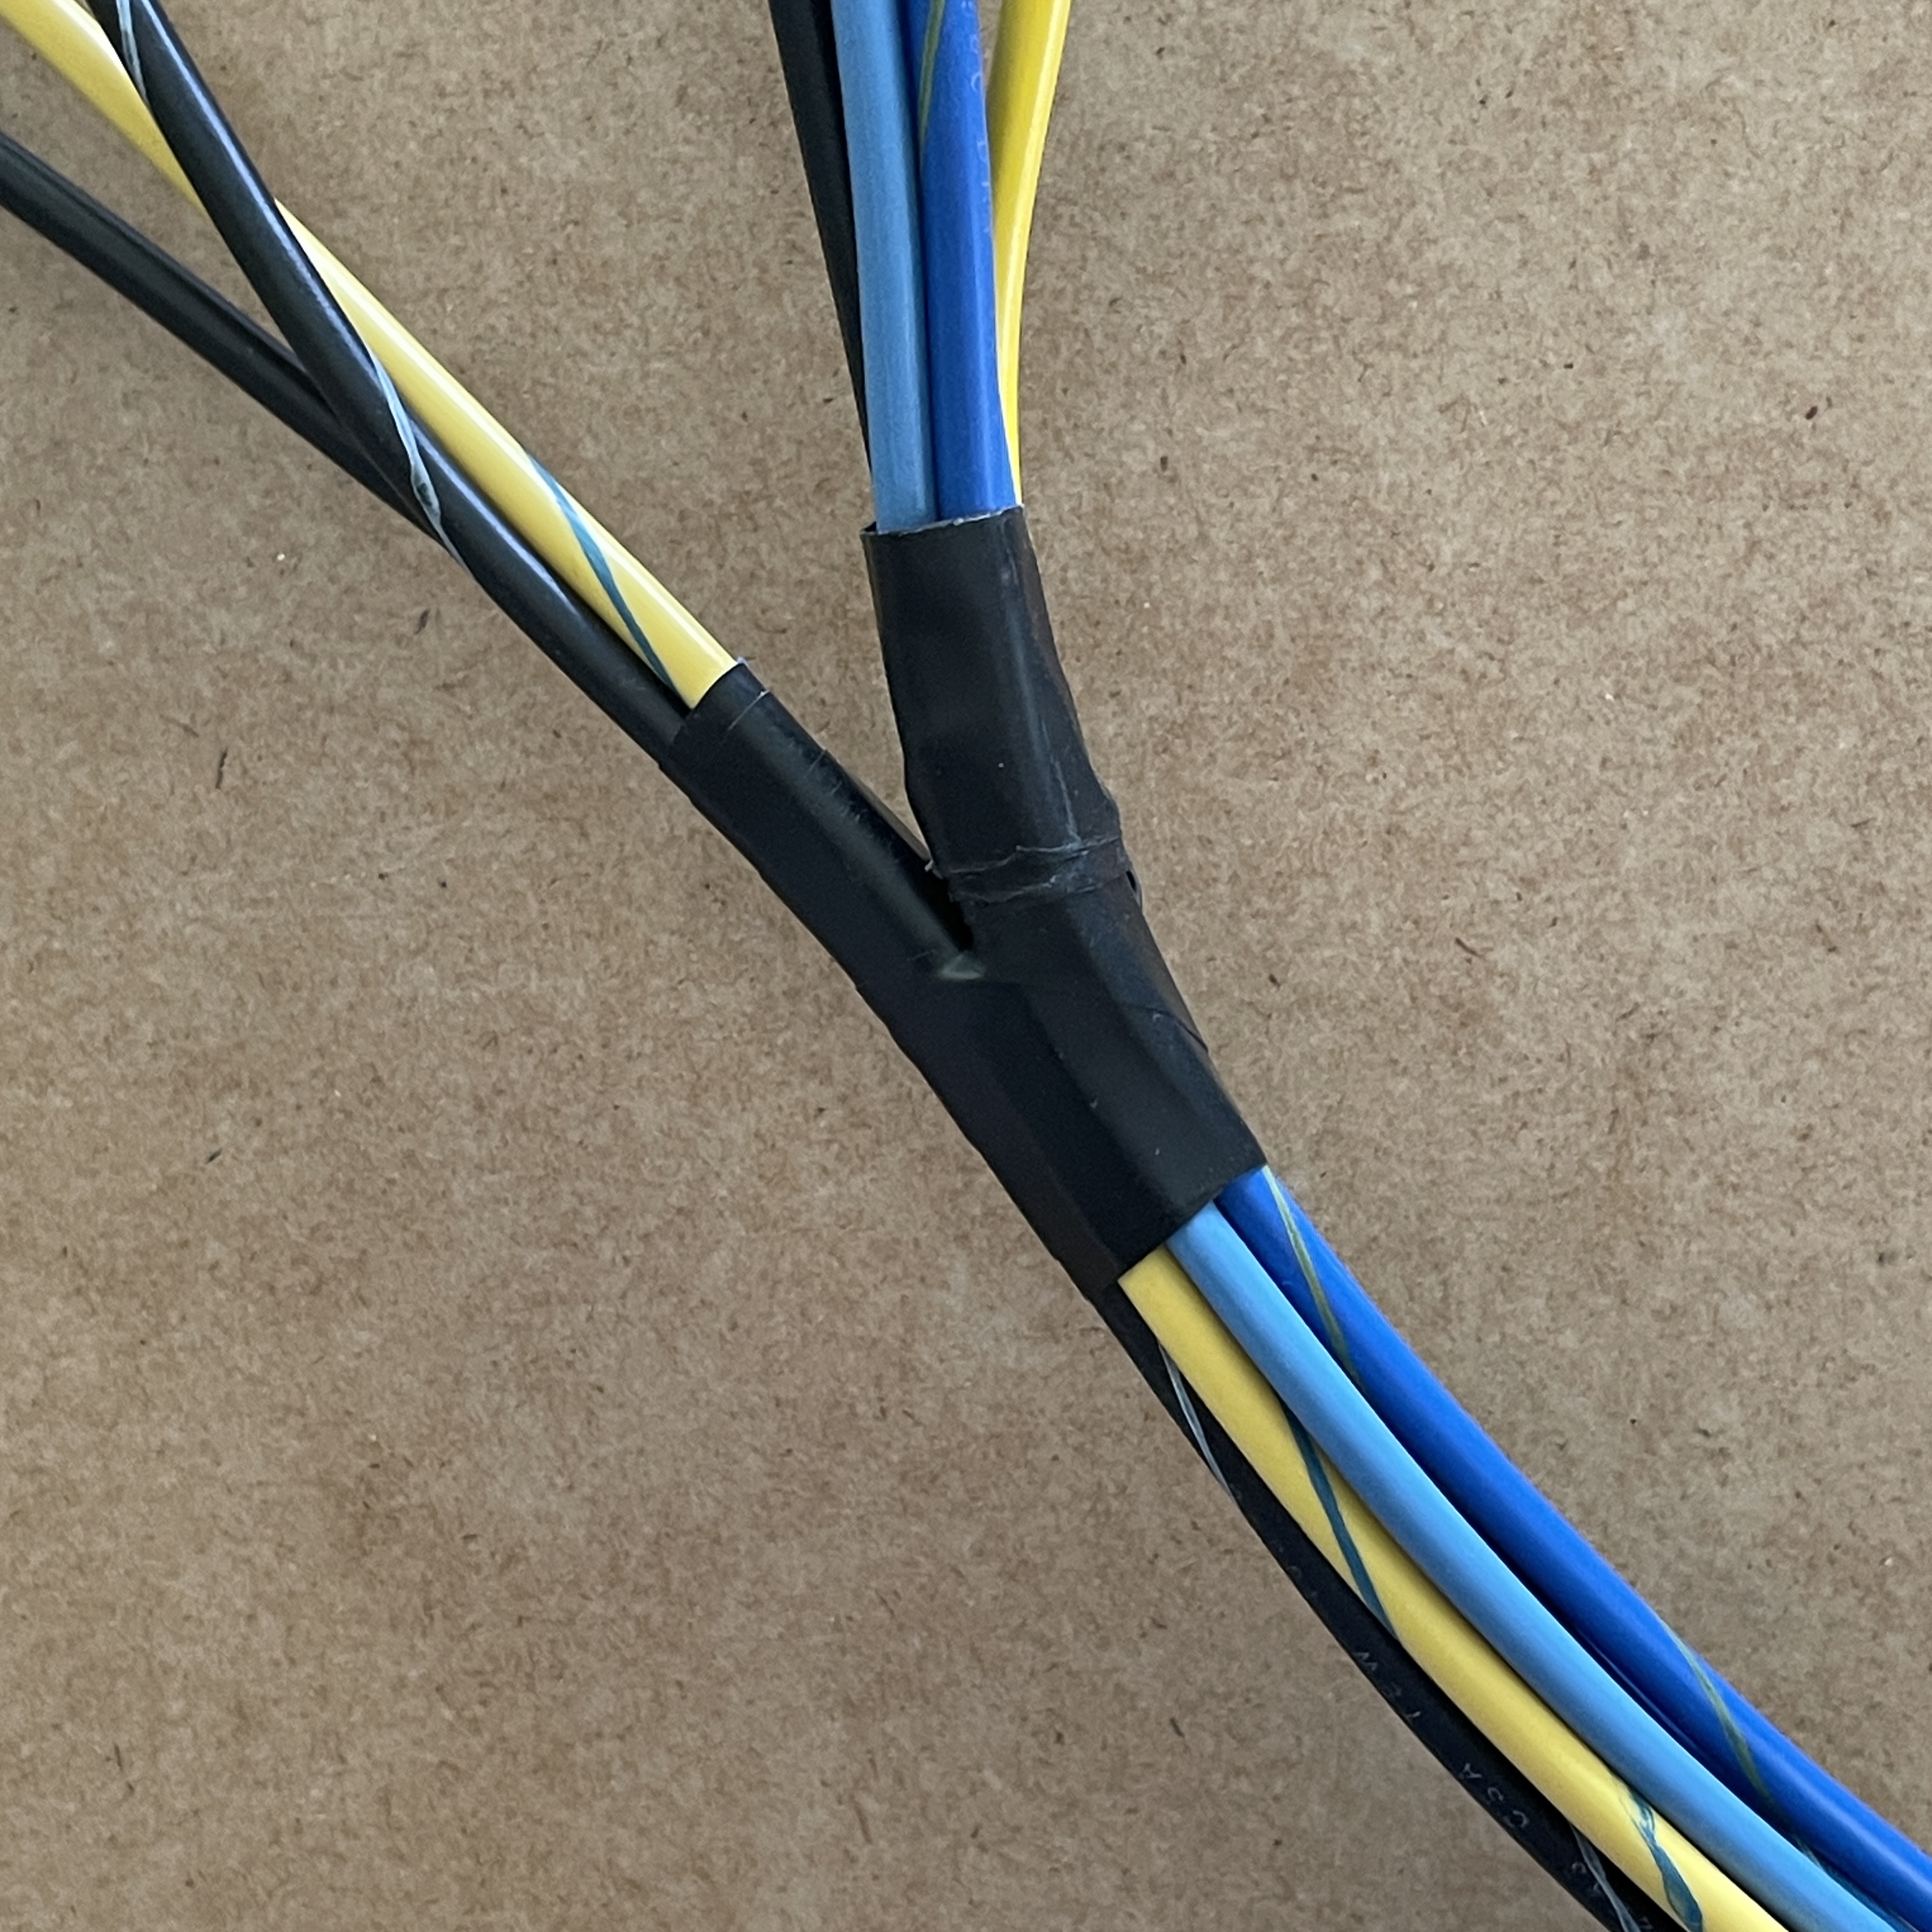
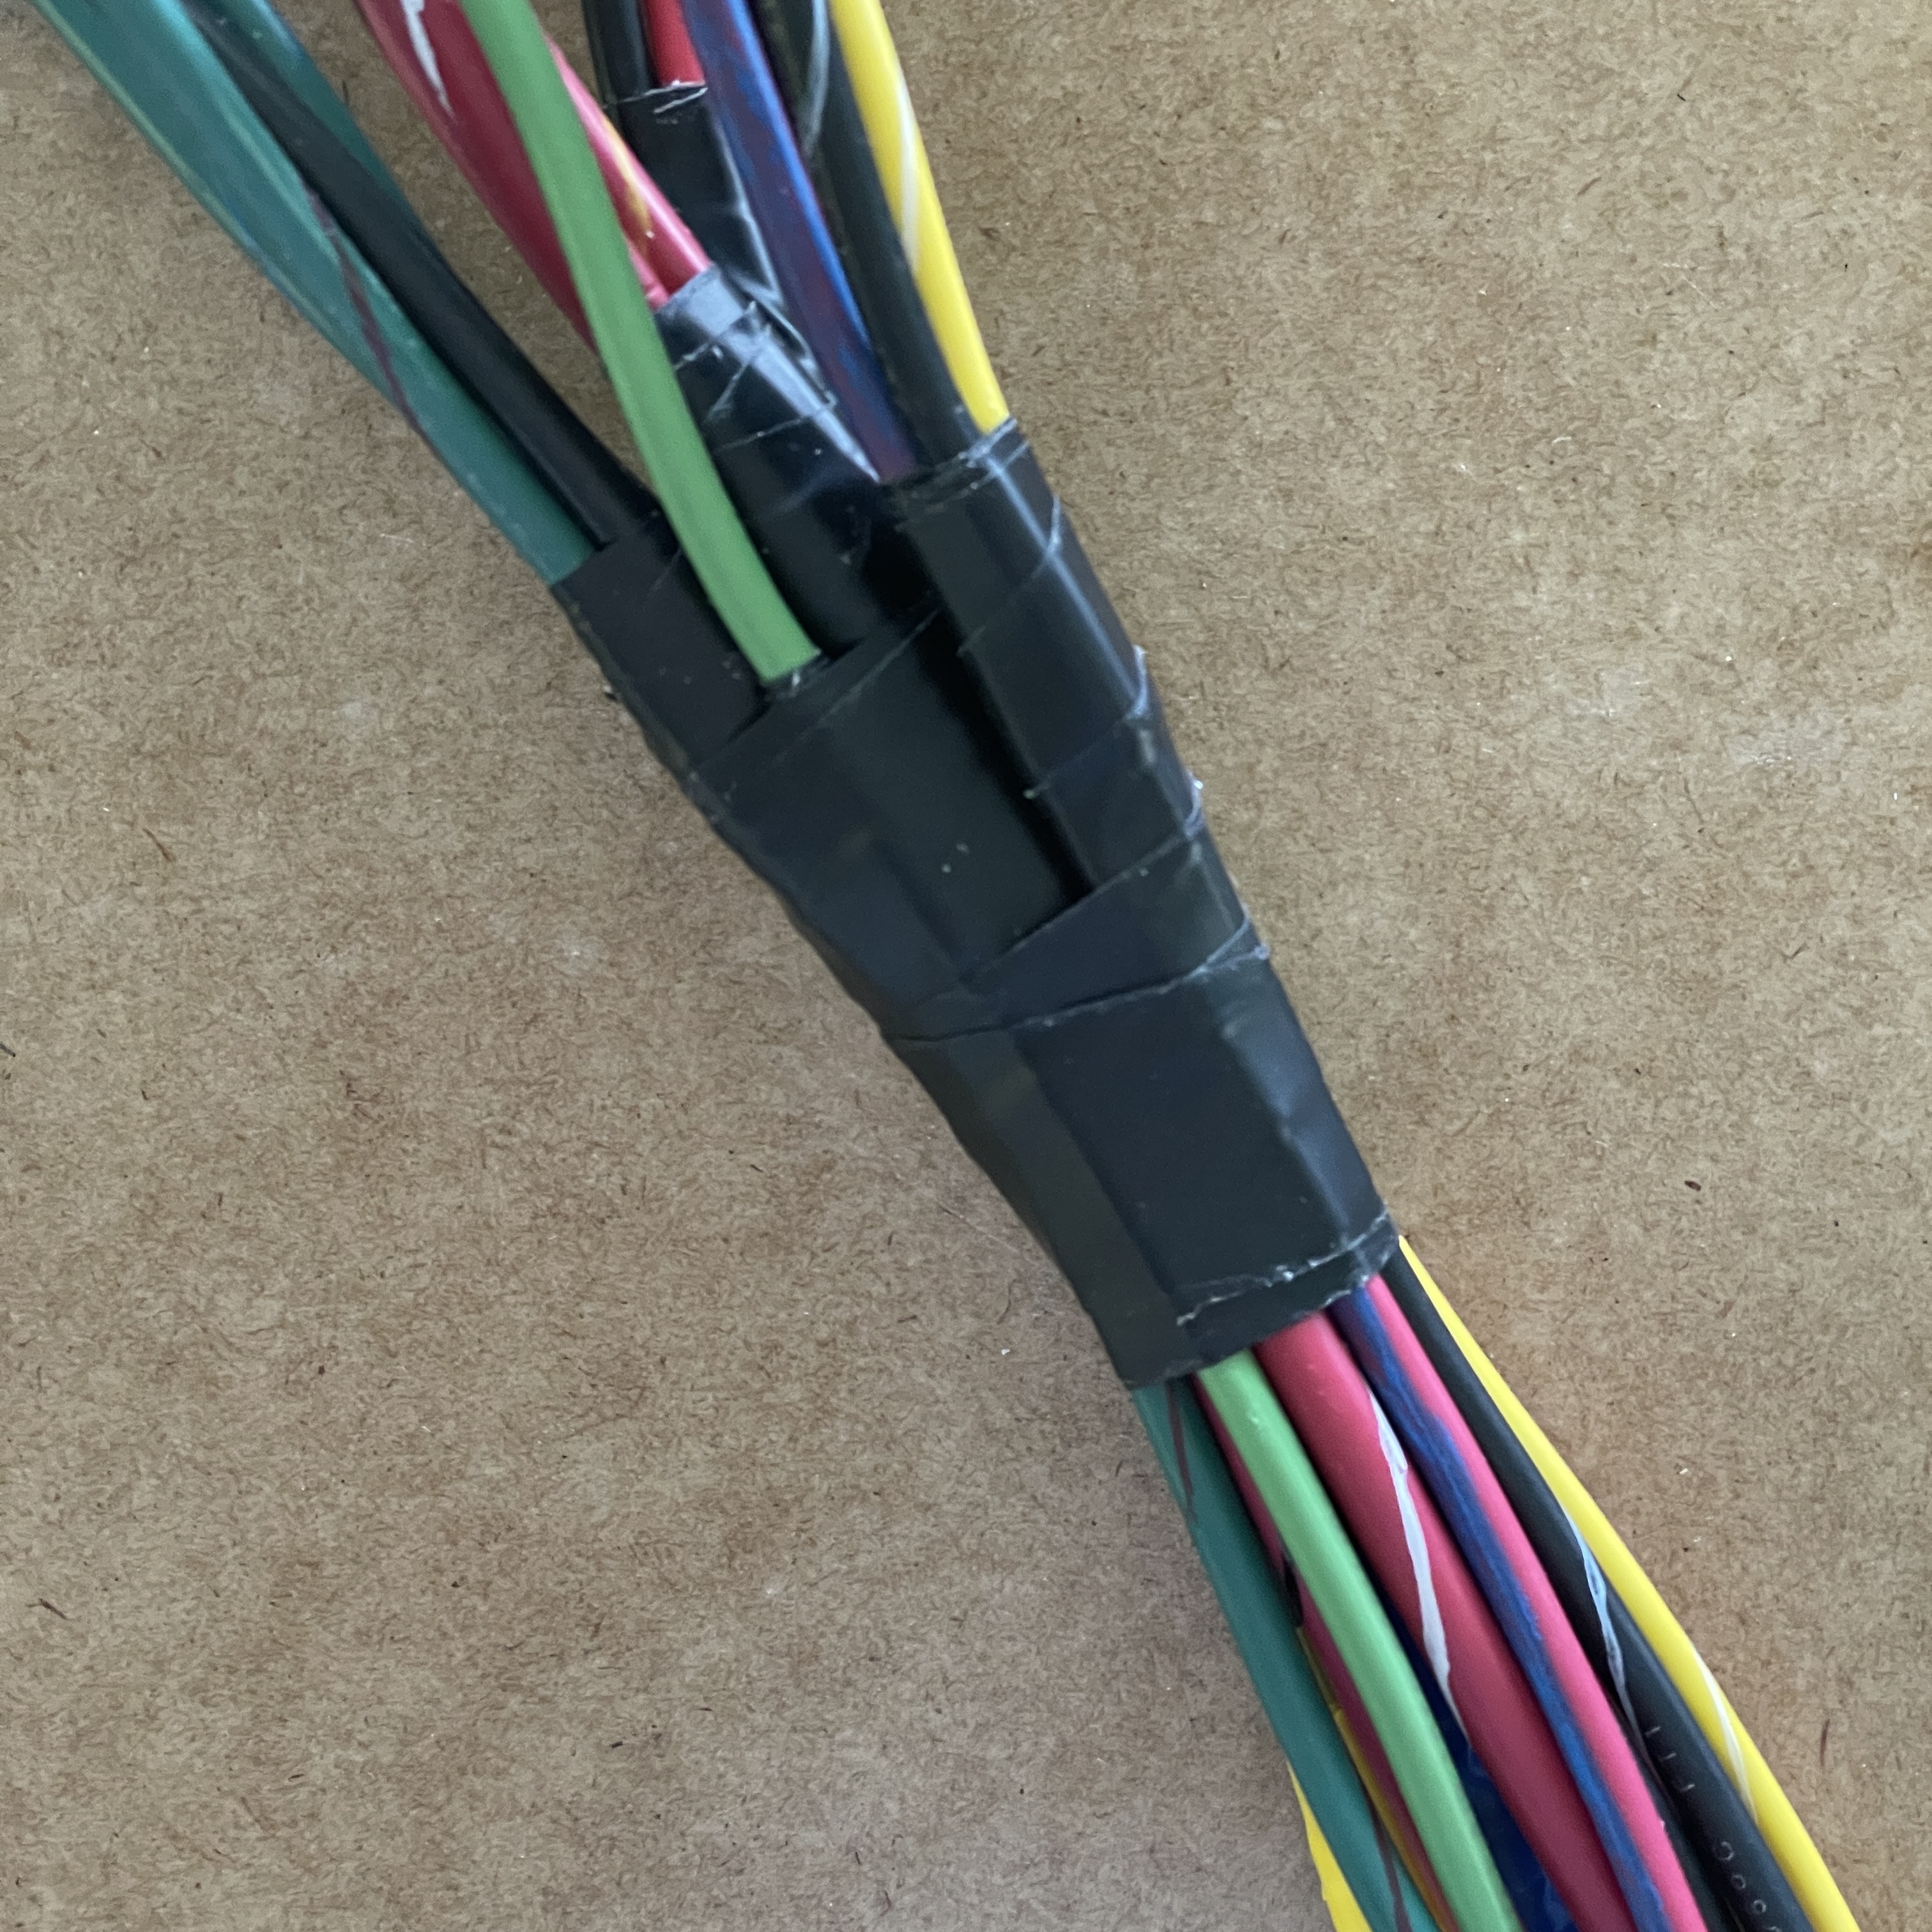
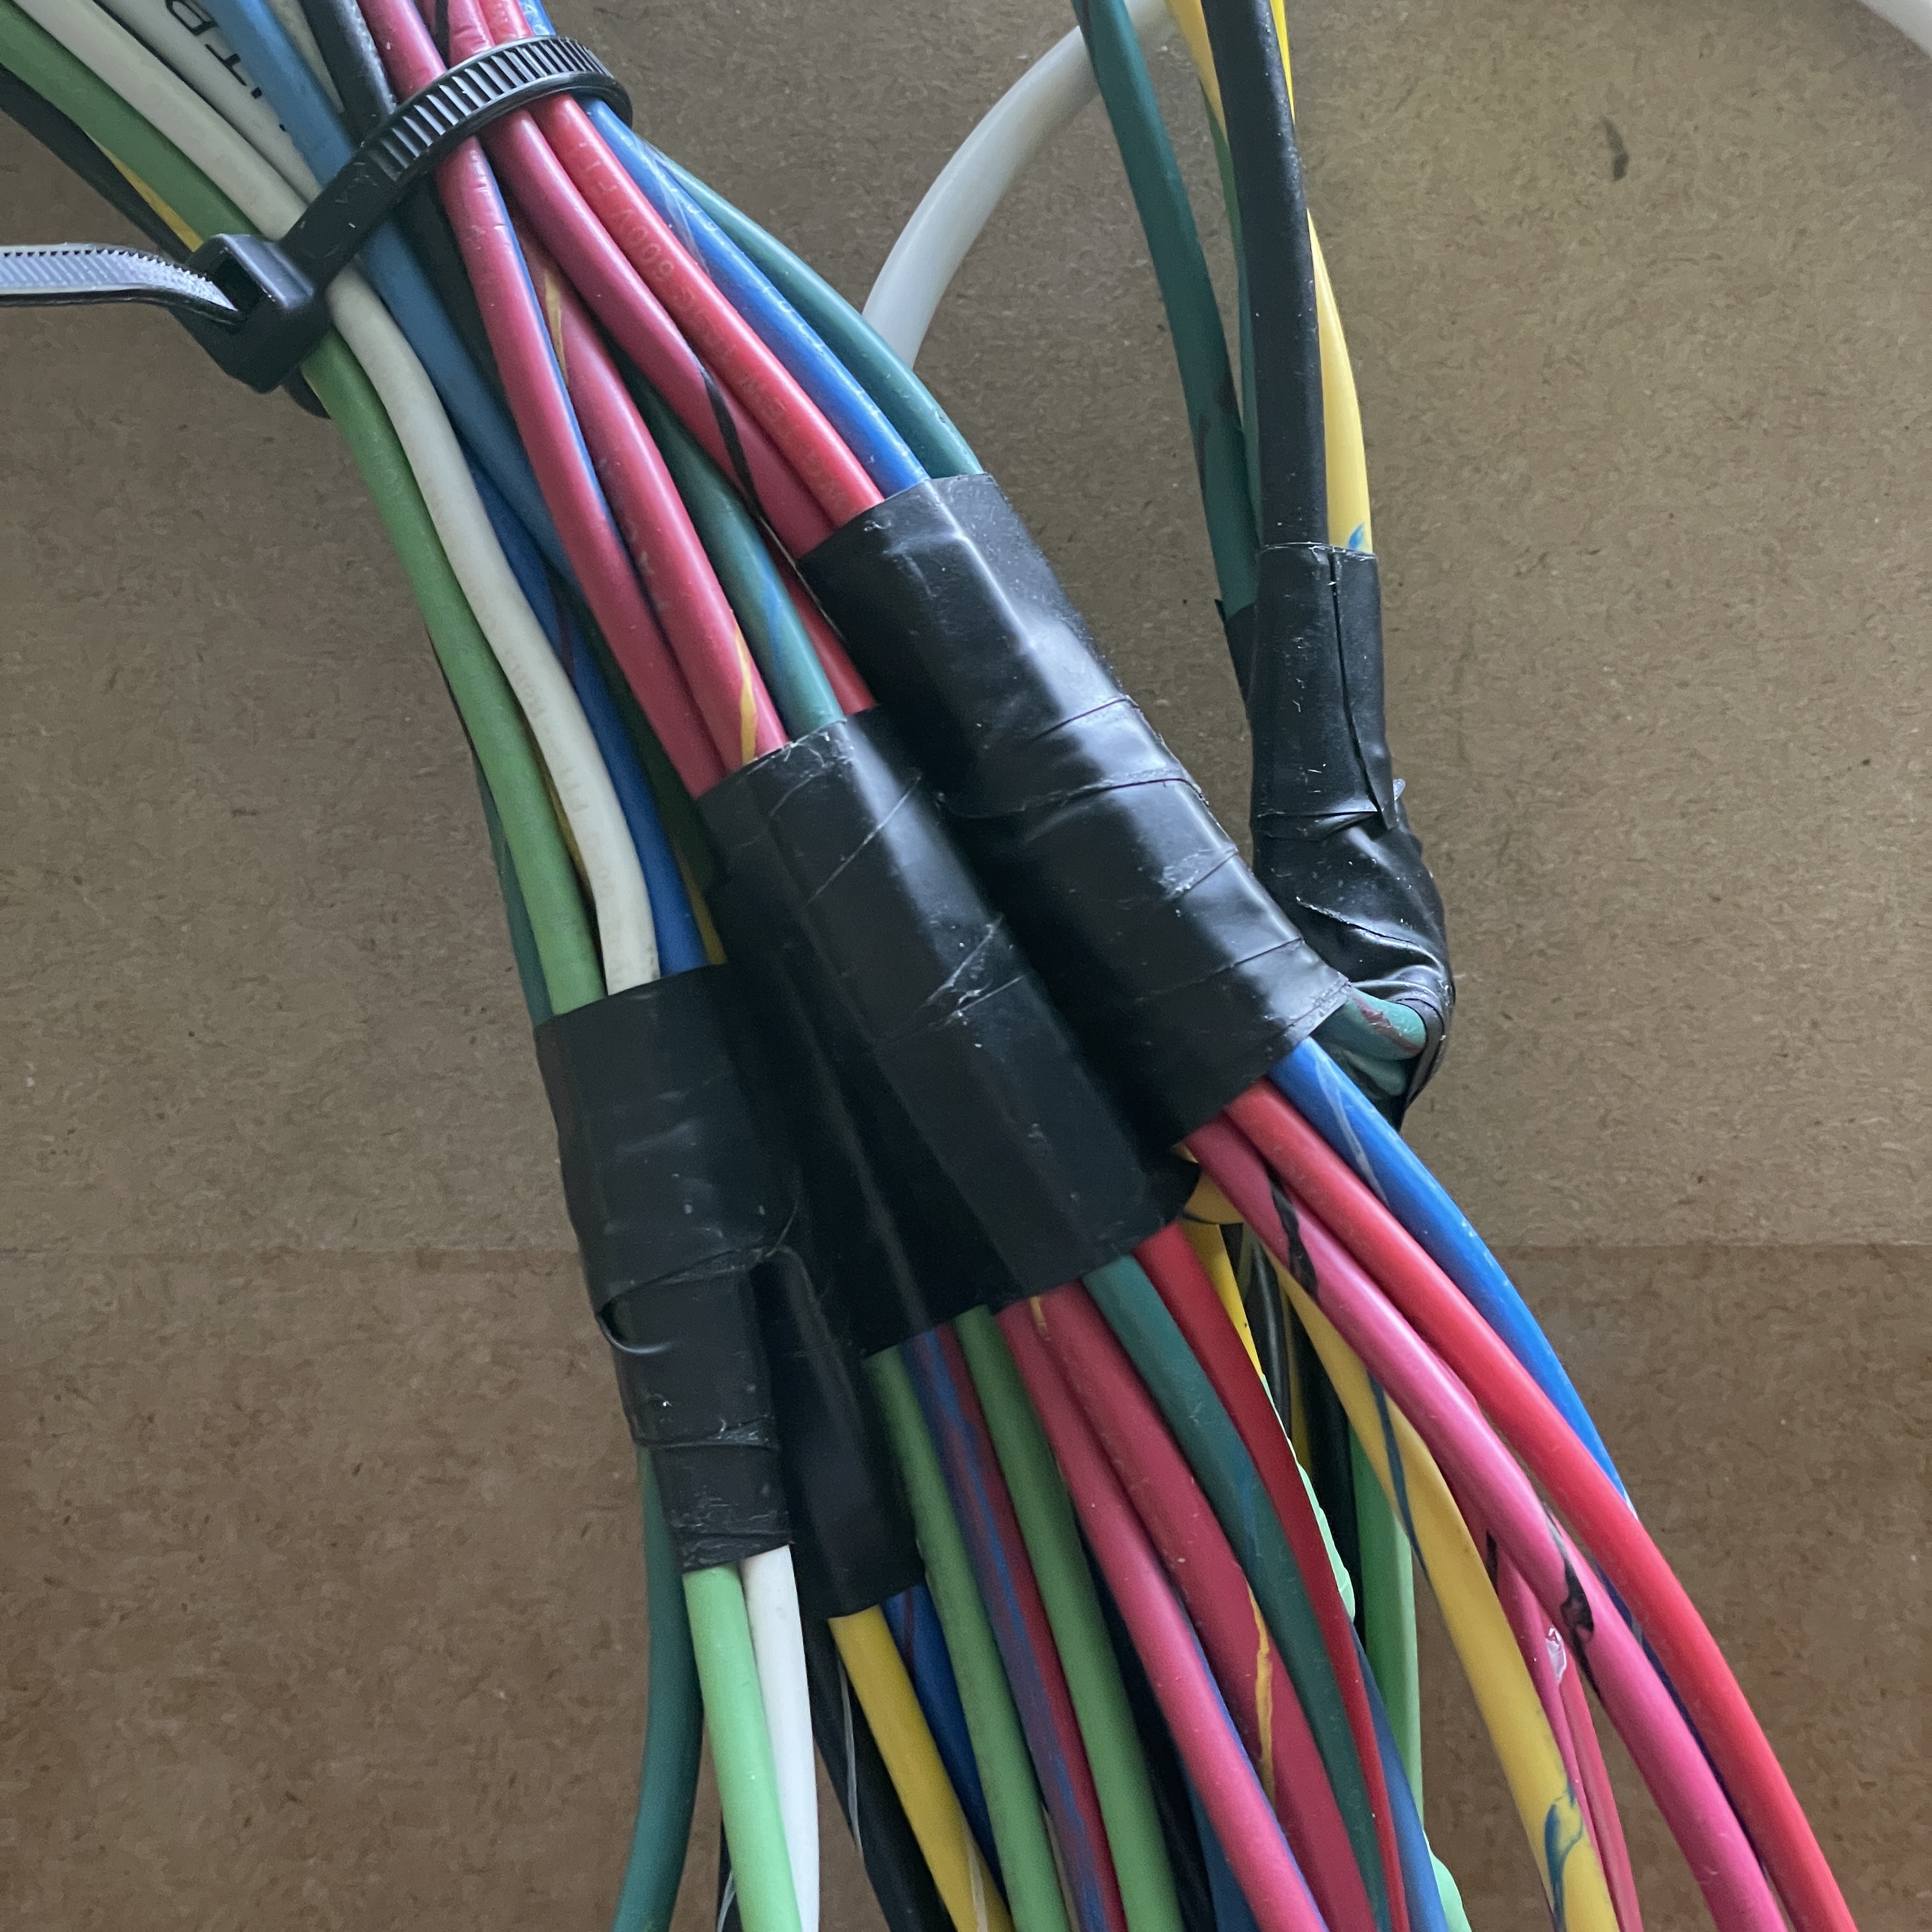
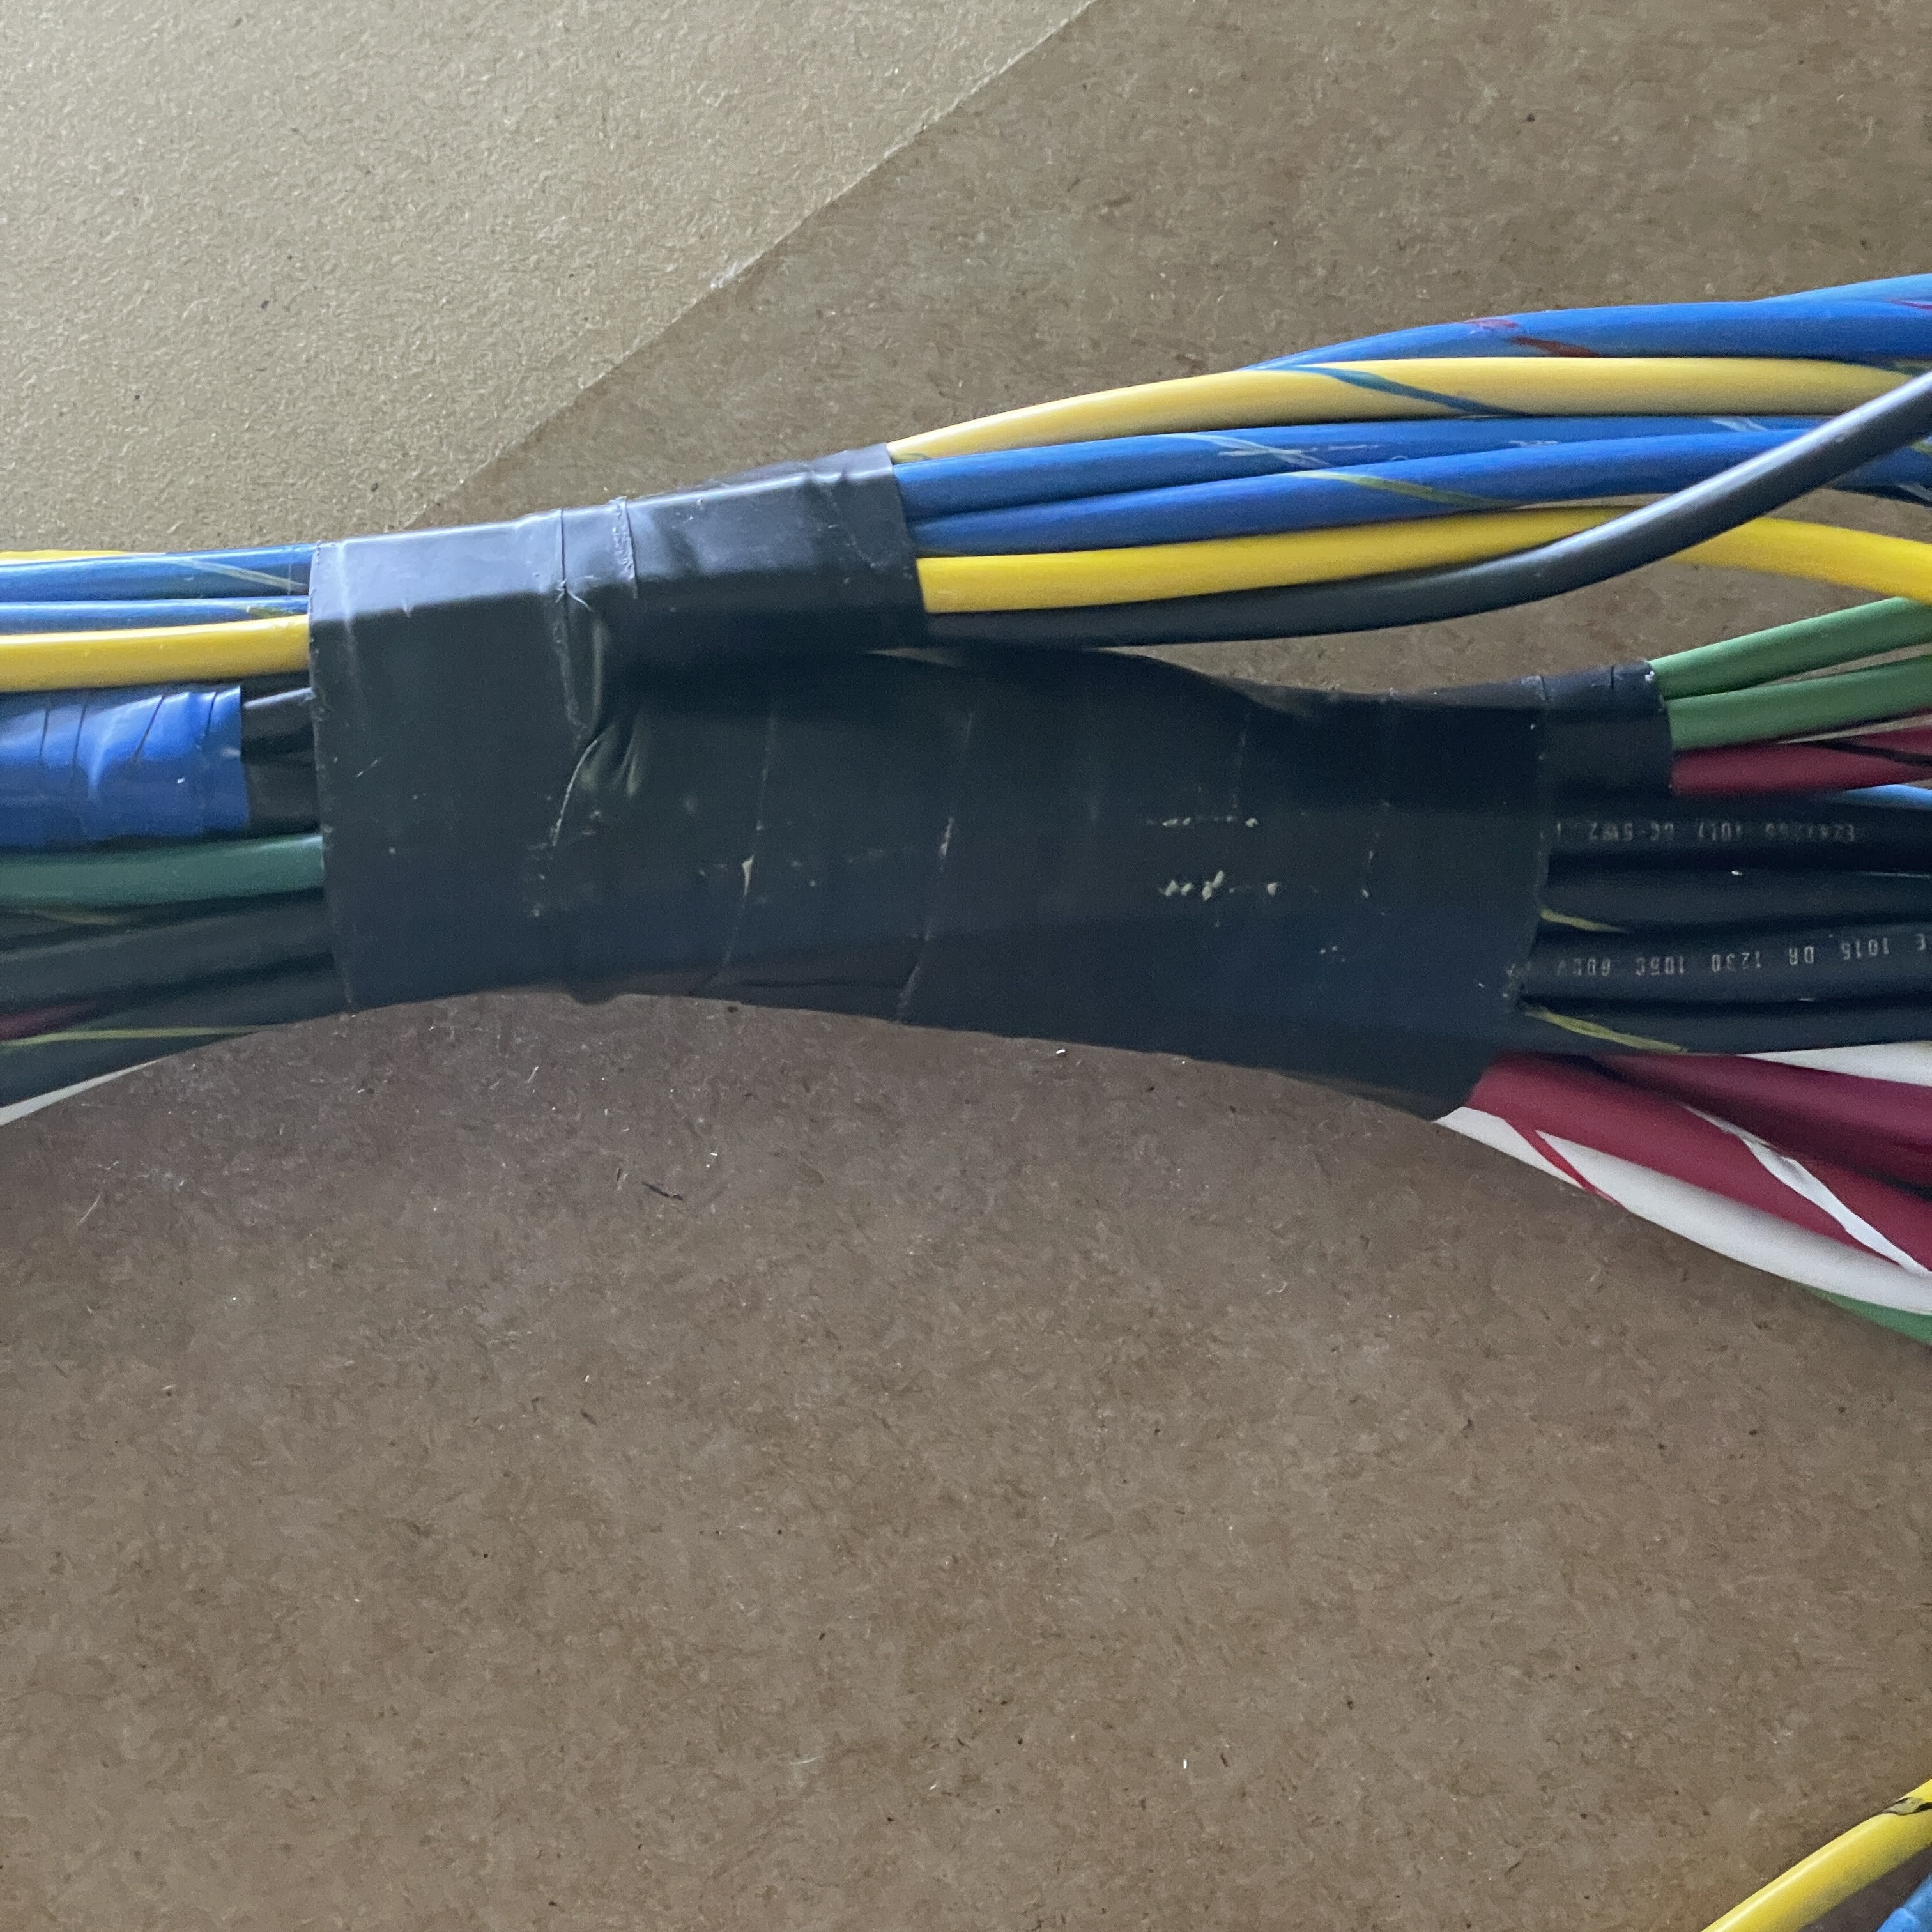
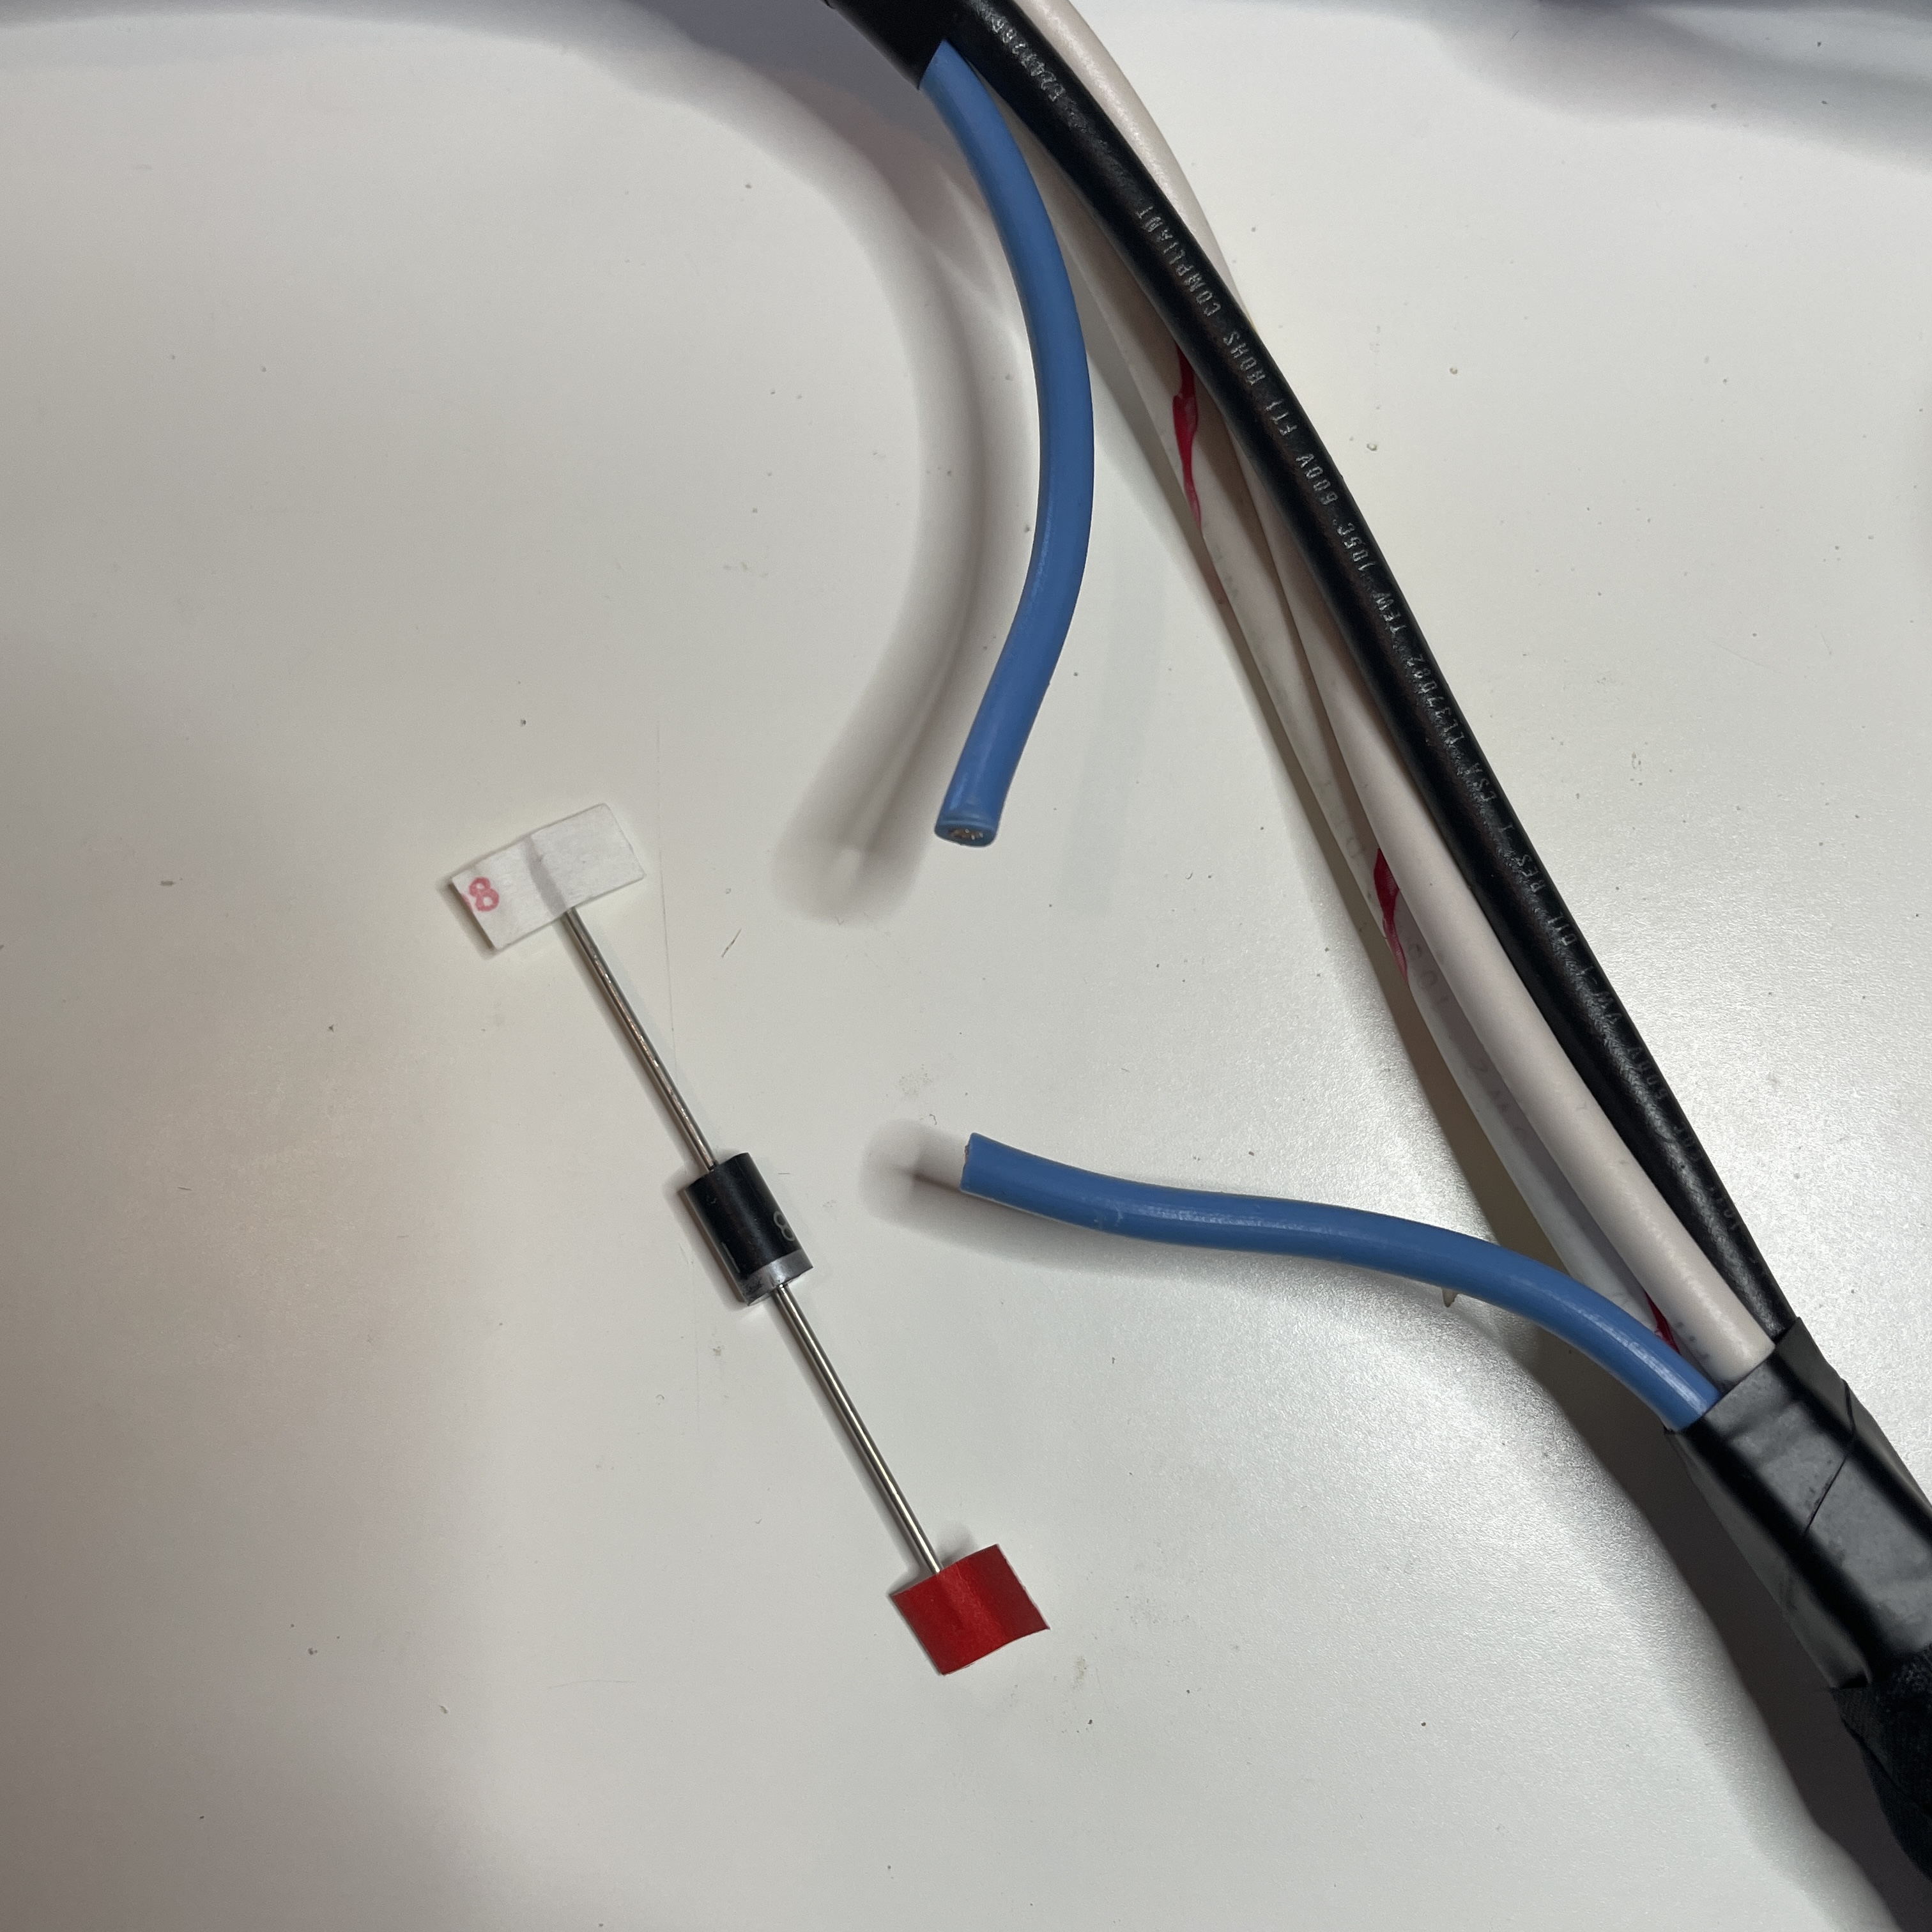
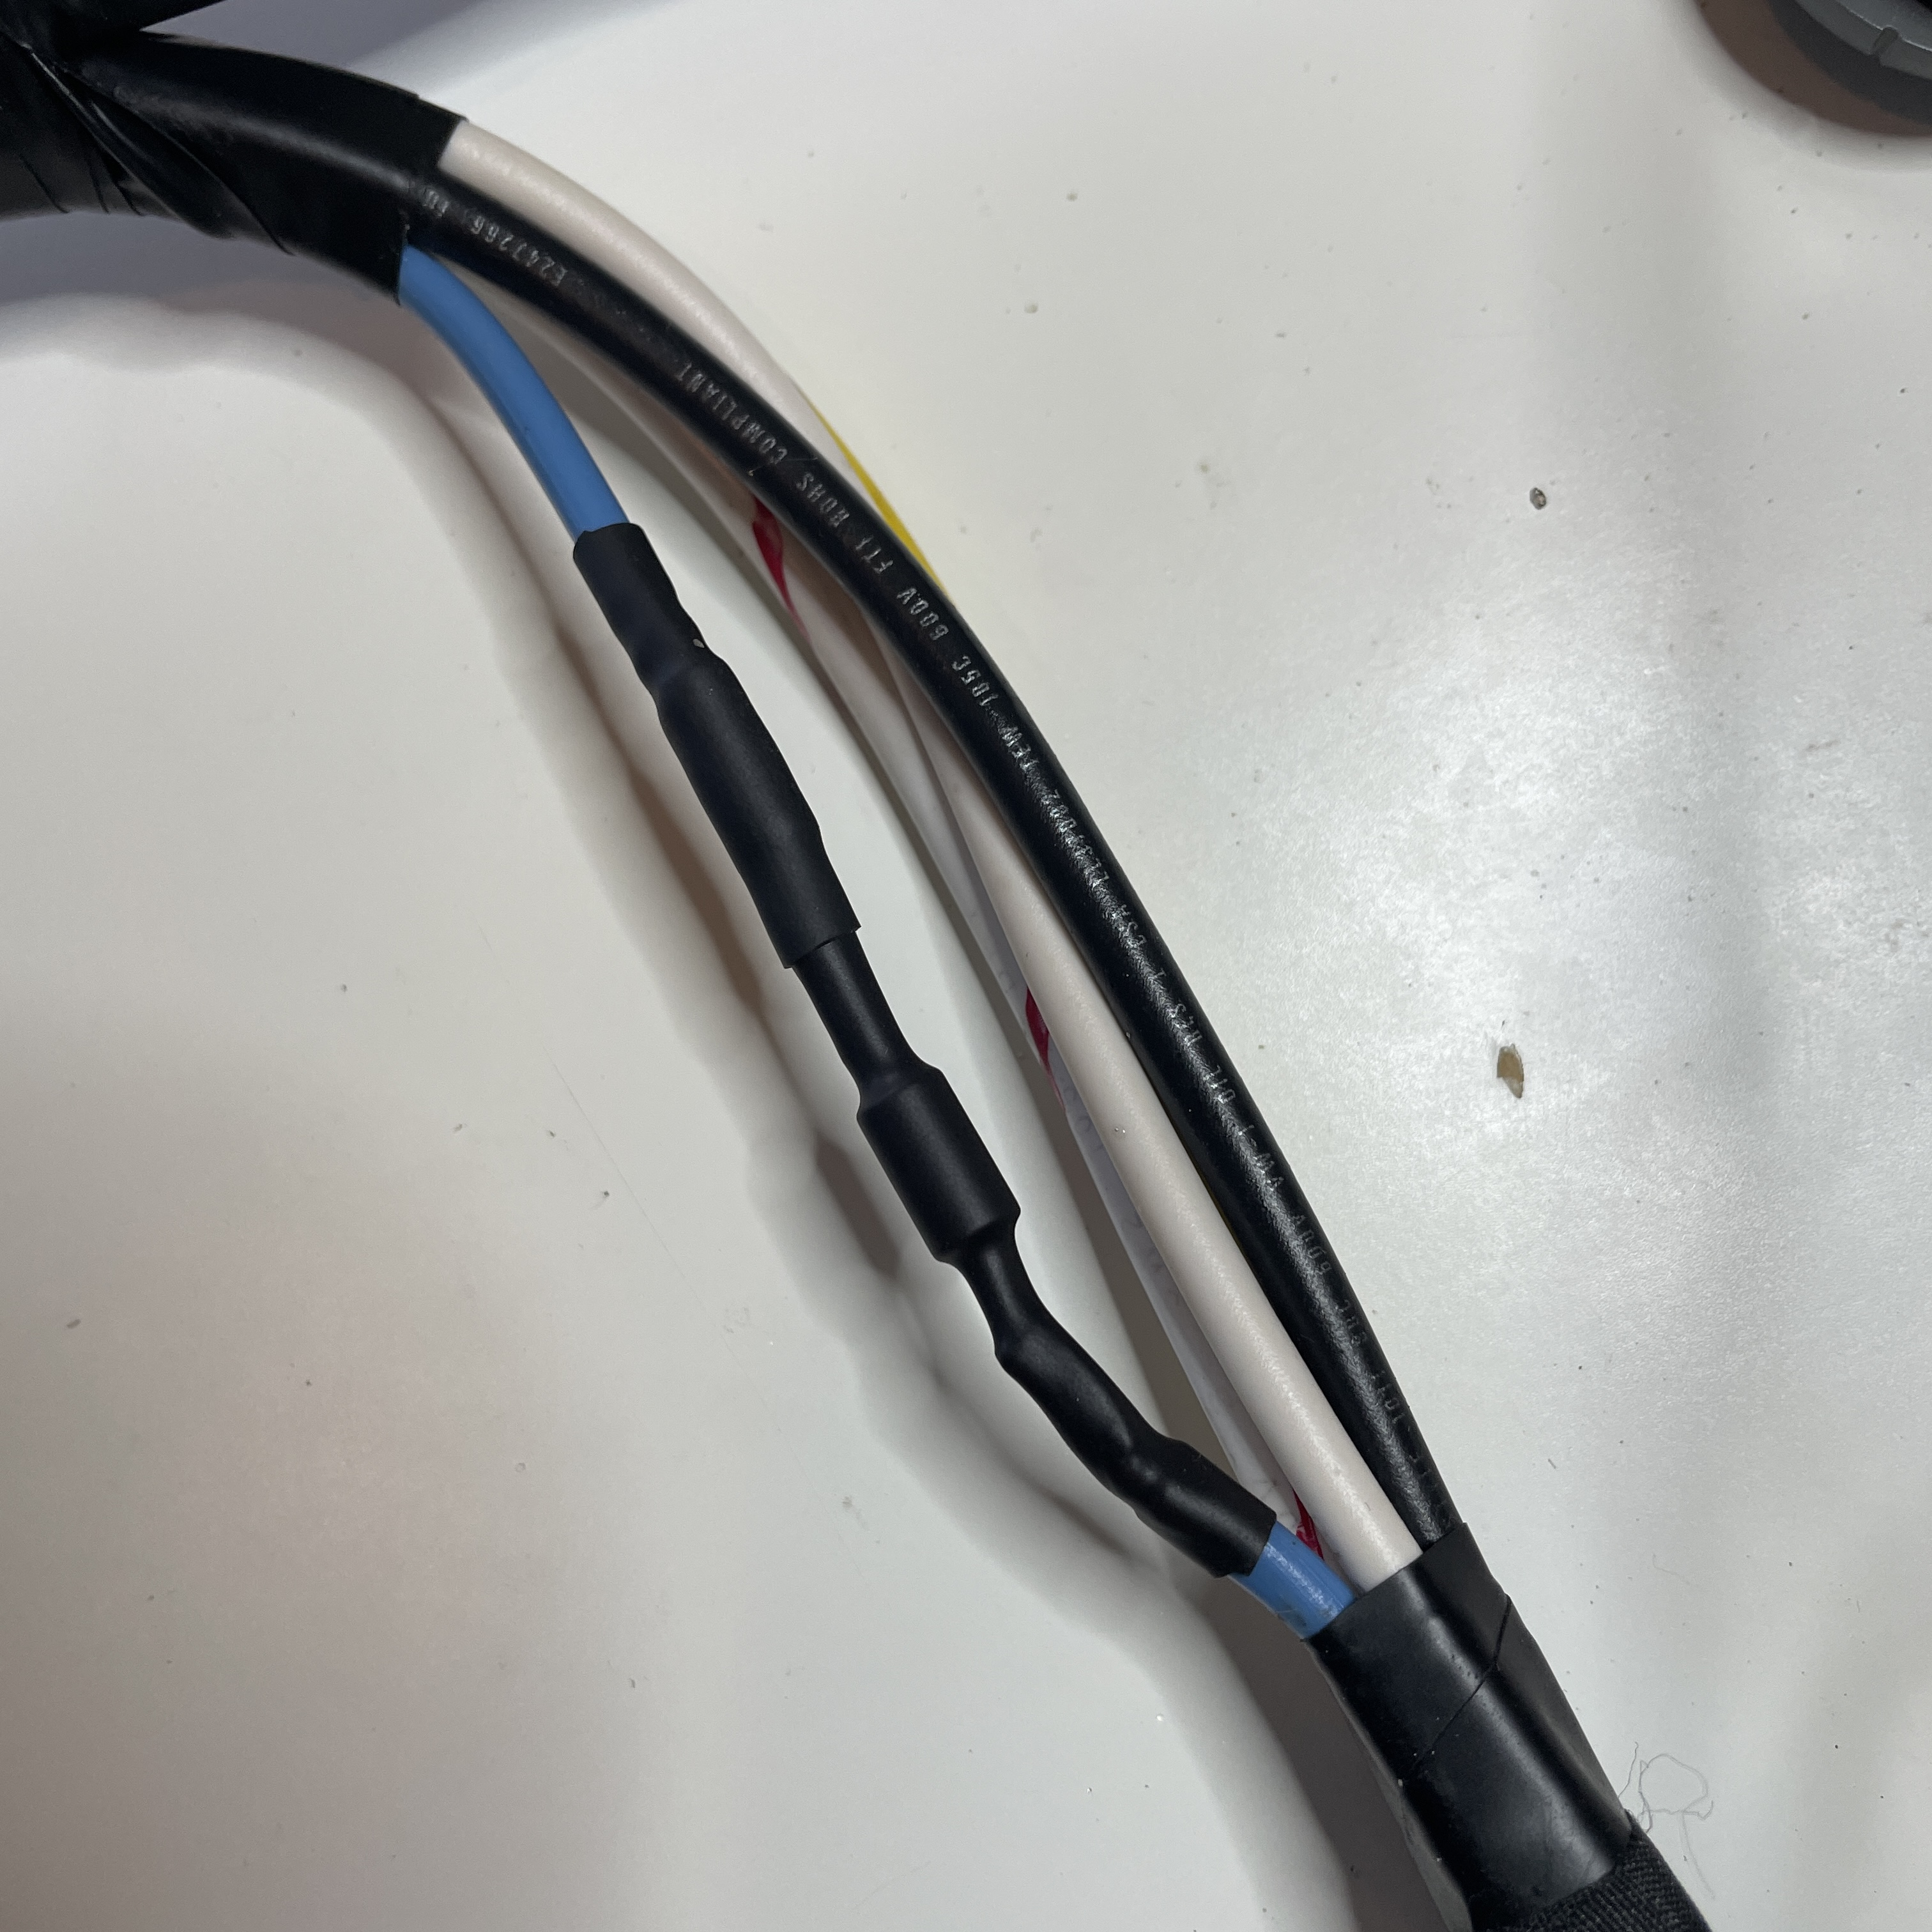
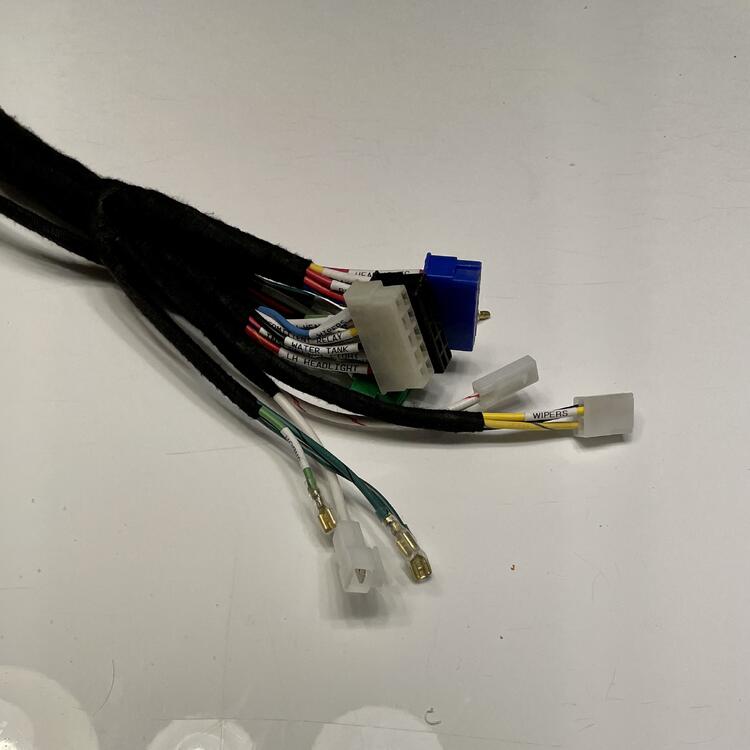
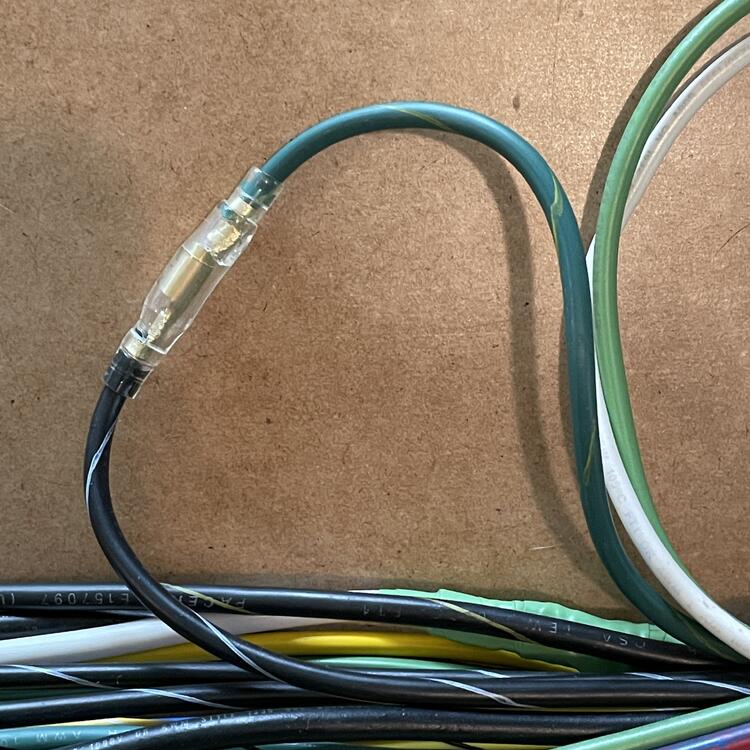
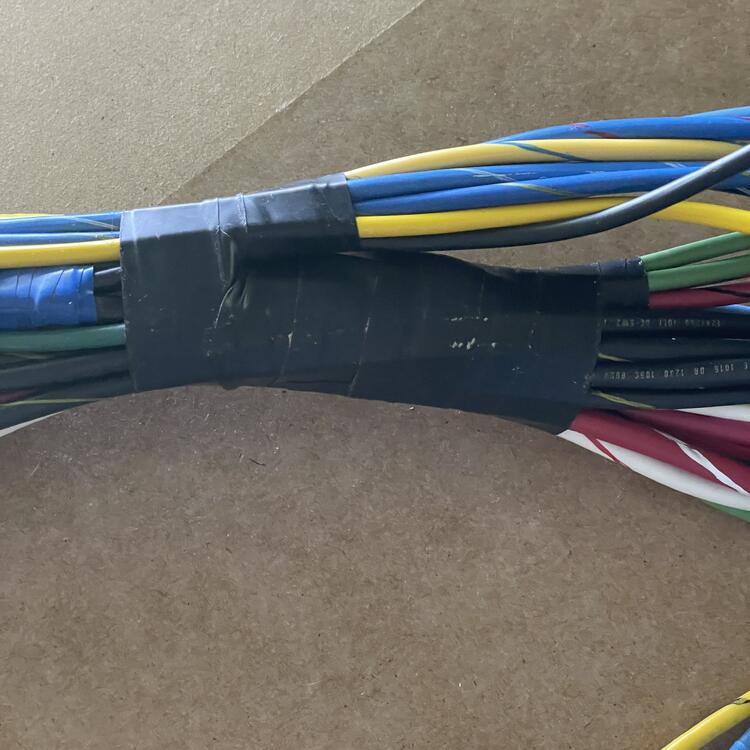
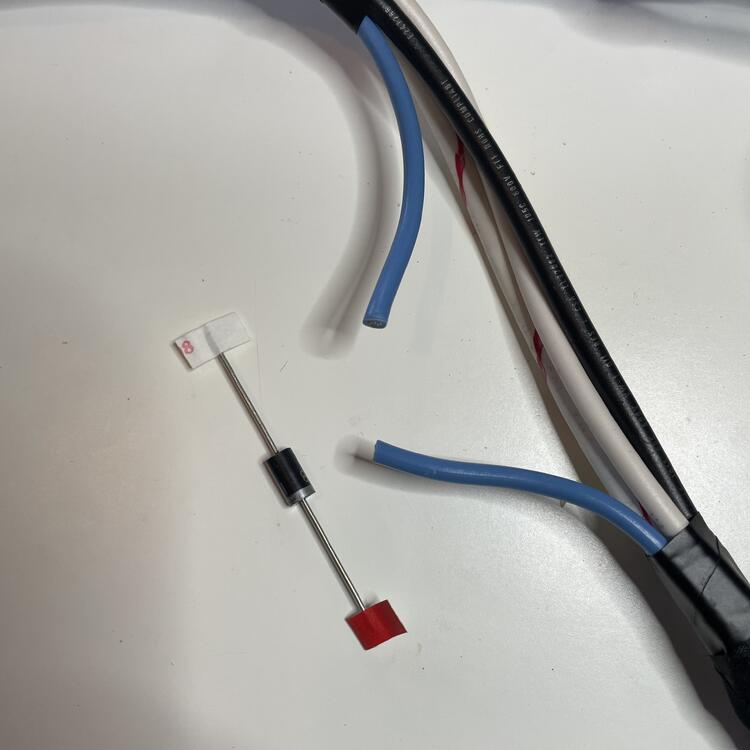
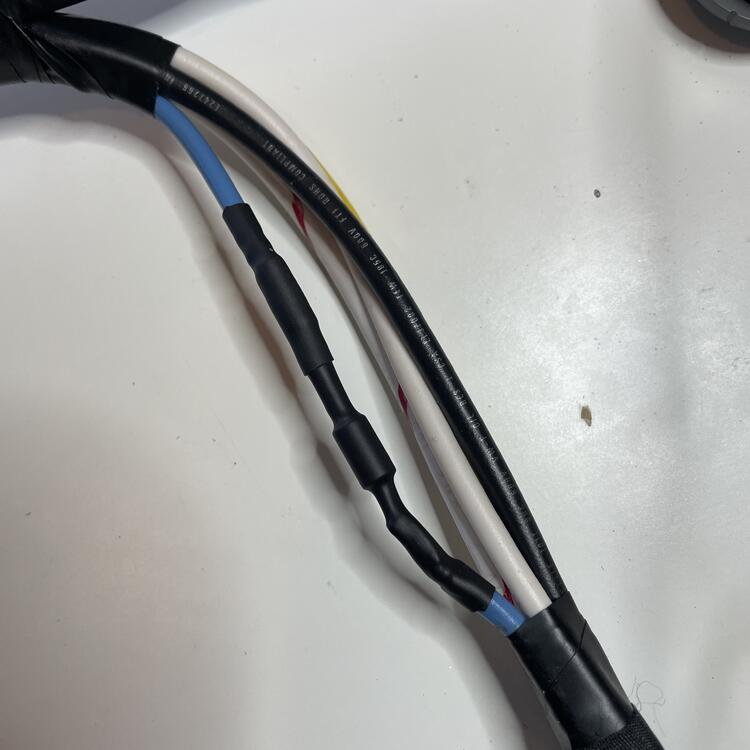
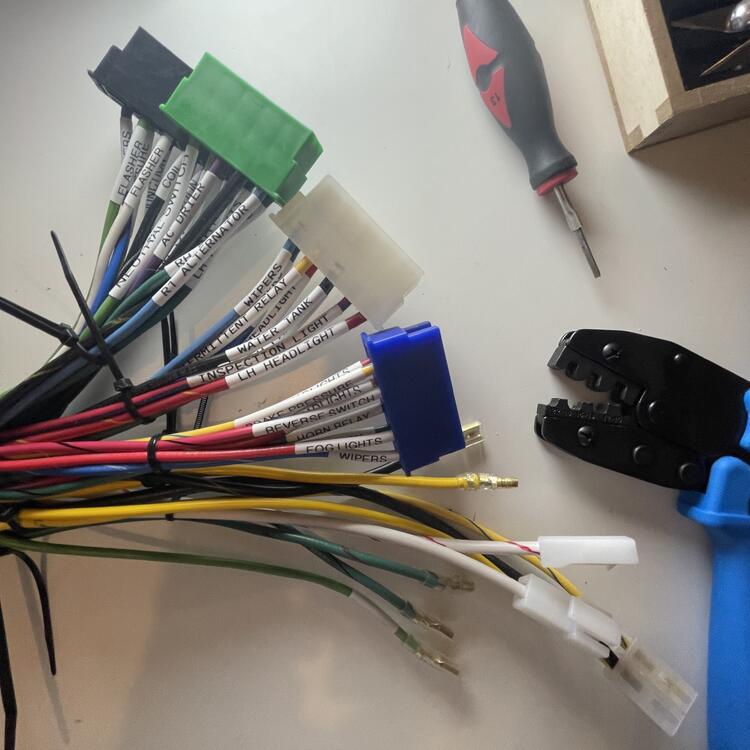
One complete (mostly) engine harness. Mostly because I am waiting for a handful of connectors to come in the mail. Once those are on I can instal it. I opted to wrap the harness in Tessa tape sealed with adhesive shrink tubing rather than use split loom or whatever. I think the taped look suits the car better and I’ve made provisions for anything I might add to the car that would need to tie into this (electric fuel pump). I used 51608 PET Felt tape on the end that is inside of the car to cut back on rattling or any other noises this could cause, but the rest of it is wrapped in 51036 PET Cloth Flame Retardant tape (their high heat chemical resistant stuff). As I was wrapping it up I realized that I had forgotten to put the diode on the Lamp wire to the alternator, so I had to splice that in. Looks okay. Good thing it’s wrapped up. I can’t remember if I mentioned this, but I opted not to splice the ballast resistor wires. Instead I made the stubby and put bullet connectors on them so the can be connected (I’m going to make a nicer looking jumper later). The reason is so if I discover that I do in fact need the 2,200 ohm resistor to make my tach work correctly with the e12-80 I won’t have to cut the harness open and can just pop it in there. And finally just a couple of shots of how I branched the wires prior to wrapping the harness. Changes from factory: Ballast Resistor delete AC pressure switch & compressor power Integrated electric fuel pump wiring (rather than separate harness) Ground wire direct to battery (-) 4-wire setup for 100 amp GM-style alternator


-
Exactly. The only reason I’m not 100% sure I’m going to do that is that I don’t know where I will put the servo. Otherwise it’s pretty simple.
-
Mine is black. I stripped them and repainted them before putting new seals on.
-
Thanks for the compliments! That’s interesting about the constant idle system. I’m assuming that plugs into an ECU? I’m running Mikunis and a ZX distributor so don’t have a computer to control. I’m thinking of rigging up an adjustable servo actuator triggered by the compressor that would interfere with the throttle lever to raise the idle when the AC is on, but I haven’t thought it through yet. I’ve integrated all of my AC wiring into my engine harness, which I am rebuilding now. Here’s the thread:
-
@gotham22 posted photos of some places where things for the AC go through the firewall on my build thread if that helps. https://www.classiczcars.com/forums/topic/51541-1973-rebuild/?do=findComment&comment=645520&_rid=30168 You should only need one wire, though, that goes from the AC thermostat switch to the pressure switch and then to the compressor.
-
Awesome! Thanks. I can probably do it tonight then.
-
@jfa.series1 Any specific paint recommendations? I have single-stage paint in all of those areas so I am hoping I can use something in a rattle can and be done with it.
-
It’s far more complicated than “copper is better than aluminum.” Yes, a chunk of copper transfers heat better than a chunk of aluminum. However, if you look at computer heat sync design, you’ll see that they frequently use a copper base to pull heat out of the devices, but then have aluminum vanes to radiate the heat because of aluminum’s ability to transfer heat to the air. I don’t know the science in this, but I have read in a handful of places that copper is better at absorbing heat and aluminum is better at expelling heat. That might be suspect, but it might be true. Also, copper radiators are tin soldered and aluminum radiators are brazed/welded with aluminum. Tin soldering inhibits the heat transfer between the copper pieces, reducing the overall efficiency of the radiator as a whole. Welding doesn’t introduce this problem, so that brings the net effect closer together. Additionally, aluminum is stronger, which allows manufacturers to use different designs and to have denser tubing throughout the core, not to mention parallel flow vs serpentine, etc. A copper radiator made the same way would weigh 100 pounds. Add into that the quality of the manufacturing and you are 100% precluded from saying a copper/brass radiator is always better than an aluminum one. I already know that (on a test bench) a Koyo cross flow is more efficient than a copper 3-row, and that is because of the design. But that doesn’t mean the Koyo is the better option. The fact that it can’t take a shroud negates some of that better design and manufacturing. But people still rave over their Koyos, which is why I am looking for real world experience with Champion vs Koyo. So if we could get back on topic and look at the performance of specific radiator models against each other I would appreciate it.
-
https://www.hotrodhotline.com/md/html/aluminum_vs_copper.php
-
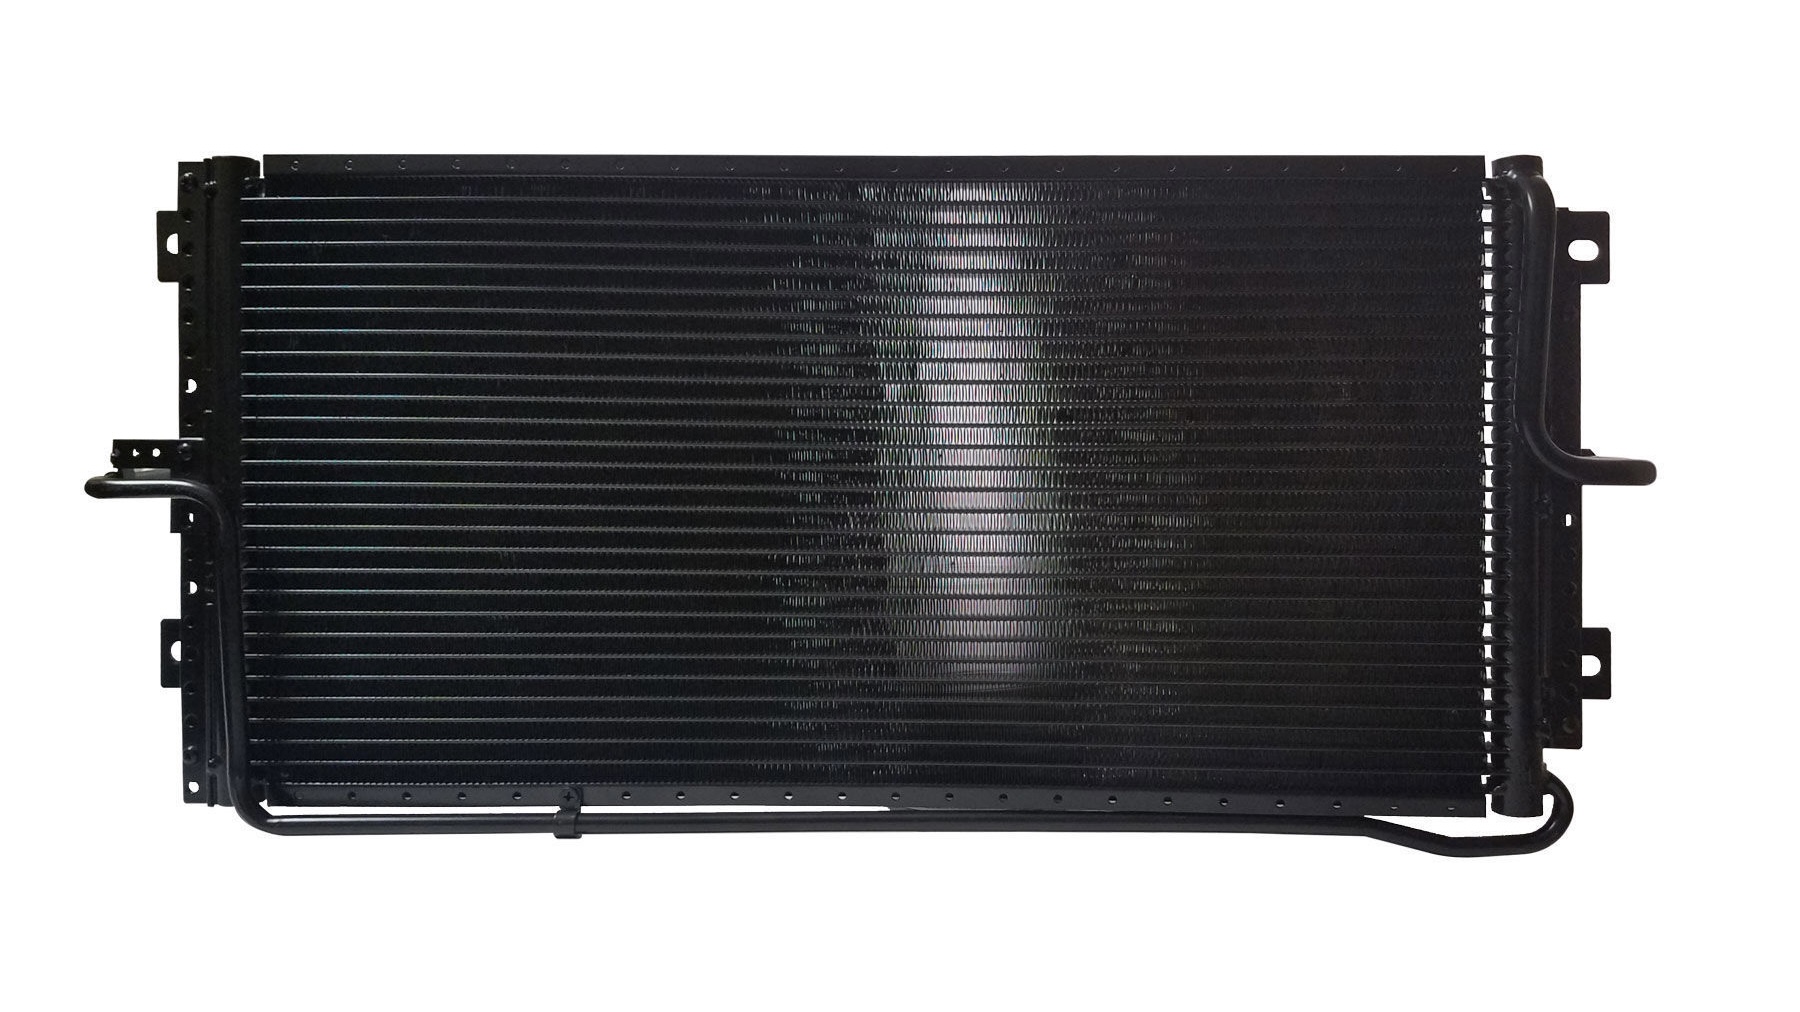
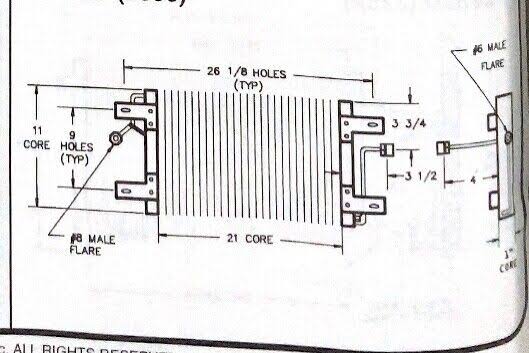
Okay, I know versions of this question have been danced around for a while but I’m having a hard time finding real information on it so I’ll risk the ire and ask it anyway: Has anyone compared the cross-flow radiators (Koyorad or MSA) to the 3-row radiators at Z Car Depot and MSA with a shroud? I’ve been going back and forth on this for a while and have seen speculation but I don’t think anyone has gone directly from one to the other and captured the results. Most of what I’ve found on this site and Hybridz is discussing going to one of those options from the factory radiator. Right now I can get a Koyorad cross flow with the correct cap for $427.74 (plus tax and shipping). I can get the 3-row from MSA $362.67 (plus tax and shipping). I think Champion makes these. They also have the 2-row high flow, but I’ve never seen anyone talk about those. That would cost $352.57 (plus tax and shipping). I think this is also from Champion. The Koyorad is cool and I’ve seen a ton of anecdotes about it cooking really well. Everyone who posts about theirs seems to love them. I’ve seen a ton of horror stories about the Champions leaking after a year or two. Based on that I was about to pull the trigger on the Koyo, but I really don’t like that it can’t take a shroud. I also don’t love how far down the bottom of the radiator comes and that they don’t have a drain plug. I won’t complicate things by mixing the options at Z Car Depot into this, because I think those are mostly the same as the ones at MSA (except maybe the “Ultimate” one, but I’m not spending $669 on this). If anyone has done actual comparisons between these, either by swapping from one to the other, by installing them on multiple cars, or through some other means of getting info about their performances, please chime in. Oh, and then there’s always the CSF brass/copper option… 🤪
-
Finally. The engine harness took me forever for a number of reason, but the main one being my earlier indecision on electric fans. I spent a ton of time trying to figure out where to put the relays (and the AC drier) in the car and how to protect them from the elements, only to realize that I am better off sticking with the mechanical fan for my purposes. Hear me out… 1. From what I’ve been able to find on the internet, the mechanical fan draws somewhere around 3,400 CFM at cruising RPM when below speeds that the fan clutch disengages and lets it freewheel. The best drawing electric setup I could find was two 12” High Output Spal fans that, together, would get me 3,740 CFM at optimal conditions. That’s great but they pulled 100 amps EACH when they start and 40 amps each when they run. The next best (strongest) option without the electrical consumption issue produced 3280 CFM. When I make changes I’m looking for better than stock. 2. If the mechanical fan really only saps 3-5 horsepower, then the simplicity, lower cost, and reduced wiring is more desirable than that gain. Yes I have a 100 amp alternator, but I don’t want to tax it more that I need to. 3. I am not a fan of the radiator shroud options for electrics. Anything that isn’t just a flat sheet reduces the clearance between the fan and the engine because the fans are all surface mounted. The mechanical fan protrudes into the old school shroud, and I can get a fiberglass replica at MSA. I did find an OEM metal one but it has been cut in two places and I think the guy wants too much for it. However, the reason I kept going back and forth was I do like that electric fans can pass more air over the radiator at a stand still than the mechanical one because they are governed by the engine temperature rather than the engine speed. I figure that I can always put a 1630 CFM pusher fan on the AC condenser if I start having issues later, or I can always change this later if I have issues. The engine harness is together, I have the connectors on the interior side, and now I can go on to adjusting the positions of zip ties that set up the the harness branches, which I hope to have done by a week from now. @billgtp, thanks for the photos! That was super helpful
-
Okay, I have a real dumb question, but seeing as my car was not put together when I bought it and I can’t find photos of this, I feel like I can ask anyway… How are the wires connecting the engine harness to the headlights routed? I don’t see any holes forward of the radiator support that go to the area behind the headlight bucket. The only thing I can figure is they go under the frame and then back up u set the fender, but this seem awe fully exposed to the elements. If someone could take some photos of the correct routing I would appreciate it.
-
I have to double check the measurements, but I think the vintage air 12x24 would be a better fit for a 240z. 13” seems to be the max height and nostalgic doesn’t have one wide enough but also that short. https://www.vintageair.com/custom/product-pop.php?pn=037033
-
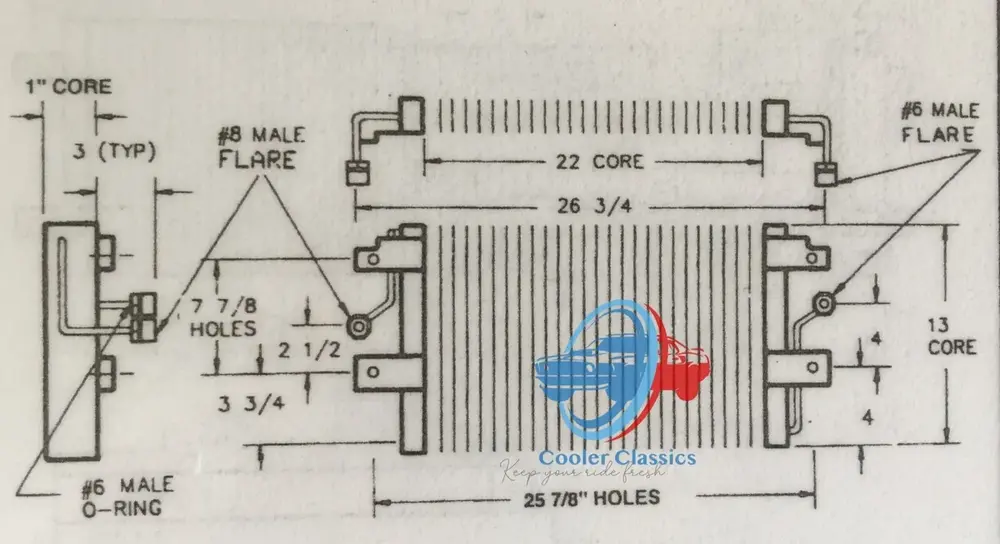
@Muzez, did you ever do this? Sorry to revive a dead thread, but I think the original question is an important one. I haven’t seen anyone confirm that a S130 A/C condenser fits into an S30 of any year. I’d like to know if one would fit in a 1973 240z. I’ve found the dimensions in inches for the 1979-81 280zx version: If these or the 260/280 versions fit I may get one of these: https://www.originalair.com/81-83-datsunnissan-280zx-parallel-flow-condenser-high-performance-parallel-flow Update: I found the dimensions for the 260z 2x2 and 280z 2x2 Condensers. I am speculating that the 260z had the same geometry as the 240z for this. 260z: 280z:


-
I was wondering if I had the light wires backwards.