


One Way
Free Member
-
Joined
-
Last visited
Everything posted by One Way
-
Thanks for the quick response. Computer dummy that I am always struggles getting the downloaded files viewable and my wonderful wife is not around to help and belittle me. My trusty Haynes manual had the same specs. I was encouraged by the consistent measurements but I am no engine expert either but Zed Head has probably forgotten more than I will ever know about these Z cars. Thanks for the helpful tips as always. The camshaft cleaning is underway. Thanks again, John-Lugoff, SC.
-
VALVE SPRING FREE HEIGHT-The specs I found call for 1.968 outer spring and 1.766 inner spring. I am having trouble navigating our computer to get the FSM to display on the screen so those specs may or may not be accurate. The springs are now all cleaned and am getting exact same measurements on all 12 springs. 1.920 outer-short by .048 1.695 inner-short by .071. How critical is the free height? Is the consistency in the measurements a good enough reason to reuse the springs on this budget conscious resurrection. Thanks for the input. The parts are all cleaning up nicely as I slowly continue the project in my limited spare time. Although 2020 has been a tough year for all, we still have plenty to be thankful to the LORD for getting us through so far. Thanks again, John-Lugoff, SC.
-
Thank you for the encouraging response. The good news is that my cam is not nearly as bad as yours was. The bad news is that I am not sure my elbow has enough grease. That clean up process will be quite the tedious task but certainly worth tackling. My rocker arm concern actually centers on the rocker arm itself, specifically the small contact end lobe at the valve stem contact area. Several are pitted and all 12 do have a slight wear groove. Thanks again, John-Lugoff, SC.
-
Just doing some more component replacing, repairing, evaluating on this resurrection project. The cylinder head checks out good. Our local automotive machine shop-Bob Rabon-removed and repaired a couple of the snapped off studs I was not able to get out, cleaned the head and just had to lightly touch up the valve seats. I did not have him check for flatness on the head, but I think I will drop it off to him before I get around to reassembling the cylinder head. The rest of the components-all intact but rusted up from the many years of bad storage before I purchased the project-have been thoroughly cleaned in the soak tank, and/or the EVAP-O-RUST solution. So far so good but am concerned about the rocker arms. They cleaned up very nicely but several of them have some pitting on the small contact lobe. The large contact lobes look like new on the rocker arms. Do they need to be replaced or can some delicate resurfacing work do the trick? The budget does not like the looks of the cost on replacement rocker arms. $47 each from Nissan and aftermarkets ranging from $9-$21 but those do not appear to have the same hardened lobes of the originals. Will I definitely need to change the pivot studs if I do new rocker arms? All of the repair manuals say yes but hoping for a budget helping solution. The valve springs are soaking right now and I will be measuring them to see if they are still within spec. Another concern is the rust on the camshaft itself. I have not yet tackled that ugly component. Any helpful tips gladly welcomed
-
I have one of the spot blasters purchased from TP TOOLS and it works great with the black oxide media on the odds and ends parts that need attention and other small areas on the car. I would imagine some baking soda would be a much softer media to use on those louvers. Thanks for all the helpful tips. I may try my hand at fabricating the passenger side upgrade. Hard to figure out why they never designed it that way from the start. My sheet metal bending skills are getting better with this resurrection project. I have gone from about a 2 to maybe a 6 on a scale of 1-10. Thanks again, John-Lugoff, SC.
-
Thanks for the quick response. I never thought to look under there. The hood vents are one of the small parts I have not yet gotten to. Not sure what the best approach would be to refinish the louvers. The black paint has peeled and blistered in many spots and the white plastic shows through. Impossible to hand sand, not sure about media blasting-may damage the plastic. Suggestions welcome, John-Lugoff, SC.
-
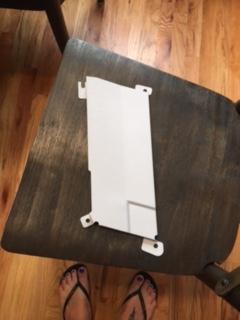
This piece was in the rear cargo area along with the easily identified parts and pieces that find their way into the cargo area of a car that had been sitting for quite some time. The clean and paint parts process has been going on for some time now on the resurrection project. This piece was painted the original body color and had some remnants of decals on it. I was able to read "air filter", "oil" on the label as well as a corner of a Champion spark plug decal logo. I cleaned the rusty portions and gave it a quick coat of rust primer. Just trying to prep the part and put in the appropriate box for the parts and pieces that have been been completed and will be ready to install. Thanks for all the help from the great group of Z people here, John-Lugoff, SC.
-
Thanks for all the info and link to the previous discussions. I know the door sills are not a critical part but I have been trying to blend in some of the more fun detailing projects like door sills, door handles, misc small parts, etc as a diversion from the much tougher and demanding projects like rear axles, suspension, did I mention rust removal, and more rust removal on this resurrection project. The diversity of projects makes the process more enjoyable for me. Thanks again. John.
-
Thanks for the responses. The buffing I have done on the inside of the sills just doesn't seem to do much. Thought I would try on the part that will not be visible before possibly doing damage on the outside. A soaking in Purple Power, some different small hand brushes, wet sanding a bit, really made a great improvement but I would like to bring them up a notch or two in appearance. On a scale of 1-10 they started off about a 3, now probably a 5-6 after the cleaning. No intentions of ever getting this resurrection project to a 10 but thought it might be nice to get these originals up a few more points. I may spend a bit more buffing time tomorrow on my day off before trying some self etch primer, metallic aluminum Fusion spray paint, and maybe a clear coat. Open for any suggestions. Thanks, John-Lugoff, SC.
-
I know there are new ones available but being budget minded, I would like to refurbish the ones that came with the car originally. Both are in decent shape after a good cleaning with some Scotchbrite and small brush. Just the expected slight pitting in a few spots but I would like to improve their looks. Can they be painted? Not sure about buffing them out to get some of the shine back. Suggestions appreciated. Thanks, John-Lugoff, SC.
-
The 78 resurrection project continues to move forward. I cleaned the drums, inside and out, using a 3M attachment on the drill and several different wire hand brushes and rotary wire brushes. I took them to work -O'Reilly Auto Parts- on my day off from work and turned them on the brake lathe. Followed up with a thorough cleaning, prime and top coat. I decided to go with the aluminum color since the drums are aluminum anyway. They look pretty good for 40 plus years old parts. Two quick questions for the Z experts. Both drums have the rubber inspection plug and just one has a metal button pressed in. What is the purpose of that button? What is the best way to keep the freshly turned drum surfaces from rusting since it will be a while before the brakes are actually put on. I was thinking a thin coat of grease which would have to be thoroughly cleaned before assembly. Thanks again. Really enjoying the project despite being so slow.
-
Being the assistant manager at O'REILLY AUTO PARTS, team members get a nice parts discount but a quick look into the bearings did not produce a high quality option. We have been too busy at our store of late to do any extra checking. Our team member pricing is almost always better than the ROCK AUTO pricing, plus no shipping costs. Although ROCK AUTO has had some parts available we were not able to source through O'REILLY in our long term resurrection project. The amount of time involved to do the rear axle bearings and seal is worth the extra cost of installing high quality parts vs unknown quality of off brands. Thanks again. John.
-
The bearing industry is certainly a peculiar one and difficult to navigate finding high quality components. Like so many other industries the company name is bought and sold and often difficult to know if the quality associated with the name went with the sale. All of the name brands AK260 mentioned in his post are or certainly were high quality products. Our resurrection project is slowly progressing. Almost all of the LR axle, control arm, axle/strut housing are cleaned, primed, and painted. The axle retaining nuts are on their way from NISSANPARTSDEAL-#43262-W1200-best price including shipping. Still researching the best source for high quality bearings. I already have the new seals, lug studs, lug nuts, and hardware ready to go. Thanks again for all the great info, John-Lugoff, SC
-
After debating with myself about a rear disc conversion and seeing all that needs to altered and my intended use of the Z car, the stock rear drum set up will be adequate. What is the best solution for finishing the brake drums? Mine are really in good condition on the inside-a quick run through the brake lathe will clean them up nicely- but the outsides are rather ugly. A good cleaning and media blasting should make them look better but what is the best paint or finish? Caliper paint, ceramic engine paint, high temp exhaust paint, or powder coating? Any suggestions gladly welcomed. Thanks, John-Lugoff, SC.
-
The rear axle bearings on my 78 resurrection project were NSK brand on the outer with a seal on the side with the extended inner race and open on the other side. Inner bearing was a NACHI brand which was open on both sides. I never thought grease and bearings would generate so many responses. Have a blessed Resurrection Day tomorrow. Thanks, John.
-
The grease did not look terrible by any means after disassembly. I was a bit surprised on how little grease there was in side the housing. The bearings themselves were packed with grease but very minimal amount of grease inside the hub cavity. The axles spun smoothly but a 40 plus year old car with no known history or maintenance I think should be replaced. The hub cavity would hold quite a bit of grease and the installation of a grease fitting might lead to putting too much grease in and damaging the seals? The outer bearing has a seal on one side and open on the other. The inner bearing is open on both sides. It is a very nicely designed piece but will certainly try to find out how much grease to install inside the hub cavity when it is time to assemble. Hopefully the factory service manual will give a heads up on that info. Thanks again, John-Lugoff, SC
-
Great success this afternoon without spending any money. I was able to pull the splined flange with my 2 jaw puller. A few blows with the hammer and steady force with the wrench pulled the flange right off. A couple of blows with the hammer with the nut threaded on the axle got the axle stub out of the inner bearing and a bearing puller along with my 2 jaw puller got the outer bearing off the shaft. Slow and steady with the puller achieved the desired goal. I will media blast, prime and paint the strut housing. Will be doing some research on locating the correct bearings and axle lock nut. I already have the seals and all new lug studs. Also have to decide on the rear brakes. Retain the stock drum set up or convert to a disc set up without a big cost or major engineering. Not sure if we can adapt a stock rear disc set up from a later model Z or other models. Advice will always be appreciated. I will not be able to assemble the stub axle until we decide if we are installing the drum backing plate which has to be installed prior to pressing in the new bearings and axle. Thanks again, John.
-
Perfect advice on the rear stub axle retaining nut! Used the Dremel tool to cut off the flat areas of the nut, mounted the whole assembly back onto the rim, stood the tire up and wedged it with a jack stand, and had no luck with the 4 ft cheater pipe on the breaker bar. A couple minutes of heat from the torch and it broke free quite easily with the cheater pipe and unthreaded smoothly off with just the breaker bar. Next step is to remove the splined flange and see about removing the stub axle. Not sure if my slide hammer will do the job or may have to invest or borrow a larger press. I just have a small 1 ton hand arbor press which is usually adequate for most of my projects. Thanks again for the great tips. Slowly making progress on this resurrection project. Thanks, John.
-
Thanks for the good word about my employer, O'Reilly Auto Parts. Our "NEVER SAY NO" attitude is promoted quite heavily by corporate management and we do our best at the front lines of the local O'Reilly parts counter to help out with those kind of strange parts needs that do not simply pop up on the parts catalog screen. Having a part # to work with is a HUGE help for both the rookie counter team member as well as for the more experienced counter team member who most likely will not have adequate time to research in finding the part# and be able to source it for the customer. I am the assistant manager at our local O'Reilly Auto Parts store and really enjoy helping people out with their not the usual run of the mill parts needs-brakes, spark plugs, filters, etc.-and really appreciate the customers who have done some homework on their own before coming in. The not so common parts are usually available through O'Reilly but sometimes the part # is the most difficult to find. Thanks again-John-Lugoff, SC.
-
No worship services today at our church so I tackled some yard work and tested out my homemade control arm shaft removal tool before having to go to work this afternoon. Tool worked perfectly. It is important to get the B-7 threaded rod to take the torque needed to pull out the bushing shaft. I used the 1/2-13 x 2ft threaded rod B7 grade-GRAINGER #19NM76, 1 inch x 12 black unthreaded pipe-GRAINGER #1CPY3, 2 heavy 1/2 flat washers-GRAINGER #22UE17, welded a M12-1.25 nut to a 1/2-13 threaded rod coupler, put that through the pipe and threaded the nut onto the shaft. I also put a 1/2-13 nut to jam the rod to the coupler as an extra measure of strength. A good sized 3/4 box wrench got the process started and then switched to a ratchet flat wrench to continue the pulling. A liberal spray of lubricant on the threaded rod before beginning the process is also a good idea. Certainly saved some money on the tool and no damage to the shaft. A good cleaning and lube on the shaft should be fine. Now just have to get the old bushings out of the control arm. Project for another day. Thanks again for all the input, John-Lugoff, SC.
-
Very familiar with prevailing torque nuts. I believe that would work on the Z stub axles with the 2 flat sides. Are the ZX axles fully round at the threaded end or do they have the flat spots? The torque specs are quite high on the rear axle nuts. I will have to do a bit more research. Thanks again for the great tips and pictures. My struts were the originals rather than the replacement cartridge style. That is what was confusing me as we tackled this project. I wrongly assumed the originals were also cartridge style. I believe I will be purchasing the KYB kit that includes the struts and bellows. The inside of my tubes look pretty good. A bit of honing and high quality grease on the cartridges should work out well. Cleaning, media blasting, priming, and top coating the rear suspension components will be quite the project in itself. Thanks again, John.
-
Thanks for the great tips. Not damaging the stub axle threads is critical in this process. What type of locknut is the ZX version? Do the ZX stub axles also have the flat spaces? BLASTER certainly worked on the strut removal. Had a few minutes before going to work and shocked myself with a few good tugs by hand on the strut rod and it began coming out of the tube. That solved my #3 issue from my list in previous post and the great info in these past several posts should help with issues #1 and #2. Thanks again. Off to work I go-John-Lugoff, SC. Jeff G-Your narrative description of the axle nut removal was far superior than the video description I found on YOU TUBE. Great job in a detailed explanation. In this case your words were worth a thousand pictures.
-
Certainly learning as we move along in the resurrection project, thanks to the wealth of Z knowledge on this site. Just a quick update. The coil spring has been safely removed with the compressor I purchased. I have the entire rear control arm assembly pulled out of the car. I am doing only one side at a time. The gland nut came off quite nicely. The LR strut had very little resistance up or down, the boot was torn and brittle, some scoring on the strut shaft, no signs of leakage, but not a whole lot of oil came out after removing the gland nut. Next obvious challenges. #1 The swing arm shaft removal. I have fabricated a pulling tool similar to the one offered at Z Car Depot. Hopefully it will work. #2 The stub axle retaining nut, bearings, and seal. The nut is obviously a use only once piece. What is the best way to remove the flattened portion of that special lock nut without damaging the threaded portion of the shaft? The one video I watched was a bit unclear but used a DREMEL tool to cut it off and a screwdriver or chisel to remove it. #3 Removing the rest of the strut. Will a slide hammer be helpful to yank it out of the tube or should a VISE GRIP work clamping it to the threaded end. I did not see any retaining rings inside the tube. My schedule required me to leave the project at this level of incompletion and will not be able to get back at it for several more days. Thanks again for all the tips and helps. Hope all are managing through the current worldwide crisis. I am following common sense precautions but mostly relying on my GOD who is my refuge and strength, a very present help in trouble. PSALM 46:1
-
I believe these to be the original struts on the car. Last verified vehicle registration was 1995. it has been sitting since then. I purchased the resurrection project about four years ago .The strut spring compressor tool is inexpensive enough to purchase and have whenever needed. It will probably be next week before I can get back at the Z project. Is oil the way to go when reinstalling new struts into the receiver tubes or would anti-seize or high quality grease work as well. The few struts I have replaced on our newer personal vehicles were all one piece units that simply bolted into place and I wrongly assumed these rear struts were similar in design and sat in the pocket of the rear axle housing. If I had any brains that worked I should have noticed the replacement strut pictures had nothing to support the coil spring. Now I know how the Z cars have the struts designed and looking forward to the challenge. Thanks again. Keep the helpful tips coming, John-Lugoff, SC
-
Dummy me alert! After reading some of the info here, I now realize the actual strut goes down into the receiver tube. I initially thought the receiver tube was the actual strut. Next step is a spring compressor purchase and then attempt to remove the strut from the receiver tube. The boots are torn, the rods pretty scuffed up, time for new struts and boots. I probably will just keep those receiver tubes attached to the axle bearing housing and clean and paint as needed. Will keep you posted. Thanks, John.
