


Dave WM
Free Member
-
Joined
-
Last visited
Everything posted by Dave WM
-
 do not have the parts catalog for that one. It maybe a weak spring inside the lifter. My take on how it works is if the cam lobe is left down at shut down, the lifter will bleed out under the load of the valve spring. BUT as soon as the cam lobe rotates over it "should" lift the internal piston pulling oil thru the one way valve on the bottom of the piston, thereby filling the lift. Now IF the spring is weak it may not be able to exert enough pressure to overcome the viscosity of the oil to draw up thru the check valve. I may end up comparing a spring tension to a known good to see if I can confirm this. Not really interested in converting to manual since I like the way the valve mechanism works when it works correctly. Worse case is I do nothing and it ticks for a few seconds until the oil pressure overcomes the one way valve and it "pumps up" on its own. I do notice times when there is NO tick on startup, again I think this relates to the cam lobe random stopping position, that is if no load then the pivot never bleeds down in the 1st place due to lack of pressure from the valve spring.
 -
I have one that keeps pumping down, would like to try a different one. If you have some you dont need let me know what you want for them. I have tried cleaning, just one keeps failing. Not a big deal as it quickly pumps up, but i would still like to try with a different one.
-
If you are going that far I would replace the evap since they are available (for now). IIRC it comes with a modernish expansion valve which is a good thing. I presume the under hood kit has the right condenser to work with R134. I looks like a PF condenser. I seem to recall two aftermarket evaps out there, one was all alum and the other looked to be copper wit alum fins. I think all alum would be better for performance since the orig was that way.
-
video
-
I keep an eye open for them. I just uploaded another video of the running engine with the high impedance injectors and a 88 turbo ecu (not the one with the replacement diodes). Ran nice got a 55 mode 3 code (no problems stored). Will get started on Jeff harness soon, the one in the video is my universal harness (can run any turbo computer from 82-89). Jeffs will be custom for just the 88-89 and will include FPR vacuum shut off for hot restarts and speed sensor for auto clean of MAF (and per the FSM also used in AF mixture control).
-
anyway the plan is to get the 200sx, look it over, see if I can figure out A if the has the same type of diodes, B clip them out, C see if I can trace back to the pump control ciruit to see how they are connected. Dont really want to mess with the current working ecu until i know more about it. I have a unmolested ECU that I can also reference.
-
maybe IIRC a damper diode?
-
looking forward to getting that donor ecu (200sx) to see what it has inside..
-
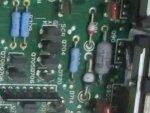
only symptom was a fuel pump that would not shut off. Its supposed to run 5 seconds with intial ign on, then shut off until start. I was checking some of the resistance readings from pin 108 (the ground on circuit for the pump relay). It had 10 ohms with no power attached. Apparently enough to ground the pump relay. working ecu had like 50k IIRC. At 1st I was thinking a shorted C-E driver transistor, but traced back to in and seemed ok. more tracing I "think" i found a trace from that same area to around those diode. Not sure anymore. anyway one of them looked brown so tested, found it shorted, then same for one next to it. Clipped out of circuit, checked again dead short. 10 ohm go away to much higher K ohms iirc, so must have been in the circuit some how.
-
that was a capt kirk copy (kirk in what are little girls made of?), will get a better picture later. Hopefully the sx200 ecu on the way will have a similar circuit I can steal from.
-
I bought a cheap 86/87 200sx computer on the outside chance the parts will be on there. Hopefully the only real diff is the number of cylinders and not any thing to do with the pump driver parts...
-
I replaced with reg diodes when pump would not shut off after 5 seconds with key in ON position. found these two to be dead shorted (out of circuit). it all works but I am guessing they maybe special (maybe avalanche) I am pretty sure they are not Zener, the pcb has "D" printed on it. That and I dont think a reg diode would work in place of a Zener but not sure about that. anyway pump works and ECU works but I don't want to use it incase they are some kind of clamping high speed diode to protect the rest of the circuit. anyway if anyone has any ideas about these please let me know. its the two round ones one blk and one red for the cathode.
-
old fuel injectors can def cause issues. only sure way is to pull them and test. beware of buying "new" replacements, better to do some research and see if you can find someone to test and if needed clean.. You may end up with a dud that will not come up to spec, hopefully if that happens whoever you find to service them can get a replacent core.
-
so the AFM shows open then dies or dies and then shows open? like in comedy, its all about timing. The bypass should show the problem if indeed the afm swtich.
-
sounds like a good combo, the issue with the 3.54 is it can limit use of high gear, but here in flat land country its generally not a problem. I do get very good gas mileage, recent trip was around 27 mpg. mostly 65ish flat highway. With the 3.54 you really can not use OD until about 60 min and then only on flats. I have a 3.7 I may try someday...
-
what is the final gear ratio? I have a 3.54 on the differential and get 80mph at 3k
-
check to see if the PCV valve is not stuck. Just remove it and give it a shake, should hear a rattle.
-
maybe some one else has had luck with the compressed air method and can chime in.
-
You could try the air, a lot easier, I would set the compressor up as high as you can get it. IIRC mine peaked out at about 120psi, pop the valves with the plastic mallet, you will hear them pop air under pressure, help to seat them, then give it a go. If not the rope trick works for sure, just more time consuming. I don't "think" its possible to drop a valve completely as long as the piston is at TDC (if you got foolish and had one at BTC, yikes) The reason I am saying this is the crank is going to want to turn under the pressure if you get just a hair off TDC. The more I think about it, the rope is fool proof... If you have ever done a leak down test you will know what I mean. I dont think the piston would travel far enough to be able to lose a valve since the pressure goes away quickly as the crank turns. IIRC it only moves about 10 degrees off TDC.
-
just remember to make sure you stuff rags around the timing chain to prevent anything getting dropped down the hole. That would ruin your day.... give the valves a light tap with a plastic mallet after getting the keepers back in, just to make sure all is seated. A small magnet on a collapsible stick helps a lot when getting the keepers out. Lastly the biggest issue I had was keeping the valves from compressing when using the spring compressor. I did not have much luck with compressed air holding them closed, IIRC I used some nylon rope, or maybe it was some plastic tubing, I don't recall, maybe both were tried. again a slight rap with the plastic mallet before applying the spring compressor may help to "break" the hold the keepers have before applying the compressor. I think I may have had the piston a couple degrees before TDC, then after getting the nylon rope in good and tight, use a 27mm socket to turn the crank just enough to really jam the piston to TDC, compressing the rope enough to keep the valve from decending. It sounds complicated but its not really hard when you get into it.
-
The valve seals are not hard to replace if you have the right tool to compress the valve spring with the head in place. I would just do that, and at least it will no longer be part of the discussion. You will know right away when you get to them. The whole job will take less that 1 hour.
-
nice fix on the cat.
-
I would just pull the regulator out and replace the burned-up wire if you have it working again. Is it working now? You should also examine the plug connectors, look for corrosion. clean it up with a small spiral metal brush and some de-oxit electrical cleaner.
-
To rotate the bolts on the back side you use a smallish wrench fitted up in the tunnel area, the spin the drive shaft. the wrench gets caught, and then turns the nut as you rotate the drive shaft. It really goes a lot quicker than described. Just remember you don't have to twist the wrench, the movement of the drive shaft does the twisting, while the wrench stay stuck in place. You just have to crack them off, from there you can finger spin them off. FYI you can tighten the same way.
-
I don't know if this is correct but it's how mine was, the wires were routed outside the support bracket for the center console. They are not well hidden this way, but you would have to really look hard to notice as they are pretty much covered by the center console. IIRC then the console can be pulled and the radio can remain behind (after removing the knobs and shaft nuts that hold it to the center console that is).

