.jpg.744a2191fe424117eba7167d17fc15d1.jpg)
jpc3006
Free Member
-
Joined
-
Last visited
Everything posted by jpc3006
-
.thumb.jpg.4f54021f7cd56e62dbb0a919d36f2306.jpg) UPDATE: I bought and installed the reproduction seal from the ebay seller (link in my original post). Fit perfectly and so far no gas leaking from the filler cap. I am quite satisfied.
UPDATE: I bought and installed the reproduction seal from the ebay seller (link in my original post). Fit perfectly and so far no gas leaking from the filler cap. I am quite satisfied. -
No, I only run alcohol free gas in the Z.
-
Hi, I've got gas leaking from the gas cap when tank is near full. I suspect the 51 year old gas cap gasket has hardened and is no longer sealing and I don't want to keep the tank only half full. Has anyone used one of these e-bay reproduction gas cap seals (https://www.ebay.com/itm/275162293539?var=0&mkevt=1&mkcid=1&mkrid=711-53200-19255-0&campid=5338590836&toolid=10044&customid=61d11ae9f5701daecbff7c749e37328f). If so how well did it work? Thanks.
-
I also have a '73 with the 60 amp alternator upgrade as described above (with the electric fuel pump and wiring modification removed). It seems to work fine with the car actually charging at idle with the lights on. My question is whether the 8 gauge wire between the alternator BAT terminal and the starter solenoid is necessary as it creates a parallel circuit to that running through the ammeter, essentially rendering it not useful. I understand the rationale about minimizing current flow through the stock wiring if running large electrical loads such as radiator fans or a big stereo but with an unmodified car is there a benefit?Note that even with a 60 amp alternator the ammeter rarely indicates a charging rate of more than 10 or 20 amps even just after starting the engine, so I doubt that the stock wiring is operating beyond its design conditions.
-
Dave, It is the original voltage regulator that came with the car, so I should be able to adjust it. I think I have a Nissan OEM spare that I bought back in the '70s but now I have to find it! FYI, I just went out and measured the voltage at various engine speeds with a VOM that is probably more accurate than the gauge in the car and it seems that the voltage peaks out at 15.3V at 2500 rpm and above, I had 13.7V at idle (all with no load). At this point I think it is probably OK as long as I have some load on the system such as the fan or lights as that brings the voltage down to what I would think is a normal value. Thanks, John
-
I noticed what seems to be a high voltage reading while driving today, but I am not sure if it is really an issue. I just added a voltmeter otherwise I would not have noticed anything! The car is a 1973 240Z with the original stock alternator and the original (points style) voltage regulator. While driving at highway speeds I noticed that the battery voltage measured over 15V. The shop manual calls for 14.30 to 14.80 volts at 2500 RPM and 68 F (67 F here today). But in the specifications for the voltage regulator it gives a regulating voltage range of 14.3 to 15.3 volts at 68 F. When I got back in the driveway I did a quick test at various engine speeds and electrical loads, everything seems to be OK with the exception of the 15.1V reading at 2000+ RPM. Here are the measured voltages: Engine at Idle: All electrical loads off (except ignition) = 13.6V Parking lights on = 13.9V Headlights on = 13.7V Headlights + fan on = 13.4V Engine at 2000 RPM: All electrical loads off (except ignition) = 15.1V Parking lights on = 13.9V Headlights on = 13.7V Headlights + fan on = 13.7V Battery Voltage with engine off = 12.6V. Is this a problem? Should I adjust the voltage regulator? Thank you for your advice, John
-
Inline6, The bushings in your first post were Nissan stock bushings consistent with those on my 1973Z. Unfortunately, that solid style bushing has been NLA for quite a while and all that was available were the serrated type bushings. I posted about these bushings in January 2020, you can find that thread if you search on mustache bar bushings. I believe the correct upper bushing with the 16 mm hole is Nissan part no. 55474-N4300. The lower one has a 13 mm hole and is part no. 55475-E8300. In was not able to locate any source of the solid bushings and used the later serrated ones which are supposed to be direct replacements. I've run with the later style bushings for two years and they seem to be fine.
-
Yes, that AtlanticZ page is where I looked first and it doesn't show a "K" cam, that's why I asked the question in the first place. The head has P79 cast into it, plain as day and it has not been cut as it still measures 4.250" thick. I spent some time cleaning up the parts and found a few curious things. I measured each cam lobe with a dial indicator and while they all are very close to the specs in the FSM for overall lobe height, some of the lobes have a 0.001" to 0.002" shallow depression between the base circle and the lobe ramp. I can't believe it was manufactured this way and it has to be due to wear but it is not on the lobe point where I would expect it. Another thing is that all of rocker arms seem to be new with no wear when compared to the other components on the head. I originally thought the rockers were stock Nissan parts but they don't have the Nissan parallelogram on them, they are marked "Y73" so they are probably aftermarket. The springs, valves and valve seals all seem to be Nissan OEM parts and judging from their condition probably the original parts that came with the head. So my thoughts are the same as yours, that the previous owner swapped out the cam and installed new rockers when he tried to rebuild the engine.
-
Zed, I finished stripping the head yesterday and it appears to be unmolested, no marks on the cam towers, stock rockers and valves, no scratches or anything indicating that someone had been in there and the cam rotates just fine but the timing chain and sprocket are aftermarket. I know that the kid and his mechanic dad that I bought it from rebuilt the bottom end. It has dished aftermarket pistons and the rods are not in their numbered positions. After seeing what they did to the bottom end I was concerned that they had also worked on the head, but it doesn't look like it. I'll try to find the thread that mentioned the L24e "K" head. I looked at so many threads here and at HybridZ that I can't remember where it was. AK260, Your suggestion is something that I had in the back of my mind, get a set of custom forged pistons to bump up the compression and leave the head alone. The cast piston route is cheaper but probably not better than forged pistons and lightweight rods. At this point I am going through the engine to know exactly what I have. I won't be working on the engine to much in the winter unless the weather stays unusually warm like it has been here the past week so I have time to decide what route to take. Thank you both for your comments and suggestions
-
Zed, I just wanted to know if it was the original cam in the 280ZX L28. I looked at the 1982 FSM but couldn't find a reference to the code on the end of the cam. The AtlanticZ Club cam index shows a "F" code for the NA 280ZX, it doesn't list a "K" code. I have read that the "K" cam was a L24e cam which has very different specs. I haven't decided what to do with this engine but if I can find some flat-top pistons for the F54 the plan is to mill the P79 head 0.080" and build a higher compression L28. At that point the cam will either be reground or simply replaced with a more aggressive one. Thanks, John
-
I am currently disassembling an L28 engine (F54 block, P79 head) from a 280ZX that I bought from a guy several years ago as a potential spare engine. When I removed the camshaft I checked the marking on the firewall end and it is clearly marked with a "K" and nothing else. It is a Nissan cam with E30 and Japan cast into it. I tried researching this camshaft but it isn't listed in the typical sources. What I've come up so far is that it may be from a Canadian 280ZX or a Maxima L24e. Does anyone know the specifications for this camshaft? Thanks, John
-
EastCoast, I just noticed your post. FYI, I eliminated the distributor points in my 1973 Z this past spring and am running the same setup as you (Pertronix Ignitor II with a Flamethrower II 0.6 Ohm coil) and have had no problems. I believe the installation of the Pertronix Ignitor II with a Flamethrower II 0.6 Ohm coil has smoothed out the idle a bit and the engine pulls strong to 6000+ rpm. As part of my installation testing, I did run in multiple configurations: 1) the Pertronix II with the stock ballast resistor and stock Nissan coil, 2) Pertronix II with the stock coil and no ballast resistor, 3) Pertronix II with 0.6 Ohm Pertronix coil and ballast resistor, and 4) the final configuration of Pertronix II with the 0.6 Ohm coil and no ballast resistor. In all four configurations my tach operated correctly. I did this because I was concerned that higher current in the ignition circuit might cause problems with the tach. I even took video of the speedometer and tach at various engine speeds for each configuration to verify that the readings were consistent. If you want to run the Pertronix II and 0.6 Ohm coil w/o a resistor, my recommendation would be to try the mod that Zed Head described above, if that doesn't work I'd be looking for another tach.
-
Search "Koni Sports for Classic Z's." This thread has all the information you desire and probably more, look at the latter pages of the thread.
-
70zfun, Reading your post made me recall my experience last year with a similar engine "miss" at high speed and high load. My engine is the original L24 rebuilt 3 years ago with Ztherapy carbs, Pertronix II, and 0.6 Ohm Pertronix coil (ballast resistor bypassed). I may be running a bit more advance than you as I have 35 degrees total (static + centrifugal) at 2800 rpm. At full throttle in 3rd going uphill merging onto a limited access highway I would get a miss that would not let it rev above 5000, it did not backfire but just wouldn't pull. Never noticed anything in 1st or 2nd gear. Everything on the engine was new or in the case of the carbs, rebuilt. The problem was resolved with new set of NGK spark plug wires. It turned out that the wire to the number one cylinder on the other wire set was defective. As a test, this morning it revved to 6000+ with no issues. I think you are on the right track, set the valves, timing, and perform a general tune up to see if there is any improvement, if not, look at your coil and wires.
-
Tool-Boy, Koni's "Ikea-like" instruction sheet indicates that you should add oil to fill the gap between the strut tube and shock cartridge. It helps cool the shock and minimizes corrosion. If you ever want to remove the shock from the strut many years down the road you will be very happy you added the oil. I've always used ATF in my struts and they were rust free when I installed the yellow Koni's last winter. Just don't overfill them and leave a little freeboard for thermal expansion.
-
Andy, The original Datsun struts didn't have a dust baffle, neither did the red Konis from the 1970s and 80s. This is the third set of Konis I've had on the car. The baffle is new to me with the yellow Konis and from what I've read it is there to keep pneumatic pressure from damaging the strut seal when bottoming out on the bump stops. I don't know if it is really necessary but I trust Koni knows what they're doing with shocks. It's a small world, my daughter lived in Lancaster until she got married a few years ago. What a beautiful town and area. I know several folks who moved there in retirement. Good luck with your Z car. John
-
There is a very long thread on this site describing the installation of the Konis, just search "Koni.". Here is a link to a youtube video embedded the thread - https://youtu.be/WoyR1-cAWH4. MSA sells a tool for tightening the "gland nut" on the strut. I used it and it works pretty well and doesn't mar the nut like a pipe wrench, just be careful that it doesn't slip. The video shows where the dust baffles go. For a bump stop I used KONI foam bump stops (70-34-95-000-0). They work well with the stock springs, but they may be too big if your car is lowered.
-
I agree with 240znomad's recommendation that you look closely at the throttle linkage. When I converted from flat-top carbs to round-tops on my '73 I also replaced the intake manifold, throttle linkage and balance tube to match the earlier 1971 carbs. Even doing all that required adjustment of the throttle linkage rods. If you disconnected the linkage and still can't get the idle speed down you may have a bent or damaged throttle plate. I experienced this on my wife's Toyota years ago when a backfire through the carb bent the throttle plate and the car would idle above 2000 rpm. The fix was to replace the throttle plate.
-
Zed, Then I must have put that foam in there. It's been over 20 years since I had the diff out and I didn't remember. In any case I think the foam deteriorated to the point where it blocked the vent and I got a cover gasket leak. So today I put a new gasket on and, at least for now, I have an open vent. I'll see if it blows any gear oil out. Thanks for the prompt response, John
-
Does anyone know if there should be a foam filter inside the differential vent? The differential is an R180 on a '73 240. I removed the plastic differential vent and there was some disintegrating foam material inside which fell apart when I removed it. I am going to reassemble without the foam and hope that it doesn't blow the gear oil out the vent.
-
I don't know what year your car is but on my '73 the taller side of the bracket is on the inside, towards the center of the car.
-
KeysZ, FYI, I also am the original owner of a 73 (1/73 build date) so I went and tested the turn signals as you described. The marker lights on my car also dim slightly when the directionals blink (when the parking lights or headlights are on). I probably would not have noticed this unless I was specifically looking for it and this is not surprising as the marker lights and the tail lights are on the same circuit. I could not detect any difference in the blinking of the tail light and the turn-signal/stop light. Since you are noticing this when you change the position of the combination switch, that is where I would focus my attention. Note that I have installed MSA's parking light upgrade harness so the current driving the lights is through a relay and not the combination switch so the behavior I see may be different than your car. John
-
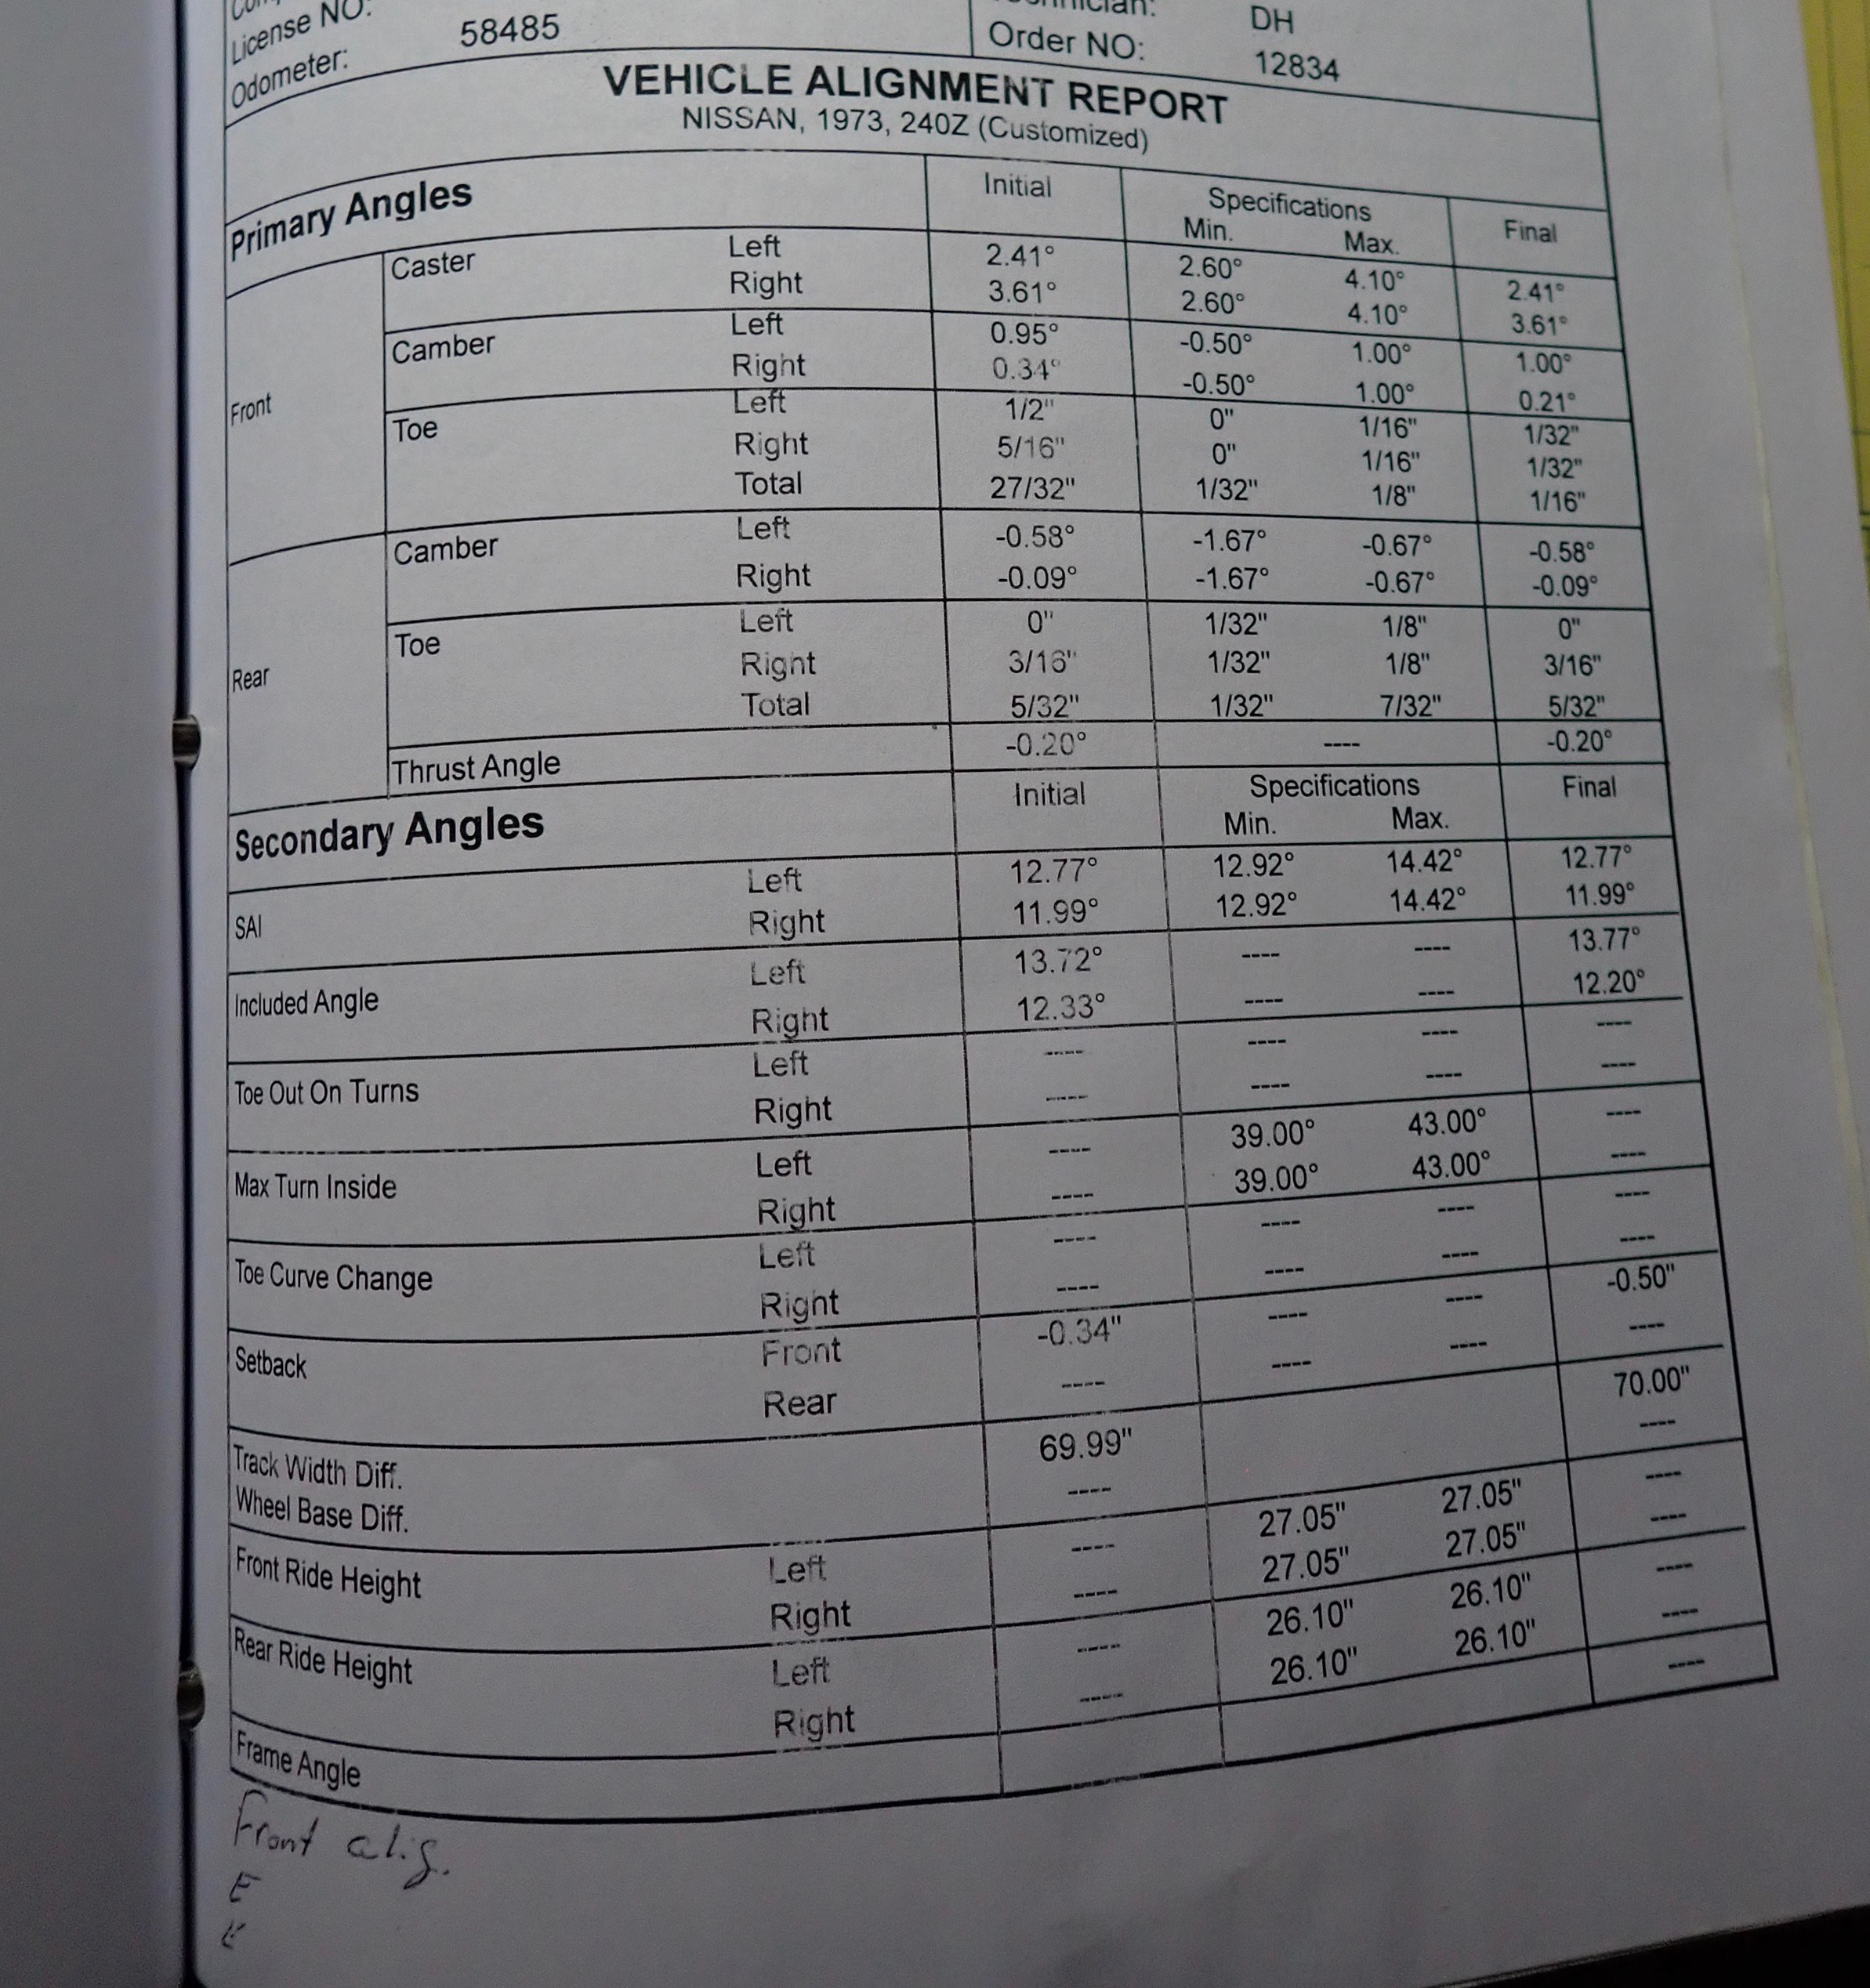
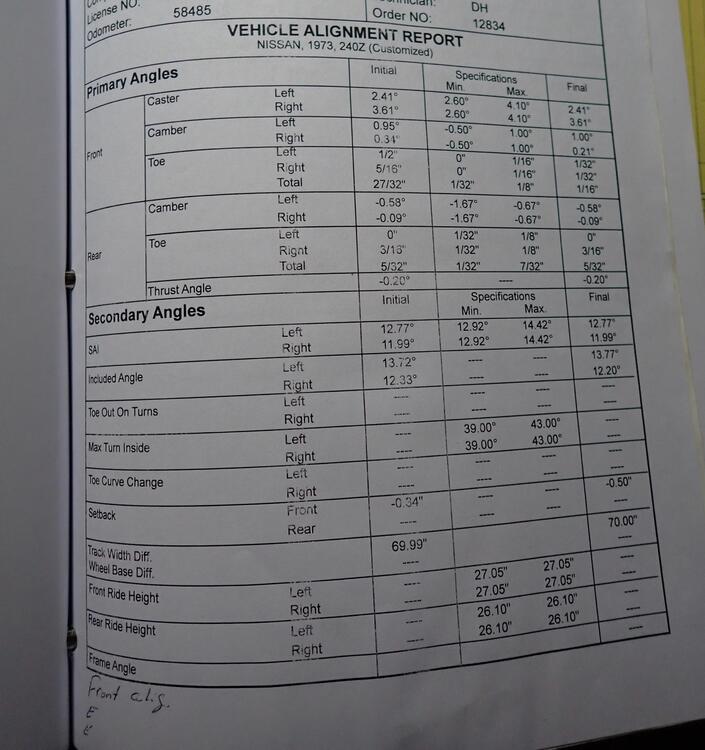
I was in his garage an watched everything but I am not really sure exactly what he did but he did lift the rear when he installed the "fixtures" to the rear wheels and I did get rear toe, camber and thrust angle measurements. The thrust angle measured correlates with the RHS rear wheel toe-in of 3/16". I plan to deal with this by shimming the inner front bushing. I also manually checked the rears when I got under it to measure. I measured the leading edge of the spindle pins to a drain hole on their respective sides and got the same distance. Not very scientific but this may have shown something if there was a gross problem. So at this point I have no reason to believe the rear is the cause of the setback but then again I found nothing wrong with the front either. You may have something on your comment about build quality. In my readings I saw a comment that some automotive manufacturers consider a 1/4" wheelbase variance within manufacturing tolerance. I know that the alignment specs on my old Ford Explorer were so wide that you were "in spec" even though the car was eating tires every 8K miles! Who knows what tolerances Nissan had for the 240Z back in the seventies. Dave (the alignment shop owner) was most concerned with the camber of the LHS front wheel. He didn't seem to be concerned with the setback. My thinking is that if I should first get the caster equal on both sides then address the camber issue as it will change with the caster change. See attached printout.
-
Zed, I looked at the chassis dimensions before posting and, as you indicate, they do not show a difference side to side. I don't think the T/C rod bushings are my problem as they are urethane and in good shape. When I was looking for problems under the car I measured the "gaps" between the washers and mounts on each side and they're the same. As best I can tell the T/C rods themselves are straight. Since I removed and painted them there is a slight chance that I swapped left for right even though they were labeled. I am considering removing both and swapping them side to side just to see if it makes a difference but I suspect it won't. Thanks for the feedback.
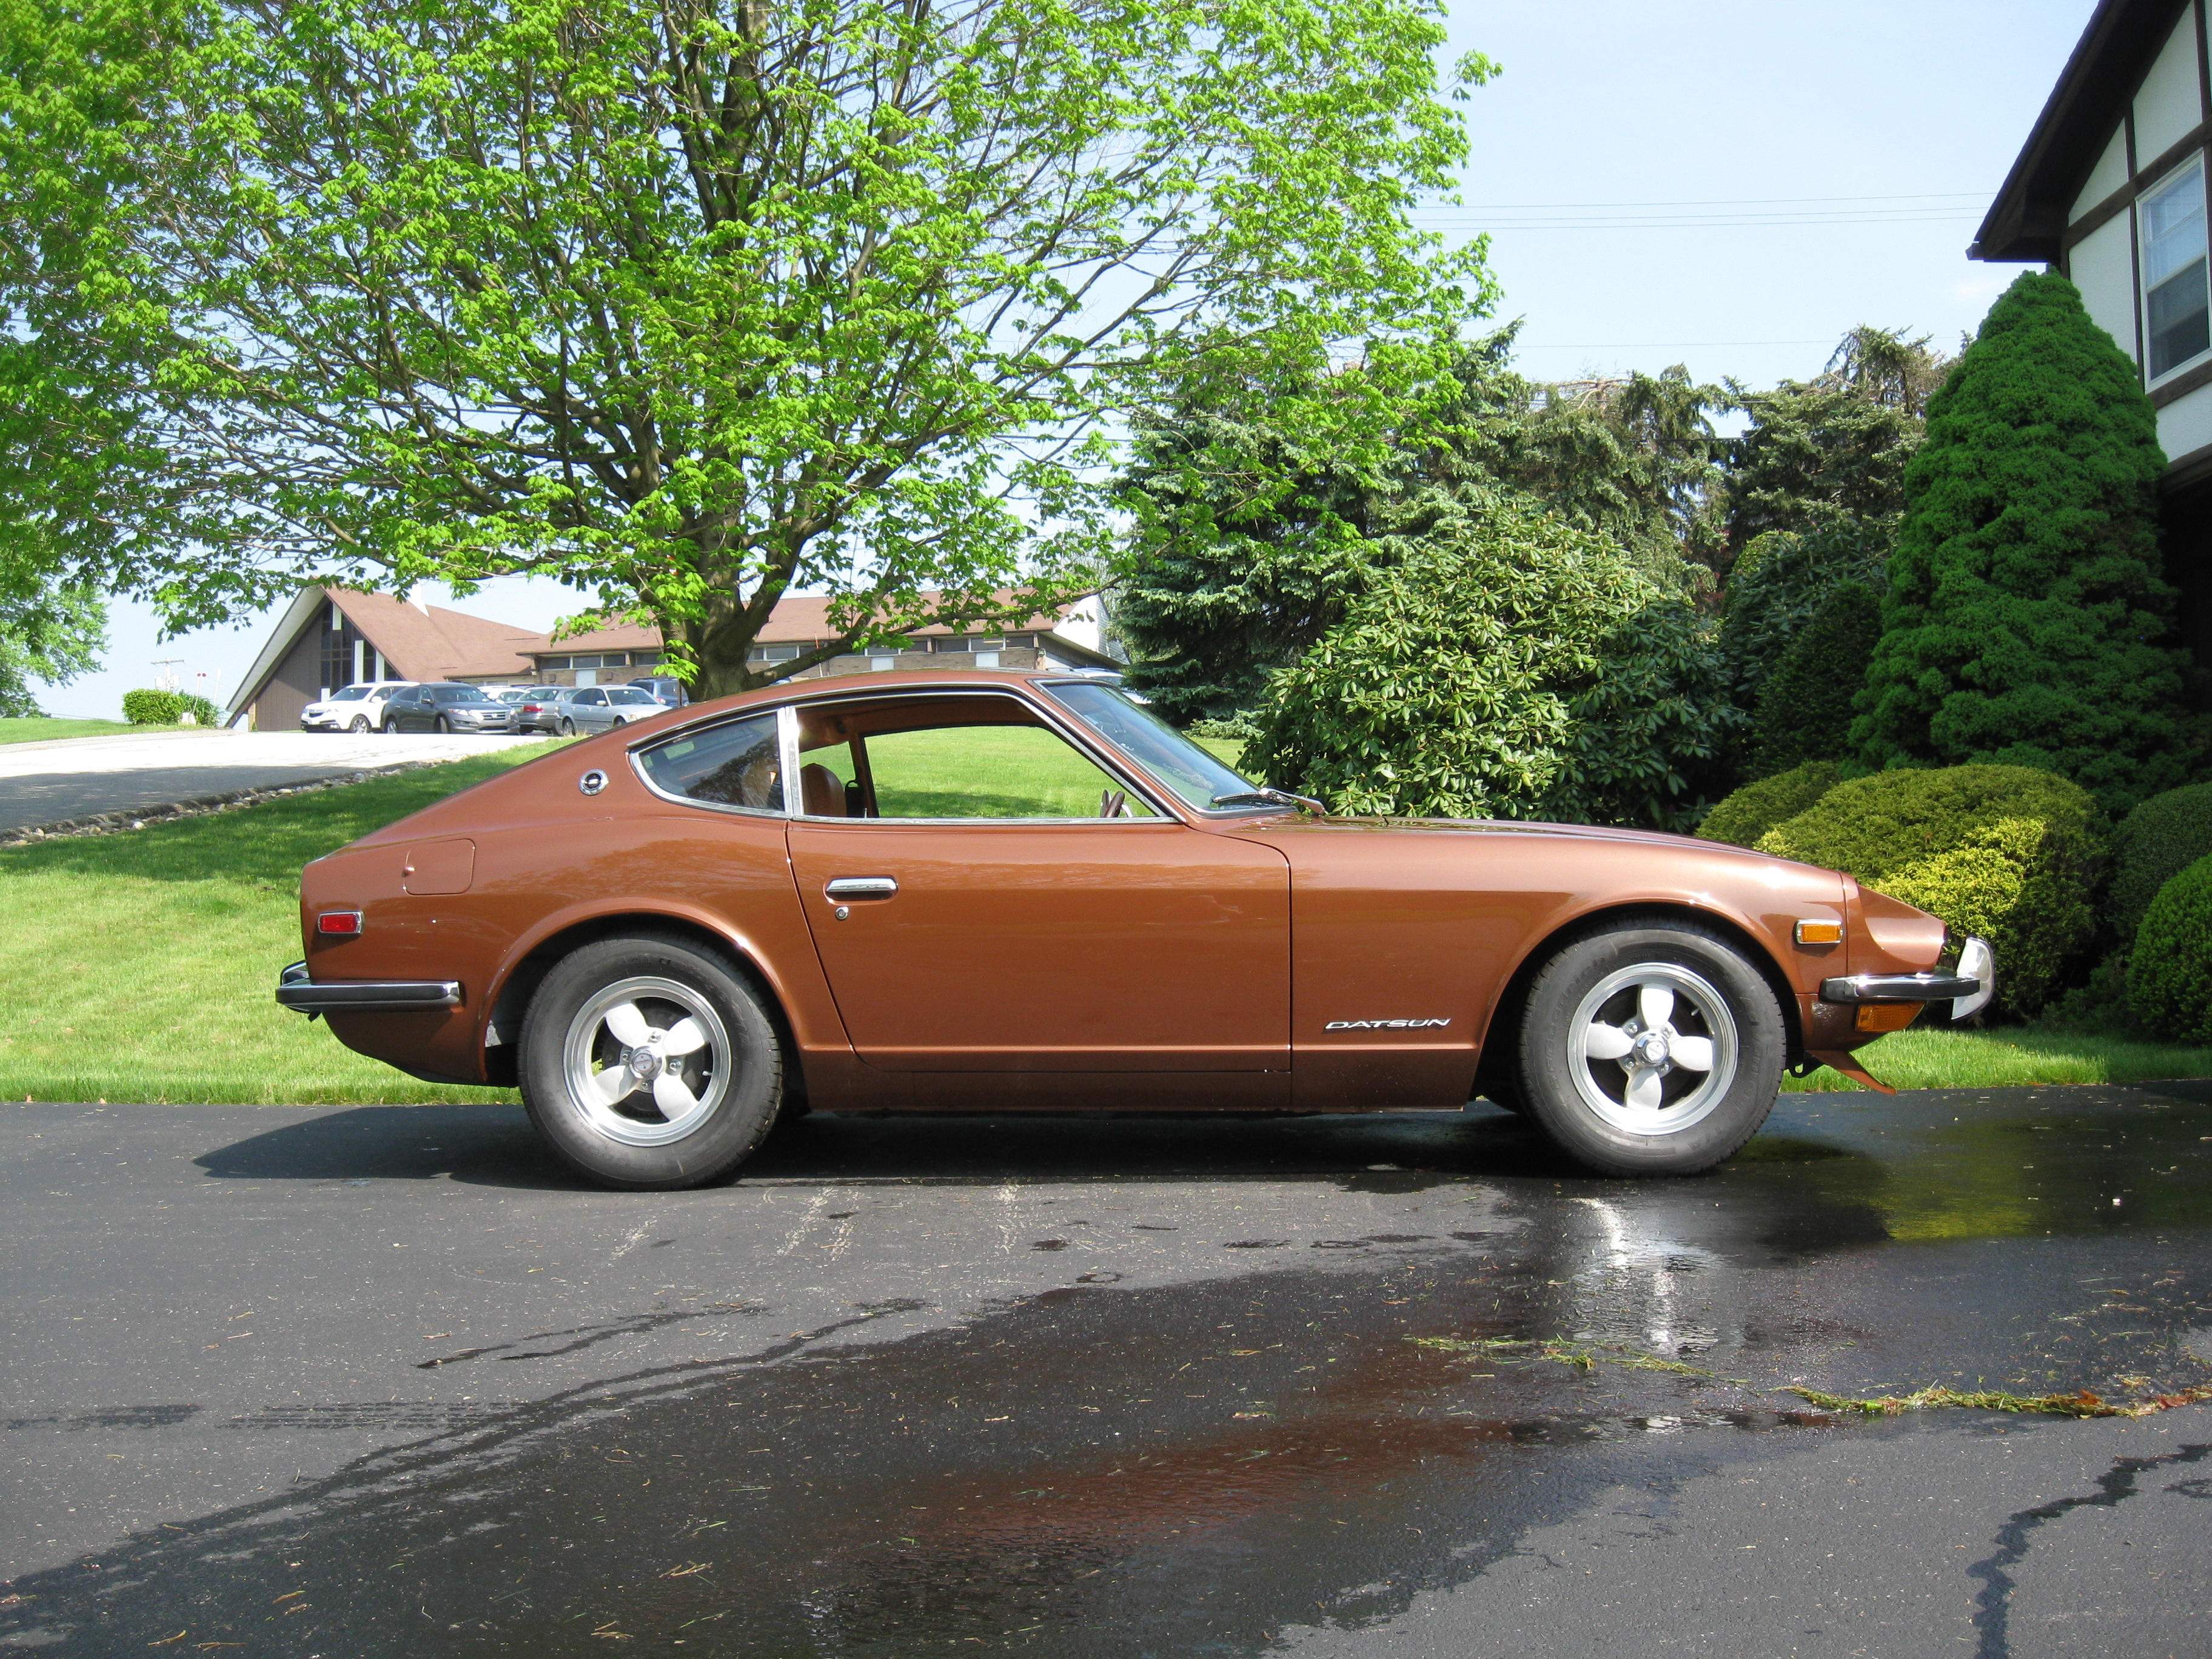
-
Does anyone know if Nissan designed the 240Z to have a setback (stagger) of the front wheels? I vaguely remember reading an article many years ago that it did but I have never seen a specification. Some background for why I am asking this question. This past winter I removed the lowering springs on my 1973 240Z and installed stock Nissan OEM springs along with new Koni shocks and stock bushings. After doing this I took it to my local alignment shop (with whom I've been dealing with since I bought the car new in 1973) and they set the toe-in and gave me the printout from the alignment machine. The printout showed the left side having less caster (2.41 degrees) than the right side (3.61 degrees) but I was not concerned as the car always had this difference with the lowering springs and with the original stock springs. However, their new alignment machine also printed out the setback of the front wheels which I was surprised to see measured at -0.50 inches after the alignment. The setback was measured as -0.34 inches prior the toe-in adjustment. I am not sure how setting the toe changed the setback but those are the numbers. To confirm the setback values I measured the wheelbase on each side and the alignment shop is correct. Measurements in my garage verify the -0.50 inch setback as the RHS wheelbase measured 91 inches, the LHS wheelbase measured 90.5 inches. A 2305 mm wheelbase is 90.75 inches. So it seems that I have the passenger’s side 0.25 inches too long and the driver’s side 0.25 inches too short. After taking these measurements I put the car on jack stands and started looking for anything that could account for the difference and I found nothing. I measured the T/C rods, the front and rear suspension mounting points, checked the front LCA bushings, etc. I know I can shim the LHS T/C rod to get the LHS wheelbase to 90.75 inches and increase the caster angle but I can't shorten the RHS without adjustable T/C rods. Note that I am the original owner of this car, it has never been in an accident and is not rusty. The car tracks just fine and seems handle OK considering the increased ride height and the new, low performance 14 inch tires. My question is whether I should try: 1) to get the wheelbase equal on each side, 2) adjust the LHS to get equal caster angles on each side and leave the passenger side alone, or 3) not to undertake making any changes and just live with it? Thanks, John