


german240
Free Member
-
Joined
-
Last visited
-
 Would you mind sharing the stl file of the output shaft plug?
 -
Just remember PLA basically looses its shape above 60°C. If you want to use it in the engine bay / interior (summer) annealing or a different filament is a must. In your print above the belt tension is too low and/or the print speed is too high (shifted layers). Your restoration is inspiring!
-
Engine mounts: My cheap Rockauto mounts failed shortly after install. The one on the passenger side split in half. So I would recommend getting better/OEM ones. Install is fairly easy with the engine in car (No engine hoist needed): 1. Support oil pan with a car jack (only a bit, do not lift the engine) 2. Remove bolts on engine side and the ones which go through the engine mount 3. Remove engine mount bracket (slides out easily towards the front) 4. Remove engine mount Don't trust all those posts saying that it is a PITA or it is not possible without engine removal. It took me 15 mins.
-
Update on U-Joint install: Yes it was easy to change them. However, 500 miles later, I can feel play at the rear half shafts (so the U-joints are starting to fail). I guess everyone was right then, the OEM joints were much tougher than today's aftermarket joints. I got a MOOG u-joint. Finally, I opted for a CV conversion so I will never have to deal with this again.
-
Hey, during the last couple of years restoring my 240Zs I made many mistakes and learnt a lot. I am going to add all these little things to this topic. Especially topics which are unclear to many of us (or sometimes there is wrong info around). There is no specific order. Please feel free to add your notes! I will add some keywords for all the guys who find this topic via Google.. 280ZX dizzy: The stock late 1971 240z tach WILL work although it is current sensing S12/S13 gearbox: A series I drive shaft is around 35mm shorter than a series II driveshaft. You will be able to install the early one with the SR/KA gearbox, however the gearbox tail shaft seal will fail eventually. This is due to the seal running at the very end of the shaft (close to the U-joint) where it already starts to get thicker (radius). A series I shaft has to be shortend by aprox 10 mm. Series II by 50 mm (not talking about series I cars). The transmission mount has to move 20mm towards the rear. Depening on the type of your mount, you can get away with modifying your existing one. 3.1L stroker build: The cheap Maxspeedingrods worked fine for me (5000 Mls so far). They were right within specifications (I did measure them before install). You have to remove some material on the driver side of the block where the main oil gallery is, otherwise the rods will hit the crankcase. U-Joint install: It is not difficult at all, all you need is a hammer, some sockets and a bench vise. Just replace them so you don't have to work on them later in the car. EDIT: Don't replace if not necessary - my MOOG joints failed quickly after install. Powdercoating suspension parts: Do not powder coat flanges (stub axles, wheel hub, diff input). The bolts will keep going loose no matter how tight they are. This is due to the paint layer settling Stagg shocks / dampers in general: Make sure that there is no lateral play of the damper in the strut tube. In other words, the top gland nut must press down the damper. You can add a washer below the damper inside the tube. BTW the Stagg shocks/Vogtland springs combo works great for spirited driving. Rear end clunk/noise: I've been reading all the topics on the web. In my case, the only issue I've never come across before was my issue: I had to tighten the big forward facing bolts which go inside the rear transverse link. Unstable braking / steering pulling to one side: RH side nut at the rear of the T/C rod bushing was not tightened enough Sandblasting fuel tank: Be aware that if you decide to blast the inside of the fuel tank, there will be a lot of blasting media inside afterwards. No matter what you do. I still get quite a lot of blasting media inside my fuel filters (I think I replaced them 4-5 times already). I would not do it again but use some chemical rust remover for the inside of the tank. Rear lights not working / weird rear light issues / turn signal issues: There are two ground points at the rear end, make sure both are fully connected. One below the licence plate light, one behind the rear valence (hard to reach, behind the fuel tank). If one of these is gone, you get all sort of issues. Fuel gauge inaccurate / always low : Make sure that both the wiring harness connectors inside the trunk (behind trunk trim panel) as well as the connectors to the fuel level sensor are in good condition. A high resistance will lead to low readings Motor mounts: Get quality ones. My cheap ones (rockauto) failed quickly (passenger side torn apart) Motor main cap side seals: Get Nissan OEM ones (cheap and still available). They have a steel strip molded in as opposed to a seperate piece of metal (like Felpro). The Felpro leaked after 2000 miles. Use a non hardening sealing compound (just cover them completely before inserting). Oil pan removing without lifting the engine: It is not difficult at all. All you need is Cyl 1 at TDC. There is little room but it works. Brake pads: If you want a better performing braking system, get better front pads first. Pagid, Ferodo, Project µ, Porterfield. Just to name a few. I opted for Pagid pads and it completely transformed my brake. Just by the pad change I went from an OK brake to a great performing brake (in fact I did lock the wheels a few times as I was used to my old brake pads (MSA Track pads)). ZG flares: If you are going to run 15" wheels, you dont have to cut a lot at the front fenders. Only about 1-1,5 cm at the top. If you cut more the flares will sit too hight. 225/50 R15 -13 wheels fit perfectly for the ZG type flares. Don't get the universal fit flares but some high quality ZG replicas. They follow the body lines and need no felting or body filler to fit. Heater valve: Just get a new one. It will fail/leak eventually even it it looks like it works. It is no effort to replace while the heater box is out of the car. Brake lines: They are easy to made if you buy Cunifer brake lines. Even with a cheap ebay tool, great results can be achieved.
-
I installed PAGID RSH 29E front brake pads and could't believe what a difference it made. Compared to the MSA "track" brake pads it feels like a complete new braking system. So far I haven't experienced any brake fade issues and the overall stopping efficiency is very high.
-
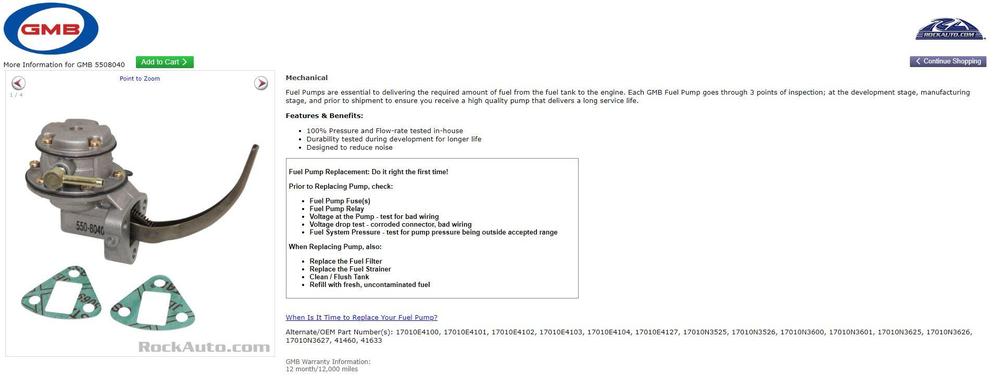
Hey guys, as my 240z is still equipped with the almost 50 yrs old original pump I think I should get a new one as good measure. Is there anyone running the GMB pump? It looks almost similar. On Amazon there are mixed opinions (works fine, broke down after a few miles). BR https://www.rockauto.com/en/moreinfo.php?pk=8893308&cc=1209169&jsn=877&_nck=ZExt1ysfqhqWnq%2BEvUNdSyqlmez6jy1gNJMlusoX3OR6oZHmd95p79CSOLvI%2BbdPEYS4HKmSAUJVlLbFA1LmAtT9rn8NZZYDAOnj5dlSGEjDqczDvxgV63sQH%2B7yOvIkNHOKxfOQ6yYpL%2F96Z3Hp2svYt313w2LJeTHlbnib7jxtzBFvj2Mdh3Ay4Ic8SyKECDR10uR%2F2bQuscKhCtI3Y1xyg8yFZvg435Boxo5Pcx6sDwgrEGj0aVldLX1Q2RQzW7qNjLRup1MQjtH0XSeF4oZD%2FjoxhJ6VMPYjGoNY27SJVrflX7rRcFhrhi6CpMMBF4QUxKrJxSe%2BSJ0Som0ZJzxSqJUDtXV3
-
Absolutely. I got the MSA Type 1 Style air dam and even at high speeds (did 140mph / 240km/h GPS speed) I have a very stable feeling car. German autobahn ? Both my diff strap as well as the lower diff mount need to be replaced. So I don't think the car gets shaky due to worn diff mounts.
-
@Captain Obvious Did you measure the belt lenght before install? I would like to prepare one, too (before I remove the old one). Great ideas!
-
-
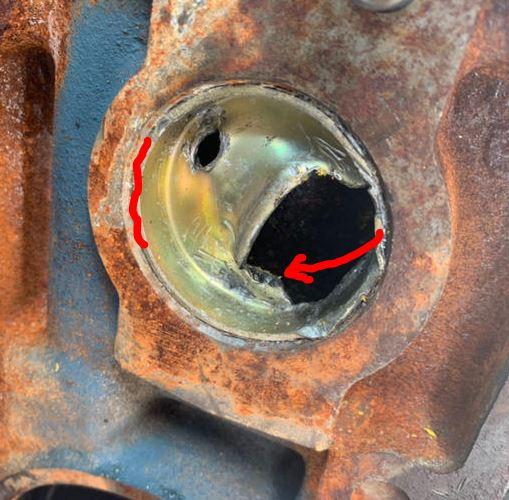
Regarding core plug removal: It is much easier to tap the plugs inwards. Just use a flat screwdriver and tap in one side (red line), the plug will tilt and can be pulled out easily afterwards!
-
-
@2377kNthis mount will not fit for a 240Z, right? I can't remember that there is the front part of the seat rail bent down like in your picture..?
-
Hey guys, I tried three times to lock the side shaft bolts (wheel side) in place, using loctite and new spring washers. After a couple of hundred miles, they loosen up again. Did someone have the same issue in the past and how did you fix this? Is there a certain orientation of the side shaft flange neccessary? Space is tight, but I managed to fasten the nuts with a long extension ultimately. Maybe they hold better now. BR
-
@240260280 I already did this in post #19 ?

