


Radeon
Free Member
-
Joined
-
Last visited
-
 It does indeed! Still only designed for the thickness of the original sway bar! And since I've read that some frame rails are showing cracks I'm better safe than sorry!:) I didn't want the L shaped plates John from baddogparts sells, because I did not want them to show in the engine bay, even though you would have to look very hard down there to find them!:D Edit: Just saw your picture! Those look way beefier than I suspect the original 240Z rails to be! On my pictures I can only see one spot weld which might hold a reinforcement plate originally on the inside (double edit, just looked at the one from underneath, from the side it's at least three more!:) ). Quite possibly the original 280Z frame rails are stronger from factory though!
 -
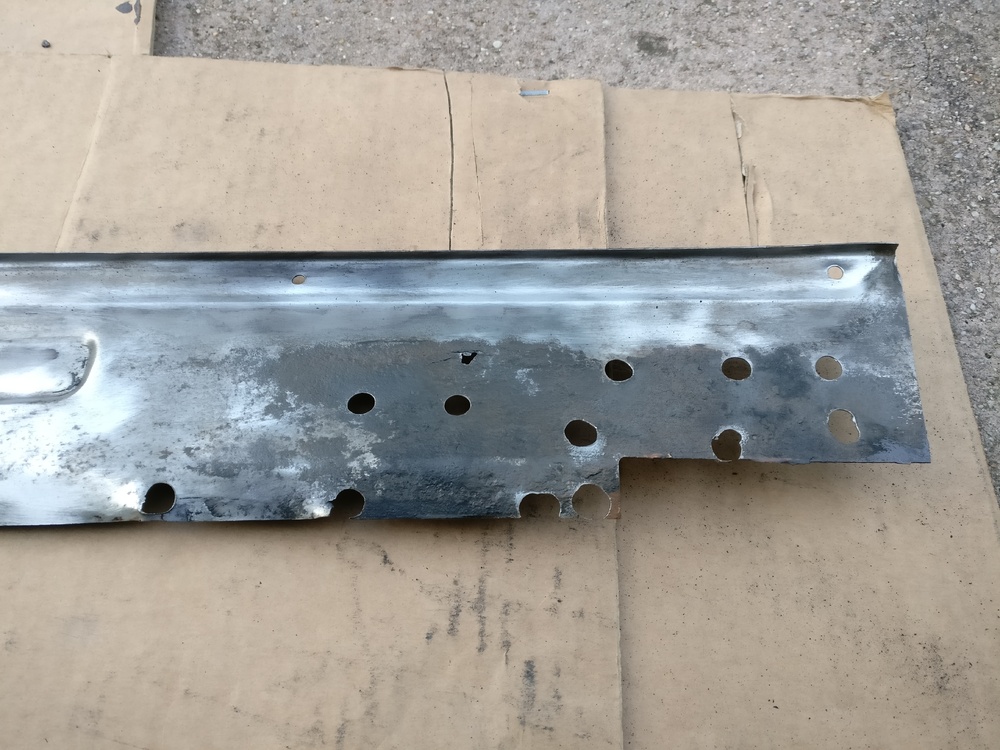
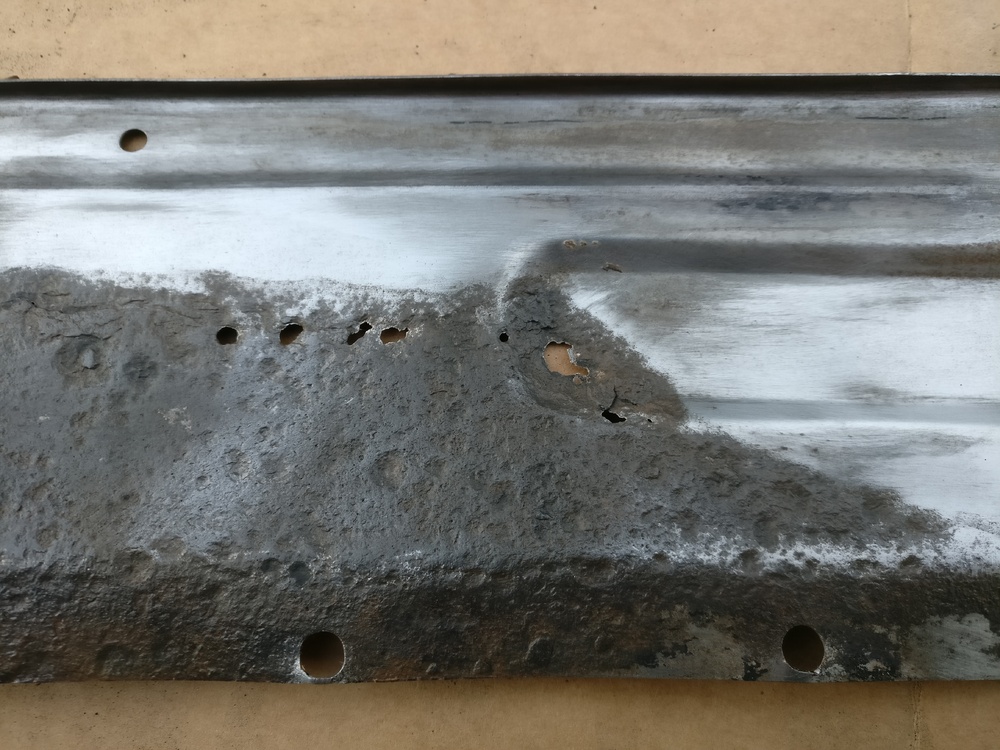
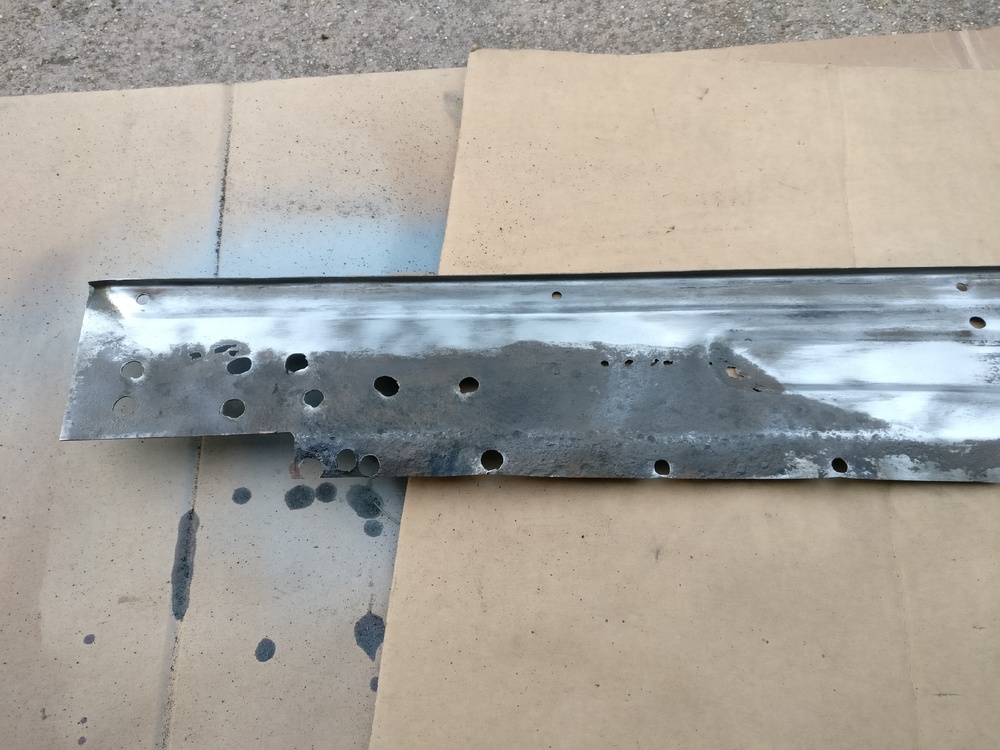
Front sway bar reinforcement Since the front sway bar mounting area is prone to fatigue when using a bigger sway bar, which I am (suspension techniques), I reinforced the area with a 3mm thick piece of fresh metal!:) What we’re working with before: CSD disk removed the old paint and rust quickly: Here are the new 3mm thick reinforcement plates: Coated them, as well as the frame rail, in a coat of zinc spray where both metals would overlap each other, to prevent any rust if water would find its way between the two! Bolted the plates onto the frame rails: Removed the zinc spray coat around the plate to prevent welding spatter: And welded them right in! Welding over head is a bitch! One side turned out quite pretty in cosmetical terms though, as I was able to have a better posture for it!:) That’s the prettiest weld I was able to achieve: BTW: I stitch welded the plates first, to reduce heat, to then fully seam weld the gaps, so less water could find its way between the two metals! The other side turned out the ugliest, but still everything is plenty strong!:) I still ground down the prone welds flat to the plate, so nothing would interfere with mounting the sway bar later on! And a coat of zinc spray to protect the metal for now! That's it for now guys! Hopefully a next post won't be to far off in the future!:)
-
Side marker holes front & rear The front fenders were in storage in the cellar for quite some time now! Just brought them up, unpacked them and started to prep everything to weld in the side marker delete plates in the front! Before prep: I started with the other fender first, since it was the last one I preped. Again I wasn’t to happy with the skillard delete plates, this time they where to wide and a lot of material had to be ground off. And no, I did not mistook the front with the rear ones, before you might think that way!:) But better to take some material off, than to bridge a huge gap trying to butt weld the plates in, as it was on the rear! As I slowly spot welded all the way around from the inside the outside looked like this. The plan all along was to spot weld from both sides, to get the new metal in as seamlessly as possible: With all the gaps filled from the outer side: And don’t forget the chrome trim holes on the fenders!:) After finished welding one fender I hung it on the car, haven’t seen her like that in a while!:) The other side was done the same way inside and outside, just a picture of the inside: And started to grind down the spot welds on the inside on both fenders: Now the finished grounded down fenders. They will need a bit of hammer and dolly work, maybe tinning it with body lead, before the painter will even do its filler magic. I also did some work on the rear delete plates as well. As I told before, and you can see above, the spot welds didn’t always penetrate all the way through. As good as I was able to I spot welded from the inside, welding shut some pin holes which came through after grinding the outside welds flush, and als just add more strength to the patch. I also welded the holes on the left rear quarter they must’ve put in some time back to anker the body filler when they repaired it I guess. That’s what It looked from the outside afterwards. I still have to grind down the new spot welds again, trying the best I can on the inside as well, then some hammer and dolly work again. Especially on the whole left quarter, as I don’t want there to be as much body filler as it was before! See you guys tomorrow again, for the last time so far!;)
-
Engine bay clean up A/C holes - welding I already talked a lot about cleaning up the engine bay. Now it was time to actually weld all those for the future unnecessary holes shut! After a lot of research I was able to figure out which holes on the left frame rail where for the vapor fuel line, and weren’t necessary for the future! Also ground down most of the welds, not yet perfectly finished though! And to have a properly clean firewall the holes for the A/C had to go as well! Before: New patches: And welded in! Once again to eager working on the car and forgot to take a picture before I started grinding down the welds!:D Also spot welded from both sides, as I’ve gotten the problem that not all the butt welds fully penetrate and would leave pinholes, this way it’ll look like seamless metal!:) I also think the area where I did not continue the ridge turned out looking pretty factory looking!:) Fully ground down now! Bit too reflective for a proper picture… See you tomorrow and have a great weekend!:)
-
Original IKI S30 long stalk fender mirrors! Managed to source a pair! I think I should do a post together with the beautiful Zstory stainless steel exhaust system with racing headers soon about new parts I got! Sent from my ONEPLUS A3003 using Classic Zcar Club mobile
-
Holy s*** guys! I just received a mail response from the Belgium distributor of my Safety Devices rear cage and he just told me that in fact I did it the right way to weld in the reinforcement plate from the inside! It was usual in the past to weld them from underneath the wheel well, but newer FIA regulations actually obligate to weld the reinforcement plates from the inside onto the floor or wheel wells, so the cage is in direct contact with the reinforcement plate! Welding windshield sill, seat rail and mirror holes Some more welding and repairs on the body! In older posts I already talked about the rust repair area under the windshield gasket. Well now finally it’s welded in: After some spot welds I removed the zinc spray coat the reduce spatter and fully spot welded in the patch panel: And ground down all the welds: I don’t have a before picture, but one hole on the drivers side seat rail was bent out of place and ripped open. I hammered it back in place and spot welded the split metal back together: And again grounded down: Again forgot to take a before picture, but I made patches for the previous side mirror mounting holes, since I’ll be going with fender mirrors! Spot welded in: After the first time grinding down the welds I had some pinholes I welded shut again: And now fully grounded down. Have to hammer and dolly the area a bit again: See you tomorrow, and have a great night or... you know the drill...!;)
-
Welder upgrade, a visit and some odds and ends The nozzle of my welder melted itself whilst I welded in the roll bar plates or brackets. Since replacement parts weren’t readily available I had an excuse to upgrade my welder with a 4m Euro mount welding gun! The original one was maybe 1,5-2m long, and a pain in the back. Had to put the welder into the car as I was welding in the roll bar plates because it was too short! Here’s the original cable, the opening already has the correct holes for the Euro mount from the manufacture: All rewired, bolted in and the new welder gun already connected! It’s so much easier to weld with the new gun!:) Maybe I’ll take some pictures of the old gun and show them at a later point in time! I also received a bearing puller a couple of weeks back and was finally able to remove the rear bearing from the shaft! And I got a visit from a friend in his somewhat new to him Opel Kadett C!:) See you tomorrow!:)
-
Door locking mechanics removal Like I promised, everyday a new post until the 1st of May!:) Have fun reading it, even though today's might not be as exiting!;) Pretty much one of the last things to bolt off of the car, besides the door itself, were the door locking mechanics. Off they go! Before: And after with a pretty empty door!:) I’m struggling with the mechanics themselves though! The plan ist to yellow zinc plate them, I’m not sure though how and if I should remove the plastic connecting clips! The plastic nut thingys on the door handle mechanics are off already! Also not sure what to do with the inside handles, since they are not separatable, and the vinyl stuff seems to be glued on: See you tomorrow and have a great evening - or whatever it is in your place!:) All the best Fabian
-
If the TÜV is happy with the harness (Gutachten/ABE or so called Einzelabnahme), they are indeed street legal in Germany! Besides, seat belts where only mandatory after 1975 in Germany, and the Zs are so uncommon here, nobody would be the wiser if ones were actually in the car from factory before 1975! A friend of mine drives his 240Z without seat belts, and it's documented this way in the car documents! Sent from my ONEPLUS A3003 using Classic Zcar Club mobile
-
"Good morning" guys! First of all thank you for your feedback! Those are all valid points and suggestions! I think for now I have to wait for the response of the safety devices distributor and get myself the front half of the cage. Then I will look into if the front will even line up with the floor! If that won't happen the geometry is off anyway, after that I can address what to do with the rear! But great to hear your alternative ideas to overcome this setback, maybe even turn it into something good!:) Exactly, as Mark pointed out I'll be running a harness, I don't think that the cage would work with the original 240Z seatbelt retractor! Maybe with the later style where the retractor sits on the shock tower? @Marcel: Thank you!:) In fact I don't have seats yet, had planned to go with Recaro SPG, probably Bride rails and Takata 4 point harness with anti submarining. I'm curious how your seats look, maybe you want to sent me some pictures via private message?:) All the best to you guys! Fabian
-
Rollbar fail and further plans Oh well. Again a terribly long break from the blog (/forum)! I honestly had the feeling in the beginning that I’m working on to many little things that are not worth a blog (/forum) post yet, and wanted to accumulate many little things for one post! After a while I realized that I actually had material for multiple posts, which again ended in procrastination regarding posting content, because I was a bit overwhelmed! Let’s start with the biggest “accomplishment” being a big fail in the end… I started the progress to weld in the supporting brackets/plates for the roll bar in which it’ll be bolted into. I had to put the roll bar in and out a couple of times to get the correct fitment for the brackets on the floor, as well as where to drill the holes on the wheel wells. After quite some time muscling with the roll bar I ended up with three holes on the wheel well: The brackets on the floor will be welded in the area where the original seat belt mechanism was. Wirewheeled that area intensively to prep it for some zinc spray and later welding in the bracket: I then did the same with the wheel well area: (keen readers will now already see where I’m about to go wrong!) The actual brackets and plates got the zinc spray treatment as well, did the rear frame rail connectors from bad dog parts as well as the patch piece for the rust spot under the windshield gasket…on the wrong side though as I later realized!:D Before: And after: I forgot to take pictures from the zinc sprayed areas inside the car! Well if you did not already catch my mistake a couple pictures ago, here it is in all it’s glory: The correct way would have been to weld the plate in from underneath the wheel well, sandwiching it between the plate and the roll bar itself. A guy in the Datsun Europe Facebook group pointed that out to me, “luckily”! I’ve never done any cage work before, and haven’t seen one in enough detail before I guess. I must have just assumed, since the lower bracket is on the inside of the car, the upper plate has to be on the inside as well! I can’t even tell if it was properly written in the instructions, since they where not model specific and written pretty vague, but threw them away back when I thought I finally finished the roll bar, so can’t check. As if it would make any difference! I’m to blame for my own mistake! :’) Anyways, I’ll at least show you the other work I did. Here are the lower brackets finished welded in, and since I wasn’t to proud of them cosmetically I ground them down. I honestly don’t have any pictures in between, as I pretty frequently forgot to take pictures when I was in the zone!:D For good measures I gave them a coat of zinc spray just for the time being: And the roll bar actually bolted in: Further plans now: I’m going to cut out the plates on the wheel well carefully to only cut the welds/plate itself, and not into the original metal of the wheel well. Hope I’ll succeed and the wheel well underneath isn’t to warped from the welding, if so, then more hammer and dolly work. Pretty surely I have to cut out the lower brackets as well, since they now might be off to some degree so the roll bar wouldn’t be sitting flush on the original wheel well now. I’m also a bit “happy” about it, since I always thought how ugly it looked having the plates and welds on the inside, theoretically visually poking through the vinyl cover of the interior if installed. Never occurred to me on my own that it’s actually not meant this way though!:D Another good point is that I decided to now order the front cage section yet already! Before my plans where to “retrofit” the rest of the cage if I actually am finding myself more on the track. Meaning I would have to strip the interior area as well as the underbody, where the front plate has to be welded in, from it’s more or less fresh coat of paint then. Also there would’ve always been the possibility that nothing would line up properly! I’ll now weld in all the plates for the entire cage correctly, but only run the rear cage/roll bar on the street, and bolt in the front section with door bars for track use! Since a lot of individual blog (/forum) post topics accumulated there will be quite a lot of them in the next days, they are scheduled to go online at 6 pm CEST on the blog and shortly after in the forum until the 1st of May one each day! Have a great evening you all, or whatever time of the day it is where you're living!:)
-
I also have the door panels from Skillard, not yet fitted, but the finish on them looks very nice! Maybe he has a second revision for the delete plates already! I just decided to order the Tabco replacement panel, I think its the best route, and I won't be pissed at me everytime I open the hatch in the future, if I hadn't done a good enough repair job! Did you drill holes throu yours to plug weld the panel in, or did you have an actual spot welder on hand? I also ordered the front bad dog frame rails, since I wasn't happy with the way mine turned out. Already lost way to much time on mine, the investment back in late December would have been way better. But one always learns I guess!:D Have a great start into the new week!:)
-
Just edited again from my PC, now everything seems to work with the pictures!:) A short little question to you guys before I hopefully will update the overall progress in a separate post very soon again! What are you guys thinking about my lower rear hatch panel? I planned on repairing it, and not buying the tabco replacement because I thought it was easily fixable cutting the rusted area out generously. The right (picturewise) side would be easy, just one bent in the repair patch, the left side is what worries me with that recessed area, since there is rust in exactly that area. What's your opinion? Just order the part and ship it to Germany and bite the bullet, or do you have a great tip for easily bending that recessed area? Thank you all so much for your help! @]grannyknot]: thanks for your link, totally forgot to answer you! but sadly those where exactly the ones I ordered and am not happy with. A good friend from Germany ordered exactly the same and wasn't happy with the fitment either :/. NOT Sent from my ONEPLUS A3003 using Classic Zcar Club mobile any longer!:D
-
Hope all you guys had a lovely Christmas with your loved ones!:) The BD connecting rails to the back should connect up to the original floor support rails. Since they are in great shape I'll just add more strenght with the connectors! If I'll even add more material to the original floor supports I shall see when I weld in the connectors, then I'll fabricate something which just has to wrap around the original floor support!:) I wouldn't even have any space for a furnace!:D Have a tiny electric heater when I can work with a closed garage door, which again isn't possible most of the time because of space!:D Welding them in from the inside and get less buildup on the outside might be a good idea for the front ones, in the back there's a support in the way to get the welding torch in properly! But since I'm a bit of a perfectionist I would still grind down on the inside as well as long as I can get to it!;)
-
Hey Charles! Those are valuable tips!:) Thank you! I actually struggled with the voltage knob, since stage 1 felt a little too less, and stage 2 was too much, blowing through pretty easily! But going down on the wire feed, staying on stage 1 and maybe stay a tad bit longer should work better! Will try that out next time, thank you!:) Regarding the gaps: in reality they were 3-4mm wide the most way around, I honestly can't mark that as a quality product. But maybe it's only the German quality prejudice and am only seeing black or white!Oh, and I have to get me one of those copper backers, that sounds great! Even though I still really struggle to weld with only one hand! I like to use the second one to guide the torch!:) Very, very valuable information here for everyone to read! I luckily got that information some months ago, but only because I read it because someone put it out there! Anything regarding thin sheet metal without structural bends doesn't like big heat! That's why I only use the CSD Discs to strip paint off of the sheet metal, and in tight areas a soft wire brush on a drill! ALSO sandblasting can generate way to much heat an warp all your precious panels! Only use plastic media on big panels, preferably the hole car and glasbeads for rusty areas! Just thought adding that so people will read it and don't make mistakes!:) Did you use them with original 240Z (front) Framerails? So where they long enough? Didn't get an answer from John yet!:) They most certainly do! As well as for welding as for grinding! But definitely not for my fingers and feet!:D


