


Radeon
Free Member
-
Joined
-
Last visited
Everything posted by Radeon
-
 It does indeed! Still only designed for the thickness of the original sway bar! And since I've read that some frame rails are showing cracks I'm better safe than sorry!:) I didn't want the L shaped plates John from baddogparts sells, because I did not want them to show in the engine bay, even though you would have to look very hard down there to find them!:D Edit: Just saw your picture! Those look way beefier than I suspect the original 240Z rails to be! On my pictures I can only see one spot weld which might hold a reinforcement plate originally on the inside (double edit, just looked at the one from underneath, from the side it's at least three more!:) ). Quite possibly the original 280Z frame rails are stronger from factory though!
 -
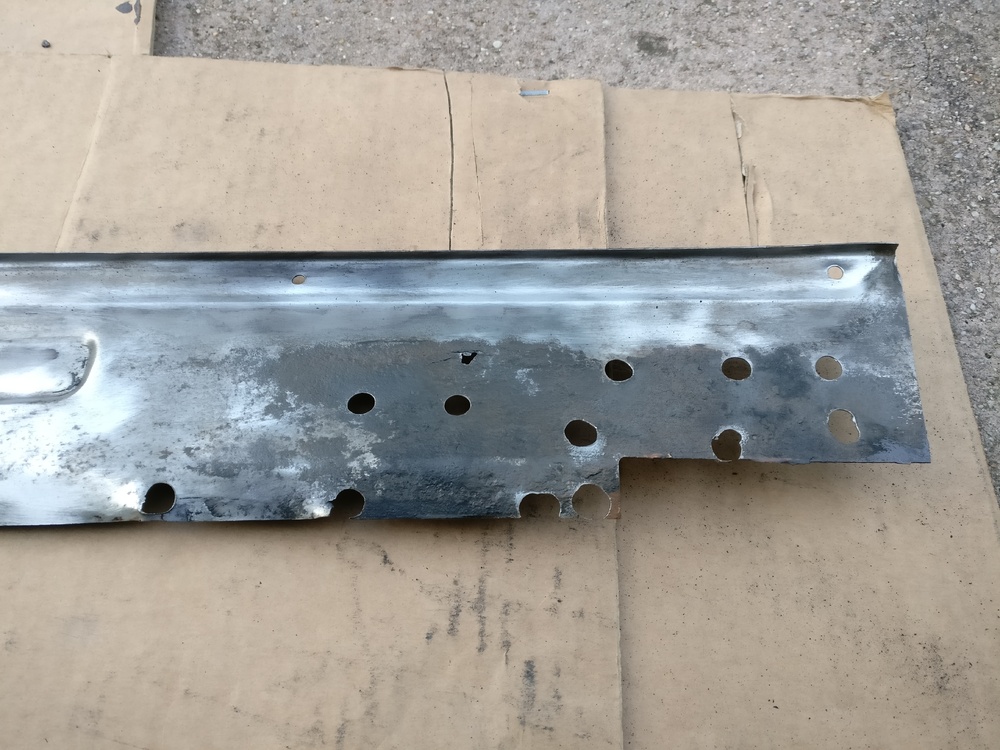
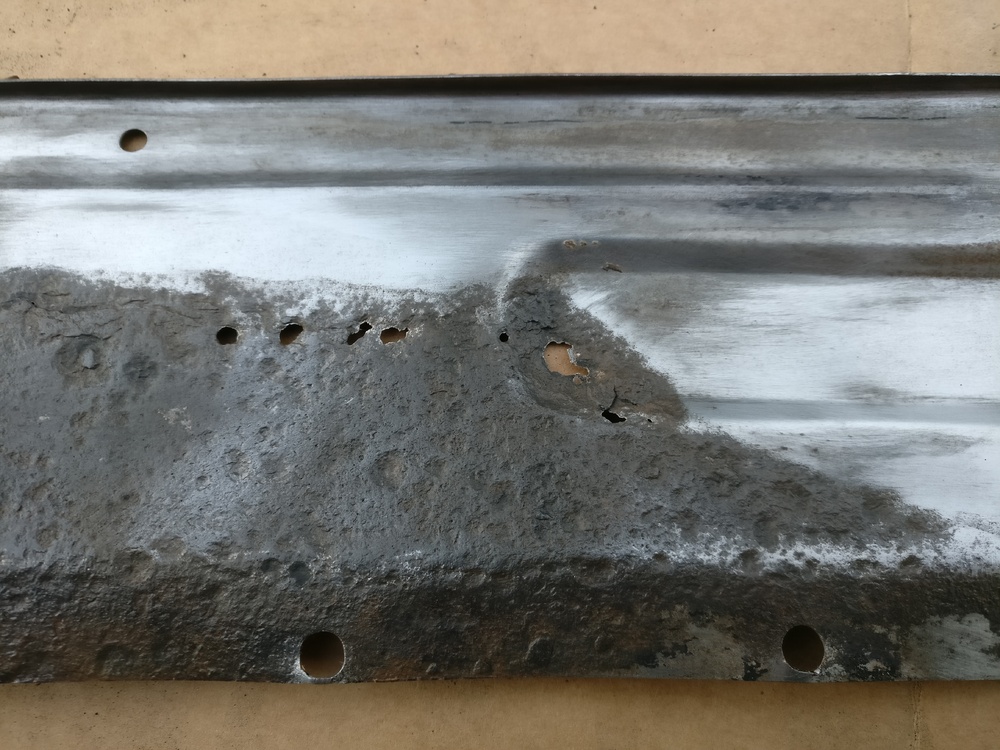
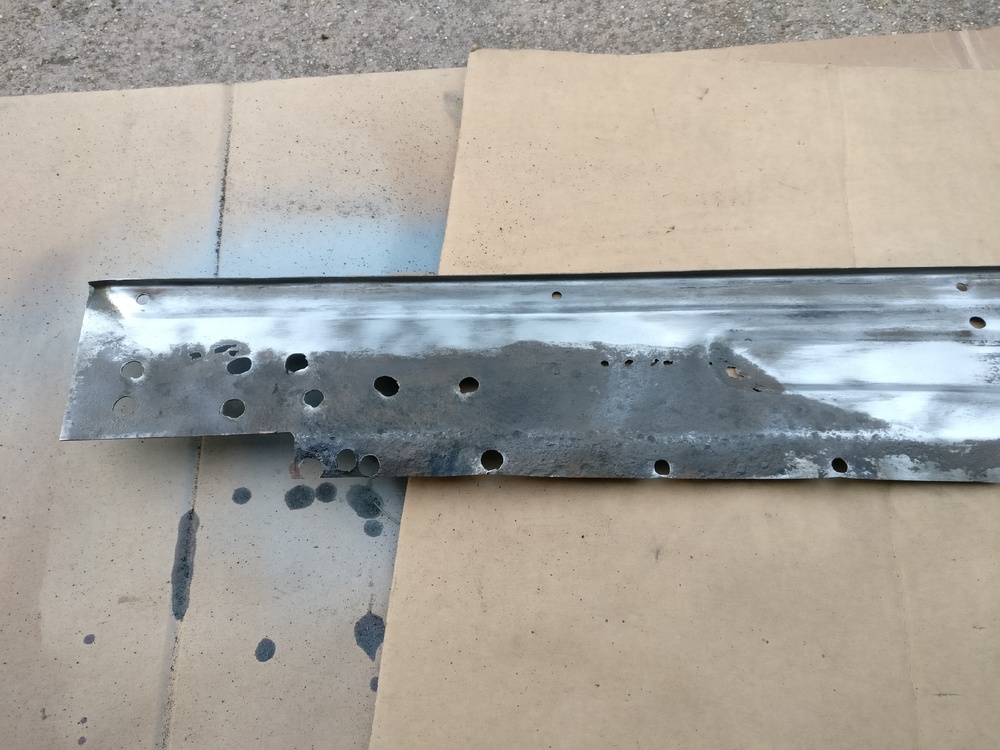
Front sway bar reinforcement Since the front sway bar mounting area is prone to fatigue when using a bigger sway bar, which I am (suspension techniques), I reinforced the area with a 3mm thick piece of fresh metal!:) What we’re working with before: CSD disk removed the old paint and rust quickly: Here are the new 3mm thick reinforcement plates: Coated them, as well as the frame rail, in a coat of zinc spray where both metals would overlap each other, to prevent any rust if water would find its way between the two! Bolted the plates onto the frame rails: Removed the zinc spray coat around the plate to prevent welding spatter: And welded them right in! Welding over head is a bitch! One side turned out quite pretty in cosmetical terms though, as I was able to have a better posture for it!:) That’s the prettiest weld I was able to achieve: BTW: I stitch welded the plates first, to reduce heat, to then fully seam weld the gaps, so less water could find its way between the two metals! The other side turned out the ugliest, but still everything is plenty strong!:) I still ground down the prone welds flat to the plate, so nothing would interfere with mounting the sway bar later on! And a coat of zinc spray to protect the metal for now! That's it for now guys! Hopefully a next post won't be to far off in the future!:)
-
Side marker holes front & rear The front fenders were in storage in the cellar for quite some time now! Just brought them up, unpacked them and started to prep everything to weld in the side marker delete plates in the front! Before prep: I started with the other fender first, since it was the last one I preped. Again I wasn’t to happy with the skillard delete plates, this time they where to wide and a lot of material had to be ground off. And no, I did not mistook the front with the rear ones, before you might think that way!:) But better to take some material off, than to bridge a huge gap trying to butt weld the plates in, as it was on the rear! As I slowly spot welded all the way around from the inside the outside looked like this. The plan all along was to spot weld from both sides, to get the new metal in as seamlessly as possible: With all the gaps filled from the outer side: And don’t forget the chrome trim holes on the fenders!:) After finished welding one fender I hung it on the car, haven’t seen her like that in a while!:) The other side was done the same way inside and outside, just a picture of the inside: And started to grind down the spot welds on the inside on both fenders: Now the finished grounded down fenders. They will need a bit of hammer and dolly work, maybe tinning it with body lead, before the painter will even do its filler magic. I also did some work on the rear delete plates as well. As I told before, and you can see above, the spot welds didn’t always penetrate all the way through. As good as I was able to I spot welded from the inside, welding shut some pin holes which came through after grinding the outside welds flush, and als just add more strength to the patch. I also welded the holes on the left rear quarter they must’ve put in some time back to anker the body filler when they repaired it I guess. That’s what It looked from the outside afterwards. I still have to grind down the new spot welds again, trying the best I can on the inside as well, then some hammer and dolly work again. Especially on the whole left quarter, as I don’t want there to be as much body filler as it was before! See you guys tomorrow again, for the last time so far!;)
-
Engine bay clean up A/C holes - welding I already talked a lot about cleaning up the engine bay. Now it was time to actually weld all those for the future unnecessary holes shut! After a lot of research I was able to figure out which holes on the left frame rail where for the vapor fuel line, and weren’t necessary for the future! Also ground down most of the welds, not yet perfectly finished though! And to have a properly clean firewall the holes for the A/C had to go as well! Before: New patches: And welded in! Once again to eager working on the car and forgot to take a picture before I started grinding down the welds!:D Also spot welded from both sides, as I’ve gotten the problem that not all the butt welds fully penetrate and would leave pinholes, this way it’ll look like seamless metal!:) I also think the area where I did not continue the ridge turned out looking pretty factory looking!:) Fully ground down now! Bit too reflective for a proper picture… See you tomorrow and have a great weekend!:)
-
Original IKI S30 long stalk fender mirrors! Managed to source a pair! I think I should do a post together with the beautiful Zstory stainless steel exhaust system with racing headers soon about new parts I got! Sent from my ONEPLUS A3003 using Classic Zcar Club mobile
-
Holy s*** guys! I just received a mail response from the Belgium distributor of my Safety Devices rear cage and he just told me that in fact I did it the right way to weld in the reinforcement plate from the inside! It was usual in the past to weld them from underneath the wheel well, but newer FIA regulations actually obligate to weld the reinforcement plates from the inside onto the floor or wheel wells, so the cage is in direct contact with the reinforcement plate! Welding windshield sill, seat rail and mirror holes Some more welding and repairs on the body! In older posts I already talked about the rust repair area under the windshield gasket. Well now finally it’s welded in: After some spot welds I removed the zinc spray coat the reduce spatter and fully spot welded in the patch panel: And ground down all the welds: I don’t have a before picture, but one hole on the drivers side seat rail was bent out of place and ripped open. I hammered it back in place and spot welded the split metal back together: And again grounded down: Again forgot to take a before picture, but I made patches for the previous side mirror mounting holes, since I’ll be going with fender mirrors! Spot welded in: After the first time grinding down the welds I had some pinholes I welded shut again: And now fully grounded down. Have to hammer and dolly the area a bit again: See you tomorrow, and have a great night or... you know the drill...!;)
-
Welder upgrade, a visit and some odds and ends The nozzle of my welder melted itself whilst I welded in the roll bar plates or brackets. Since replacement parts weren’t readily available I had an excuse to upgrade my welder with a 4m Euro mount welding gun! The original one was maybe 1,5-2m long, and a pain in the back. Had to put the welder into the car as I was welding in the roll bar plates because it was too short! Here’s the original cable, the opening already has the correct holes for the Euro mount from the manufacture: All rewired, bolted in and the new welder gun already connected! It’s so much easier to weld with the new gun!:) Maybe I’ll take some pictures of the old gun and show them at a later point in time! I also received a bearing puller a couple of weeks back and was finally able to remove the rear bearing from the shaft! And I got a visit from a friend in his somewhat new to him Opel Kadett C!:) See you tomorrow!:)
-
Door locking mechanics removal Like I promised, everyday a new post until the 1st of May!:) Have fun reading it, even though today's might not be as exiting!;) Pretty much one of the last things to bolt off of the car, besides the door itself, were the door locking mechanics. Off they go! Before: And after with a pretty empty door!:) I’m struggling with the mechanics themselves though! The plan ist to yellow zinc plate them, I’m not sure though how and if I should remove the plastic connecting clips! The plastic nut thingys on the door handle mechanics are off already! Also not sure what to do with the inside handles, since they are not separatable, and the vinyl stuff seems to be glued on: See you tomorrow and have a great evening - or whatever it is in your place!:) All the best Fabian
-
If the TÜV is happy with the harness (Gutachten/ABE or so called Einzelabnahme), they are indeed street legal in Germany! Besides, seat belts where only mandatory after 1975 in Germany, and the Zs are so uncommon here, nobody would be the wiser if ones were actually in the car from factory before 1975! A friend of mine drives his 240Z without seat belts, and it's documented this way in the car documents! Sent from my ONEPLUS A3003 using Classic Zcar Club mobile
-
"Good morning" guys! First of all thank you for your feedback! Those are all valid points and suggestions! I think for now I have to wait for the response of the safety devices distributor and get myself the front half of the cage. Then I will look into if the front will even line up with the floor! If that won't happen the geometry is off anyway, after that I can address what to do with the rear! But great to hear your alternative ideas to overcome this setback, maybe even turn it into something good!:) Exactly, as Mark pointed out I'll be running a harness, I don't think that the cage would work with the original 240Z seatbelt retractor! Maybe with the later style where the retractor sits on the shock tower? @Marcel: Thank you!:) In fact I don't have seats yet, had planned to go with Recaro SPG, probably Bride rails and Takata 4 point harness with anti submarining. I'm curious how your seats look, maybe you want to sent me some pictures via private message?:) All the best to you guys! Fabian
-
Rollbar fail and further plans Oh well. Again a terribly long break from the blog (/forum)! I honestly had the feeling in the beginning that I’m working on to many little things that are not worth a blog (/forum) post yet, and wanted to accumulate many little things for one post! After a while I realized that I actually had material for multiple posts, which again ended in procrastination regarding posting content, because I was a bit overwhelmed! Let’s start with the biggest “accomplishment” being a big fail in the end… I started the progress to weld in the supporting brackets/plates for the roll bar in which it’ll be bolted into. I had to put the roll bar in and out a couple of times to get the correct fitment for the brackets on the floor, as well as where to drill the holes on the wheel wells. After quite some time muscling with the roll bar I ended up with three holes on the wheel well: The brackets on the floor will be welded in the area where the original seat belt mechanism was. Wirewheeled that area intensively to prep it for some zinc spray and later welding in the bracket: I then did the same with the wheel well area: (keen readers will now already see where I’m about to go wrong!) The actual brackets and plates got the zinc spray treatment as well, did the rear frame rail connectors from bad dog parts as well as the patch piece for the rust spot under the windshield gasket…on the wrong side though as I later realized!:D Before: And after: I forgot to take pictures from the zinc sprayed areas inside the car! Well if you did not already catch my mistake a couple pictures ago, here it is in all it’s glory: The correct way would have been to weld the plate in from underneath the wheel well, sandwiching it between the plate and the roll bar itself. A guy in the Datsun Europe Facebook group pointed that out to me, “luckily”! I’ve never done any cage work before, and haven’t seen one in enough detail before I guess. I must have just assumed, since the lower bracket is on the inside of the car, the upper plate has to be on the inside as well! I can’t even tell if it was properly written in the instructions, since they where not model specific and written pretty vague, but threw them away back when I thought I finally finished the roll bar, so can’t check. As if it would make any difference! I’m to blame for my own mistake! :’) Anyways, I’ll at least show you the other work I did. Here are the lower brackets finished welded in, and since I wasn’t to proud of them cosmetically I ground them down. I honestly don’t have any pictures in between, as I pretty frequently forgot to take pictures when I was in the zone!:D For good measures I gave them a coat of zinc spray just for the time being: And the roll bar actually bolted in: Further plans now: I’m going to cut out the plates on the wheel well carefully to only cut the welds/plate itself, and not into the original metal of the wheel well. Hope I’ll succeed and the wheel well underneath isn’t to warped from the welding, if so, then more hammer and dolly work. Pretty surely I have to cut out the lower brackets as well, since they now might be off to some degree so the roll bar wouldn’t be sitting flush on the original wheel well now. I’m also a bit “happy” about it, since I always thought how ugly it looked having the plates and welds on the inside, theoretically visually poking through the vinyl cover of the interior if installed. Never occurred to me on my own that it’s actually not meant this way though!:D Another good point is that I decided to now order the front cage section yet already! Before my plans where to “retrofit” the rest of the cage if I actually am finding myself more on the track. Meaning I would have to strip the interior area as well as the underbody, where the front plate has to be welded in, from it’s more or less fresh coat of paint then. Also there would’ve always been the possibility that nothing would line up properly! I’ll now weld in all the plates for the entire cage correctly, but only run the rear cage/roll bar on the street, and bolt in the front section with door bars for track use! Since a lot of individual blog (/forum) post topics accumulated there will be quite a lot of them in the next days, they are scheduled to go online at 6 pm CEST on the blog and shortly after in the forum until the 1st of May one each day! Have a great evening you all, or whatever time of the day it is where you're living!:)
-
I also have the door panels from Skillard, not yet fitted, but the finish on them looks very nice! Maybe he has a second revision for the delete plates already! I just decided to order the Tabco replacement panel, I think its the best route, and I won't be pissed at me everytime I open the hatch in the future, if I hadn't done a good enough repair job! Did you drill holes throu yours to plug weld the panel in, or did you have an actual spot welder on hand? I also ordered the front bad dog frame rails, since I wasn't happy with the way mine turned out. Already lost way to much time on mine, the investment back in late December would have been way better. But one always learns I guess!:D Have a great start into the new week!:)
-
Just edited again from my PC, now everything seems to work with the pictures!:) A short little question to you guys before I hopefully will update the overall progress in a separate post very soon again! What are you guys thinking about my lower rear hatch panel? I planned on repairing it, and not buying the tabco replacement because I thought it was easily fixable cutting the rusted area out generously. The right (picturewise) side would be easy, just one bent in the repair patch, the left side is what worries me with that recessed area, since there is rust in exactly that area. What's your opinion? Just order the part and ship it to Germany and bite the bullet, or do you have a great tip for easily bending that recessed area? Thank you all so much for your help! @]grannyknot]: thanks for your link, totally forgot to answer you! but sadly those where exactly the ones I ordered and am not happy with. A good friend from Germany ordered exactly the same and wasn't happy with the fitment either :/. NOT Sent from my ONEPLUS A3003 using Classic Zcar Club mobile any longer!:D
-
Hope all you guys had a lovely Christmas with your loved ones!:) The BD connecting rails to the back should connect up to the original floor support rails. Since they are in great shape I'll just add more strenght with the connectors! If I'll even add more material to the original floor supports I shall see when I weld in the connectors, then I'll fabricate something which just has to wrap around the original floor support!:) I wouldn't even have any space for a furnace!:D Have a tiny electric heater when I can work with a closed garage door, which again isn't possible most of the time because of space!:D Welding them in from the inside and get less buildup on the outside might be a good idea for the front ones, in the back there's a support in the way to get the welding torch in properly! But since I'm a bit of a perfectionist I would still grind down on the inside as well as long as I can get to it!;)
-
Hey Charles! Those are valuable tips!:) Thank you! I actually struggled with the voltage knob, since stage 1 felt a little too less, and stage 2 was too much, blowing through pretty easily! But going down on the wire feed, staying on stage 1 and maybe stay a tad bit longer should work better! Will try that out next time, thank you!:) Regarding the gaps: in reality they were 3-4mm wide the most way around, I honestly can't mark that as a quality product. But maybe it's only the German quality prejudice and am only seeing black or white!Oh, and I have to get me one of those copper backers, that sounds great! Even though I still really struggle to weld with only one hand! I like to use the second one to guide the torch!:) Very, very valuable information here for everyone to read! I luckily got that information some months ago, but only because I read it because someone put it out there! Anything regarding thin sheet metal without structural bends doesn't like big heat! That's why I only use the CSD Discs to strip paint off of the sheet metal, and in tight areas a soft wire brush on a drill! ALSO sandblasting can generate way to much heat an warp all your precious panels! Only use plastic media on big panels, preferably the hole car and glasbeads for rusty areas! Just thought adding that so people will read it and don't make mistakes!:) Did you use them with original 240Z (front) Framerails? So where they long enough? Didn't get an answer from John yet!:) They most certainly do! As well as for welding as for grinding! But definitely not for my fingers and feet!:D
-
I just wrote John how far the rear ones actually extend, I might just go with them! The method described in you post is pretty good though! If i won't use it in this matter i will keep it in mind for future projects to bend thicker metal easier, thank you!:)
-
Hey Mark! Thank you! I know them already though, that's why I wrote "without purchasing prefabbed frame rails". I might however consider just buying the rear ones from them and connect them to my existing ones, maybe they are even already long enough to reach up to the 240Z original frame rails! Just purchasing in the States from Germany is a pain in the arse every time, since shipping is pricey!
-
Some news! I started with some more body work and welded the first time on the body! At first I was really intimidated as a welding beginner to weld on thin sheet metal, hearing all those stories about warpage and burning through! Of course they do happen if you’re not careful, but after some practice on scrap metal I got the hang of it! I’m by no means a professional welder, but pretty much all of my welds will be grounded down, so they only have to be strong, not look good! Even though every now an then some pretty once even came along!:) First task was the rusty metal under the hatch sheet metal. Sadly I did not take pictures in between, but this was what i begun with: And what I ended up with, already grounded down! The next task was the battery tray! Even though mine was in quite good shape, minus one rust spot, it had to go anyway since I’m relocating the battery under the passenger seat in my quest to clean up the engine bay and make it oh so pretty!:) Still “in”: And out it goes! So if anyone’s interested, the battery tray’s for sale as is (Europe!)! Maybe I’ll restore it later down the line, really come to like welding, and make some more profit out of it. To still be able to work inside the garage, where it was at most one or two degrees above freezing, I planned to weld in this new piece. But since my zinc spray decided to not work, albeit being completely full and unused had to postponed it. Definitely want something between metals when I put two on top of each other. Either zinc spray, or this red weld through primer. Haven’t had much luck finding some in Germany though yet. Today I beared the cold outside for some hours, shove the body out of the garage and further CSD-stripped the left rear where some body damage was fixed before with filler, and also some unrepaired damages. Got rid of almost all of the fillered areas, so I can see the damaged area, and try my best with hammer and dolly soon! I also stripped all the areas where I needed to weld, being the chrome trim holes, as well as around the side marker holes to delete them! And plug welded them shut! Actually pretty easy with a short rotating motion. To delete the side marker holes I purchased the delete plates from Skillard over Zcardepot, after a friend recommended them. To be utterly honest I’m not impressed by them at all! The gap around is huge(!) for being a CNC cut item and one corner even had quite the indent. The picture beyond doesn’t even do it justice, it looks even worse in reality:/. A lot of bridging the gap will be involved. I hope they already fixed it! And am curious how the delete plates will perform on the front fenders! Anyways, “butt welded” the plate in, again, not pretty but sufficient strong! Have to grind it down to properly weld the last gaps shut, as I wasn’t able to get in between the buildup properly. But that’s a task for the future, I got dark and more importantly utterly cold to keep on working! Once again, let’s see how fast I get the bodywork done!:) One last question though: I will be keeping the original frame rails, since they are in well enough shape still (minus some wrong jack up action, but not structurally critical), but I would like to extend them, maybe even connect them all the way back! What’s the best way without purchasing prefabbed frame rails, and not having a metal brake? Have a happy holiday all you guys!:)
-
Thank you!:) Well you seem to have at least an interesting fleet going on to soften the pain!;)
-
Newest progress, parts and a "rolling chassis"! Today’s update is about miscellaneous stuff and a “rolling chassis” at the end of the post! I hassled for weeks with the rear spindles, they just did not wanted to come out… Heated the housings with a propane torch for several minutes and bashed on the spindle with a wooden hammer to not mangle the threads on the spindle. Just shortly before the spindle was out on the second housing the wooden hammer gave up!:D Was able to get the rest of the way out with the remainings of the hammer!:D Already went an bought another bearing remover for the ones on the spindles, but haven’t tried it out yet! And I wasn’t able to get the bearings inside the housing out yet. Drum Brake Calipers removed and partly disassembled. I also removed the sleeve of the lower control arms of the front with a handsaw. And cut out the rusty areas. Already did some sheet metal patches for the rusty aread as well as for the window mirror holes since I’ll be going with fender mirrors, forgot to take pictures yet though! And since I freshly got new Vogtland lowering springs in the mail and never posted about the other new parts I already acquired I wanted to take a group picture before i put everything back into boxes to store it for the next time! There are still some new parts I acquired not showed, I may post something about them in following posts! The majority of the time working on the car for the last times was for this bad boy. Also my first welding exercise! Now I can finally roll the chassis around and work on the body outside of the garage!:) I also took that chance to clean up the garage quite a bit and hung the dashboard on the wall, so its finally off the ground! Let’s see how fast I’ll be getting the body ready for paint!:)
-
That will be the last two posts that already existed on my blog, now you will be up to speed on the progress so far! Which means that the posts here will only be as frequent as I get to spent time working on the car!:) Carburetor and inlet disassembly Directly after I finished “disassembling” the engine I started on the carburetors. The plan is to clean them up optically as well as technically of course, rebuild them with new carb rebuild kits and yellow zinc plate all the screws, springs and linkages and so on.That’s what we’re dealing with “today”, you can still see all the plugged up holes from the EGR crap: First I disassembled the “balancing bridge”(?) and the first bit of throttle linkage. Then disconnected the carburetors from the inlet and removed the coolant lines. One of the heat insulating spacers wouldn’t come off. Does anyone know if the coolant lines are really necessary? Or just if you cold start in really cold weather to get the carburetors up to temperature? Seems odd to preheat the fuel/air mixture. Especially with a heat insulated spacer to avoid it… Or does it actually cool it and I’m all wrong!?:D After the inlets were off I completely disassembled both SU carbs and the linkage and sorted it into two separated zip loc bags. Big new parts and some rust "discoveries" I just got a huuuge package from Belgium. The rear cage from Safety Devices arrived well packaged! Thanks Frank!:) Had to roughly put it in, need another hand and a ratched strap to get it into it’s “final” position and mock up all the support braces! Looks already great! Didn’t want to unwrap it yet though, to protect it as long as possible!:) I really lucked out regarding rust problems on my shell, I always knew though that I should inspect the metal under the hatch closer and wanted to definitely remove it just to be sure! I sadly don’t have a proper before pic, but you can somewhat see that the metal was in great shape on first sight. Looked pretty much like that from side to side. After I drilled out all the spotwelds (after way to many dulled out drill bits:/) I was able to lift it up and inspect the rust under it: It’s nothing too major, and will be fixed with a few patches, no need of a completely new piece! But still very happy I went this way! The only other rust issue I have is under the windshield gasket! Already trimmed it out a bit, but didn’t finish yet. That’s what it looked before! I hopefully soon find a good price on a middleclass welder, so I can tackle everything that has to be welded on the chassis. Mainly those little rust repairs, sidemarker delete and a bit of engine bay shaving. As well as the rear cage brackets and I plan on reinforcing the sway bar mounts up front and connecting the frame rails. I actually got myself a welder last week and ordered some supplies already. Think I can start learning to weld on a lot of test material by the end of the week!:) That's it for now, as I said you're now up to date and the next updates will only come as fast or slow as I get some progress on the car!:) All the best to you guys! Fabian
-
Hey Andreas! I'm sorry, didn't know!:O Still very happy with the quality of these, can highly recommend them!:) I'm actually still a bit unsure about the colour! I love the (original) blue, but don't want to end up with "yet another" Devil Z Replica. That's why I'm pretty sure I'll be going with anthracite. Thank you!:) Hey Patcon! Found the thread I guess you're referring to!:) They actually mention 280zx rotors, but for a rear disk swap, which I'm sure utilizes the original rear 280zx rotors, whereas mine are pretty sure front ones!:D I think I'm going to run full stock for the first restoration iteration, maybe with some upgraded brake pads, but the once on the car are basically new, so are the rubber brake lines. Would be a shame to through them directly away. Hey Bart! Maybe you want to come to Frankfurt am Main next year, the guys in the German Facebook Group are planning a meet then!:) This is Tim's thread!:) Hey Rossiz! Thank you! Yeah, I got lucky! Just some work under the sheet metal under the hatch and under the windshield gasket really! Hey Munters! Thank you!:) Where from Swiss are you exactly? I'm originally from Überlingen/Lake of Constance! And do you know Nils from Schaffhausen? You can find his progress on JDM Junkies! Okay, next two progress posts!:) Suspension removal and disassembly "As I said a post before" I’m tossing the idea of completing a task till the very and and just update you guys on the progress so far! The complete suspension components are removed quite long ago and most of it is already fully disassembled. Let’s get you up to speed! I don’t have that many pictures, but you’ll get the point. Here’s one of the front suspension still assembled to the car, already took the brakes of though. Aaand it’s out: Also took a nice explosion view of the front suspension disassembled: The rear suspension also dropped right out: Since the axles and hubs are not yet disassembled I didn’t take a picture of the disassembly progress of the rear so far! Wasn’t able to geht the U-Joints out of the axle, and the spline in the hub was not willing to get out yet as well… Don’t really have the space for a press, but maybe the only option. Or do you guys know another great option? And ablaze! One picture of the old bushing removal at least! Since I’ll be going with upgraded sway bars from suspension techniques the original front sway bar is for sale! Hit me up if you’re interested (Once again for the European guys only)!:) Engine disassembly Right ahead on this one: I won’t fully disassemble the L24 engine. It ran great when I bought the car, no reason to fiddle with it, since I’m planning to build a performance L28 after the Z is finished but still am going to keep the L24 as a night stand or something (:D) because of the matching numbers, no reason to rebuild the L24. I will however check valve lash, but the head will pretty sure stay on the block and it will only get a clean up and fresh coat of paint. Oilpan and valve cover will get a coat of black powdercoating, the latter one in wrinkle structure. Without further ado, here we go: This is what I started with: Keen eyes might have spotted the cracked area in the valve cover. If you have a spare and are located in Europe hit me up!:) After I got rid of all the wiring and plumbing I removed the intake with the carburetors as well as the fuel lines. Next to go was the exhaust manifold and I just took the upper coolant inlet with it: I noticed something strange about the exhaust port on cylinder 1. Had some weird deposit in it. As you can see, the other ports were perfectly normal. Same thing on the exhaust manifold as well: My worst idea was a coolant leak in the head gasket into the 1st cylinder, but I never saw white smoke from the car when I test drove it. Any ideas what it could be? And if it’s something to worry about? I also checked the spark plugs for irregularities, but the spark plug from cylinder 1 , the one on the left, looks just like the others. That’s as far as the engine is disassembled for now. Plan is to only remove the oilpan and valve cover for powder coating, but leave them on for now the protect the innards of the engine for now. I also think a new waterpump was installed not long ago! If anyone’s interested, the exhaust manifold and warm air inlet thingy are for sale as well as the fuel rail setup (in Europe: ), I already ordered a full race stainless steel exhaust and manifold from Sean from Zstory!:) That's it for today guys! There will be two more blog posts tomorrow, then you'll be pretty much up to speed on how far the progress on the car is so far!:) All the best Fabian
-
Hey Mark! I'm only living for a bit over half a yearn near Stuttgart, am originally from the lake of constance in the very south of Germany!:) Thank you!:) Hey racer47201! Wow, sehr gut dafür dass es schon so lange her ist!:O (Wow, very good regarding it was that long ago!) Thank you!:) Hey Charles! That's actually great advice! Did not even think about it back then! Was my first engine removal ever!;) Have to change this bushing soon anyway, the gear lever is very sloppy! But are the 280ZX rotors working with any plug & play conversion? Maybe in the back? If not I would rather go the 300ZX rotor/ later model Toyota 4x4 caliper route:). I already have a km/h faceplate!:) Sean from Zstory in France makes them, he distributes them to the Zcardepot as well!;) Will look into the dash repair thread, but everything DIY I know so far is new expanding foam, filler smooth it, paint it. Leading to new cracks pretty soon. Another DIY method Romas from DWc in Lithuania uses is the step mentiond before, then drill holes all over the dash, fibreglass resin, fibreglass a whole sheet over the dash, then again filler smooting and painting. less prone to cracks. If I find a company like justdashes.com in Germany/Europe who utilizes the "thermo-vacuum-forming-process" I'd also love to go with that, but no luck so far! Hey Captain Obvious! Great name!:D Already got a new faceplate, see above. Thank you anyway!:) Hey Bart! Keep in mind that all progress I'm posting right now is from the last months from April onwards! But my hope and plan is to get her running, through the German TÜV with all it's mods and back on the road early 2017. April would be amazing! Let's see if that's going to work out!:) Plan is though just barebones! So almost no interior expect dash, steering, seats and rear cage, and possibly with just the old wiring harness with some mods. Once on the street I'll tackle a complete new wiring harness and all the other loose ends!:) So you're from the Netherlands? Are you in the Datsun Europe Group in Facebook?:) I guess you mean Tim with his orange Z!:) We're in eager contact along our builds!:) Okay, as promised two more posts from the blog, I will now be away until Monday evening, then there will be more posts!:) Sound deadening removal and some bits and bobs With the help of dry ice pellets I was able to remove a bunch of the sound deadening. Didn’t work as great as hoped though! Had 2x 6,5kg, should had opted for the 30kg package, which would have cost me the same in the long run. You always learn! That’s what I started with: The magic is happening!:) Always looks cool! And what I was left with after the second attempt. Will use the heat gun method for the rest! As a tip for someone who's going to attempt it themselves in the future: pile the dry ice and isopropyl alcohol mixture/paste on the transmission tunnle as a big iceberg first, the vertical surfaces are the toughest and the dry ice will find its way onto the floor pan area anyway! Along the days before I removed some other bits and pieces, like this snakey mess of a wiring harness!:) Also wanted to share the exhaust setup I had, looks pretty cool with the stacked pipes, but it definitely has seen better days! Will be replaced with the beautiful stainless steel full race system from Zstory, also with stacked pipes at the end! Thanks to Sean ahead of time!:) If anyone knows anything about the exhaust, and if it's something special and still worth something, even though the mufflers are shot and there's one rust hole in one pipe, let me know!:) And whilst we’re at it, my whole set of trim pieces are for sale! The end pieces for the long and middle pieces are here as well, one is missing though, has never been on the car as I purchased her! (As always, Europe only!:) ) 280Z Visitation I got a special visitation on Friday (way back!;) )! Alex was on a road trip from Ireland to Romania with his fiancee to marry her there, and had a short stay at my place!:) All the best to you guys!:) Okay, that's it for the next days, I'll be writing again next Monday! A great weekend to you all already!:) All the best Fabian
-
Hey Charlie! Well next time you're in Stuttgart you come by and say hello!:) As promised the next two iterations from the blog: Dashboard As with all sun damaged Zs the dash is in sad shape as well, sporting some hefty cracks. I’m going to try to restore the dash with the tips found online, hopefully the result will be pleasing!:) But first I stripped the whole dash of all the components! Speedometer will be changed to the proper way of measuring speed, kilometres per hour!;). Completely striped dashboard, foam skin and metal structure underneath will only be separated during restoration, as the foam is brittle enough. Engine and transmission removal "Finally a new blog post!:)" Work on the car was a bit slow in the last three months (back then), but far from no progress at all! The engine and transmission had to get out of the chassis. Since it wasn’t economical to rent an engine hoist I actually purchased one, even though I’m already running low on available space! At least I’ll be using it at least three times more on this car alone! As the height of my garage wouldn’t be sufficient I dragged the car outside on the side of the road – an image very unfamiliar in Germany. Nobody works on their car on the streets here, and most cars are new, seeing a workshop regularly, anyway! Had to jack the car in the front and back up and down to jiggle the engine and transmission out in one piece! And she’s free! If you’re wondering why the gear knob is still on the transmission: It was glued in place because the threads where damaged. Didn’t know at the time and was wondering why it wont unscrew. Engine and transmission separated and clutch, pressure plate and flywheel removed. Back in the garage on the engine stand! Empty in here!:) There will be two more blog posts tomorrow morning, then I'm off to Munich and Berlin until Monday evening! See you guys in the morning!;)
-
Hey Chris!:) As I wrote in my first post those are the blog entries from my restoration blog on fabianspeth.wordpress.com. They reach from April until now!;) A mechanical impact wrench in this case though!:) I had to drill those screws out with a counterclockwise rotating drill bit, if I recall it right one came actually out with it, the other one lost its head and I will have to weld a nut on it to get more leverage to extract it!:) The body is indeed in great shape! I did however found some minor rust, will be postet here in the next days, or you can already look in up on the blog!:) I don't want to bloat the thread right from the beginning in posting all blog entries at once!;) Main area is under the sheet metal under the hatch, a tiny area under the windshield gasket and some small holes in the doors. Hey hr369! Haha, right?:D There is no such law that passed!;) It's an idea from "Die Grünen" party, which are the ecological party here in Germany. And even if the law would someday pass, it only affects NEW cars. That - in theory - from 2030 on no cars with petrol or diesel engines could be registered if they were build in 2030 or later!;) The 2050 ban (idea) for all petrol/diesel cars is also false (as of now), they originally wanted to ban NEW petrol/diesel cars by 2050 as of last year, this year "Die Grünen" even want it by 2030. I highly doubt it will come that far by 2030, and even if it would, Germany has always had a sweet spot for historic cars, so they would get an exception regulation. As it is in the big cities now, normally there are emission standards for all cars in major cities, if the car does not pass it doesn't get a green (all cities) yellow (some major cities) but a red (no major cities) sticker in the windshield. Historic cars (with a H license plate though - period correct modifications of max 10 years earlier!) can drive into all cities and don't even need a sticker at all! Hope that cleared some things up!:) Okay, since I had no time yesterday evening here are two new blog posts, and I will post two more by evening! Will also post two more tomorrow morning, then I'm off to Munich and Berlin until Monday! Engine bay cleanup The first round of engine bay cleanup includes emission control and A/C removal. Messy engine bay before All the emissions control related items. The air pump is the biggest scam, pumping fresh air into the exhaust clearly reduces exhaust fumes…right. All the A/C components removed. If anyone wants to restore it, I’m happy to sell it! Didn’t work in my car, but wasn’t charged anyway (again, Europe only!:) ). After a few recommendations in the Z forums I decided to get the Odyssey PC680 as a replacement battery, since the one which came with the car was shot, and the Odyssey is a extremely lightweight alternative. Starts the car without any problems. Planning to mount it under the passenger seat, hence the mention in the engine bay cleanup post! Still a lot to do! The coolant reservoir has to go completely, or a better looking unit will be moved in front of the radiator support along with the coil. Planning to clean up the engine bay a lot, Taryns bay is the inspiration! Mechanical fuel pump will go as well, only an electrical one will be installed at the fuel tank. I want to reroute the fuel lines and plan to delete the return line. A new engine wiring harness has to be done. In the far future triple Webers are planned. Until now the SU carburetors will be restored. If anyone has tips for the engine bay clean up, I’m happy to hear them! Still messy enough engine bay after Spare parts There came some spare parts with the car, quite a lot of them have to be identified still! If you know anything about the following parts please share the information!:) The most important thing I found, because ‘murica!:D It’s a California import, so there’s that!:) Two rear strut spares New clutch and clutch cover, haven’t found out if its for the 240Z yet. ‘New’ 280ZX Front rotors. Not sure if they are reusabel with the surface rust. And the 240Z doesn’t have vented discs originally, so they won’t work with the stock calipers. Not yet sure which brake setup I’ll be going with, because the car has to stay within the oldtimer registration restrictions in Germany, which says that modifications have to be period correct and can only be 10 years newer than the car. Not sure if thats ’72, or ’78 +10 for the whole S30 series. Is there a use for 280ZX rotors on a 240Z? Only heard about the newer Toyota Hilux (4x4) calipers with 300ZX rotors, or the older calipers with the original 240Z rotors. Alternator Belt seems to be for the 240Z. And a spare inspection light, which doesn’t fit into the clean engine bay theme anyway. Correct rear crank shaft Seal? Correct release bearing? Clutch slave cylinder for the 240Z Crankshaft seal? Clutch spigot bushing An array of gas struts for the hatch and all of them have differences compared to the original on the right which is totally shot. Not sure if any of them will work in the car. Whoever can shed some light on some parts is very welcome!:) And for nostalgia reasons; the original California blue plates!:) Thanks for any input from you guys!:) We read each other in the evening!:) Fabian


