qz16
Free Member
-
Joined
-
Last visited
Everything posted by qz16
-
Steve J, Thanks for the correction. Still think it would be a good idea to see if there is 12 volts on that pair of wires, before going any further. Thanks again steve J I just thought of this, and yes, I know it is silly, but are you sure that the bulb that is not lighting is actually the high beam indicator or is it possible that it is something else? Is there any other bulbs that are on?
-
Duffman, If your headlights switch from low beam to high beam, then the switch is not likely to be the problem. Likewise, if the headlights switch then the relay is likely to be good as well. If you can switch the high beam indicator bulb from led to incandescent, then you can get to the socket. Can you put a multi-meter on the wire going to the socket and the other end of the multimeter to ground and see if there is 12v? Don’t forget to try it with the high beam switch in both positions. If there is 12 volts then it probably is a grounding issue. When the socket is installed in the speedometer it is grounded. If it is not firmly installed into the speedometer then you might not get a ground to the socket. If you do not have 12v in the lead to the socket then I think the problem gets a bit more insidious. Its been a while but I think that function goes through the combination switch. If necessary, I can dig out the schematic, but I would check the voltage to the socket first. regards, q
-
A friends car was exhibiting something similar. He would crank the engine and it would sound like it was spinning, but not start. Sometimes it would start and run well. Come back a while later and it would not start. We went down the same route suspecting the solenoid and/or starter. We took the valve cover off and it looked like the valves wee operating, oil was spraying etc. When it was in the failing state to check spark via the distributor, we turned the crank with a socket and ratchet. It seemed to turn way too easily like there was no compression. He did a compression check and two cylinders were zero (engine cold because it would not start it to warm it up). A couple of hours later he repeated the compression check and low and behold it registered much higher, but not normal. The car started and again it ran well. Turns out it was a couple of stuck valves - that is when he revealed that he had put some old gas in to dispose of or use up. Unlikely that you are having the same issue, but it may be worth eliminating. Hope it resolves soon.
-
As always, thanks zkars
-
SUCCESS - Autozone was able to special order the STP air filter - #SA3378, and it fits my airbox. I have not heard back from O'reilly's yet. Once again thank you DatsunZguy. Update 12/21/22: Unfortunately O'reillys was not able to locate a suitable filter. They were as always very nice. The manager took the time to take the measurements and search for similar filters. He did come up with the K&N filter that zKars mentions below but said that all of his sources claimed that it was out of stock.
-
DatsunZguy - Thanks for the quick response. I had previously checked oreilly, autozone, napa, and advanced auto - all of those sites indicated out of stock conditions. Having said that armed with the specific part number I did call both Oreilly and autozone and both said that they would try to special order it. So, thank you for the part number lead. It may take a few days, but I will update this thread if they are able to fill the order.
-
I have a late 1973 240z air filter box. I've been restoring the car for a while. I am trying to locate an air filter. I did not realize it but evidently there are two (2) different sizes. One that is approx. 2.375 inches high and another that is about .25 inches shorter. I am not having a great deal of luck locating the correct air filter. Does anyone have a current source for these air filters. I believe they were used on late '73 (240 Zs) and 1974 260 Zs. I have tried all of the usual suspects (zcardepot, thezstore, ...etc) Thanks in advance for your assistance.
-
I would like to help you if I can. Can you tell me which step is confusing to you. Thanks. ooops - I read my post from the beginning and realized that you might have been joking - You know humor is a funny thing. (That's a pun.) The person your telling the joke to needs to realize that it is a joke. If when you said - "What rear roller?" you meant that you no longer even had a rear roller, then I have passed yet another milestone in my life. I am now at the point that humor needs to be described to me. On the other hand, if you meant - What rear roller, as in what are you talking about, then forget about this oops para and zero me in so I can correct whatever mistake I have made. Have a great day
-
Sorry I was away from the site for a few days. Thanks to all for the responses. The images from U.K. JerZ were very helpful. I also found some other information indicating that there were two different thickness'. Those on the higher portion were 1/2" - 9/16" thick while the lower section got 1/4"-5/16" thick. The images above show these different thickness'. BTW - sorry for not making it clear - I have a '73 240z. When I pulled the tank I saw the indents. My tank has 3 indents for isolators on the lower section and two indents for isolators on the upper section. I found some neoprene and/or DOBTIM Neoprene that is the right thickness'. Once again, thanks for the help. regards, ron
-
Does anyone know if there was anything between the fuel tank and the bottom of the chassis? Was there any material isolating the tank metal from the chassis? Thanks in advance for your help.
-
So, I found something that fits. The screw is an M5 .8 I do not know the correct length. I happen to find a few 20mm and they appear to work well. Thanks anyway.
-
Does anyone know what fastener is used to hold the rear view mirror bracket on a 1973 240z? Size and pitch would be great if you know it. If not does anyone know if they are the same bolts as the sun visors. Thanks in advance for your help
-
I have an MSA 3-2 header with 2 inch tubes. Does anyone have a source for a T304 stainless steel 2-1 merge collector (2.0 inch inlet, 2.5 inch outlet) that will mate with the MSA header. My understanding is that the MSA header mates with the original Datsun merge collector, but I can’t confirm this because I do not know if my current merge collector is original equipment. I realize I can have a muffler shop fabricate a collector but was hoping for a less expensive solution. I found some merge collectors online, vibrant for example but the center to center measurement of the inlet tubes is not the same as the MSA header. The center to center measurement of the MSA is 2.44 inches, while the center to center measurement of the Vibrant collector is 2.125. I am hoping that someone has bought a merge collector that mates to the original s30 exhaust. Thanks for your help.
-
dutchzcarguy - Thanks for the response.. I will make the packing, appreciate the suggestion. Cantechz and steveJ - thanks as well
-
okay so, I looked in the garage and the stuff that I was talking about is called butyl tape. I dont think seam sealer would be a good idea because I think it has adhesive. Does anyone know what the original packing was made from?
-
Thanks for the quick response. Since the part is discontinued, I guess I have 3 options: 1. live without the gasket - probably not a good idea - paint will probably chip 2. get the rubber gaskets that go behind the headlight bucket and modify them 3. make something out of rubber or that flexible sealer used for an RV. I think Wick Humble (How to Restore ....") calls the stuff dumdum. If you have any other suggestions don't hesitate. Anyway, I appreciate the help - thanks. Regards, ron ps - I just remembered what the real name is for dumdum - Its a seam sealer, comes stuck to a sheet in a roll. I have used to seal an AC on a RV roof, seemed to work.
-
Is there a gasket or seal between the "headlight case" and the front fender? My concern is metal to metal contact.
-
Perhaps you should consider making one change at a time. The rebuild would be last on my list. Just a thought for what it is worth.
-
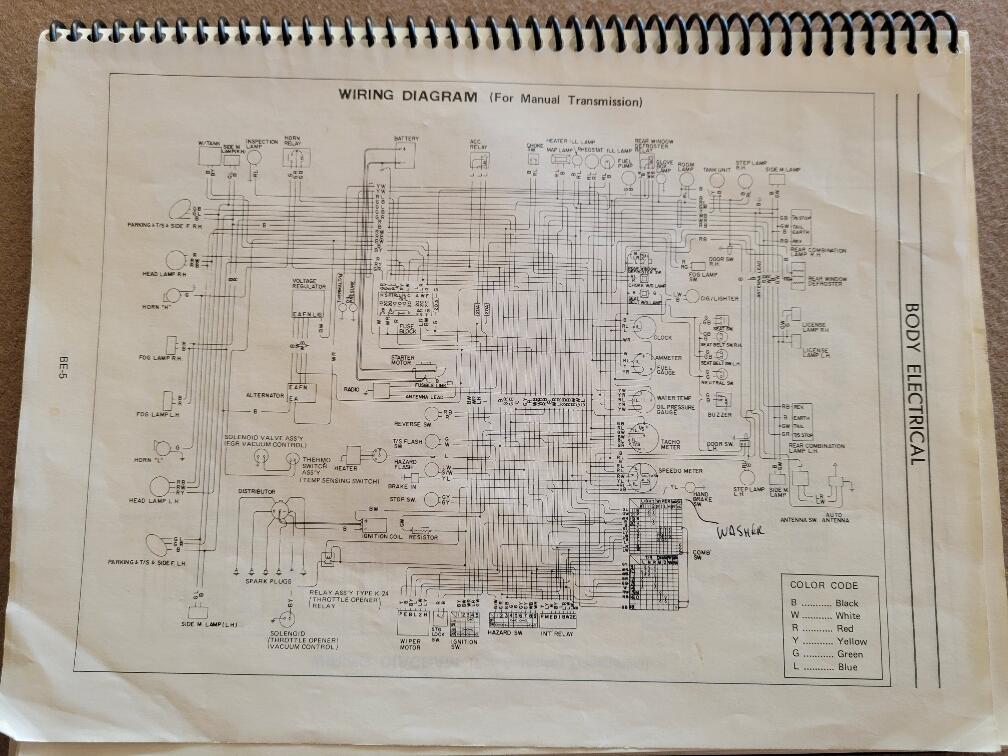
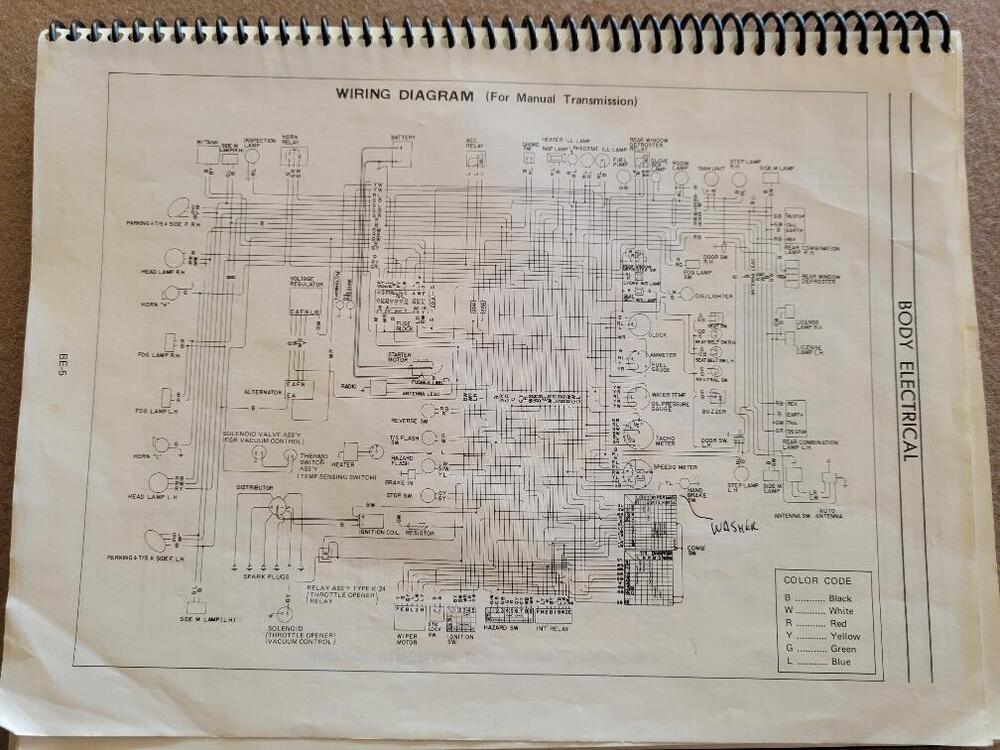
I located a schematic that may interest you. The area of interest is on the right side center page.
-
I am not sure that I understand your question. My first thought was that you are asking how the seat switch physically mounts under the seat. My recollection is that it is pressed into the seat spring with the movable part of the switch facing upward into the seat. When you sit on the seat your weight depresses the movable part into the switch and the connection is made. Others are answering the electrical side so I will also try to help with that. The original wiring shows two (2) wires on the seat switch, one green and one green with a black trace/stripe. The Green with the black trace is connected to the Passenger (right side) seat belt mechanism. The Green wire coming out of the Passenger seat belt mechanism goes to the Driver (left side) seat belt mechanism. The Green with a black trace wire from the Driver seat belt mechanism ties back to the Green wire on the Passenger seat switch. I don't believe the driver side seat switch is connected. The idea is that if the driver turns the ignition on and is sitting in the seat and he does not have his seat belt extended then the warning lamp and buzzer are activated. If the driver turns the ignition on and a passenger is sitting in the seat, then the first part of the circuit is activated. If his seat belt is not buckled, then the second part of the circuit is activated, and the buzzer and the warning lamp are activated. If the passenger seat belt is fastened, then the second part of the circuit is de-activated, and the warning lamp and buzzer are de-activated. I think there is enough information to troubleshoot the problem. If not don't hesitate to ask more questions. I will also try to locate a schematic that shows the seat belt and seat switch circuit and post it. Last comment - My recollection is that this circuit uses these 3 pin mini connectors. There are only two wires in the connectors and the connectors are keyed so you can't put them in backwards. regards, ron
-
MY car was not being started regularly as I was in the middle of restoring it. I had heard that there were issues with new fuel pumps. I bought 2 before I finally took a friend's advice. Background: Fuel tank restored Hard and soft fuel lines replaced Carbs restored I filled the fuel bowls, and it would run for a bit I filled the fuel filter and bowls, and it would run A few days after shutdown I noticed that the fuel filter bowl was not full, a few days later it was empty. Would not start, would not fill fuel filter bowl. I was convinced that the pump was not strong enough to pull fuel from the tank to fill all the lines and the fuel filter. As part of troubleshooting, I used a jerry can and short hose to simulate the tank and hard line. Could not pull fuel to fill the filter. There was some information regarding the amount of vacuum created by the pump, so I measured the pumps. Sorry but I forget the results and have lost my notes. An old school method to test a mechanical fuel pump is to put it in a vise and work the arm. If it wheezes it supposedly is more likely that it is ok, if not it is supposedly bad. Solution to my issue: A friend told me to recheck all of the hoses from the fuel filter to the carbs. I did that everything seemed tight. I replaced all of the hoses and this time I used the correct diameter. It was more difficult to connect the right diameter, they seemed overly tight. When this was done, I once again filled the fuel filter and the float bowls. It started and I have not seen the fuel filter bowl empty since, that was 7 or 8 months ago. The car has not been restarted due to other work on it that I am doing. My story is not complete – I never did put the original pump on to prove that it still had life. Bottom line: I am sure there are some bad fuel pumps out there, and I am not saying that you don’t have a bad fuel pump. This is what seemed to solve my problem. It was difficult for to believe it at the time, but as the months went by and the fuel filter remained full other issues became more pressing. The car starts now even after long periods of storage. Hope this helps.
-
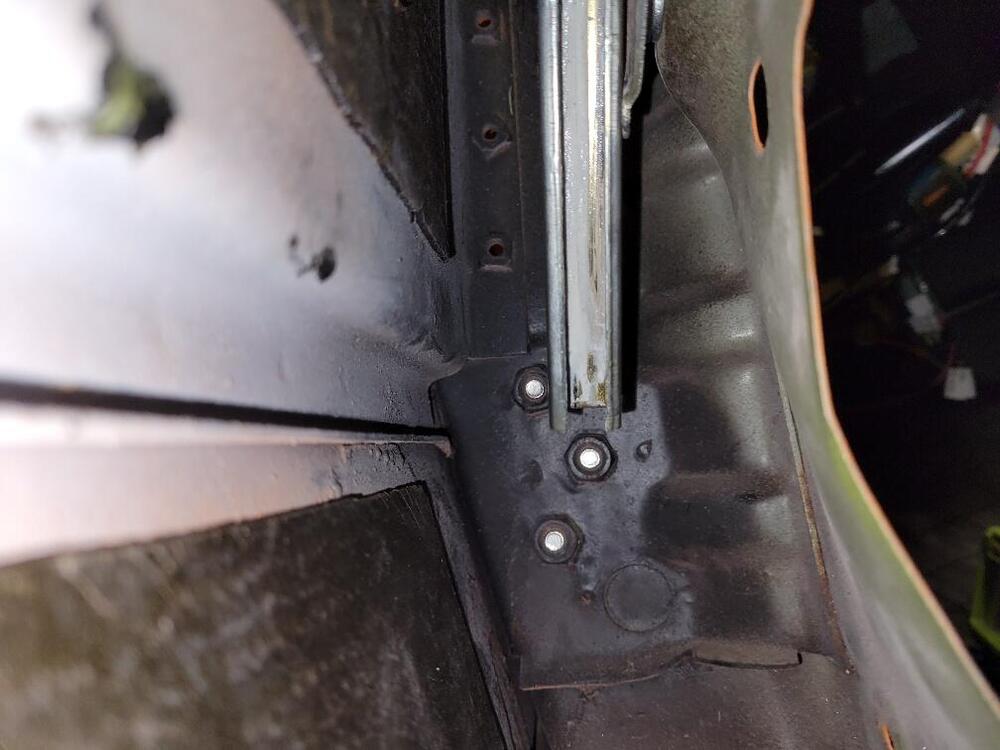
Mystery solved. SteveJ - your last post caused me to take a picture of the inside of my door. I apologize for wasting everyone's time. In the image below you can clearly see an additional bar (just to the left of the front sash) that has the welded nuts. I guess the bar is welded to the inside of the door. The bolts go thru the outer hinge side of the door and thru the "safety bar" and into the welded nut. Once again, thanks for everyone's assistance. I guess I was guilty of taking you on a "snipe hunt", without meaning to.
-
SteveJ - thanks for the effort - really do appreciate it. Okay, so the first picture is the inside of the forward portion of the inner door, the hinge side. If I am understanding correctly this is the area of interest. As SteveJ states you can clearly make out at least 2 of the three welded nuts. There is nothing that I can see that is captured on the inside of the door. The bolt goes through the door and into the welded nut. I do not see a safety bar or anything else captured by the bolt. Also, there is nothing on the free side of the welded nut. Is it possible that the bolts are compressing multiple layers of metal? The outside layer: screw hole layer (my original post view) and an inside layer (welded nut layer). And there is no additional discrete bar. Translation - if you can feel the welded nut and the bolt is installed then you are not missing anything?
-
SteveJ, Please don't do that. Its too much trouble and there are too many opportunities to damage your door card. Trust me I have remove the window crank clip enough times to be wary I am sure someone will remember where they saw it and post it. Very nice of you though - thank you.
-
Zkars – you have always been helpful in the past – thanks again. SteveJ thanks for the image. I am a little slow so bear with me. If SteveJ’s image is accurate then whatever those three bolts should be holding in place would need to be between the bolt head and the door. I looked at the interior of the door. All I can feel is welded captive nuts. On the other hand, if the bar was internal to the door, then wouldn’t they have put the welded nuts on the exterior of the door and install the bolt from inside the door. I am just guessing so I reserve the right to be wrong. I’ve looked in the manuals that I have and can’t find anything. Is there someplace that you can direct me to for more information? Has anyone seen this part? I know it is a lot of trouble, but can anyone post an image of a safety bar? –Thanks in advance. Is it possible that this was cut-in to production after our car was manufactured? My last thought has to do with a TV show – “Cheers”. The episode had to do with a prank that they pulled on the Doc. (Frasier Crane) – they took him “SNIPE” hunting – a practical joke or fool’s errand. No offense intended, but Jim are you taking me snipe hunting? Appreciate the help. Regards, ron