qz16
-
Posts
147 -
Joined
-
Last visited
-
Days Won
2
Content Type
Profiles
Knowledge Base
Zcar Wiki
Forums
Gallery
Events
Downloads
Store
Blogs
Collections
Classifieds
Everything posted by qz16
-
The car that we are working on is a1973 240z. Door cards are in good shape but I need to clean and covert them from tan to black. There is a chrome strip 3-4 inches below the top of the door card. I am told that this accent is plastic. I do not want to replace the vinyl on the door card but would like to remove and replace the chrome strip. How does one go about removing this strip and not marring or destroying the vinyl. Thanks in advance for your assistance.
-
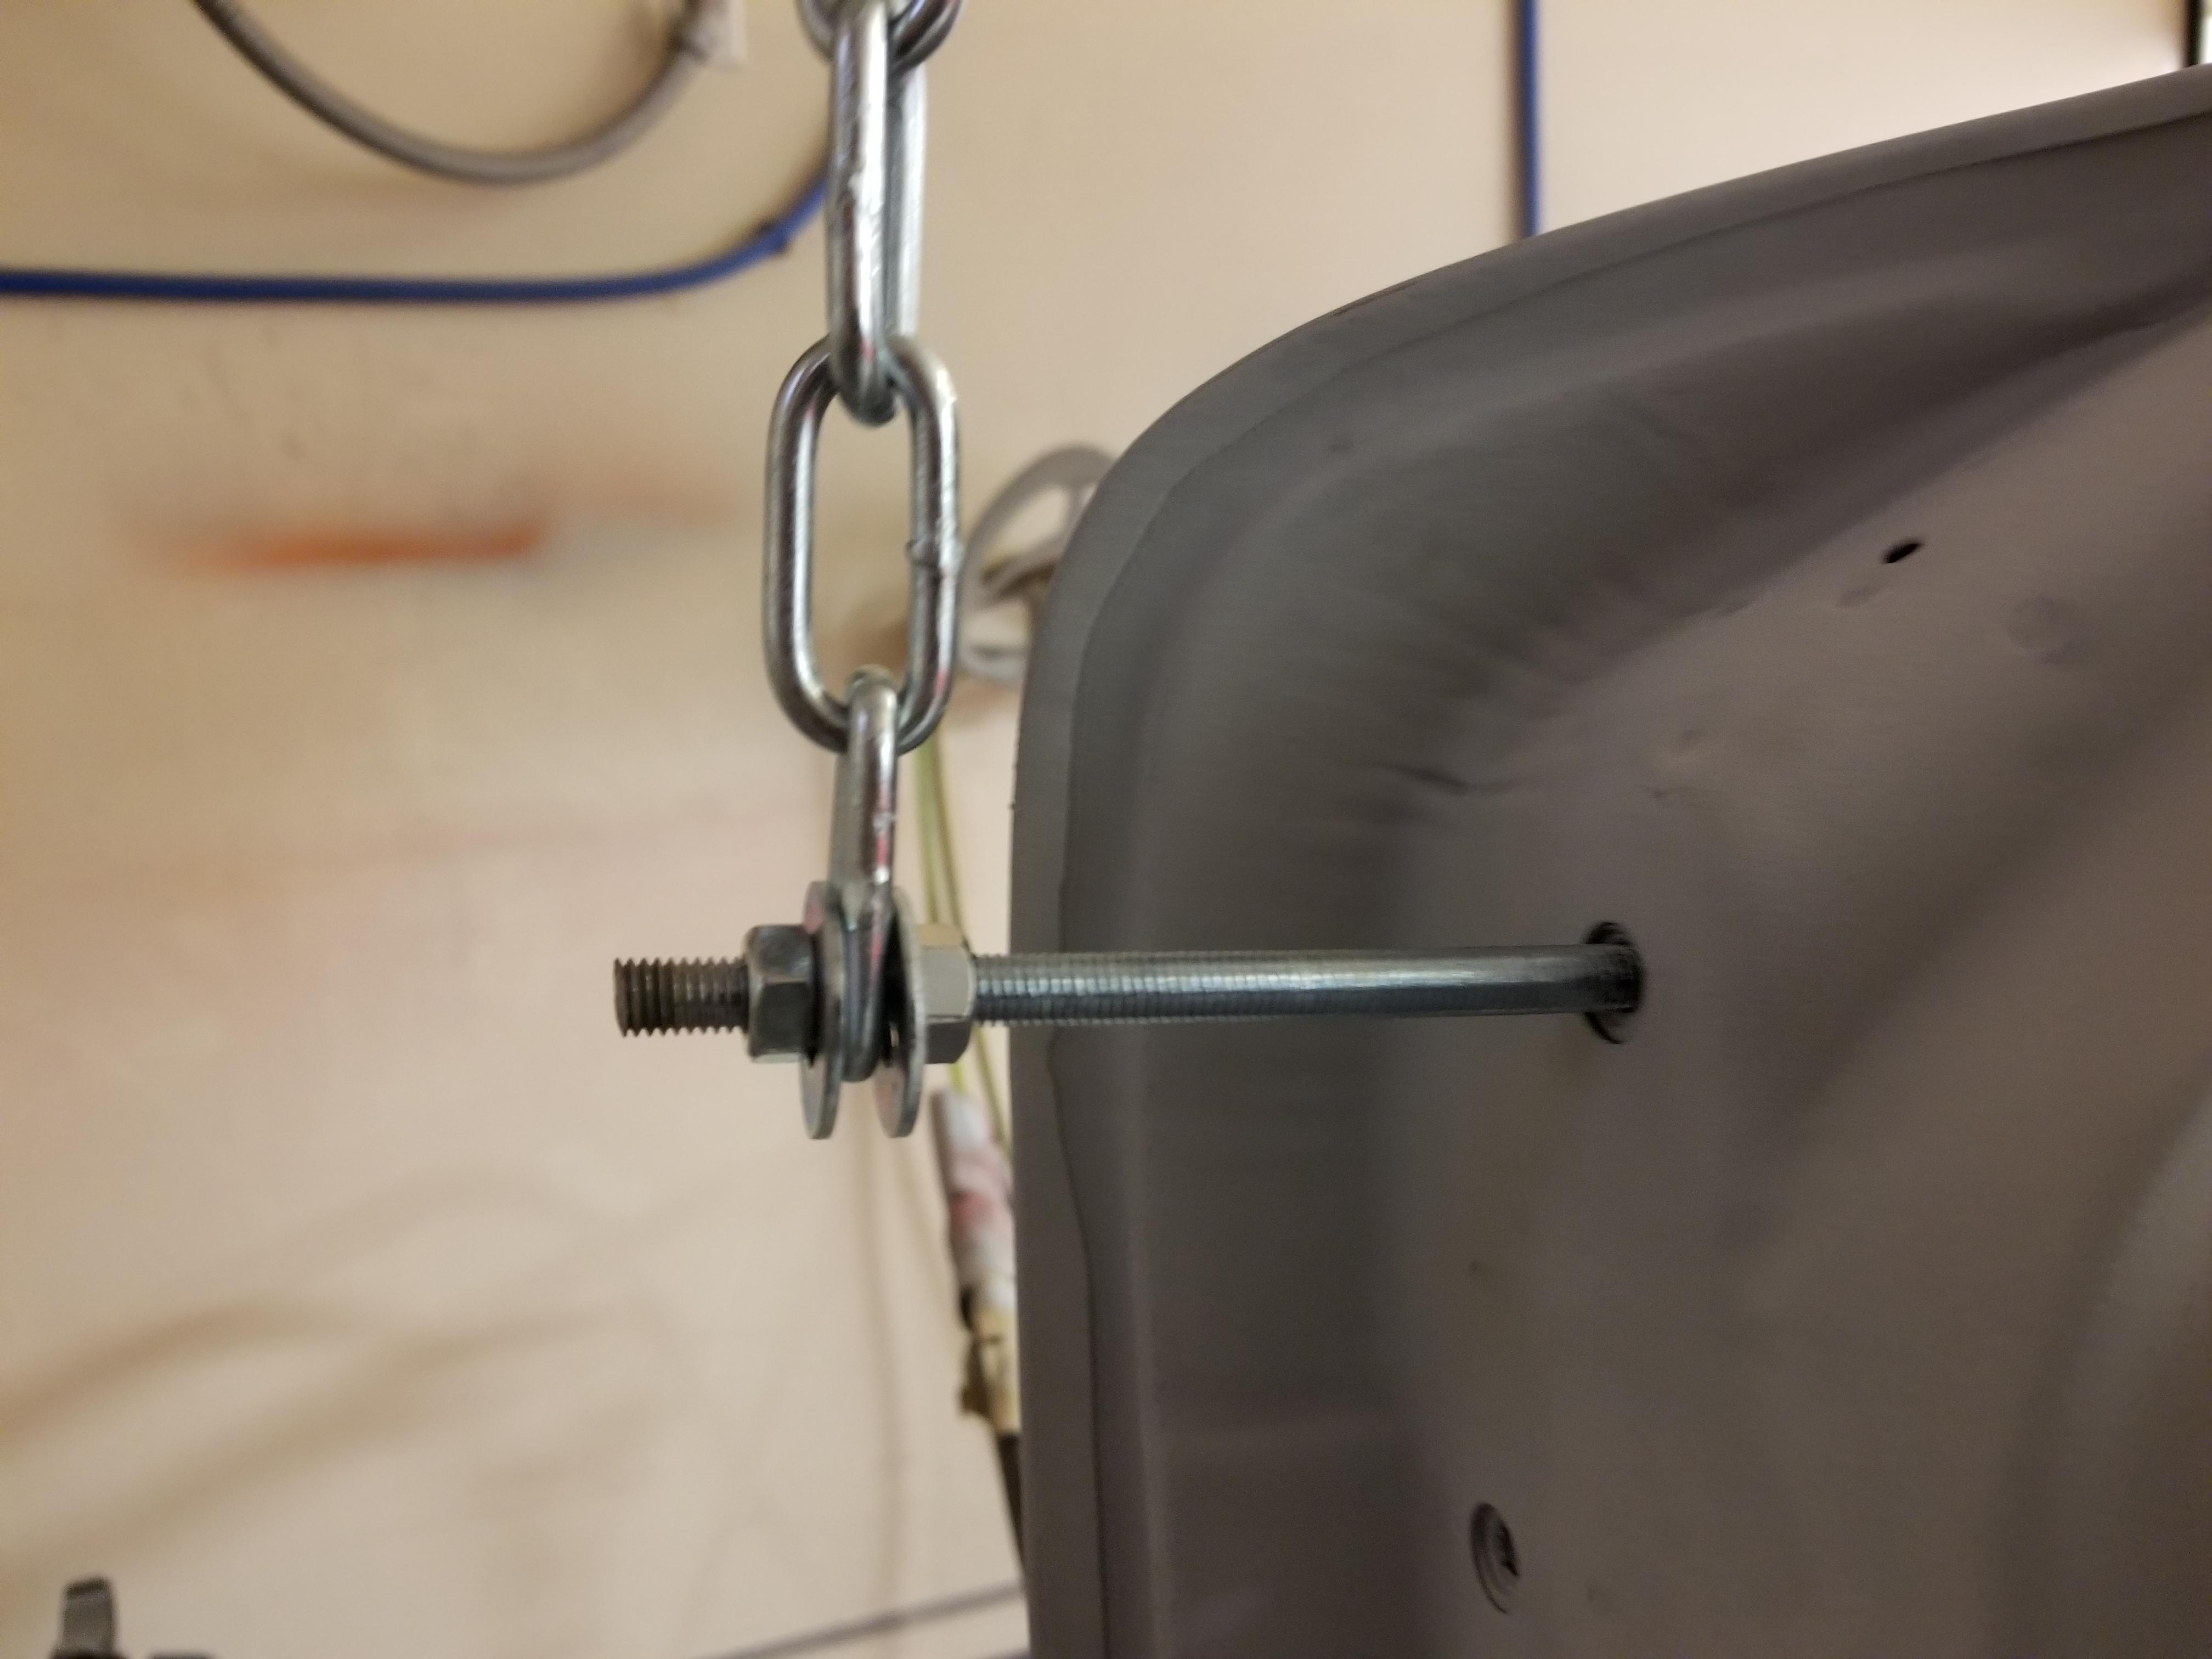
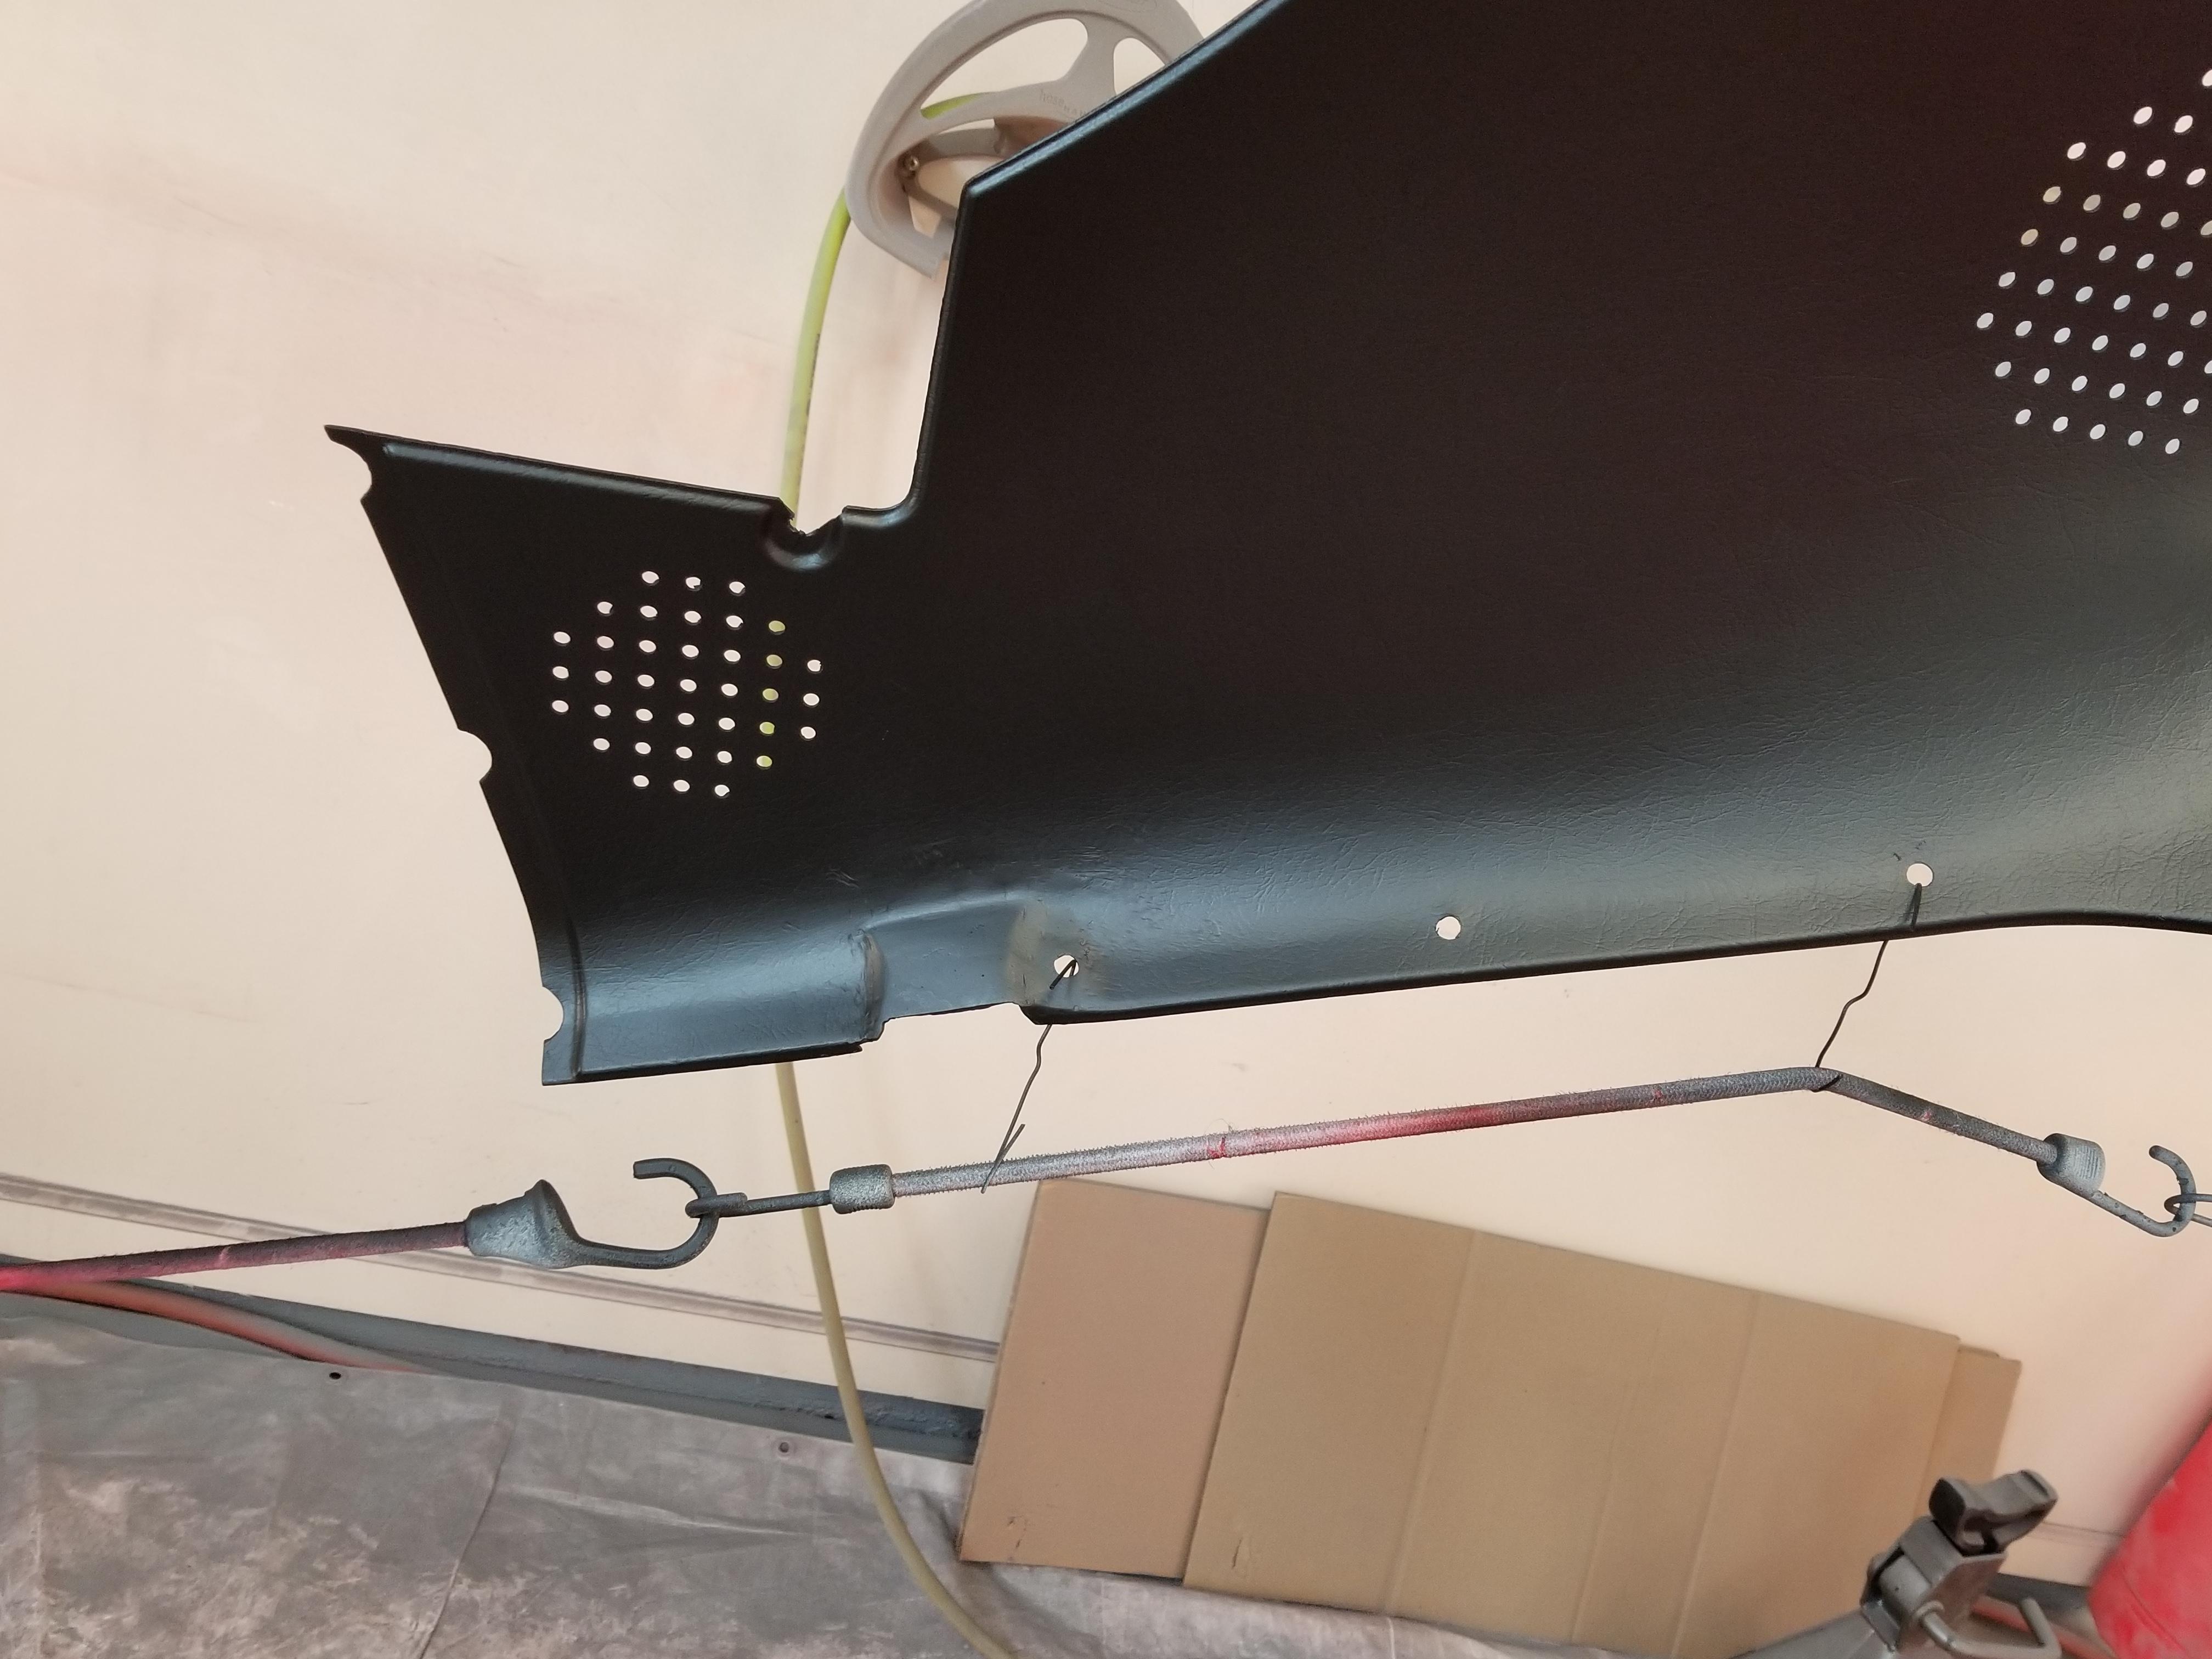
Well, I primed the door both sides at the same time but it was hung in a weird position with wire. I don't think anything other than coverage is important with regard to primer. I hand block everything before applying color. So, there is primer under the washer. My plan was to spot repair that area when i take it off the rack. I may even wait until after the door is hung. I have not found a way to avoid some nicks and scratches during the assembly stage so touch up is just a part of the process. Aesthetically the washers and the latch will probably hide this defect effectively. But thanks I forgot to mention that issue and the novice painter might not realize that the area would need touch up at some point. Good catch.
-
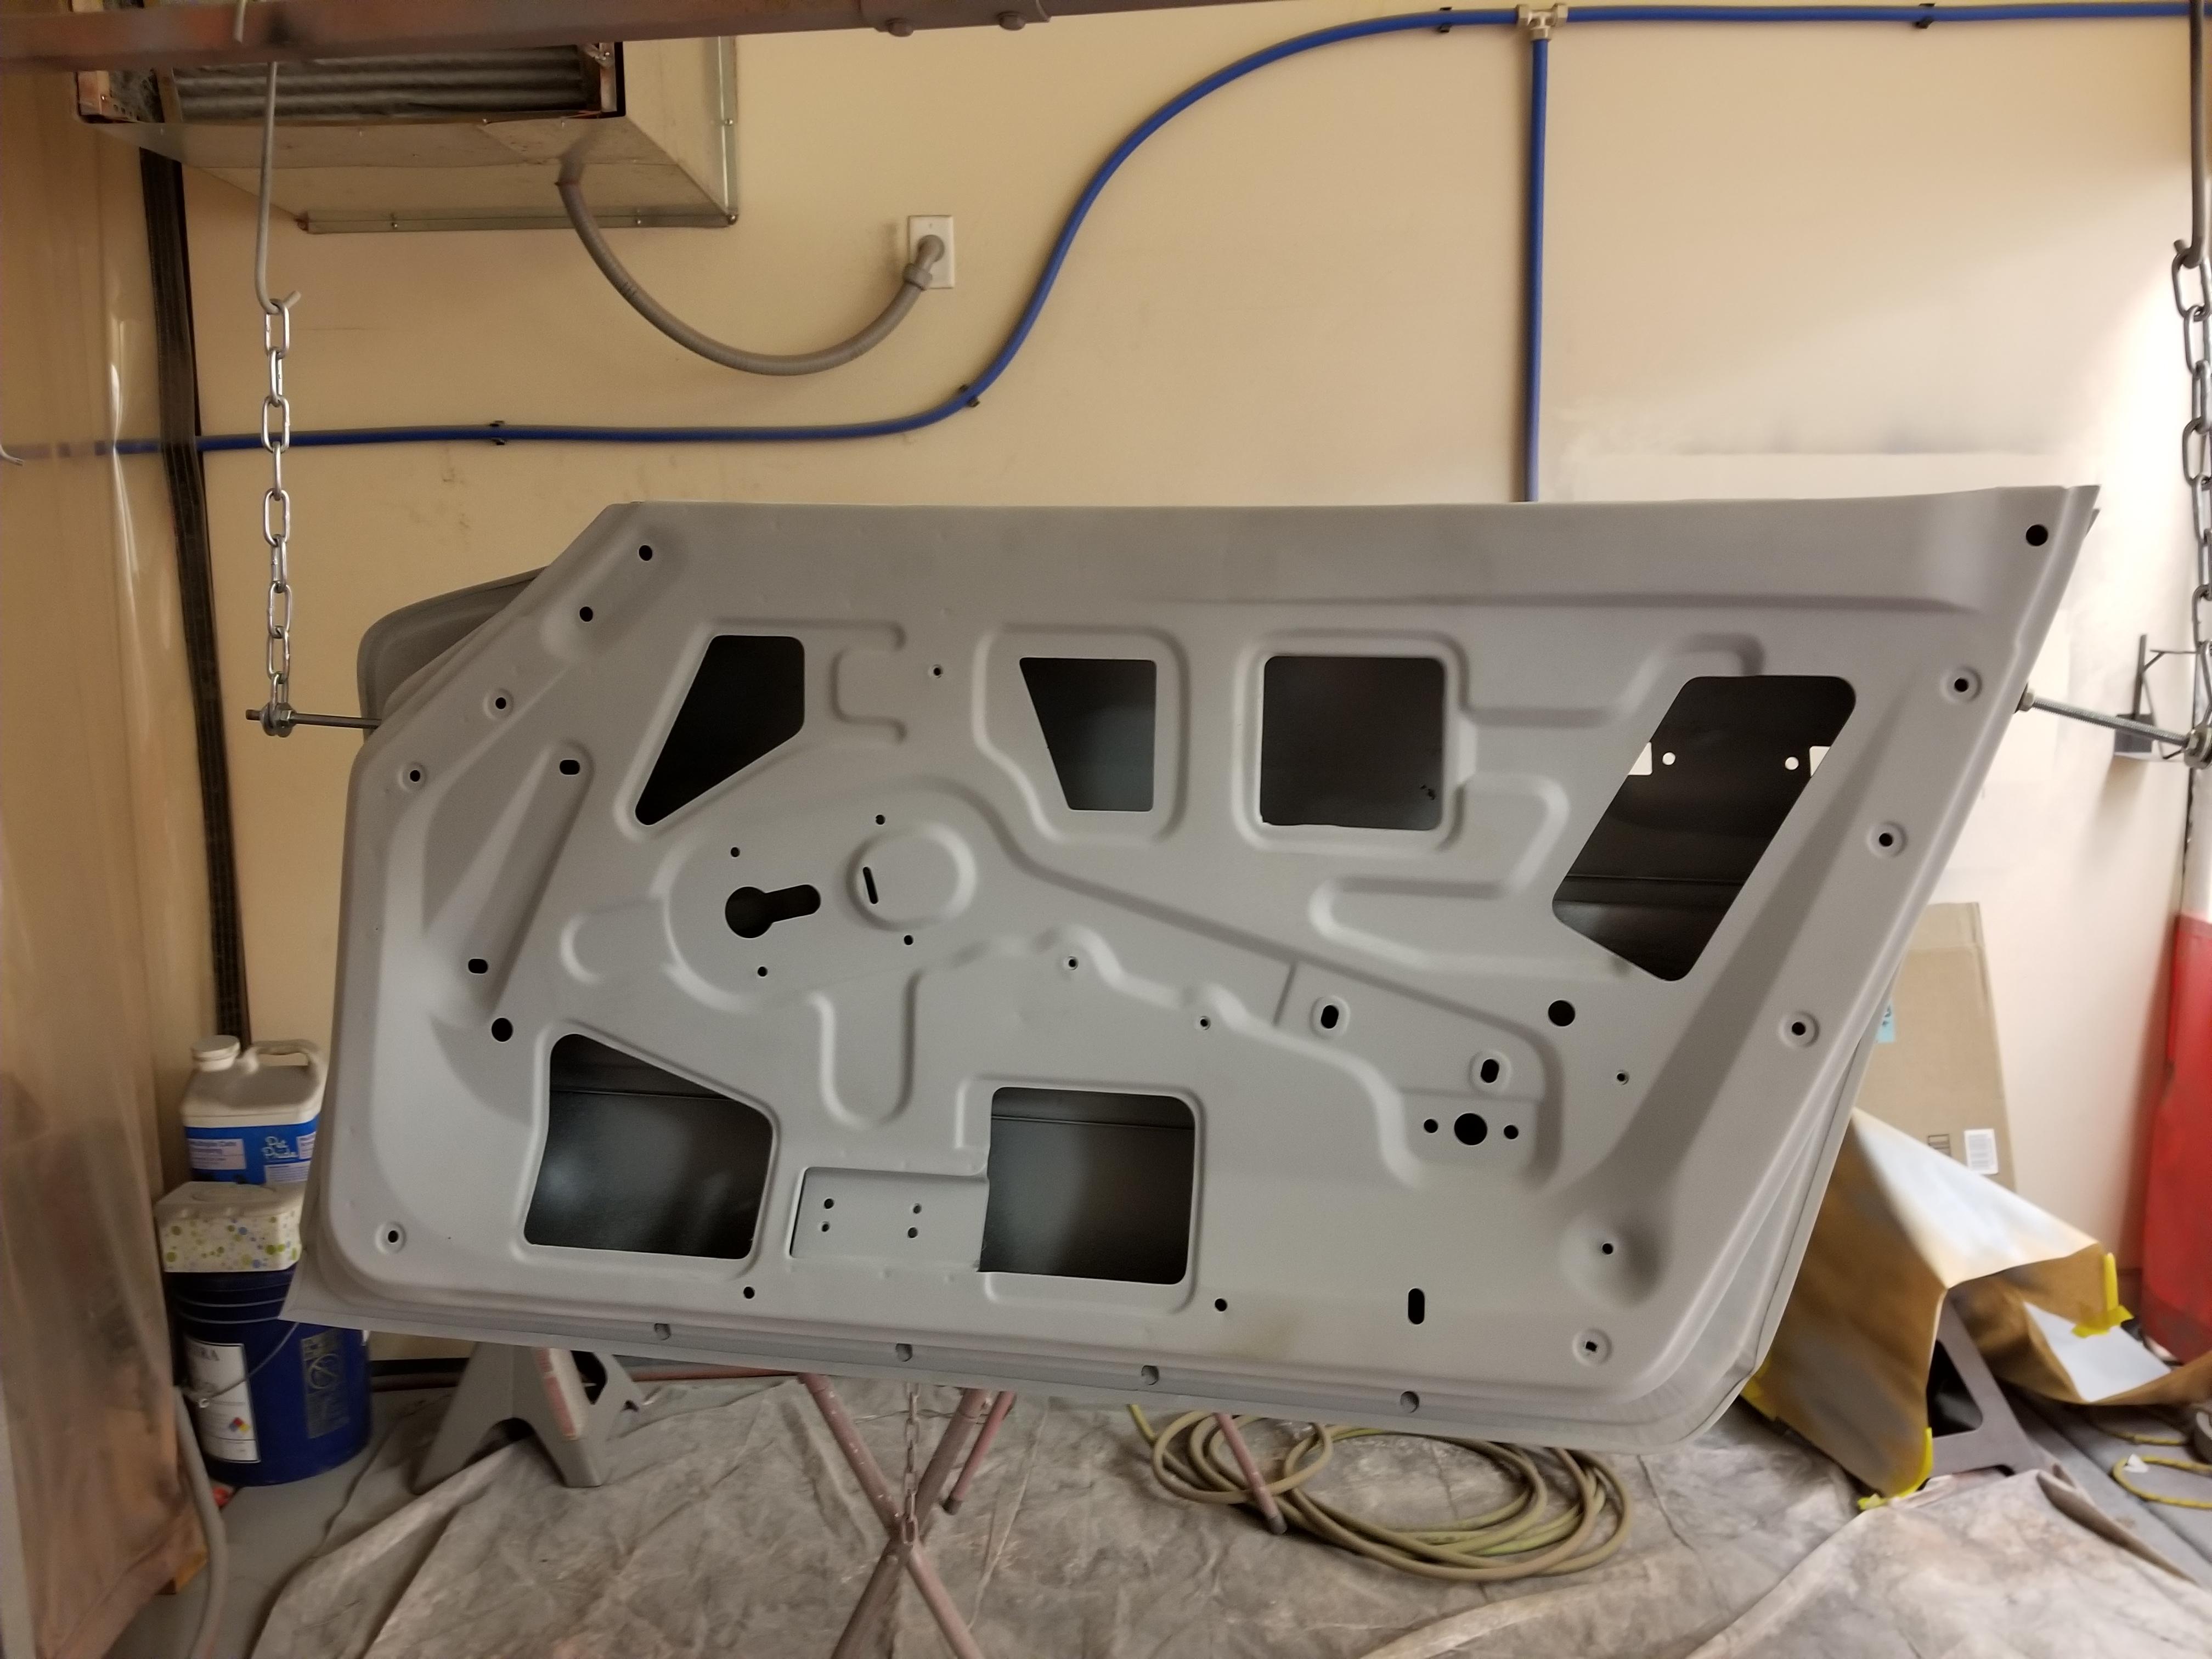
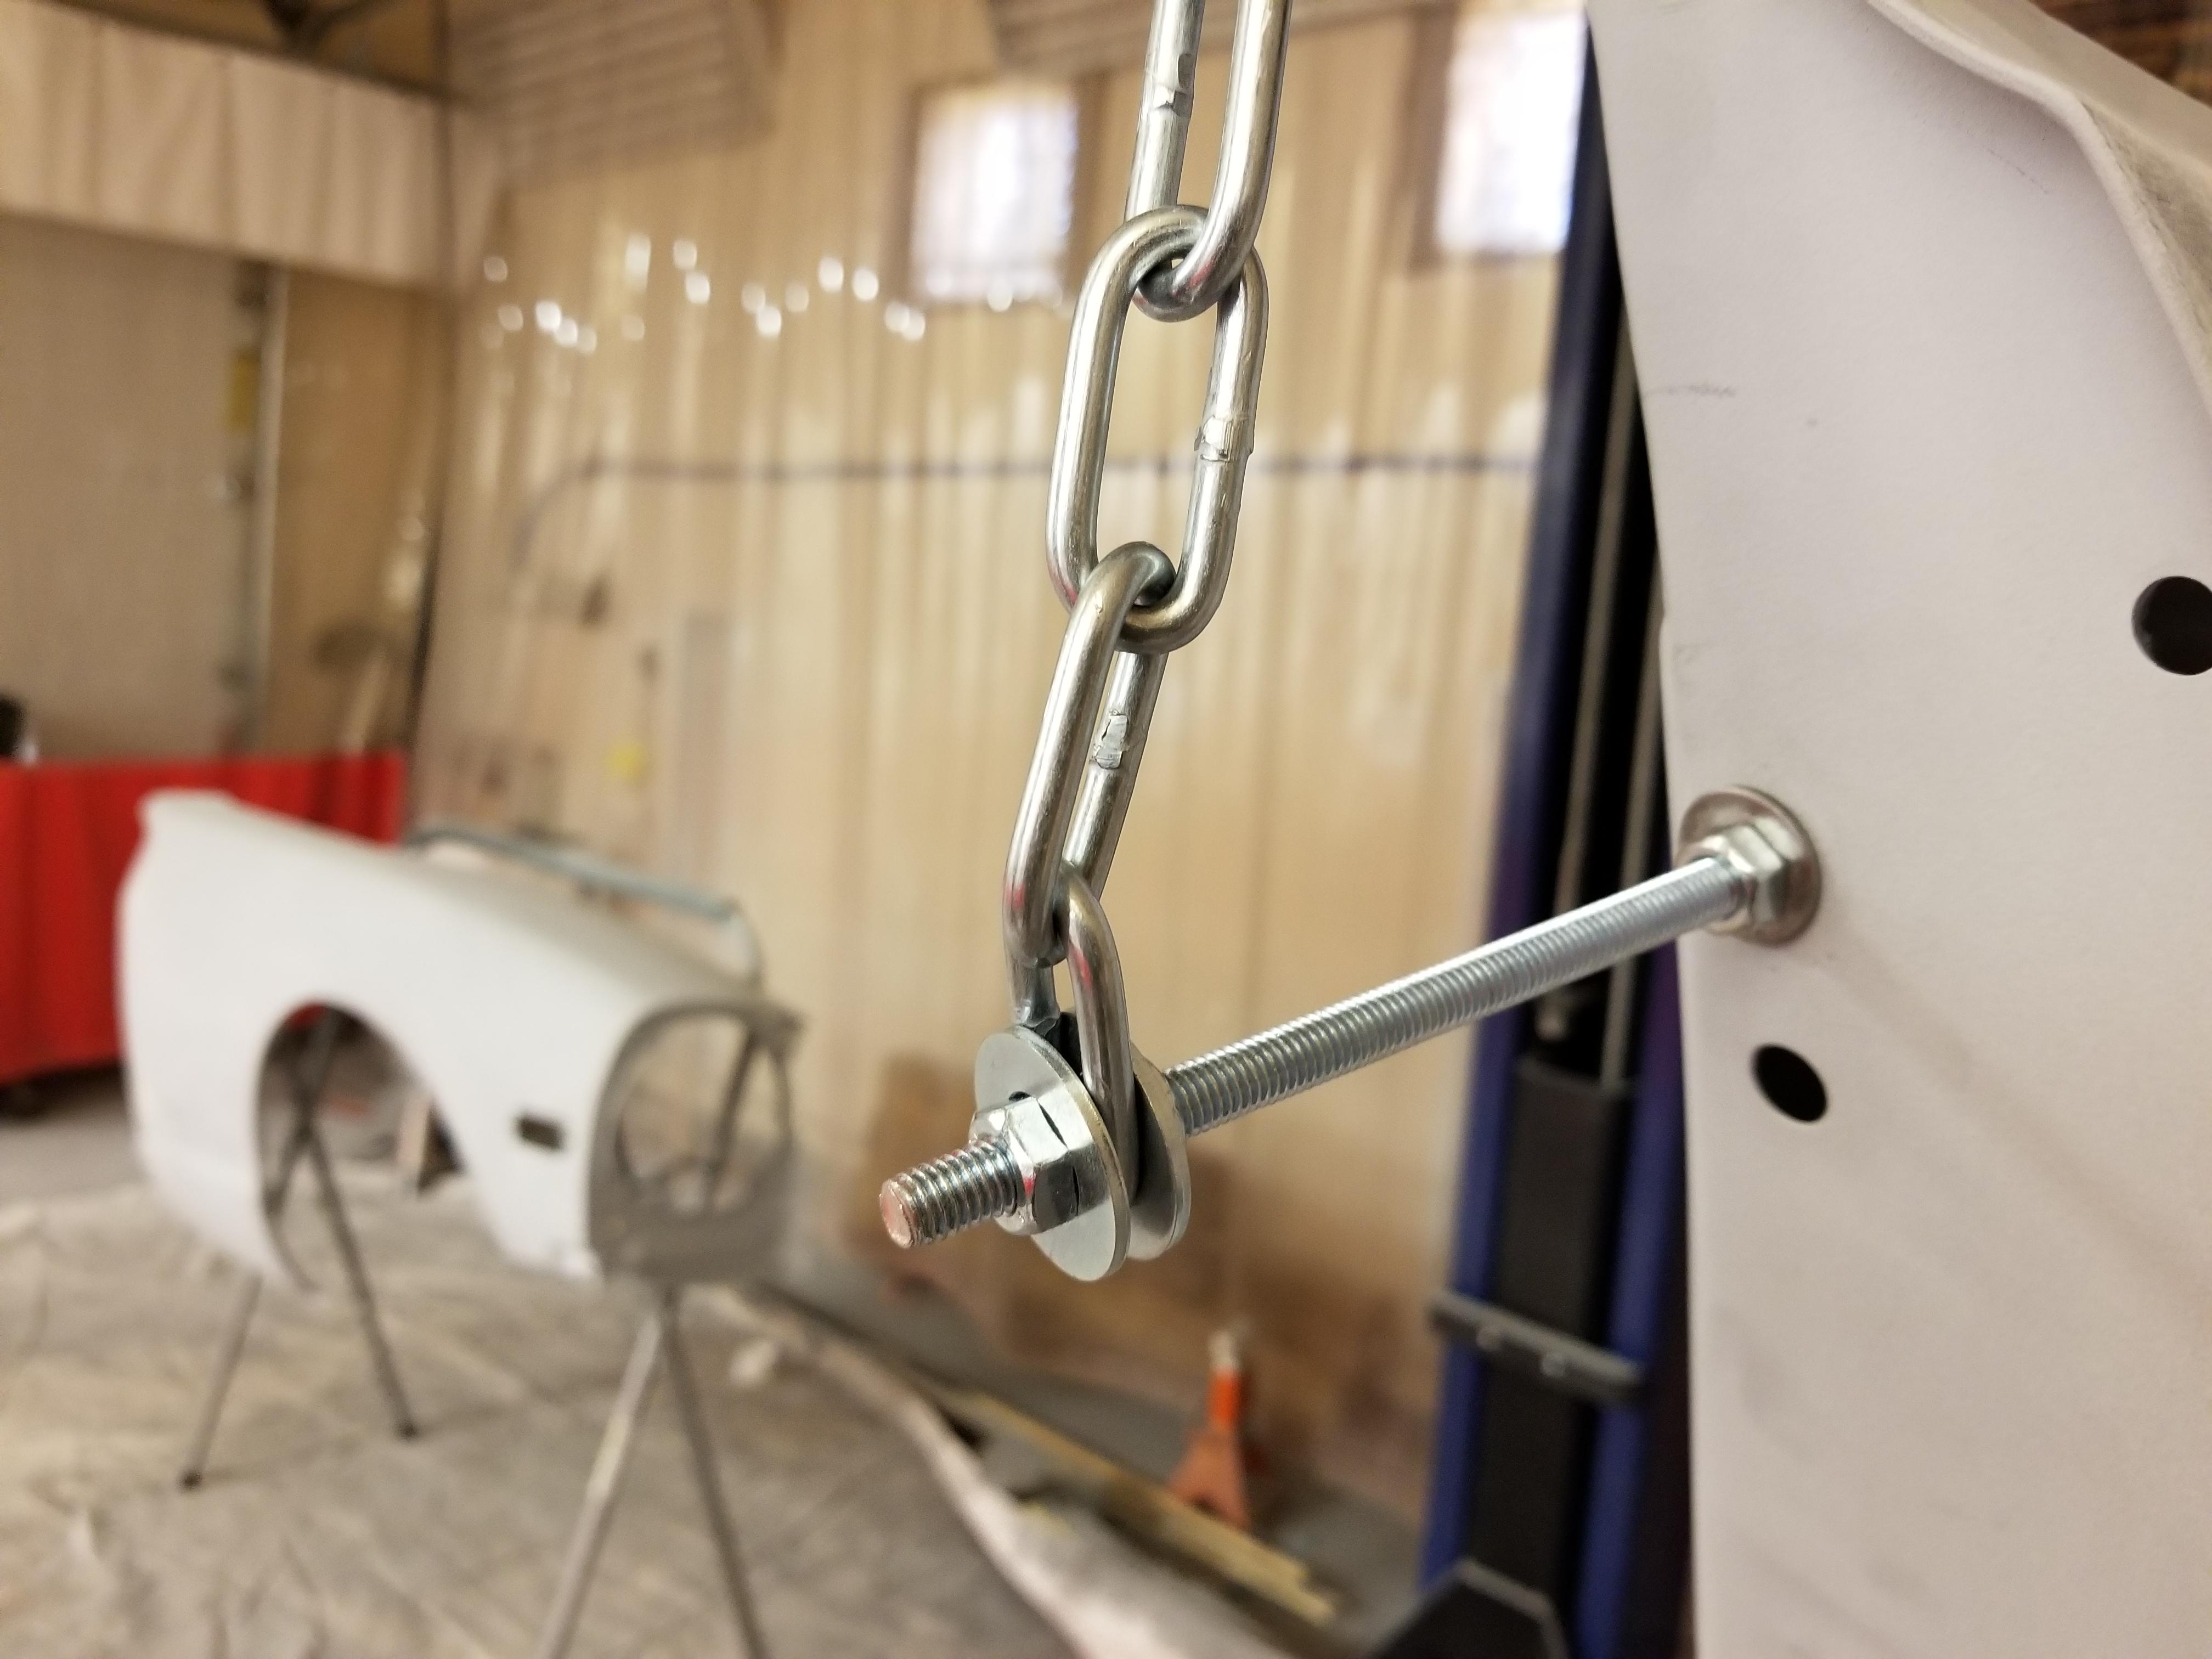
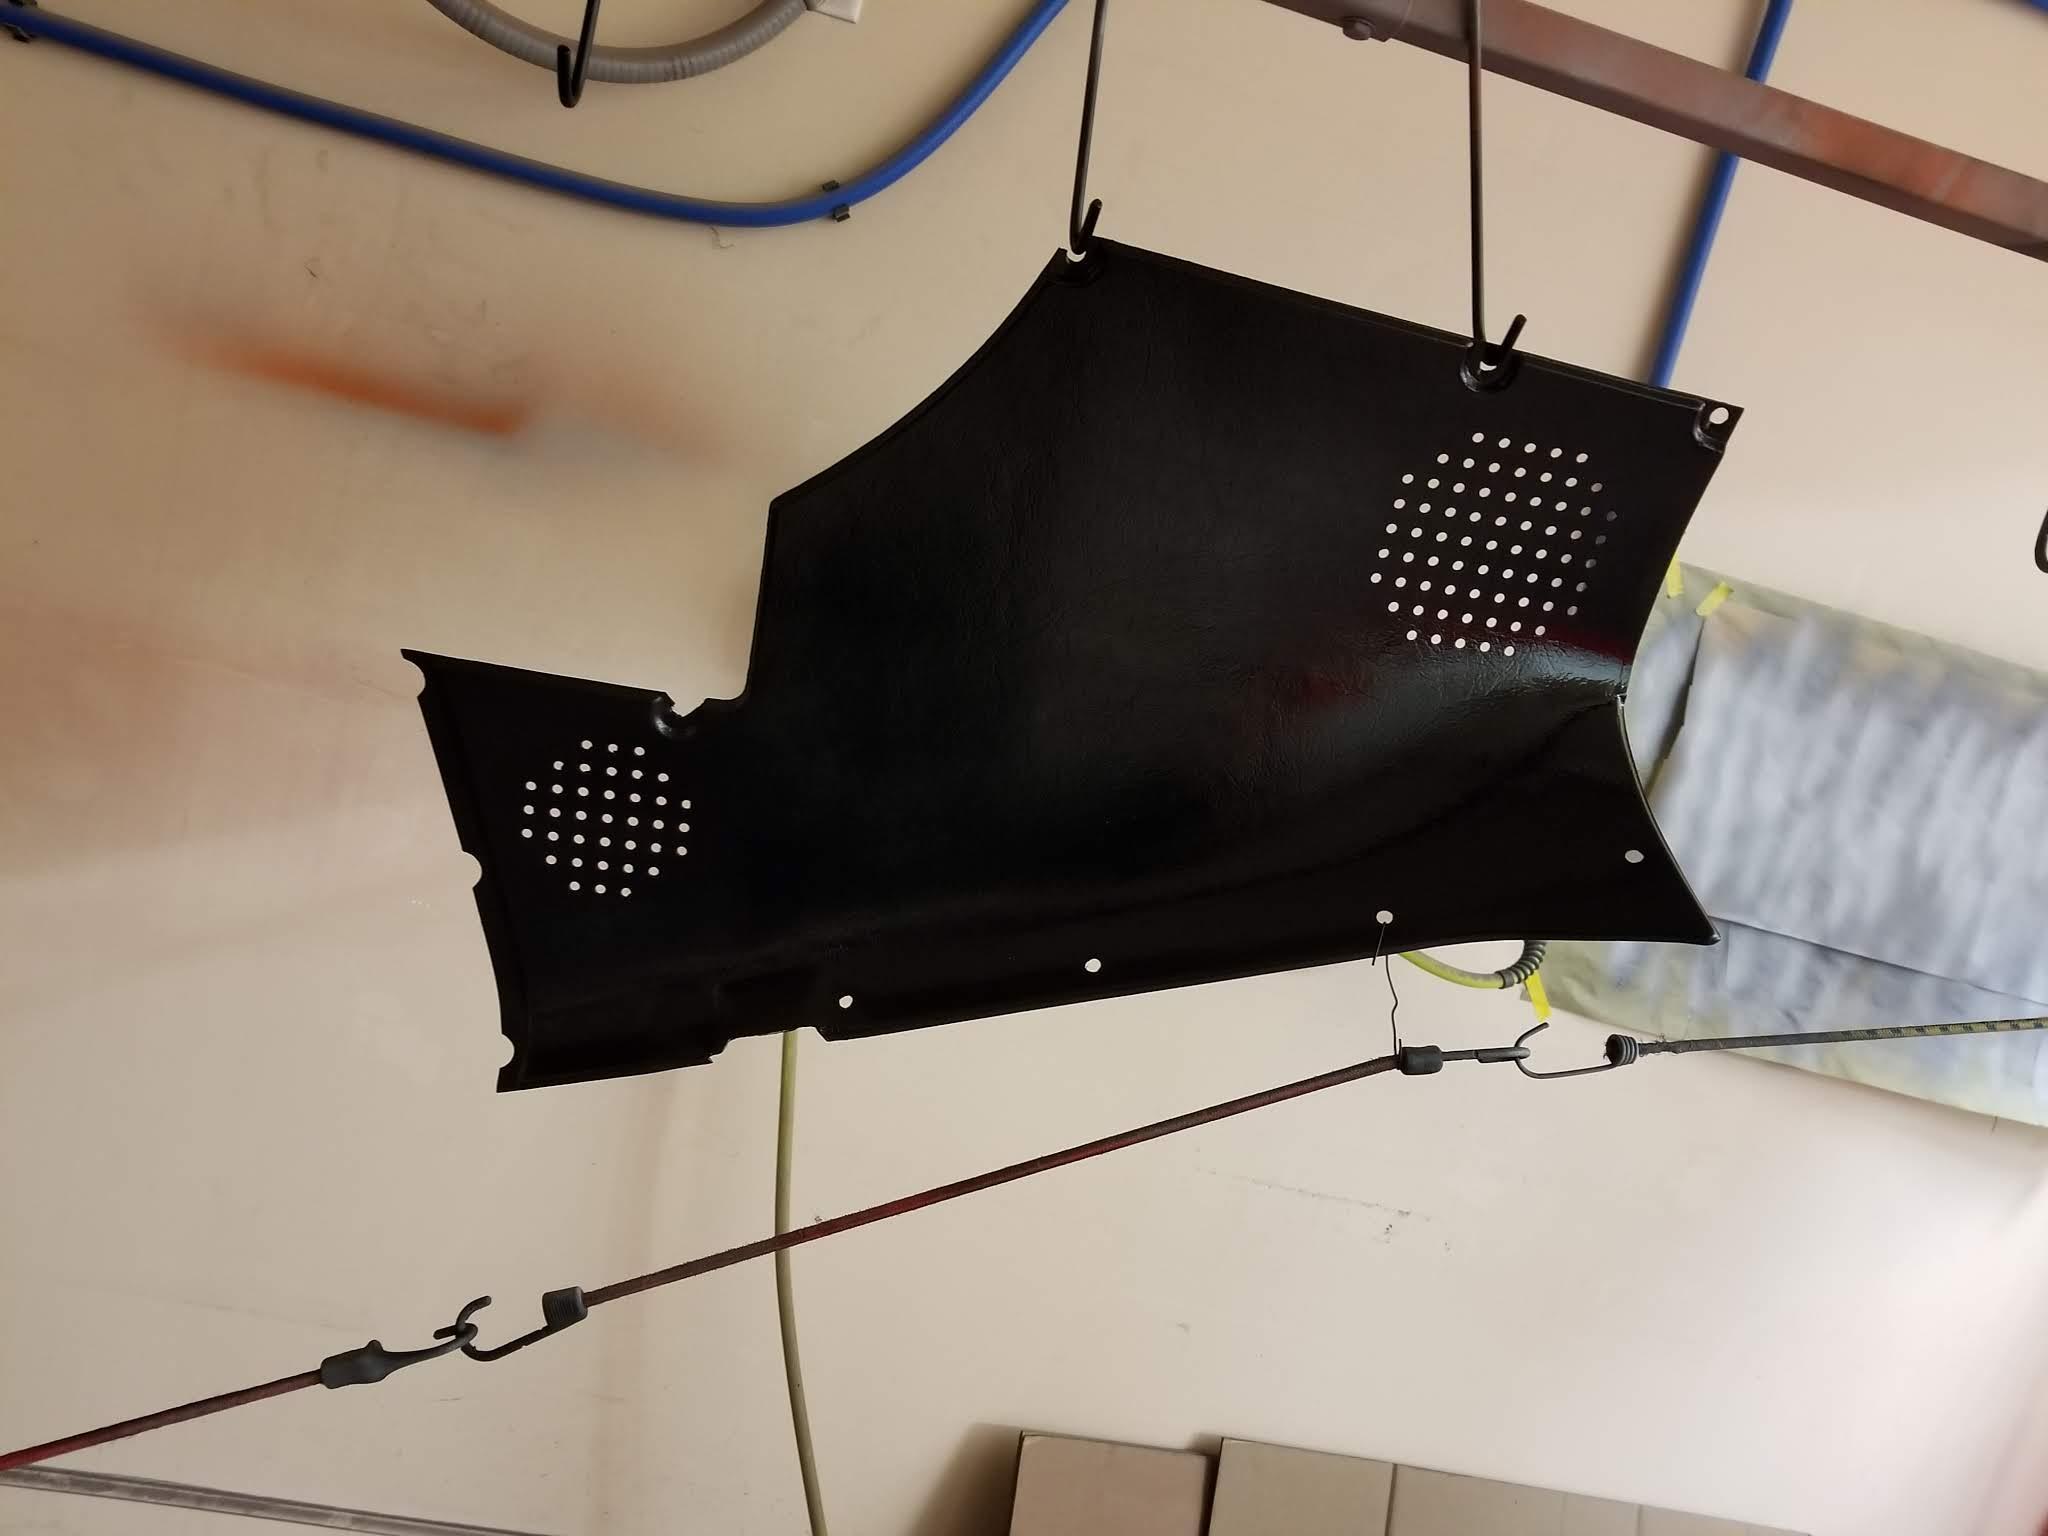
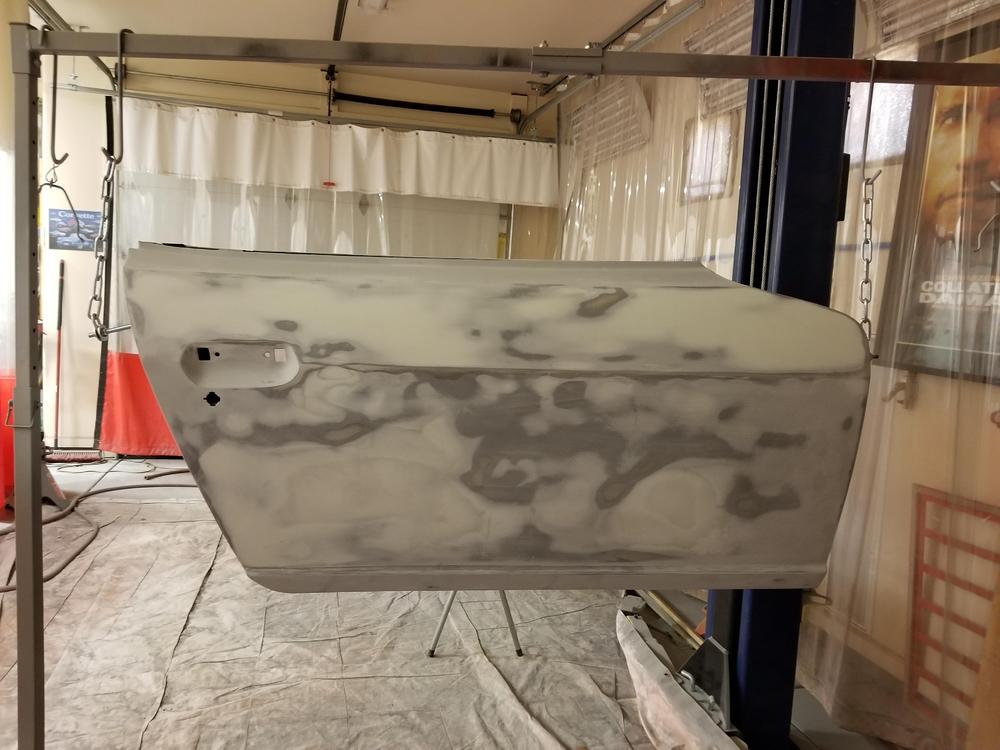
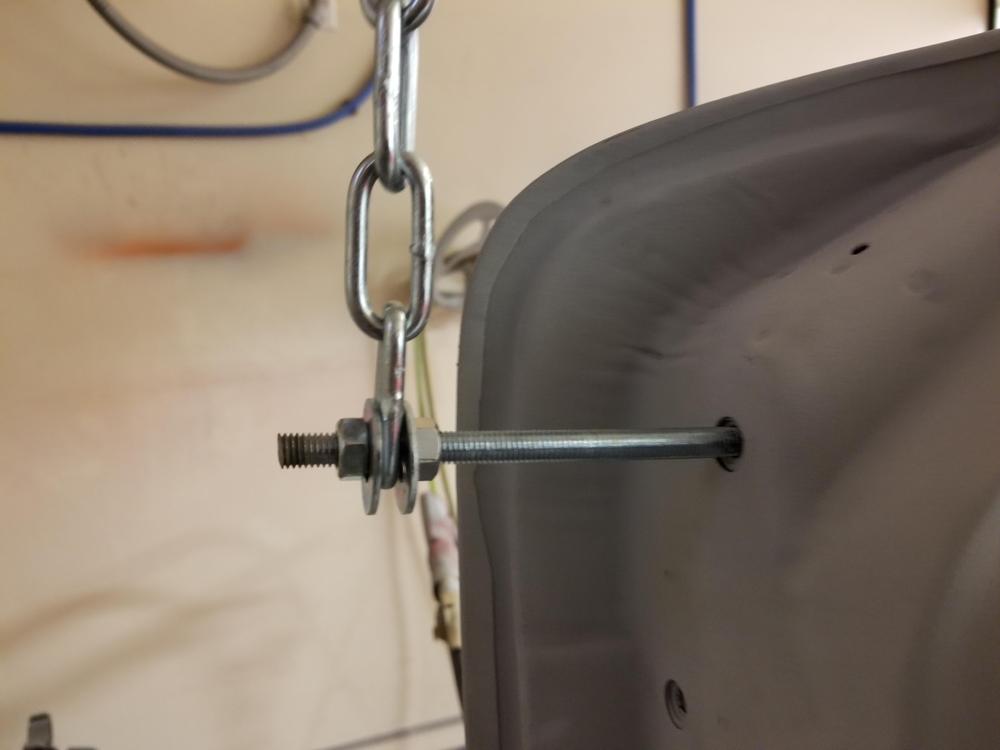
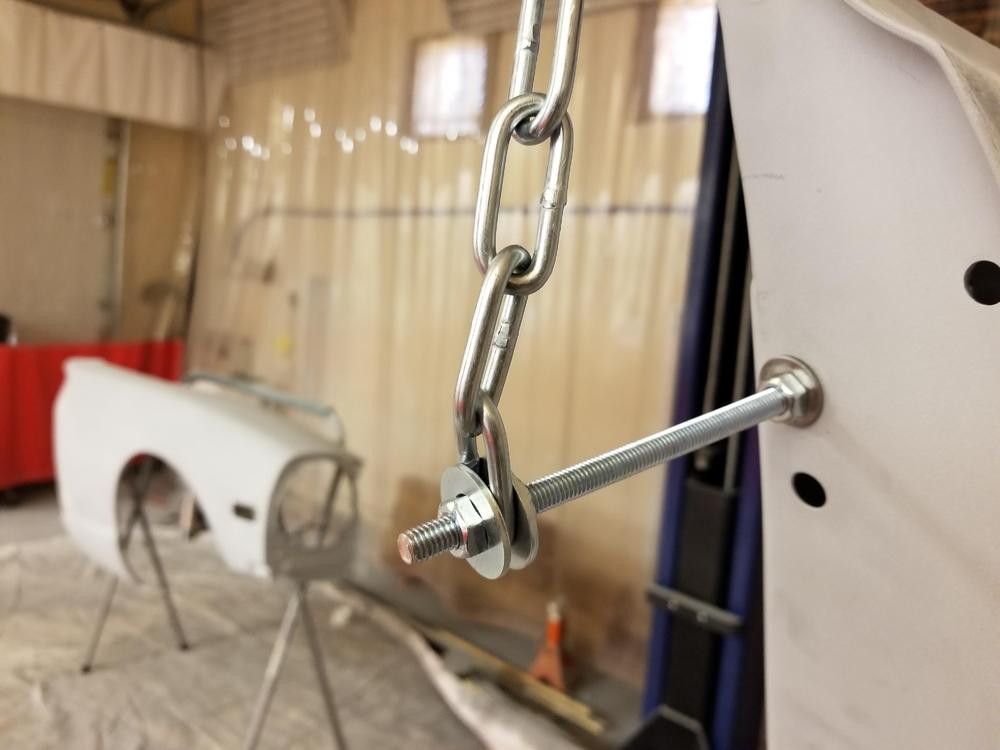
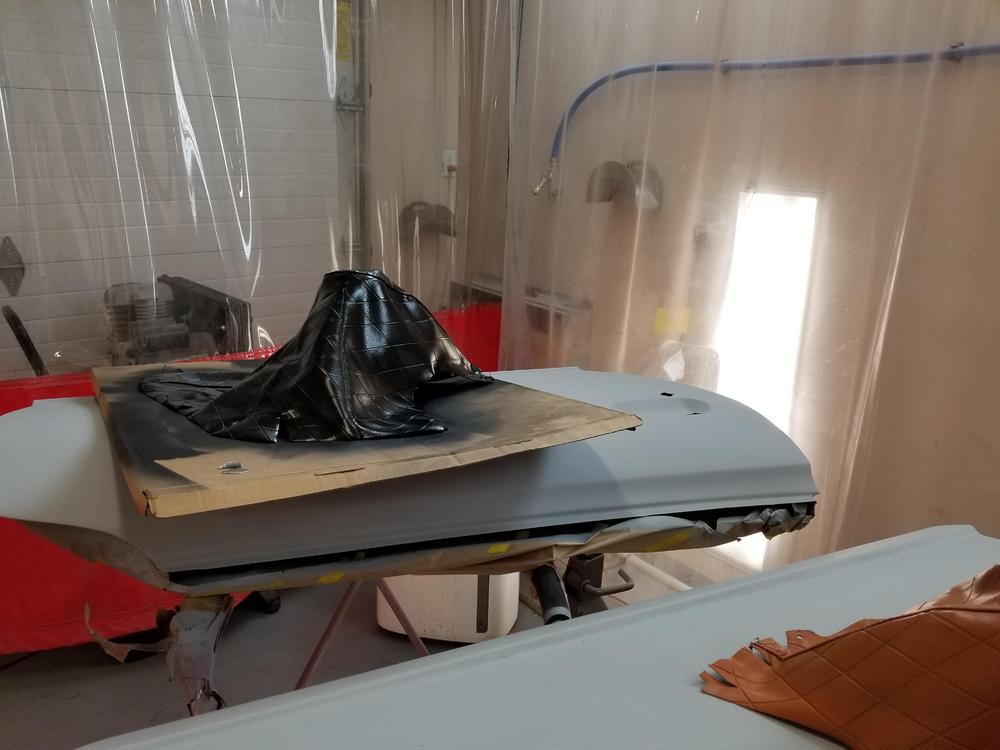
Truth be told I am painting my second complete car. So I am just a novice. The first was an mgb. This one is a 73 240z. When I painted the “B” I removed the doors, hood and trunk lid. The first problem was how to paint both sides of something using a 2 stage paint system. I purchased a few paint stands (scissor type) and they are a necessity if you are going to do any paint or body work. After struggling with the stands and painting one side at a time I finally broke down and bought a simple rolling rack. Mine isn’t very expensive (about $90). It is terrific for painting small light parts both sides at once. I never figured out a good way to suspend heavy awkward items like doors. I tried the obvious stuff: hooks through holes … ect. but a door doesn’t hang well unless it is suspended from the right spots and at the right height for painting. It is also preferable to have the part hanging in the same way that it will be mounted on the car. I looked online for tips on how best to hang parts for painting both sides but never found anything particularly insightful. So, in an attempt to help some novice painter out there. All doors have hinges. Hinges on most cars bolt onto the door via a threaded hole. There are usually holes on the opposite side. If the threaded holes are not large enough to hold the weight of the door any hole without threads will do. My first attempt was to use the hinge bolt (8 x 1.25). Simple right. Put the bolt through a few links of chain and screw it into the hinge hole. Use another bolt through a large hole on the other side. Make sure you use large washers to distribute the load on the entire surface of the hole. Pass the bolt from the inside of the door through the hole and a few links of chain and a nut. This works but the chain will inevitably hit the top of the door skin and also be in the way as you paint the inside border that shows after you install the door card. So here what worked well for me. You need longer bolts. So that the chains hang unobstructed vertically, and far enough away from the door to allow you to get paint where you need it. I wanted a single bolt for a bunch of different parts. I needed bolts that were approximately 6 in. long. Could not find anything that long that was threaded all the way. I did find 8 mm threaded rod. It was 36 inches. Cut two (2) six (6) inch pieces. Used a thread file to clean up the ends. For the bolt through the unthreaded hole I put a nut followed by a large washer. Passed the combination through the inside of the door through the hole. Next was another washer and a nut to hold the assembly tight against the door. Next I placed a nut and then a washer the about 6 in. of chain followed by a washer and a final nut. If you are nervous about nuts coming loose on threaded rods you can double nut the ends. On the opposite side (the hinge side) I threaded the rod into the threaded hinge hole. I threaded enough of the rod to have about an inch showing on the inside of the door – this insures that you are using all of the threads to hold the door. Next I threaded a nut down the rod about 1.5 inches, followed by a washer, the chain, another washer and then a final nut. The door can then be hung with the chains vertical and away from the skin. I know this was not brain surgery, but it solved an issue for me, and I hope as a minimum it saves you some time.

-
So I am one of the folks that posted about dashes for the 240z. It was not my intention to highjack this thread. My purpose was to gather some information on the credibility of the company. Ivan and Hung both appear to be quite ethical. They would not accept any payment, not even a deposit before they felt really confident that they would be able to fill the order. I was impressed with this behavior. They also appear to be very serious about the quality of their product. This is the type of vendor that we want to find. To be honest I would also have to say that they do not make it easy on their customers or themselves. Not having a website and not communicating clearly is definitely an issue. Bottom line: I think these gentlemen are honest, but may be victims of their own success. My understanding was that they were to receive 280z dashes in the march timeframe, but I have no way to confirm that. This will serve as an update regarding my progress with the 240z dash that I ordered. After being told that one was available I sent them payment. Shortly after that they shipped the product. It is to be delivered next week (3/12/19). I will start a 240z dash thread to document my entire experience from order to installation. I am hopeful that the quality of the dash as well as the relatively reasonable price will justify the wait. Best of luck with your 280z builds.
-
sorry, I just did not pay sufficient attention when I read your question. You said vent hoses and I totally spaced out. The interior on this project has stalled. I have been waiting for a replacement dashboard from Vintage Dashes since September. Sorry I could not be more helpful. If the dash shows up I will be getting back into this and will make sure that I take photos and post them here. If, and it looks likely that you will finish before me please post your photos. Once again sorry I could not be more helpful. good luck with your project.
-
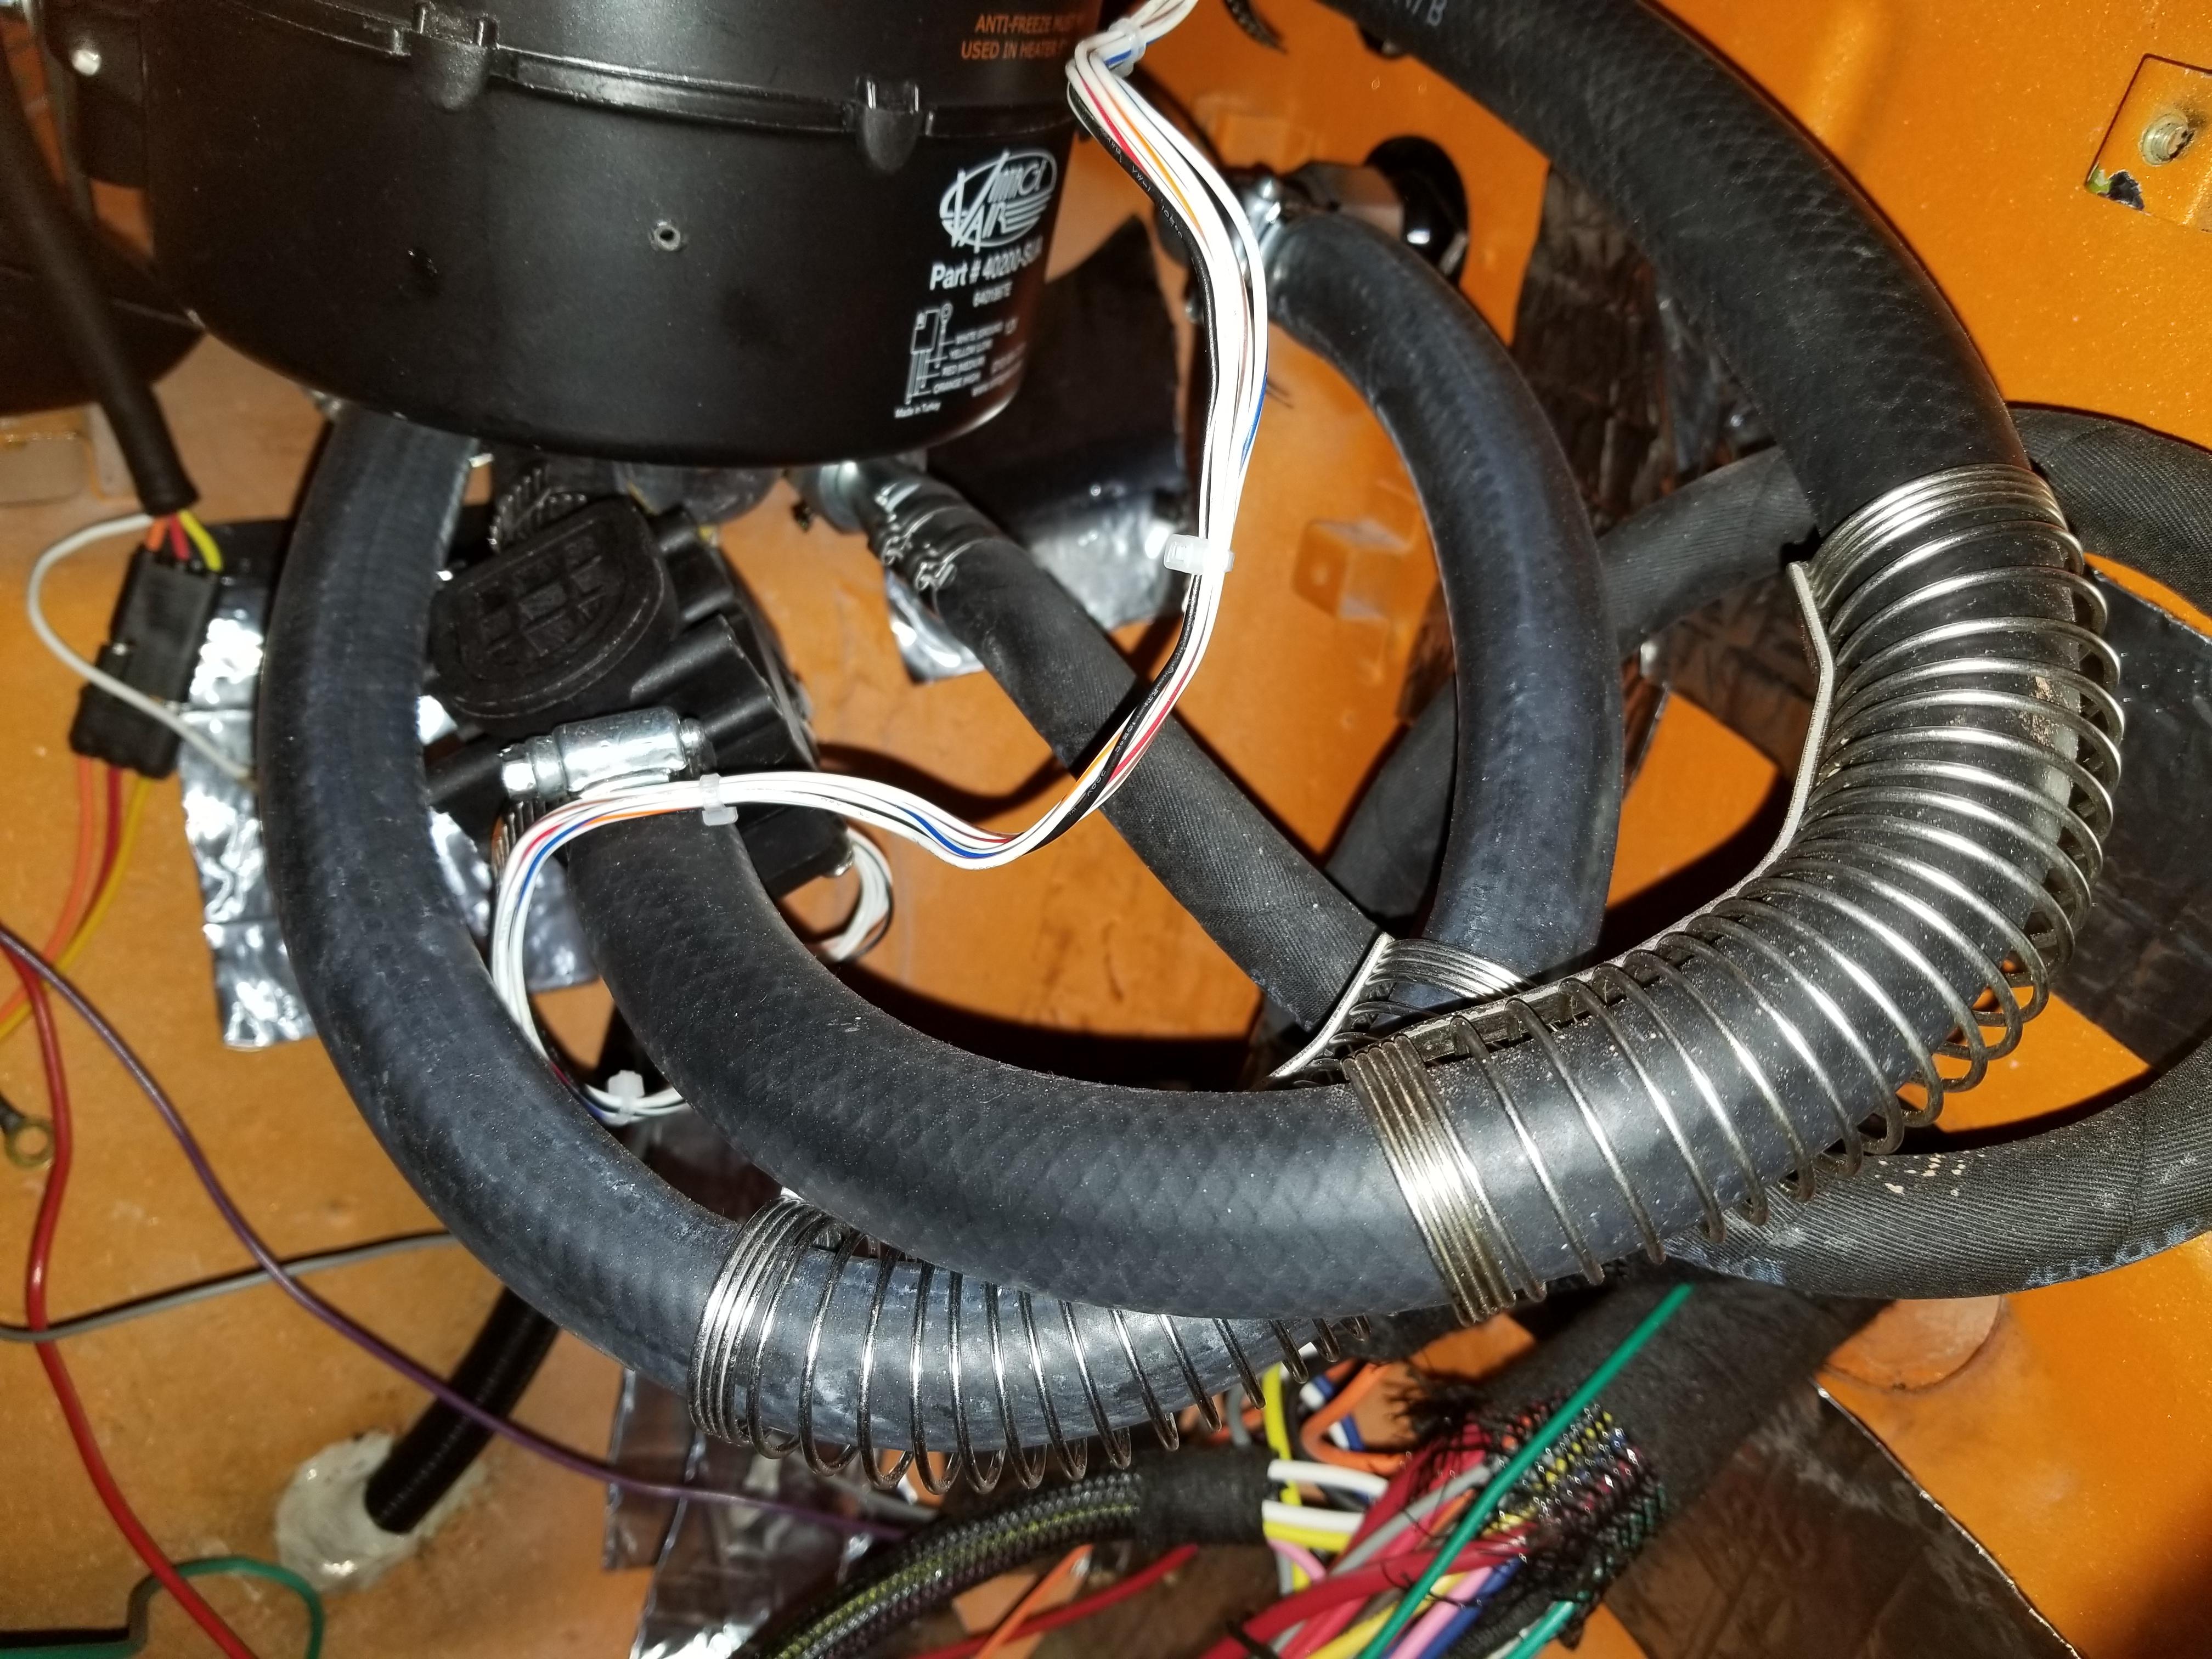
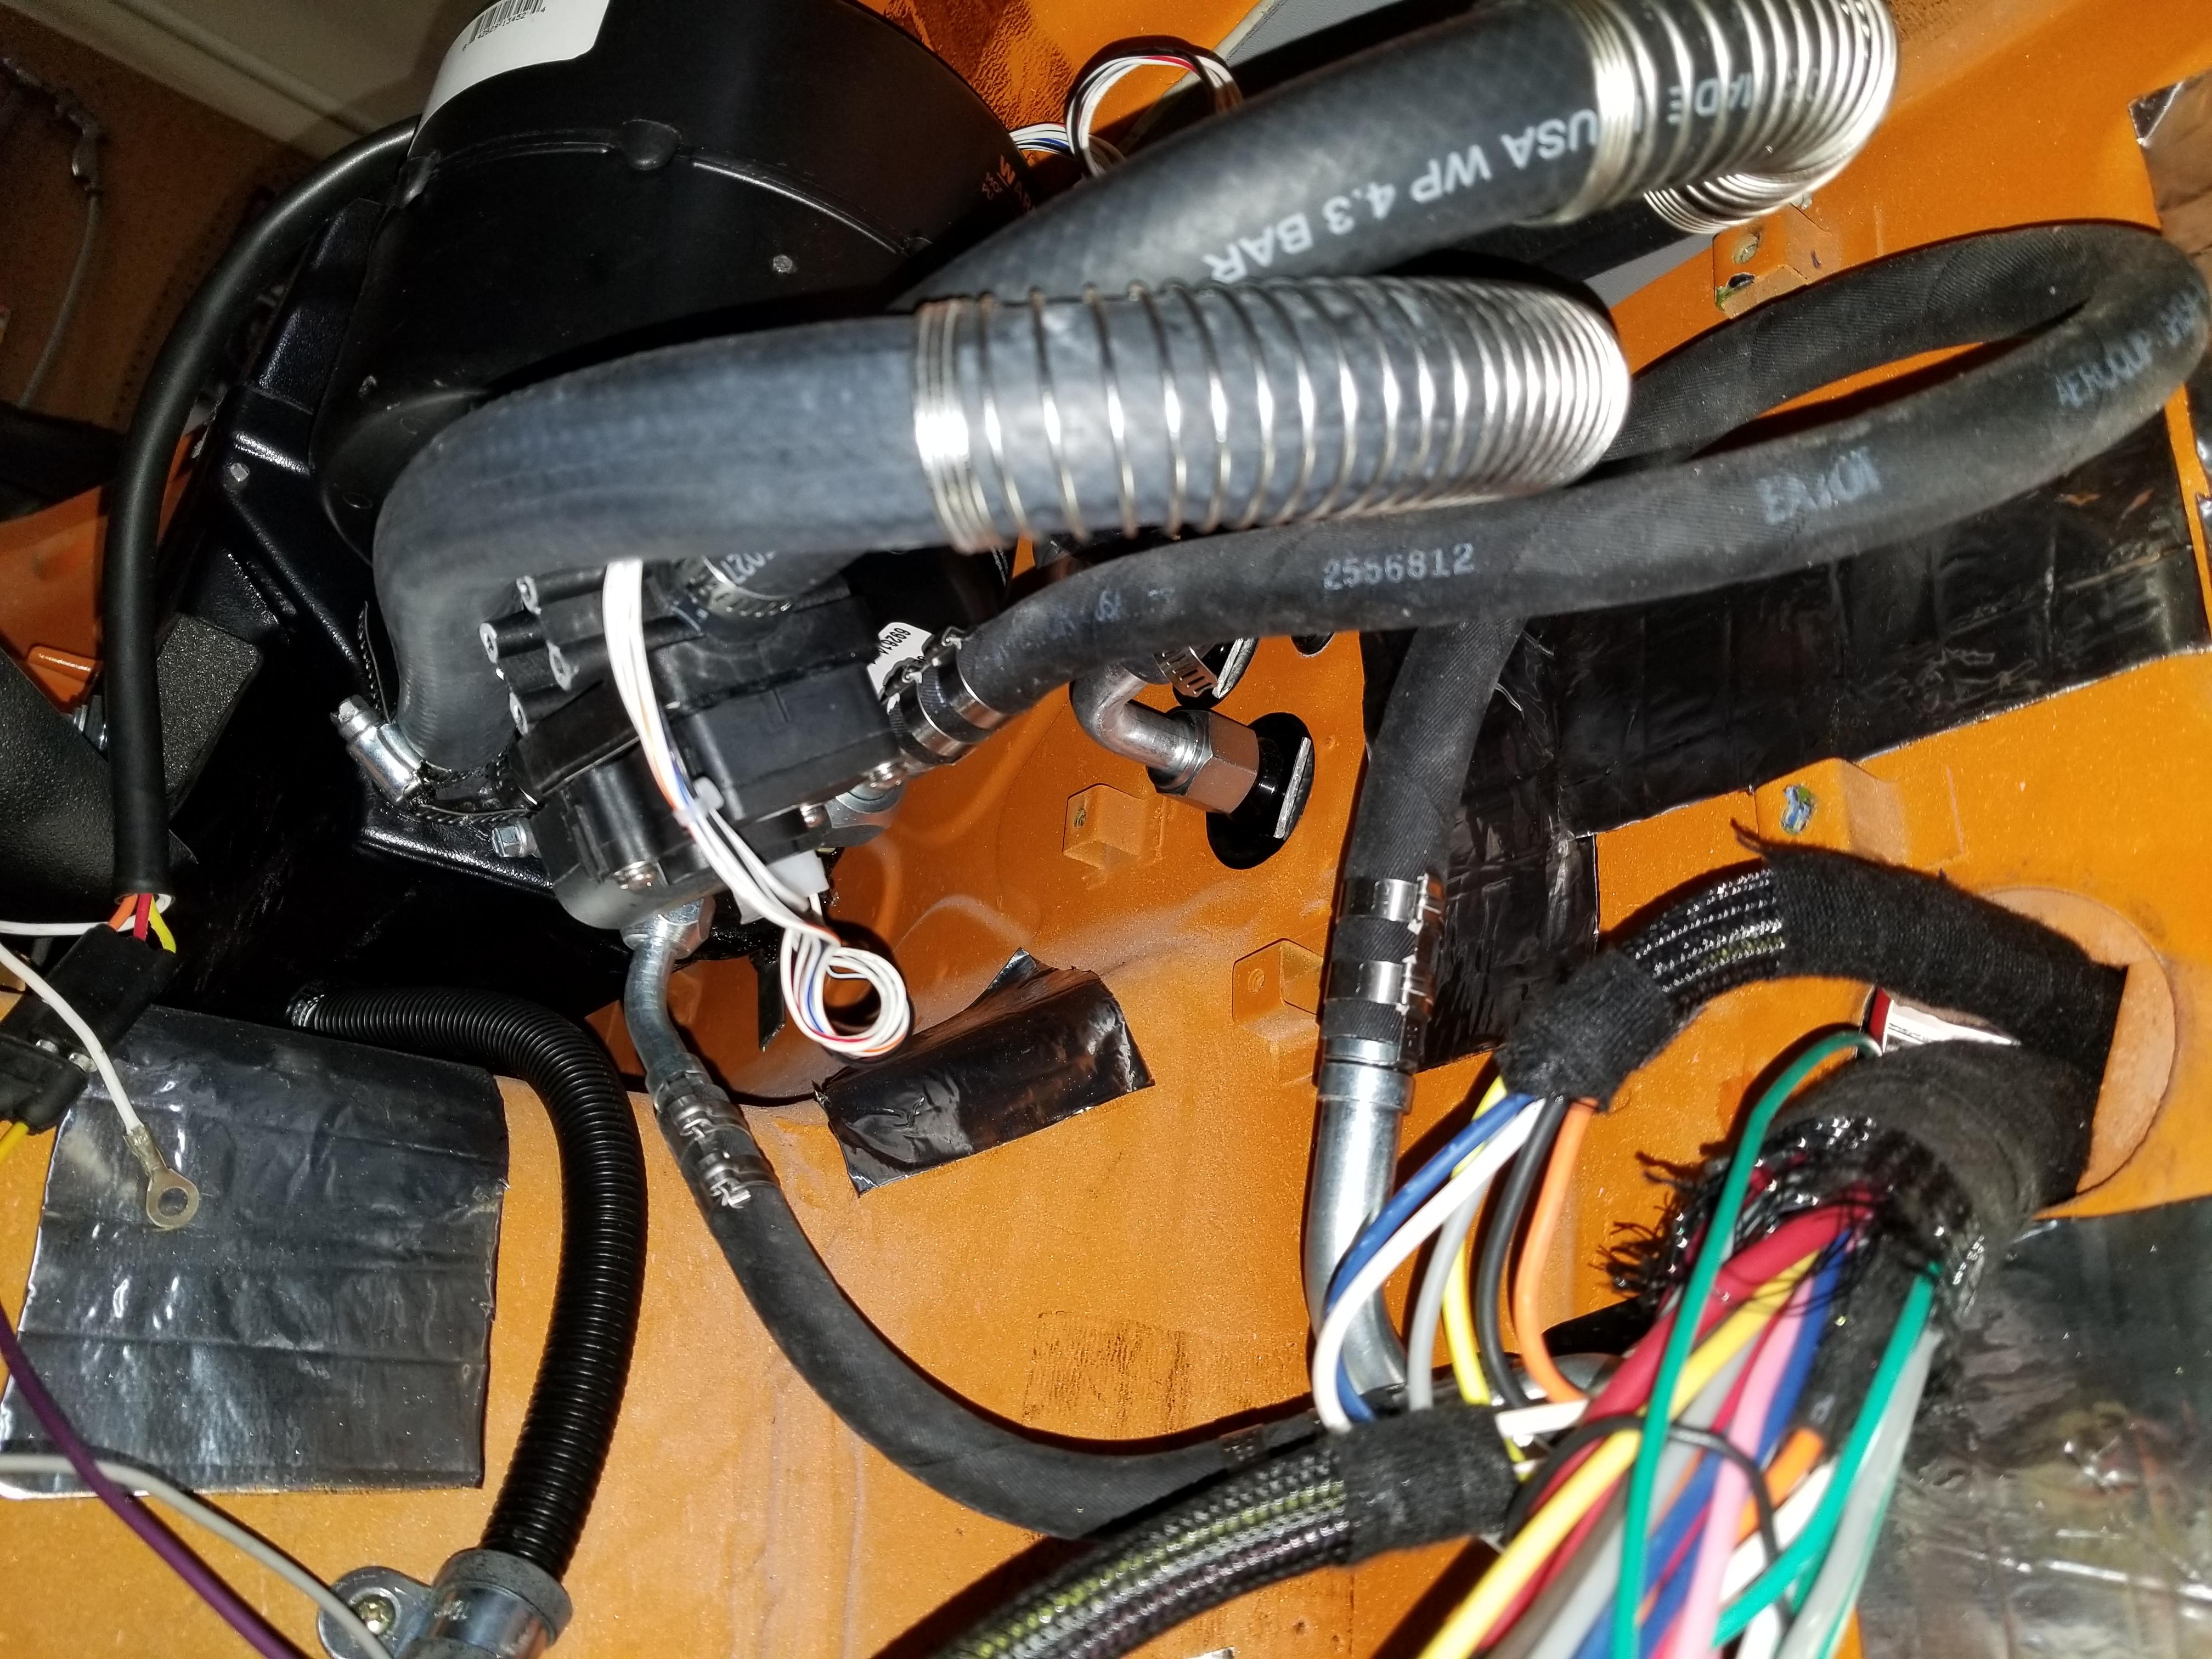
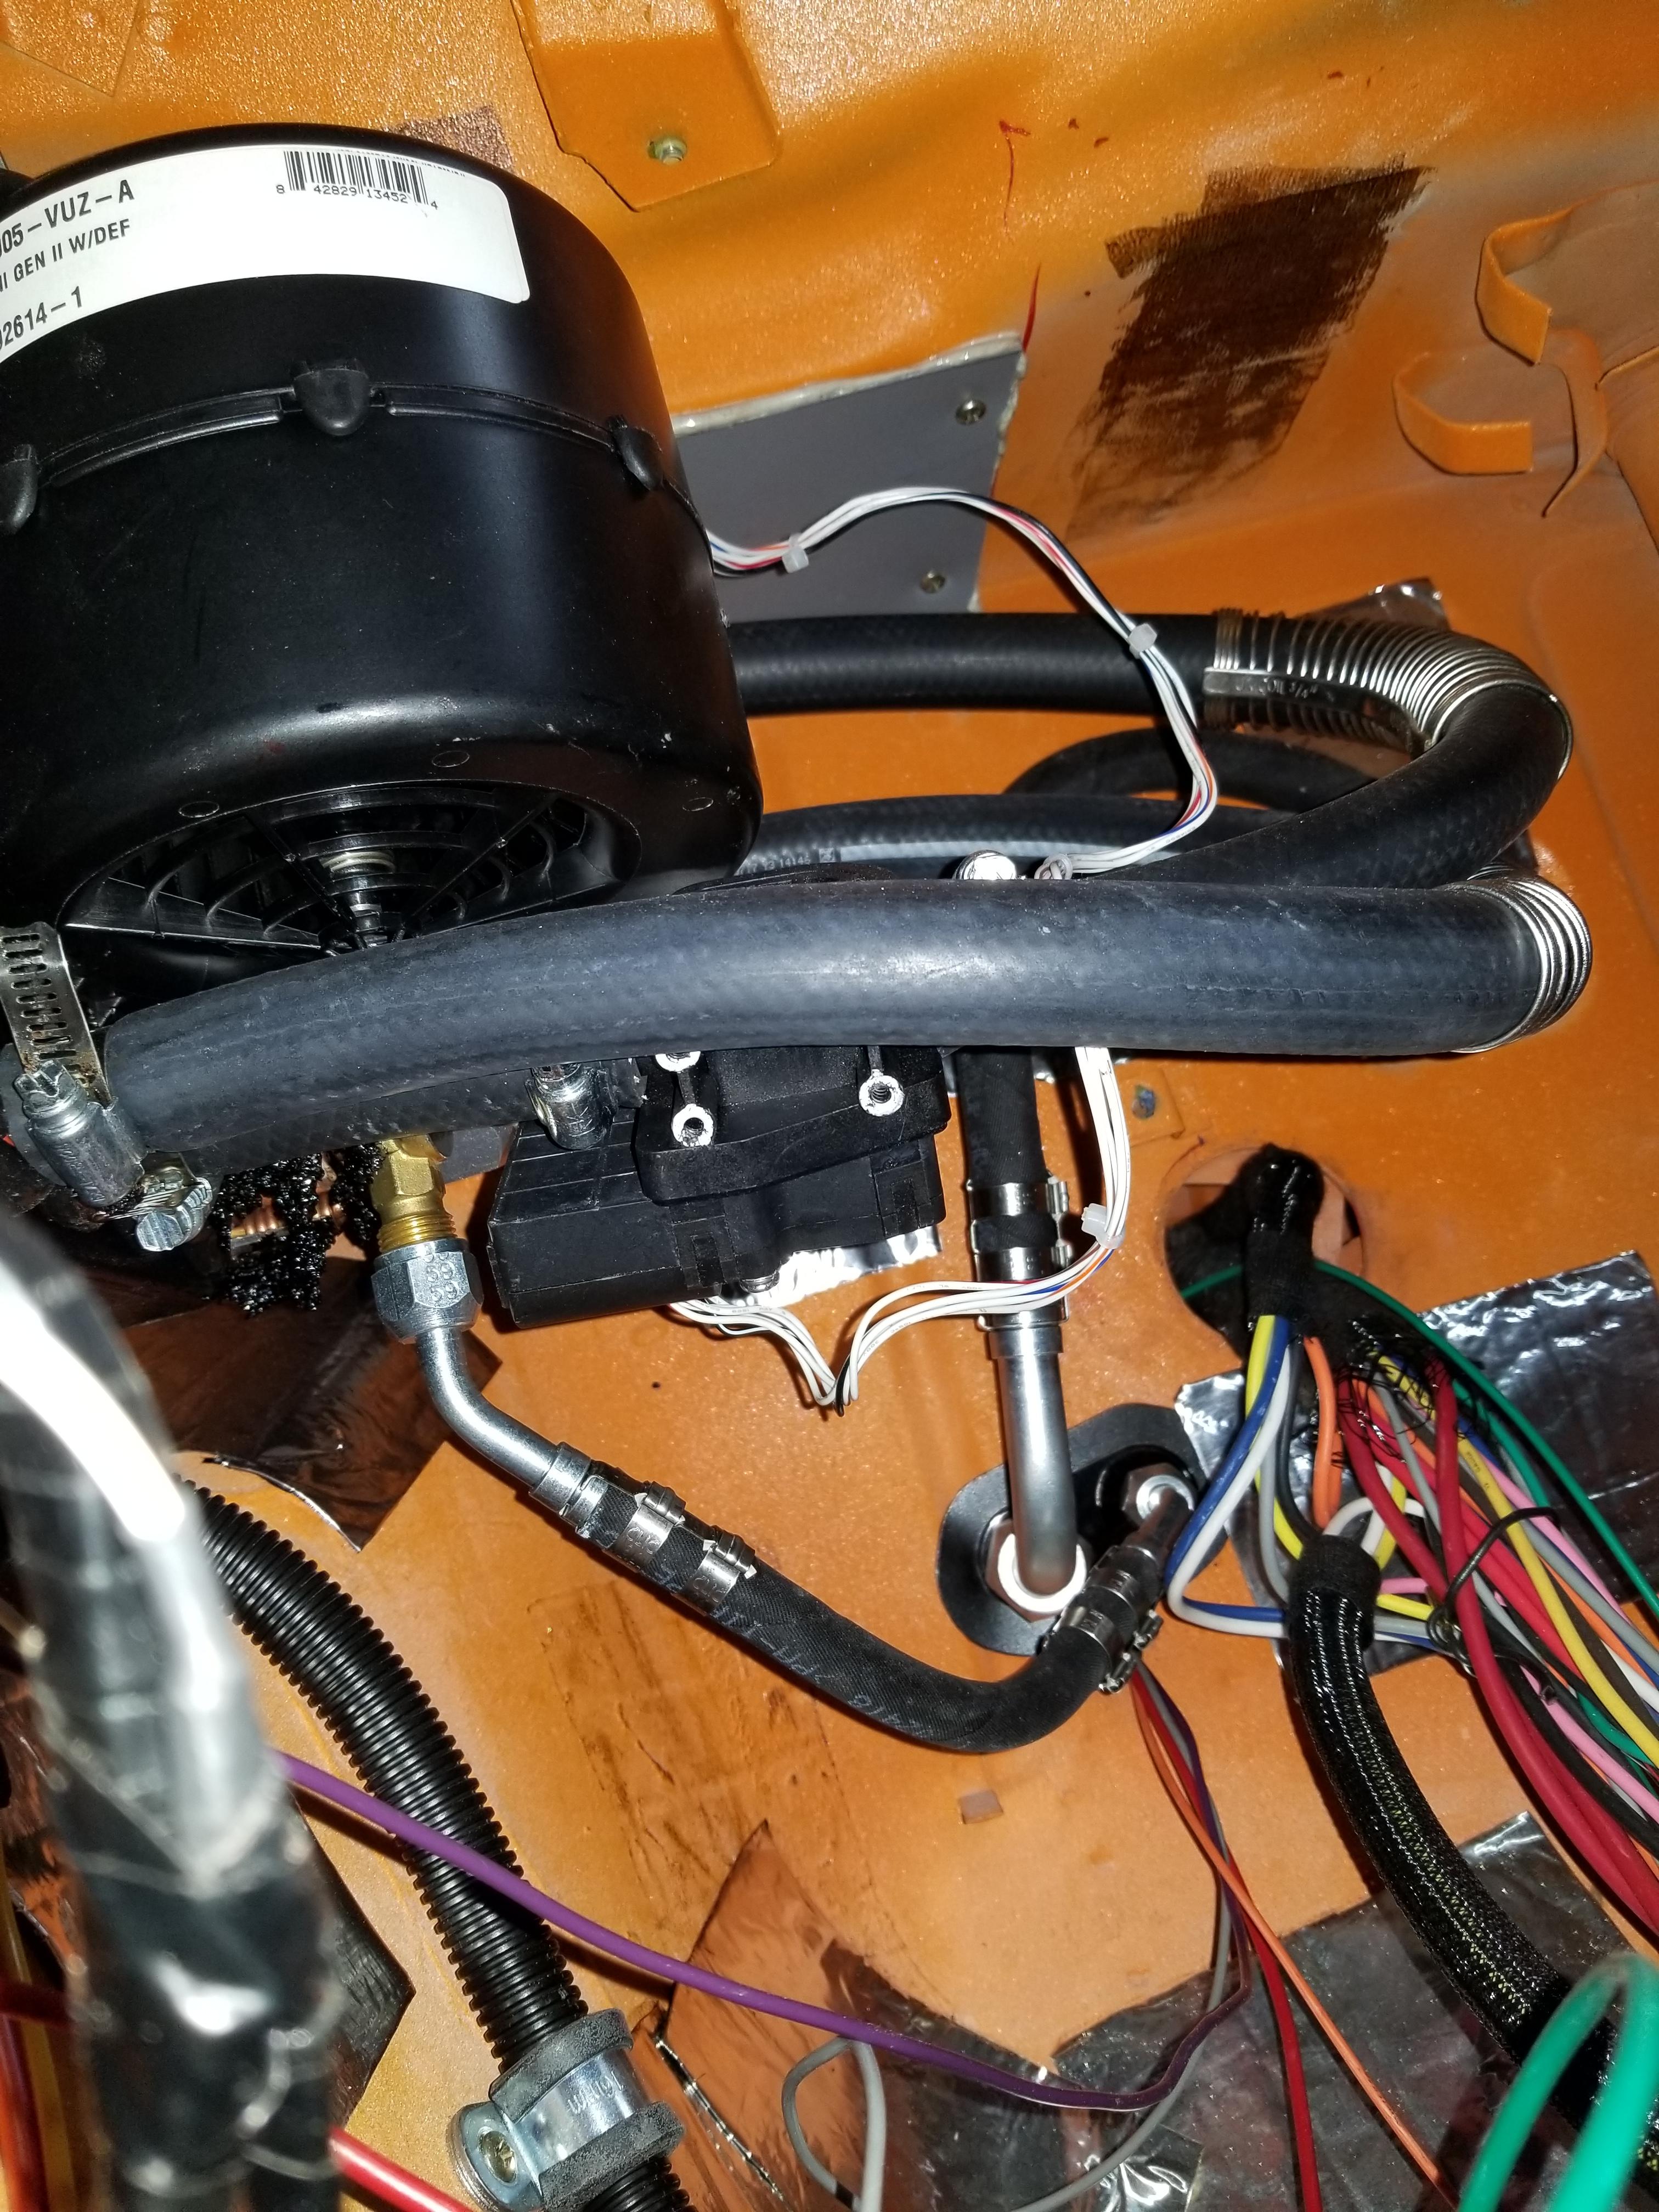
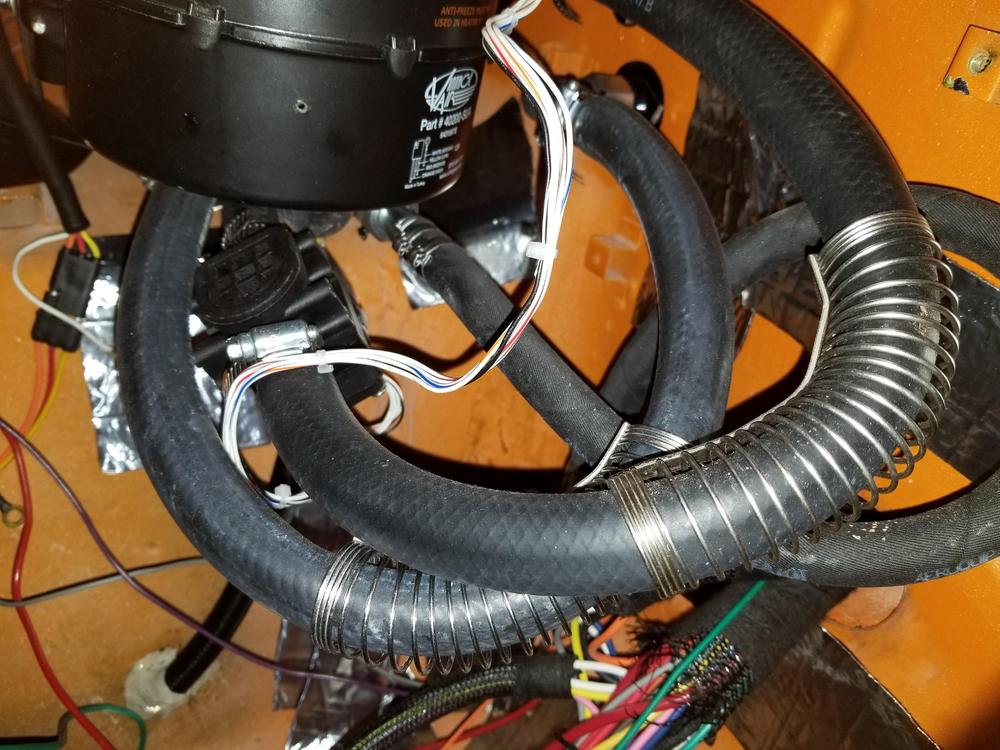
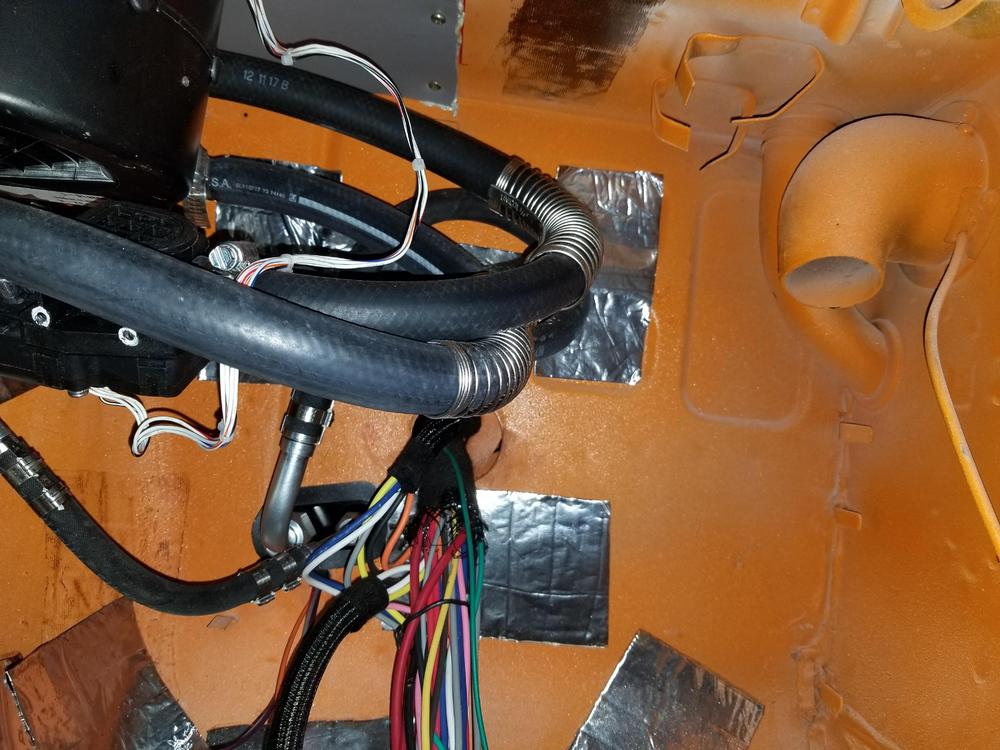
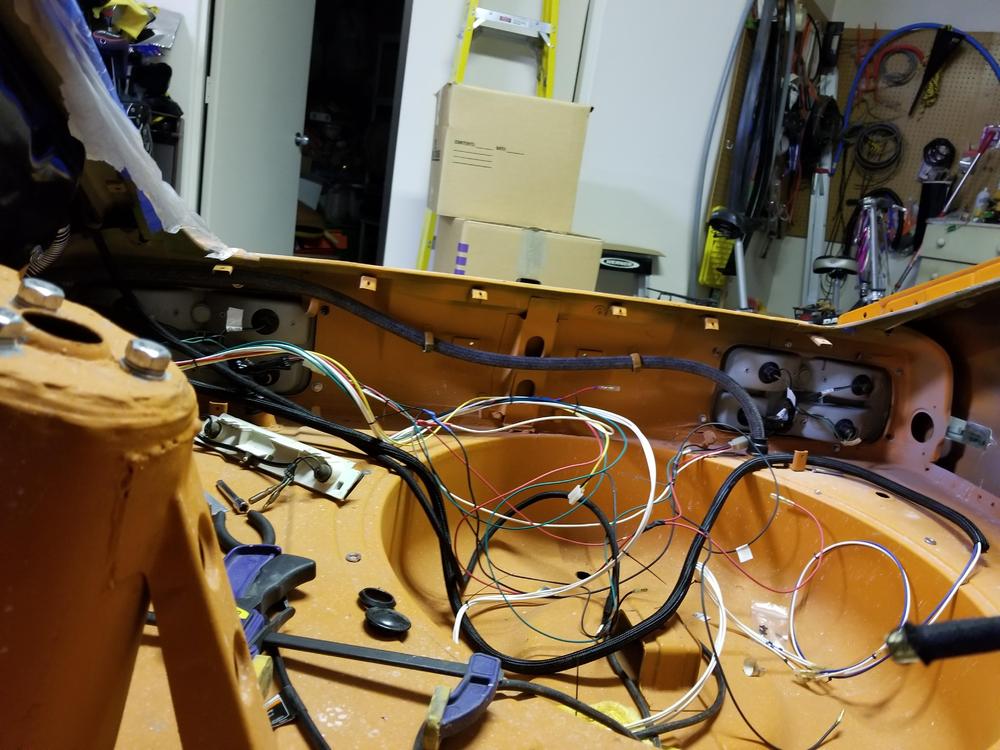
Wheee, I am sure that I have the detail photo for whatever you are looking for and if not I can take an additional shot or two. Having said that I am not sure what you are looking for. Below are additional pictures of the cockpit to bulkhead hose routing. Hope this helps but if not let me know what you need and I will snap another shot. So this is a fairly good shot that shows 3 of the 4 hoses. The hoses moving left to right . The first hose (furthest from the firewall is the heater return hose. The next one if the heater entry hose. It has the electric valve (box closest to the Evap Unit). Both heater hoses have EZ coils on them to prevent collapse of the hose. Probably not needed but bend is sharp (not severe) and I just wanted to be on the safe side. The heater hoses go through the firewall behind the evap unit, those bulkhead connections are partially visible in this image. This image is shows the AC bulkhead connections below and to the right of the evap unit. My partially dressed wire harness obstructs the view of the 2nd ac bulkhead connection. This image is from underneath (low in the footwell). Not a lot of extra room. It actually looks worse than it is because of the water valve (the square plastic box under the water hoses). This is really the first view of the 4th hose (the 2nd ac hose). It points down. This is probably the best view of the AC hoses, bulkhead entry/exit in the middle of the image and the goofy routing that I used to get it to the evap. Bottomline: You are correct. There is not a lot of room, but it is certainly enough. It is a pain in the neck to make the connections because of the contortions that you have to go through, kneeling on the ground outside the cockpit etc. I am a little too big to be an easy fit in the footwell. Between the cramps due to the twists of my upper body and the skinned hands I was certainly glad to be done with it. Like I said if you need a different view let me know.


-
Grannyknot – I also have tried to buff with a Dremel but had the same experience – melted part of the lens. I am going to go back sand the burned lens and see if I can get something I like using the clear coat. Thanks for the tip regarding the rubber. I have used the SEM clear, just out of it right now, and you’re right it is good, but I have not been disappointed with any of their products. Great results on your restoration of your plastic. Hard to believe that those old brittle pieces can be brought back to new – nice job. JFA – you’re a better man than I – I used a one inch wheel on a dremel and I still scared it. I think my biggest problem was the speed, had it turning to fast, but I just don’t have the touch to buff plastic, that’s why I try to avoid the runs and the orange peel, and when I can’t I develop my skill at rationalization. “Its only a side marker”, “No one will ever notice it” and so on. In the past I have always been shamed into buying a new lens. Once again, thanks for the responses. Regards, ron
-
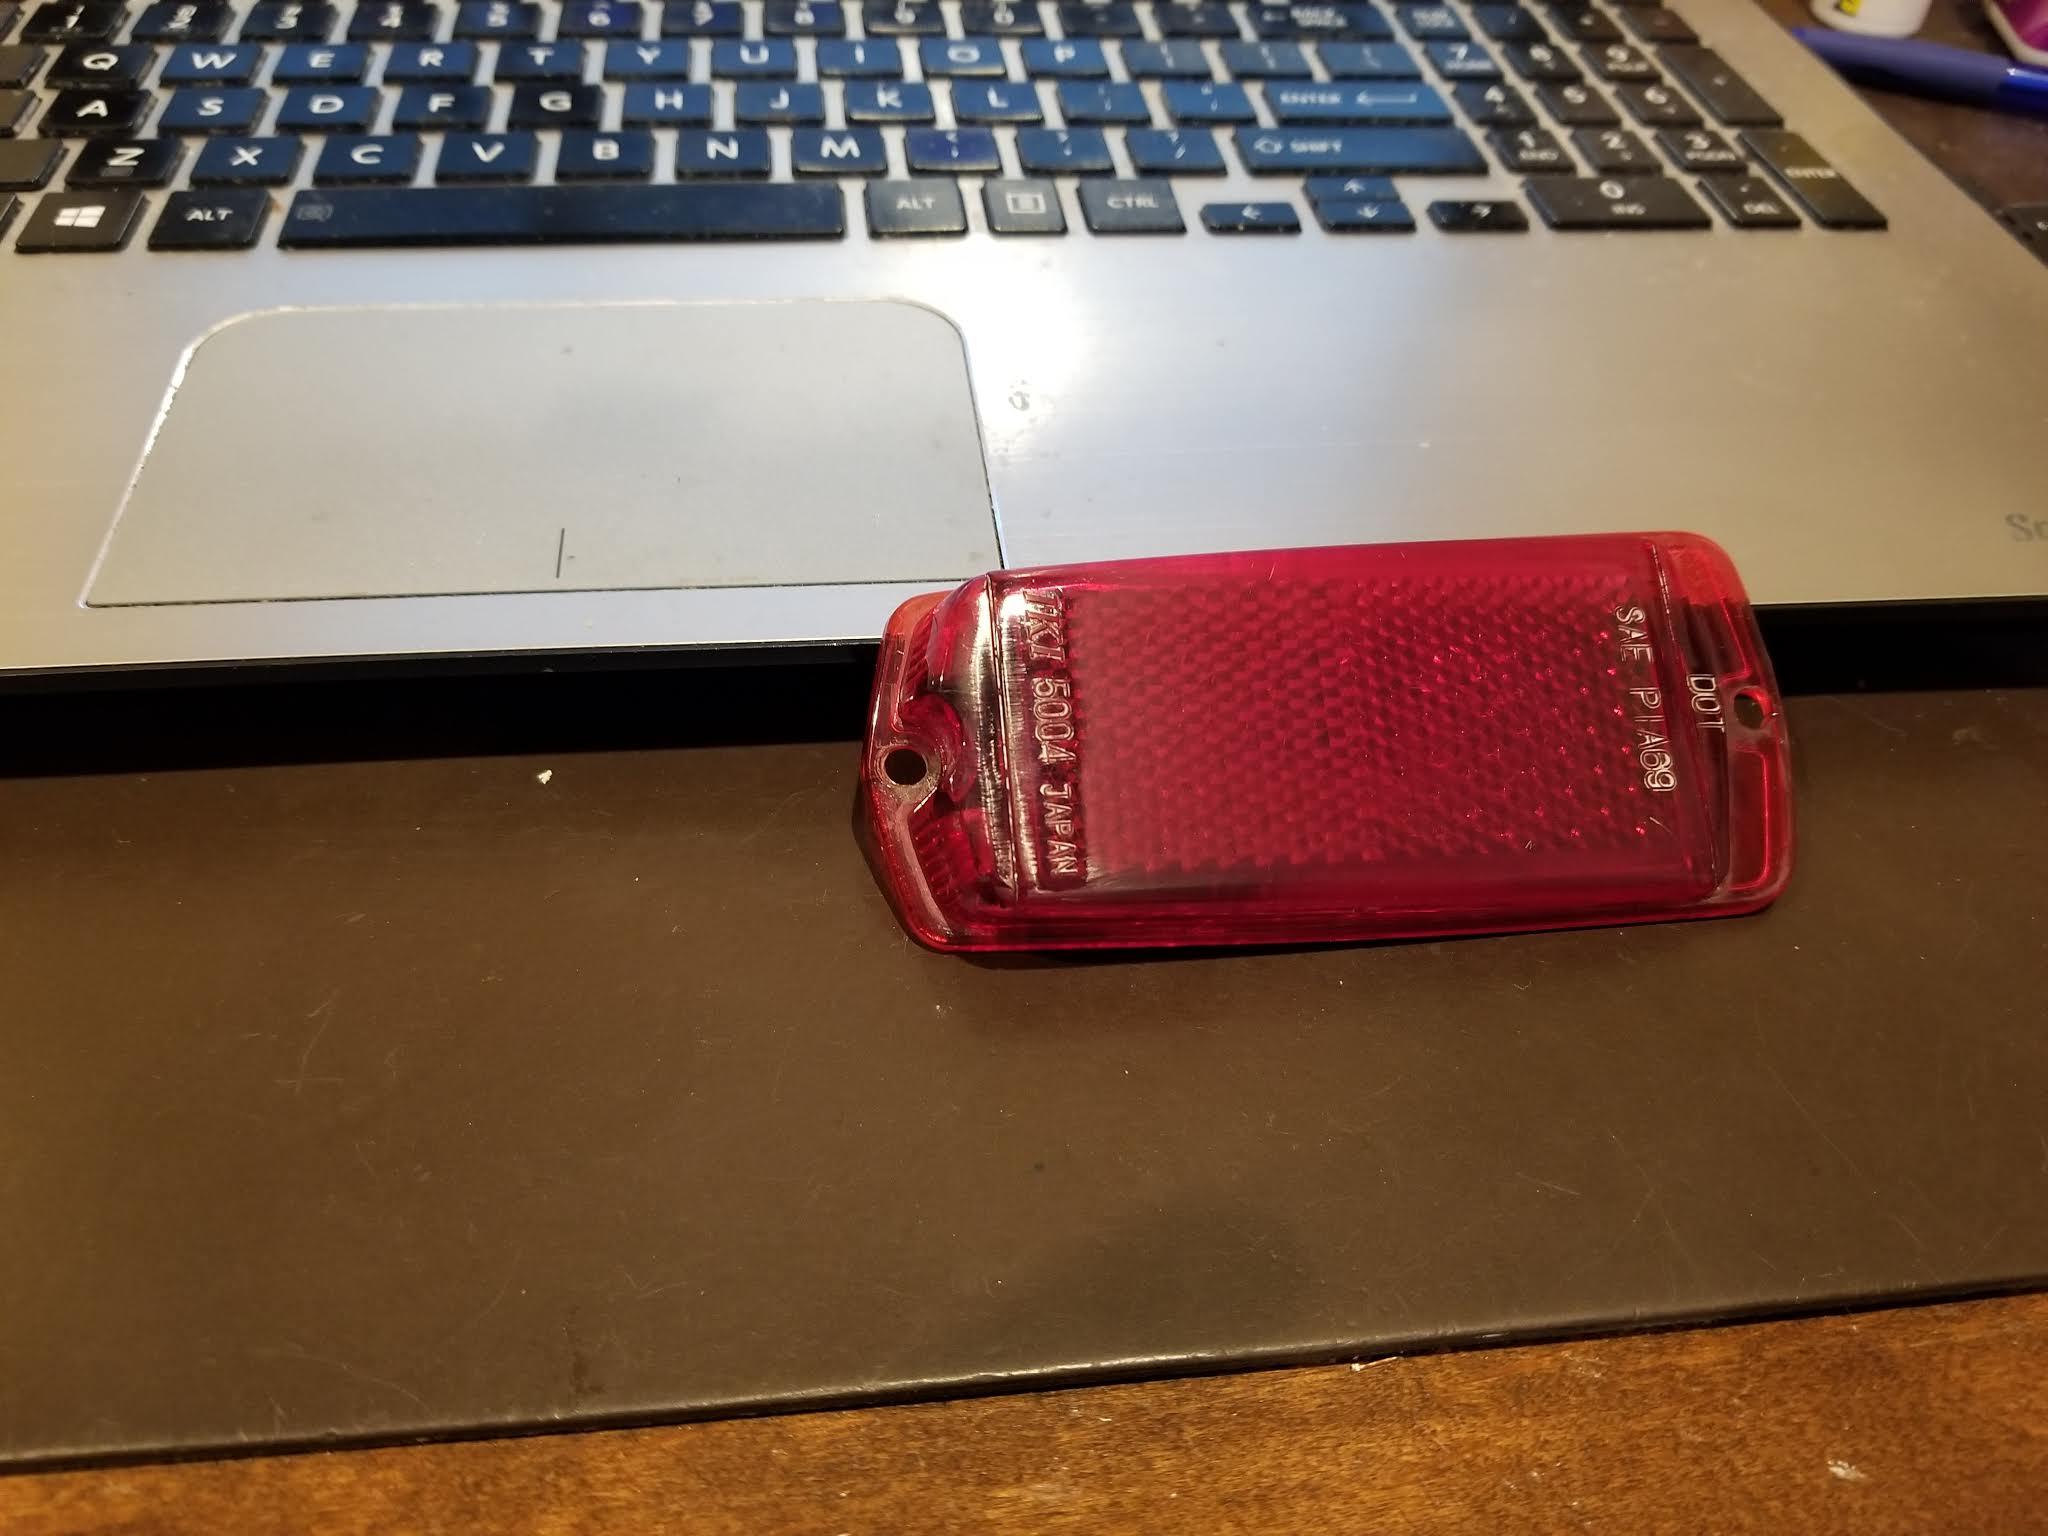
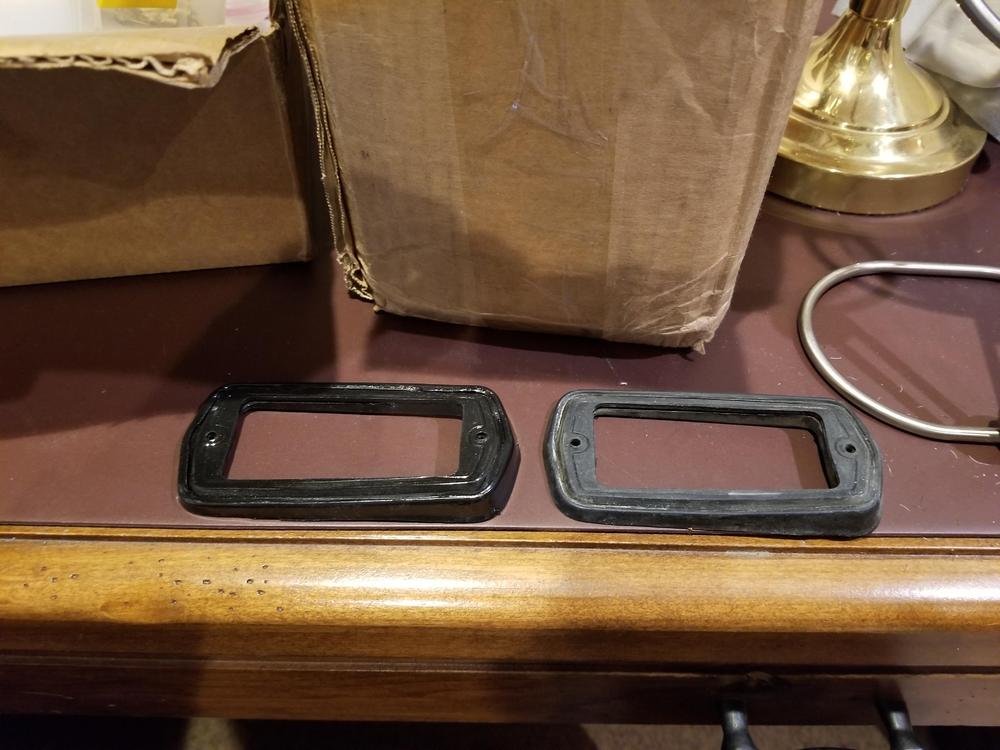
I saw somthing on the web that showed the restoration of a plastic lens. I think the youtube was done by chris fix. They did something I had not seen before - clear coating plastic – so I thought I would give it a try. Side marker lens' are fairly inexpensive and available so if I screwed it up or if it just flat out did not work it would not be a total disaster. My rear side markers were scratched and they were moderately oxidized. Unfortunately, I was so excited to try something new that I did not take a “before” picture. I did think of a picture after I had sanded the reflectors. Below is the image after wet sanding with #600, #1000, #1500, and #2000 grit. If you decide to do this you can skip the 1500 grit, its just not necessary for this type of project. After sanding I cleaned it with Eastwood Pre Prep. Then I sprayed an adhesion promoter for plastic (I am happy with the results that I get with SEM products (sand free), but there are others as well). I then sprayed clear using a VHT spray can that I had left over from another project. A couple of light coats and then 2 medium wet coats. The trick here is to try to get the clear to flow without causing any runs. If you do get a run or noticeable orange peel you can always sand it with #2000 grit, and polish and buff, or you can always start over with #600 grit, #1000, #2000 and re-clear. Anyway, below is an image of both reflectors with clear coat. You will have to trust me on this - the picture does not measure up to the actual result. The lens look like brand new. For some reason, lighting, reflections, who knows what the picture just does not measure up. One caution - do not touch the lens for at least 24 hours. The clear coat needs to cure (harden) before you handle it and definitely do not rush to assemble it. Of course, if a little is good why not do more – so I cleared a rubber gasket just to see if it would take the clear. The next image shows one gasket cleared and one without the clear coat. Normally I would not even try to paint rubber without the right product, but the gasket took the clear and it is a big improvement. If anyone has used a specific product line please let me know what adhesion promoter worked for you on rubber. I am amazed with the results. Now, I don’t know if any of the products that I used will ultimately do harm to the plastic reflectors or whether these results will hold up for any length of time, but at this point I would have to say the results were terrific without spending a great deal of time and without requiring a lot of technique, and with very little expense. Bottom line: I would certainly recommend this process. My expectation is that the clear will hold up over time and the only real danger to the plastic could be the adhesion promoter. Next time around I would leave out the adhesion promoter and only sand with the #600 grit and then clear. If that was not smooth enough perhaps sand with finer grit after the clear coat and then buff. Of course, I would like to hear from anyone that can tell me what the long term expectation should be and whether or not I should expect the lens to deteriorate. Hope this helps - good luck


-
Thanks for the quick response. I like the idea of something hard to deflect the water. I wonder why Nissan didn't do that. Once I make up my mind I may come back to you to take advantage of your offer for a real one - thanks.
-
I just completed the honda wiper motor upgrade thanks to Zs-ondabrain (knowledge base article) and to and to brandenz (atlanticz tech tip). My restoration is a 1973 240z. When I tore it down there was no boot/bag covering the original wiper motor. I believe you can buy the boot from Banzai for about $70. I also found someone quoting a Nissan part number 28836E4100. I do not know if this number is the real deal. Normal Nissan sites do not recognize this number, but I did find the following: https://parts.bayridgenissan.com/p/Nissan__/COVER---MOTOR/51241601/28836E4100.html. This is a dealer in Brooklyn, NY. Again, there is no image on their site and I do not know if it is really available or if it is really the cover for the wiper motor. The price is great $8.95. Has anyone bought this product from this dealer? Sorry for the long lead in. Is the bag/boot (plastic/vinyl) really needed. As best I can tell the bag is not totally sealed. I think there are holes for the motor shaft connection to the wiper linkage, and for the screws to mount the motor to its bracket. So, moisture can still get inside. I realize that the bag does protect the motor from water entering via the cowl. I know I am being lazy about acquiring the bag or making a replacement, and then installing it. Does anyone have any experience operating without the bag over a long period of time? As an alternative I was thinking about coating the motor to improve its resistance to water.
-
az240, its true a picture is worth ..... thanks
-
zup, cant thank you enough. i thought that is where it might go, but there is a support strap or bracket that mounts between the antenna body and the fender well and that also grounds the base. i am sure you are correct it probably is a good idea to ground the metal mast as quickly as possible. once again thank you.
-
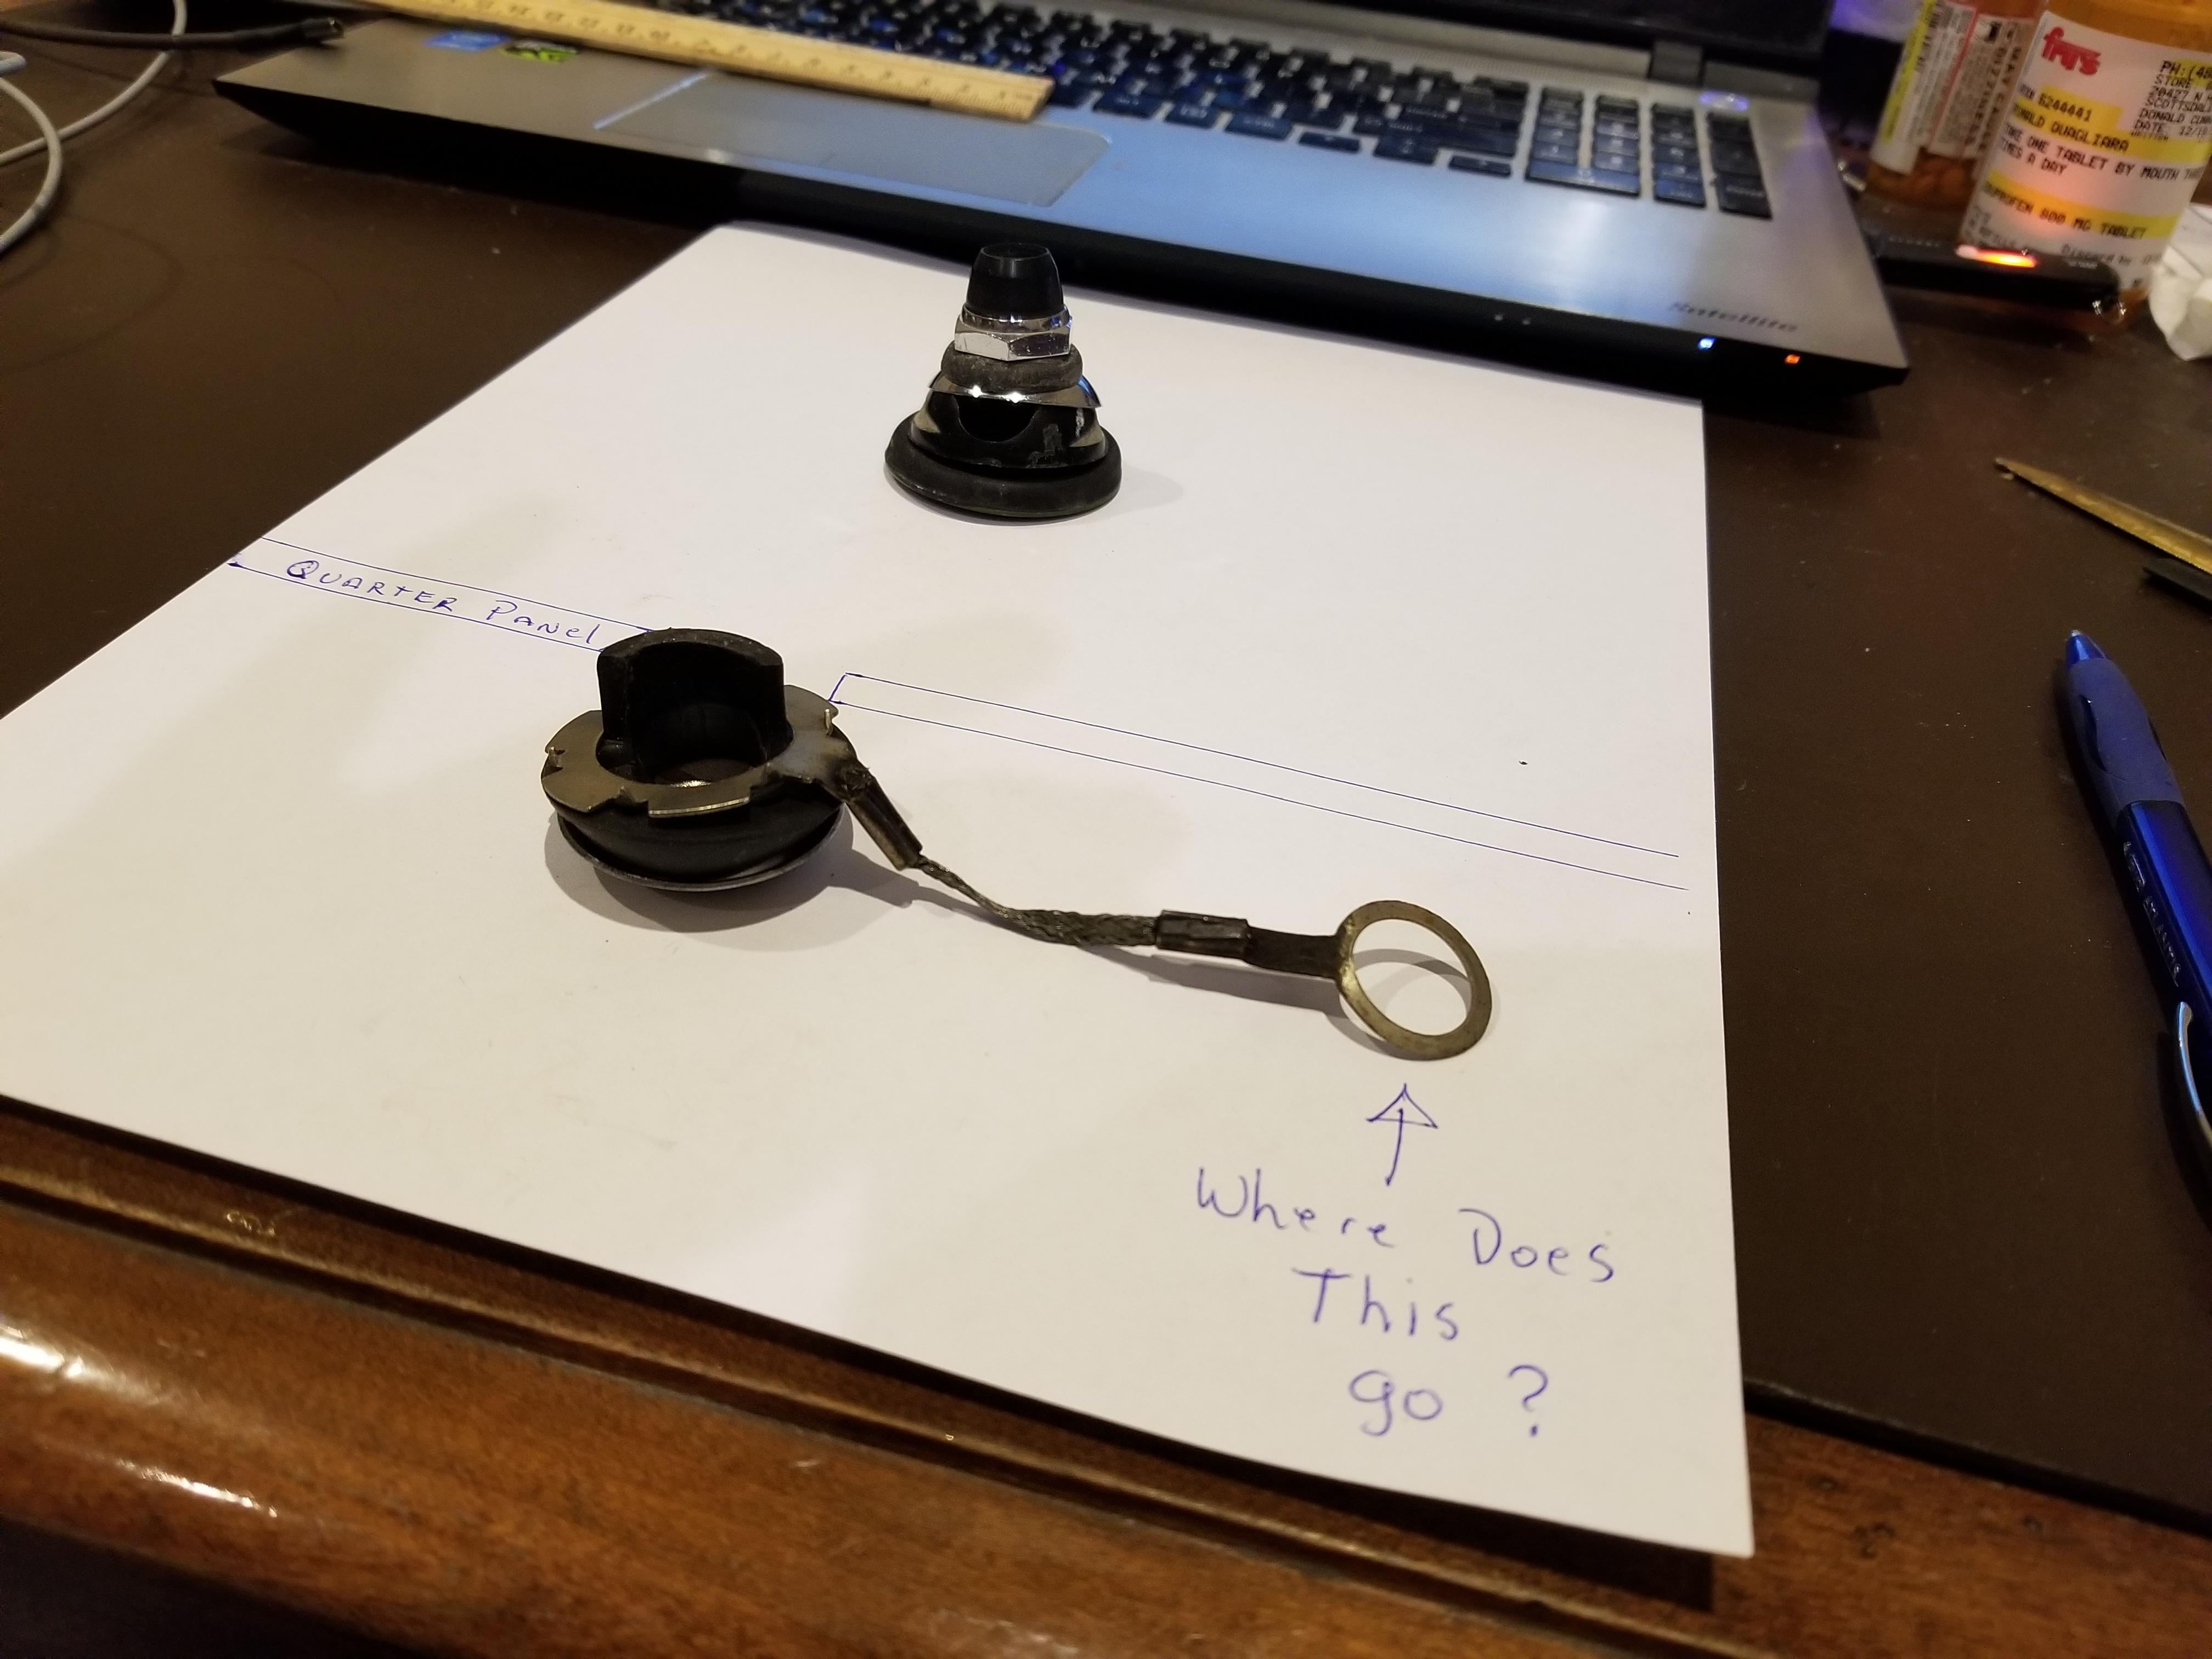
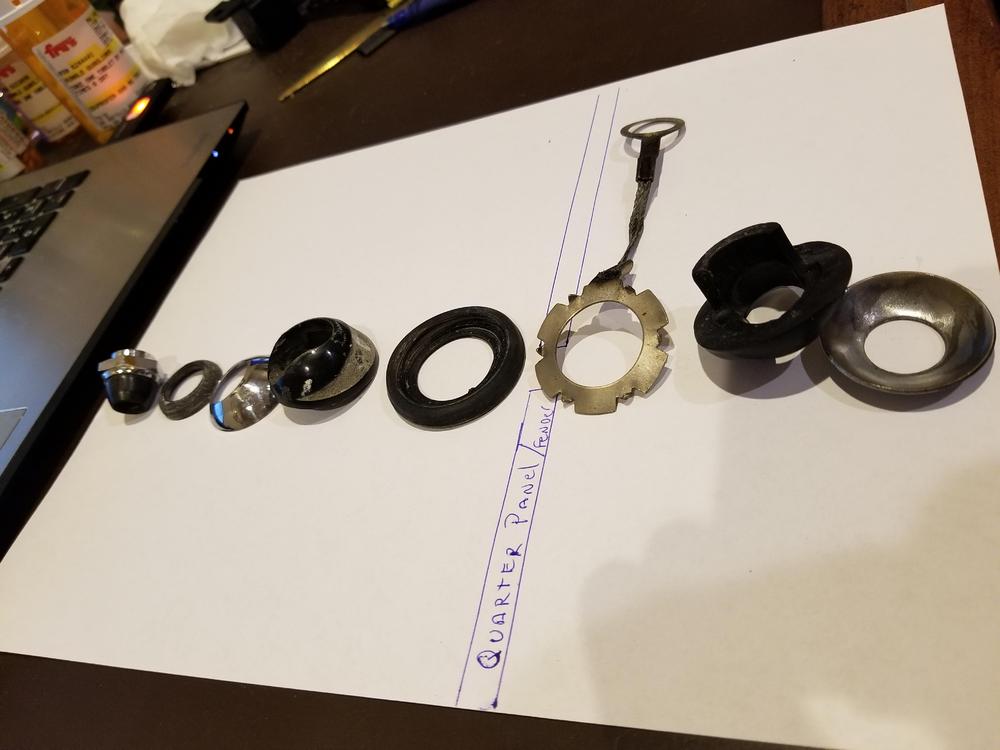
I have a 1973 240z that I am restoring. I am trying to re-install the factory electric antenna. It does work. Attached are two photos. The first attempts to show the mounting hardware in the order that I believe the various pieces should be assembled. I tried to show what is above and what is below the quarter panel. The second photo is of the assembled pieces. I believe that I have all of the pieces above the quarter panel. I have two questions: Am I missing any pieces? Just below the quarter panel I have what I believe is a grounding ring. It has prongs that are bent upward to contact the panel when everything is tightened. There is a stranded metal strap attached to the grounding ring with prongs and there is a mounting ring at the other end of the strap. What does this mounting ring attach to? Thanks in advance for your assistance.

-
i built all new harness engine bay cockpit overhead and hatch. that's why i asked you about the fuel tank to gauge piece. obviously the old harness did not have it so i did not reproduce it, so i will have to add it. regards, q
-
how completely stupid of me - I do have the access hole. The grommet is still there. Painted over by yours truly. I did not see it until I zoomed in on your picture and mine at the same time. Thanks very much.
-
CanTechZ - The two pictures you sent are worth 1000 words. Thank you very much. I have a 1973 which in most regards is quite similar to your 70. Having said that I do not have the access hole in hatch area that appears in your picture.
-
I am doing a complete restore and foolishly I installed the tail lights and the taillight panel without giving a thought to the license plate light. All of the interior trim is off because I am changing the color. Guess I was too in a rush to finally see some forward progress putting stuff on the car. Thanks for the quick reply.
-
can someone please tell me what the path is for the license plate light. How do you route wires from the hatch area harness to the light? Do I have to remove the taillight finishing panel to see an access hole? thank you.
-
paid the invoice for the lowers thanks
-
Thanks for the reply. I did order the part. regards, ron
-
Does anyone have a source for part #1 (upper quarter window seal) in the above diagram? This part is used on all 70-78 Z coupes. I have rebuilt both quarter windows - inner and outer seal and weather strip. I have door seals. But there are two additional pieces for the quarter window an upper and lower quarter window seal. The lower (small, rectangular) piece is available. None of the usual suspects (vintage rubber, precision rubber, thezstore,, zcardepot, zcarsource) have the upper seal. Thanks in advance.

-
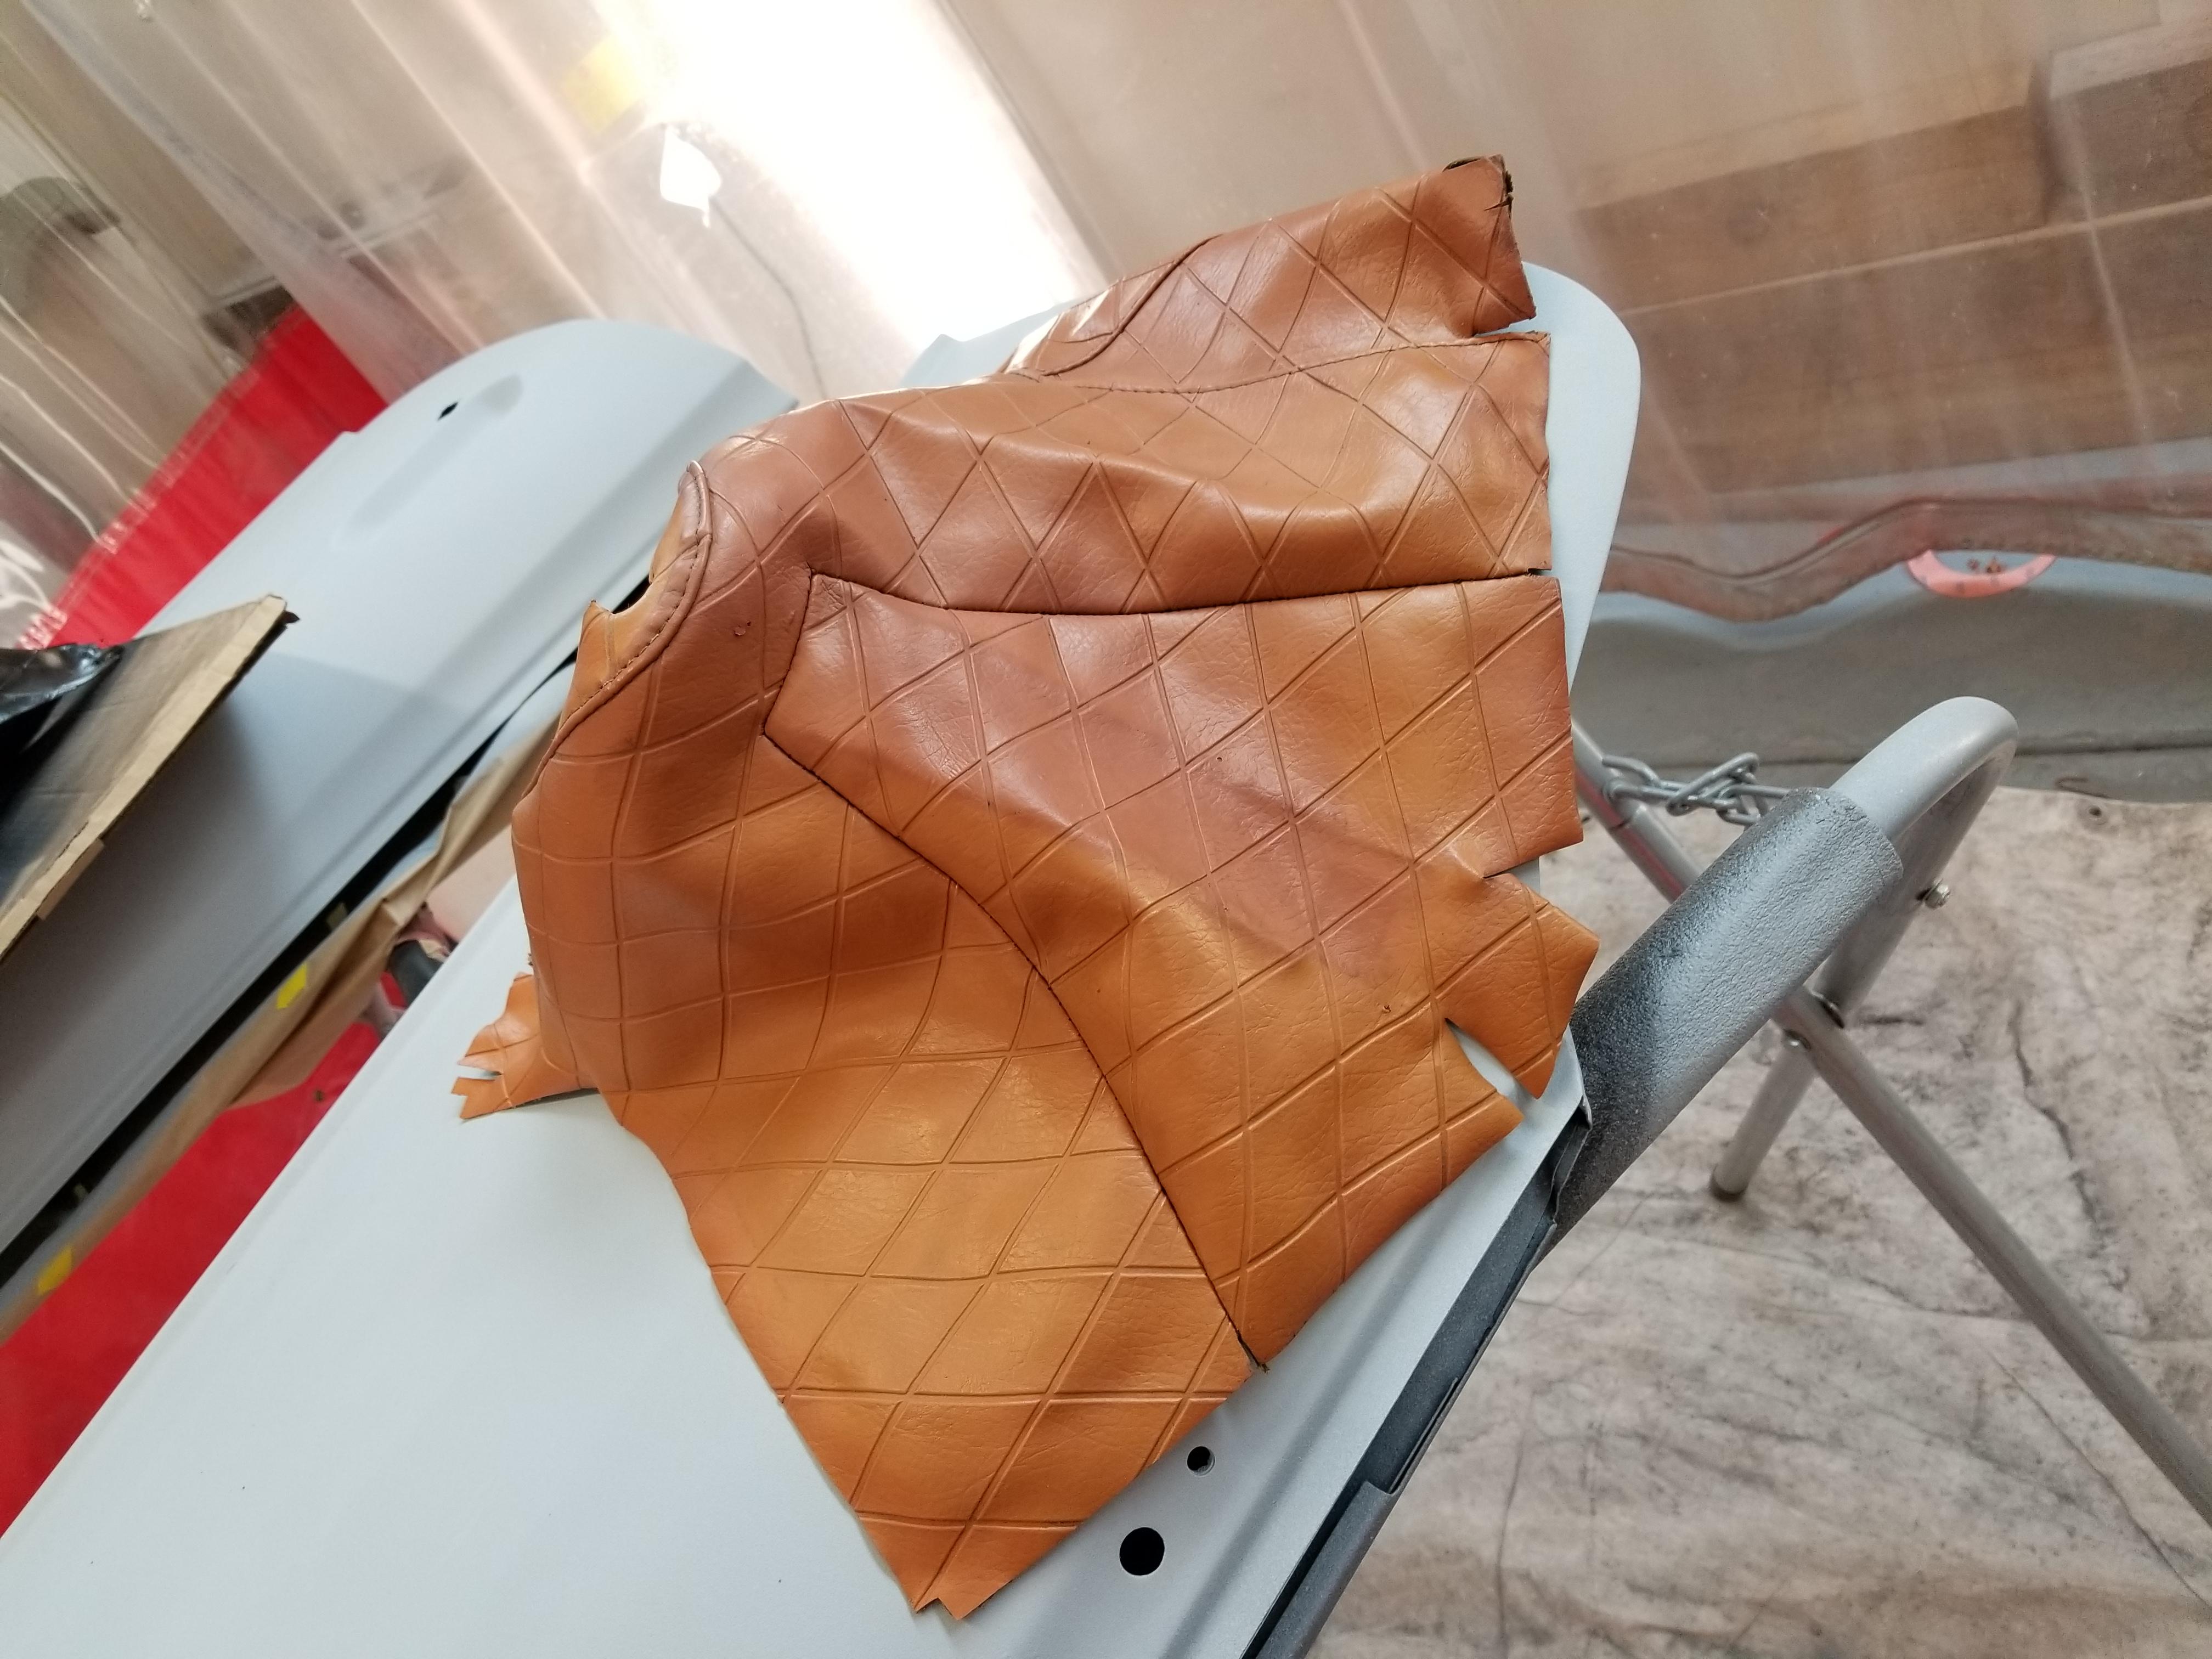
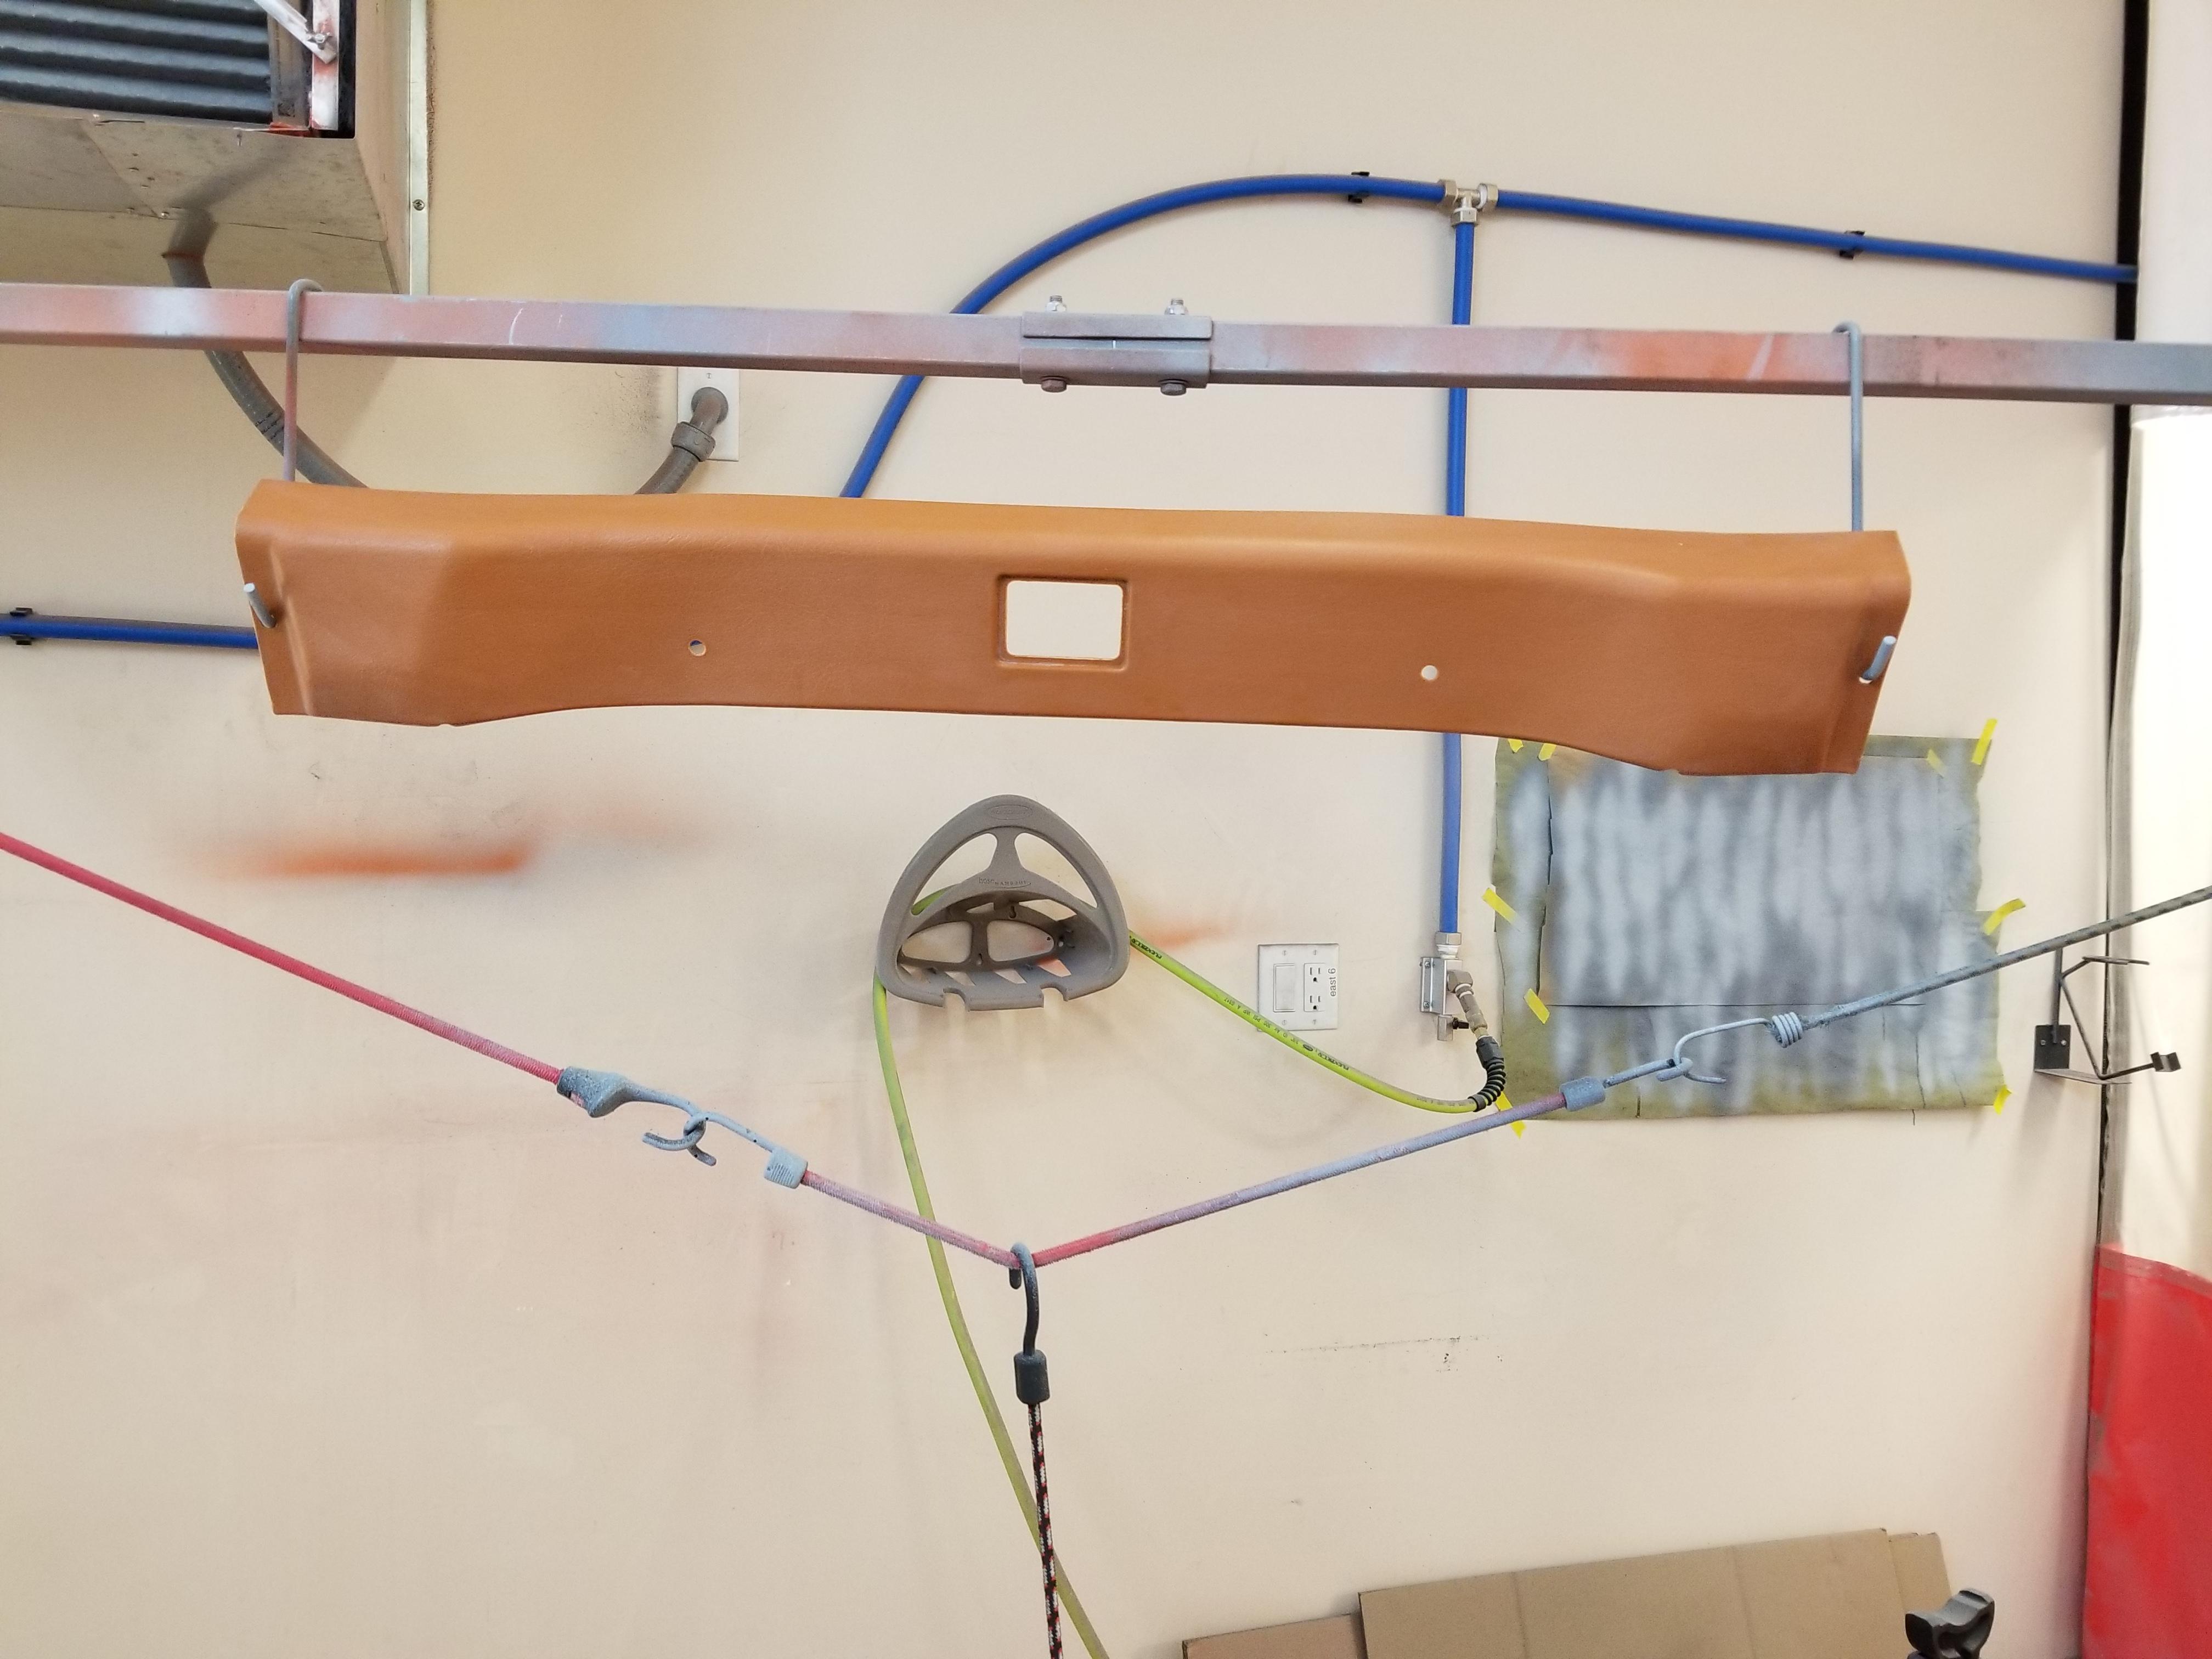
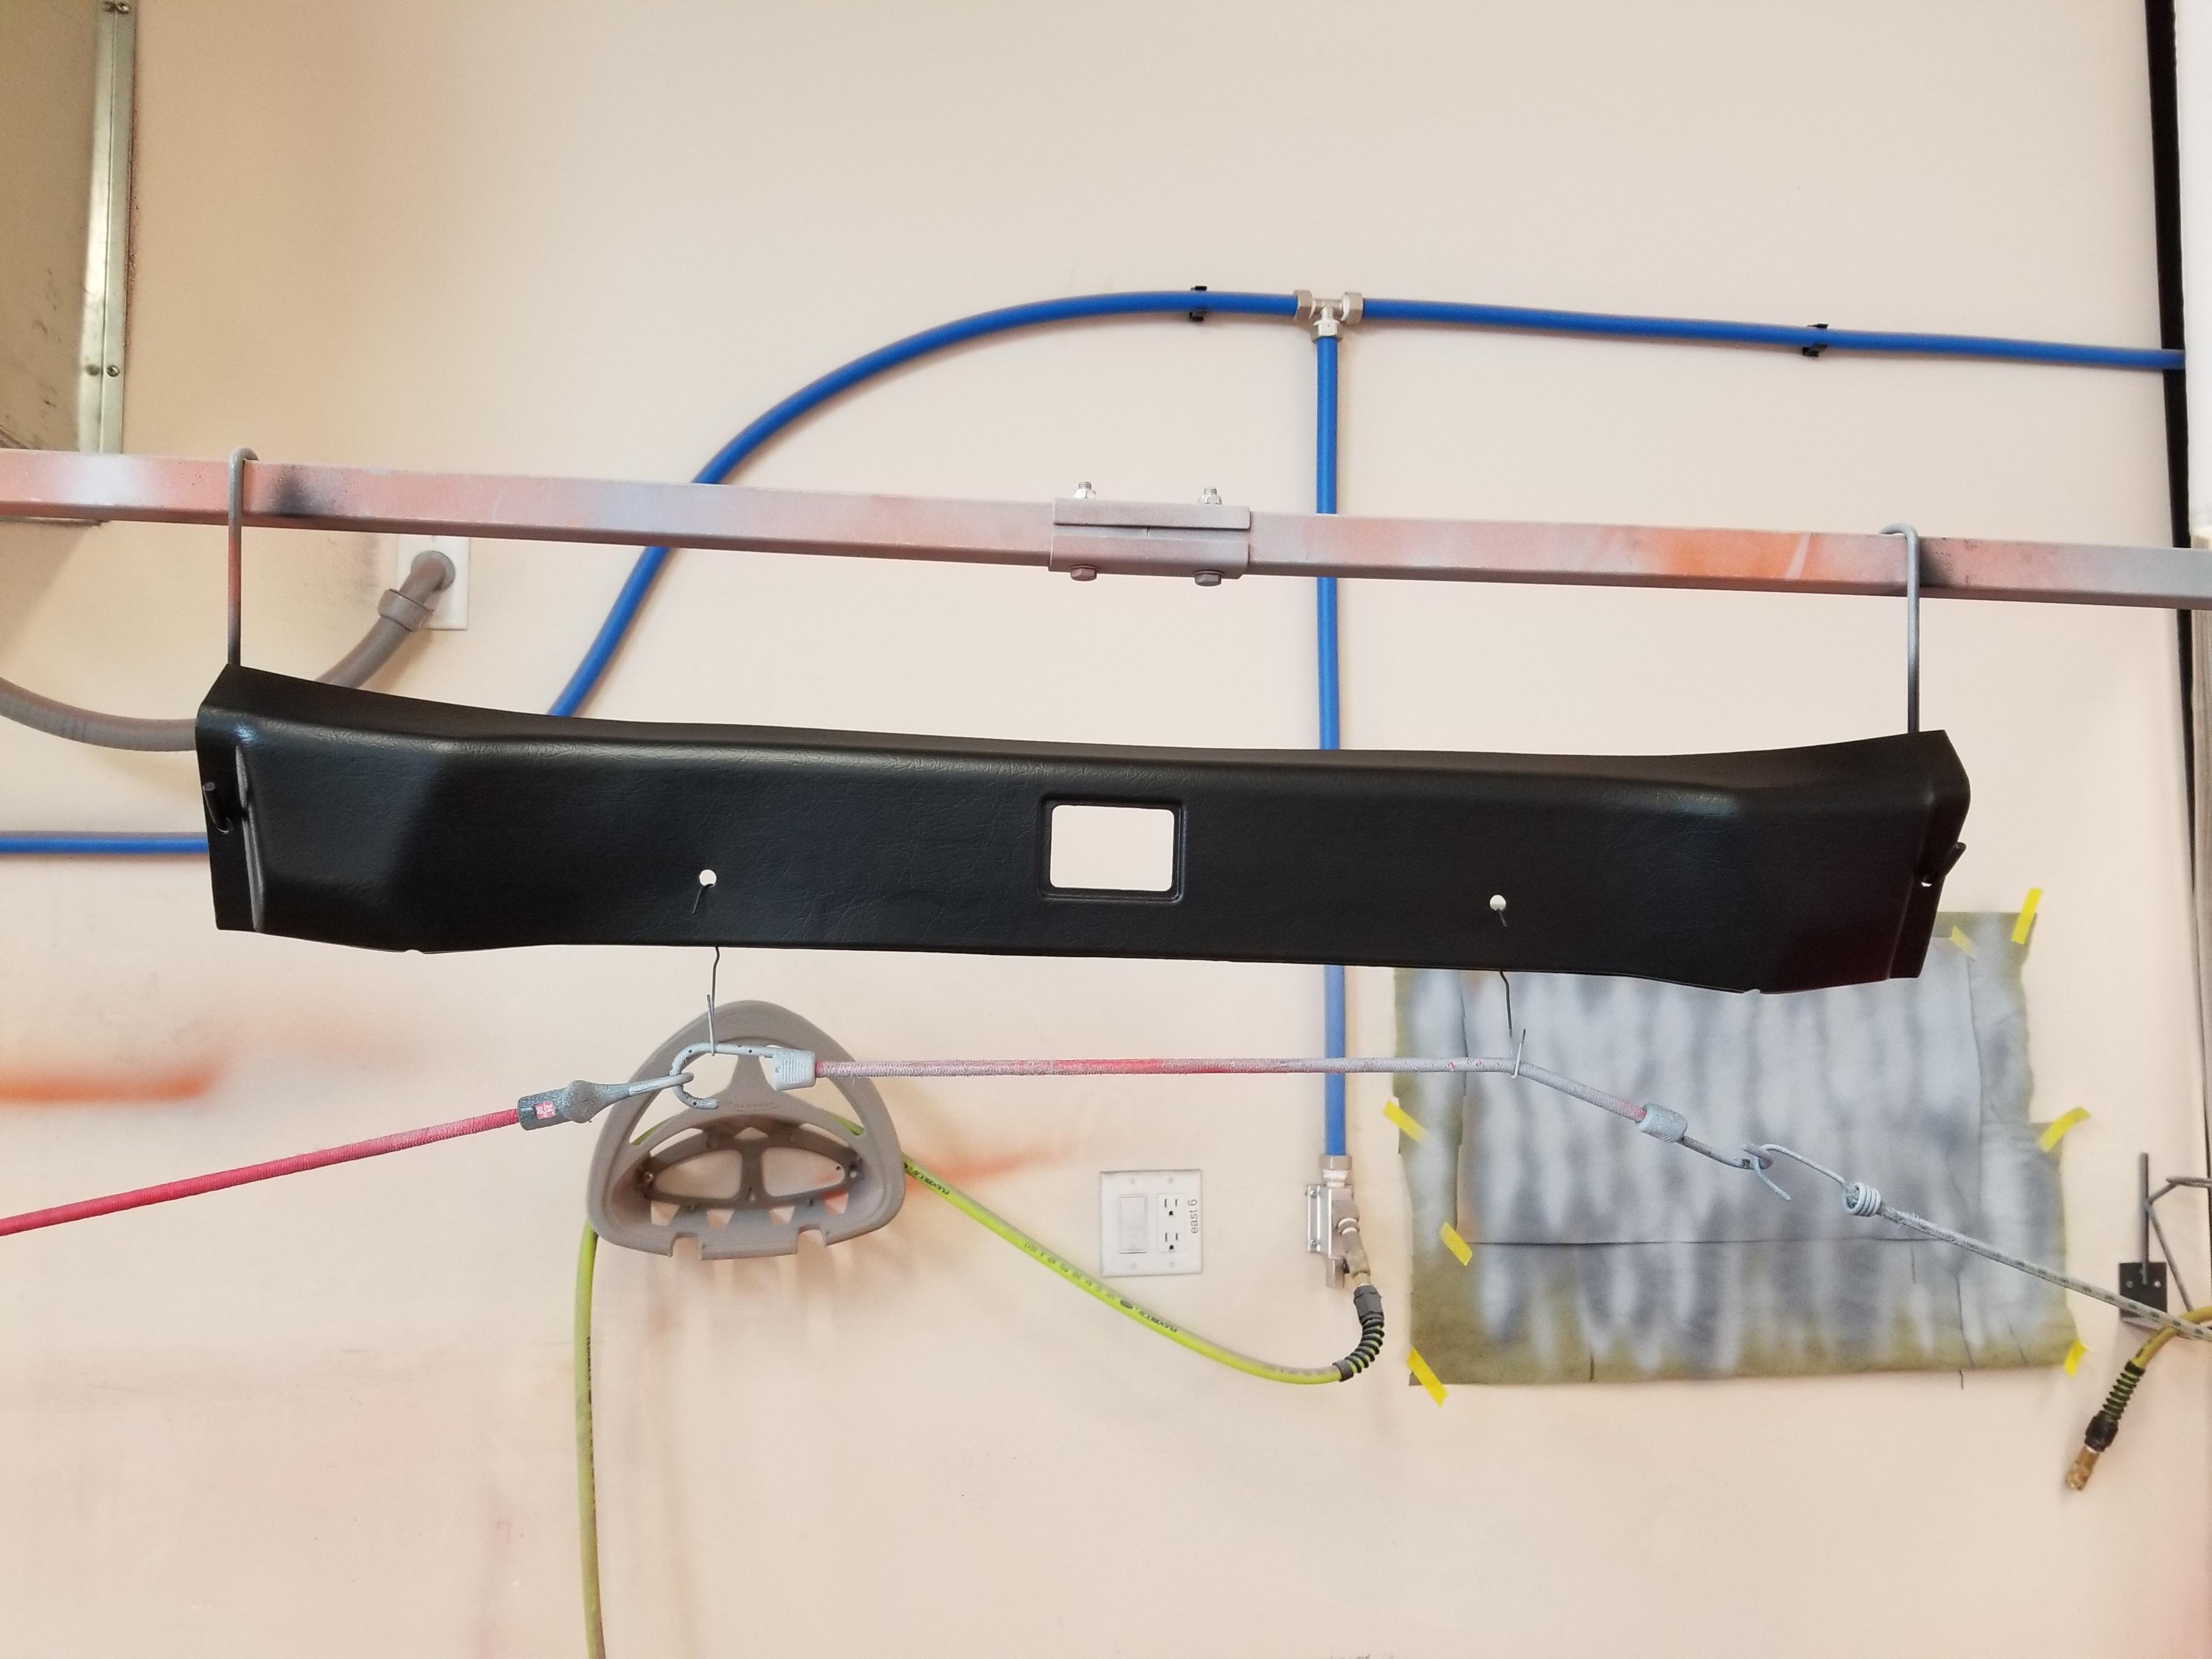
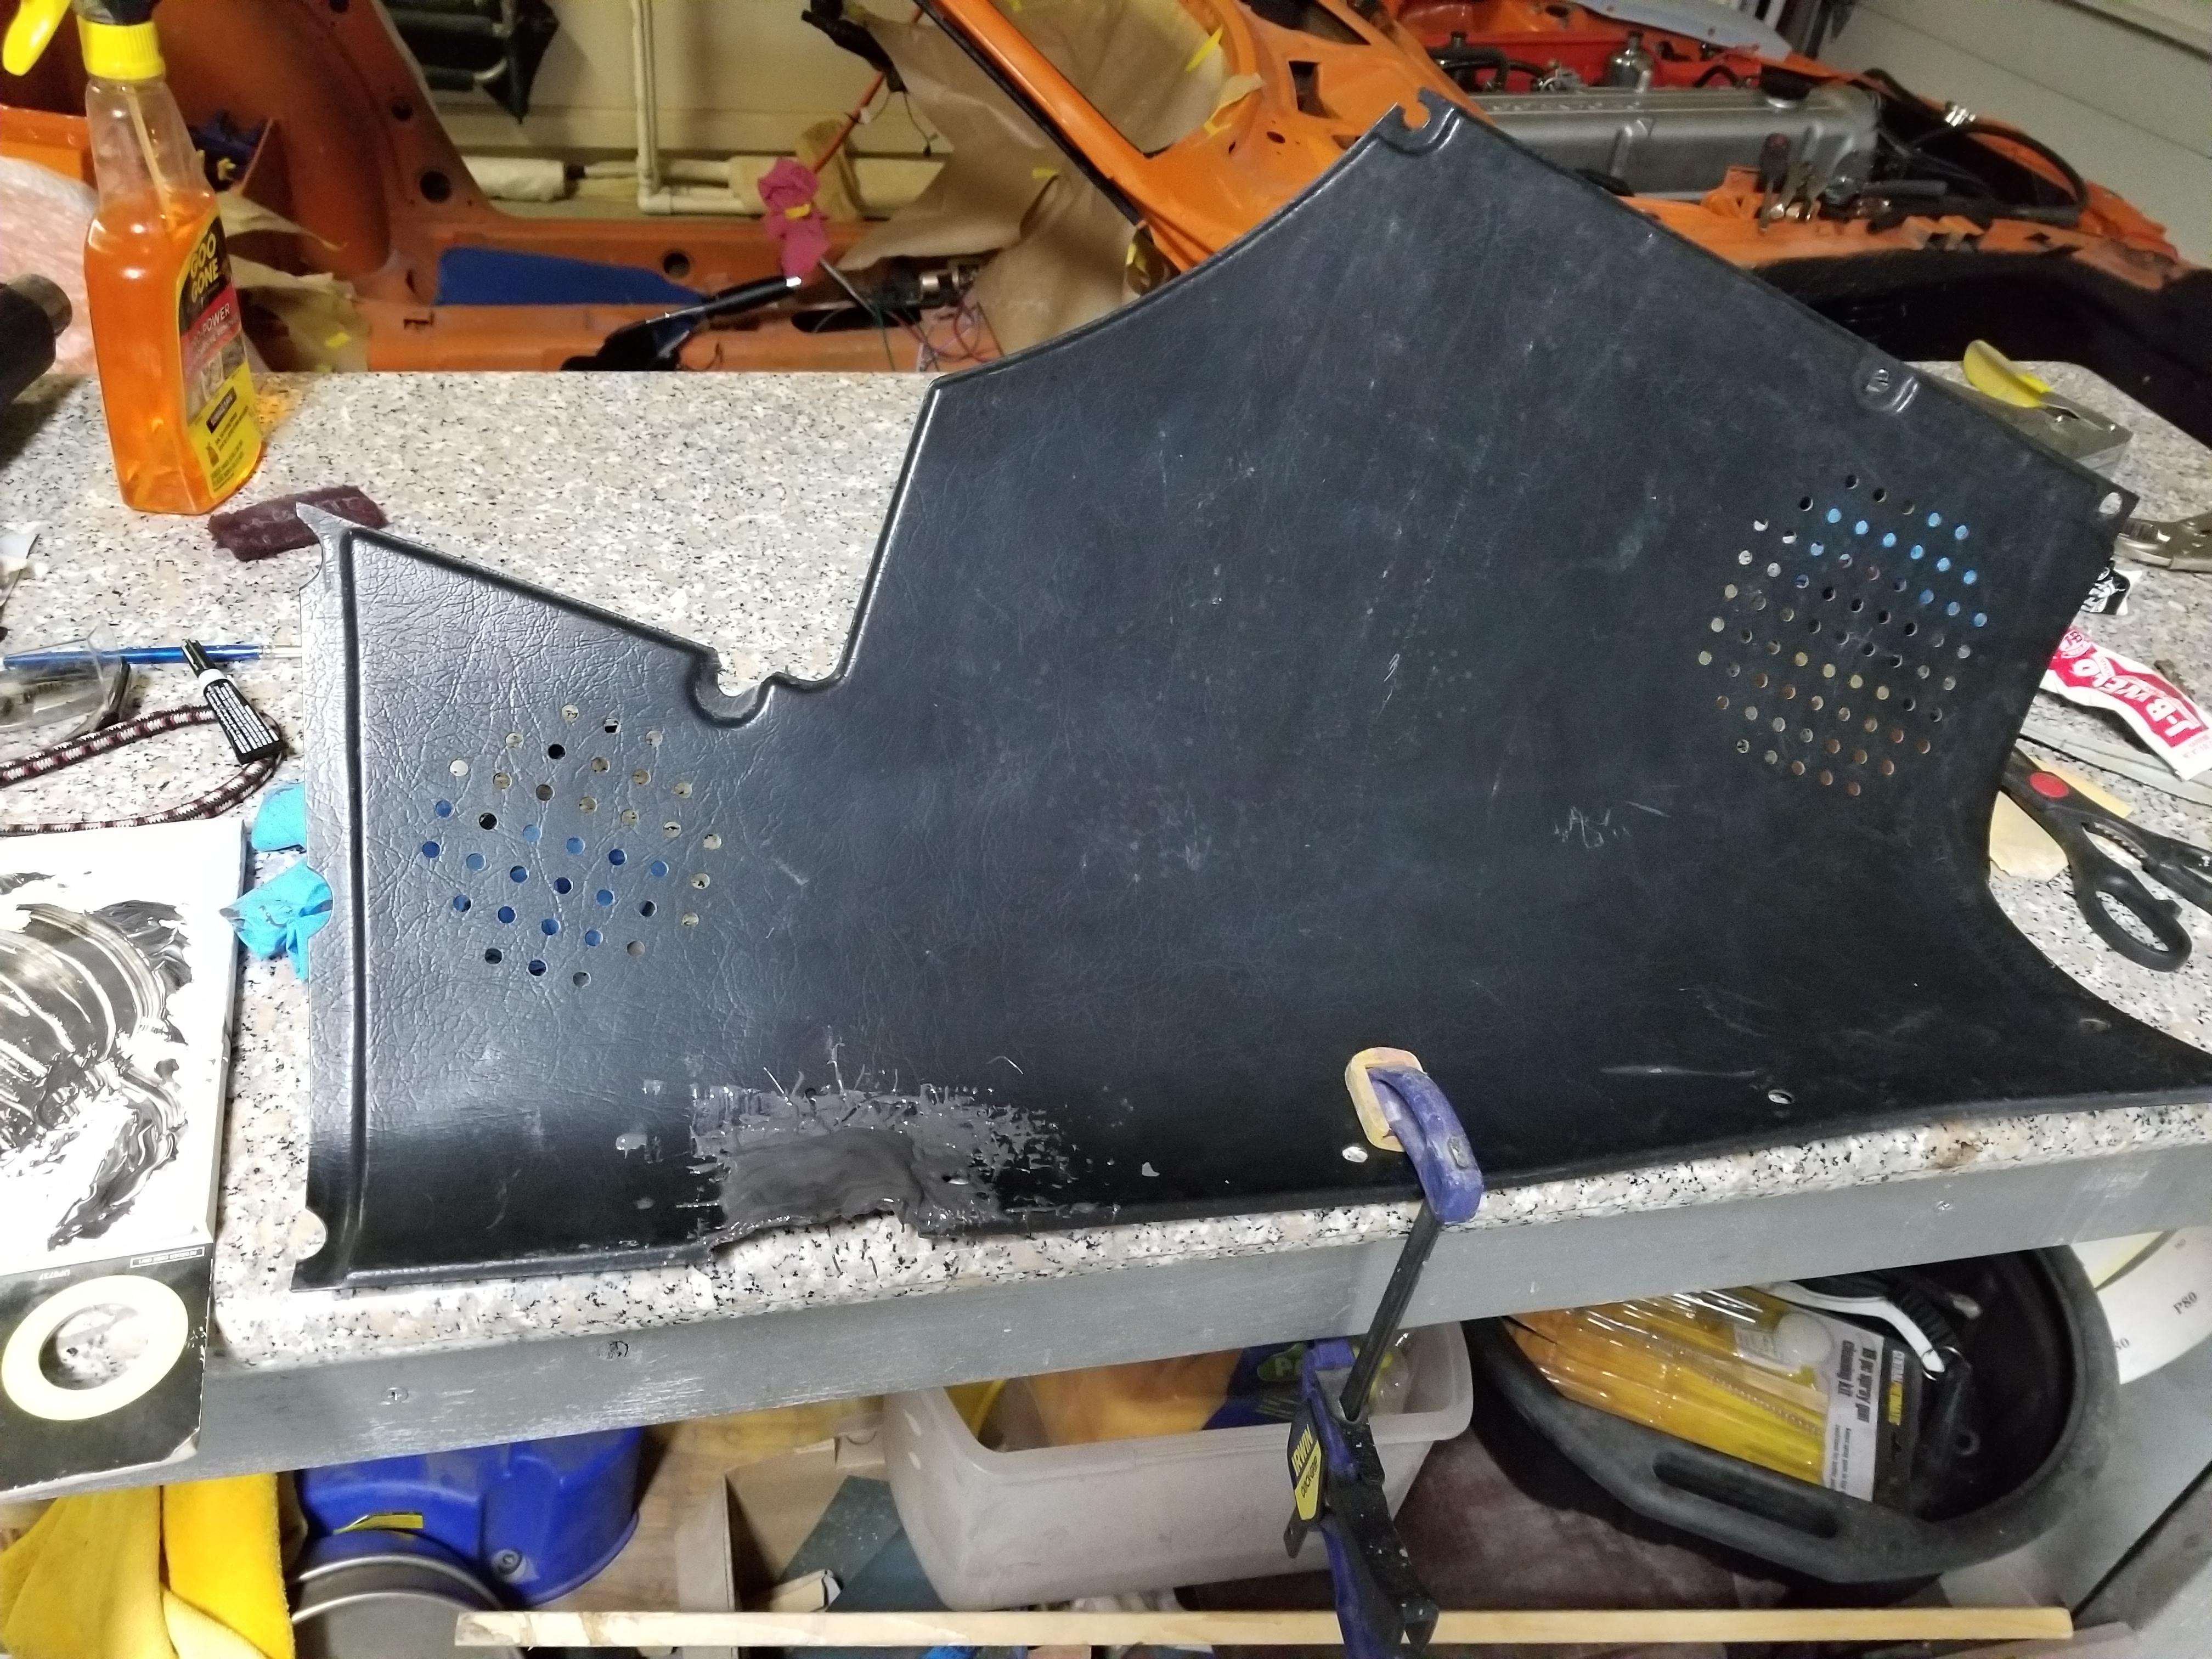
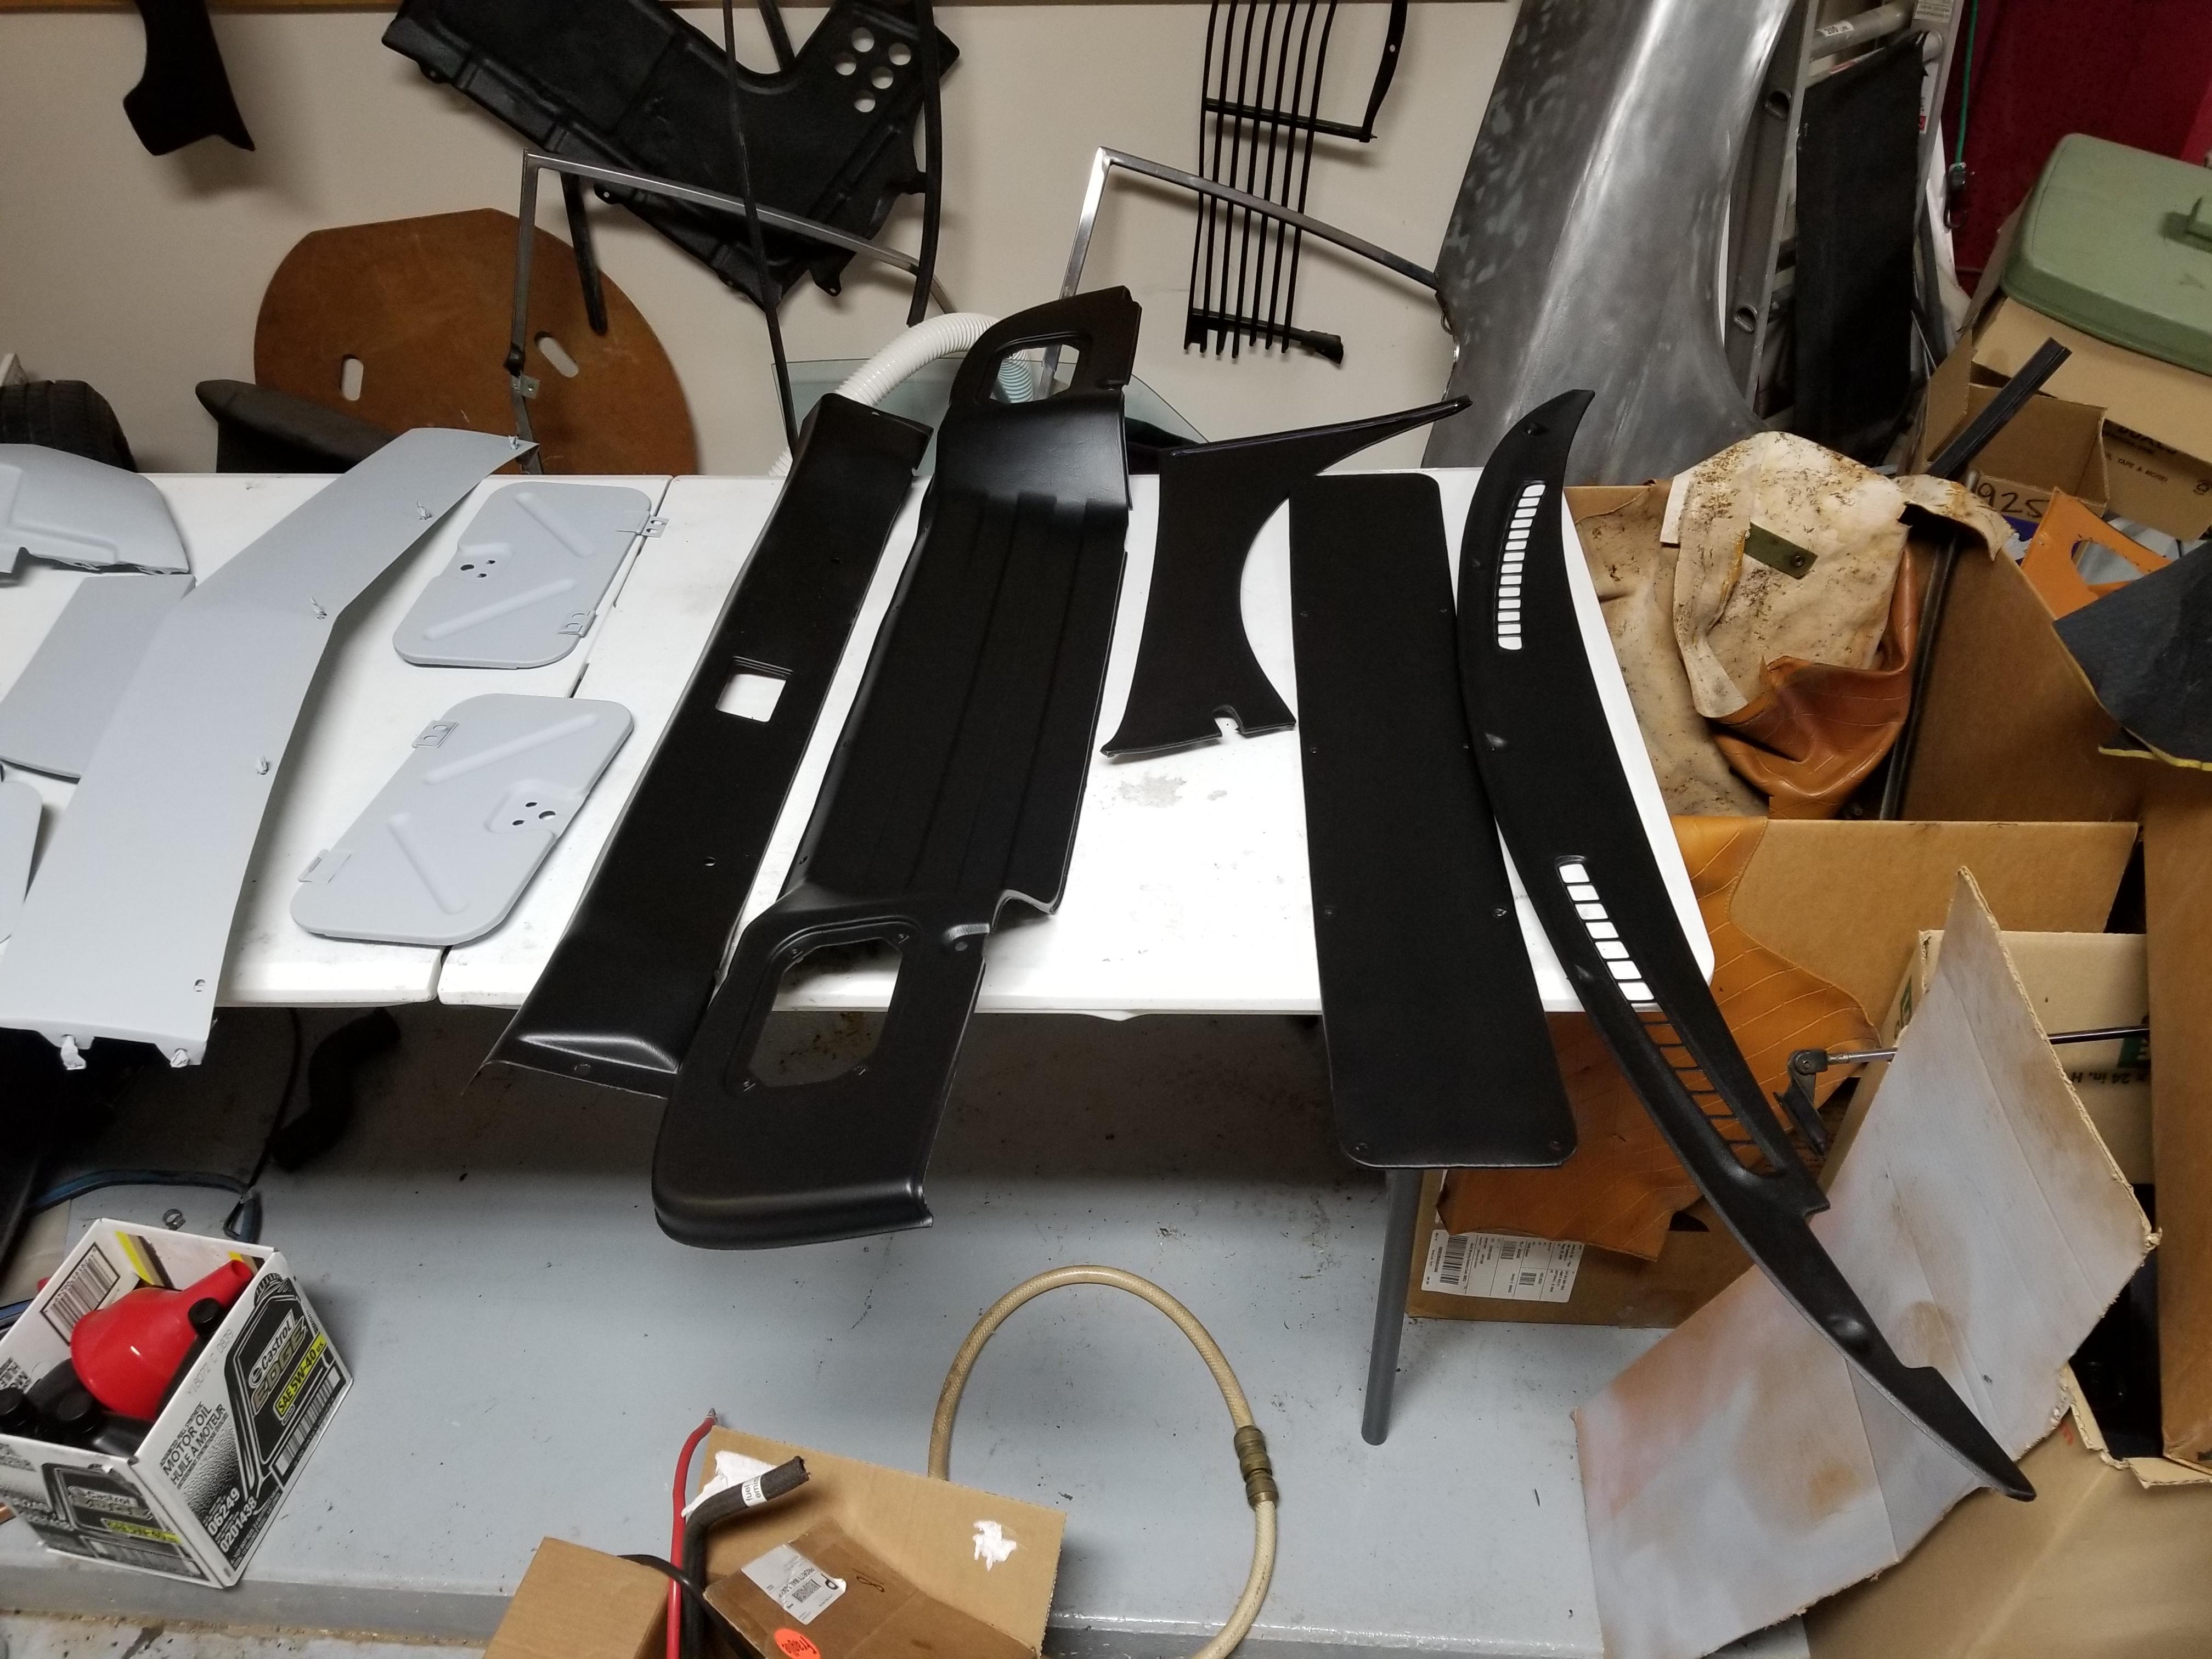
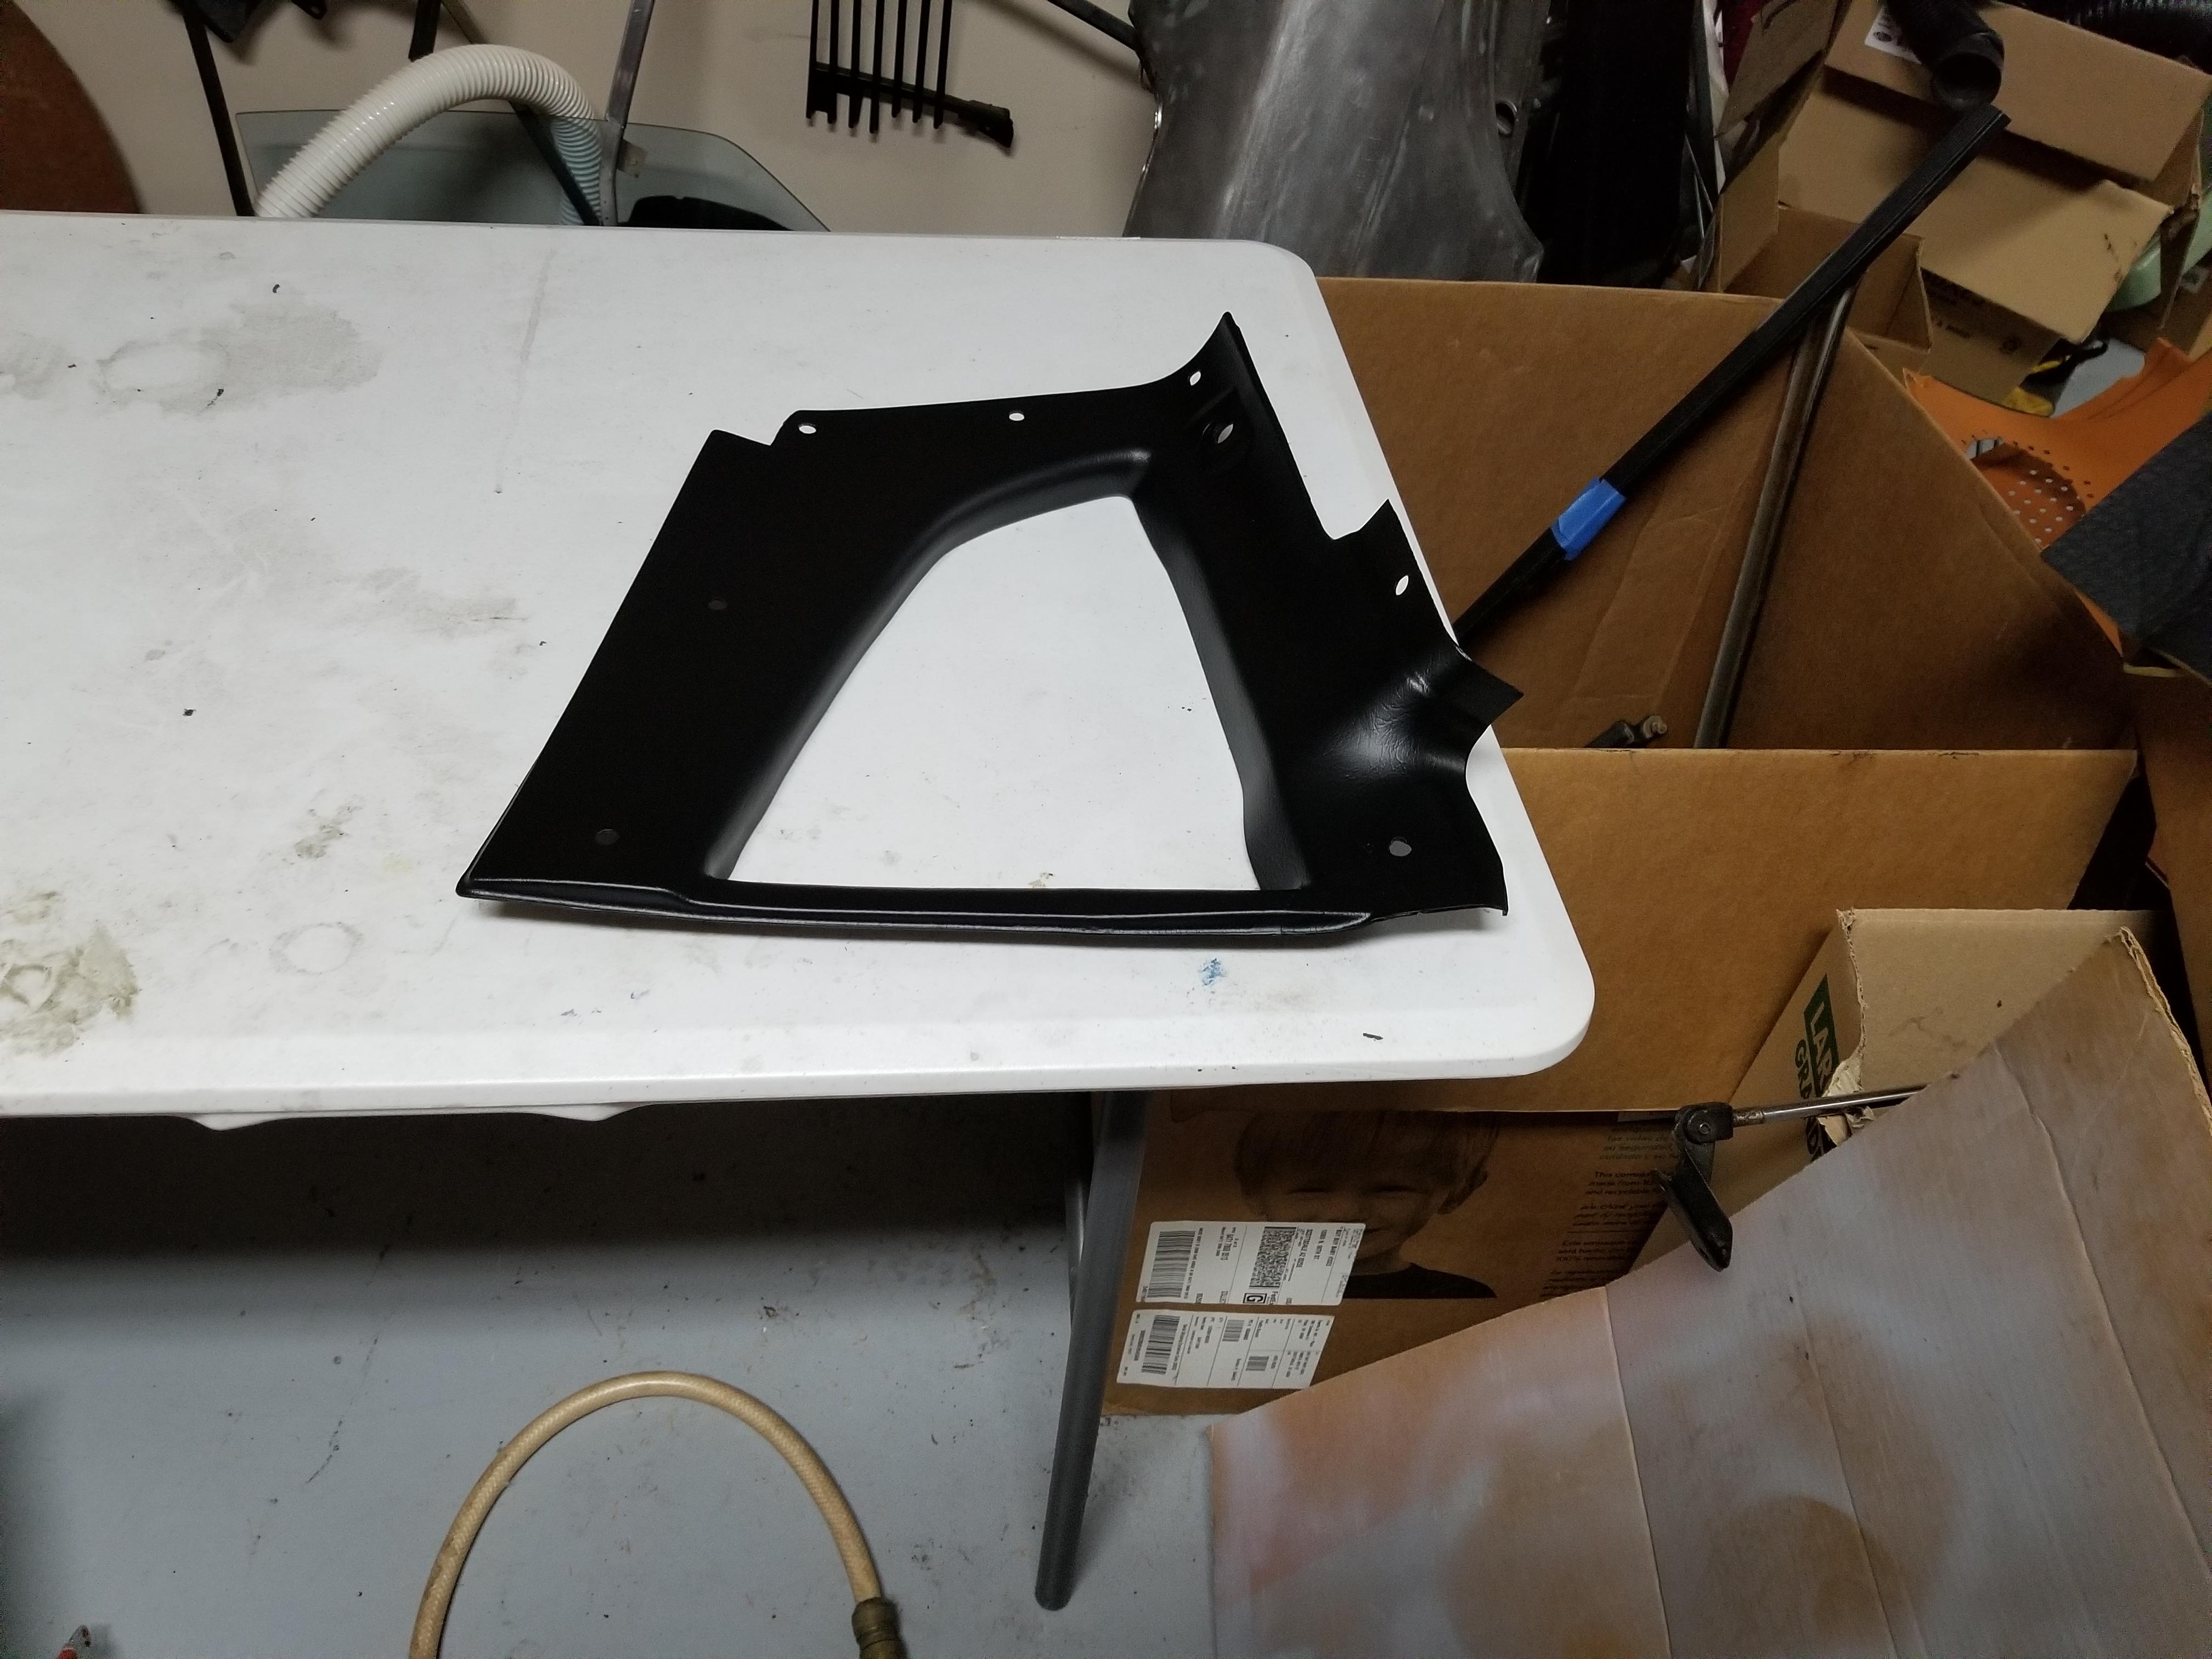
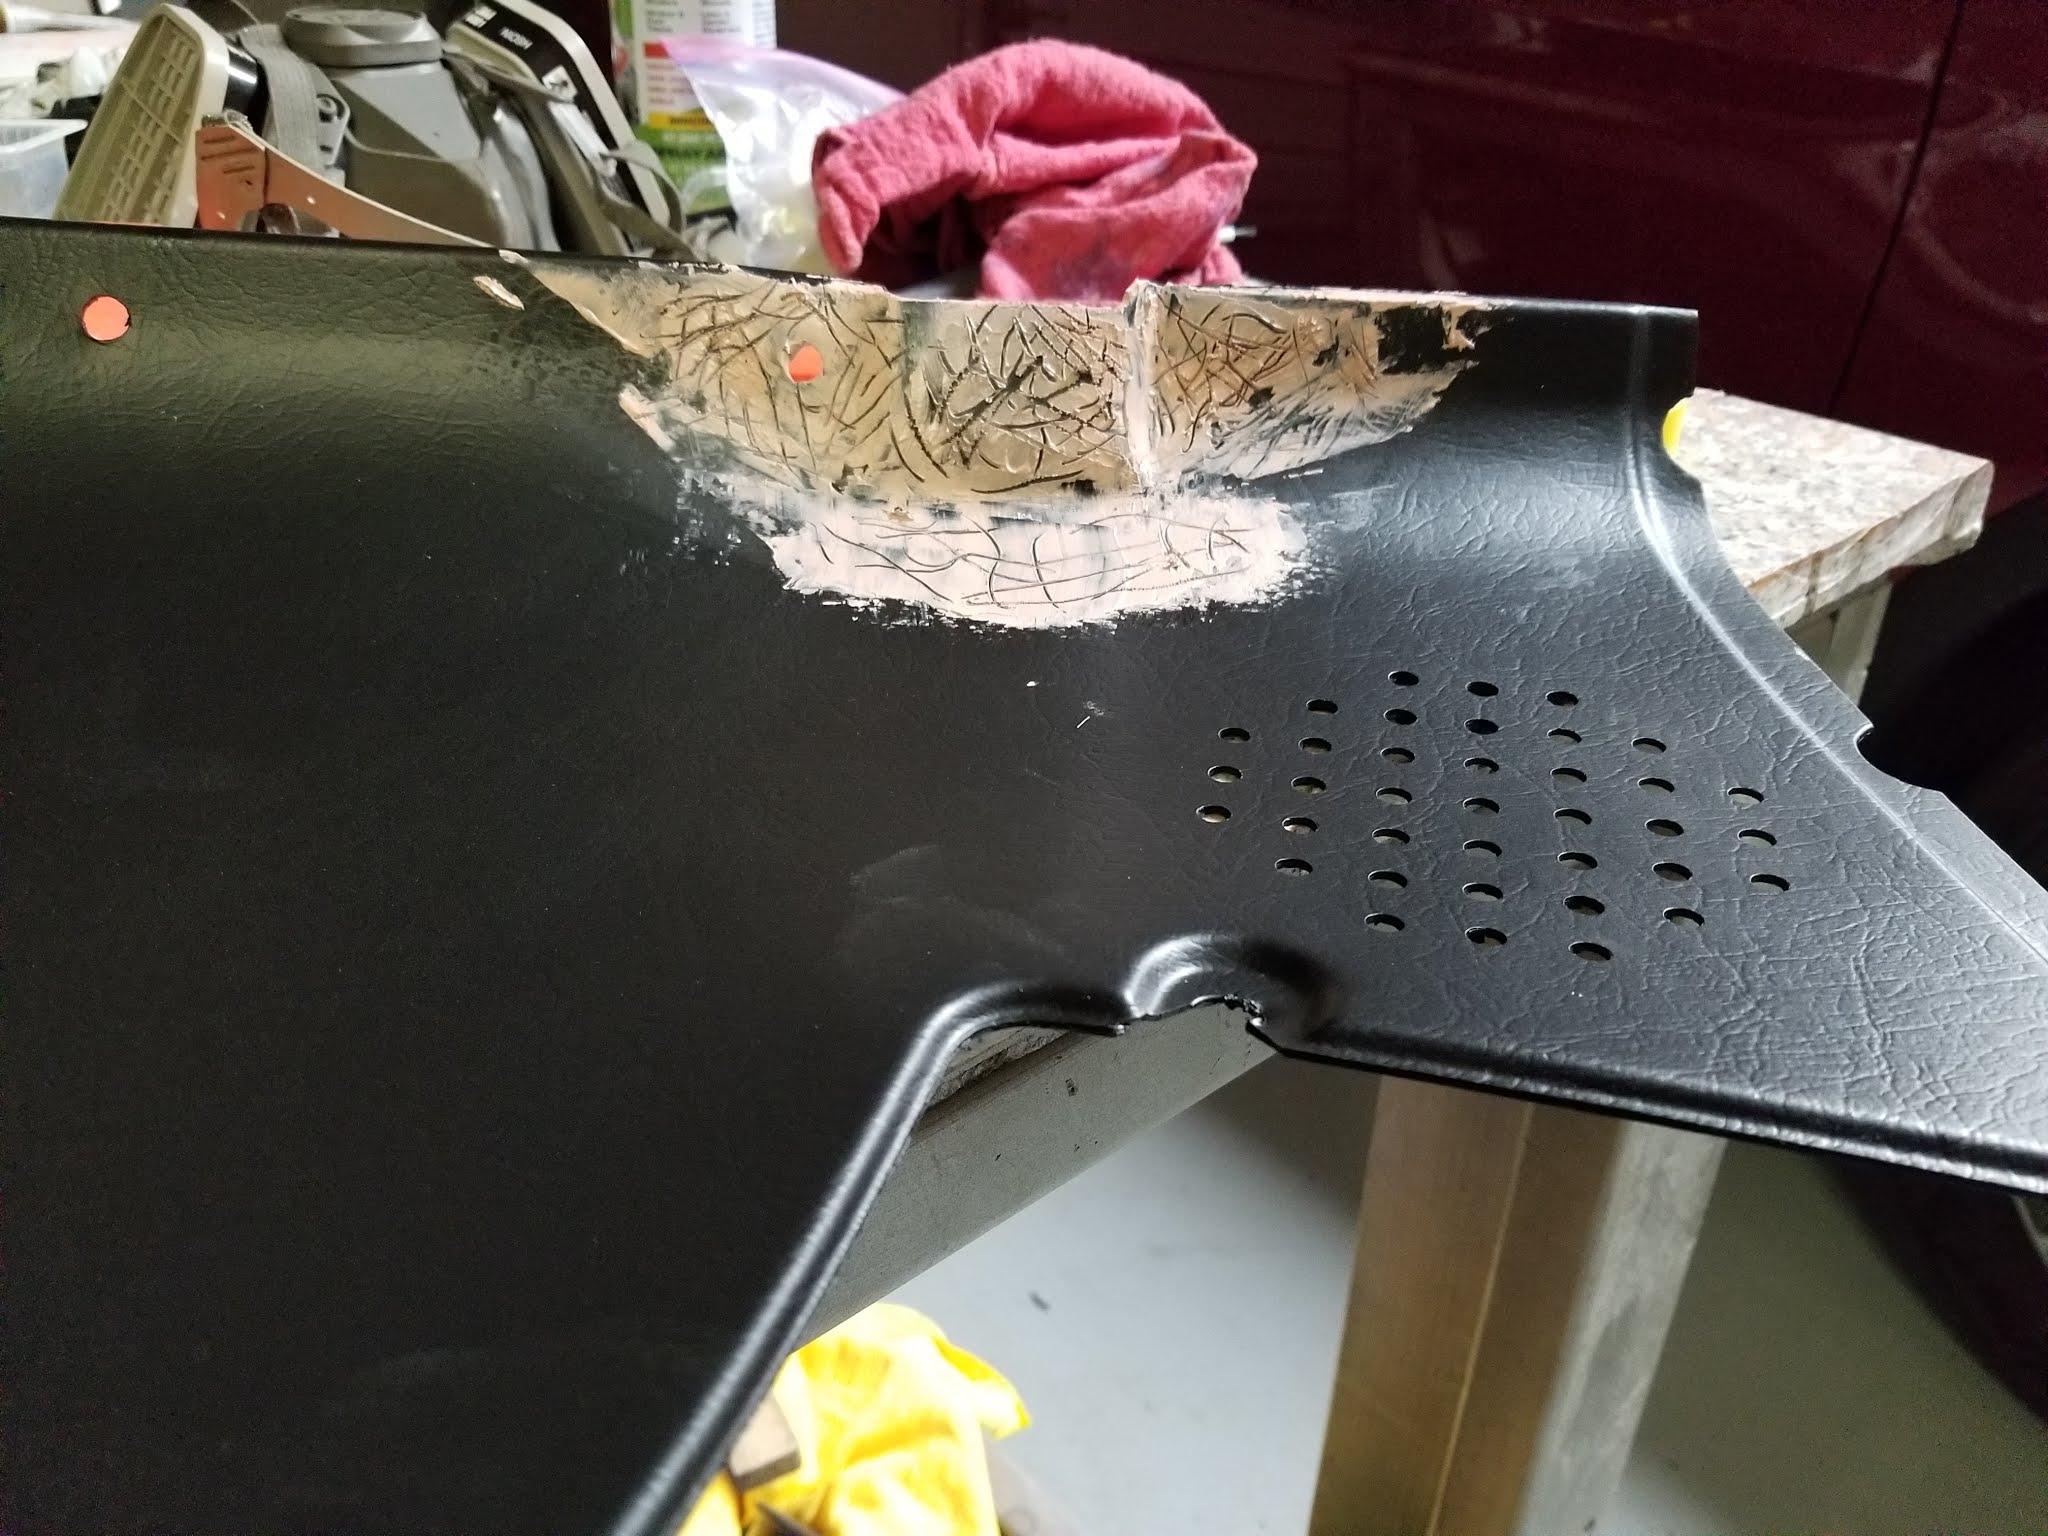
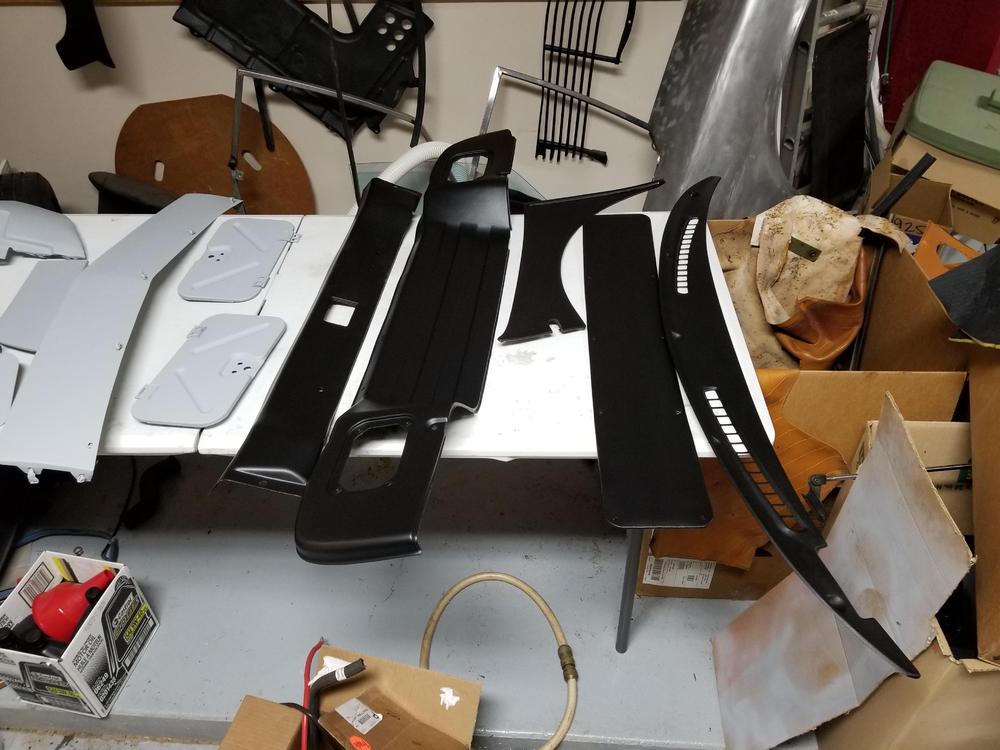
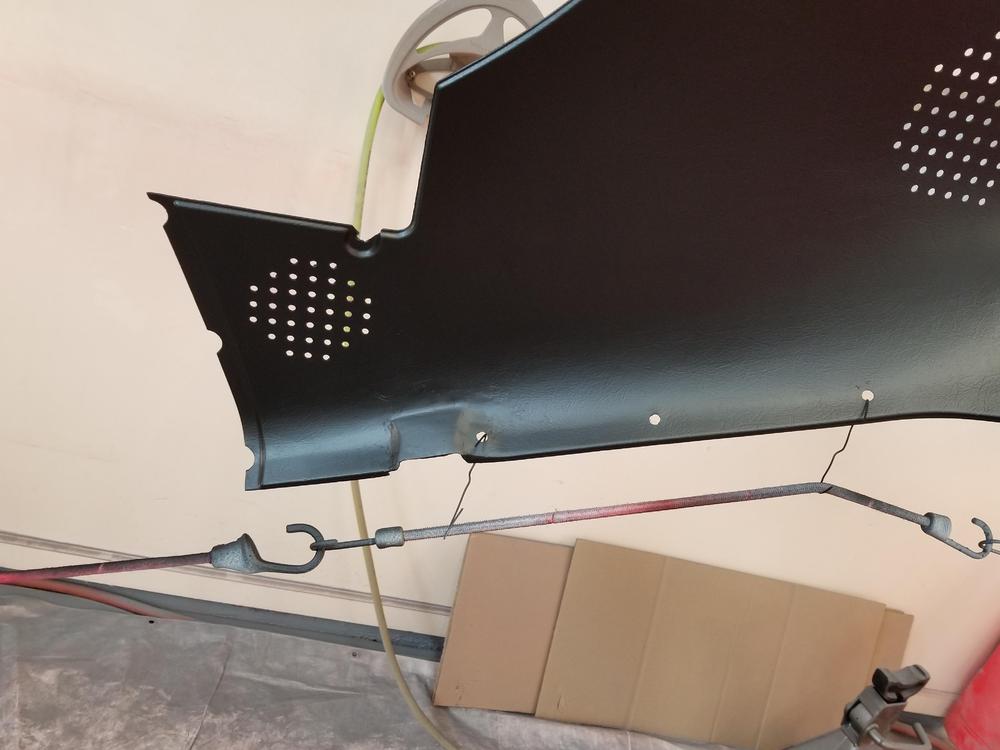
So, I thought it would be a good idea to update the thread regarding the change of interior color. I must admit that I was leery of changing the color of vinyl with a paint/dye. Our vinyl was in fairly good shape and it is quite expensive to replace all of the vinyl and plastic, so I thought it would certainly be worth a try. After a reasonable amount of research, I decided to use the SEM product line. I also decided for once in my life to strictly follow SEM’s process. I had two pieces of vinyl that were damaged through exposure to the sun. But even these pieces turned out well, and I do not think it was purely due to the fact that I was going from tan to black. I think the result would have been just as good if I repainted them in the tan color. Anyway, the result was truly amazing. Every vinyl piece came out looking brand new. It is nearly impossible to tell that they have undergone a restoration and a color change. Yes, there may be a seam that if pulled when installing might show the original color. I plan to touch up these spots after I install the interior. You can avoid this possibility by spraying the back of the material at least on the seams. I did have a spot or two where there are cuts/splits in the vinyl, and one very small hole. I simply took some black vinyl and superglued it on the back of the piece. I did this for two reasons: to reinforce the area so the cut/split did not grow and in case the material was pulled during installation it would merely expose the added black vinyl. Once these areas were painted, I could not spot them easily. The plastic trim was in relatively good shape considering that it is 45+ years old. One of my rear quarter pieces had been hacked up by a previous owner who was attempting some ridiculous change to the speaker areas using a machete. A replacement panel came with the car so I used that. A few other panels had chips where material was missing. These few areas were of the 1- 2 sq. in. category. Some panels had cracks, mostly at the edge of the panel, some minor and some more considerable, but all required attention or the crack would have continued to grow. I found a product called Q-Bond. It is an interesting process. For a crack I cut a “V” groove in the back of the plastic and cleaned the area around the crack. They give you what seems to be a graphite like powder. You sprinkle the powder into the grove. Since it is primarily the back I sprinkled it liberally around the groove as well. If the crack cannot be completely closed in the front of the panel you place a piece of tape on the front covering the cracked area. I used yellow tape that I have experience with from painting a car. It sticks well, but can easily be removed and has never damaged an area that I have used it on. The graphite like material can’t fall through the crack because of the tape. Q-Bond also provides what they call super-glue. Looks just like what you buy in the hardware store. You dribble a few drops on top of the graphite that is mounded on the back of the crack. It seeps in and sets up in less than 30 seconds. I gave it a few hours and then sanded the front of the panel to insure that the filling was level with the front surface. We painted the panel with the SEM product and where it was just a crack you could not tell that anything had been done. The crack line looked like it was part of the original pattern on the plastic. Where major repair was required, I used J_B weld to fill a missing area. The J-B weld patch as well as any other areas on the front of the panel that needed to be sanded were rendered flat with no grain. I tried scribing lines with a pin in some thin putty but this wound up looking like scratches. I have read about graining pads, but I think they perform better on vinyl/leather than a hard plastic panel. I decided to use a textured paint from SEM. This will not imitate grain, but I thought it would be better than leaving it flat. You don’t have a lot of control other than varying the distance of the nozzle from your work to produce less texture. I lightly sanded the texture and tried to blend it into the original grain. I then repainted the panel to get a consistent color. Its not perfect but if you are not looking for it you can’t spot it and the panel is repaired. Where I was missing a lot of material, I added some plastic pieces cut from the panel that I replaced. I super glued these to the back of the panel I was repairing and then used JB-Weld to bring the repair level with the rest of the panel’s surface. This also worked really well. Its strong, but it is ugly. Once again, I used the texture and sanded it and then painted the entire panel. It will not pass concourse inspection but it definitely is cheaper than replacing the panel, and it is a sound repair and it is another piece of authenticity - a 45 year old piece of trim that looks pretty good. As an example this is the vinyl that covers the rear shock tower. It has been cleaned with a mild soap, and Scrubbed with a gray scotch brite pad using SEM soap. You can see signs of fading from the sun. Here is one of the shock tower vinyl sections painted. Plastic panels - this is the interior overhead where the dome light mounts in the middle. I was amazed at how nicely the plastic and the vinyl cleaned up. This is one of the rear hatch area panels. It installs behind the rear wheel. It had some cracking and it also had a missing section around one of the mounting holes. The first picture shows all of the repair work - cracks at edges and the missing section around one of the mounting holes. The picture below show the panel after paint has been applied. You can see the patch area. The only issue with this panel is the total lack of grain in the repair area. It was noticeable and so I pushed on. Here is the my first crude attempt at trying to see if I could imprint some grain. This looks awful here but it was even worse when color was applied. The next picture is of the panel with everything having been sanded. It has the benefit of the texture paint having been applied, and color over that. The rest of the plastic and vinyl came out even better and I was very satisfied that we were able to save so much of the original car. Can't wait to see all of the vinyl and the trim panels go back in the car. Unfortunately, I completely rewired all of my electrical harness, and don't want to assemble the interior until after I test everything. Testing the harness is waiting on a new dash. Early on in the restoration I tried repairing the dash, but it crumbled and my total lack of expertise inspired me to try wrapping the skeleton with vinyl. Twice I thought I was going to get away with it but alas the speedometer and the tachometer wells could not be done by me to my satisfaction. I then searched for someone in need of some extra cash but every shop that I went to said that it was so difficult that they would have to charge enough to fund their son's first year at Harvard. Next step on the road to wasting a fortune was a full cap. I would have stuck with the cap, but this car is for my son, and I worried that the cap would not do well in the cold climate that he lives in. The overall restoration is coming out pretty good and to be honest the cap just didn't match what we were able to achieve with the rest of the car. I am currently on a wait list for a replacement dash pad. products that we used: 1. Gray Scotch Brite pads 2. Dawn dish soap 3. SEM Soap 4. Vinyl/leather prep or plastic Prep 5. SEM Sand Free (adhesion promoter) 6. SEM Color Coat Satin Black 7. Q-Bond 8. J-B Weld The following URL is valuable in terms of a reference for the SEM products that you will need and the overall process. https://www.semproducts.com/product/color-coattm-mixing-system/system#product-videos I suggest you watch the video. I also watched this video. Their humor is a bit tiring but I found it before the SEM youtube and it encouraged me to give it a try. episode 128 Dyeing Door Panels and dash pads Autorestomod. Bottom line: If you are thinking about refreshing your plastic interior trim or your vinyl – DO NOT hesitate The SEM process works, at least if you diligently follow their instructions. They have a complete line of colors and you can even mix a color to match something. If you have plastic that needs repair within reason you can successfully restore your plastic panel cracks with Q-Bond. I am sure that there are other products out there that work just as well but I have not tried them and because these have worked so well for me I probably will not experiment with anything else in the future. The one thing that I do want to try is grain imprinting using those grain pads. Hope this helps.


-
First, I wanted to thank those of you that responded regarding vintage dashes and the 240z. I also wanted to give you an update. I was able to connect with the vintage dash people. They are for real. They have developed multiple products. They are different than many vendors that I have dealt with in the past, namely they are very serious about producing a quality product. They appear to be very ethical. They decided not to take deposits in advance, unless they had product on the shelf. Quite admirable when you think about it. For whatever reason they were having a manufacturing issue with their mold. What they described to me was (in my opinion) a couple of minor aesthetic flaws. They believe that this situation is resolved and expect to have 240 product within 4-5 weeks. They do keep a list of customers that have requested product. My understanding is that it is based on emails that they receive. I believe that originally they were requesting a deposit, but as I said earlier they stopped that practice. So if you contacted them by email you are apart of their request list even if you did not provide a deposit. My understanding is that in the very near future they will be reviewing this list and contacting customers to validate interest. "Whee" is correct - a little more patience will be required.
-
thanks for the advice
-
thanks for responding. what is the definition of placing an order? i have emailed and spoken by phone but they would not accept any money, not even a deposit. i am supposedly on a list, but no idea of how close that puts me to a dash. just getting frustrated.