qz16
Free Member
-
Joined
-
Last visited
Everything posted by qz16
-
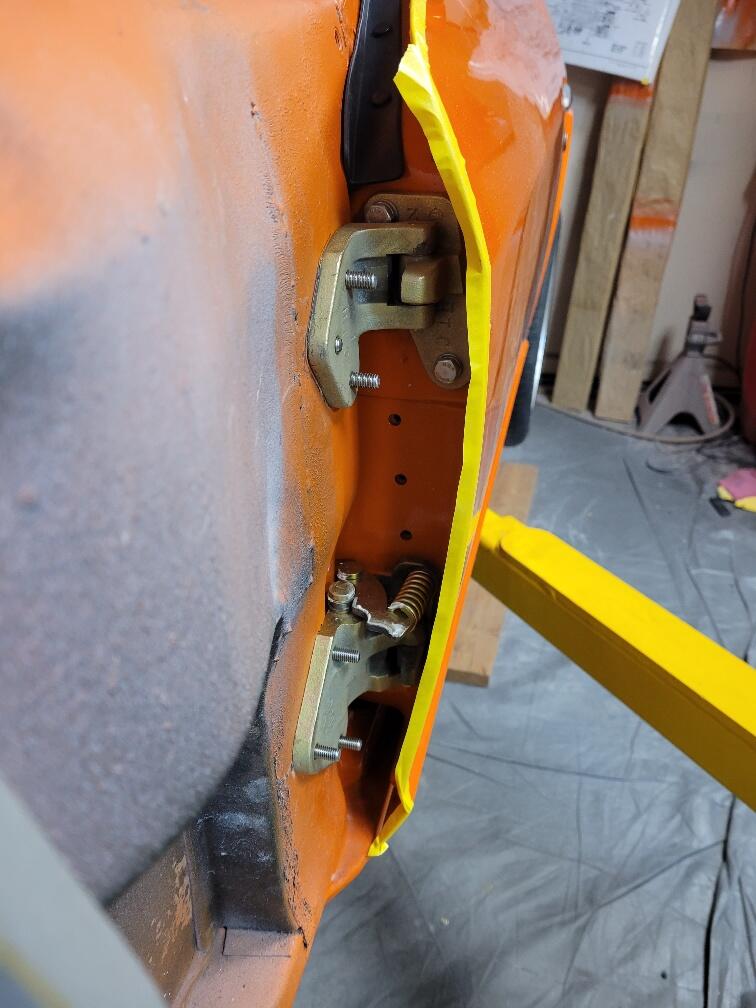
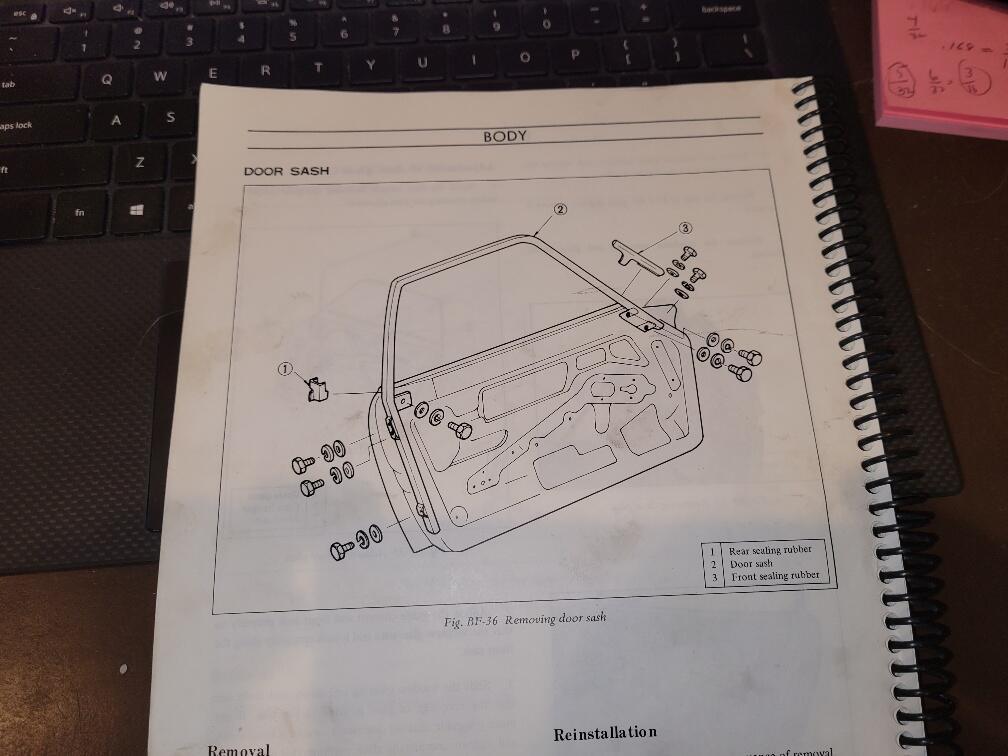
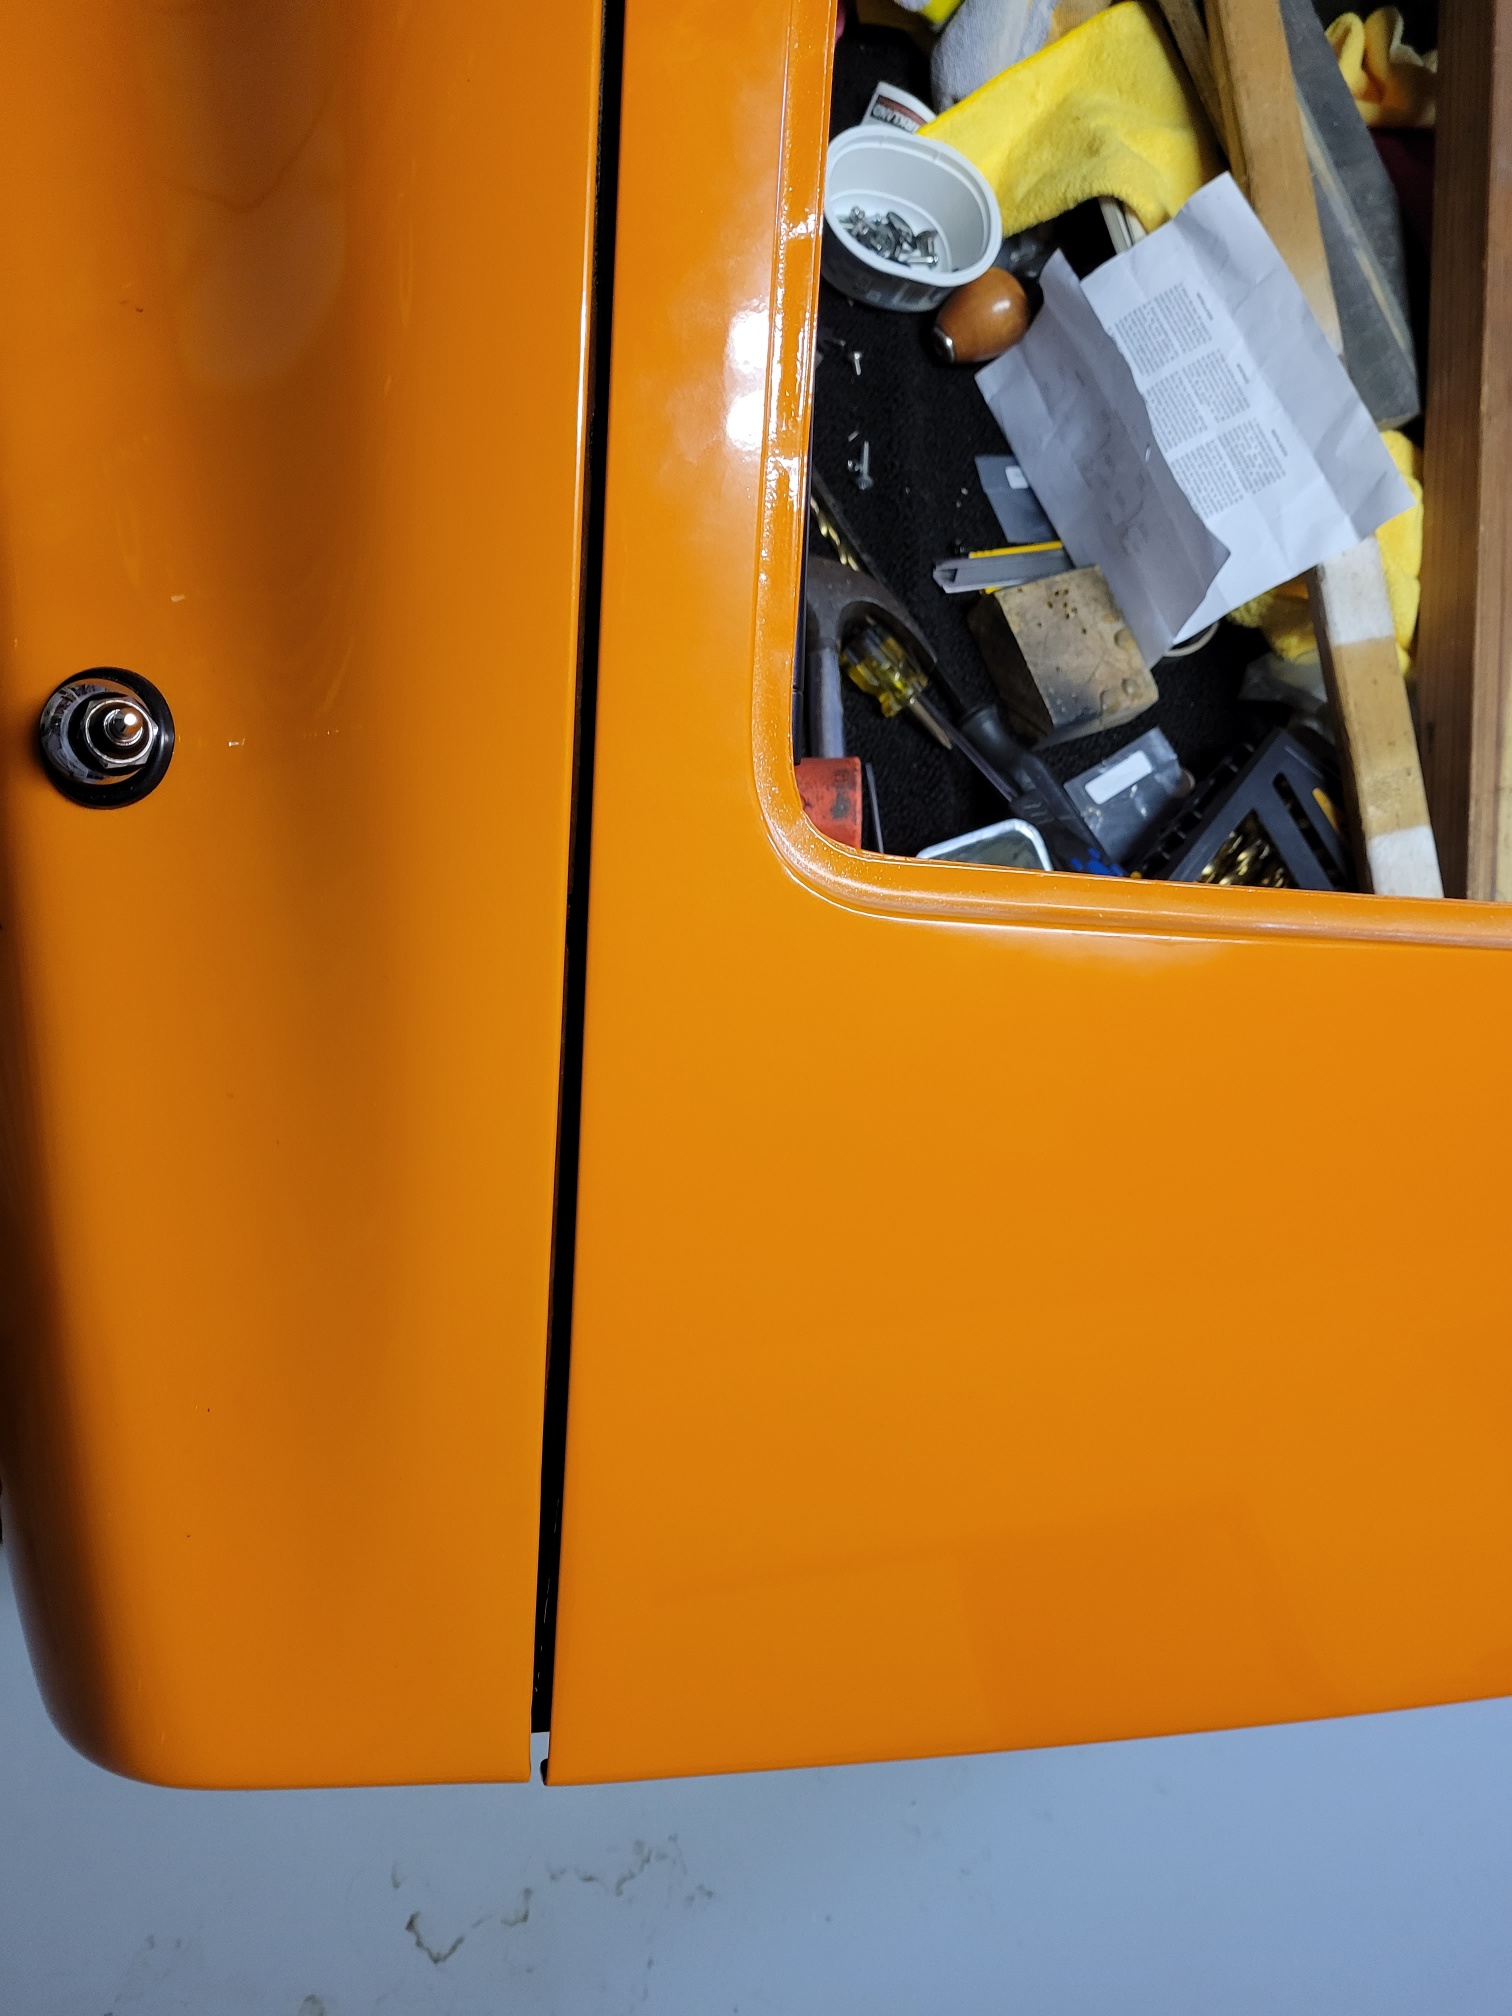
We have a 1973 240z. Both Doors have these holes. Does anyone know what they are for? Would appreciate any insight you can offer regarding the three holes between the door hinges. Thanks in advance for your help.
-
chuck - thanks for the information. Now I understand why they added the extra screws to the 260z/280z. Can't figure out why they thought adhesive was good enough to hold the upper and lower seals on a 240z, and require screws and a metal strip to hold the center of the 260z/280z in place. I think the best thing for me to do is to use the original upper and lower, quarter seals, and then if I don't like the aesthetics to put a weather strip between them held by adhesive, making sure that it is thin enough not to rub against the door sash. Really do appreciate the information - thanks.
-
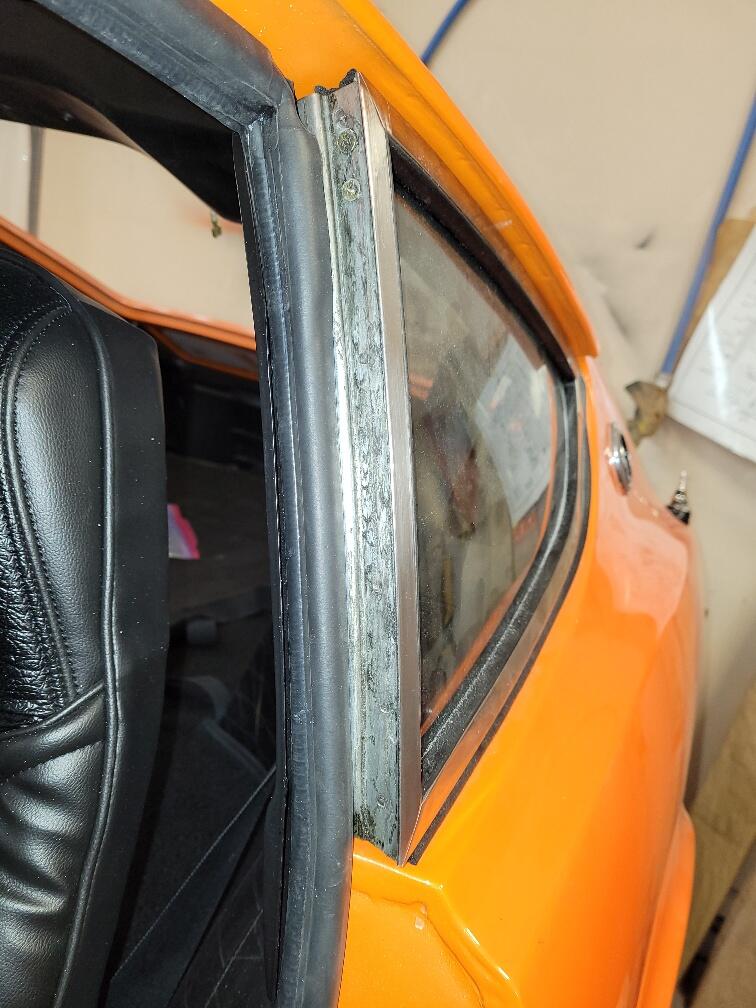
heyitsrama - Thanks for the response. I have the 1970-1973 version and you are correct it does not cover much of the area. I did not know that there was an available 260z, 280z version - thank you. It looks like it will cover the length of the front quarter glass frame. Interestingly enough MSA has the following note about the 260-280z version: Note: This weatherstrip can commonly be found installed on 240Z's, although it was never installed from the factory. You will need to locate screws and drill holes in your quarter window frame if you want to add these to your 240Z. I'm not thrilled at the thought of drilling the extra holes into the quarter window frame, and I don't understand why they don't rely on adhesive to hold the seal in place, unless it is so thick that it rubs against the door sash when you close the door. Perhaps you could answer that question - how thick is the weatherstrip, and does it rub when you close your door? Thanks again for the response.
-
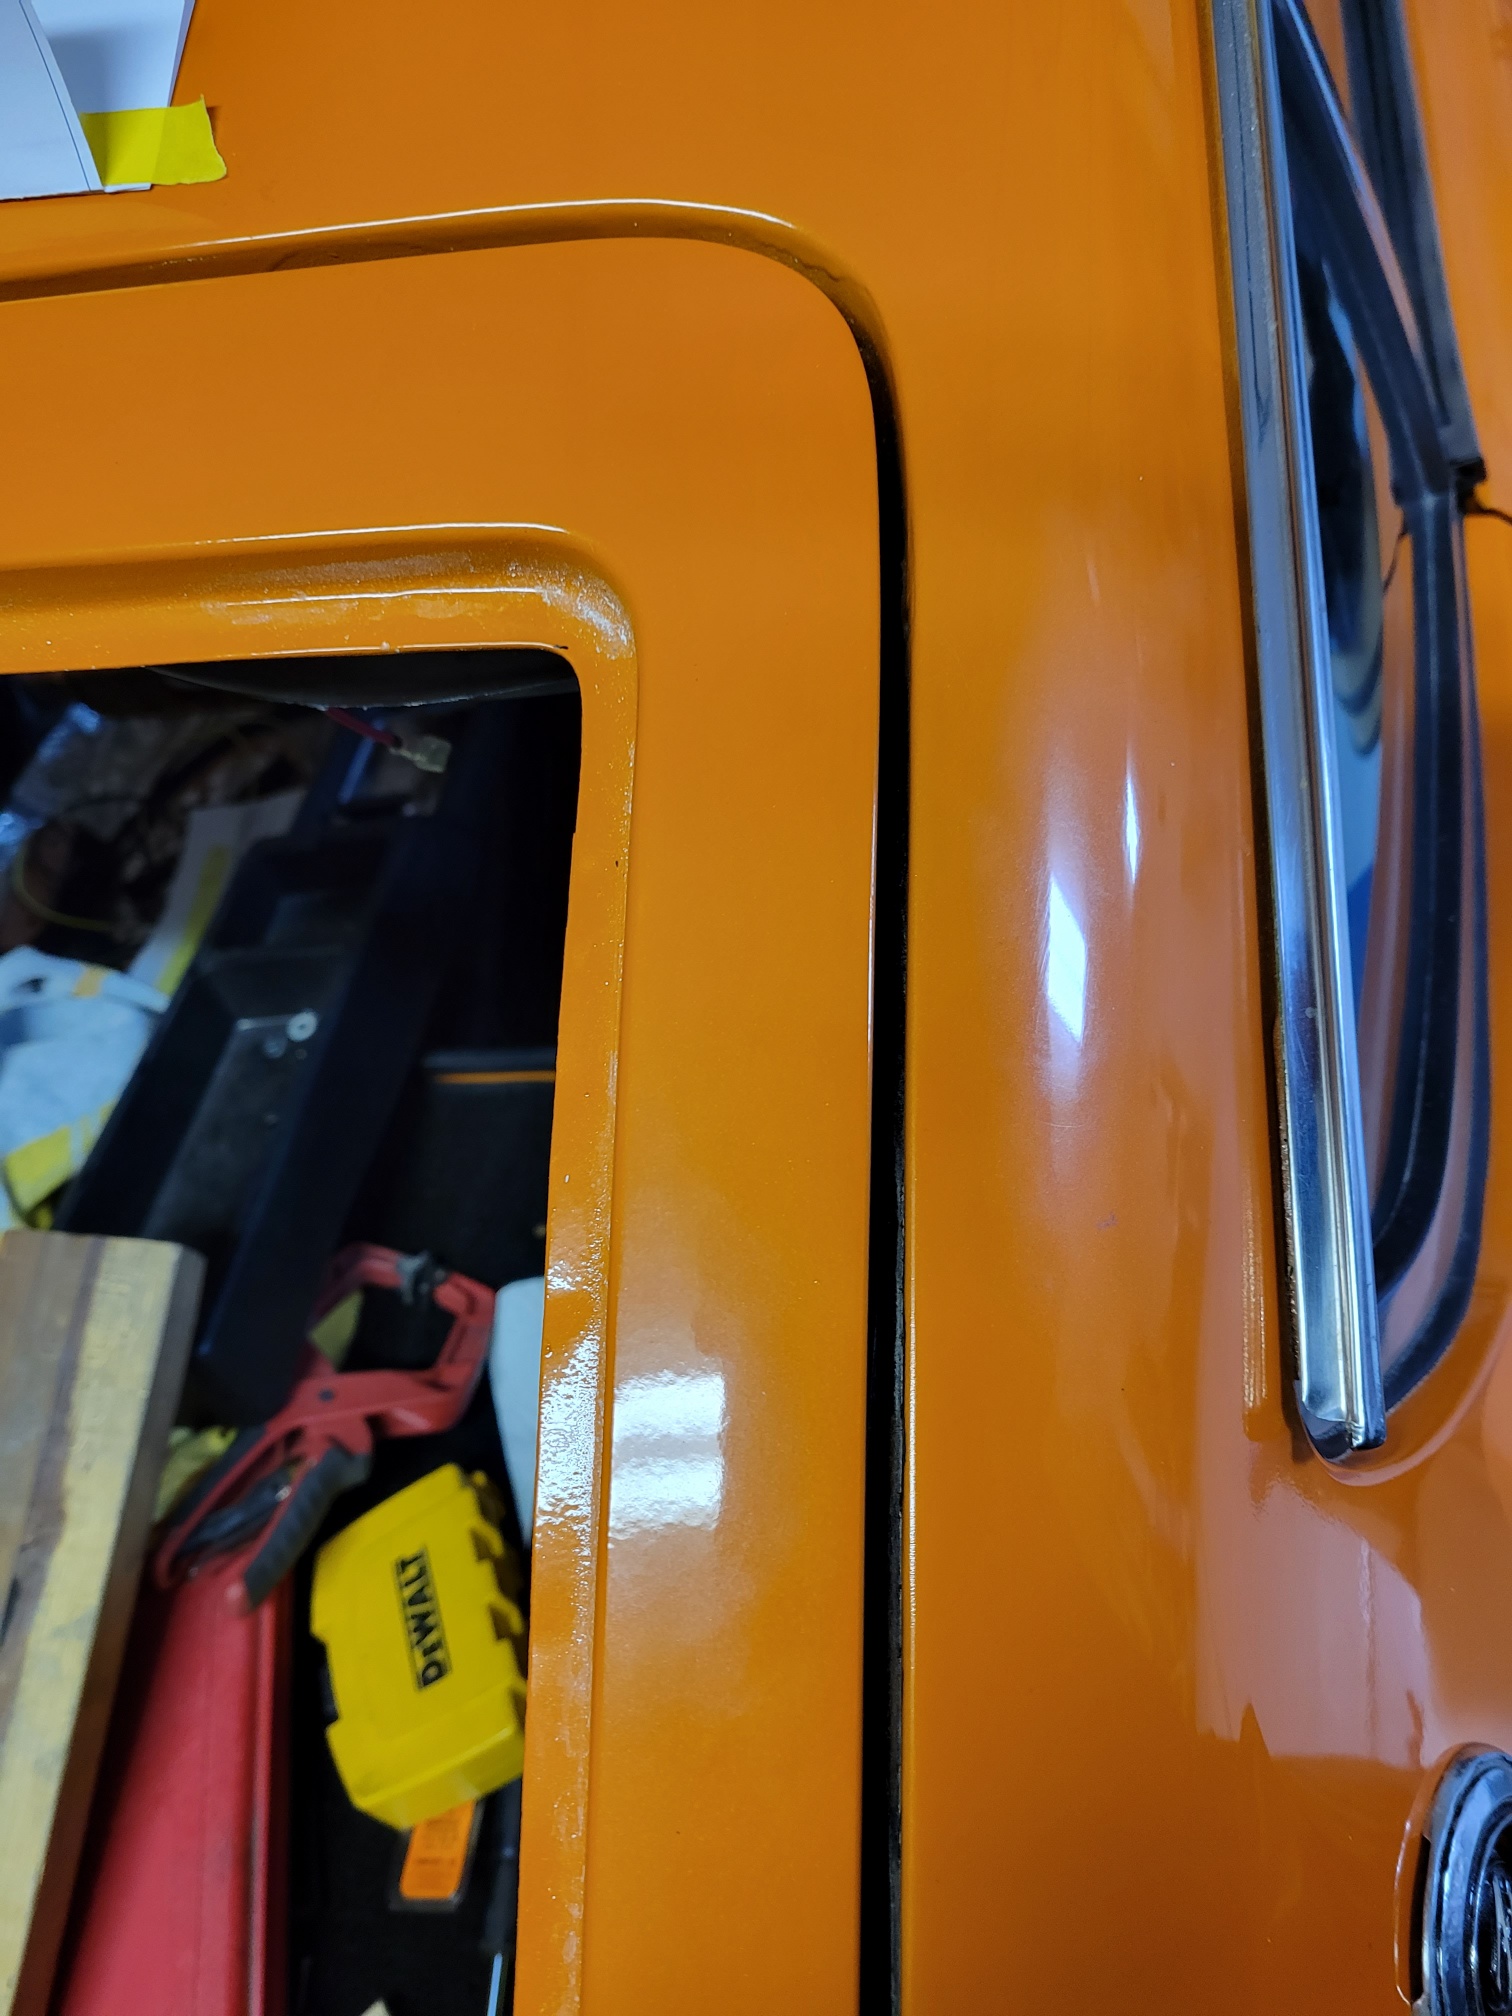
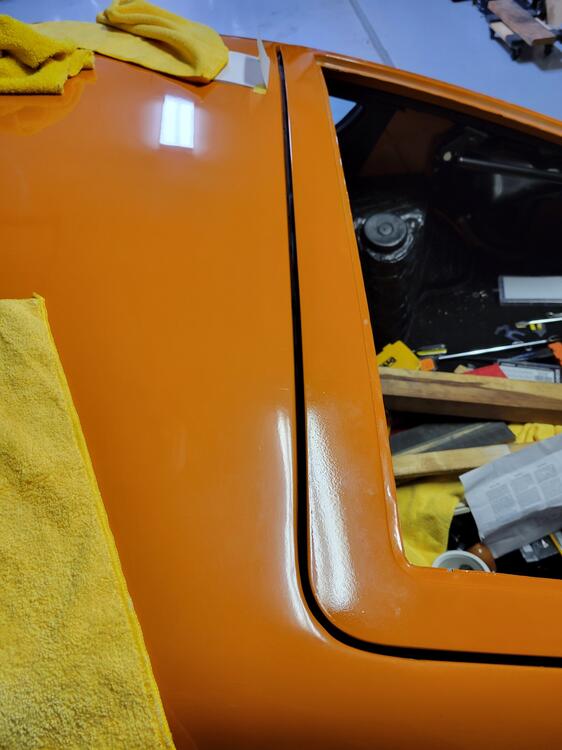
I have a 1973 240z and I am looking for an outlet to purchase the weatherstip that goes on the outside of the quarter glass. This would fit between the Door Sash and the quarter window and be mounted on the quarter window. Thanks in advance for your assistance.

-
Glad it turned out to be nothing serious. zkars is correct your latch is quite different than my 240z. Sorry to mislead you. I also learned a trick from Zed Head which was worth the price of admission to this thread.
-
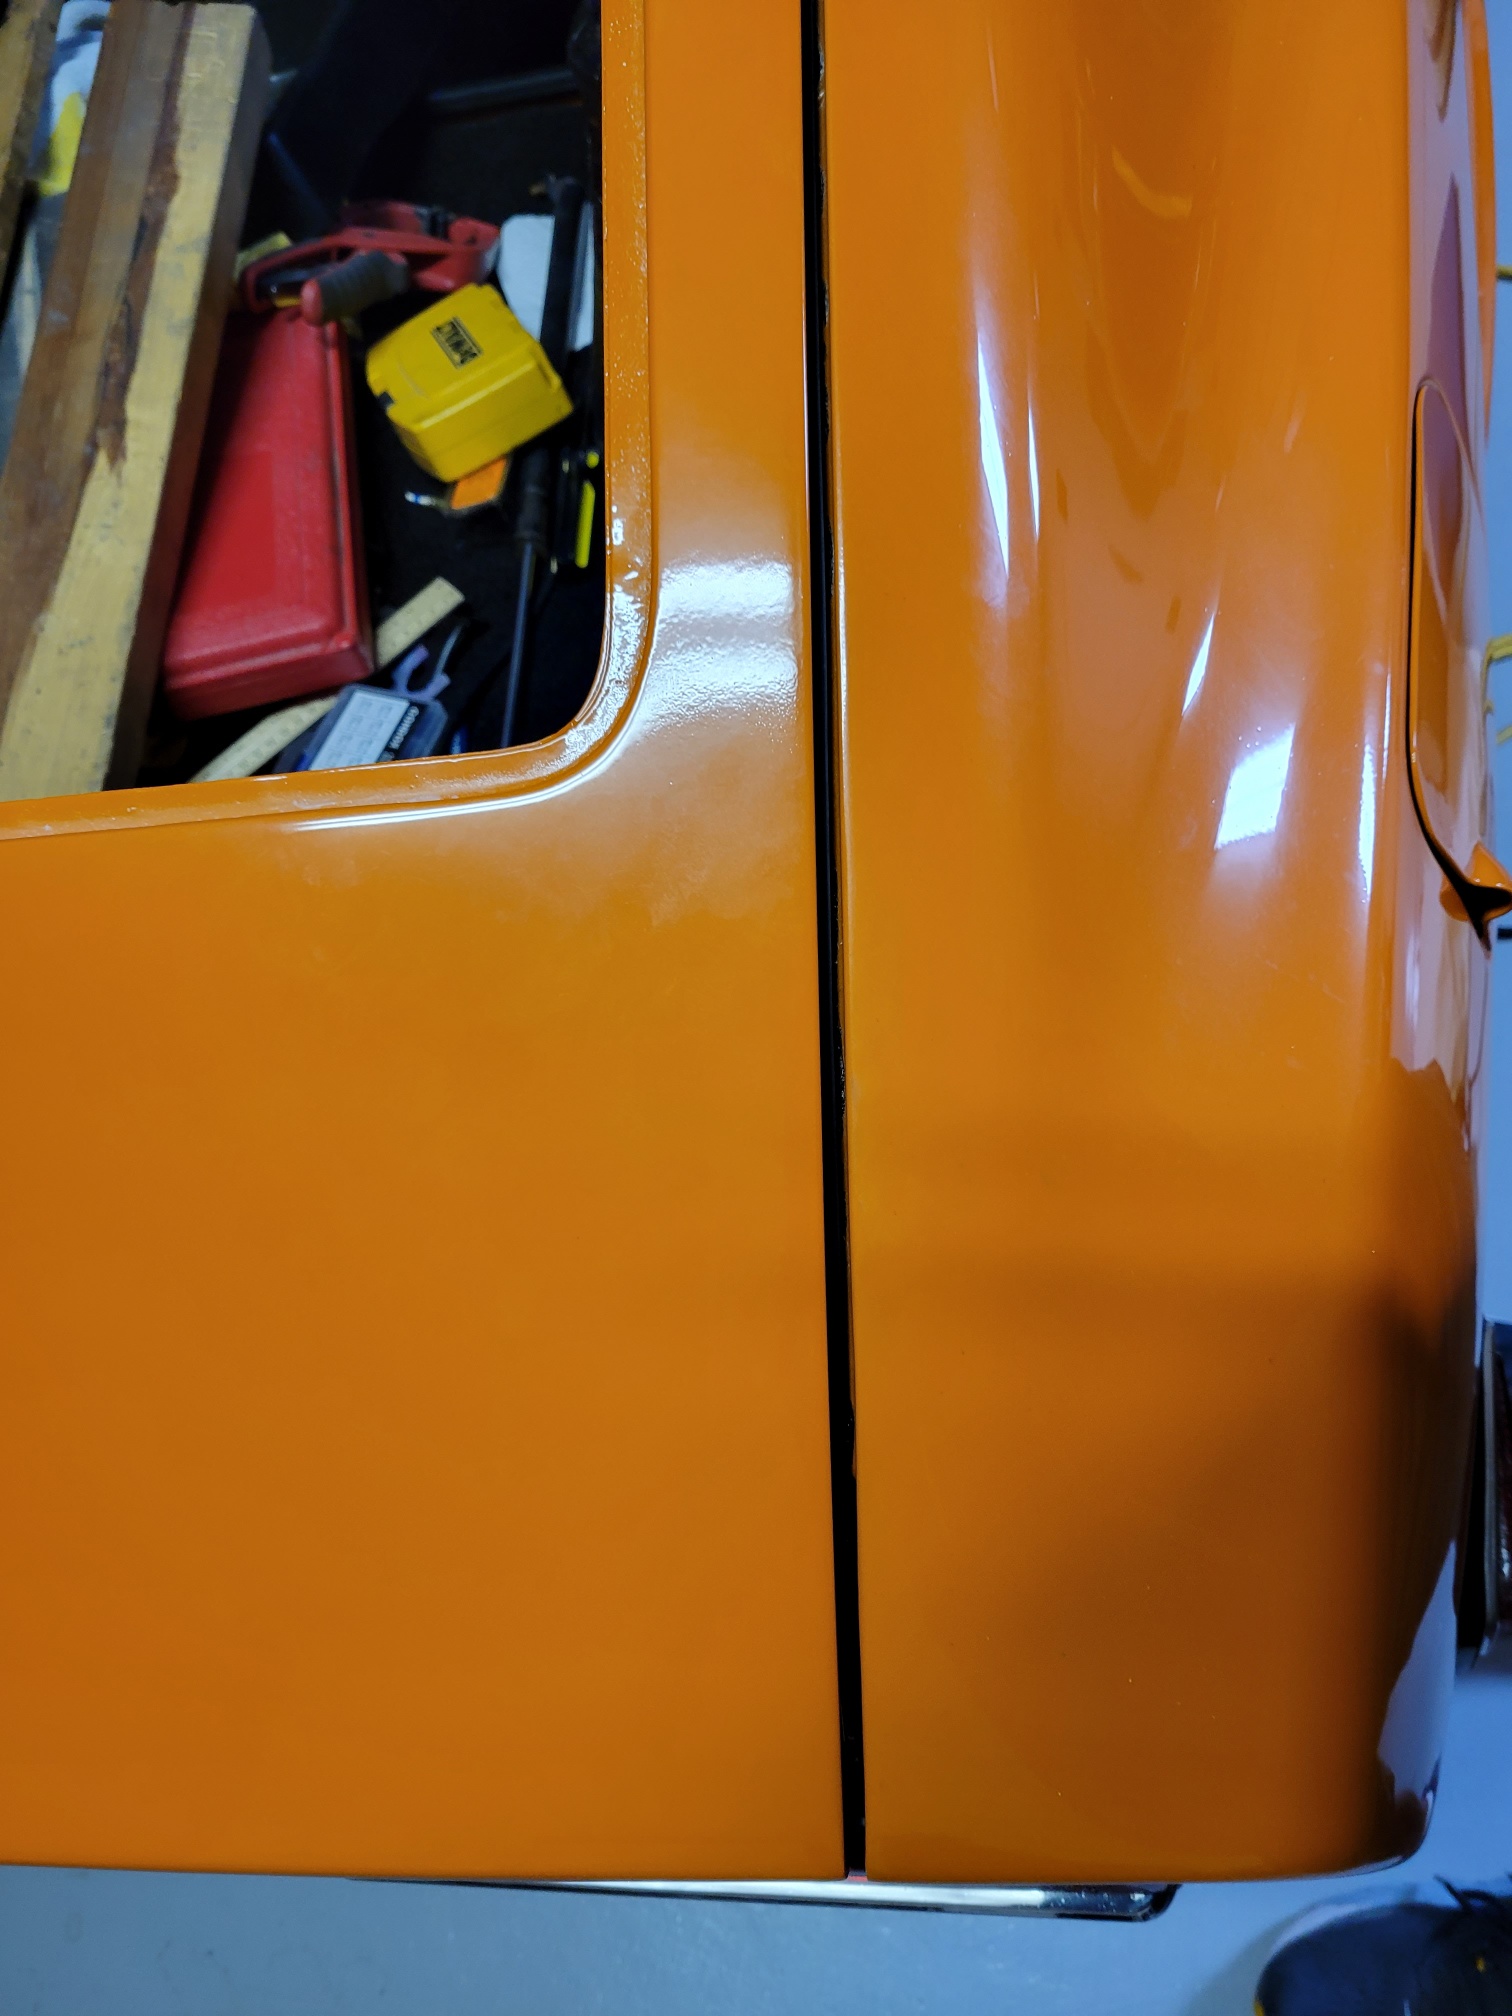
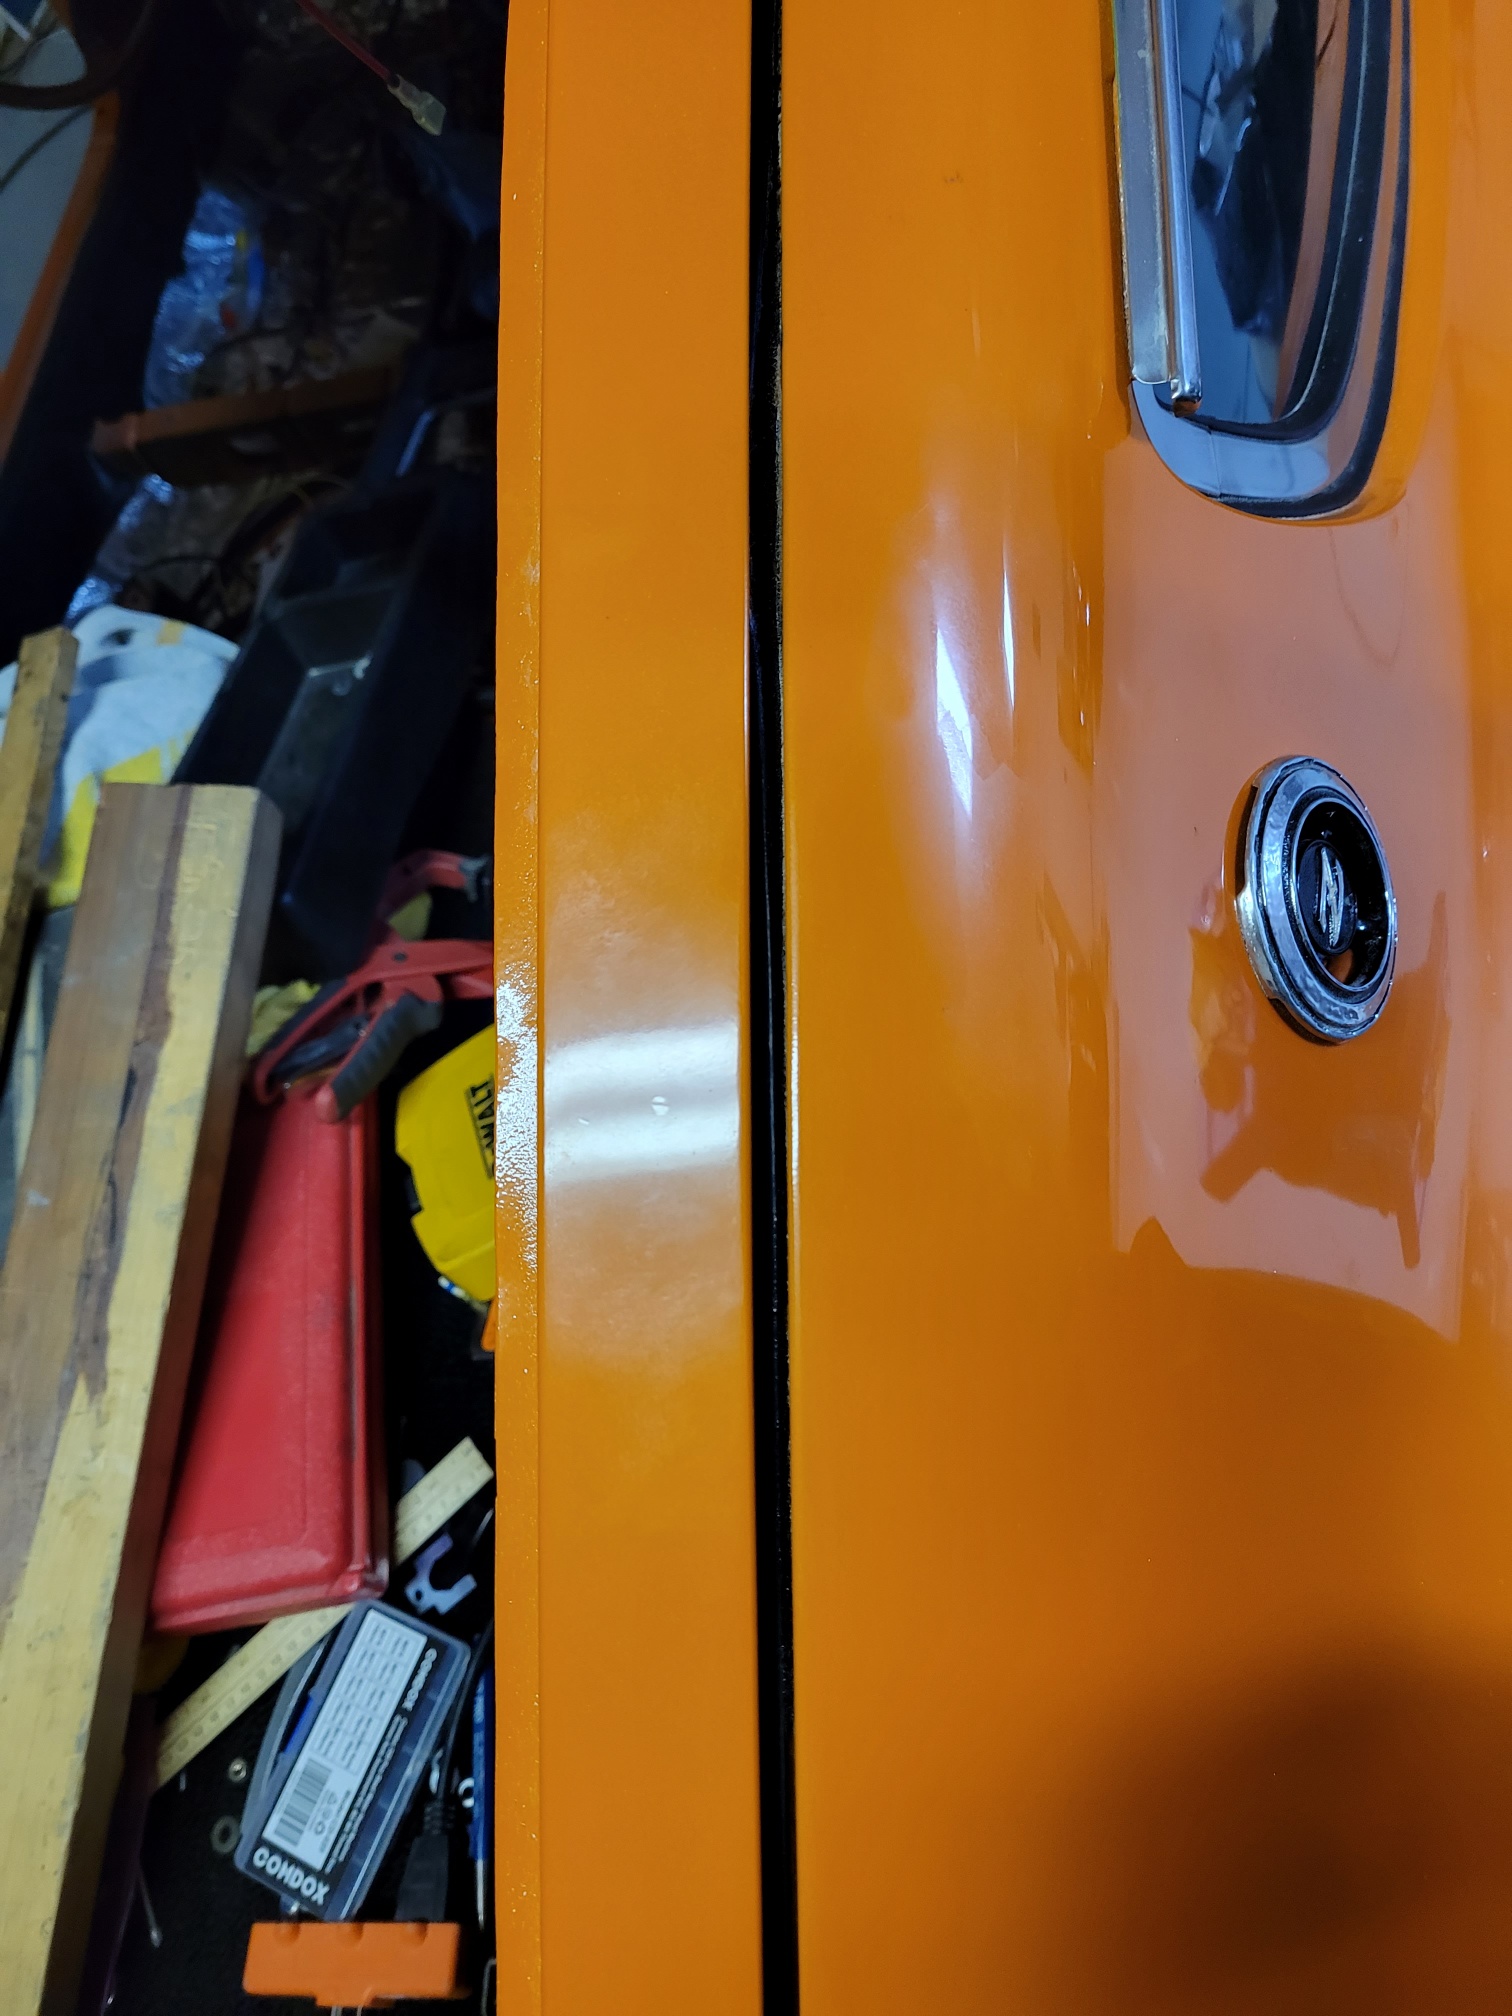
The gaps look pretty good. Before replacing it I would suggest that you soak it in something to see if that resolves the issue. Maybe we are overthinking it. Perhaps it is as simple as just being gummed up or suffering from overspray. Just curious - when you adjusted your striker (on the body side of the door frame) did you ever try rotating it. By this I mean holding its top position (single screw) and pushing the bottom clockwise (toward the door). If you can't move the striker clockwise then push the top screw in towards the interior just a bit. I would also check the wear on the striker. Don't mean to be just creating work for you, but please continue to post your progress. Hope you are able to solve it quickly. regards, ron
-
One more thing - It's hard to tell but in the first picture it looks like the door is hung with the rear bottom corner a bit low. You might check the entire door frame and the bottom of the door for scratches.
-
If it isn't too much trouble could you post pictures of the entire door to see all of the gaps. Also, post a picture of the B pillar to see the lock and the dovetail, and the door side of the striker as well. In the past has the door closed properly? If so, has there been any recent work on the door? Have you changed the hinge positions? With you sitting in the car can you determine if anything is making contact and preventing the door from closing? With the weatherstrip removed there should be some space all around the door, including the door bottom. Is the door sash (window frame) hitting the door frame? There is a door seal mounted (with three plastic retainers on the top front of the door, is there contact in this area with the frame?
-
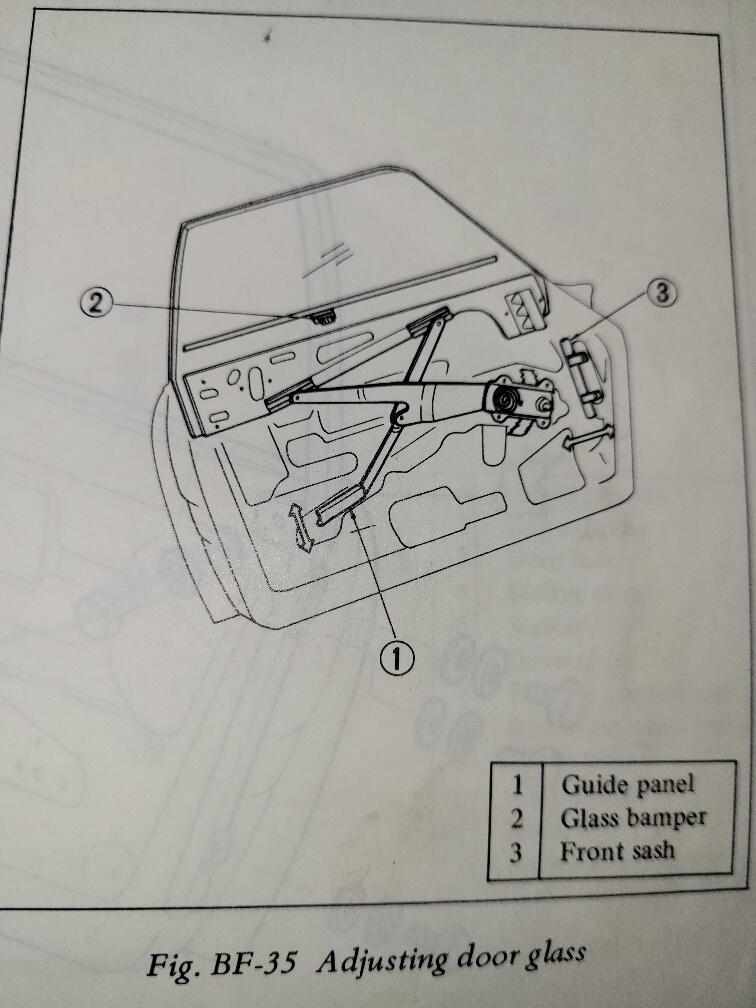
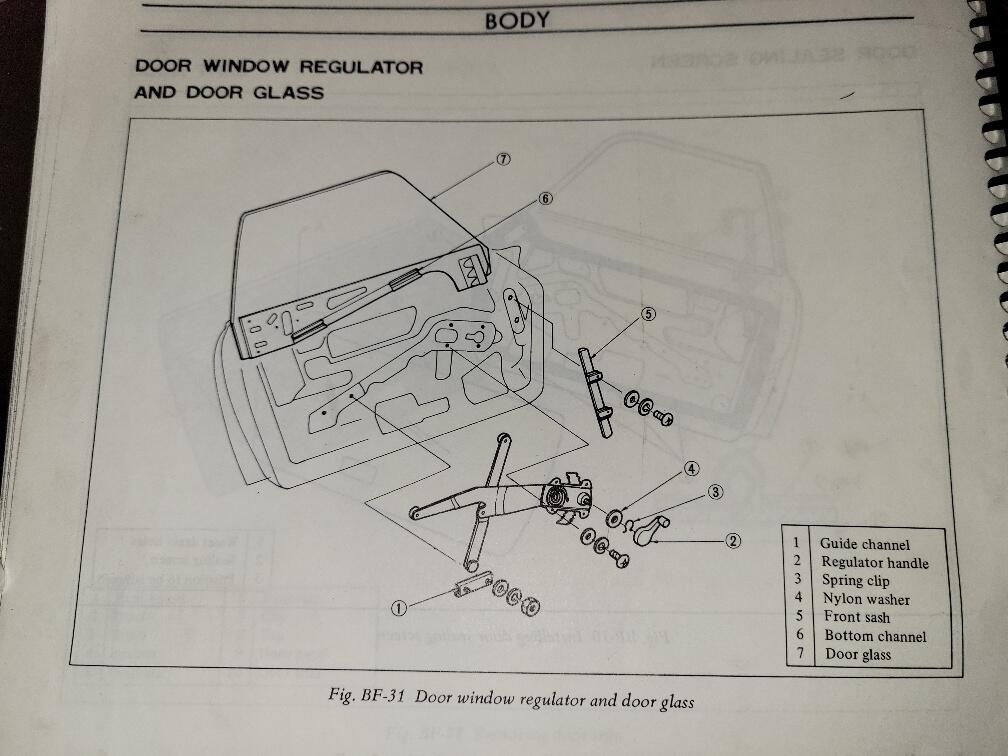
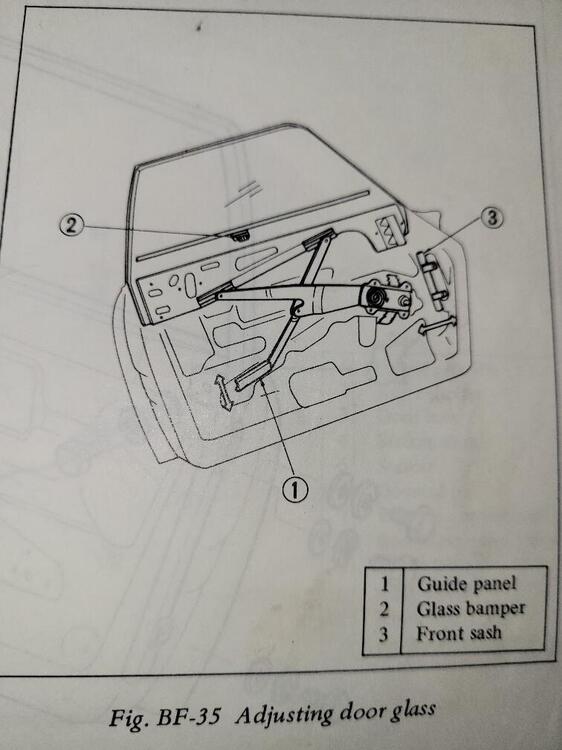
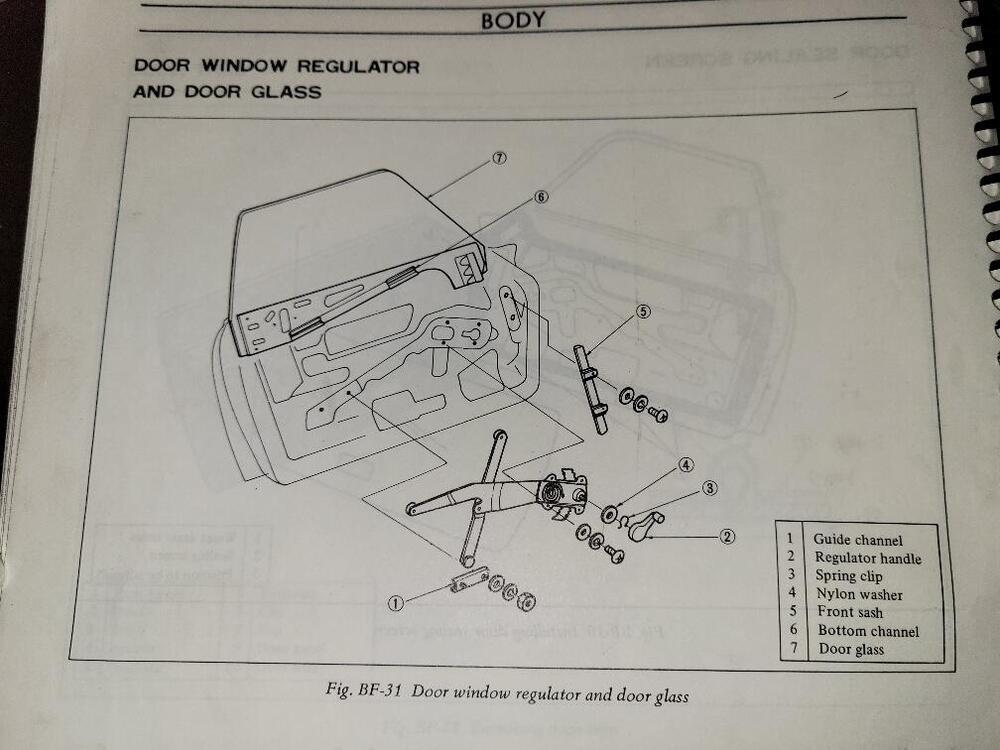
I Have installed a few windows in British cars and this is my second opportunity with a 240Z. So, I don’t have a tremendous amount of experience, but I think this will provide a bit more detail that may help you. Outlined below is a procedure that worked well for me and I hope will help you. Please feel free to correct/improve the process for the next guy. Door Glass Install Install the outside rear view mirror. I installed insulation and sound deadener. I think this helps with noise and temperature control and it also gives the door a bit of added weight improving the feel of the door. I put white lithium grease on the rollers and channels, and on just about anything else that moved before installing anything. I installed the door locking mechanism, and all of its associated parts exterior door handle, key lock, and interior door handle. I removed the door sash (frame/channel that surrounds the glass) to make it easier. I installed the window regulator. To move the regulator I attached a vise grip to the knurled winder mechanism, be careful not to crush the grooves. At this point my troubles began. From what I read I thought that the front sash (front channel about 12 inches long) and the guide channel were supposed to be installed. I tried installing the glass by reversing what the service manual describes for removing the glass. Tilting it and sliding the front roller into its channel. I wasted hours and lost ½ a pint of blood and got nowhere. When the front roller was in the channel it would come out as I tried to install the rear roller, or the front sash guide. So, I walked away had a cup of coffee and decided to take a look at the entire mechanism. I was alone on this task so it is easy to get worn out hunched, and holding the glass, etc. Here is what I came up with and the glass was installed in less than 30 minutes. The first (6) six steps are valid and was my starting point. The front sash (approximately 12 inch long channel for the plastic slide at the front of the glass) and the guide channel (approximately 4 inch channel mid door toward the door lock) are not installed at this point. I think this would be a good time to remind you that you should install the outside rear view window before going any further. It’s painful to do it after installing the glass, don’t ask how I know that it is painful. Getting the window into the car can be tricky. The manual suggests: front first and down on an angle. If you are concerned about your paint I would protect it with at least a strip of tape on all edges of the door. Watch the outside of the window as it enters the door as there are screws (at the front tip of the window where the slide is located), that can get hung up on the door. The window sits closest to the door skin, in between the skin and the window regulator. At this point I re-installed the window sash with one screw in each or the two top corners. There are 3 rollers. Two of the rollers face the window. One faces the interior of the car. One of the two rollers that face the window will be on your left as you face the interior of the door. The 2nd roller will be on your right. The right most roller is mounted on an arm that has the third roller (facing the interior of the car) attached at the opposite end of the arm. This roller (facing the interior of the car) should be sitting down, toward the bottom of the door, before you try to install either of the other rollers. If it is not in this position it will be more difficult to position it later on because it will get hung up on the regulator and the interior door sheet metal. Seating the regulator rollers into the window channel Wind the regulator almost all the way down. Now slowly wind the regulator up and watch the rear channel, toward the door lock. I believe this step is easier if this roller enters the channel from the right side (nearest to the door hinge) of the channel. When it is close to the regulator roller slide the glass forward or back to allow the roller to enter the channel. Once the roller is in place slide the glass a bit more to insure that the roller stays in the channel. Slowly wind the regulator almost to the bottom of the door. I believe this step is easier if this 2nd roller enters its channel from the left side of the channel, nearest the door lock. Remember the third roller must be lower than the other two rollers. Watch the front channel of the glass. When it is close to the level of the regulator front roller stop and move the glass forward toward the door hinge, make sure you don’t move the glass so much that the first roller comes out of its channel. Push the roller into the channel and slide the glass toward the rear (toward the door lock) to keep the roller in the channel. To move the roller toward the channel you might try pushing down on the opposite side of the arm where the 3rd roller is located. You might also need to grab the glass and move it forward (toward the door hinge) corner up toward the top of the door. Slowly wind the regulator up about half way, when the remaining roller is accessible slide the guide channel on to the roller. Move the guide channel toward its mounting holes to get the guide studs in position. You may need to wind the regulator up or down slightly to get the guide channel studs to their mounting holes in the door. When one is in the hole place a nut on it to insure that it stays put. By winding the window up/down you should be able to manipulate the guide channel’s 2nd stud into its mounting hole. Now from the top (right side facing the door interior) push the front sash down and guide it onto the plastic window slide. Push it down and move the window to the front or rear so you can place the screws through the door and into the front sash. Tighten (finger tight) everything and using the window regulator roll the window up and down. If everything is moving smoothly then tighten everything and bandage any wounds.

-
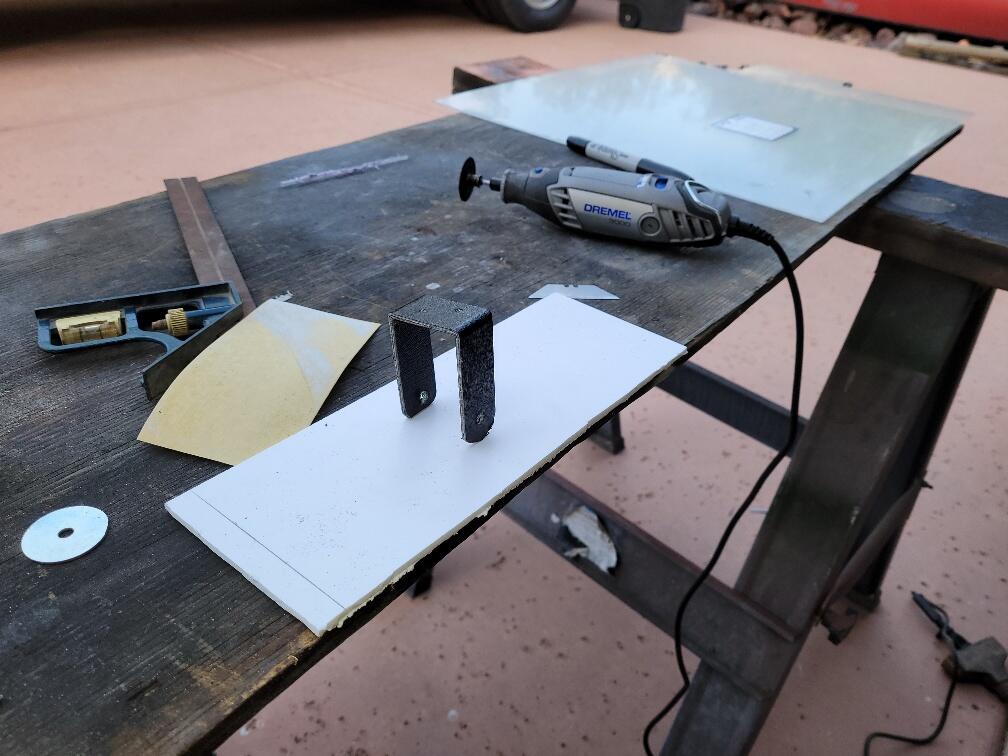
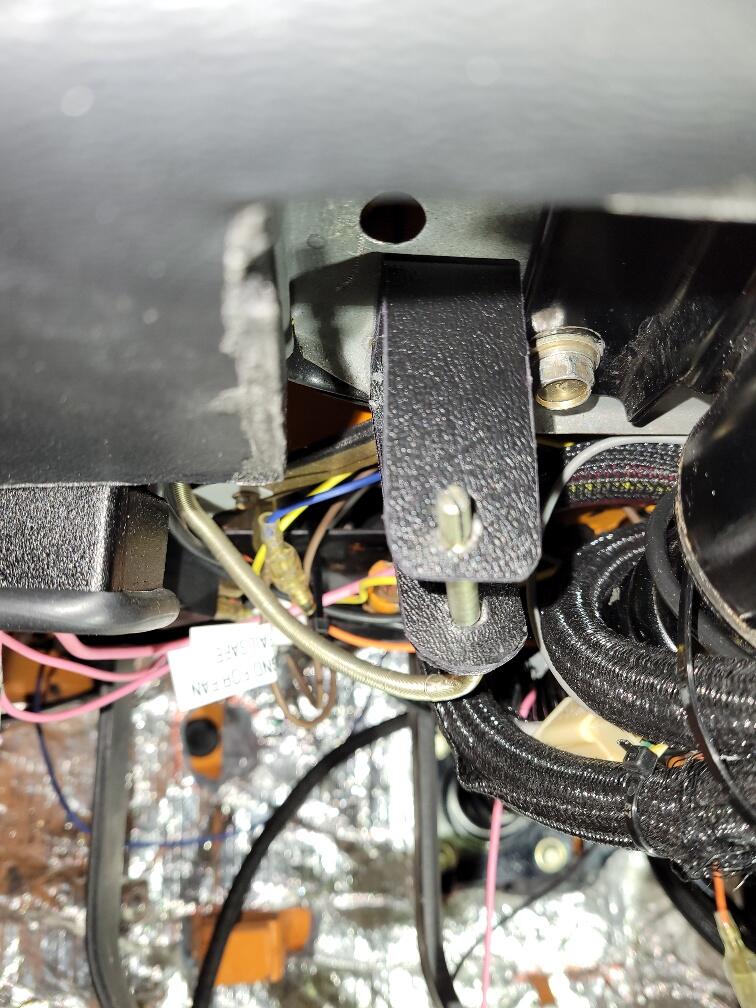
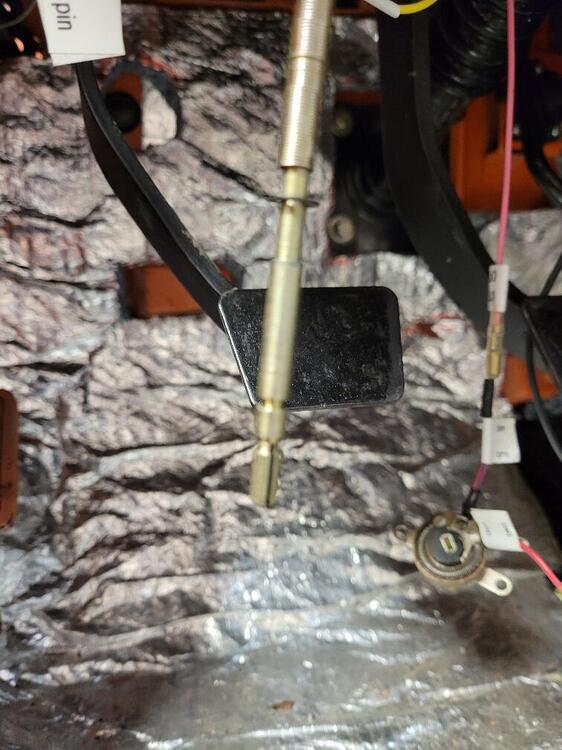
To finish off this topic I would like to show you what I did with your assistance. I searched under the dash for any kind of mounting hole, but alas there were none. I suspect that originally there was a bracket that mounted inside the dash and drove the reset cable/spindle vertically downward through the bottom of the dash. I have removed my dash a number of times for various reasons, but have no intention of doing it again unless it is absolutely necessary. This issue does not meet that bar. So, based on your assistance I came up with the following solution. I created a bracket that allowed the spindle to turn freely. The “C” clip at the back prevent the spindle from moving forward in the bracket. The knob, when I find one that fits will prevent the spinde from moving rearward out of the bracket.s The bracket had to be long enough to extend far enough below the dash line so that it would be accessible. The bracket I made is perhaps a bit too small in that it may be difficult to g it is definitely out of the way, and it does reset the trip odometer. So, thank you again, this is one more item on my tick list that is put to bed.


-
Terrapin Z- Thanks. I will first search for the original hole in the dash and give it a try. If it works it will be much easier that I thought. Appreciate your effort.
-
Siteunseen - The link to the removal was an education on taking the cable out of the speedometer and fixing one that would not reset correctly. Thank you. SteveJ - You bet the picture helps. Actually, I needed both Situnseen's URL and SteevJ's photo to figure out what to do. I don't think the cable can go in from the front because the largest (diameter) is the the end that the knob attaches to. So I think the right way to do this is to remove the cable from the speedometer head. Put it through the dash and reconnect it to the speedometer. Slip a "c" clip into the groove behind the dash and then slip another "C" clip into the groove on the front of the dash. Of course, from time to time I have departed from what was the correct way and I may have to do that in this case. If my dash thickness is different than the original I may not be able to get the clips on both sides. So I may just make a small panel to be mounted below the dash; that way I can control the issue of the thickness of the panel by using washers between the back of the panel and the "C" clip. Anyway, thanks to both of you. ron
-
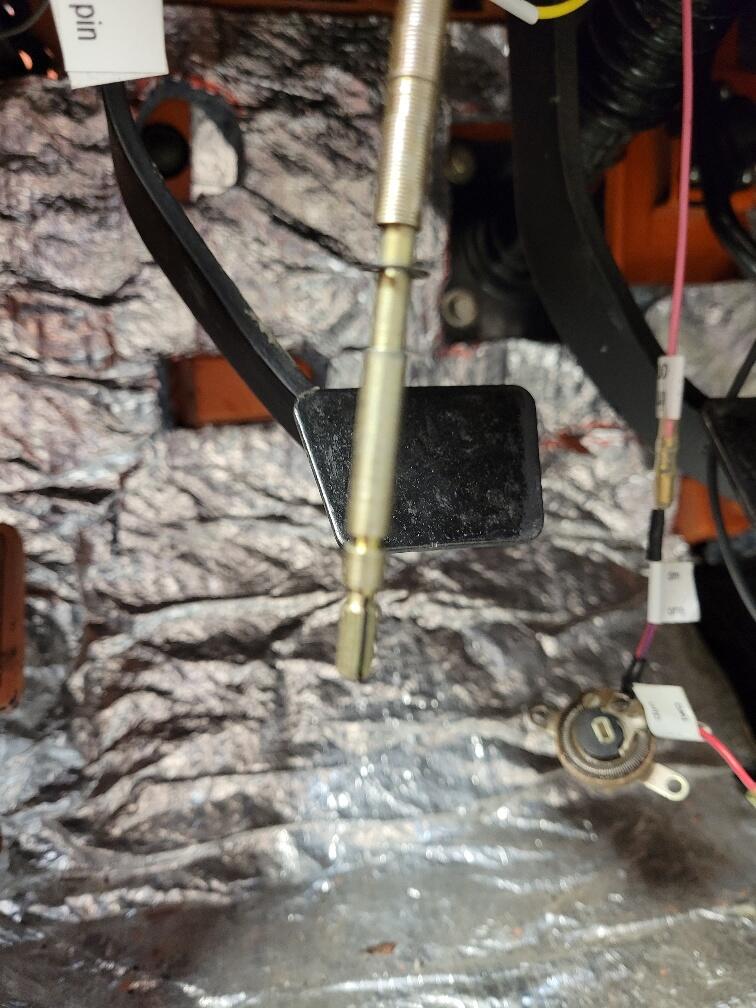
Would appreciate some help regarding the mounting of the odometer reset switch. The car is a 1973 240z. The dash has been replaced and one of the last two things to find a home is the odometer reset. It is a long shaft without threads and there are some grooves on the shaft that make me think there must have been some sort of a pressure clip. The grooves are set back from where a knob might be attached. Here is a picture of what I have. If you could take a snapshot of the mechanical fastener, or know what it is called It would be a big help. Thanks .
-
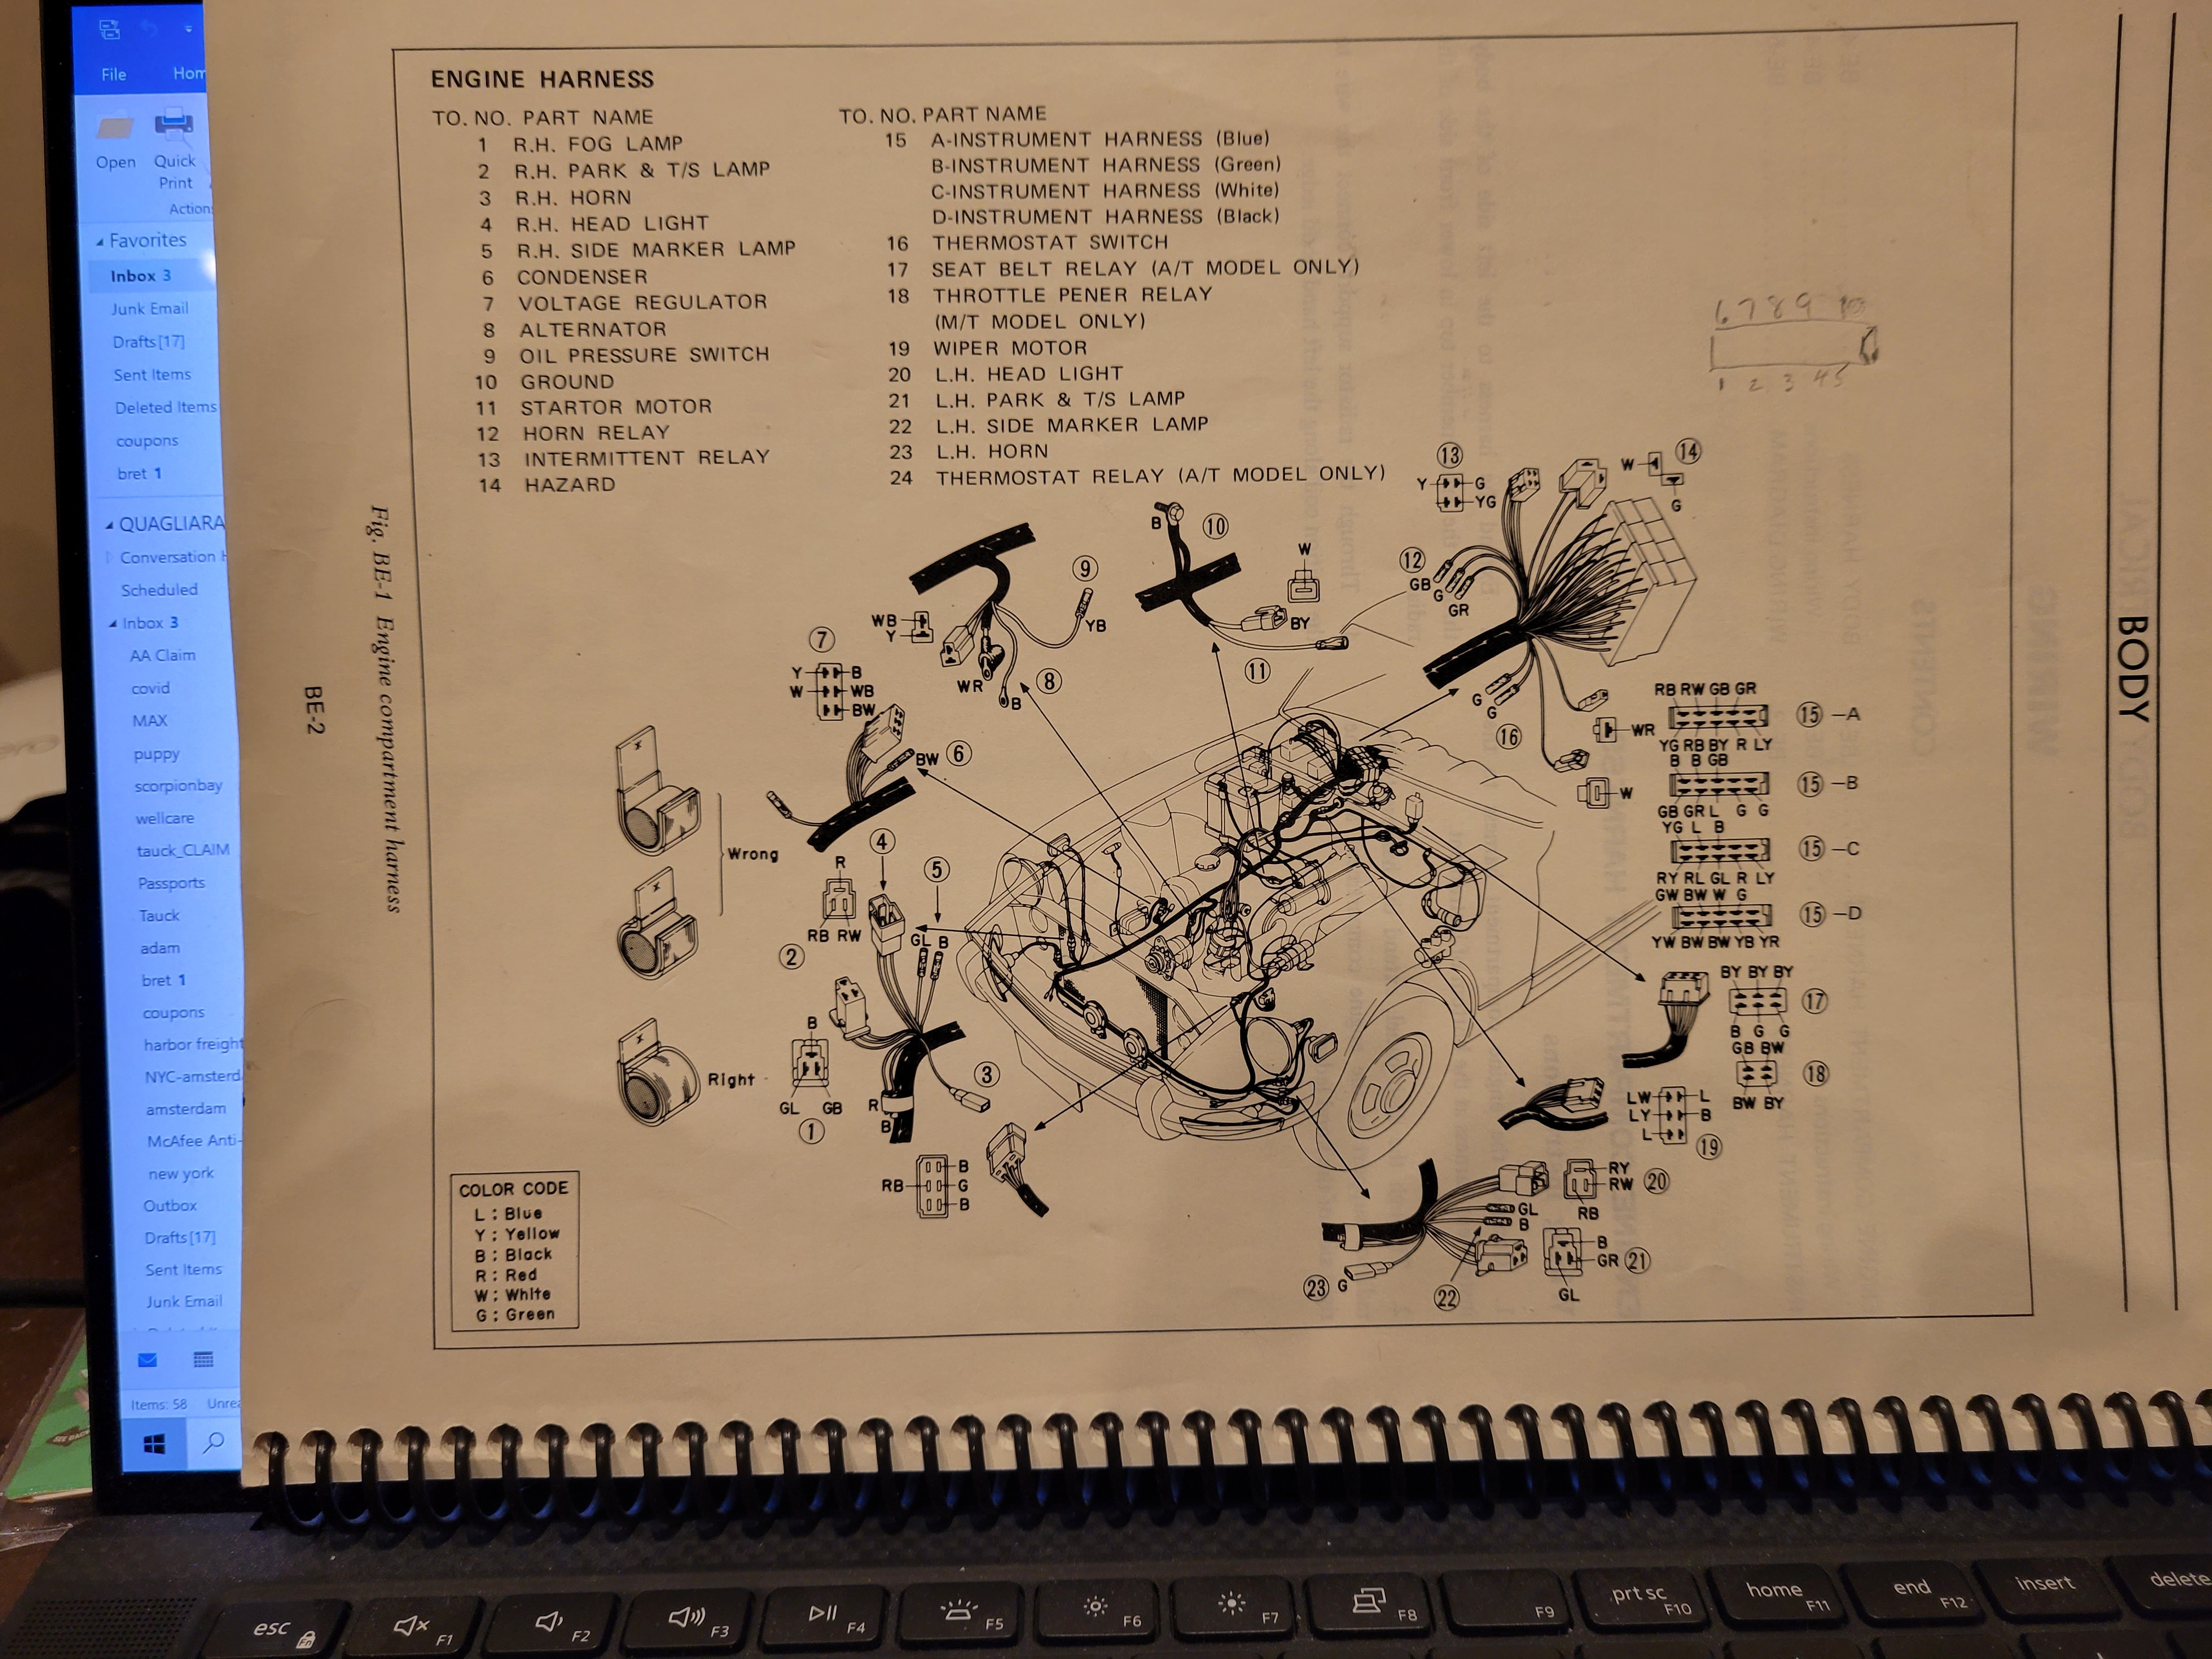
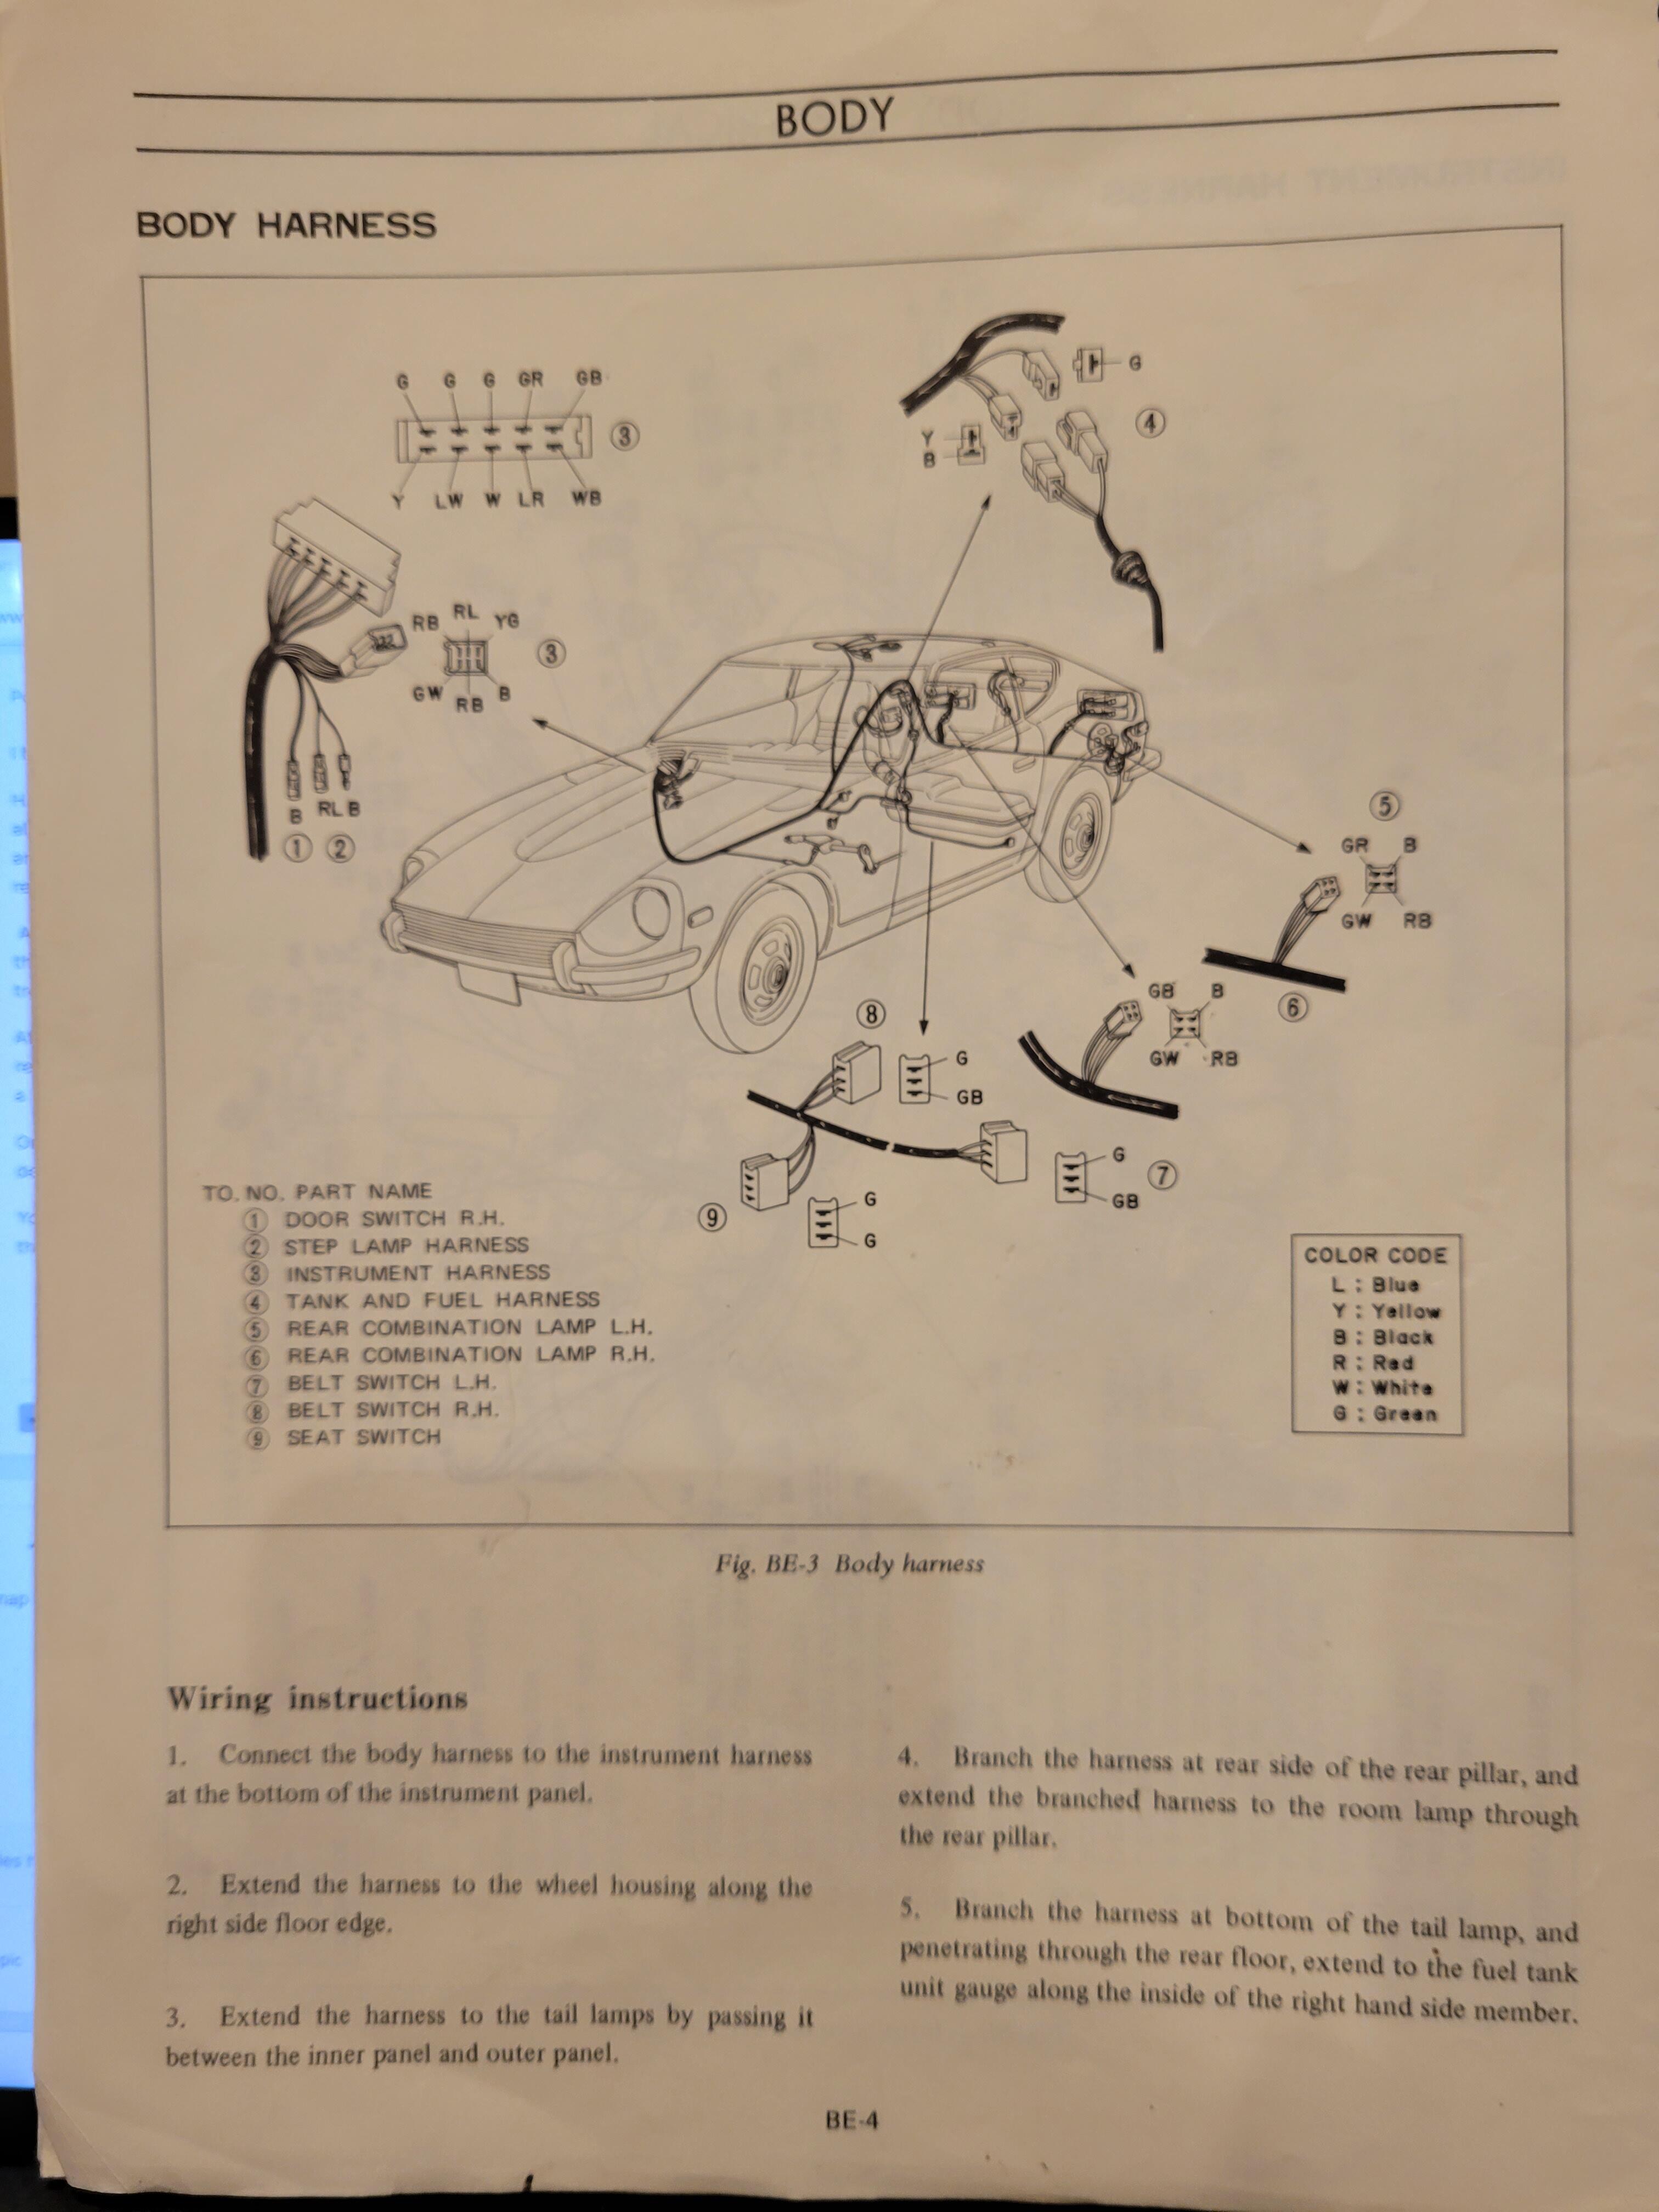
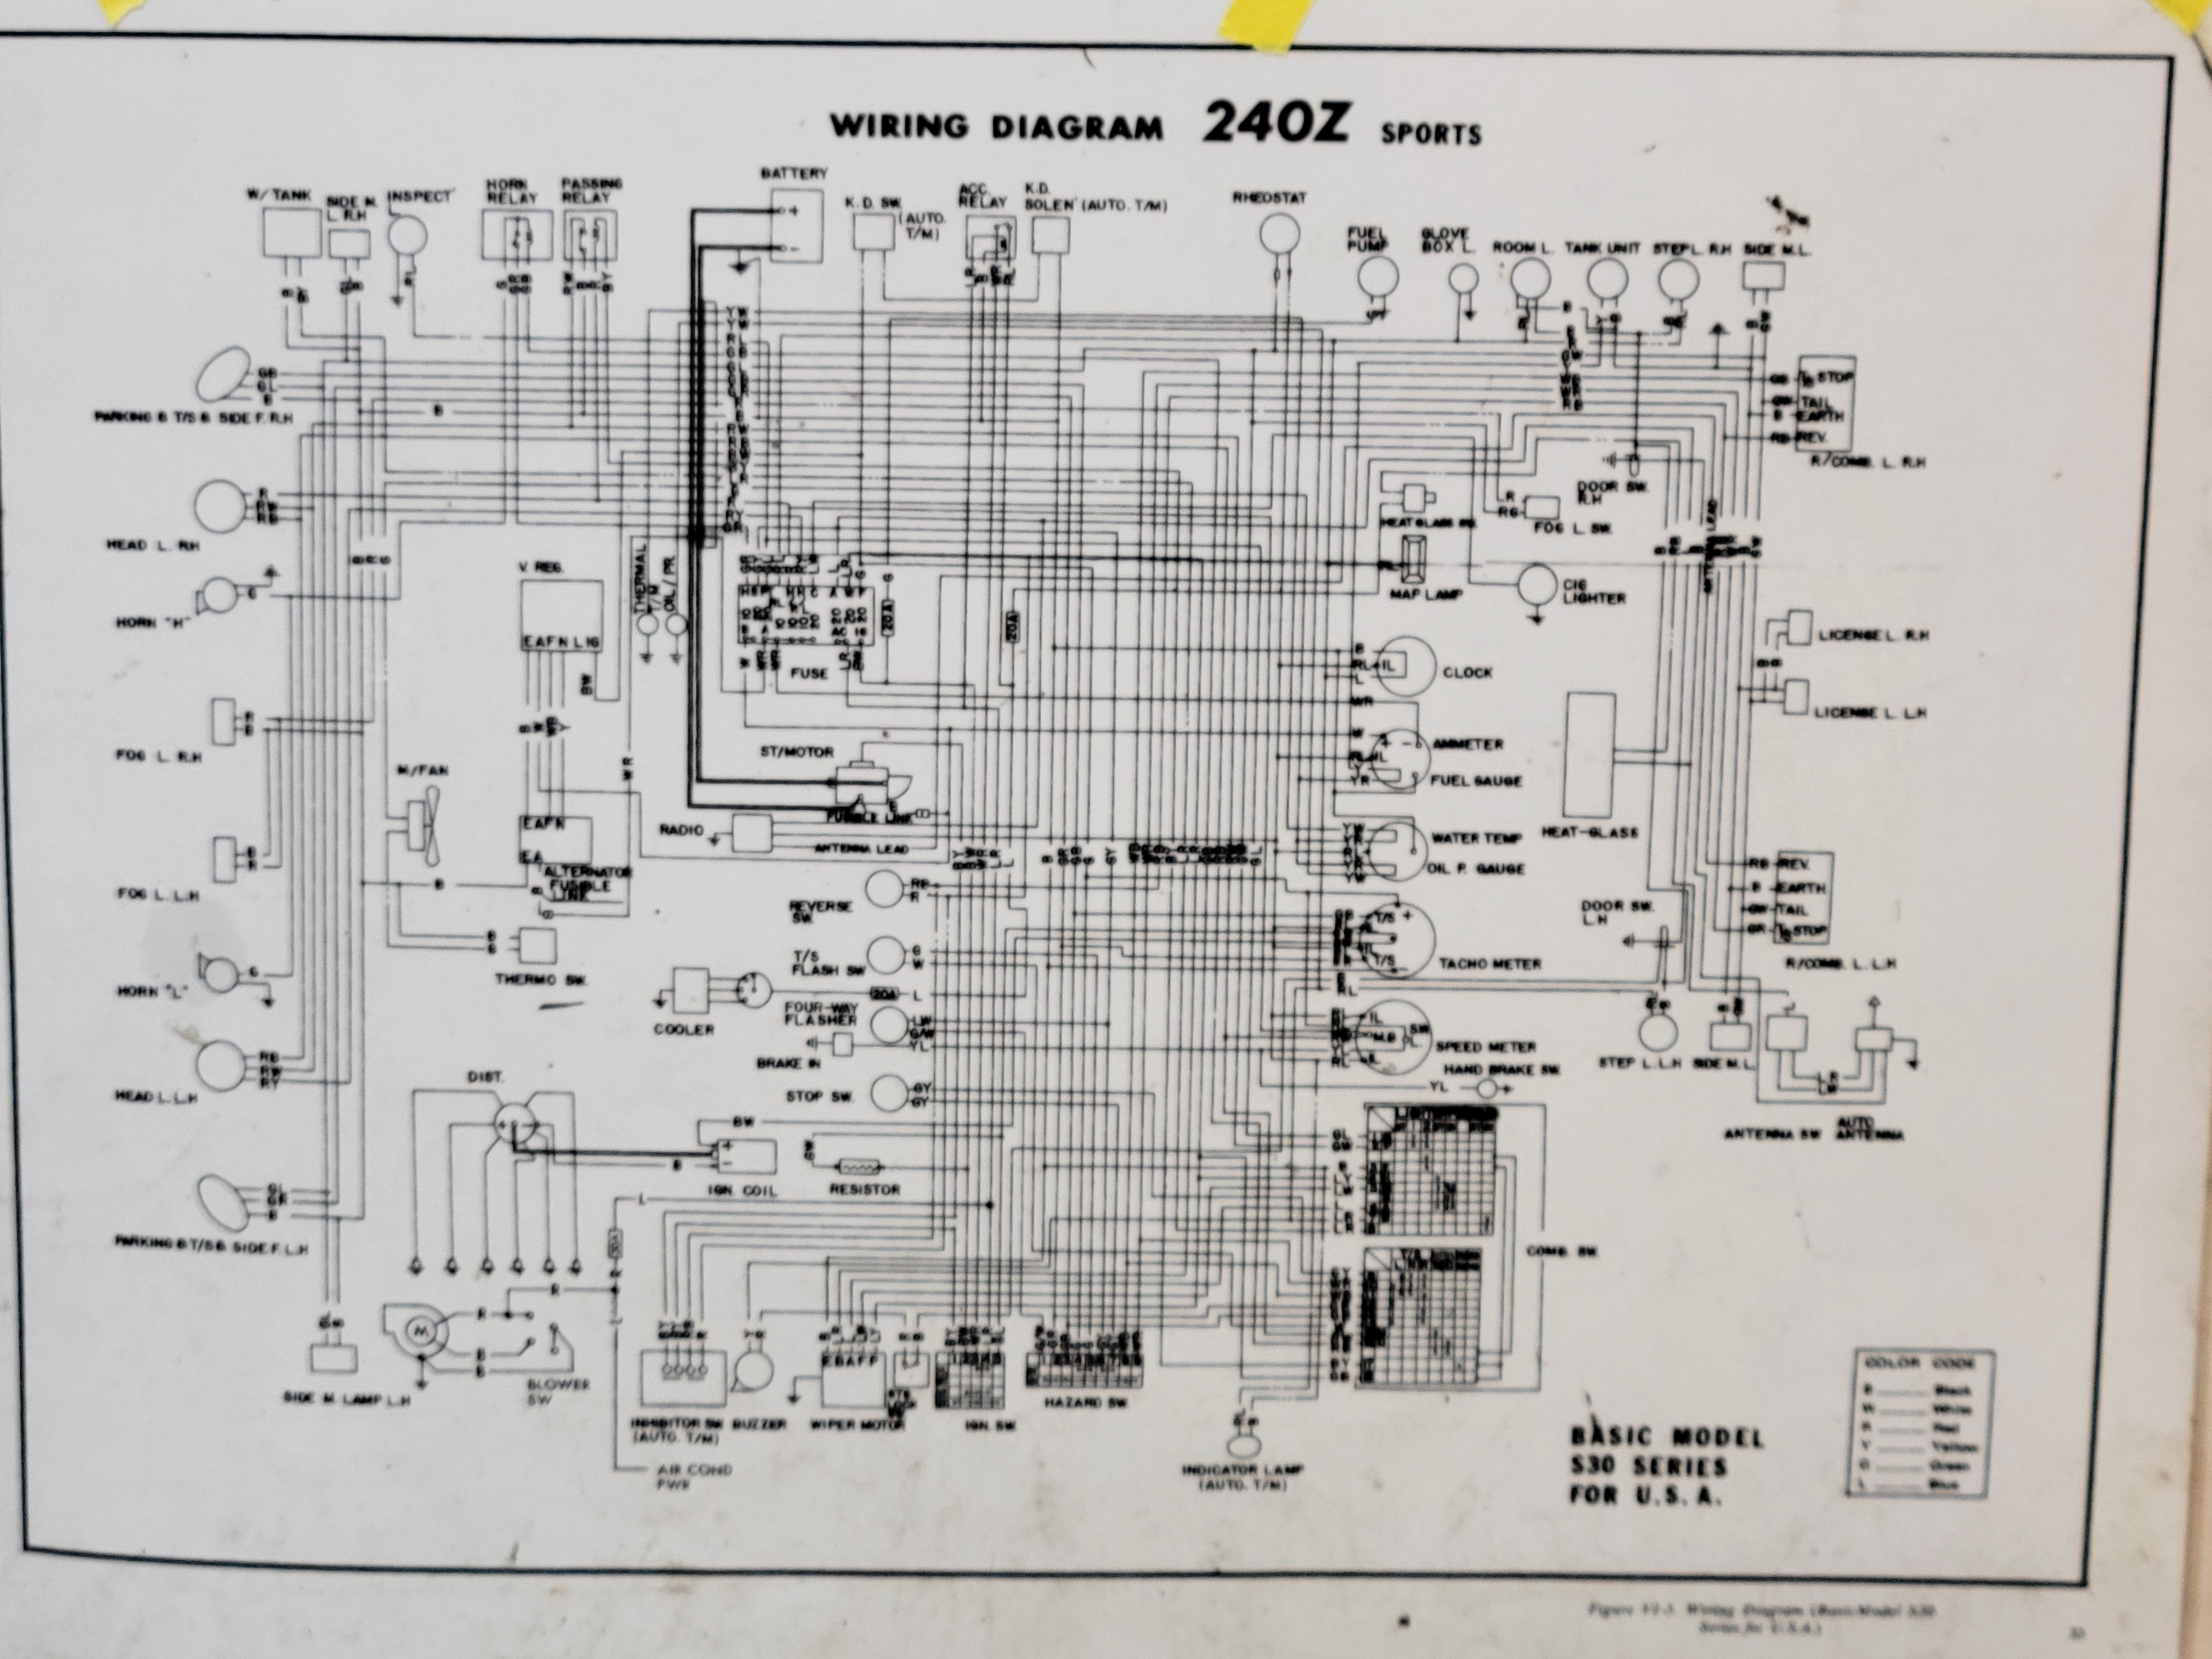
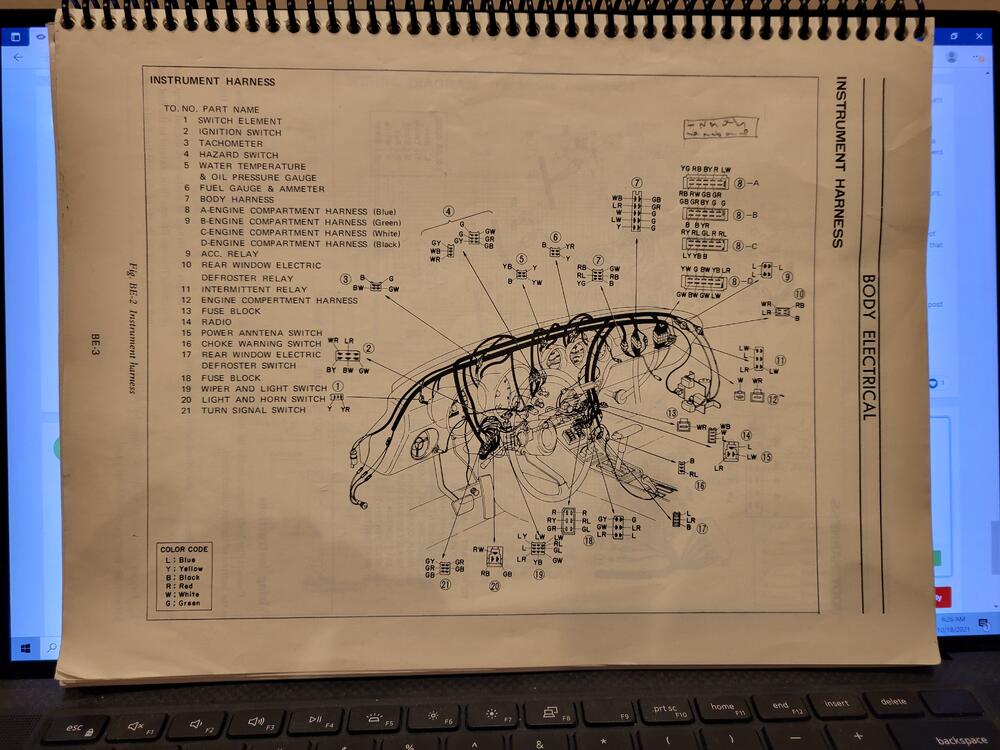
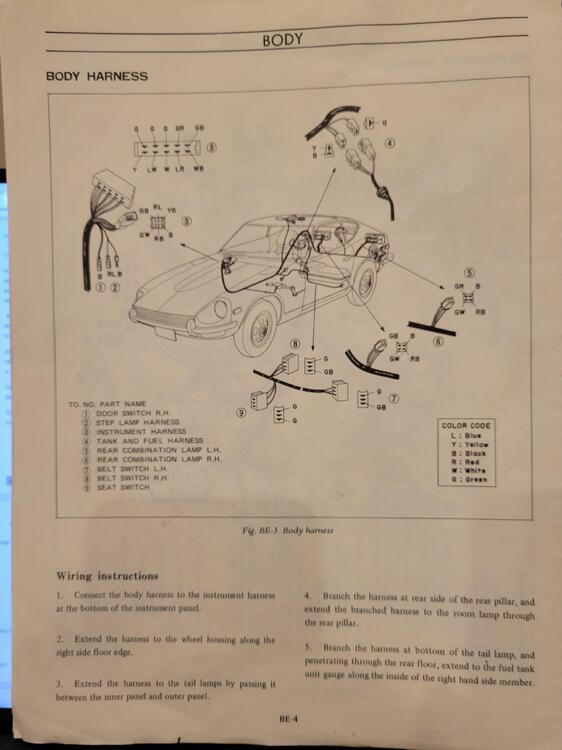
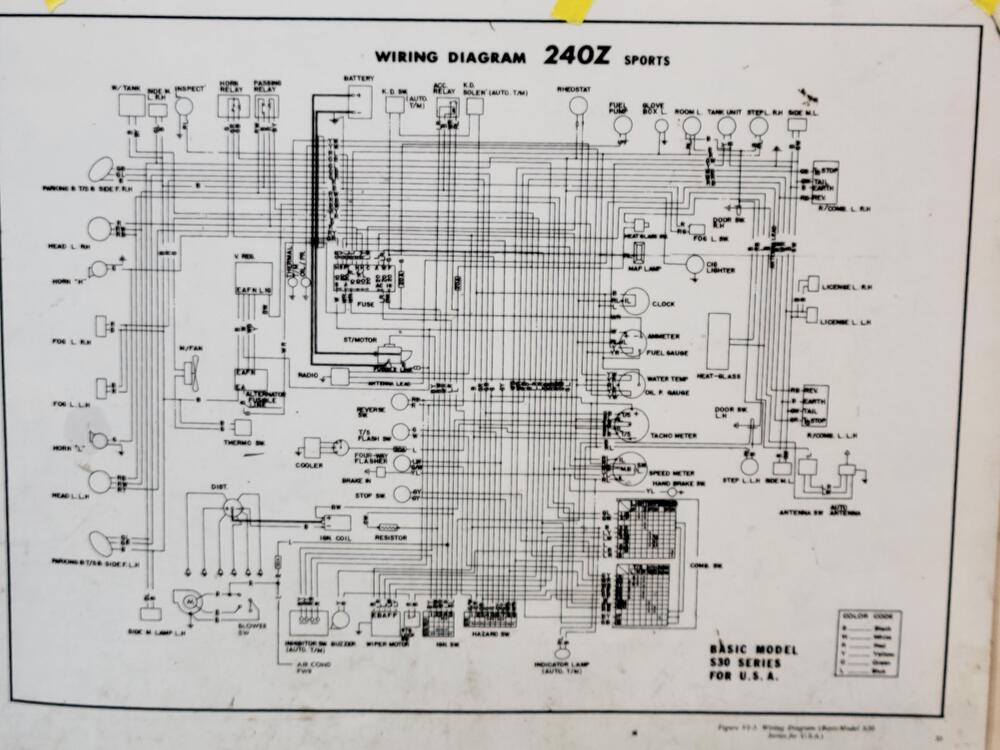
So, I took a few snap shots from the service manual: top right corner depicts the 4 connector blocks that are tied together. Pin out detail is on right. Below is a lamenated schematic that I think I got from Bonzai Auto works Hope it helps. Let me know if I can help.

-
I have a 1973 so I am not sure that your set up is exactly the same as mine. Having said that, I believe up under the passenger side you will see a bank of connector blocks. Your wire harness is separated into a few pieces. If memory serves me there are 4 larger connectors with 10 pins in each. There is a also a few individual connectors. The 4 larger connector blocks (black white green and blue) connect the dashboard or instrument harness, hatch area harness, to the engine harness. The relays for things like the horns, and wipers are located on the passenger kick panel and are connected with individual connectors. There is also an “L” shaped connector that connects the hazard relay. Another for the main power from the battery to the fuse block. Can’t remember other detail at this moment. Anyway, I would start by taking copious notes and labeling the various individual connectors, and I would disconnect the battery and leave it disconnected until the issue is resolved. Write down the order of the 4 larger connectors, they are colored and I believe keyed. I think there is a good chance that the problem is one of the relays, but that is just a guess from some of the things that you posted. Don't conclude anything based on guesses. You can troubleshoot this to the point where you can eliminate the actual issue, and not waste time or money replacing items that are not damaged. After labeling all of the connectors I would disconnect them from the engine harness and see if the short still exists. If it is gone than reconnect one connector at a time to determine which harness has the issue. If the short is not removed then I would disconnect the individual connectors. If everything is disconnected and you still have an issue then the problem is likely to be in the engine compartment. I say likely because there is always the possibility that a previous owner has added or modified something. Once you figure out which area has the issue then I would get a schematic and track it down. I have a laminated schematic in the garage and will post a picture when I can, a bit later today. If you do not have a meter or short detector you need to buy one, you can get something fairly inexpensive. You may be overwhelmed, frustrated and confused right now. Electrical systems are similar to plumbing, without some of the sloppy mess. Go slow, take your time do one thing at a time and draw a conclusion. If your not sure post the question. Write down what you are doing and what the results are so the forum can help you. It may take a while but you will get through it.
-
So, I have 1973 240z - not aware of any differences that would affect these measurements. Across the radiator support your image #3 -39 3/4 in. Your image #1 - 39 5/16" Your image #2 - 39 1/2" If this satisfies you - great - If you need really accurate measurements then let me know and I will dig out the laser and get some batteries in it. edit: Okay so I went back with the laser: your image #1 measured 39 5/16" your image #2 measured 39 1/2" your image #3 measured 39 3/4" now realize: my hood is attached and generally aligned my fenders are not fastened to the body my grill, bumper, and valence are not mounted Hope this helps Just curious what issue are you trying to resolve?
-
I think I understand the benefits and the desire to run either an electric fuel pump with or without a mechanical pump. In your original post you mention that you don't run your 240z frequently and that you thought the diaphragm may have dried up and caused the pump to fail or not perform as it should. Sorry if this is off topic. During the restore of our car there have been long periods where the car has not been started. I am running a mechanical pump without the benefit of an electric. I have a fuel filter before the pump. I too was having issues starting after the car sat for a while. After sitting for a period of time the fuel filter bowl was always empty. At first I did not think much of this, but that changed with time and effort. Since the car is in the process of being restored most of its parts are new or restored. New fuel pump, new hoses and clamps, restored fuel tank, restored SUs, restored plumbing from the pump to the SUs., ... etc. I read that many of the cardone fuel pumps had issues so I purchased another pump, but it too was not able to suck fuel from the tank. I got to be an expert at filling fuel bowls by hand, to get the car started. I was thinking that my fuel pump was not strong enough to pull the fuel the distance from the tank while it was cranking and that it was taking too long to crank the car to fill all the lines and the fuel bowls. A friend suggested that there was an air leak that was causing the system to lose its vacuum, and that the tell tale was the fuel filter bowl being empty after the car sat for a while. He talked me into checking to make sure that the right size (diameter) hoses were everywhere. Sure enough I did have some that were a bit larger than they were originally. While I never really proved that the diameter of the hoses and clamps was the issue, the fuel filter bowl now is able to stay full even after the car sits for months. I believe if I checked the fuel pump that there would be fuel in the pump keeping the diaphragm wet. Anyway, I was considering going to an electric pump but forgot about it after my issue was resolved. Don't get me wrong electric fuel pumps are great, a little noisy sometimes, but pushing fuel at a constant rate is beneficial. Really like Racer X's and Steve J's safety solution.
-
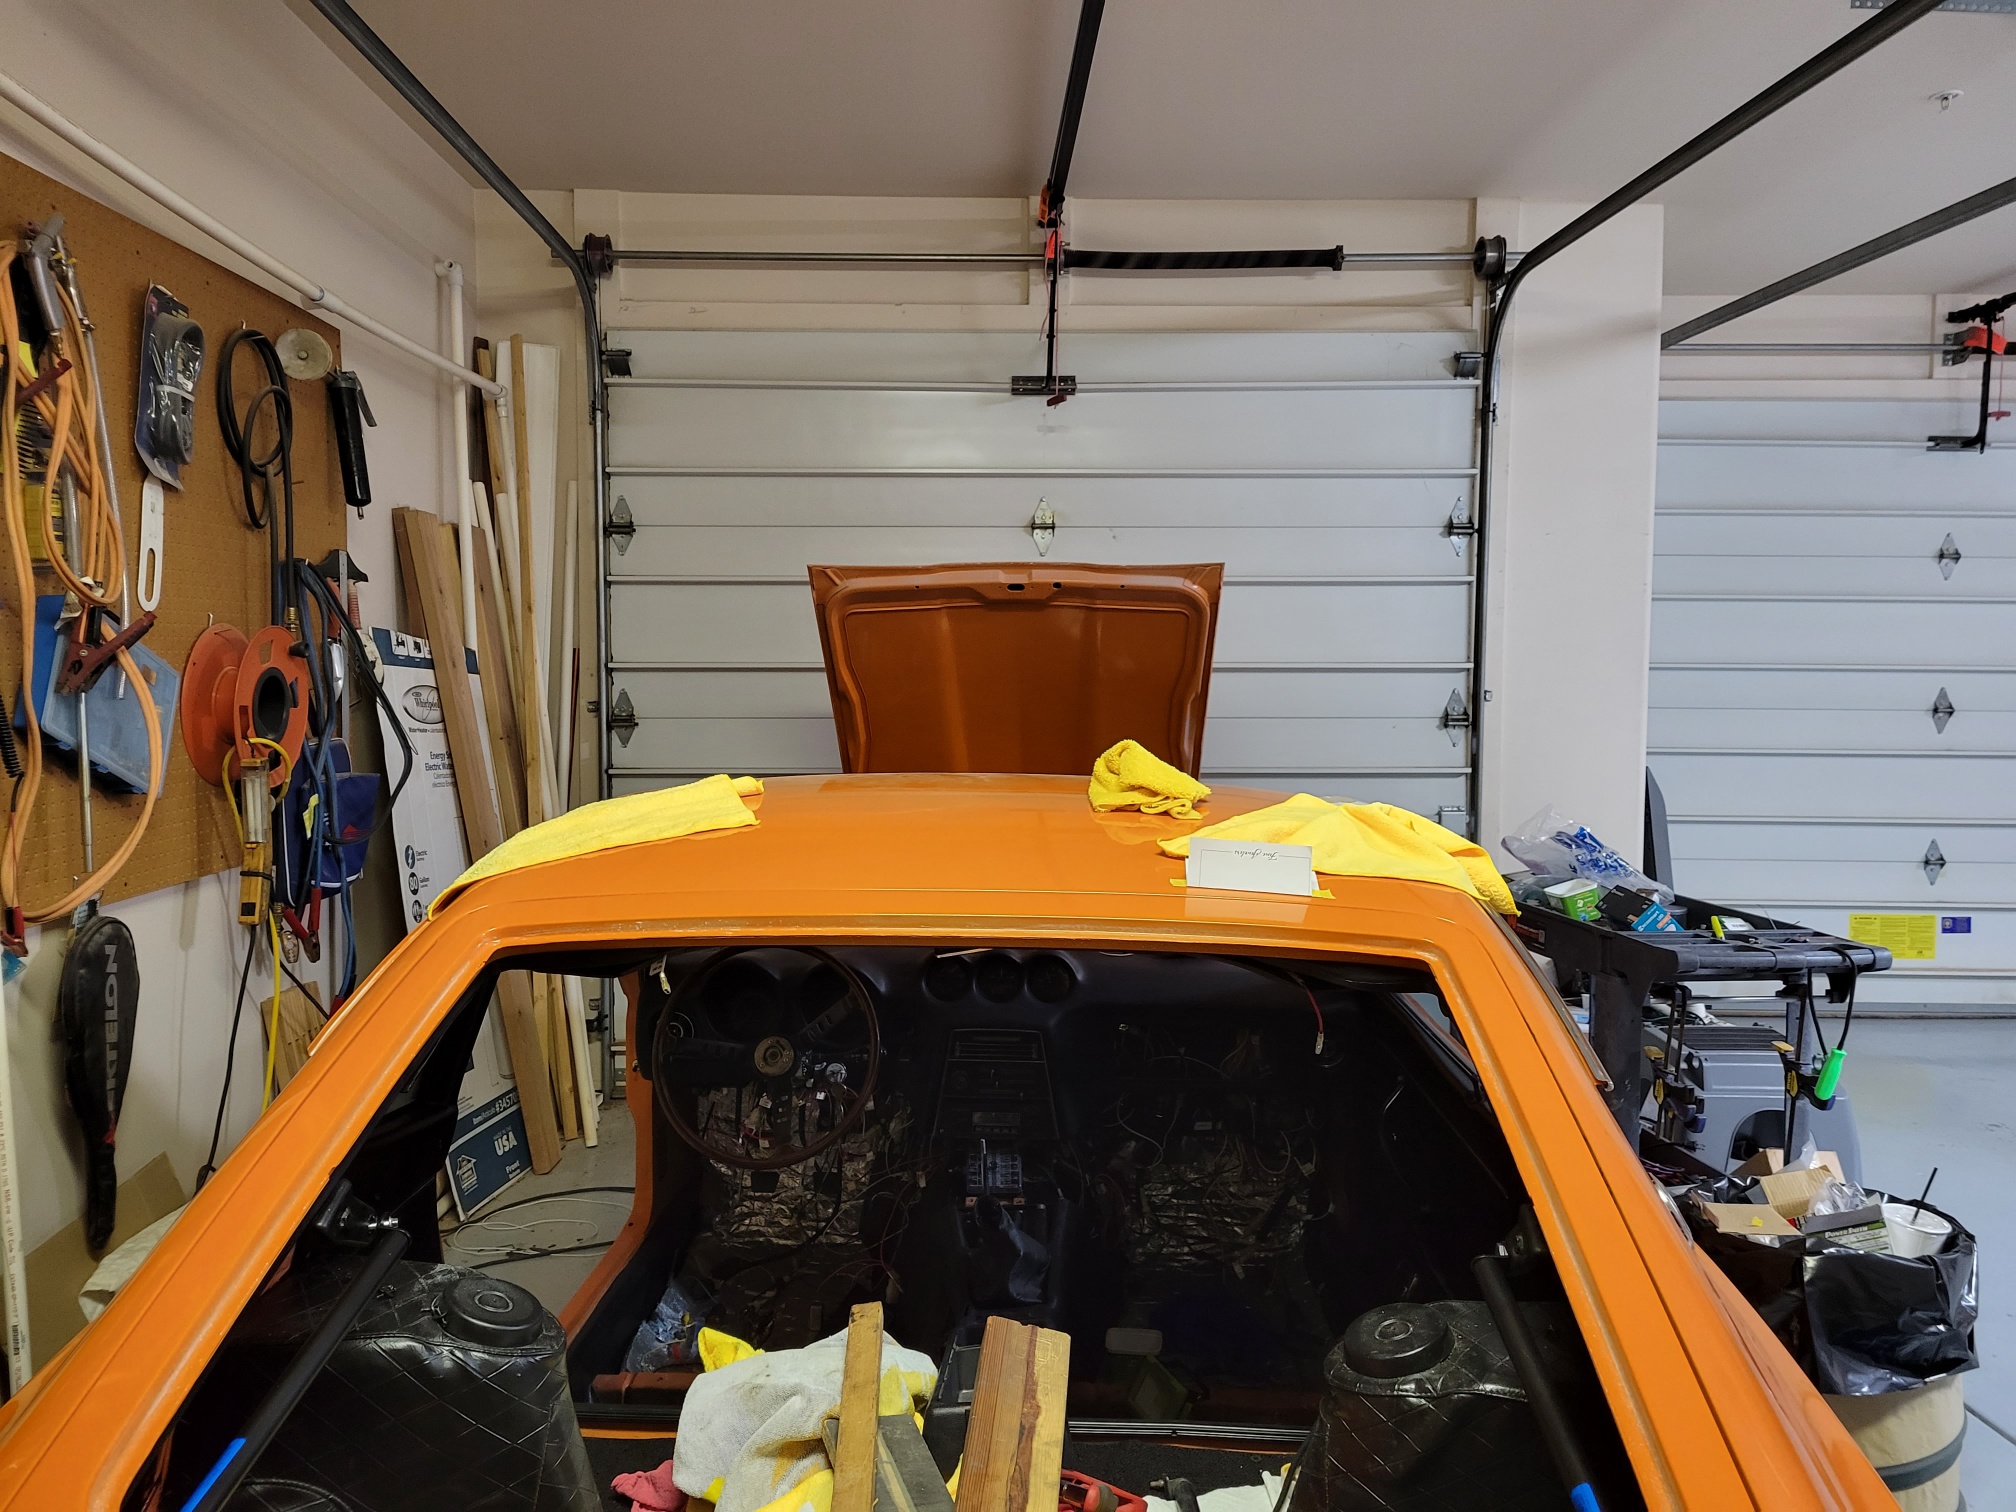
Hatch Alignment Guide I have searched for a process/procedure, or guide to help me align a 240z hatch, but have not been able to find one. It may be out there, but It has eluded me. I am not a professional, just a do-it-yourselfer. I am restoring a 1973 240z. My hatch gave me a bit of trouble and this is the process that I used to achieve reasonable results. This is meant only as a guide, something that hopefully is a bit better than obvious. I think alignment is often considered daunting by some. It really is not rocket science. It takes effort, be patient, be careful, and be realistic. If you could look at a new Z coming off the line in the 70s, I think you would notice that they were great cars, but they were not perfect – for example their gaps were not always uniform. There is a phrase that I was taught on my first job after college – “The enemy of good is better”. There is another thread “Hatch Alignment” that has photos of my hatch, and its gaps. Please feel free to improve or correct any errors - thanks Install and clearance Check Remove the hatch striker to prevent the hatch from locking before it is aligned. Install the appropriate weather stripping. Tape the entire body opening of the hatch to protect it from scratches/chips while fitting the hatch. Install the hinges into the body. This requires two bolts per hinge. Adjust hinges upward toward the roofline. This will help if you have any issues clearing the roofline as you close the hatch for the first time. You might want to mark a line on the hatch body to define the position of the hinge. This occurred to me after I aligned my hatch. A good way to keep track is to make the most current line the longest. Installing the hatch is a two man effort. It requires two short screws per side. The hatch tab holes are beveled so there is no adjustment up/down, left/right. Placing shims between the hatch tab and the hinge move the hatch toward the front of the car closing the gap at the roofline. This is the only adjustment involved with the tab. My glass was removed during deconstruction of the car. The hatch is considerably lighter without it. I found it easier to handle the hatch without the glass. Some people recommend installing the glass before aligning the hatch. Do not install the hatch lift support strut. Do not let the hatch close, keep it propped open. There is only one strut for a 240z. The 260z and 280z had 2 struts, one on each side. Some, including me, believe that the single strut on the left (drivers) side causes the hatch to twist over time. The force of the strut when the hatch is in the open position forces the left side higher than it would be otherwise. I believe that this puts downward pressure on the right (passenger) side of the hatch driving it toward the body opening. Prop open the hatch with a stick. It should be high enough to be well away from the roofline. The hatch should move freely at this point. In addition to the tape I put thin towels along the body opening to protect everything. The next step is better with more than one person, especially if your glass is installed. Slowly start to close the hatch checking to make sure that it clears the roofline and the edges of the body opening. If you have sufficient clearance – congratulations you have passed the first hurdle. The next step is to align the hatch. If you do not have sufficient clearance, don’t panic yet. There are a few relatively easy things that you can do to help with clearance issues. You can add the second strut. This is probably a good idea anyway. Realize that the standard single 240z hatch strut has a force of 88lbs. If you add the second strut to the right side I would strongly recommend that you replace your original 240z hatch strut, with two 260z/280z hatch struts. Each of these is rated at 44 lbs. of force which is the equivalent of the original single strut at 88 lbs. The second thing you can do is to position your hinges to create sufficient clearance. The last thing that I can think of is to remove the hinge and enlarge the hole that the bolts go through to mount the hinge, this will increase the amount of adjustment that you can achieve. Adding a 2nd hatch strut To add the second strut you need a few parts including a body mount for the strut bracket. These body mounts were spot welded and they have a few bends that put them close to the quarter panel skin. The body mount bracket is not left/right side dependent. Most of the early S-30s that I have seen have broken spot welds. This could be due to the 88 lb. strut, or it could be due to the uneven forces applied from the hatch when closing and opening the hatch. Y You will also need the mounting bracket for the strut. This bracket comes in left/right versions. It screws into the strut body mount, and the strut is bolted to the bracket. The next piece to the puzzle is the strut itself. It is not right/left side dependent. Order a 260z/280z strut as it has half the force of the 240z strut. Make sure the mounting matches your hardware. I have seen these with either ball mounts, or shoulder bolts. The last piece is the bracket that is attached to the hatch and is the mounting place for the other end of the strut. This bracket is available from zcardepot. This bracket comes in a left/right configuration. I was not able to find new versions of the other brackets for sale commercially, which means you will have to get them from either a 240z/260z/280z. It is easy to remove them from a car with an air hammer or a hammer and chisel, without damaging the quarter panel skin of the donor. Adding the 2nd strut may help with clearance issues on the right side of the car. The location of the brackets is the mirror image of the left side. Since you can’t easily spot weld the body mount you can drill two holes and mount the bracket with screws through the channel of the body opening. Caulk these when done. If you need more specific assistance to install the 2nd strut I believe that there are directions either on this forum or on the internet. Hinge Positioning Positioning a hinge is not difficult. The hinge can be moved left and right as well up or down, within limits. There are two limiting factors. The first is that the captured nut in the body has a range of adjustment. The second is the size of the hole that the hinge bolt goes through. You should remove the hatch tab screws that hold the hatch tab to the hinge. After removing the screws you will need to prop the hatch on the right side so it does not collide with the roofline. NEVER remove the screws from both hatch tabs at the same time. The 88lbs of force in the strut/s can get the hatch out of control in a hurry. At one point I thought my hinge was adjusted as high up as possible, but it wasn’t. It actually was being restrained from going as high as it could by the rubber gasket that the hinge fits into. Enlargement of the hole in the hinge I was nervous about this alteration, but it is an option. I needed this alternative. Prop the hatch and remove the hinge from the car. Put it in a vice. With a small flat file or a small round file you can open up the hole the bolts go through. Figure out where you need the extra space and only open the area needed. Realize when you do this you will need a larger split washer and a larger flat washer. You do not want to remove too much material as this could weaken the hinge mount. Hatch Alignment I was told that if you separate everything, the hinges from the body and the hatch from the hinges that you turn a difficult task into a very difficult task. I wanted the best possible restoration that I could muster. Old hinges on doors, hatches, etc. usually have issues and I was concerned about rust issues in the hinge wells. Anyway, without realizing that I was making the problem more difficult I separated everything in order to refinish and substitute new parts. I also don’t know how you can inspect the hatch tabs without removing them from the hinge. If I had it to do over again I would mark the position of the hinges before working on the body. They ae left and right oriented and stamped with an L/R. If I was not going to do bodywork in the area behind the hinge then I would not remove them at all. If I were going to replace the hinge because it was weak or bent, but I was not going to need to do body work behind the hinge then I would wait until installing the hatch and replace one side at a time, after the hatch was installed. Bottomline: Even though I separated everything I was able to do a fairly good job of aligning my hatch. I do not believe that aligning a hatch is a very difficult job. Installing the hatch is definitely a 2 man job, especially if your glass has not been removed, but alignment can be done without help. Having said that 4 hands are better than two. The process is an iterative one. Make one change at a time and check your results. Protect your car with tape and towels. I will assume that you have achieved adequate roofline clearance, and that after every adjustment you check to see that you still have the clearance that you need. If you lose the clearance consider backing out the last change and see if there isn’t another way to achieve the alignment that you want. First step for me was to see if the hatch fit within its opening squarely. Another way to put this is to check if your right side gap (the space between the hatch edge and the body opening edge) is the same near the top of the hatch as it is at the bottom. If the gap is not uniform check the left side. If the left side has the opposite issue then you have an alignment issue. If it isn’t then you might have a more serious issue like the hatch or the body opening not being square. If one or the other is not square then you will not be able to get uniform gaps without doing body work. If you do not opt for bodywork then you may still be able to align the hatch to achieve the best possible result given the body issues. Assuming the hatch and the body opening are reasonably close to being square. Check the right side gap top and bottom. If it isn’t the same then you need to make a decision as to whether the top gap or the bottom gap is closer to the desired gap. If either the top or the bottom is too close to the body edge then this will be the point that you will want to affect. For example say the gap at the bottom of the right corner is too close to the body edge you have a few choices: i. you could move the left top side of the hatch closer to the roofline or ii. you could move the right top side away from the roofline. My preference is usually to avoid any action that decreases roofline clearance if possible. So I would put a shims behind the right side hinge under both bolts. This pushes the hatch top right edge toward the back of the car and the top left corner toward the front. I think it is best to loosen both sides of the hinge before inserting a shim under either bolt. I found it easier not to completely remove the bolt. Tighten both bolts a couple of turns at a time, until both are sufficiently tight. Check the right bottom corner if the gap is larger then we are moving in the right direction. Check the right side top and bottom gap. If they are more uniform then the adjustment was successful. I would check the left side gap top and bottom. If the gap is not uniform then you need to make an adjustment. Shims installed on the opposite side will move the side you are working on closer to the body at the lower corner. To affect the top corner of the side that you are working on shim the hinge on that side. When you have gotten the side gaps top and bottom sufficiently close to your liking you can move on to the next step. With the side gaps uniform top to bottom you will want to compare the left side gap to the right side gap. I am exaggerating to make a point, lets say the right side gap is 1 inch (at the top and the bottom) and the left side gap is .5 inch (top and bottom). It would be ideal to make both the left and right side gaps equal at .75 inches. You need to move the entire hatch (top and bottom) toward the gap that is larger (right side). To do this you will need to loosen both hinges. I was working alone so: i. I removed the hatch tab screws from the right side, and propped the hatch up with a stick. ii. Next I loosened the hinge bolts on the right side. This allowed me to move the right side hinge to the right, because it was not held in place by the hatch on the right side. You typically will not need to move the hinge very much. You can check that it has moved by lowering the hatch as if you were going to put the screws through the hatch tab. If the holes line up you have not moved the hinge, if the hinge is to the right by a small amount compared to the hatch tab hole then you have moved the hinge and you should tighten the hinge bolts. Make certain that you have not disrupted your previous changes to the hinge position or you will disrupt the progress made earlier on the side gaps. iii. Carefully, loosen but do not remove the left side hinge bolt (the left side hatch tab screws should still be tight at this time. Pull the hatch from the right side and push the left side hinge to the right. It will probably need some persuasion. My advice is not to hammer or rubber mallet the hatch. I did smack the hinge in order to move it. It is difficult because the hatch is still attached to it, and it would be best to have a second person to push the hatch top and bottom while you pull the hatch from the left side. Remember you do not need a lot of movement, and you don’t want to overdue it and have to reverse the adjustment. Keep checking the right side tab holes – when they line up with the right side hinge you have affected an adjustment to the right. Re-install the right side hatch tab screws and tighten the left side hinge bolts. Check your work and repeat as necessary. Remember the hinges have vertical adjustment and horizontal adjustment within limits. If you need more then they can provide then you will need to remove the hinges one at a time and enlarge the hinge holes to get additional movement. You will probably need to do this on both sides. Remember I said that hatch alignment was not that difficult, but it is work and it can be frustrating. Take your time, take breaks, if I can do it so can you. Now with the gaps uniform top to bottom on both sides and with the gaps relatively equal on both sides check the bottom corner of the hatch to see how it aligns with the edge of the quarter panel. If the body lines line up you can move on if not you can cause them to line up by adding shims behind the hinges on one or both sides – this drives the hatch toward the back of the car. If you need to move the hatch away from the back of the car you can accomplish this by adding a shim between the hatch tab and the hinge. I found it helpful to use double sided tape to hold the shims in place for the tab adjustment. Place the tape on the shim and stick it to the hatch tab then move the hinge up to cover the shim and insert the hatch tab screw. The last thing is to check the height of the hatch at the roofline. Adjust the hinges up or down. The best way to adjust the hinges is always to loosen both sides. Again, a friend comes in handy anytime you need to move both sides of the hatch at the same time. Hope this helps to make the job easier.
-
Someone asked: What do you think caused the issue that required the addition of the 2nd strut to obtain the necessary clearance? In thinking about this I believe that you need to understand this car’s starting point. My son, and I bought the car for one reason and that was to have the fun of restoring it. Our intention was to keep it, so every decision was based on what was best for the car. I believe that we did not knowingly sacrifice quality in any area. We bought the best and did our best, if for no other reason than we intend to keep the car forever. We started deconstruction immediately after purchasing the car. This is an important point. We had no history with this car. I don’t know if the hatch closed properly before we took it apart. It closed, so the real question is how uniform were the gaps, was the paint at the roofline scuffed/chipped. The answer on the gaps is that they did not impress me as being particularly bad, or indicative of a body issue. That’s not a very definitive answer, but it is all that I have. The paint was in miserable condition. There was zero clear coat and some rust in the typical spots, right dog leg, right fender near the door, right rocker, lower hatch, and lower right quarter panel. I don’t believe that I would have noticed a scuff or chip given the condition of the paint. None of this really mattered to us because we were going to restore every nut and bolt anyway. We were changing the color so we were taking it to bare metal and everything had to be removed from the frame. I am sure that the hatch is twisted/warped. Not so badly that it would not close, but bad enough that it was perceptible when laid out on something flat. Now, did it twist because it was forced at some point during its life? Did it twist over time because of the single strut? Did it warp because the glass was removed and it was stored for a few years? Was it warped because I live in Arizona and we get huge swings in temperature? Whatever the reason and whenever it happened (most probably before we purchased the car) the result is that it has some amount of twist in it. When the glass is installed will the weight take some of the twist out? When it is closed against the new weather strip will it tend to right itself to some small degree? Does the fault lie in the bodywork that I did? The point is I can’t answer definitively what caused the clearance issue. The car is 48 years old and we have owned for it for 5 years. like most of us it has a past. Was it necessary to add the 2nd strut or was there another way to solve the problem? I can tell you that I believe the 2nd strut is a positive improvement to a great car. Nissan thought it was an expense worth adding to an already great car, beginning with the 260z. My simplistic experimenting leaves no doubt in my mind that having 2 struts to balance the weight of the hatch is a good thing. And finally, it appears to solve my clearance issue. Do you need it to align your hatch? I don’t know, but I needed it to align my hatch given my abilities and level of patience. If you have a 240z I would check the spot welds on the hatch lift strut body mount. I would also check the hatch tabs carefully as someone suggested earlier; this may be a manifestation of the uneven force placed on the hatch when it is being closed. I hope this thread helps someone tackle a job that they might not otherwise attempt.
-
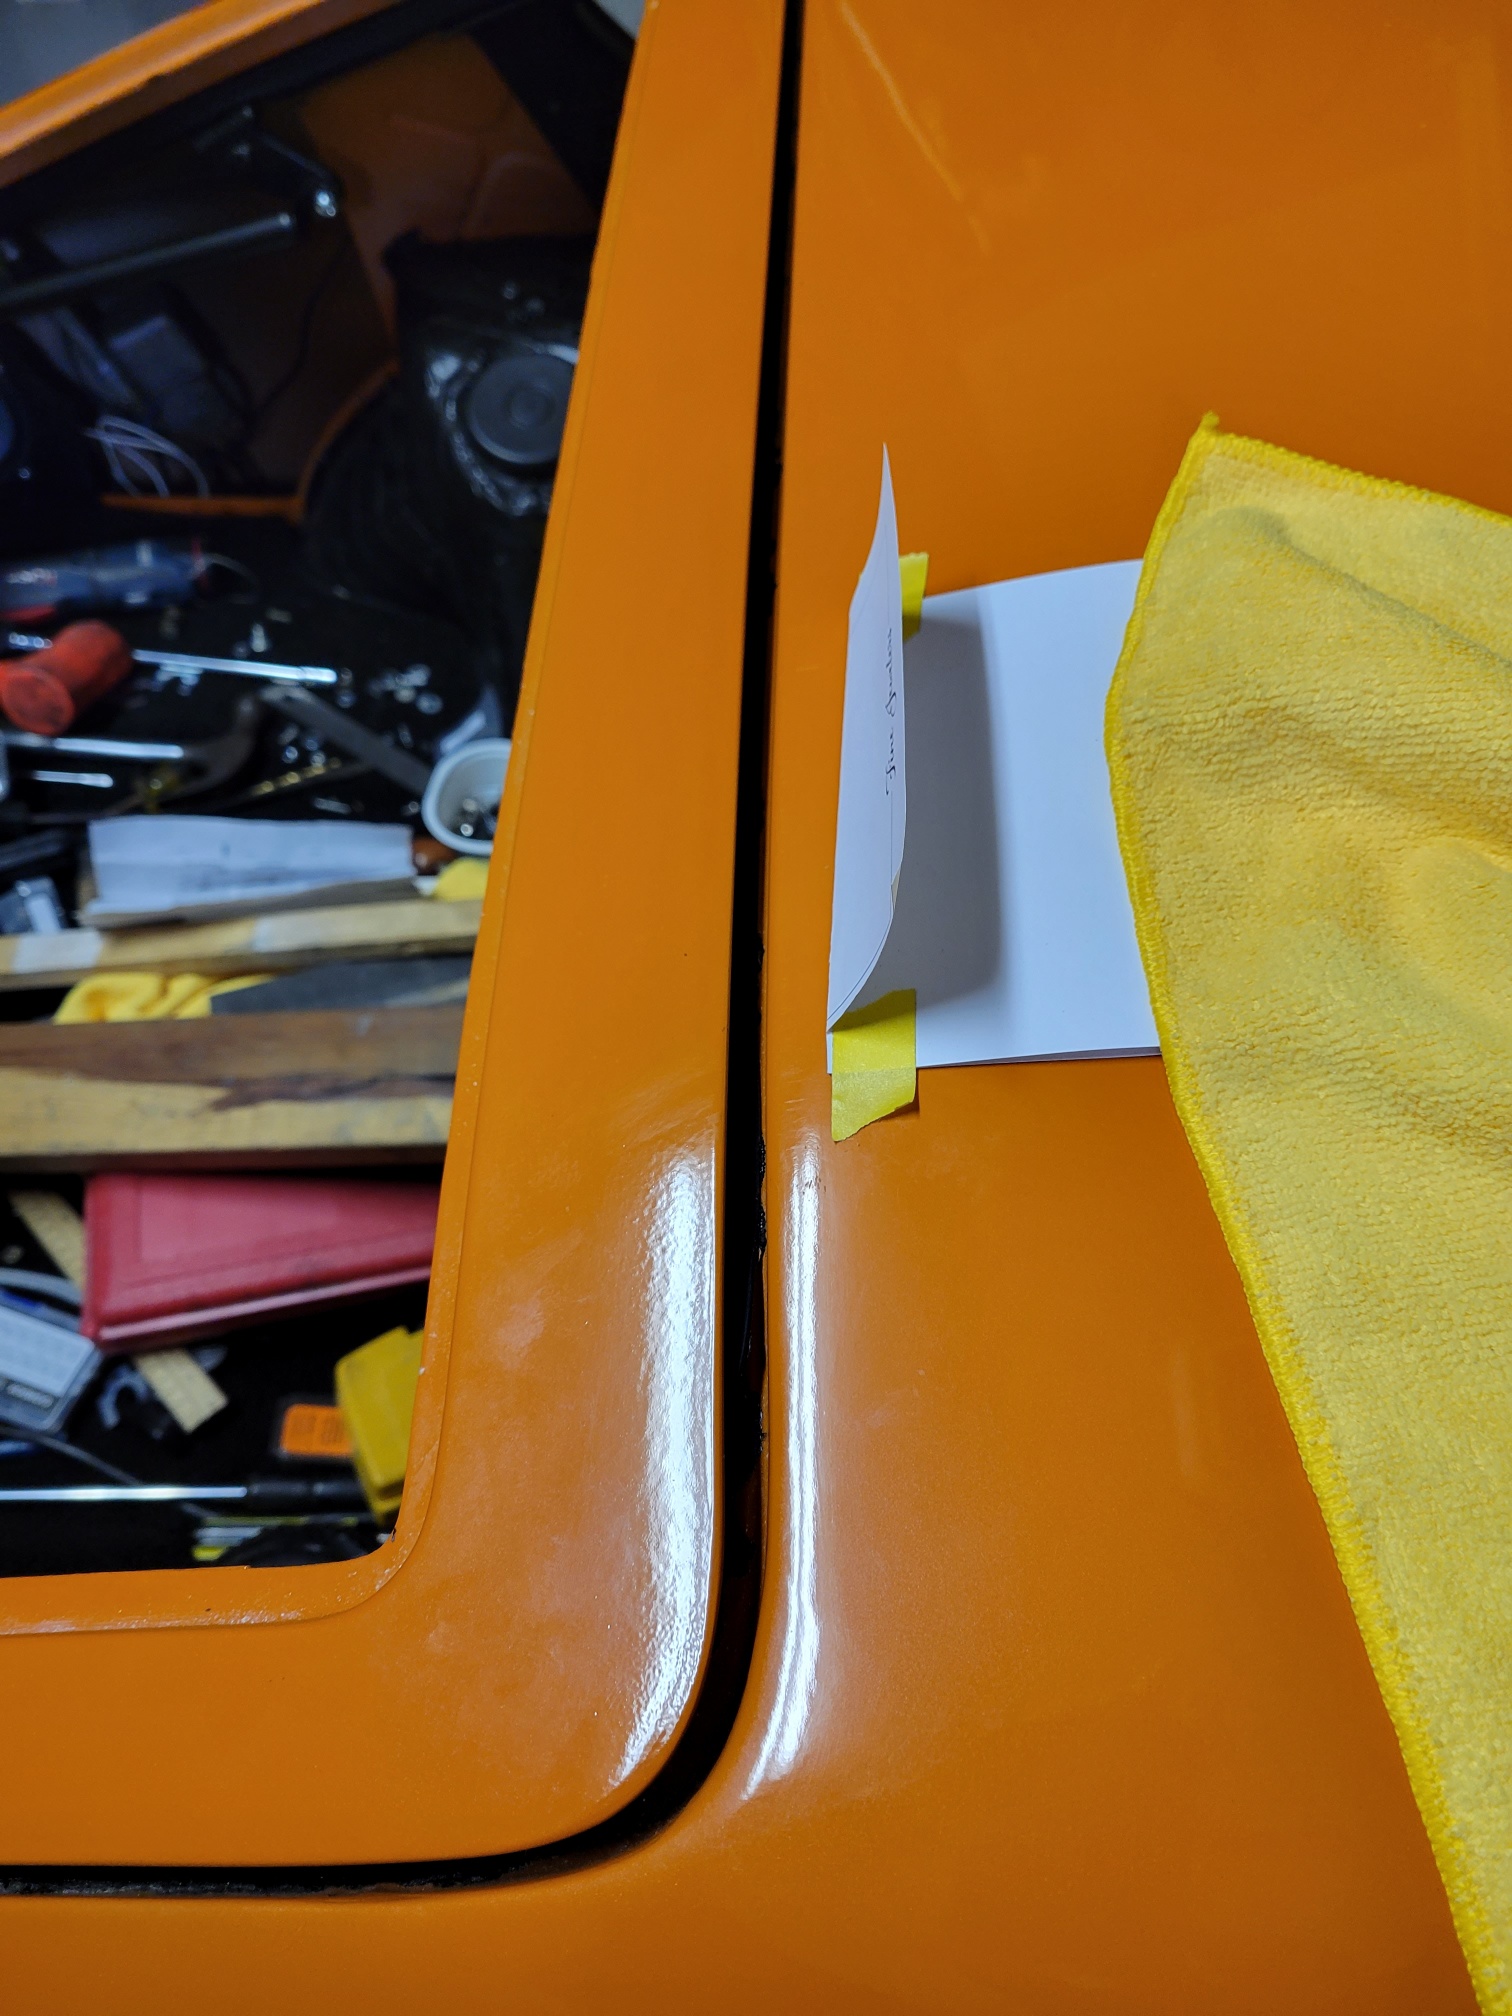
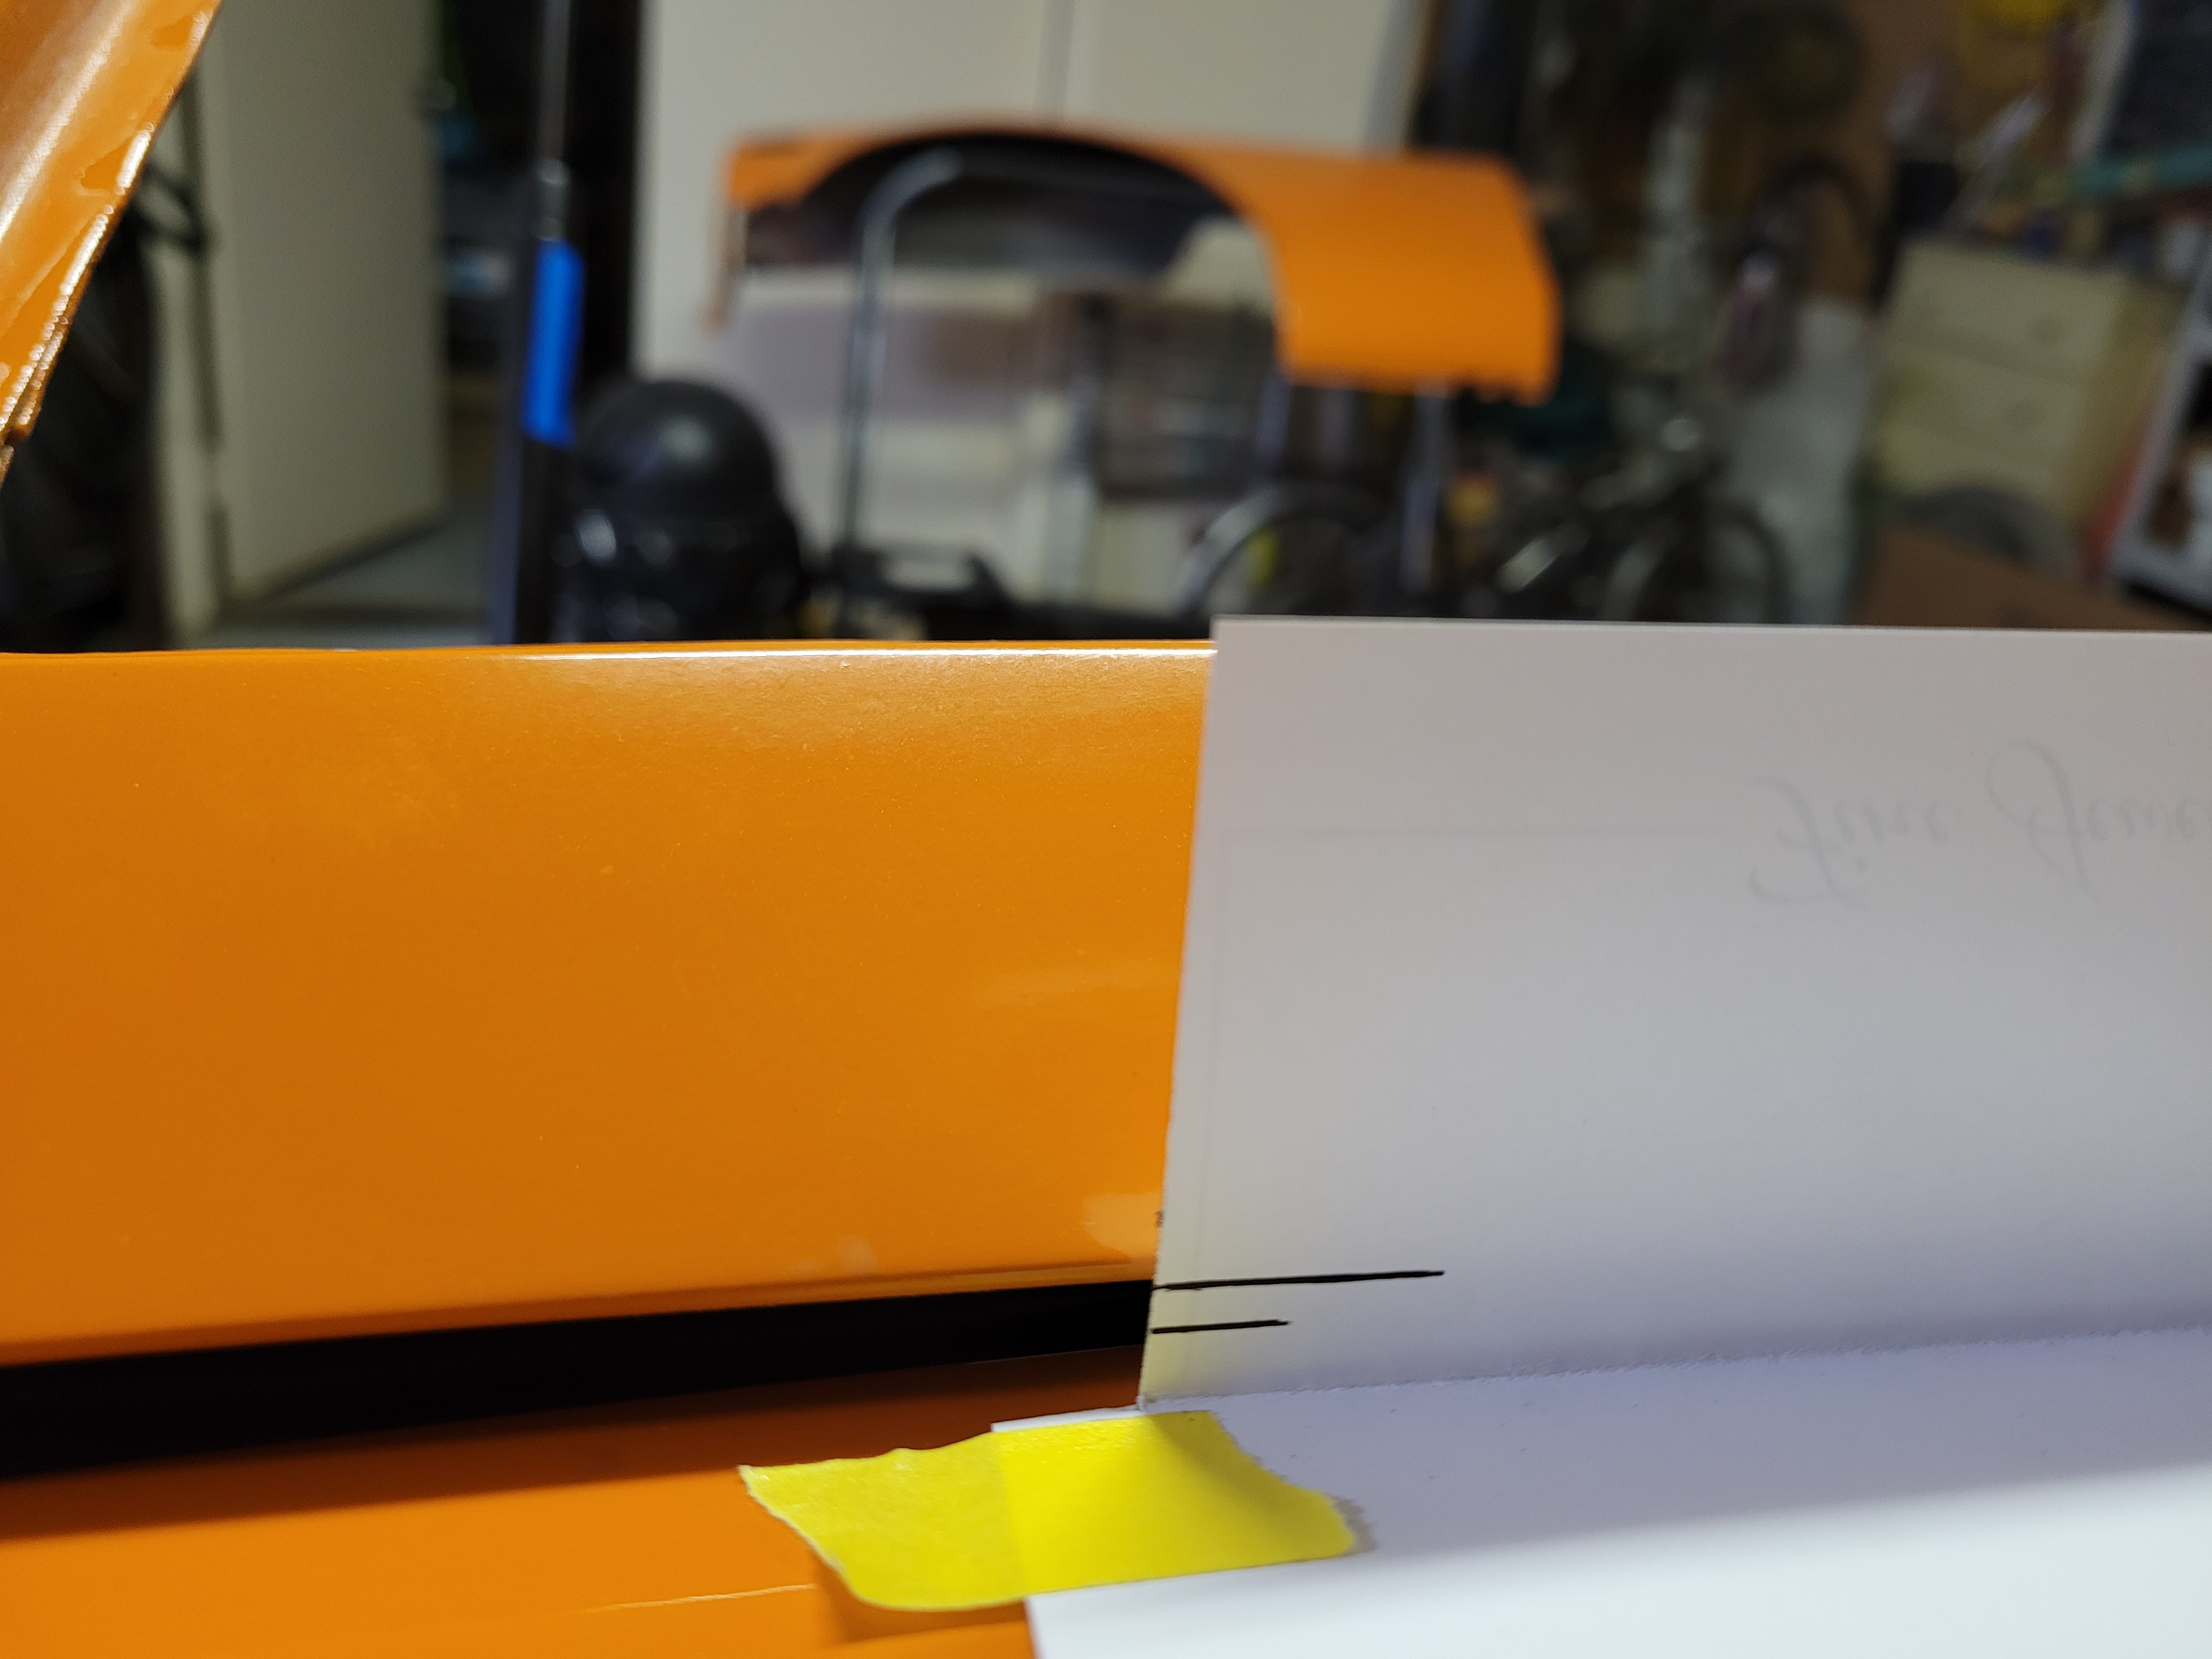
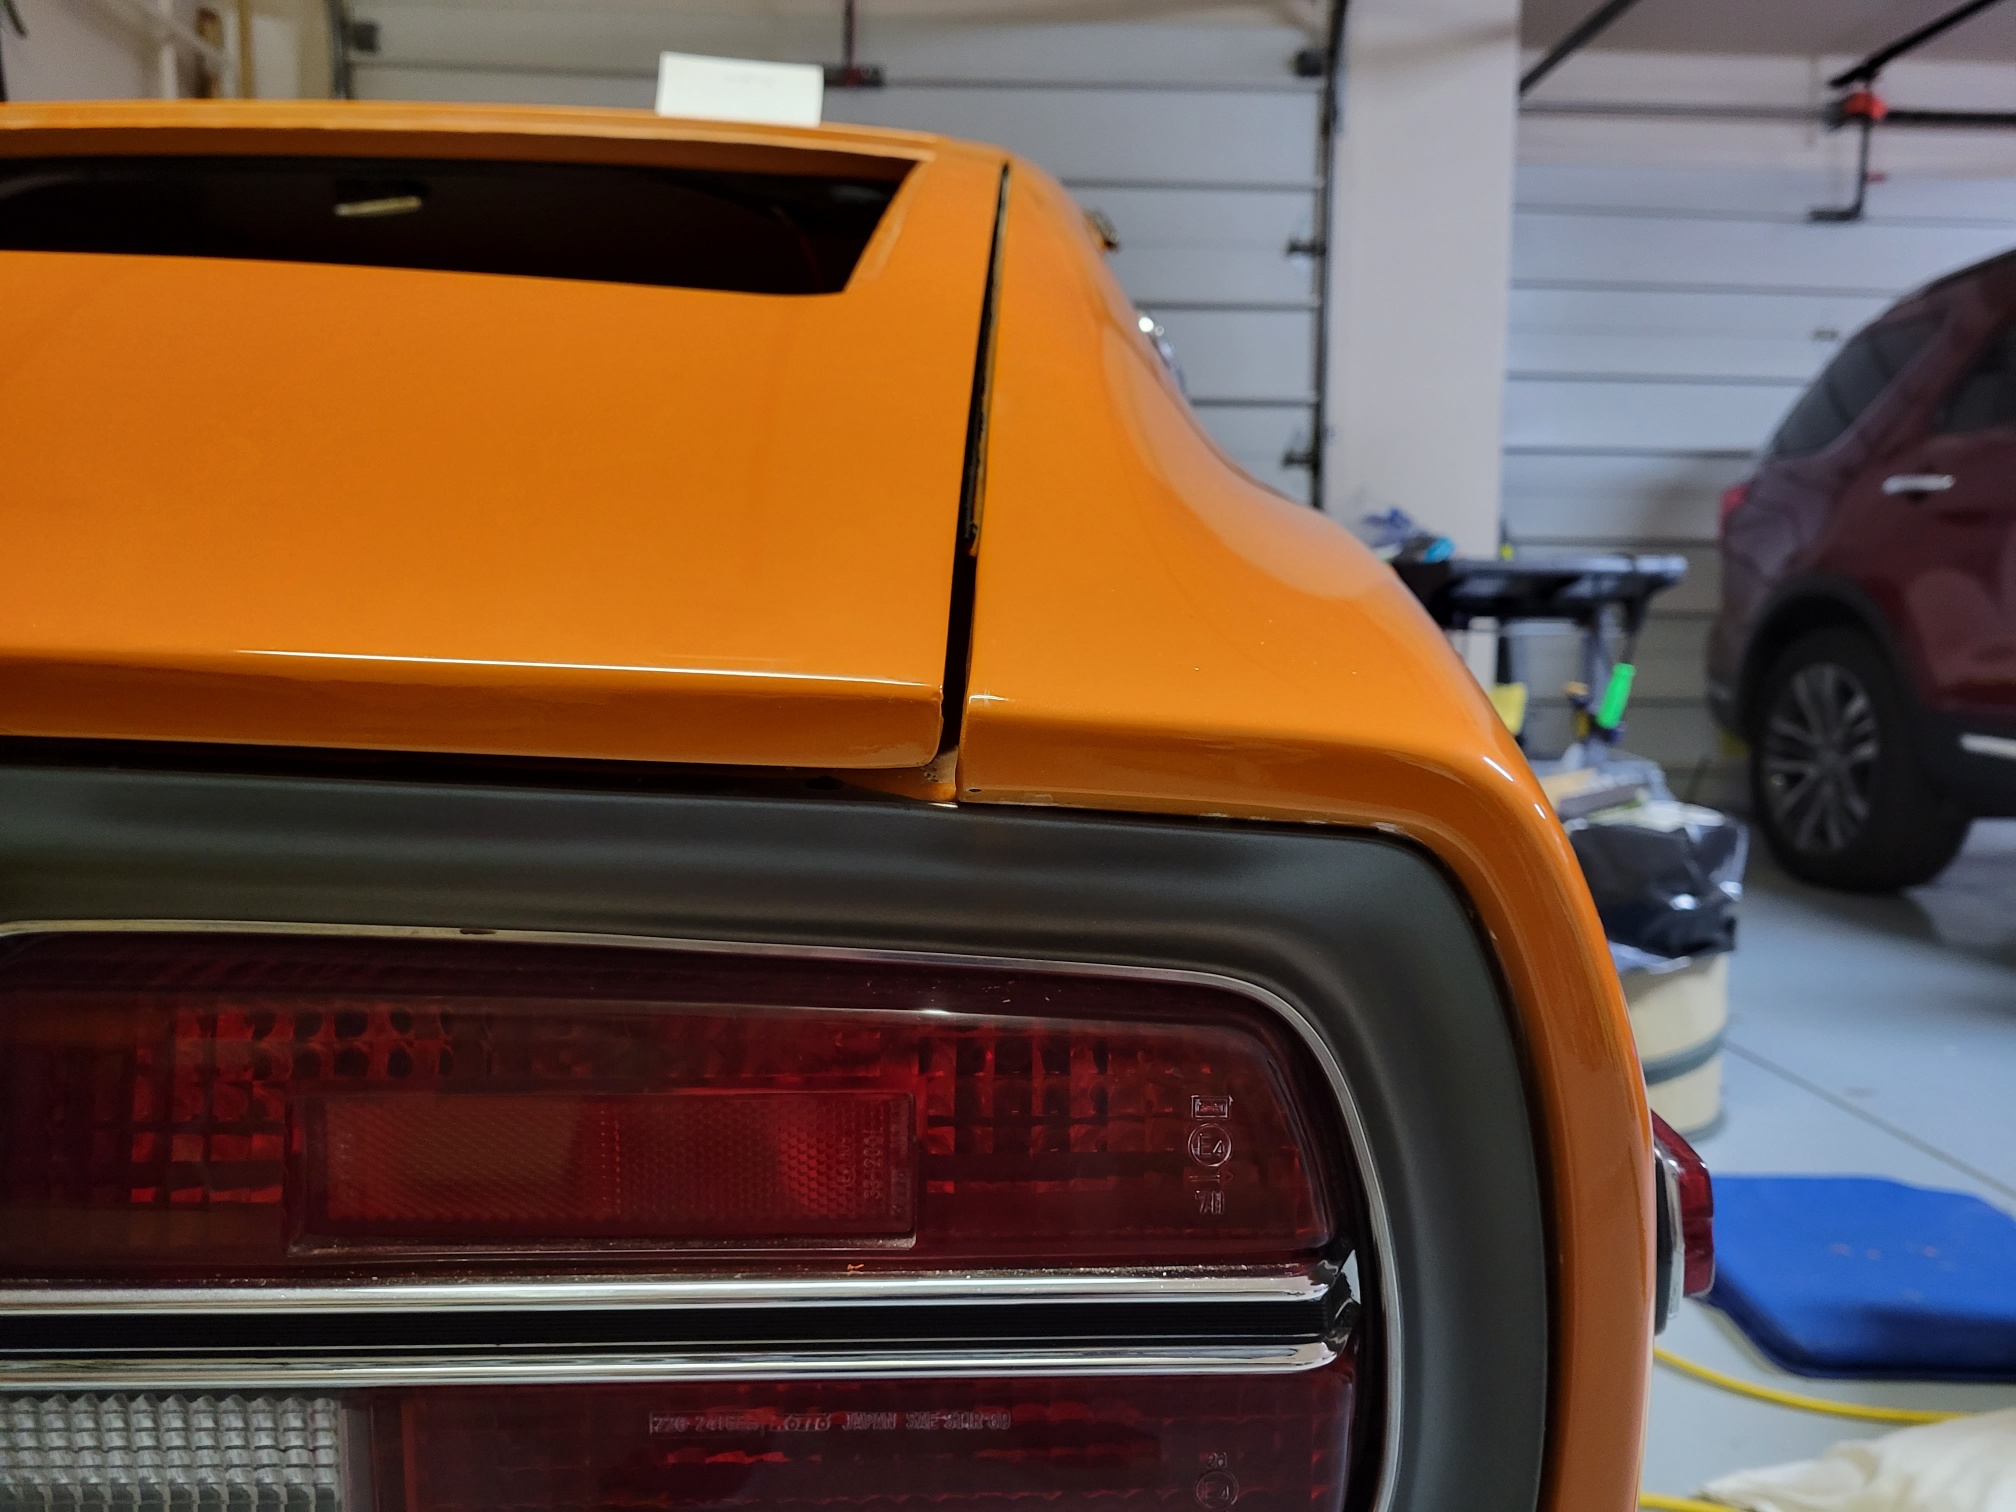
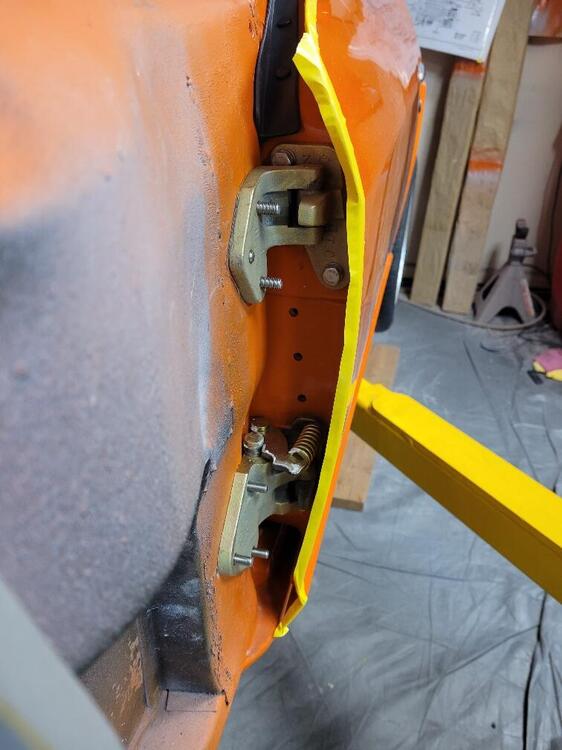
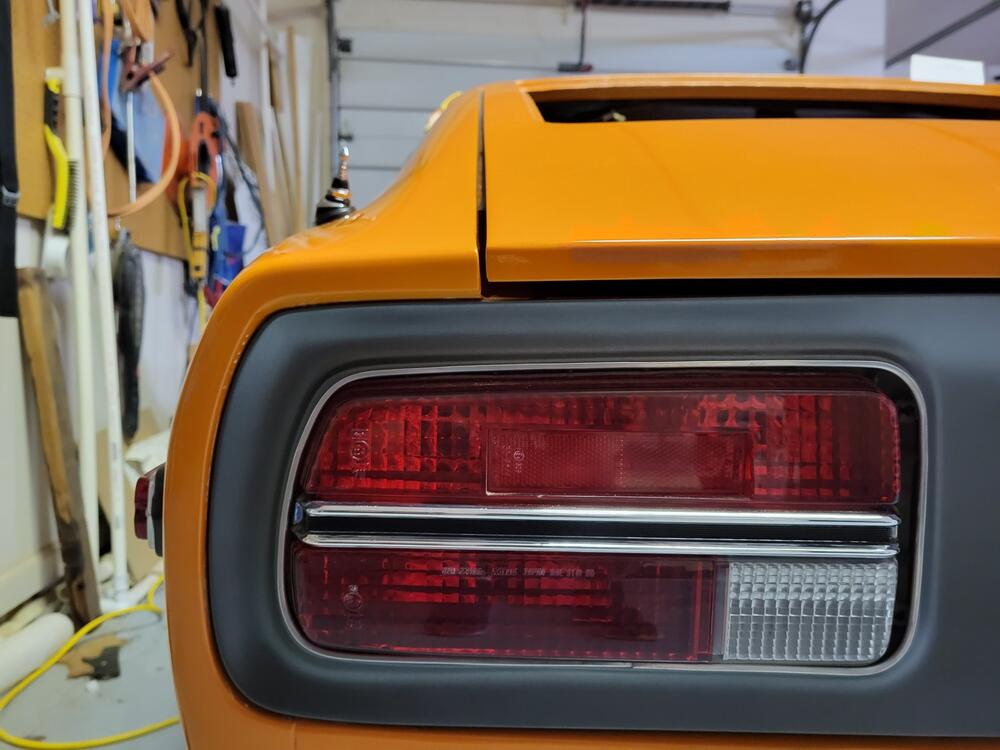
2nd Strut It took a while to get the parts for the 2nd strut . I did not realize that the body mount was spot welded and the strut bracket was screwed to it. CS was able to source the body mount – thank you. Installation of the 2nd strut confirmed that the strut forces the hatch vertically upward, and provided the extra clearance that was required to protect the body. The image below shows the 2nd strut loosely installed. vertical rise hatch corner Earlier in this post I had a similar picture. In it I had lifted the hatch right corner by hand to show the maximum vertical rise that I thought would be possible. I did not move the paper with the lines on it. This latest image below, shows where the hatch right corner sits in its open resting position with the 2nd strut installed. Patcon - I was wrong about there being vertical movement in the hatch hinge. My comment made it seem as if there was slop in the hinge. My hinges are new, and they have little to no slop in the hinge. As you know, on a 240z there was originally only one strut to help raise the hatch. As you press upon the bottom of the hatch to close it you begin to overcome the 88 lbs. of force of the strut. As you push down on the bottom of the hatch; the top of the hatch, at the roofline reacts, in the opposite direction. The left side has nowhere to move as the strut is already forcing the hatch up, the length of the strut being the limiting factor. The harder you push the hatch to close it the higher the force becomes at the top of the hatch on the right side. This force causes the right side of the hatch to appear to rise, but it is actually causing the hinge to rotate on its hinge pin and in fact it creates vertical movement at the right corner. Eventually I think you create enough downward force on the bottom of the hatch to overwhelm the left side strut and the hatch rotates downward to the closed position. For whatever reason I need a little more clearance (probably earlier in the cycle) to clear the roofline. Putting the 2nd strut in on the right side seems to provide that extra lift. Below are the results after installation of the 2nd strut and aligning the hatch. Left Top Corner Right Top corner Right Middle Gap Left Middle Gap Right Bottom Corner Left Bottom Corner Hatch Top Left Gap Hatch Top Right Gap Hatch Roofline Hatch Lip Corners I am not satisfied with my work on the quarter edge corner or the hatch edge corners. I guess it just got past me at the time. I'll do better next time. As far as the the body line not matching. I think I will be able to address this with a striker adjustment and hopefully some help from installation of the glass compressing the new weather stripping.


-
CS, I Think you have a great point about the glass. I have been concerned about the effect of its weight, and form. Also, the hatch frame may benefit (not very likely I suppose) from being locked in place against the weatherstrip. Because the hatch is so much easier to handle without the glass and because the glass is 40+ years old and therefore fragile I wanted to at least get to the point where the hatch would open and close before installing it. I’ve already got the second strut parts ordered. They will be here in a few days. You have helped me a lot in the years that I have been working on the bucket and I respect your experience, but I have come this far and would like to see the impact of the second strut. I don’t need a great deal of vertical help to clear the roof line, and the weight of the glass may negate the vertical lift gained by the strut. You know as well as I that the 2nd strut is not the final solution even if it works. If it works I am going to have to get the hinge higher in its mounting. I don’t want to risk damage to the roof line or even the paint if the strut gets old and fails. Once the hatch can open and close freely I will install the glass before going any further. As always, thanks for your advice and experience. Regards, q
-
Pictures can be deceiving. It's helpful to know how they were taken, and what the corresponding adjustments were when they were taken. For example it is easy to jump to the conclusion that the hatch extends far beyond the fender. In one of my posts I said: “I do not have the latch hardware installed so the hatch is not shown fully closed.” Because the hatch is not fully closed and because of the angle that the picture was taken the rear edge of the hatch looks far worse than it is in reality. Will it be perfect when I am done – I doubt it. But the hatch rear edge will be close enough to matching the rear fender edge to satisfy most folks, at least in my house. zedhead - Don’t worry about being brutal. I will take positive advice from anyone whenever it is offered. I am just trying to give the “bucket” my best effort, sometimes it is an iterative process. This forum has been a tremendous help to me. I have tried to post items that might help the next guy avoid a few problems or solve a problem faster than he/she might otherwise. For example I was unaware that the hatch lift strut actually raises the hatch vertically, when in the open position. I think this might help the next guy. Anyway, I have the parts coming that I need for a right side hatch strut. This will allow me to prove/disprove that my issue can be resolved with a very slight vertical movement in the hatch open position. Once I can close the hatch without worrying about the paint I can do the trial and error adjustments for the gaps. I will post pictures, bad or good. Some can trash the effort, and I am sure that some will help me figure out how to improve it. Once I get the hatch right with the additional strut I can decide whether I want to get the vertical movement with the strut or by opening up the adjustment holes for the hinge. I put this off because I dread making those holes larger, and because I still think introducing the 2nd strut with the 260z was an upgrade, certainly not just for aesthetics. On the other hand, part of me thinks that the 240z had one strut and the bucket is a 240z so it should have one strut. Roberts280z – You have a little more extensive work on your project than was needed on mine. The bottom of my hatch had the typical rust issues and I had some welding, patching and metal filling to do on it. The left side of the bucket was fairly clean, the right side had a lot of work in the dogleg area and some in the lower quarter. I could not find much help via the forums to align the hatch, but I am hopeful that this thread will ultimately turn into a procedure/process that helps others do it faster and better. I look forward to your comments – thanks. Let me know if you need a measurement. Patcon & Grannyknot– As always, I appreciate your assistance – thanks. Thanks to all for your help.
-
-
the problem is that there is no more vertical adjustment, using the bolts that hold the hinge to the body. I suppose I could make the adjustment hole larger. do you have a good way to do that or should I just use a drill or a round file?
-
Yes, the hatch just nicks the roof where the tape is. I don't need a lot of clearance at this point but you can see from the other pics of the closed hatch that I need to bring the hatch more toward the front of the car which will likely cause more of a clearance issue. I would like to get the gaps to look good but I am not a perfectionist. And Yes I plead guilty on the paint. It still needs a final buffing. Thanks for the compliment. I love to paint. This is the 2nd car that I have done. My first was a 1974 MGB, that I still have.