plucker
Free Member
-
Joined
-
Last visited
-
I agree partially, I would have picked one on the back side of the bearing, however when I found the shims that fit the ID perfectly and they were machined. I realized that spacing out on the ID would work just as well. I do not think the shims need to be hardened. the compression load is not that much ( almost none if you shim it correctly )so almost anything will withstand the compression loading. ( heck I have used notebook paper to shim the side bearings on a R180, worked great for 5 years of road racing ! , looked brand new after I took it apart ! ) Also the axial location of the pinion does not matter. as long as you don't run into the rack with the bearing, it wont care at all where it is , unless your pinion is worn out and you need to match the wear marks. axial play and preload are important, location is not. while I agree in theory with your points, but practically I think you have to remember this is a rack and pinion, not a high speed, high load application. I will report if it works out ok ! Thanks
-
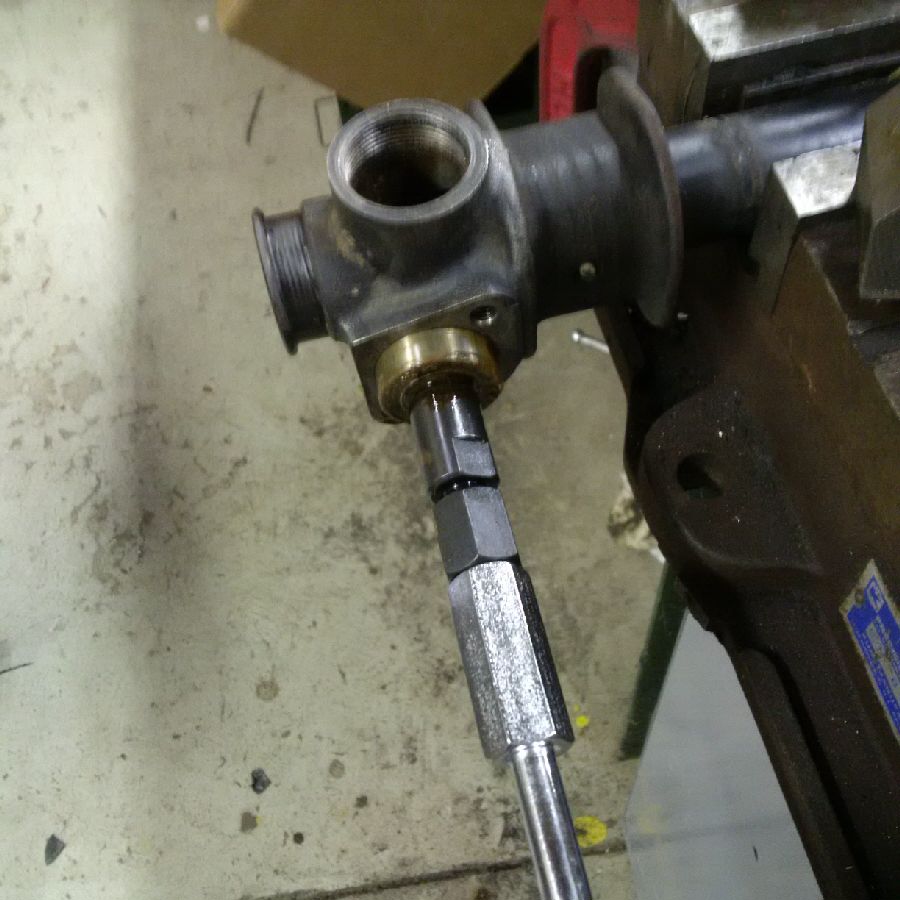
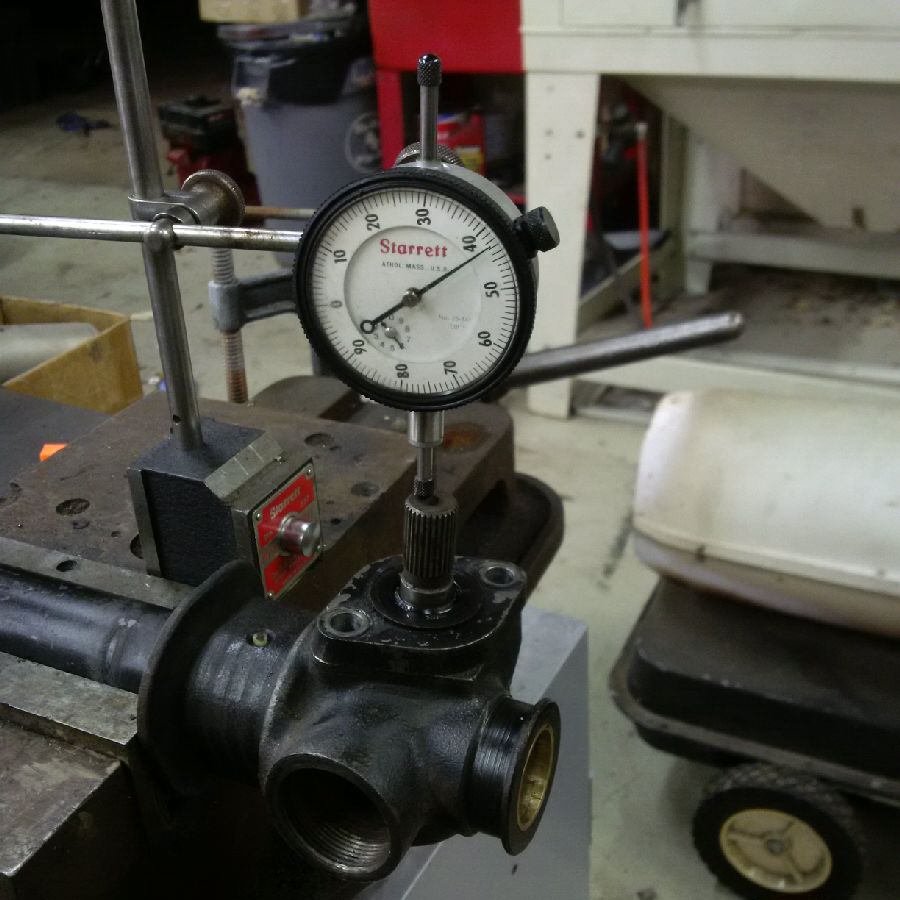
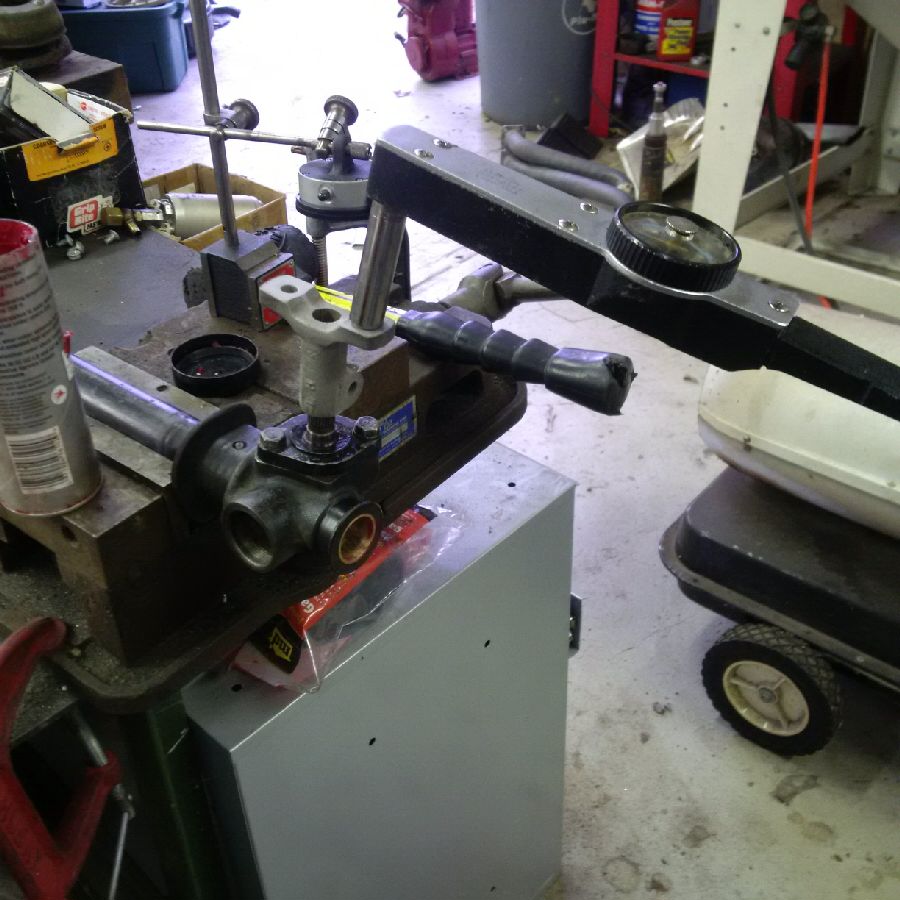
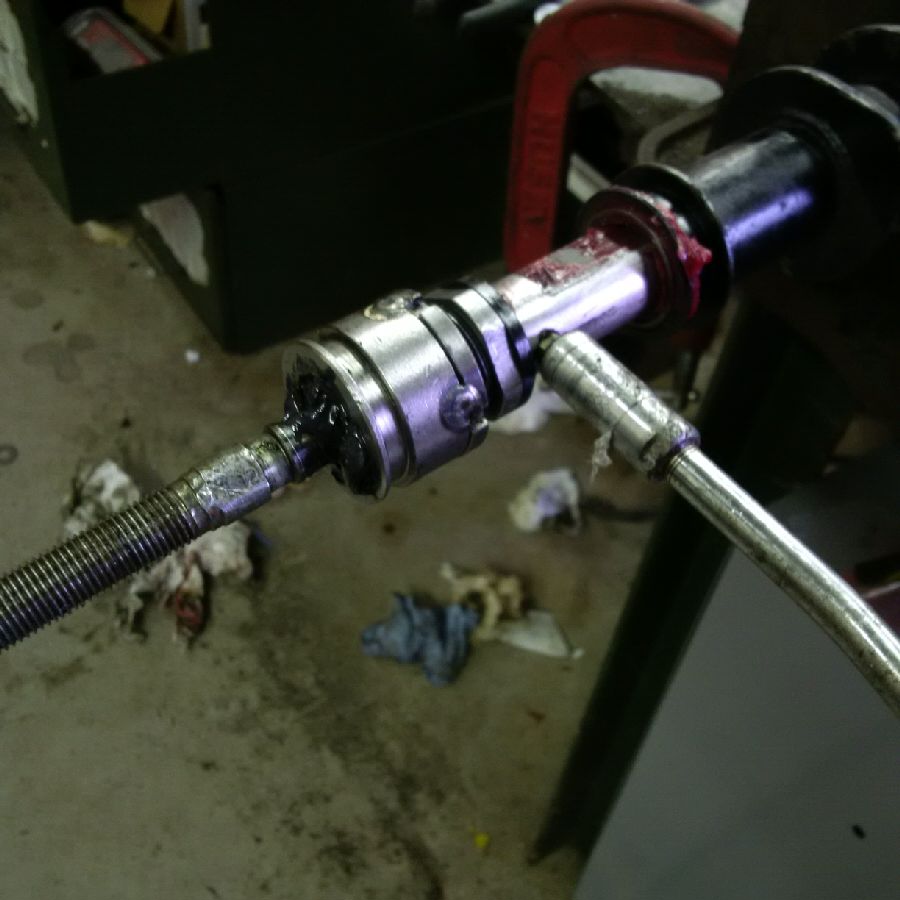
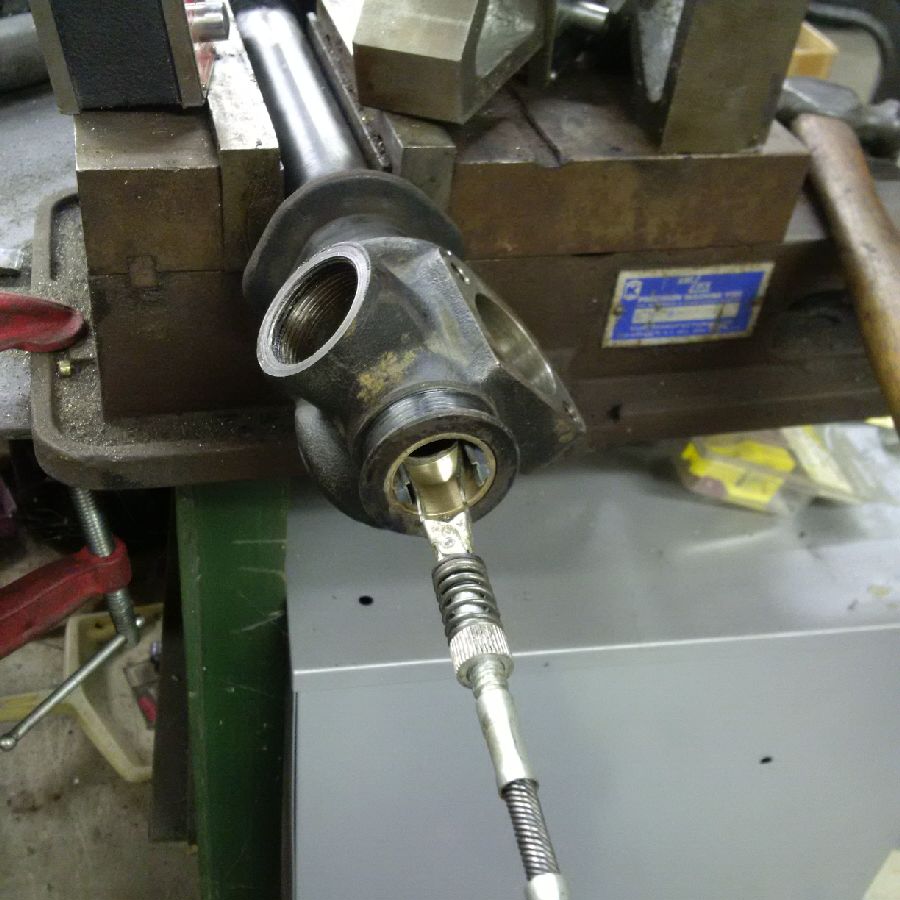
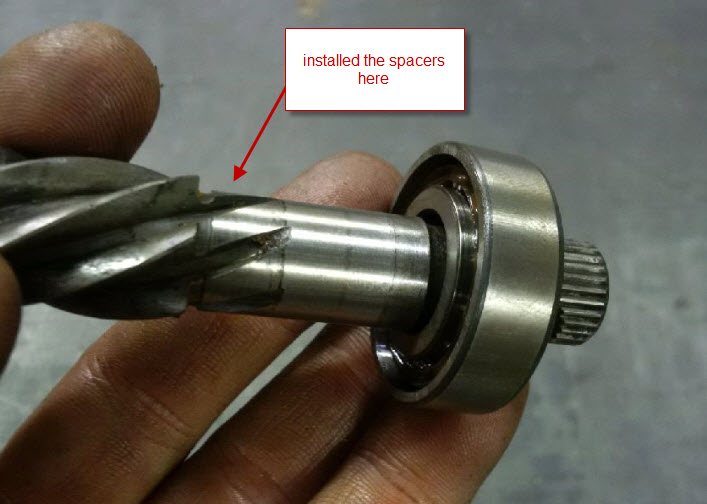
finished up the rack this week.. so I had to buy a slide hammer pilot bushing puller to get the inner bearing out of the rack housing.. that bearing was really bad, the water in the housing really killed the bearing If you remember the bearing you can get are 1mm too narrow to work, so I had to find or make a spacer. several folks have mentioned that a valve shim would work.. I dug around in my stuff and looked for something I could use or modify, and lo and behold I found the perfect washer ! 15mm id .035 thick ( close enough to 1 mm for me ! ) I installed two of them between the pinion and the bearing ( otherwise you cannot install the pinion if it is on the other end, it fouls with the rack. ) after I installed the pinion with the spacers, I set up a dial indicator to determine how much axial play the pinion and its bearings had, Ideally one would have a bunch of the shims so you could get a just .002 free play or so .. I only had 3 shims.. played with it until I got what I think is a few thousands of preload. I measured .002 with the bearing housing and shims in place but not torqued. after I tightened the bolts the free play disappeared. no play but it still turned easy the shop manual specifies checking the turning torque. so I checked it with a small dial torque wrench rigged with a steering spline piece, It was within specs. I then installed the rack and the mesh adjustment shoe ( had to work the shoe with a bit of sandpaper to get it to move freely in the bore ) . adjusted the preload while taking torque measurements. ( never quite understood why there are shims under the spring, I just adjusted the positioned the big screw cap and locked the jam nut ? ) . got the torque within spec, but it always had a tight spot on one side of the travel.. not even torque all thru the travel. installed the inner tie rods, installed a grease nipple and pumped them full of grease , they felt good with no real play and did not flop around installed the boots with tye wraps and all done ! ( I also painted the housing before I put the boots on ! gotta look good ! )


-
not sure. I have never seen a 240 / 260 rack, but I think they are different
-
re-looked at my part #'s , I was not real sure what I needed so I ordered several bushings , looks like I got confused ! here is what I bought: Products ------------------------------------------------------ 2 x Z90 2530 (Z90_25mmx28mmx30mm) = $7.06 2 x ZMB 2530-20 (25mmx30mmx20mm) = $9.68 ------------------------------------------------------ Sub-Total: $16.74 UPS (UPS Ground): $14.92 Total: $31.66 so I must have used the ZMB 3530-20 that makes sense since the z90 bushing is not big enough ( it is a better bearing though , lube pockets and it is split , but not suitable for modification ) the length ( 20mm ) is right for the drivers side, however it would be a bit short for the passenger side, but it would work fine . looking at their web site they have options that are longer not sure how long the passenger side is but the same bearing is available in 25,40, and 50mm lengths http://asbbearingsonline.com/index.php?main_page=index&cPath=86&sort=20a&page=9 . I chose to not replace the passenger side because it was not worn at all. so if you want to do this without a lathe, just buy the ZMB 2530-20 ( or longer ) and have a machinist turn the OD down to 1.125 my next challenge is trying to get a puller to remove the backside pinion bearing , the horrible freight one I bought was too big to fit down in the pinion housing, it also was not strong enough to pull the drivers side bushing nor did it have enough reach to get the passenger side out http://www.harborfreight.com/3-jaw-pilot-bearing-puller-4876.html
-
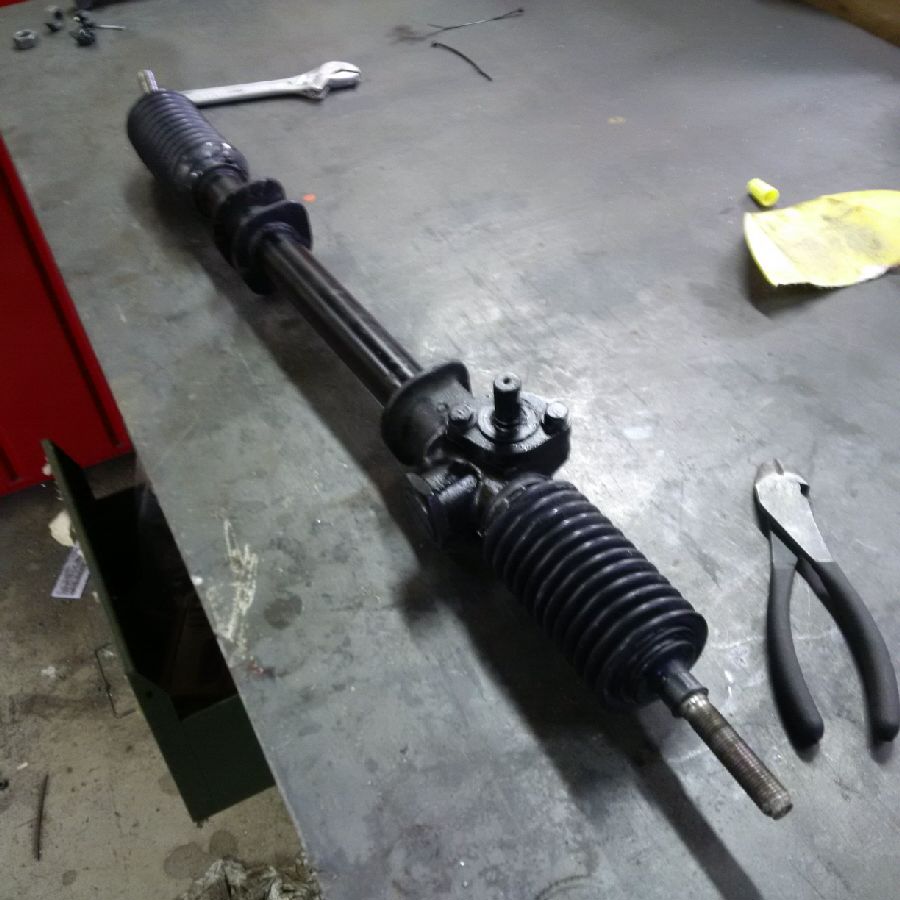
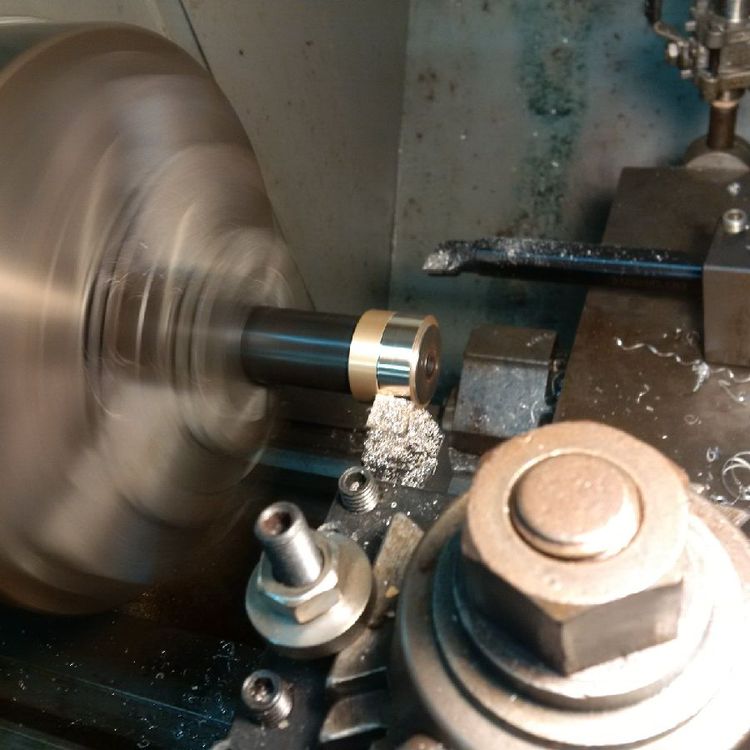
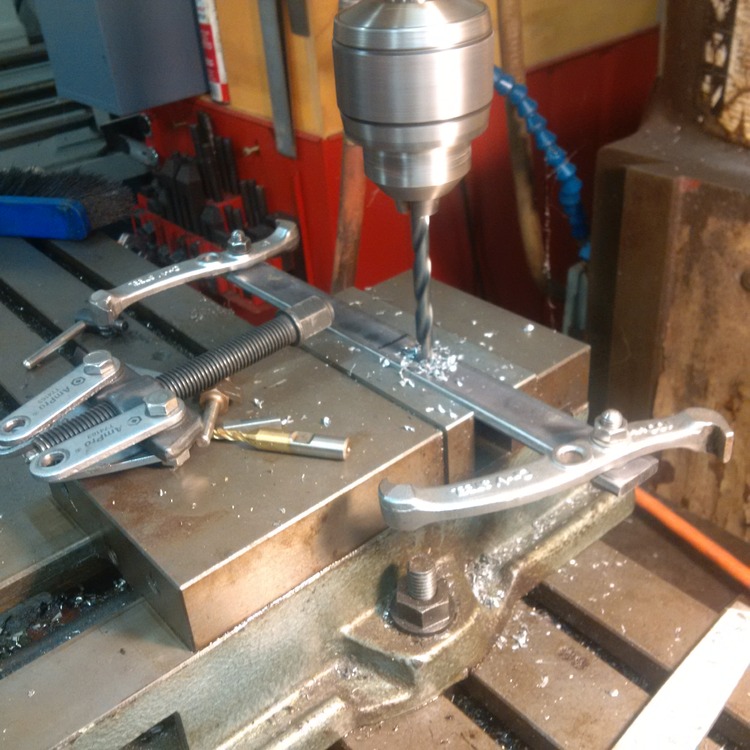
going to share my rack re-build here for anyone that is interested first I disassembled the rack, ( well documented in the FSM and here ) , then I assessed the condition of all the major pieces 1) the inner tire rods were good and tight with no real play 2) the rack end bushings were mixed , the drivers side showed significant play, but the passenger side was tight. 3) the pinion bearings were shot, in fact the housing was partially full of water so then I tried to source parts, the standards stuff was available, I ordered rack mount bushings ( rubber ) , bellows, and outer tie rods. however the internal parts, end bushings and bearings were not available. so I had figure out something I ordered bearings from mcmaster carr, that I think will work with a spacer.. the originals are angular contact ball bearings, 15mm id x 35 mm od x 12 mm thck. looking thru the mcmaster catalog I found https://www.mcmaster.com/#6680k13/=16kgt7i which are very similar, just need to make a 1mm spacer to make them wide enough. I measured the rack itself and it is 25mm, so I looked for the bronze bushings that might fit, could not measure the OD of originals before I got them out but they were around 1.125" . the closest thing I found was http://asbbearingsonline.com/index.php?main_page=index&cPath=103_105_109 so I ordered 2 z90-2530 Last night I replaced the drivers side rack end bushing. could not get the sleeve bushing to come out with my harbor freight id puller, so I ended up cutting it lengthwise with a hacksaw blade ( almost all the way thru ) and then it pulled easy. I measured the remaining bore in the rack as 1.124" ID. the bushing OD measured 1.185" or so, so to the lathe ! the hard part of most projects like this is how do you hold the part ? luckily I had bought some expanding collets. so I started by machining it to the .984" diameter of the bushing then I put the bushing on it, expanded the mandrel , and turned the bushing OD to 1.125 giving me .001 of press fit. After pressing in to the rack housing, ( using the collet and a hammer.. plus a little torch heat on the housing ) the ID of the bushing had shrunk a bit, so I had to hone it with a brake hone. So after a 30 mins of honing and test fitting, I got the rack to slide smoothly in the housing with no detectable free play NIce! next I will work o the pinion bearings and see if I can make them work.


-
that might be why I had to adjust the push rod about 1/4" I know there was not one on that booster. and the symptoms are what everyone talks about, long travel then too grabby when they do engage ! wil see if that is the issue . thank you !
-
update; the harness re-build worked out well, got the car running good enough for a test drive.... car ran ok. brakes are still terrible.. realized the problem is no power boost, looked thru my pile of parts and found a 7.5" booster. held vacuum some of the time, but if you touched the output rod, it would leak. after a bit of investigation the problem was corrosion on the output rod. took it out, polished the corrosion off of the rod, greased it up and no more leaks. had to really worked to get that rod adjusted to the shop manual specified .380" had to heat and soak in oil to get it loosened up. put it back on the car and now I have too much boost, but I will make a few changes to make that better.
-
needle scalers rock! I used it to remove about 12 lbs of undercoating off of my race car a year or so ago. temperature makes a ton of difference ! glad it worked out for you
-
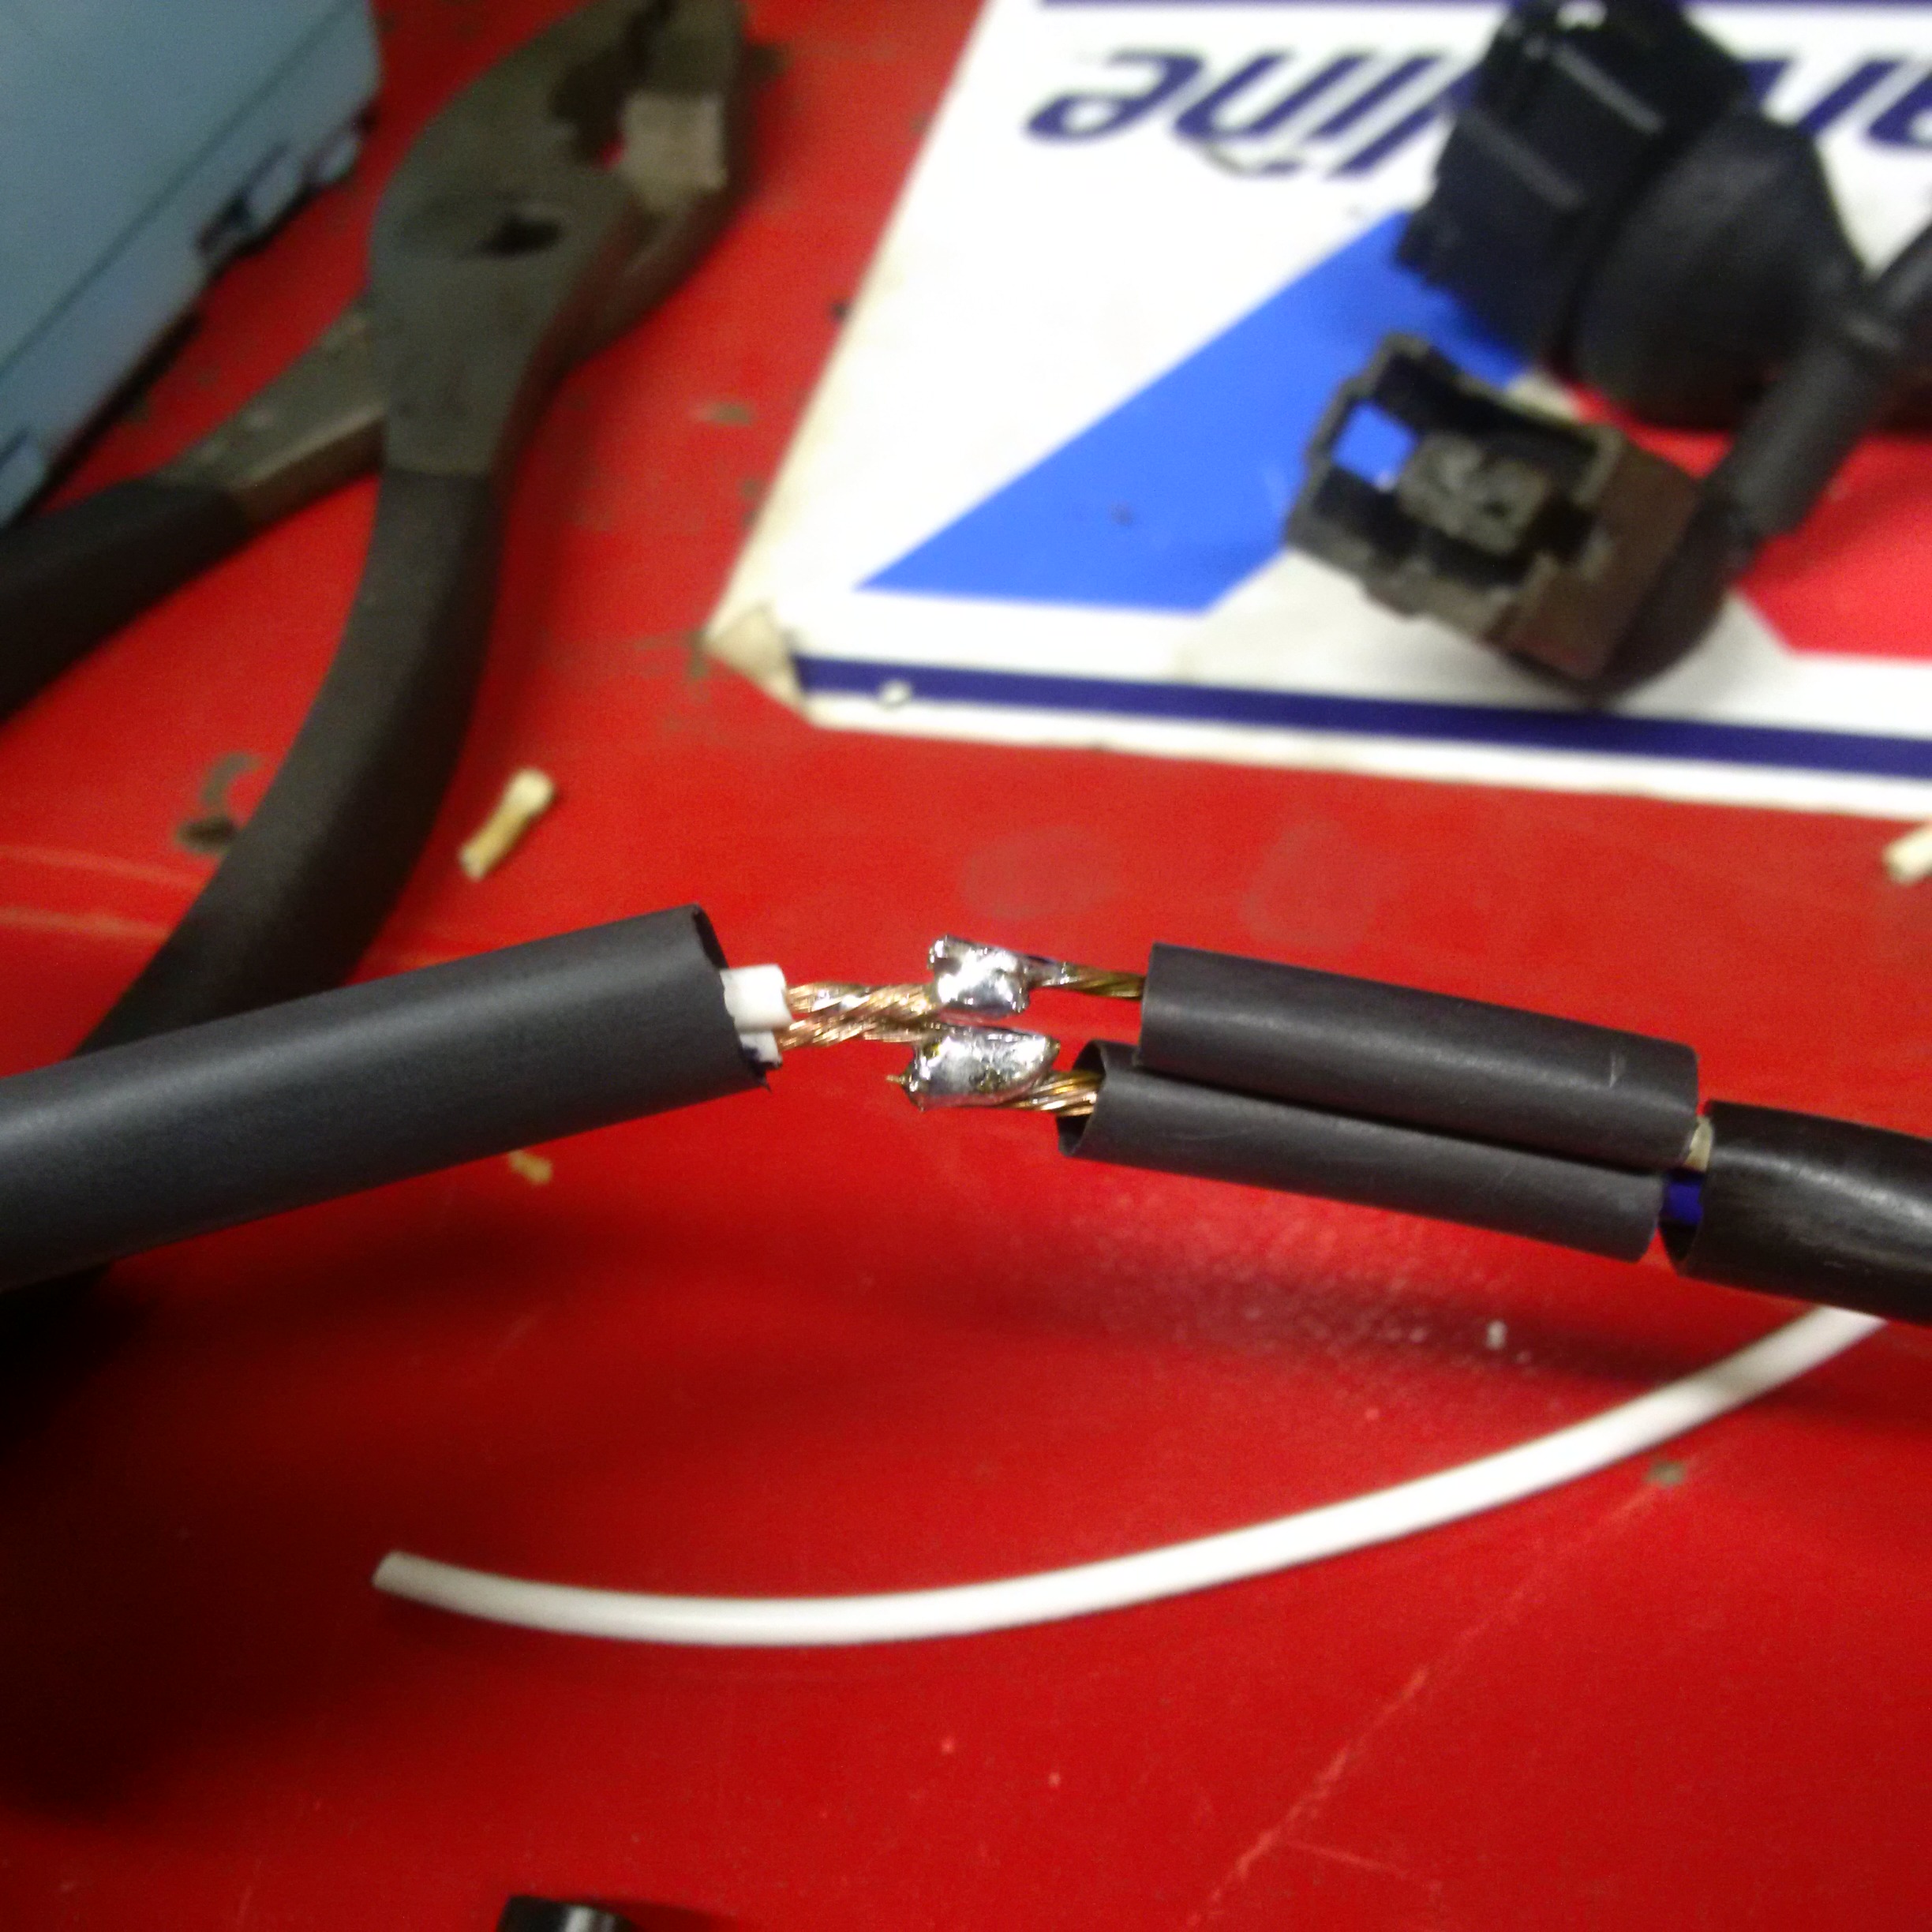
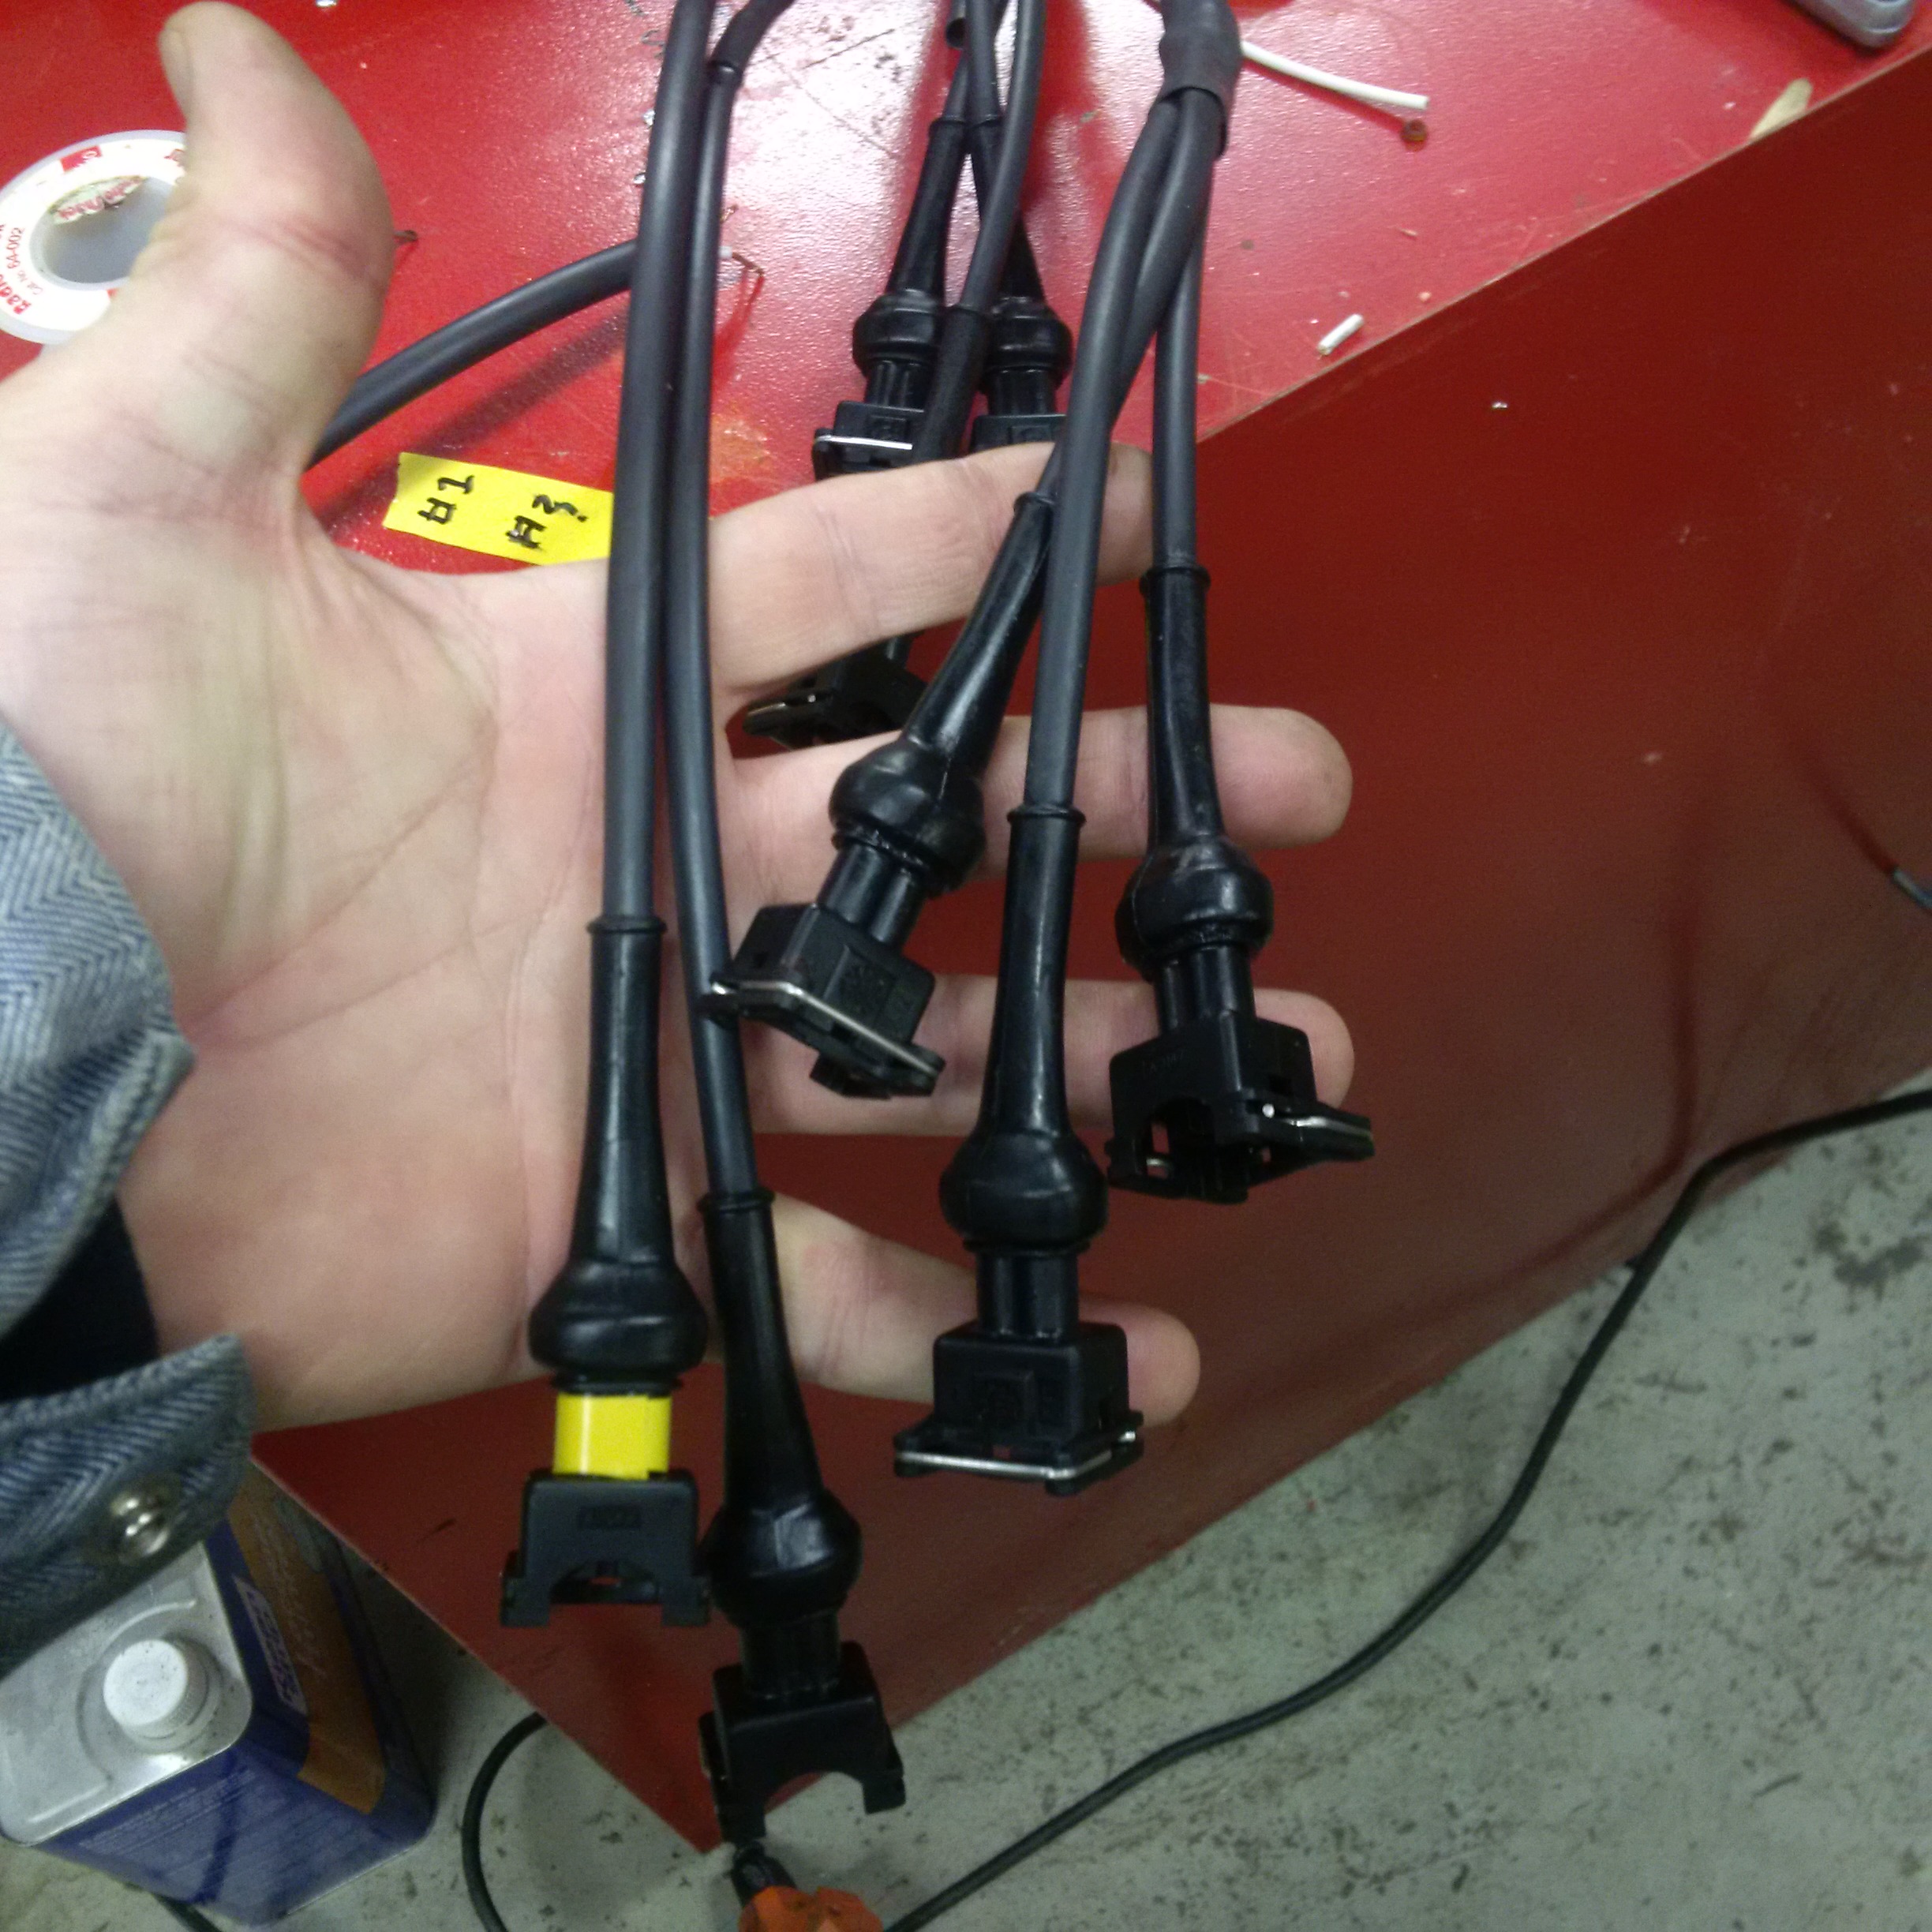
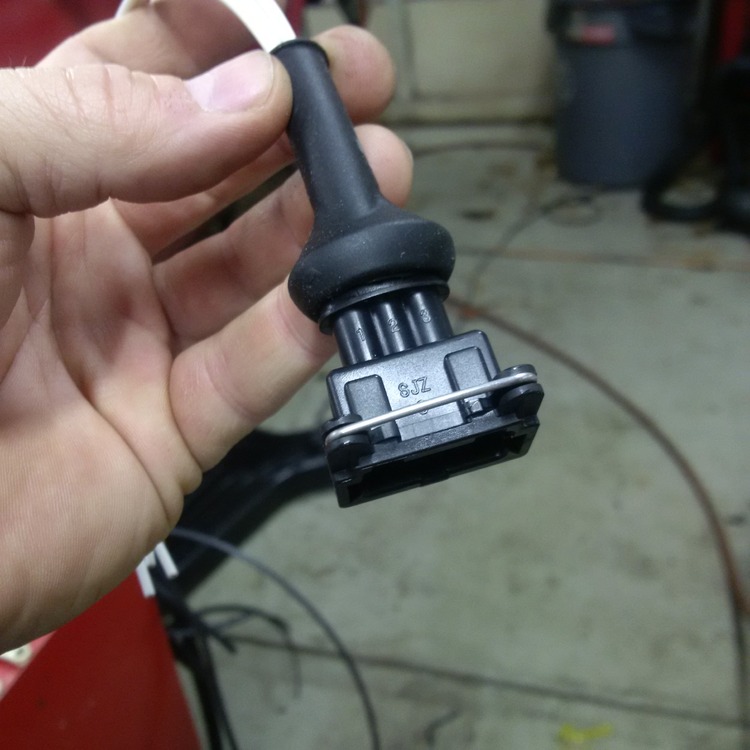
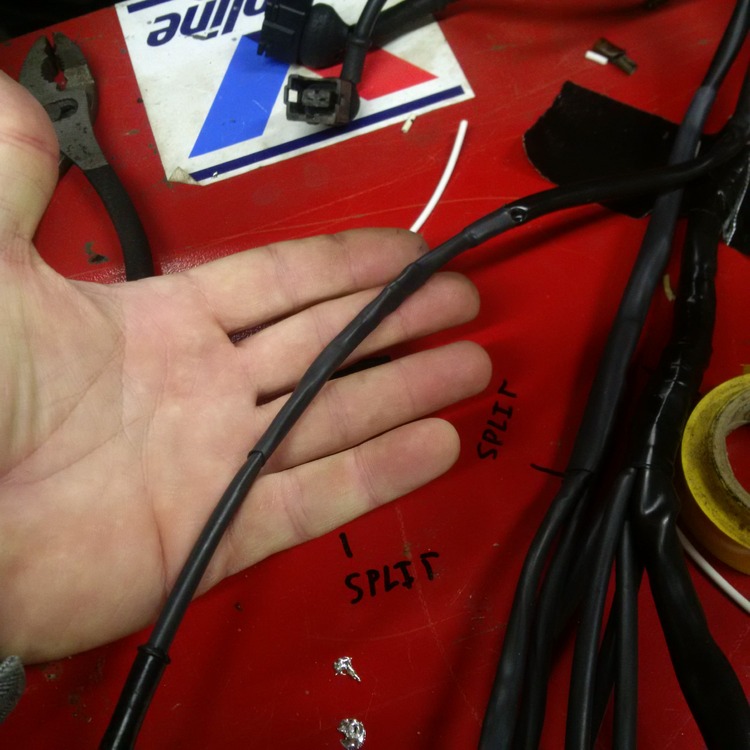
FUEL INJECTION HARNESS RE-BUILD I have been playing around with the engine trying to get it to run reasonably.. I pulled the injectors to replace them with anothere set I had laying around, unfortunately a few of the fuel injector connectors crumbled to dust as i tried to recconect them.. oh well I guess I needed to fix that anyway. so I ordered a connector kit from e-bay that had all of the ev-1 style of connectors, including the air meter. picked the style with boots and 8" long pigtails.. that had enough wire to replace the crumbly wires. stole some heat shrink out of the electrical shop at work and went to town . I think the kit was about $65.00 or so seemed like a good deal. brought an old roll around cabinet up the the car so i had a surface to work on, taped the harness to the top and marked out the lengths of each connector branch. pulled the boots off and added heat shrink to the pigtails.replaced the boots, cut the harness wires stripped the ends and soldered the wires together. you have to make sure the heat shrink is in place before you so the soldering. with all the branches and splits you really have to pay attention to how you can get the heat shrink on, after you solder on a connector you cannot get the heat shrink on over the connector ! I did not worry about polarity of the connectors except for the thermo-time switch and the throttle switch ( hope I am right ) , I did not replace the air meter connector as it was in really good shape. I also eliminated the bullet connectors on the water temp and thermo-time part of the harness, I figured less connectors mean less problems right ? might be ready for a test tommorow


-
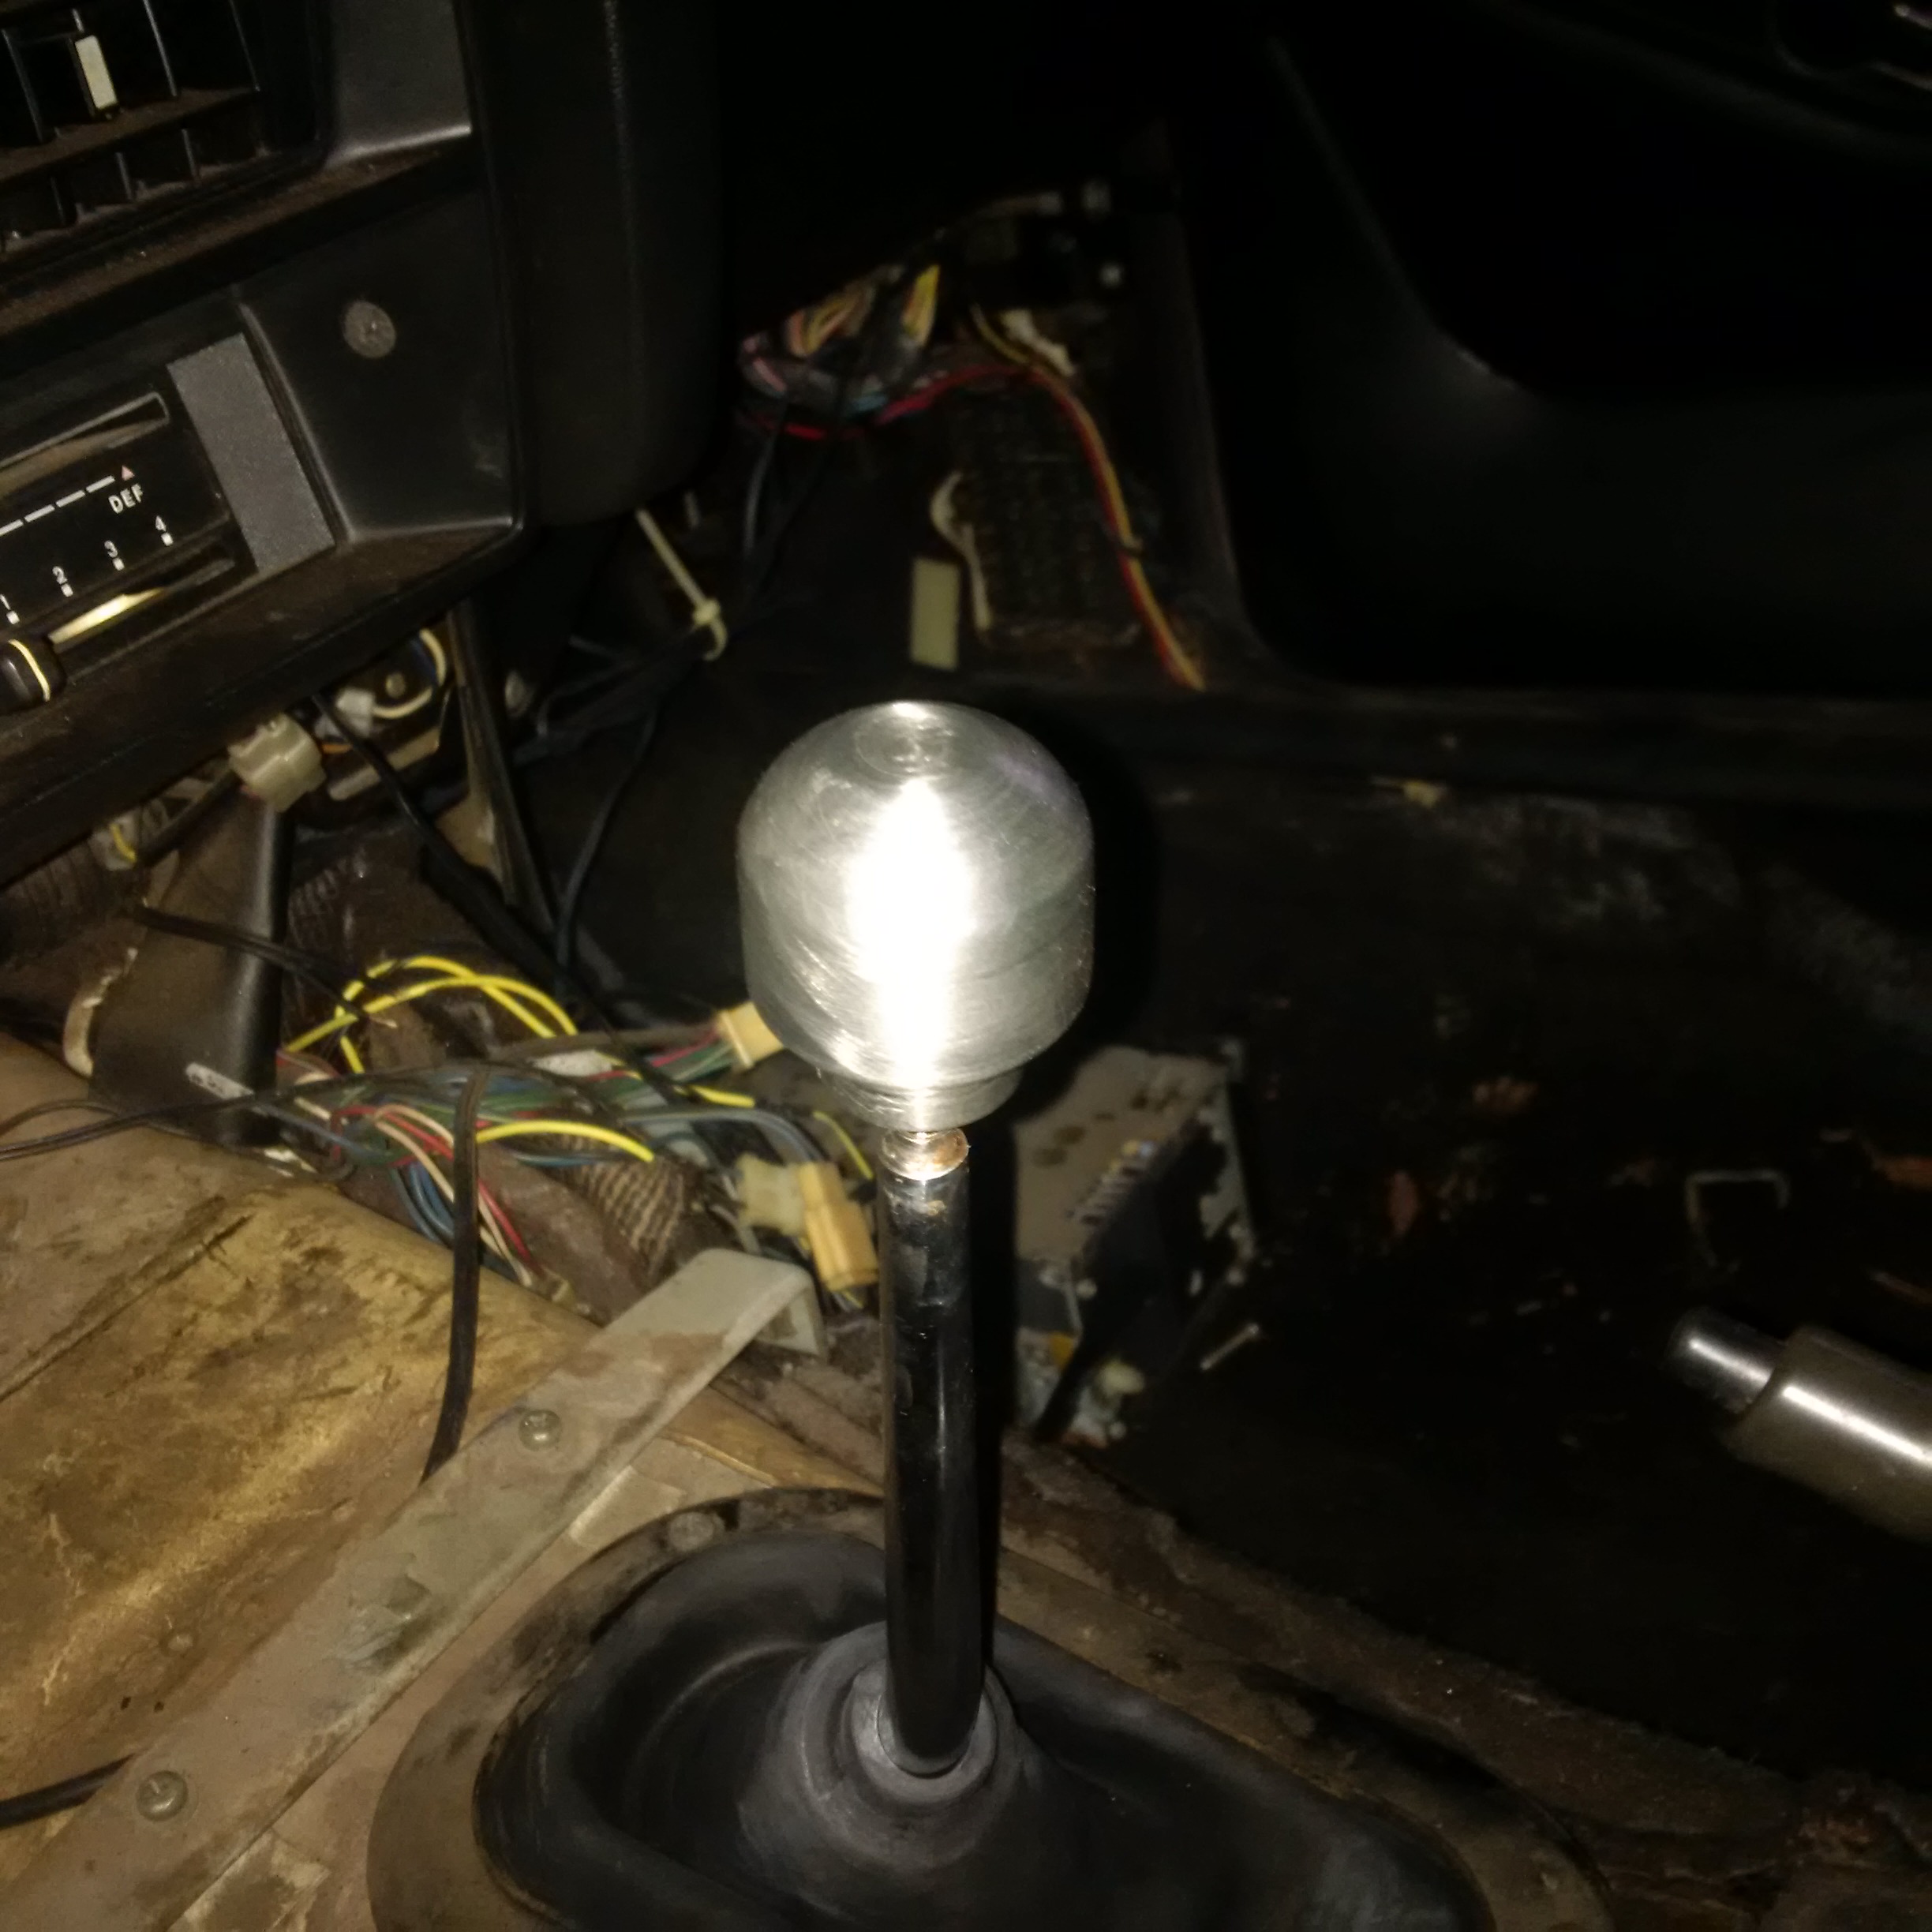
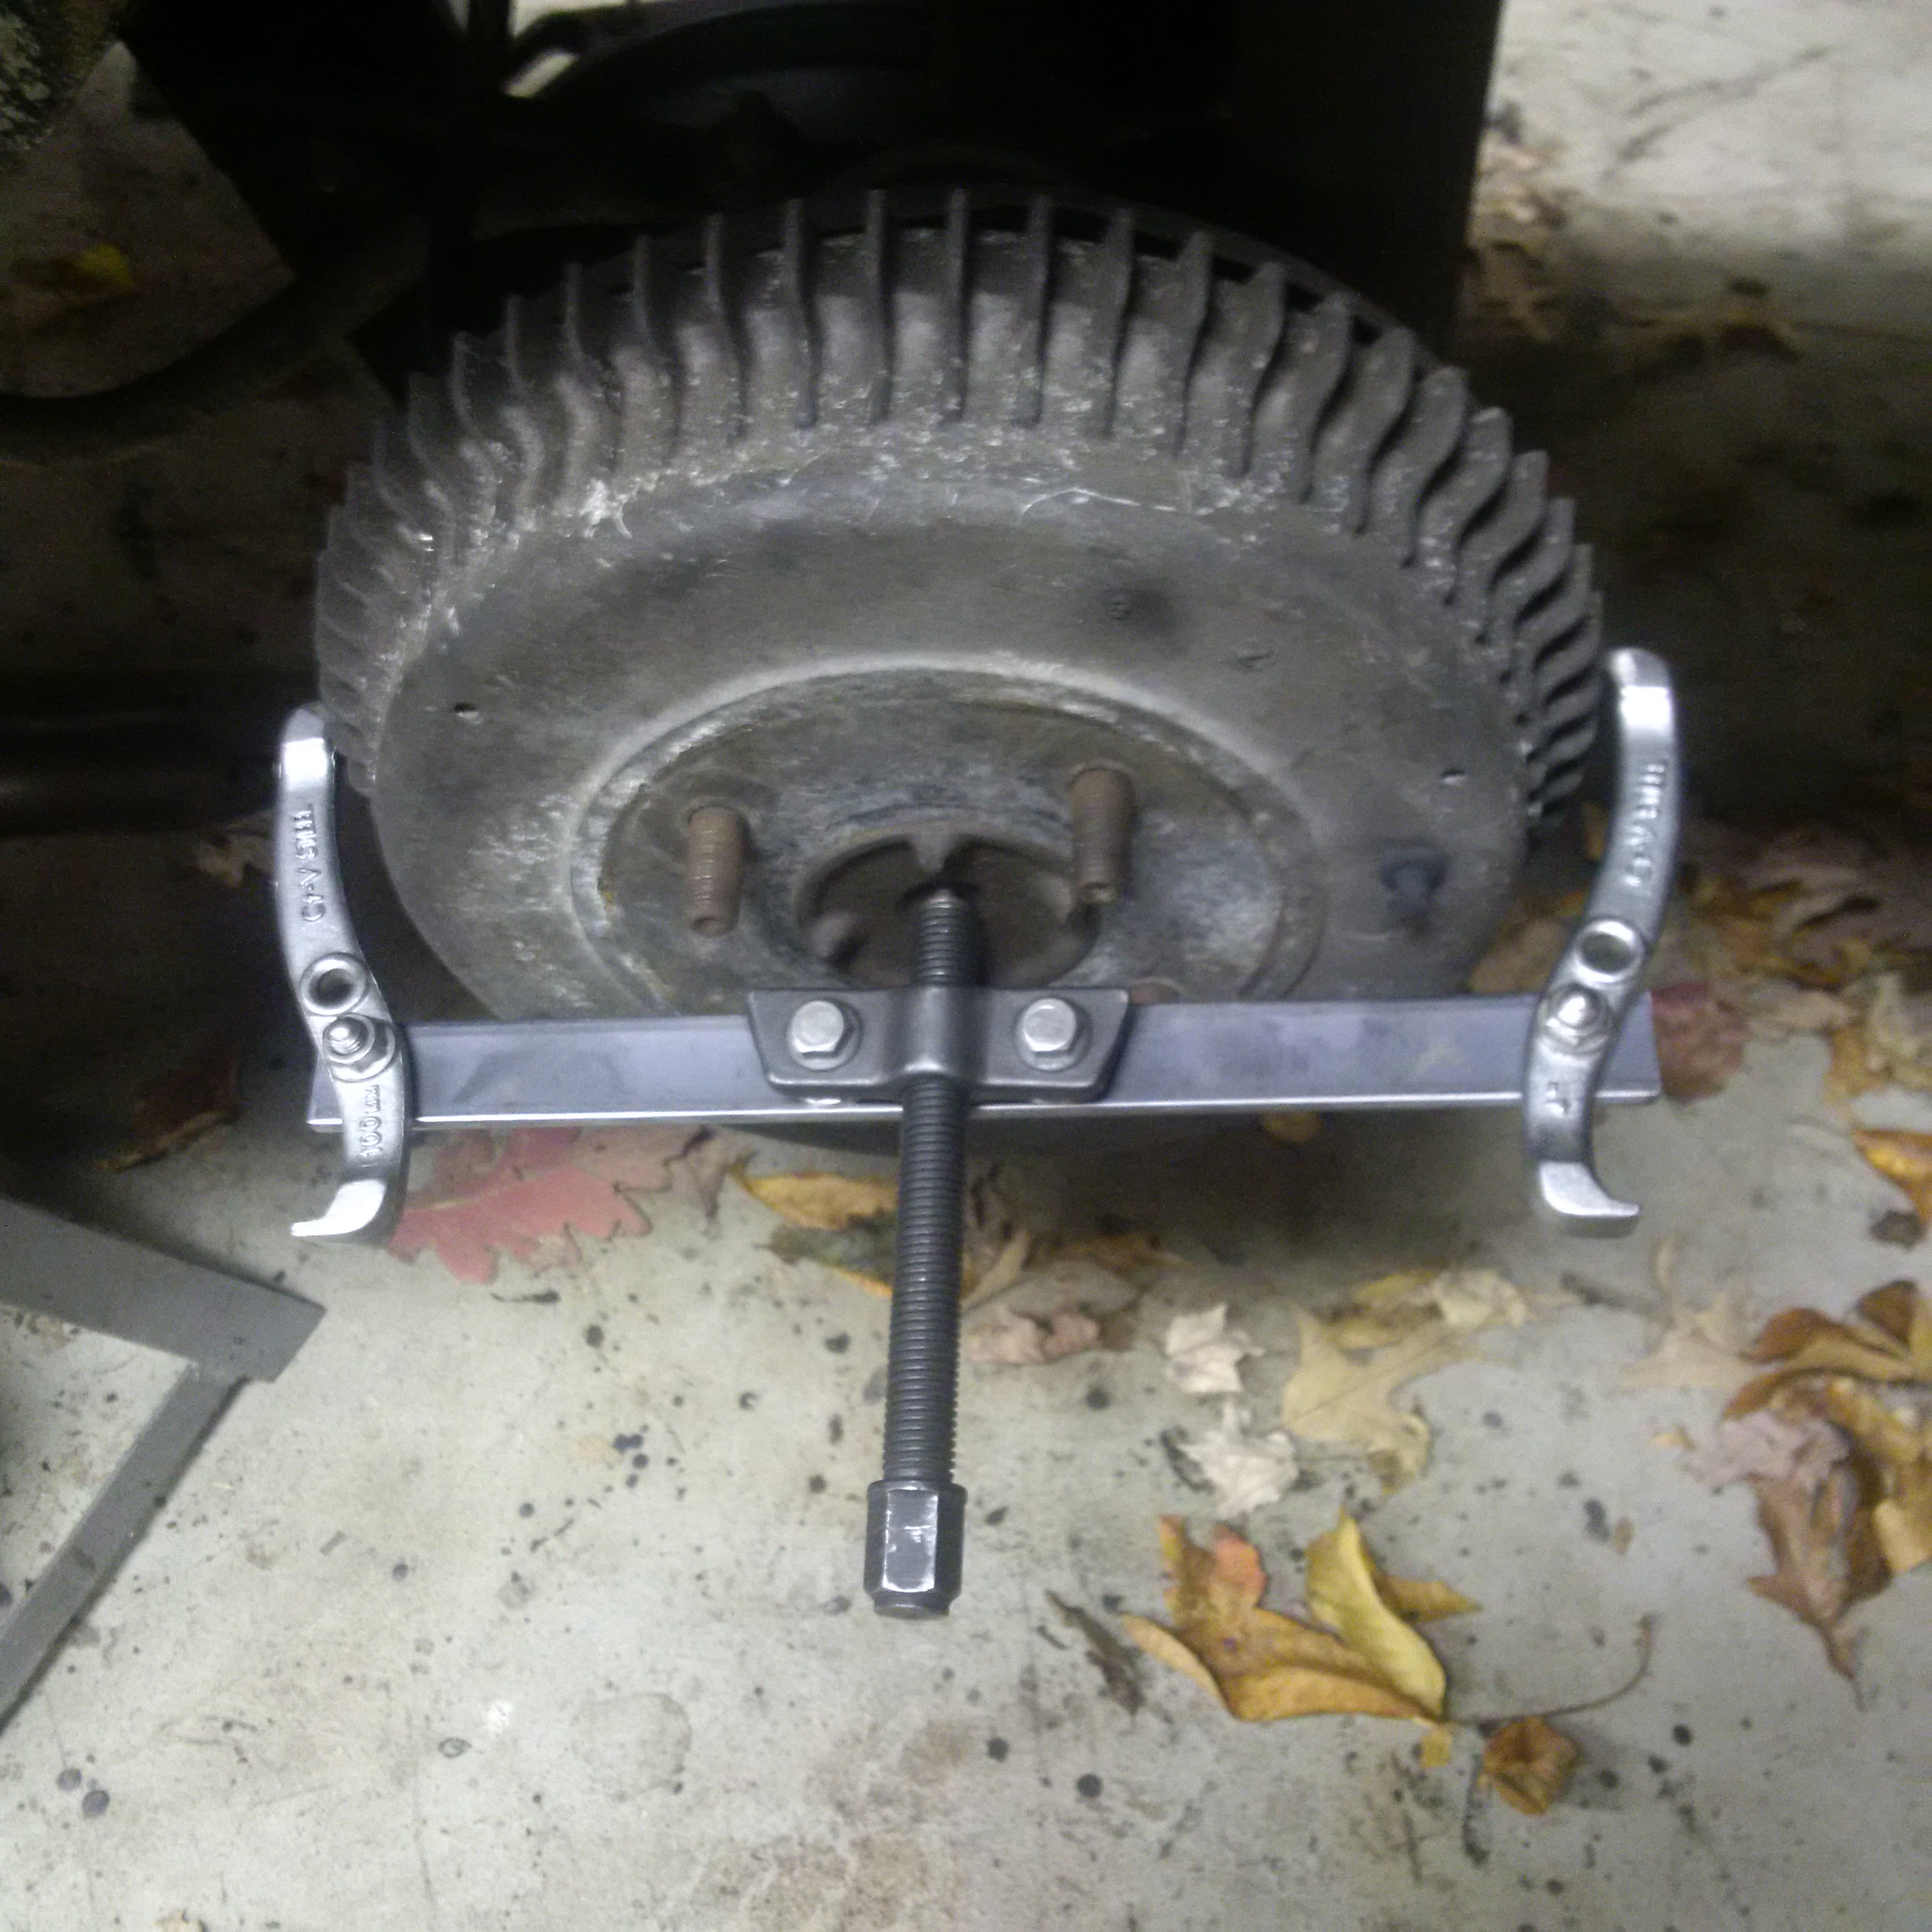
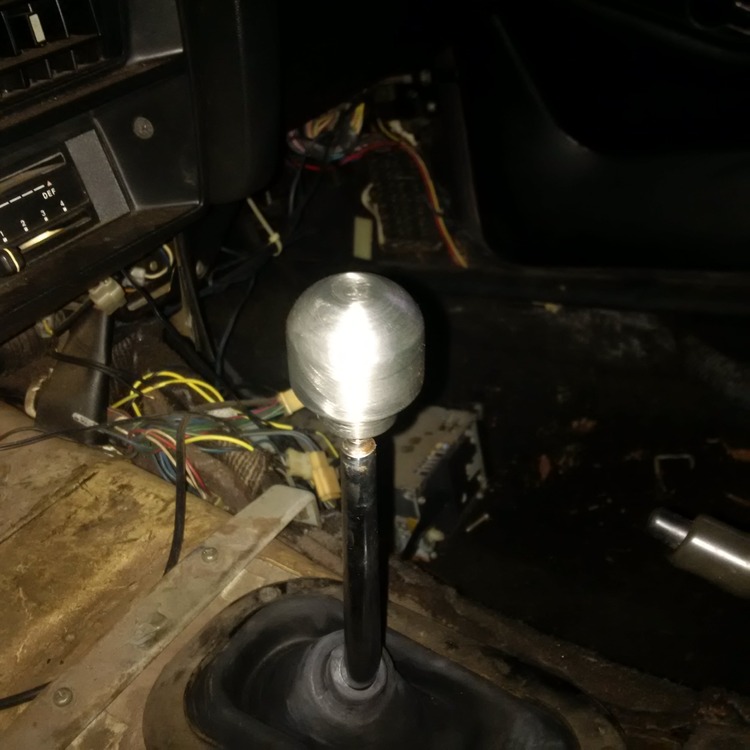
progress update : finally got the rear drums off, my puller and a propane torch, plus persistence payed off, they finally came off. the drivers side fell apart in pieces, the shoe linings were no longer connected. and there was about 1/2 cup of debris in the drums... of course the wheel cylinders were shot. ordered cheap chinese shoes and wheel cylinders. got the drivers side assembled . hopefully soon will have a car that is capable of stopping ! The shift lever seemed vaugely attached to something in the gearbox... that would not do. took it apart and found no bushings whatsoever on the shift lever.. that would explain it ! went ahead and made a bushing on the lathe. could not find my bronze material so I just made it out of aluminum. works great ! and near zero cost ! while I was on the lathe, I made a cool stainless shift knob to replace the knob-shaped thing that was there. of curse I forgot to take a picture , next time
-
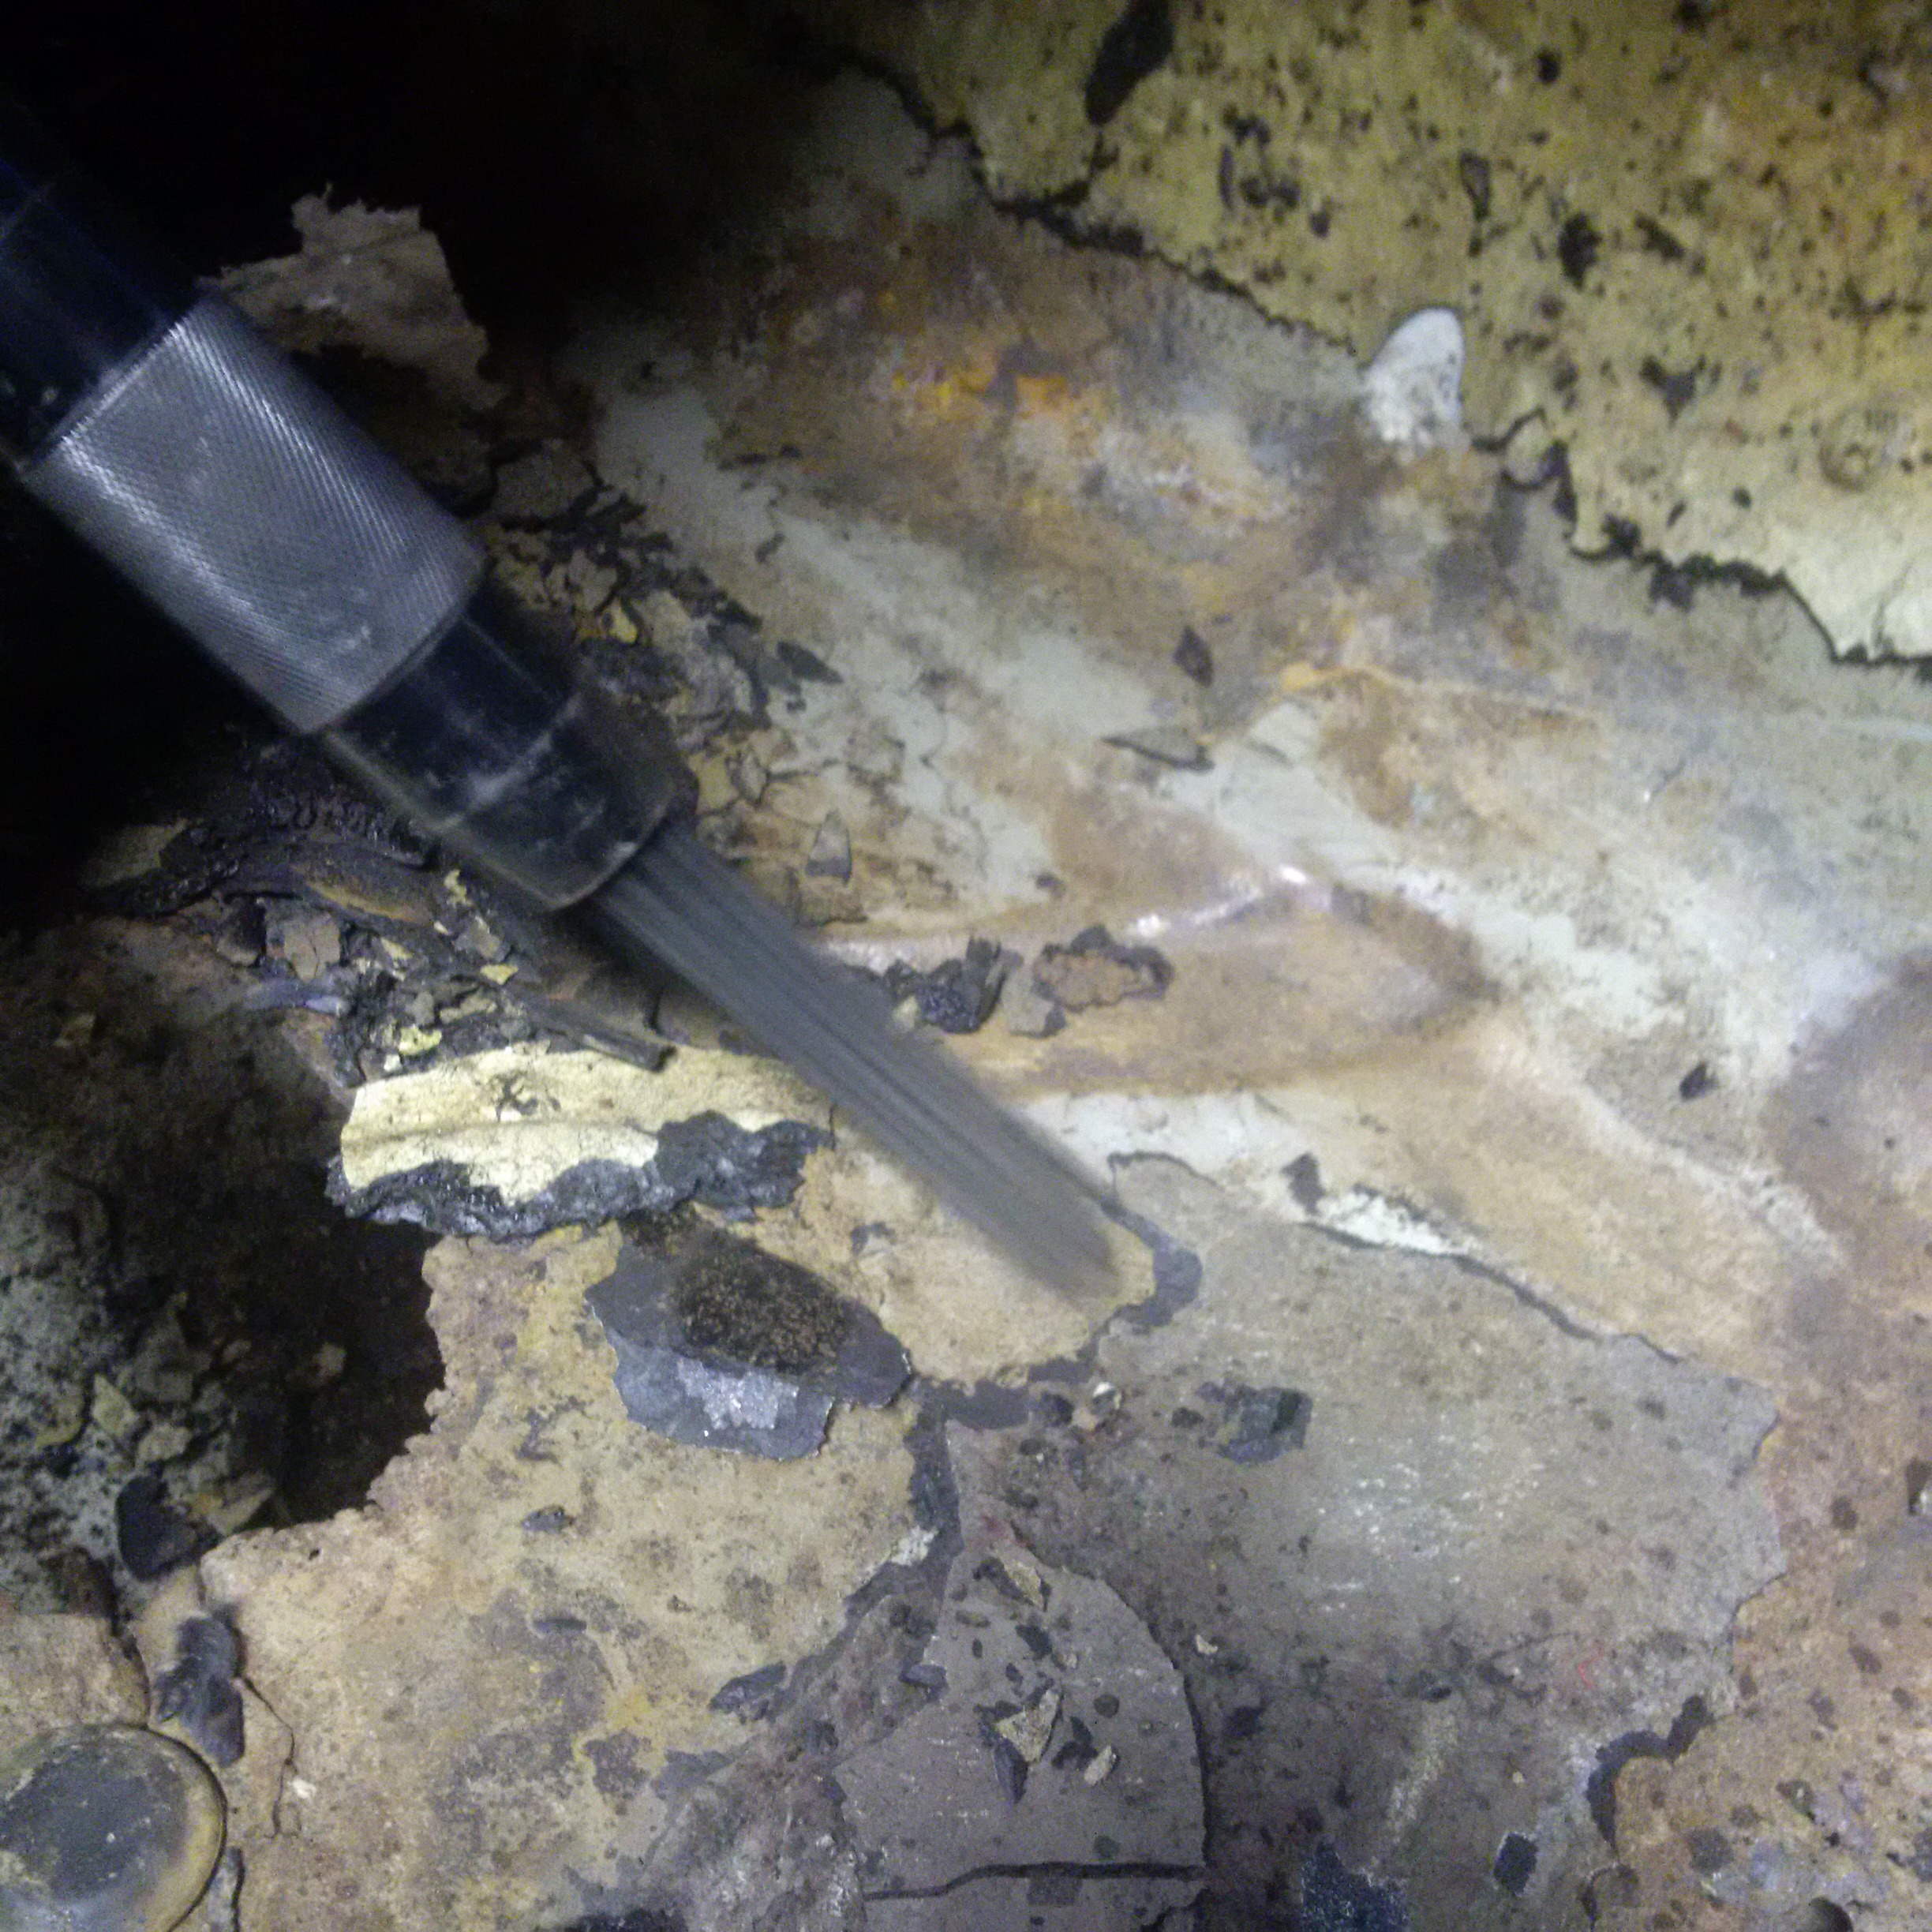
so have made some progress on the car, still did not run right, after cleaning the tank, fuel pressure was sometimes low and was getting worse, so I put a new ( old ) fuel pump and a new fuel filter, and added a clear pre-pump filter on the car. it is running even better. got the front calipers re-built. had to pick thru my pile of caliper pistons to find some that were not too pitted. question, does anybody sell new pistons ? I am running out of good ones, was thinking about having a set made out of 304 stainless. ( buddy has a machine shop ) started working on the rear brakes. and the curse of the stuck pistons raised its head. modified a puller to work on the drums but still not go. need to get some heat on there next I patched up the drivers side floor pan for the short term so my feet dont fall thrugh ! found a great way to get the tar pad off, I have read all the forums on using dry ice etc. but that would require me going to buy the stuff, that was not going to happen, so I got out the trusty needle scaler. worked like a charm, if you get the right angle on the leading edge, it falls off like crazy. cut out some sheetmetal and pop riveted in place and Voila a temporary floor !


-
yep.. red bird looks almost like my car ! yours looks much much better though ! made some progress, got the tank painted and back in the car and it runs ok now. it is amazing how good fuel pressure makes a car run alot better! ( still setting on jack stands ) now need to focus on getting the brakes working, and the suspension from flopping around... then i can drive it... oh and a functioning seat..
-
short term I will run the stock F.I. long term I have always wanted DCOE's for the sound and the mechanical-ness of them . when I went to get the car, I was traveling for work 1 hour from it, so I just took the truck and trailer.. so I really got paid $.56 a mile to go get the car . nice coincidence huh?
-
1st I use my pressure washer thru the openings, loose nuts, etc, then I bring out the big guns.... muratic acid... after 1/2 hour the tank looks like it has been sandblasted inside, except for a few places in the corners and inside the fuel pickup "well" right in the center. make a 90 pressure washer lance to shoot the water stream right into the "well" and most of that out as well.. rinse it out with navel jelly ( phosphoric acid ) and rinse and rinse and rinse trying to get the muratic out. still flash rusted a bit, but I coated it with oil and gas mixture to retard that a bit. going to try to get the tank back in in the next day or so and see what happens.