


240260280
Member
-
Joined
-
Last visited
Everything posted by 240260280
-
 Yep, this stuff is real. Must be the legalized pot effect.

-
Well if you really want to lower the bar:


-
12-13 at idle is stinky. 16.5 up a hill is lean. That is the catch 22 you have to deal with. You can enrich the jet at the sacrifice of idle and cruise.
-
Shake out the hoover bag
.gif.11dcb3e694ba0e374392af2f1480b8bd.gif)

.jpg.1e739a145bf849185372adaefd4f76b9.jpg)
-
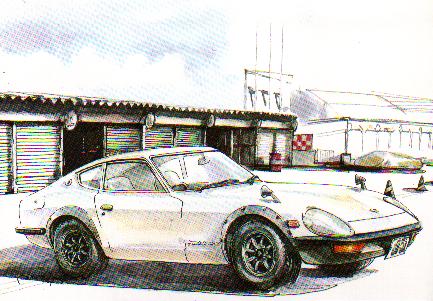
Good choice in colour too! Congrats to S.
-
You are stuck with having to reshape the needle or buy new ones.
-
Well the only items in the vicinity are bumper, gnose, lights, horn, and radiator. I think the part pre-dates the gnose so that is crossed off. Bumper reinforcements also came in late 74 so that could be ruled out. As Kats said it seems too big and structural for just holding horns. As well it is not on all bodies so that is another part of the puzzle. For this it would make more sense to be part of an option like AC rather than for factory alignment (which one would think to be on all bodies). Sometimes oil coolers are hung out there... could it be for that? Or maybe it is a mount for some sort of front accessory... snow plow, bike rack, rally fog lights, a really big hood emblem,?
-
Kats, I forgot that @Captain Obvious made a discovery that the small pistons in the damper plunger can cause problems with binding. You may want to simply unscrew these plungers and swap to see if the problem moves with the plunger.
-
Air/Fuel O2 measurement is best method.
-
The anvil slipped onto the accelerator pedal and the car shot through the wall like a scaled cat. It was last seen in Kingston heading east.
-
I agree. A great tool is a timing light with built-in tach. and advance. I use mine all the time.
-
I applied the thicker sealant in the channel that takes the pinch weld. You can use a small long-nose bottle of the fluid stuff to place under the lip touching the glass after it is installed to finish the job. Better to be safe as a leak has to work through the dash then puddle on the floor and not evaporate before you usually notice it.
-
2000 is just a ball park to give the engine a bit more air and speed. Go as high as you feel comfortable with. The key is to make sure they have the same air flow then adjust the fuel jet height to make sure they each drop to the same RPM. It is iterative so you have to repeat a few times to get it dialed in.
-
GnoseZ gets his testing skills from a driver that often goes on the dirt shoulder to make things tougher on the guys behind him thus the dirt road testing.
-
Try the piston lift experiment but with the engine at 2000rpm (use the fast idle screw in the middle of the carb linkage to get the 2000 rpm). If both carbs are getting the same air and same fuel, the rpm drop should be the same when you lift a piston. Note: 1. SU's are air balanced at idle using the stop screws on each side of the carb and a flow meter. 2. SU's are air balanced at 2,000 to 3000rm using the screw in the linkage near the back carb (the back carb's air is matched to the front carb). 3. The fuel is matched by jet height and needle shape.
-
I'm lost on the bolts in the bowls part. Replace the exhaust jets with bolts? Aren't the 00 jets basically a block already? I believe the 00 means there is no bleed black hole so the accel pump chamber (under the piston) can only empty into the throat of the carb. It can not "bleed back" into the fuel bowl. The trick to disable the accel. jets is to replace this component at the bottom of each fuel bowl with a small bolt. By doing this, no fuel can flow into accel jet passages. Note: at high RPM's the strong venturi effect in the throat can pull raw fuel out of the accel circuit. This scavenging effect can enrich the higher RPM part of the curve so it is good to tune w/o the accel circuit first then tune it last to see what impact it has on transitions and also at high RPM's
-
Mail is a standard. Email is a standard. Facebook is a company......that has nearly fooled everyone.
-
Try tightening nut first. If it still binds then file the top of the bolt. You can buy longer arms if all else fails.
-
-
I asked Mr. Matsuo and he did not know their purpose. Your idea makes sense. Another similar mystery: My Honda Ridgeline has a funny piece of metal at the rear base of the driver side (LHD) front wheel well but it is not on the right. It turned out it helped compliance with front left-side head-on collision requirements..... so sometimes it is safety rather than function that can make the answer difficult to determine.
-
Hi Kats, The pistons can bind if the domes are out of alignment. The way to check is to remove the plungers then lift and drop the pistons with your fingers in the throat on the bottom of the piston lifting it up and down. You should be able to feel any binding. The final calibration check is to lift both up to the top and release at the same time. They should "clunk" on the bottom at the same time. If not, it is possible that the margins have carbon or that the domes and pistons were mixed up at some time (or the springs are not matched or the nylon stop washer is missing in one). Sometimes you can swap the two pistons and the fall calibration will work better. Pistons and domes are matched in the factory but wear and mix-ups do happen. Binding is usually caused when screwing down the domes. If the dome is clocked (rotated) too much from its natural position, or if one screw is tightened too much at one time (to tilt the dome toward it) then binding will occur. The trick to optimally installing a dome is: 1. Fit the dome w/o screws and rotate it cw and ccw while visually noting the stopping points. You can mark with a pencil. Usually there is ~ 1mm of arc in each direction from the center. 2. Insert the screws to their middle depth (ensure no pressure on dome flange) and repeat the rotating the dome to note the stopping points. 3. Turn all 4 screws down evenly and in a cross pattern (like lug nuts on a wheel) but again, do not tighten so that the dome can not be rotated. You just want the screws to apply minimal pressure and just kiss the flange so that you can still rotate the dome but this time with a slight resistance caused by the screws. 4. Rotate the dome while lifting and dropping the piston. Note that in the center of rotation, the piston will not bind. This is where you want the dome to be. 5. Once the dome is in the sweet spot, Turn all 4 screws down evenly and in a cross pattern (like lug nuts on a wheel). Be sure to give each only a 1/4 to 1/2 turn at a time. Continue lifting and dropping the piston to ensure all goes well. 6. After both domes are screwed down, do the drop test to ensure both fall at the same rate. 7. Add oil and the plunger then repeat the drop test to ensure both fall at the same time. Finally, when considering an oil, the important item to note is what the damper does: It only slows transitions of the piston to smoothly meter fuel. Here are the key transitions: 1. Engine vibrations: without the damper, the pistons would shake in the dome and wear it out the edges. 2. Road bumps: without the damper, the pistons would clunk up and down when going over bumps and dips causing the fuel flow to change radically in short bursts. 3. Acceleration: the damper reduces the fuel metering during acceleration by keeping the needle deeper in the fuel jet orifice. Another opposite effect of the delayed piston rising is the increase of fuel flow caused by the manifold vacuum creeping forward of the throttle plate to draw more air over the annular fuel puddle. This also increases the venturi pull of the fuel as more air is now flowing over the bridge and through the smaller opened area above it. The net effect is more fuel during the acceleration stage but not too much. 4. Deceleration: the damper increases the fuel metering during deceleration by keeping the needle higher in the fuel jet orifice. Another opposite effect of the delayed piston falling is the decrease of fuel flow caused by the manifold vacuum being stopped completely in the throat by the closed throttle plate. The result is less air to draw from the surface of annular fuel puddle as the venturi pull of the fuel is low (Less air is now flowing directly over the bridge and through the very large opening area above it. The net effect is reduced fuel during the deceleration stage but not too little. Ultimately the damper oil you chose will only be noticed during acceleration. Thicker oil will enrich the acceleration mixture, thinner oil will lean the acceleration mixture.
Hurray Alan!!! Finally an answer!!! Mystery solved.
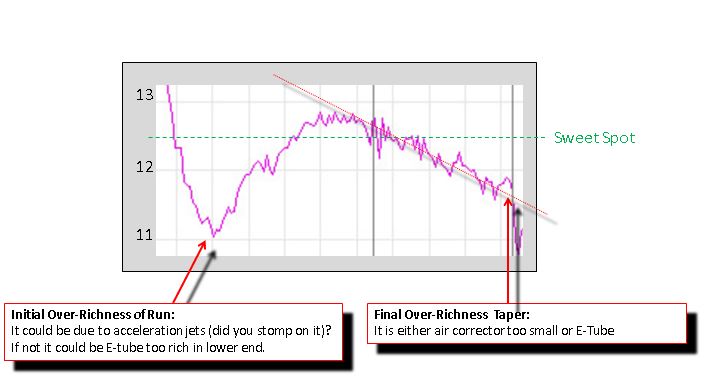
Great stuff for the repeatable measurements. You are testing like a pro! Put bolts in the bottom of the fuel bowls to kill the acceleration jets. Replace those 0 bleed back spill jets with the bolts. Quick and efficient. Once you do this and measure, you will see what that squirt of liquid fuel is doing. I think it is significant, especially with the bleed-back blocked in those 00 spill jets you have at the bottom of the bowls now. I would continue to tune with the bolts in place then do your final tune with the accelerations jets back in place. To attack the curve, a change from 155main to 150main will lean out the whole WOT run. Hopefully it will go from you current average ~12 towards 12.5-13.0. You can then go to 145 if needed. To lean out the high end, a change in the air corrector from 185 to 195 may do it.
It is not that bad. There are a few things you can try: Overall you are in the ball park and it should be nice to drive. There are just two items to consider for tweaking further: 1. The low end richness is either the E-Tube being richer in the low end or the acceleration jet kicking in too much. If you punched the pedal then maybe we are seeing the effect of the squirt of too much liquid fuel. 2. The tapering from middle to the end is minor. You go from 12.7 to 11.7. It could be due to the air tube being a tick too small or the E-Tube again. Here are a few first steps to try: 1. Repeat the test a few times to make sure the shape we see above is consistent and real. Testing has to be repeatable. 2. To address the start of the main richness, first repeat the test but try not to stomp and see what happens. 3. If there is a difference from "squeezing" the accelerator rather than stomping, then remove the accelerator jets and do a few runs to see how the mains engage without the acceleration jets. This will give us their leanest limit. Report back to us with the data. Here are some other tuning items but please hold off for now as changing too many parameters will cloudy the waters: 1. If you look at the shape of the mains during the pull, there is a peak in the middle of the pull. You can flatten it by smashing down the middle or bringing up the ends. The only way to attack the middle would be with E-tubes so it is too expensive and too exploratory. 2. The high end looks simple to play with. A larger air corrector will lean out more as the RPM's increase. This will flatten things nicely. 3. The whole shape will rise if you reduce the main fuel jet. 4. You may be able to lean the low end by using smaller acceleration jets.


Important Information
By using this site, you agree to our Privacy Policy and Guidelines. We have placed cookies on your device to help make this website better. You can adjust your cookie settings, otherwise we'll assume you're okay to continue.