


240260280
Member
-
Joined
-
Last visited
Everything posted by 240260280
-
 I was thinking of doing similar with clear vapour barrier and tuck tape to seal. If you can keep the wind off then no paint abrasion.
 -
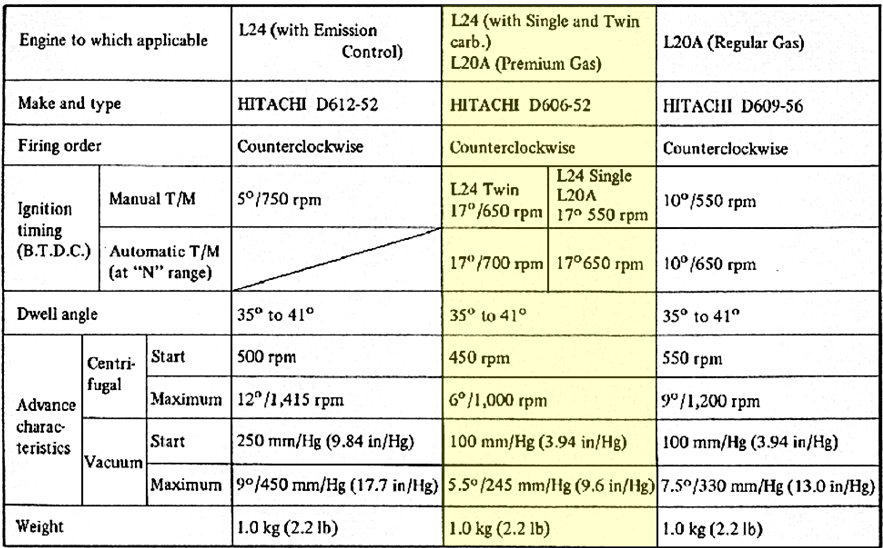
The 1970 L24 w/o pollution devices (middle D606-52) has 17 degrees initial advance at 700rpm and the mechanical advance is "all in" (additional 12 to make total of 29 at only 1000rpm). So it seems that the engine (focusing on performance and ignoring emissions) likes a lot of advance and "switches on" at low rpms! The one-spring distributor is a way to achieve it! But Jim has the emission distributor (D612-52) that comes in at 1,415 rpm... but it shows a 6 degree centrifugal rather than the 12 degree shown below ?
-
Hmmm, the length of the slots determines the amount of advance so the short slot should greatly limit the advance.... ie, it will set the max advance limitation. This allows the manufacturer to only have to calibrate the length of one slot rather than have two matched. Also, without a spring, the free weight will be pulled to zero at engine stop maybe even at idle (by the sprung weight pulling its weight inward, and in turn, turning the slotted cross piece to 0)....but when the engine rpms increase, the unsprung weight will greatly speed up the advancing. It would act almost as a switch (off and on) rather than a ramp up. Perhaps this architecture allows the advance to happen quickly and the purpose of the spring is simply only to pull it all back to zero at very low rpms? My guess is that this asymmetry caused unwanted rotational imbalance and shaft wear so a symmetrical re-design was made.
-
Honey! I shrunk the Z!
-
Jim, a great discovery. I never looked closely at early distributors yet but your photo shows two different sized slots for the weights to move. This points to asymmetry and could explain the one spring. All the ones I opened had equal length slots vs
-
-
Looking at pictures again. What is up with the engine block colour for so low miles? Not much blue to be seen?
-
Orange peel and paint thickness measurements seem to tell us something.
-
Reminds me of 1969: Wizzer Toy and UFO TV show. and
-
$2M USD with Batmobile styling:
-
I love that blue car!

-
Given enough time, @Captain Obvious could roll out a whole Z on his lathe 🙂 Nice work,... lol that is how I was thinking to skin the cat too.
-
It fits in the same category as the single rear control arm and extra wiper holes.... but, worth noting just the same.
-
OK, I'll stir the pot in the debate of which market the Z was made for/ optimized for. Things like hood prop size, brake handle location etc. have been discussed. Here is another: Below we see the S31 (released in Japan only ~ 76 to 78) BUT its rear body panel clearly has unused large holes mandated for the larger 280z bumpers of the North American Market. Just say'n 🙂
-
Jim Frederick's
-
Perhaps our "free review services" should be socialized on BAT's S30 section.
-
Piet Mondriaan Art 1921 Partridge Family Bus La Vie Claire Racing 1984
-
It must be the shiny surface revealing it. I never saw this before?
-
The tires have dangerous looking deformations in the sidewalls: I never saw this part painted? (Gas line shield plate). Is it normal?
-
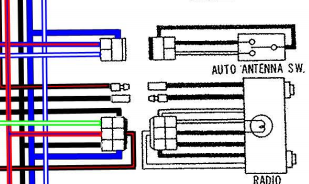
WOW First Class Posts Bob S.! BIGGGGG THANKSSSSS Here is Schematic... (not exact match but they are known to have differences)
-
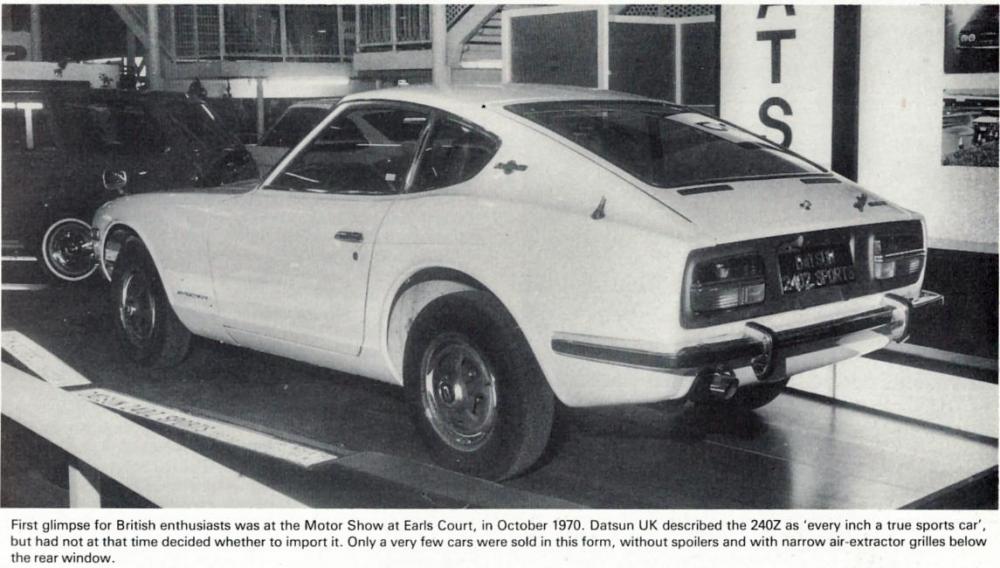
October, 1970 London
-
Thanks gang. My buddy has a mint, low-mile 78 going on BAT soon. He is just adding the radio to bring it to its original spec.
-
If you decide to bash it, I would recommend having someone with a lathe drill out and tap a steel pipe or similar and put a counter sunk taper inside. Screw it down over all the threads then pound the "thread saver". Work one side, then move to the other. Don't try to move the spindle pin too far in one direction at once. Spray liquid wrench in the middle hole and also work it in from the ends as you move the pin back and forth.
-
Also work from centre outward alternating towards back then towards front like the service manual shows.
-
Start at 40 and work up if you are not sure.


