240zadmire
Member
-
Joined
-
Last visited
Everything posted by 240zadmire
-
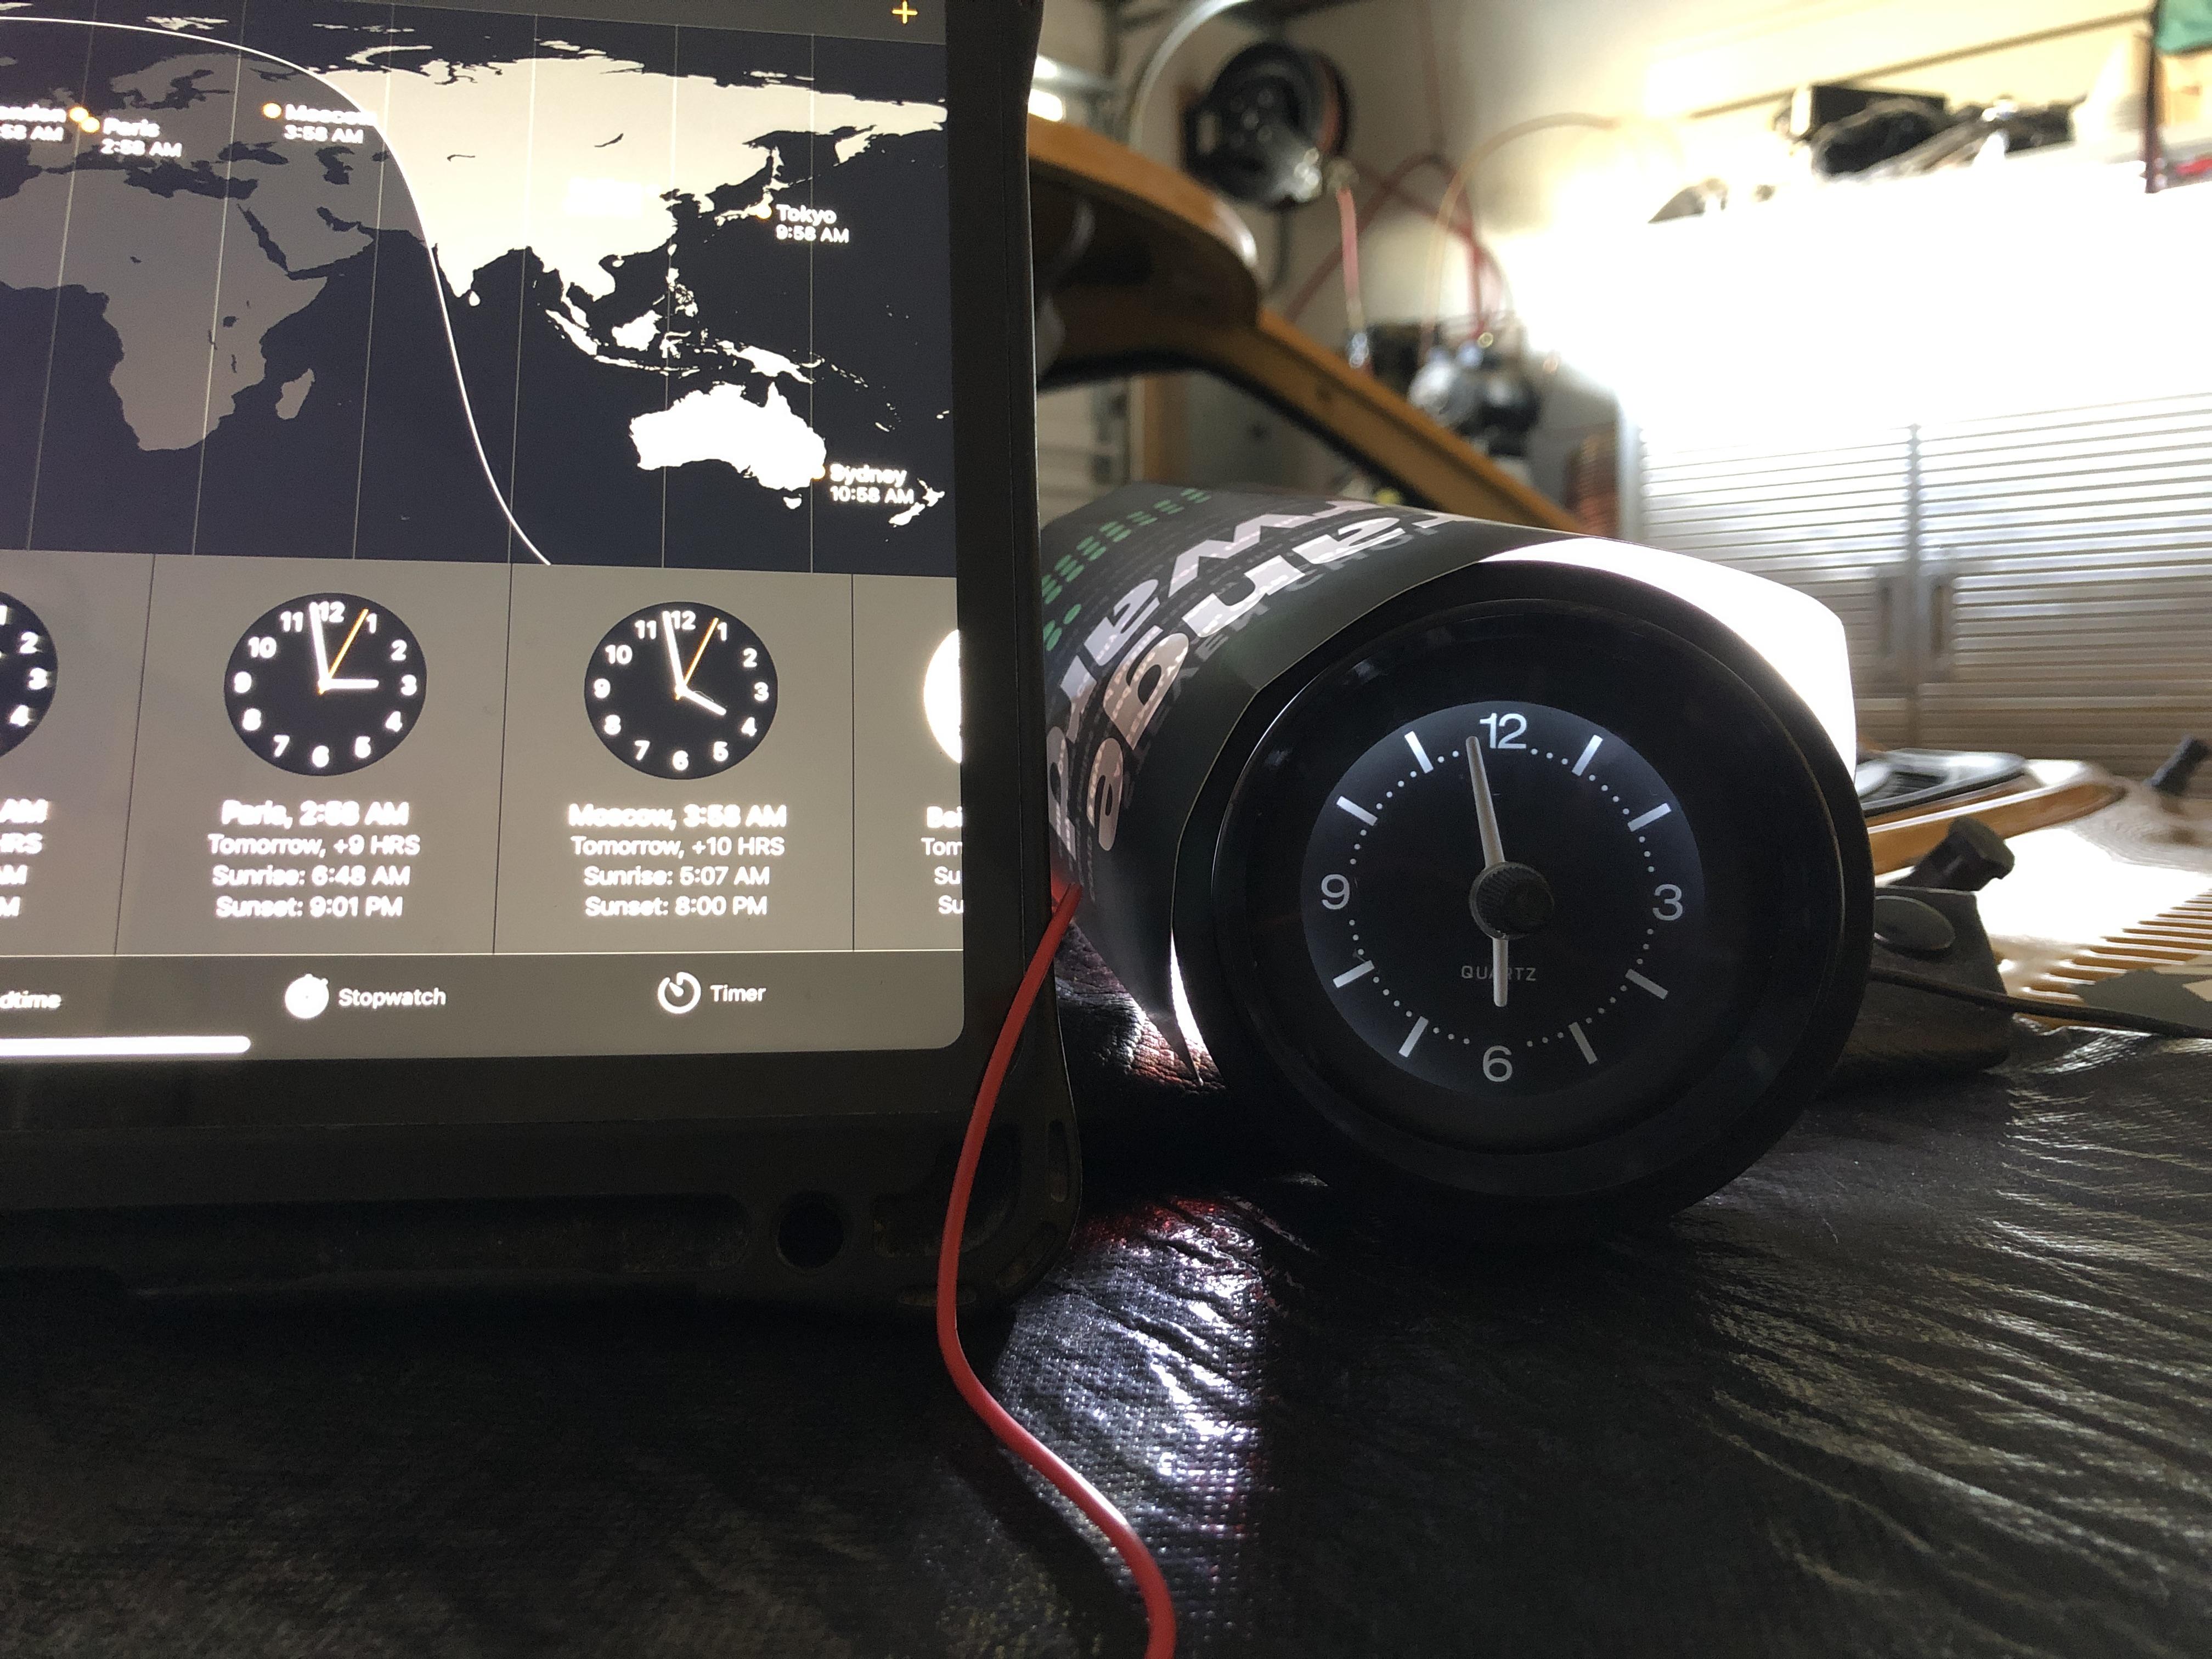
@zclocks the quartz is in. Let’s see how long de lasts but from +30hrs, she keeps very accurate time. I have a favorite to ask. The original clock is on the bench right now. I believe I found the culprit unless it is by design. Pardon my terminology but he wheel that connect directly to the pendulum shaft appears to be deform. If it is, I’m guessing due to temperature and gravity the pull it down cause it to deform. But then again, not likely gravity be side it is so light... anyway, if I flip the clock upside down, it spins just fine. Just like if the clock was face down. But up right, the pendulum wheel slowly stops. if that is deformed, a quick fix would be turn upside down, turn the faceplate upside down again and flip the bracket upside down as well. Let me know your thought. regards


-
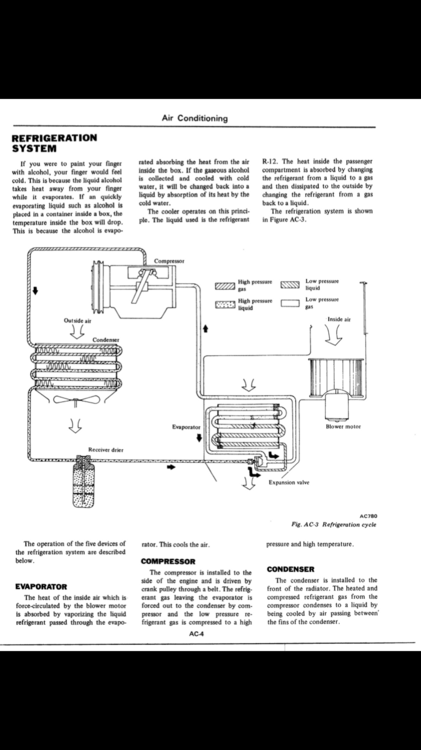
That’s quite high. If convert to r134a, isn’t that r134a pressure lower? Like 225psi? on another note, the high pressure switch wires broke flat broke off to the switch. Look like it’s hard silicone or glass. Wonder if the switch still good to try to salvage. another note is that to hot wires the high pressure to see if compressor clutch work, turn out clutch still good to go. Will wait for the after market drier receiver and pull the vacuum regards
-
I have 2 questions about the switch mounted on the receiver drier - Is it binary or is it bipolar? - what PSI does it operates? regards
-
@Dave WM thank you sir. I’m still reading to get more understand and hopefully by weekend, rent the tool at autozone or oreilly and see if I can check the leak. This is my first time working on AC. It’s been upper 90 degree in California lately. If the system is sealed,i it would be a cool breeze for sure. regards
-
I’m an idiot. Can you please hand hold me and tell me exactly which one is the low pressure and which one is high pressure valves? I cannot correlate the picture with the actual setup in the car. 1. is the valve from the compressor to the cabin/firewall is the low pressure and the other is high pressure? 2. I bought the fitting and it already has the needles in it. When I open the caps from the compressor, there is also needle already in them. Should I remove the needles already in the valves currently on the compressor? i want to pull the vacuum to see if there is any leak without starting the car. regards
-
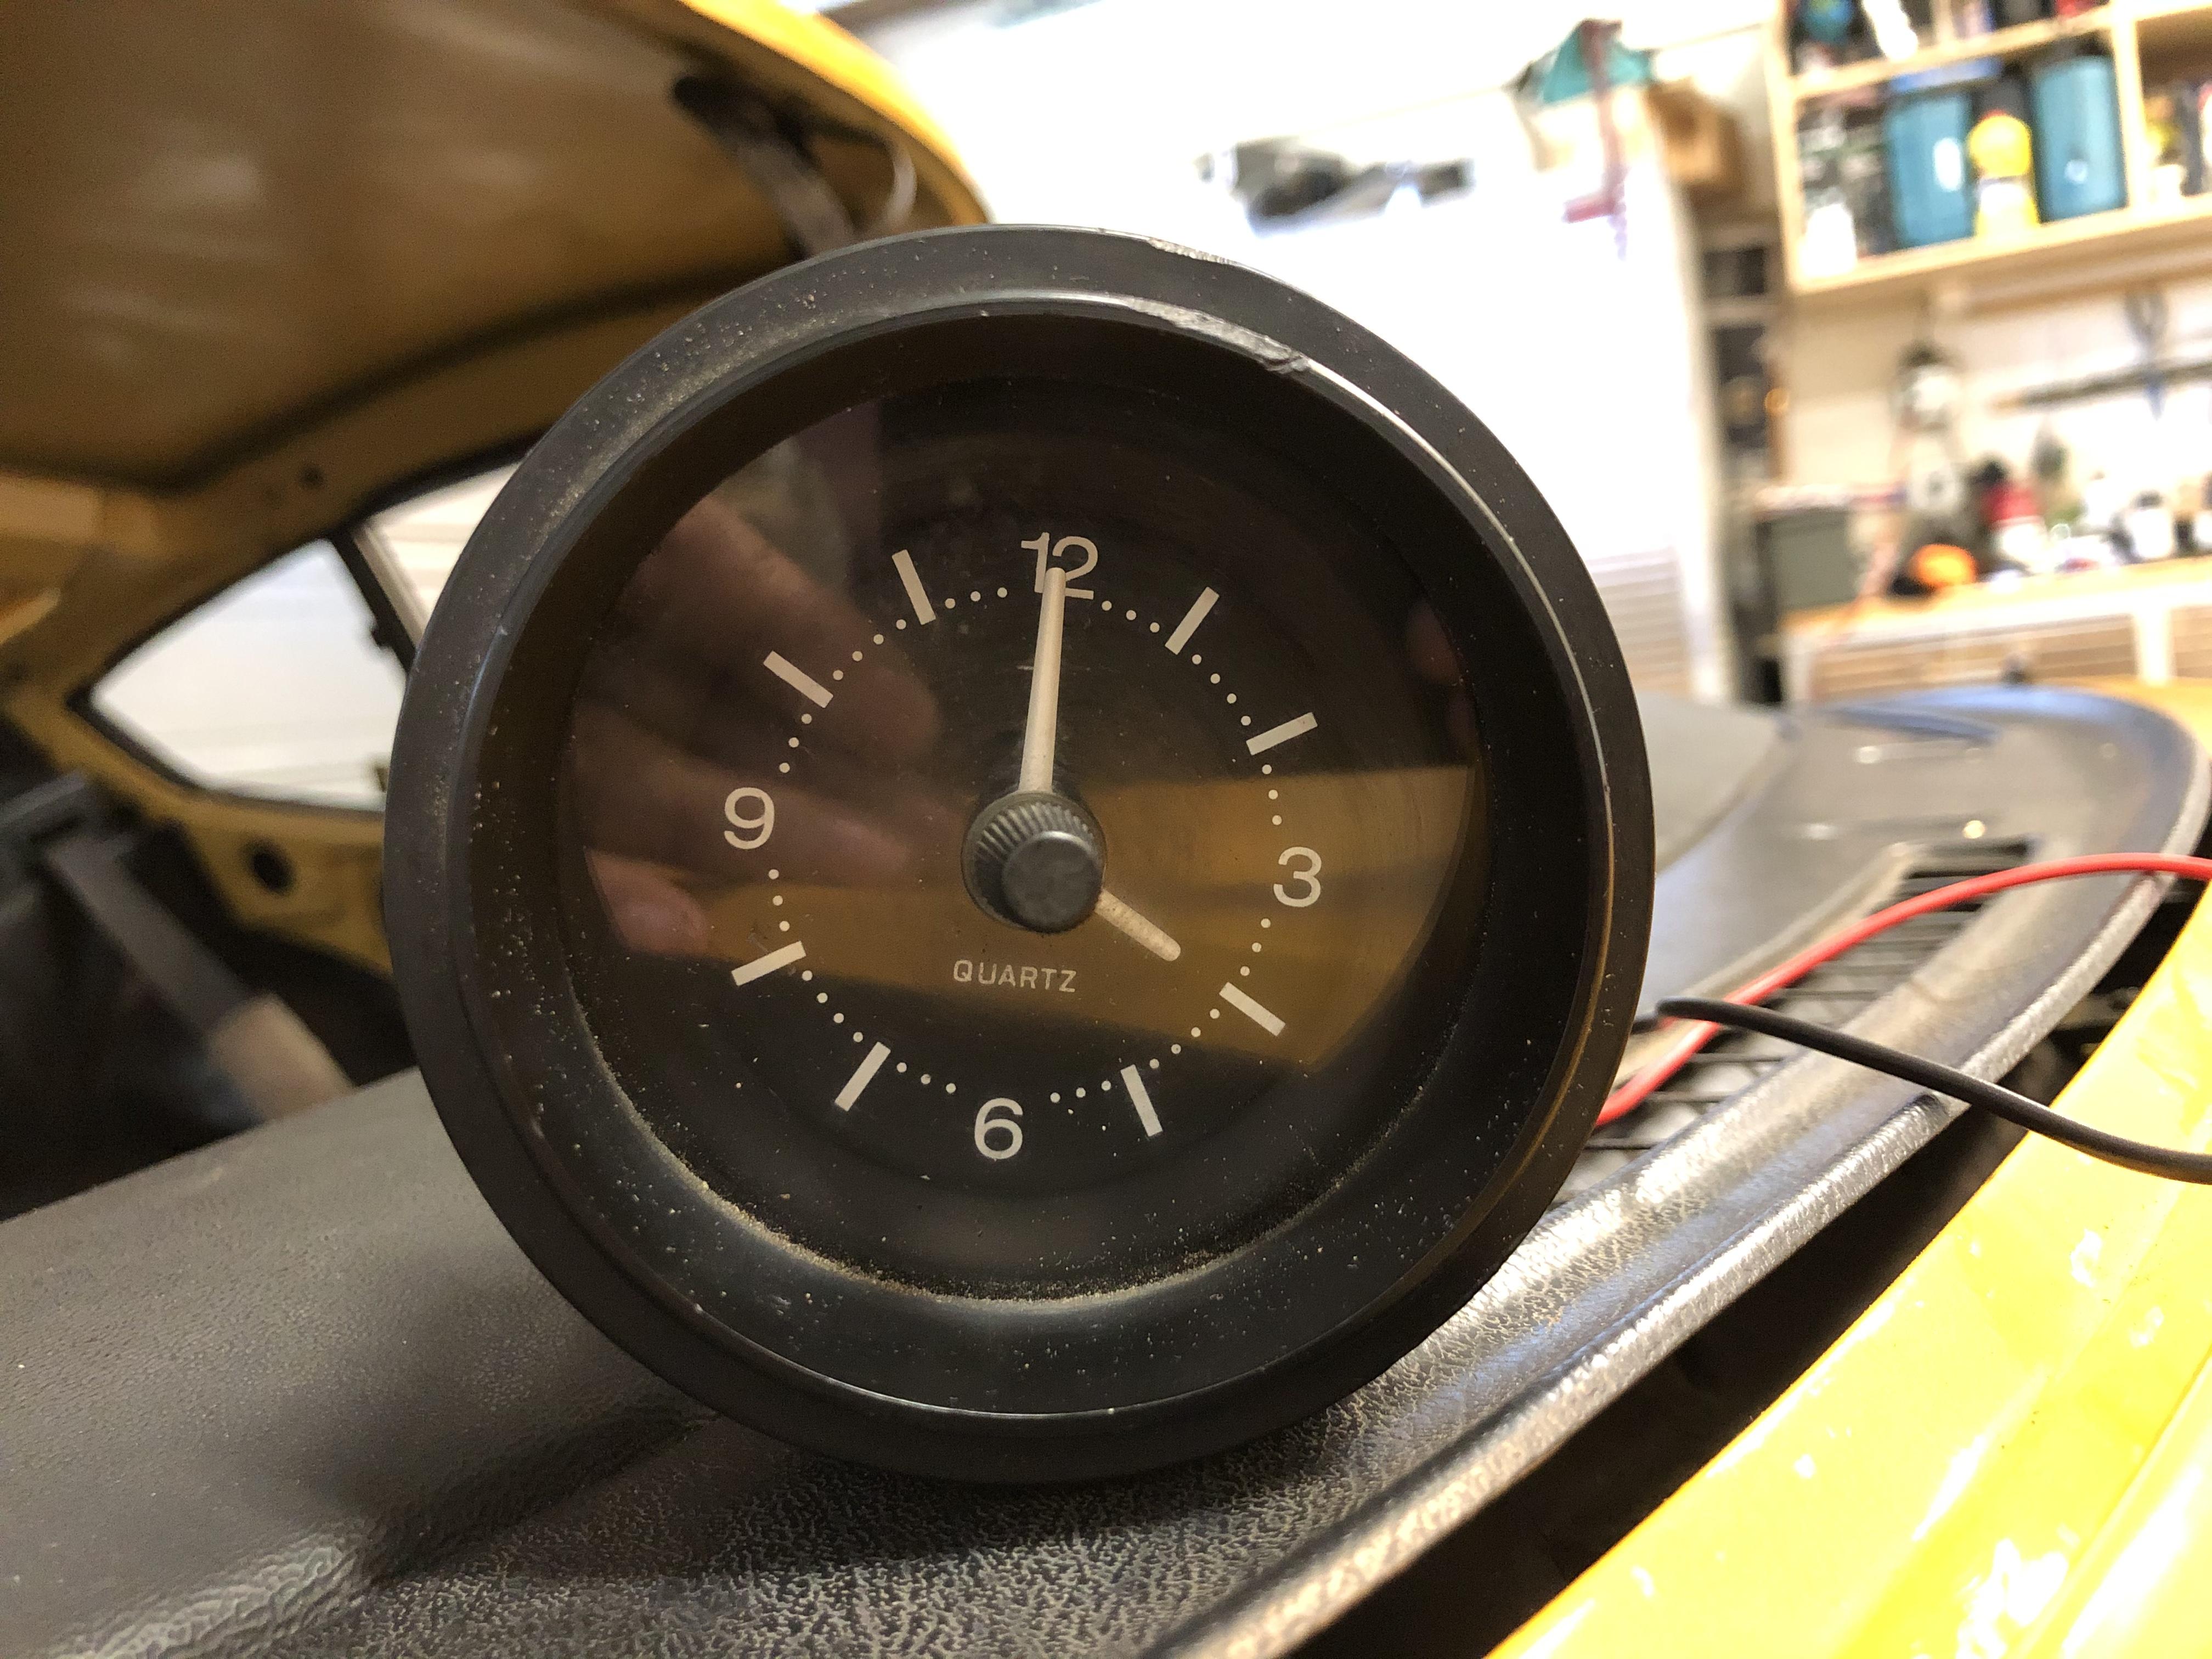
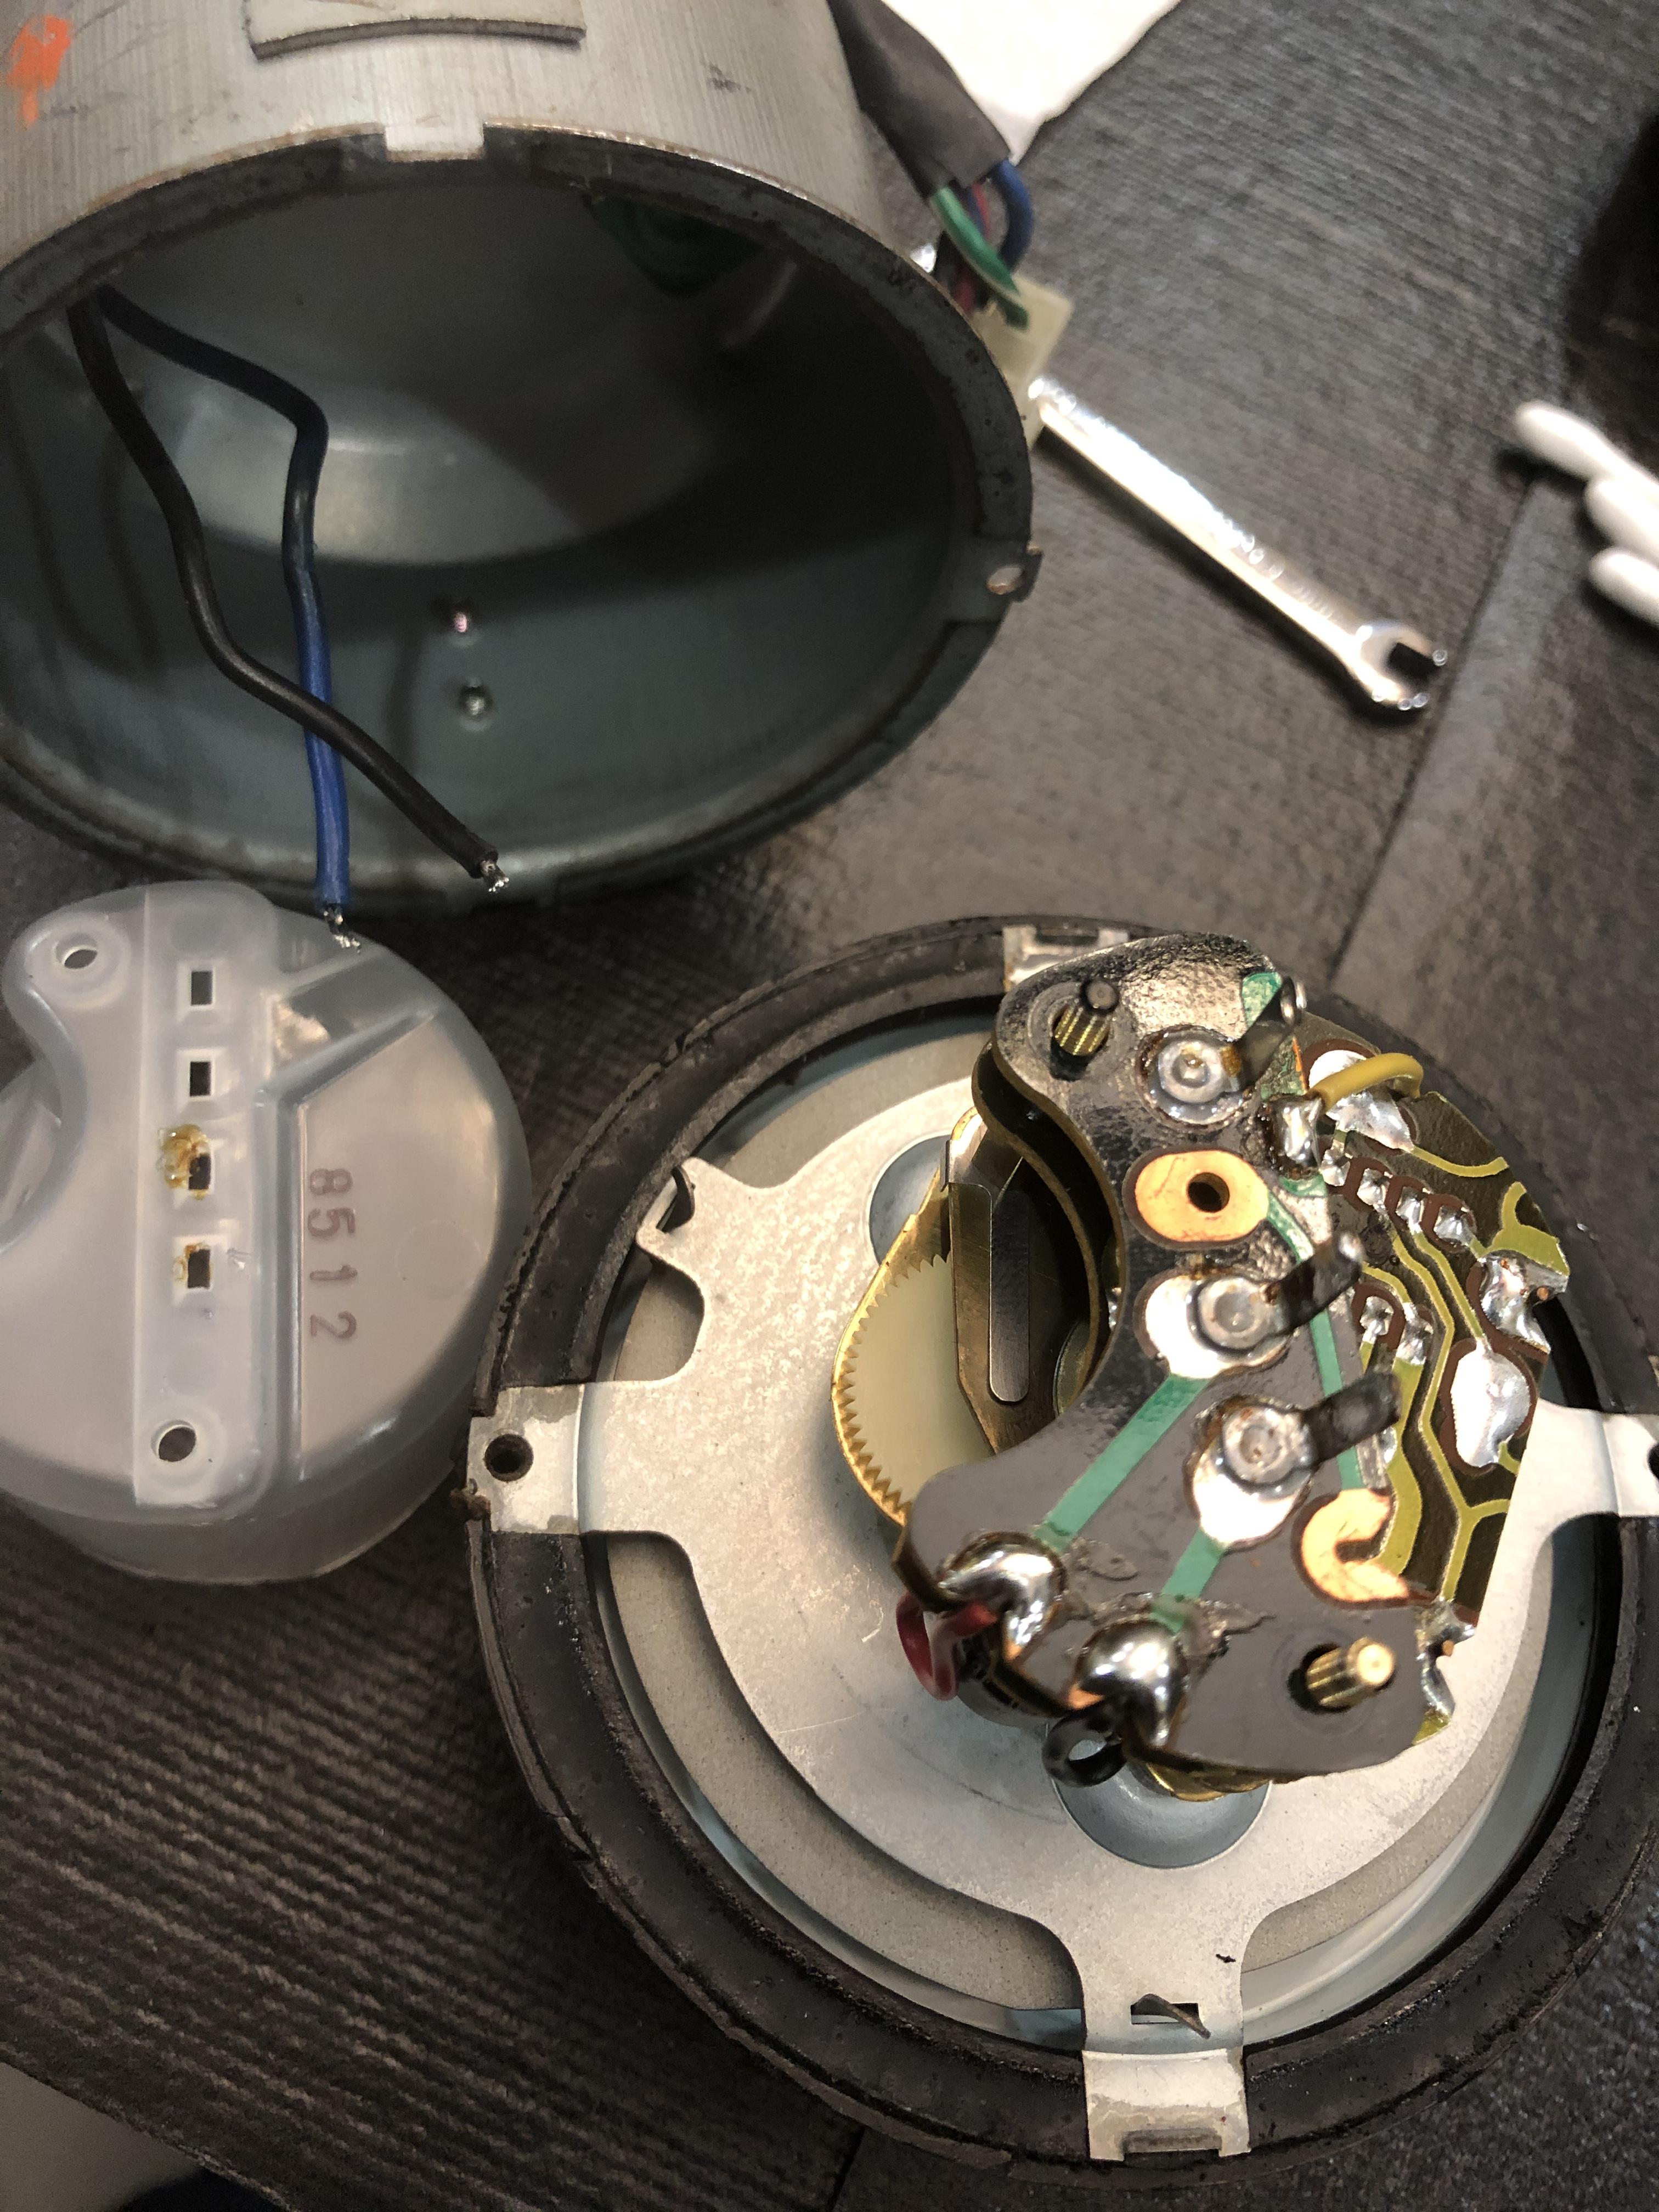
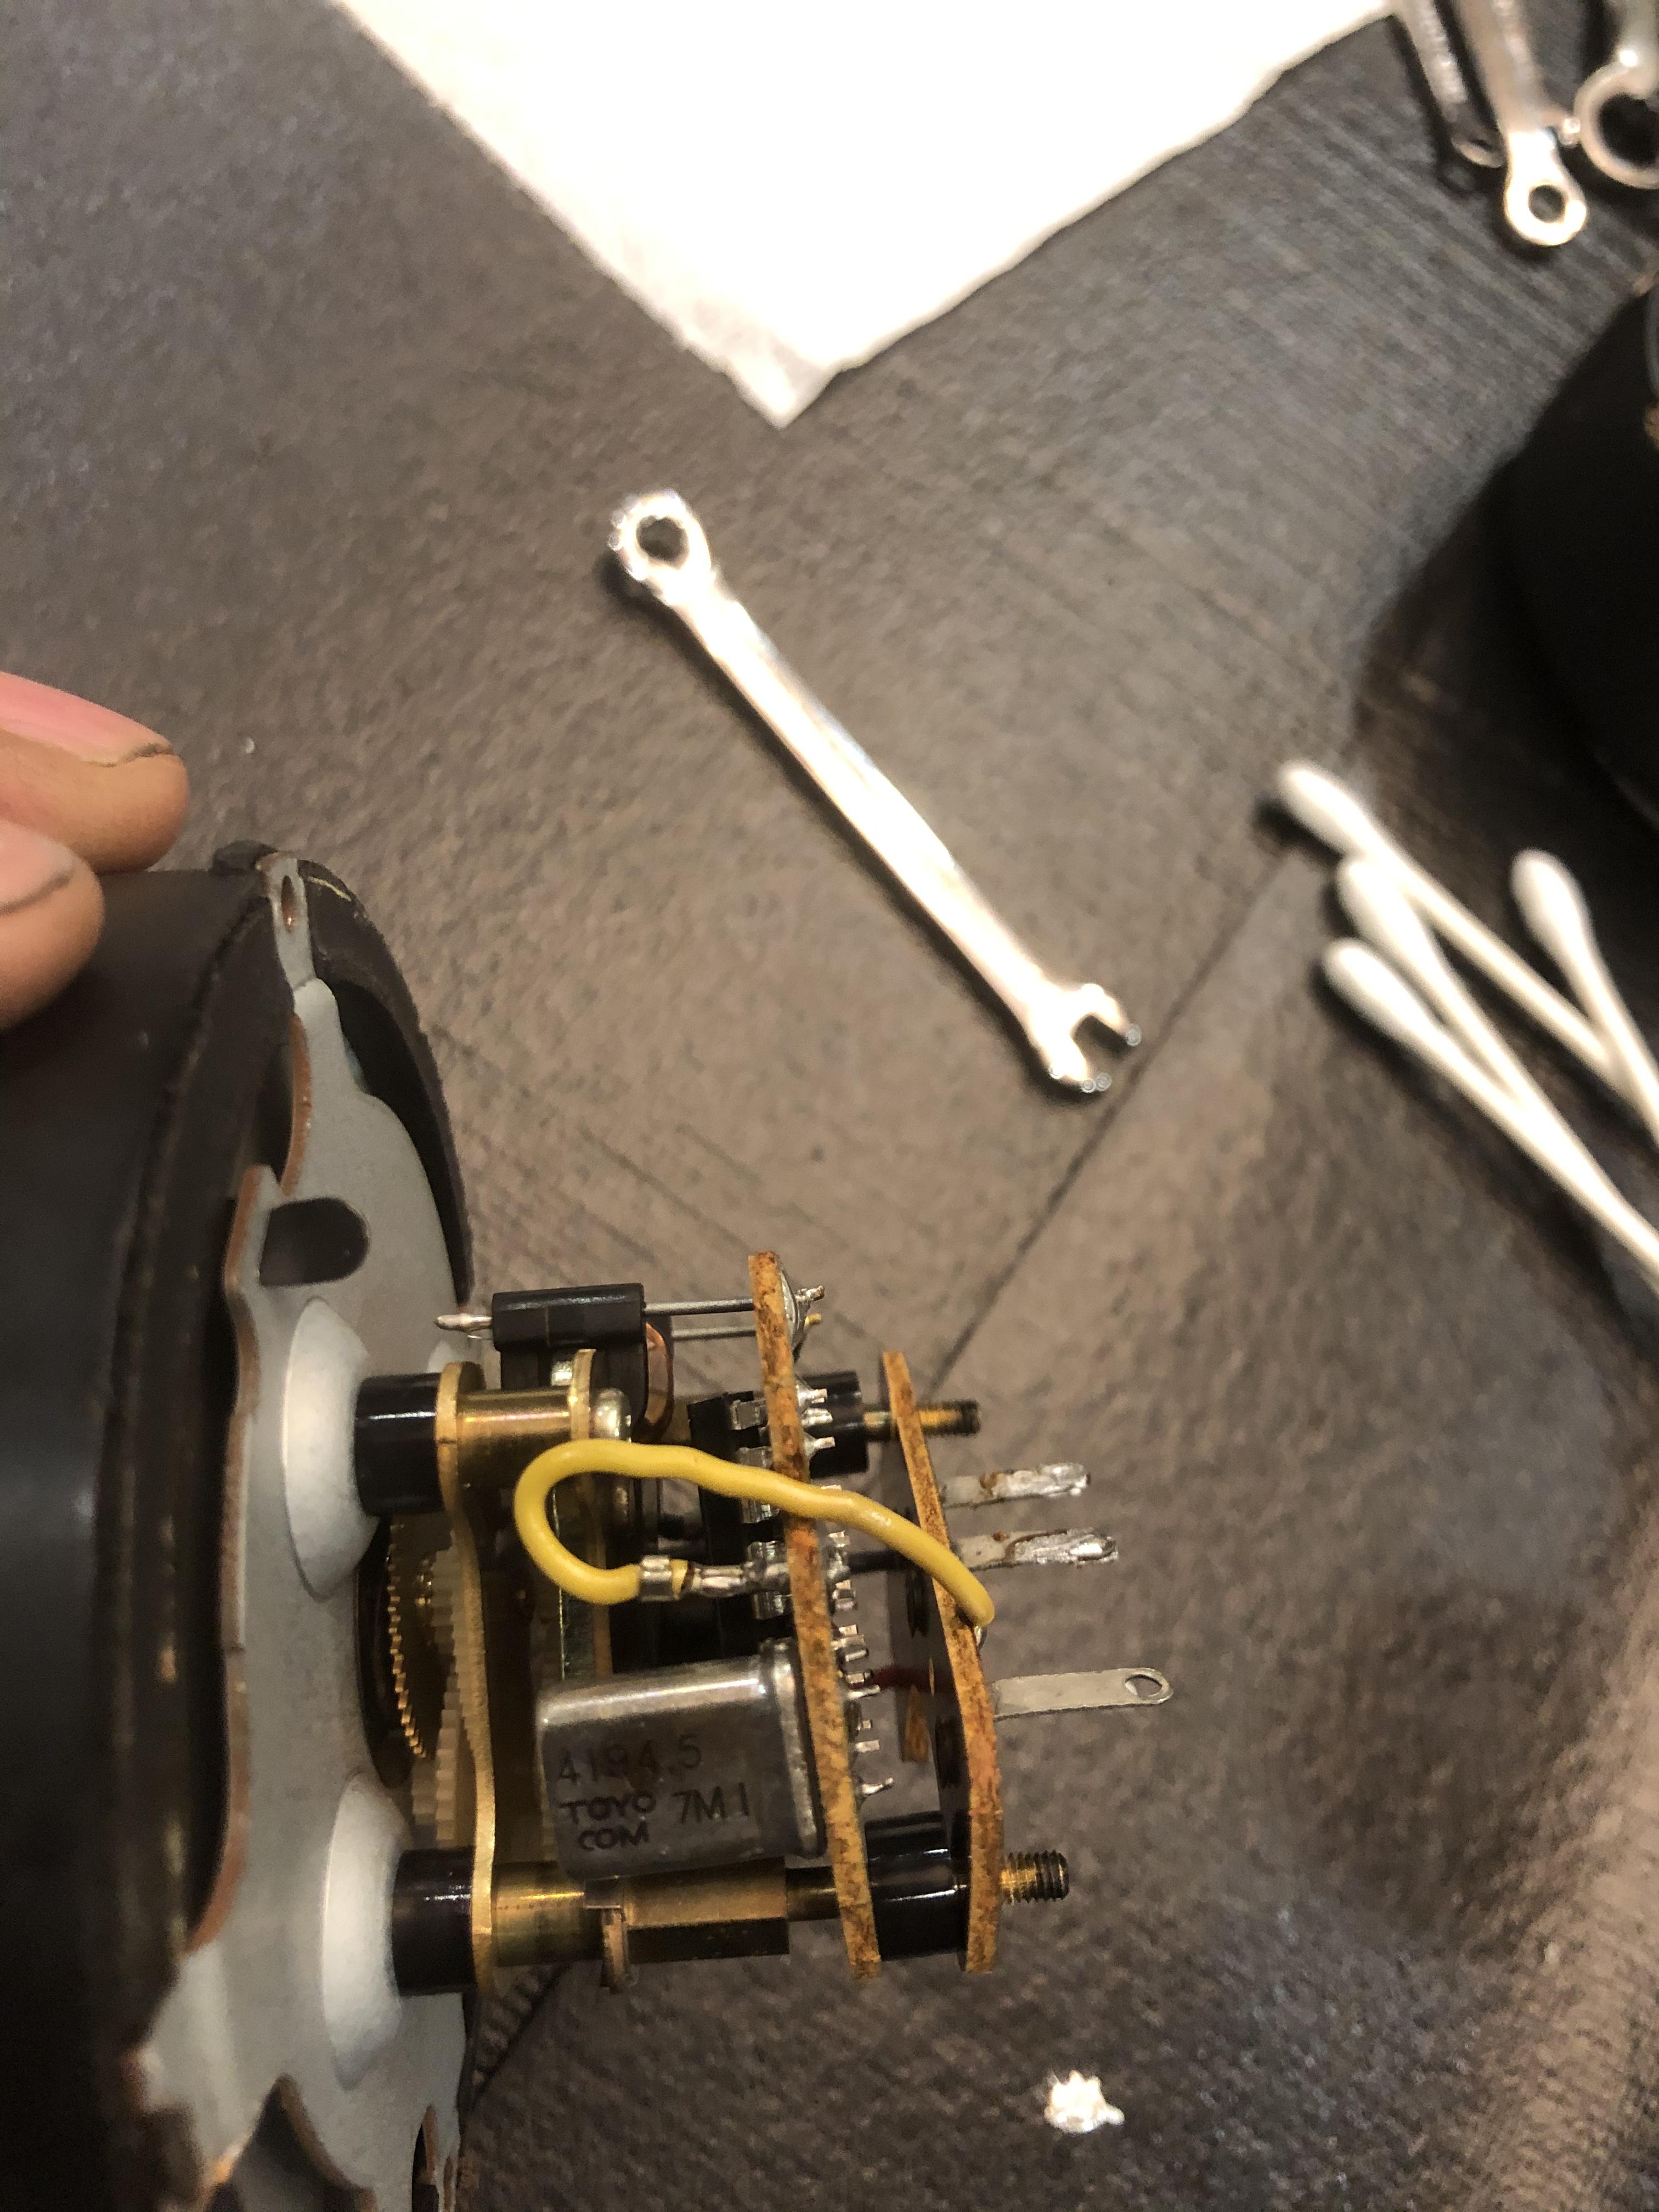
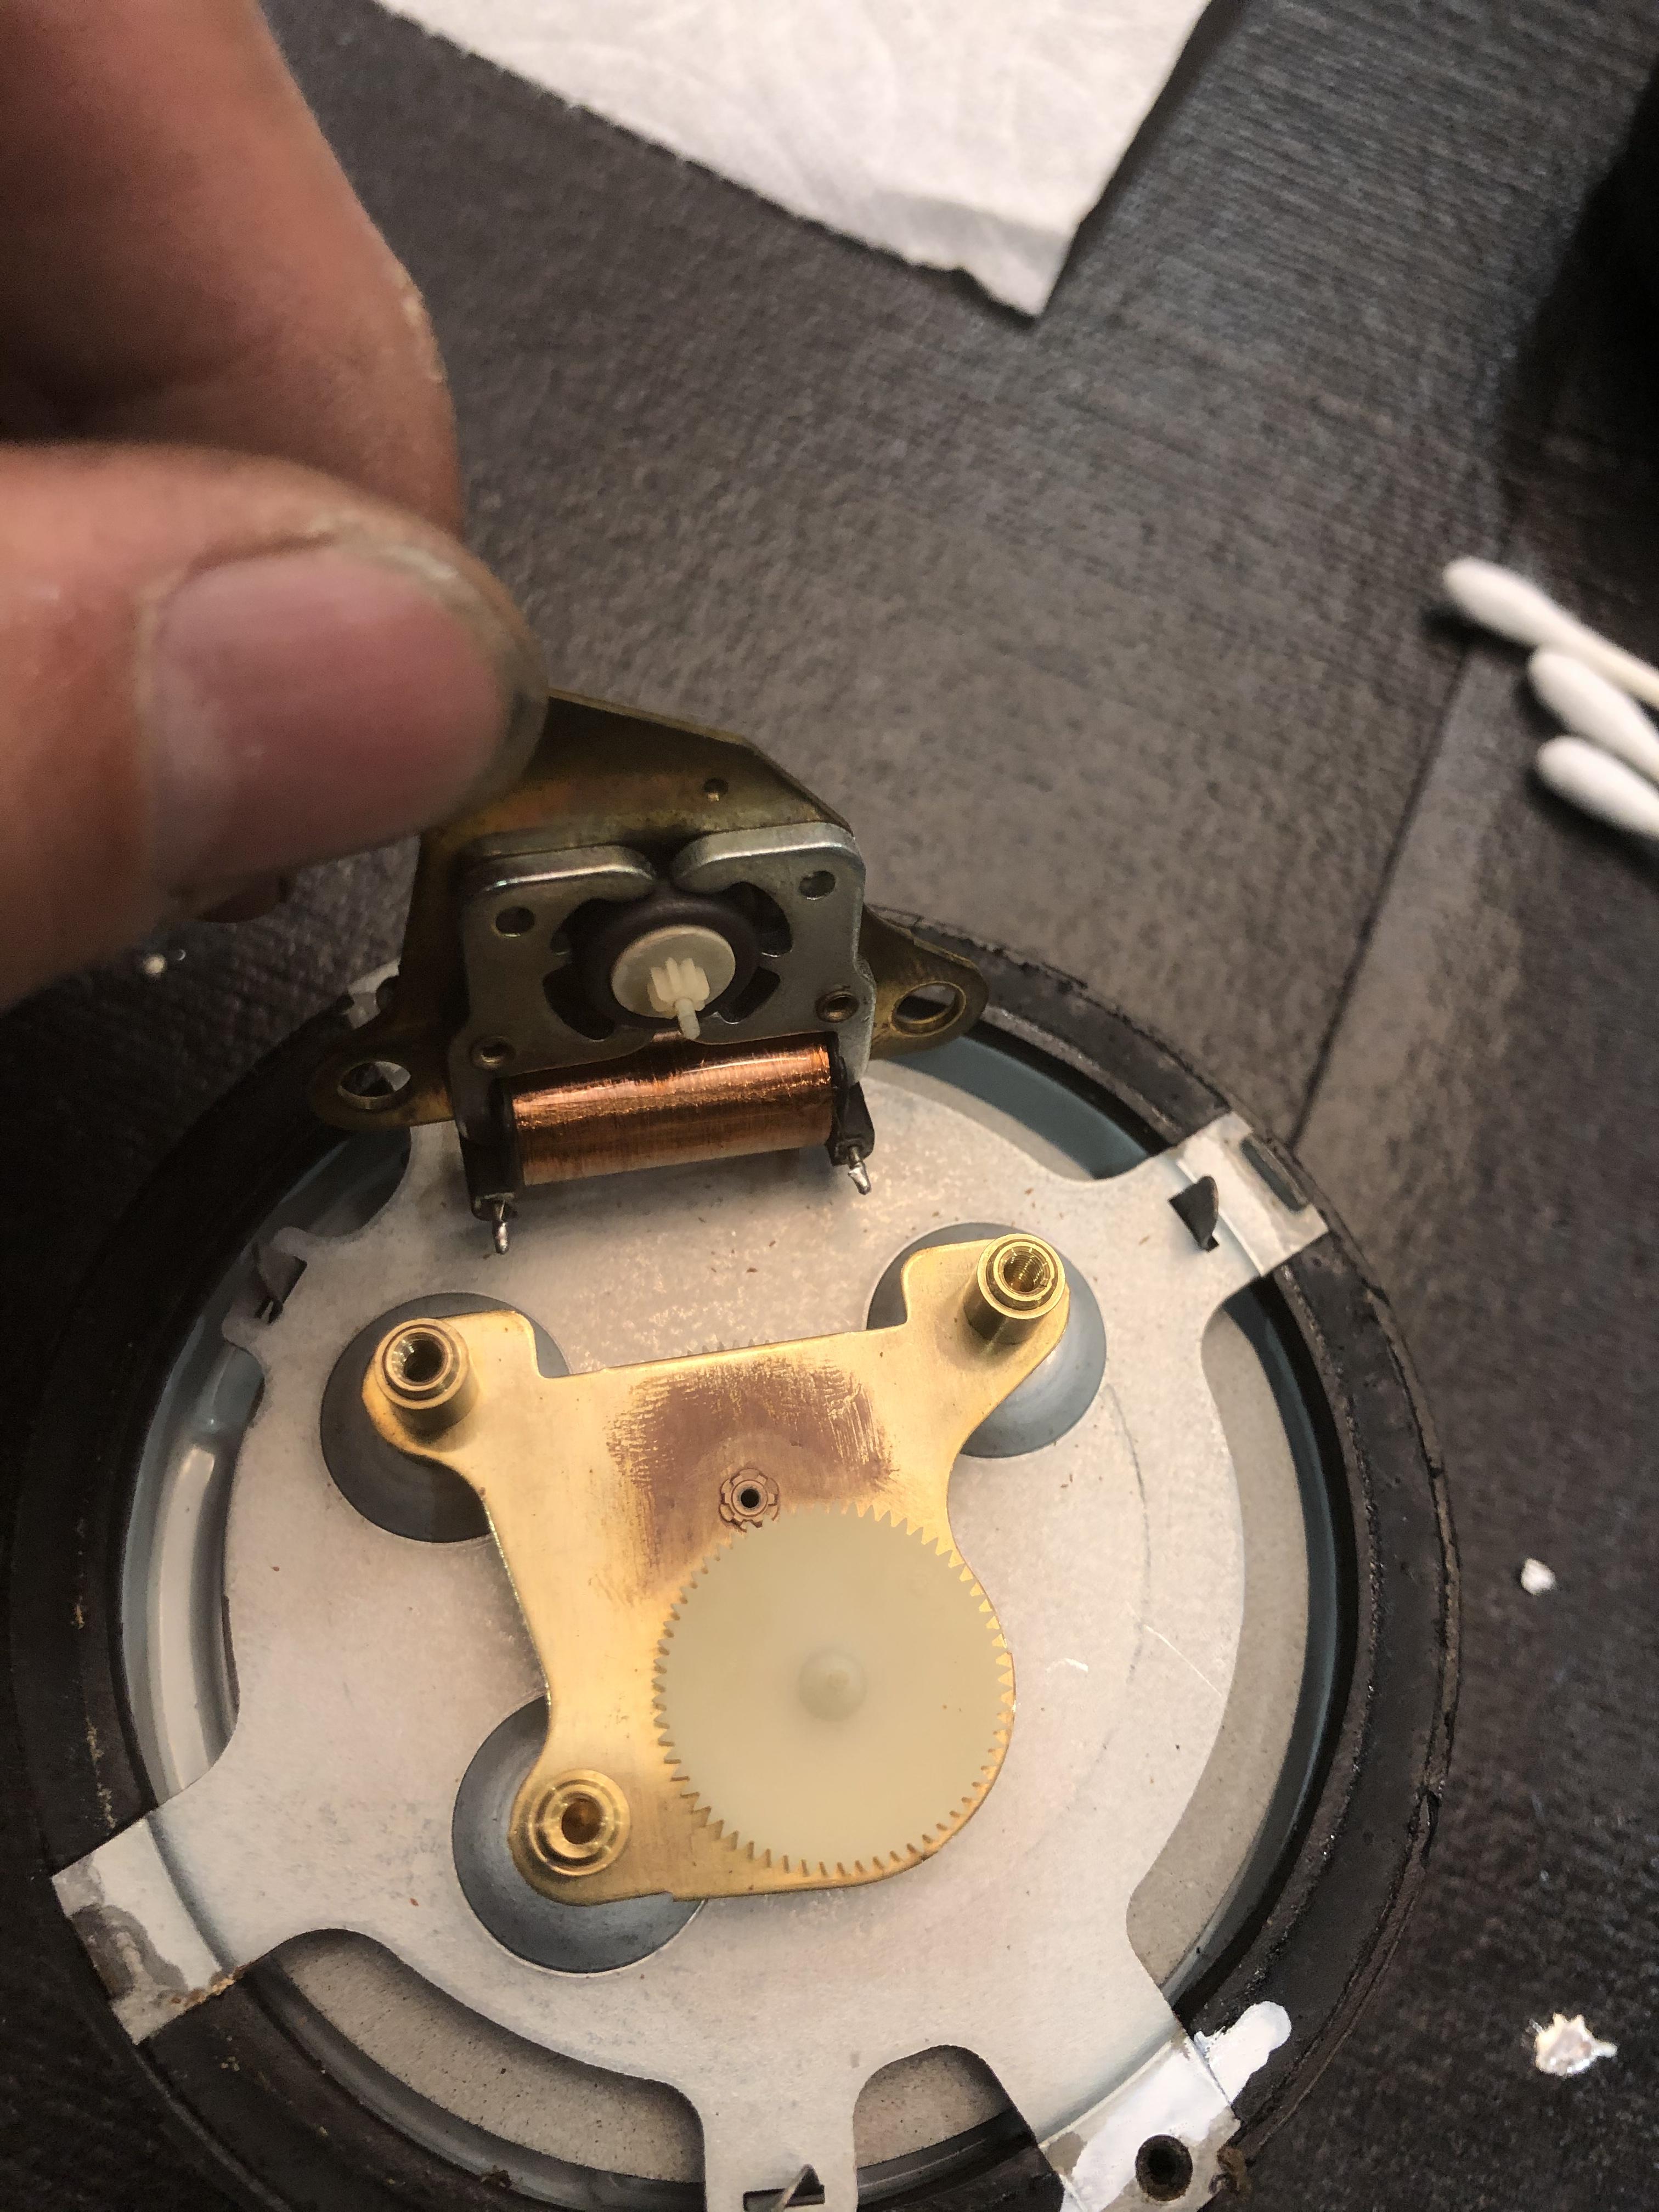
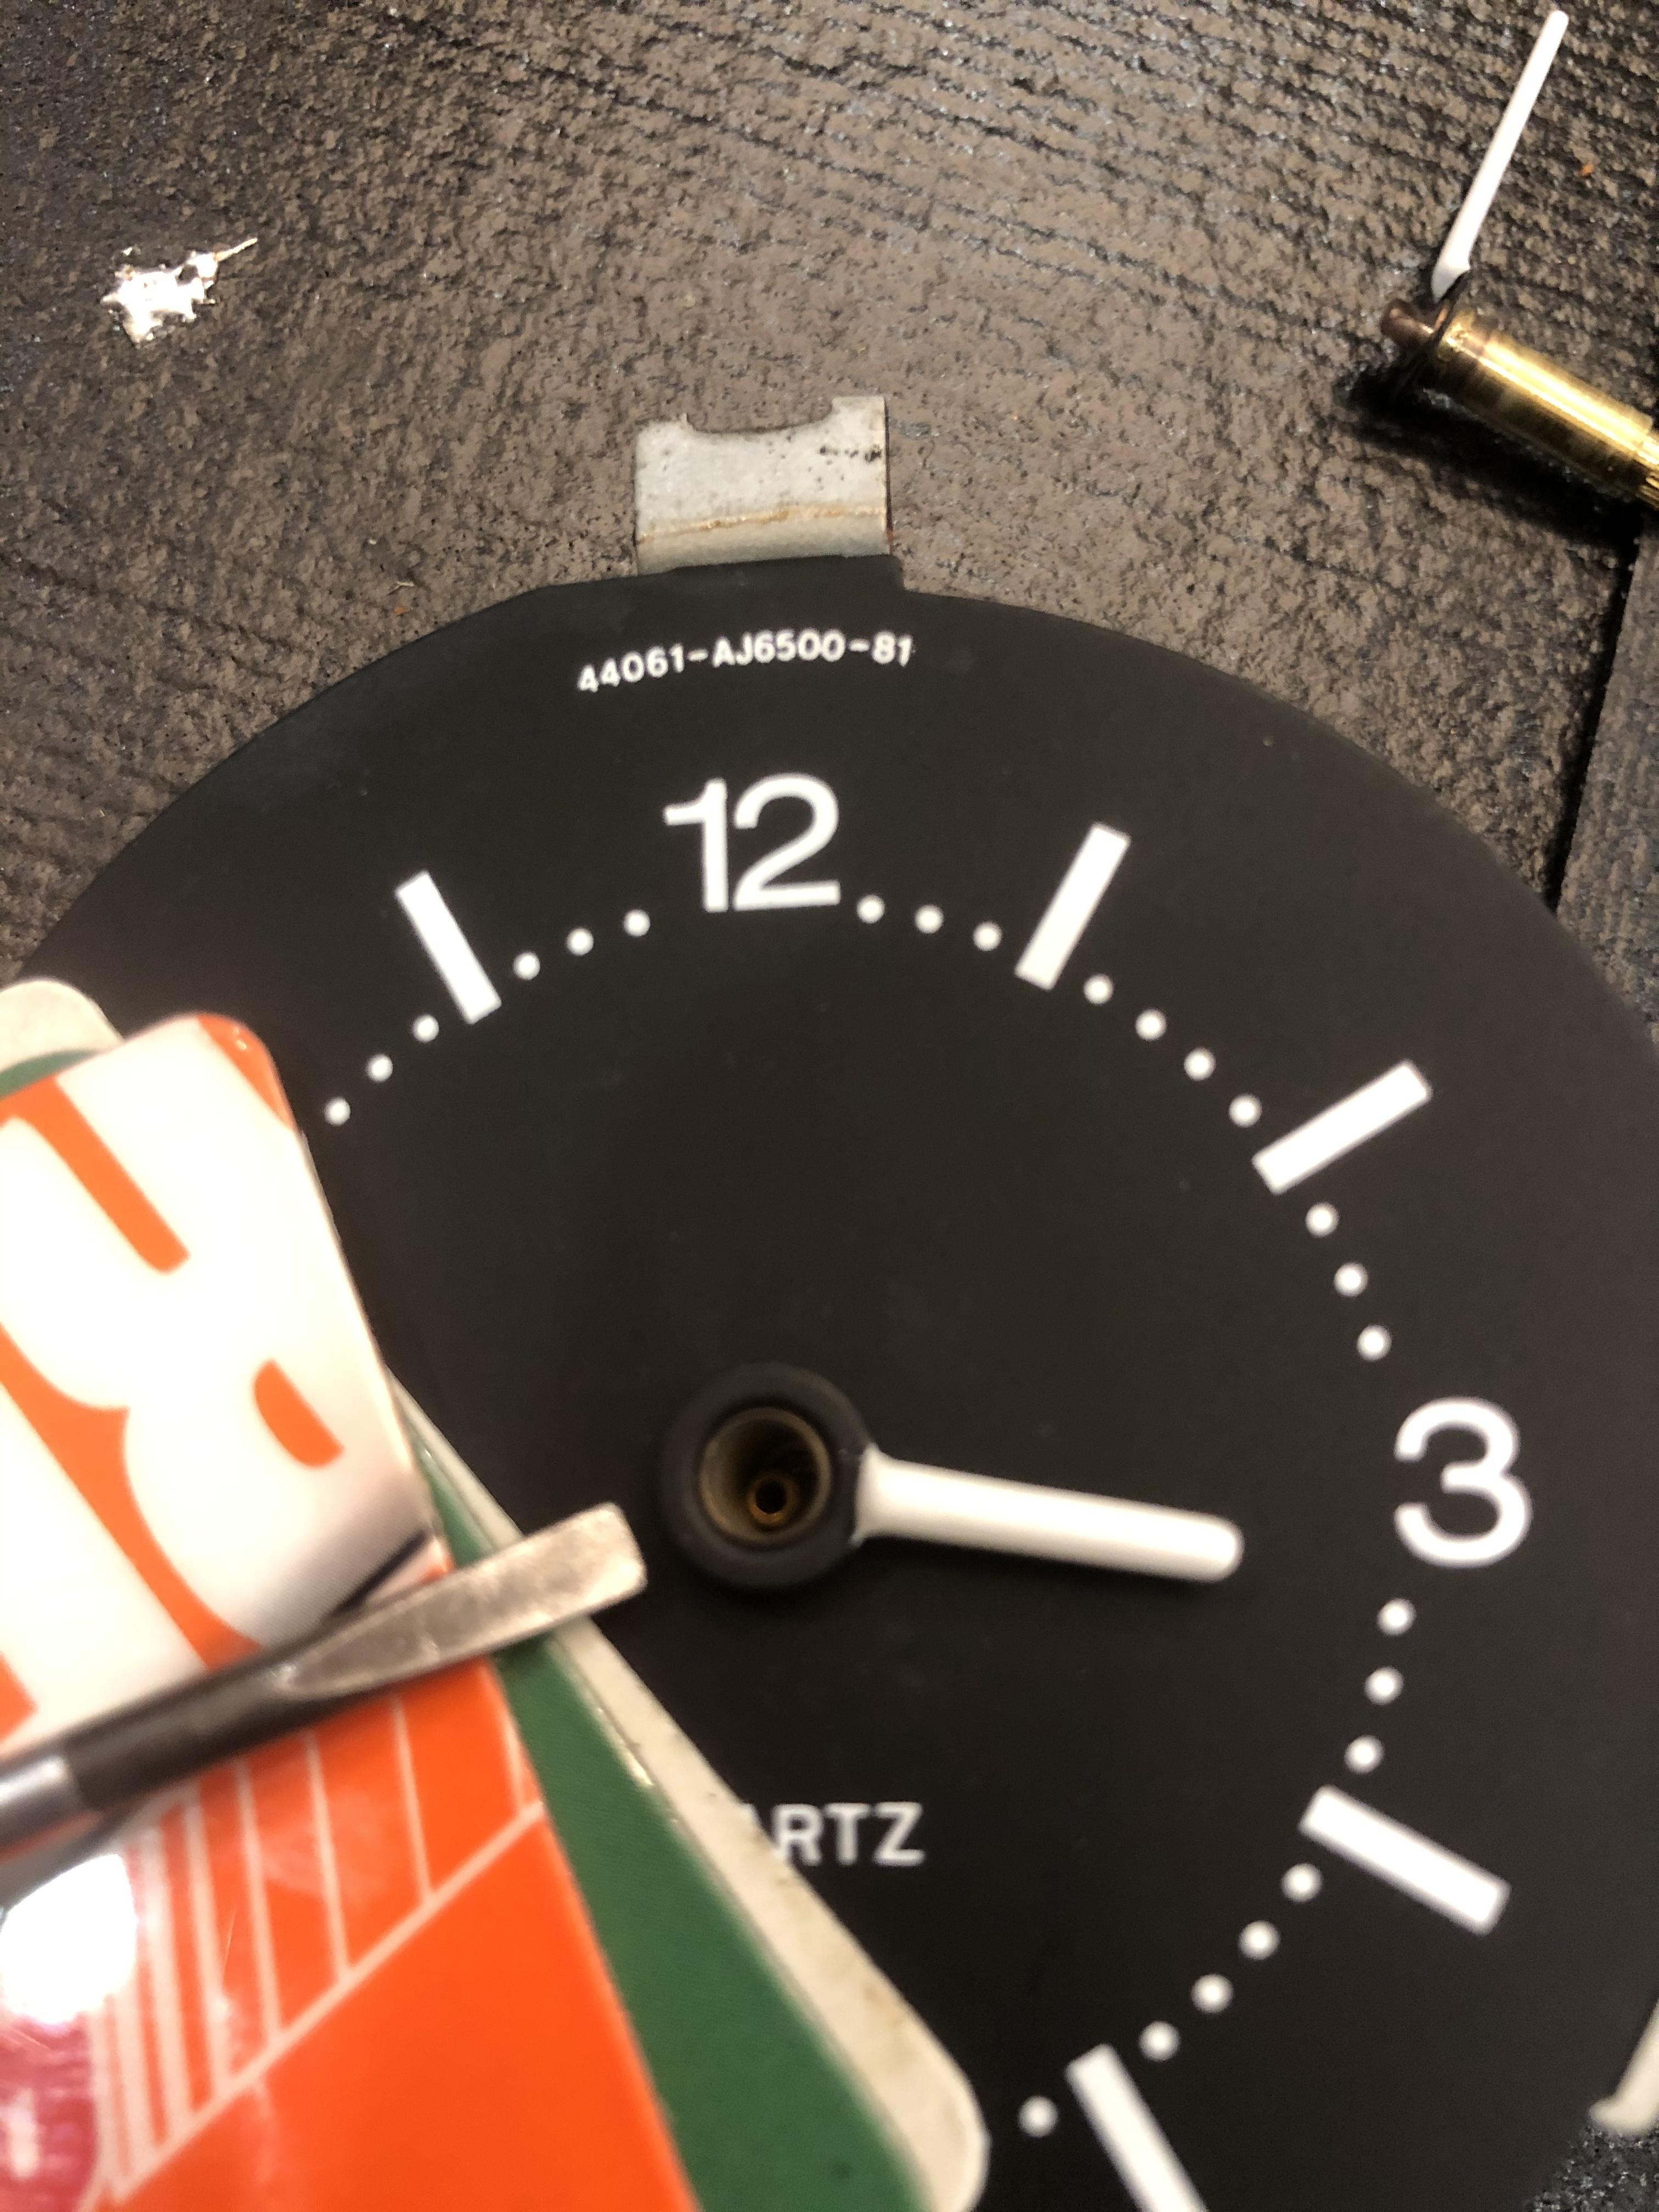
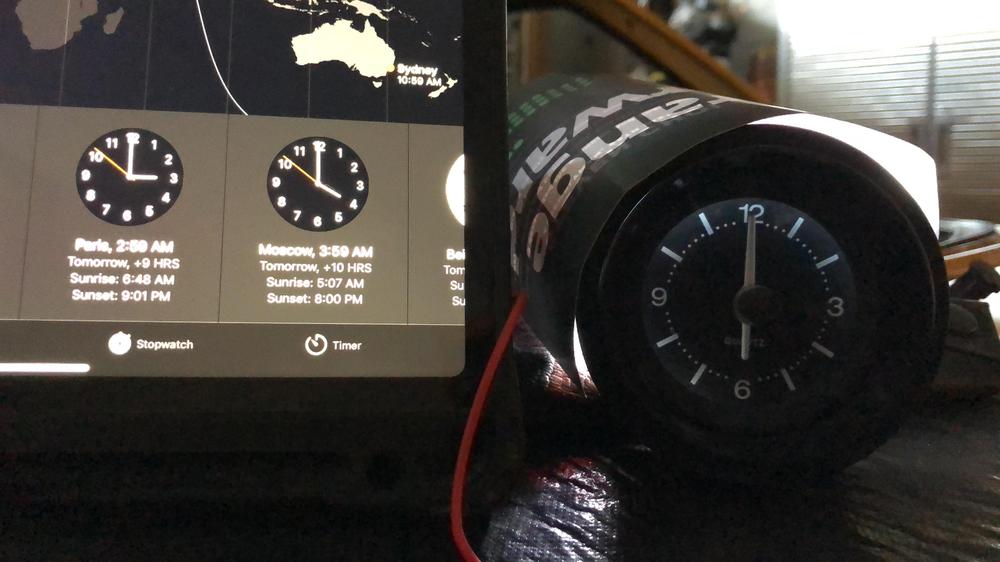
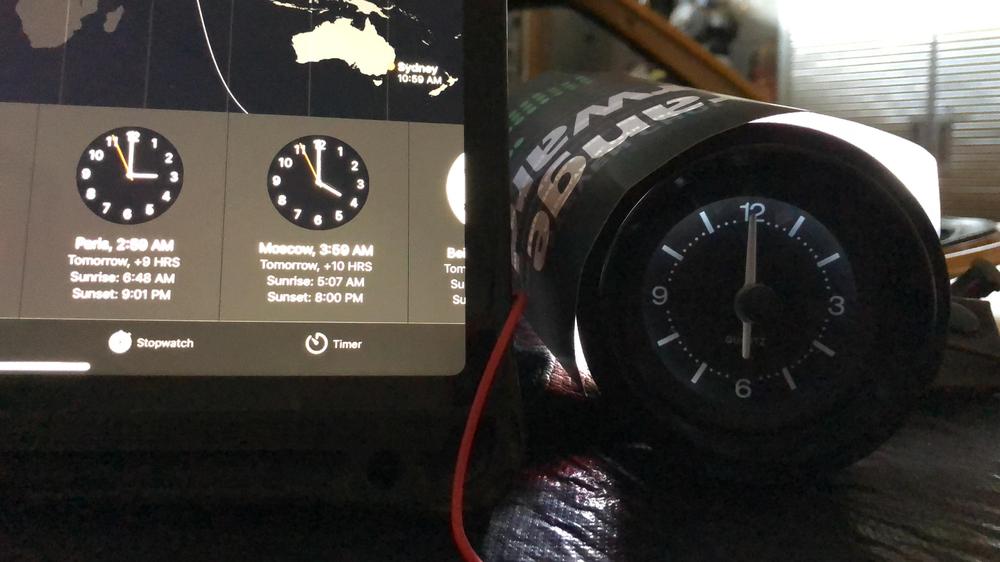
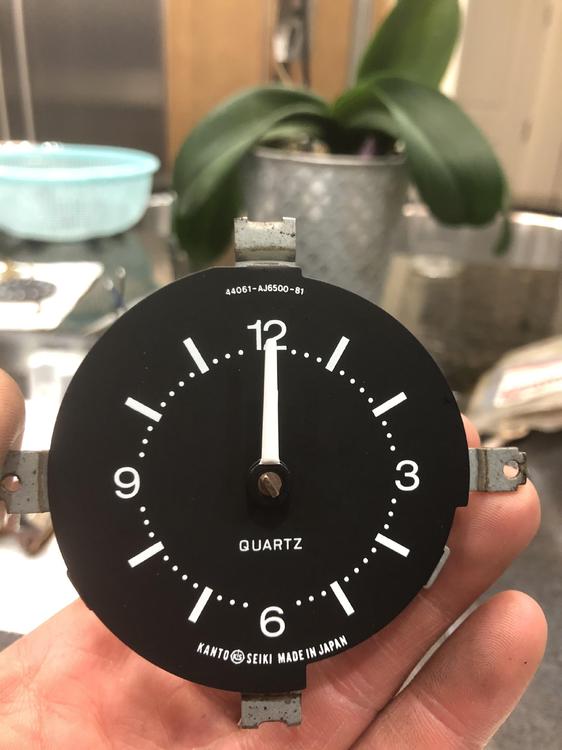
Hi @zclocks i tried all sort of things from transmission fluid mixed with brake fluid, blaster fluid... torch heat, not the acetylene, heat, cool ... to remove the egr pipe to the exhaust manifold, I lost the battle. i did examined the hands and looked to me the minute hand was pressed in hard or welded in. Did not give it a second thought and jump the gun too quick. That’s my fault. Fail the patience part miserably ? No wonder I had to tap a bit hard from the back to remove it. it was so hard to record the video. So much light interference. I had to shone a flash light in the back to get the clock illuminate. You can hear the solenoid strike every 5 second or so if you turn on the volume to the max. after 20+ hours, the clock is pretty accurate. I did confirm I can see the 2 cranked you mentioned. And I did set the clock to be faster approximately 10-15 seconds. please see the photos and the video. I hope it won’t cause too much trouble in future. I’ll keep an eyes for a donor one to get the gear. This time, will do the proper way. thanks again for all the info and help regards IMG_1598.MOV


-
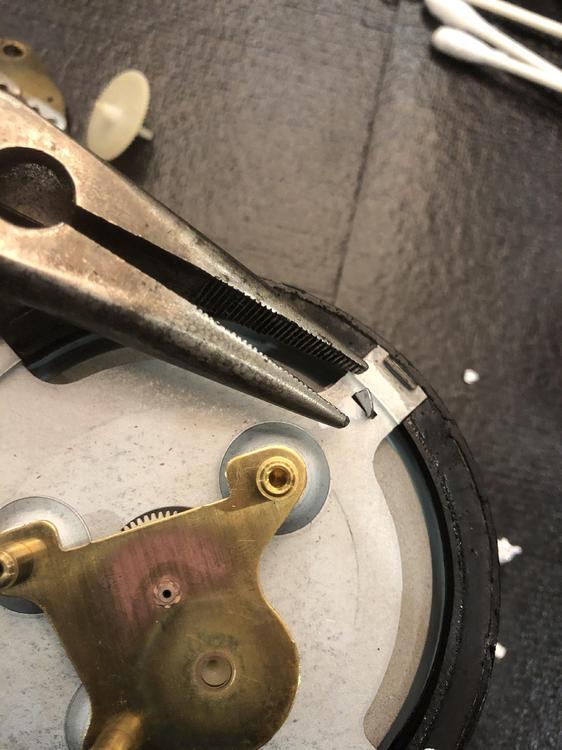
@zclocks, Sir, you're very detail. Thank you for sharing your knowledge. It is lock in my vault. Will definitely refer to it next time I got another chance of fixing a clock. I didn't not pay attention close enough to the gear. I thought there has to be a puller like the 3 or 2 prongs to pull the pulley from the engine. The modified pliers is a genius. I did not know why I thought the minute hand and the shaft is a one piece. Had I pay a little bit more attention, I would have go the same route as pulling the hour hand by stacking up credit card. But I notice it pretty hard to pry it out and might ended up the same result. That was why I used the resize watch link and tap it out. The pliers is the way to go. The force will only between the object need to be removed and the host it is sitting on. It won't disturbed other component. Very nice! Since you suggest to keep the clock roughly 10-15 seconds faster/slower, I set it to run approximate 15 seconds faster. The clock has been keeping good time at least 16 hours before I left this morning. Let's see if I have a magnify glass or my kids might have one. I need to reexamine the gear again to see its condition. I'm curious. Won't remove it as you mentioned another stress might permanently damage it. Funny thing ... there used to be a clock/watch repair shop in the mall near my place. Couple of decades ago... There used to be an old guy fixing all sort of clock/watch, big/small. Whenever I walk by, I always admired how steady his hand with his "miniature" tool sets. He must be in his late 60s or early 70s but real steady. Didn't pay much attention as there were more important things to notice at the mall when you're a teenager, you know what I mean. Again, thank you for pointing out the obvious and I learn something. Will post the picture of the clock tonight when I get home. regards,
-
Hi everyone. I'm in search of a weatherstrip kit for the car. The prices seem to range some what $228 to $300+ a kit. few questions: - Anyone using any of the kit below carparts.com zcardepot.com zcarsource.com ocautocarpets.com thezstore.com I'm sure there are a few more kit from other sources as well. It doesn't say the kit have the groove for the chrome on top of the windshield and hatch back. please share your experience how's the fitment as I read some kit doesn't seal well on the windshield top corners and doors won't close. regards
-
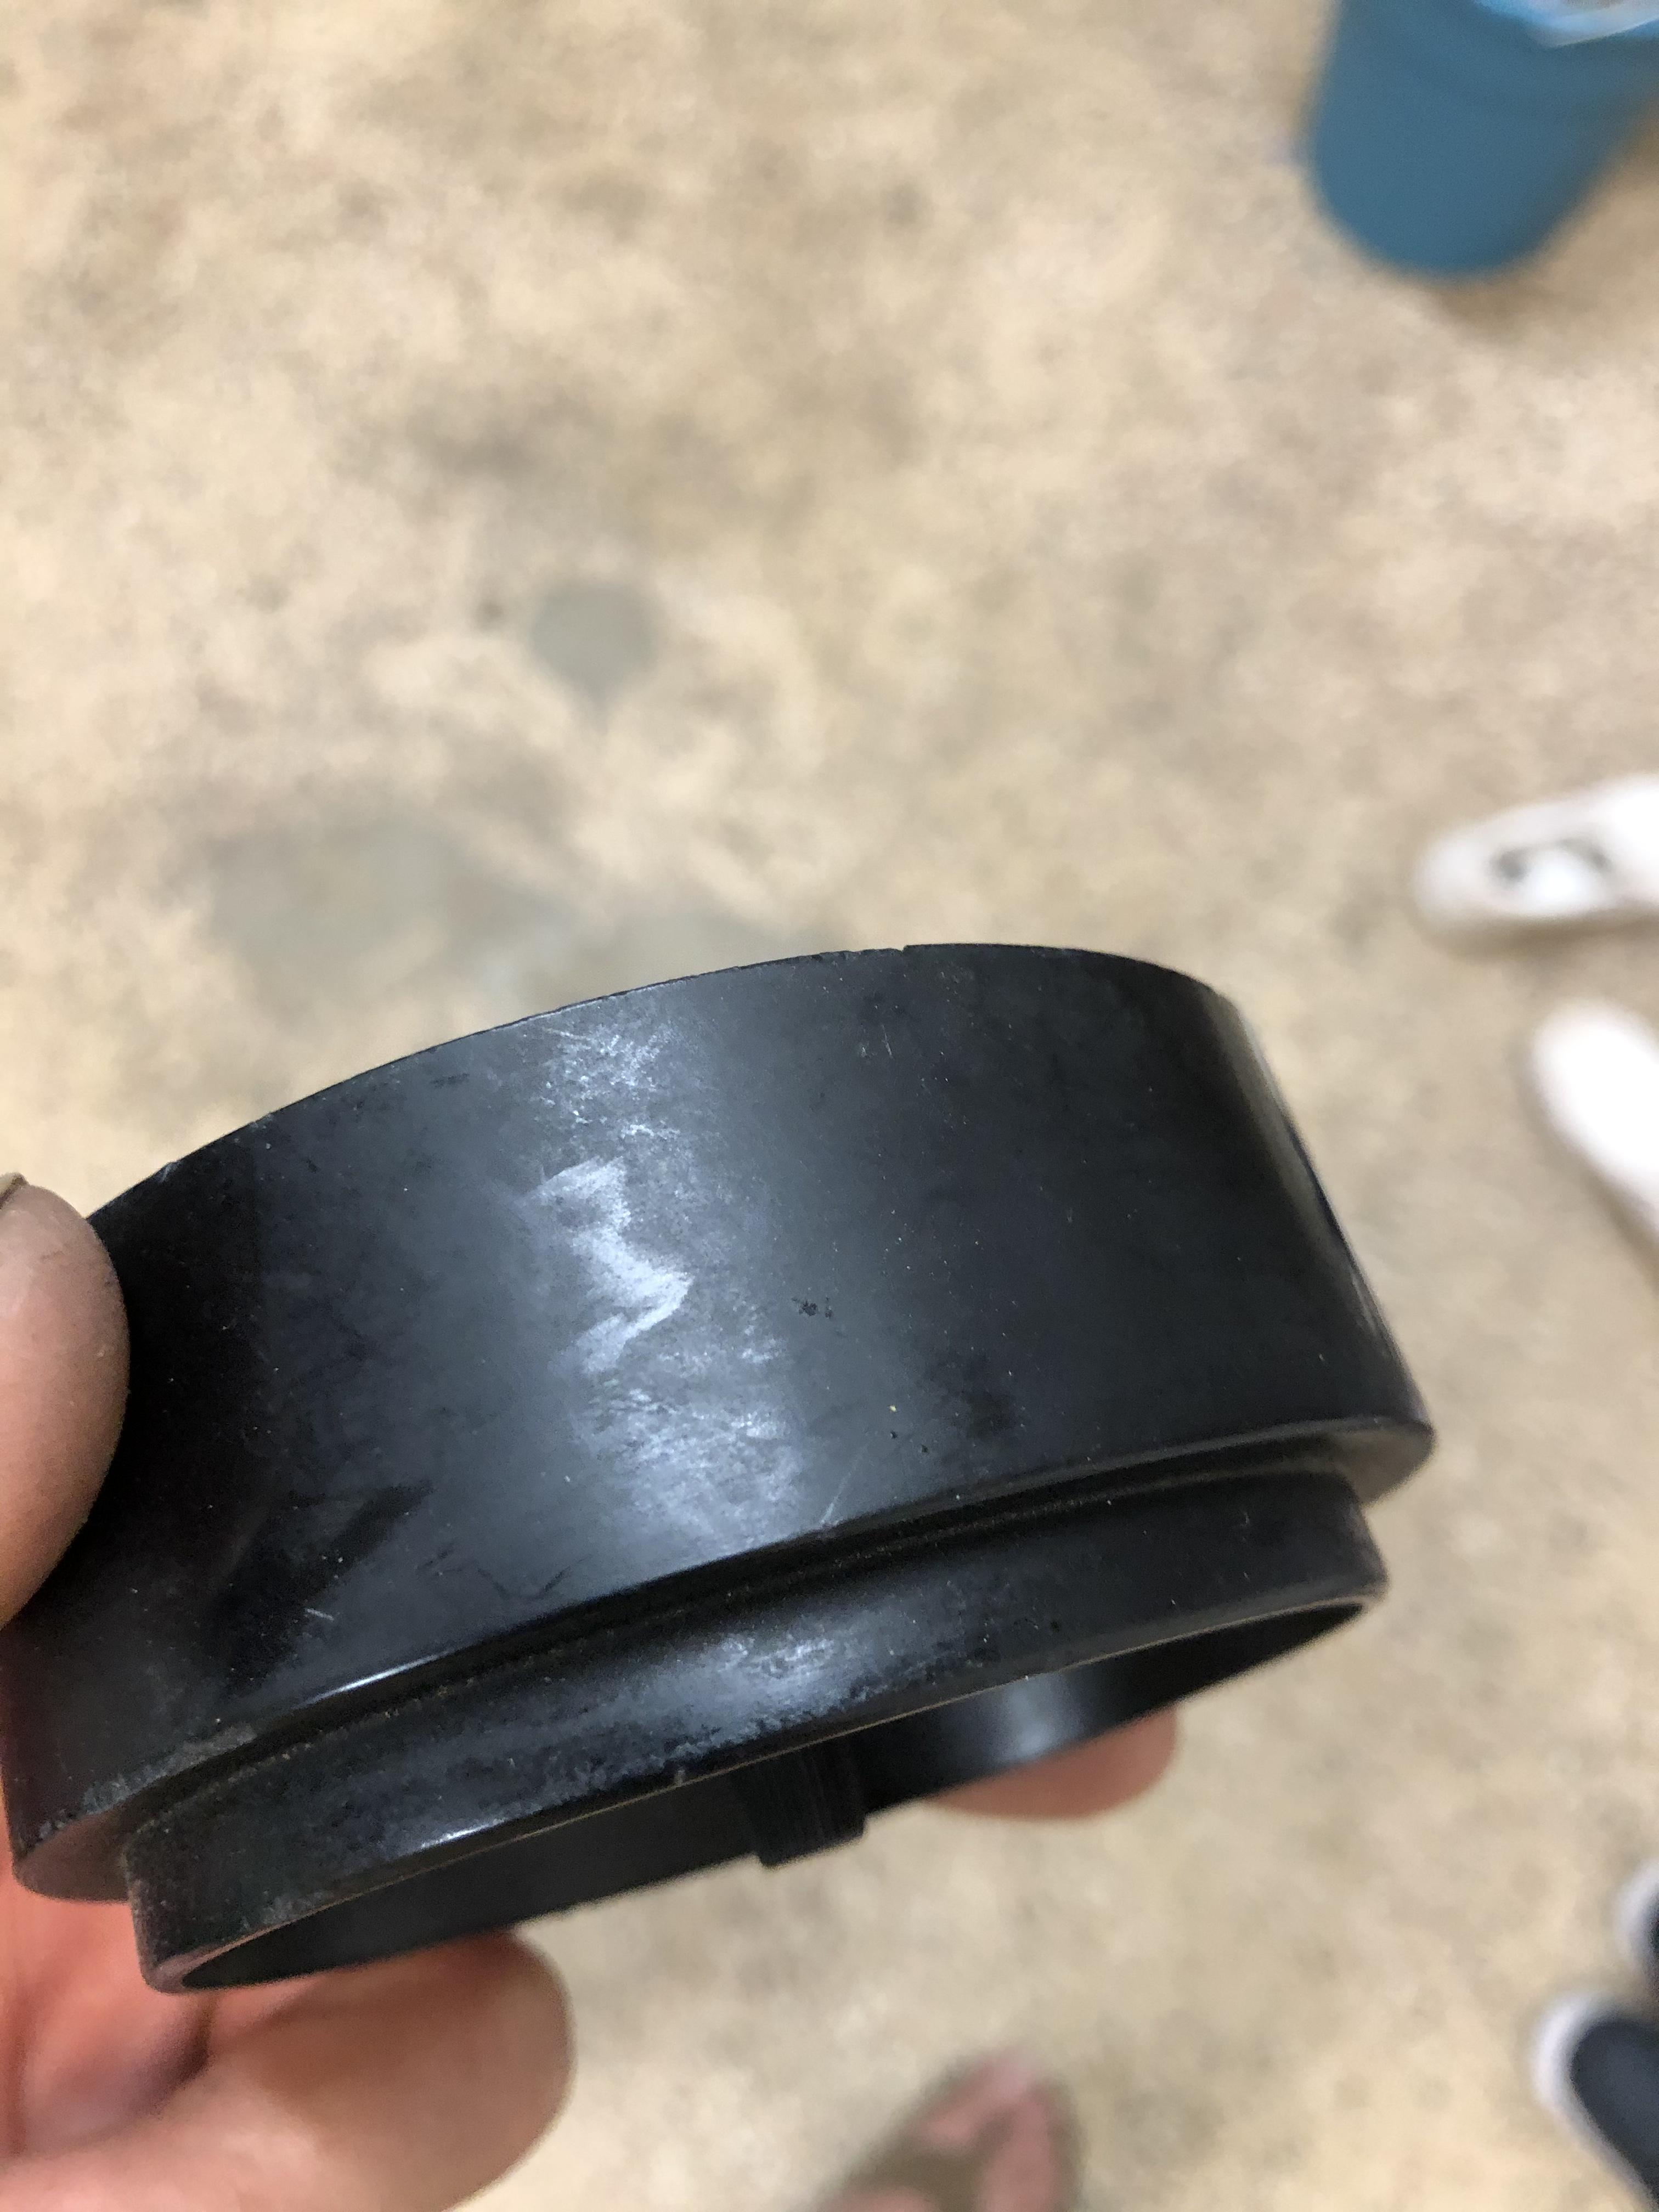
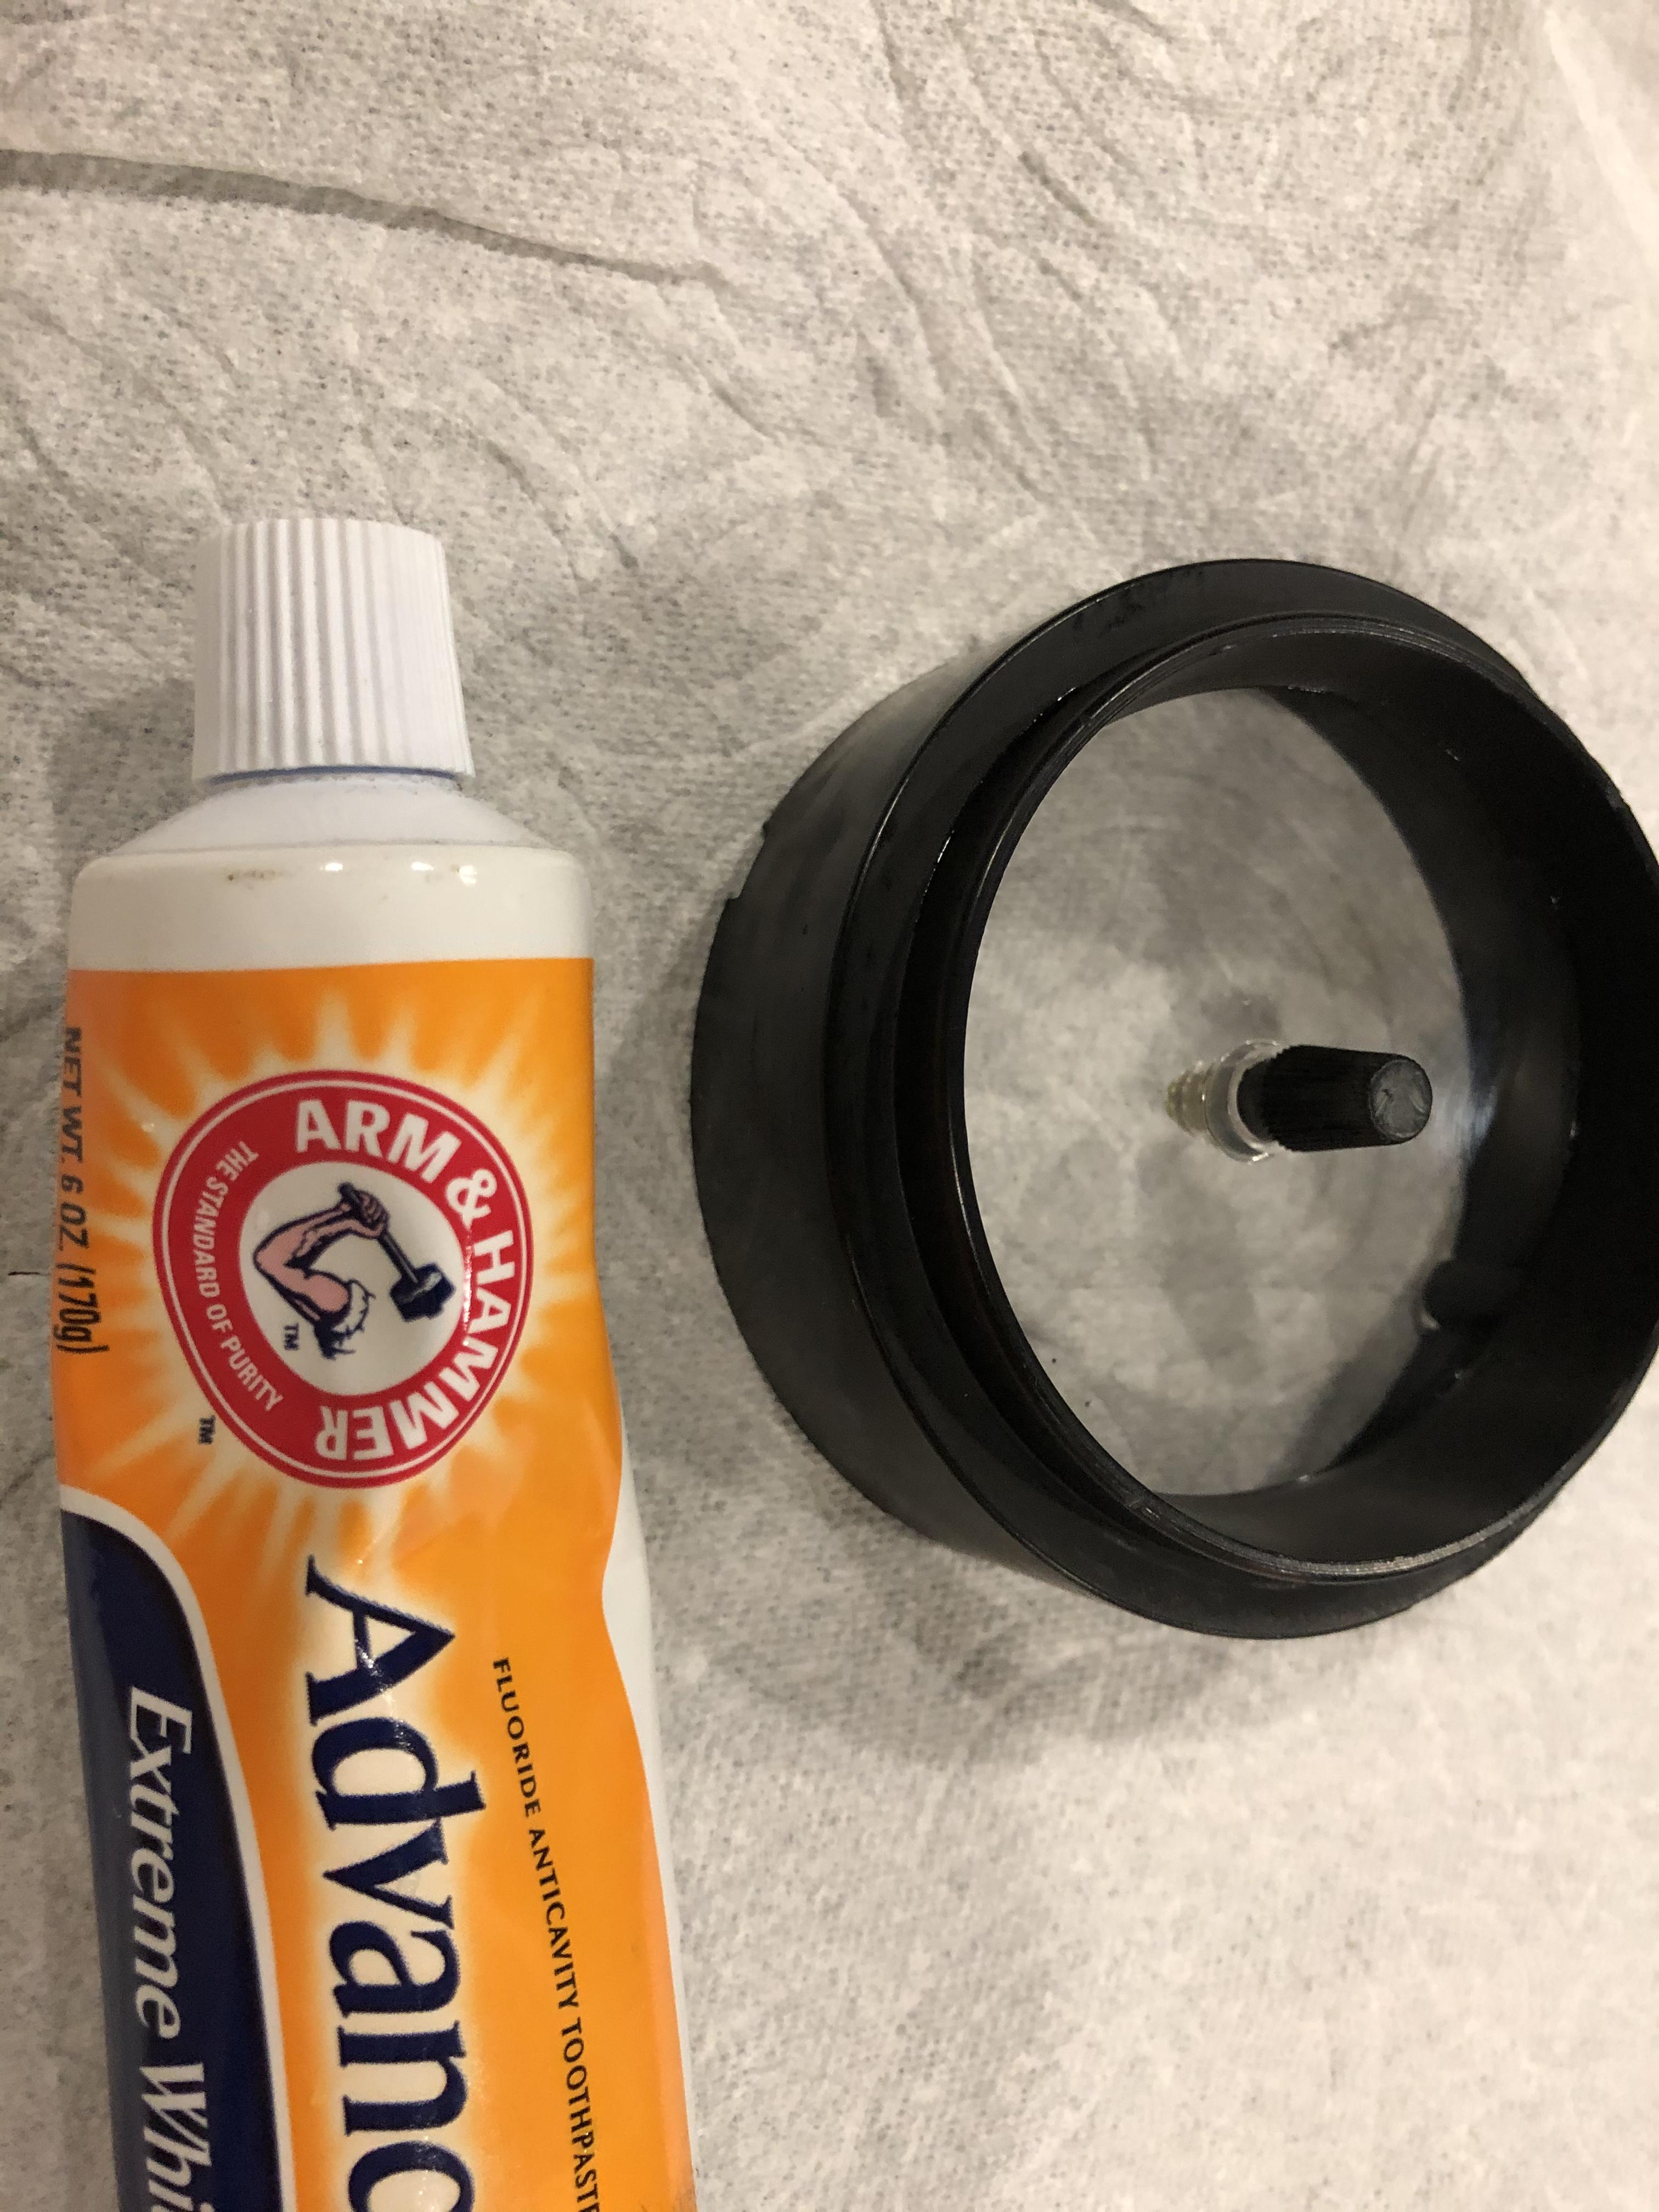
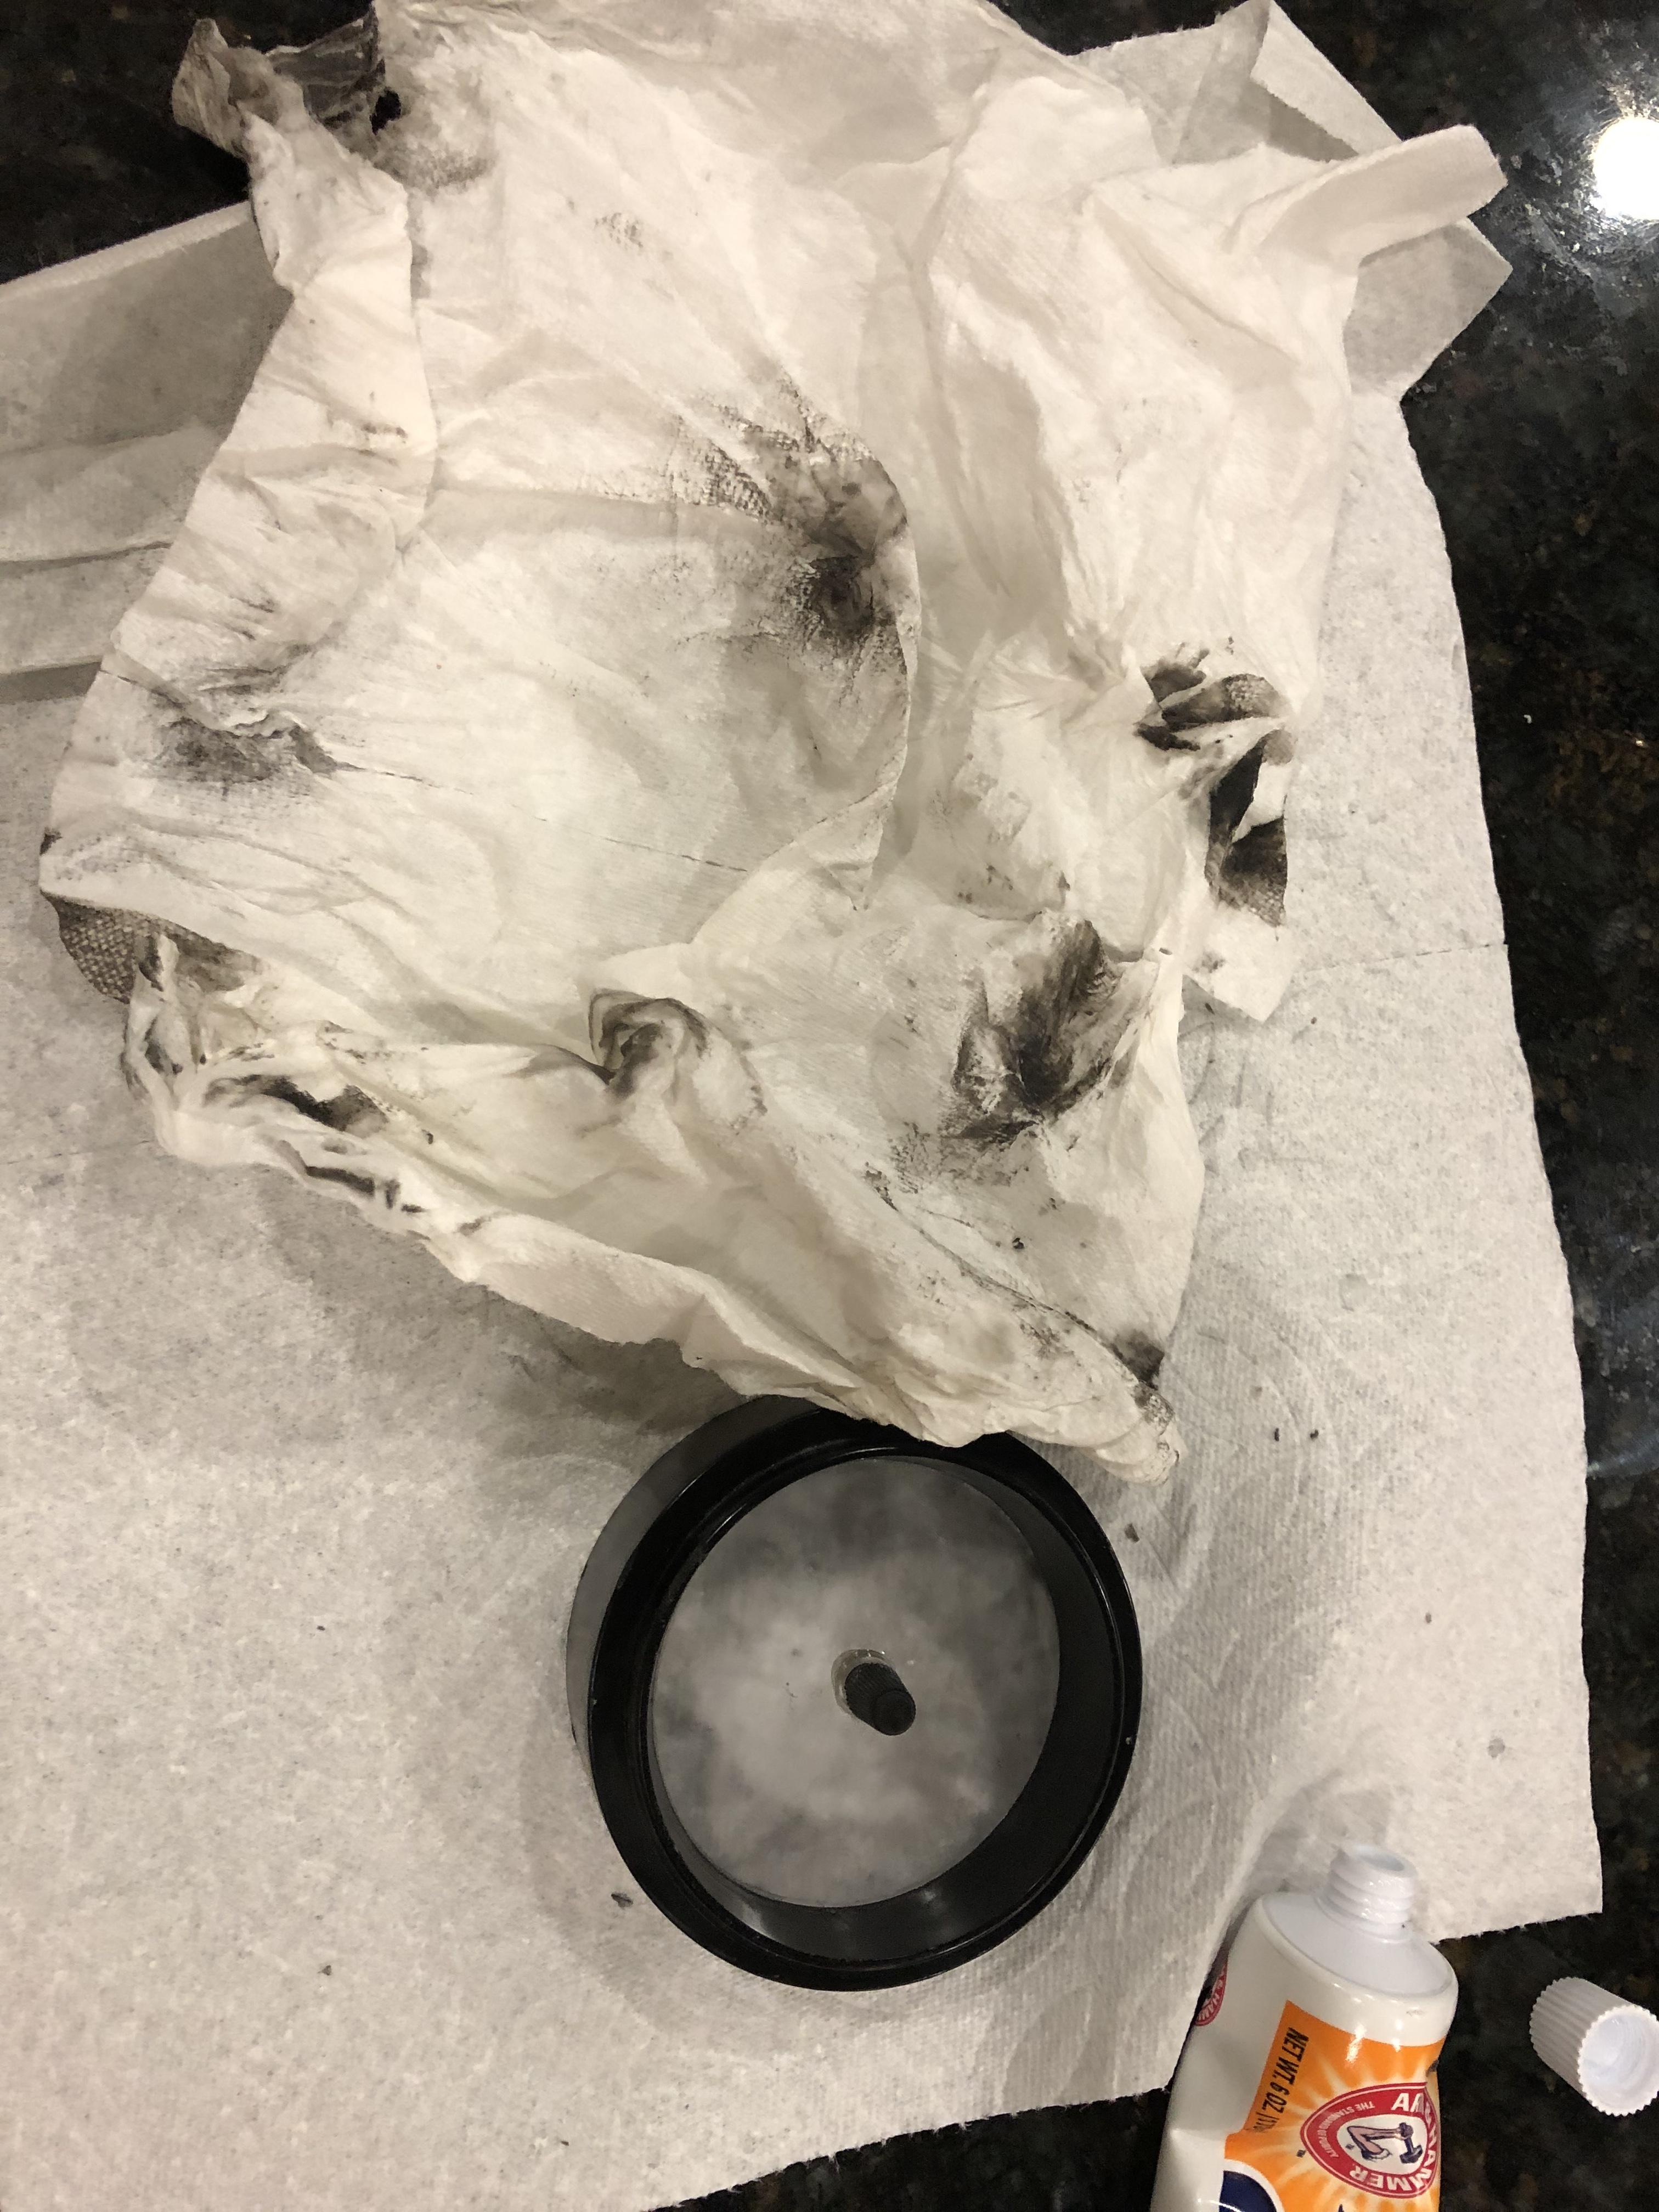
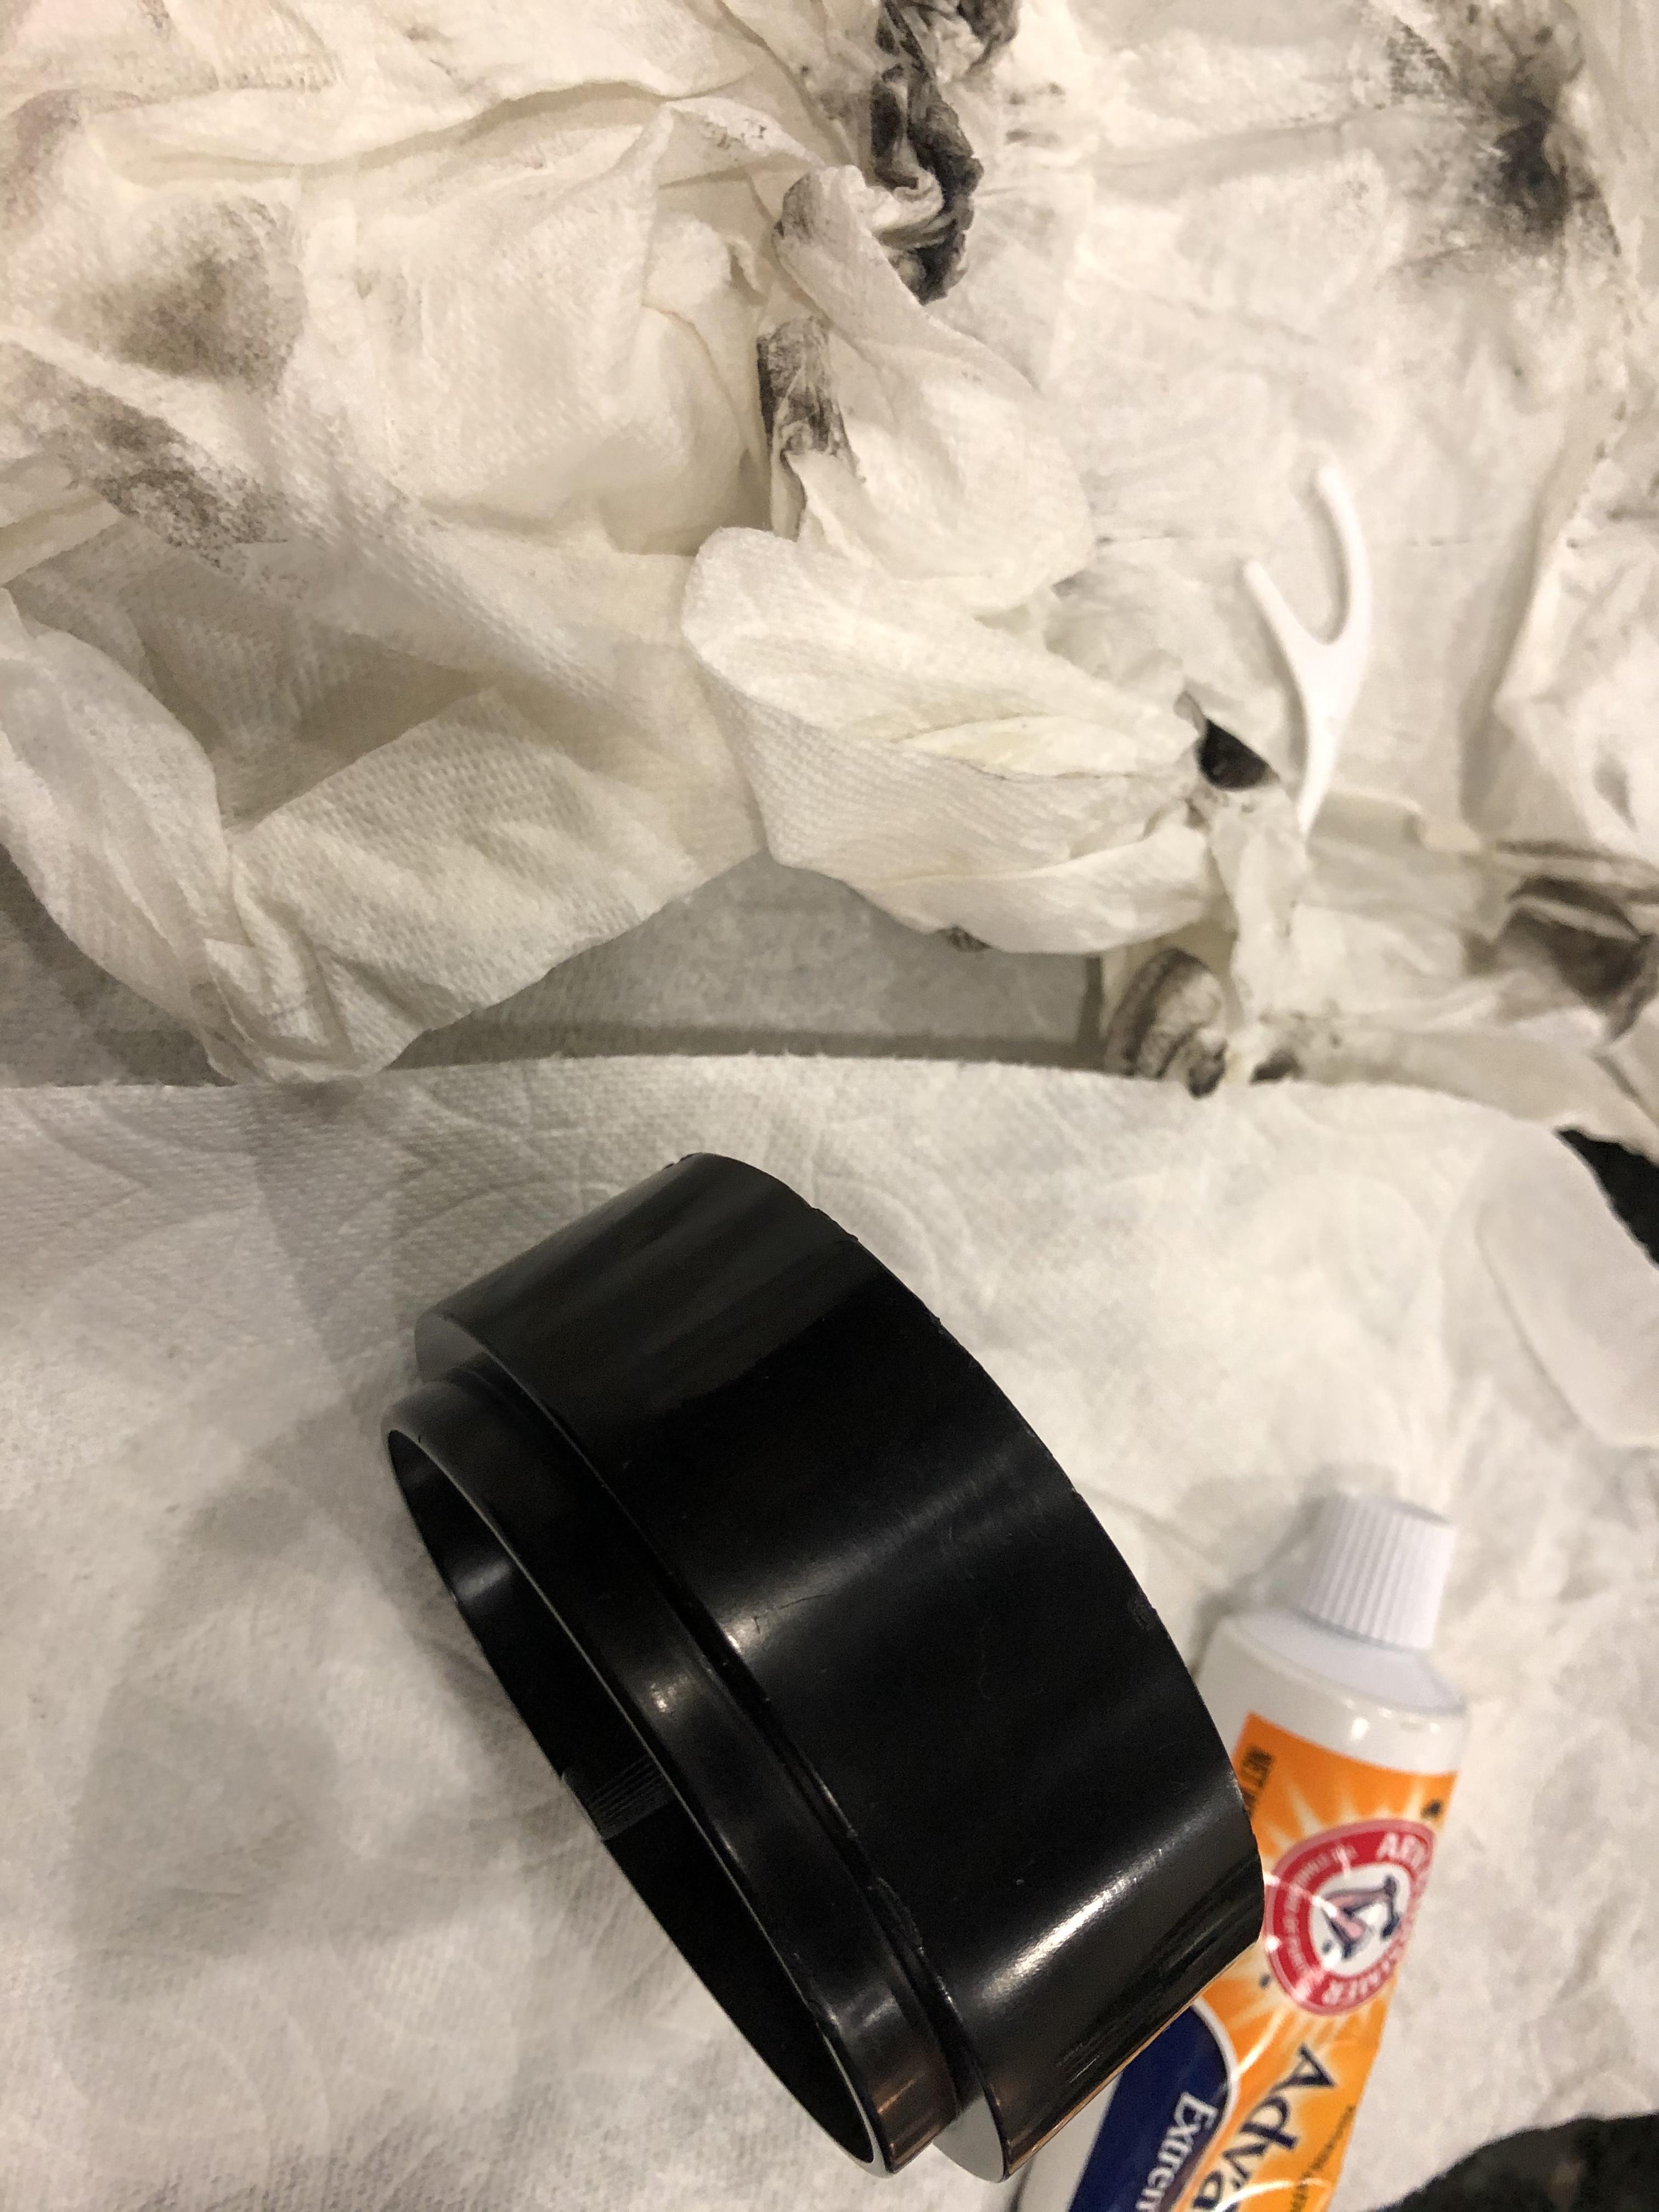
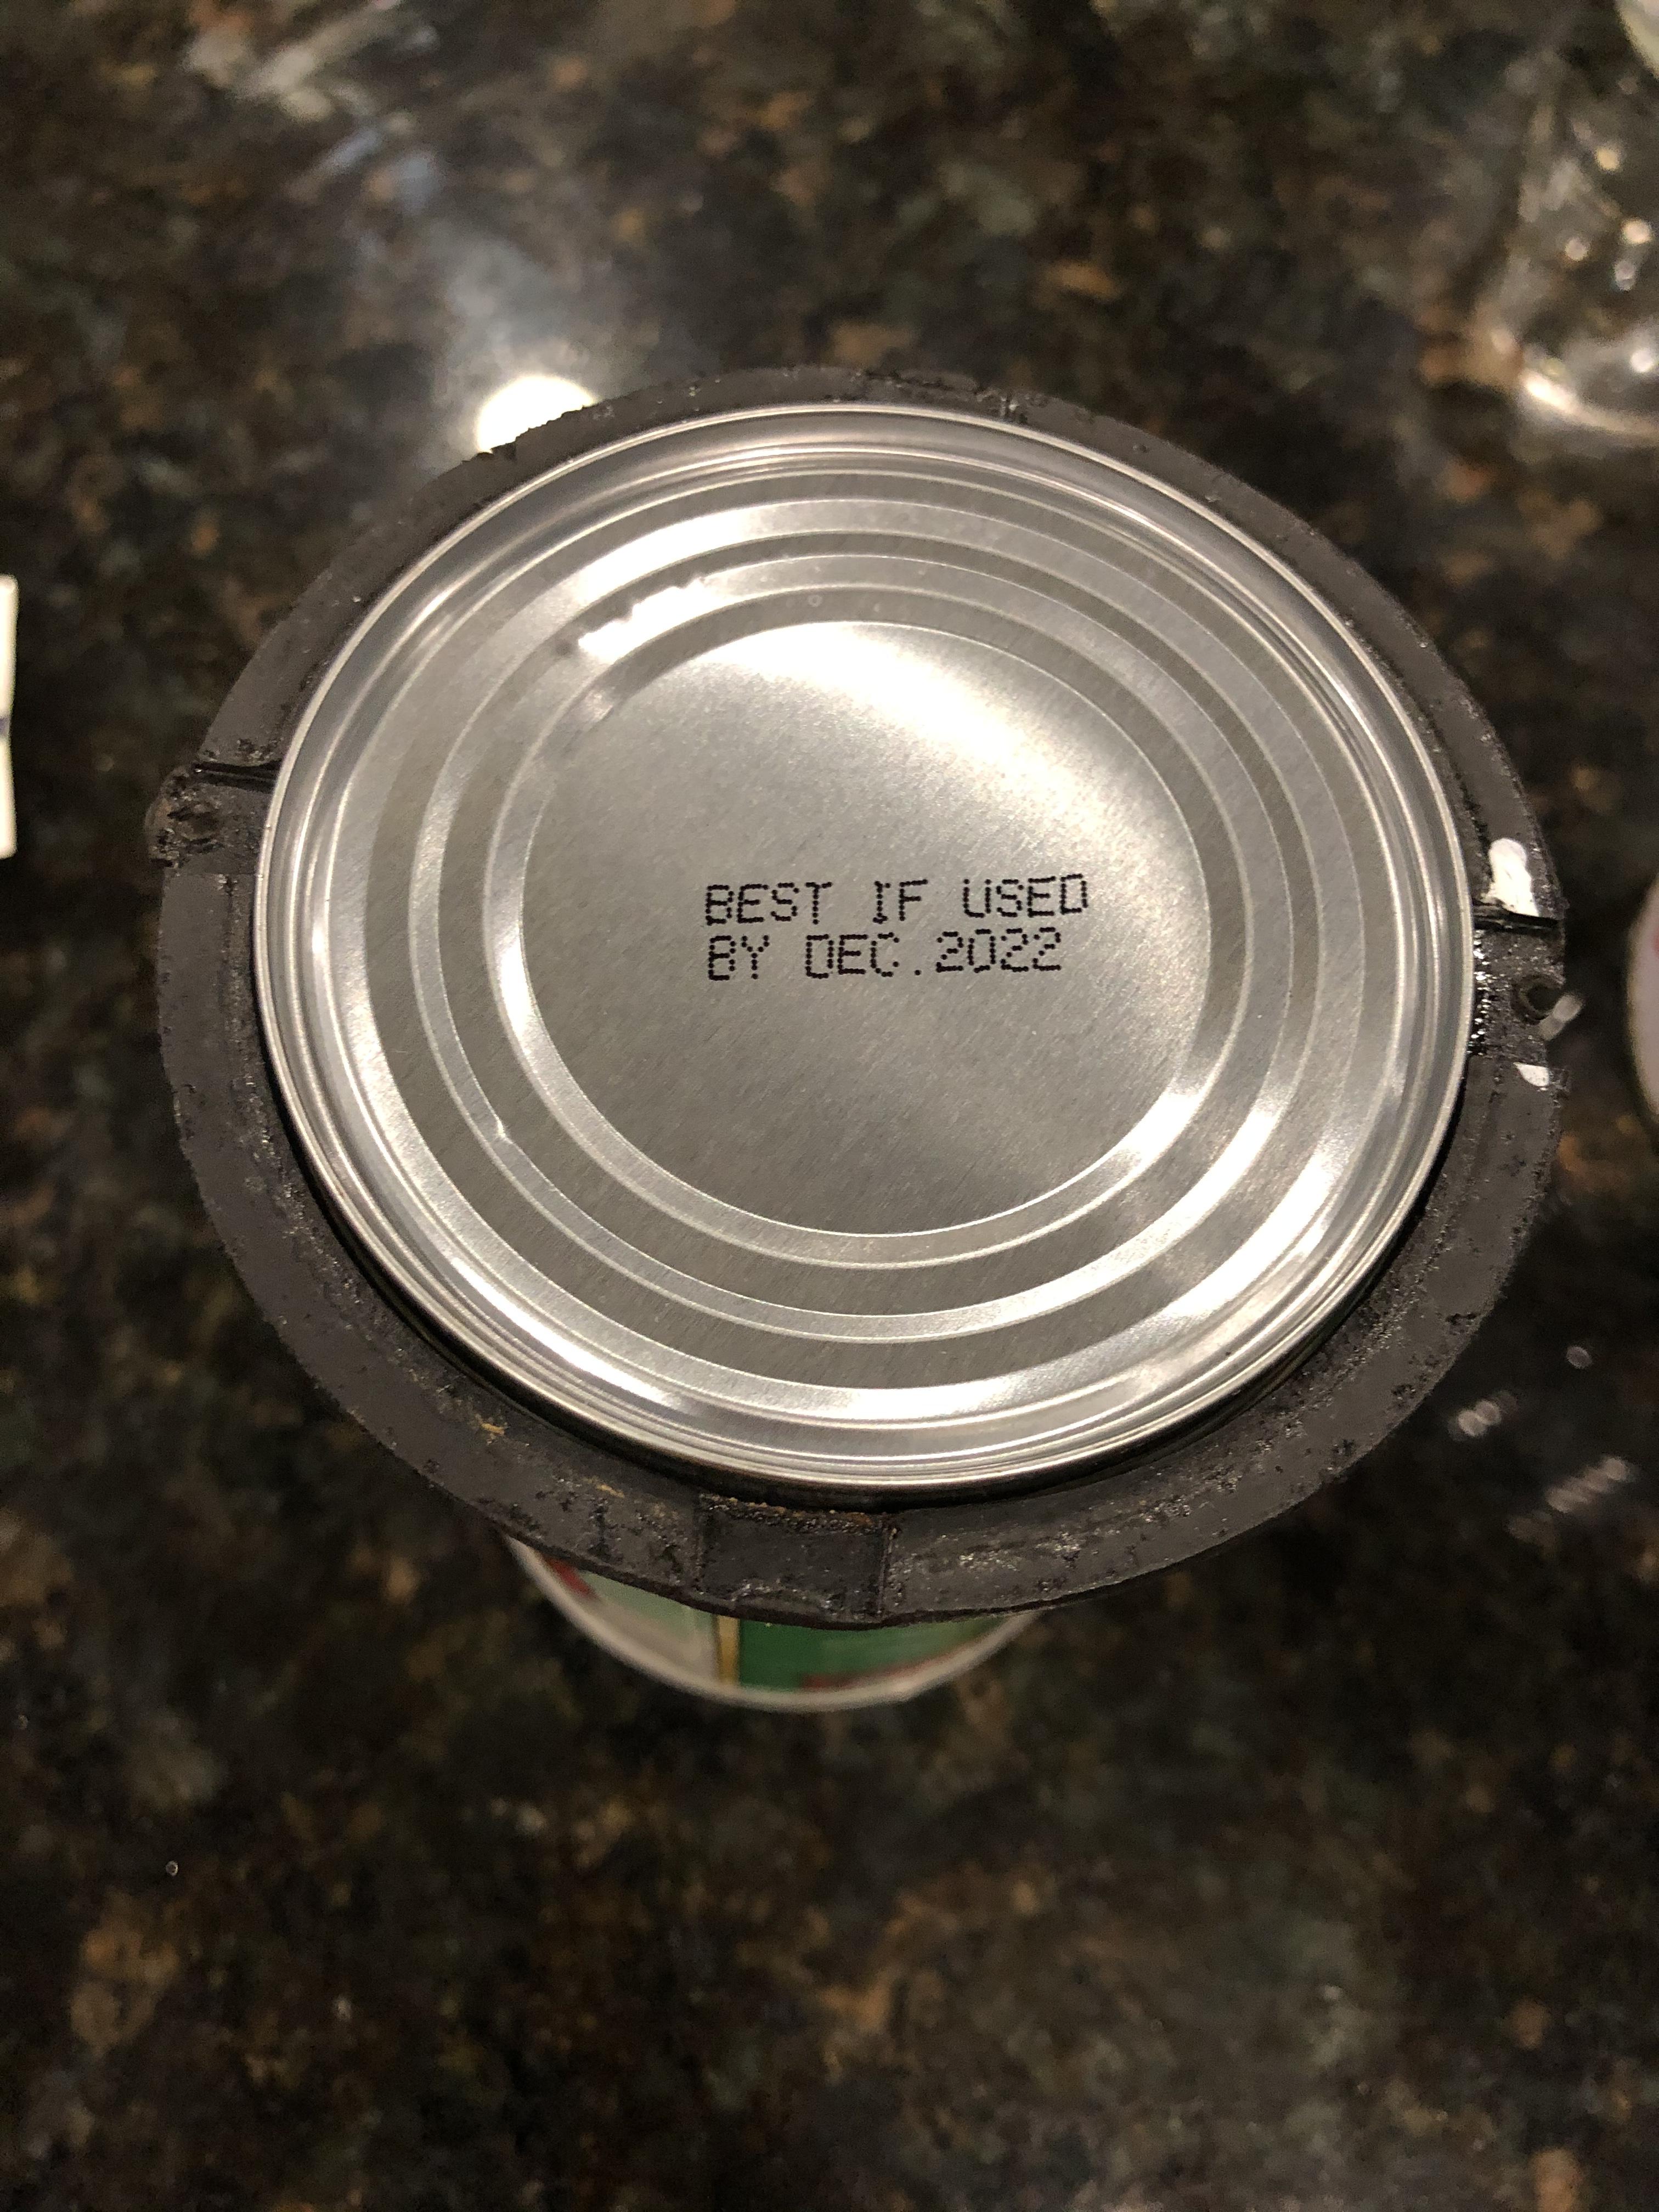
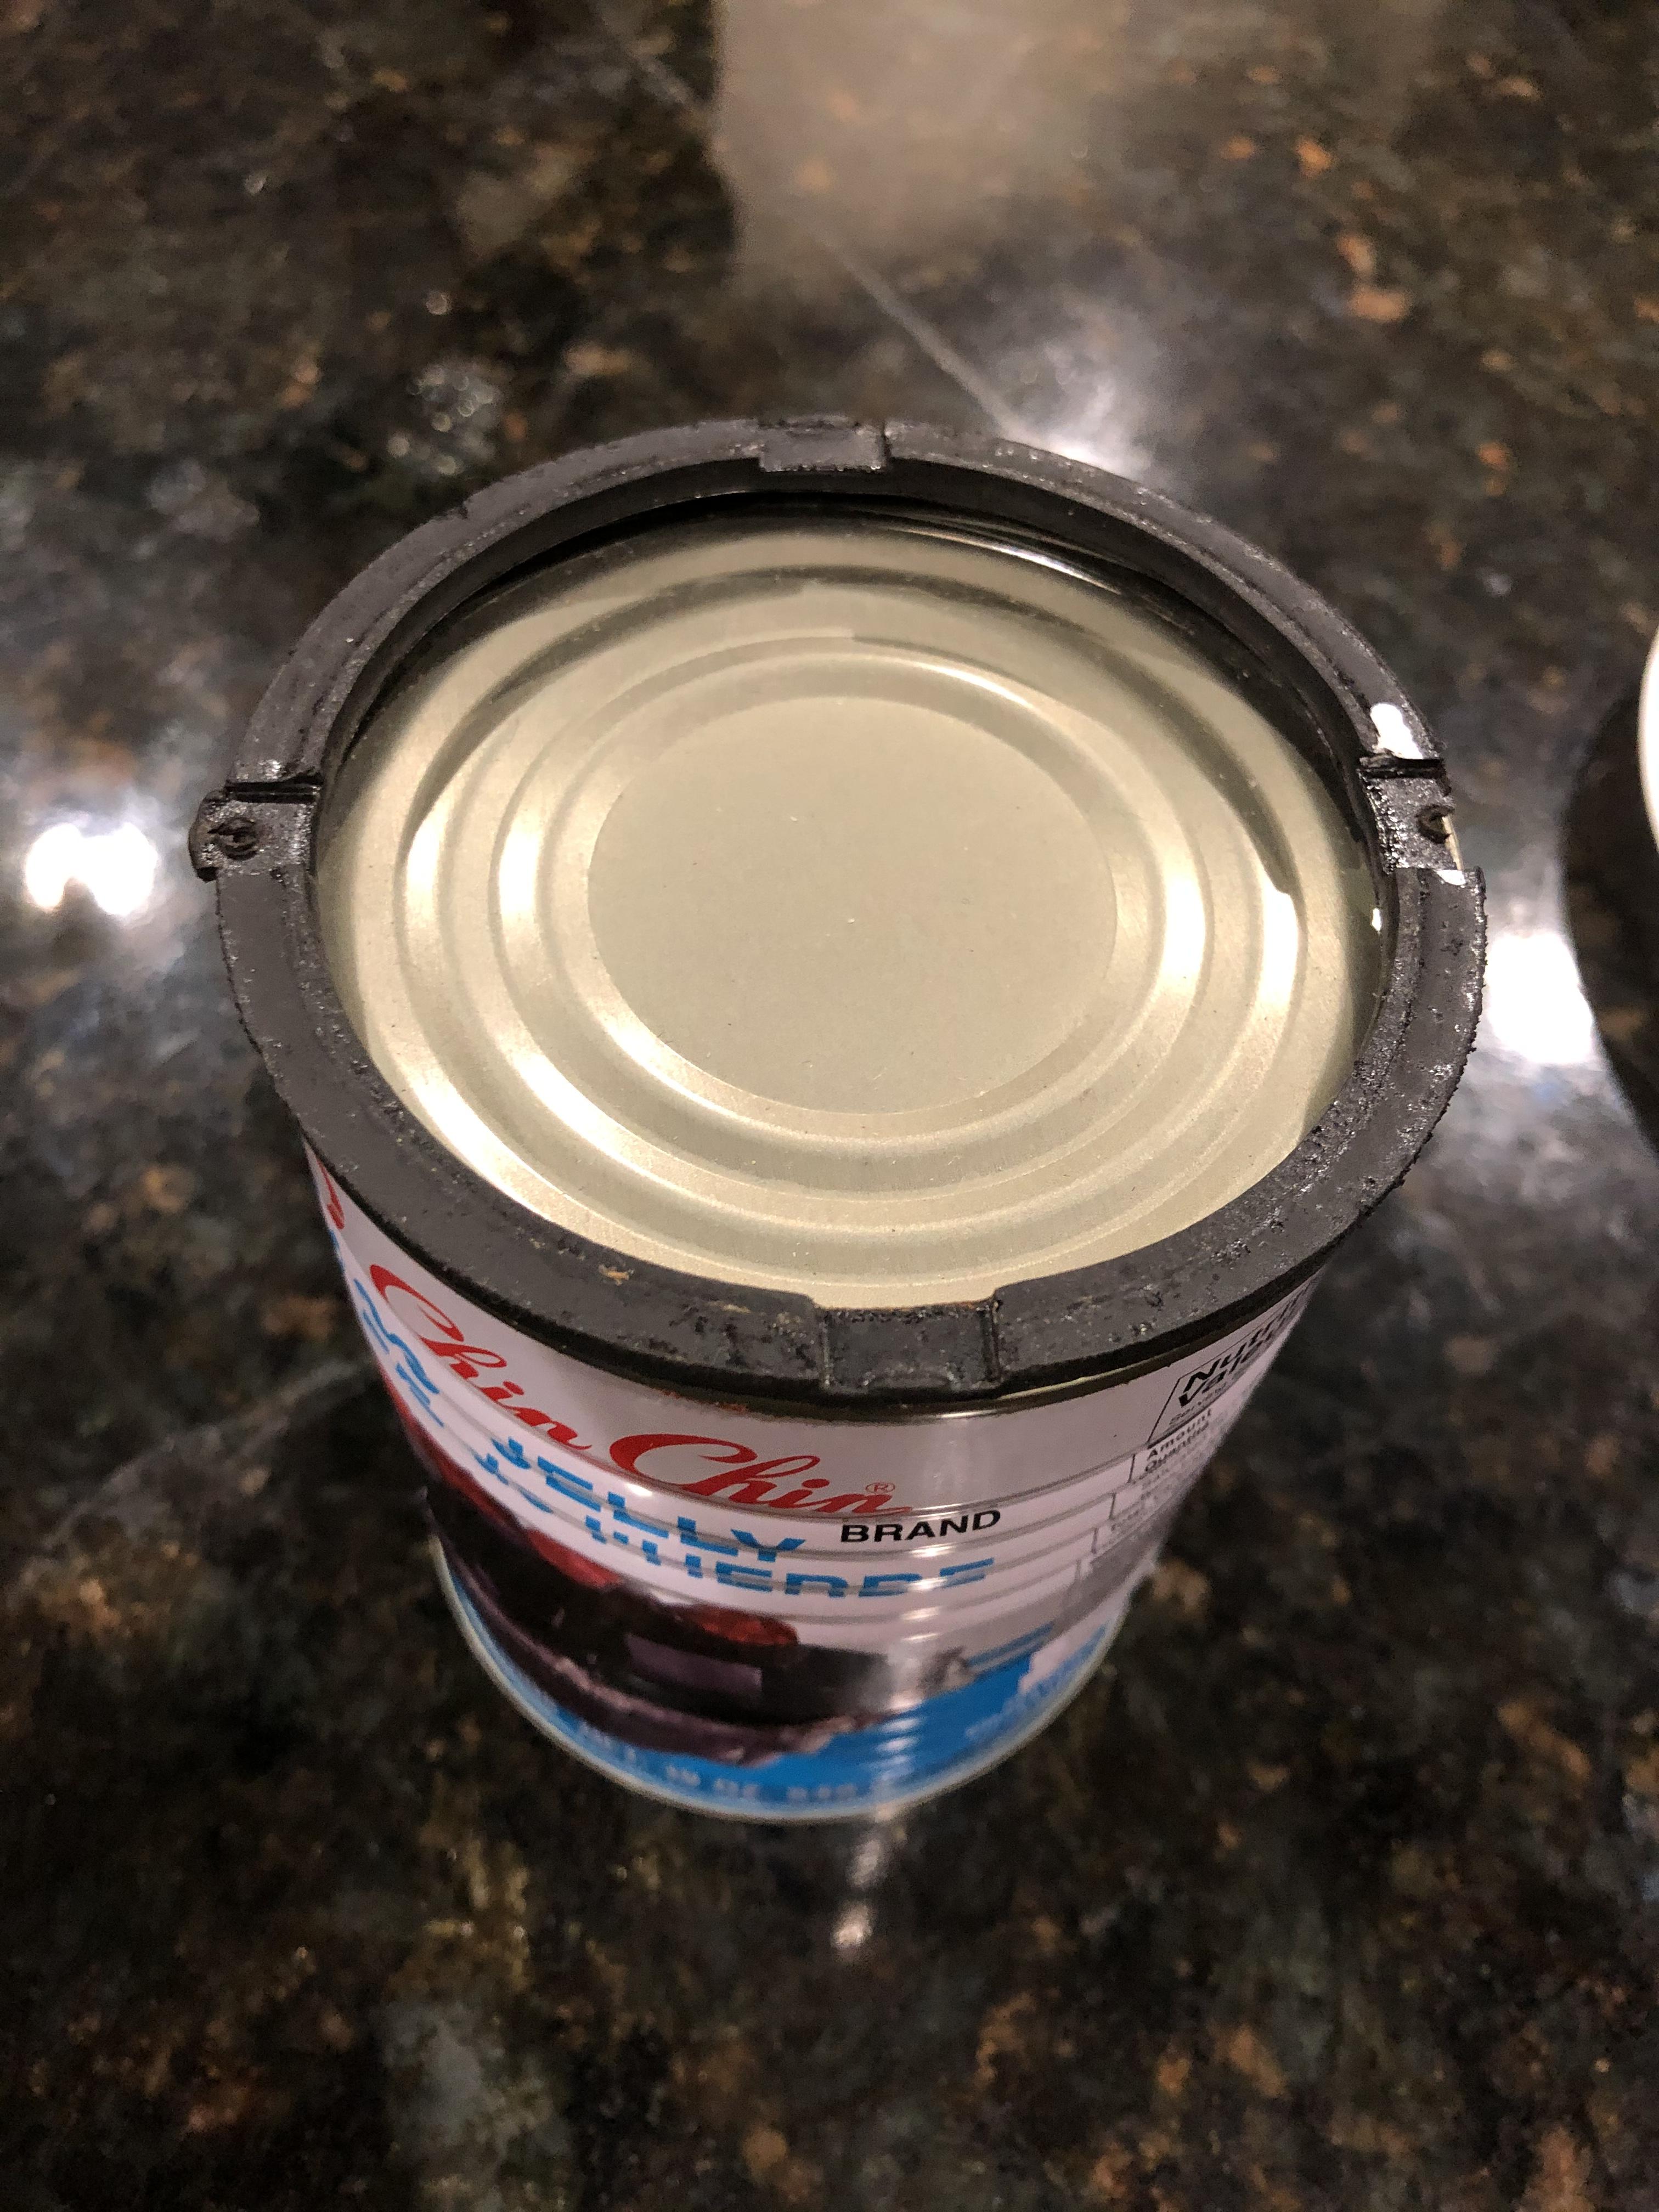
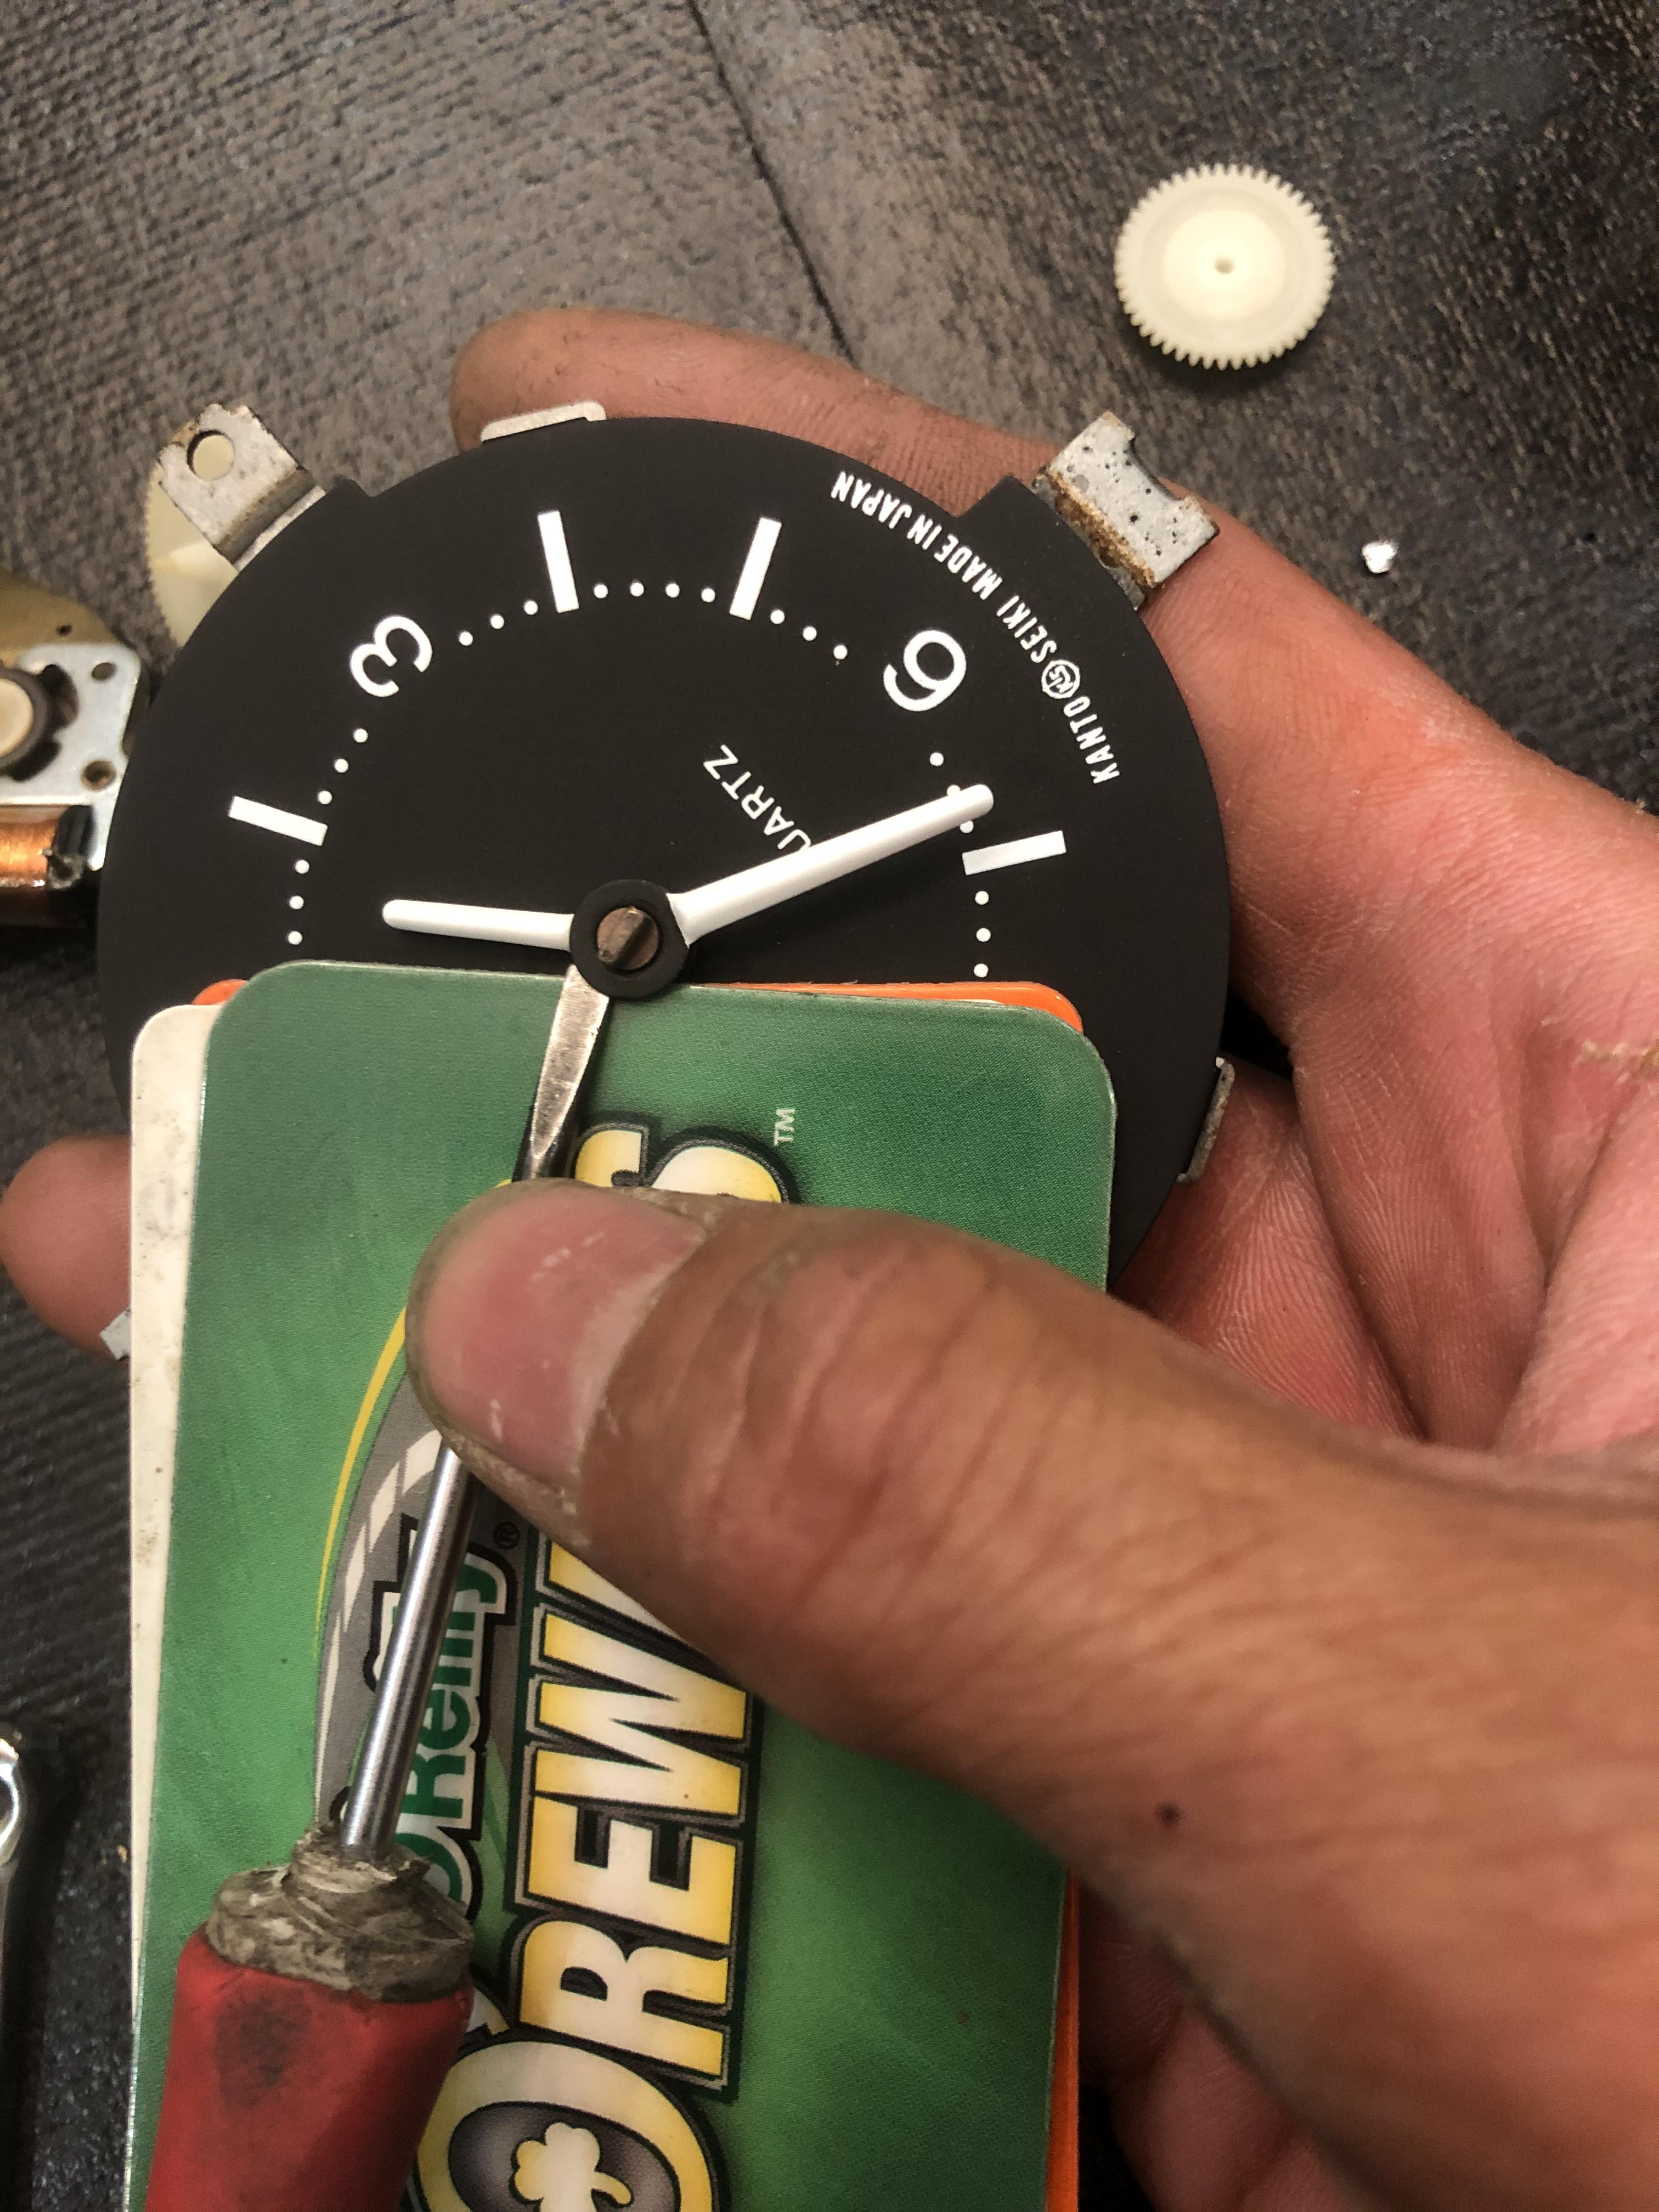
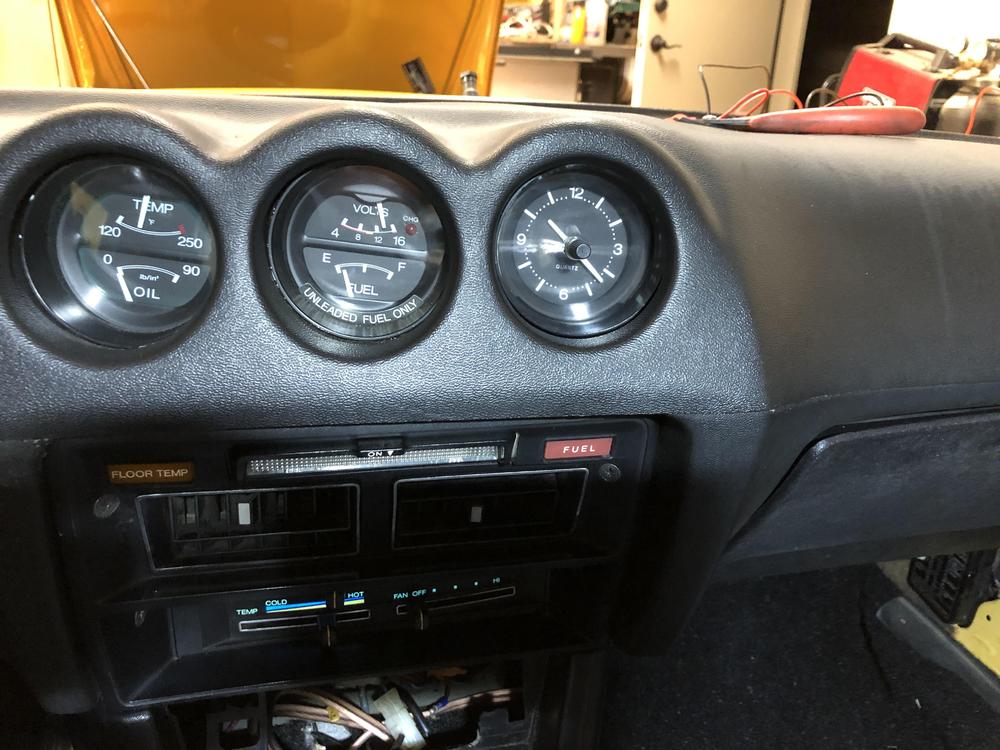
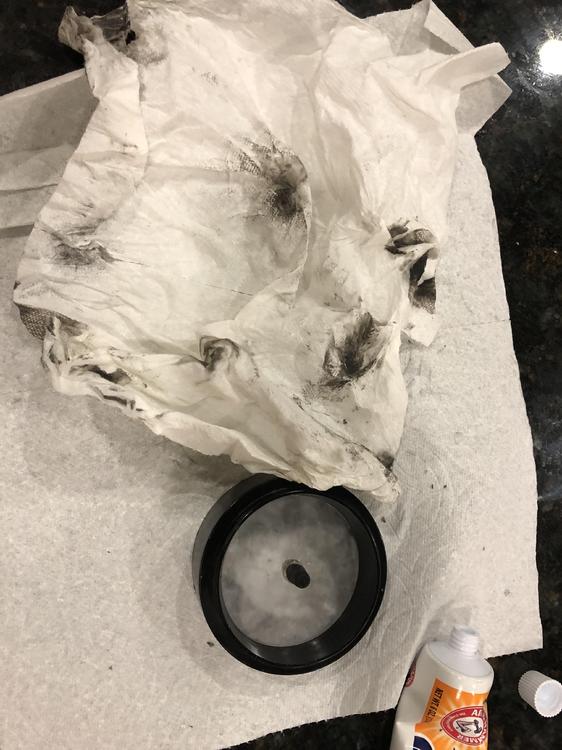
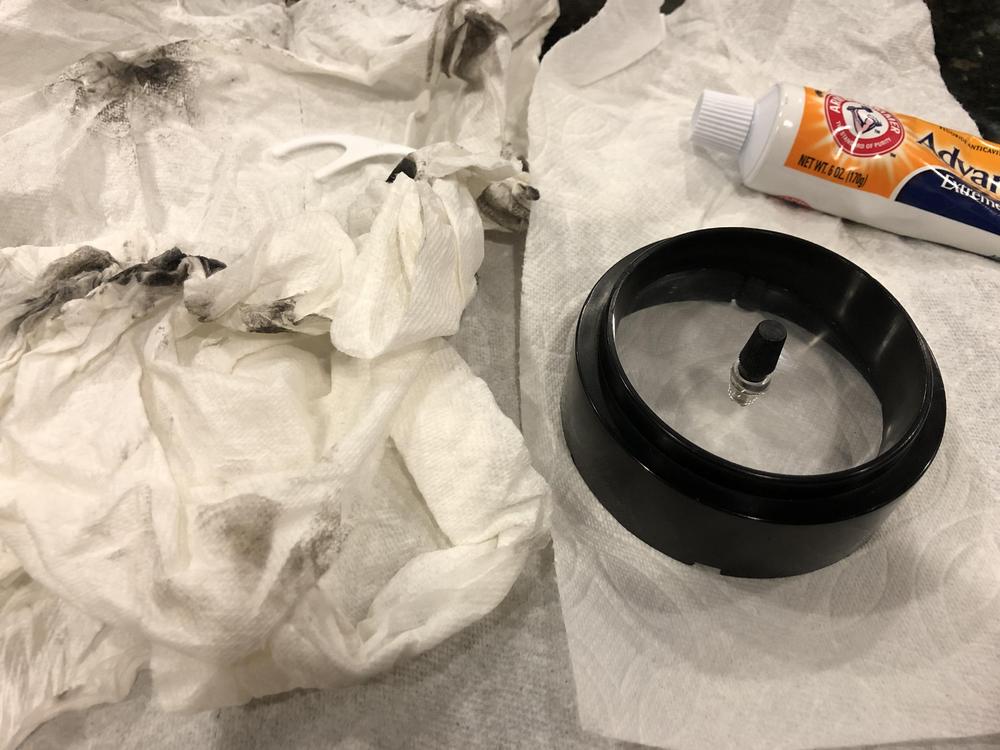
@zclocks i thought about using 6 o’clock to leverage the gravity but the hour hand already pretty stiff from moving around. I want some lines on the face plate as close to the hour hand as possible to use as reference. That’s why I choose any line besides the number and if the hour hand move by accident while I fiddling or gravity, I would know immediately. It’s great to know about + 10-15. Had I pay more attention in geometry class... About removing the clock from the dash... someone suggested to remove from the heater, vent control ... the minute I look at it, I say no way it will come out. If it does, scratch all over and your hand probably will get bruises. I went the same route as yours. Remove glove compartment and it’s so much easy to get it out. next step is polishing it. learn years back that tooth paste also can be used to polish headlight... though mine didn’t come out the way they showed on YouTube but definitely better than before. its all about around house hold products. Keeping environment friendly ?. - 2 tooth picks (you’ll see it use latter) - few paper tower sheet or a roll (I don’t have fiber cloth, sheep fur....) - tooth paste with baking soda and peroxide - dish wash soap. Not the kind in dishwasher. - Compressed air can. Not your 100 gallons 20 horsepower. Don’t need CFM here. A bit overkill for this application in my opinion. put 1 tooth pick in your mouth and keep it there. before wash thoroughly with water and soap rinse it and now apply tooth paste on it. Use paper tower and rub it in circular motion or whatever. Wash, rinse and repeat to your satisfaction. The advantage is using hand to polish is that, at the end of the session, you’ll get a firm curl bicep. Just like the picture ? once done, blow with compressed air to get all water residual. I just blow it using my mouth. Don’t want to leave any water in the adjustment knob. Might get corroded. I drop a few rubbing alcohol and hopefully when alcohol evaporates, it takes away water too. After all the work out, final product look like this. The photos don’t do it justice but you should feel smooth and shine against light. I suppose I can pry the glass off but then I don’t have glue to glue it back in and light brake it... job is a bit harder though. oh about the tooth picks, One is to clean the hard to reach such as where the glass meets the shrouding. Or the external where your fingernail cannot reach it. The other toothpick your mouth is holding is use to pick something stuck in your teeth after your ate dinner. What about this you might ask. What is it for? you’ll need to replace the seal. It brittle and cannot provide seal for dust and other moisture stuff. It just happen the cans fit perfectly to cut the seal. I’m going to need to experience this. I order the rubber sheet and hopefully the same thickness for the seal. I need to figure out how to cut the seal. Once I’m done with the cans I can eat it too. regards


-
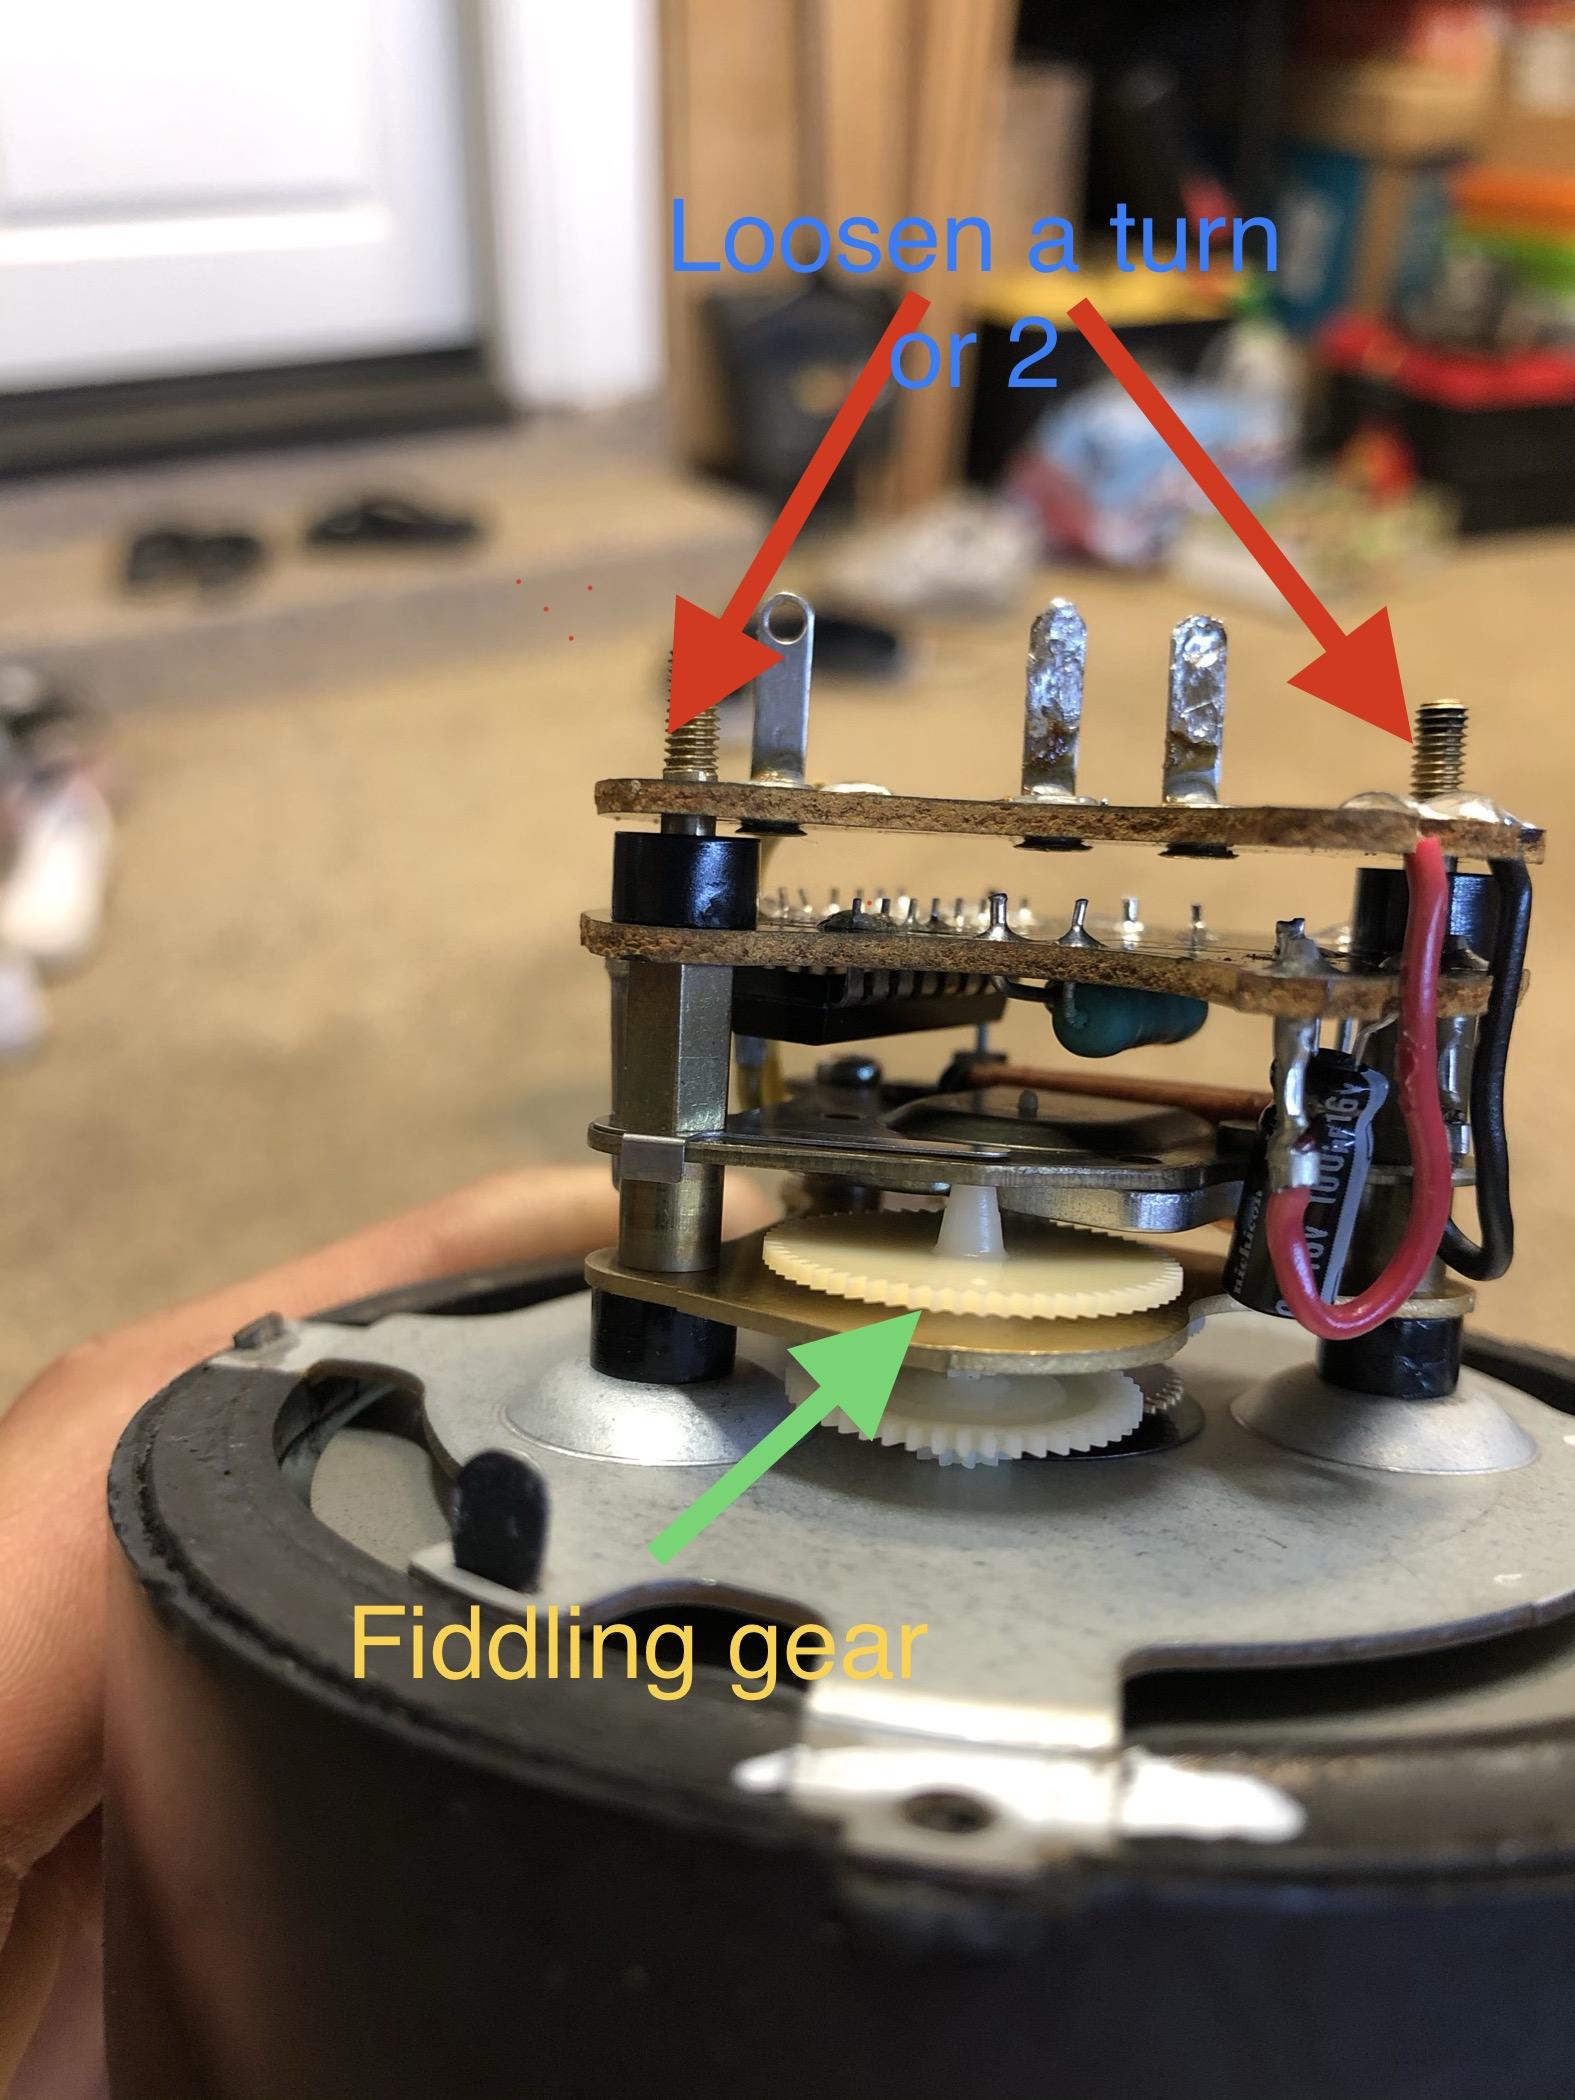
Ok, ok, I told you that I must stop before I screw up... we’ll, I cannot help it. I’m sick, I need professional help! its one of those things though only you know about it, nobody else, but you know about it bothers me. So, I decided to take another look to adjust the clock hands. This procedure is semi noninvasive. I did not take all the gears out but loosen up just one. Adjust the hour hand to one of the hour not 12, 3, 6, or 12. The minute hand should be pretty close to 12. Loosen up the 2 long bolts a turn or so. That will allow the gear right beneath it to loose from its position. Slightly lift it up and fiddling with it either left or right depends on the minute hand on the right or left of 12. Raise the clock up while fiddling it so you can see where you’re at. i got darn close if not spot on. Hi @zclocks what do you think? What’s your method? when time permits, I will work on the original analog clock. I always love then to look at the mechanical clocks. Perhaps build a see through case and put it in my workbench/office. Talking about mechanical clocks, how folks build automatic/mechanical watches is beyond my mind can comprehend. Intricate, beautiful mechanically and durability. What a time piece! regards


-
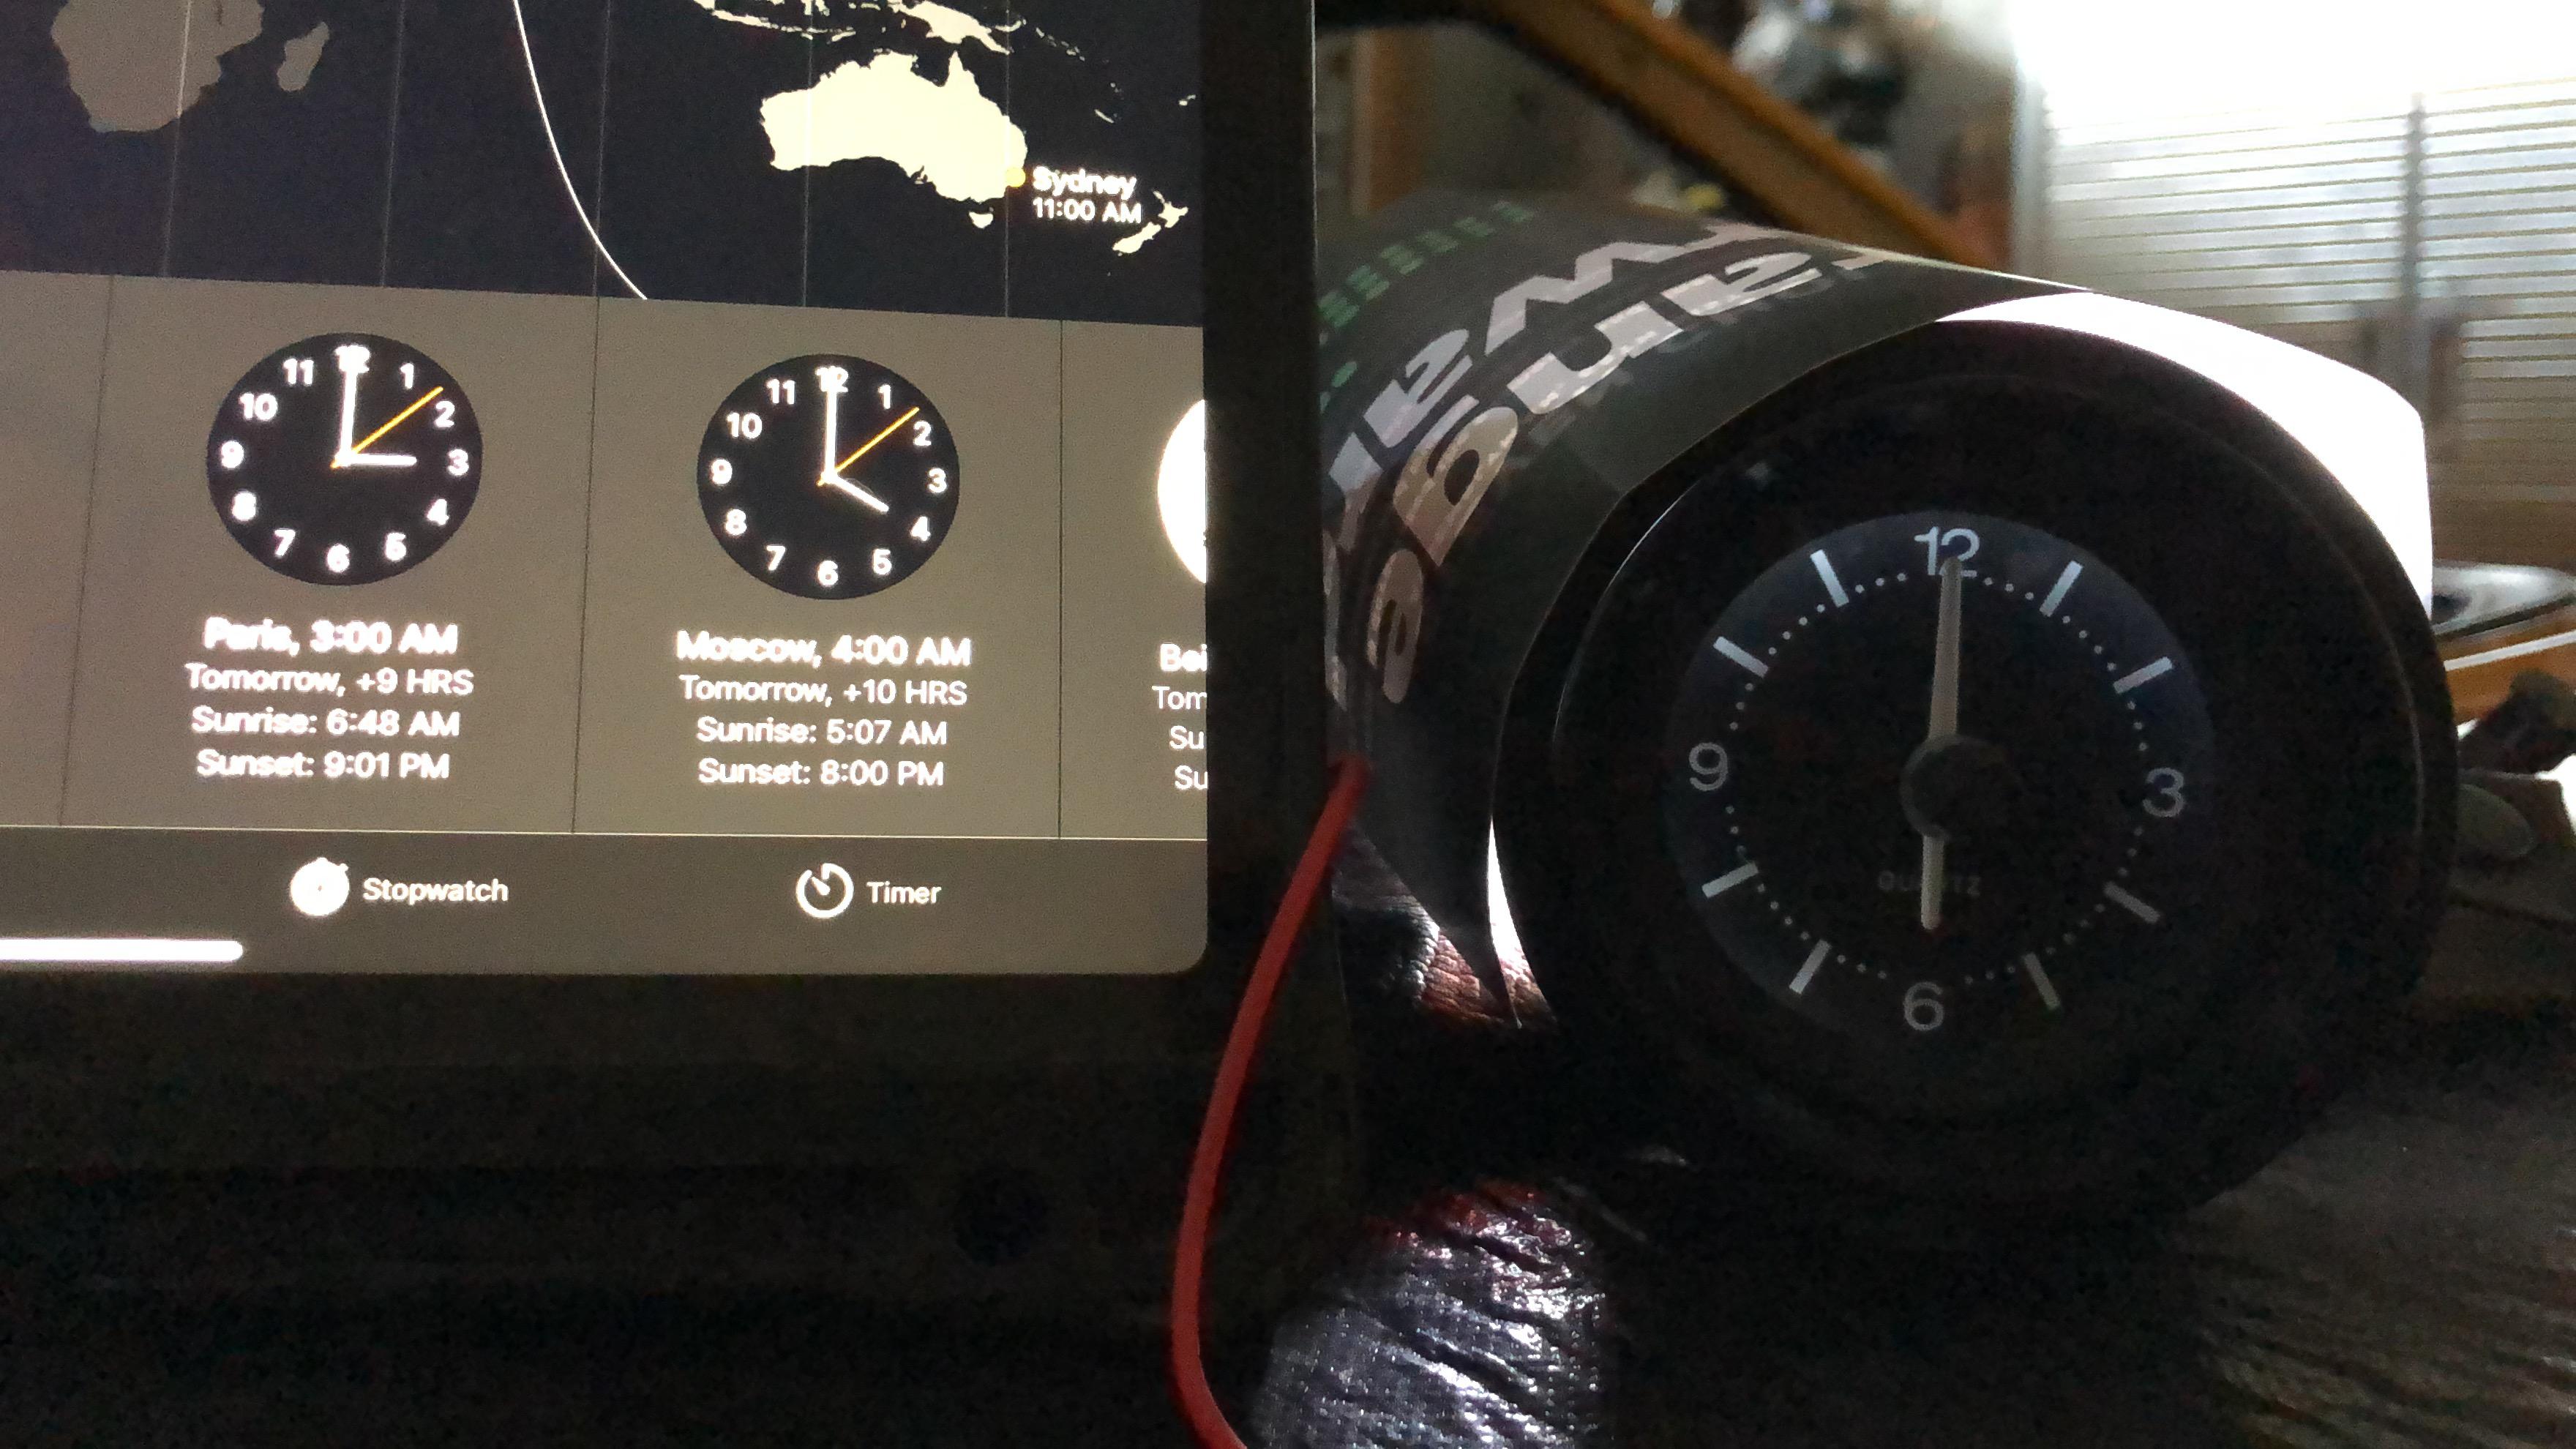
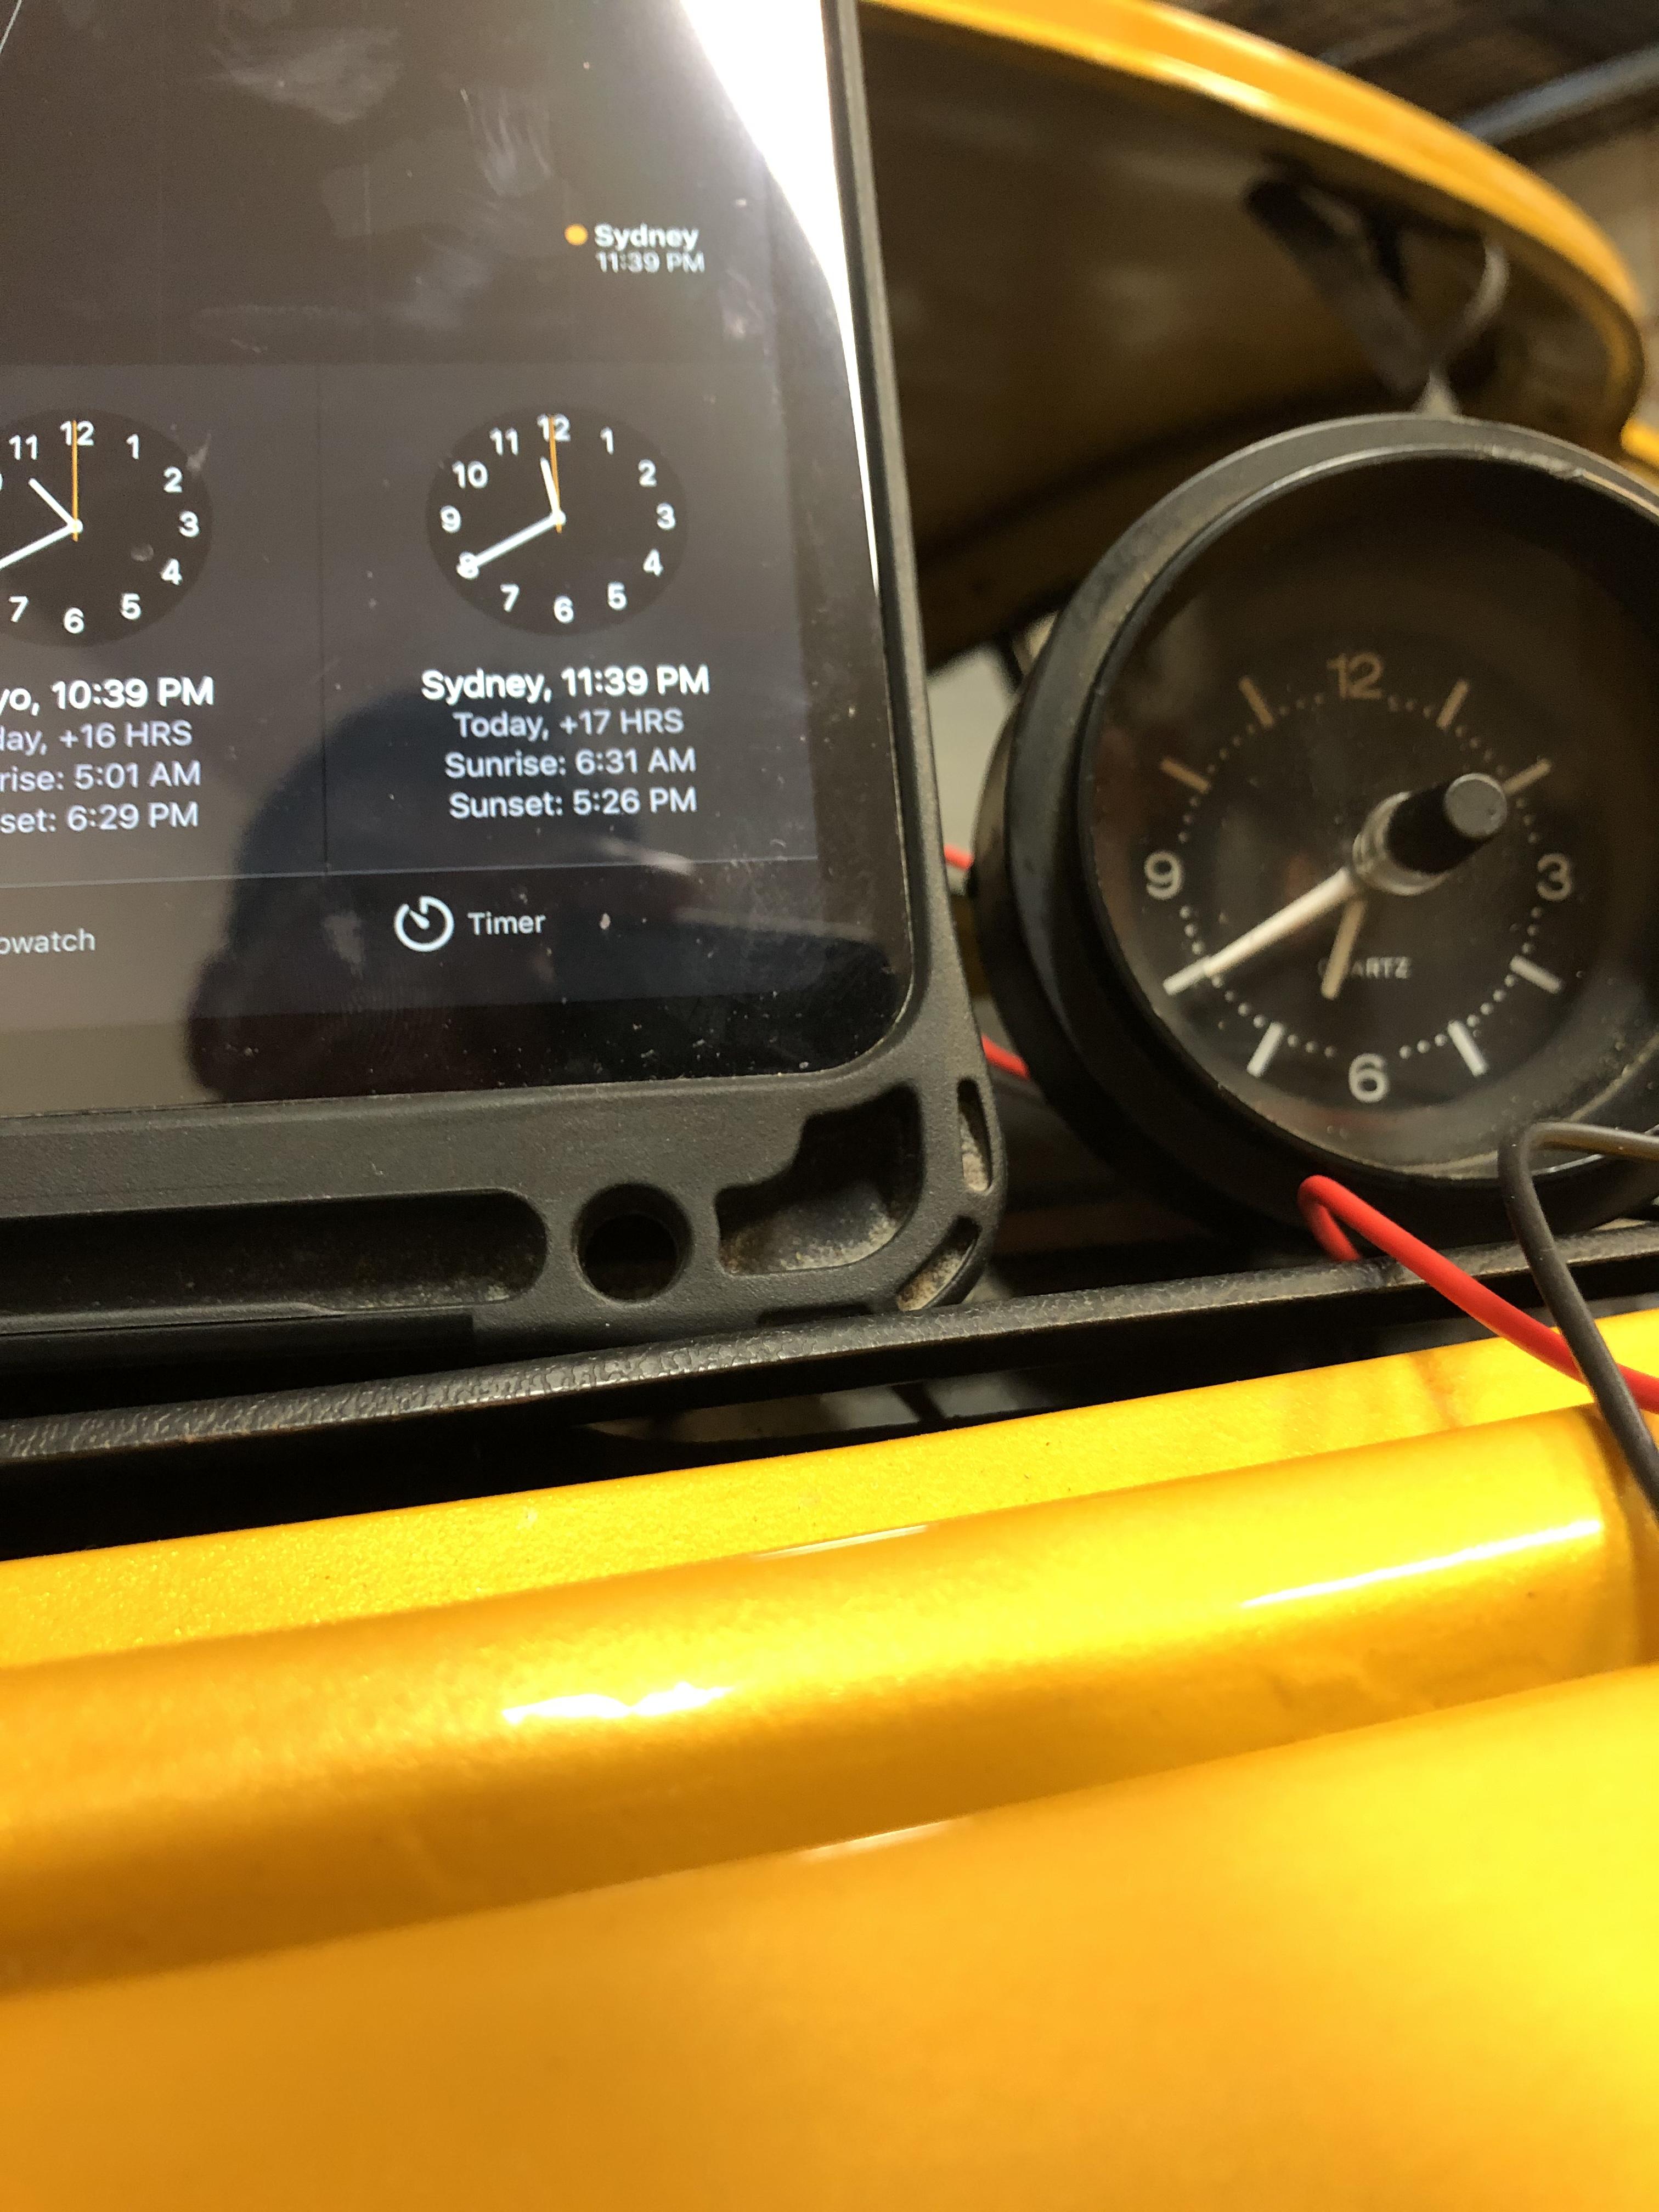
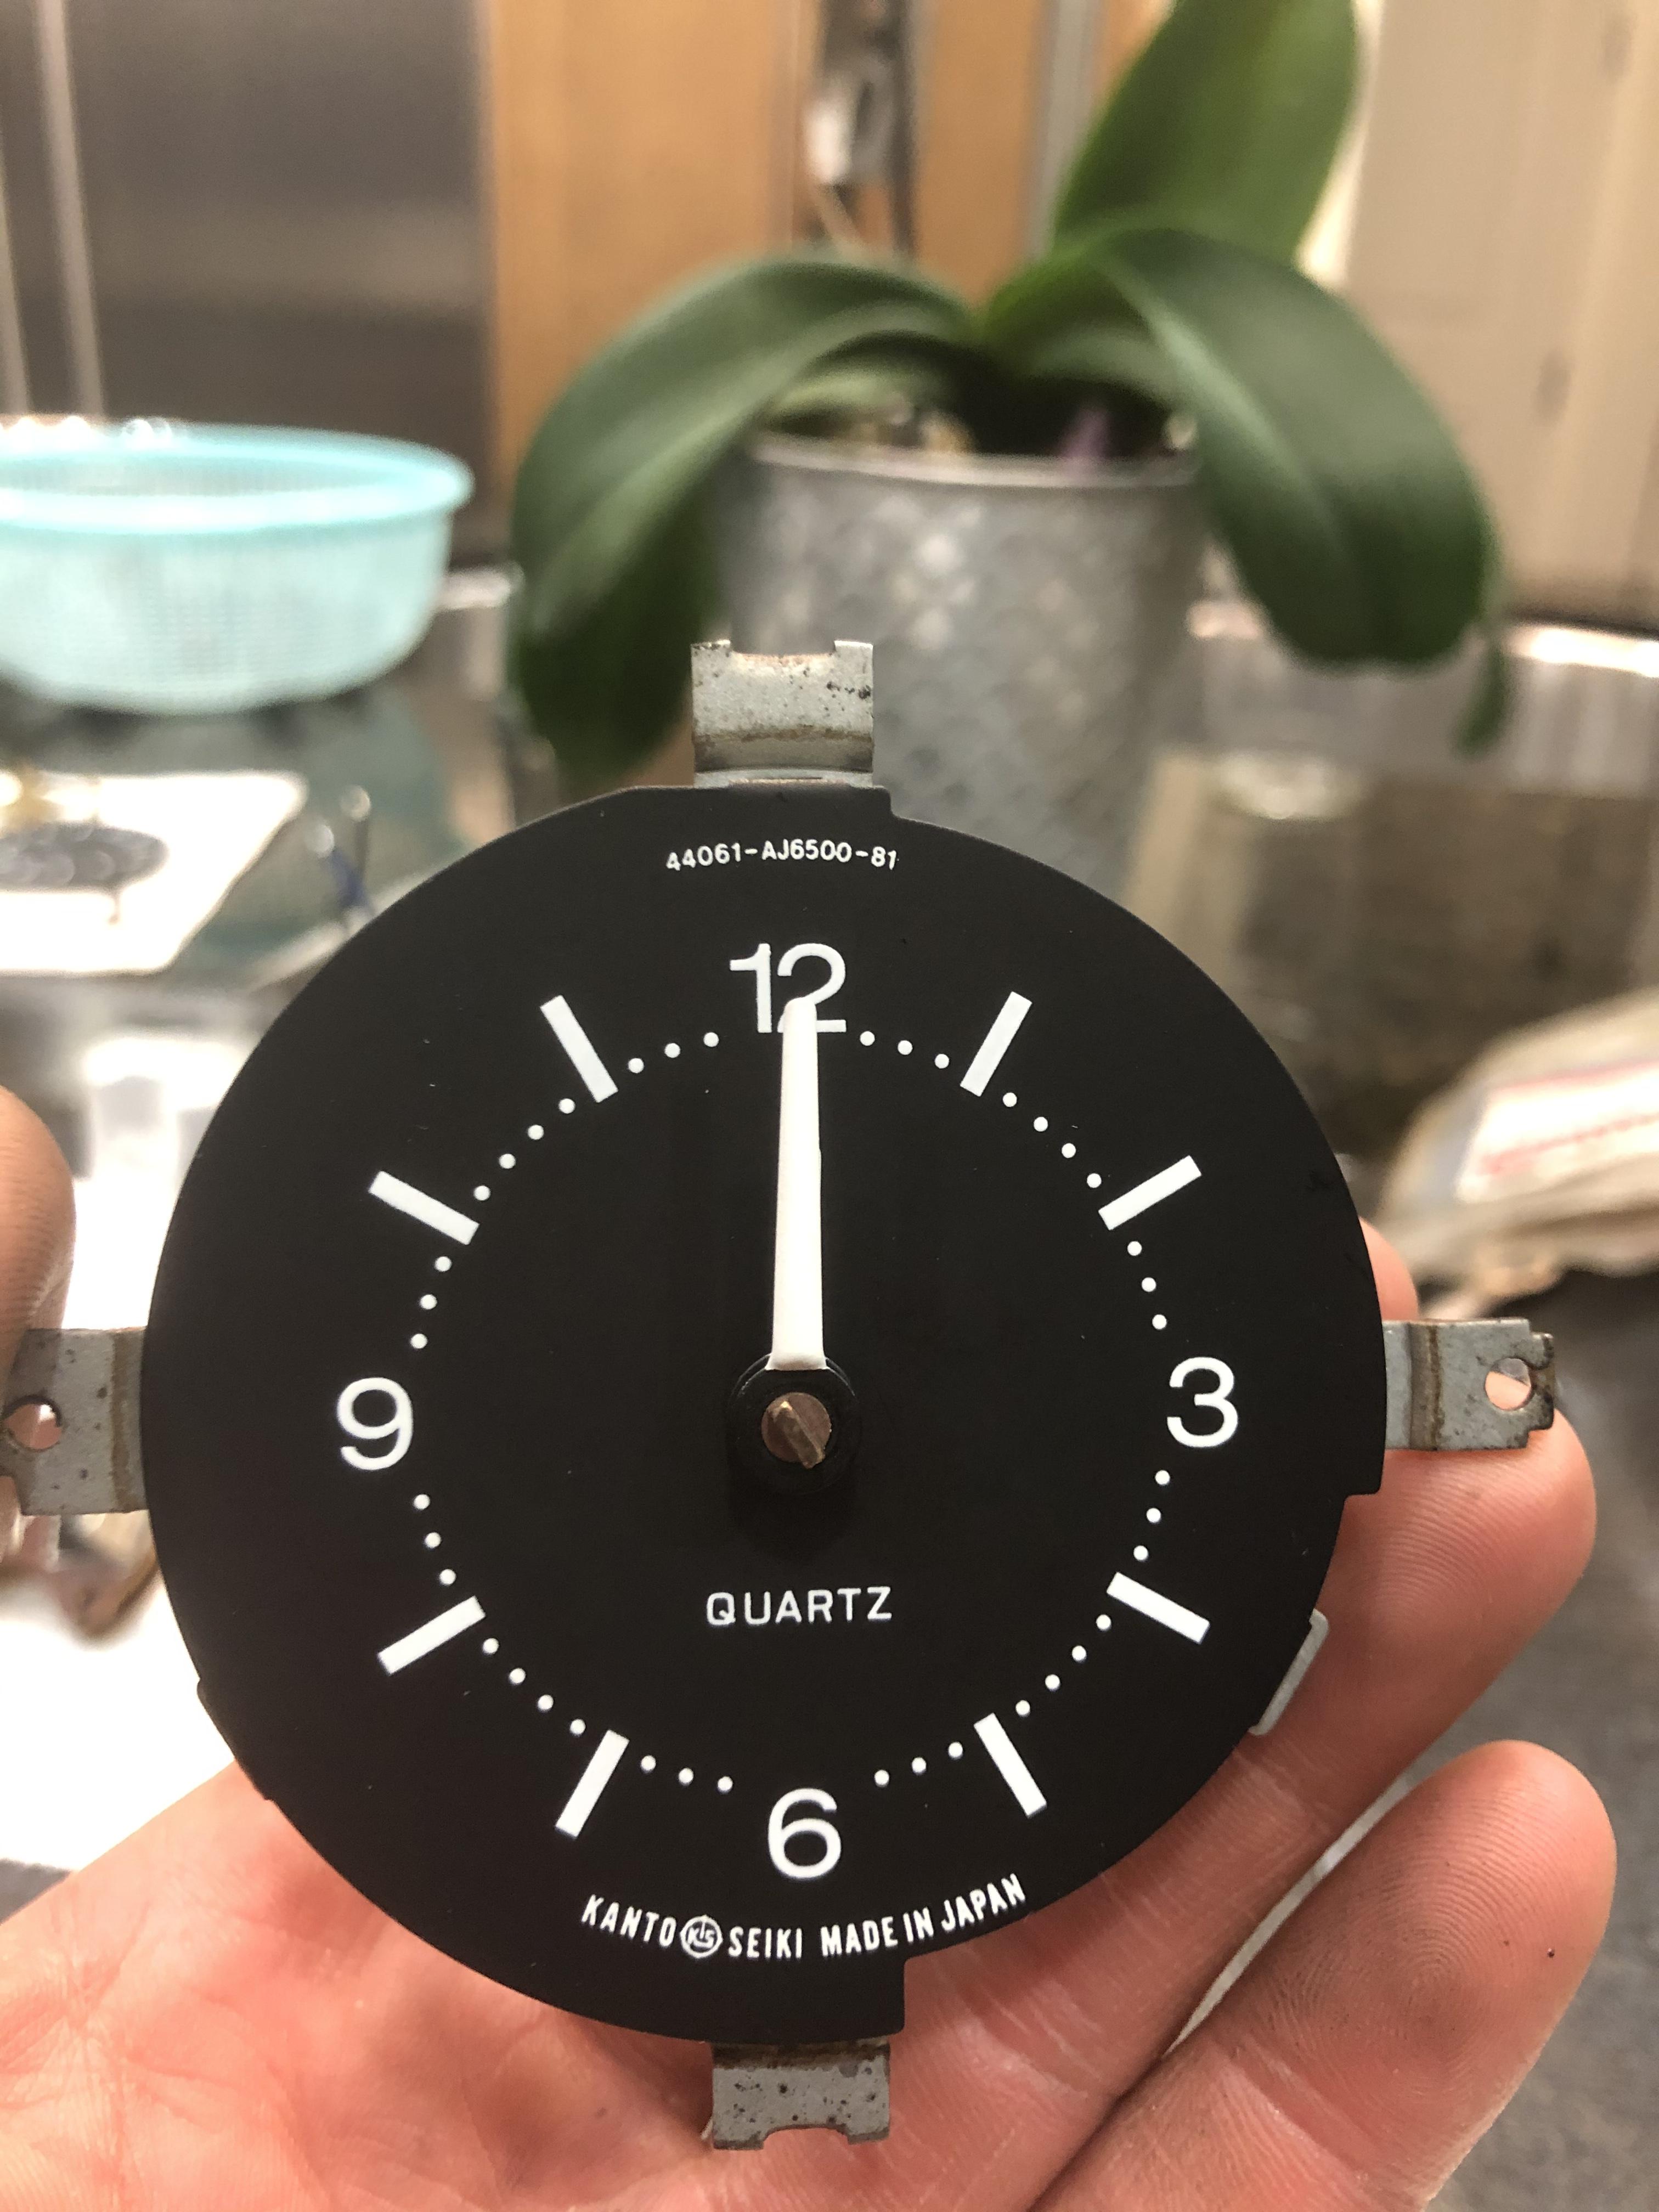
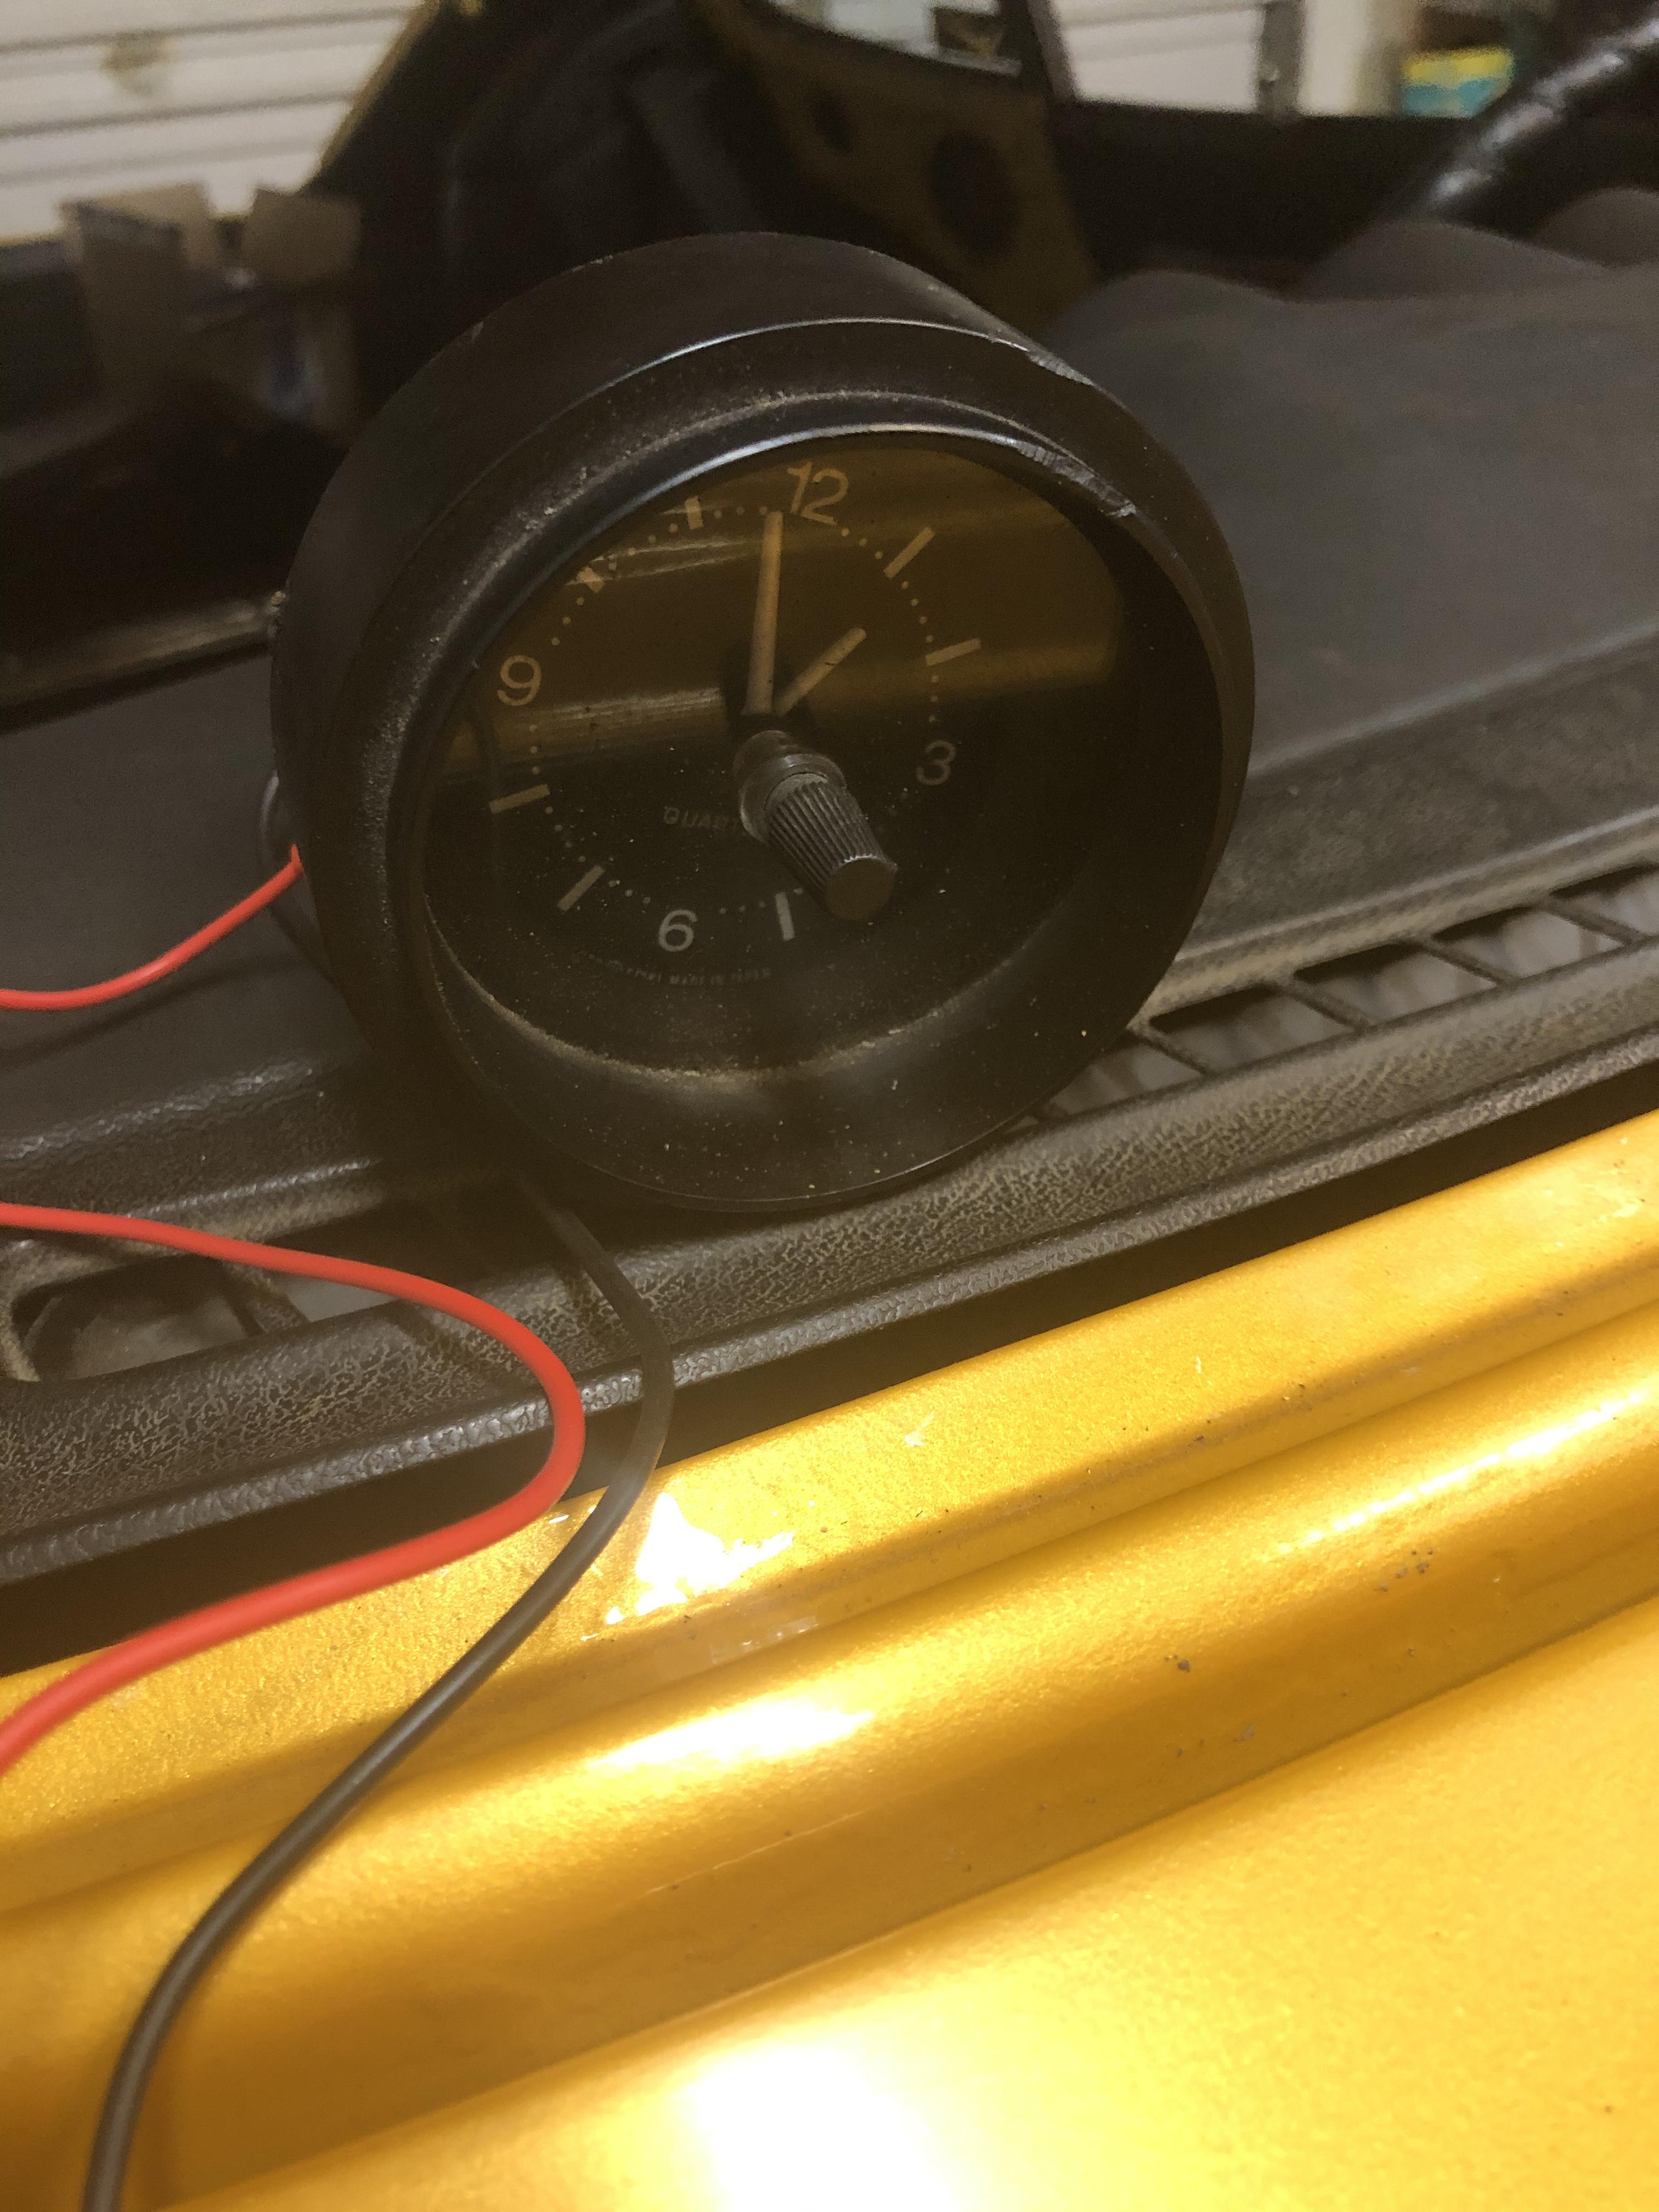
Hi all, after 30 hours or so, connected directly to the car battery (I don’t have a primary DC inverter) I’m very please to see the clock works beautifully. She ticks every 5 seconds or so. I did tried to sync my phone clock and hookup the red wire on the clock knowing it’s impossible to sync like that... I think either the clock run slower 10-15 seconds due to at least 2 factors - improper sync at the begin - hour hand and minute hand are not true zero or 12 o’clock. - one tooth not align to true zero/12 o’clock come to thing about what I mentioned about putting back the order it came out... the hour and minutes hand should put back later... had a thought last night.... me thinking hahaha i still think it’s better to put all the gears in first before the hour and minute hands. Though firmly put the minute hand in as well so that it will be straight with all the gears. Once it is done, put the white plastic on just so that the clock has some reasonable flat surface to stand on its own. Circuitry boards can be loosely in or not, doesn’t matter at this point. Now try to align the hour and minute hands as straight and true to zero/12 as possible. Gently push the hour hand in using one flat screw driver to make contact. Once satisfy, push around it or use 2 flat screw drivers for balance and firmly push in. Of course if you have other tools such as a stand... might be different story. a few seconds faster/slower of the clock won’t make the car goes any faster. This is the point I must must must stop. Otherwise, the likely hood that I’ll screw up beyond the point of return is extremely high regards

-
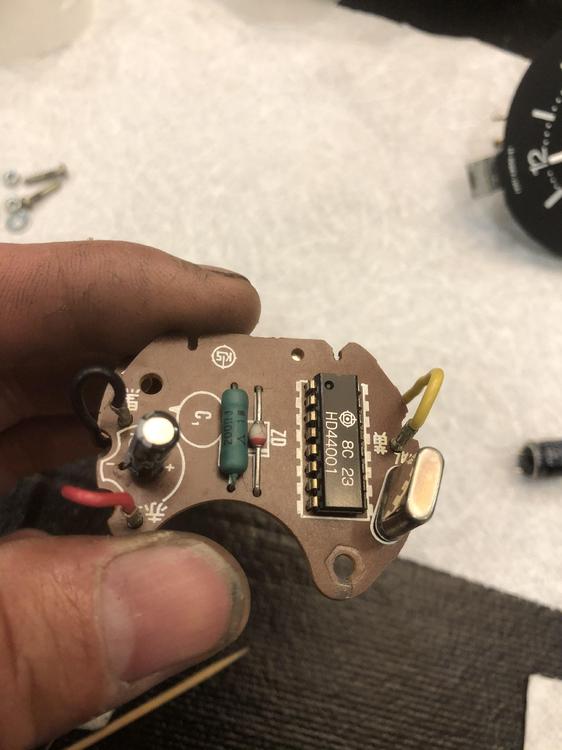
@Captain Obvious thanks for those values. I’m not looking to replace those as I know they’re very hard to die. Btw, the shapes look like resistor and diode, but I’m more familiar with resistor with stripes and diode look more like a red crystal or a black cylindrical with a white stripe at one end. Man, if I understood how these things work, there are so many little projects I can do using Arduino, raspberry pi. Well, can’t learn every thing in one day... got to sort my Z out first before embargo into another .... got to keep cool ?
-
@Captain Obvious you cannot imagine how many time I screw up part of curiosity, part of “what if” had I leave it alone. It would be working perfectly. I pushed the limit where I should not, knowingly I don’t understand completely... and still. should you care about my electronic skills... I had 1 semester in high school for extra curriculum in my junior year. One hour twice a week. We covered the basic components such as. Resistors, transistor, potential meter. I don’t believe we covered capacitor. We learned a lot of theory. How to read resistor colored coded. It’s application to reduce current... We even build simple circuit such as blinking light and make it blinked faster using potential meter. All on breadboard. It was fascinating..... anyway, the main reason I didn’t pursuit electrical engineer mainly due to cost. Want to good at something, you need practice, lot of practice. Theory alone won’t cut it for me as I’m a visual and hand on kind of guy. Buying components were expensive to me as they weren’t readily available like today online. Information like library vs online is another matter... Only place I know selling them was radio shack. true story, couple of years back I had to rebuild my car alternator. Suddenly, the transistor I learned years back make sense. I mean, alternator means current is alternating. But battery is direct current. How is it possible that an alternating current able to charge the battery. It was like a lightbulb turn on my head that the transistor can block one current and allow the other, in one package. Fascinating. about I had few capacitors readily available is because years ago, I had to recap a “vintage” stereo. Capacitors were bulging up and looked up online suggest those were dead or on their way out. Keep searching, join forums and people suggest to replace them all since I’m there.... screw up few things here and there, get help, do over... I’m still a monkey see monkey do. Brain is too dense now. I wish I have knowledge like you guys understand why and how things work the way they are... @zclocks I realize and impressed that the gears are that good. I couldn’t adjust the hour pretty sure $5 is a waste... I was lucky I ran into one of your thread about no need to lube it. My common sense would just to put a few drop of sewing machine oil. the answers you guys responses only come from not just experience but thoroughly understood why things work like that. Light is light, LED or incandescent have different applications. I’m referring to the fuel light on other thread. I doubt if I bring the car to the shop, they would know about it if there is no “old timer” around, no disrespect here. will keep the clock run to night as well. Got other thing todo tonight and garage/car time is off limit. ? regards
-
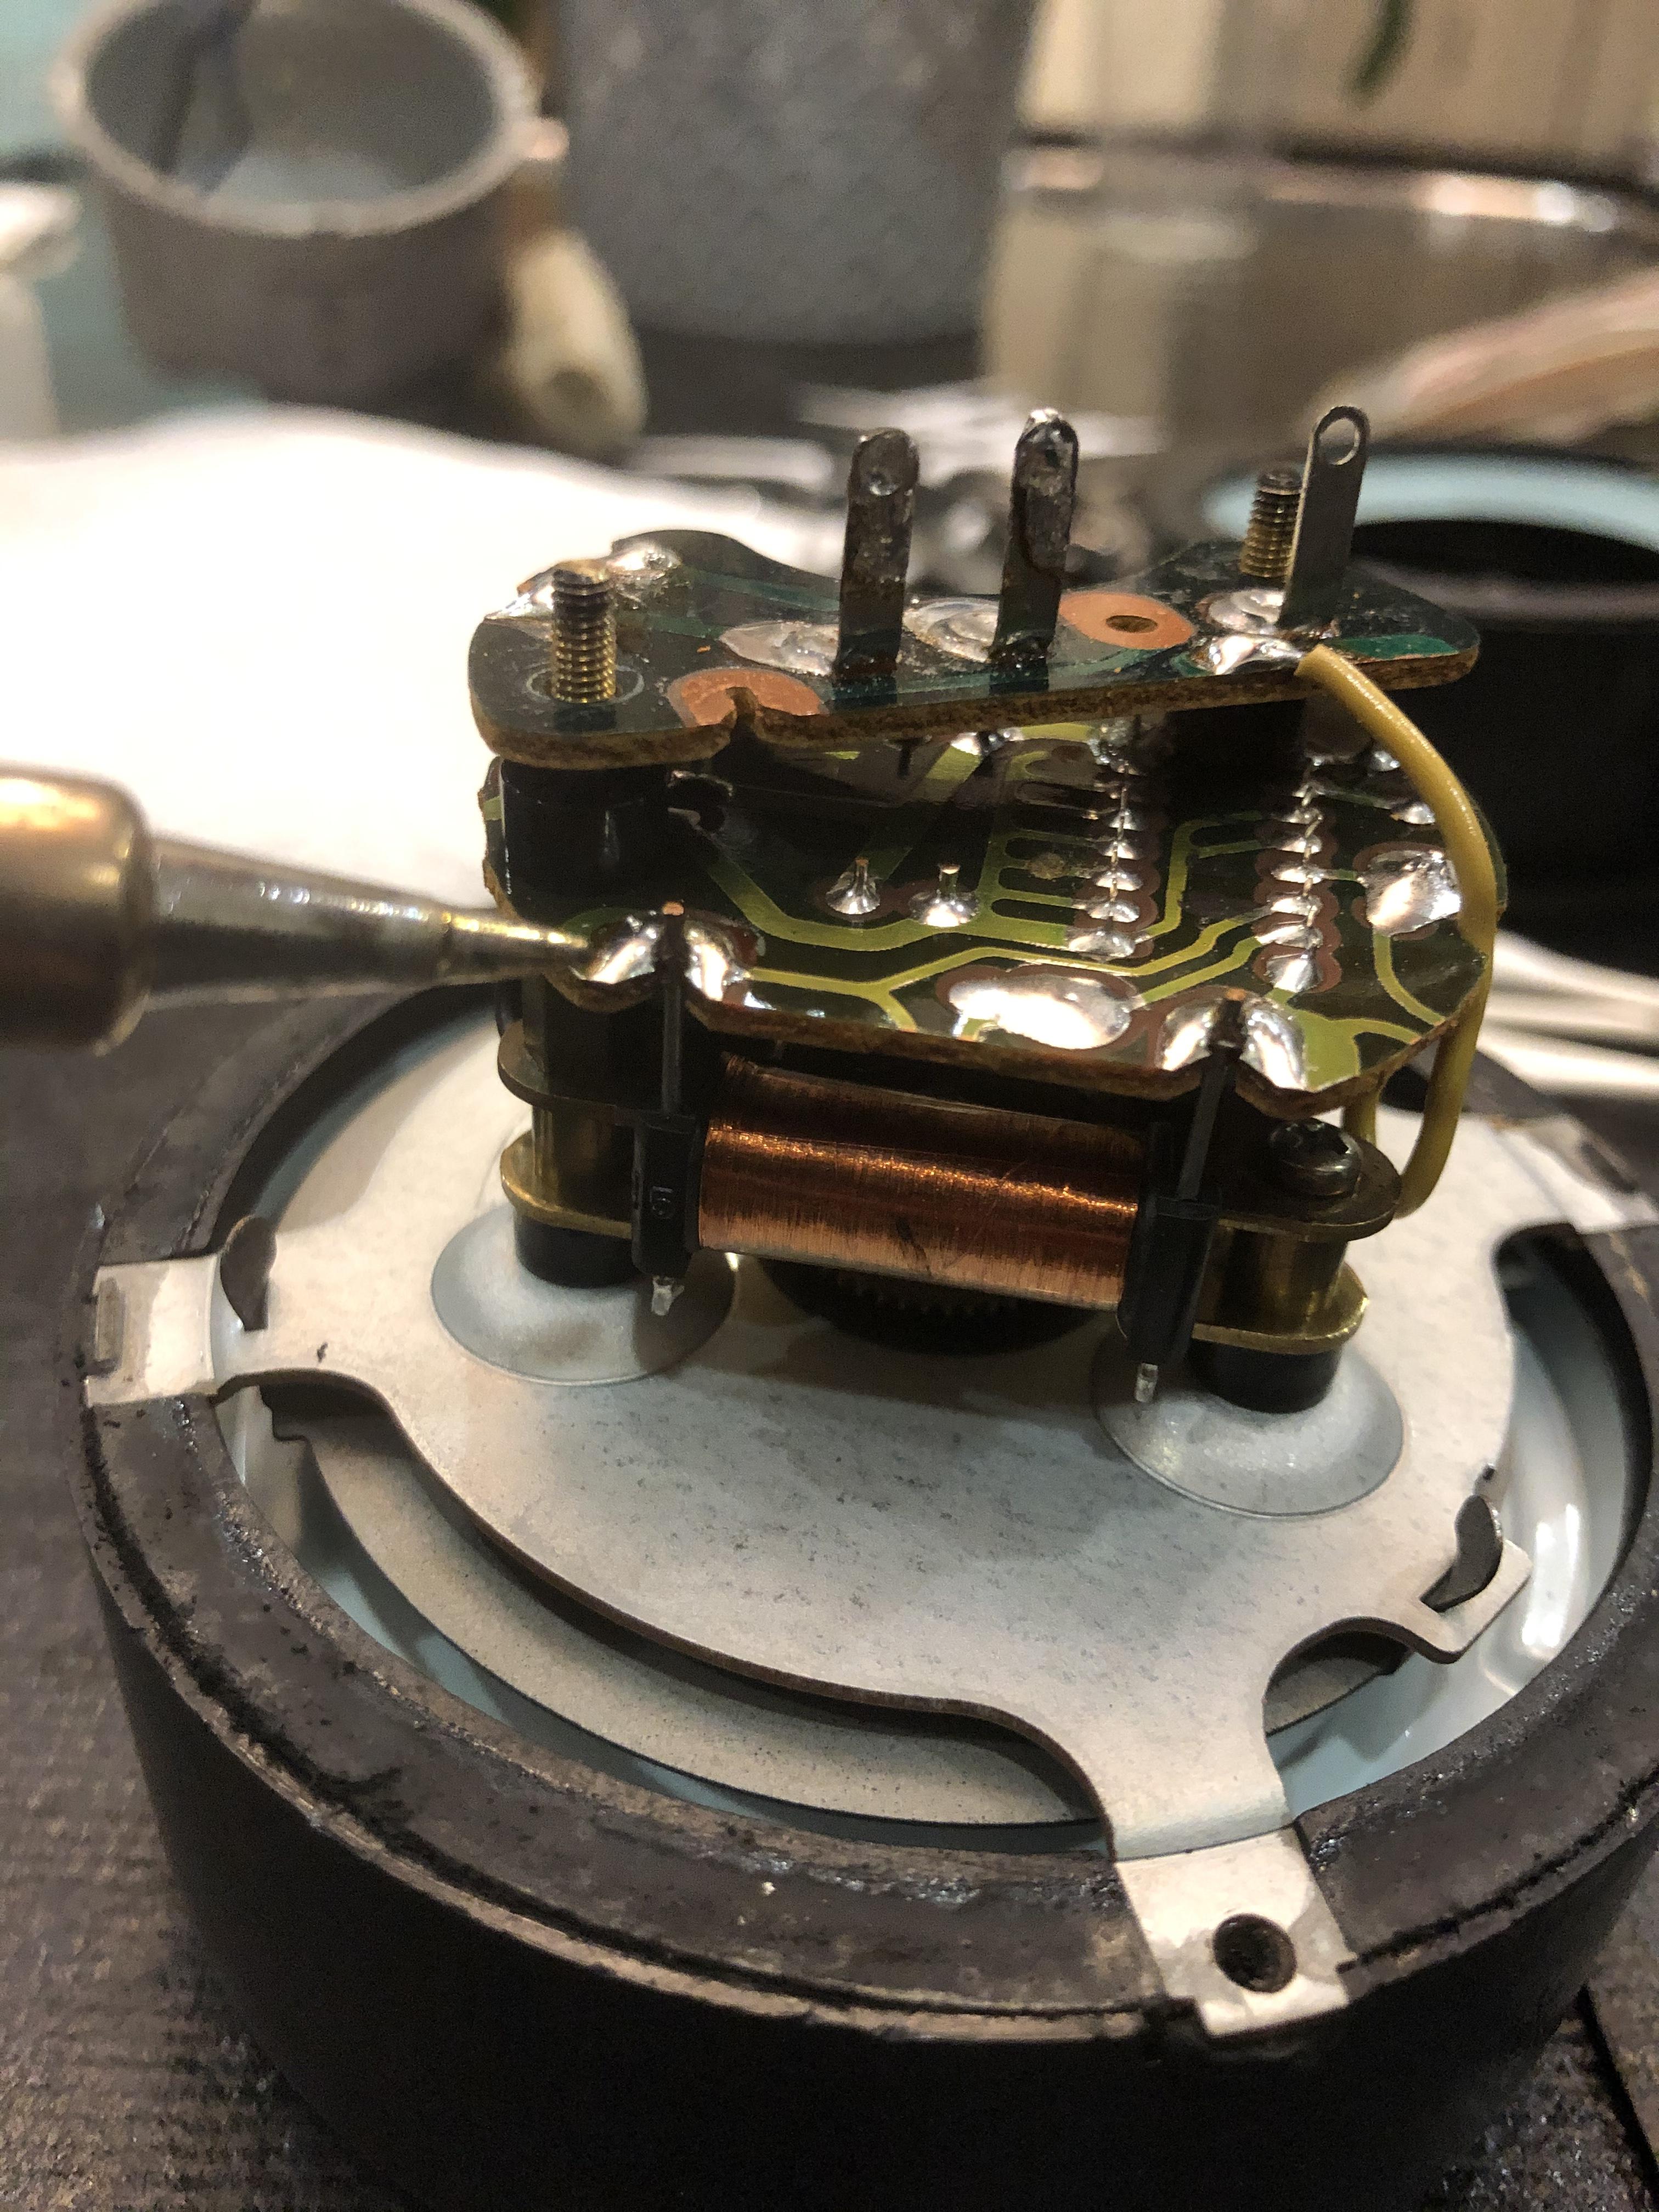
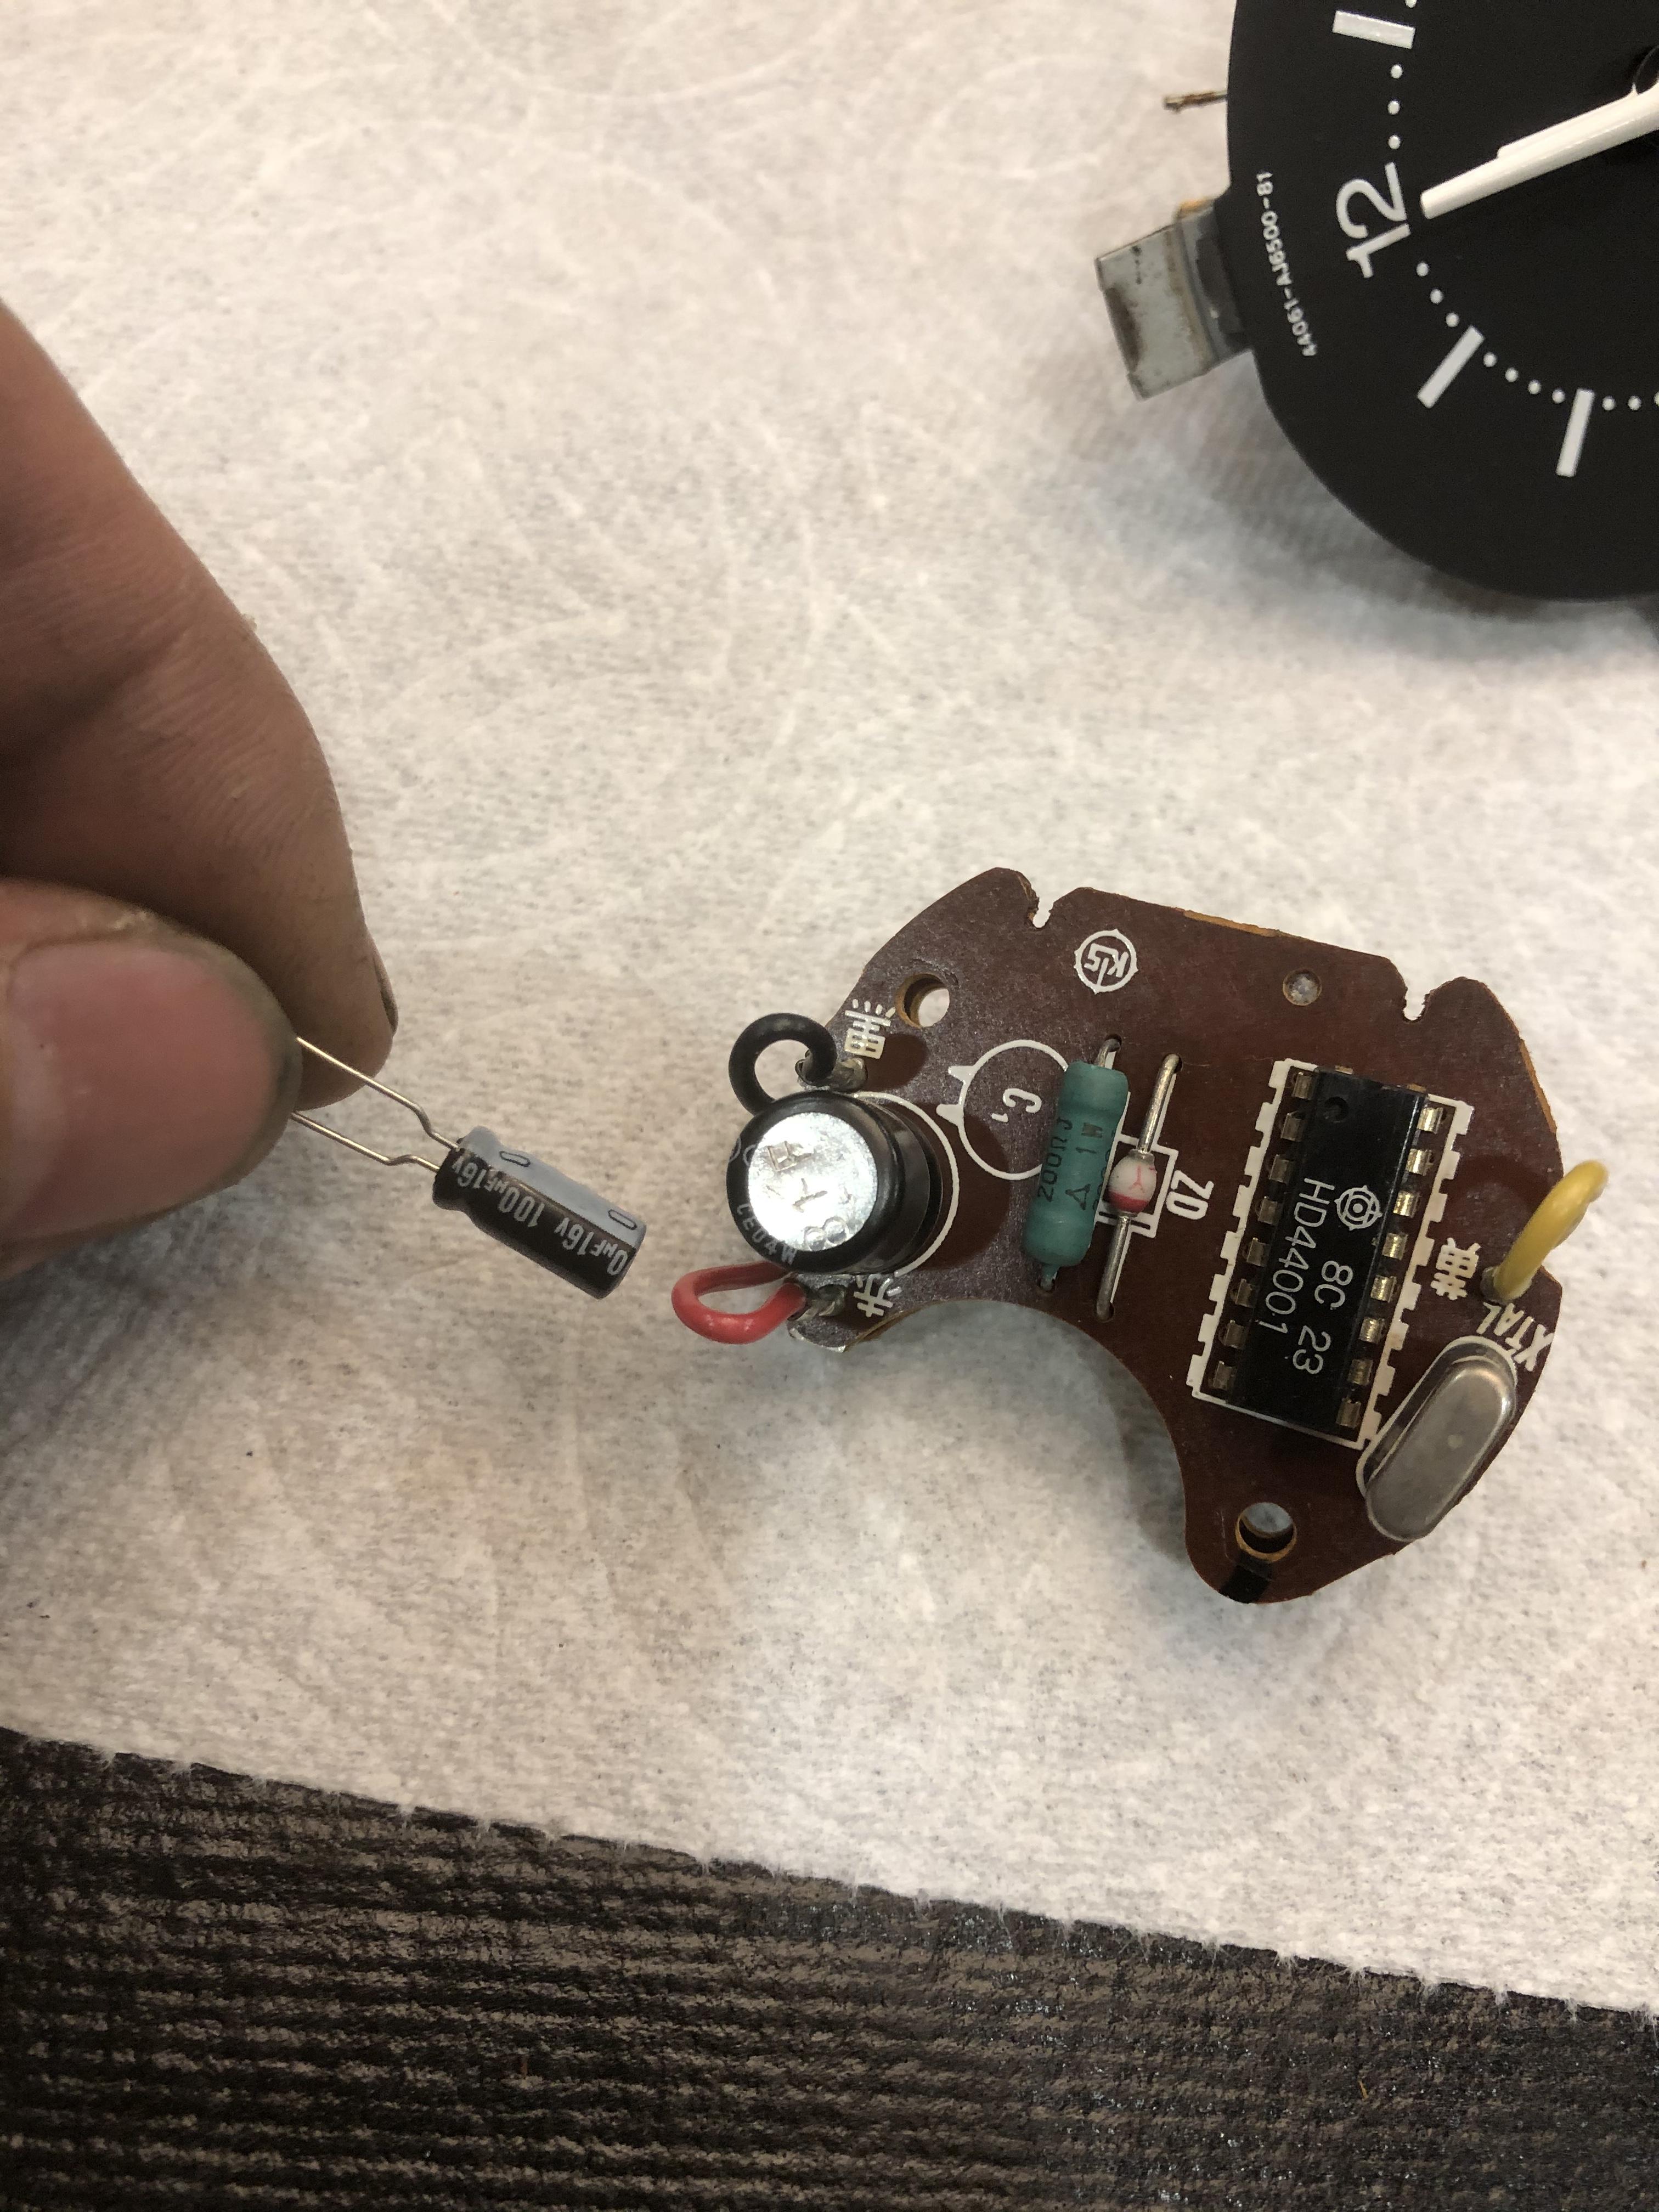
Hi @Captain Obvious my greatest strength/asset is willing to try anything. I observe. When I set my mind to do something, I’m over obsess and it drives me my t sometime. If I can watch people doing things, I can pickup a lot of stuff. If I see people do things, even though I’m not 100% sure of it, I’d try it anyway. Did you know that never in my life welding? Because of this car, now I know the basic of MIG welding. It’s ugly and I have to put extra work on the grind it down afterward. But I know something now and not afraid of it. Oh, and I ran 220v for the welder too. Who would have though connect two wires in the Main panel of 110v to create 220v??? Call the electrician to drill a hole from out side to inside the garage probably 2 feet cost $400 labor or so only. No parts. Too much money for me as I need cash for the car. Watch YouTube for hours and went to homedepot got the circuit breaker and subpanel... rest is history. I live by the motto, “ask, and you shall get answer” don’t be afraid of the question. If/when you don’t know, you don’t know. Simple as that. well, the clock, she holds well. I’ll leave it connected to the battery overnight and she is ticking every 5 seconds or so. Yippee ? Will keep her connected for another 12 hr or so and she will be polish and go in. Do you happen to know the values of those resister and the diode? There is no number on the diode. Resister usually have color coded, but this one looks weird thank you all for the help and guidance

-
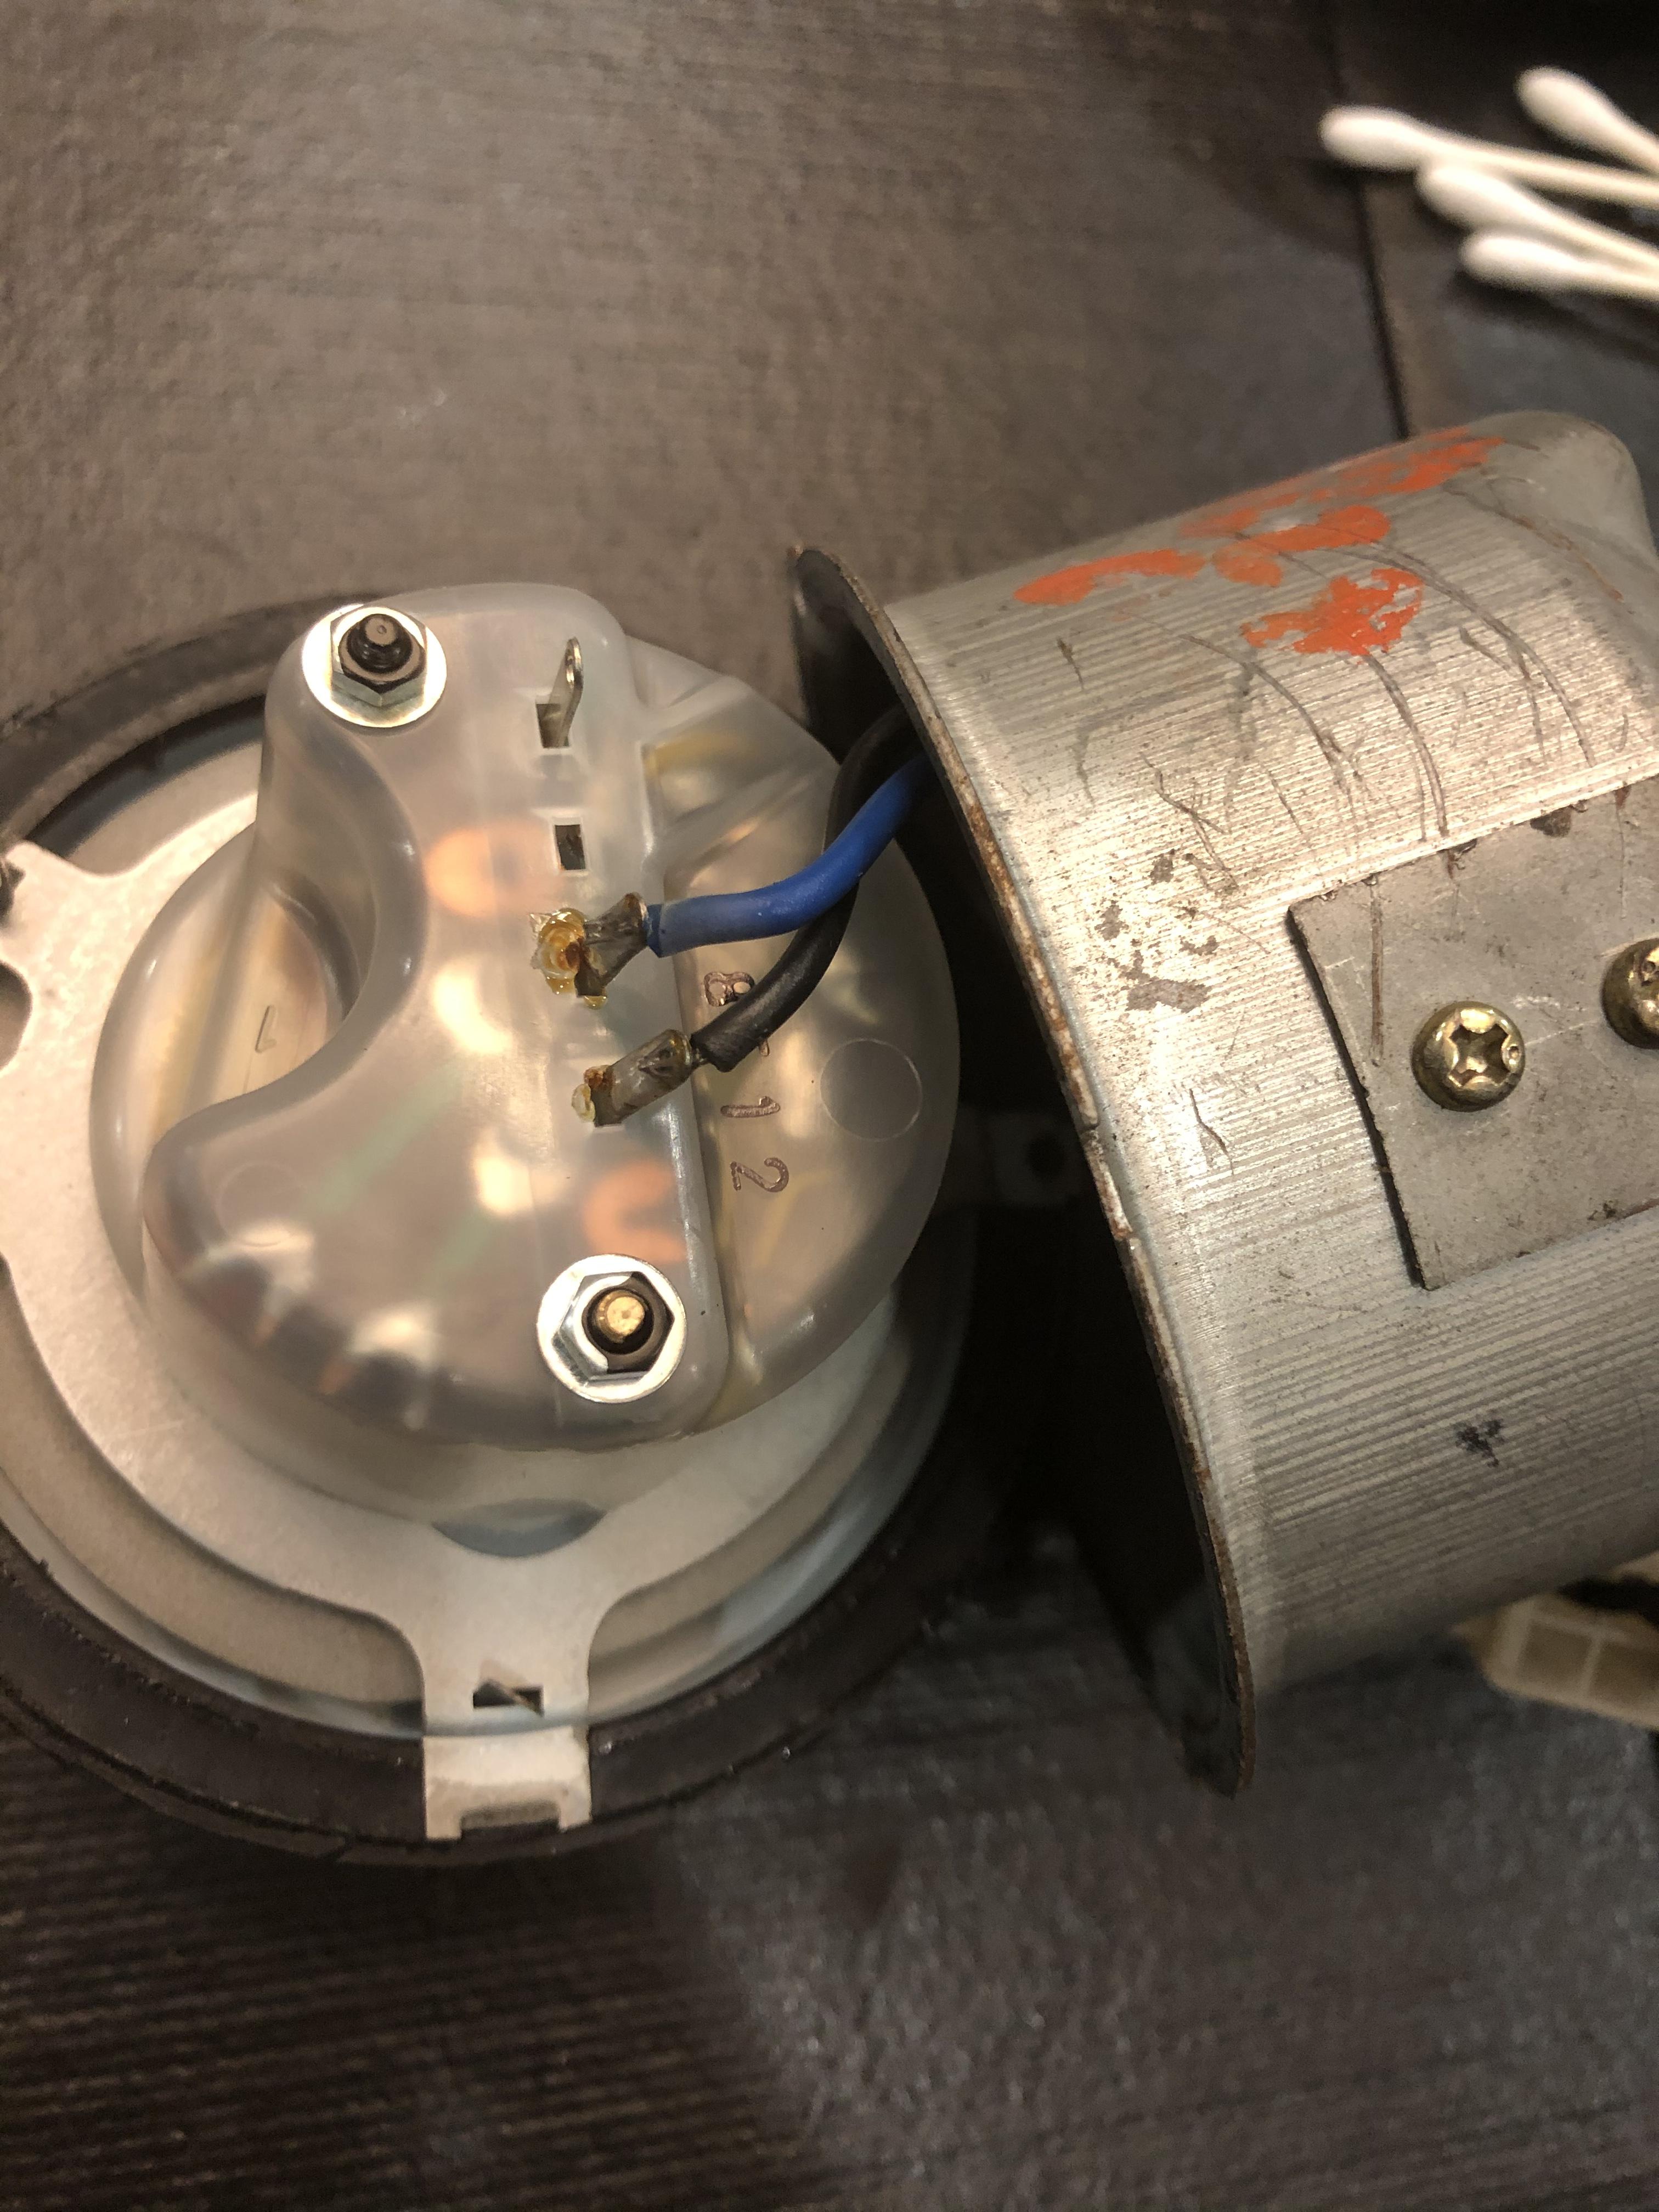
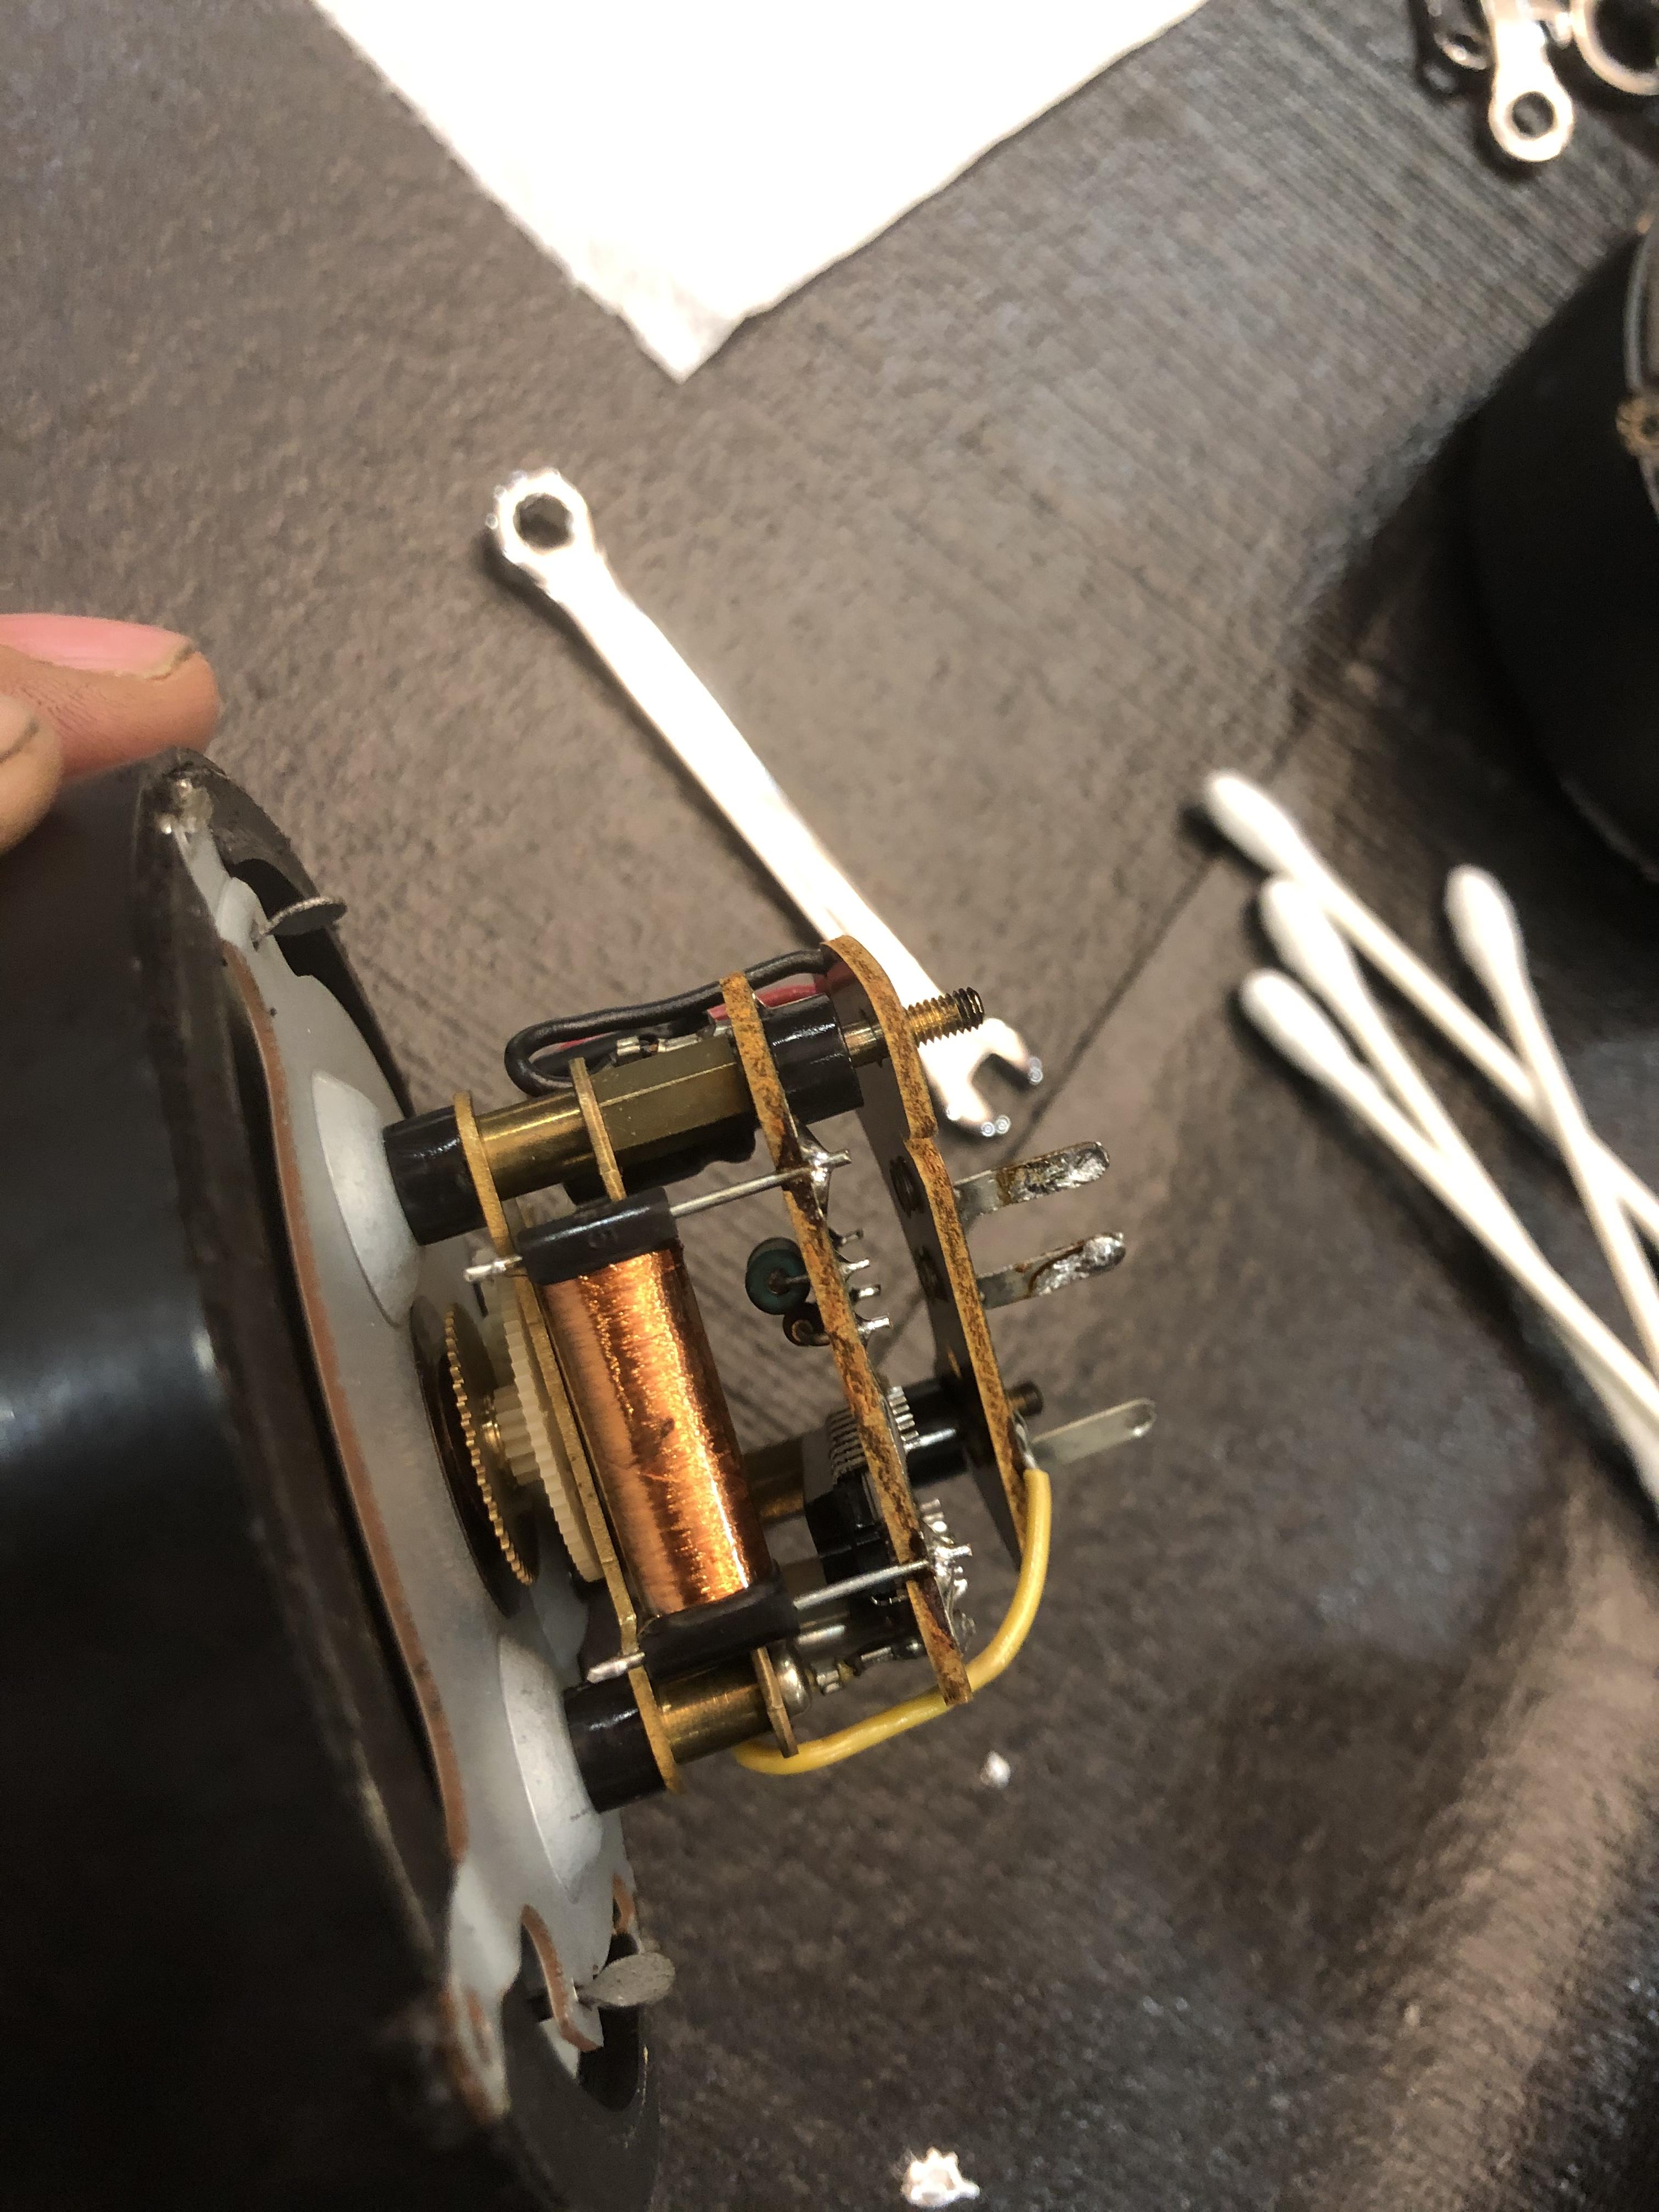
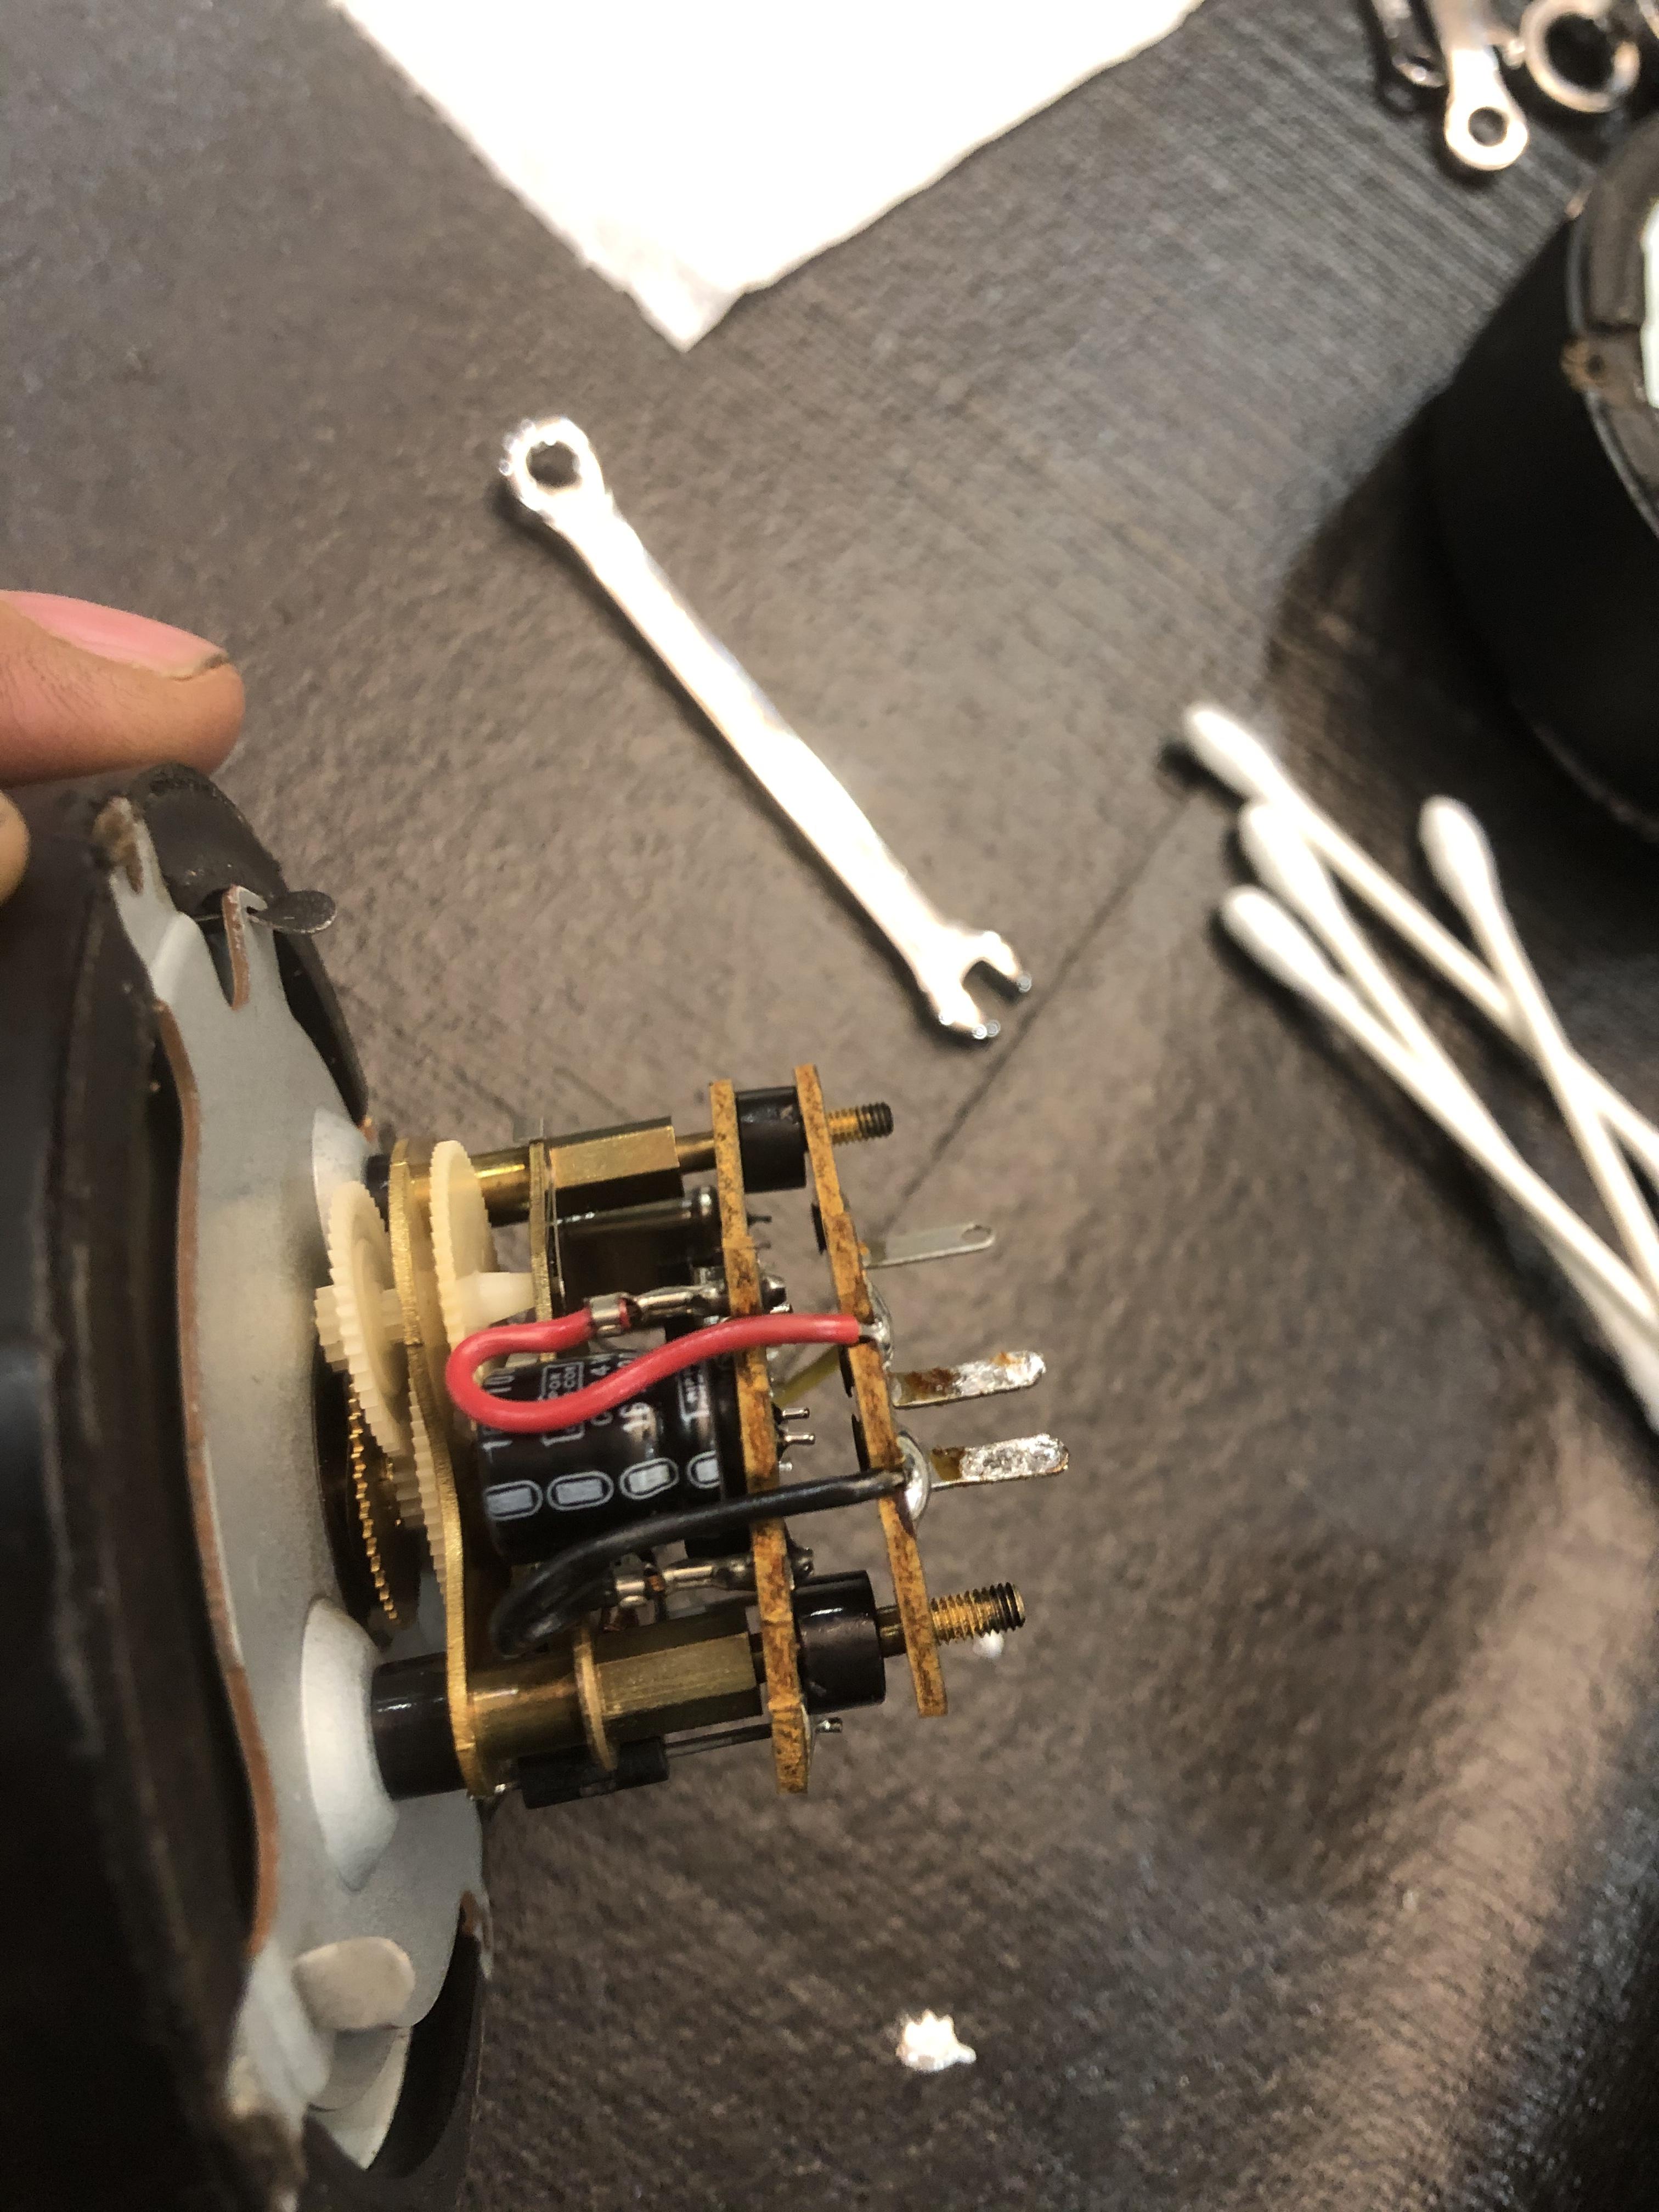
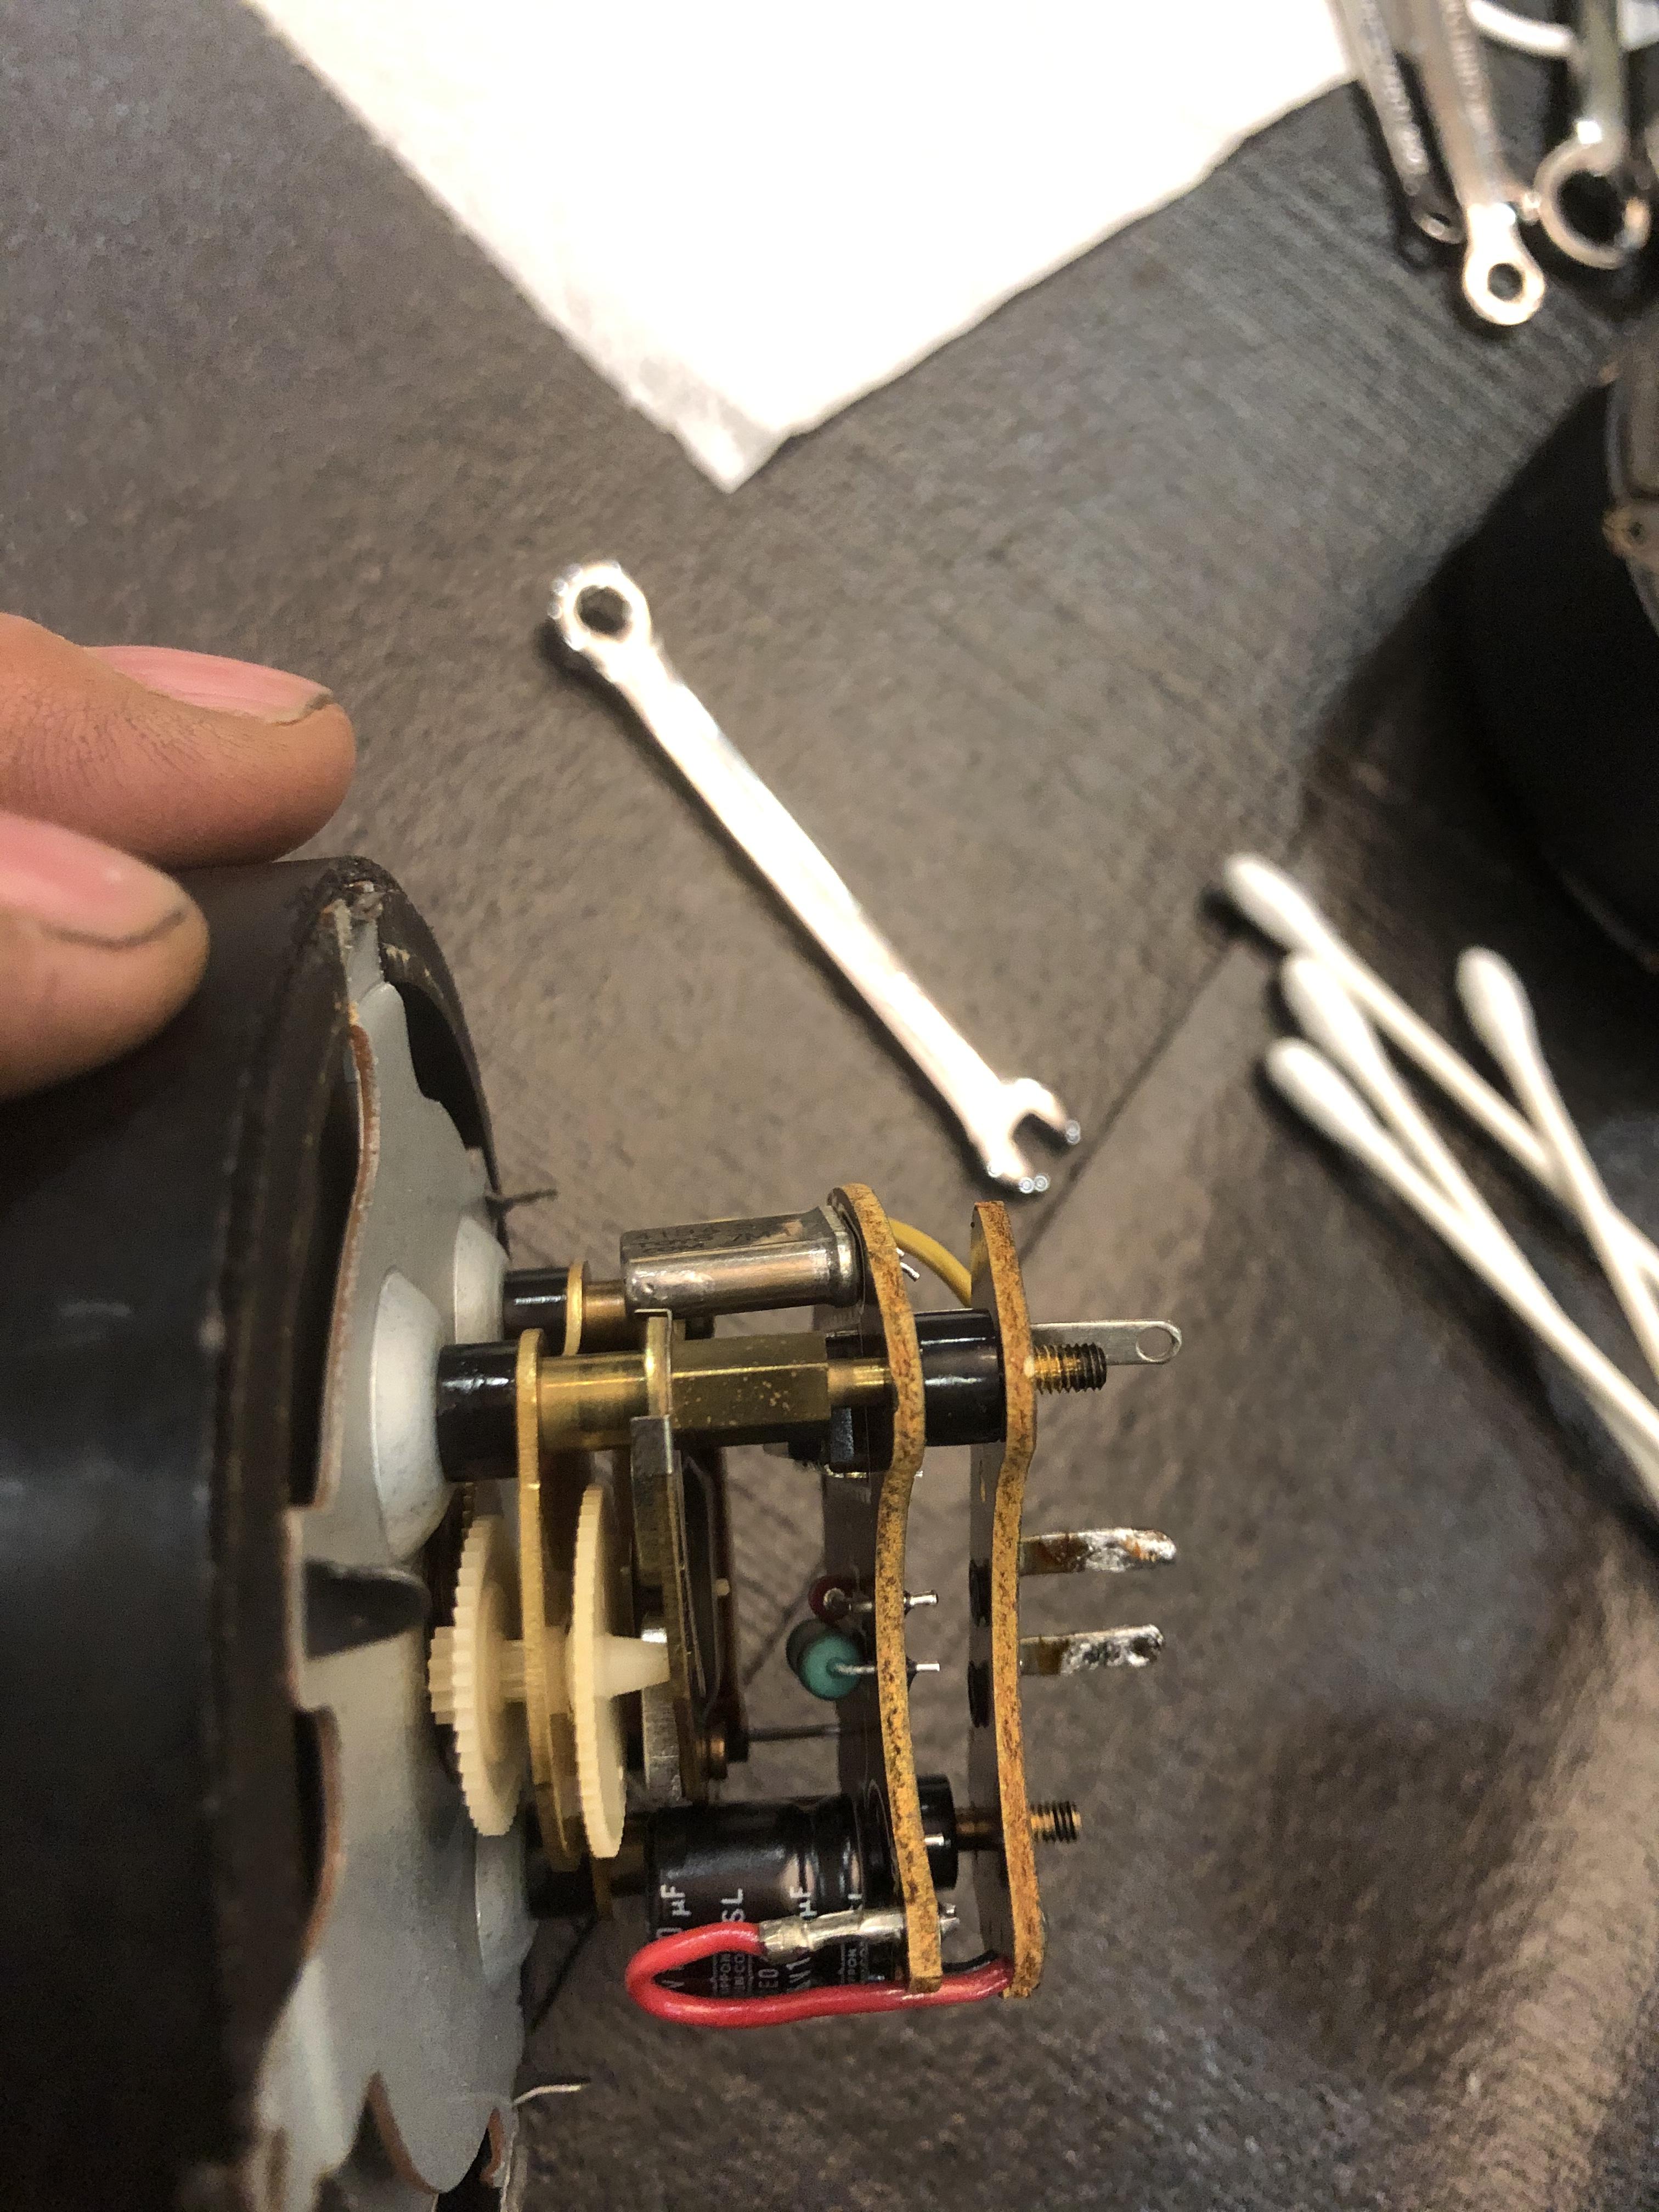
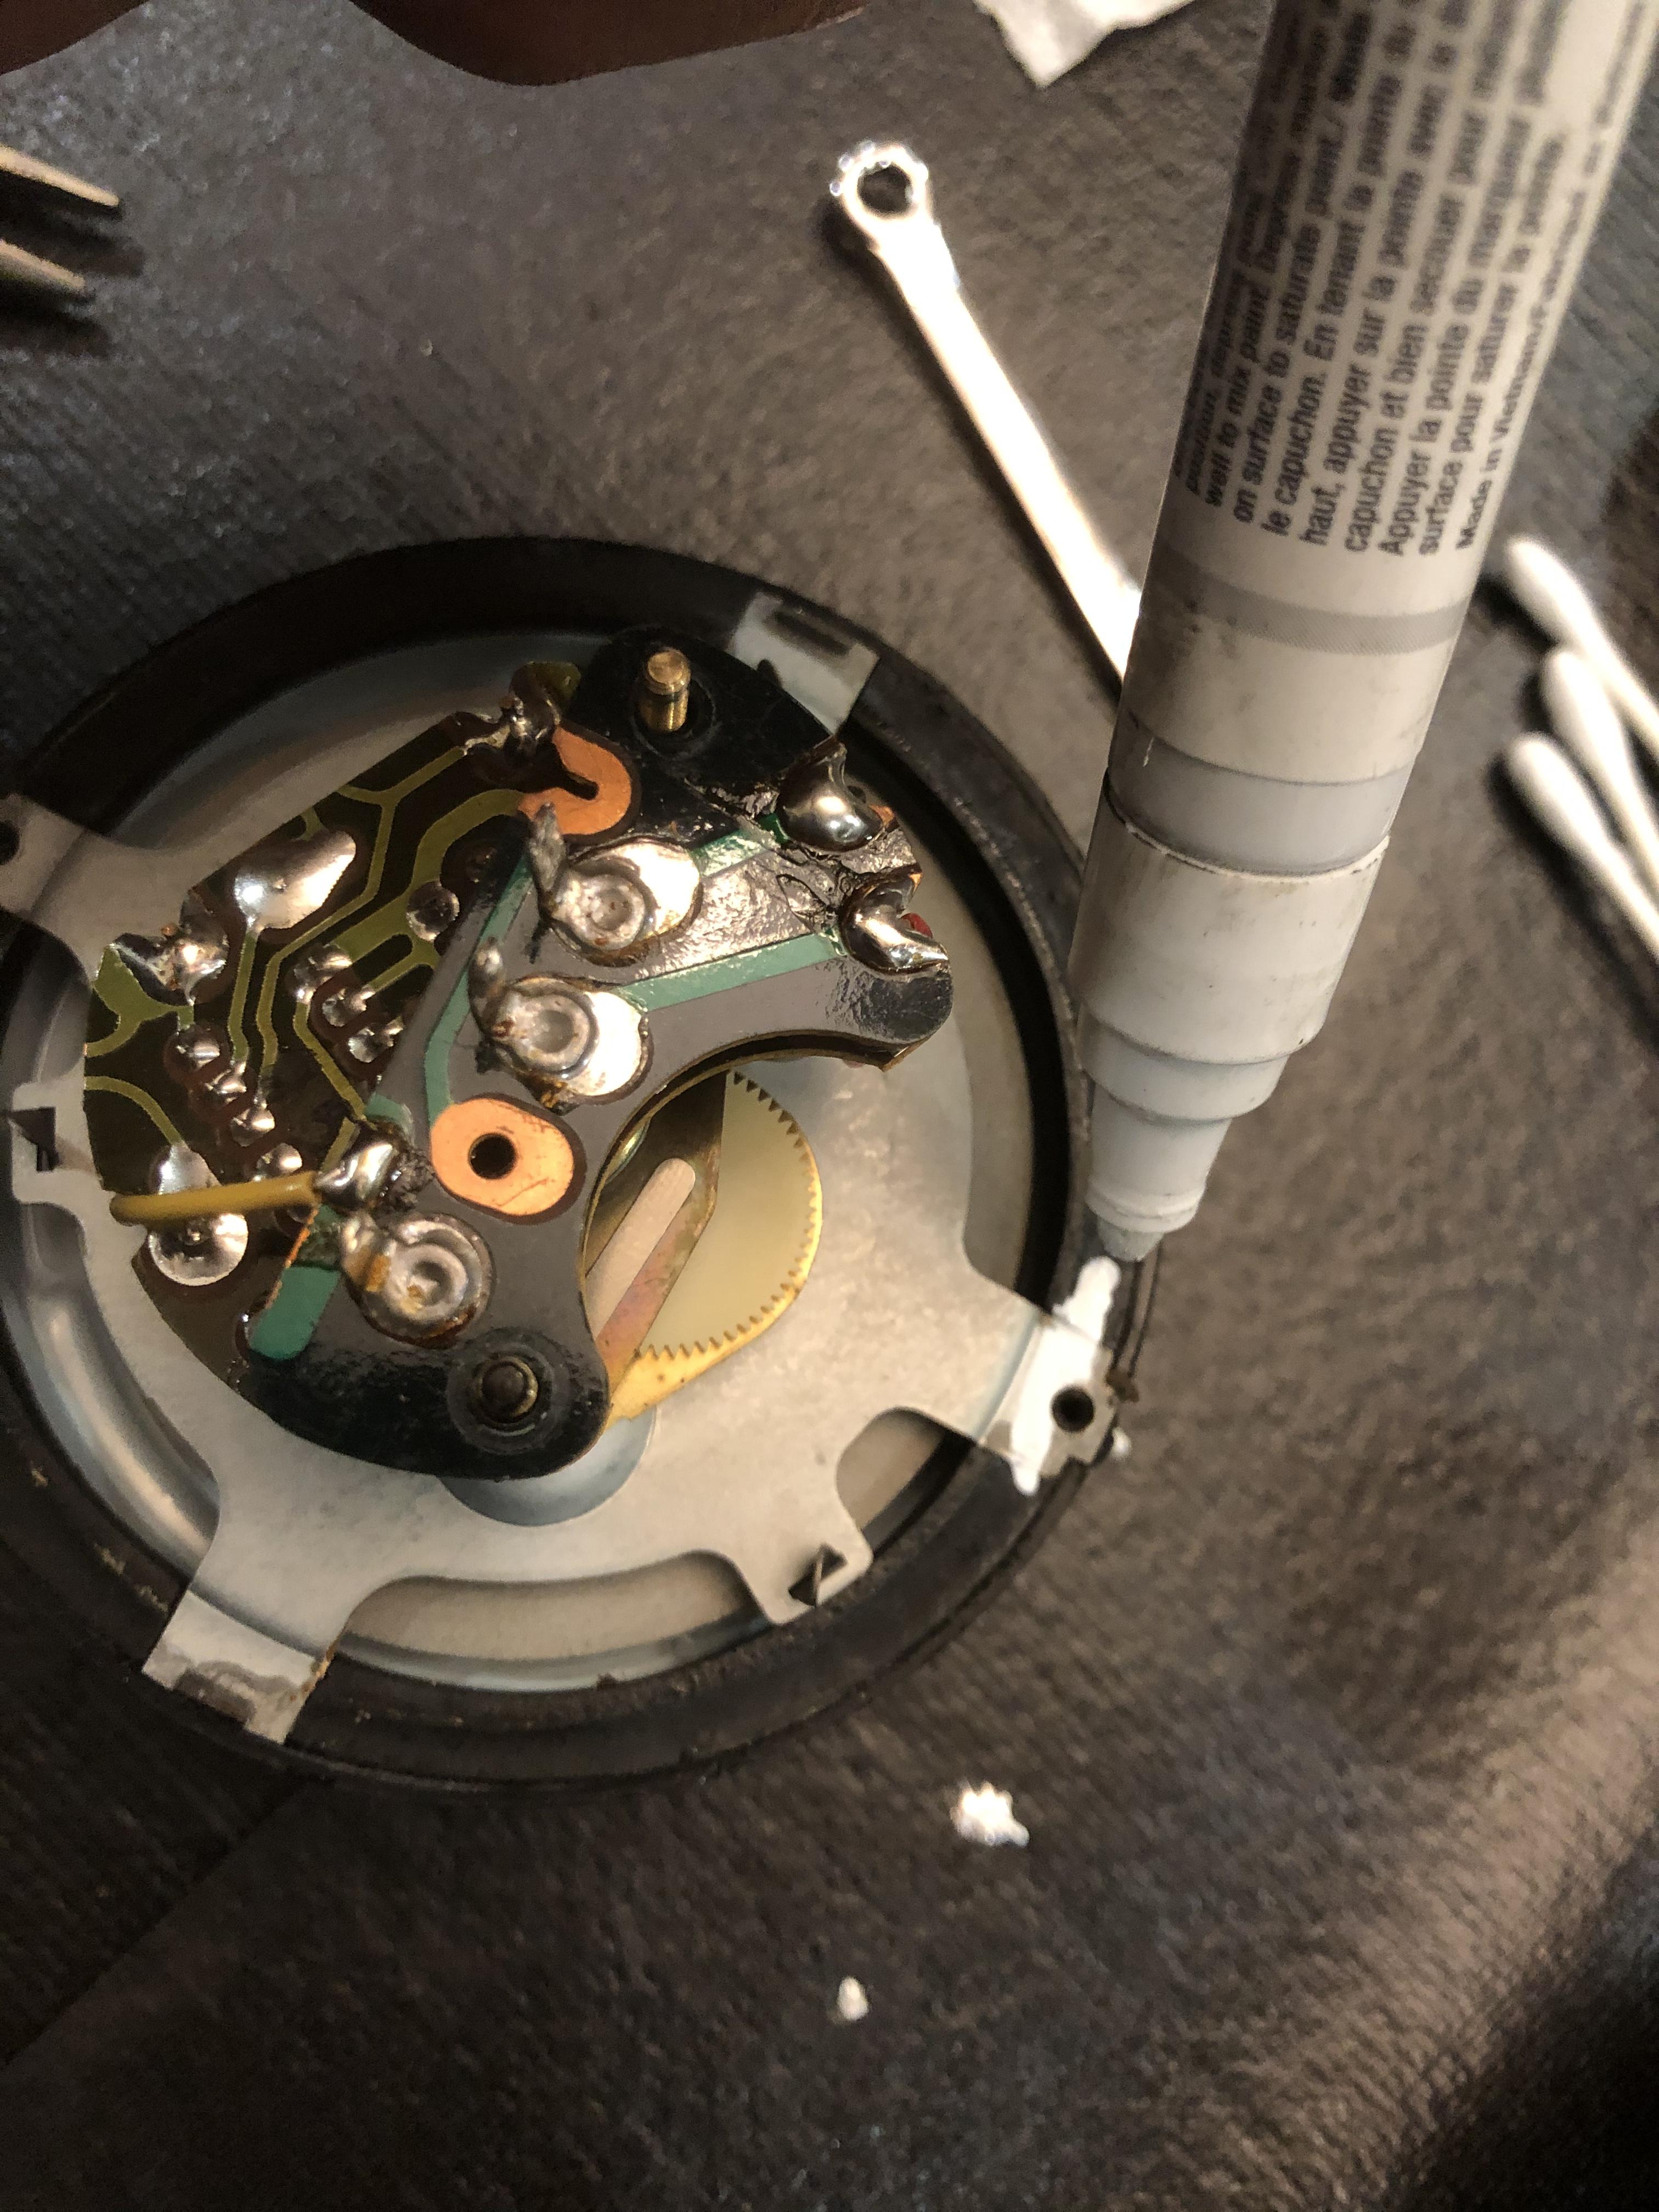
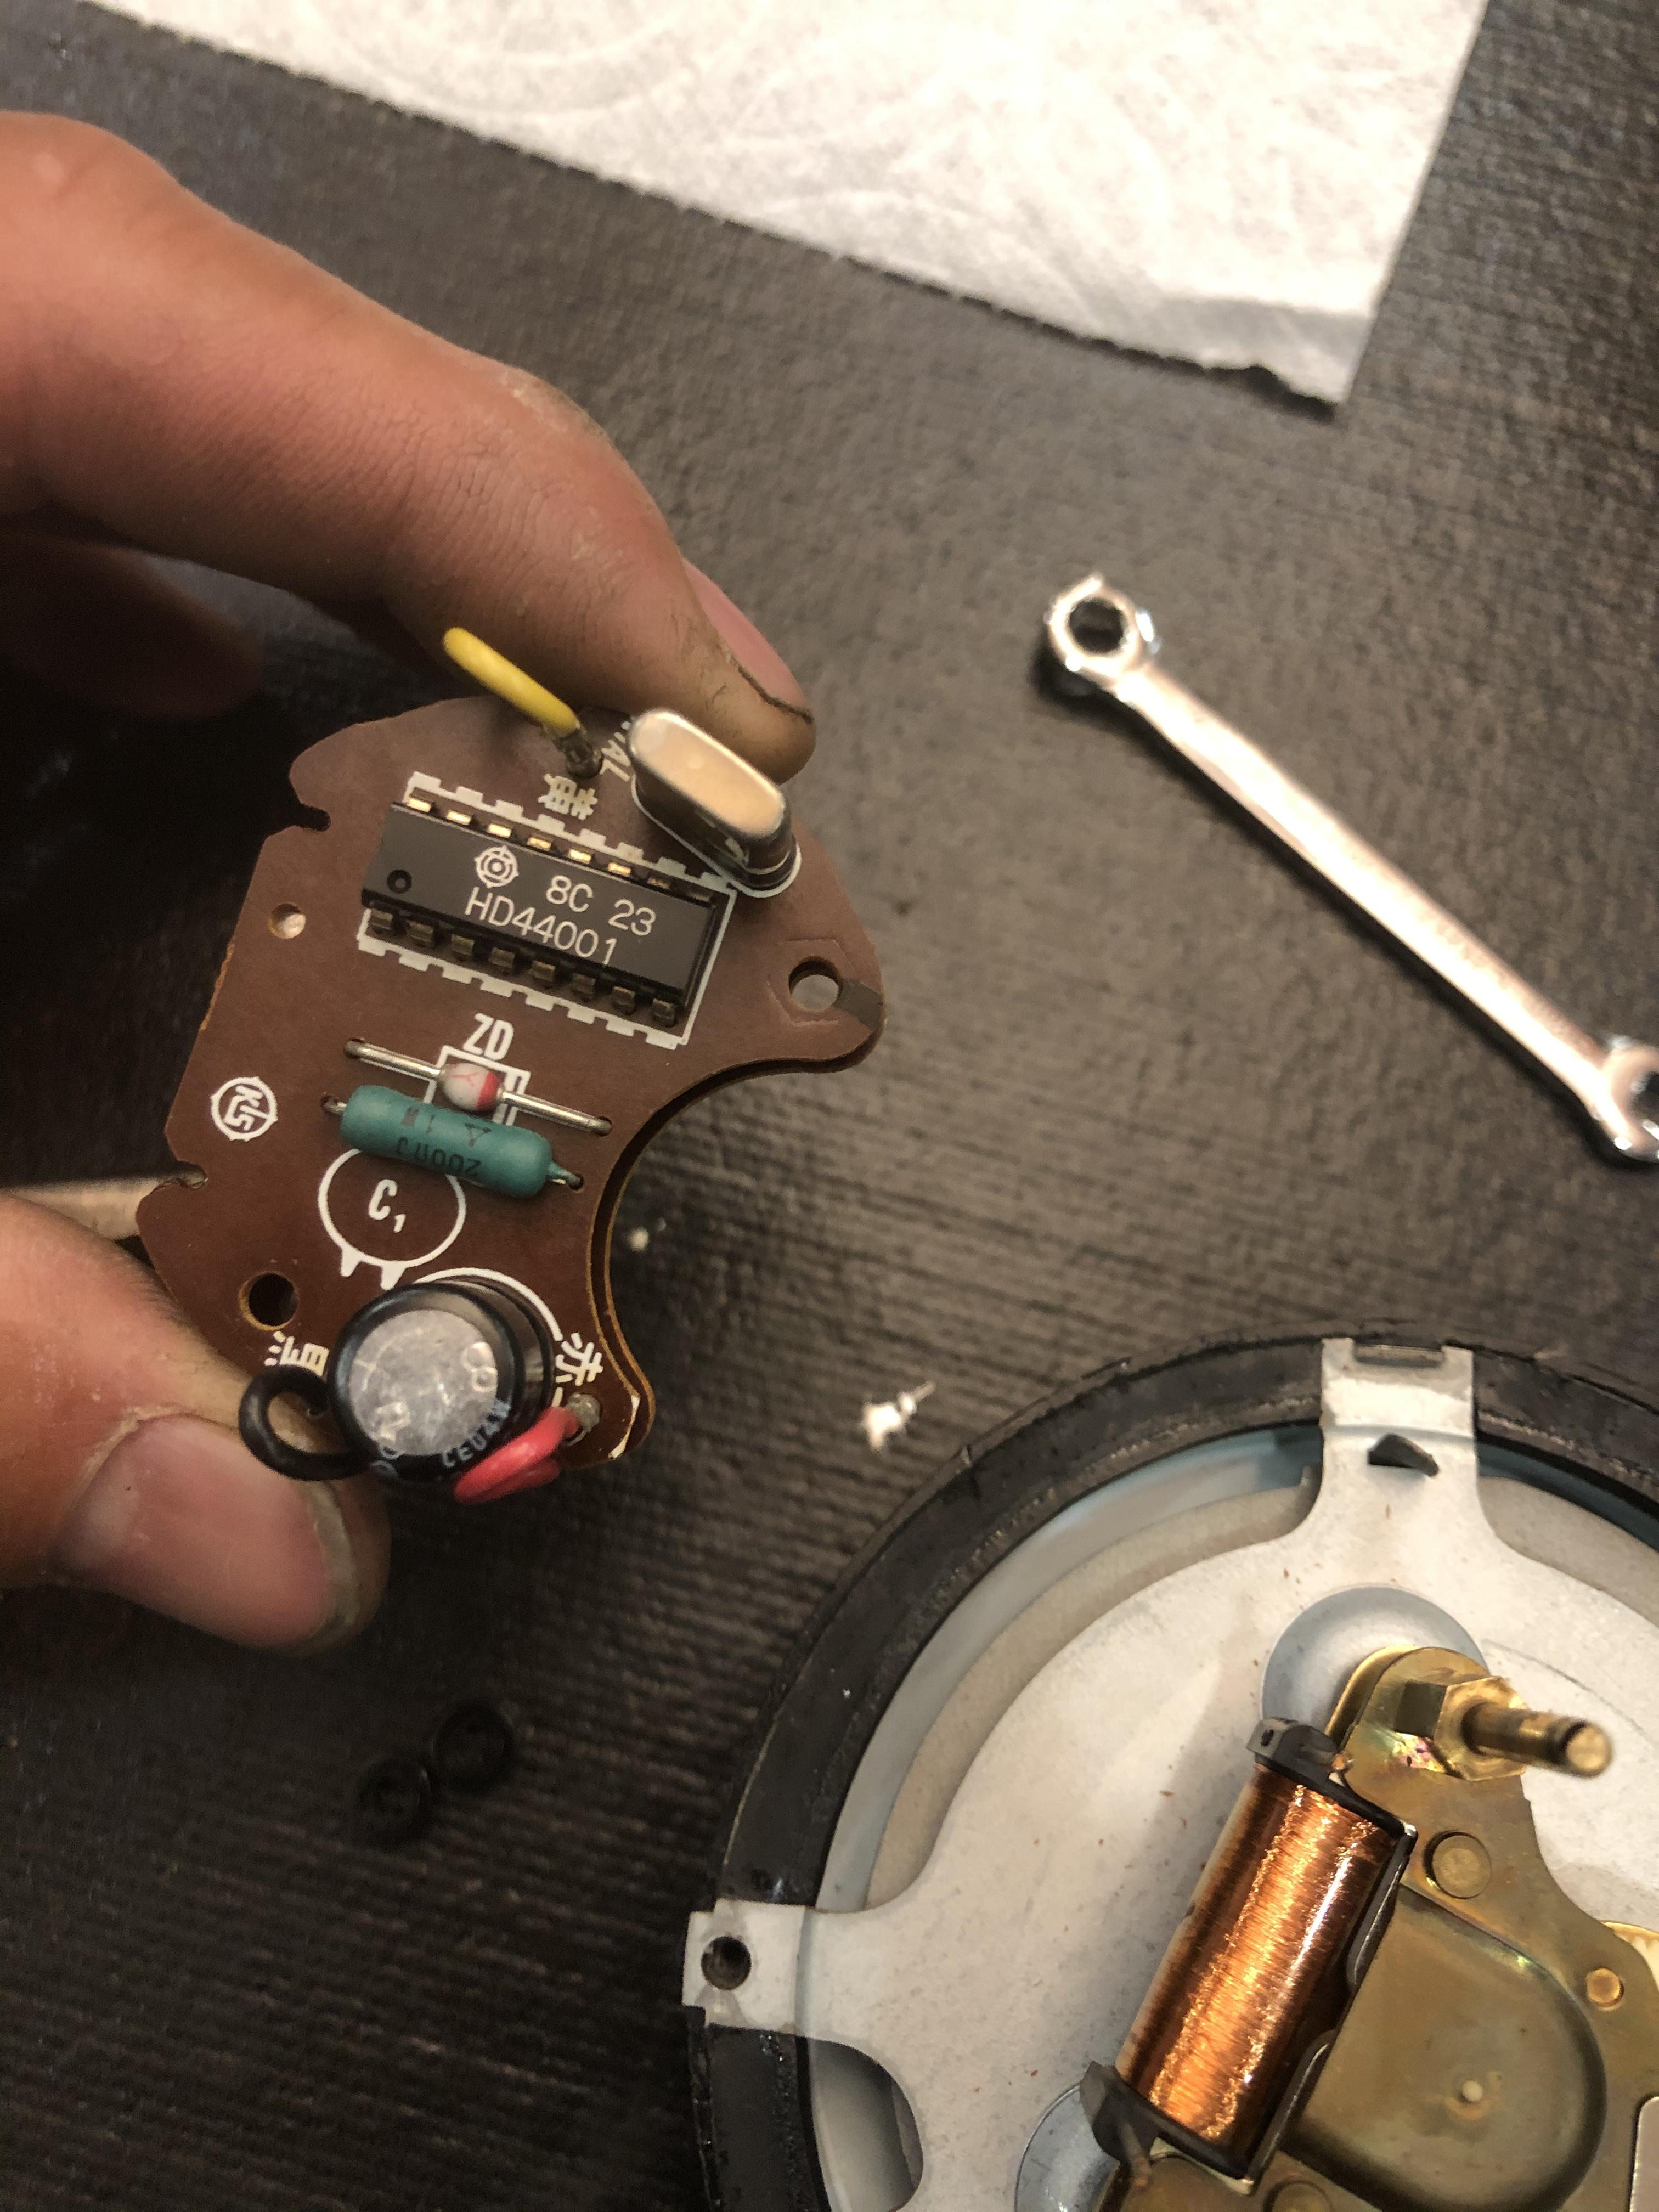
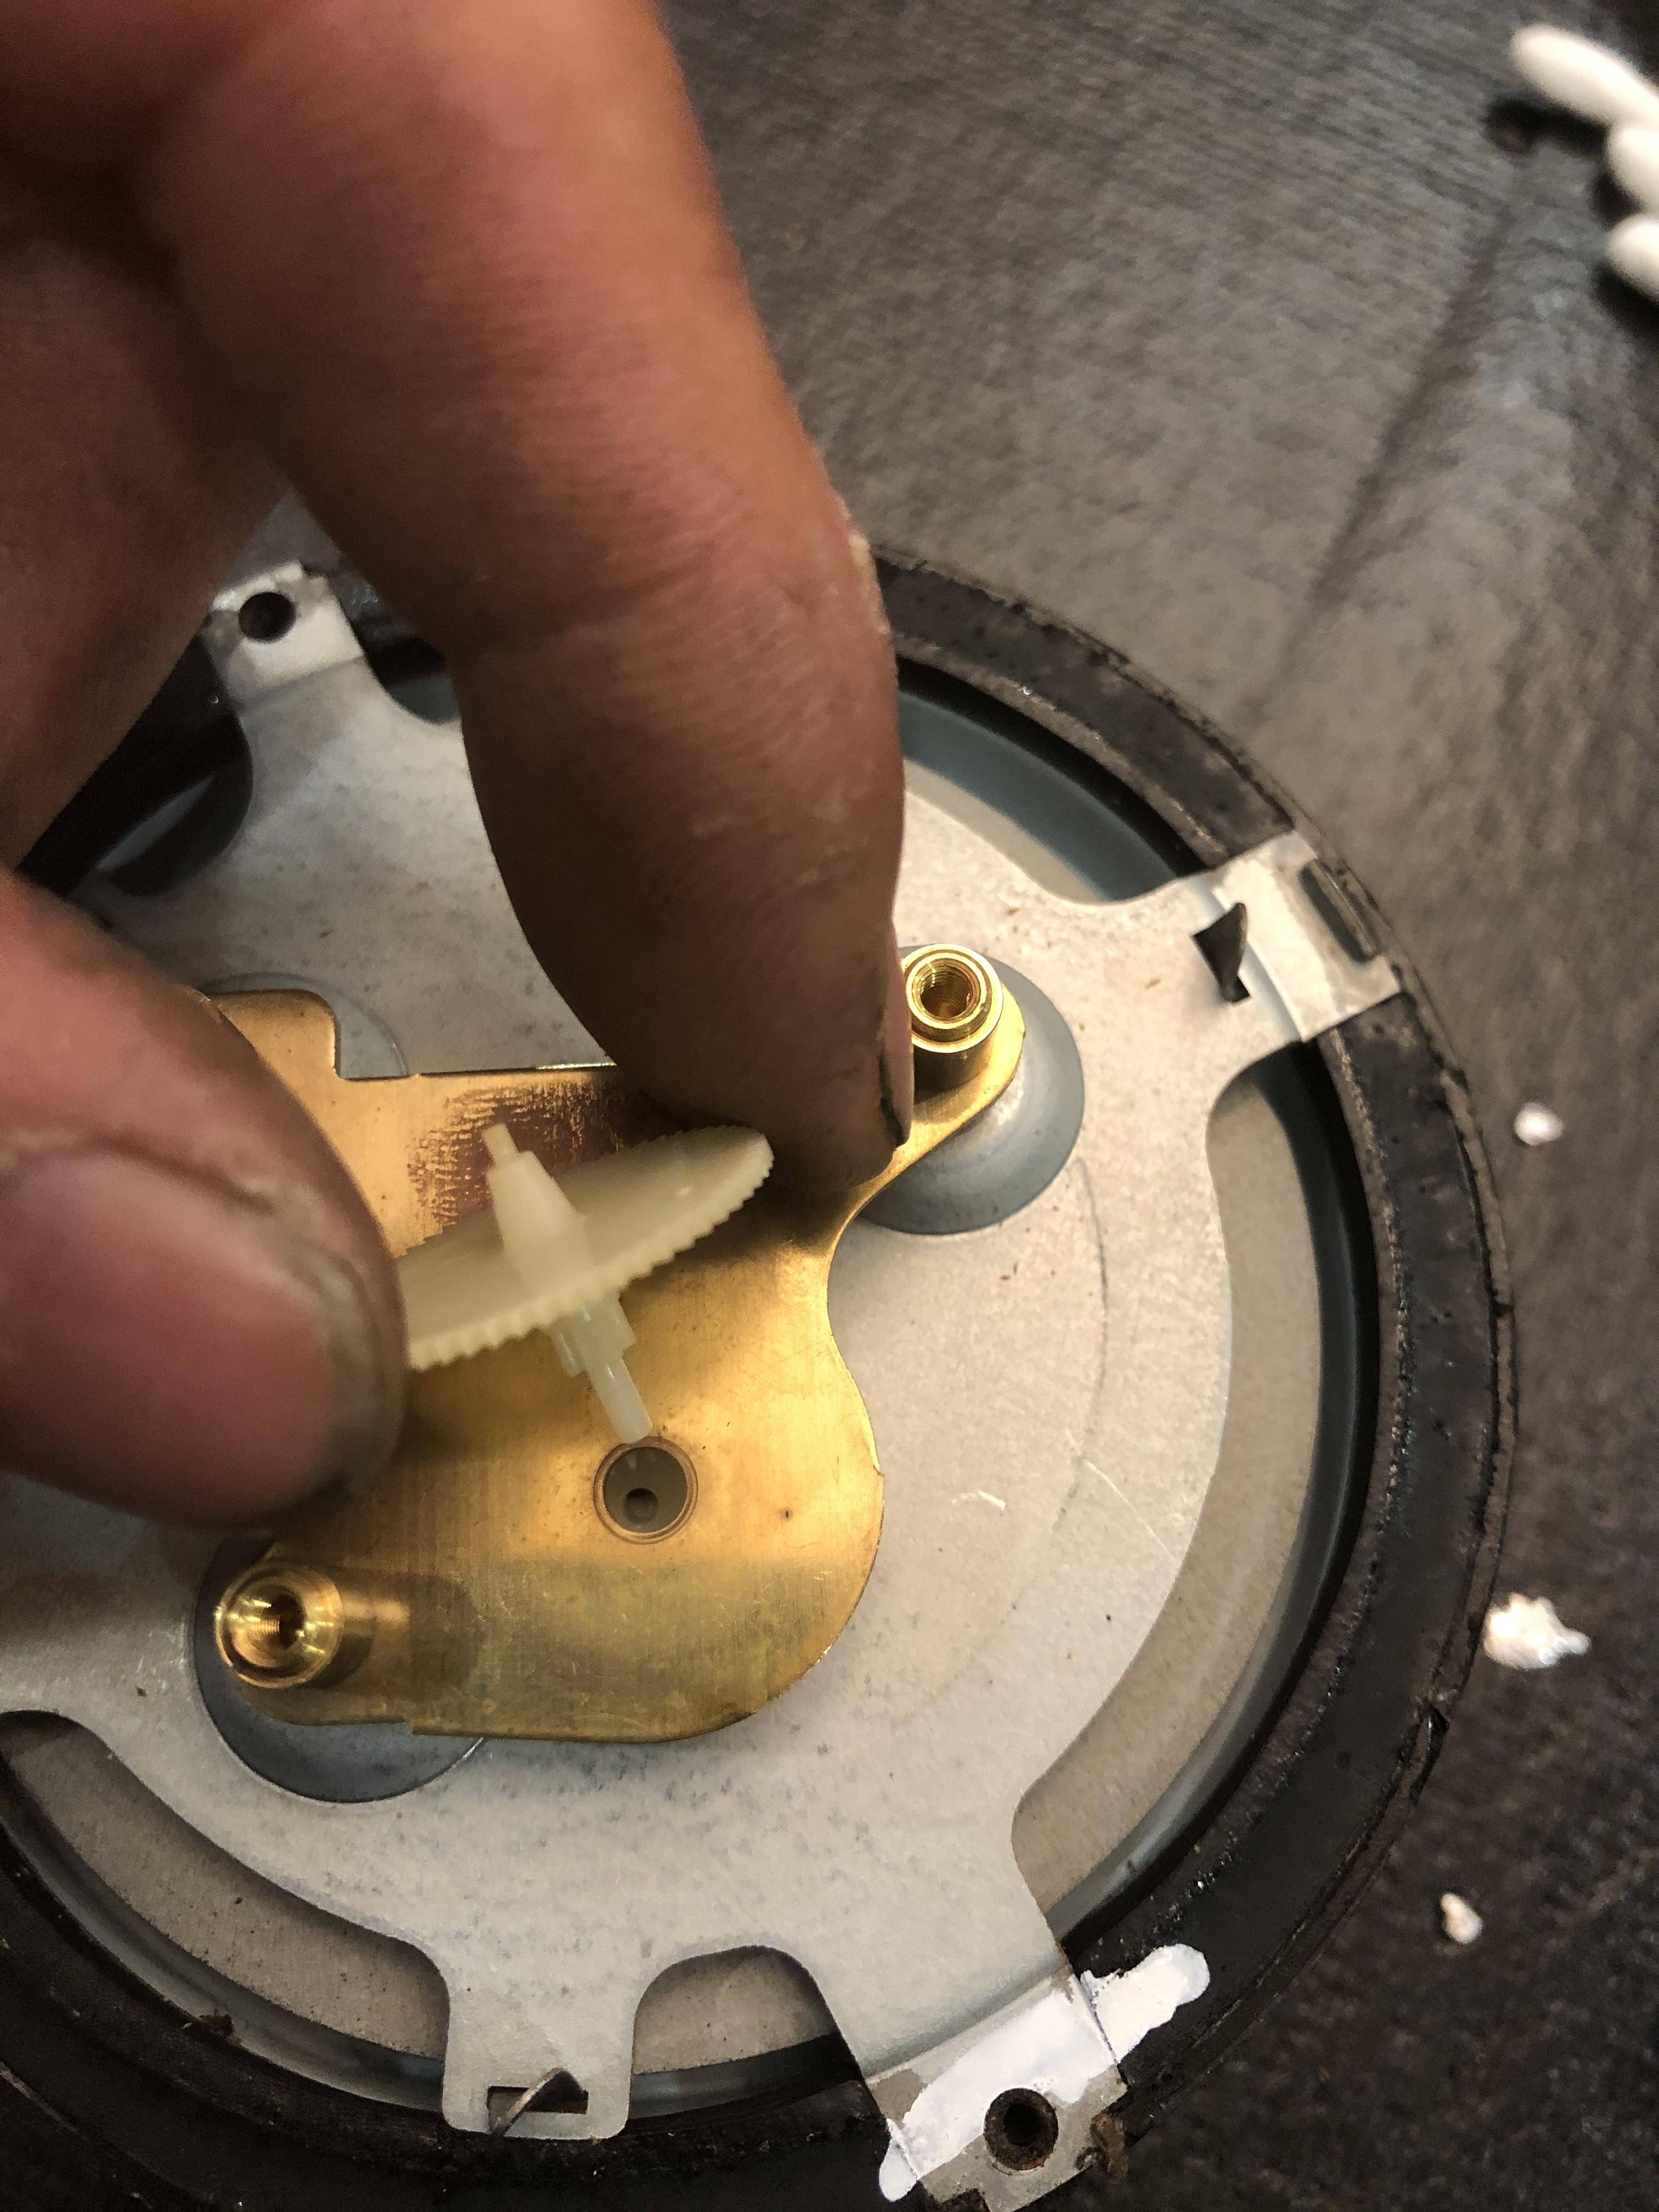
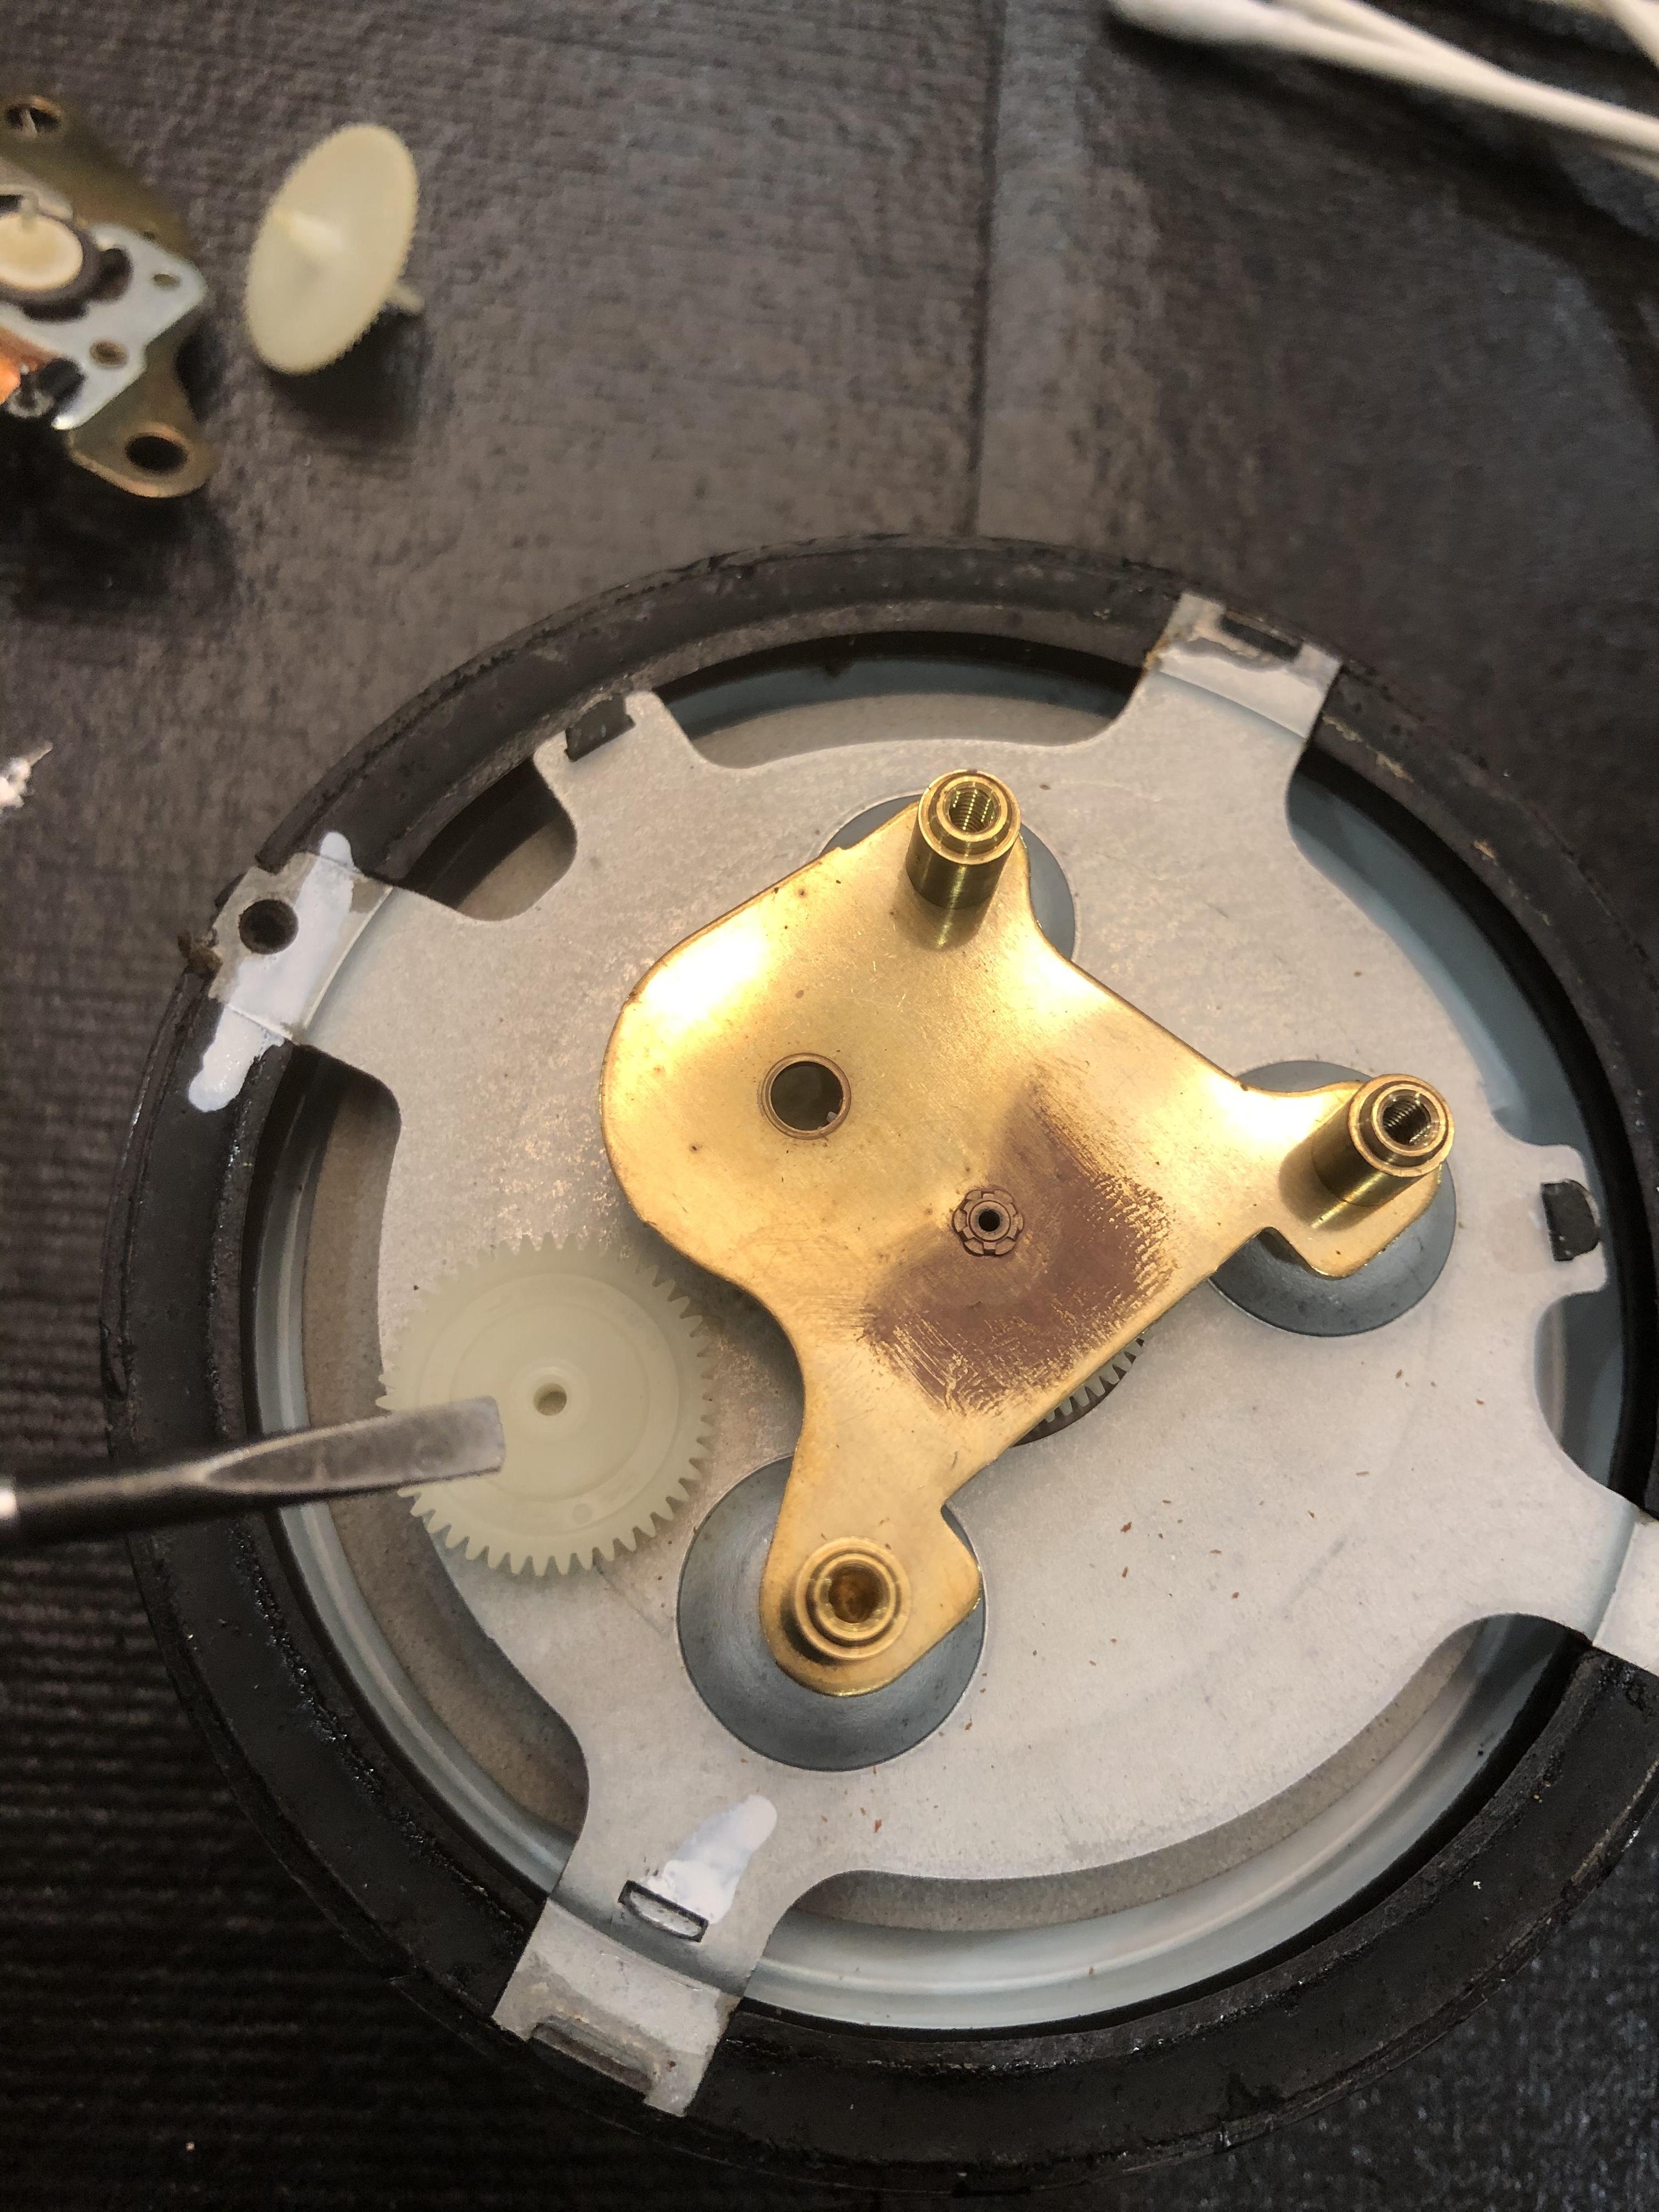
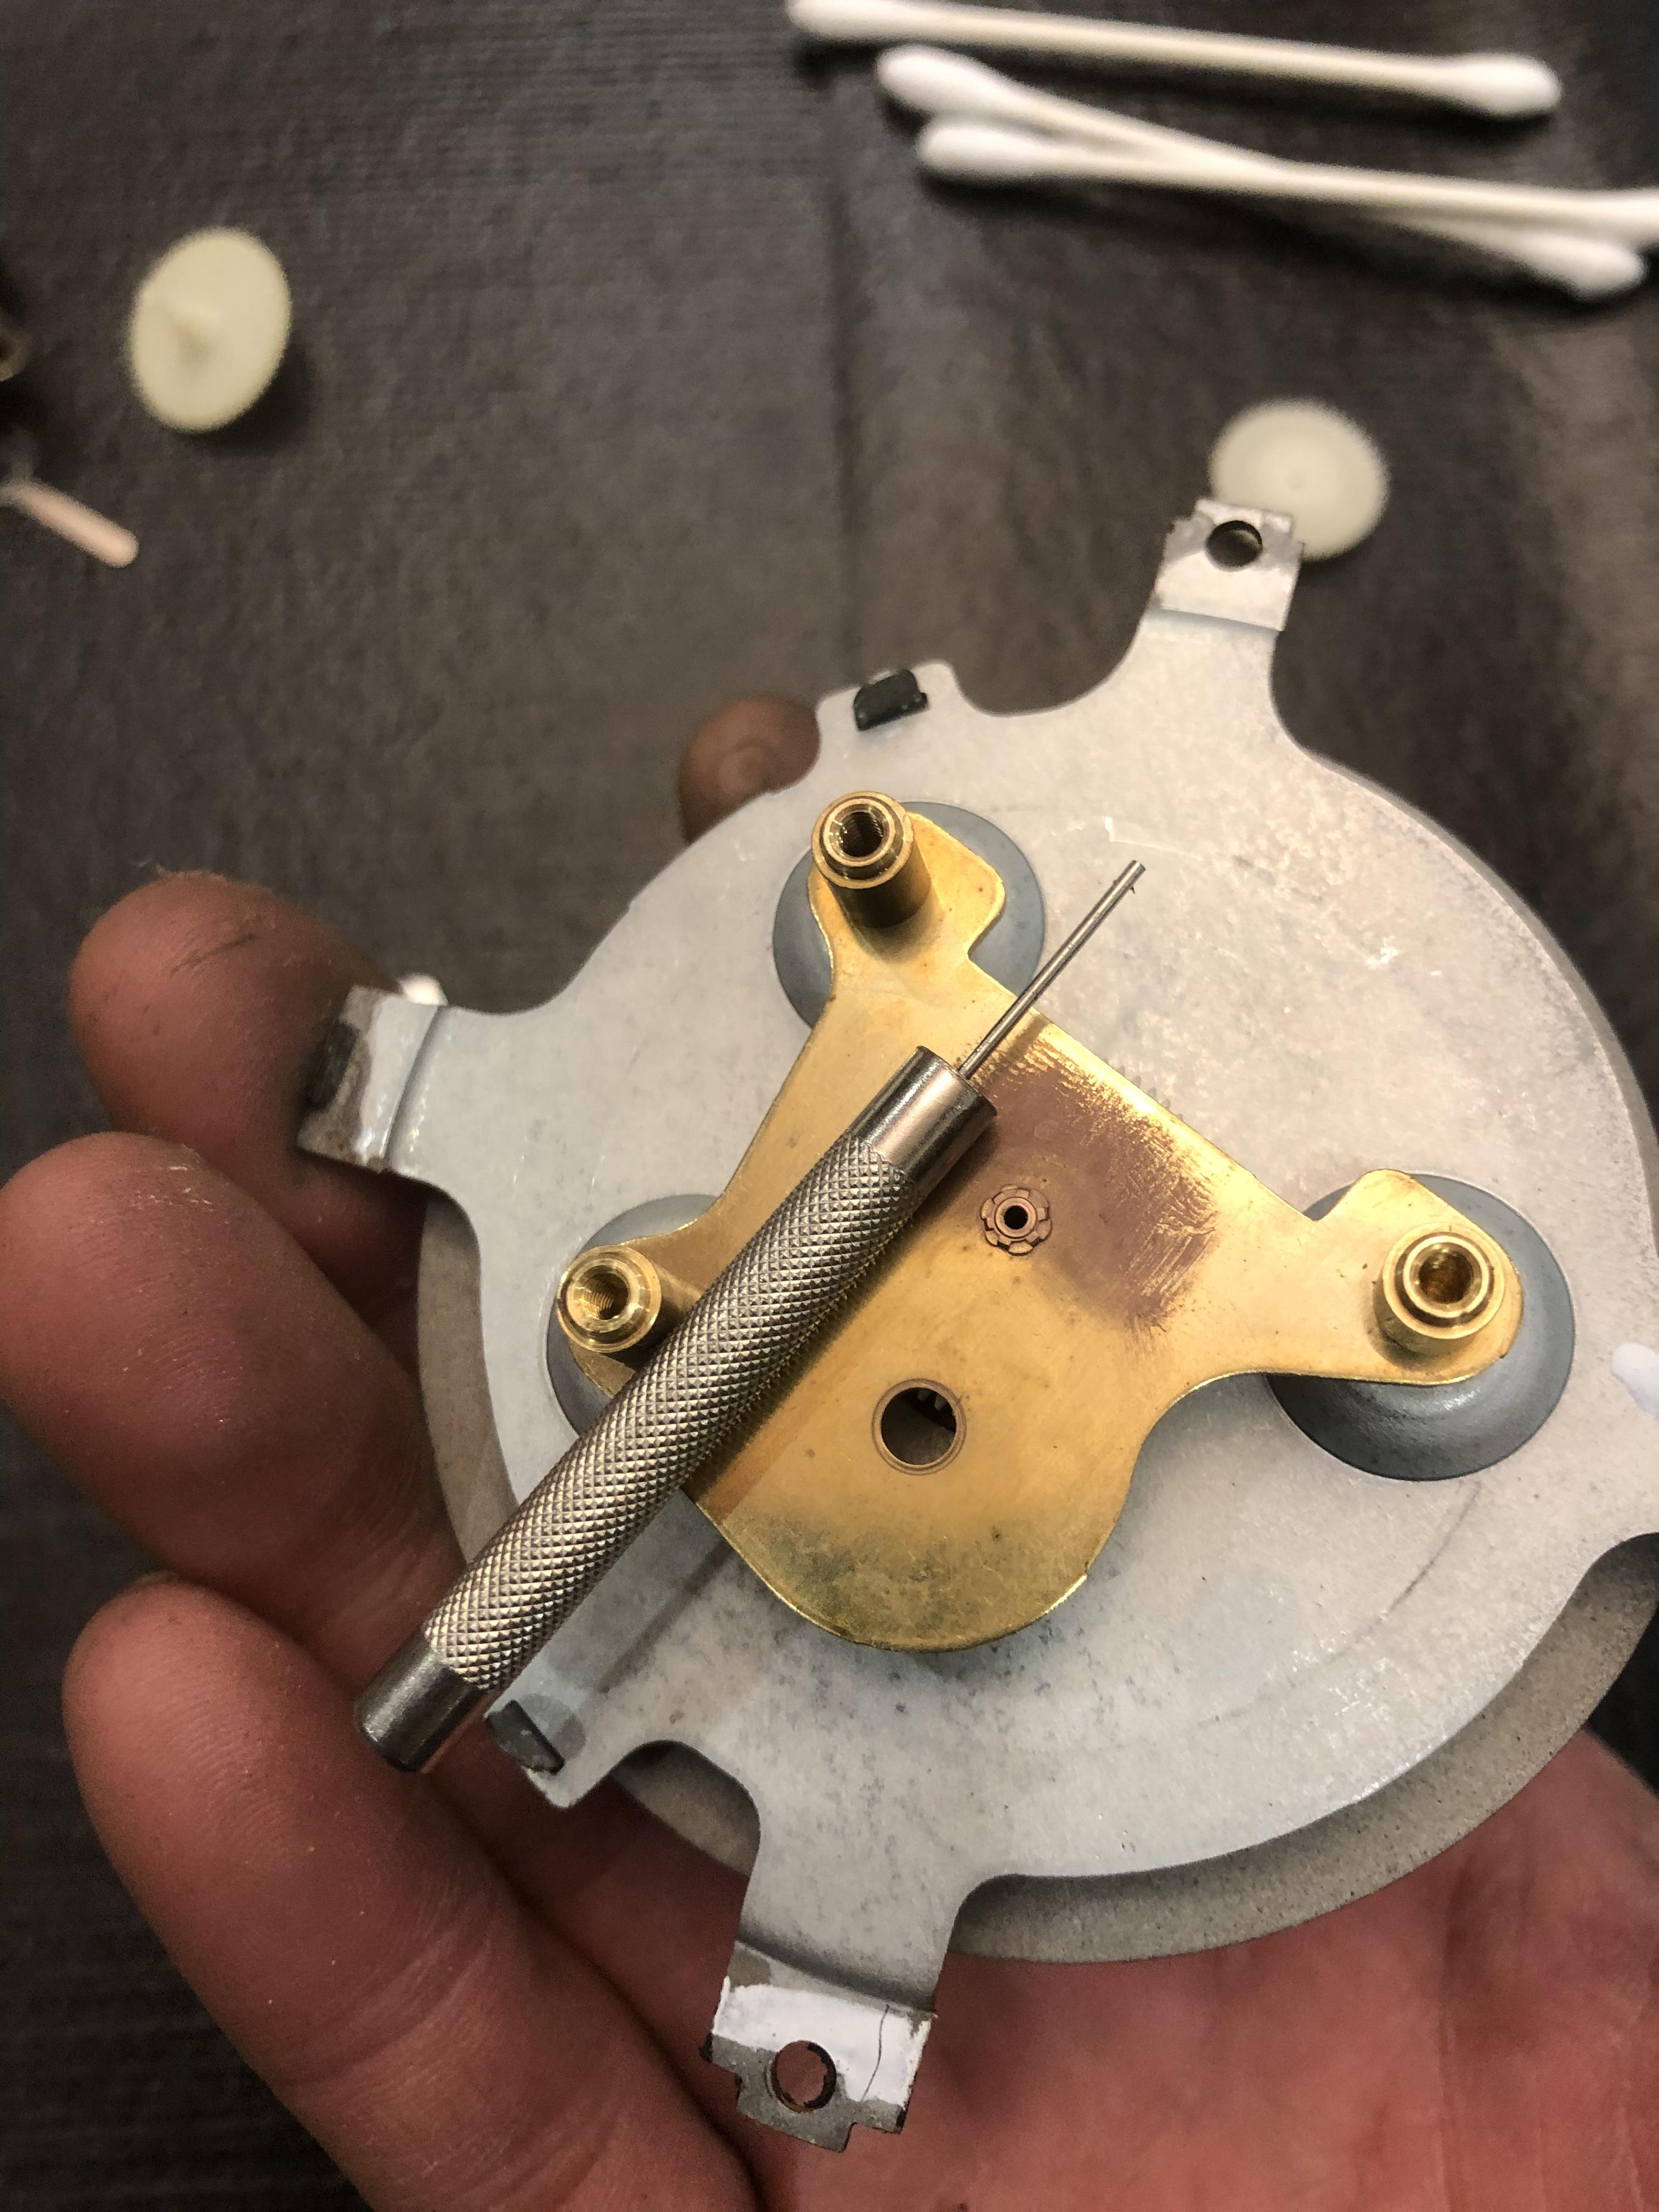
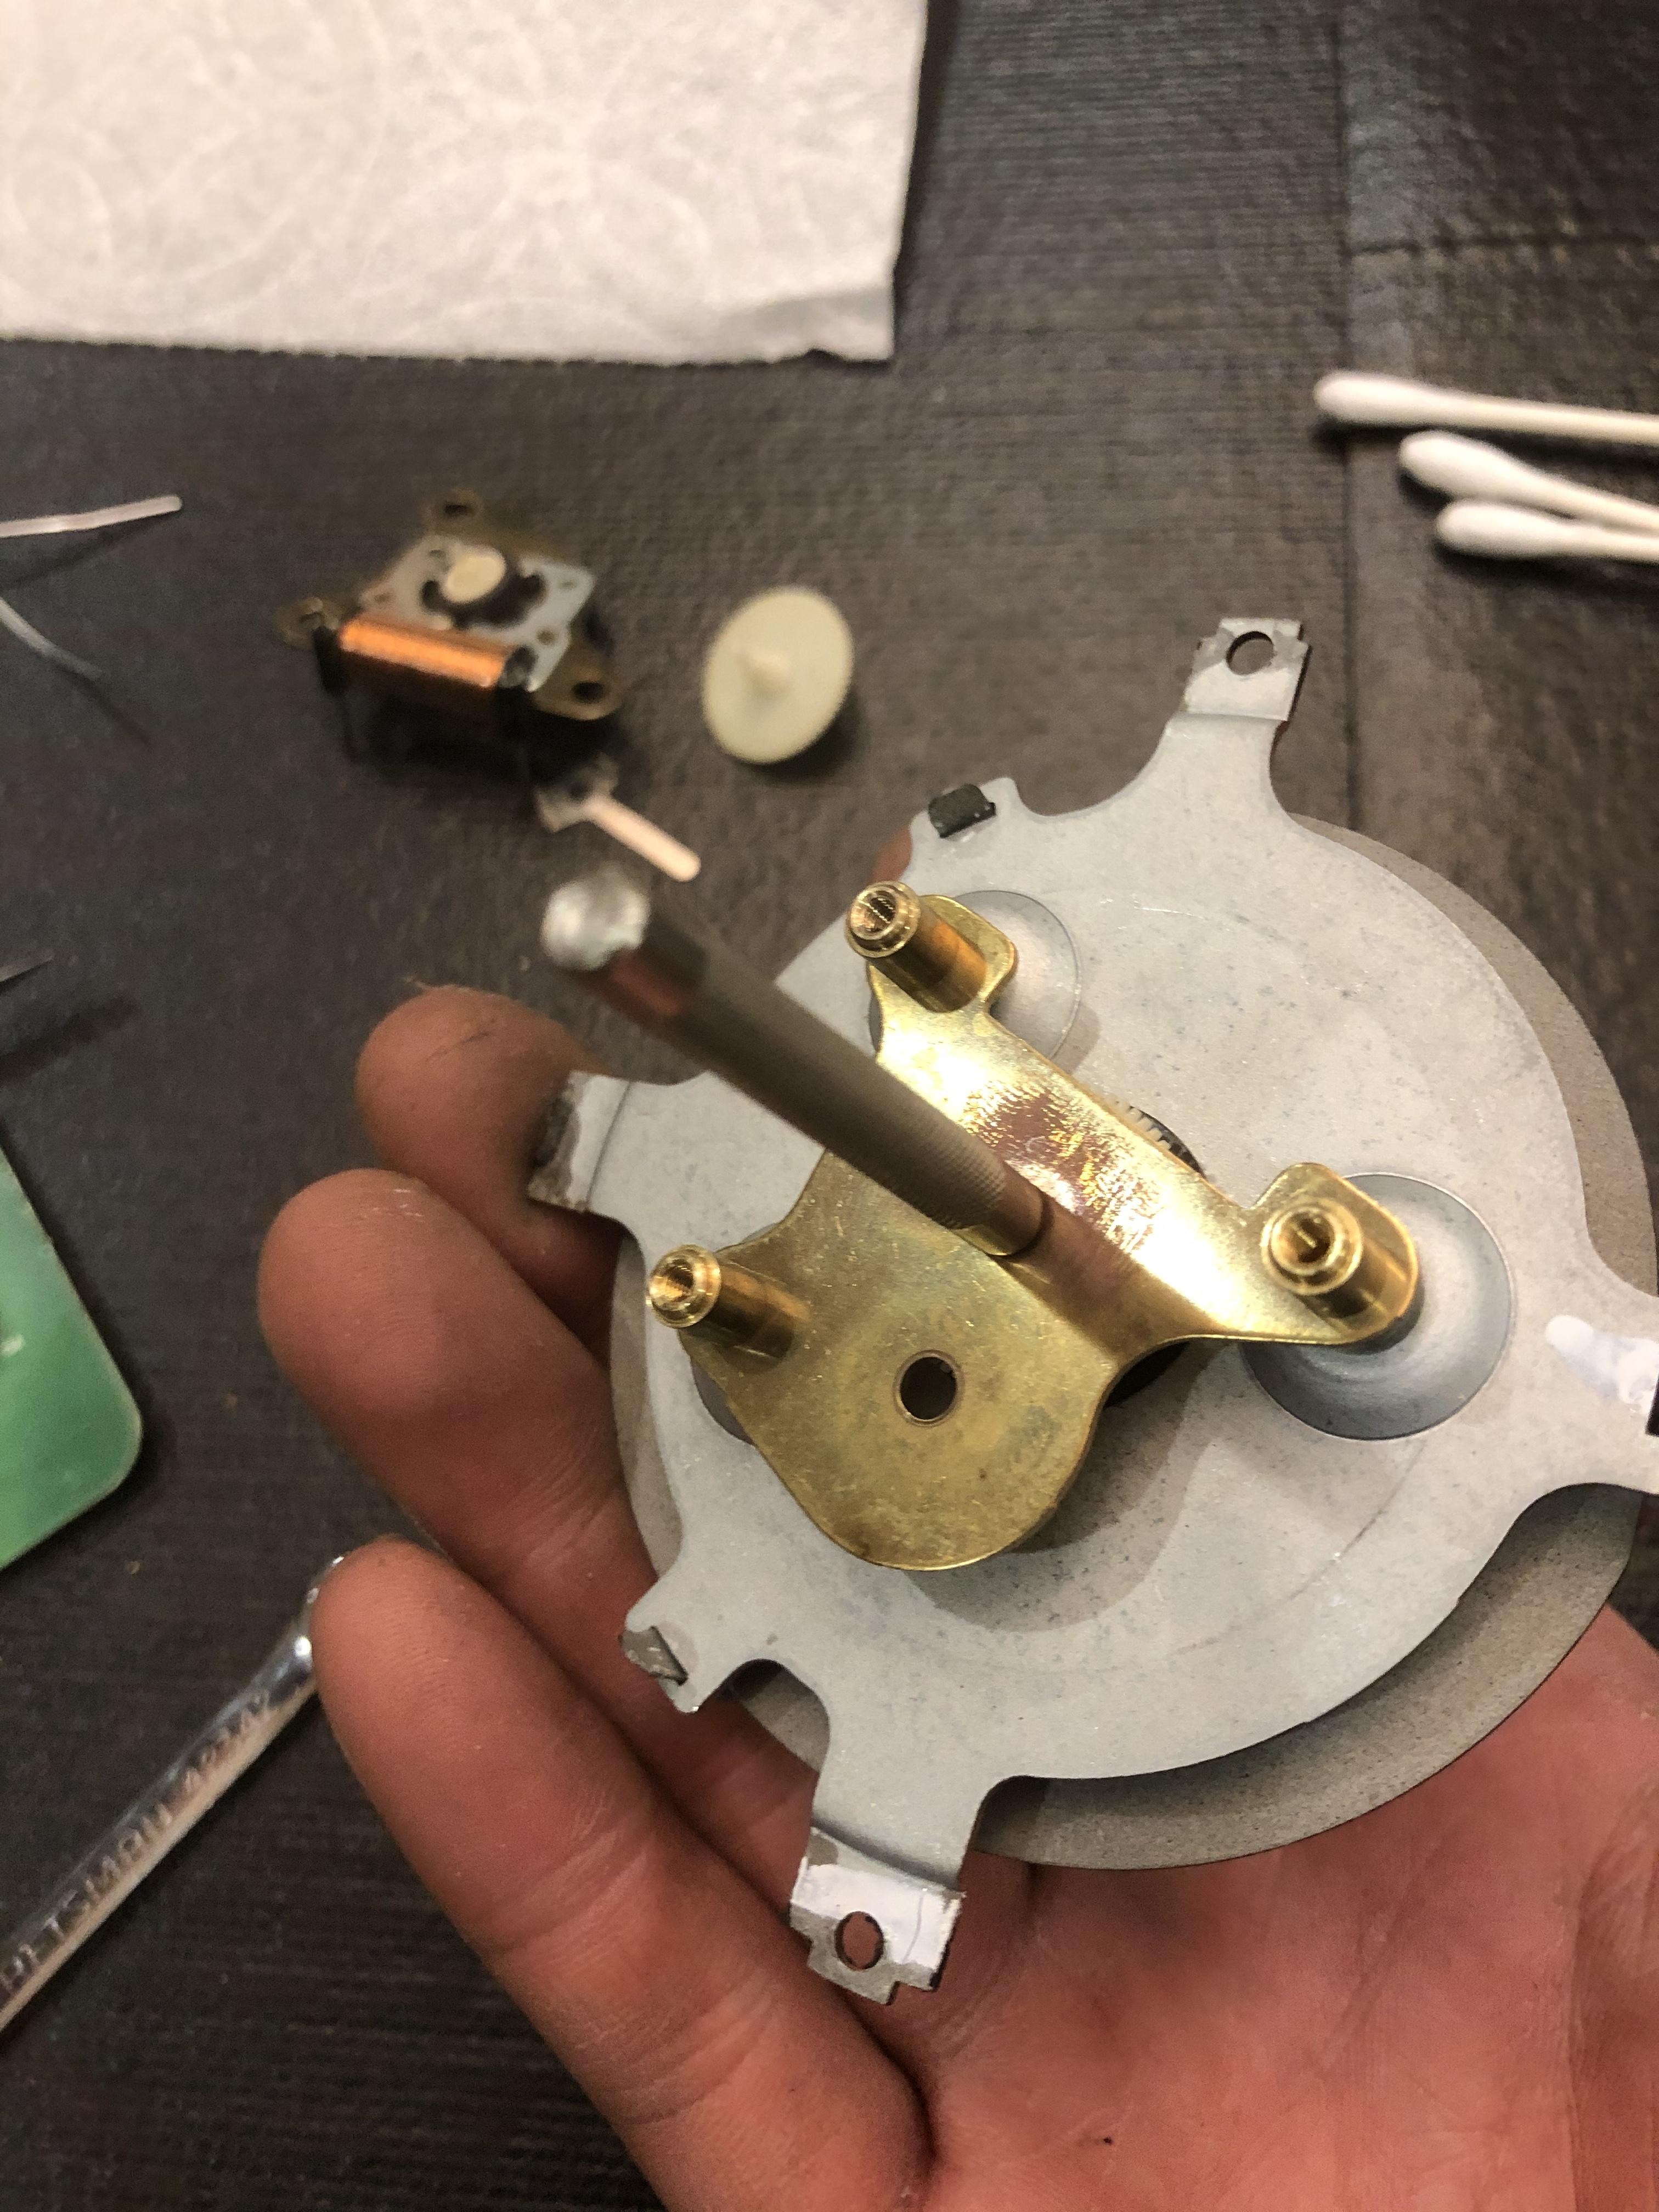
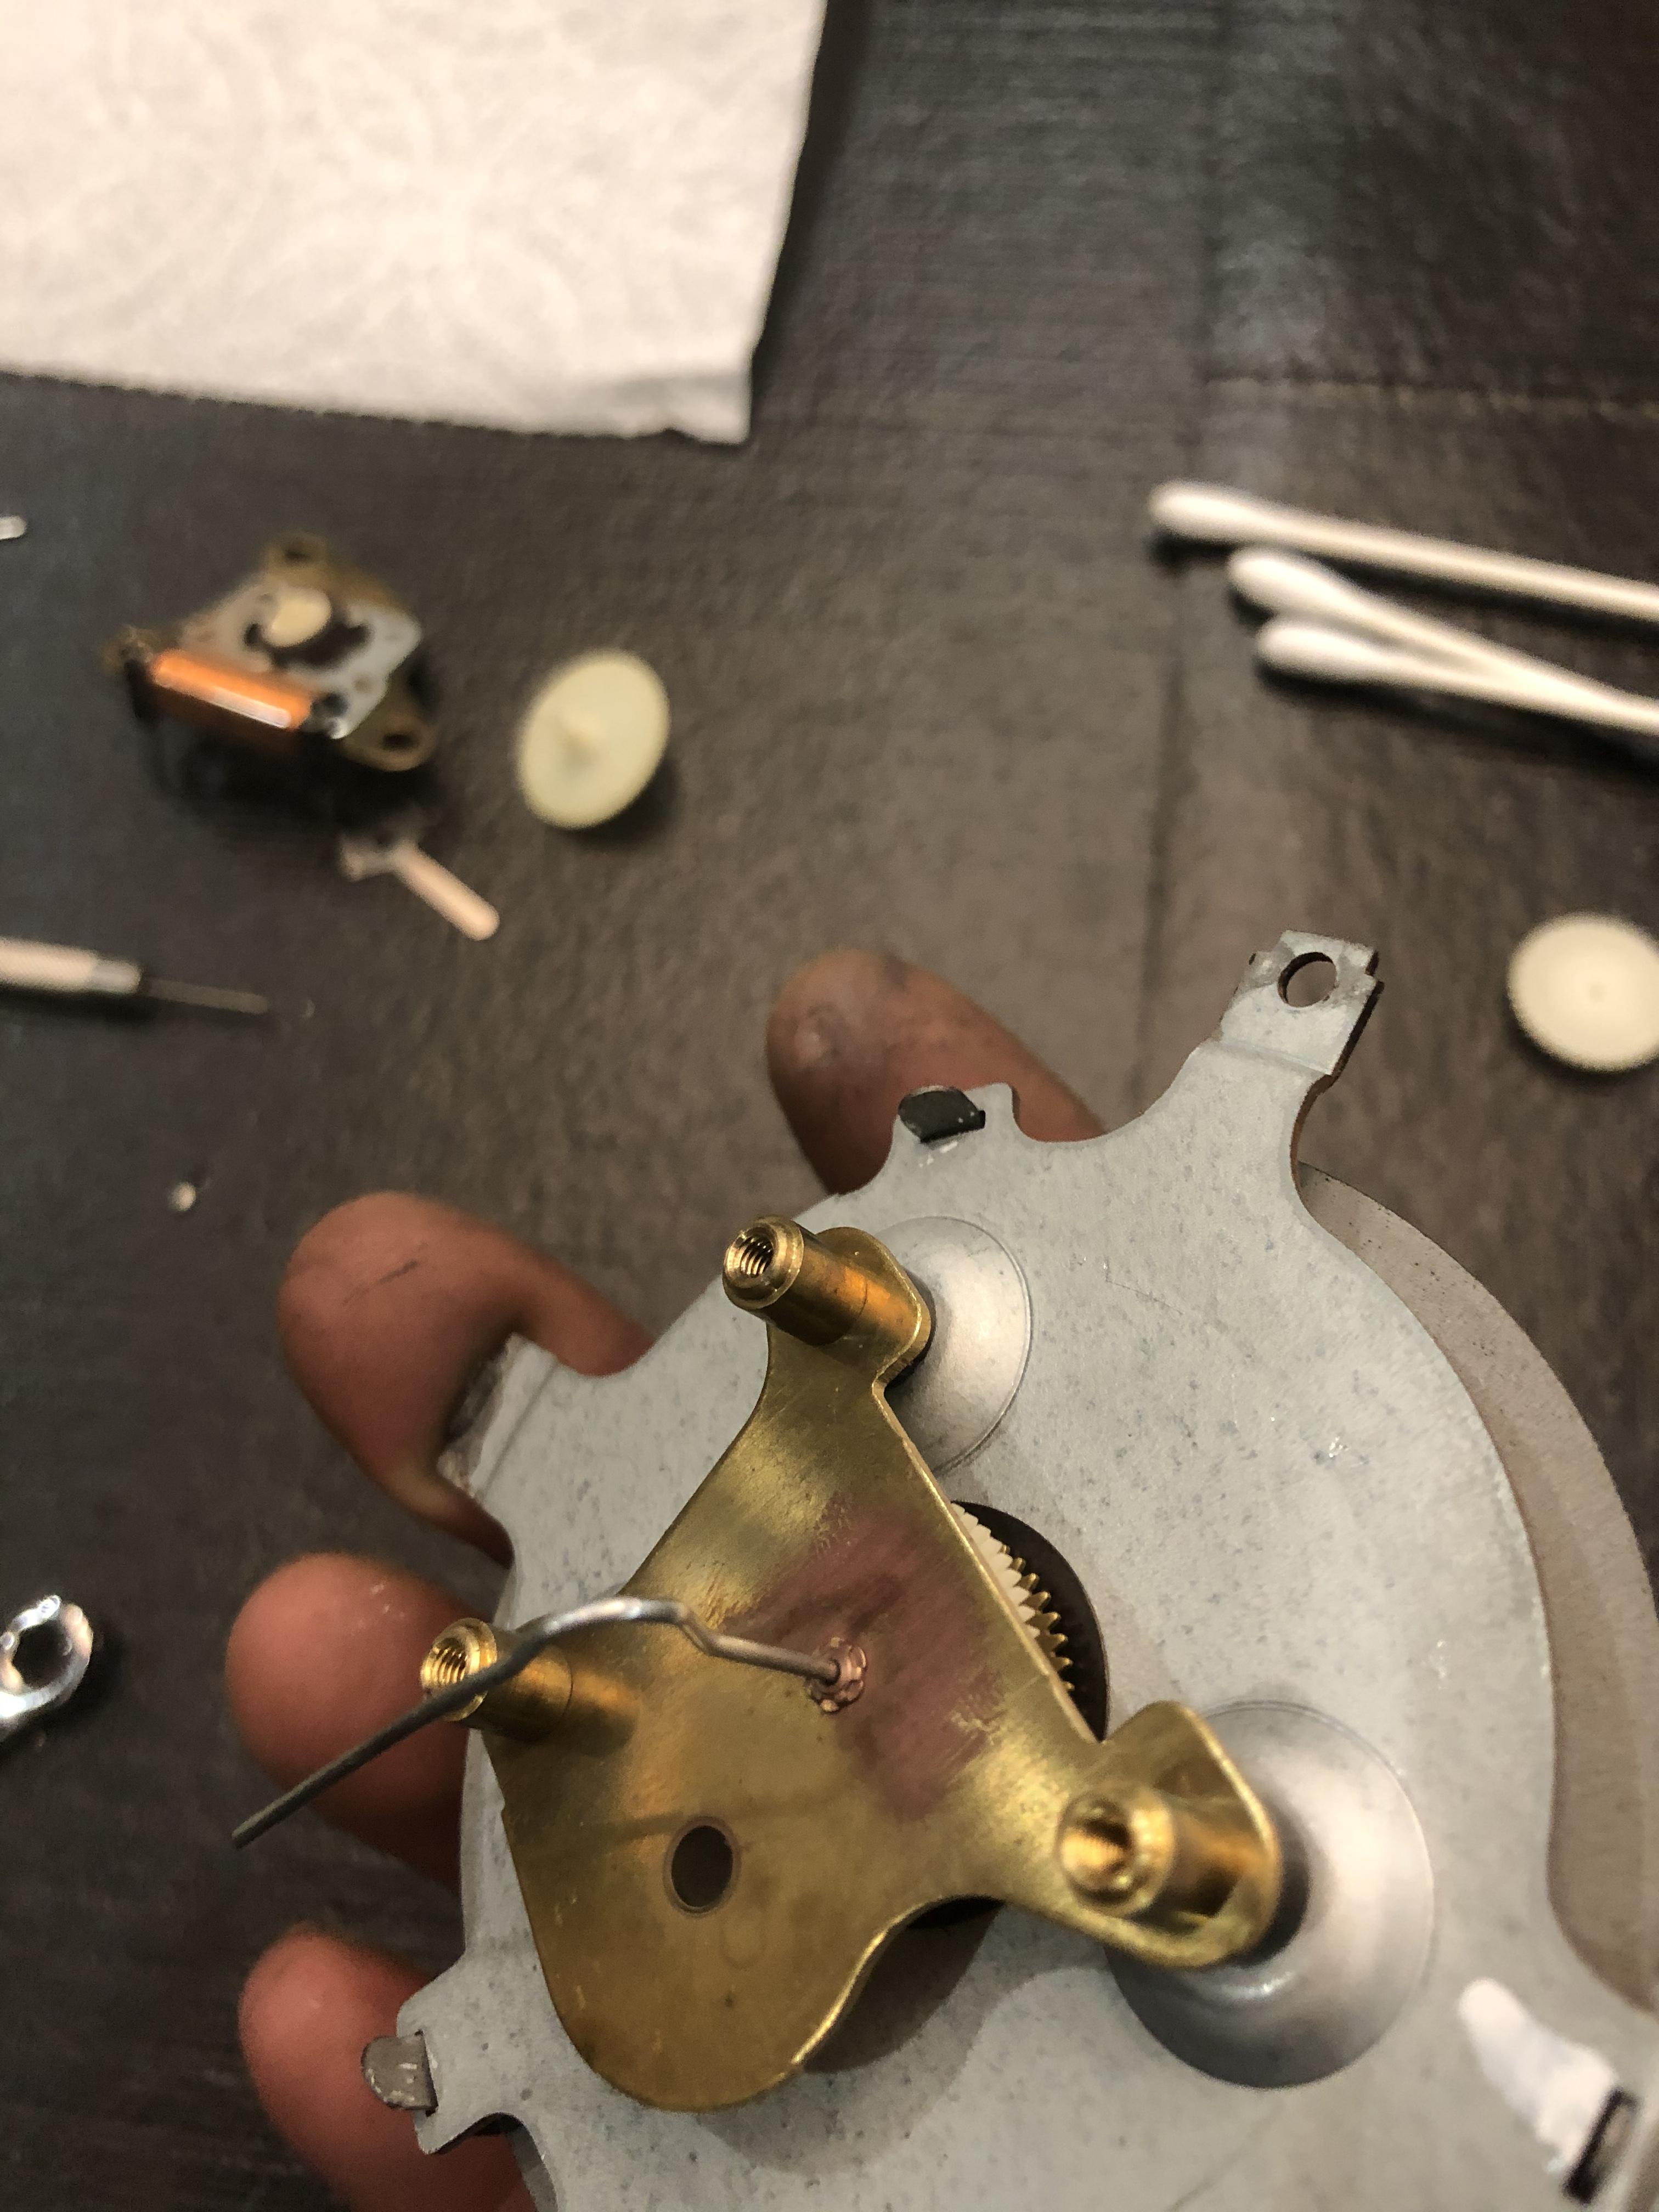
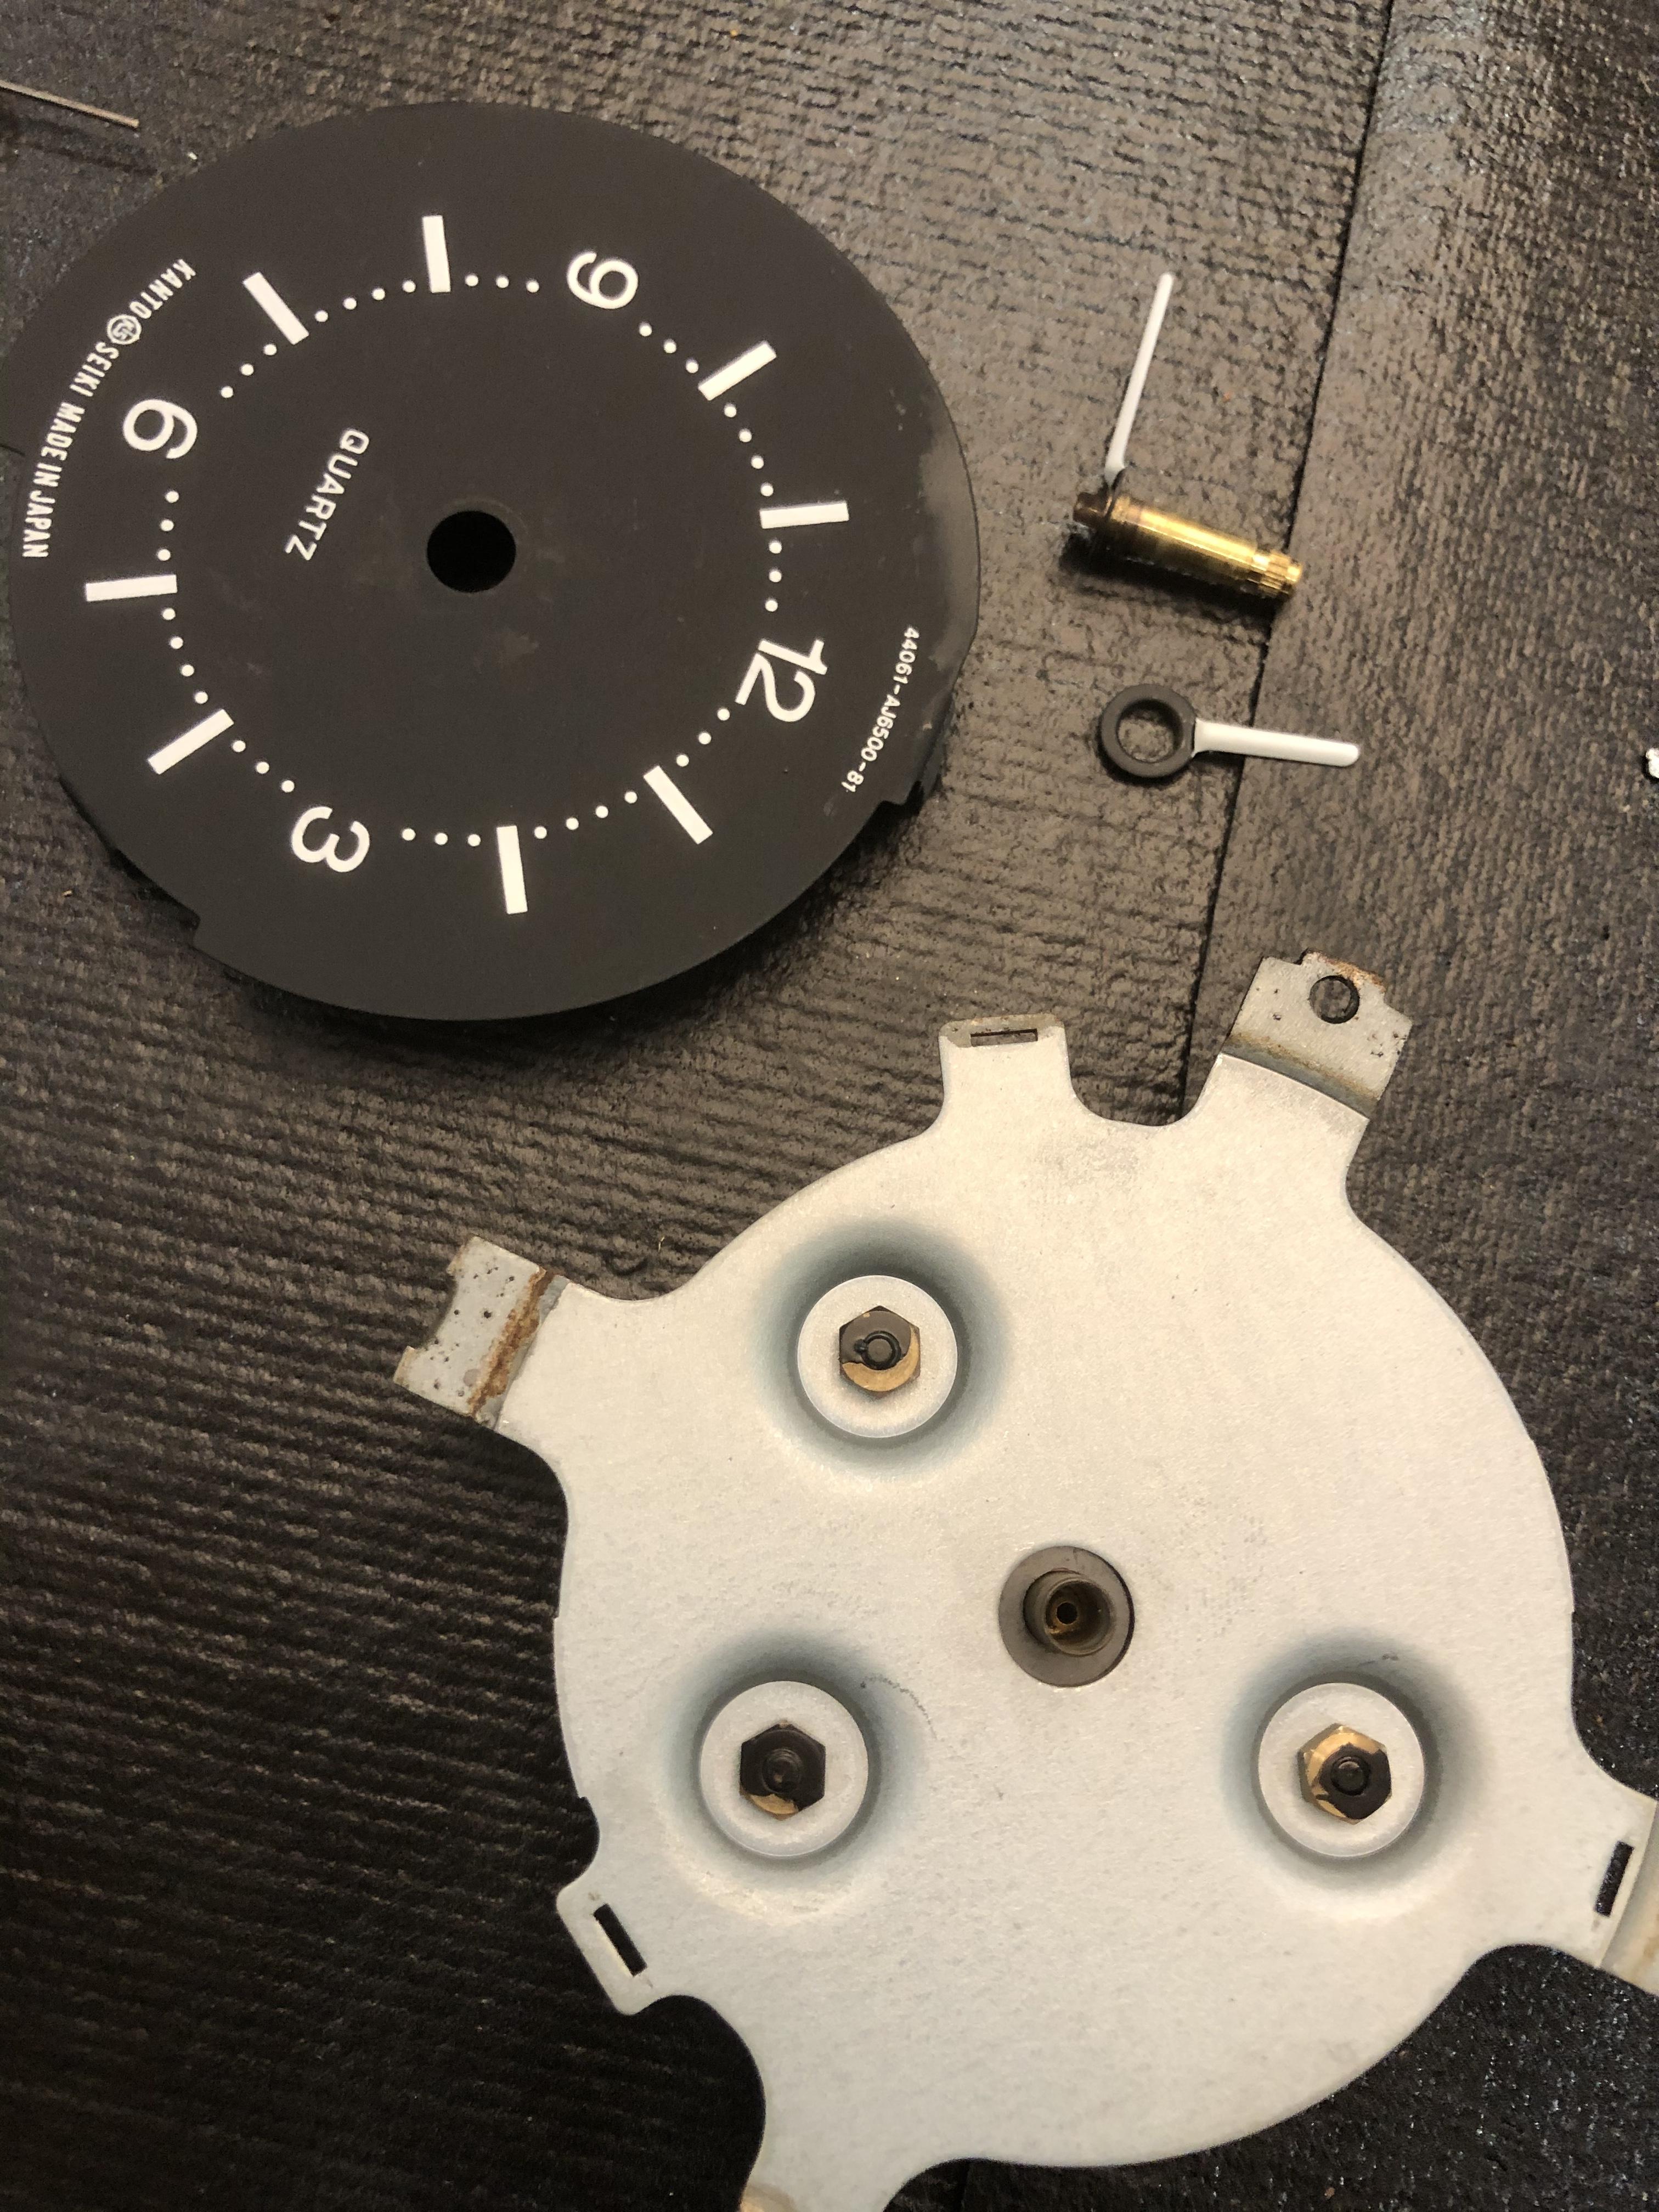
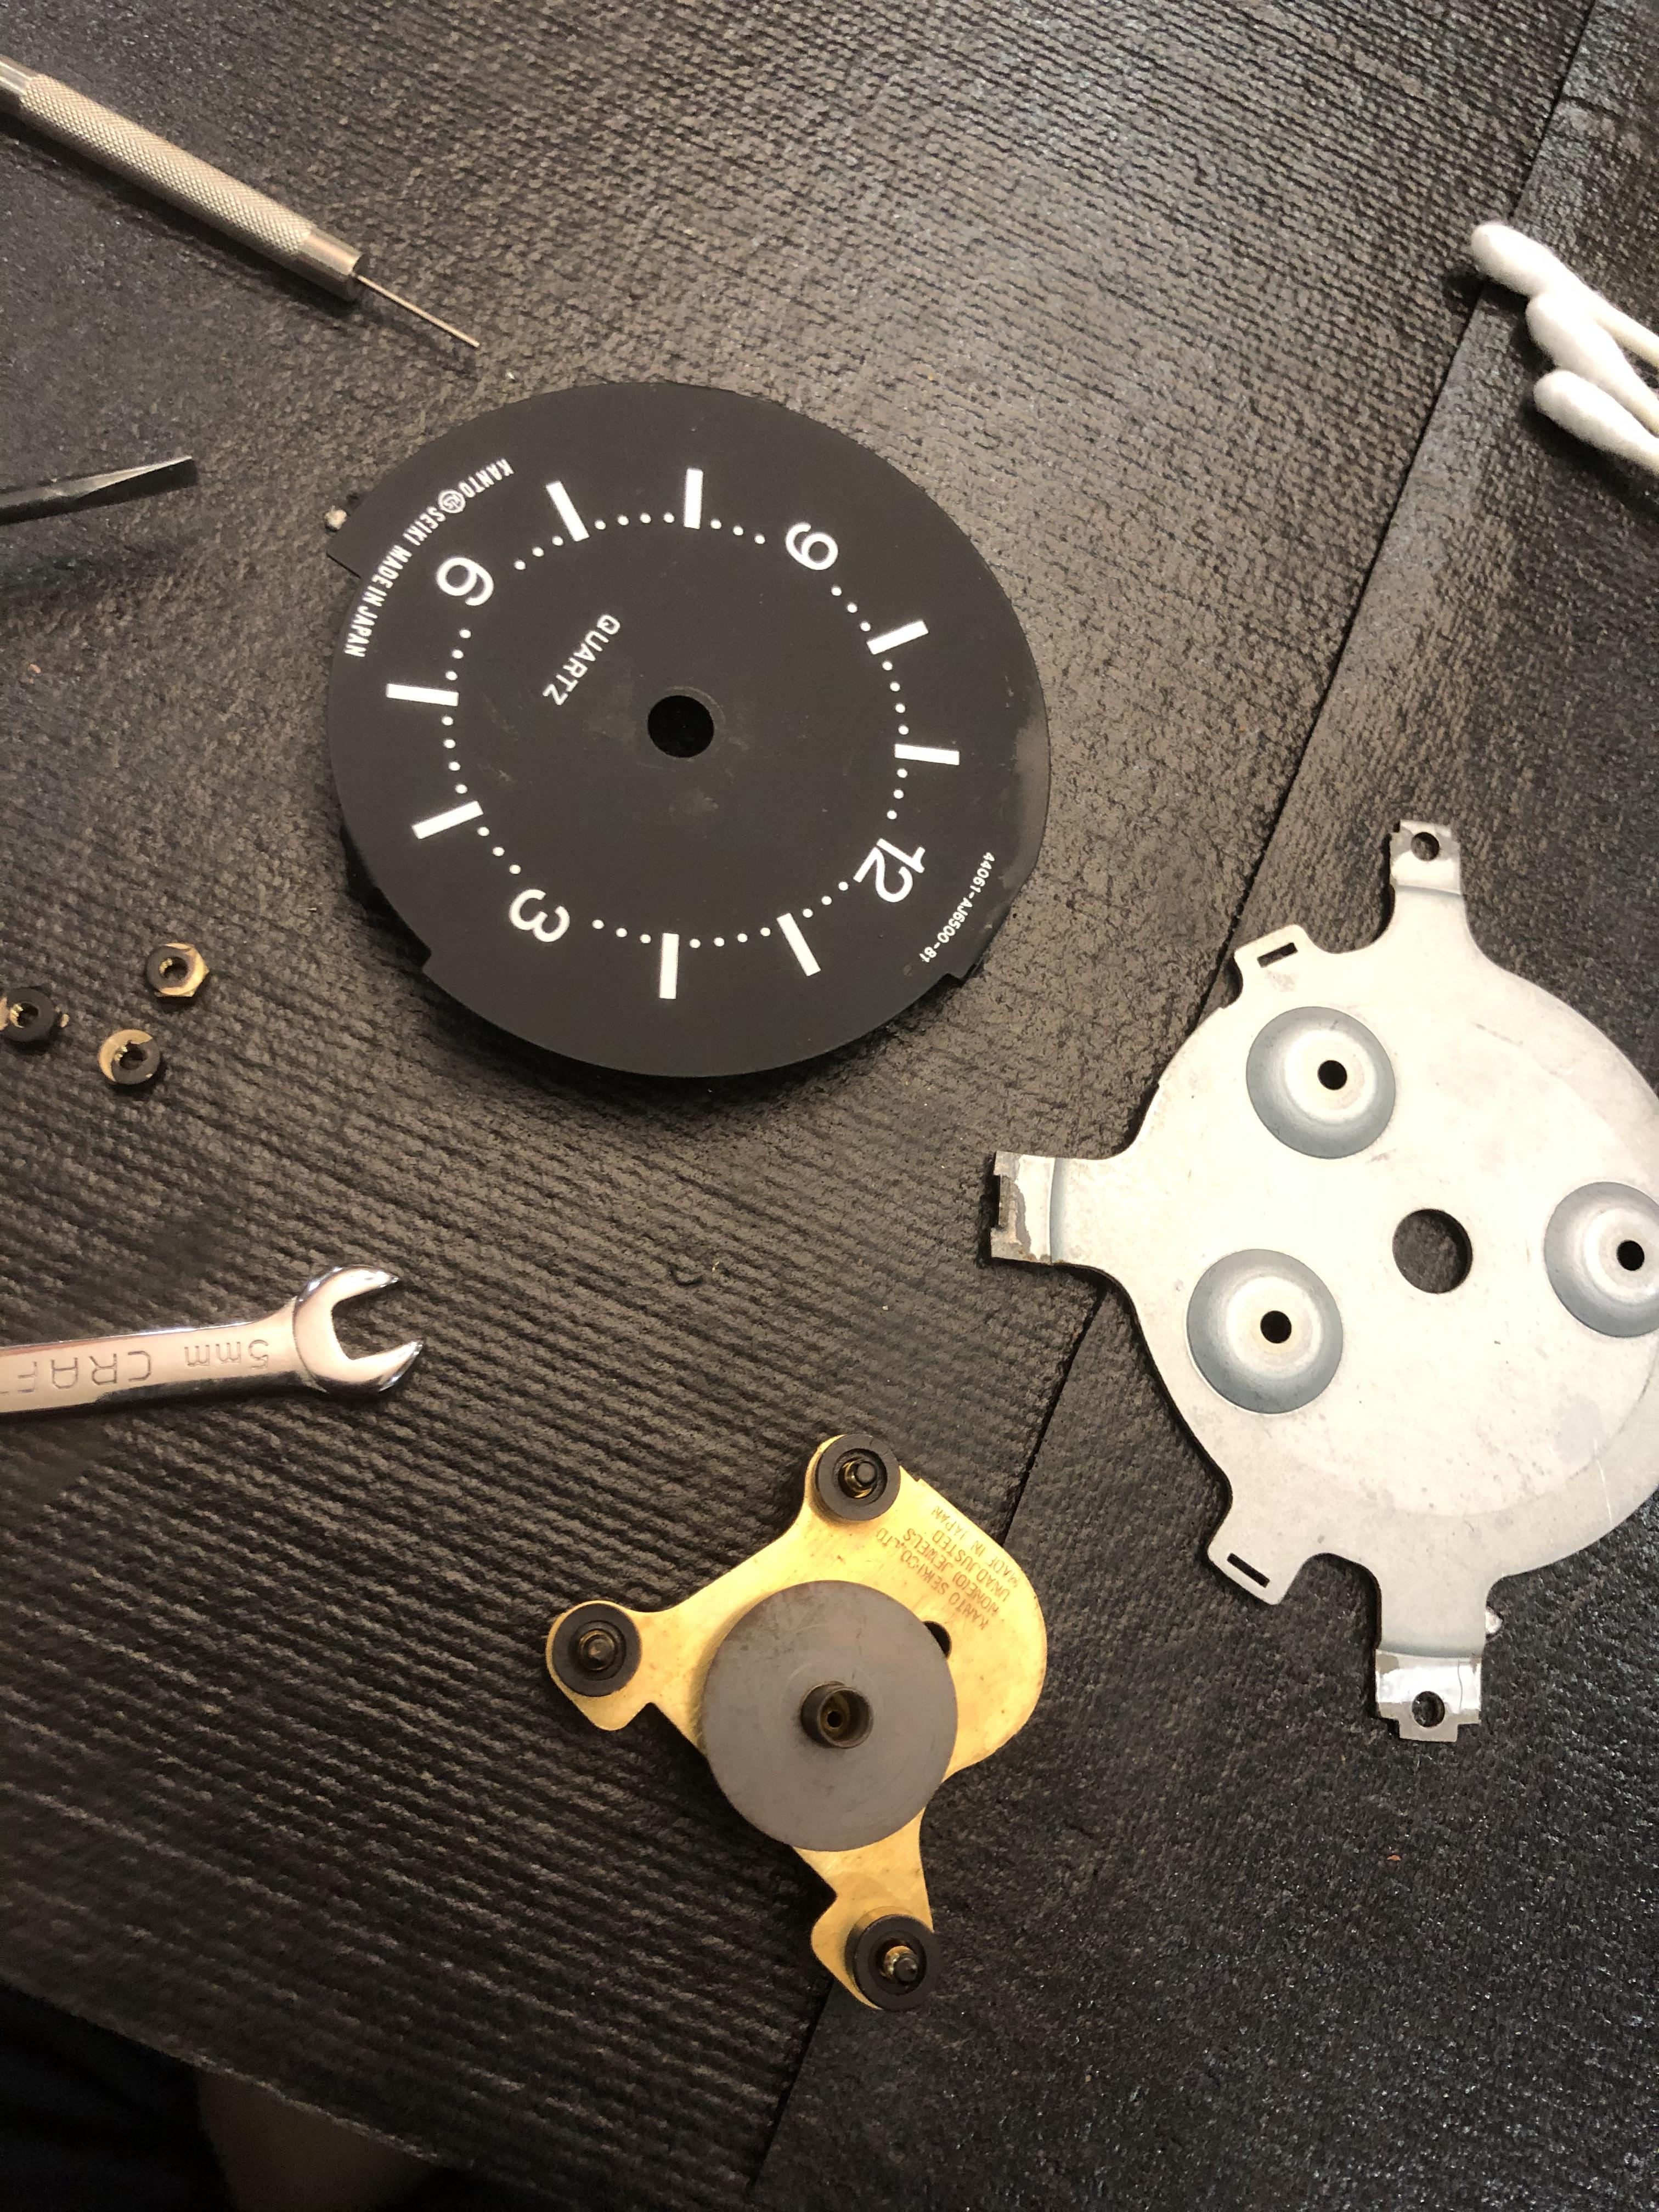
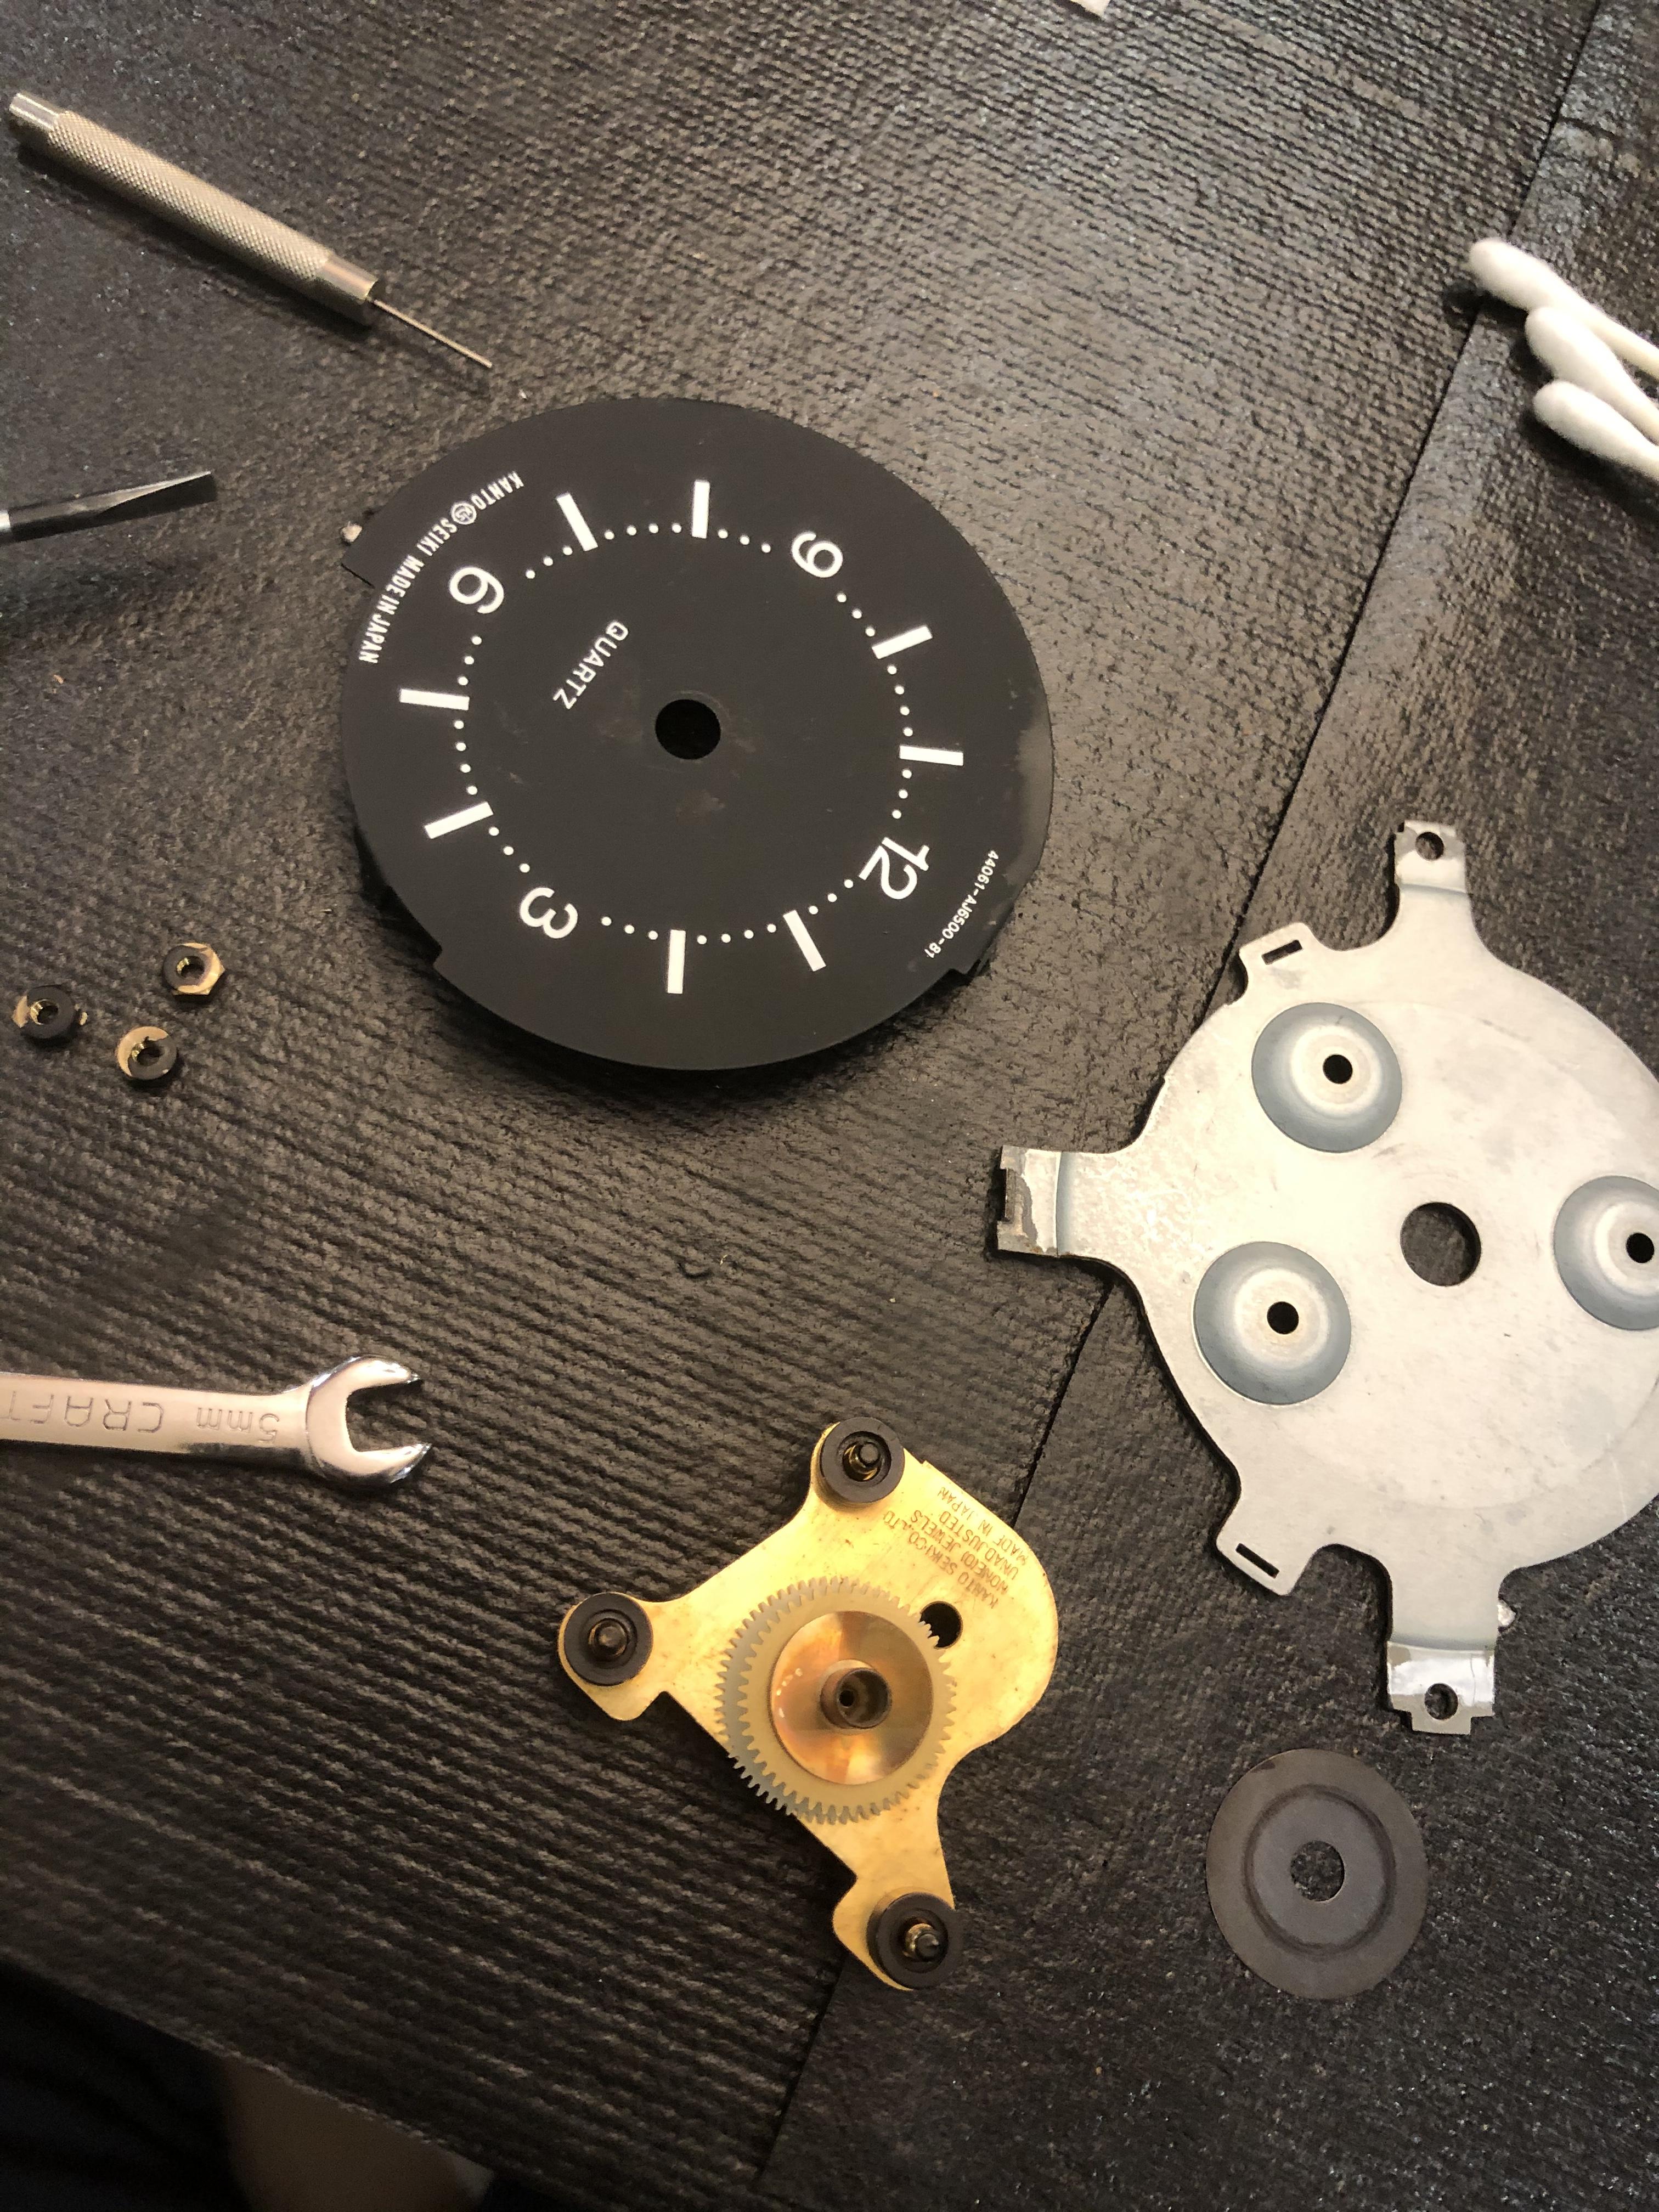
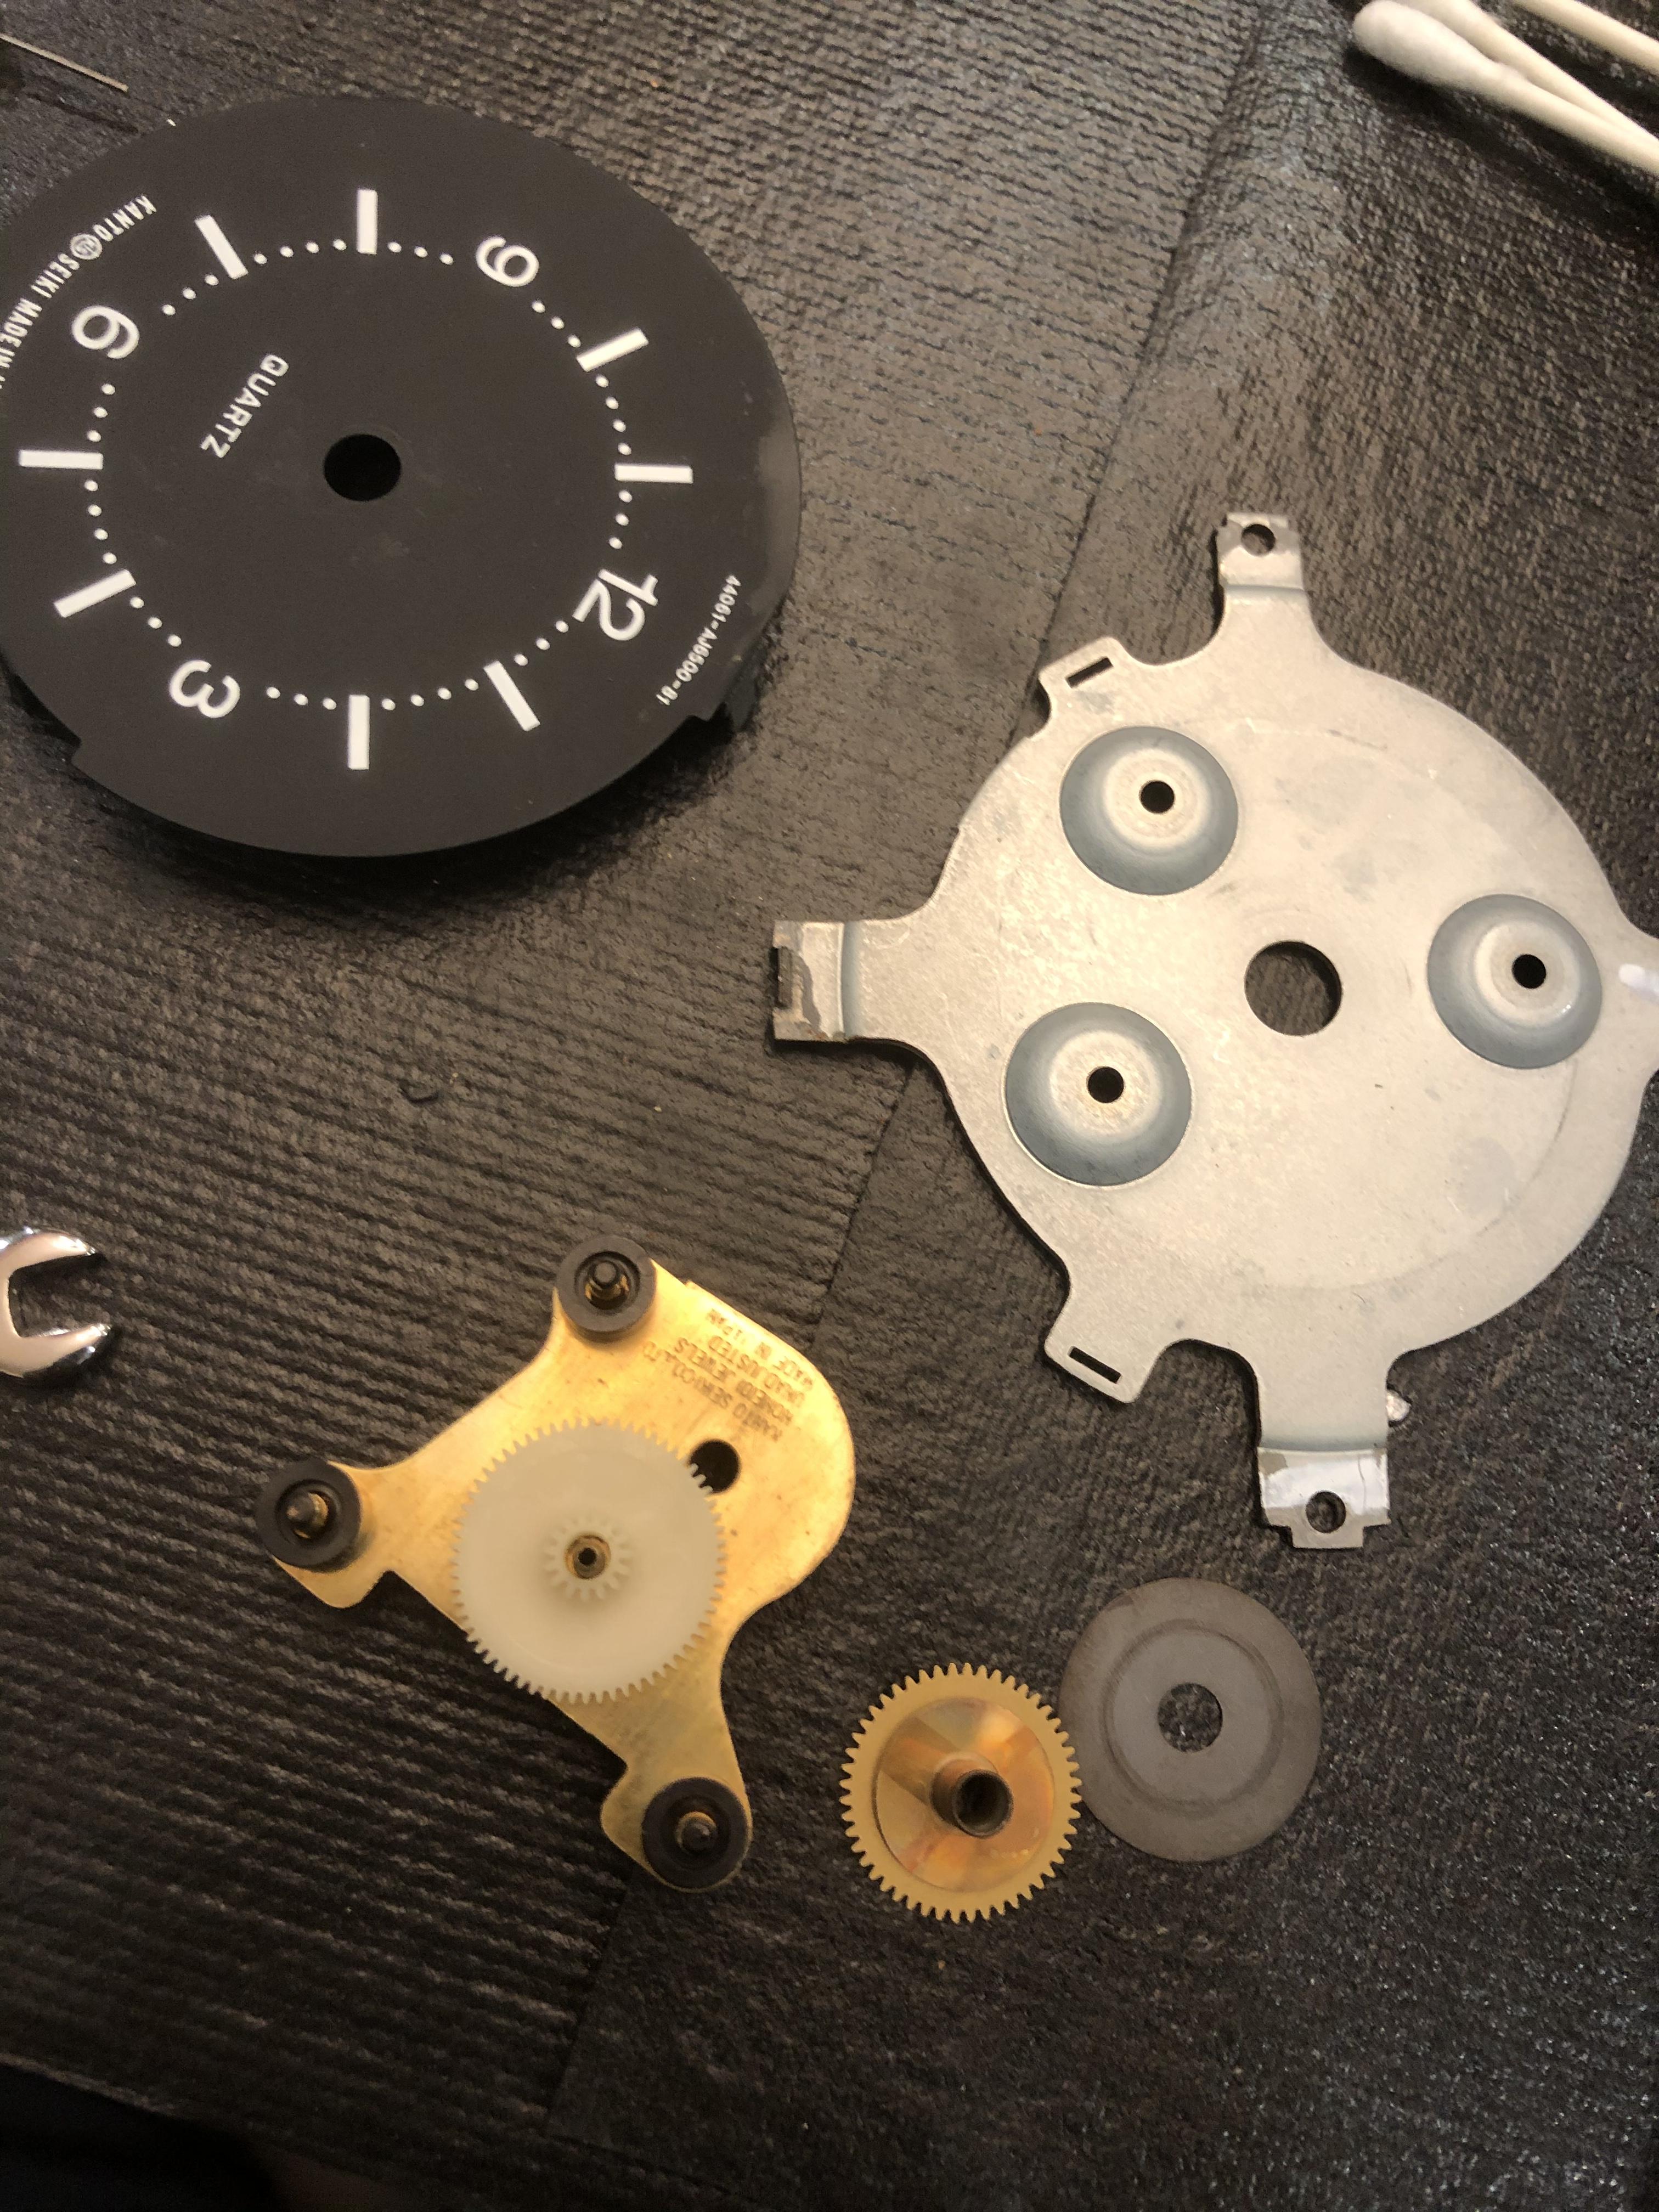
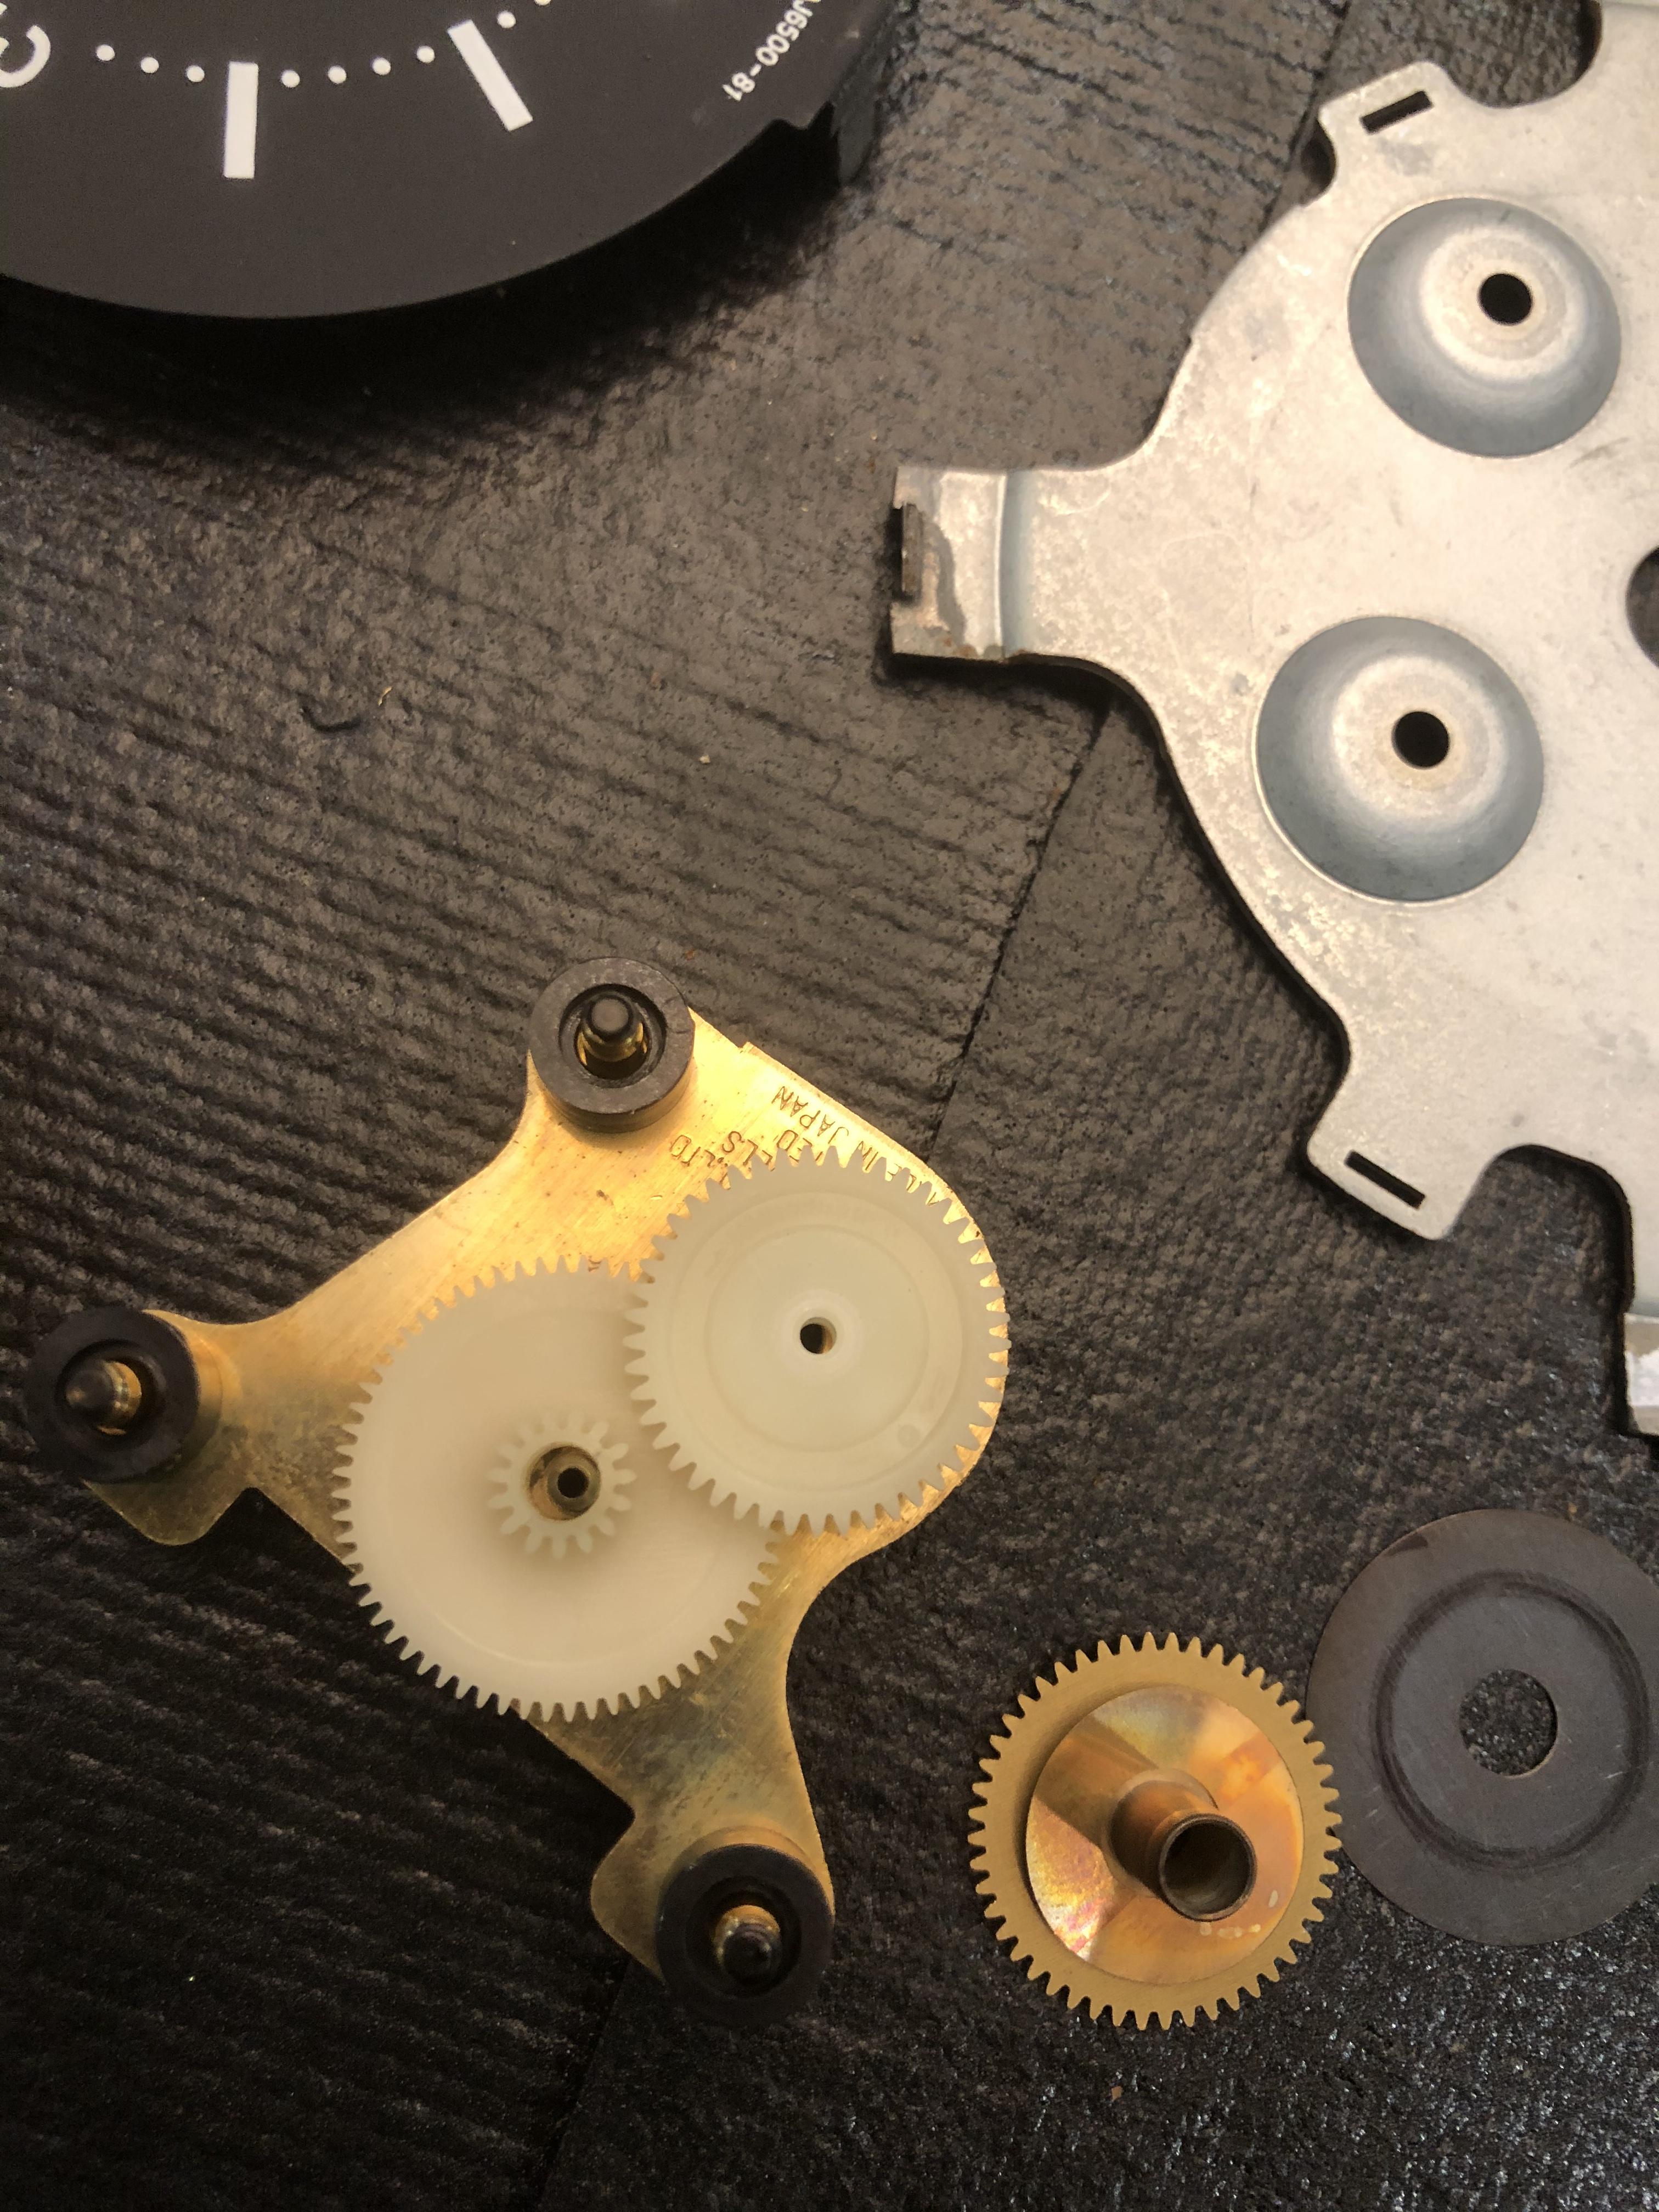
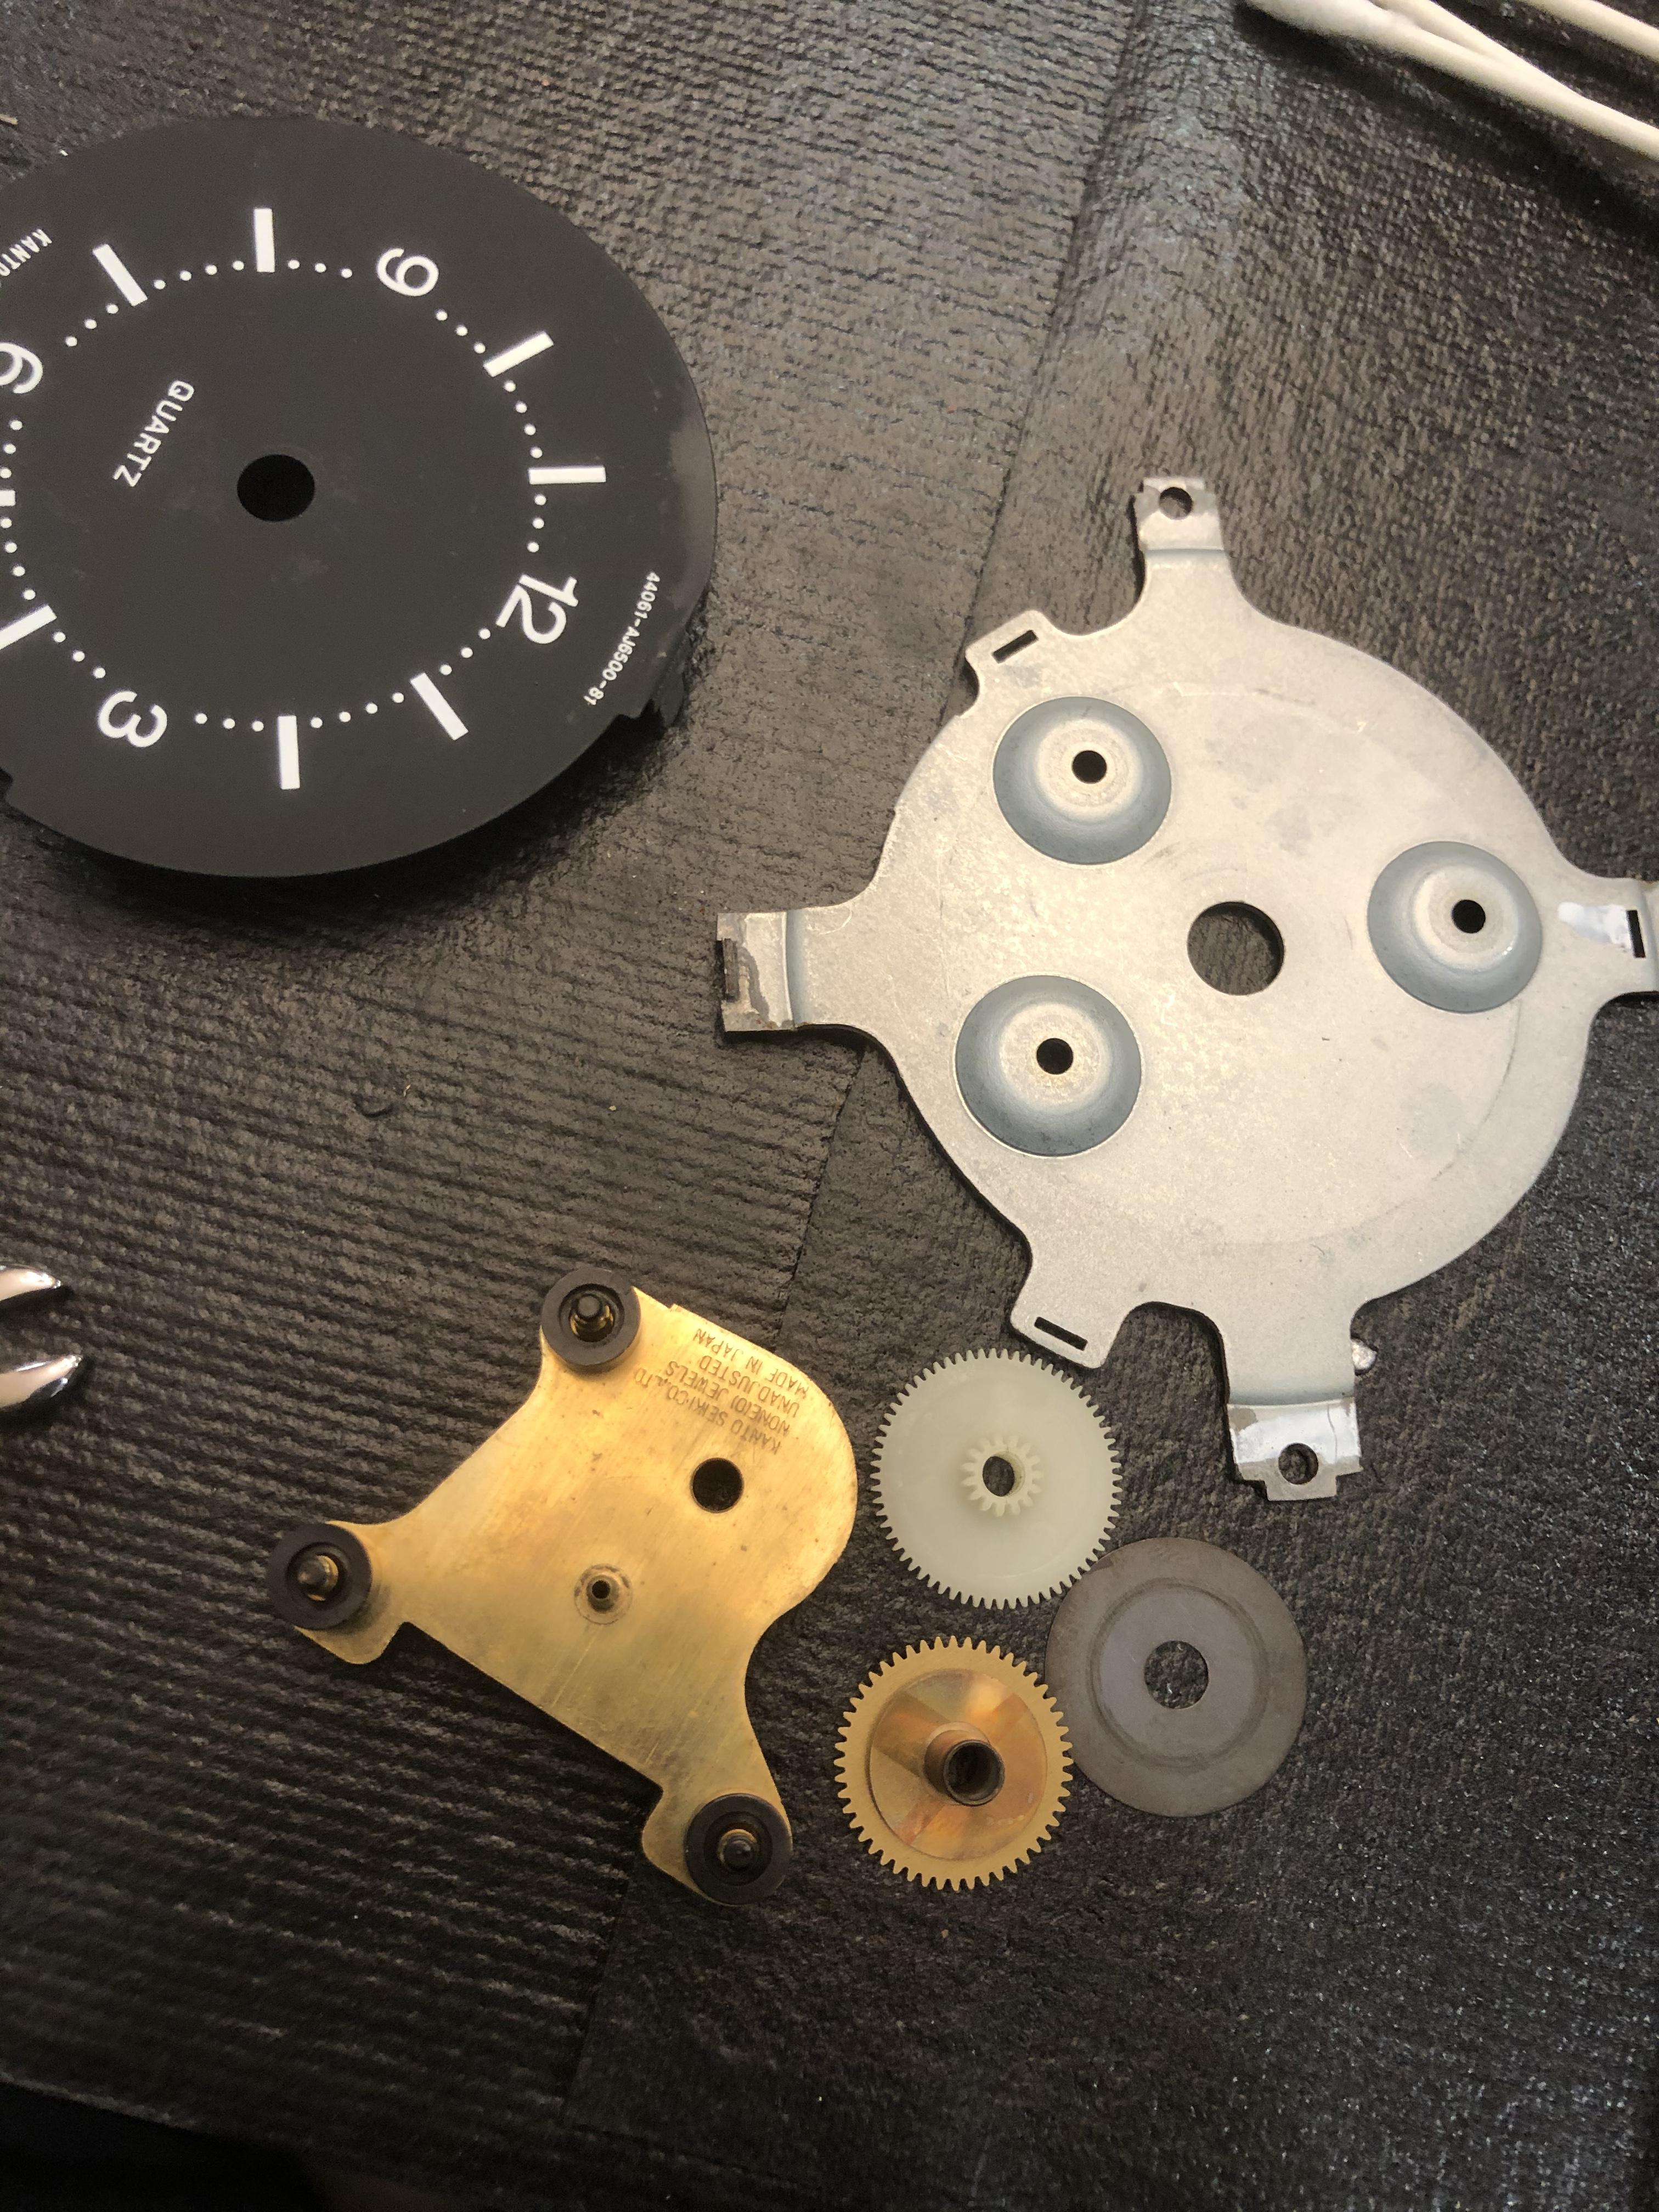
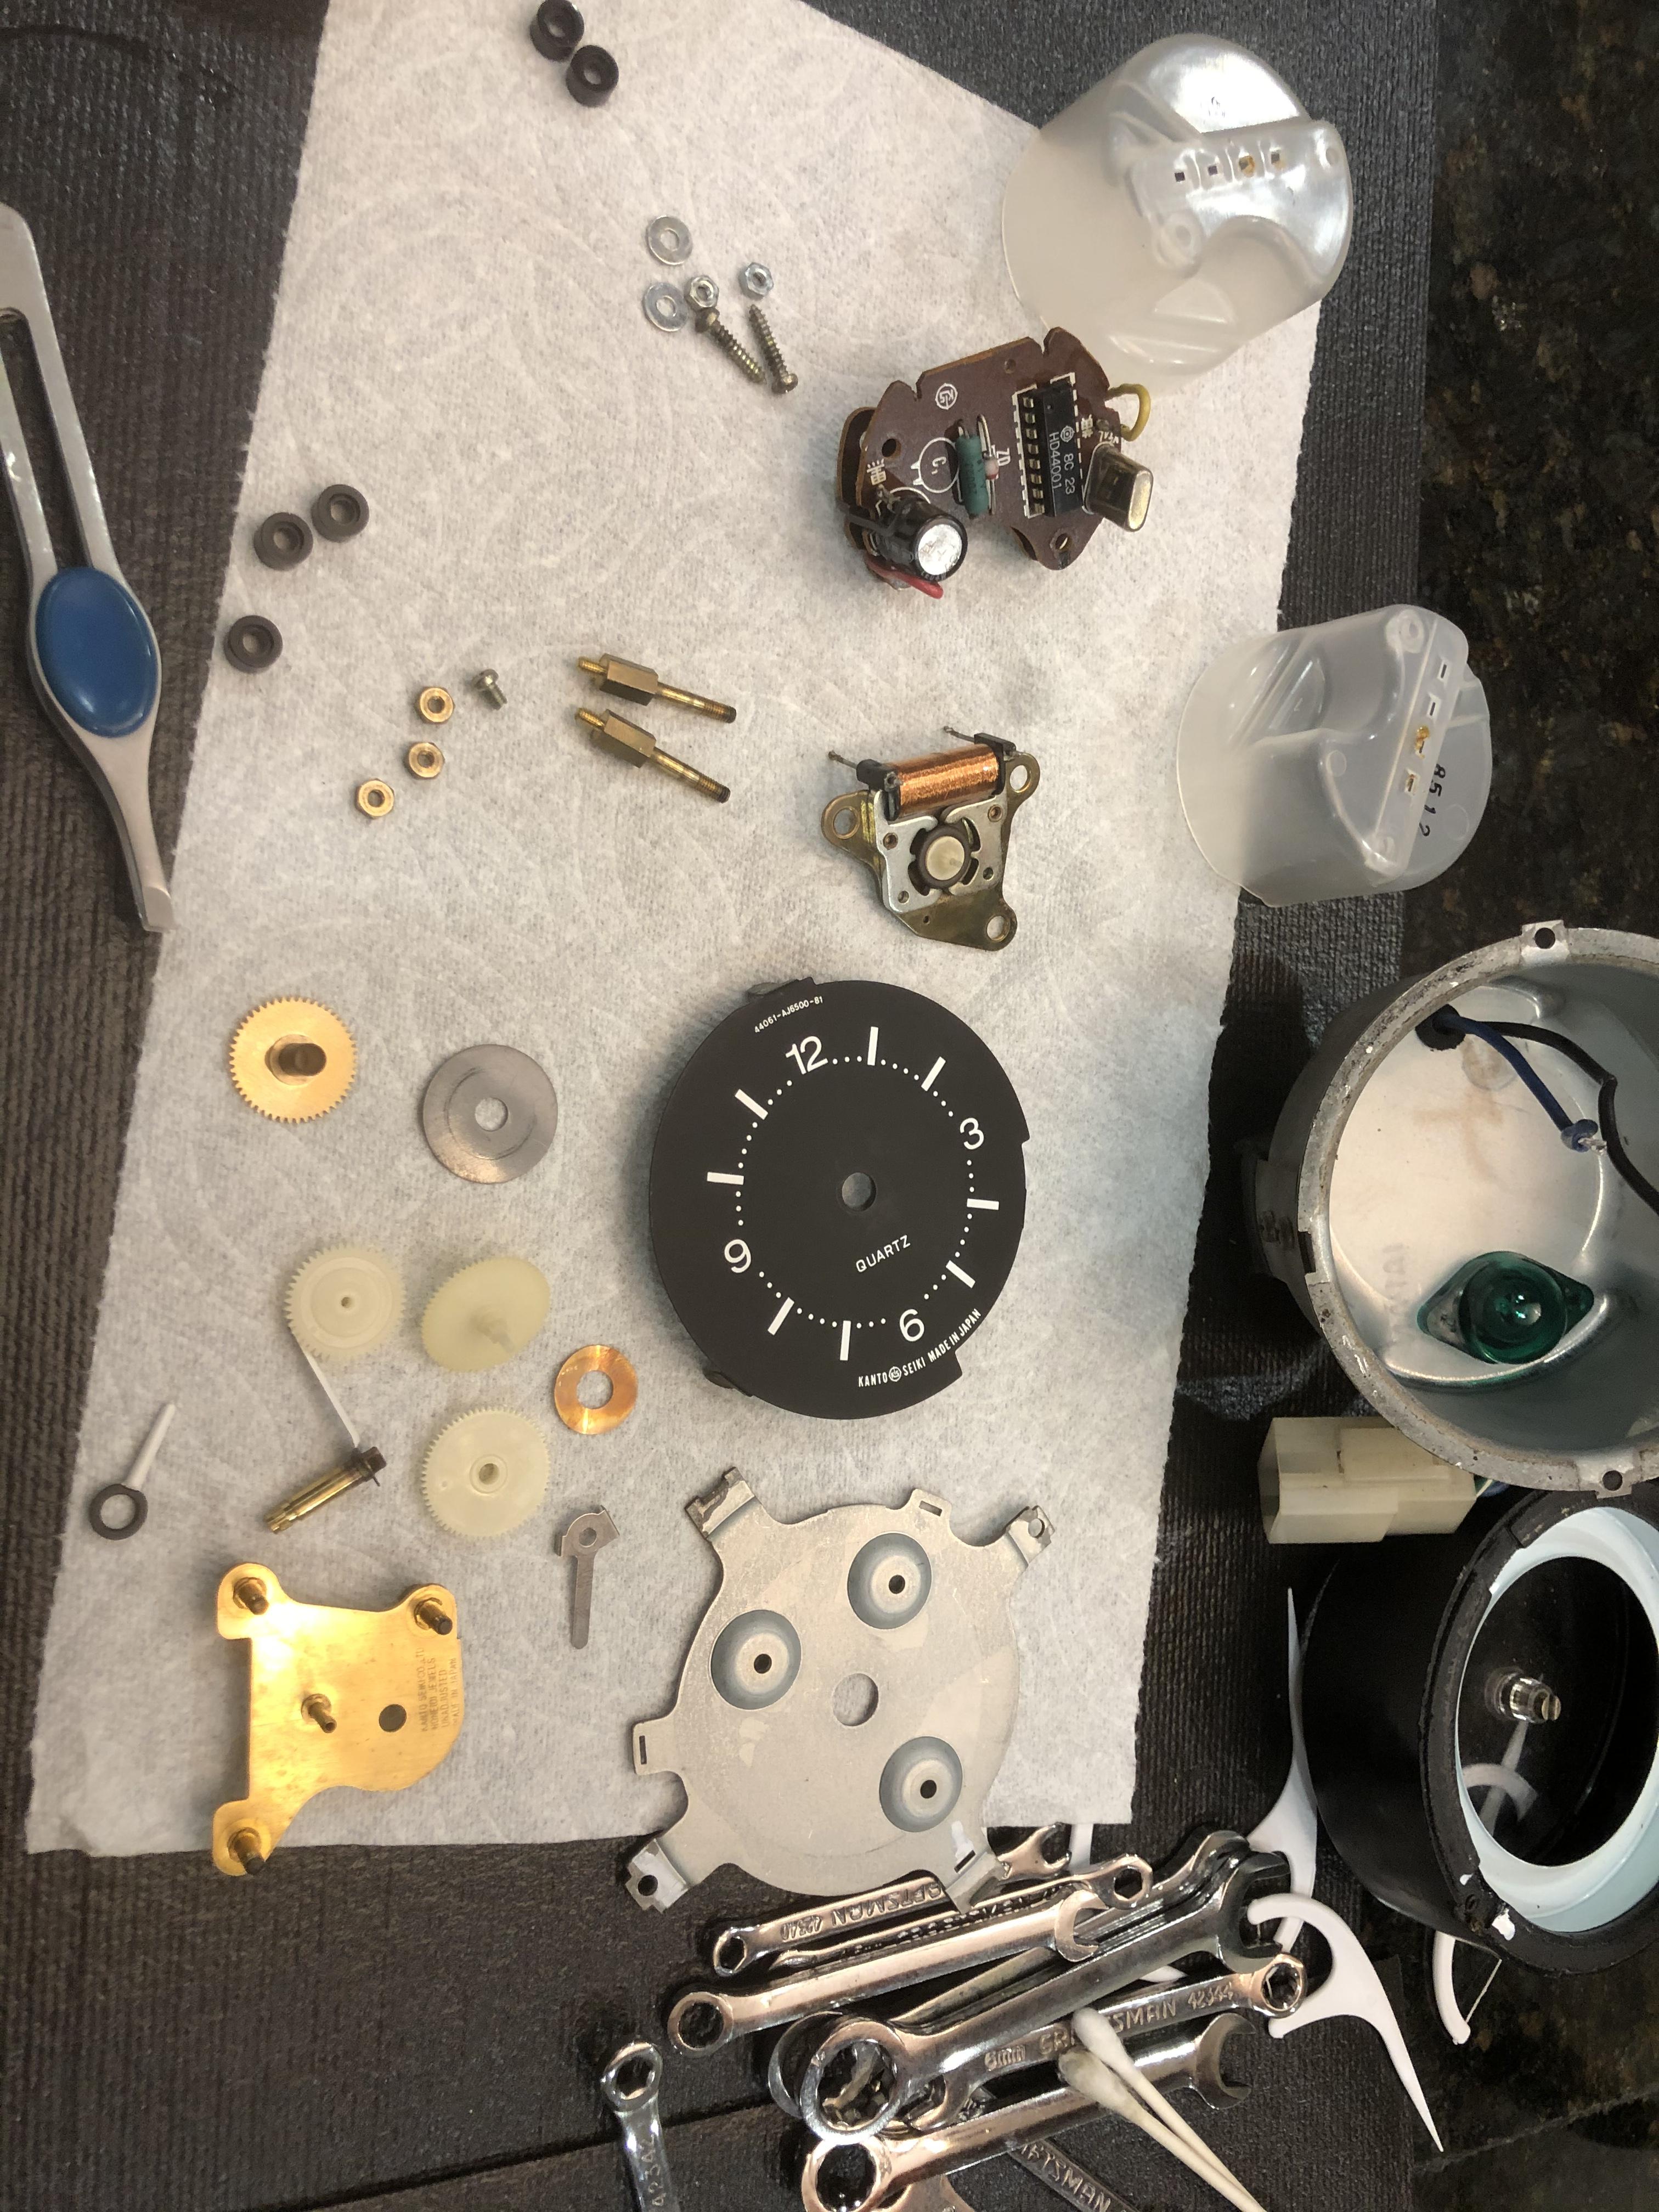
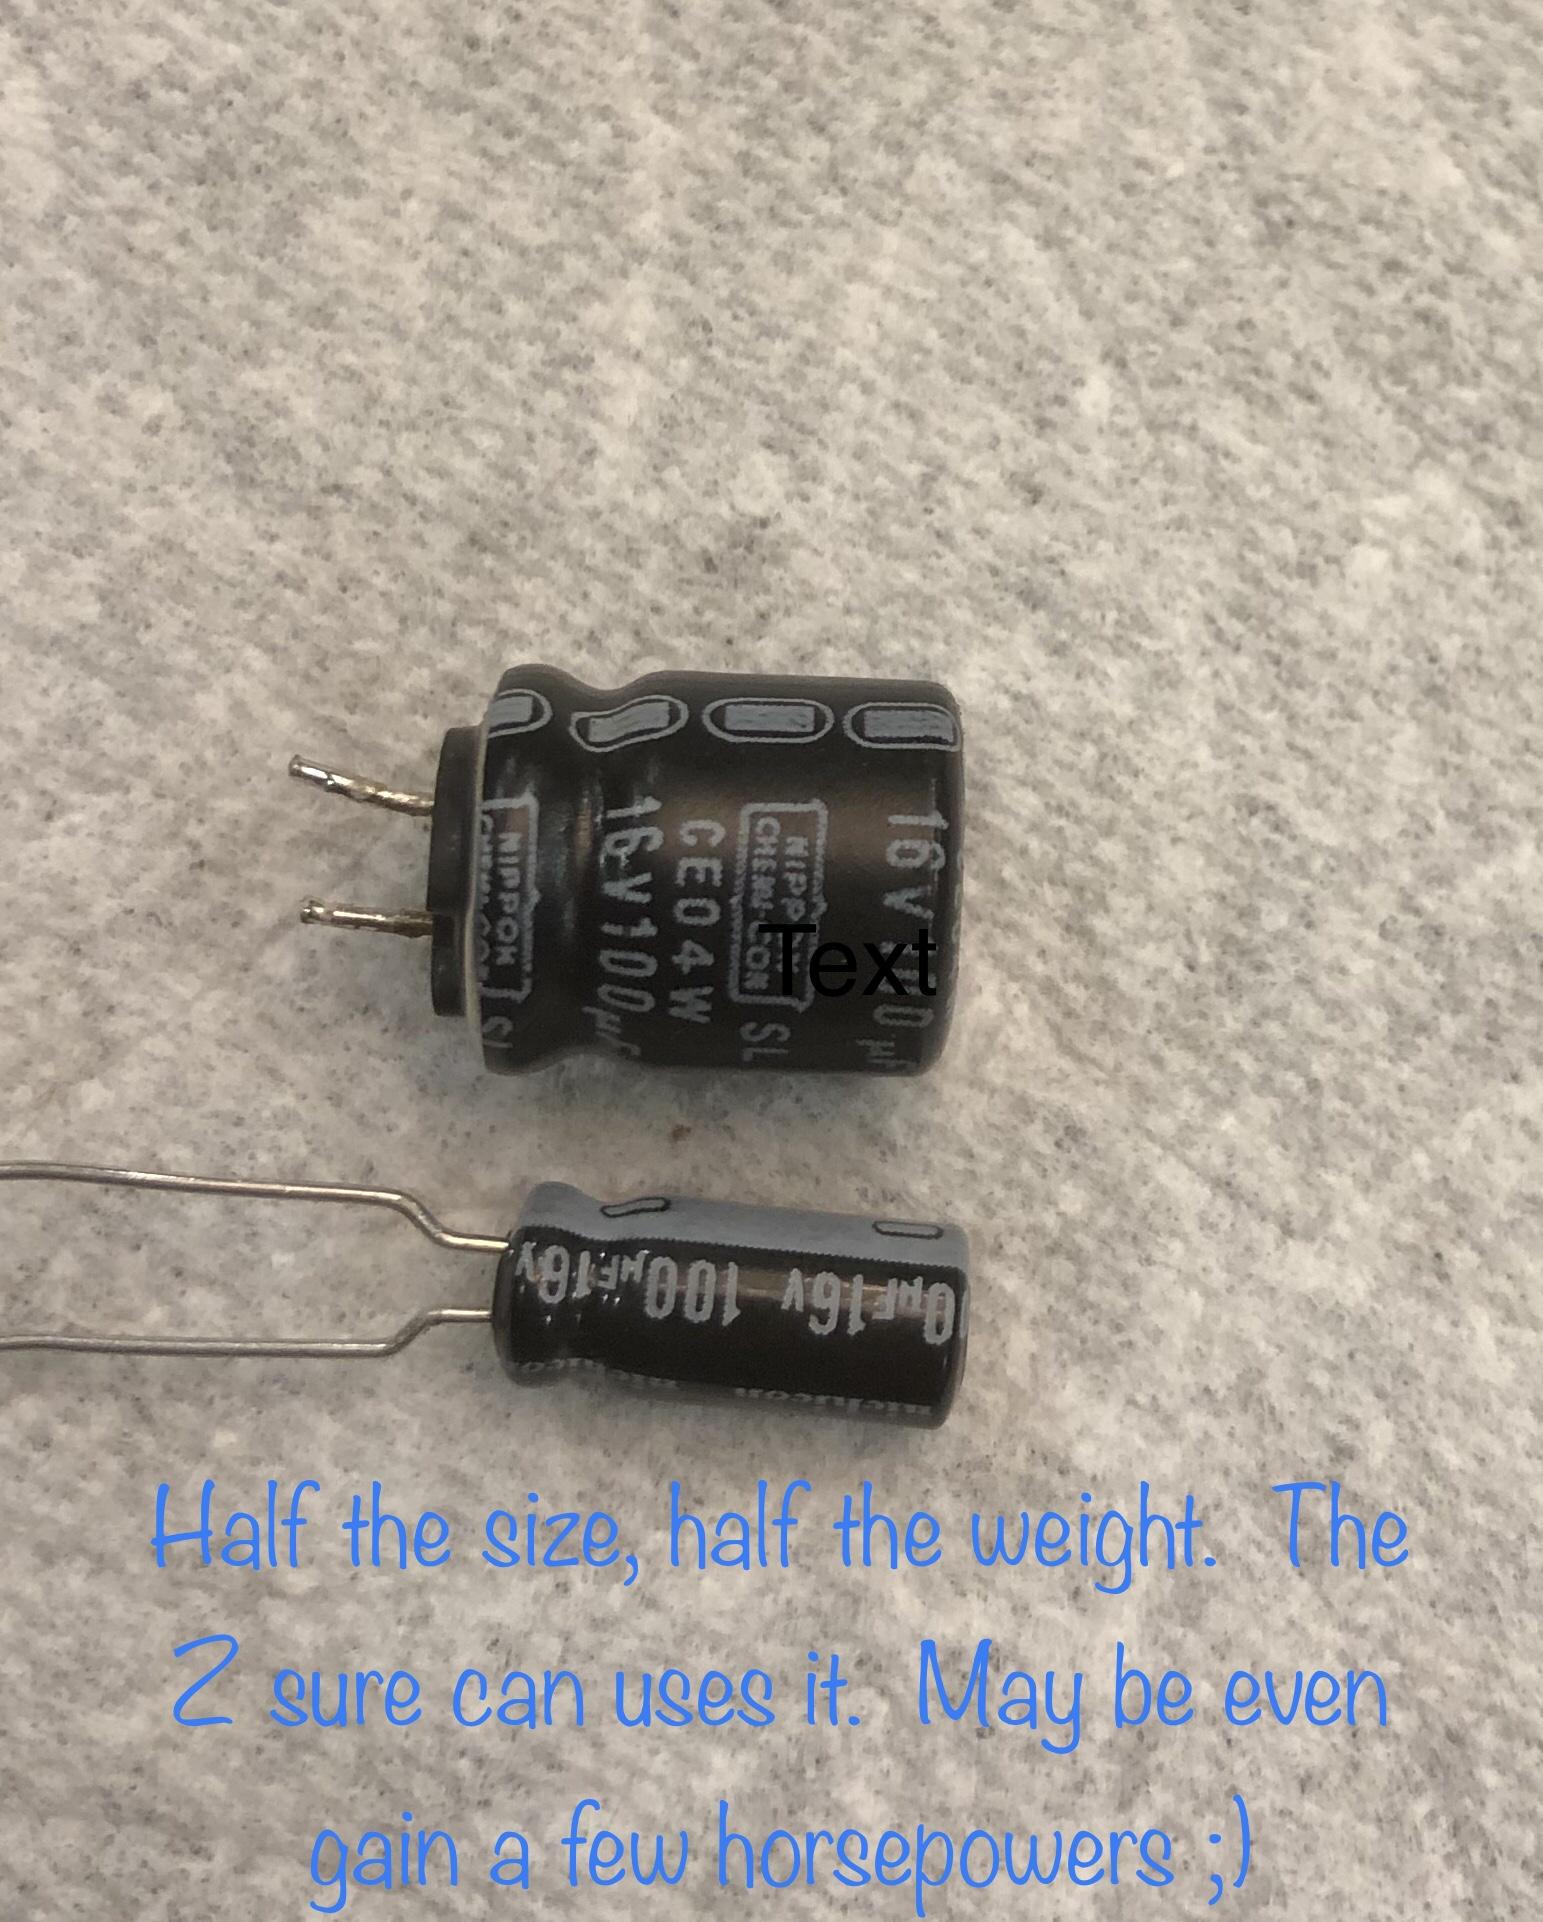
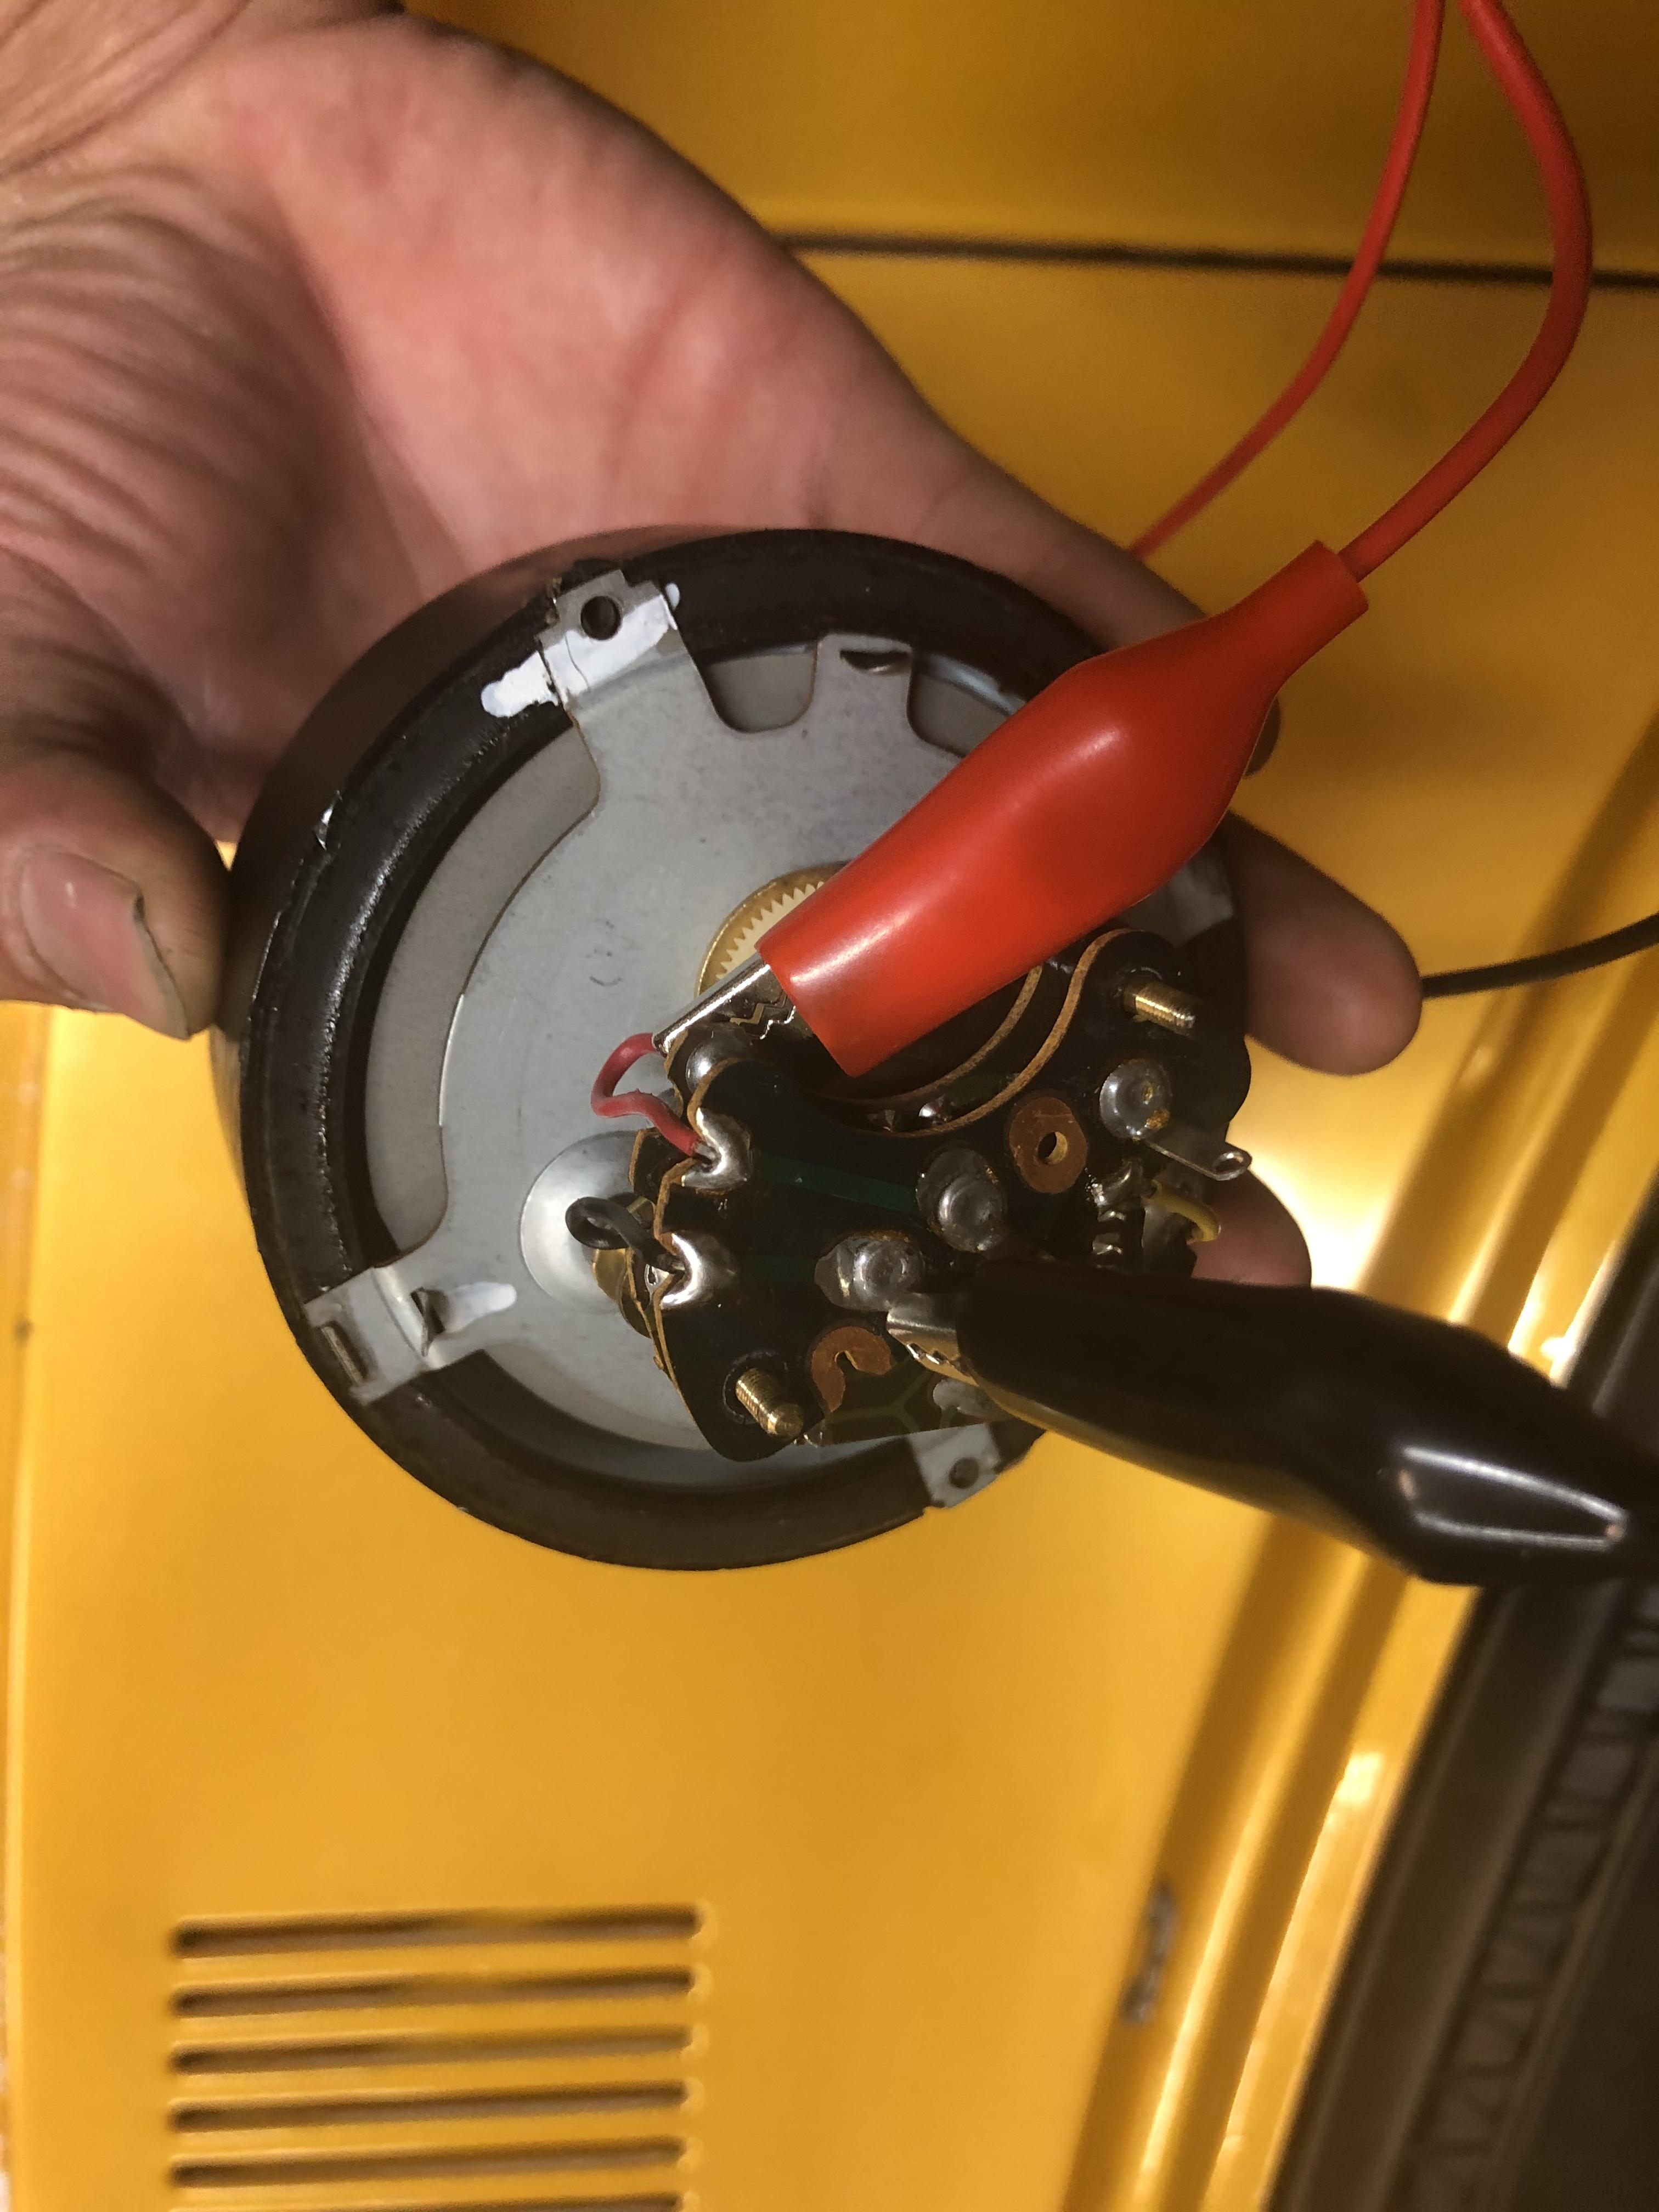
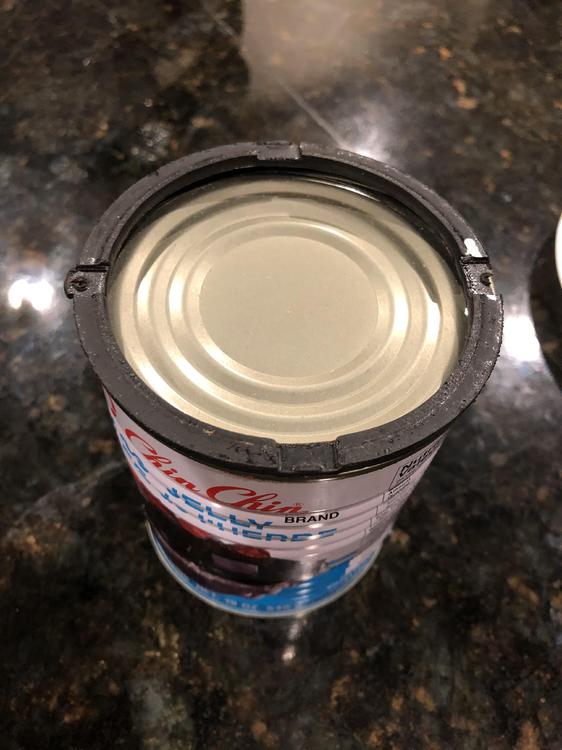
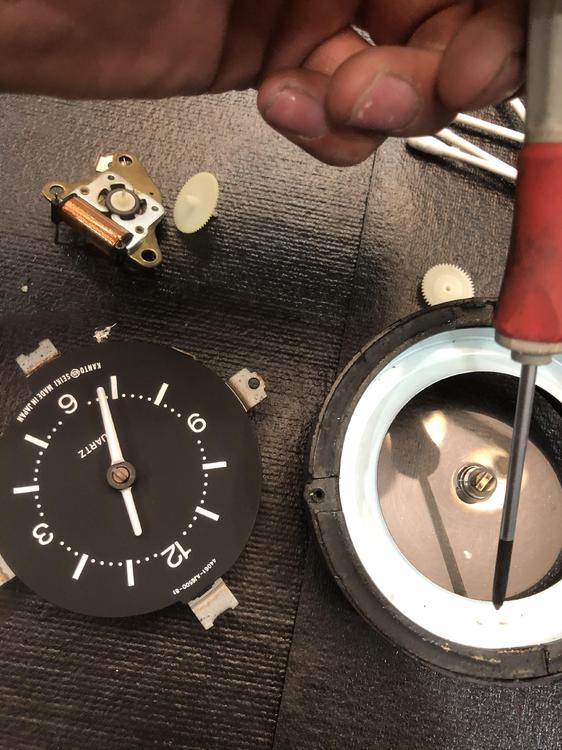
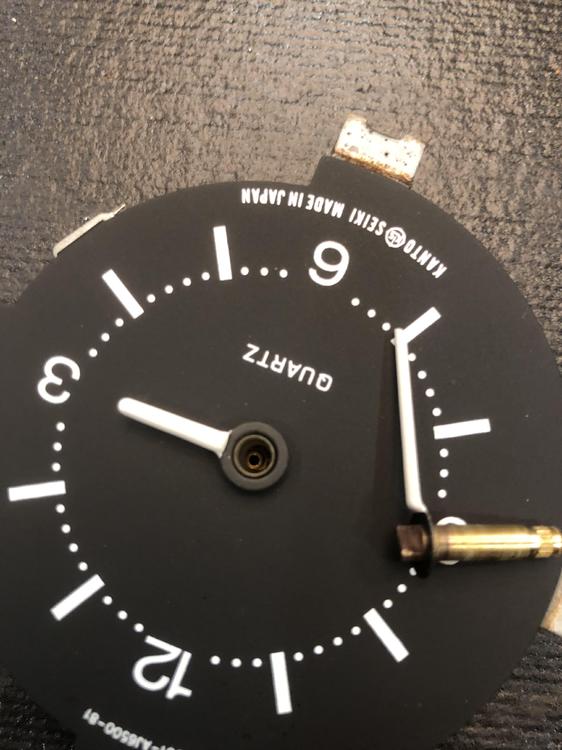
Hello all, I took a stab at a seized quartz clock. disclaimer: my first rebuild clock ever. Follow at your own risks. tools: - plier, smallest possible - white towers, a few sheets - q-tips, a handful - plastic toothpick with floss string. Put one in your mouth right now. You’ll need it later - screw driver - wire cutter - rubbing alcohol - 3 credit cards or o’reilly reward card - soldering iron - 5m wrench - punch tool for resizing your 18th birthday that your rich grand daddy gave you. It will be come useful later unscrew to get the main housing out. Push the black and blue wires in to make room. Use a bit of force to pry out as there is a rubber seal and stick firm together as it is 40+ years. Once remove, you’ll see black and blue wires soldered to the pin. Unsolder then and remove excessive soldering. Use 5mm wrench to remove 2 nuts and gently pull the white housing of the clock out. Take pictures, observe everything. Handle with care and wear gloves just coincident, I’m out of gloves ? unsolder the 2 pins that hold the coil and the circuit board should be remove easily. Set it aside. Observe and take pictures. Unscrew the 3 screw and a gear might fly off. Remember to take picture. remember the toothpick in your mouth? It is now come in handy. Bite down on it to control your strength and give you focus. You’ll have to remove the hour and minute hands to get the remaining gears out. Remove the clock hands is not the same as remove the spindle pins on the rear suspension. Don’t go to town with it. Use the punch that use to resize your 18th birthday Rolex. Make sure the pin SMALLER than the hole otherwise you’ll damage the hole. See photo. Bite down the toothpick and give it a gent tab. Hold the clock on the side, not the face. the minute hand should pop out. If the punch key is too short, get a smallest cotter pin or similar and try to push it out. the hour hand is a bit tricky as you have to pull it out from the clock face. Get 3 credit cards or the like. Stack up and use a flat screw driver to pry it out. Be gentle don’t bend or scratch the paint. It’s going to be tough to touch up ? after that, remove the 3 screws from the body and remaining gears should fall out. Again, be-sure to take photos along the way. You’ll need it to put back together. use denatured alcohol to clean gears. Use q tip and toothpick for the gear teeth. once done, reverse the order. one thing I made a mistake and gave me a hell of a time to put back in. I think it will be easier to put all the gears back in first before putting the hour and minutes. I fiddled awhile to align the hands. I think it should be 12 o’clock for ease of adjustment. I think at least I misalign a tooth or 2 as it is true 12. while I was at it, I replace the capacitor with same value. The new one is smaller physically than the original one. The Z need or the weight los possible. Perhaps even give it a boost in power due to the lighter clock. thats how I did it. I don’t know if it is the right way to do it. It seem to work and will let it run over night to see what happen. I do not have the equipment to see if replaced the capacitor make any difference. regards -


-
@Captain Obvious when you work alone all by yourself... the car is simple but there are just so many little things. It’s overwhelming and overlooked stuff. Part ignorance, part just rushing through and omit stuff. As you’ve notice on the brake issue, I’m so bless having such folk with a wealth of knowledge. A second pair of eyes/ears/hands definitely a good thing. regards
-
@AZDatsun sound like a good plan. Keep us update please
-
that's the only way to learn sir. At least for me any way. Try to use all my senses. "Curiosity kll the cat"! Don't get kill though. I was looking at this awhile back. Looking very good. Perhaps waiting for winter to get both AC and radiator hoping the new promoted marketing director saw a slow in demand of these items during winter weather and give a huge discount ? I can wish, can i! .https://www.oreillyauto.com/detail/b/murray-heat-transfer-4283/cooling---heating-16773/radiator-20386/radiator-11357/02ac48565f9e/murray-heat-transfer-radiator/433634/4459519/1977/nissan/280z?q=radiator&pos=0
-
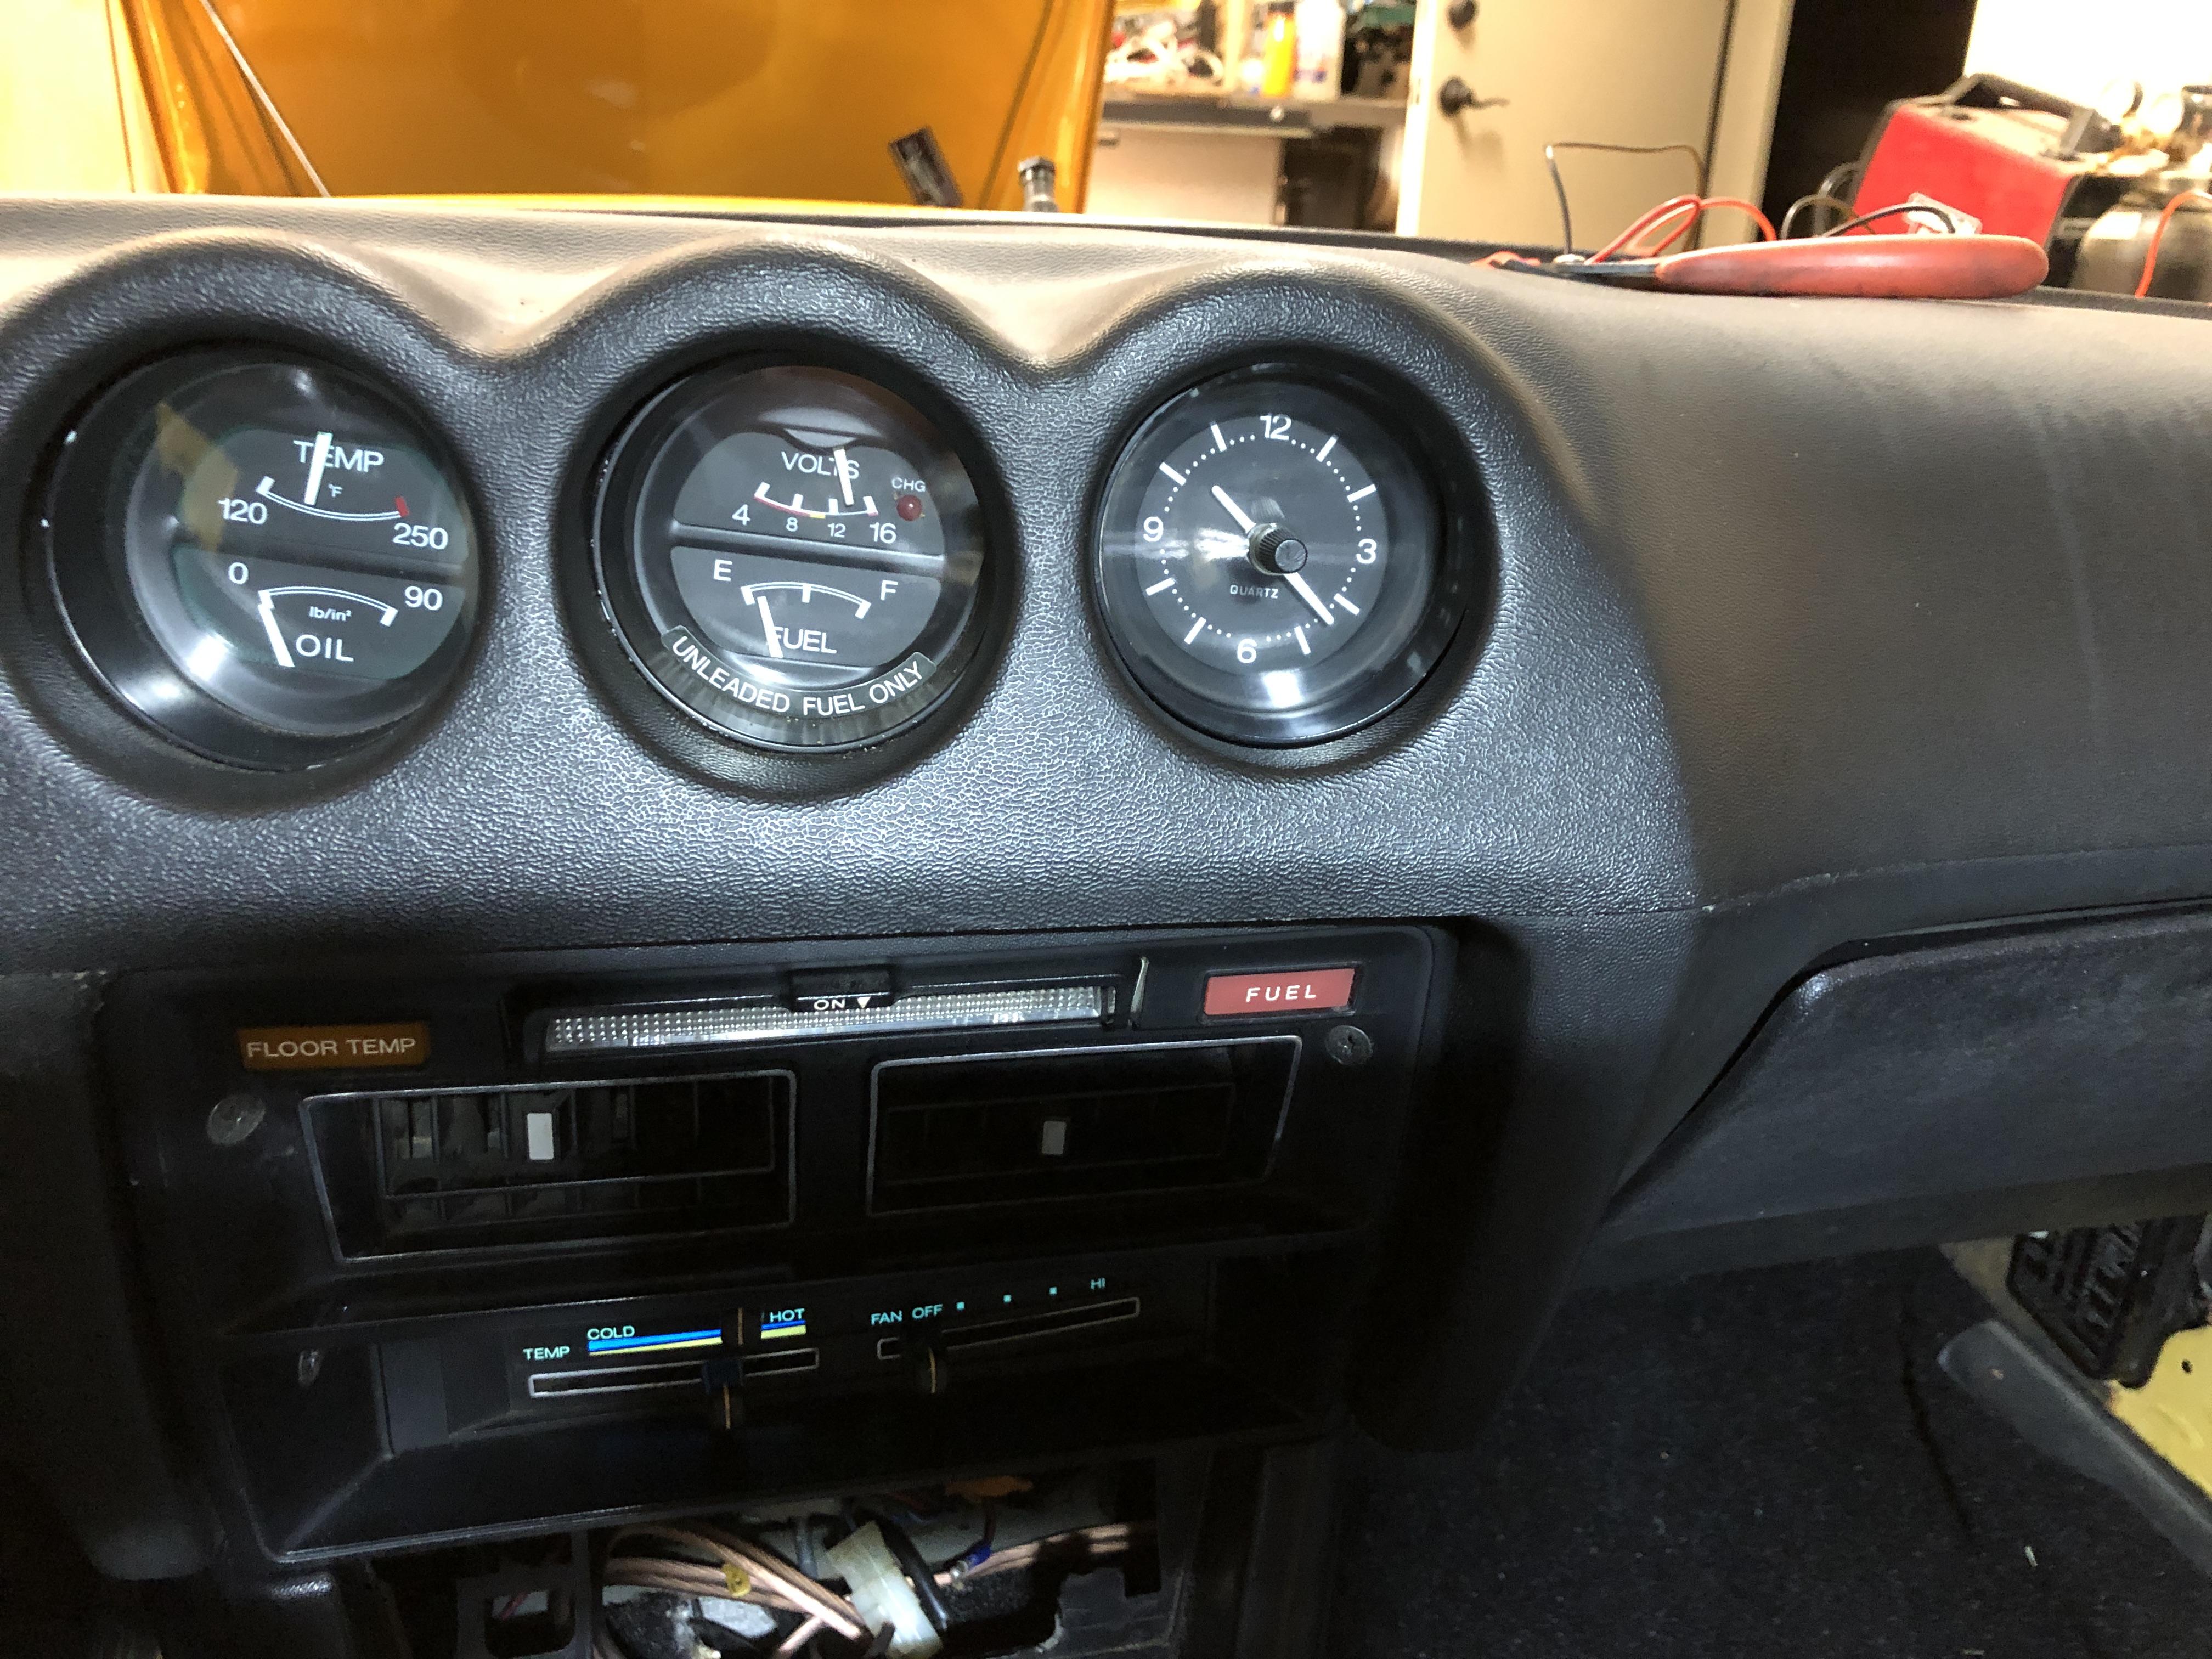
Look inside the radiator has not of white calcium/scales. The fins has a few damage probably something was caught in the fan blade. I drove around the neighbor for half an hour and the temperature gauge's needle is right between 120 and 250. I figure, probably 180, 190. I see lot of people put the 3 rows aluminum. I'm sure it is much better than the stock one but to me, it looks ugly. I think there is an after market selling for $300 or so. I'm not there yet. This AC will take a long time I afraid. Worse case, there is always outside air ? or use this during traffic jam economical and environmental friendly!
-
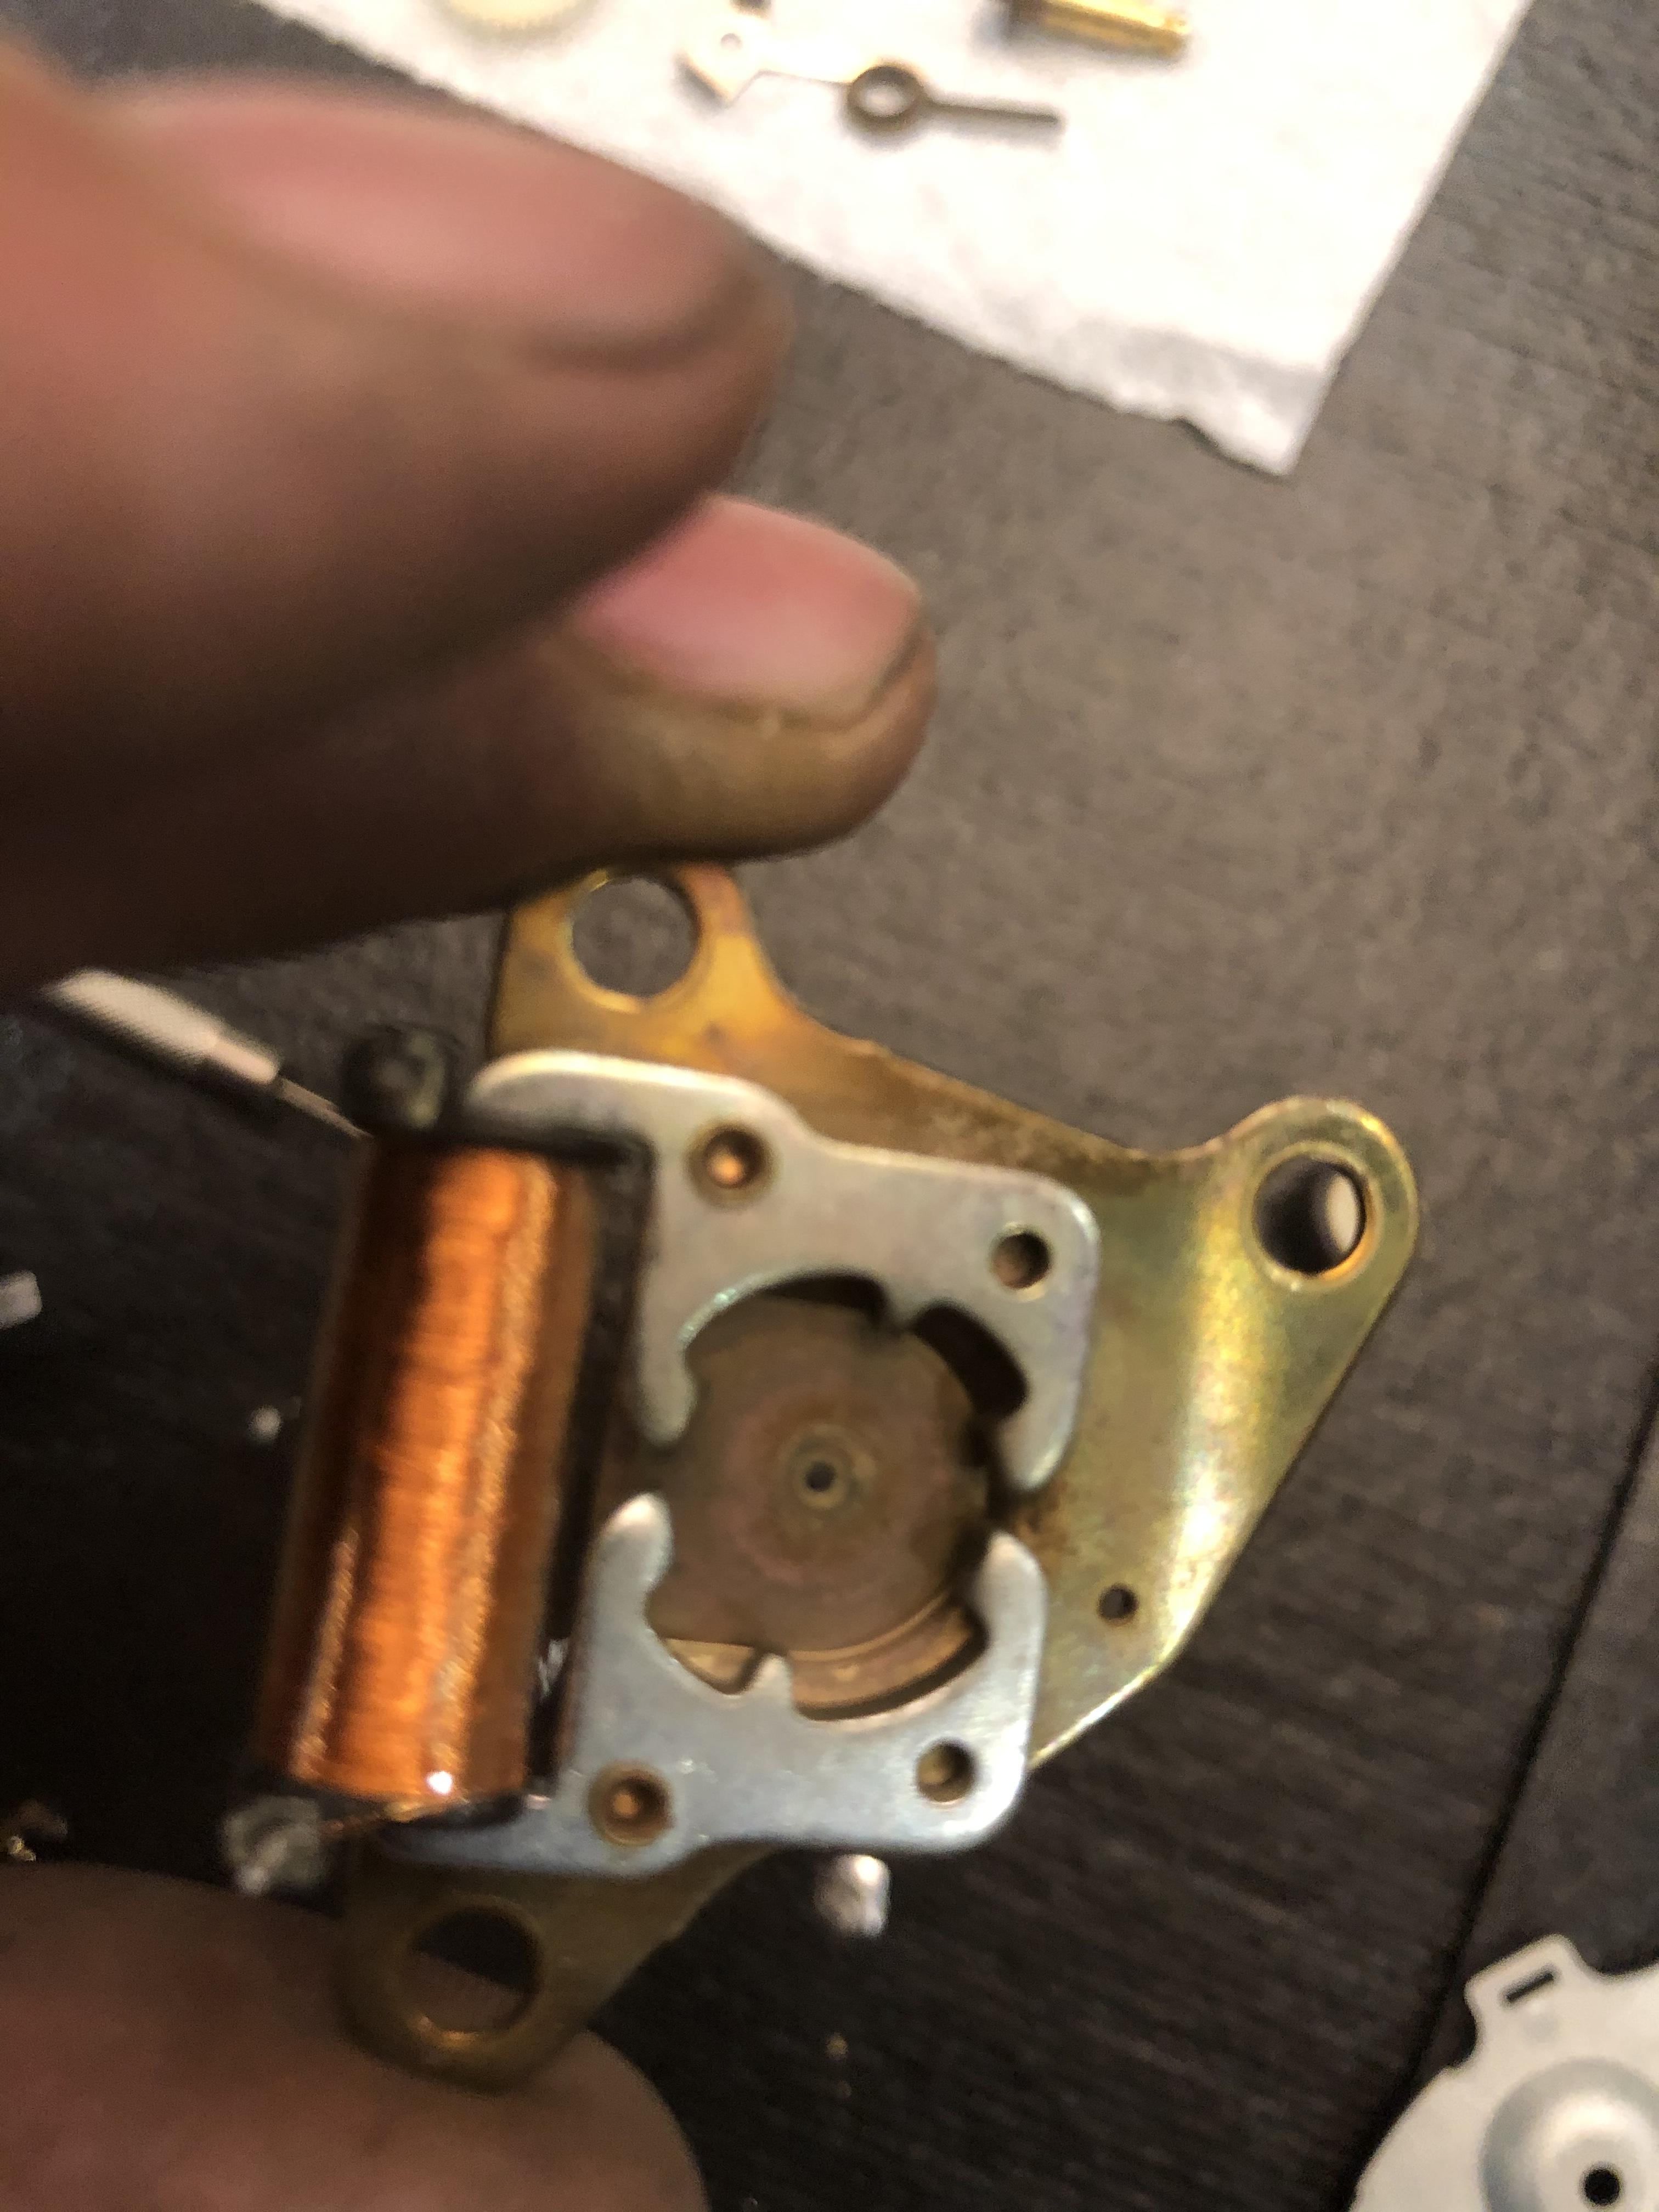
Hi @zclocks thanks for the info. Yes, the coil wires on the original clock are like hair width. So tiny I thought initially was dust or something. I did hook it up and seem like it tried to move but couldn’t. Figure capacitors should dried up after 43 years. I had a few capacitors on my other projects. Though the capacitance are the same, the voltage is 25volts I think. Replace it and see what happens and it did turn smoothly. But only face down as I believe the magnetic bars are heavy and it doesn’t have enough power lifting up, if standing up right. about the quartz, the teeth were very “scorched” sound when trying to adjust. Common sense so I thought, put some sewing general purpose oil to lube the gears. It helps until I read your other threads that denatured alcohol is the only thing needed to clean the gears. So much for common sense eh. For consolation prize, I didn’t put wd40 or worse engine oil or grease ? i have not open it yet. There are so many gears so tiny and I don’t have proper tools. this will be another great experience that I want to learn. Glad to hear mechanical is the only issue I should tend to, though daunting task nevertheless. my toolsets are heavy duty like hammer, torch ... compare to delicate tool for the watch. At the end of this experience, whether I get it working or not, I’ll learn how to be patience and detail. Worth the efforts. Any pointer you can give is greatly appreciate regards
-
All I read is $$$$ and more $$$$$ appreciate everything you said. I will try least $ first. Grease elbow is no problem. Worse case, leave all windows down and the windshield hasn’t install yet. Might keep it uninstalled. It’s 95 degree today and I feel great having resolve the fuel light issue thanks to you and other folks
-
anyone use this kit? https://nostalgicac.com/datsun-240z-260z-280z-compressor-upgrade-kit.html
-
Hi @Dave WM I don't know the condition. The car sat since 2004. I didn't ask the previous owner. My bad. though the belt was loosen from the compressor. Figure it wasn't working for awhile, that why the belt was loosen up. I strip the car down nut by nut, bolt by bolt to rebuild the engine. When I opened the hose/condenser/compressor ... oil/refrigerant still there. I thought It was dried up but I guess still some left. I have the SWP123 as well. Seem to be in decent shape. It is mounted to the car now. Wonder how do I check to see if it is still working. about replacing the whole thing in the engine bay. that will cost a pretty pennies. regards
-
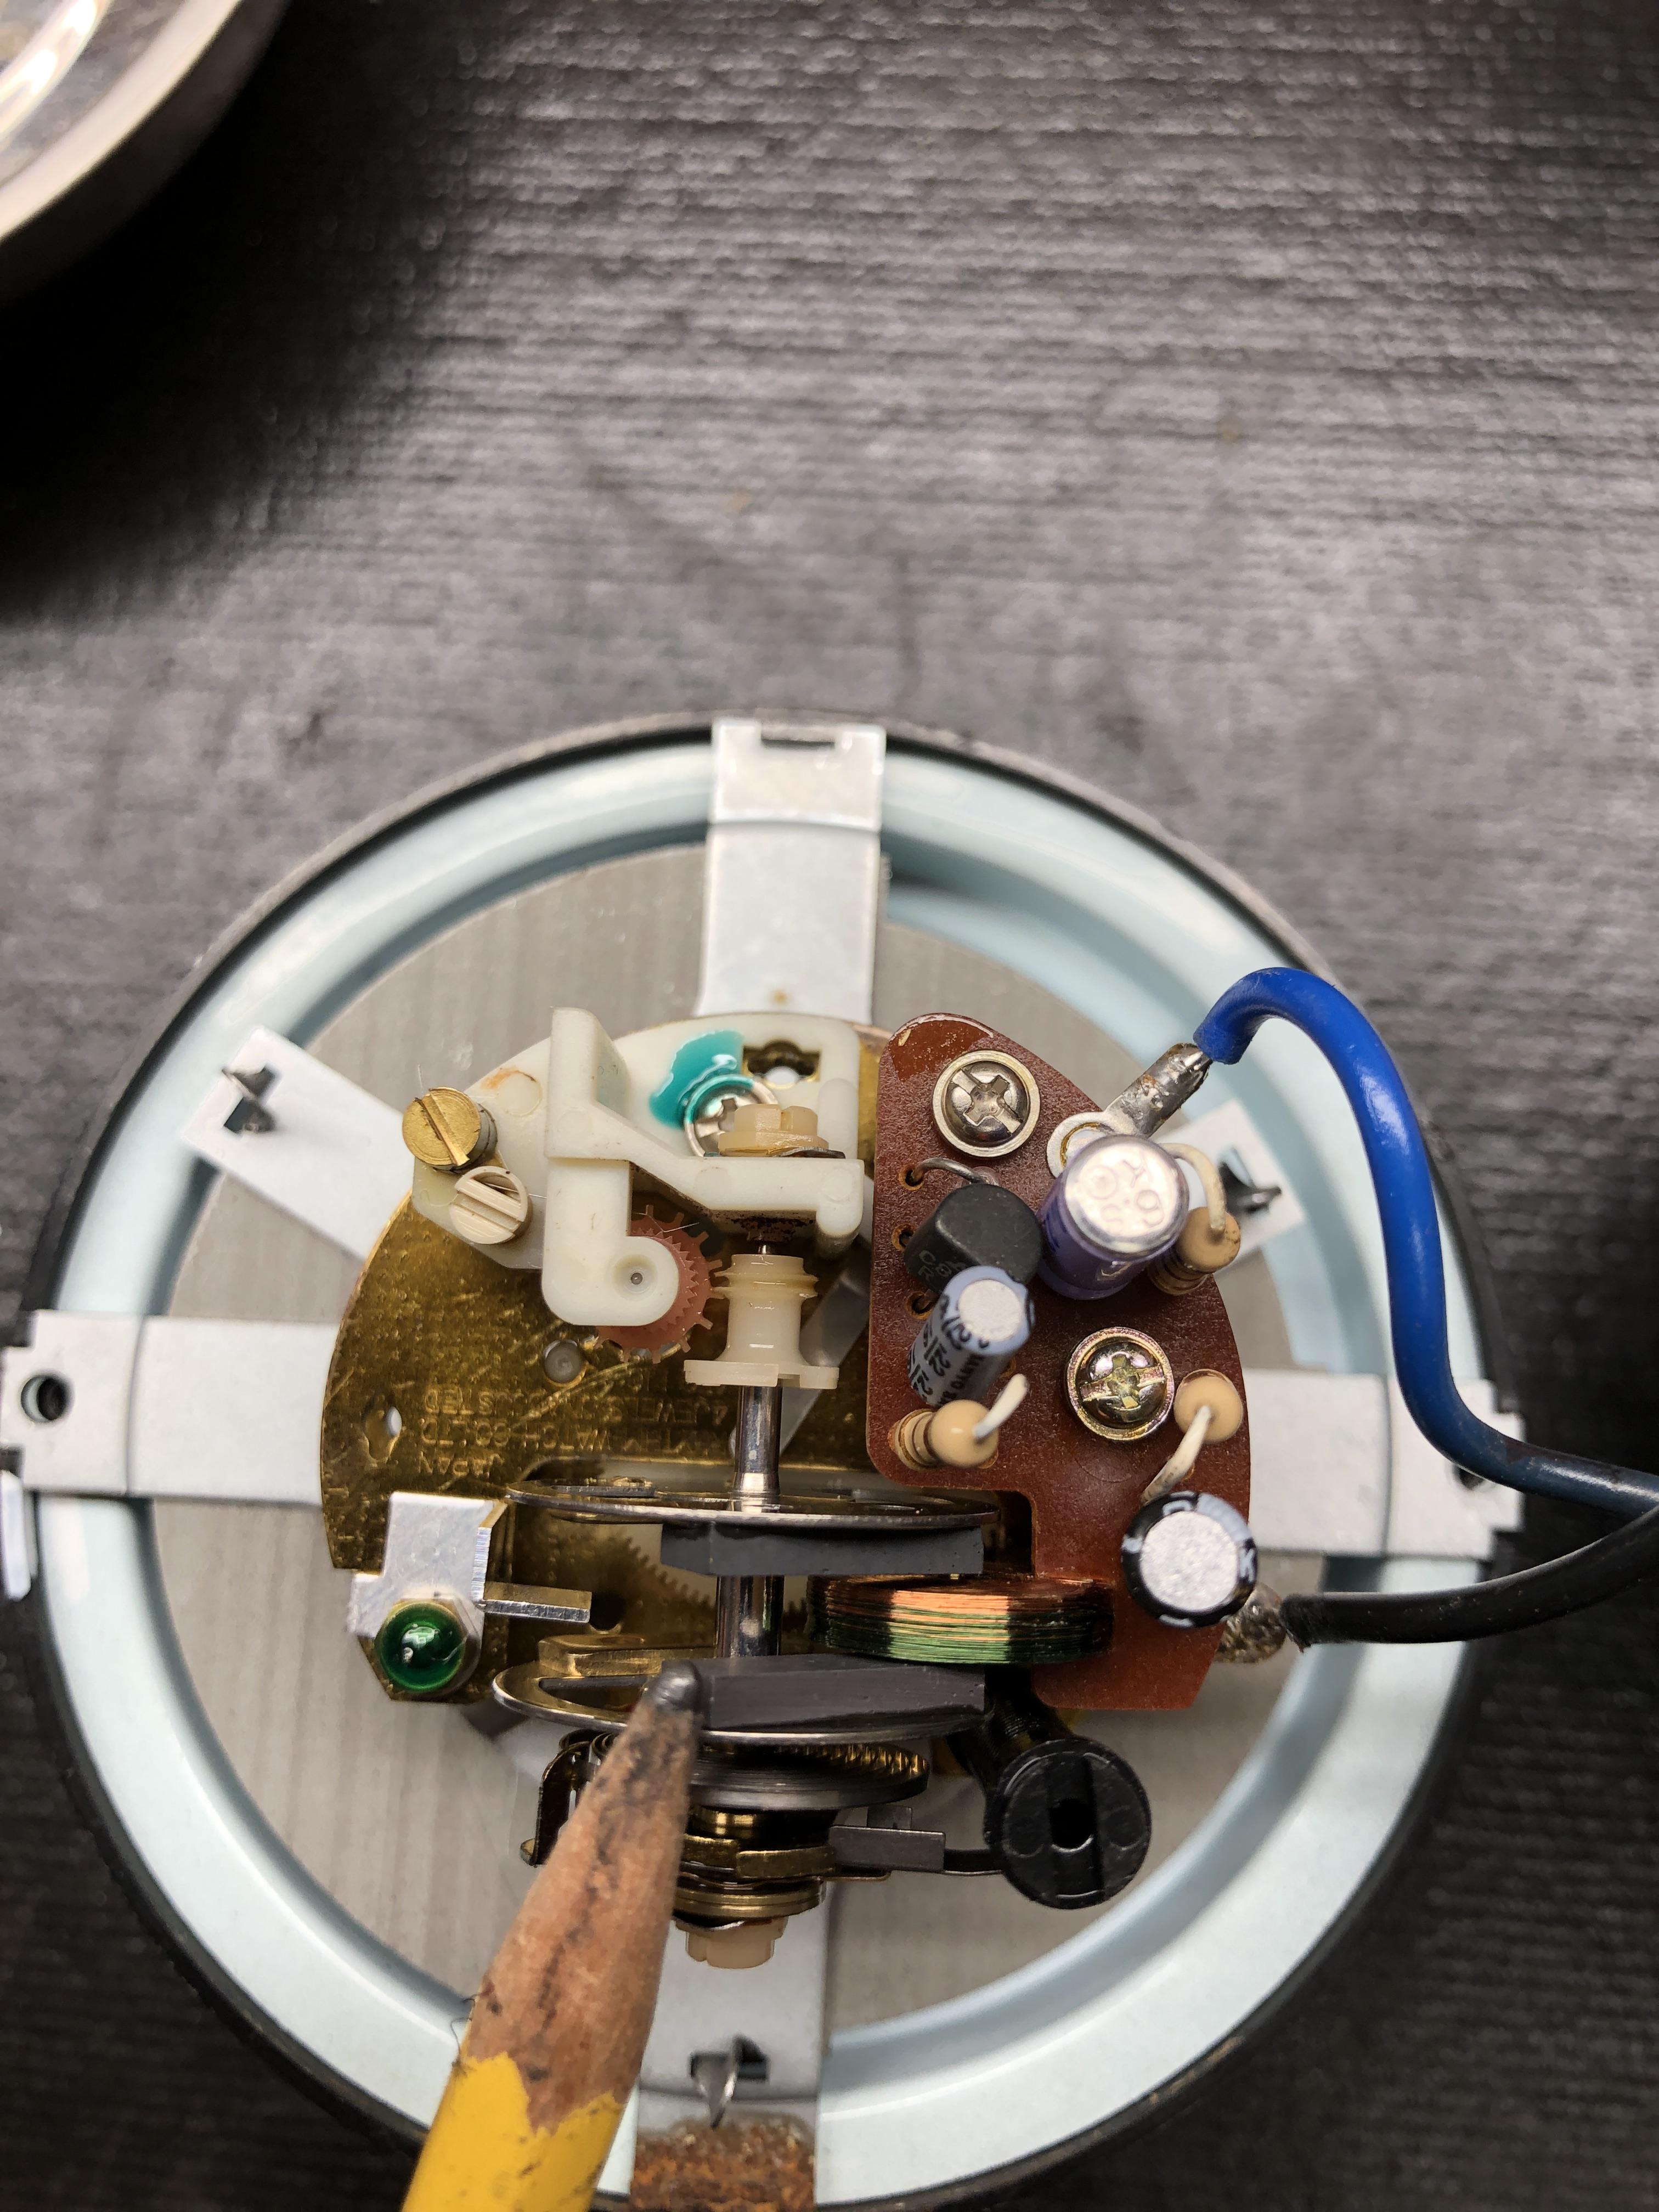
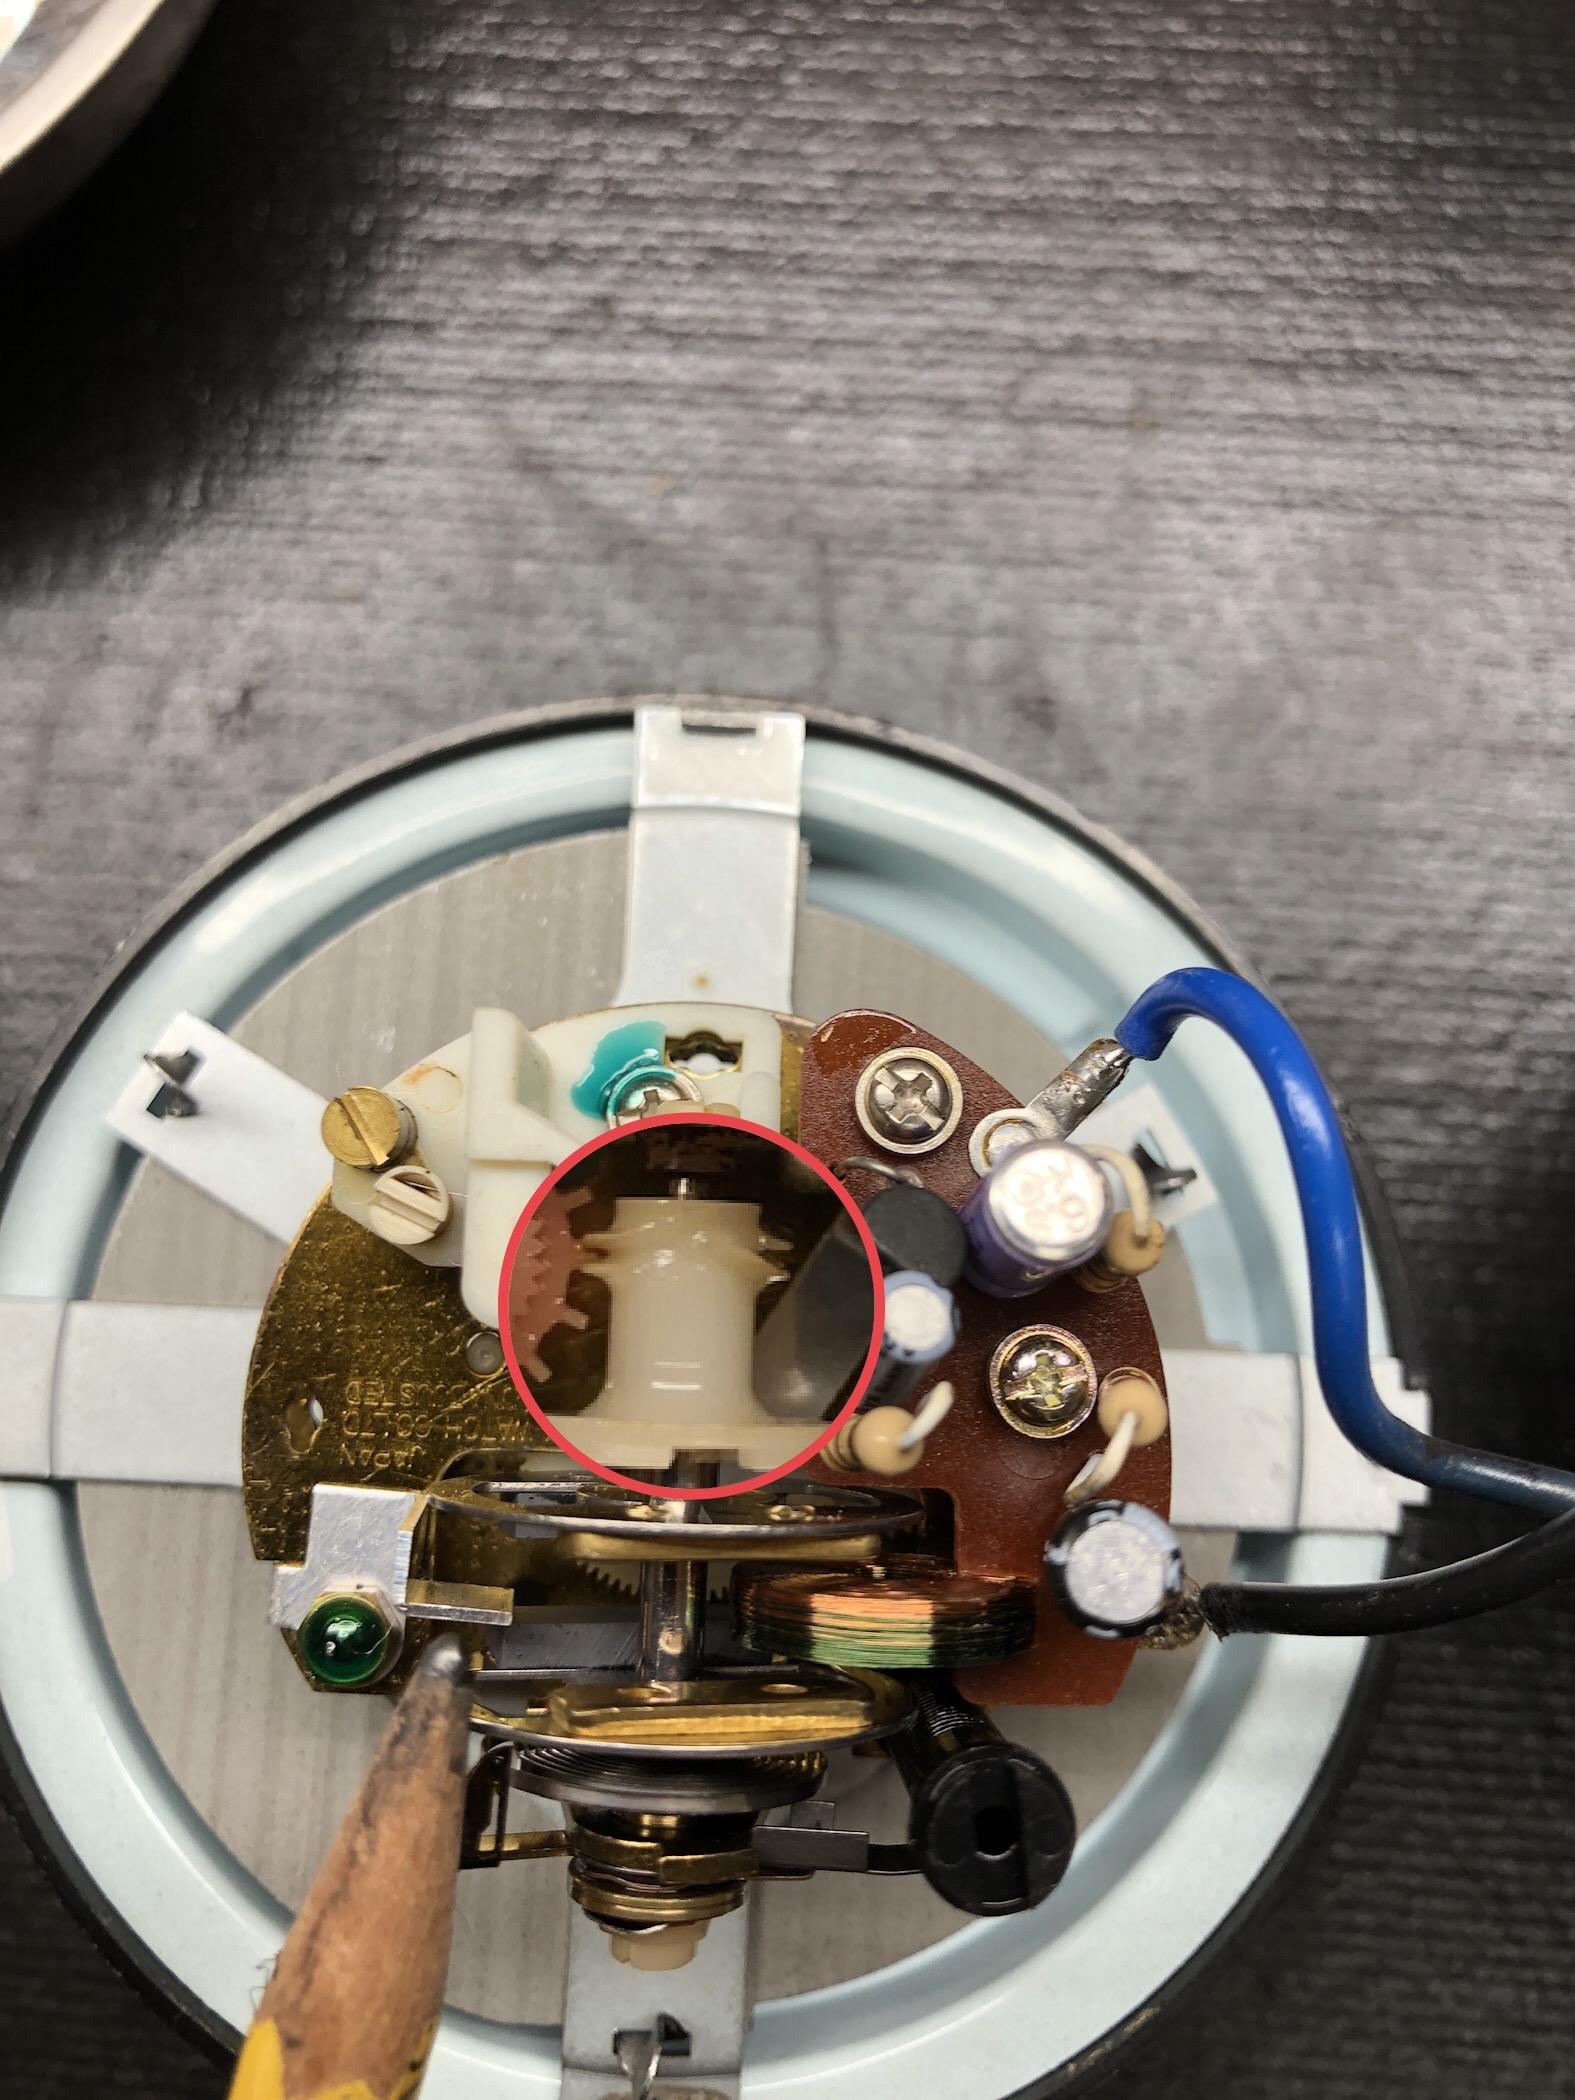
Hi all, The original clock is dead. I found instructions on this forum how to rebuild the clock. I happened to have 2 capacitors but don't have the smallest one. I believe 0.22uf. However, the instruction seem to suggest to replace the transistor as well. I don't have it yet. long story short, I able to get it run/spring when put face down. But orient position correctly, seem like it is too weak to oscillate. Learn that the Quartz version is more reliable than this one. Went ahead and get one for $5 knowing it is not working. Search online many hours and doesn't seem like anyone rebuilt it accept send it in to a shop or zclocks. Wonder why!!!! The mechanical seems simpler than the pure analog. Pardon my limited electrical knowledge but there seem to be few things can be replace on the quartz clock. The white flat cylindrical look, I think it call quartz oscillator. Wonder what is the value for that? is it 7 MHz? what voltage, capacitance? the other black rectangle is the Integrated Chip I believe. few other components look like diode, resistor. I don't know their values either. Has anyone rebuild this? or have good instructions on how to go about it? Seem like digikey.com and mouser.com sell a lot of component. Just need the values and hopefully they carry those component. I'm a tinkering kind of guys. want to try to see if I can rebuild it. Much appreciated regards
-
Hi all, My AC system is stock or at least what I been told. Always use R12 and haven't converted to R134 yet. The fitments on the compressor still R12. Not like the R134a where one is bigger than the other and sometime caps color coded. I read online, forums, including this one and seem like people stating that R134a can be run on R12 system provided flush all refrigerant, new fitments, run not as cool as R12, high pressure.... Knowing R12 is no longer available or at least at authorized AC shop. The dilemma I have is that I'd like to keep the car as stock as possible. Which lead to parts hard to find and sometime impossible. Seem like there is a company have the equivalent to R12 calls Frostycool R12a. questions below: - has anyone use this product before on the stock R12 system? - I need an A/C drier though the fitment of the tube/pipe need to bend a bit to connect to this. Is this one work well with stock AC? TCW I also need a high switch. I suppose unscrew the front bolt on the driver for the high switch. Much appreciate