Racer X
Free Member
-
Joined
-
Last visited
Everything posted by Racer X
-
 That has to be my most favorite era in sports car racing.
 -
August? Small world, eh? So you were a lineman? I worked 30 years at a public utility, in vehicle maintenance. The majority of the work was on bucket trucks, and I was a hydraulic specialist. But I also worked on the rest of the fleet, and did lots of fabrication work too. Now I build airplanes at the largest building in the world. At least for another 5 months or so.
-
Nah. Lately most everyone is younger than me, so they are a bunch of “kids”. There is only one guy my age on the crew I am currently working with at The Big Shed, everyone else is in their 40’s or younger. What gets me is when one of the younger guys whines that he is getting too old for this work. I point out I’m old enough to be his dad (or grandpa), and I outwork him every day.
-
Me too. 65 the end of August. I hope to retire September 1, although I really like the work I do. Yes, mornings can be rough, until I have a coffee, and get all the stuff that is stiff and sore from a lifetime of playing and working too hard working again. But I keep reminding myself that pain is weakness leaving the body.
-
And how old is old?
-
I wouldn’t go any further than checking for loose head bolts. If none move at the low range of the max torque, they aren’t loose. By the way, you can download the FSM here for free, just click the download button and change the save to to your desktop. It is a PDF, so all you need to do after it is downloaded is click it to open. Easy as opening a book, Click This Link, Then Click The Download Button
-
The head Cliff posted isn’t an L series 6 cylinder head, looks like a 4 cylinder head. Still, the sequence is similar, starting in the middle and working out. The maximum torque is a range because the head bolts are torque to yield bolts. Since the head has been on the car for so long, you don’t need to go through the stepped sequence of torque values. Also, given that the bolts are tty, it is better to set your torque wrench to the lower end of the maximum range, at 54 ft lbs. Your looking for a loose bolt, not installing a fresh head on a new gasket. I have found broken head bolts this way. But Zed makes a good point. The oil passages are on the right side of the block and head, and the engine is leaned to the right, about 12 degrees or so. It would be a good idea to check the cam cover bolts for proper torque before taking it off. Also, don’t use a cork gasket. They leak before you even put them on. An OEM or equivalent gasket, with no sealer. Torque the bolts, and it should not leak.
-
Looks like hair to me. If it was a crack it wouldn’t be so straight.
-
Look in the factory service manual, available for download on this forum. I had a head gasket leak on an older L series engine in my 280ZX and tightening the head bolts to spec stopped it. I drove that old beater around for ten years after that without a bit of trouble.
-
Have you checked the tightness of the intake and exhaust manifold fasteners? Still, even if they were loose, engine oil wouldn’t be leaking from there. I would say the head gasket is leaking some. Take the cam cover off and check the torque on the cylinder head bolts.
-
-
He says: I searced instantgram and found 3 theekaisers. 2 which are private. So, will the real theekaiser please stand up?
-
The summer/winter valve directs warm air from the exhaust manifold heat riser when selected for winter to prevent icing in the carburetor throats, blocks that off and directs cooler air from the front when selected for summer.
-
Aftermarket sunroof. I was drawn to the car until I saw this picture.
-
Look under your car. Is there a drain plug? If so, remove it (be prepared to catch any gas that may be in there. If not, siphon as much as you can and pull the tank. Drain the tank, remove it, then look inside. An inspection mirror helps. Observe the condition, and take the appropriate action. You won't really know until you get it out and have a good look. You shouldn't be driving it at this point. The tank has a snakepit of hoses and I would bet big money that they all leak. Fix them while you got it apart. Which lines? Drain the tank, remove it, make whatever repairs are needed, reinstall and add gasoline. Get it cleaned inside and out, so you can be sure.
-
Experience. Hook the coil up correctly. With it connected directly like you do to the battery it stays powered up all the time. When hooked up correctly, you turn the key off it takes the power away from the ignition, and the car shuts off.
-
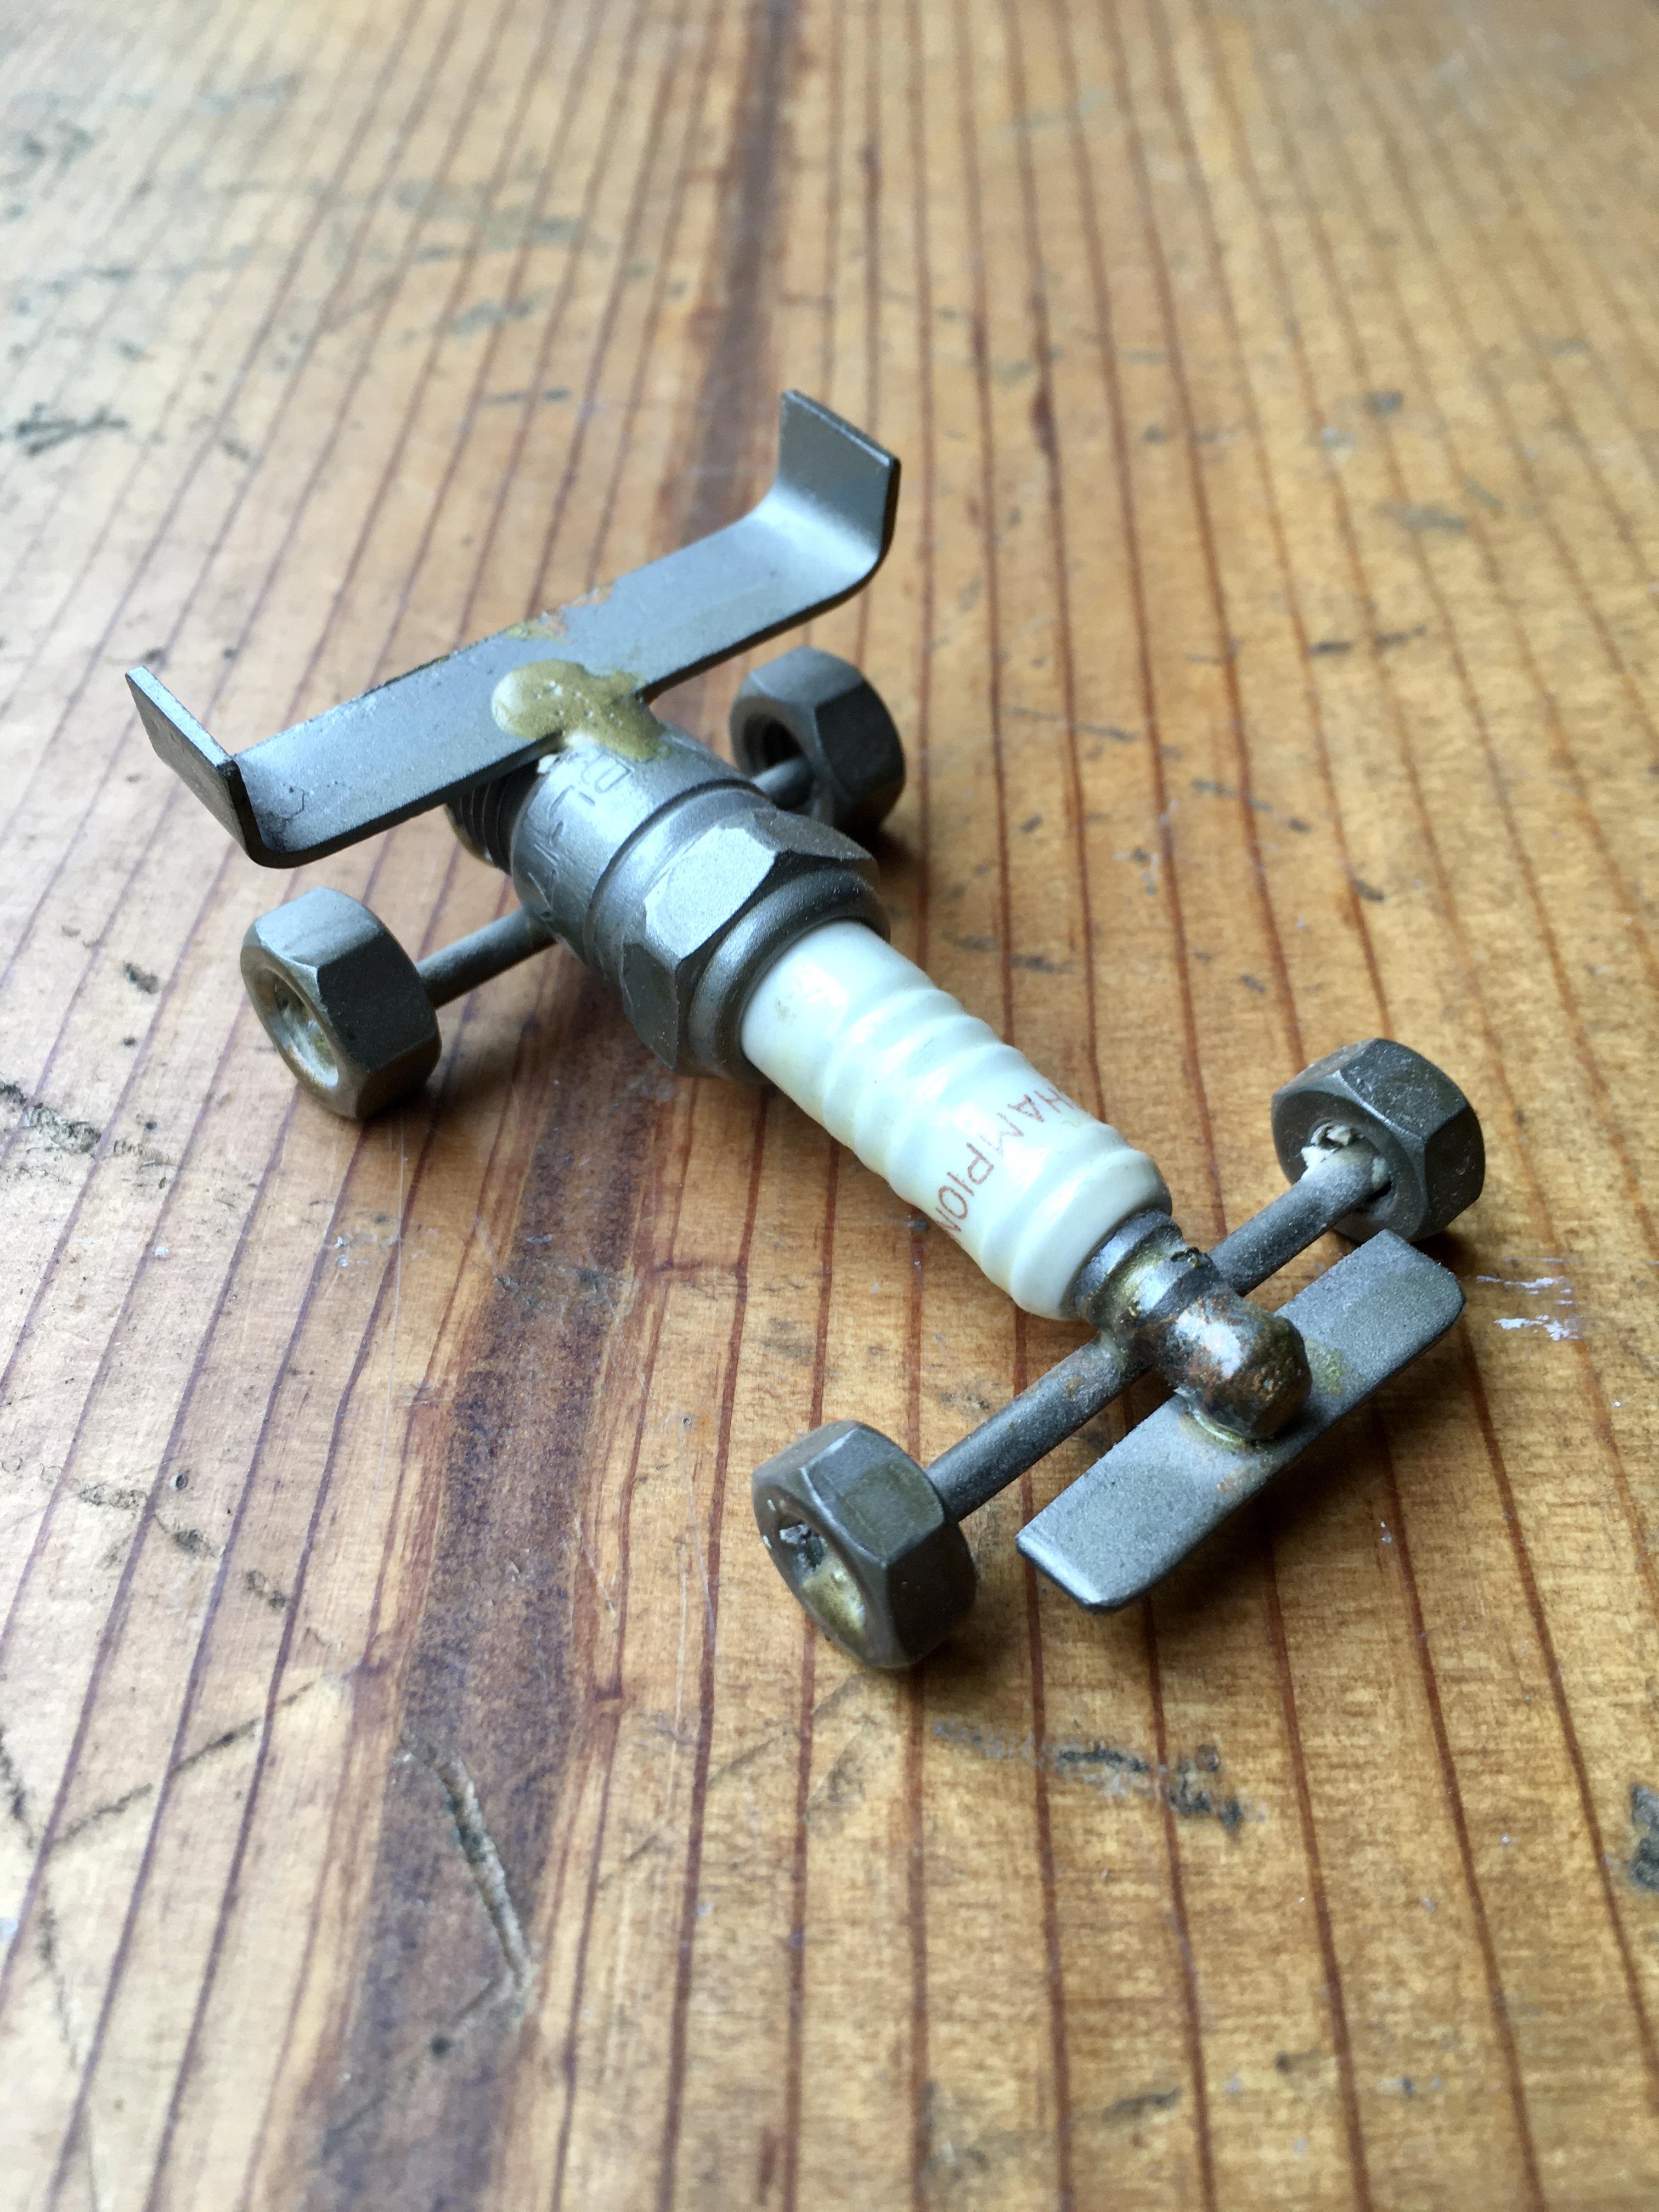
@Shawninvancouver, the battery negative cable should have two wires, a large diameter one (4 or 2 gage) that goes to one of the starter mounting bolts, and a smaller diameter wire (10 gage) that goes to a bolt on the firewall near the battery. Grounding is very important, all grounds must be clean and tight. Given the amount of corrosion in the photos you have posted, it would be a good idea to go through every ground and clean them up, and ensure they are tight on reassembly (don’t overtighten and break off the fasteners). When using your multi meter, use the alligator clip lead for the negative, connect it directly to the battery negative terminal (assuming the battery is connected correctly). using the sharp probe on the positive lead, push the point hard into the point you are testing for voltage. For simple continuity tests, use the pointed probes on both leads to contact testing points. I wrote earlier that the thing on the side of the distributor is a condenser, and what you need to do there. By the way, have you repurposed the old spark plugs yet? Full disclosure: The spark plug I used for this one is a tapered seat plug that actually came out of a late 1970's or 1980's era Chevy 350. I replaced several hundred over the 30 years I worked on the fleet at a public electric utility. I made dozens of these things on my lunch breaks, gave all but this one away.


-
Lubricate the bushing flanges and the mating surfaces on the hub with silicone grease and use two thin putty knives to wedge it in like Jeff did. Clamp the lower control arm in a vise, and have your buddy hold the putty knives. Tapping with a plastic coated dead blow sledge helps persuade it,. A couple of long, tapered line up bars helps get things the last few millimetres, and lined up for the pin.
-
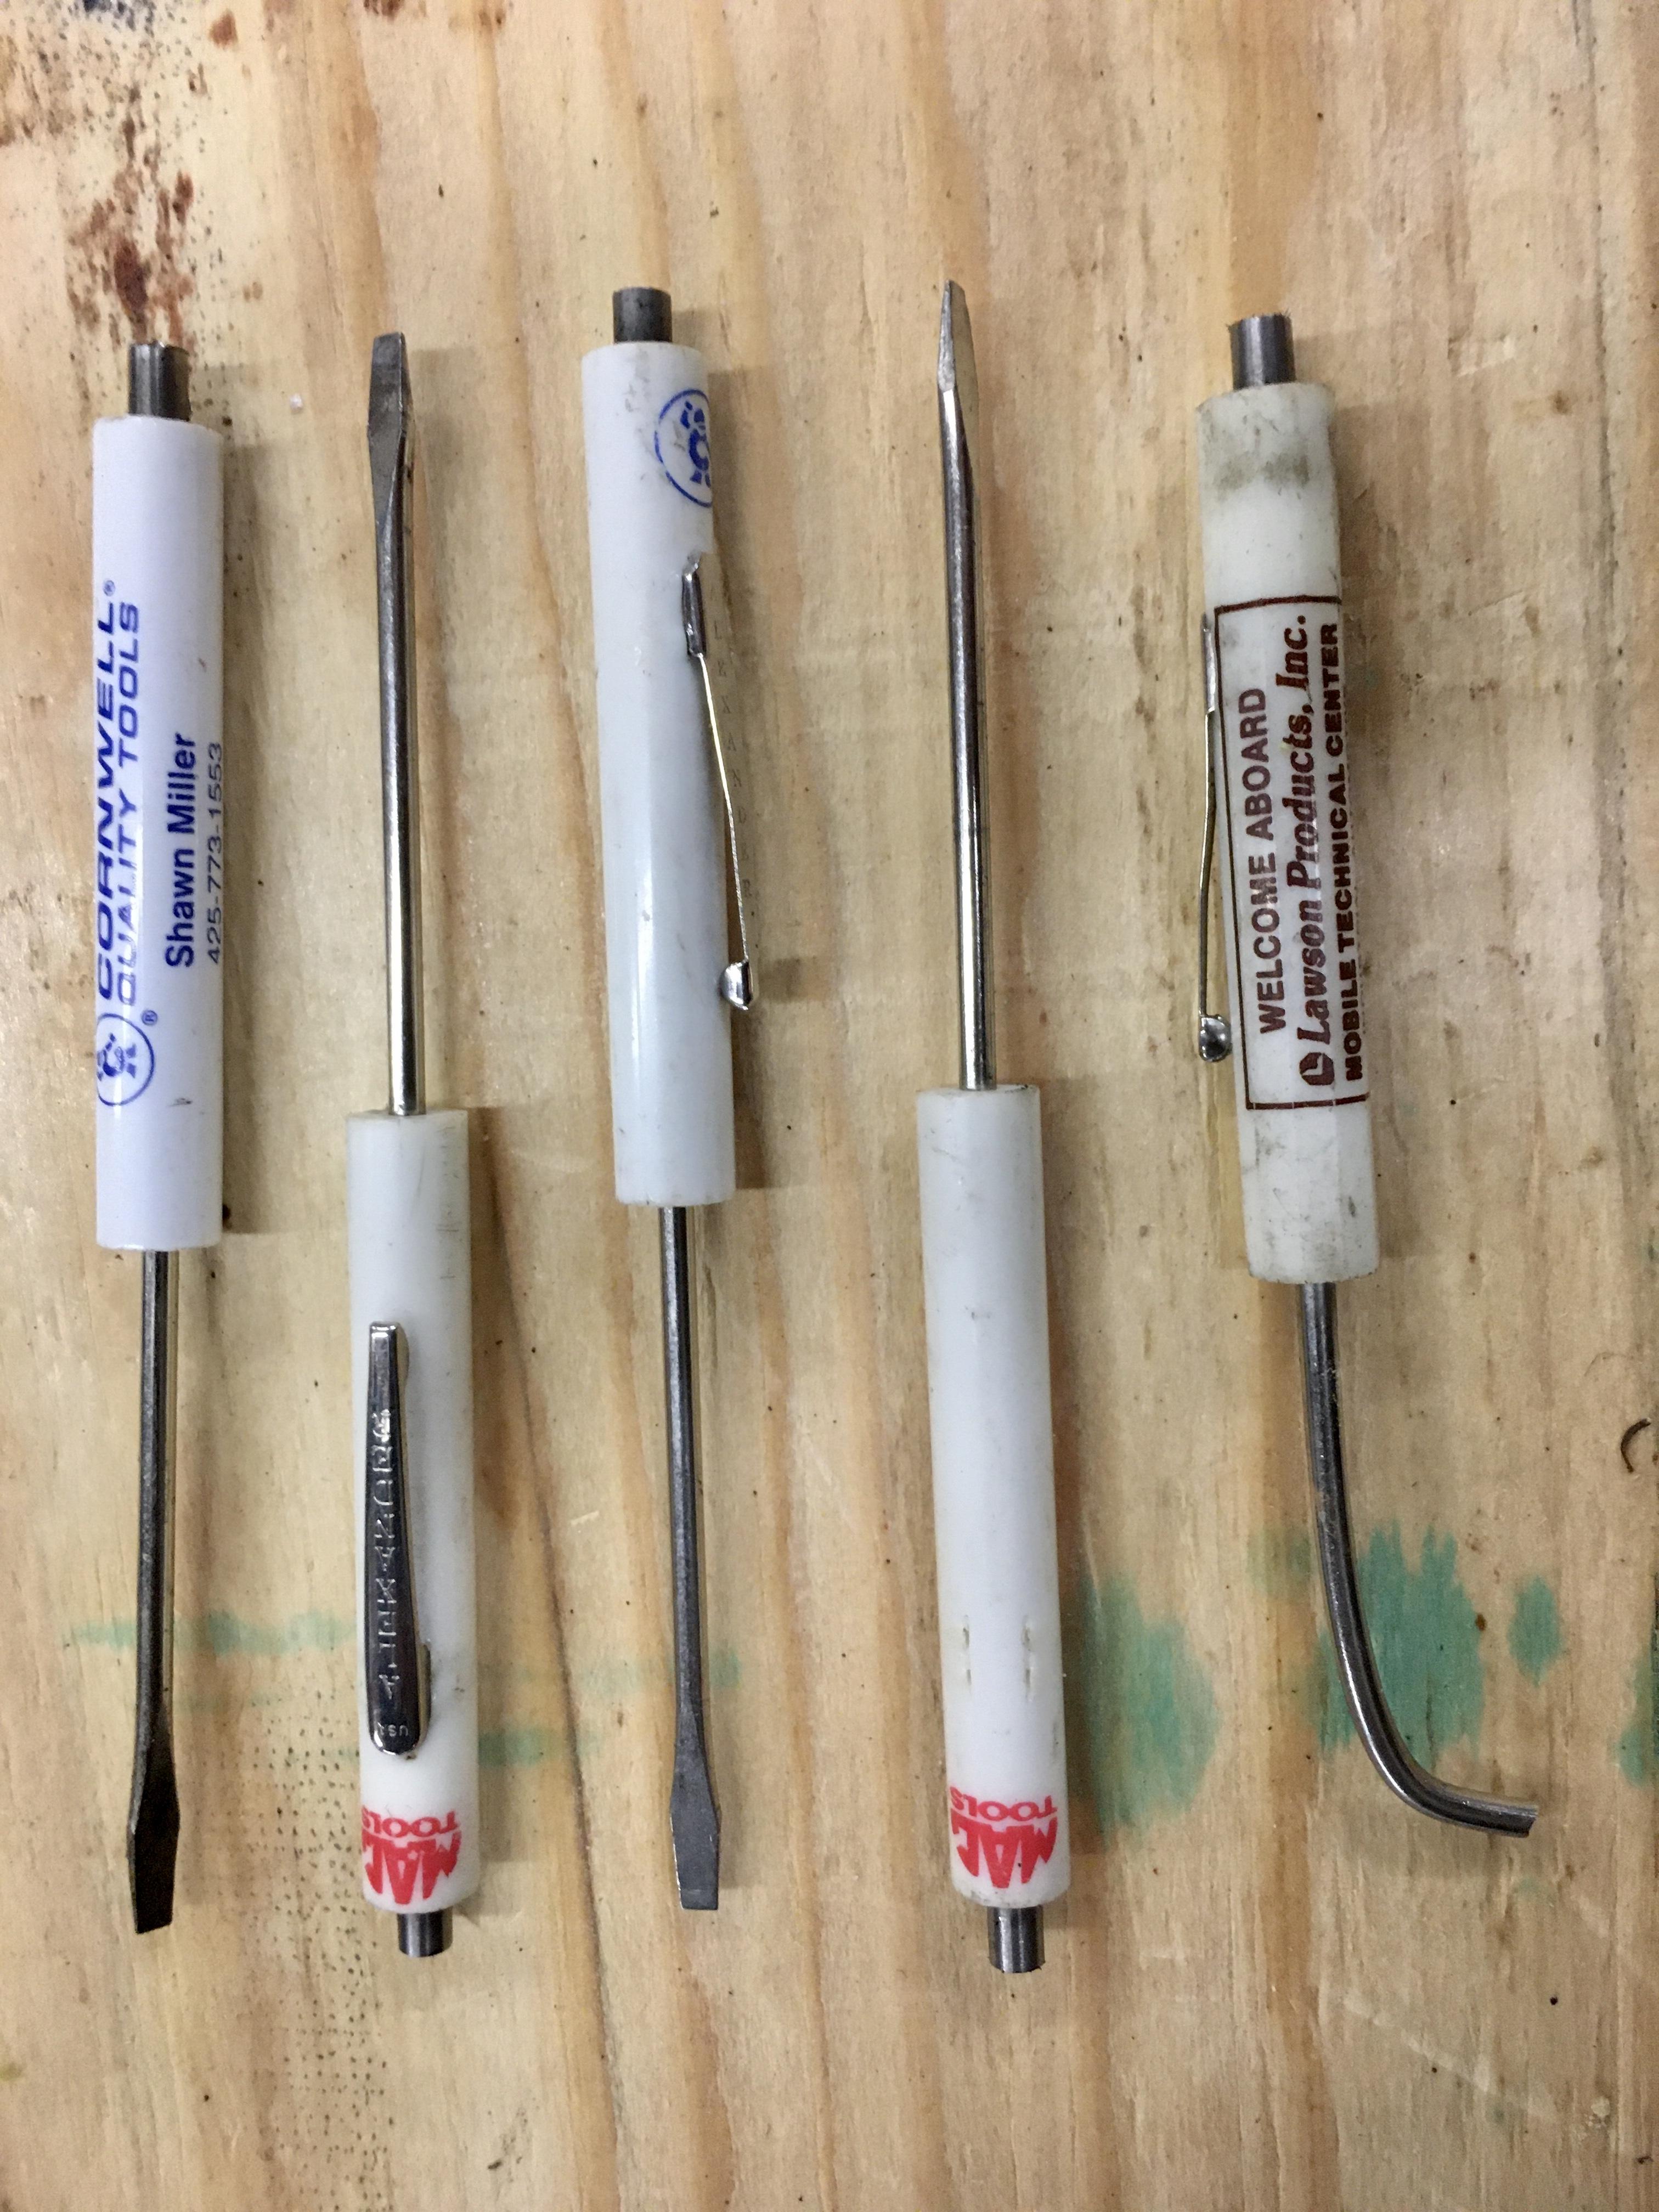
These should be in every toolbox. The file is a point file, fine double cut, parallel faces. Points only need filing if they get burnt and eroded, and only as a stopgap until a new set can be installed. Never file new points. Also use a clean tool when setting the gap, any oily residue will ruin them. The other tool can be used to set plug and point gaps, the wire brush for cleaning the wire sockets in the distributor cap and coil center post.

-
Well the last time @Z-Envy posted here was that post, August 31, 2018. Two years ago. Looking at his profile, he hasn't visited the forum since.
-
I use a small flat tip screwdriver, like all the tool guys give away. Like one of these:
-
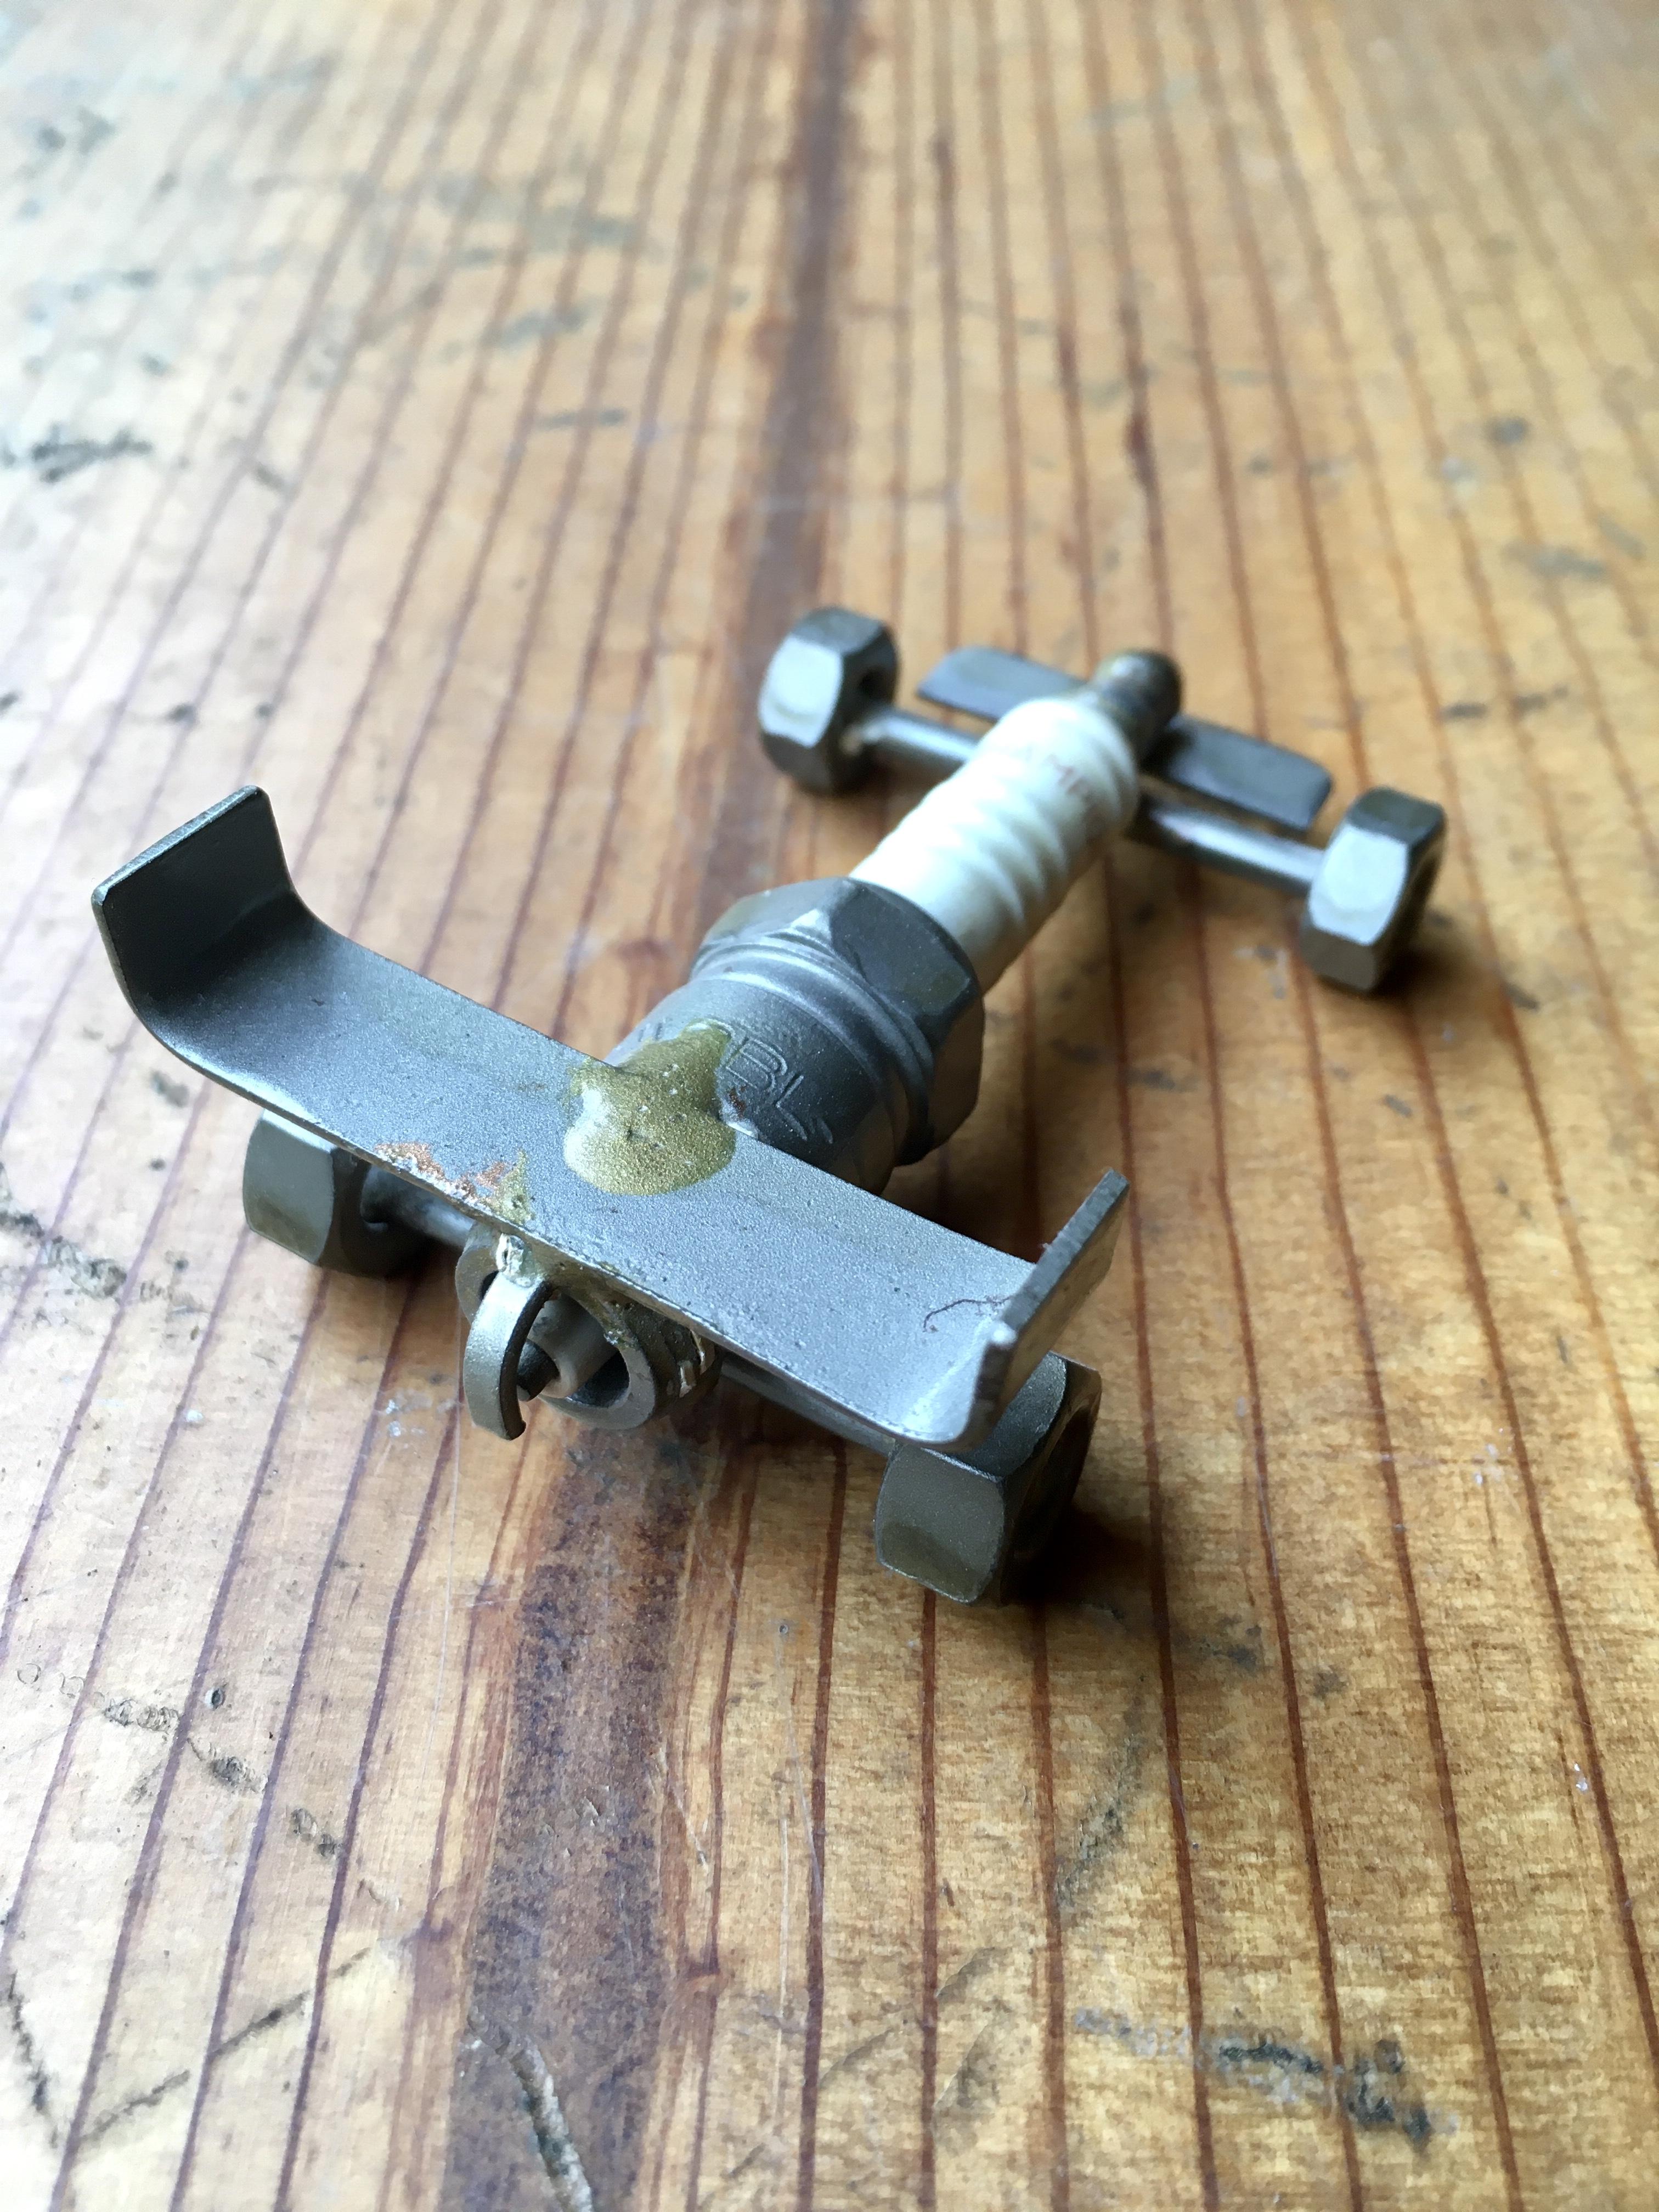
The ignition parts look pretty bad. I see a crack in the distributor cap, the rotor tip is corroded. The plug wires look pretty shabby. The contacts on the points are corroded. The connections at the coil are corroded. The thing on the side of the distributor is called a condenser, it helps reduce ignition noise that is picked up on the radio. It isn't needed to make the ignition work, but usually comes with the points. Replace all that stuff, get NGK wires, there is a set tailor made for L series engines, all the plug leads are numbered, and the correct length. Highly recommended. Everything else you can get reasonably good quality parts at NAPA. The coil should be fine, clean the contacts with a small wire brush, clean and bright. Don't forget the inside of the center where the wire to the distributor goes. Coils rarely fail, usually physical damage causes them to leak (they have oil in them), or causes the windings to short. As for testing it for spark, do what the guy in the video does (ignore the brown wire he mentions). It should work like the video if the coil is serviceable. With a multimeter you can do continuity testing to see if the windings are in good condition or shorted out. If you didn't put NGK plugs in it, buy some and use the others to make toy race cars with nuts, welding rod and bits of scrap sheet metal for wings. Set the points and plugs to spec, and be sure to use the little red capsule of grease that comes with the points, it goes on the plastic follower that rides the cam in the distributor (put it on the opposite side of the contact tip, a little wipes off onto the cam as it wears, keeping the cam/follower lubed). Also, check the ignition advance mechanism under the points. Connect a vacuum pump to the diaphragm and see if it moves, and also check the mechanical advance (one of those screwdrivers works here too).
-
Sort of. Filling any cooling system with water will be OK, so long as the weather isn’t at or below freezing, AND provided you don’t forget and leave it in. Engine coolant performs several jobs. First, it has glycol in it, lowering the freezing point. Second, coolant has a lubricant which helps lubricate the water pump seal. And having a radiator cap that is in good condition, and a functioning thermostat help keep the engine from overheating. So for starting an old engine just to see what you have should be OK with only water, but must be drained afterwards, after the engine has had time to cool off.
-
Which cable?
-
Heater control panel.