Racer X
Free Member
-
Joined
-
Last visited
Everything posted by Racer X
-
 Stupidity shouldn't always be painful, sometimes it needs to be fatal. Even then they never learn.
 -
Good to see it is coming together. I gotta ask. Are the vice grips pinching the brake hose?
-
I think you're right, there is not a relief on the rear quarter. I just checked the rear strut tower differences, 240 to 280. The tower is 42 millimeters (1.65") higher on the 280. In the shots looking in from the back they do look taller. This car is looking more like a 280 that has been given the 240 look with the bumper makeover. Another odd thing is I can't see the park/turn signals in the grille. Maybe the brackets rusted away and they fell off.
-
There should be no wear in that area. Once the hub is assembled, the bearing preload set, and locked, that part of the bearing should not move. It does seem odd that several different bearings aren't fitting. If you have a caliper measure the bearings and compare the size differences. Get some emery cloth (also called crocus cloth, any good auto supply store should carry it). It comes in a roll, but some stores will sell it by the foot. I get the roll and beat inflation a bit. Tear off a strip about 12 to 14 inches long and sand briskly, on a clean and dry surface, moving around so that you sand all the way around. Wipe it off with some solvent on a rag, followed with a dry rag, and inspect it visually with a bright light, and feel it. It should be smooth as a baby's butt., and shiny. Before sliding the bearing on to check the fit, wipe it clean with solvent on a rag, followed by a wipe with a clean dry rag. Neatness counts here, the tolerances are close and anything that shouldn't be there may keep things from fitting together, and after all, wheel bearings are very important. Have a clean work area, lay freshly cleaned bearings, nuts, washers, seals, etc. on a clean dry shop towel. A roll of those blue things they sell at the chain parts places are suitable, and disposable so your wife won't shoot you for washing the cloth variety out in her washing machine. Also, I looked at the FSM procedure for setting the bearing preload. For reference, here it is (I'm skipping the first two steps): Tighten the wheel bearing locknut to 18 to 22 ft lbs. Rotate wheel hub a few turns in both directions to seat wheel correctly. Then, retighten spindle nut to the above torque. (this means to losen and then reset the nut torque) Loosen the wheel bearing lock nut 60 degrees. Install adjusting cap and align groove of nut with hole in spindle. If grove does not align with hole, relocate adjusting cap. If hole and groove still do not come into alignment, loosen wheel bearing lock nut as much as 15 degrees more. Again, spin wheel hub several times in both directions to see if it rotates freely. Then measure bearing preload as follows: (the diagram shows the mechanic using a small scale to pull and check the rotating force required to begin rotating the hub) The starting torque is 3.5 to 7.4 inch pounds. Having done a zillion wheel bearings I have developed a feel for the task, so I don't bother with a torque wrench or a scale. I can say that if I did, I would stick to the lower side of the range for the nut tightening. The FSM stresses that care be taken to not overtighten the bearings, and I think even 18 ft lbs is too tight. I also spin the hub as I snug the nut down, something the FSM fails to require. When you finally get this resolved, choose the correct length cotter key, so the ends can be neatly bent tightly around the spindle and not rub on the dust cap. And when installing the dust cap, don't bash on it with a hammer, tap it in gently on the lip around the edges with a flat tip screwdriver (about 5/16" wide). it should slide in snugly, but easily. If you bend the dome it will rub against the spindle. Good luck, this really sounds like a trying endeavor for you. I hope this information helps you get your Z back on the road!
-
The sheet metal is let in for the bumper for the 240. The later 260 and 280 are smooth, no depression for the bumper.
-
You should never need to use force to assemble wheel bearings. Take it all apart, clean everything up. Inspect the spindle where the bearings slide on, and if there are any burrs, clean them up with a strip of emery cloth. Then see if the new bearings will slide into place. Also, measure the ID of the bearings, and the OD of the spindle. You should have a couple thousandths of an inch of clearance. Once you get it sorted out, and things are slipping together properly, grease the bearings (also, don’t pack the journals full of grease, it isn’t needed and wastes grease), drop the inner bearing into the hub, install the dust seal, slide the hub and bearing onto the spindle, then insert the outer bearing, washer and nut. Tighten the nut by hand, while spinning the hub. When you get it as snug as you can by hand, then use a socket, and a 3/8” drive ratchet to set the bearings while again rotating the hub. I believe the service manual specifies a torque, but I usually snug by feel, then back the nut to the first point the nut lines up with the cotter key hole, then insert the key, and replace the dust cap. There should be a very small amount of free play.
-
I have too much blood in my alcohol system. 🙂
-
Aren't the top of the rear strut towers taller and flat on the 280Zs to mount the retractors for the seat belts? The pictures look like they are open. Also, the rear quarter panels have the relief for the 240 bumpers, rather than the smooth quarters of the 280. It certainly is of questionable pedigree.
-
Odd that even though it appears to be a 240, bumpers, parking lights, under the hood it looks like a 280, fuel but injection, relays, etc. on the fenderwells, and the taillights are all 280. Someone has mixed two Z cars, and then rust happened. I've been given better condition Z cars than this one. They would have to pay me to haul this one away for them.
-
I thought that too, still, it looks like a considerable amount of the underside of the car is rusty. The suspension, subframes, crossmember, stabilizer bar and mounts, springs are all quite corroded. Some pictures show the overlap of the stiffeners, like where the front crossmember mounts. Looks like it is rusted under the stiffener, and has a pretty good start at eating away the underlying metal. The buyer is going to have a lot of work to do if they want the car to survive. And that will cost a lot of money.
-
Twenty six grand is a lot of money for a rustbecket.
-
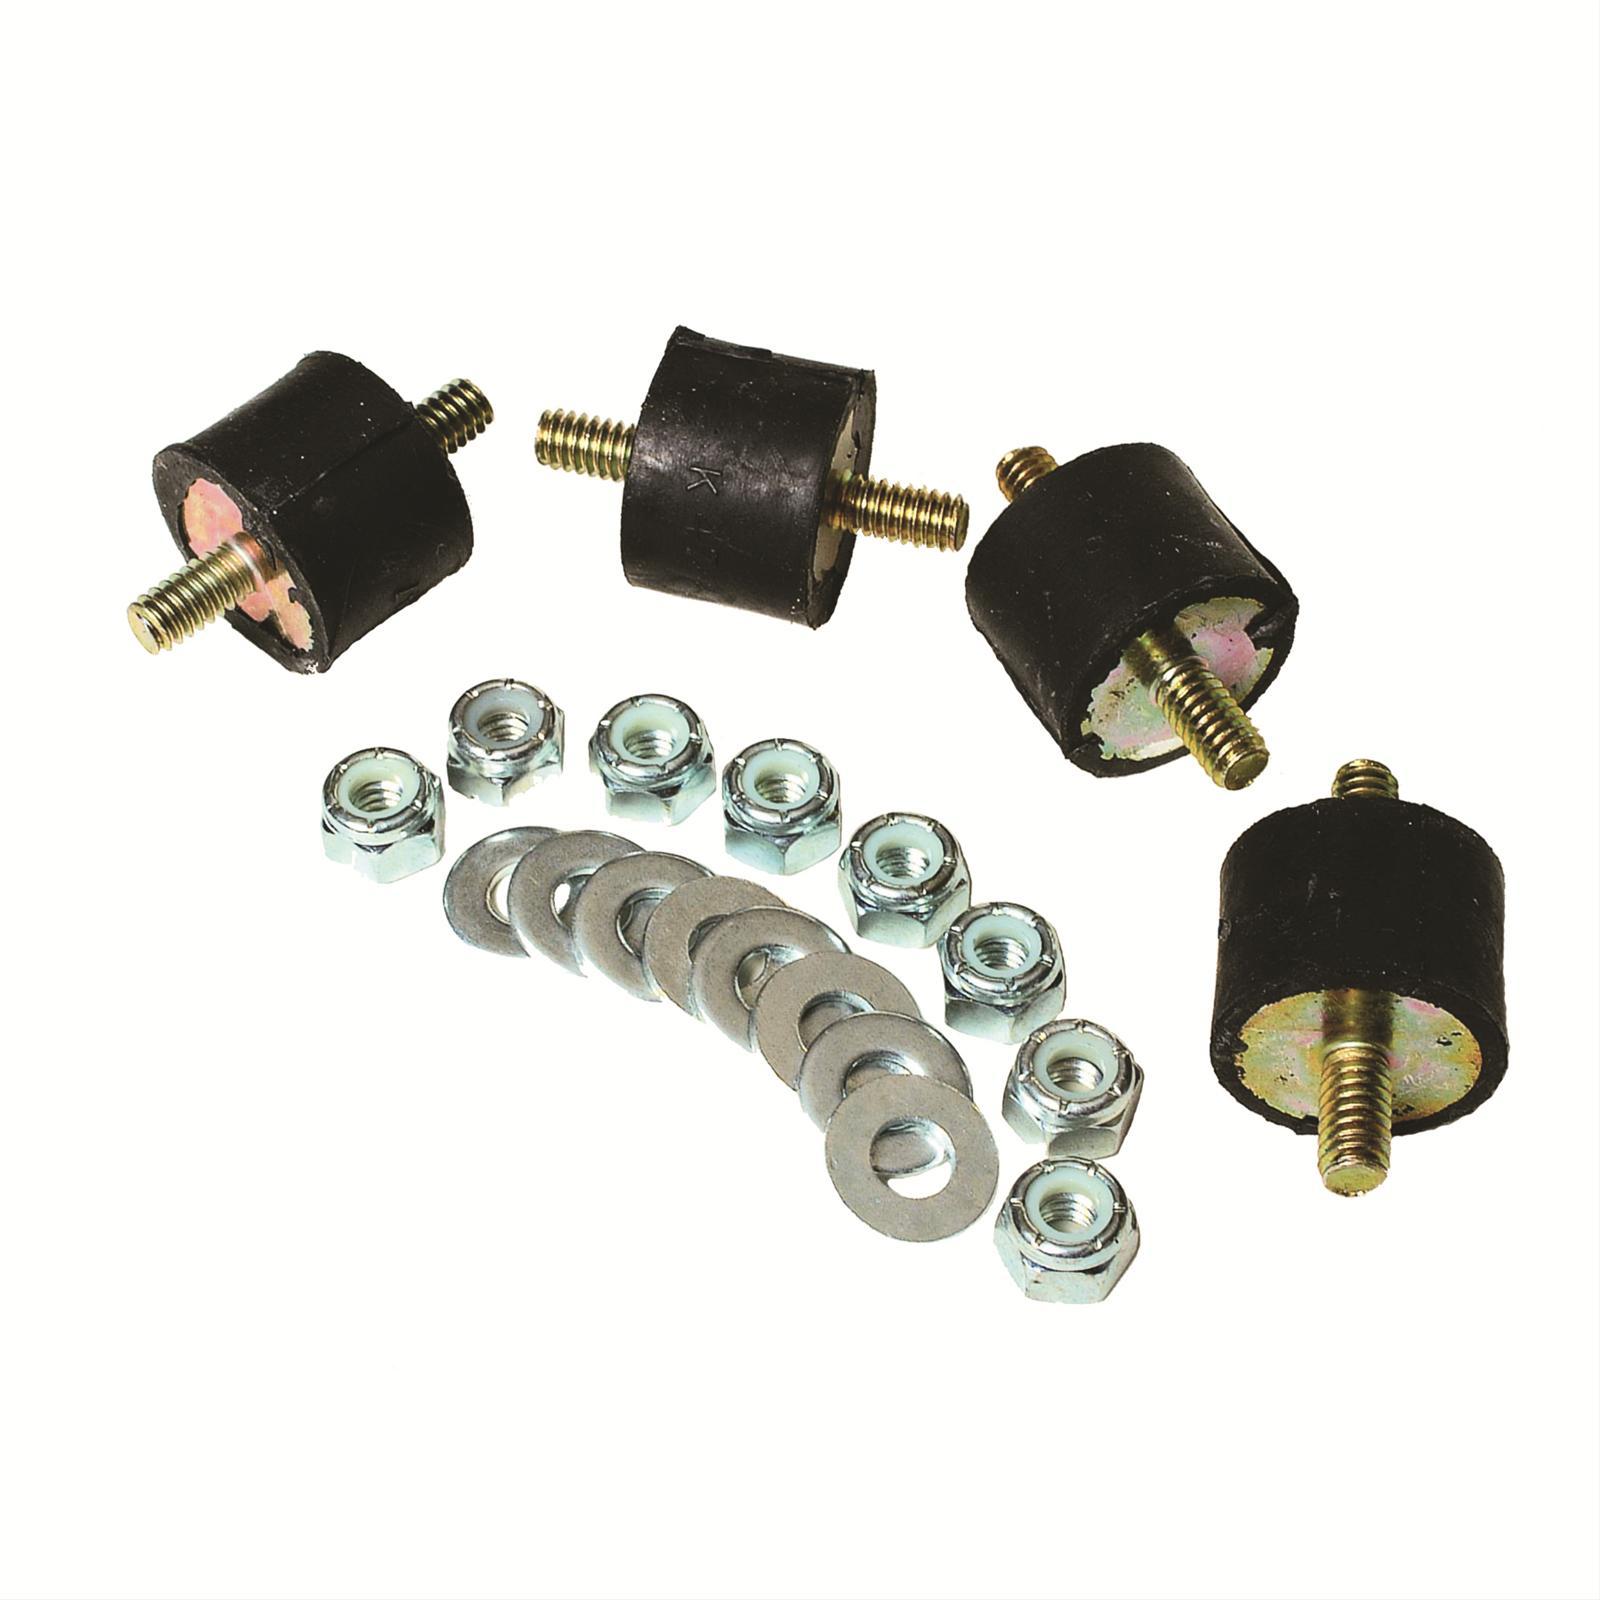
The isolators look like these: (not my picture)


-
A vise with rubber soft jaw inserts should be suitable for holding the needle without damaging it. I would also try some penetrating oil where it inserts into the piston to try and free it up too. After sitting for so long there is most likely some corrosion where the needle seats in the piston, so take your time, and be patient.
-
I remember when I turned 50. Mrs. Racer 2.0 organized a party, inviting all of my friends over. On buddy gave me 50 beers, and said I had to drink them all on that day. I tried, but I’m not a big drinker. Eventually I did drink them all, but it took few days. Maybe you should have your Z drink 50 gallons of premium gasoline, eh?
-
Clean the grease out, then take a die grinder with a suitable rotary file, and clean up your indescretions. Take your time, be careful and only remove the displaced material. Be sure to thoroughly remove all bits of metal shavings before reassembly.
-
There are two of those on my race car, my Dodge Ram has a version of the Carter pump to send fuel to the injector pump (Cummins diesel), and I built a fuel transfer cart that has a Carter pump. Mount them with rubber isolators and the noise is much lower.
-
On a positive note, Racer gets off of quarantine tomorrow, and can go back to work. Shift start at 5:48 am. Alarm set for 1:45 (long commute, and gotta get there early to get a decent parking spot). Back to the rat race. Yay. Yay.
-
-
Good points, and clearly something to consider. The golden era of automobiles was the 50's, 60's and early 70's. The evolution to electronic everything in an effort to reduce exhaust emissions and squeeze every last bit of potential out of a gallon of fuel has changed the automotive scene in a strange way. Most cars these days are disposable appliances, that when worn out, or obsoleted out, are cast aside in favor of the latest electronic gimcrackery. Having recently discovered the modest gold mine I am sitting on, I have found myself wondering how long it will last, where it will peak and at what level. But rather than fret about the future value of my cars, I think I'll do my best to enjoy them. I never started the car thing as an investment anyway, rather it is a passion, something that gives great satisfaction and rewards.
-
Unless the air filter is really dirty, removing it probably won't lean the mixture out enough to compensate for the lower air density.
-
Correct. I made an error in my math, resulting in the 2 psi figure. Sorry, eh? Still, 8 psi is nearly half that of sea level. Consider an older, high mileage engine that isn't producing the original rated output, then cut that output by nearly half, and you now have a huge deficit. Time for some NOS.
-
Pick any one, except the brake booster one. You just want to create a vacuum leak. I'm skeptical that any of this will help at 14,000 feet though. The problem with a normally aspirated engine at high altitude is the air density. There isn't enough oxygen in the air, and the relative air pressure is much lower than at sea level. When the intake valve opens at sea level, the atmospheric air pressure is something like 14 pounds per square inch, so the air/fuel mixture is easily crammed into the cylinder. The relative e air pressure at 14,000 feet is only around 2 pounds per square inch. At such low relative atmospheric pressure it isn't very easy to get the air/fuel mixture into the cylinder, even with the suction created by the rapidly descending pistons. What a normally aspirated engine needs at high altitude is the addition of an oxidiser. A shot of nitrous oxide might do the trick. Or some aviation gasoline, which has oxidisers added to aid combustion at the altitudes airplanes operate at. Turbocharged engines aren't affected by the low atmospheric air pressure, as they use waste engine heat to turn an impeller to force the air/fuel mixture into the engine.
-
Yes, that is the right taillight opening. There is another picture of the vapor tank, fuel filler neck and some of the boxes on a car with the right quarter panel removed, but it wasn't done to facilitate the replacement of all that stuff.
-
That is looking from the inside, with the interior panels removed.
-
Wow, twenty grand for a high mileage car (at least 168,000 miles), with a recent scuff and blow paint job (and a color change), and an L28. I wonder what head it has on it. There is rust bubbling up on the cowl panel, through that two year old paint job. The leather seats are nice though. Giv s that twenty grand feel.