Racer X
Free Member
-
Joined
-
Last visited
Everything posted by Racer X
-
 And the VIN stamped on the firewall isn’t consistent with a series 1 chassis.
 -
As I mentioned, if the gasket that was on it is not damaged, and is the correct type, it can be reused.
-
How would you tap a tapered pipe thread in a sheet metal can a few thousandths of an inch thick?
-
A comment on the use of Plastigauge. As I mentioned, do not rotate the crank while performing this task, the plastic will get smeared and result in an erroneous reading. Additionally, lay the bit of Plastigauge directly in line with the crankshaft, not at an oblique angle. I find using a tweezers helps with precise placement here.
-
Well, again, this is something that should have been addressed immediately with the builder, before trying to suss it out on your own, especially given your lack of mechanical experience and knowledge, but what has been done cannot be undone, so the best we can do is move forward. So far you have an idea of what the rod bearing clearances are. Nothing jumps out there. Next up you should check the main bearing clearances, and post the results here. On reassembly of the oil pickup and pan, I suggest you use thread locker on the oil pickup bolts, and a very thin film of silicone sealer on both sides of the gasket. It looked like the pan rail was pretty clean, and if you recall I did ask if the builder used any sealer. If no sealer was used on the oil pan gasket, and the correct gasket (I’m talking the master the gasket is made from, the OEM, and the OEM quality aftermarket gaskets) was used, it can be reused multiple times, providing it isn’t damaged. Once you have the bottom end buttoned up, refill the crankcase and install a new filter. You obliquely mentioned that you had removed the oil pump, and I’m still not clear if you replaced the pump with new during the rebuild, or if you reused the old one. Did you disassemble it and check it according to the factory service manual? As I mentioned, the process is detailed in the manual, and is easy to do. You clean and inspect the gerotor (that’s what the two metal pieces are called that actually move the oil), then place the parts inside the housing and use a feeler gauge to check the clearances. If it is determined that 5he pump is serviceable, lubricate it and reassemble. Also check the pump pressure relief spring. I’ve already shown you where it is. I suspect there may be a problem either with the oil pump, it may be worn beyond limits, or with the pressure relief spring, it may be broken, or has lost tension, or is simple too weak. After that, if you still don’t have good oil pressure, you really need to have a conversation with the builder. And don’t spend a lot of time running the engine until you are certain that it has proper lubrication.
-
So yes, three of the readings you got were slightly out of range. Not enough to cause a dramatic change in oil pressure, but still of concern. I believe you mentioned that the oil pressure was fine, but suddenly changed, is that correct?
-
Yes, but how do you know what the fasteners were torqued to? It can’t be accurately checked with a click type torque wrench, only with the types I referred to.
-
I want the ‘Cuda.
-
How tight the fasteners are will make zero difference in the clearance, provided they are torqued correctly (severely under torqued may cause a larger clearance, but there will be other, more serious consequences, such as the bottom end coming apart, not a good thing). So far it looks good. The bearing shells show no wear. How do the journals look? Also, you can run your fingernail across the journal and bearing shell, to ensure there are no cuts or grooves. Next, what do the main bearing journals and bearings look like?
-
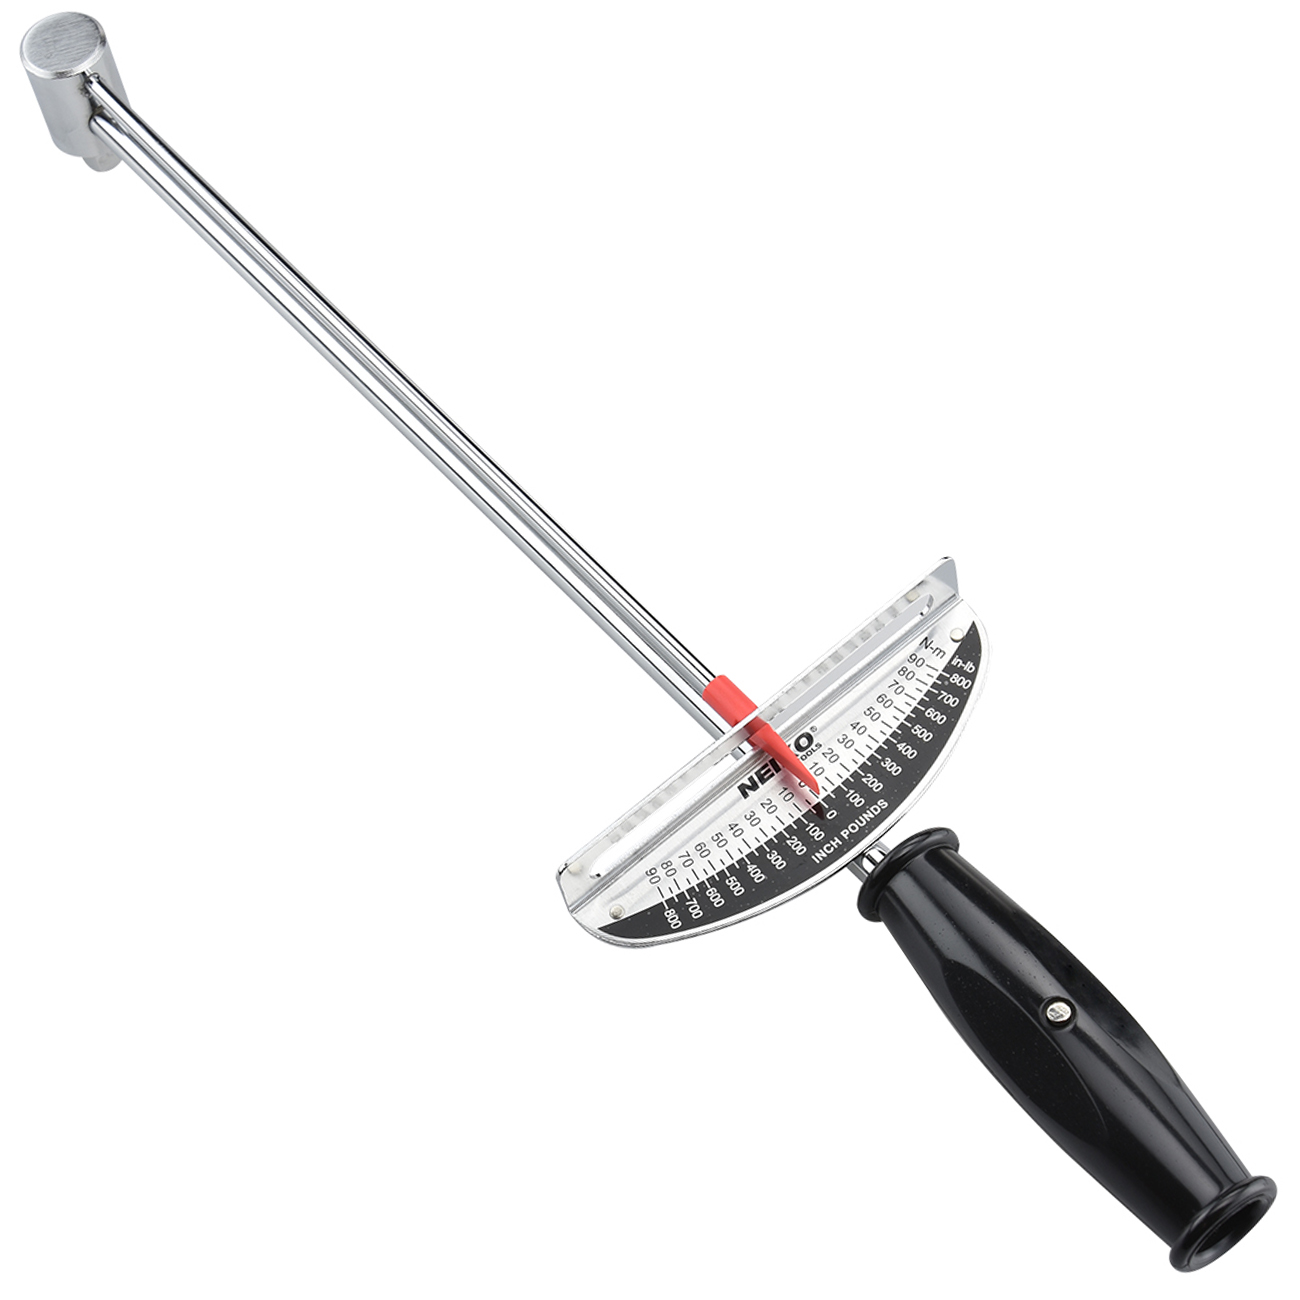
All the torque specifications needed are either in the factory service manual, or, if using the 9mm rod bolts, the Frank Honsowetz book How To Hotrod Your L Series Engine. Use the factory service manual, or the book by Mr. Honsowetz. I’m not sure what you mean here. Did you use a torque wrench like this? A beam type, or a dial type are the only types of torque wrench that will allow you to see the force required to move a fastener, i. e. how tight it was. Once the fastener is moved, it will no longer be at the proper torque. Using a click type torque wrench cannot do this with any degree of accuracy. You need to measure the shank of the bolt, not the end of the threads sticking out of the nut. Again, the factory service manual will have everything you need to know, including proper bearing clearance. I’m a little confused Wally. You mentioned you checked the torque on the fasteners, but now say you haven’t opened your torque wrench. Also, as an aside, having never opened your torque wrench, how did you tighten the lug nuts on your wheels? Sorry for getting off topic, but lug nuts should always be torqued to specification.


-
Interesting how they used paint to mark self locking nuts, which will never come loose, but nothing on the differential cover bolts, which have nothing save for a lock washer under the head.
-
It would have been a good idea to talk with the guy before going to all the fuss you’ve gone through at this point. You would simply relate the concern and allow them to respond. I suspect the rebuild cost a few bucks, and you work hard for that money. You have every right to expect a quality product, eh? Should you decide to talk with the guy, don’t tell him all that you have done so far, as that would cloud the issue. Simply let them know that you have a concern about low oil pressure, and let them decide how they will address it.
-
Yes, the best way is to remove everything, and measure, and figure the difference. But as mentioned, plastigauge is what you would use in this case. Remove one bearing cap, wipe the journal and bearing shell with a clean, lint free cloth (I cannot overemphasize the importance of cleanliness), lay a line of plastigauge on per the instructions, replace the bearing cap (with the bearing shell), install and torque the fasteners, remove the cap and check the plastigauge against the standard printed on the paper sleeve the plastigauge came in (I cut a length of the sleeve a little narrower than the journal so I’m not trying to lay 6” of paper sleeve on it). After making a note of the reading, clean the plastigauge with a bit of denatured or isopropyl alcohol, and after ensuring the journal and bearing shell are clean, apply some assembly lube and reinstall, torquing fasteners to spec. Do not rotate the crank during this process, as doing so will smear the plastigauge and skew the results. You will need to rotate the crank for each rod journal, to the bottom of the stroke (precision isn’t a concern, you are only moving the journal to a position where it is easier to access). As I mentioned, now is the time to do this. All main bearings, and rod bearings can be checked, just only do one at a time. Work methodically, and remember, cleanliness is crucial. I’m confident that if you know how to handle tools, and feel ok using a torque wrench, you can do it. Thanks for the information about the time on the engine. I have to ask, why haven’t you engaged the builder about this? If I paid someone else to rebuild an engine, and it only had 100 miles on it, I would look to them to resolve it.
-
Doesn’t the Z rubber guy reproduce those? If not, you may be able to find a suitable replacement from a newer car. If you own something newer, start by looking it over. Bound to be something on a newer car that can be made to work.
-
I know your experience causes you to be reticent to do so, but now is the perfect time to check bearing clearances to rule them out as a cause, or determine if there is a problem. You’ll also be able to asses the condition of the bearing shells. Did you mention how many miles on this engine since the rebuild? How many oil changes?
-
So clean the threads, both in the block and on the bolts. Blue thread locker is supposed to be removable, red is intended for a more permanent lock. I use red for things like this, as it isn’t impossible to remove, and the bolts are less likely to come loose.
-
No offense taken Zed. Notice the post where I mention the rule of thumb for oil pressures, never did I indicate that 10-13 is ok at anything but idle. Also notice comments about all the possible reasons for low oil pressure. Again, I don’t see any purpose in repeating what I have already posted.
-
I would also add that if the pickup was loose, and air was getting into the lubrication system, the oil pump, rod and main bearings, camshaft journals, cam followers and cam lobes would be damaged fairly quickly, and horrible noises would be coming from the engine.
-
I’ve already made recommendations going forward. So far Wally hasn’t followed them. He even ignored my recommendation to not run the engine with the cam cover removed. Simply turning the engine by hand, or with the starter while the ignition is disabled, will move enough oil to determine if the system is pushing oil to the valvetrain.
-
Someone is selling these? Who? I agree. If the ball can be depressed with a finger, and is clearly free to open when needed, there isn’t any reason to mess with it.
-
If the oil pickup was loose enough to allow air into the oil passages, then the oil would get foamy. The oil in the videos doesn’t look like it has air in it (although the video quality is poor)
-
I’m going to make it sound like an echo chamber. Where did you get that awesome looking wheel at?
-
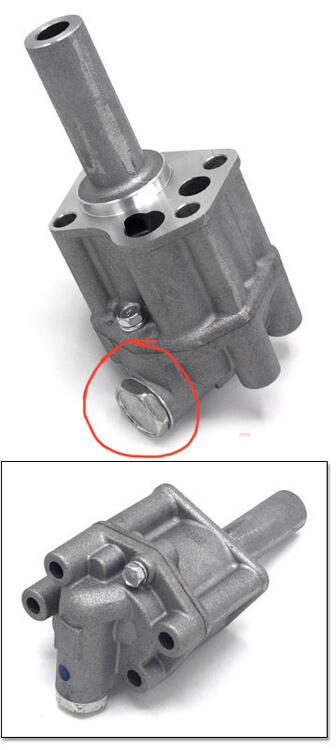
That is the relief I mentioned. I have worked through many different combinations of spring setups to tune the oil pump for the race engines I build. I’ve used two springs, one inside the other, single springs of varying rates, and made shims to fine tune the pressure in the system. The rule of thumb for oil pressure, in any engine, is 10 pounds for every 1,000 rpm. So at 5,000 rpm you want to see at least 50 psi, 8,000 rpm (yes, I turn these engines that fast) you need 80 psi. A couple pounds more is OK, a couple pounds less, not so much. The spring and valve are under the fitting circled in red.
-
So Wally, this engine was running fine, and oil pressure was good, correct? If so, then there is really only a few things it could be. 1. The oil pressure relief spring may have broken, or lost its springiness. This would result in low, or inconsistent oil pressure. The spring can be removed without removing the pump. An easy check. 2. The builder didn’t use thread locker on the oil pickup where it attaches to the bottom of the cylinder block, and the bolts have come loose. This would result in air getting sucked in and the oil would get bubbles in it. You would see this on the dipstick and in the oil you splashed everywhere when running the engine with the cam cover removed. I doubt this is the problem. 3. the bearing clearances have somehow become too large. Excessive bearing clearances will definitely result in low oil pressure, but there will also be an accompanying knock as the rods and main bearings rattle about. Again, I don’t think this is the issue, as an engine doesn’t last long when this occurs. 4. If you reused the old oil pump, and it wasn’t disassembled, cleaned, and inspected to verify adequate clearances, it could be the cause of low oil pressure. 5. The correct amount of oil in the crankcase, and the correct dipstick. The oil sump capacity is 5 quarts if I remember correctly. Starting with an empty crankcase, and a new filter (should hold about one quart), refill the engine with the correct amount of oil, start it up, run for a minute, then shut it off. After waiting five or ten minutes, check the oil level. It should be within the high and low marks on the dipstick. (as for the question of the correct dipstick, have you replaced it with the one that was with the engine originally?)
-
Because the F indicates front, and R indicates rear. The master cylinder is two cylinders in tandem. One is designed to supply the proper amount of volume to the front calipers (which require significantly more volume than the rear wheel cylinders), the other designed to provide the correct volume for the rear. Get them mixed up and the brakes won’t perform correctly.