Racer X
Free Member
-
Joined
-
Last visited
Everything posted by Racer X
-

-
First, the engine doesn’t have a timing belt, it has a chain. And whoever pulled the head didn’t block the chain, and the tensioner, so before the head can be reinstalled, the front cover will have to come off, and the tensioner reset, as well as the timing. The pistons and combustion chambers look like they don’t have a lot of time on them, but the top of the cylinders look like they do, and the cooling passages towards the front of the block look clogged and the rest of the visible cooling passages look too corroded. There does appear to be something not right, like Zed pointed out, but I’d rather not comment based on pictures alone. Detonation will burn the tops of the pistons, eventually burning holes through the piston tops. Detonation can also break the ring lands, and rings, something that may or may not be visible without removing the pistons. The part of the valves that need inspection can’t be seen while they are installed in the head. I see someone spent a bit extra and sprung for head studs. You mention a turbocharger. What kind of fuel delivery? Carburetor? Injection? The pistons don’t look like the kind used in a turbocharged engine. Usually a dished piston is used, not a flat top. Tuning a high compression turbocharged engine is difficult, eliminating detonation requiring very high octane fuel, ultra precision fuel delivery and ignition timing. Looks like you have some work to do.
-
Fresh air vent I believe.
-
I quit using thread tape when the Teflon thread paste came out. Easy enough to apply to one thread, one complete circuit around, and not the whole fitting. The tape is easily over used, with excess coming loose and going places you don’t want it. And you need a thread sealant on BSP threads too, any tapered thread that is sealing fluids should have a sealant.
-
Yes, the opening is at the very lowest point in the cooling jacket. Rust scale builds up along both sides of the passages around the cylinders. I’ve seen them so full of sediment that simply picking what could be reached didn’t get the passage open. After getting a block back from the machine shop I always reach down from the cylinder deck through the coolant passage holes with a tool I made to break as much loose as I can, and get the passages as clean as possible.
-
If it was a head gasket leak, the coolant trail would start at the parting line between the head and the block, most likely close to where the the bores are closest to the side of the block. A small side note, checking cylinder head bolts for tightness is part of the routine valve lash check and adjustment. I have found, and corrected, many loose head bolts this way, and averted a head gasket failure. As mentioned, the item circled is the drain for the cooling jacket around the cylinders, and yes, there is a standard male pipe fitting that will fit. I always put a brass petcock in the engines I build, the brass conforms easily to the BSP threads, and I use a small amount of Teflon thread paste to ensure a good seal. Makes for easy draining of the cooling system for maintenance and tear downs.
-
A Honda swapped Z sold for $95,000 on BAT. https://bringatrailer.com/listing/1974-datsun-260z-68/
-
When measuring resistance there isn’t any polarity. You either get an ohm reading or you don’t. If the reading is a negative value something isn’t right. Try the measurement again, ensuring good contact of both probes.
-
Adding a spacer between the intake manifold and cylinder head is adding to the stack up, and asking for more leaks. The two places you say the header pipe is contacting the underside of the intake manifold don’t make sense. There is only one exhaust outlet there, and the pipe couldn’t touch the intake manifold in both places. I would suggest you install all the studs, then then the washers (yokes), and the bolts, for both the header and intake manifold, snug them all up and see where everything winds up. If the header still interferes with the intake manifold then the tubing is what needs adjustment, i.e. removed and replaced with a piece more appropriately bent to fit. Or, you could eliminate the intake manifold heating circuit and cut away the coolant passages.
-
Nice build page. Love the wallpaper in your garage.
-
To check continuity of a connection, that connection must be intact. Testing as you described doesn’t do that, it only tests the circuit through the wire, back through the system to the point on the chassis where you touch the probe. To check the integrity of a ground (or any connection) ensure the ground is clean, bright and tight. Then set the dvom to ohms, and using sharp probes, pierce the installation of the wire about 1/2” from the connection with one probe (polarity doesn’t matter here), then pierce the finish of the chassis about 1/2” away from the connection with the other probe. There should be some resistance, the lower the better.
-
You need to check the grounds for continuity from the wire to the chassis. If there is no continuity at the grounds, you could put a thousand volts into the wire from the battery side and the light will not illuminate. All grounds need to be bright and tight.
-
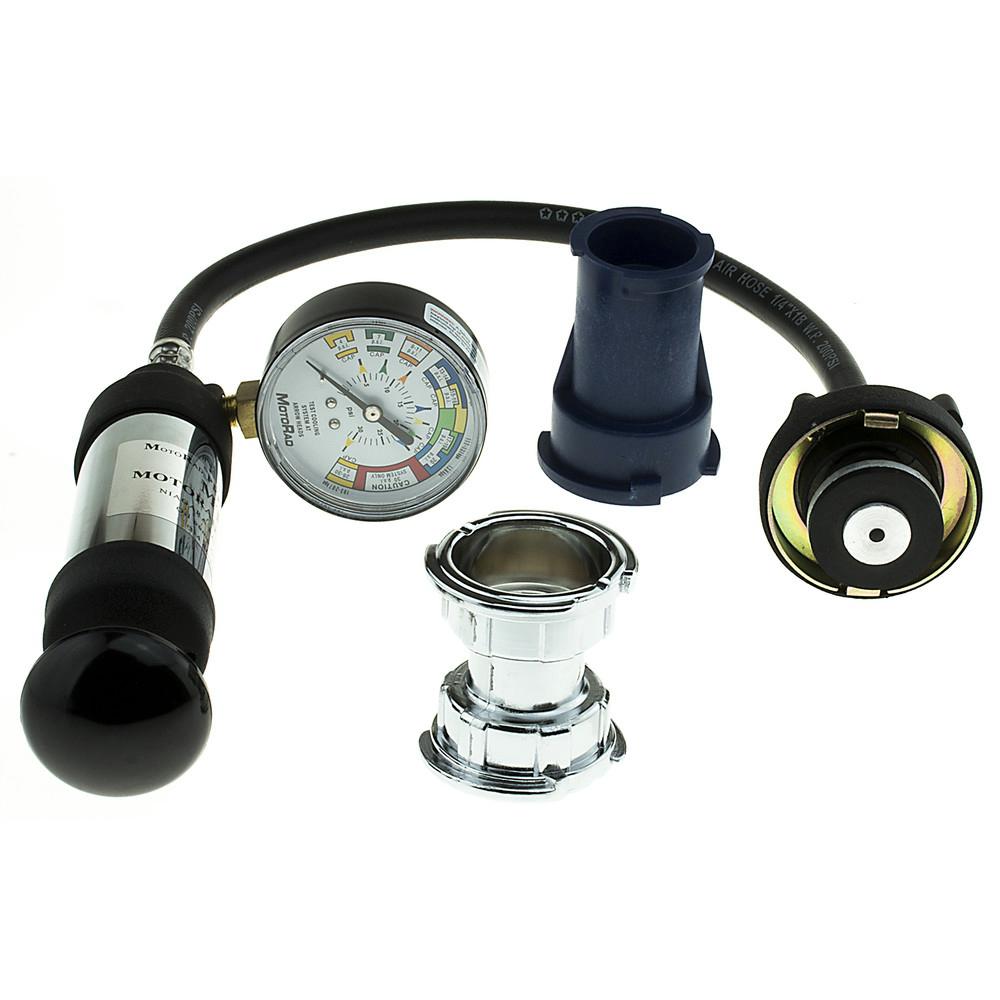
I just went through the whole thread, and see all the stuff you have done. The only two things that I don’t see that haven’t been done, and should have been done first, is a system pressure test, and check the radiator cap for pressure. Use a cooling system pressure tester to pressurize the system and then watch to see if it holds pressure. It can also be used to check the radiator cap. Local parts stores rent them if you don’t wish to purchase one. I have found two at garage sales for a couple of bucks. If there is a loss of pressure, the cause needs to be found and corrected. Sometimes it is simply a loose hose clamp, but it could also be a failing head gasket. There has been discussion about the boiling point of water, and the boiling point of the coolant mixture, but no one has mentioned that the boiling point is raised buy increasing pressure in the cooling system. I forget the precise numbers, but that is the function of the radiator cap, to increase pressure and raise the boiling point. This helps the coolant to carry the heat to the radiator, which then dissipates the heat befor the coolant is returned to the engine to collect more heat. Also, are you using ordinary tap water, or distilled water. Tap water will have minerals, and even worse in your area, iron. This leads to excess scale and rust in the cooling passages, and contributes to electrolysis.

-
I saw that comment earlier. But as Zed pointed out, the thermostat holds coolant flow back until the system reaches operating temperature. If the engine is running too hot, it is likely a problem with the radiator, the smaller cooling passages in the cylinder head, or the impellers of the water pump eroded from electrolysis. (I have seen water pump impellers eroded to nearly nothing as a result of poor cooling system maintenance.)
-
Forty five bucks for a thermostat? Buy one at NAPA. About $10. I can guarantee that your classic Z won’t know the difference. Used a NAPA thermostat on engines in my race Z, never had cooling system troubles. (I must say that when running hard, as during a race, the oil system needs a cooler, as the oil also carries heat away from the engine.)
-
Went into town late this afternoon, it was dark as I drove back into the country, and down the dark country lane that leads home. The sight of our home, lights in the windows, reminded me of this.
-
Every now and then the email links to new listings goes to spam. I contacted BAT regarding the problem, and they never replied. The innernet is a wild and dangerous place. Nefarious characters lurking at every turn, ready to pounce and rip one to bits.
-
Do you have an account?
-
Well then, if we are all getting the nag, it must be real and not some hackers trying to scam us. Thanks guyz.
-
Anybody else getting pestered by BAT to “strengthen” their password? I started seeing a banner at the top of each page today, and a few minutes ago there was an e-mail pestering me about it.
-
I still think that since the entire system isn’t fully connected and grounded the lights are back feeding somewhere.
-
Do you have everything connected as it will be when the car is finished, including all grounds? It is possible that the system is back feeding if parts of it aren’t fully connected and grounded.
-
If it were mine I might use satin, if it is available. I’d even go to the local automotive paint and auto body supply shop and see what they have. I think 3M used to have a line of specialized finishes, and some of the paint shops offer loading material in rattle cans for hobbyists like us.
-
There are upholstery spray finishes available. The previous owner of my 72 used black to change the interior color from the original butterscotch color. It has held up well, only showing wear in a couple places on the doorcards, the plastic finishers in the rear area still have a convincing black finish. Prep is key to successful refinishing of any surface. I would recommend using denatured alcohol or isopropyl alcohol (not rubbing alcohol) as a suitable solvent. Wet wipe with clean wipers, dry wipe before the alcohol evaporates, repeat several times, always using fresh, clean wipers for every step. Disposable paper shop towels are better than reusable cloth, which may have residue from laundering that will contaminate the surface. The main ingredient in products like Armor All is silicone. Although it makes things look shiny and new, paint will not adhere to it. Be sure to clean the console inside and out, as any residual silicone will ruin the finish. A good final scrub with scotchbrite, saturated with the alcohol, then one last wet wipe, dry wipe with clean paper towels to give the surfaces some tooth. Apply the finish in a clean, dry environment, within the recommended temperature range. Your mileage may vary.
-
Sold for: £34,875.