kutukutu1
Member
-
Joined
-
Last visited
Everything posted by kutukutu1
-
Finally was able to get the half shafts off. It looks like there are no clips in there. Pictures attached.

-
Thank you. I will take out my half shafts and look for the clip. They are probably missing or i am just not pushing hard enough
-
Thanks for the feed back. Its an LSD from what i know. Wheels spin in the same direction so that says lsd to me. Dont know what type though. I would need to completely remove the stub axle to see the clip? After i take the axle, ensure clips are in the groove, i just insert the axle all the way in and it will clip itself in, correct? You say they look like 280zx axles, and yes there has been modifications to the wheel side, there is a round piece that was welded to the square 4 bolt stock flange.
-
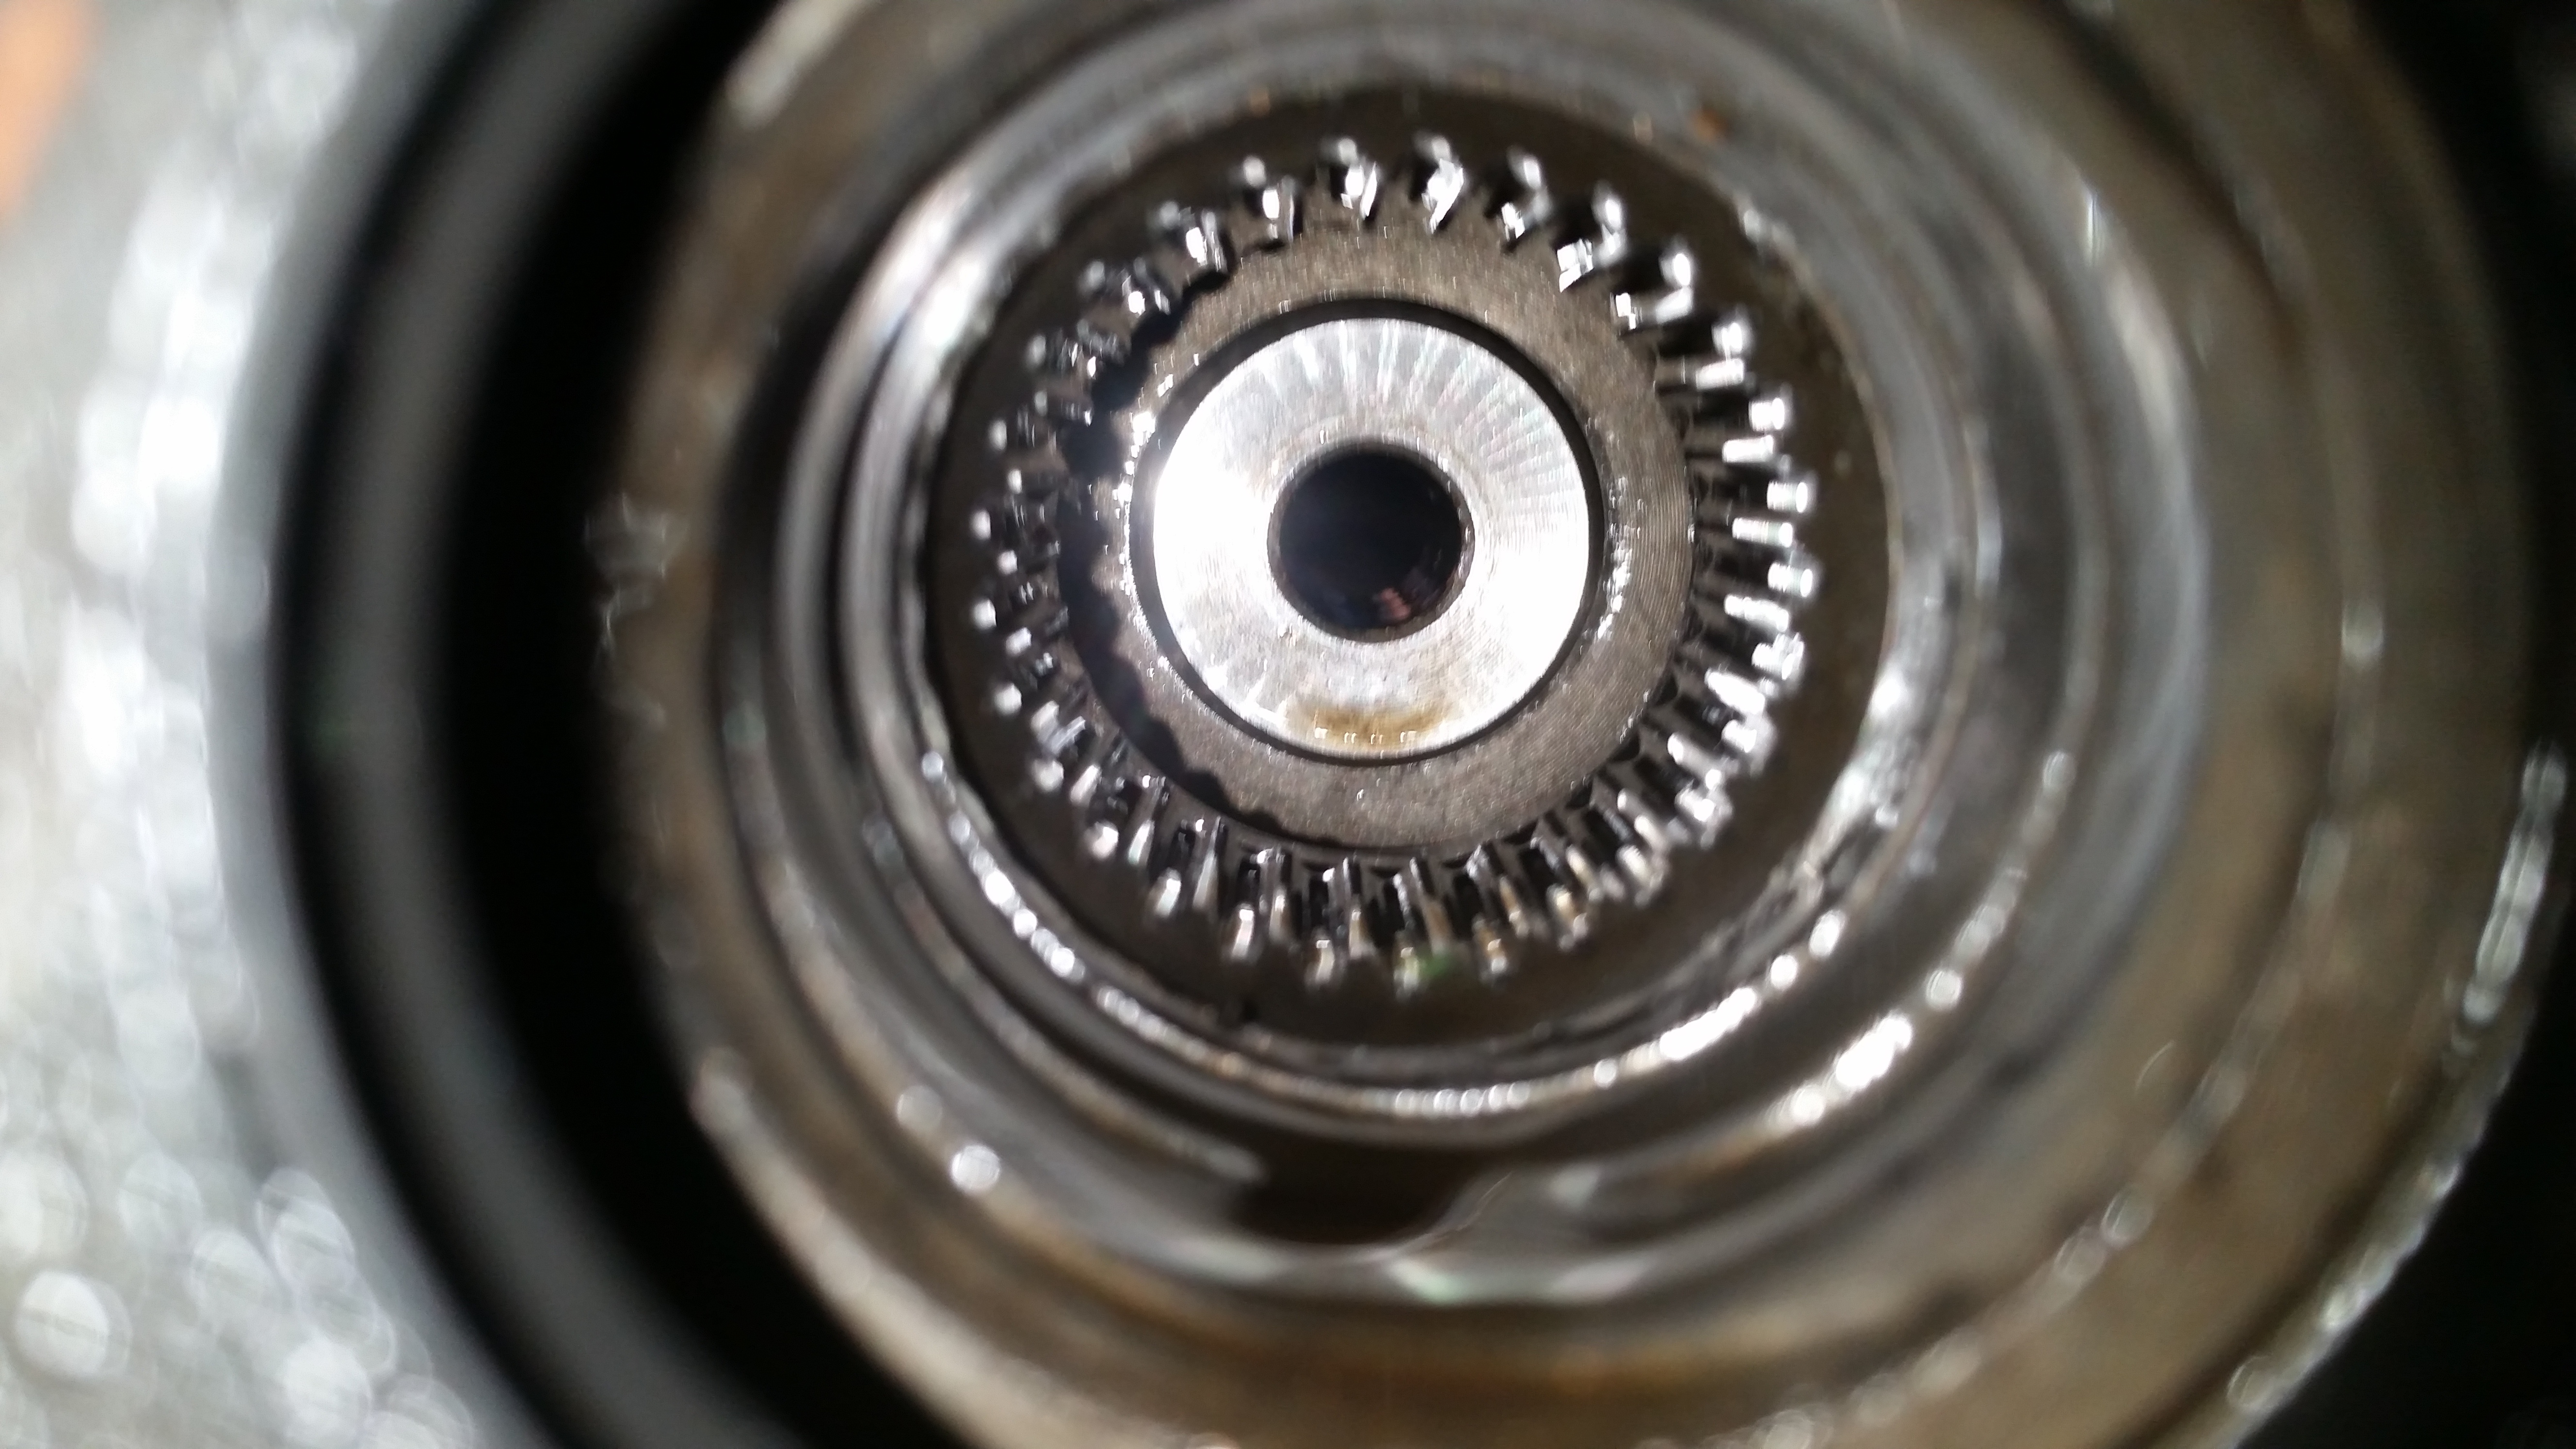
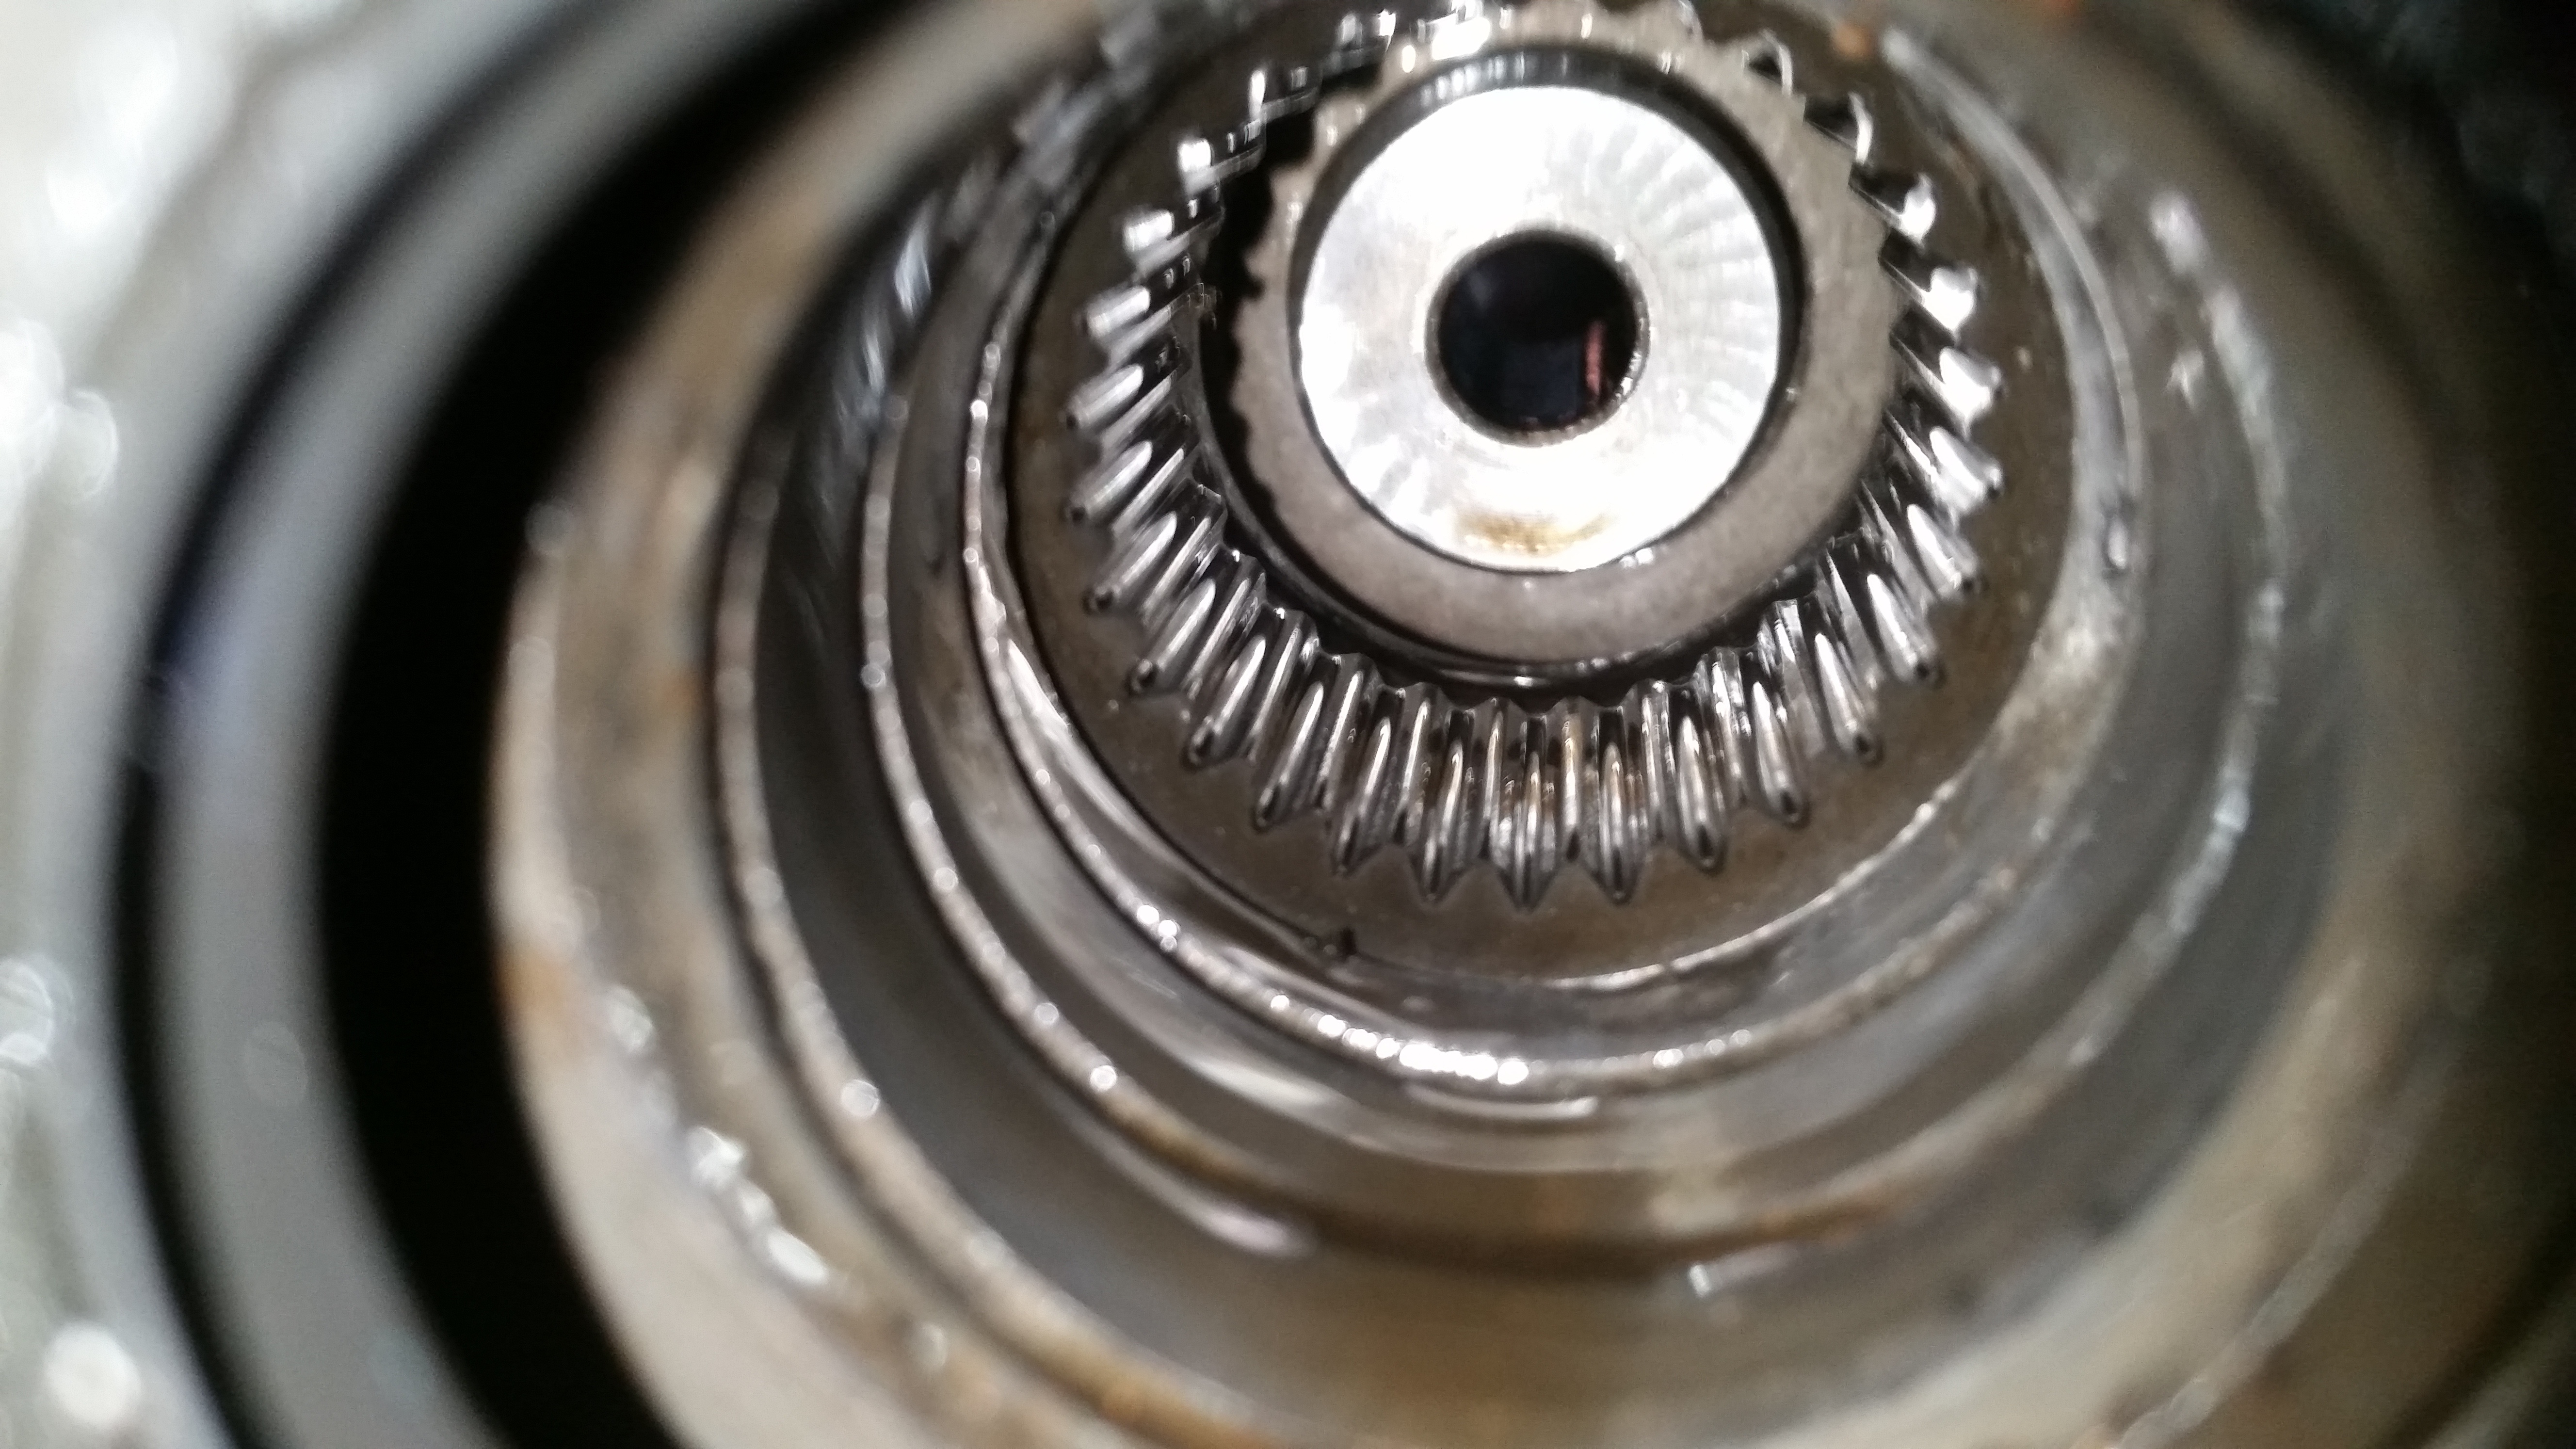
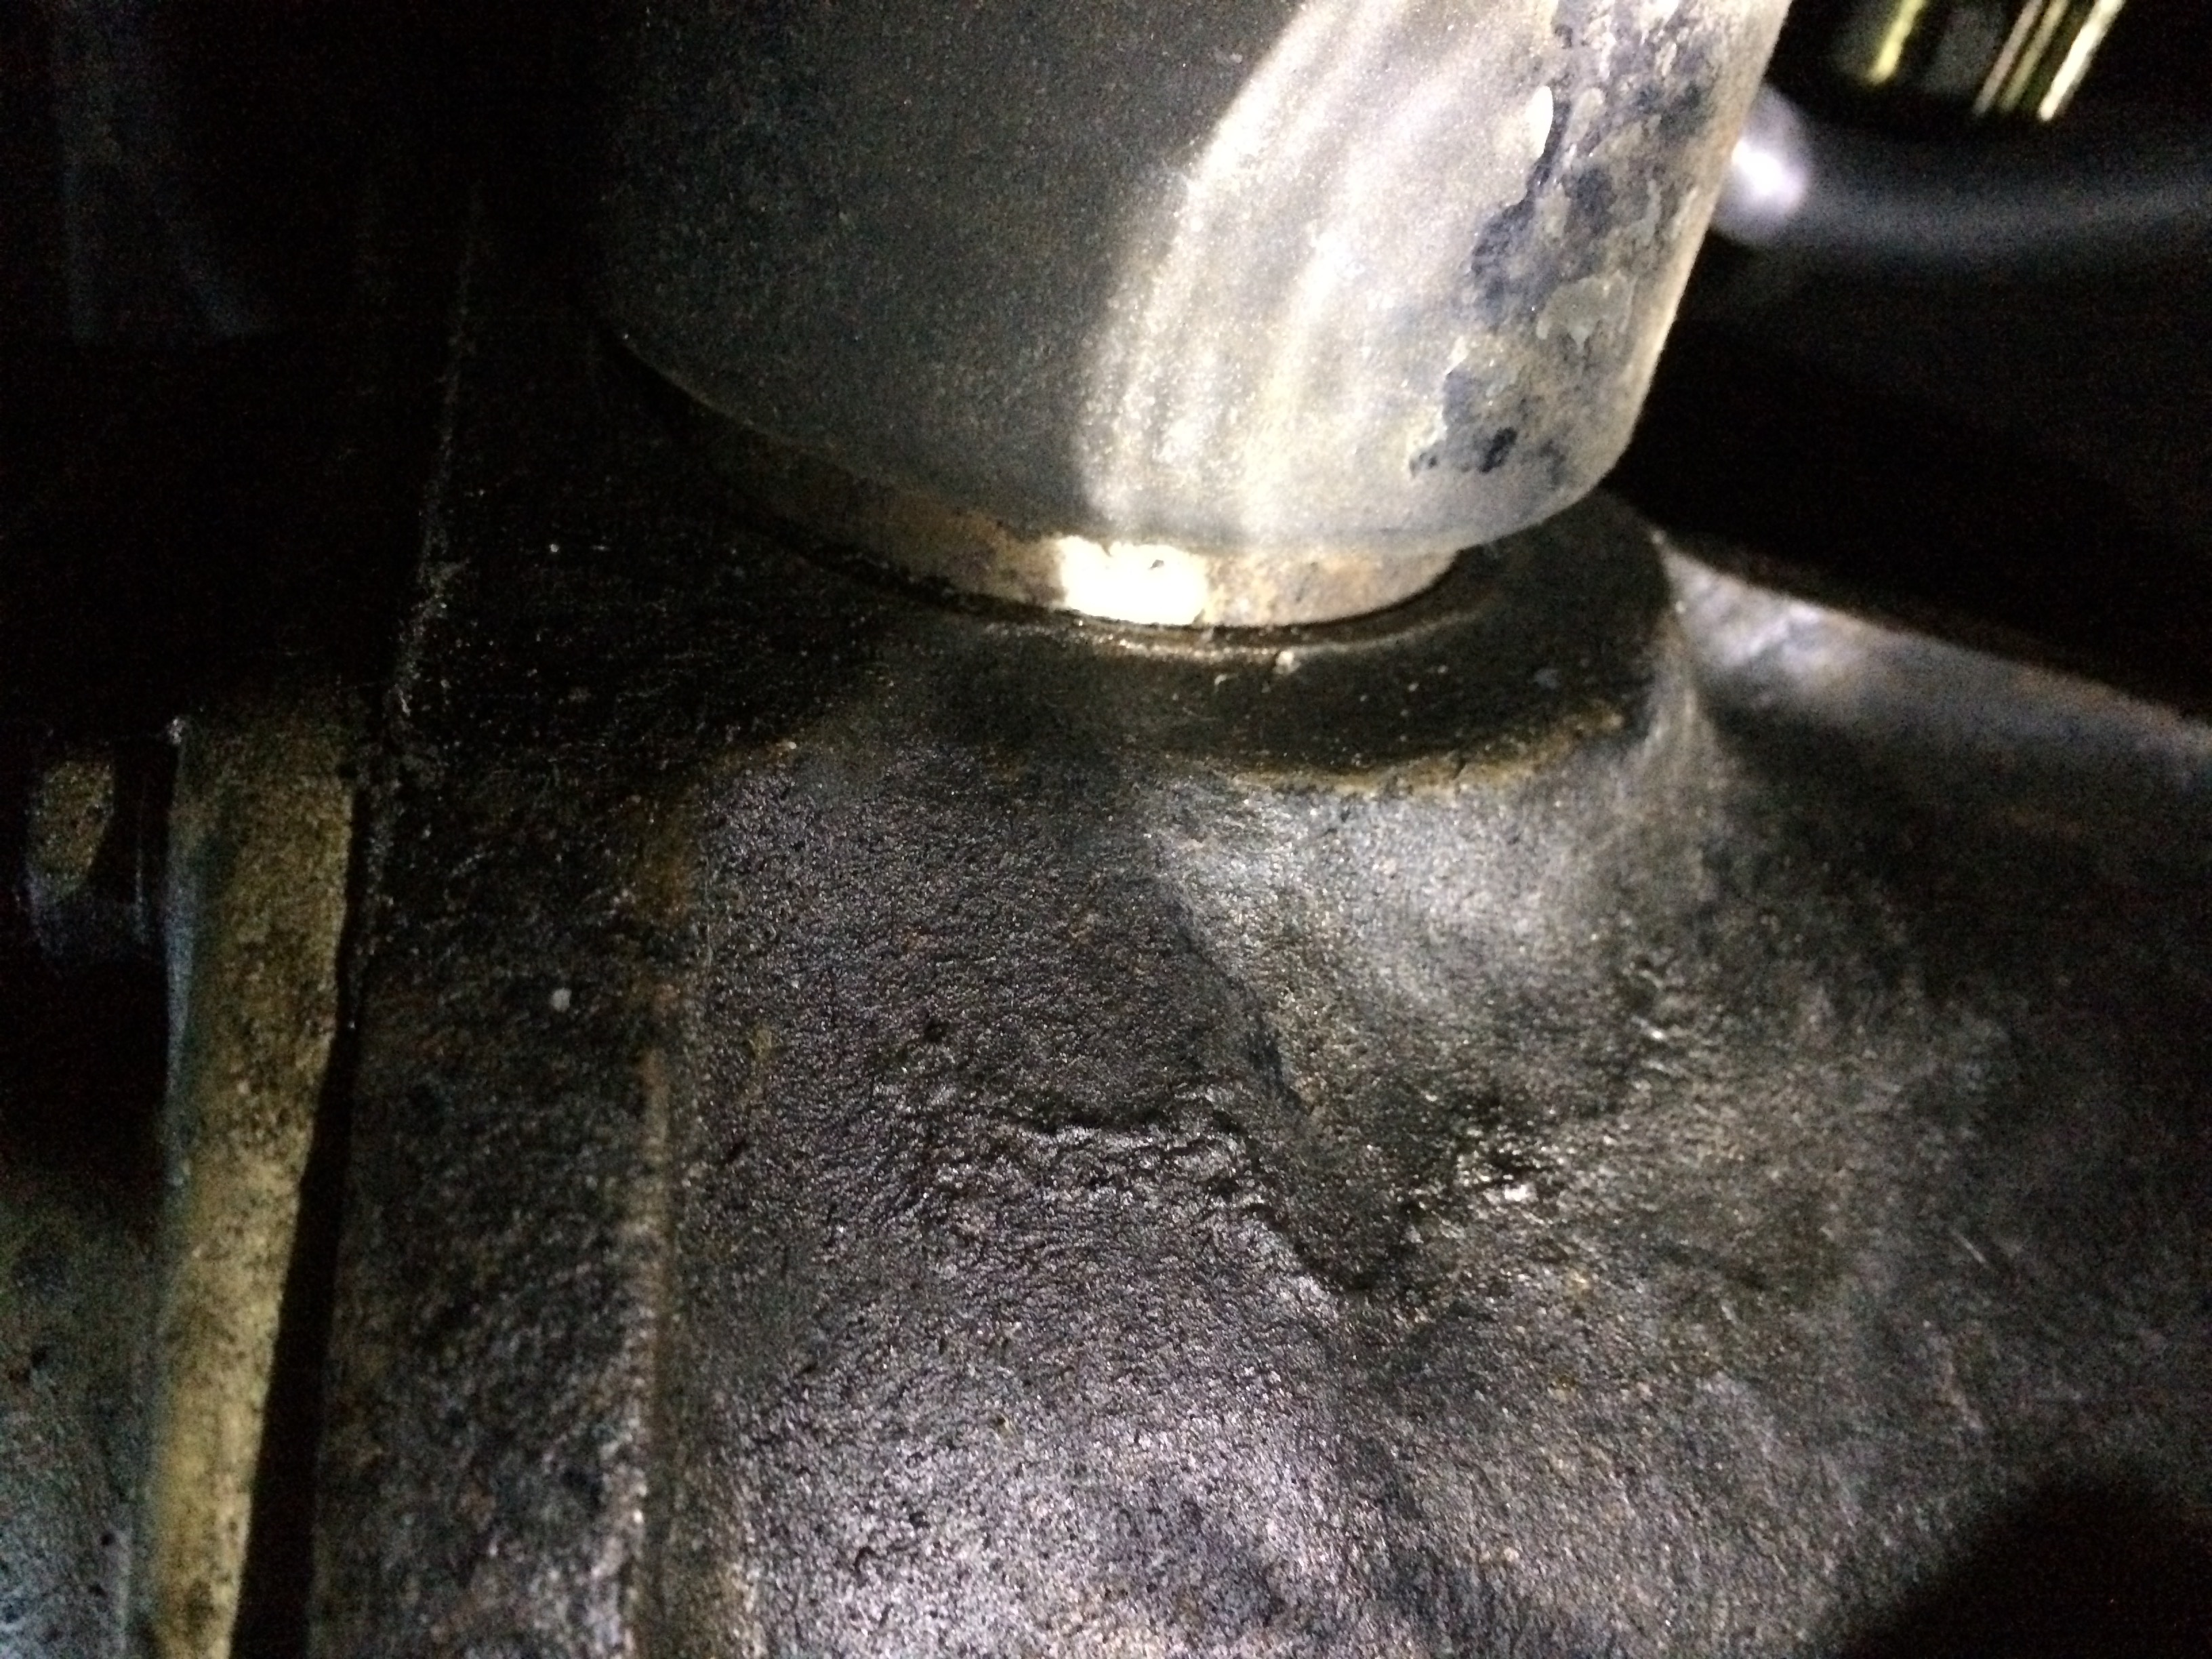
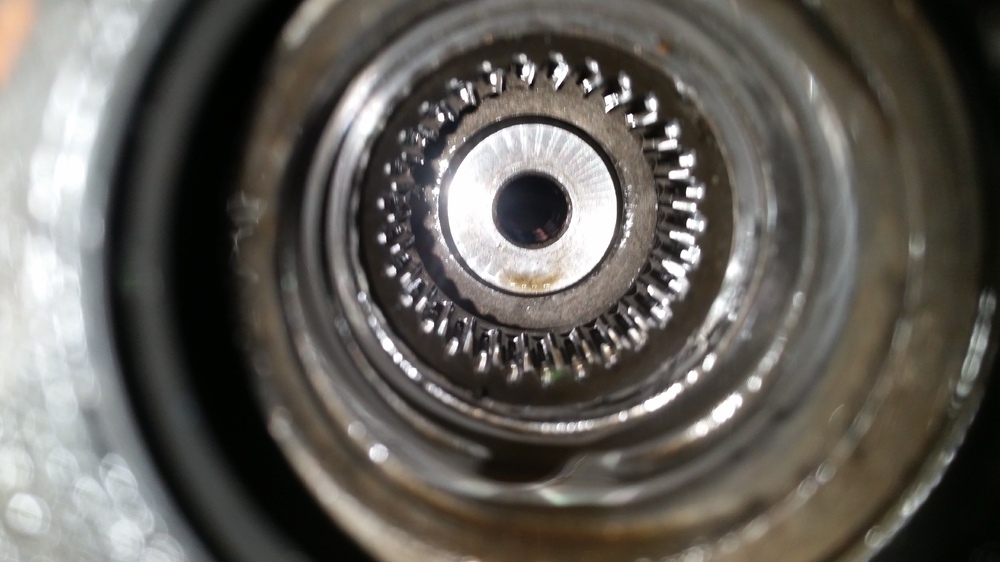
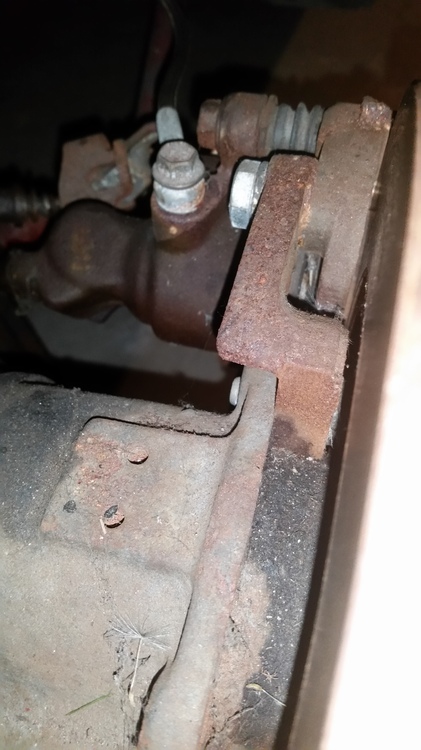
Hello, I have a 78 280z and i knew the diff and half shaft were not stock. By looking at pictures i think its an R200 300zx Turbo LSD diff. My problem is not as much identifying the diff rather than what is going on with my half shafts. The axle stub that goes into the diff does not seem to be retained inside the diff at all. I can move the axle stub in and out of the diff. I cant pull it completely out since its connected to the wheels, but i dont think they are supposed to do that. They also look like they are very close to the inner pivot point of the lower suspension arm and i am afraid with the axle stub being so loosely in the diff that it will make contact with the lower control arm. Can anyone help me and tell me how the damn axle stubs get retained in the diff? Both sides do the same thing. pic 1 is thr axle stub inside the diff. Does not seem to be fully seated and is not retained inside the diff pic 2 is other side of half shaft. Cant be seen in the pic, but the part that is to bolt the cv shaft is welded to the stock 4 bolt flange. pic 3 is diff cover. Thanks


-
-
Thanks for the help. Going thru the FSM, the little lightbulb in my brain stopped flickering and lit up. So i decided to check the check valve. I had checked it and i saw it was functioning, but didnt dawn on me that it could have been backwards. It was backwards. Have to love figuring out DIY work from previous owners. Now it brakes. Thanks you very much for the help
-
Master cylinder and booster were not removed. Should i check that? I have never seen the car with brakes so the previous owner could have removed it and not done it right. Any steps on how to make sure that rubber disc is installed properly?
-
All, I have a 78 280z. The car has the 280zx rear disc conversion. The rear lines had been damaged and leaking. I bought lines, swapped them and bleed all 4 corners and as well as bleed the master cylinder thru the bleeders on it. The pedal is hard as a rock, cant lock the brakes and it takes a lot of pressure to slow down Checked brake booster, it holds vacuum and the pedal felt softer when i drew vacuum so that rules out the booster. I checked vacuum at engine at idle and its riding around 14 to 12 inhg which is low. I checked compression and i get around 145 to 150 psi on the third pump on all cylinders so compression is good. If i pump the pedal then hold and start the car, the pedal does not move further down. I increased the idle rpm and the gauge reading went to about 15 inhg, but still the pedal was hard. I am lost as to what else to do or check, any help is appreciated. Thanks
-
Thanks. Tank is new, i swapped it, old one was shot.
-
Hi Ben, I saw your post on Hybrid z because i have the same issue. You didnt post a solution, Have you found one you can share? thanks
-
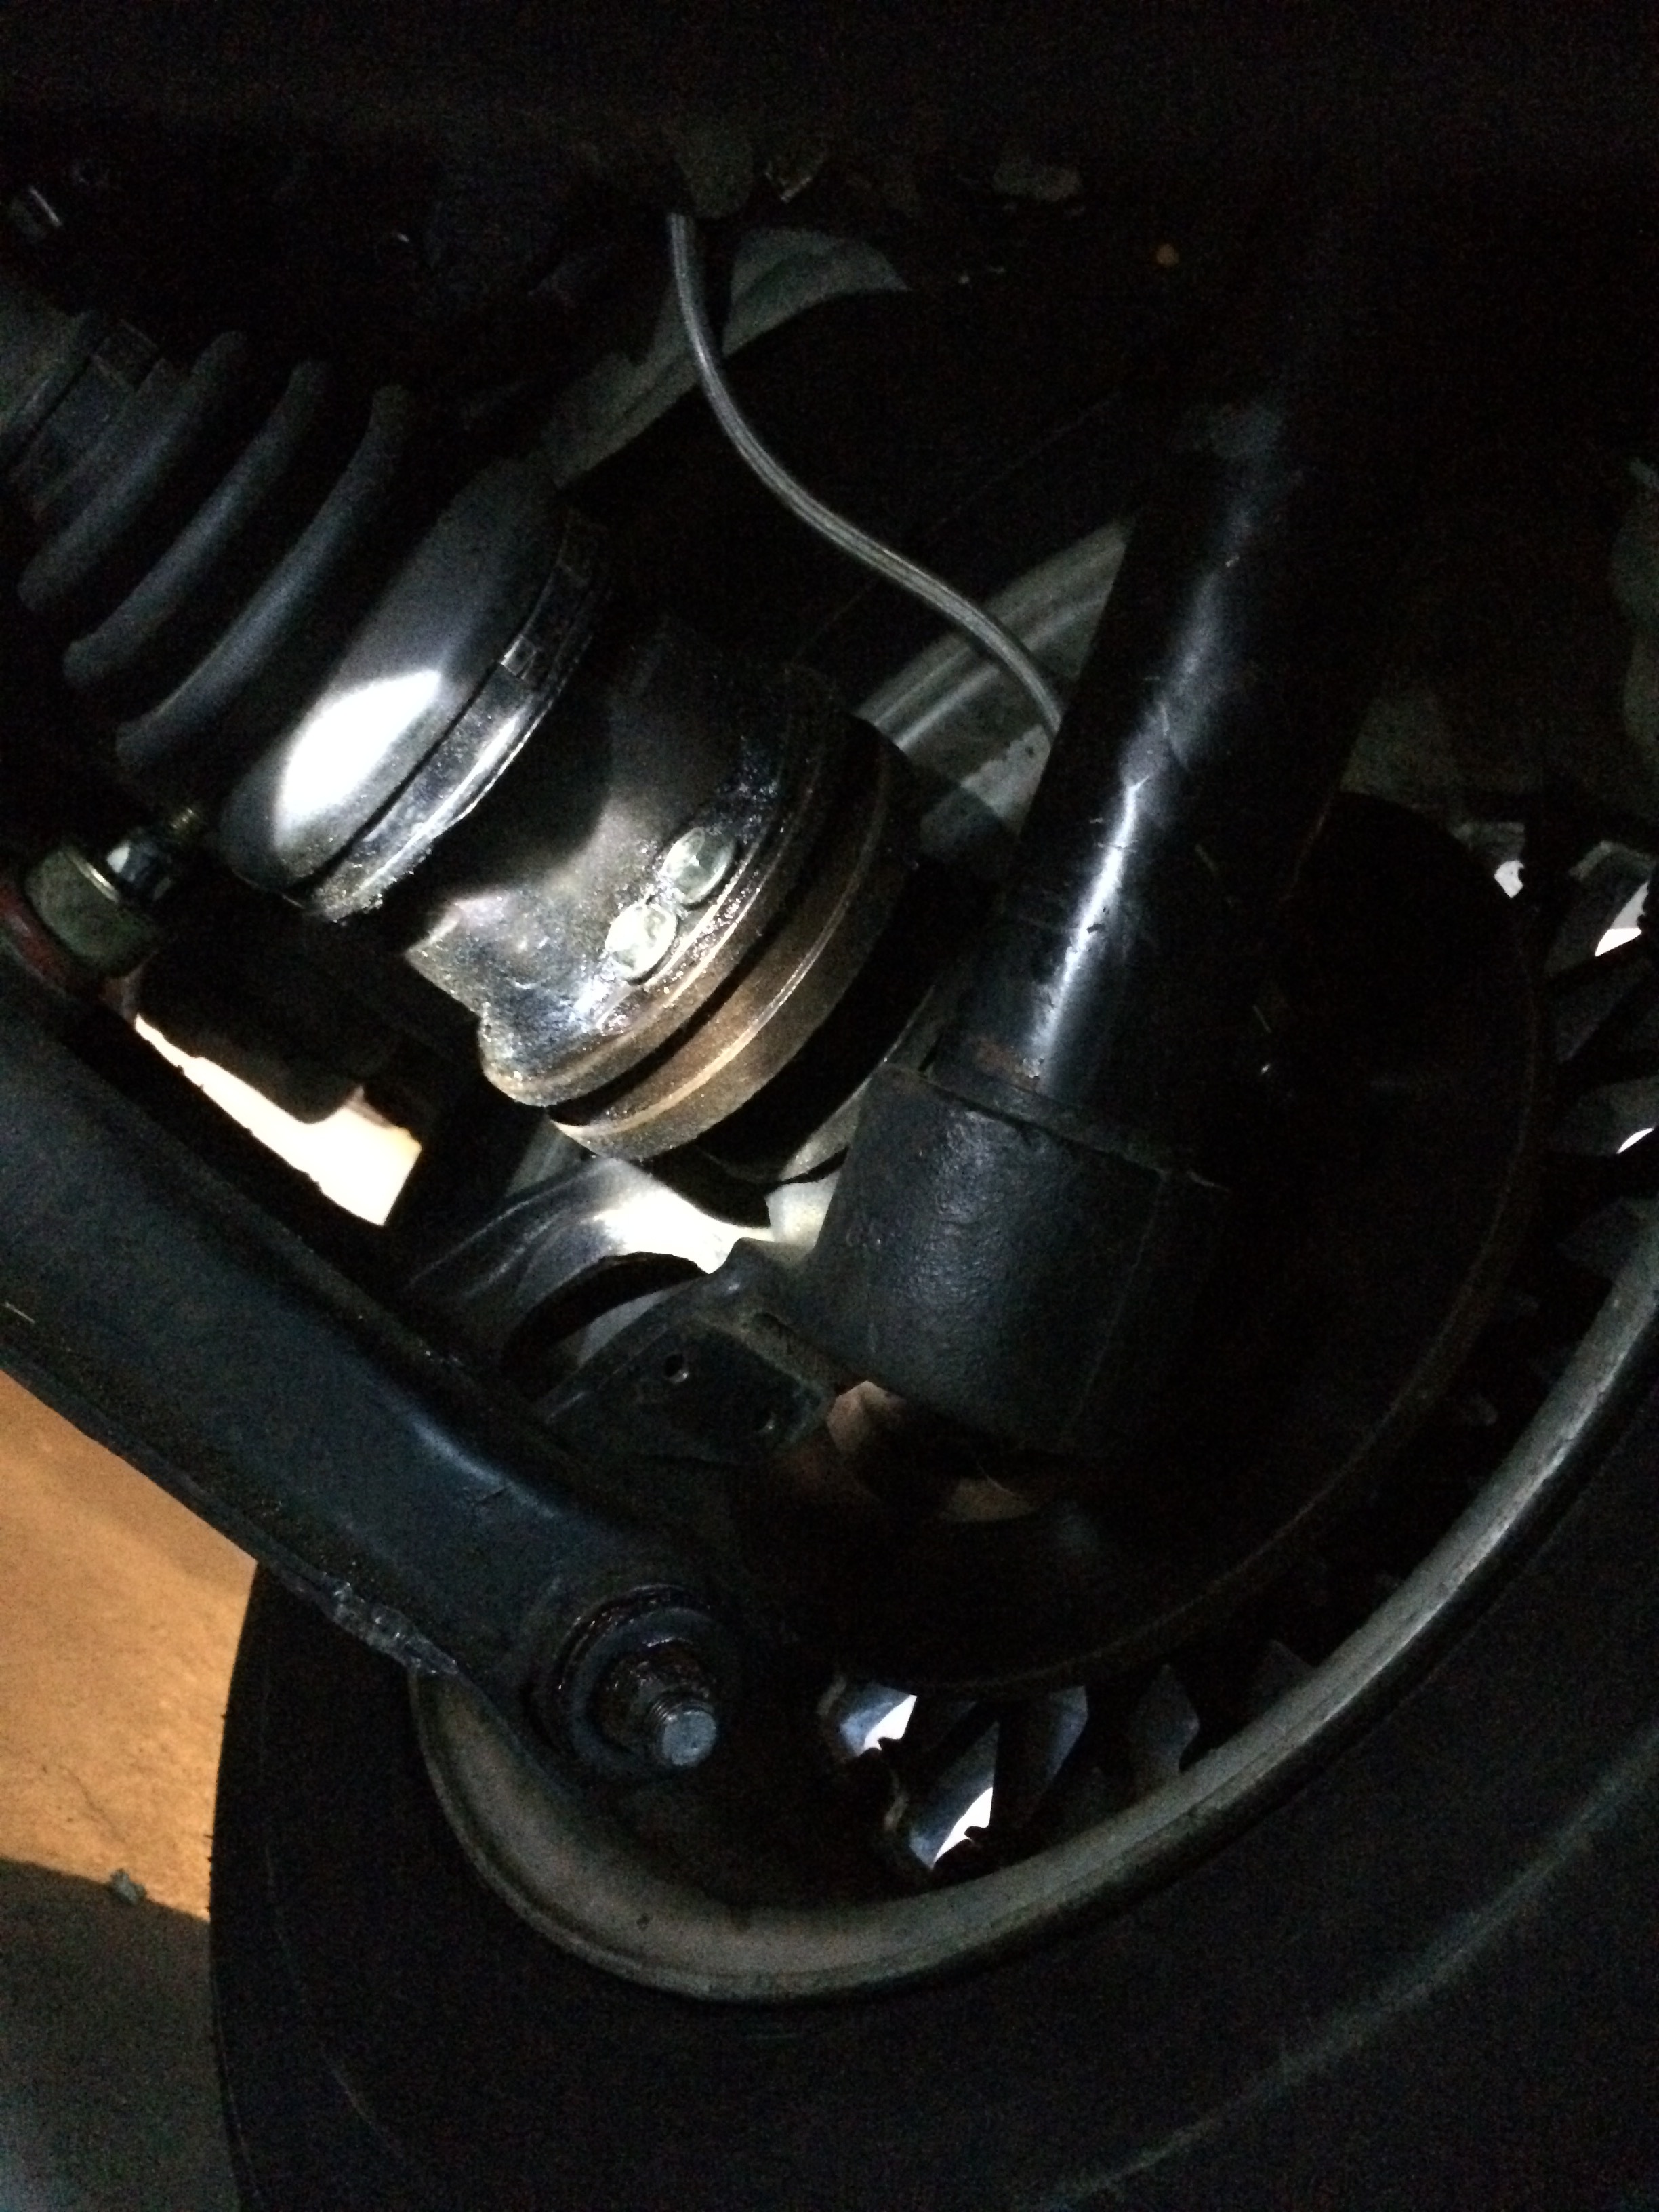
Pictures are on the first post. You can see the ebrake sheath bracket on the first picture. That bracket hits the flex line, you can see in the first picture where it kinked due to the bracket hitting it.
-
I bought a connector for the GM alternator for the L and S. The connector only goes on one way so i wired it as it came. I took out the pins of the connector and swapped them and the car now stays on. I dont know if it runs because the connector came improperly pinned from the person i bought it from or because if the L wire is not connected or connected wrong, the relay will work and the car will turn on. I dont know if what i said makes sense.
-
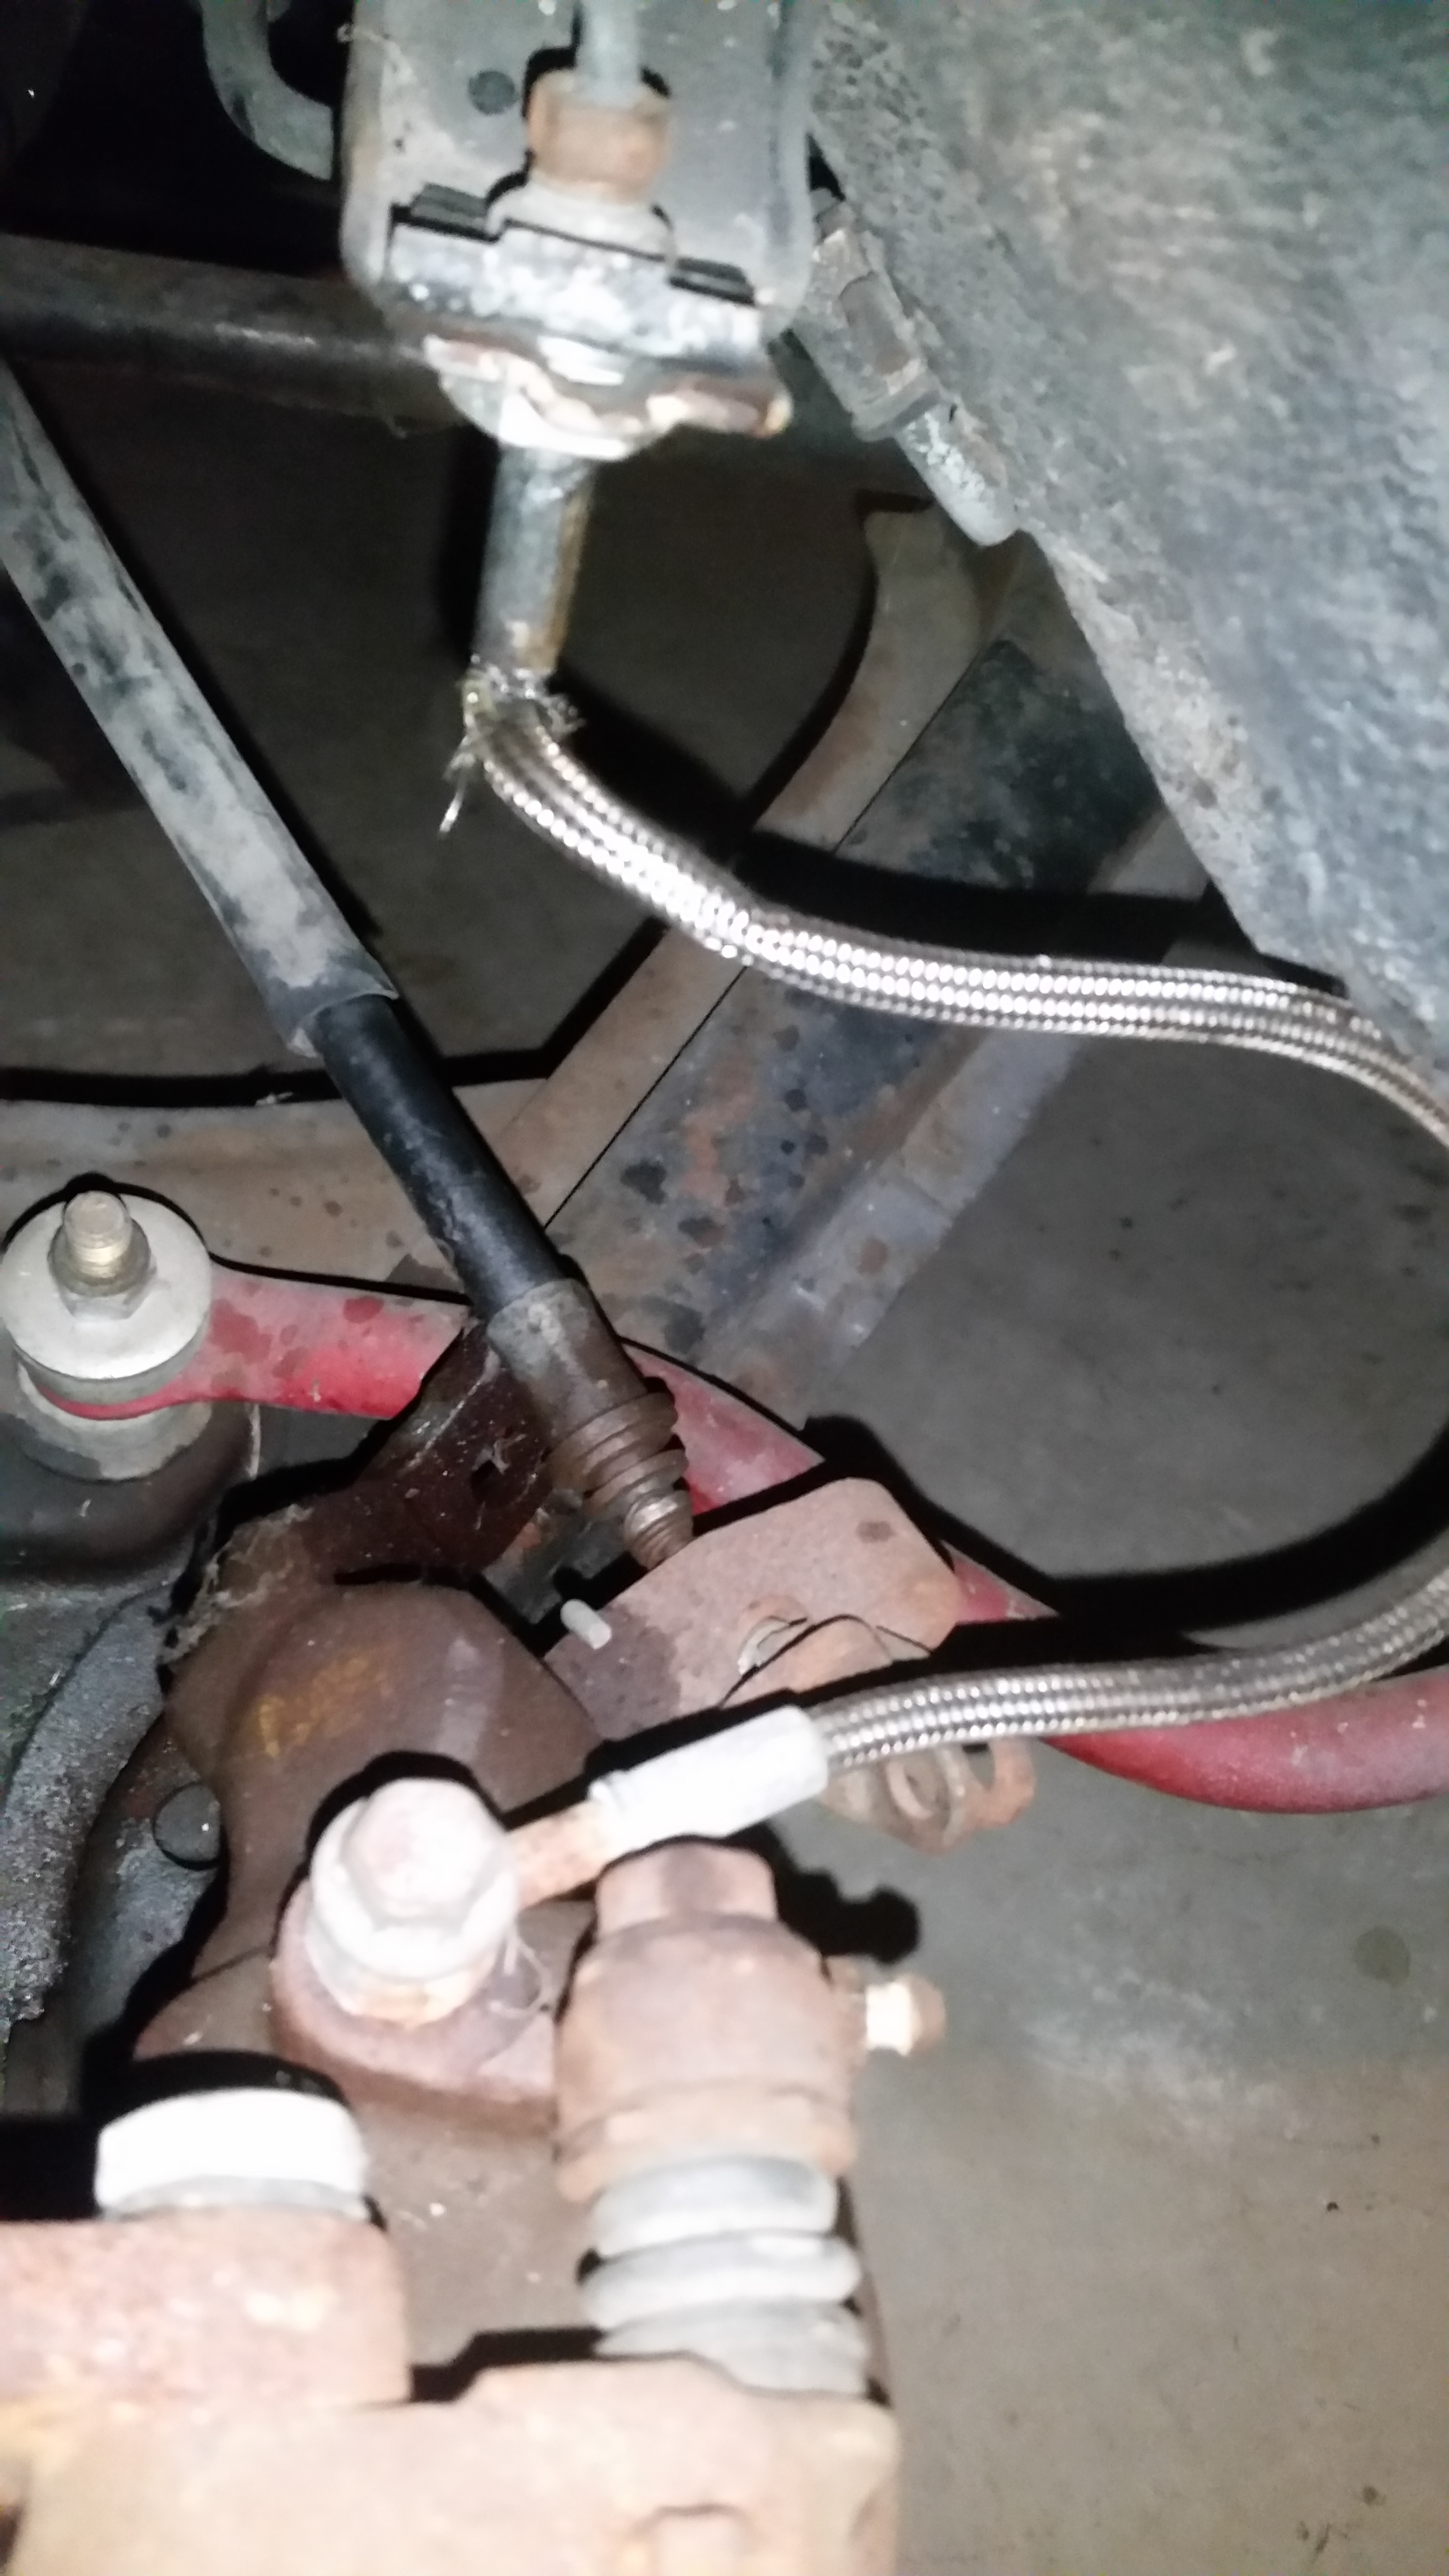
ok, looked thru a bunch of pictures and i have the 280zx rear calipers. Has anyone had the same issue with the ebrake bracket hitting the flex line and damaging it? Did you reroute the hardline out of the way? Any info is appreciated. thanks
-
Ok, so i looked at the relay and it looked ok, so i traced back to the blue alternator wire. Since my alternator dash light was always on, i swapped the 2 connection on the GM alternator and the light went off and now you can see the relay click and it all works great. I ask because the dash light now does not turn on, even when i put the key in "acc".
-
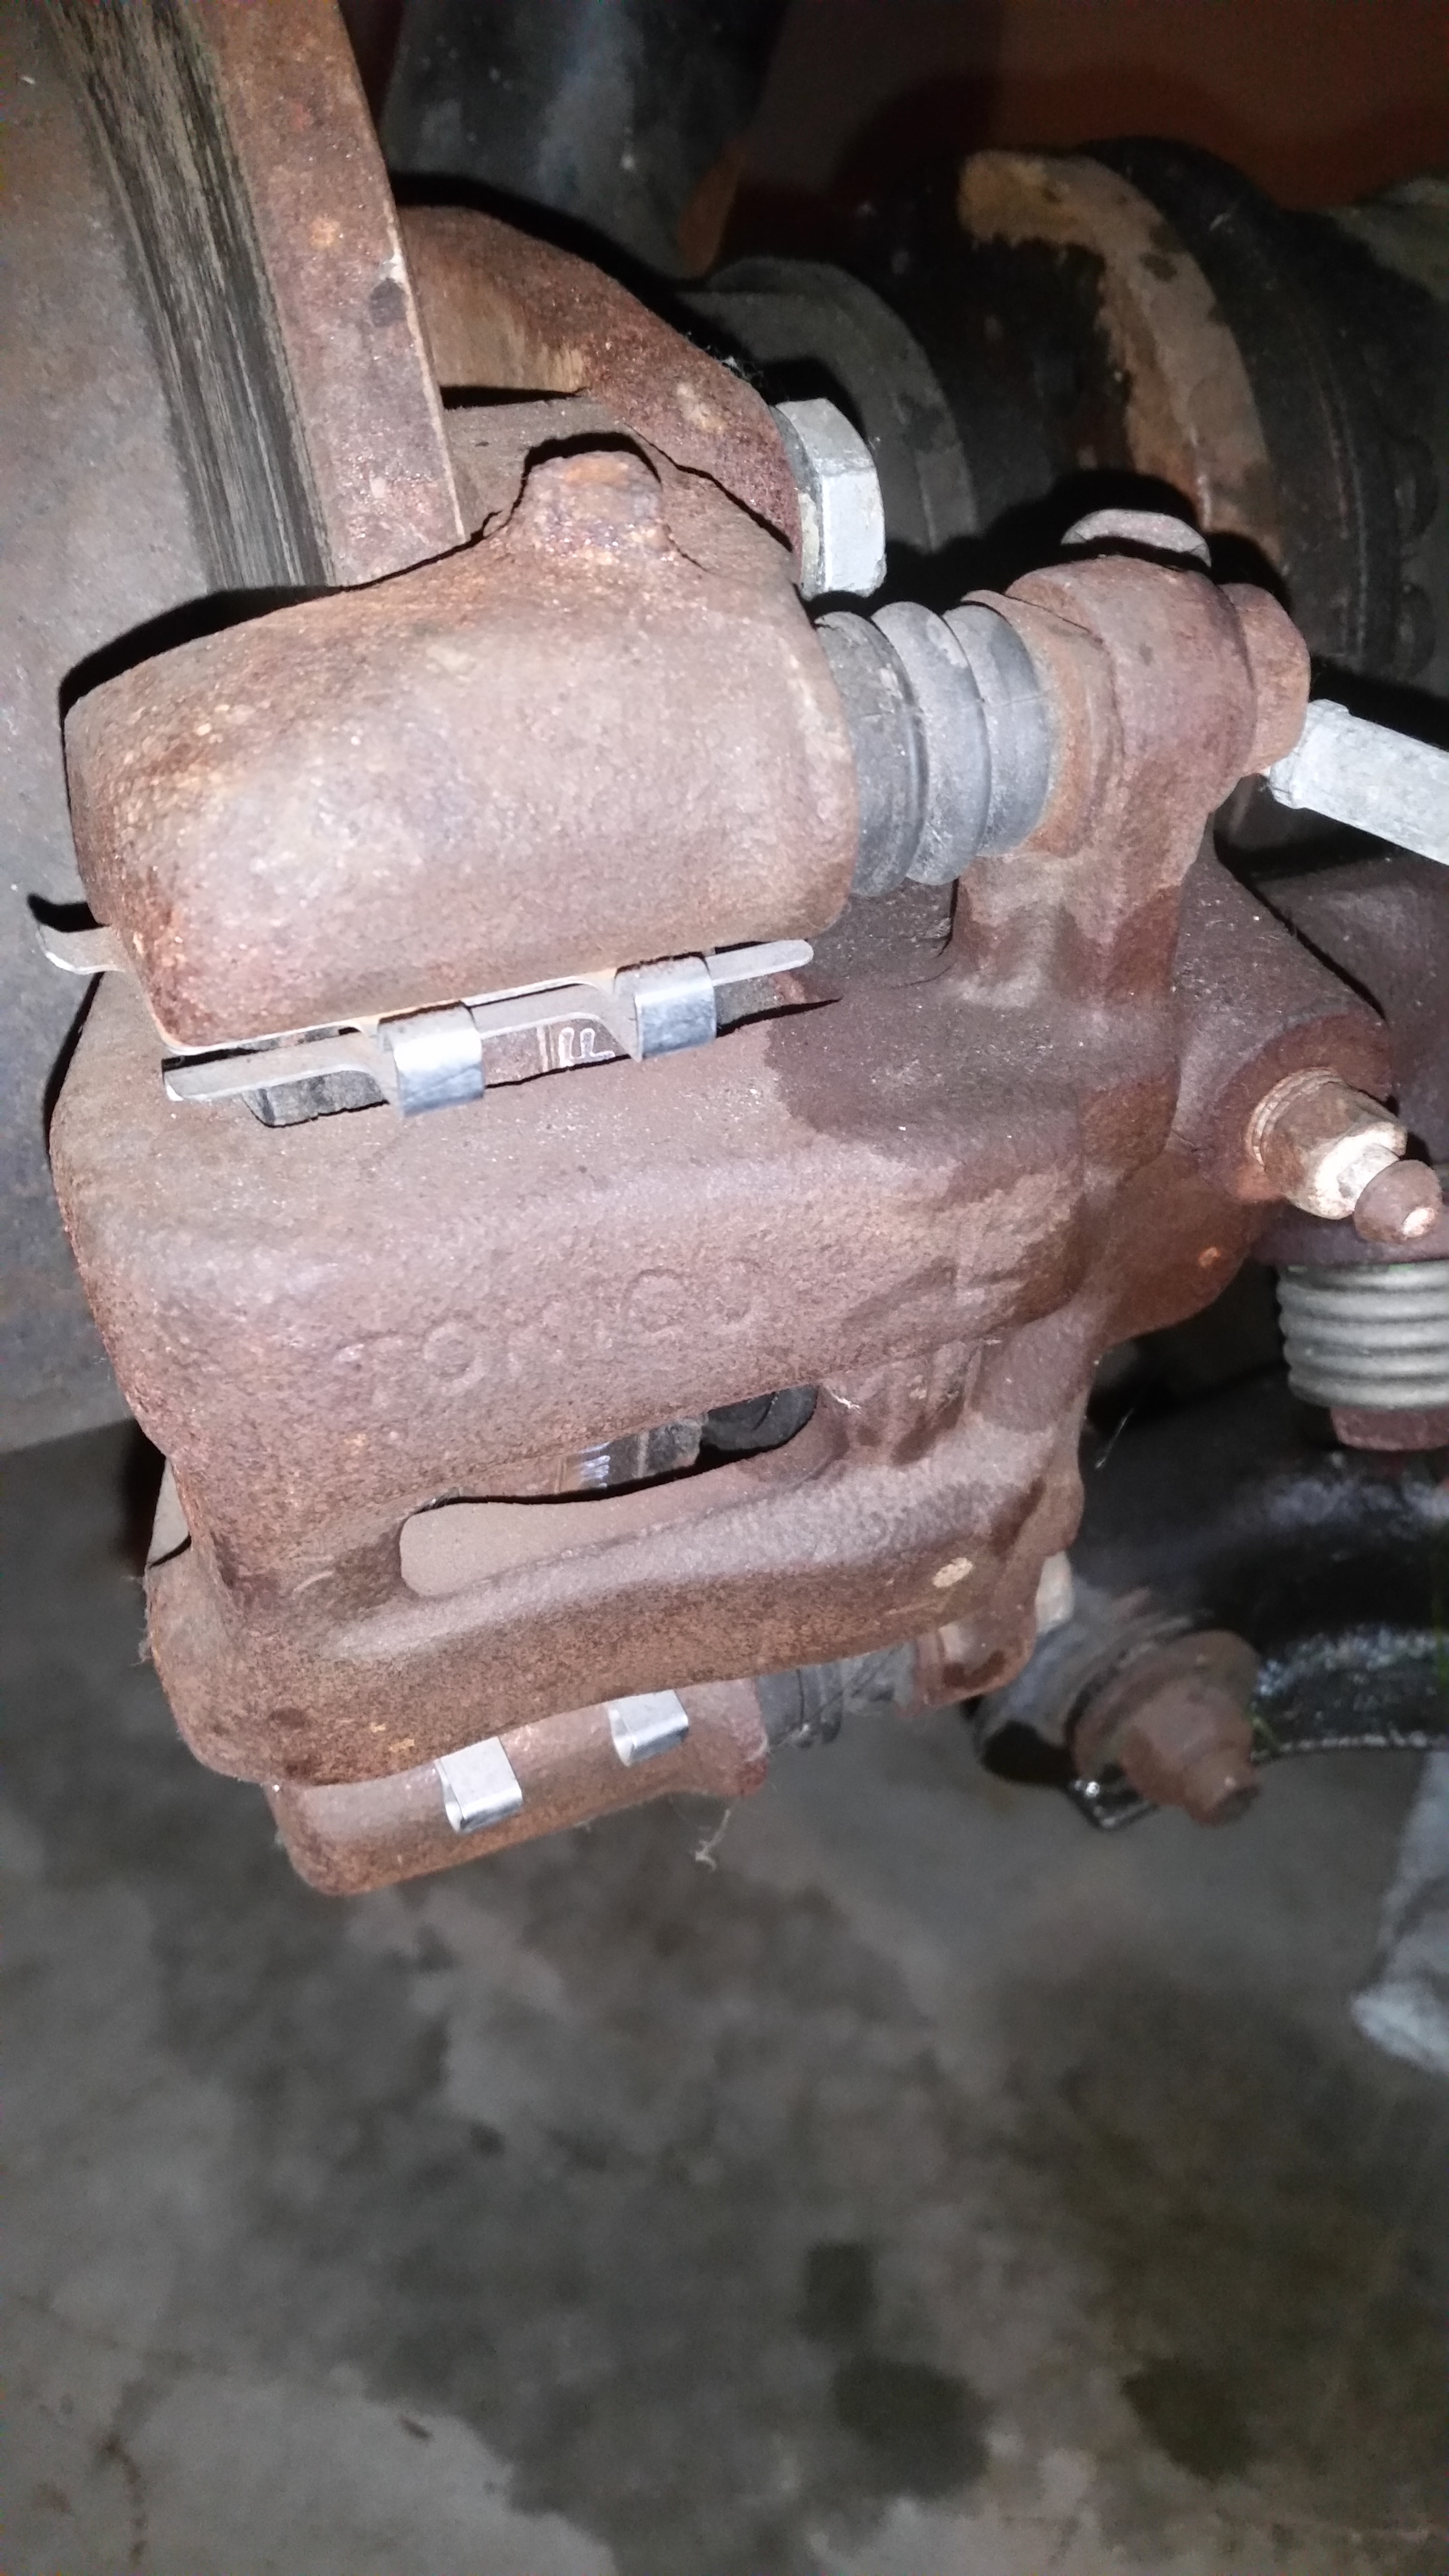
Alright, so i got the lines, they are great, but i found out why the other ones got damaged. When the car is down on the tires and suspension compressed, the bracket on the caliper that holds the ebrake sheath hits square on the line where it meets the hardline, which in turn is why the old line was damaged. The ebrake bracket is cast with the caliper so there is no way of moving it. Any suggestion? A solution is to just cut it and not have an ebrake, but if i can have an ebrake, then better. You can see in the first picture i posted the bracket and the flex line where it got hit by the bracket. My caliper is not an 85-86 maxima caliper. Those dont have the ebrake bracket cast with the caliper. Can anyone identify the caliper form the pics?
-
Thanks. Just ordered them.
-
Hello, I recently bought a 78 280z and it came with a rear disc conversion installed. Both my rear lines are kinked and leaking and i am trying to identify which kit it is and where i can source 2 braided rear lines. By searching around it looks to be the silvermine kit. The mounting bracket looks like its theirs. the caliper looks like the maxima caliper. I would like some confirmation from those that have more experience since i am a newb in the z world and its upgrades. I have looked at various sites and they all sell the kit, but none sell the brake line alone. Thanks


-
Alright, solution!!!! I had tapped for 12v switched at the yellow line that goes to the ac relay. This made it run thru the inductor of the relay causing the voltage to drop and making it too low to start the fan, but enough to latch the relay switch if a jump started. I switched the wires and wired the 12v switched to the blue and white line going into the relay. There is a blue and white coming out of the relay so make sure you don't use that one. Everything worked after that. Thanks you all for the help
-
Yep, I'll try that and jump it, see if it's all good. I'll post back.
-
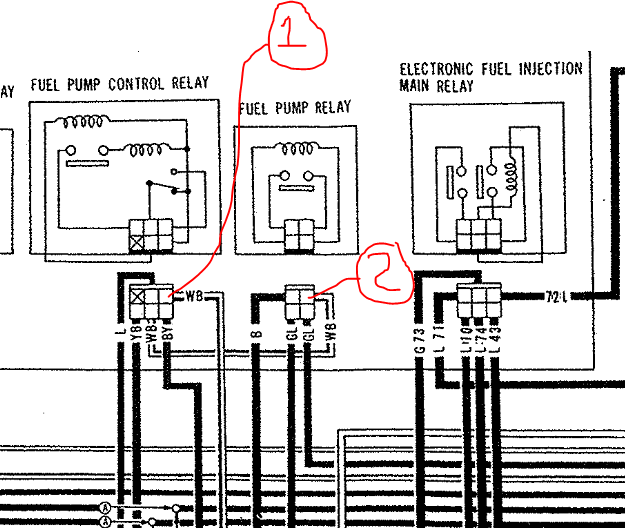
OK, i put the ignition switch back to original and it still had the same issue. I tested point 1 and i got 12V constant even when the engine was stumbling and the fuel pressure was dropping. Tested point 2 and you could see the voltage 12.4V when the engine ran fine, but you could see it cut out and loose voltage. With this test, that tells me that the fuel pump control relay is faulty and sometimes it fails to keep the WB and WB latched together, which is why i loose voltage. Correct?
-
Lol, you all seem trust worthy. I think I found the issue. The car had an aftermarket alarm and there is a mess under the steering column. There is an aftermarket installed relay that when unplugged the starter won't crank and I can replicate the issue or keep it running by wiggling the wires that go to the relay. I'll get the fsm and fix the mess the previous owner left behind. Thank you all for the help. I'll post back once I fix the wires and confirm the fix.
-
Ok thanks. I'll check the ig switch. Fyi, I also have the gm alternator upgrade. It could have something to do with it. I wired it per online instructions bUT the alternator light is always on for what I can see, but I haven't had the car long enough I think for it to turn off.
-
Ok, any specific way of checking it or just take it out, disassemble and see if anything looks blatantly wrong?
-
Update I unplugged starter solenoid and probed the fuel pump and I got 12v at "start", no voltage at "on". I unplugged the oil sender and the pump came on with key on "on" and the car ran and idled perfectly with no issues. I wanted to confirm it would not stay running when I plugged the oil sensor back in, but it stayed running with no issues. I probed the fuel.pump again, but with the starter plugged in and key "start", pump came on 12v on the meter, then key to "start" meter went down to .63 then all of a sudden qent back to 12v. I tried the whole process once again and this time it died and no voltage with key "on" after start. Tried again and it started working again and got voltage again with key on "on". Now it's doing it intermittently so I am a bit lost. Thanks for the help