Jeff Berk
 Subscriber
-
Joined
-
Last visited
Everything posted by Jeff Berk
-
 I think I got it now. I ended up tightening each of the four screws on the dome a little at a time, checking every 1/2 turn to make sure the piston moved freely until all screws seemed snug. Now time to try and tune it.
 -
Response to Mark: Did they slide freely before the rebuild?<- Yes, Use a Sharpie pen on the piston. <-I'm assuming you mean to look for scuffs when I move the piston up/down? You might also try leaving the 4 screws slightly loose and gradually tighten them as the piston is being slid up and down. <- I need to hold the dome down or it will lift when I move the piston Did you try switching the pistons too? <-I'll try that maybe tonight. Response to 240260280 Remove needle and plunger, Install dome but with all 4 screws very loose and not touching dome, Rotate Dome CCW and CW while lifting and dropping piston to explore where it binds and does not bind. Put dome in middle of its free rotation limits. Turn down 4 screws so they just kiss the metal dome <- this is where I don't understand. The dome screw holes will only permit two orientations. Neither resolves the problem, even with the needle removed. Response to the Great CO: If the piston is sticking even without the needle installed, then it should stick even without the dome installed on the carb body. <- No, it freely moves without the dome but sticks with the dome. With that in mind... Did you try mixing and matching all the domes, pistons, and carb bodies? Maybe something got mixed up during the rebuild? <-That is a strong possibility. I've only tried switching the domes but not the pistons. I'll try that tonight. Did you accidentally drop a piston or a dome? <-not that I recall but if I can figure out how to mount the piston and dome on a rotating jig, I can use a precision micrometer to look for deformation. My next steps: 1) Switch the pistons and domes around in all combinations to try to isolate the problem. 2) Mark the piston with something that easily rubs off and figure out what is rubbing against what.
-
I rebuilt my pair of carb's using Z-therapy's kit. My rear carb seems to function correctly but the piston sticks and does not fall to the bottom in the front carb. I tried moving the orifice around to better center the needle but then out of desperation, removed the needle and it still is getting stuck so it's not the orifice or the needle causing the binding. I also tried switching the dashpot domes front and back and the front one still sticks. The piston moves freely only with the dome off. I've read where people say never to remove metal (e.g. sand) the dashpot dome and elsewhere where it is offered as a suggestion. Does anyone have an idea how I should resolve this? I was thinking of rubbing something on the internal surfaces and then seeing where it rubs off after forcing the piston up and down to figure out where it's binding. thanks Jeff
-
FYI... Thanks all After running it outside for a half hour, it stopped smoking so all the oils and anti seize must of burnt off. I was sure I screwed up something.
-
Thanks for the opinions. I replaced the gasket with I think a Felpro brand gasket. I think I used an antiseize everywhere so maybe that's where the smoke came from.
-
I did a lot of miscellaneous work on my 260z to get it ready for the Summer. I was ecstatic that it started after rebuilding the dome-top carburetors. While I was working on the carburetors, I removed the intake manifold to polish it up and coat it with a clear heat resistant paint. A minute or so after the car started, smoke from around the manifold gasket began to appear. I'm assuming I need to pull the intake and exhaust manifolds off and reinstall it but I'm not sure what I did wrong the first time. One thing I think I did wrong was to not use a torque wrench because it was difficult to reach the bolts. Are there any other pointers you could provide?
-
Looks like: https://www.rockauto.com/en/moreinfo.php?pk=7646880&cc=1276398&jsn=__GIP__1__ is the closest (Toyota Land Cruiser) since it is the right length and is a M10 male/female; however the grove for the hose end clip is on the wrong end and I'd need to assume the thread is 1.0 pitch. I guess I can go with that if I cannot locate anything better. I wonder if the problem is with the banjo bolt fitting on my brake caliper. EDIT: I went to Summit Racing and they ordered Dorman Hydraulic Brake Hoses H381093 which I think is what will work.
-
It looks like the closest I can find is CENTRIC 15044303 which is a front hose for a Toyota Land Cruiser (1981). Unfortunately, there are no measurements provided so should I assume M10-1.0? I might try contacting Centric or one of the other manufactures to see if they can provide the specs. Or maybe a trip to Summit Racing.
-
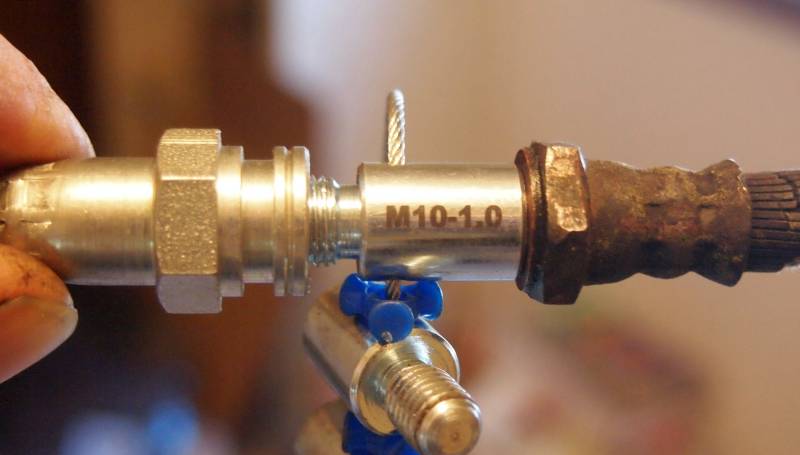
My old brake lines from the banjo bolt fitting to the metal brake line at my front calipers are being replaced and I ran into this problem. At the banjo end the threading is M10-1.0 male while the end of my new line is a M10-1.0 female. The brakes are a four piston design so I'm assuming it's a Toyota upgrade. The new brake line is a Centric 150.42010 from Rock Auto. Did the Toyota caliper take a different flexible brake line than the stock 260z brake caliper? thanks
-
-
I think the problem is that the product is not sold by Amazon so you need to pay the full shipping cost. I noticed that several of the Polyvance products have an erratic price history (www.camelcamelcamel.com) so you might consider setting an alert for a price drop if you want to use their system. Padded Dash Filler (B0002JKE6Y) Currently $24.99 but was $17.99 in January Plastic Magic (aerosol) (B0002JKE3M) Currently $25.95 but was 17.96 up until January.
-
I think most of the guide came from the web site: https://www.polyvance.com/280Z-Dashboard-Repair/ The video on the site does a great job. I couldn't afford Polyvance so I just used a flexible plastic filler from Autozone and then flocked the dash to hide imperfections. Some would say tacky, but I kind of like it. Jeff
-
CO: Not that much can go wrong...go wrong...go wrong, usually what happens is that I uncover something related that I want to do while I'm at it. Like replacing the differential's rear gasket only to realize it's attached to the cross member behind it. I'm assuming that I can extract the studs using two bolts on each stud to grip them but I think I'll pass this time and see if my half shaft seals were the source of the leak first. If I keep going with "while I'm at it, I might as well..." I'll not have the Z back together by the time the snow melts. Jeff
-
That did it! Thank you Zed Head, Patcon, DutchzGuy, and Namerow
-
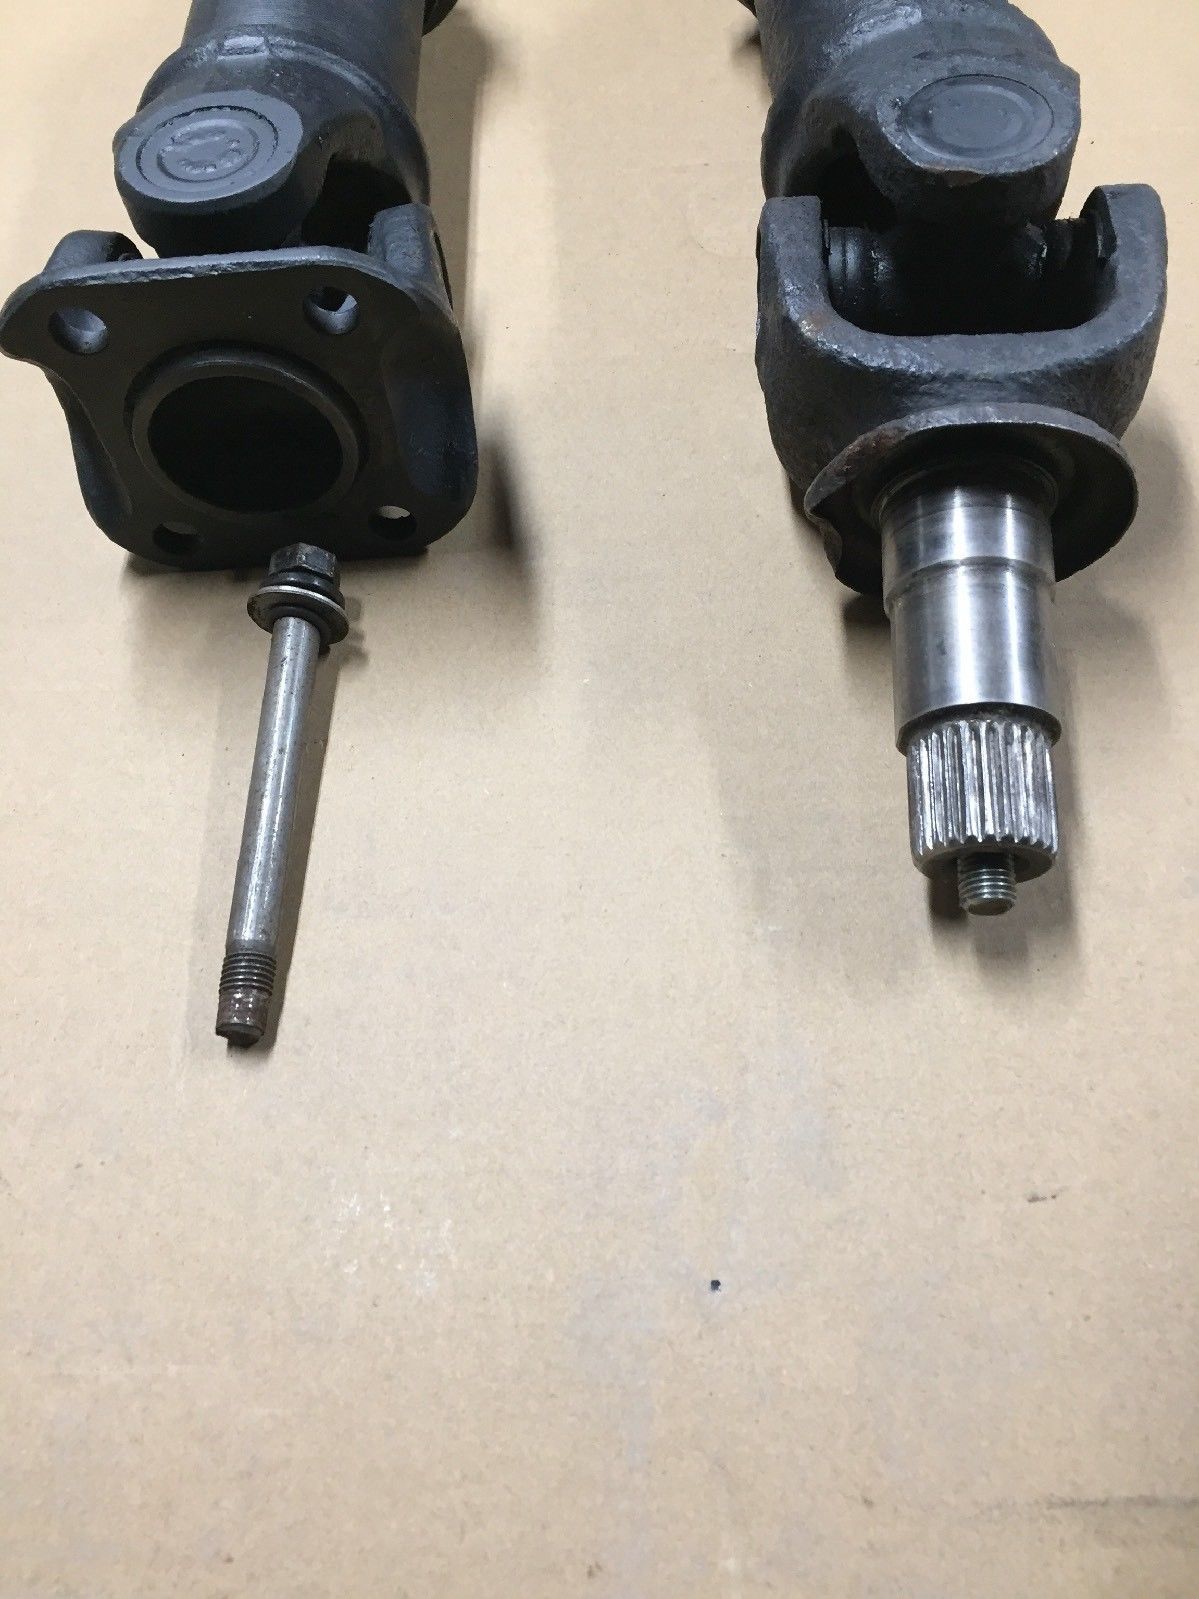
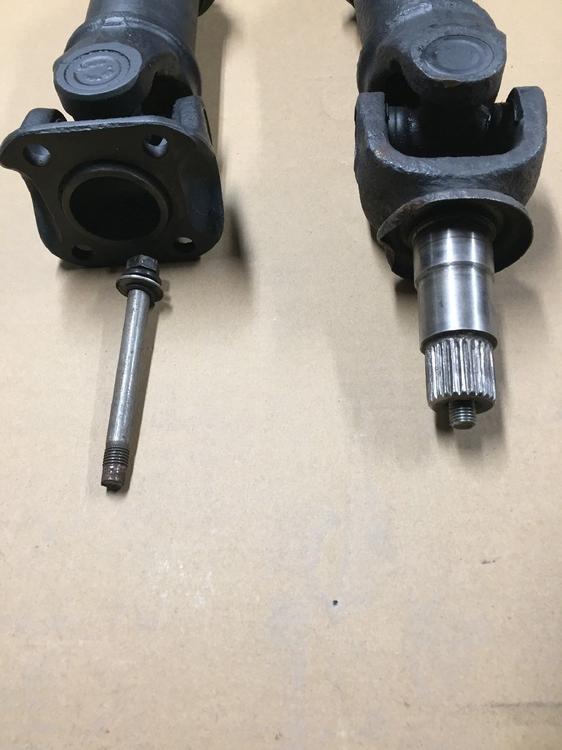
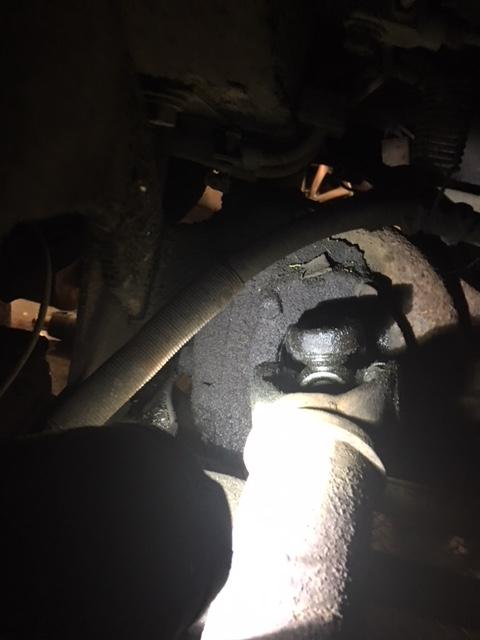
yup... clean off the goo and you never know what you'll find. There was the allusive bolt hidden in the yoke. I could use some suggestion on how to get that little s*#t out of there. The 1/2 shaft wheel end is free to flop around so should I find some way of securing it in one place like attaching a pipe to it with two U bolts while I yank on the wrench? I'm worried that I'll just round the head of the bolt. As usual, the FSM shows a mechanic holding the shaft in one hand while turning the wrench with the other. Similar to the directions on removing the rear suspension spindle pin by pulling it out with two fingers. For the curious, I don't know if it is true, but someone on e-bay that is listing a single bolt shaft says: These half shafts or rear axle shafts as they are some times known were offered as an option beginning in '74 to reduce rear end vibration. They incorporate the the rear end stub flange into the half shaft eliminating the inside flange on each side of the differential. They are smoother running reduce axle weight and are COOL. He sent me the following pic for reference showing the two types of shaft ends:

-
I saw that pulling tool when I first looked up the procedure and thought I needed it to remove the shaft. So to confirm, to replace the seal I do not need to remove that plate, do not need the puller, but do need to remove the side yoke fixing bolt. What is the side yoke fixing bolt? Maybe I just need to clean up the differential to see it. Edit: I cleaned off the area around the half shaft to differential and I still cannot locate any bolts except the 5 noted above. What is really odd, when I look at WordWorkerb's site I see this for the 1/2 shaft to diff connection: It shows four flange bolts and I think a few of the five bolts I previously removed, albeit encrusted with gunk. I do not have flange bolts on that end of either of my 1/2 shafts. Only at the wheel end. I'm kind of stuck as to what to do next.
-
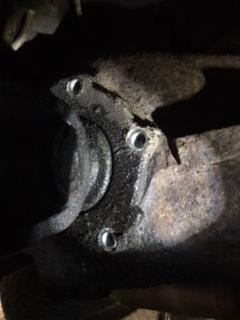
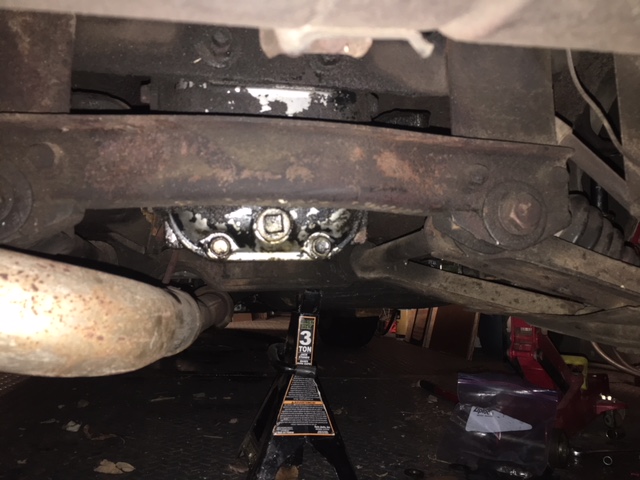
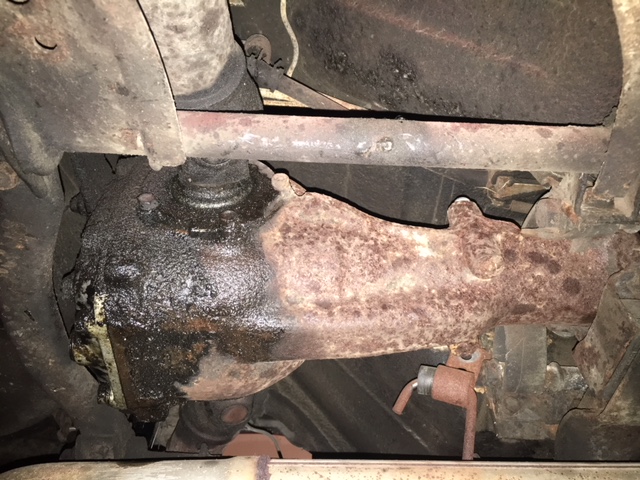
I'm back again with another question. I'm trying to pull the right half shaft out and I'm assuming that the plate with 5 bolts is holding the shaft from just falling out so I can get to the seal. You could see in the photograph the plate with three of the five bolts removed (other bolts are also out). The plate seems stuck. Should I pry harder or is there something else I need to do? Jeff
-
I'm pulling the half shaft since I already have the other end of the shaft disconnected to replace the strut. If you go to the site listed below, there are detailed instructions on seal replacement (with the differential removed from the vehicle) http://woodworkerb.com/home/datsun-240z-rebuild/replacing-oil-seals-r180-differential/
-
Thanks ZedHead. Just to be on the safe side, please look at these two photos and confirm that this is an R180 if you have a minute. I just want to be sure I purchase the correct part. From the looks of it, it has been leaking for some time so I'm likely going to drain what's left and refill. Any suggestion on what works best for a lube? GL5?
-
I have a 260z but I think the differential was switched out in the 1980's with an R200 differential. While replacing the strut on the right rear I noticed dried oil around the half shaft seal. I started looking up how to replace the seal and it looks there are several specialized tools needed. Is this a straight forward repair? I thought that all I needed to do is unblot it and yank out the shaft. Jeff
-
I'm in the process of building this tool. How well did it work for you? Also, has anyone considered adding grease fittings to prevent the spindle from getting stuck next time?
-
concerning Bulldog, if you plan on coating it then taking somewhere else to paint: "...Bulldog is effective up to 24 hours. If the sprayed part is left overnight, the basecoat can be applied with no issue. If the part is left longer than 24 hours it needs to be scuffed and tacked, again. Apply 1 light coat of Bulldog before applying basecoat." http://www.finishmaster.com/prod/assets/GBDS12326_QBDS12327_EBDS12328.pdf
-
I didn't think of looking at RockAuto. I'll go that route. No need for it even to be from a Z.
-
I am in need of a throwout bearing to build a spindle pin removal tool. As long as it can spin, I can use it. I am hoping to get one for the cost of shipping if possible. Thanks Jeff
-
I have one of those in my 260z but the lack of stereo was too much. I'm installing a modern radio in my glove compartment and a switch to go between the old and new radios. I had to use a relay to switch between speakers since speakers couldn't be wired both as mono and stereo at the same time.